zb快捷键
ZB快捷键

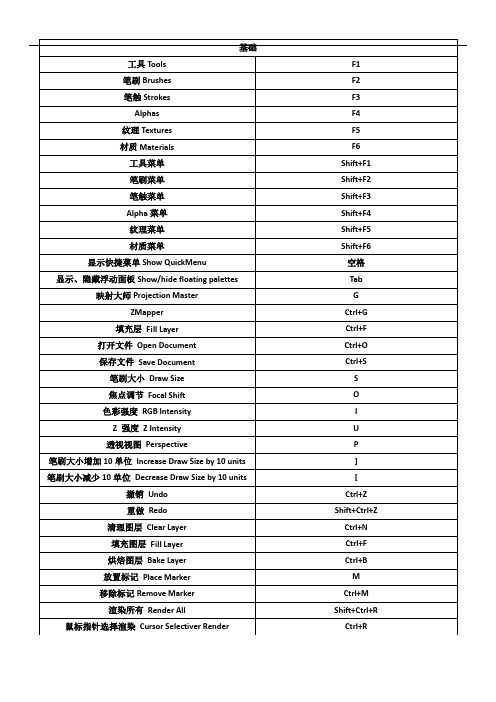
常规 General弹出选择 Popup selection工具 Tools – F1笔刷 Brushes – F2笔划(借鉴1.5的参考手册改为笔划) Strokes – F3Alphas (暂不翻译)– F4纹理 Textures – F5材质 Materials - F6显示快捷菜单 Show QuickMenu - 空格或右击Spacebar or Right Mouse click显示、隐藏浮动面板 Show/hide floating palettes – TAB映射大师Projection Master – GZMapper (暂不翻译)– Ctrl+G指定自定义热键 Assign custom hotkey – Ctrl+单击该项目(在Preferences(参数)菜单下的Hotkeys(热键)次菜单中存储热键)Ctrl+click on item (store hotkeys in Preferences> Hotkeys submenu)颜色面板 Color Palette拾取鼠标指针下的颜色 Select Color under cursor - C主次色互换 Switch Color - V填充层 Fill Layer - Ctrl+F文件面板Document Palette打开文件 Open Document - Ctrl+O保存文件 Save Document - Ctrl+S绘画面板Draw Palette笔刷大小 Draw Size - S焦点调节 Focal Shift - O色彩强度 RGB Intensity - IZ 强度 Z Intensity – U透视视图 Perspective – P笔刷大小增加10单位 Increase Draw Size by 10 units - ]笔刷大小减少10单位 Decrease Draw Size by 10 units - [编辑面板Edit Palette撤销 Undo - Ctrl+Z重做 Redo – Shift+Ctrl+Z图层面板 Layer Palette清理图层 Clear Layer - Ctrl+N填充图层 Fill Layer - Ctrl+F烘培图层 Bake Layer – Ctrl+B标记面板 Marker Palette放置标记 Place Marker - M移除标记 Remove Marker – Ctrl+MMovie面板 Movie Palette快照 Snapshot – Ctrl+ Shift+! (US) Shift+Ctrl+PageUp (UK)参数面板 Preferences Palette配置 Configuration存储配置文件 Store Configuration File - Shift+Ctrl+I加载用户界面配置文件 Load User Interface Configuration File - Ctrl+L存储用户界面配置文件 Save User Interface Configuration File - Shift+Ctrl+Alt+I渲染面板 Render Palette渲染所有 Render All - Shift+Ctrl+R鼠标指针选择渲染 Cursor Selective Render – Ctrl+R模板面板 Stencil Palette开启模板 Stencil On - Alt+H隐藏显示模板 Hide/Show Stencil - Ctrl+H硬币控制器(用来控制模板的一个圆形控制器) Coin Controller –空格 Spacebar笔划面板 Stroke Palette懒鼠标(还是翻译成滞后笔刷呢?) Lazy mouse - L重复最后一笔 Replay Last Stroke - Ctrl+1记录笔划 Record Stroke - Ctrl+3重复所有被记录的笔划 Replay All Recorded Strokes – Ctrl+2纹理面板 Texture PaletteCrop文件并填充(Crop不明白具体含义) CropAndFill - Shift+Ctrl+F 从文档中掠夺纹理(强盗行为呵呵)Grab Texture From Document –Shift+Ctrl+G工具面板 Tool Palette存储工具 Save Tool - Shift+Ctrl+T几何体( Geometry细分 Divide - Ctrl+D进入低一级分辨率 Lower Res - Shift+D进入高一级分辨率 Higher Res - D边缘加环 Edge Loop –Ctrl+E (须隐藏部分网格) (partially hidden mesh)HD几何体 HD Geometry切入、出 HD雕刻模式 Toggle in/out of HD Sculpting mode – A (鼠标指针放在网格物体上)(cursor over mesh)渲染所有 HD几何体 Render all HD Geometry – A(鼠标指针放在在背景上) (cursor over background)遮罩 Masking查看、隐藏遮罩View Mask - Ctrl+H反选遮罩 Invert Mask - Ctrl+I清除遮罩Clear Mask - Shift+Ctrl+A遮罩所有Mask All – Ctrl+AZ球 ZSpheres预览适应的皮肤 Preview Adaptive Skin - A变换面板 Transform Palette激活对称 Activate Symmetry - X绘制指示器 Draw Pointer - Q移动 Move - W缩放 Scale - E旋转 Rotate - R编辑 Edit – T网格物体居中(在编辑模式下) Center mesh in canvas (when in Edit mode) - F显示多边形结构 Draw Polyframe - Shift+F点选择模式 Point Selection Mode - Shift+Ctrl+P设置坐标轴点 Set Pivot Point – Ctrl+ P清除坐标轴点 Clear Pivot Point - Shift+P快照 Snapshot - Shift+S套索选择模式 Lasso selection mode - Ctrl+Shift+M缩放面板 Zoom Palette实际大小 Actual Size - 0 (数字零)[zero]抗锯齿一半大小 Antialiased Half Size - Ctrl+0放大 Zoom In - + (加号)[plus sign]缩小 Zoom Out - - (减号)[minus sign]Z脚本面板 ZScript Palette加载Z脚本 Load ZScript - Shift+Ctrl+L重新加载Z脚本 Reload ZScript - Ctrl+U隐藏Z脚本 Hide ZScript - H鼠标操作 Mouse Actions切换到Z加和Z减 Toggle ZAdd and ZSub - Alt(按住) (hold down) 在图层缩略图上,切换所有图层的开和关On Layer thumbnail, toggle all layers on/off - Shift+Click选择鼠标点击的物体所在的图层Select layer on which clicked pixol resides - ~+单击画布(美式键盘) @+单击画布(英式键盘)~+Click canvas (US) @+Click canvas (UK)移动图层内容向上下左右(在X&Y坐标平面)Move layer contents up/down/sideways (X & Y)- ~+拖动(美式键盘)@+拖动(英式键盘)~+Drag (US) @+Drag (UK)面后移动图层内容(Z轴向)Move layer contents forward/backward (Z) - ~+Alt+拖动(美式键盘)@+Alt+拖动(英式键盘)~+Alt+Drag (US) @+Alt+Drag (UK)显示项目简介(当弹出信息已经启用)Show item description (when Popup Info is switched on) - Ctrl+鼠标指针放到该项目上Ctrl+cursor over item往自定义界面添加项目 Move item to custom interface position –Ctrl+拖动(在可自定义启用的状态下)Ctrl+Drag (when Enable Customize is switched on)从自定义界面移除项目Remove item from custom interface position – Ctrl+拖动到画布(在可自定义启用的状态下)Ctrl+Drag to Canvas (when Enable Customize is on)编辑模式操作 Edit Mode Actions转化 Transformations自由旋转 Free Rotate - 单击并在背景上拖动 Click & Drag Background移动 Move - Alt+单击并在背景上拖动 Alt+Click & Drag Background 约束到90度旋转 Constrain to 90-degree rotation - 单击+拖动,按Shift Click+Drag, press Shift缩放 Scale –Alt+单击,松开Alt,在背景上拖动 Alt+Click, Release Alt, Drag Background绕Z轴旋转 Rotate around Z-axis - Shift,单击,松开Shift,拖动Shift, Click, release Shift, Drag遮罩Masking在物体上绘制遮罩(alpha,笔划可用时)Paint mask on object (alphas/strokes can be used) - 按住Ctrl Ctrl (hold down)删除或绘制反遮罩 Delete or paint reverse mask –按住Ctrl+Alt ( hold down)反转遮罩 Reverse mask – Ctrl+单击背景 Ctrl+Click Background清除遮罩 Clear Mask – Ctrl+Click+背景上拖动Ctrl+Click+ Drag Background恒定强度的遮罩 Constant-intensity mask - Ctrl+单击,松开Ctrl,拖动(始于网格物体)Ctrl+Click, Release Ctrl, Drag (starting off mesh)透明度遮罩 Alpha-intensity mask - Ctrl+单击并拖动(始于网格物体,关闭套索模式)Ctrl+Click & Drag (starting off mesh, Lasso off) 虚化遮罩 lur mask - Ctrl+在网格上单击Click on mesh模板Stencil创建自定义模板 Create custom Stencil - Shift+Ctrl+单击,松开Ctrl,拖动(在套索选择模式下)Shift+Ctrl+Click, Release Ctrl, Drag (when Lasso selection switched on)局部网格可见 Partial Mesh Visibility显示部分网格 Show mesh portion – Shift+Ctrl+单击并拖动Shift+Ctrl+Click & Drag隐藏部分网格 Hide mesh portion - Shift+Ctrl+单击,松开shift,拖动 Shift+Ctrl+Click, Release Shift, Drag显示全部网格 Show entire mesh - Shift+Ctrl+单击背景Shift+Ctrl+Click Background显示被选择的网格组(在全部可见的网格物体上)Show only selected Polygroup (on fully visible mesh) - Shift+Ctrl+单击Shift+Ctrl+Click隐藏被选择的网格组(在全部可见的网格物体上)Hide selected Polygroup (on fully visible mesh) - Shift+Ctrl+单击Shift+Ctrl+Click反相可见性 Reverse visibility - Shift+Ctrl+在背景上单击并拖动Shift+Ctrl+Click & Drag BackgroundZ球的编辑操作 ZSphere Edit Actions绘制模式Draw Pointer加子Z球 Add a child ZSphere - 在Z球上拖动 Drag ZSphere删Z球 Delete ZSphere - Alt+单击Z球 Alt+Click ZSphere加等大子Z球 Add a child ZSphere at same size – Shift+Click加笔刷大小的Z球 Add a child ZSphere at Draw Size –开始拖动,按Ctrl start Drag, press Ctrl定义磁性球、打断网格 Sphere Define magnet/ break mesh - Alt+单击链接球 Alt+Click Link-Sphere插入Z球 Insert ZSphere - 单击链接球 Click Link-Sphere移动模式 Move Mode移动Z球 Move ZSphere - 拖动Z球 Drag ZSphere摆姿势(自然链接的移动,链接长度不变) Pose (Natural-linked move) - Alt+拖动链接球 Alt+Drag Link-Sphere移动链接 Move Chain –拖动链接球 Drag Link-Sphere缩放模式 Scale Mode缩放Z球 Scale Zsphere - 拖动Z球 Drag ZSphere链接充气、放气(链接长度不变)nflate/deflate chain – Alt+拖动链接球Alt+Drag Link-Sphere缩放链接 Scale chain - 拖动链接球Drag Link-Sphere旋转模式 Rotate Mode捻转(滚动)链接Spin chain - 拖动Z球Drag ZSphere控制扭动Control twist - Alt+拖动链接球Alt+Drag Link-Sphere旋转链接 Rotate chain - 拖动链接球Drag Link-SphereRetrieved from/docs/index.php/Default_Hotkeys_and_Mou se_Actions补充部分:工具菜单 shift+F1笔刷菜单 shift+F2笔划菜单 shift+F3Alpha菜单 shift+F4纹理菜单 shift+F5 材质菜单 shift+F6。
Zbrush常用快捷键大全(彩色整理)教学内容
Zbrush常用快捷键以下是常用的快捷键:空格键激活鼠标指针下的菜单(按住不放再拖拉鼠标指针可定位文档)左键在空白处单击并拖动=旋转视角alt建+左键在空白处单击并拖动=平移视角alt键+左键然后放开alt键在空白处拖动并平移=缩放视角+放大文档- 缩小文档0(零)查阅文档的实际大小旋转中配合shift,捕捉在正交视点处旋转中配合ALT,以相对平滑方式旋转视图按下DEL ,可以将物体在画布中最大化显示Ctrl+0 查阅文档实际大小的一半,抗锯齿(还影响输出)ctrl+shift+拖动=未选中的部分将隐藏。
ctrl+shift+点击空白处=恢复显示ctrl+shift+拖动+释放(ctrl、shift)=选中的部分将隐藏Ctrl+f 用当前texture填充canvas当前layerCtrl遮罩功能Ctrl+d 细份一次Tab隐藏/显示浮动调控板H隐藏/显示Zscript窗口C在指针下面拾取颜色S绘图大小I RGB强度Shift+I Z强度Shift+d 绘制贴图的时候让模型上的网格线隐藏Q绘图指示器(默认为所有工具)W移动模式E缩放模式R旋转模式T编辑模式Shift+s 备份物体M标记物体点中marker ctrl+M 取消标记Ctrl+Z 撤销Shift+Ctrl+Z 重做Alt/Option 影响转换大多数工具G打开Projection MasterAlt+A Alpha调控板Alt+C Color颜色调控板Alt+T tool调控板Alt+T Transform调控板Alt+R Render调控板Alt+鼠标左绘图模式下可以删除Z求点Shift+crease--------------crease everythingShift_uncrease------------uncrease everythingA ------------------zSphere to Z meshctrl+N ----------------- clear the layer迅速了解zbrush应掌握的要点1、介绍ZB保存时是一个画面,要保持三维物体的可编辑性必须保存为笔刷。
ZB快捷键
Z B快捷键(总12页) -CAL-FENGHAI.-(YICAI)-Company One1-CAL-本页仅作为文档封面,使用请直接删除Zbrush 快捷键----------------(2010-04-02 21:51:57)转载▼标签:zbrush杂谈zbrush 快捷键----------------空格键激活鼠标指针下的菜单(按住不放再拖拉鼠标指针可定位文档)左键在空白处单击并拖动=旋转视角alt建+左键在空白处单击并拖动=平移视角alt键+左键然后放开alt键在空白处拖动并平移=缩放视角+ 放大文档- 缩小文档0(零)查阅文档的实际大小旋转中配合shift ,捕捉在正交视点处旋转中配合ALT ,以相对平滑方式旋转视图按下DEL ,可以将物体在画布中最大化显示Ctrl+0 查阅文档实际大小的一半,抗锯齿(还影响输出)ctrl+shift+拖动=未选中的部分将隐藏。
ctrl+shift+点击空白处=恢复显示ctrl+shift+拖动+释放(ctrl、shift)=选中的部分将隐藏Ctrl+f 填充2维图片层Ctrl 遮罩功能Ctrl+d 细份一次Tab 隐藏/显示浮动调控板H 隐藏/显示Zscript窗口C 在指针下面拾取颜色S 绘图大小I RGB强度Shift+I Z强度Shift+d 绘制贴图的时候让模型上的网格线隐藏Q 绘图指示器(默认为所有工具)W 移动模式E 缩放模式R 旋转模式T 编辑模式Shift+s 备份物体M 标记物体Ctrl+Z 撤销Shift+Ctrl+Z 重做Alt/Option 影响转换大多数工具G 打开Projection MasterAlt+A Alpha调控板Alt+C Color颜色调控板Alt+T tool调控板Alt+T Transform调控板Alt+R Render调控板Alt+鼠标左绘图模式下可以删除Z求点、介绍ZB保存时是一个画面,要保持三维物体的可编辑性必须保存为笔刷。
ZBRUSH快捷键(补全)
Zbrush快捷键(补全)常规 General弹出选择 Popup selection工具 Tools – F1笔刷 Brushes – F2笔划(借鉴1.5的参考手册改为笔划) Strokes – F3Alphas (暂不翻译)– F4纹理 Textures – F5材质 Materials - F6显示快捷菜单 Show QuickMenu - 空格或右击Spacebar or Right Mouse click显示、隐藏浮动面板 Show/hide floating palettes – TAB映射大师Projection Master – GZMapper (暂不翻译)– Ctrl+G指定自定义热键 Assign custom hotkey – Ctrl+单击该项目(在Preferences(参数)菜单下的Hotkeys(热键)次菜单中存储热键)Ctrl+click on item (store hotkeys in Preferences> Hotkeys submenu)颜色面板 Color Palette拾取鼠标指针下的颜色 Select Color under cursor - C主次色互换 Switch Color - V填充层 Fill Layer - Ctrl+F文件面板Document Palette打开文件 Open Document - Ctrl+O保存文件 Save Document - Ctrl+S绘画面板Draw Palette笔刷大小 Draw Size - S焦点调节 Focal Shift - O色彩强度 RGB Intensity - IZ 强度 Z Intensity – U透视视图 Perspective – P笔刷大小增加10单位 Increase Draw Size by 10 units - ]笔刷大小减少10单位 Decrease Draw Size by 10 units - [编辑面板Edit Palette撤销 Undo - Ctrl+Z重做 Redo – Shift+Ctrl+Z图层面板 Layer Palette清理图层 Clear Layer - Ctrl+N填充图层 Fill Layer - Ctrl+F烘培图层 Bake Layer – Ctrl+B标记面板 Marker Palette。
Zbrush快捷键操作大全
Zbrush快捷键操作大全空格键激活鼠标指针下的菜单(按住不放再拖拉鼠标指针可定位文档)左键在空白处单击并拖动=旋转视角al t建+左键在空白处单击并拖动=平移视角alt键+左键然后放开alt键在空白处拖动并平移=缩放视角 + 放大文档 -缩小文档0(零)查阅文档的实际大小旋转中配合 shi ft ,捕捉在正交视点处旋转中配合ALT ,以相对平滑方式旋转视图按下DEL ,可以将物体在画布中最大化显示Ctrl+0 查阅文档实际大小的一半,抗锯齿(还影响输出)ctr l+shi ft+拖动=未选中的部分将隐藏。
ct rl+sh ift+点击空白处=恢复显示ctrl+shif t+拖动+释放(ct rl、sh ift)=选中的部分将隐藏Ctrl+f 用当前textu re填充c anvas当前lay erC trl 遮罩功能C trl+d细份一次Tab隐藏/显示浮动调控板H隐藏/显示Zscri pt窗口C 在指针下面拾取颜色S绘图大小I R GB强度Shif t+I Z强度S hift+d 绘制贴图的时候让模型上的网格线隐藏Q 绘图指示器(默认为所有工具)W移动模式E 缩放模式R 旋转模式T编辑模式Shif t+s 备份物体M 标记物体点中marke r ctr l+M 取消标记Ctrl+Z 撤销Shif t+Ctr l+Z 重做Al t/Opt ion 影响转换大多数工具G 打开P rojec tionMaste rAl t+A A lpha调控板A lt+CColor颜色调控板Alt+T to ol调控板Alt+T Tr ansfo rm调控板Alt+R Re nder调控板。
Zbrush常用快捷键

Zbrush常用快捷键空格键激活鼠标指针下的菜单(按住不放再拖拉鼠标指针可定位文档)左键在空白处单击并拖动=旋转视角alt建+左键在空白处单击并拖动=平移视角alt键+左键然后放开alt键在空白处拖动并平移=缩放视角+ 放大文档- 缩小文档0(零)查阅文档的实际大小旋转中配合shift ,捕捉在正交视点处旋转中配合ALT ,以相对平滑方式旋转视图按下DEL ,可以将物体在画布中最大化显示Ctrl+0 查阅文档实际大小的一半,抗锯齿(还影响输出)ctrl+shift+拖动=未选中的部分将隐藏。
ctrl+shift+点击空白处=恢复显示ctrl+shift+拖动+释放(ctrl、shift)=选中的部分将隐藏Ctrl+f 用当前texture填充canvas当前layerCtrl 遮罩功能Ctrl+d 细份一次Tab 隐藏/显示浮动调控板H 隐藏/显示Zscript窗口C 在指针下面拾取颜色S 绘图大小I RGB强度Shift+I Z强度Shift+d 绘制贴图的时候让模型上的网格线隐藏Q 绘图指示器(默认为所有工具)W 移动模式E 缩放模式R 旋转模式T 编辑模式Shift+s 备份物体M 标记物体点中marker ctrl+M 取消标记Ctrl+Z 撤销Shift+Ctrl+Z 重做Alt/Option 影响转换大多数工具G 打开Projection MasterAlt+A Alpha调控板Alt+C Color颜色调控板Alt+T tool调控板Alt+T Transform调控板Alt+R Render调控板Alt+鼠标左绘图模式下可以删除Z求点Shift+crease--------------crease everythingShift_uncrease------------uncrease everythingA ------------------zSphere to Z meshctrl+N ----------------- clear the layer迅速了解zbrush应掌握的要点1、介绍ZB保存时是一个画面,要保持三维物体的可编辑性必须保存为笔刷。
ZB快捷键

清除遮罩 Clear Mask – Ctrl+Click+背景上拖动Ctrl+Click+ Drag Background
恒定强度的遮罩 Constant-intensity mask - Ctrl+单击,松开Ctrl,拖动(始于网格物体)Ctrl+Click, Release Ctrl, Drag (starting off mesh)
从自定义界面移除项目Remove item from custom interface position – Ctrl+拖动到画布 (在可自定义启用的状态下)Ctrl+Drag to Canvas (when Enable Customize is on)
编辑模式操作 Edit Mode Actions
缩小 Zoom Out -Байду номын сангаас- (减号)[minus sign]
Z脚本面板 ZScript Palette
加载Z脚本 Load ZScript - Shift+Ctrl+L
重新加载Z脚本 Reload ZScript - Ctrl+U
隐藏Z脚本 Hide ZScript - H
鼠标操作 Mouse Actions
变换面板 Transform Palette
激活对称 Activate Symmetry - X
绘制指示器 Draw Pointer - Q
移动 Move - W
缩放 Scale - E
旋转 Rotate - R
数字雕塑软件ZBrush 快捷键

缩放(Zoom):+ -
适中(Actual):0
半大(AAHalf):Ctrl+0
Ctrl+N:清空画布
4、物体编辑
创建新物体后,原物体不再能编辑,而是作为画面中的一个元素
导入模型(作为笔刷编辑):tool/import
保存笔刷(可在ZB中继续编辑):tool/save as
旋转中配合 shift ,捕捉在正交视点处
旋转中配合 ALT ,以相对平滑方式旋转视图
按下 DEL ,可以将物体在画布中最大化显示
Ctrl+0 查阅文档实际大小的一半,抗锯齿(还影响输出)
ctrl+shift+拖动=未选中的部分将隐藏。
ctrl+shift+点击空白处=恢复显示
ctrl+shift+拖动+释放(ctrl、shift)=选中的部分将隐藏
对物体添加光滑1级处理,增加VrayDisplacementMOD修改器,选择2D mapping,点texmap选择置换贴图。然后用鼠标左键点它拖到一个空闲的材质球上,把贴图V方向的Tiling改为-1,blur改为最小,在output卷展栏里把RGB Offset改为-0.5。然后渲染看效果。如果发现置换厚度不合适,可以调整VrayDisplacementMOD修改器里面的Amount。渲染。
对模型应用法线贴图:赋予物体材质,bump贴图通道添加Normal Bump贴图类型,在normal通道选择Bitmap,然后选择生成的法线贴图,确定。把V的Tiling改为-1,回到normal bump层级,钩选flip Green(Y),选择Tangent模式。完成。
zb快捷键

【F1】工具/Tools【F2】笔刷/Brushes【F3】笔划/Strokes【F4】笔刷通道/Alphas【F5】纹理/Textures【F6】材质/Materials【TAB】显示、隐藏浮动面板/Show or hide floating palettes【G】映射大师/Projection Master【Ctrl+G】ZMapper/原normal与displaymap用插件,现已整合〓颜色工具〓【C】颜色面板/Color Palette拾取鼠标指针下的颜色/Select Color under cursor 【V】主次色互换/Switch Color【Ctrl+F】填充层/Fill Layer〓文件面板〓【Ctrl+O】打开文件/Open Document【Ctrl+S】保存文件/Save Document〓绘画调节面板〓【S】笔刷大小/Draw Size【O】焦点调节/Focal Shift【I】色彩强度/RGB Intensity【U】Z 强度/Z Intensity【P】透视视图/Perspective【] 】笔刷大小增加10单位/Increase Draw Size by 10 units 【[ 】笔刷大小减少10单位/Decrease Draw Size by 10 units〓撤销〓【Ctrl+Z】撤销/Undo〓图层面板〓【Ctrl+N】清理图层/Clear Layer【Ctrl+F】填充图层/Fill Layer【Ctrl+B】烘培图层/Bake Layer〓渲染面板〓【Shift+Ctrl+R】渲染所有/Render All【Ctrl+R】鼠标指针选择渲染/Cursor Selective Render〓模板面板〓【Alt+H】开启模板/Stencil On【Ctrl+H】隐藏显示模板/Hide/Show Stencil【空格Spacebar】硬币控制器/Coin Controller〓笔划面板〓【L】滞后鼠标/Lazy mouse【Ctrl+1】重复最后一笔/Replay Last Stroke【Ctrl+3】记录笔划/Record Stroke【Ctrl+2】重复所有被记录的笔划/Replay All Recorded Strokes〓几何体编辑和控制〓【Ctrl+D】细分/Divide【D】进入低一级分辨率/Lower Res - Shift【D】进入高一级分辨率/Higher Res【Ctrl+H】查看、隐藏遮罩View Mask【Ctrl+I】反选遮罩Invert Mask【Shift+Ctrl+A】清除遮罩Clear Mask【Ctrl+A】遮罩所有Mask All【A】预览适应的皮肤Preview Adaptive Skin【Q】绘制指示器Draw Pointer【W】移动Move【E】缩放Scale【R】旋转Rotate【T】编辑Edit【F】网格物体居中(在编辑模式下) Center mesh in canvas (when in Edit mode) 【Shift+F】显示多边形结构Draw Polyframe【Shift+Ctrl+P】点选择模式Point Selection Mode【Ctrl+ P】设置坐标轴点Set Pivot Point【Shift+P】清除坐标轴点Clear Pivot Point【Ctrl+Shift+M】套索选择模式Lasso selection mode〓缩放面板〓【0】实际大小Actual Size【Ctrl+0】抗锯齿一半大小Antialiased Half Size【+ 】放大Zoom In【- 】缩小Zoom Out〓Z脚本面板〓【Load ZScript - Shift+Ctrl+L】加载Z脚本【Reload ZScript - Ctrl+U】重新加载Z脚本【Hide ZScript - H】隐藏Z脚本【Mouse Actions】鼠标操作【Alt(按住)】切换到Z加和Z减Toggle ZAdd and ZSub。
zb快捷键——精选推荐
zb快捷键Renaissance indoor roamingThe brush Size increases by 10 units.Reduce the brush Size by 10 units.Edit panel Edit the PaletteUndo Undo Undo, Ctrl + ZRedo -- Shift + Ctrl + ZLayer Palette Layer PaletteClean the Layer Clear Layer - Ctrl + NFill the Layer Fill Layer - Ctrl + FBake Layer Bake Layer - Ctrl + BMarker Palette Marker PalettePlace Marker Place Marker - MRemove Marker Remove Marker - Ctrl + MThe Movie panel Movie the PaletteSnapshot Snapshot - Ctrl + Shift +! (US) Shift + Ctrl + PageUp (UK)The parameter panel Preferences PaletteConfigure the ConfigurationStore Configuration File Store Configuration File - Shift + Ctrl + ILoad User Interface Configuration File Load User Interface Configuration File - Ctrl + LSave the User Interface Configuration File Save User Interface Configuration File - Shift + Ctrl + Alt + IRender panel Render PaletteRender All Render all-shift + Ctrl + RThe mouse pointer chooses Render Cursor Selective Render - Ctrl + RStencil Palette for template panelOpen the template Stencil on-alt + HHide the display template Hide/Show stencil-ctrl + HCoin Controller (a circular Controller used to control the template) Coin Controller - space SpacebarStroke PalettedLazy mouse (or is it translated as a lag brush?) Lazy mouse L.Repeat the Last Replay Last Stroke - Ctrl + 1 FRecord Stroke - Ctrl + 3Repeat All Recorded Strokes All Recorded Strokes - Ctrl + 2Texture panel Texture PaletteCrop files are filled (Crop doesn't understand the exact meaning)Grab Texture From Document - Shift + Ctrl + GTool Palette Tool PaletteSave tool-shift + Ctrl + TGeometry HDivide the divide-ctrl + DLower Res - Shift + DEnter Higher resolution Higher Res - DEdge and ring Edge Loop - Ctrl + E (must hide part of the grid) (partially hidden mesh)HD Geometry HD GeometryGo to the HD Sculpting mode Toggle in/out of HD Sculpting mode -- A (mouse pointer over mesh)Render all HD Geometry Render all HD Geometry - A (mouse pointer over background)Mask MaskingView, hide the Mask View Mask - Ctrl + HInvert Mask Invert - Ctrl + IClear Mask Clear Mask - Shift + Ctrl + AMask All the Mask All - Ctrl + AZ ball ZSpheresPreview Adaptive Skin - ATransform Palette Transform PaletteActivate Symmetry Activate Symmetry - XDraw Pointer - QMove - WZoom Scale - Erotus-rEdit Edit - TThe grid object Center (in Edit mode) Center mesh in canvas (when in Edit mode) -fDraw Polyframe - Shift + FPoint Selection Mode, Point Selection Mode - Shift + Ctrl + PSet the axis Point Set Pivot Point - Ctrl + PClear Pivot Point - Shift + PSnapshot Snapshot - Shift + SLasso selection mode - Ctrl + Shift + MZoom Palette Zoom PaletteActual Size of Actual Size - 0 (digital zero) [zero]Antialiasing Half Size, antialiasing Half Size - Ctrl + 0Zoom In - + (plus sign)Zoom Out - (minus sign) [minus sign]Z script Palette ZScript PaletteLoad Z script Load ZScript - Shift + Ctrl + LReload the Z script, Reload ZScript - Ctrl + UHide the Z script Hide ZScript - HMouse Actions for Mouse ActionsSwitch to Z plus Z minus Toggle ZAdd and ZSub - Alt.On the Layer thumbnail, switch all layers and turn On Layer thumbnail, toggle all layers On/off Shift + ClickSelect the object of the mouse to Click the Select layer in the layer on which clicked pixol resides - ~ + Click on the canvas (American keyboard) @ (English keyboard) ~ + + Click on the canvas Click canvas (US) @ + Click canvas (UK)Mobile layer content Move to the up and down or so (in X&Y coordinate plane) layer contents up/down/sideways (X & Y) - Drag (American keyboard) @ ~ + + Drag (English keyboard) ~ + Drag (US) @ + Drag (UK)Axial surface after moving layer content (Z) Move layer contents forward/backward (Z) - ~ + Alt + Drag (American keyboard) @ + Alt + Drag (English keyboard) ~ + Alt + Drag (US) @ + Alt + Drag (UK)Show the project description (when Popup Info is switched on) - Ctrl + cursor over item on the projectAdd the project Move item to custom interface position - Ctrl + Drag (in a customizable state) to the custom interface position - Ctrl + Drag (when Enable Customize is switched on)Remove the project Remove item from custom interface position - Ctrl + Drag to Canvas from the custom interface position - Ctrl + Drag to Canvas (when Enable Customize is on)Edit Mode Actions Edit Mode ActionsTransformationsFree Rotate Free Rotate - Click and Drag Click & Drag Background in the BackgroundMove the Move - Alt + Click and Drag Alt + Click & Drag Background in the BackgroundConstrain to 90 degrees rotation to 90-degree rotation - Click + Drag, Shift Click + Drag, press ShiftScale the Scale - Alt + Click, loosen Alt, Drag Alt + Click on the Background, Release Alt, Drag BackgroundRotate around the Z axis, Rotate around z-axis - Shift, Click, loosen Shift, Drag Shift, Click, release Shift, DragMask MaskingPaint mask on object (alphas/strokes can be used) - hold down.Delete or draw the mask Delete or paint reverse mask - hold down Ctrl + AltReverse mask Reverse mask - Ctrl + Click Background Ctrl + Click BackgroundClear Mask Clear Mask - Ctrl + Click + Drag BackgroundConstant intensity mask Constant - Ctrl + Click, Release Ctrl, Drag (from the grid object), Ctrl + Click, Release Ctrl, Drag (starting off mesh)Transparency mask alpha-intensity mask - Ctrl + Click and Drag (starting from the grid object, close the Lasso mode) Ctrl + Click & Drag (starting off mesh, Lasso off)Mask the lur mask - Ctrl + Click Click on mesh on the gridTemplate fontCreate the custom template Create custom stencil-shift + Ctrl + Click, loosen Ctrl, Drag (in the Lasso selection mode) Shift + Ctrl + Click, Release Ctrl, Drag (when Lasso selection switched on)Partial Mesh Visibility is visible in local gridsDisplay part of the grid Show mesh - Shift + Ctrl + Click and Drag Shift + Ctrl + Click & DragHide part of the grid Hide mesh - Shift + Ctrl + Click, loosen Shift, Drag Shift + Ctrl + Click, Release Shift, DragShow all the grid Show's entire mesh - Shift + Ctrl + Click Background Shift + Ctrl + Click BackgroundShow the selected grid group (on all visible grid objects) Show only selected Polygroup (on fully visible mesh) - Shift + Ctrl + Click Shift + Ctrl + ClickHide selected Polygroup (on fully visible mesh) - Shift + Ctrl + ClickReverse visibility - Shift + Ctrl + Click on the Background and Drag Shift + Ctrl + Click & Drag BackgroundZSphere Edit Actions is edited by the Z ballThe drawing mode the Draw PointerAdd the Z ball Add a child ZSphere - Drag Drag ZSphere on a Z ballDelete the Z sphere Delete ZSphere - Alt + Click the Z ball Alt + Click ZSphereAdd a child ZSphere at same size -- Shift + ClickZ ball Add a child ZSphere at Draw Size with brush Size - start dragging, Ctrl start Drag, press CtrlDefine the magnetic Sphere, interrupt the grid Sphere Define magnet/break mesh - Alt + Click the Link ball Alt + Click Link - SphereInsert the z-ball Insert ZSphere - Click the Link ball Click Link - SphereMove Mode Move ModeMove ZSphere, Move Z sphere, Drag Z sphere, Drag Z spherePose (Natural Link movement, Link length invariant) Pose (Natural linked move) - Alt + Drag Link to the SphereMove the Link Move Chain - Drag Link ball Drag Link - SphereZoom Mode Scale ModeScale zsphere-drag Z sphereLink to air and gas (the Link length is constant) nflate/deflate chain - Alt + Drag Link - SphereZoom Link Scale chain - Drag Link ball Drag Link - SphereRotate Mode Rotate ModeTwist (scroll) link to Spin chain - Drag and Drag Z sphereControl twist Control twist - Alt + Drag Link ball Alt + Drag Link - SphereRotate Link Rotate chain - Drag Link ball Drag Link - SphereYou can get it from /docs/index.PHP/Default_Hotkeys_and_Mouse_ActionsSupplement:Tool menu shift + F1Brush menu shift + F2Stroke menu shift + F3Alpha menu shift + F4Texture menu shift + F5Texture menu shift + F61, the introductionThe ZB is saved as a picture, which must be preserved as a brush for the editing of the three-dimensional object.The transformation of the objectPress "T" to enter edit mode after creating an object.Rotate view: the mouse is dragging in the empty space, shift+ LMB can Angle 90 degrees Angle.Translation view: Alt + LMBZoom view: Alt + LMB, leave Alt under the LMB, and drag the left mouse up and downAlt + click: the object is moderateMove W: drag the mouse in the blank space - move vertically in the direction of the canvas and move upwards. Drag the lock in the intersection and move the object around the canvasRotating E: rotate around freelyZoom R: the circle is equal to the zoom3, the canvasScroll: press the space button to drag the mouseZoom: + -Moderate (Actual) : 0(AAHalf) : Ctrl + 0Ctrl + N: empty the canvas4, the object editorOnce a new object is created, the original object is no longer editable, but as an element in the imageImport model (as a brush editor) : tool/importSave the brush (you can continue editing in ZB) : tool/save asExport objects: tool/exportNote: prior to importing obj from Max... / importexport chooses iFlipY, iFlipZ is positive.5, interfaceTab: hide the tool panelThe drop-down menu can be dragged to the margins of both sidesThe buttons can be ctrl-pressed and drag to the margin of the canvas. CTRL + click can cancel the shortcut button.The mouse click on the tool to press Ctrl to display the instructions.6, model segmentationTool/Divide (Ctrl + D) can subdivide the modelThe SDiv changes the subdivision level, or the Lower Res (Shift + D) and Higher Res (D)Generally in low precision adjustment first large, depicting the meticulous precision is higher and higher, don't start work under the highest accuracy, as interactive speed and efficiency are not very high.The hidden and display of polygonsHiding the polygon can speed up the operation, and it can also avoid incorrect manipulation of parts that don't need to be edited.Methods:(1) Ctrl + Shift + LMB drag box to select, appear green box, loosen the mouse, outside the box is hidden.(2) Ctrl + Shift + LMB drag box to select, appear green box, first open Shift (the red box) and then release the mouse, the box inside is hidden.(3) Ctrl + Shift click on the model, which is previously hidden and displayed(4) Ctrl + Shift click on the blank space to display all the sections(5) when the model shows partial polygon state, clicktool/polygroups/Group Visible to display the currently displayed polygon as a display Group. Ctrl + Shift and then click on any part of the group to hide other groups.(6) by default, select box to include the whole deformation to work more, if AAHalf PtSel below button (Ctrl + Shift + P), as long as the selection and polygon intersection.8, maskCtrl + LMB drag out the mask area, the mask is dark grey, no longer being edited.Ctrl + LMB drag out the mask area, the mask is dark grey, and then press Alt, the area becomes white, and you can reduce the area of the montmorillon.Ctrl + click canvas empty space, mask inversionCtrl + LMB is dragging in the blank space of the canvas. Select the frame without touching the object, and you can cancel the maskCtrl + LMB can draw the mask on the modelYou can change the type of the mask on the Alpha menu.Color and shapeThe object turns out to be light grey, and if you change color in the palette, the color of the object changes. Select Color/FillObject to populate the current Color.Above the canvas button note:Mrgb: the current material and colorRgb: give colorM: the current materialRgb Intensity: transparencyIncreases the Zadd thicknessZsub: reduce the thickness ofZ Intensity: brush strengthThe Focal Shift: diffusion valuesDraw Size: brush SizeThe above button can appear on the canvas by right-clicking or pressing the space bar10, the use of gauge rulerStencil/stencil on can display the rule, light areas cannot be edited. Click the right button or the space key to manipulate the tool, then select the appropriate button.Invr: invertingStretch: expand to canvas sizeActual: Actual sizeHoriz: the width matches the canvasVert: a highly matched canvasWrap mode: package mode, stick to the surface of the modelSelect an Alpha from the Alpha menu, and click make st to define the current pattern as a ruler. We can make black and white images and save them as PSD, JPG, BMP, tif and so on.Note that JPG needs 24bit to be used.11, symmetryTrans... In the menu, press >, x <, >, y <, > z <, and then you can do the mirror image of the corresponding axis, if > M < is not pressed, the operation will be on the same side.Keyboard shortcuts: x \ y \ z12, trans menuThe first five slightlyCamera (snapshot) : copy objects in placeM + arrow: mark object position, mark object position - you can empty the canvas and allow the object to appear again in the original position, keyboard shortcut: M.STD: standard, high on the surface of the object, continuous in strokeStdDot: after releasing the mouse, the brush is applied to the pointInflat: dilation, pen and picture continuouslyInflatDot: dot expansionLayer: a continuous drawing of an iso-height, the stroke of a stroke will not stackPinch: contract to make the transition easierNudge: similar to daubSmooth: Smooth and relax the gridEdit curve: Edit the brush strength curveClick on the curve to create a new control point.Drag the control point to the window and then drag it back, the point is turned into a corner, and the operation will be smooth again.Drag control point to the window, loosen the mouse, the control point will be canceled.The control point has a aperture in the smooth state, and the click of the mouse in the aperture can change the aperture size and affect the tension of the curve.Focal Shift: change the rate of decay of the curveNoise: generate a random Noise curve that can be used to draw tiny bumps13, the use of the Projection MasterYou can use all kinds of ALpha graphics and stroke strokes for drawing.Press the G key, select the colors, you can also select the option, and then enter the car, and then the model Angle can't be changed when you enter the drawing state. You have to switch back by the G key and pick now.14, use MultiMarkersAfter editing the object, press the M key before replacing the tool, record the object's current location, and then create a new object, edit and match. MultiMarkers then empty canvas, select tool, drag in the canvas all tagged objects, can be respectively to change position, it can be added to multiple objects in the picture. To edit the shape of the object, you must first select Tool/make polymesh, converted to editable object variability. Then empty the canvas, select the newly generated object as a tool, and create it.15, using Z ballSelect z balls in the Tool Tool, drag the size in the canvas,Use draw to add a new ball to the ball.In the draw tool is activated, Alt + click control the club to remove the ball and Alt + click control the connections between the ball the ball, son will be virtual, ball into effect the ball, do not produce entity, but affects the shape of the entity.The child control ball is moved into the father's control sphere and produces a hollow effect that can be used to make eye socket wiring.Preview or press A to preview the generated grid model under Tool/Adaptive Skin. Density: segment DensityMake Adaptive Skin generates the grid model.。
ZB初学教程

ZB初学教程
一、打开ZB后。
1、打开ZB界面
和其他软件一样有菜单和工具栏,最大的好处在于要用的下拉菜单在界面上都有。
在界面左边有这样一个工具栏,
界面右边最上面
打开保存导入导出
2、和所有3D软件都一样可以新建模型开始制作。
在界面打开后可以直接在这两个地方新建模型。
建好你想要的模型后按T确定。
这里大多数会有一个常见问题:当你按T
的时候在界面上有两个新建模型
但是能动的只有一个,另外一个怎么办
按Ctrl+N就可以删除多余的那个模型了。
当然也可以导入之前在3DMAX里做好的中摸。
3、新建好模型后就可以开始雕刻制作了
在雕刻制作时记得把透视打开,快捷键是P;移动的快捷键Alt+左键;缩放Ctrl+右键物体居中F
线框显示Shift+F;缩小界面Ctrl+0;还原界面0
第一次用都会这样,选好了笔刷后发现在模型上无法雕刻。
在右手边最上边的命令菜单下有一个Make polyMesh3D
点击之后就可以进行编辑状态了,
之后是一些常用的笔刷和材质球。
3、之后在做好第一步的模型大体的雕刻后
点击右手边的菜单第三个命令下拉菜单的
快捷键Ctrl+D
可以看到区别在界面上的面数的变化和物体的变化,之后再进行下一步的制作。
SubTool是物体管理。
添加分层删除分层
右手边的菜单栏第二个Layers的下拉菜单是ZB里的一个分层命令。
在这里可以分开雕刻也可以放入材质。
按住空格不放是一个快捷操作面板。
在做好之后点击Save As保存,
Ctrl+s是保存软件设置,保存文件点击右上角Save As。
ZB快捷键
2.视图操作
转动:右
平面转动:shift+左ZB快捷键ZB快捷键
平移:alt+左
缩放:1,ALT+左
2,放开ALT不松鼠标
3,拖动鼠标
回到中心:ALT+左,单击空白处
3.隐藏和显示
只显示匡选部分:CTROL+Shift+右匡选
无论2D还是3D,画了一笔后上述设置均可调整
按contrl时画的数个笔划可同时调整设置
快捷键
填充:contrl+f
清除画布:contrl+n
拾取颜色:alt+左 பைடு நூலகம்
部分遮蔽:ctrl+右
放大画布“+”
缩小画布“-”
缩小笔刷“[ ”
放大笔刷“]”
反选“CTRL+i”
细化“CTRL+D“
z 开/关笔刷在z轴上的对称效果
v 对调前景色和背景色
a 预览zsphere的蒙皮效果
g projection master
p或f1 切换到透视图
h 调出zscript窗口
c 貌似是给模型随机添加一个颜色(==不知道为什么会有这么奇怪的功能)
ctrl+z 返回
ctrl+shift+z撤销返回
画好遮罩后,按住ctrl鼠标单击画好的遮罩,可以把遮罩变得模糊。
在preference-custom ui-enable customize 激活了自定义界面后,按住ctrl可任意托拽菜单或菜单里的子功能,把
它们放到自己喜欢的地方(但仅限于窗口周围的托盘内,不能放在窗口上)1.界面定义
ZBrush快捷键
ZBrush快捷键zbrush4 快捷键大全,General ShortcutsOpen Project - Ctrl+OSave Project - Ctrl+SUndo - Ctrl+ZRedo – Shift+Ctrl+ZPopup selection (on PC only)Tools – F1Brushes – F2Strokes – F3Alphas – F4Textures – F5Materials - F6 (with cursor off canvas area)Show QuickMenu - Spacebar or Right Mouse clickShow/hide floating palettes – TABShow item description (when Popup Info is switched on) - Ctrl+cursor overitemShow alternative item description - Ctrl+Alt+cursor over itemAssign custom hotkey – Ctrl+Alt+click on item (store hotkeys in Preferences> Hotkeys submenu)Projection Master – GLightbox and SpotlightShow/hide Lightbox - , [comma key]load selected item - Double-click on Lightbox thumbnail(texture/alphas will beloaded into Spotlight)load into Texture or Alpha palette - Shift+double-click ontexture/alphaTurn on/off Spotlight - Shift+ZShow/hide Spotlight Dial - ZEdit mode Navigationwith a 3D mesh in Edit mode -Free Rotate - Click & drag BackgroundMove - Alt+Click & drag BackgroundConstrain to 90-degree rotation - Click+drag, press ShiftScale –Alt+Click, Release Alt, drag BackgroundRotate around Z-axis - Shift, Click, release Shift, drag(For best results turn off RightClick Navigation in the Preferences>Interface menu.)Right-Click Navigation(Turn on RightClick Navigation in the Preferences>Interface menu.) Move - Alt+Right-click & drag (can be over the model)Scale - Ctrl+Right-click & drag (can be over the model)Rotate - Right-click & drag (can be over the model)Sculpting and PaintingDraw Size - SFocal Shift - ORGB Intensity - IZ Intensity – UIncrease Draw Size by set units - ]Decrease Draw Size by set units - [(set increment in the Zplugin>Misc Utilities>Brush Increment slider) Edit mode on/off - TDraw - QMove - WScale - ERotate - RToggle ZAdd and ZSub - Alt (hold down)Sculpting BrushesShow Brush pop-up - BStandard Brush - B - S - TSmooth Stronger - B - S - SMove Elastic - B - M - EMPolish - B - M - PClipCurve - B - C - CClayLine - B - C - LColorSelect Color under cursor - CSwitch Color - VStrokeLazy mouse - LReplay Last Stroke - 1Record Stroke - 3Replay All Recorded Strokes – 23D ModelsSave Tool - Shift+Ctrl+TFit Mesh to view - FPerspective – PFloor Grid - Shift+PActivate Symmetry - XShow/hide Polyframe & polygroups - Shift+FPoint Selection Mode - Shift+Ctrl+PSet Pivot Point – Ctrl+ PClear Pivot Point - Shift+PSnapshot a version to canvas - Shift+SSubToolsList all SubTools - NAlt+click on SubTool - select that SubToolGeometryDivide - Ctrl+DLower Res - Shift+DHigher Res - DEdge Loop – Ctrl+E (partially hidden mesh)HD GeometryToggle in/out of HD Sculpting mode – A (cursor over mesh)Render all HD Geometry – A (cursor over background)MaskingView Mask - Ctrl+HInvert Mask - Ctrl+IClear Mask - Shift+Ctrl+AMask All – Ctrl+ASelect Masking Brush - hold Ctrl while selecting brush from popup Paint mask on object (alphas/strokes can be used) - Ctrl (hold down) Delete or paint reverse mask – Ctrl+Alt (hold down)Reverse mask –Ctrl+Click BackgroundClear Mask – Ctrl+Click+ drag BackgroundConstant-intensity mask - Ctrl+Click, release Ctrl, drag (starting off mesh)Alpha-intensity mask (using MaskPen or MaskRect brush) - Ctrl+Click & drag(select alpha while holding Ctrl)Blur mask - Ctrl+Click on meshSharpen mask - Ctrl+Alt+Click on meshTopological Maskingin Move, Scale or Rotate mode - Ctrl+click+drag the action line on the modelPartial Mesh Visibility & Clip BrushesSelect Selection or Clip Brush - hold Shift+Ctrl while selecting brush from popupShow mesh portion – Shift+Ctrl+Click, release keys & drag (green selection area)Hide mesh portion - Shift+Ctrl+Click, release keys & drag - pressAlt (red selection area)Move selection or clip area - 'press Spacebar without releasingmouse/penShow entire mesh - Shift+Ctrl+Click BackgroundShow only selected Polygroup (on fully visible mesh) -Shift+Ctrl+ClickHide selected Polygroup (on fully visible mesh) -Shift+Ctrl+Click twiceHide selected Polygroup (on partially visible mesh) - Shift+Ctrl+ClickReverse visibility - Shift+Ctrl+Click & drag BackgroundClipCurve add soft direction change - click Alt onceClipCurve add sharp direction change - click Alt twicereverse clip area - Alt (hold down)StencilStencil On - Alt+HHide/Show Stencil - Ctrl+HCoin Controller – SpacebarZSpheresPreview Adaptive Skin - ADraw modeAdd a child ZSphere - drag ZSphereDelete ZSphere - Alt+Click ZSphereAdd a child ZSphere at same size – Click+drag, press ShiftAdd achild ZSphere and scale Link Spheres – Click+drag to size new ZSphere, press Ctrl+dragInsert ZSphere - Click Link-Spherewith Tool>Adaptive Skin>Use ClassicSkinning on:Sphere Define magnet/ break mesh - Alt+Click Link-SphereMove modeMove ZSphere - drag ZSpherePose (Natural-linked move) - drag Link-SphereMove Chain – Alt+drag Link-SphereScale modeScale Zsphere - drag ZSphereInflate/deflate chain – Alt+drag Link-SphereScale chain - drag Link-SphereRotate modeSpin chain - drag ZSphereControl twist - Alt+drag Link-SphereRotate chain - drag Link-SphereZSketchActivate ZSketch Edit mode - Shift+A (with a ZSphere armature in Edit mode)Preview Unified Skin - ACanvas and 2.5DReverse 2.5D brush effect - Alt (hold down)Crop And Fill - Shift+Ctrl+FGrab Texture From Document – Shift+Ctrl+GDocument LayersClear Layer - Ctrl+NFill Layer - Ctrl+FBake Layer – Ctrl+BOn Layer thumbnail, toggle all layers on/off - Shift+ClickSelect layer on which clicked pixol resides - ~+Click canvas (US) @+Click canvas (UK)Move layer contents up/down/sideways (X & Y)- ~+drag (US) @+drag (UK)MarkersPlace Marker - MRemove Marker – Ctrl+MCanvas ZoomActual Size - 0 [zero]Antialiased Half Size - Ctrl+0Zoom In - + [plus sign]Zoom Out - - [minus sign]TimelinePlace a new key frame - click on the TimelineSelect an existing key frame - click on the key frame dotZoom Timeline in/out - click on selected key frame dotMove selected key frame - click+drag dot to new position (dragging off endwill delete)Store new data in existing key frame - Shift+Ctrl+click on the key frame dotDelete a key frame - click+drag dot off the TimelineCopy selected key frame - Shift+click on the Timeline at the point where you want the copyCopy multiple key frames - Shift+click on all the key frames dots to be copied, then Shift+click the Timelineat the point where you want the copiesCreate Transition key frame - Ctrl+click on an existing key frame dotCreate Rigid key frame - Alt+click on an existing key frame dotGo to Previous Camera key frame - LEFT ARROWGo to Next Camera key frame - RIGHT ARROWPlay the Timeline (will play as a loop) - Shift+click on the Timeline cursorStop the Timeline playing - click EscRecord Timeline as a Movie - Shift+Ctrl+click on the Timelinecursor(set the cursor to the start first using the LEFT ARROW)Movie Snapshot to Movie– Ctrl+ Shift+! (US) Shift+Ctrl+PageUp (UK)Render Best Preview Render (BPR) - Shift+RRender All - Shift+Ctrl+RCursor Selective Render – Ctrl+RCustom UI and ConfigurationMove item to custom interface position – Ctrl+Alt+drag (when Enable Customize is switched on)Remove item from custom interface position – Ctrl+Alt+drag to Canvas (when Enable Customize is on)Store Configuration File - Shift+Ctrl+ILoad User Interface Configuration File - Ctrl+LSave User Interface Configuration File - Shift+Ctrl+Alt+IZScripts Load ZScript - Shift+Ctrl+LReload ZScript - Ctrl+U Show/Hide ZScript window - H。
Zbrush常用快捷键大全(彩色整理)资料讲解

Z b r u s h常用快捷键大全(彩色整理)Zbrush常用快捷键以下是常用的快捷键:空格键激活鼠标指针下的菜单(按住不放再拖拉鼠标指针可定位文档)左键在空白处单击并拖动=旋转视角alt建+左键在空白处单击并拖动=平移视角alt键+左键然后放开alt键在空白处拖动并平移=缩放视角+放大文档- 缩小文档0(零)查阅文档的实际大小旋转中配合shift,捕捉在正交视点处旋转中配合ALT,以相对平滑方式旋转视图按下 DEL ,可以将物体在画布中最大化显示Ctrl+0 查阅文档实际大小的一半,抗锯齿(还影响输出)ctrl+shift+拖动=未选中的部分将隐藏。
ctrl+shift+点击空白处=恢复显示ctrl+shift+拖动+释放(ctrl、shift)=选中的部分将隐藏Ctrl+f 用当前texture填充canvas当前layerCtrl遮罩功能Ctrl+d 细份一次Tab隐藏/显示浮动调控板H隐藏/显示Zscript窗口C在指针下面拾取颜色S绘图大小I RGB强度Shift+I Z强度Shift+d 绘制贴图的时候让模型上的网格线隐藏Q绘图指示器(默认为所有工具)W移动模式E缩放模式R旋转模式T编辑模式Shift+s 备份物体M标记物体点中marker ctrl+M 取消标记Ctrl+Z 撤销Shift+Ctrl+Z 重做Alt/Option 影响转换大多数工具G打开Projection MasterAlt+A Alpha调控板Alt+C Color颜色调控板Alt+T tool调控板Alt+T Transform调控板Alt+R Render调控板Alt+鼠标左绘图模式下可以删除Z求点Shift+crease--------------crease everythingShift_uncrease------------uncrease everythingA ------------------zSphere to Z meshctrl+N ----------------- clear the layer迅速了解zbrush应掌握的要点1、介绍ZB保存时是一个画面,要保持三维物体的可编辑性必须保存为笔刷。
■Zbrush常用快捷键(彩色版)
Zbrush常用快捷键空格键激活鼠标指针下的菜单(按住不放再拖拉鼠标指针可定位文档)左键在空白处单击并拖动=旋转视角alt建+左键在空白处单击并拖动=平移视角alt键+左键然后放开alt键在空白处拖动并平移=缩放视角+放大文档- 缩小文档0(零)查阅文档的实际大小旋转中配合shift,捕捉在正交视点处旋转中配合ALT,以相对平滑方式旋转视图按下DEL ,可以将物体在画布中最大化显示Ctrl+0 查阅文档实际大小的一半,抗锯齿(还影响输出)ctrl+shift+拖动=未选中的部分将隐藏。
ctrl+shift+点击空白处=恢复显示ctrl+shift+拖动+释放(ctrl、shift)=选中的部分将隐藏Ctrl+f 用当前texture填充canvas当前layerCtrl遮罩功能Ctrl+d 细份一次Tab隐藏/显示浮动调控板H隐藏/显示Zscript窗口C在指针下面拾取颜色S绘图大小I RGB强度Shift+I Z强度Shift+d 绘制贴图的时候让模型上的网格线隐藏Q绘图指示器(默认为所有工具)W移动模式E缩放模式R旋转模式T编辑模式Shift+s 备份物体M标记物体点中marker ctrl+M 取消标记Ctrl+Z 撤销Shift+Ctrl+Z 重做Alt/Option 影响转换大多数工具G打开Projection MasterAlt+A Alpha调控板Alt+C Color颜色调控板Alt+T tool调控板Alt+T Transform调控板Alt+R Render调控板Alt+鼠标左绘图模式下可以删除Z求点Shift+crease--------------crease everythingShift_uncrease------------uncrease everythingA ------------------zSphere to Z meshctrl+N ----------------- clear the layer迅速了解zbrush应掌握的要点1、介绍ZB保存时是一个画面,要保持三维物体的可编辑性必须保存为笔刷。
ZB笔刷快捷键

在物体上绘制遮罩(alpha,笔划可用时)Paint mask on object (alphas/strokes can be used) - 按住Ctrl Ctrl (hold down)
删除或绘制反遮罩 Delete or paint reverse mask – 按住Ctrl+Alt ( hold down)
模板面板 Stencil Palette
开启模板 Stencil On - Alt+H
隐藏显示模板 Hide/Show Stencil - Ctrl+H
硬币控制器(用来控制模板的一个圆形控制器) Coin Controller – 空格 Spacebar
笔划面板 Stroke Palette
透明度遮罩 Alpha-intensity mask - Ctrl+单击并拖动(始于网格物体,关闭套索模式)Ctrl+Click & Drag (starting off mesh, Lasso off)
虚化遮罩 lur mask - Ctrl+在网格上单击Click on mesh
模板Stencil
纹理 Textures – F5
材质 Materials - F6
显示快捷菜单 Show QuickMenu - 空格或右击Spacebar or Right Mouse click
显示、隐藏浮动面板 Show/hide floating palettes – TAB
映射大师Projection Master – G
保存文件 Save Document - Ctrl+S
绘画面板Draw Palette
ZBrush快捷键与鼠标操作
旋转链接Rotate chain
拖动链接球
隐藏部分网格Hide mesh portion
Shift+Ctrl+单击,松开shift,拖动
显示全部网格Show entire mesh
Shift+Ctrl+单击背景
显示被选择的网格组Show only selected Polygroup
Shift+Ctrl+单击
隐藏被选择的网格组Hide selected Polygroup
缩小Zoom Out
‘-’(减号)
模板Stencil
创建自定义模板Create custom Stencil
Shift+Ctrl+单击,松开Ctrl,拖动(在套索选择模式下)
局部网格可见Partial Mesh Visibility
显示部分网格Show mesh portion
Shift+Ctrl+单击并拖动
Shift+Ctrl+F
Grab Texture From Document
Shift+Ctrl+G
工具面板Tool Palette
存储工具Save Tool
Shift+Ctrl+T
几何体Geometry
细分Divide
Ctrl+D
进入低一级分辨率Lower Res
Shift+D
进入高一级分辨率Higher Res
Shift+Ctrl+A
遮罩所有Mask All
Ctrl+A
Z球ZSpheres
预览适应的皮肤Preview Adaptive Skin
- 1、下载文档前请自行甄别文档内容的完整性,平台不提供额外的编辑、内容补充、找答案等附加服务。
- 2、"仅部分预览"的文档,不可在线预览部分如存在完整性等问题,可反馈申请退款(可完整预览的文档不适用该条件!)。
- 3、如文档侵犯您的权益,请联系客服反馈,我们会尽快为您处理(人工客服工作时间:9:00-18:30)。
移动图层内容 向上下左右(在X&Y坐标平面)Move layer contents up/down/sideways (X & Y)- ~+拖动(美式键盘)@+拖动(英式键盘)~+Drag (US) @+Drag (UK)
硬币控制器(用来控制模板的一个圆形控制器) Coin Controller – 空格 Spacebar
笔划面板 Stroke Paletted
懒鼠标(还是翻译成 滞后笔刷 呢?) Lazy mouse - L
重复最后一笔 Replay Last Stroke - Ctrl+1 F
隐藏被选择的网格组 (在全部可见的网格物体上)Hide selected Polygroup (on fully visible mesh) - Shift+Ctrl+单击 Shift+Ctrl+Click
记录笔划 Record Stroke - Ctrl+3
重复所有被记录的笔划 Replay All Recorded Strokes – Ctrl+2
纹理面板 Texture Palette
Crop文件并填充(Crop不明白具体含义) CropAndFill - Shift+Ctrl+F
显示多边形结构 Draw Polyframe - Shift+F
点选择模式 Point Selection Mode - Shift+Ctrl+P
设置坐标轴点 Set Pivot Point – Ctrl+ P
清除坐标轴点 Clear Pivot Point - Shift+P
删除或绘制反遮罩 Delete or paint reverse mask – 按住Ctrl+Alt ( hold down)
反转遮罩 Reverse mask – Ctrl+单击背景 Ctrl+Click Background
清除遮罩 Clear Mask – Ctrl+Click+背景上拖动Ctrl+Click+ Drag Background
放置标记 Place Marker - M
移除标记 Remove Marker – Ctrl+M
Movie面板 Movie Palette
快照 Snapshot – Ctrl+ Shift+! (US) Shift+Ctrl+PageUp (UK)
参数面板 Preferences Palette
编辑模式操作 Edit Mode Actions
转化 Transformations
自由旋转 Free Rotate - 单击并在背景上拖动 Click & Drag Background
移动 Move - Alt+单击并在背景上拖动 Alt+Click & Drag Background
绘制指示器 Draw Pointer - Q
移动 Move - W
缩放 Scale - E
旋转 Rotate - R
编辑 Edit – T
网格物体居中(在编辑模式下) Center mesh in canvas (when in Edit mode) - F
清除遮罩Clear Mask - Shift+Ctrl+A
遮罩所有Mask All – Ctrl+A
Z球 ZSpheres
预览适应的皮肤 Preview Adaptive Skin - A 变换面板 ransform Palette
激活对称 Activate Symmetry - X
重做 Redo – Shift+Ctrl+Z
图层面板 Layer Palette
清理图层 Clear Layer - Ctrl+N
填充图层 Fill Layer - Ctrl+F
烘培图层 Bake Layer – Ctrl+B
标记面板 Marker Palette
放大 Zoom In - + (加号)[plus sign]
缩小 Zoom Out - - (减号)[minus sign]
Z脚本面板 ZScript Palette
加载Z脚本 Load ZScript - Shift+Ctrl+L
重新加载Z脚本 Reload ZScript - Ctrl+U
面后移动图层内容 (Z轴向)Move layer contents forward/backward (Z) - ~+Alt+拖动 (美式键盘)@+Alt+拖动(英式键盘)~+Alt+Drag (US) @+Alt+Drag (UK)
显示项目简介 (当弹出信息已经启用)Show item description (when Popup Info is switched on) - Ctrl+鼠标指针放到该项目上Ctrl+cursor over item
约束到90度旋转 Constrain to 90-degree rotation - 单击+拖动,按Shift Click+Drag, press Shift
缩放 Scale – Alt+单击,松开Alt,在背景上拖动 Alt+Click, Release Alt, Drag Background
绕Z轴旋转 Rotate around Z-axis - Shift,单击,松开Shift,拖动 Shift, Click, release Shift, Drag
遮罩Masking
在物体上绘制遮罩(alpha,笔划可用时)Paint mask on object (alphas/strokes can be used) - 按住Ctrl Ctrl (hold down)
渲染所有 HD几何体 Render all HD Geometry – A(鼠标指针放在在背景上) (cursor over background)
遮罩 Masking
查看、隐藏遮罩View Mask - Ctrl+H
反选遮罩 Invert Mask - Ctrl+I
快照 Snapshot - Shift+S
套索选择模式 Lasso selection mode - Ctrl+Shift+M
缩放面板 Zoom Palette
实际大小 Actual Size - 0 (数字零)[zero]
抗锯齿一半大小 Antialiased Half Size - Ctrl+0
渲染面板 Render Palette
渲染所有 Render All - Shift+Ctrl+R
鼠标指针选择渲染 Cursor Selective Render – Ctrl+R
模板面板 Stencil Palette
开启模板 Stencil On - Alt+H
隐藏显示模板 Hide/Show Stencil - Ctrl+H
renaissance 室内漫游
笔刷大小增加10单位 Increase Draw Size by 10 units - ]
笔刷大小减少10单位 Decrease Draw Size by 10 units - [
编辑面板Edit Palette
撤销 Undo - Ctrl+Z
恒定强度的遮罩 Constant-intensity mask - Ctrl+单击,松开Ctrl,拖动(始于网格物体)Ctrl+Click, Release Ctrl, Drag (starting off mesh)
透明度遮罩 Alpha-intensity mask - Ctrl+单击并拖动(始于网格物体,关闭套索模式)Ctrl+Click & Drag (starting off mesh, Lasso off)
从文档中掠夺纹理(强盗行为 呵呵)Grab Texture From Document – Shift+Ctrl+G
工具面板 Tool Palette
存储工具 Save Tool - Shift+Ctrl+T
几何体( Geometry H
细分 Divide - Ctrl+D
进入低一级分辨率 Lower Res - Shift+D
进入高一级分辨率 Higher Res - D
边缘加环 Edge Loop – Ctrl+E (须隐藏部分网格) (partially hidden mesh)
HD几何体 HD Geometry
切入、出 HD雕刻模式 Toggle in/out of HD Sculpting mode – A (鼠标指针放在网格物体上)(cursor over mesh)
往自定义界面添加项目 Move item to custom interface position – Ctrl+拖动(在可自定义启用的状态下)Ctrl+Drag (when Enable Customize is switched on)
