富士施乐多功能一体机刷卡使用培训手册海尔
用户操作手册-富士施乐
D125/D110/D95 Copier/Printer 用户操作实用手册富士施乐(中国)有限公司客户服务及支持部目录一.正确放置原稿---------------------4二. 复印1.简易复印步骤---------------------52. 常用的复印应用使用手送纸盘复印环保纸、厚纸、信封等非标准纸张---7复印双面文件--------------------9对图像进行缩放-------------------10将图像移位或自动居中----------------11消除副本四周阴影------------------13复印书刊----------------------14同时复印不同尺寸的原稿---------------15将文件进行分页/装订/打孔/工程图折纸--------16印制小册子或套印A3红头文件-------------17复印身份证等其它证件----------------18把多页文件复印到单页纸上--------------19自制大型海报--------------------20将一个图像重复多个印在单页纸上-----------21在文件中添加注释------------------22加附封面或套印A4红头文件--------------23制作C型、Z型折纸------------------24在副本文件中插入分隔页---------------25将不同设定的原稿集中起来进行复印----------26进行样本复印--------------------27储存常用的复印功能----------------28调用已储存的复印功能----------------29三. 打印1.基本打印步骤--------------------302. 常用的打印应用把多页文件打印到单页纸上--------------31打印小册子-------------------32打印封面页或套印红头文件-------------33设置喜好设定-------------------34机密打印或样本打印----------------35添加自定义尺寸纸张----------------37正确打印环保纸、厚纸、信封等非标准纸张------38设置打印首选项------------------39 3. 介质打印概况(选配)介质打印概况------------------40注意和限制事项-----------------41介质打印文件------------------42四. 扫描1. 扫描到信箱登记信箱----------------------43扫描到信箱-------------------44从信箱中提取扫描文件----------------452.用邮件接收扫描文件---------------473.把文件扫描到PC保存---------------484.把文件扫描到USB保存--------------495.把文件扫描到URL-----------------506.扫描(WSD保存)--来自PC------------517.扫描(WSD保存)--来自主机------------538.扫描输出文件格式----------------54五.计数器确认---------------------55六.确认消耗品的用量----------------56七.清除卡纸--------------------57八.控制面板的使用介绍---------------58一、正确放置原稿两种方法放置原稿--自动输稿器:单张,多张原稿。
施乐系列打印机使用说明
ApeosPort -III C3300/2200 DocuCentre -III C3300/C2200/C2201用户操作实用手册Fuji Xerox (China) LimitedCustomer Service & Support Operation12一、复印1、基本复印步骤---------------------5正确放置原稿--------------------7使用手送纸盘复印环保纸、厚纸、信封等非标准纸张---8色彩模式----------------------102、常用的复印应用复印双面文件--------------------11对图像进行缩放-------------------12将图像移位或自动居中----------------13消除副本四周的阴影-----------------15复印书刊----------------------16同时复印不同尺寸的原稿---------------17将文件进行分页/装订----------------18印制小册子或套印A3红头文件------------19复印身份证---------------------20把多页文件印到单页纸上---------------21自制大型海报--------------------22将一个图像重复多个印在单页纸上-----------23在文件中添加注释------------------24加附封面或套印A4红头文件------------25目录3进行样本复印--------------------26储存常用的复印功能-----------------27调用已储存的复印功能----------------28二、打印1、基本打印步骤---------------------292、常用的打印应用进行机密打印或样本打印---------------30把多页文件打印到单页纸上--------------32打印小册子---------------------33打印封面页或套印红头文件--------------34设置喜好设定--------------------35正确打印环保纸、厚纸、信封等非标准纸张-------36添加自定义尺寸纸张-----------------37设置打印首选项-------------------38无纸化发送传真-------------------393、多媒体打印(选配)多媒体打印概况--------------------40注意和限制事项--------------------41多媒体部件----------------------42多媒体打印照片/文件-----------------43三、传真1、基本传真步骤--------------------452、常用的传真应用将一份传真发到多个接收方--------------46将多页原稿发送在单页纸上--------------47重发未发送的文件------------------48查看传真是否发送成功----------------49四、扫描1、扫描(新建机密信箱) -----------------50(信箱保存)-------------------51从信箱中提取扫描的文件--------------532、扫描到邮件---------------------543、扫描到PC保存-------------------554、扫描输出格式--------------------56五、计数器确认---------------------57六、确认消耗品的用量------------------58七、控制面板的使用介绍-----------------5943. 在菜单中选择[复印]。
施乐系列打印机使用说明

ApeosPort -III C3300/2200 DocuCentre -III C3300/C2200/C2201用户操作实用手册Fuji Xerox (China) LimitedCustomer Service & Support Operation12一、复印1、基本复印步骤---------------------5正确放置原稿--------------------7使用手送纸盘复印环保纸、厚纸、信封等非标准纸张---8色彩模式----------------------102、常用的复印应用复印双面文件--------------------11对图像进行缩放-------------------12将图像移位或自动居中----------------13消除副本四周的阴影-----------------15复印书刊----------------------16同时复印不同尺寸的原稿---------------17将文件进行分页/装订----------------18印制小册子或套印A3红头文件------------19复印身份证---------------------20把多页文件印到单页纸上---------------21自制大型海报--------------------22将一个图像重复多个印在单页纸上-----------23在文件中添加注释------------------24加附封面或套印A4红头文件------------25目录3进行样本复印--------------------26储存常用的复印功能-----------------27调用已储存的复印功能----------------28二、打印1、基本打印步骤---------------------292、常用的打印应用进行机密打印或样本打印---------------30把多页文件打印到单页纸上--------------32打印小册子---------------------33打印封面页或套印红头文件--------------34设置喜好设定--------------------35正确打印环保纸、厚纸、信封等非标准纸张-------36添加自定义尺寸纸张-----------------37设置打印首选项-------------------38无纸化发送传真-------------------393、多媒体打印(选配)多媒体打印概况--------------------40注意和限制事项--------------------41多媒体部件----------------------42多媒体打印照片/文件-----------------43三、传真1、基本传真步骤--------------------452、常用的传真应用将一份传真发到多个接收方--------------46将多页原稿发送在单页纸上--------------47重发未发送的文件------------------48查看传真是否发送成功----------------49四、扫描1、扫描(新建机密信箱) -----------------50(信箱保存)-------------------51从信箱中提取扫描的文件--------------532、扫描到邮件---------------------543、扫描到PC保存-------------------554、扫描输出格式--------------------56五、计数器确认---------------------57六、确认消耗品的用量------------------58七、控制面板的使用介绍-----------------5943. 在菜单中选择[复印]。
FUJI XEROX DocuWide 6035系列数字多功能一体机 说明书

环境● 符合国际标准的环保节能设计*1*24卷模式进纸黑白扫描是标准配置,彩色扫描是可选配置。
*复印打印扫描*●●●●DocuWide 6035EPDocuWide 6035 MF切割按钮支持多种尺寸系列,提供灵活选择支持国际标准的A 系列、B 系列、英制系列。
特别设计的加宽的特A 系列,可方便中国客户的使用。
自动装纸机构,实现轻松装纸只需将纸张前端送入,即可自动装入纸张。
配备切纸按钮,轻松修正前端纸边。
支持多种数据格式,轻松、快速输出高品质图像。
选件工程技术部门输入输出流程中不可或缺的部分。
本小册子中提及的其他名称都是相应公司的商标。
尽管所载信息在打印时正确无误,富士施乐亚太区保留随时更改所述机器规格参数而不另外通知的权利。
视产品购买所在国家或地区,规格参数、选件名称和供货情况可能会不尽相同。
FXCL 0811北京 北京市朝阳区建国路甲92号世茂大厦904室 电话:010-********上海 上海市淮海中路300号香港新世界大厦29F/30F/32F 电话:021-********广州 广州市东风中路410-412号健力宝大厦15楼 电话:020-********深圳 深圳市福田区益田路4068号卓越时代广场32楼01~08、10室 电话:0755-********成都 成都市锦江区滨江东路9号B 座香格里拉中心办公楼6层 电话:028-********沈阳 沈阳市和平区南京北街206号城市广场第二座1406室 电话:024-********天津 天津市南京路75号国际大厦502室 电话:022-********长春 长春市南关区亚泰大街3218号通钢国际大厦A 座21层01室 电话:0431-********青岛 青岛市香港中路61号阳光大厦A 座30层EH 电话:0532-********/69大连 大连市西岗区中山路147号森茂大厦1202E 电话:0411-********/80哈尔滨 哈尔滨市南岗区民益街76号网通广场20楼 电话:0451-********杭州 杭州市潮王路240号银地大厦一层 电话:0571-********武汉 武汉市建设大道568号新世界国贸大厦I 座21层2105-2107室 电话:027-********长沙 长沙市芙蓉区韶山北路159号通程国际大酒店写字楼1208室 电话:0731-*******郑州 郑州市中原中路220号裕达国际贸易中心A 座22层2212 电话:0371-********温州 温州市车站大道高联大厦9B3 电话:0577-********合肥 合肥市淮河路303号安徽邮电大厦11层D 座2号 电话:0551-*******南京 南京市汉中路89号金鹰国际商城21层B2-C1座 电话:025-********常州 常州市延陵西路23、25、27、29号投资广场17层1706单元 电话:0519-********无锡 无锡市中山路343号东方广场商务楼11层GH 座 电话:0510-********苏州 苏州市苏州工业园区苏华路2号国际大厦1610单元 电话:0512-********东莞 东莞市南城区胜和路3号胜和广场C 座11C 电话:0769-********厦门 厦门市思明区鹭江道8号国际银行大厦12层H 座 电话:0592-*******福州 福州市五四路国贸广场29楼C1 电话:0591-********西安 西安市南关正街88号长安国际广场B 座1006室 电话:029-********重庆 重庆市渝中区邹容路68号大都会商厦2301室 电话:023-********昆明 昆明市北京路155号附1号红塔大厦1201室 电话:0871-*******乌鲁木齐 乌鲁木齐市中山路86号中泉广场13楼B 座 电话:0991-*******富士施乐在华分支机构富士施乐全国服务热线:800-820-5146 400-820-5146/。
施乐versalink系列多功能和单功能打印机系统管理员指南说明书

富士施乐M205B 多功能一体机 设置语言 接电源线数据线 装驱动 调整粉盒 使用操作方法步骤

施乐M205B 打印浓度调整
调 整第 墨一 粉步 盒
接 电 源第 线二 和步 数 据 线
用心服务
设第 置三 语步 言
装第 驱四 动步
调整粉盒:首次使用,要在
AK M205B
开机前把墨盒拧到锁定状态 (如图1.5),然后关好前盖; 皇 搬动打印机前把墨盒拧回到解 冠 锁位置(图1.4)避免搬动时 墨盒漏粉出来。
AK M205B
3.1按机器右侧的电源键
3.1按开机 键
设 置 语 言
3.2按电源键开机后屏幕 显示
AK M205B
皇 3.3按向下键选择第三项 冠 Simplified Chinese (简体中文)
设 置 3.4按“OK”键 语 言
AK M205B
皇 变成中文显示)如图,再按 冠 OK键
3.5按OK键后屏幕显示(已
4.2把光盘放到电脑光驱
AK M205B
Hale Waihona Puke 皇 4.3鼠标左键单击“开始 冠 设置”
装 驱 4.4单击“下一步”,直到 动 出现“开始安装”
AK M205B
皇 冠 4.5点击“开始安装”
调 整 4.6点击“安装” 墨 盒
广州AK皇冠数码科技
Thank you for watching! I will be vey pleased to help.
3.6此过程略长,请耐心 调 等待勿动机器。至屏幕显 整 示 墨 盒 表示机器可用
装驱动:部分电脑不会自动 AK M205B
读取驱动,需要打开“我的电 脑” 双击驱动程序才会出现如 皇 冠 图4.3的窗口。装驱动时注意 有的杀毒软件会拦截驱动动程 序,暂时关闭杀毒软件或允许 程序运行
富士施乐 5540 多功能机 使用手册(Mac)说明书

请确保在使用机器之前阅读本说明书。
阅读完本说明书之后,请妥善保管。
© 2017 Xerox Corporation.版權所有。
Xerox®、Xerox and Design®是 Xerox Corporation 在美國和/或其他國家/地區的註冊商標,並且經 Xerox Corporation 的授權使用。
Visioneer 是 Xerox®的商標使用人。
Content © 2017 Visioneer, Inc. 版權所有。
Visioneer 品牌名稱和 OneT ouch®標誌是 Visioneer, Inc.的註冊商標。
除非著作權法允許,否則若未事先獲得書面許可,禁止重製、採用或轉跡。
宣稱的著作權保護包括法規或司法目前允許,或此後授與之可申請著作權的所有形式的資料和資訊,包括但不限於螢幕上顯示的軟體程式所產生的資料,例如樣式、範本、圖示、螢幕畫面、外觀等。
請移至,選取您的產品,然後按一下 [保固方案] 連結,檢視您掃描器的保固條款與條件。
文件版本:05-0941-200 (2017 年 12月)Mac®和 Mac OS®是 Apple, Inc. 在美國和/或其他國家/地區的註冊商標。
Adobe®、Adobe® Acrobat®、Adobe® Reader®和 Adobe® PDF 標誌是 Adobe Systems Incorporated 在美國和/或其他國家/地區的註冊商標。
Post-It®是 3M 在美國和/或其他國家/地區的註冊商標。
Kensington®是 ACCO Brands Corporation 在美國和/或其他國家/地區的註冊商標。
TWAIN™是 TWAIN Working Group在美國和/或其他國家/地區的註冊商標。
得力 M201CR彩色数码多功能复合机入门指南 说明书

M201CR快速设置第 8 页快速操作第 11 页使用说明书在使用本产品之前,请务必先仔细阅读本使用说明书。
请务必保留备用。
请在充分理解内容的基础上,正确使用。
操作本产品前,请阅读“重要安全指示”(⇒第 2 页)。
阅读完本指南后,请将其存放在安全的地方,以备将来参考。
本文档中的信息可能会有所变更,敬请留意。
重要安全指示本章介绍相关重要安全指示,预防对本机用户和他人造成伤害并防止造成财产损失。
请在使用本机前阅读本章节,然后按照说明正确使用本机。
请勿实施本手册中未提及的任何操作。
在法律允许的范围内,得力对于因本说明书中未说明的操作、使用不当或者非得力或非得力授权的第三方所进行的维修或改装而导致的任何间接的、偶然的或其他形式的损失(包括但不限于商业利润损失、业务中断或商业信息丢失)不承担责任。
对本机的不当操作或使用可能会造成人身伤害和/或不在“有限保修”范围内的需要大规模维修的机器损坏。
安装若要安全舒适地使用本机,请仔细阅读以下注意事项并将本机安装在适当的位置。
警告请勿安装在可能会造成火灾或触电的位置• 通风槽被堵塞的位置(过于靠近墙壁、床、沙发、地毯或类似物体)• 潮湿或多尘的位置• 会受到阳光直射的位置或室外• 会受到高温影响的位置• 会受到明火影响的位置• 酒精、油漆稀释剂或其他易燃物附近其他警告• 请勿将未经许可的电缆连接到本机,否则可能会导致火灾或触电。
• 请勿将项链和其他金属物或装满液体的容器放在本机上。
如果异物与本机内部的电气部件接触,可能会导致火灾或触电。
请将电源线插头插入专用电源插座,并在本机和其他电子设备之间保持尽可能大的空间。
请勿将本机安装在低热阻材料制成的薄板或类似物体上。
本机内置一个纸盒加热器,通电后主机底部会发热。
因此,在将本机安装在桌面上时,若未安装选购纸盒,请尽量避免在本机和桌面之间使用耐热性差的薄板或垫子,如乙烯基塑料桌垫。
使用无线 LAN 时• 请将本机安装于距离无线 LAN 路由器 50 米及以内处。
施乐420培训手册
THE DOCUMENT COMPANYXEROXWorkCentre Pro 420October , 2002上海富士施乐复印机有限公司客户服务部资料准备:上海富士施乐复印机有限公司客户支援部上海闵行开发区南谷路46号电话:(021)64300480***XEROX DocuLock Protect Until FOREVER***X和此处产品名称和数字是XEROX CORPORAFION的注册商标,其他的公司注册商标同样被公认。
注意当本手册准备工作中的每项保养均已被进行时,FXSL不承担任何错误或疏忽而产生的责任。
注意所有提供给FXSL外部客户的维修文件仅用于介绍信息用途。
FSXL维修文件只应由经过产品培训的合格人员使用。
FSXL不担保或申明这类文件是完整的,也不担保或表示向这些客户提供该文件的任何修订本。
客户对设备或设备的模块,部件或零件进行维修可能影响FSXL对该设备提供的保修。
你应研究有关客户或第三方提供的服务的保修条款。
如果客户因此维修该设备,模块,部件或零件,客户将有此解除了FSXL应承担的任何和所有责任,并同意赔偿,保护和保持FSXL不受因此类维修造成的第三方直接或间接的索赔要求。
警告本设备产生,利用并会辐射射电频率能量,如果不按照说明和文件安装和使用设备,则可能对无线电通讯产生干扰。
经检测,它符合FCC系列15章节1小节对A级数字装置的限制,在商业环境中运行时能提供适当的干扰保护,本设备在居住区运行很可能造成干扰,用户需自费排除干扰。
警告本机含有不可见激光,激光束出现时没有可见的指标。
维修期间,由于不可见激光,机器为了3B级产品。
如果直视激光,可能造成眼睛受伤,必需严格遵守维修程序,不得有改动,维修机器时维修代表必须观察该处的激光安全注意事项不要将具有反射表面的工具放入ROS开口中。
在电源接通激光被激励的情况下,不要注视ROS窗口区域。
第1章主电源子系统概述 (4)组功能详解 (4)1.1主电源发生电路 (4)1.2机器联锁 (6)1.3机器冷却 (8)第2章模式选择子系统概述 (9)组功能详解 (9)2.1模式选择 (9)第3章PC/网络接口子系统概述 (12)组功能详解 (12)3.1PC/网络接口 (12)第4章主驱动子系统概述 (14)组功能详解 (14)4.1主驱动 (14)第5章自动输稿器(ADF)子系统概述 (16)组功能详解 (16)5.1原稿输入部分 (16)5.2原稿输出部分........................................................................175.3副本出口部分 (17)第6章光学子系统概述 (18)组功能详解 (18)6.1扫描电机控制 (18)6.2曝光控制 (19)6.3激光控制 (20)第7章供纸子系统概述 (22)组功能详解 (22)7.1纸盘1供纸和7.2纸盘2供纸 (22)第8章纸张输送子系统概述 (25)组功能详解 (25)8.1纸盘1纸张输送和8.2纸盘2纸张输送 (25)8.3旁路纸盘纸张输送 (26)8.4 纸张定位 (27)第9章静电复印子系统概述 (29)组功能详解 (29)9.1鼓架 (29)9.2色粉传感 (31)9.3消电灯 (31)第10章定影子系统概述 (33)组功能详解 (33)10.1定影器温度控制 (33)10.2定影出口 (34)10.3 输出盘 (34)第1章主电源子系统概述主电源子系统的作用是:l提供AC和DC操作电压l监控联锁l提供冷却空气主电源子系统由以下组功能组成:l 1.1主电源发生电路l 1.2机器联锁l 1.3机器冷却组功能详解1.1主电源发生电路主电源发生电路执行以下功能:l向定影模块中的加热棒提供ACH和CANl产生并向机内各部件提供DC工作电压和DC COM。
富士施乐复印机多功能一体机使用手册说明书
使用手冊- 適用於單機操作 -目錄重要的安全說明 (5)保護您的個人資料 (7)控制面板的說明 (8)使用液晶面板 (10)調整控制面板角度 (12)省電功能 (12)當關閉電源時 (13)電源故障後自動重新開機 (14)處理紙張和原稿選擇紙張 (16)放入紙張 (17)記憶卡的使用方法 (19)插入記憶卡 (19)移除記憶卡 (19)放置原稿 (21)自動進紙器 (ADF) (21)工作平台 (23)複印模式複印文件 (26)複製 / 修復相片 (28)複印模式選單清單 (31)相片模式列印相片 (34)使用各種版面配置列印 (36)列印格線紙 (38)列印相片賀卡 (40)從外部 USB 裝置進行列印 (43)備份資料至外部儲存裝置 (44)相片模式選單清單 (45)傳真模式連接電話線 (48)使用傳真專用的電話線路 (48)與電話裝置共用電話線路 (48)檢查傳真連線 (50)設定傳真功能 (51)設定快速撥號項目 (51)設定群組撥號項目 (52)建立標題資訊 (54)傳送傳真 (56)輸入或重撥傳真號碼 (56)使用快速撥號 / 群組撥號 (57)依次撥號發送 (58)在指定時間發送傳真 (60)透過連接的電話機發送傳真 (62)接收傳真 (63)自動接收傳真 (63)手動接收傳真 (65)輪詢接收傳真 (66)列印報告 (67)透過電腦發送傳真 (68)傳真模式選單清單 (69)掃描模式掃描至記憶卡 (72)掃描至電腦 (74)掃描模式選單清單 (75)設定模式 (維護)檢查墨水卡匣存量 (78)檢查和清潔印字頭 (79)校正印字頭 (81)設定 / 更改時間和區域 (83)透過數位相機列印 (85)設定選單清單 (87)解決方法錯誤訊息 (90)更換墨水卡匣 (91)清除夾紙 (94)夾紙 - 印表機內部 (1) (94)夾紙 - 印表機內部 (2) (98)夾紙 - 自動進紙器 (ADF) (99)夾紙 - 印表機內部 (3) (100)無法拉出紙匣 (103)列印品質 / 版面的問題 (105)傳真問題 (106)附錄 (107)2關於這本使用手冊當閱讀操作說明時,請遵守這些指導方針:w c Q R&警告:請務必小心遵守,以免身體受傷。
上海施乐客户服务部 THE DOCUMENT COMPANY XEROX 学生手册
THE DOCUMENT COMPANYXEROXWorkCentre Pro 320/315学生手册April, 2001上海施乐客户服务部WorkCentre Pro 320/315学生手册Mar. 20011第1章 介绍欢迎进入WorkCentre Pro 320/315维修培训教程,该教程用于:l 解释培训教程l提供充足的知识以使你能维修WorkCentre Pro 320/315主要目标主要目标是:l 在培训期间识别,诊断和修理机器,执行所需的全部管理工作。
l 在安装的同时使客户了解机器。
本章目标本章将提供:l 培训包内容综述l 学生手册综述l 各章要点l 培训策略综述l 教程规则l培训包内容除WorkCentre Pro 320/315机器,PC 和工具之外,你的培训包提供你成功完成教程所需的全部资源,内容有:l 学生手册l 用户操作手册l 维修手册l 机器安装程序(维修手册第九节)l操作原理学员必需具备的条件假设l你具有维修WorkCentre Pro 320/315机器和执行Xerox 维修政策所需的技能和知识。
l 你已成功通过新雇员培训l 你已成功通过必要的先行培训l 你已成功通过激光安全培训或先前已通过激光产品考核l你已具备诊断和维修机器故障时运用维修文件和基本工具所需的知识学生手册描述学生手册向你提供:l 你必须达到的目标l 产品知识l 了解机器配置l 机器操作方法l 了解维修策略学生手册由下列章组成:l 第1章——介绍——回顾培训教程l 第2章——熟悉机器——复习用户操作手册,机器功能l 第3章——部件拆卸——复习维修手册和机器内部部件l 第4章——岗位培训要求——教你执行所有必要的操作以及如何与客户交流WorkCentre Pro 320/315学生手册Mar. 20012培训策略本培训教程属自我调整型,从第1章至第4章依次进行。
培训包,工具,机器,PC ,用户操作手册和教员是成功完成维修培训所必备的资源。
施乐高端彩色多功能一体机PDL参考指南说明书

June 13, 2017PDL Reference Guide for Xerox® AltaLink® Products Customer Tip©2017 Xerox Corporation. All rights reserved. Xerox®, Xerox and Design®, CentreWare® and AltaLink® are trademarks of Xerox Corporation in the United States and/or other countries. BR8133Other company trademarks are also acknowledged.Document Version: 1.0 (June 2017).Table of ContentsAccessing Extended Features (4)Overview (4)Using this Guide (4)Feature Listing (4)Comment Commands (5)PJL SET Commands (5)PCL Commands (5)PS Commands (5)Reference Topics (6)General Commands (6)Media Commands (7)PCL5 Command Tray Mapping Tool (8)Formatting Commands (11)Finishing Commands (11)Print Job Accounting Commands (13)PJL/PCL Dependencies/Caveats (14)DSC/PS Dependencies/Caveats (15)Examples (16)Basic PCL/PJL Template (16)Sample PJL Headers (17)Basic PostScript/DSC Template (18)Additional Information (19)Accessing Extended FeaturesOverviewThis document describes how to access the extended features of the Xerox® AltaLink® Products for environments that do not have a custom driver.Some of the commands & syntax used in this document requires familiarity with PostScript (PS) or Printer Command Language (PCL).This document provides the Printer Description Language (PDL) commands and syntax for each feature. The following tables are also included:Features supported by the AltaLink ProductsCommands to use in a PCL print jobCommands to use in a PS print jobThe information contained in this document is not intended as a PS or PCL reference manual, but a guide for using the extended features in PS, PCL or ASCII print jobs.Using this GuideRefer to the Feature List for the feature you would like to implement. Select the page number to jump to that page.Follow the syntax listed for the command required. Read the “Dependencies/Caveats” section for additional information.Feature ListingPCL and ASCII print jobs can use PJL commands or PCL commands to access the attributes of the printer. PostScript print jobs can use Document Structuring Commands (DSC) or PS commands. If there is more than one method listed to access a specific feature, determine the best method for your application and use that method. In this document, both PJL COMMENT and DSC are referred to as Comment commands.Comment CommandsTo process all PJL COMMENT commands and DSC, enclose them with XRXBegin and XRXEnd commands.Example for a PCL or ASCII print job:@PJL COMMENT XRXbegin@PJL COMMENT OID_ATT_START_SHEET OID_VAL_JOB_SHEET_NONE;@PJL COMMENT XRXendExample PS print job:%%XRXbegin%%OID_ATT_START_SHEET OID_VAL_JOB_SHEET_NONE;%%XRXendThe first parameter of the command is an attribute followed by a value.Comment commands must end with a semicolon except for the XRXbegin and XRXend commands.A comment command not enclosed by XRXbegin and XRXend is not a Xerox specific command and is treated as a real comment with no functional attachment to its contents.PJL SET CommandsPJL SET commands are available for some features. If you choose to use these commands, do not enclose them with the XRXBegin and XRXEnd commands. PJL SET commands do not require a semicolon at the end of the command line.PCL CommandsPCL commands are available for some features. If you choose to use these commands do not enclose them with the XRXBegin and XRXEnd commands. Refer to a PCL reference manual for more specific information regarding PCL commands.PS CommandsPS commands are available for some features. If you choose to use these commands, do not enclose them with the XRXBegin and XRXEnd commands. Refer to a PS reference manual for more specific information regarding PS commands.Reference TopicsWhen interpreter receives XRXBegin it begins to parse PJL COMMENT commands checking for Xerox-specific commands until it receives the command to stop parsing.PJL COMMENT Command DSC Comment Command@PJL COMMENT XRXbegin %%XRXbeginWhen the interpreter receives this command it stops parsing PJL COMMENT commands.PJL COMMENT Command DSC Comment Command@PJL COMMENT XRXend %%XRXendGeneral CommandsUse the following commands to specify the number of copies or collated sets of a document.Language CollatedPS<</NumCopies int/Collate true >> setpagedevice<</NumCopies int/Collate true >> setpagedevicePJL @PJL SET QTY=intPCL5 No PCL5 command available, use PJLLanguage UncollatedPS<</NumCopies int /Collate false >> setpagedevicePJL @PJL SET COPIES =intPCL5 <Esc>&l#XPDL No PCL5 command available, use PJLThis command turns on/off the banner sheet that prints at the beginning of every job. It only applies to the job that contains the command; it does not affect any other jobs. If the device is configured to disable banner sheets, this command is ignored.PJL COMMENT Command@PJL COMMENT OID_ATT_START_SHEET OID_VAL_JOB_SHEET_”string”;DSC Command%%OID_ATT_START_SHEET OID_VAL_JOB_SHEET_”string”;Where string is:NONE Do not create a banner sheet for this job.FULL Create a banner sheet for this job. By default, if the START SHEET comment is not included a banner sheet is generated unless the device has banner sheet disabled.USER A custom start sheet is included in this job.Media CommandsThis command specifies the tray to supply the job’s media.PS <</MediaPosition int >> setpagedevicewhere int is from the table below.PCL5 <Esc>&l#Hwhere # is from the table below.PCL6 ubyte ## attr_ubyte MediaSourceTray 1 example: 0xc0 0x04 0xf8 0x26where ## is the hex number assigned to each selection.Tray PS int PCL5 # PCL6Auto select null 7 0x011 1 4, 2, 3, or 6 0x042 2 1 0x053 3 5 or 23 0x074 4 8 or 24 0x085 5 21 0x0A6 6 22 0x09PCL5 Command Tray Mapping ToolA user with Administrator access rights to the device has the opportunity to change the PCL5 command used to identify a specific paper tray.A user can do this by opening Xerox® CentreWare® Internet Services by entering the printer’s IP address in their favorite Web browser.To get to the PCL Tray Mapping page select the Properties tab → Services → Printing → Page Description Languages → PCL → Tray Mapping. Once there the user is able to select which listed command will be used for a paper tray.Note:C hanging the device’s default mapping may cause issues when trying to select a paper tray with the PCL 5 driver.This command specifies the size of media on which to print the job.Note: some sizes may not apply to every printer model.PCL5<Esc> &l#AWhere # is the number from the table below.PS<</PageSize [width height] /CustomPageSize false >> setpagedeviceWhere width and height [w h] are the numbers from the table below.PCL6Defined Paper Sizeubyte_array ubyte ## string attr_ubyte MediaSizeexample: 0xc8 0xc0 ## string0xf8 0x25where ## string is from the table below.Media Sizes PCL5 # PCL6PS [w h] Points## String2 0x06 LETTER [612 792] Letter8.5 x 11”(216 x 279 mm)3 0x05 LEGAL [612 1008] Legal8.5 x 14”(216 x 356 mm)6 0x06 LEDGER [792 1224] Tabloid/Ledger(304 x 482 mm)A327 0x02 A3 [842 1191] (297 x 420 mm)26 0x02 A4 [595 842]A4(210 x 297 mm)B6 JIS44 0x06 JIS B6 [363 516] (128 x 182 mm)1 0x04 EXEC [522 756] Executive7.25 x 10.5”(184 x 266 mm)Postcard 6 x 9”160 0x06 na-6x9 [432 648] (152 x 228 mm)71 0x05 JPOST [284 420] Postcard Hagaki(100 x 148 mm)Postcard Oufuku Hagaki Dbl72 0x06 JPOSTD [420 566] (148 x 200 mm)Note: For additional Media sizes please consult your Xerox Local Support CenterThis command specifies the custom media size on which to print the job. Insert a media size command within the PCL portion of the print job. PS<</PageSize [width height ] /CustomPageSize true >> setpagedevicewhere [width height] is the physical dimension of the paper at 72 points/inch (PS points)PCL5[Esc]&f ####I ← for the width [Esc]&f ####J ← for the length [Esc]&l101Awhere #### is the physical dimension of the paper at 720 points/inch (decipoints).PCL6uint16_xy x y attr_ubyte CustomMediaSize ubyte eTenthsOfAMillimeter attr_ubyte CustomMediaSizeUnits ISO B6 example : 0xd1 0xe2 0x04 0xe0 0x06 0xf8 0x2f 0xc0 0x02 0xf8 0x30where x i s the width (1/10mm) in hex (lsb, msb) and y is the length (1/10mm) in hex (lsb, msb)Envelope Sizes PCL5 # PCL6 ## StringPS [w h] Points #9 ½ Booklet 9 x 12”(228 x 304 mm) 1800x10 na-9x12-envelope[648 864]#104.125” x 9.5” 81 0x05 COM10[297 684] C4(229 x 324 mm) 171 0x12 iso-c4-envelope-c4 [649 918] C5(162 x 229 mm) 91 0x02 C5 [459 649] DL(110 x 220mm) 90 0x02 DL [312 624] Monarch 3.875” x 7.5”800x07 MONARCH[279 540]Media types are used to distinguish the type of media a job requires. PS <</MediaType (string ) >> setpagedevice PCL5 <Esc>&n #Wd stringwhere # is the length of string+1, and string from the table below PCL6ubyte_array uint16 ## ## string attr_ubyte MediaType Example : 0xc8 0xc1 0x0C 0x00 transparency 0xf8 0x27where ## ## is the length of the string in hex (lsb, msb), and string from the table below.PS (string) value PCL5 examples PCL6 Hexadecimal and String cardstock <Esc>&n 10Wd cardstock 0x09 0x00 cardstock envelope <Esc>&n 9Wd envelope 0x08 0x00 envelope Labels <Esc>&n 7Wd labels 0x06 0x00 labels Letterhead<Esc>&n 11Wd letterheadFormatting CommandsThe values indicate the feed edge to use. Feeds paper so that Leading Edge of paper is the shorter side.PJL COMMENT Command String DSC Comment Command String@PJL COMMENT OID_ATT_FEED_EDGE %% OID_ATT_FEED_EDGEWhere string is:OID_VAL_FEED_EDGE_SHORT_LEADINGOID_VAL_FEED_EDGE_SHORT_TRAILINGOID_VAL_FEED_EDGE_LONG_LEADINGOID_VAL_FEED_EDGE_LONG_TRAILINGPS<< /Leading Edge int>> setpagedevicenull= use default orientation for specified /PageSize to select which edge is the top of the page.0 = Short edge, leading edge is the top of the page.2 = Short edge, trailing edge is the top of the page.This command specifies if a job is to print on one side or both sides of the sheet. Choose one of the methods below for indicating this feature.Simplex/Duplex PS PCL5 PJLone-sided << /Duplex false /Tumble false >>setpagedevice<Esc>&l0S@PJL SET DUPLEX=OFFtwo-sided long-edge << /Duplex true /Tumble false >>setpagedevice <Esc>&l1S@PJL SET DUPLEX= ON@PJL SET BINDING= LONGEDGEtwo-sided short-edge << /Duplex true /Tumble true >>setpagedevice <Esc>&l2S@PJL SET DUPLEX= ON@PJL SET BINDING= SHORTEDGEFinishing CommandsThis feature provides a physical offset of hard copy that distinguishes between sets or stacks within a job.PJL PS@PJL SET JOBOFFSET=string<< /Jog int>> setpagedeviceWhere string is ON or OFF Where int is: 0 = no offset, 3 = offset each setPDL Reference Guide for Xerox® AltaLink® Products 11Indicates the output bin where the print job is sent.Note: Some output options may not be available on every product modelOutput Tray PS PJL Comment CommandSimple Catch Tray Offset Catch Tray << /OutputType (MiddleTray) >> setpagedevice @PJL COMMENTOID_ATT_OUTPUT_BINSOID_VAL_OUTPUT_BIN_MIDDLE;Top output tray of finisher << /OutputType (TopTray) >> setpagedevice @PJL COMMENTOID_ATT_OUTPUT_BINSOID_VAL_OUTPUT_BIN_TOP;Finisher stacker tray << /OutPutType (Stacker) >> setpagedevice @PJL COMMENTOID_ATT_OUTPUT_BINSOID_VAL_OUTPUT_BIN_STACKER;PDL Reference Guide for Xerox® AltaLink® ProductsThis command indicates hole punches for a print job on a device with hole punch capability.Note: Some hole punch options may not be available on every product model.PJL COMMENT Command DSC Comment Command@PJL COMMENT OID_ATT_PUNCH int; %%OID_ATT_PUNCH int;Where int is:0 = Punch Off1 = Punch On,2 = Use 2 Hole Punch3 = Use 3 Hole Punch,4 = Use 4 Hole PunchNote: int 1 will be emitted to invoke the default punch setting on the device.PS<< /Punch int1 /PunchDetails << /Type 6 /NumHoles int2 >> >> setpagedeviceWhere int1is:0 = Punch Off4 = Punch On (after each showpage or copy page operation)Where int2is:0 = Punch Off,1 = Punch On,2 = 2 Hole Punch,3 = 3 Hole Punch,4 = 4 Hole PunchNote:Setting NumHoles to 1 causes a punch with the default number of holes.Print Job Accounting CommandsAllows User ID data to be sent with job for the purposes of Job-based accounting.PJL COMMENT Command@PJL COMMENT OID_ATT_ACCOUNTING_INFORMATION_AVP “XRX_USERID,xxxx”;Where xxxx is actual User ID entered by user.DSC Comment Command%%OID_ATT_ACCOUNTING_INFORMATION_AVP “XRX_USERID,xxxx”;Where xxxx is actual User ID entered by user.Allows Account ID data to be sent with job for the purposes of Job-based accounting.PJL COMMENT Command@PJL COMMENT OID_ATT_ACCOUNTING_INFORMATION_AVP “XRX_ACCTID,yyyy”;Where yyyy is actual Account ID entered by user.DSC Comment Command%%OID_ATT_ACCOUNTING_INFORMATION_AVP “XRX_ACCTID,yyyy”;Where yyyy is actual Account ID entered by user.PDL Reference Guide for Xerox® AltaLink® Products 13This PJL command sends the users pin number for use by devices that support the Internal Auditron or Xerox®Standard Accounting (XSA). You must provide at least a valid USERID. You may also provide a GENERAL Account number or GROUP Account number if required.PJL COMMENT Command@PJL COMMENT OID_ATT_ACCOUNTING_INFORMATION_AVP "XRX_USERID,xxxx";@PJL COMMENT OID_ATT_ACCOUNTING_INFORMATION_AVP "XRX_GENERALACCT,yyyy";@PJL COMMENT OID_ATT_ACCOUNTING_INFORMATION_AVP "XRX_GROUPACCT,zzzz";Where xxxx is a valid USER Pin number.Where yyyy is a valid GENERAL Account number.Where zzzz is a valid GROUP Account number.DSC Comment Command%%OID_ATT_ACCOUNTING_INFORMATION_AVP "XRX_USERID,xxxx";%%OID_ATT_ACCOUNTING_INFORMATION_AVP "XRX_GENERALACCT,yyyy";%%OID_ATT_ACCOUNTING_INFORMATION_AVP "XRX_GROUPACCT,zzzz";Where xxxx is a valid USER Pin number.Where yyyy is a valid GENERAL Account number.Where zzzz is a valid GROUP Account number.PJL/PCL Dependencies/Caveats• Locate all PJL commands in the beginning of the file before the image data starts (PS or PCL).• To combine printer escape commands (not including PJL commands):– The first two characters after the <esc> must be the same.– All alpha characters must be lowercase, except the final terminating character.– The commands are read left to right. Combine them in the order you wish them executed.– For example, print 5 copies (<ESC>&l5X) and use letter size (<ESC>&l2A) is combined as: <ESC>&l5x2A• In case of duplicate commands, the last one requested takes precedence.• The PJL SET COPIES command takes precedence over the PCL command (<Esc>&l#X) to determine number of copies. In general, PJL commands takes precedence over PCLcommands.• Printing jobs with odd number of pages & duplex front and back imaged covers, the printer always prints on both sides of the front and back covers. Remaining pages are printed on thedocument body media type & color with a blank page inserted to allow an image on bothsides of the back cover.• When using the Blank Front or the Blank Front & Back Cover command, the Cover Media Size command is optional. If the cover size command is not in the PDL, the printer assumes thecover media size is the same as the document body.PDL Reference Guide for Xerox® AltaLink® Products• Use one of the following methods to specify media selection:– Describe the media attributes with size, color, and type to allow the device to select the matching source tray. If this media description method is used, leave the tray sourcecommand out of the job, or set to Auto. If not, the tray source command takesprecedence over the tray selection capabilities of the device.– Indicate the tray source for the job. If the tray source command is used, the system automatically defaults paper type to the defined SYSTEM DEFAULT unless specifiedotherwise. This prevents inadvertent use of special paper types. To override, include apaper type specification of UNSPECIFIED in the job.DSC/PS Dependencies/Caveats• All %% commands (DSC comments) must be in the first 64KB of the job.• WorkCentre and ColorQube devices support PostScript resolutions up to and including 1800 x 1800. Some PostScript jobs may not print if the high resolution is indicated. If this occurs,print the same job at a lower resolution.• The following media sizes do not print duplex and do not support staple commands: A6, B6,5 x 7" Postcard (4.5 x 6"), envelopes and any custom sized media where the page width isless than 5.5". A request to duplex or staple these media sizes is ignored.• Jobs that indicate Transparencies, Labels, Envelopes or Tab-Stock do not support duplex commands. The duplex print request is ignored when any of these media types are used.• When printing an odd number of pages in a document with duplex front and back imaged covers, the printer always prints on both sides of the front and back covers. The remainingpages print on the document body media type and color with a blank page inserted to allowan image on both sides of the back cover.• When using the Blank Front or the Blank Front and Back Cover command, the Cover Media Size command is optional. If the Cover Media Size command is not in the PDL, the printerassumes the cover media size as that of the document body.• Use one of the following methods to specify media selection (where applicable):– Describe the media attributes with size, color, and type to allow the device to select the matching source tray. If this media description method is used, leave the tray sourcecommand out of the job, or set to Auto. If not, the tray source command takesprecedence over the tray selection capabilities of the device.– Indicate the tray source for the job. If the tray source command is used, the system automatically defaults paper type to the defined SYSTEM DEFAULT unless specifiedotherwise. This prevents inadvertent use of special paper types. To override, include apaper type specification of UNSPECIFIED in the job.PDL Reference Guide for Xerox® AltaLink® Products 15ExamplesBasic PCL/PJL TemplateThis section illustrates a standard PCL template example that is used to access general print features. This example lists each feature and the syntax, both PCL commands and PJL, required to use these features.Note:T his section is only an example that may include features & commands that do not exist on all products.This print job specifies the following items: Job owner; Job name; 11 x 17 paper size; Heavyweight, Green paper, 1 staple, draft mode.Section 1 (Opening Command, Required for all files)<Esc>%-12345XSection 2 (PJL Set Commands)@PJL SET RESOLUTION=600@PJL SET COPIES=1@PJL SET DENSITY=4@PJL SET JOBOFFSET=ONSection 3 (XRXbegin – Opening Comment Statement, Required)@PJL COMMENT XRXbeginSection 4 (PJL Comments)@PJL COMMENT OID_ATT_JOB_NAME "Readme.txt"; (Quotation marks are required)@PJL COMMENT OID_ATT_START_SHEET OID_VAL_JOB_SHEET_NONE;@PJL COMMENT OID_ATT_JOB_OWNER "John Smith"; (Quotation marks are required)@PJL COMMENT OID_ATT_JOB_TYPE OID_VAL_JOB_TYPE_PRINT;@PJL COMMENT OID_ATT_DEFAULT_MEDIUM_TYPE "Cardstock";@PJL COMMENT OID_ATT_DEFAULT_MEDIUM_COLOUR "Green";@PJL COMMENT OID_ATT_PRINT_QUALITY OID_VAL_PRINT_QUALITY_DRAFT;@PJL COMMENT OID_ATT_FINISHING OID_VAL_FINISHING_STAPLE;@PJL COMMENT XRXSTAPLE=PORTRAIT;Section 5 (XRXend - Closing Statement for Comment Section, Required)@PJL COMMENT XRXendSection 6 (PCL Code used to invoke PCL Language)@PJL ENTER LANGUAGE=PCLSection 7 (PCL Data Stream or ASCII Document inserted here for Options such as Selecting Different Fonts, Simplex, Duplex, etc.)[Document or Text to print inserted here]PDL Reference Guide for Xerox® AltaLink® ProductsSection 8 (Closing Command, Required at end of Document)<Esc>%-12345XSample PJL HeadersNote: This section is only an example that may include features and commands that do not exist for every product model.Example 1 Header for Simple Print<Esc>%-12345X@PJL SET COPIES= 1@PJL COMMENT XRXbegin@PJL COMMENT OID_ATT_JOB_OWNER “John Smith”;@PJL COMMENT OID_ATT_JOB_NAME “Print Job”;@PJL COMMENT XRXend@PJL ENTER LANGUAGE=PCL[Insert PCL document or text to be printed here]<Esc>%-12345XExample 2 Header for Proof PrintThis is a proof print job header that requests 6 copies<Esc>%-12345X@PJL SET COPIES= 6@PJL COMMENT XRXbegin@PJL COMMENT OID_ATT_JOB_TYPE OID_VAL_JOB_TYPE_ PROOF_PRINT@PJL COMMENT XRXend@PJL ENTER LANGUAGE=PCL[Insert PCL document or text to print here]<Esc>%-12345XExample 3 Header for Finishing OptionsThis is a proof print job header requesting the staple option. You must send the job to the stackerusing the native PCL command.<Esc>%-12345X@PJL COMMENT XRXbegin@PJL COMMENT OID_ATT_JOB_OWNER “John Smith”@PJL COMMENT OID_ATT_JOB_TYPE OID_VAL_JOB_TYPE_PROOF_PRINT;@PJL COMMENT OID_ATT_FINISHING OID_VAL_FINISHING_STAPLE;@PJL COMMENT XRXSTAPLE=PORTRAIT;@PJL COMMENT XRXend@PJL ENTER LANGUAGE=PCL<Esc>&l2G[Insert PCL document or text to print here]<Esc>%-12345X*** Some Products will need to only select the Stapler, the stacker will be automatically added.PDL Reference Guide for Xerox® AltaLink® Products 17Basic PostScript/DSC TemplateThis section is an example of a standard PostScript template that is used to access general print features. This template lists each feature and the syntax, both Postscript commands and DSC (Document Structuring Conventions) required.Note:T his section is only an example that may include features and commands that do not exist for every product model.This example print job specifies the following items; Job owner; Job name; 11 x 17 paper size; Drilled; Ivory paper; 1200 x 1200 resolution; Staple off; Landscape; Sample set; Draft mode; Offset off; Banner sheet off; Duplex long edge; One copySection 1 (Adobe Reference Command)%!PSSection 2 (XRXbegin - Opening Comment Statement, Required)%%XRXbeginSection 3 (OID Commands)%%OID_ATT_JOB_OWNER "John Smith"; (Quotation marks are required)%%OID_ATT_JOB_TYPE OID_VAL_JOB_TYPE_PRINT;%%OID_ATT_START_SHEET OID_VAL_JOB_SHEET_NONE;%%OID_ATT_JOB_NAME "Readme.txt"; (Quotation marks are required)%%OID_ATT_PRINT_QUALITY OID_VAL_PRINT_QUALITY_DRAFT;Section 4 (XRXend - Closing statement for Comment Section, Required)%%XRXendSection 5 (Options Such as Selecting Different Fonts, Simplex, Duplex, etc.)<< /PostRenderingEnhance false >> setpagedevice<< /Staple 0 >> setpagedevice<< /Jog 0 >> setpagedevice<< /ManualFeed false >> setpagedevice<< /MediaType (Drilled) >> setpagedevice<< /MediaColor (Ivory) >> setpagedevice<< /DeviceRenderingInfo << /Type 4 /ValuesPerColorComponent 2 >> >> setpagedevice<< /PageSize [792 1224] >> setpagedevice<< /Duplex true /Tumble false >> setpagedevice<< /Collate false >> setpagedeviceSection 6 (Postscript Data Stream Inserted Here)[Postscript]Section 6 (Postscript Data Stream Inserted Here)%%EOFPDL Reference Guide for Xerox® AltaLink® ProductsExample 1 Header for Simple Print0%!PS%%XRXbegin%%OID_ATT_JOB_OWNER “John Smith”;%%OID_ATT_JOB_NAME “Print Job”;%%OID_ATT_COPY_COUNT 1;%%XRXendExample 2 Header for Proof Print%!PS%%XRXbegin%%OID_ATT_JOB_TYPE OID_VAL_JOB_TYPE_PROOF_PRINT;%%OID_ATT_COPY_COUNT 6;%%XRXendExample 3 Header for Finishing OptionsThis job header specifies the following items: 10 copies; Duplex; Collated; Staples; Sent to themain tray; Job name; Bold image qualityNote: To use the staple and collate features, you must send the output to the stacker%!PS%%XRXbegin%%OID_ATT_JOB_OWNER “John Smith”;%%XRXend<< /PageSize [612 792] >> setpagedevice<< /OutputType (MainTray) >> setpagedevice<< /Staple 3 >> setpagedevice<< /Duplex true /Tumble false >> setpagedevice<< /PostRenderingEnhance true >> setpagedevice<< /Collate true >> setpagedevice<< /NumCopies 10 >> setpagedeviceAdditional InformationYou can reach Xerox Customer Support at or by calling Xerox Support inyour country.Xerox Customer Support welcomes feedback on all documentation - send feedback via e-mail to:*******************************.Other Tips about Xerox multifunction devices are available at the following URL:/support/dctips/dctips.html.PDL Reference Guide for Xerox® AltaLink® Products 19。
富士施乐多功能一体机复印指南说明书
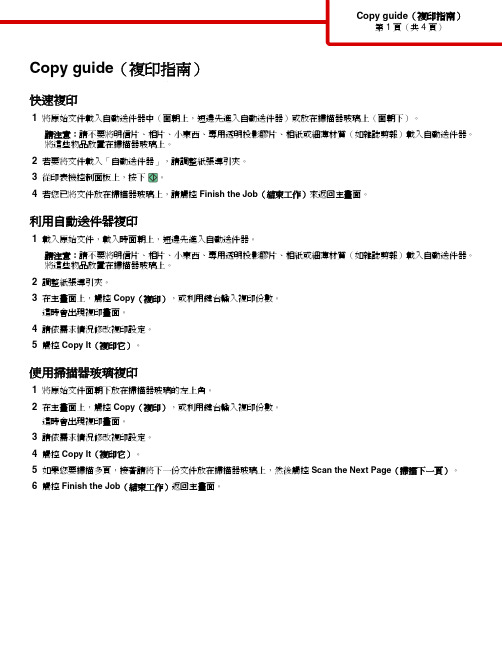
Copy guide(複印指南)快速複印1將原始文件載入自動送件器中(面朝上,短邊先進入自動送件器)或放在掃描器玻璃上(面朝下)。
請注意:請不要將明信片、相片、小東西、專用透明投影膠片、相紙或細薄材質(如雜誌剪報)載入自動送件器。
將這些物品放置在掃描器玻璃上。
2若要將文件載入「自動送件器」,請調整紙張導引夾。
3從印表機控制面板上,按下4若您已將文件放在掃描器玻璃上,請觸控Finish the Job(結束工作)來返回主畫面。
利用自動送件器複印1載入原始文件,載入時面朝上,短邊先進入自動送件器。
請注意:請不要將明信片、相片、小東西、專用透明投影膠片、相紙或細薄材質(如雜誌剪報)載入自動送件器。
將這些物品放置在掃描器玻璃上。
2調整紙張導引夾。
3在主畫面上,觸控Copy(複印),或利用鍵台輸入複印份數。
這時會出現複印畫面。
4請依需求情況修改複印設定。
5觸控Copy It(複印它)。
使用掃描器玻璃複印1將原始文件面朝下放在掃描器玻璃的左上角。
2在主畫面上,觸控Copy(複印),或利用鍵台輸入複印份數。
這時會出現複印畫面。
3請依需求情況修改複印設定。
4觸控Copy It(複印它)。
5如果您要掃描多頁,接著請將下一份文件放在掃描器玻璃上,然後觸控Scan the Next Page(掃描下一頁)。
6觸控Finish the Job(結束工作)返回主畫面。
暫停列印工作以製作複印文件若要暫停目前的列印工作,以製作複印文件:請注意:Job Interrupt(工作中斷)必須設定為 On(開),此功能才可以運作。
1將原始文件載入「自動送件器」中(面朝上,短邊先進入「自動送件器」),或放在掃描器玻璃面板上(面朝下)。
請注意:請不要將明信片、相片、小東西、專用透明投影膠片、相紙或細薄材質(如雜誌剪報)載入「自動送件器」。
將這些物件放在掃描器玻璃面板上。
2若要將文件載入「自動送件器」,請調整紙張導引夾。
3從印表機控制面板,按下4如果您要掃描多頁,接著請將下一份文件放在掃描器玻璃上,然後觸控Scan the Next Page(掃描下一頁)。
一体机使用技巧
一体机使用技巧为了适应快节奏的办公要求,许多企事业都购买了集传真、打印、复印、扫描等功能的多功能一体机。
多功能一体机购买回来后,用户都希望它能够用的时间更长一些,出的故障更少一点,而且花费在维修和耗材上的费用应该更少一点。
那么如何正确使用一体机呢?1、多用连续复印与普通打印机不一样的是,一体机在每次启动时,都需要进行重新预热,如果长期频繁启动一体机的话,就很容易会影响一体机内部光学器件的寿命。
为了避免这种频繁启动现象,我们应该尽可能地集中作业,把需要复印的材料都集中起来,使用多功能一体机的连续复印功能,来进行批量化操作,不但可以很好地保护一体机的寿命,还能提高复印的速度。
该功能的具体使用也是比较简单的,我们只要在一体机控制面版上将工作方式设置成“连续复印”模式,然后再按一下“复印”按钮,多功能一体机就自动把文稿复印好。
但复印的文稿在数量上有一定的限制,一般的多功能机连续复印量最多是99页,但这对于我们平常办公相信已是绰绰有余了。
同时还可以进行“多份连续复印”,这样能同时连续复印成多份文稿,这在拥有较大复印量的情况下,是一种非常不错的选择,操作时,在数字键盘上输入将要复印的份数,点击“复印”按钮后,多功能一体机就会帮我们处理余下的事情。
对于少量的复印任务,除非特别紧急,一般不主张随用随复,而应该是连续复印,以确保一体机高效工作。
2、事先摆放好纸张摆放好纸张应该包括使用优质打印纸或者传真纸以及把纸张正确放置在导纸盒中,因为在一体机处于连续工作状态时,最有可能影响效率的就是复印纸张出现问题,一旦纸张在传送过程中出现什么异常,例如一体机不进纸、多页进纸或者卡纸,这样不但影响一体机的正常工作,严重的话还能损坏一体机内部的纸张传送装置。
为了避免复印纸张传送出问题,我们首先应该确保使用高质量的复印纸,其次要求复印纸摆放要正确,平整放置在送纸器内,不要放得太满,并且将导轨调整到适应纸宽。
一旦纸张卡在一体机内部时,我们应该尽量地关闭一体机电源,然后再小心地将卡住的复印纸从一体机内取出来。
施乐DC 2000-1080数码复印机(培训手册)

50 分钟 整体学习
20 分钟 颁发结业报告
了解成像部分纸张输送和选购的单 学员练习 纸盘模块(STM)。
・ 了解打印、定影和副本排出顺序 ・ 在第 14 章,你将学习打印机和
扫描器规格。 ・ 再次阅读培训资料和手册,以作
更清晰的了解。 ・ 检查机器和周围的物品,并按顺
序装上它们。 教员签发结业报告
学员练习
・ 培训资料 ・ 手册
・ 培训资料 ・ 手册
・ 培训资料 ・ 手册
1-2
目录
第2章
复印过程
2-1
2.1 综述....................................................................................................................................... 2-1 2.2 系统概况 ............................................................................................................................... 2-1 2.3 复印过程 ............................................................................................................................... 2-2
这是一天的课程,下列时间安排可作参考。
自 9:00 9:10 09:30
所需时间 10 分钟 20 分钟 30 分钟
- 1、下载文档前请自行甄别文档内容的完整性,平台不提供额外的编辑、内容补充、找答案等附加服务。
- 2、"仅部分预览"的文档,不可在线预览部分如存在完整性等问题,可反馈申请退款(可完整预览的文档不适用该条件!)。
- 3、如文档侵犯您的权益,请联系客服反馈,我们会尽快为您处理(人工客服工作时间:9:00-18:30)。
复印(基本复印步骤)
将原稿面朝上放进自动输稿器, 或面朝下放在稿台玻璃上。
在液晶屏上选择复印进入[复印]画面。
复印(基本复印步骤)
根据需要配置功能。
使用数字键盘输入要复印的份数。如果您输入了一个不 正确的值,请按清除(C)键并输入正确的值。按启动 键开始复印。
复印(基本复印步骤)
大量原稿复印
扫描(邮件发送)
指定接收方法1
❖ 您可以通过通讯簿指定接收方地址。
选择接收方地址,然后选择Biblioteka 象和关闭。扫描(邮件发送)
指定接收方法2
选择键盘。
手动输入邮件地址。
扫描(邮件发送)
设置完其它参数后按开始键开始扫描。
打印(双面打印)
利用此功能,您可将2页文件打印到1张纸的正背面,为环保做一份贡献。
打印(多张合一)
利用此功能,您可将2张、4张、8张、16张或32张原稿打印到单页上, 能节省不少纸张呢!
扫描
• 扫描默认值:
-自动 - 200dpi - PDF
• 扫描至邮件
扫描(邮件发送)
此功能允许您扫描原稿并将扫描后的数据作为电子邮件附件发送。
富士施乐多功能一体机使用手册 ---DC-III 2007
设备使用介绍
• 刷卡流程 • 刷卡复印 • 刷卡打印 • 扫描
刷卡(刷卡复印、打印步骤)
要使用复印、打印功能必须先刷卡认证,获取机器的使用权,否则无法使用 这些功能。
刷卡
复印
退出
打印
把员工卡放在读卡器左边, 当屏幕上出现对勾表示刷卡 认证通过。
认证通过后可以使用打印、 复印功能。
使用完机器后,按认证键退 出自己的账户。否则,其他 人可以用此账户操作机器。
注:当机器没有任何操作超过30秒,机器会自动退出认证。
复印功能
复印默认设置:
- 黑白 - 100% - 单面⇢单面 - 纸张选择:自动
基本复印步骤 缩放倍率 (25%–400%) 纸盘选择 双面复印 多张合一(1-8Up) 混合尺寸原稿复印 ID卡复印
打印
• 打印默认值
-A4 -双面
• 刷卡输出 • 双面打印 • 多页合一打印
打印(刷卡输出)
首先在自己的电脑上发送打印作业。然后到多功能机旁刷卡认证后按个人打印键。
❖ 选中文件,然后选择打印开始输出文件。您也可以选中 文件后删除不需要打印的文件
打印(刷卡输出)
操作完毕后,按认证键退出账户。
注:使用此功能时ID卡只能放在玻璃稿台上。
复印(ID卡复印)
❖ 选择有,按屏幕提示将证件放置在离稿台玻璃左上角略远的位置,按绿色启动键先扫描正面。
当屏幕左上角显示请放置下一张原稿,再按[启动]键时,把证件反面放置再 与正面相同的位置,按绿色启动键扫描反面,机器即可把证件的正、反两 面复印在A4纸的同一面上。
❖
复印(混合尺寸原稿复印)
利用此功能,您可同时将不同尺寸的原稿,复印到与原稿尺寸相同的纸张上。也可以指定纸张 尺寸,将混合尺寸的原稿复印到相同尺寸的纸张上。
❖
按图示方法放置不同尺寸原稿。
复印(ID卡复印)
利用此功能,您可轻松地将身份证或其它证件的双面复印到单页纸张上。
在输出格式画面选择第2页,然后选择ID卡复印。
❖ 如果您想使用无法放置在纸盘1、2、3、4 或6 中的纸张,请使用纸盘5 (手送纸 盘)。选择其他纸盘,然后选择纸盒5(旁路纸盘),并设置相应的属性。
复印(双面复印)
利用此功能,您可将2张单面原稿印在1张纸的正背面,为环保做一份贡献。
复印(多张合一)
利用此功能,您可将2张、4张或8张原稿复印到单页上,能节省不少纸张呢!
注:使用此功能时,原稿必须大于1页
复印(缩小/放大)
此功能允许您选择放大或缩小副本尺寸的复印倍率。
在基本复印画面的倍率选择中按需选择100%、自动%、50%A3-A5、其他倍率。
选择其他倍率可以显示常用纸张之间的缩放,可根据需要选择相应的比例按钮。
复印(纸盘选择)
默认设置为自动,机器会根据原稿尺寸和指定的复印倍率,自动选择放置有合适纸张 的纸盘,当纸盘无纸张时,机器会自动跳到其它具有相同设置的纸盘。 当选择某一纸盘时,此纸盘纸用光后机器会停止,提示加纸。
如果您有其他原稿,可在当前原稿正在扫描时选择触摸屏上的[有下一张原稿]。此操作 允许您将几份原稿扫描为单份数据。
在扫描期间选择有下一张原稿。放置下一份原稿。按 启动键。在所有原稿都已完成扫描之后, 选择无下一张原稿。
复印(基本复印步骤)
停止复印作业
复印(基本复印步骤)
改变复印份数
选择份数变更使用数字键指定副本份数。新的份数必须包括已经印刷的份数。 您输入的数字不能小于已经印刷的份数。
