oracle数据库帮助文档
《oracle数据库培训》ppt课件

游标操作及异常处理机制
游标概念
游标是用于处理查询结果集的一种数据库对象 ,可以逐行访问查询结果。
游标操作
包括游标的声明、打开、获取数据、关闭等操 作。
异常处理
介绍PL/SQL中的异常类型、捕获异常的方法以及自定义异常的处理方式。
存储过程、函数和触发器编写与调用
归档日志文件
可选的,用于长期保存日志信息 。
逻辑存储结构
表空间
数据库的逻辑分区,用于存储特定类型的数据 。
表空间中用于存储特定类型数据的逻辑单位,
段
如表段、索引段等。
段中连续的数据块,是数据分配和释放的基本
区
单位。
内存结构
1 3
系统全局区(SGA)
包括数据库缓冲区、共享池、重做日志缓冲区等,用于提高 数据库性能。
系统日志分析
分析系统日志,发现异常事件和错误。
性能监控工具
利用Oracle提供的性能监控工具,实时监控系统性能。
SQL语句优化技巧
SQL语句优化目标
提高SQL语句执行效率,减少资源消耗。
优化方法
重写SQL语句,调整查询逻辑;使用索引,提高查询速度;避免全表扫描,减少I/O操作;利用SQL优化器 提示,指导优化方向。
配置监听器
使用Oracle Net Manager配置监听器,确保客户端能够连接到数据 库。
设置数据库参数
根据需要调整数据库参数,如内存分配、连接数限制等。
创建表空间和用户
根据需要创建表空间、用户和角色,并分配相应的权限。
验证安装和配置
连接到数据库
检查日志文件
使用SQL*Plus或其他客户 端工具连接到新创建的数据
Oracle Database 19c 多模型数据库白皮书说明书

目的陈述本文档概述了Oracle Database 19c 中包含的特性和增强,仅用于帮助您评估升级至Oracle Database 19c 的业务优势和规划您的 IT 项目。
免责声明本文的任何形式(软件或打印介质)包含有 Oracle 公司独家所有的专用信息。
您访问和使用此保密材料时必须遵守您的 Oracle 软件许可协议和服务协议中已实行且您同意遵守的条款和条件。
事先未经Oracle 的书面批准,不得向Oracle 之外的任何实体披露、复制、转载或分发本文及本文所载信息。
此文档既不作为您的许可协议的组成部分,也不会纳入到任何与 Oracle 及其子公司或分支机构的合同之中。
该文档仅供参考,仅用于帮助您作好准备以便实施和升级文中所述产品特性。
本文档不承诺提供任何材料、代码或功能,也不应将其作为购买决策的依据。
本文档所述任何特性或功能的开发、发布以及相应的时间安排均由 Oracle 自行决定。
考虑到产品架构的性质,可能无法在不冒较大代码不稳定性风险的情况下安全地包含文中所述的全部特性。
目录目的陈述 (2)引言 (4)多模型数据库架构 (5)Oracle Database 19c中的多模型特性 (6)Oracle Database 19c 中的 JSON (8)Oracle Spatial and Graph 中的属性图数据库和分析 (9)Oracle Spatial and Graph 的空间数据库和分析 (10)Oracle Spatial and Graph 的 RDF 语义图三重存储特性 (11)分片数据库模型 (12)ORACLE XML DB (12)Oracle Text (14)Oracle SecureFiles (14)SecureFiles中的存储优化 (14)Oracle Database 19c 中的SecureFiles特性 (15)结论 (15)引言四十年以来,商用关系数据库管理系统取得了长足的发展,各种功能、数据类型、分析和数据模型不断得到开发和采用,这一过程中也形成了一种一致的模式。
oracle11g还原数据库步骤__概述说明以及解释
oracle11g还原数据库步骤概述说明以及解释引言部分的内容可以按照如下方式撰写:1. 引言1.1 概述引言部分将介绍本篇文章的主题,即Oracle 11g数据库还原步骤。
数据库还原是一项至关重要的任务,它可以帮助恢复丢失或损坏的数据,并确保系统的连续性和可靠性。
在本文中,我们将深入探讨Oracle 11g数据库还原的步骤和过程,以及执行还原操作前需要注意的准备工作。
1.2 文章结构在本文中,我们将按照以下顺序来讨论Oracle 11g数据库还原:- 首先,我们将介绍Oracle 11g数据库还原的重要性,阐述为什么必须进行数据库还原操作。
- 其次,我们将概述Oracle 11g数据库还原的步骤,并列出每个步骤的简要说明。
- 第三部分我们将详细描述执行数据库还原操作前所需进行的准备工作。
- 接下来,我们将提供执行数据库还原操作的详细步骤,包括必要时涉及到的命令和工具。
- 最后,我们将讨论完成数据库还原后进行验证和测试的方法与技巧。
1.3 目的本文旨在为读者提供有关Oracle 11g数据库还原的全面指南。
通过学习本文,读者将能够了解数据库还原的重要性、掌握进行数据库还原操作的步骤和技巧,并且能够有效地验证和测试还原后的数据库。
我们希望这篇文章能够帮助读者在数据库还原过程中避免常见错误,并提供相关提示和建议。
2. 正文:2.1 Oracle 11g数据库还原的重要性在数据库管理中,数据的安全性和完整性是至关重要的。
由于各种原因,比如硬件故障、用户误操作或者系统遭受攻击,数据库可能会丢失或损坏。
因此,在这些情况下,数据库还原变得非常重要。
Oracle 11g数据库还原是指恢复已经丢失或被损坏的数据到其先前可用状态的过程。
2.2 Oracle 11g数据库还原的步骤概述数据库还原通常包括以下主要步骤:- 备份介质准备:确定可用的备份介质,并确保其处于良好状态。
- 目标库环境准备:在目标库上创建必需的目录结构,并配置参数以适应还原操作。
oracle字符串转date的函数 毫秒-概述说明以及解释
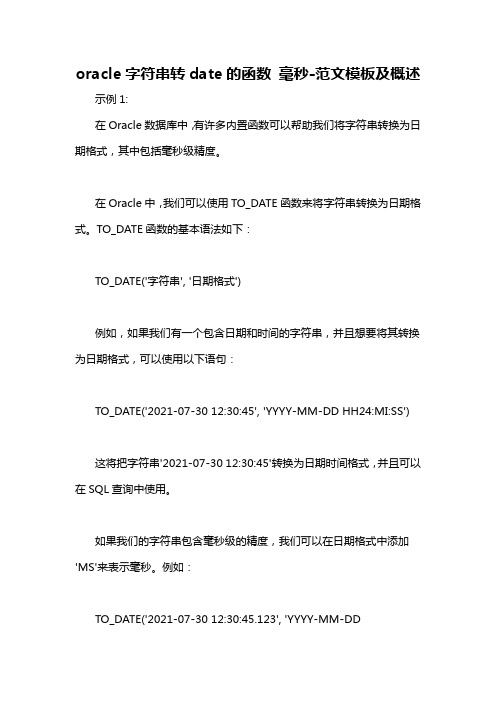
oracle字符串转date的函数毫秒-范文模板及概述示例1:在Oracle数据库中,有许多内置函数可以帮助我们将字符串转换为日期格式,其中包括毫秒级精度。
在Oracle中,我们可以使用TO_DATE函数来将字符串转换为日期格式。
TO_DATE函数的基本语法如下:TO_DATE('字符串', '日期格式')例如,如果我们有一个包含日期和时间的字符串,并且想要将其转换为日期格式,可以使用以下语句:TO_DATE('2021-07-30 12:30:45', 'YYYY-MM-DD HH24:MI:SS')这将把字符串'2021-07-30 12:30:45'转换为日期时间格式,并且可以在SQL查询中使用。
如果我们的字符串包含毫秒级的精度,我们可以在日期格式中添加'MS'来表示毫秒。
例如:TO_DATE('2021-07-30 12:30:45.123', 'YYYY-MM-DDHH24:MI:SS.FF3')这将把字符串'2021-07-30 12:30:45.123'转换为日期时间格式,并且保留毫秒级的精度。
另外,如果我们需要在日期时间格式中精确到毫秒级的精度,我们可以使用CAST函数来转换日期时间格式为TIMESTAMP格式,例如:CAST(TO_DATE('2021-07-30 12:30:45.123', 'YYYY-MM-DDHH24:MI:SS.FF3') AS TIMESTAMP)这将把字符串'2021-07-30 12:30:45.123'转换为TIMESTAMP格式,并且保留毫秒级的精度。
总的来说,在Oracle数据库中,我们可以使用TO_DATE函数和CAST 函数来将字符串转换为日期格式,并且保留毫秒级的精度。
oracle数据库RAC服务器配置文档
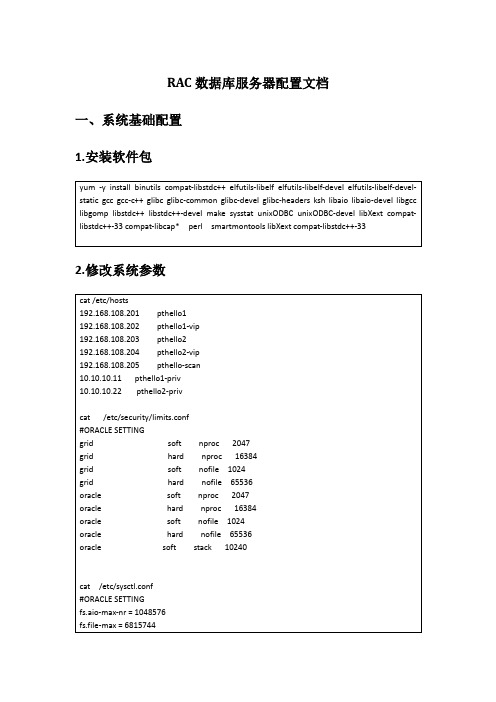
RAC数据库服务器配置文档一、系统基础配置1.安装软件包2.修改系统参数3.添加用户和组4 修改用户环境变量Grid用户5 通过ASMLIB管理磁盘二、安装集群软件密码:system123[root@pthello1 ~]# /u01/app/oraInventory/orainstRoot.sh Changing permissions of /u01/app/oraInventory.Adding read,write permissions for group.Removing read,write,execute permissions for world.Changing groupname of /u01/app/oraInventory to oinstall.The execution of the script is complete.[root@pthello1 ~]# /u01/app/11.2.0/grid/root.shPerforming root user operation for Oracle 11gThe following environment variables are set as:ORACLE_OWNER= gridORACLE_HOME= /u01/app/11.2.0/gridEnter the full pathname of the local bin directory: [/usr/local/bin]: Copying dbhome to /usr/local/bin ...Copying oraenv to /usr/local/bin ...Copying coraenv to /usr/local/bin ...Creating /etc/oratab file...Entries will be added to the /etc/oratab file as needed by Database Configuration Assistant when a database is createdFinished running generic part of root script.Now product-specific root actions will be performed.Using configuration parameter file: /u01/app/11.2.0/grid/crs/install/crsconfig_params Creating trace directoryInstalling Trace File AnalyzerOLR initialization - successfulroot walletroot wallet certroot cert exportpeer walletprofile reader walletpa walletpeer wallet keyspa wallet keyspeer cert requestpa cert requestpeer certpa certpeer root cert TPprofile reader root cert TPpa root cert TPpeer pa cert TPpa peer cert TPprofile reader pa cert TPprofile reader peer cert TPpeer user certpa user certAdding Clusterware entries to upstartCRS-2672: Attempting to start 'ora.mdnsd' on 'pthello1'CRS-2676: Start of 'ora.mdnsd' on 'pthello1' succeededCRS-2672: Attempting to start 'ora.gpnpd' on 'pthello1'CRS-2676: Start of 'ora.gpnpd' on 'pthello1' succeededCRS-2672: Attempting to start 'ora.cssdmonitor' on 'pthello1'CRS-2672: Attempting to start 'ora.gipcd' on 'pthello1'CRS-2676: Start of 'ora.cssdmonitor' on 'pthello1' succeededCRS-2676: Start of 'ora.gipcd' on 'pthello1' succeededCRS-2672: Attempting to start 'ora.cssd' on 'pthello1'CRS-2672: Attempting to start 'ora.diskmon' on 'pthello1'CRS-2676: Start of 'ora.diskmon' on 'pthello1' succeededCRS-2676: Start of 'ora.cssd' on 'pthello1' succeededASM created and started successfully.Disk Group OCR created successfully.clscfg: -install mode specifiedSuccessfully accumulated necessary OCR keys.Creating OCR keys for user 'root', privgrp 'root'..Operation successful.CRS-4256: Updating the profileSuccessful addition of voting disk a6bad62405144f4bbf5ff6551ea45a59.Successful addition of voting disk 538bba4d8aa14f8dbf111803543072a8.Successful addition of voting disk 59db1c91b1f04fb9bf6454344c5774e4.Successfully replaced voting disk group with +OCR.CRS-4256: Updating the profileCRS-4266: Voting file(s) successfully replaced## STATE File Universal Id File Name Disk group-- ----- ----------------- --------- ---------1. ONLINE a6bad62405144f4bbf5ff6551ea45a59 (ORCL:OCR_VOL1) [OCR]2. ONLINE 538bba4d8aa14f8dbf111803543072a8 (ORCL:OCR_VOL2) [OCR]3. ONLINE 59db1c91b1f04fb9bf6454344c5774e4 (ORCL:OCR_VOL3) [OCR]Located 3 voting disk(s).CRS-2672: Attempting to start 'ora.asm' on 'pthello1'CRS-2676: Start of 'ora.asm' on 'pthello1' succeededCRS-2672: Attempting to start 'ora.OCR.dg' on 'pthello1'CRS-2676: Start of 'ora.OCR.dg' on 'pthello1' succeededConfigure Oracle Grid Infrastructure for a Cluster ... succeeded1:pdksh ########################################### [100%] [root@pthello2 ~]# /u01/app/oraInventory/orainstRoot.shChanging permissions of /u01/app/oraInventory.Adding read,write permissions for group.Removing read,write,execute permissions for world.Changing groupname of /u01/app/oraInventory to oinstall.The execution of the script is complete.[root@pthello2 ~]# /u01/app/11.2.0/grid/root.shPerforming root user operation for Oracle 11gThe following environment variables are set as:ORACLE_OWNER= gridORACLE_HOME= /u01/app/11.2.0/gridEnter the full pathname of the local bin directory: [/usr/local/bin]:Copying dbhome to /usr/local/bin ...Copying oraenv to /usr/local/bin ...Copying coraenv to /usr/local/bin ...Creating /etc/oratab file...Entries will be added to the /etc/oratab file as needed byDatabase Configuration Assistant when a database is createdFinished running generic part of root script.Now product-specific root actions will be performed.Using configuration parameter file: /u01/app/11.2.0/grid/crs/install/crsconfig_paramsCreating trace directoryInstalling Trace File AnalyzerOLR initialization - successfulAdding Clusterware entries to upstartCRS-4402: The CSS daemon was started in exclusive mode but found an active CSS daemon on node pthello1, number 1, and is terminatingAn active cluster was found during exclusive startup, restarting to join the clusterConfigure Oracle Grid Infrastructure for a Cluster ... succeeded[root@pthello1 ~]# /u01/app/oracle/product/11.2.0/db_1/root.shPerforming root user operation for Oracle 11gThe following environment variables are set as:ORACLE_OWNER= oracleORACLE_HOME= /u01/app/oracle/product/11.2.0/db_1Enter the full pathname of the local bin directory: [/usr/local/bin]:The contents of "dbhome" have not changed. No need to overwrite.The contents of "oraenv" have not changed. No need to overwrite.The contents of "coraenv" have not changed. No need to overwrite.Entries will be added to the /etc/oratab file as needed byDatabase Configuration Assistant when a database is createdFinished running generic part of root script.Now product-specific root actions will be performed.Finished product-specific root actions.[root@pthello1 ~]#[root@pthello2 ~]# /u01/app/oraInventory/orainstRoot.shChanging permissions of /u01/app/oraInventory.Adding read,write permissions for group.Removing read,write,execute permissions for world.Changing groupname of /u01/app/oraInventory to oinstall.The execution of the script is complete.[root@pthello2 ~]# /u01/app/oracle/product/11.2.0/db_1/root.sh Performing root user operation for Oracle 11gThe following environment variables are set as:ORACLE_OWNER= oracleORACLE_HOME= /u01/app/oracle/product/11.2.0/db_1Enter the full pathname of the local bin directory: [/usr/local/bin]: The contents of "dbhome" have not changed. No need to overwrite. The contents of "oraenv" have not changed. No need to overwrite. The contents of "coraenv" have not changed. No need to overwrite.Entries will be added to the /etc/oratab file as needed by Database Configuration Assistant when a database is created Finished running generic part of root script.Now product-specific root actions will be performed.Finished product-specific root actions.[root@pthello2 ~]#三、安装数据库软件[root@pthello1 ~]# /u01/app/oracle/product/11.2.0/db_1/root.sh Performing root user operation for Oracle 11gThe following environment variables are set as:ORACLE_OWNER= oracleORACLE_HOME= /u01/app/oracle/product/11.2.0/db_1Enter the full pathname of the local bin directory: [/usr/local/bin]: The contents of "dbhome" have not changed. No need to overwrite. The contents of "oraenv" have not changed. No need to overwrite. The contents of "coraenv" have not changed. No need to overwrite.Entries will be added to the /etc/oratab file as needed by Database Configuration Assistant when a database is created Finished running generic part of root script.Now product-specific root actions will be performed.Finished product-specific root actions.[root@pthello2 ~]# /u01/app/oracle/product/11.2.0/db_1/root.sh Performing root user operation for Oracle 11gThe following environment variables are set as:ORACLE_OWNER= oracleORACLE_HOME= /u01/app/oracle/product/11.2.0/db_1Enter the full pathname of the local bin directory: [/usr/local/bin]: The contents of "dbhome" have not changed. No need to overwrite. The contents of "oraenv" have not changed. No need to overwrite. The contents of "coraenv" have not changed. No need to overwrite.Entries will be added to the /etc/oratab file as needed by Database Configuration Assistant when a database is created Finished running generic part of root script.Now product-specific root actions will be performed.Finished product-specific root actions.四、配置数据库密码:system123五、集群状态验证。
Oracle数据库安全配置基线
Oracle数据库安全配置基线
简介
本文档旨在提供Oracle数据库的安全配置基线指南,以帮助确保数据库的安全性。
通过按照以下步骤进行配置,可以减少潜在的安全威胁和风险。
配置步骤
以下是Oracle数据库安全配置的基线步骤:
1. 安装最新的数据库补丁:确保在安装数据库之前,先安装最新的补丁程序,以修复已知的安全漏洞。
2. 禁用默认的系统帐户:在部署数据库之前,禁用默认的系统帐户(如SYSTEM、SYS、SYSMAN等),并创建自定义的管理员帐户。
3. 启用密码复杂性检查:使用强密码策略,确保数据库用户的密码具备足够的复杂性和强度。
4. 实施账户锁定策略:设置账户锁定策略,限制登录失败的次数,以防止暴力。
5. 限制数据库访问权限:核实数据库用户的访问权限,仅赋予他们所需的最低权限,以限制潜在的恶意操作。
6. 启用审计功能:启用Oracle数据库的审计功能,记录和监控数据库的所有活动,便于发现潜在的安全威胁。
7. 启用网络加密:使用SSL/TLS等加密协议,确保数据库与客户端之间的通信是安全和加密的。
8. 实施备份和恢复策略:定期备份数据库,并测试恢复过程,以防止数据丢失和灾难恢复。
9. 定期审查和更新安全配置:定期审查数据库的安全配置,并根据最新的安全标准和最佳实践的推荐,更新配置以提高安全性。
总结
通过遵循以上基线配置步骤,可以帮助提高Oracle数据库的安全性。
然而,在实际应用中,还应根据具体情况进行定制化的安全配置,并持续关注新的安全威胁和漏洞,及时进行更新和升级。
Oracle10g数据库透明网关连接sqlserver2005配置说明文档

Oracle 10g透明网关连接Sql Server 2005 配置说明(一) 环境如下:ORACLE 10g 安装在:172.64.8.139 的window server 2003SqlServer 2005安装在:172.64.8.142(二) :下载透明网关10g下,透明网管是一个单独组件,可以到oracle官方网站下载/technology/software/products/database/oracle10g/htdocs/10201winso ft.html,然后搜索10201_gateways_win32.zip,即可下载。
这个安装包有300M。
(三) 安装透明网关:注意:安装之前要必须要将原有的数据库服务器启动起来,不然会重复安装OraTg10g_home1数据库软件,这样就会有2个数据库软件。
1、下载10201_gateways_win32.zip插件,并解压。
2、进入10201_gateways_win32文件夹,点击setup.exe。
3、点击下一步选择安装的路径,路径是D:\oracle\product\10.2.0\db_1文件夹(这里是我的oracel的安装路径,根据自己机器的路径修改)。
4、点击下一步,选择Oracle Transparent Gateway for Microsoft SQL Server 10.2.0.1.0,点击下一步.5、填写SQL服务器名和SQL数据库名6、点击安装,安装完成之后会在D:\oracle\product\10.2.0\db_1文件下多出一个文件夹tg4msql,即安装成功。
(四) 配置:1. 在Oracle的D:\oracle\product\10.2.0\db_1\tg4msql\admin目录下,打开inittg4msql.ora,添加配置如图:注意红色部分2、配置Oracle的D:\oracle\product\10.2.0\db_1\network\admin目录下的listener.ora。
oracle数据库安全加固操作手册
1.支持按用户分配账号。
结果:现网已实现2.与设备运行、维护等工作无关的账号,应能够删除或锁定。
结果:现网已实现3.应按照用户分配账号。
避免不同用户间共享账号。
避免用户账号和设备间通信使用的账号共享。
结果:现网已实现4.应删除或锁定与设备运行、维护等工作无关的账号。
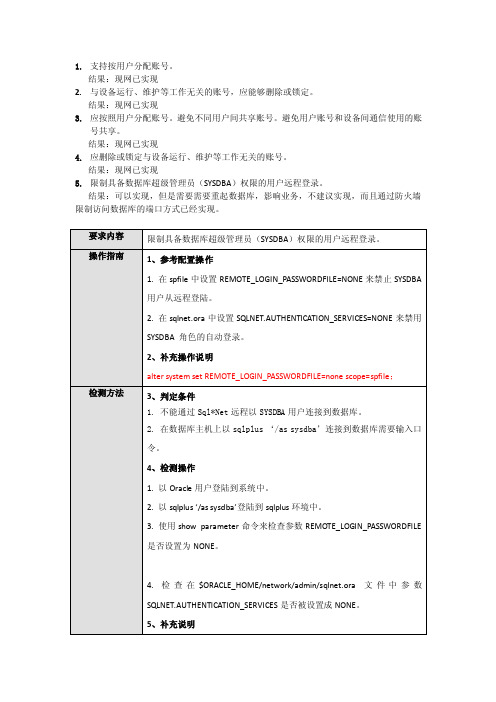
结果:现网已实现5.限制具备数据库超级管理员(SYSDBA)权限的用户远程登录。
结果:可以实现,但是需要需要重起数据库,影响业务,不建议实现,而且通过防火墙限制访问数据库的端口方式已经实现。
6.对于采用静态口令认证技术的设备,应支持数字、小写字母、大写字母和特殊符号4类字符构成的口令。
应支持配置口令复杂度。
在配置了复杂度后,设备自动拒绝用户设置不符合复杂度要求的口令结果:部分账号已实现(system和CS车务通),其他账号实施时需要重新配置现网的应用配置,影响业务,不建议实现。
7.对于采用静态口令认证技术的设备,应支持配置用户连续认证失败次数上限。
当用户连续认证失败次数超过上限时,设备自动锁定该用户账号。
必须由其他账号,通常为具有管理员权限的账号,才可以解除该账号锁定结果:现网已实现(系统默认是10次)8.对于采用静态口令认证技术的设备,应支持按天配置口令生存期功能。
在配置了口令生存期后,设备在口令超过生存期的用户登录时,应提示并强迫该用户设置新口令结果:可以实现,但是应用账号不建议实现,将会影响应用系统;编号:安全要求-设备-ORACLE-配置-10-可选9.对于采用静态口令认证技术的设备,应支持配置用户不得重复使用其最近已用口令的功能。
当配置相应功能后,设备拒绝用户重复使用在限制次数内的口令结果:可以实现,但是应用账号不建议实现,将会影响应用系统;见问题8的实现10.对于采用静态口令认证技术的设备,应配置当用户连续认证失败次数超过6次(不含6次),锁定该用户使用的账号结果:现网已实现(系统默认是10次)11.对于存在关系型数据库的设备,设备应支持对数据库表,给不同数据库用户或用户组分别授予读取、修改的权限。
oracle最全面的错误疑难解决方案和总结文档
通过配置sqlnet。ora文件,可以修改oracle登录认证方式:
SQLNET。AUTHENTICATION_SERVICES=(NTS)是基于操作系统验证
SQLNET。AUTHENTICATION_SERVICES=(NONE)是基于Oracle验证
update;insert;delete;select
(
预定义角色:把常用的权限集中起来,形成角色(套餐)
比如dba connect resource三种角色
自定义角色:自己定义套餐
(
在一个数据库实例下:
当一个用户,创建好后,如果该用户创建了任意一个数据对象(表或触发器等),这时我们的DBMS就会创建一个对应的方案与该用户对应,并且该方案名字和用户名一致。
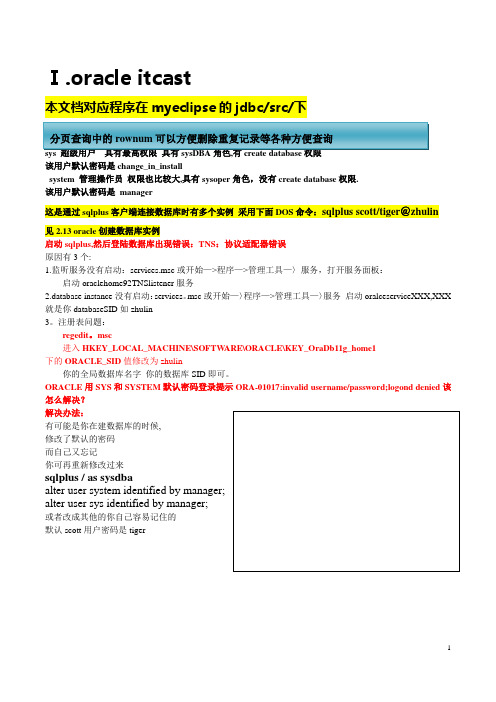
启动oraclehome92TNSlistener服务
2.database instance没有启动:services。msc或开始—〉程序—>管理工具—〉服务启动oralceserviceXXX,XXX就是你databaseSID如zhulin
3。注册表问题:
regedit。msc
进入HKEY_LOCAL_MACHINE\SOFTWARE\ORACLE\KEY_OraDb11g_home1
(2)oradim–startup–sid数据库实例名
linux下:
(1)lsnrctl start(启动监听)
(2)sqlplus sys/chang_on_install as sysdba(以sysdba身份登录)
sqlplus /nolog
conn sys/chang_on_install as sysdba
Oracle数据库中chr()、ascii()、asciistr()、convert()函数的使用
Oracle数据库中chr()、ascii()、asciistr()、convert()函数的使用文档作者: 叶玉虎创建日期: 2016-08-22更新日期: 2016-08-22Version: 1.文档控制更改记录审阅分发人员参考文献一.Oracle数据库中chr()、ascii()、asciistr()、convert()函数的使用在oracle数据库中有很多的转换函数,主要有chr()、ascii()、asciistr()、cast()、chartorowid()、convert()、rowidtochar()、to_char()、to_date()、to_number()等,其中to_char()、to_date()、to_number()是最常见也是最常用的,chr()一般常出现在控制字符串输出的时候。
本文主要总结chr()、ascii()、asciistr()、convert()这四个转换函数:1、chr()chr()函数是将ASCII码转换为字符:ASCII码->字符,ASCII码对应的字符可以参见本文后面的ASCII编码表。
图1:chr()示例2、ascii()ascii()函数是chr()的反函数,它表示将字符转换为ASCII码:字符-> ASCII码。
图2:ascii()示例3、asciistr()asciistr()函数是将字符串转换为ascii字符串,如下图3:图3:asciistr()示例关于asciistr()函数,我在网上看到一篇文章说可以用asciistr()函数来判断一个字符串中是否含有中文字符,我看了其思路,挺有参考价值的,大概是这样的:图4:用asciistr()函数判断一个字符串中是否含有中文字符根据上图4可以看出,如果是中文字符,那么用asciistr()转换以后,其形式是\4E2D这样的,前面有斜杠\,但是并不是所有带有\都是中文字符,因为斜杠\本身用asciistr()转换后,其结果是\005C,也是带有\的,所以对于这个字符要特别注意下。
oracle数据库维护手册

目录1. 检查数据库基本状况41.1. 检查ORACLE实例状态41.2. 检查ORACLE服务进程41.3. 检查ORACLE监听状态52. 检查系统和ORACLE日志文件62.1. 检查操作系统日志文件62.2. 检查ORACLE日志文件62.3. 检查ORACLE核心转储目录72.4. 检查ROOT用户和ORACLE用户的EMAIL 73. 检查ORACLE对象状态73.1. 检查ORACLE控制文件状态73.2. 检查ORACLE在线日志状态83.3. 检查ORACLE表空间的状态83.4. 检查ORACLE所有数据文件状态83.5. 检查无效对象93.6. 检查所有回滚段状态104. 检查ORACLE相关资源的使用情况104.1. 检查ORACLE初始化文件中相关参数值10 4.2. 检查数据库连接情况114.3. 检查系统磁盘空间124.4. 检查表空间使用情况124.5. 检查一些扩展异常的对象134.6. 检查SYSTEM表空间内的内容144.7. 检查对象的下一扩展与表空间的最大扩展值145. 检查ORACLE数据库备份结果145.1. 检查数据库备份日志信息155.2. 检查BACKUP卷中文件产生的时间155.3. 检查ORACLE用户的EMAIL 156. 检查ORACLE数据库性能156.1. 检查数据库的等待事件156.2. DISK READ最高的SQL语句的获取156.3. 查找前十条性能差的SQL 166.4. 等待时间最多的5个系统等待事件的获取16 6.5. 检查运行很久的SQL 166.6. 检查消耗CPU最高的进程166.7. 检查碎片程度高的表176.8. 检查表空间的I/O 比例176.9. 检查文件系统的I/O 比例176.10. 检查死锁及处理176.11. 检查数据库CPU、I/O、内存性能186.12. 查看是否有僵死进程196.13. 检查行链接/迁移196.14. 定期做统计分析196.15. 检查缓冲区命中率206.16. 检查共享池命中率206.17. 检查排序区206.18. 检查日志缓冲区217. 检查数据库安全性217.1. 检查系统安全日志信息217.2. 检查用户修改密码218. 其他检查228.1. 检查当前CRONTAB任务是否正常228.2. ORACLE JOB是否有失败228.3. 监控数据量的增长情况228.4. 检查失效的索引238.5. 检查不起作用的约束238.6. 检查无效的TRIGGER 23本文档为本人亲自整理的公司的维护文档,内容很详细,DBA日常任务基本就是文档中写的那些,初学DBA或是有意学习DBA的同学们可取去学习学习,文档有实例讲解,很实用。
ORACLE_RAC 文档
Oracle 10g RAC 教程第一部分 Oracle10g RAC数据库简介在硬件级别上,RAC 集群中的各节点共享三种功能:1.对共享磁盘存储的访问2.与专用网络的连接3.对公共网络的访问。
共享磁盘存储Oracle RAC 依赖于一个共享磁盘体系结构。
数据库文件、联机重做日志和数据库的控制文件必须都能为集群中的每个节点所访问。
共享磁盘还存储 Oracle Cluster Registry 和 Voting Disk(稍后讨论)。
配置共享存储有多种方法,包括直接连接磁盘(通常是使用铜缆或光纤的 SCSI)、存储区域网 (SAN) 和网络连接存储 (NAS)。
专用网络每个集群节点通过专用高速网络连接到所有其他节点,这种专用高速网络也称为集群互联或高速互联 (HSI)。
Oracle 的 Cache Fusion 技术使用这种网络将每个主机的物理内存 (RAM) 有效地组合成一个高速缓存。
Oracle Cache Fusion 通过在专用网络上传输某个 Oracle 实例高速缓存中存储的数据允许其他任何实例访问这些数据。
它还通过在集群节点中传输锁定和其他同步信息保持数据完整性和高速缓存一致性。
专用网络通常是用千兆以太网构建的,但是对于高容量的环境,很多厂商提供了专门为 Oracle RAC 设计的低延迟、高带宽的专有解决方案。
Linux 还提供一种将多个物理 NIC 绑定为一个虚拟 NIC 的方法(此处不涉及)来增加带宽和提高可用性。
公共网络为维持高可用性,为每个集群节点分配了一个虚拟 IP 地址 (VIP)。
如果主机发生故障,则可以将故障节点的 IP 地址重新分配给一个可用节点,从而允许应用程序通过相同的 IP 地址继续访问数据库。
Oracle 集群就绪服务(CRS)Oracle RAC 10g 引进了 Oracle 集群就绪服务 (CRS) —一组用于集群环境的与平台无关的系统服务。
在 RAC 和 Oracle 并行服务器先前版本中,Oracle 依靠厂商提供的集群管理软件来提供这些服务。
oracle数据库 升级-降级 兼容性矩阵 (文档 ID 1577660.1)
源数据库
目标数据库
8.0.6 (或更高版本)
10.1.x
8.1.7 (或更高版本)
10.1.x
9.0.1 (或更高版本)
10.1.x
9.2.0 (或更高版本)
10.1.x
以下版本的数据库需要间接升级。
源数据库 7.3.4 (或更低版本) 8.0.5 (或更低版本) 8.1.6 (或更低版本)
=> 9.2.0.4.0 =>
目标数据库 11.1.x 11.1.x 11.1.x 11.1.x 11.1.x
更多信息,请参阅以下链接: /docs/cd/B28359_01/server.111/b28300/preup.htm#CEGEIBHC
详细信息
升级
升级到12.1.x的升级兼容性矩阵 能够直接升级到Oracle 12c Release 1的数据库最小版本
源数据库
目标数据库
https:///epmos/faces/DocContentDisplay?_adf.ctrl-state=125o95zpxb_4&id=1577660.1
从11.2.x降级的降级兼容性矩阵 源数据库
可能降级到
11.2.x
10.1.0.5.0 (或更高版本)
11.2.x
10.2.0.3.0 (或更高版本)
11.2.x
11.1.0.6.0 (或更高版本)
更多信息,请参阅以下链接: /docs/cd/E11882_01/server.112/e10819/downgrade.htm
升级到11.2.x的升级兼容性矩阵 能够直接升级到Oracle 11g Release 2的数据库最小版本
ToadforOracle使用文档

ToadforOracle使⽤⽂档Toad®for Oracle版本 12.0.1发⾏说明30 July 2013⽬录欢迎使⽤ Toad for OracleToad for Oracle 为各种技能和经验⽔平的数据库专业⼈员提供了⼀种直观有效的⼯作⽅法,并且全⾯改善⼯作流程、效率和⽣产⼒。
有了 Toad for Oracle,您可以:通过可视化展⽰,理解数据库环境。
通过⾃动化和平滑的⼯作流程,轻松按期完成⼯作仅仅使⽤⼀个⼯具便可执⾏基本的开发和管理任务部署满⾜⽤户要求的⾼质量应⽤程序;在⽣产环境上性能可预测并且运⾏可靠验证数据库代码,以确保达到最佳可能的性能并遵守最佳实践标准轻松管理和共享项⽬、模板、脚本及更多Toad for Oracle 解决⽅案是为您⽽建的,也是由您建造的。
凭借逾 10 年的开发和来⾃不同社区(例如 Toad World)的反馈,Toad for Oracle 已经成为最强⼤和最实⽤的⼯具。
装机量超过 200 万的 Toad for Oracle 会继续成为数据库开发和管理的“事实”标准⼯具。
Toad for Oracle 版本Toad 所有商业版均捆绑了附加的 Quest 产品,依您购买的版本⽽定。
欲知您 Toad 版本及捆绑产品的详情,请参阅。
版本更新 (12.0)请审阅以下部分,了解本发⾏版本的新功能。
12.0.1 修补程序信息Toad 12.0.1 ⽀持 Oracle 12c;。
在此修补程序中介绍的其他修复和改进都包括在下⾯的中。
所有 Toad 版本在 Toad 12 中,以前只存在于 DB Admin Module 的这些功能,在 Toad 专业版中也可以使⽤:模式⽐较 - 同步脚本和模式定义⽂件模式的 HTML ⽂档⽣成器 – 模式的定义⽂件⽣成模式脚本借助 Toad for Oracle 12.0 提供的平滑⼯作流程节省时间借助可以查找功能和答案的“跳转”搜索、直接访问 Toad World ⽤户论坛、快速⽐较多个模式的功能、⽤于团队编码和版本控制的简化⼯作流程以及新的私⼈脚本存储库,可以更快地完成您的功能。
oracle19c_数据字典保护参数_解释说明

oracle19c 数据字典保护参数解释说明1. 引言1.1 概述在现代信息时代,数据的安全性和保护变得越来越重要。
数据库作为存储和管理大量关键数据的核心组件,必须采取有效措施来保护其中的数据。
Oracle是当今业界最流行和广泛使用的关系型数据库之一,它提供了许多功能和机制来确保数据库的安全性。
本文将重点介绍Oracle 19c中的数据字典保护参数,并对其进行详细解释说明。
数据字典是Oracle数据库中存储有关表、列、索引、用户等对象以及其属性信息的系统表。
由于数据字典的重要性,为了防止非授权用户获取敏感数据或篡改系统元数据,Oracle引入了一些特定参数来加强对数据字典的保护。
1.2 文章结构本文将按照以下结构进行讲解:- 第2部分将介绍什么是数据字典保护参数,并强调数据字典在Oracle数据库中的重要性。
- 第3部分将详细解释说明Oracle 19c中各个具体的数据字典保护参数。
- 第4部分将介绍实施这些参数所需遵循的步骤和注意事项。
- 最后,在第5部分总结文章内容并再次强调Oracle 19c数据字典保护参数的重要性,并展望数据库安全性的未来发展方向。
1.3 目的本文的目的是为读者提供对于Oracle 19c中数据字典保护参数的全面理解和解释。
通过深入了解这些参数及其作用,读者将能够更好地保护数据库中存储的关键数据,并采取适当措施预防潜在的安全威胁。
同时,本文也旨在引起人们对数据库安全性问题的关注,并为未来改进数据库安全性提供思路和方向。
2. 数据字典保护参数2.1 什么是数据字典保护参数数据字典保护参数是Oracle数据库中的一组配置选项,用于保护和管理数据库中的核心组件和关键元数据。
这些参数可以控制对数据字典的访问权限、修改操作以及数据字典在系统运行时的行为。
2.2 数据字典的重要性数据字典是Oracle数据库中非常重要的组成部分,它记录了数据库对象(如表、视图和索引)的定义和属性信息,存储了系统级别的统计信息,并提供了对数据库结构和内容的访问接口。
oracle tns12592解决方法 -回复
oracle tns12592解决方法-回复Oracle TNS-12592解决方法在使用Oracle数据库时,有时你可能会遇到一个TNS-12592错误。
这个错误通常表示无法连接到Oracle数据库实例。
下面将为你详细介绍如何逐步解决这个问题。
1. 理解TNS-12592错误TNS-12592错误指示了一个网络连接问题,它发生在客户端(例如,SQL*Plus)试图连接到Oracle数据库实例时。
这个错误可能是因为无法在网络上找到数据库服务,或者是因为连接请求被拒绝。
2. 确保TNS Listener正在运行首先,你需要检查Oracle数据库服务器上的TNS Listener是否正在运行。
TNS Listener负责接收来自客户端的连接请求,并将其路由到相应的数据库实例。
如果TNS Listener没有运行,客户端将无法与数据库实例建立连接。
你可以通过以下步骤检查TNS Listener的状态:- 打开命令提示符或终端窗口。
- 输入以下命令,以检查TNS Listener的状态:bashlsnrctl status如果TNS Listener正在运行,你将在输出中看到相应的信息。
如果TNS Listener没有运行,你可以使用以下命令启动它:bashlsnrctl start这将启动TNS Listener,并允许客户端连接到数据库实例。
3. 检查Oracle数据库实例名在连接到Oracle数据库时,需要提供正确的数据库实例名。
确保你正在使用正确的实例名,并将其配置在TNS连接描述符(TNSNAMES.ORA 文件)中。
TNS连接描述符是一个文本文件,它包含了数据库实例的网络连接信息。
它通常位于ORACLE_HOME/network/admin目录下。
打开这个文件,确保其中包含正确的实例名和对应的连接信息。
例如,假设你尝试连接到一个名为"ORCL"的数据库实例,你的TNS连接描述符中将有一个类似于以下内容的条目:bashORCL =(DESCRIPTION =(ADDRESS = (PROTOCOL = TCP)(HOST = localhost)(PORT = 1521))(CONNECT_DATA =(SERVER = DEDICATED)(SERVICE_NAME = orcl)))确保你的实例名与TNS连接描述符中的实例名一致。
oracle帮助文档
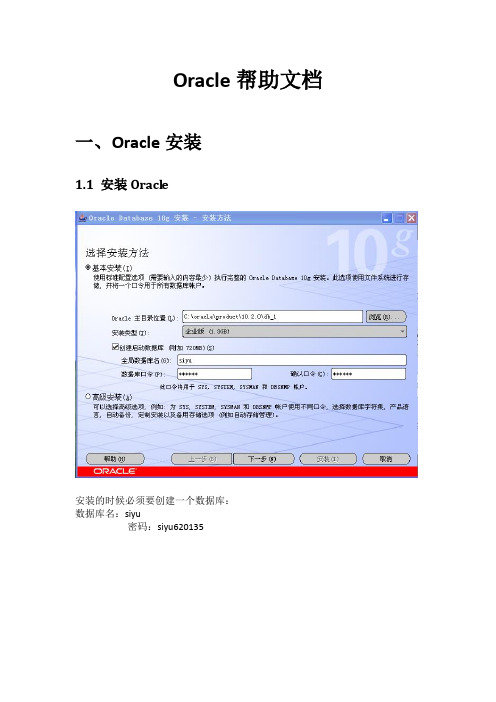
Oracle帮助文档一、Oracle安装1.1 安装Oracl e安装的时候必须要创建一个数据库:数据库名:siyu密码:siyu620135创建用户和给用户解锁:1.2用户管理:* SYS:sys620135* SYSTEM:system620135* SCOTT:scott620135现在Oracle已经按照完成,就可以使用Oracle数据库了1.3数据库服务管理:最重要的两个服务:●OracleOraDb10g_home1TNSListener →Oracle数据库监听服务●OracleServiceSIYU →Oracle数据库服务名称由OracleService+ 数据库名称而来,这里数据库名称为SIYU二SQLPlus2.1进入SQLPlus2.1.1 进入SQLPlus控制台点击‘开始’—> ‘运行’—> 在输入行中输入‘sqlplus’确定进入SQLPlus控制台:输入用户名和密码进入SQLPlus控制台。
2.1.2进入SQLPlus windows操作界面点击‘开始’—> ‘运行’—> 在输入行中输入‘sqlplusw’确定进入SQLPlus windows操作界面的登录界面:输入你的用户名和密码,在这儿有一个主机字符串,这是因为如果这台机子上有多个数据库的时候这里要输入数据库的名称。
进入到以下界面中现在就可以在该窗口中进行数据库操作了。
2.1.3 SQLPlusW操作基本上就用SQLPlusW 即SQLPlus windows界面进行sql操作!因为在SQLPlusw中的编辑是不能改变的,所以可以在记事本中编辑sql语句,通过用ed文件名称进行运行。
通过用@命令执行txt或sql文件@命令中默认找到的就是后缀为.sql文件,即使不在文件后面跟后缀名也可以找到:@c:\aaa即可;如果是txt文件就需要跟后缀名!在SQLPlusW中也可以用conn命令连接其他用户例如:方式登录。
Oracle官方文档中文版-SQLPlus快速参考 Release 9.2
SQL*Plus快速参考Release 9.22002年3月Part No. A90843-01关于快速参考快速参考描述了i SQL*Plus中的按钮和图标,以及i SQL*Plus和SQL*Plus命令语法。
对于每个命令的详细信息,请参考SQL*Plus User's Guide andReference。
快速参考中包括下面的主题:命令语法中的约定Documentation Accessibility启动iSQL*Plus运行iSQL*Plus服务器统计信息报告iSQL*Plus导航iSQL*Plus首选项iSQL*Plus工作屏幕按钮启动和退出SQL*Plus启动和关闭数据库输入和执行命令操作SQL、SQL*Plus和PL/SQL命令格式化查询结果访问数据库其它Oracle是注册商标,Oracle9i、SQL*Plus和i SQL*Plus都是Oracle Corporation的商标或注册商标。
其它用到的名称可能是它们各自所有者的商标。
版权所有@ 1996,2002 Oracle Corporation.保留所有权利。
命令语法中的约定下面两张表描述了本快速参考中使用的命令语法的符号和约定。
命令、术语和子句特征示例说明大写BTITLE 完全按照拼写样式输入文本;不必一定要以大写输入。
小写斜体column 一个子句值;替换一个适当的值。
具有特殊意义的单词 c 单个字符。
char CHAR值(在单引号中的文本值)或者CHAR类型的表达式。
d ore 日期或者DATE类型的表达式。
expr 未指明的表达式。
m or n NUMBER值。
text CHAR常量,可以有也可以没有单引号。
variable 用户变量(除非文本指定了其它的变量类型)。
标点符号特征示例说明竖线| 分隔可选的语法元素。
中括号[ON|OFF] 一个或多个可选项。
如果有两个被竖线分隔的项,只需输入其中一项。
不要输入中括号或竖线。
- 1、下载文档前请自行甄别文档内容的完整性,平台不提供额外的编辑、内容补充、找答案等附加服务。
- 2、"仅部分预览"的文档,不可在线预览部分如存在完整性等问题,可反馈申请退款(可完整预览的文档不适用该条件!)。
- 3、如文档侵犯您的权益,请联系客服反馈,我们会尽快为您处理(人工客服工作时间:9:00-18:30)。
Oracle® Database Express EditionGetting Started Guide11g Release 2 (11.2)E18585-04July 2011Welcome to Oracle Database Express Edition (Oracle Database XE). This guide getsyou quickly up and running using Oracle Database XE by creating database objectsand a simple application. It covers the following topics:■Exploring the Oracle Database XE User Interface■Creating a Database User■Installing SQL Developer■Getting Started Using SQL Developer■Unlocking the Sample User Account■Creating an Application Using Application Express■Learning More About Oracle Database XE■Major Changes for Release 11.2■Documentation AccessibilityThis guide assumes that you have installed Express Edition on your Windows orLinux system, as described in Oracle Database Express Edition Installation Guide forMicrosoft Windows and Oracle Database Express Edition Installation Guide for Linux x86-64.1Exploring the Oracle Database XE User InterfaceThe user interface to Oracle Database XE includes the following:■System Menu Commands■Database Home Page1.1System Menu CommandsTo access the major features of Oracle Database XE, use the system menu as follows toget to the available specific commands:■On Windows, from the Start menu, select Programs (or All Programs), thenOracle Database 11g Express Edition.■On Linux, click the Application menu (on Gnome) or the K menu (on KDE), thenpoint to Oracle Database 11g Express Edition.Then select from the submenu items:■Get Help: Displays the following selections:-Go To Online Forum : Displays the online forum for discussions about Oracle Database XE.-Read Documentation : Displays the Oracle Database XE documentation library on the Internet.-Register For Online Forum : Allows you to register for the Oracle Database XE online forum.■Backup Database: In NOARCHIVELOG mode (the default), shuts down the database, backs it up, and then restarts it. In ARCHIVELOG mode, performs anonline backup of the database. For more information on backups, see Oracle Database Express Edition 2 Day DBA .■Restore Database : Shuts down and then restores the database to the most recent backup. For more information on restoring a database, see Oracle Database Express Edition 2 Day DBA .■Run SQL Command Line : Starts the SQL Command Line utility for Oracle Database XE. To connect to the database, issue the connect command in the following format at the SQL prompt:connect username /password where username is the user name, such as system or another user account name, and password is the password that was assigned when Oracle Database XE was installed or when that user was created. To get help, you can enter the command help at the SQL prompt after you have connected to the database.■Start Database : Starts Oracle Database XE if it is currently stopped. By default, the database is started for you after installation and every time your computer isrestarted. However, to reduce the overall performance load on the system, you can manually stop the database, and then manually restart it later.(If the database is not currently stopped, an informational message is displayed that the database is already started.)■Stop Database : Stops Oracle Database XE if it is currently started.■Get Started: Displays the Oracle Database XE Home Page in your default browser. See Section 1.2, "Database Home Page".1.2Database Home PageThe Database home page is a Web browser-based interface for performing various database administration operations, including the following:■Monitoring database storage ■Monitoring database sessions ■Viewing database initialization parametersNote:To start or stop the database: On Windows, you must belogged in as the user who installed Oracle Database XE or as aWindows administrator; on Linux, you must be logged in as the userwho installed Oracle Database XE or as a user who is a member of thedba user group (typically the user oracle ).■Getting started with Oracle Application ExpressTo access the database home page, follow these steps:1.Navigate the system menu as follows:■On Windows, from the Start menu, select Programs (or All Programs), then Oracle Database 11g Express Edition, and then Get Started.■On Linux, click the Application menu (on Gnome) or the K menu (on KDE), then point to Oracle Database 11g Express Edition, and then Get Started.The Oracle Database XE home page appears:For detailed information about these database-level operations, see Oracle Database Express Edition 2 Day DBA.2.Click the button or tab for any category you are interested in (for example,Storage).If you are prompted for login information, specify:■Username: Enter system for the user name.■Password: Enter the password that was specified when Oracle Database XE was installed.2Creating a Database UserYou must create at least one database user that you will use to create database objects.A database user is a type of database object: a user is associated with a database schema, you connect to the database as a database user, and the database user is the owner of any database objects (tables and so on) that you create in the schema associated with the user.For example, to create a database user named chris. Follow these steps, using the command line:1.Display the SQL command prompt window. For example, on Windows, clickStart, then Programs (or All Programs), then Oracle Database 11g ExpressEdition, and then Run SQL Command Line.2.Connect as the SYSTEM user:■Type: connect ■Enter user-name: system ■Enter password: <password-for-system>3.Create the user. For example, enter a statement in the following form:SQL> create user chris identified by <password-for-chris>;4.Grant the user the necessary privileges. For example:SQL> grant connect, resource to chris;5.Optionally, exit SQL*Plus (which also closes the command window):SQL> exit3Installing SQL DeveloperYou now want to be able to create and work with database objects (tables, views,procedures, functions, and so on) in the database that you installed. To do this, you can use Oracle SQL Developer and Oracle Application Express (also referred to as Oracle Application Express):■SQL Developer is a graphical tool that enables you to browse, create, edit, and delete (drop) database objects; run SQL statements and scripts; edit and debugPL/SQL code; unload (export) and load (import) data; migrate third-partydatabases to Oracle; and view metadata and data. The instructions in this guide use SQL Developer for getting started with database development.SQL Developer is not packaged with Oracle Database Express Edition, but it is easy to download and install SQL Developer. Much of the Express Editiondocumentation assumes that you have installed SQL Developer.■Application Express is a rapid Web application development tool for developing and deploying professional applications. Application Express has more limitedobject-creation features than SQL Developer, but Application Express allows you to create form-based applications quickly. This guide includes sections that explain how to create such an application.Application Express is packaged with Oracle Database Express Edition, so no separate download or installation is needed.SQL Developer as an Alternative for Creating Database Users:Ifyou have experience with SQL Developer, you can use it instead of thecommand line to create a database user, as follows: 1.Create a database connection for the SYSTEM user.2.Open that database connection for the SYSTEM user.3.Right-click the Other Users node in the Connections navigator under that connection.4.Select Create User , and specify the necessary information. (Under Roles ,grant CONNECT and RESOURCE.)To install and start SQL Developer:Step 1: Go to the Oracle Technology Network page for SQL Developer at/technetwork/developer-tools/sql-developer/ Step 2: Click the Downloads tab (next to Overview).Step 3: Read and accept the license agreement.Step 4: Follow the instructions for downloading and installing SQL Developer.Tip:Windows users may find it convenient to download the kit thatincludes a JDK (Java Development Kit). The kit size is larger, but itdoes not require you to have a JDK on your PC. (In addition, youaren’t required to know if you have a JDK, or if the one you have is anacceptable version).The installation itself is simple. For example, on a Windows PC you can unzip the downloaded file into C:\Program Files.To start SQL Developer, go to the sqldeveloper directory under the SQL Developer installation directory (for example, on a Windows system this might be C:\Program Files\sqldeveloper), and do one of the following:■On Linux systems, type: sh sqldeveloper.sh■On Windows systems, double-click sqldeveloper.exe.If you are asked to enter the full pathname for java.exe, click Browse and find java.exe. For example, on a Windows system the path might have a name similar to C:\Program Files\Java\jdk1.6.0_21\bin\java.exe.4Getting Started Using SQL DeveloperTo start using SQL Developer to create and work with objects and schemas in your XE database, follow these major steps:1.Install and start SQL Developer, as explained in Section3.2.Create some database connections, as explained in Section4.1.3.Connect to the database and work with database objects, such as by doing thetutorial described in the online help, as explained in Section4.2.SQL Developer comes with a tutorial and demos to help you learn to use its features.See Also:■Oracle Database SQL Developer Installation Guide■Oracle SQL Developer User's Guide4.1Creating Database ConnectionsTo work with your Express Edition database in SQL Developer, you must create some database connections, so that you can view and work with database objects, use the SQL Worksheet, and use other features.To create database connections, you can use one or more of the following approaches:■Autogenerate Local Connections■Create Connections Manually4.1.1Autogenerate Local ConnectionsYou can automatically create a database connection for each unlocked user account on the local system by right-click the Connections node and selecting Create Local Connections. The connections are placed in a folder named Auto-Generated Local Connections, as shown in Figure1.Figure 1Autogenerated Connections in SQL Developer WindowFor autogenerated connections, you will always be prompted for the password when you connect, and you cannot edit the user name or password in the connection properties dialog box. To be able avoid the password prompt by selecting the Save Password option for a connection, you must create the connection manually.4.1.2Create Connections ManuallyYou can manually create database connections to the local Express Edition database and to Oracle Database instances on other systems. If you create a connection manually, you can specify the Save Password option to avoid having to enter the password each time you connect, and you can edit the user name and password associated with then connection.To create a new database connection:1.In the Connections navigator, right-click the Connections node and select NewDatabase Connection.e the dialog box to specify information about the connection. Figure2 shows theinformation to create a connection for a database user named CHRIS.Figure 2Creating a Database ConnectionIn the connection definition in Figure2:■Connection Name: An alias for a connection to the database using the information that you enter. Example: XE_CHRIS■Username: Name of the database user for the connection. This user must have sufficient privileges to perform the tasks that you want to perform whileconnected to the database. Example: chris■Password: Password associated with the specified database user.■Save Password: Specify this option if you want the password is saved with the connection information; you will not be prompted for the password onsubsequent attempts to connect using this connection.■Hostname: Host system for the Oracle database. For your Express Edition database, the hostname is localhost.■Port: Listener port. The default is 1521.■SID: Database name. The default for Express Edition is xe.3.Click Test to check if you have entered the correct information for the connection.If the test is not successful, correct information as needed and click Test again.4.When the test is successful, click Save to save the connection.5.To open the connection after saving it, you can click Connect. (You can also openthe connection using the Connections navigator.)4.2Working with Database ObjectsTo get started quickly working with database objects, do the short tutorial in the SQL Developer online help (also available in Oracle SQL Developer User's Guide). This tutorial creates three tables, a sequence, a view, and a PL/SQL procedure for a small library database, and inserts some sample data into the tables. You can create theseobjects using a database connection to a user that you created (such as one to CHRIS if you used that example).To access this tutorial in the help:1.Click Help, then Table of Contents.2.In the Contents navigator, double-click the topic Tutorial: Creating Objects for aSmall Database.3.Follow the instructions for the major steps in the tutorial.In addition to or instead of doing this tutorial, you can unlock the supplied sample HR user account (see Section5), and then use a database connection to the HR user to view tables, procedures, and other objects. (You can modify data in the tables owned by HR, but you probably do not want to because many documents show examples that assume the supplied data.)You can also check the many tutorials, demos, courses, and other resources mentioned on the SQL Developer Start Page and on the Oracle Technology Network.5Unlocking the Sample User AccountTo view any objects owned by the supplied sample database user named HR, or to create the form-based application as described in Section6, "Creating an Application Using Application Express", you must first unlock the HR sample account.Oracle Database XE comes with a sample database user named HR. This user owns several database tables in a sample schema for a fictional Human Resources department. However, for security reasons, this user’s account is locked. You need to unlock this account before you can view the HR objects or build any applications that use these objects. You can use either of the following approaches to unlock the account:■Unlock HR Using SQL Developer■Unlock HR Using the SQL Command Line5.1Unlock HR Using SQL DeveloperTo unlock the sample user account using SQL Developer:1.Open a database connection for the SYSTEM user. For example, with theconnections shown in Figure1, "Autogenerated Connections in SQL Developer Window" in Section4.1.1, open the connection named SYSTEM.2.In the Connection navigator under the connection for the SYSTEM user, expandthe Other Users node.3.Under Other Users, right-click the node for the HR user and select Edit User.4.In the Create/Edit User dialog box, uncheck (deselect) the option Account isLocked.a.For New Password and Confirm Password, enter the password that you wantfor the HR user.b.Uncheck (deselect) Password expired (User must change next login).c.Uncheck (deselect) Account is Locked.5.Click Apply to alter the HR user so that the account is unlocked and not expired.6.Click Close to close the dialog box.5.2Unlock HR Using the SQL Command LineTo unlock the sample user account using the SQL command line:1.Display the SQL command prompt window. For example, on Windows, clickStart, then Programs (or All Programs), then Oracle Database 11g ExpressEdition, and then Run SQL Command Line.2.Connect as the SYSTEM user:■Type: connect■Enter user-name: system■Enter password: <password-for-system>3.Enter the following statement to unlock the HR account:SQL> ALTER USER hr ACCOUNT UNLOCK;4.Enter a statement in the following form to specify the password that you want forthe HR user:SQL> ALTER USER hr IDENTIFIED BY <hr-password>;5.Optionally, exit SQL*Plus (which also closes the command window):SQL> exit6Creating an Application Using Application ExpressYou can use Oracle Application Express to create applications with forms linked to tables and data in the database. This section guides you through creating such an application using the supplied HR account, and it contains the following sections:■Getting Started with Application Express■Logging in to the Workspace for the Sample Account■Creating a Simple Application■Running Your New Application6.1Getting Started with Application ExpressTo use Application Express, you must create at least one Application Express workspace. For this exercise, you will create a workspace for the HR user, so that you can develop the sample application using the HR database account. (After you perform the steps in this section, you do not need to repeat them for creating and modifying Application Express applications in this workspace.)To create the Application Express workspace:1.From the system menu, navigate to Oracle Database 11g Express Edition andselect Get Started.2.On the Database home page, click Application Express.3.On the Login page, log in with the user name and password for the SYSTEMaccount.4.On the Oracle Application Express page, create a workspace for the existingdatabase user HR, as shown in Figure3.Figure 3Creating an Application Express WorkspaceDatabase User: Specify Use Existing to create the workspace for the existingdatabase user named HR.Application Express Username: Enter a desired name for the Application Express workspace to be created. Example: hr_apexPassword and Confirm Password: Enter the password to be used for theApplication Express workspace.5.Click Create Workspace.6.On the next page, click the click here link to log in to the workspace.The first time you attempt to access the workspace, you will be prompted to reset the password for the workspace. (You can specify the same password or a different one.)6.2Logging in to the Workspace for the Sample AccountTo create the application, you must log in to the workspace that you created in Section6.1, "Getting Started with Application Express".To log in to the workspace:1.From the system menu, navigate to Oracle Database 11g Express Edition andselect Get Started.2.On the Database home page, click Application Express.3.On the Login page, click the button Already have an account? Login Here.4.Log in to the Application Express workspace.Now you are ready to create your first application using Application Express.6.3Creating a Simple ApplicationCreating an application is an easy way to view and edit your database data. You create this application based on the EMPLOYEES table, which is part of the HR schema.To create an application based on the EMPLOYEES table:1.On the Application Express page for the workspace, click Application Builder.2.Click the Create button.3.Under Create Application, for Application Type select Database and click Next.4.Under Create Application:: Enter MyApp.b.Application: (Accept the default.)c.Create Application: From Scratchd.Schema: HRe.Click Next.Next, add pages to your application.5.Under Add Page:a.Page Type: Report and Form.Notice that Action describes the type of page you are adding.b.Table Name: Click the up arrow, and then select EMPLOYEES.c.Implementation: Interactived.Click Add Page.Two new pages are listed at the top of the page, under Create Application.e.Click Next.6.On the Tabs panel, accept the default (One Level of Tabs) and click Next.7.On the Shared Components panel, accept the default (No) and click Next.This option enables you to import shared components from another application.Shared components are common elements that can display or be applied on any page within an application.8.On the Attributes panel, for Authentication Scheme select the default(Application Express) and all remaining defaults, and click Next.9.On the User Interface panel, select Theme 2 click Next.Themes are collections of templates that you can use to define the layout and style of an entire application.10.On the Confirm panel, confirm your selections. To return to a previous wizardpage, click Previous. To accept your selections, click Create.After you click Create, the following message displays at the top of the page:Application created successfully.6.4Running Your New ApplicationTo run your application:1.Click the Run Application icon.2.In the log in page, enter hr for both the User Name and Password.Your application appears, showing the EMPLOYEES table.3.Explore your application.You can query the EMPLOYEES table, if you want. To manage the application, use the Developer toolbar at the bottom on the page.The Developer toolbar offers a quick way to edit the current page, create a new page, control, or component, view session state, or toggle debugging or edit links on and off.4.To exit your application and return to Application Builder, click Edit Page 1 on theDeveloper toolbar.5.To return to the Database Home Page, select the Home breadcrumb at the top ofthe page.Congratulations! You have just created and run your first application usingApplication Express with Oracle Database XE.7Learning More About Oracle Database XETo learn more about using Oracle Database XE, you can use the Oracle Database XE Documentation Library, which is available from the system menu or the administrative console.Be sure to review these documents, in particular:8Major Changes for Release 11.2This section summarizes the major changes between Oracle Database XE Release 11.2 and the previous release (10.2).The most obvious difference is in the user interface, specifically the Database Home Page, as explained in Section 8.1.The resource limitations are the same as for Release 10.2, except that you can now store up to 11 GB of user data (not including Express Edition system data), as opposed to 4 GB in Release 10.2.Oracle Database XE Release 11.2 contains a vast set of Oracle Database features that have been introduced since Release 10.2. In general, Oracle Database XE Release 11.2 contains the features of Oracle Database Standard Edition Release 11.2, except as qualified in Oracle Database Express Edition Licensing Information . See that manual for detailed information about features that are and are not included in Oracle Database XE.8.1User Interface ChangesIn Oracle Database XE Release 11.2, you can use the Database Home Page to perform various database administration tasks, including monitoring database storage, monitoring database sessions, and viewing database initialization parameters. To access Oracle Application Express, click the Application Express button on the Database Home Page and follow the instructions. Once you create a workspace,TitleContent Oracle Database Express Edition 2 Day DBADiscusses common day-to-day administrative tasks.Oracle Database Express Edition 2 Day Developer's GuideExplains how to take advantage of the Oracle Database Express Edition development environment.Oracle Database Express Edition 2 Day + Application Express Developer's GuideOffers a series of tutorials that describe how to build database-centric Web applications using the Oracle Application Express client.Oracle Database Express Edition 2 Day + PHP Developer's Guide Provides a tutorial that shows you how to download and install Apache and the Zend Core PHP drivers, and then how to use PHP to connect to Oracle Database XE, and demonstrates how to use PHP to develop a simple application that accesses and modifies data.Oracle Database Express Edition 2 Day Plus Java Developer Guide Provides a tutorial that shows you how to use Java and JDBC to connect to Oracle Database XE, and demonstrates how to develop a simple Java application that accesses and modifies data.Oracle Database Express Edition 2 Day Plus .NET Developer Guide Describes the key features of Oracle Data Provider for .NET and Oracle Developer Tools for Visual Studio .NET. It leads you through installation and configuration, shows how to build basic applications using Oracle Data Provider for .NET and Oracle Developer Tools for Visual Studio .NET, and how to create and use both PL/SQL and .NET stored procedures.username, and password, you can access Oracle Application Express directly from your Web browser as described in Oracle Database Express Edition 2 Day + Application Express Developer's Guide.9Documentation AccessibilityFor information about Oracle's commitment to accessibility, visit the Oracle Accessibility Program website at/pls/topic/lookup?ctx=acc&id=docacc.Access to Oracle SupportOracle customers have access to electronic support through My Oracle Support. For information, visit/pls/topic/lookup?ctx=acc&id=info or visit /pls/topic/lookup?ctx=acc&id=trs if you are hearing impaired.Oracle Database Express Edition Getting Started Guide, 11g Release 2 (11.2)E18585-04Copyright © 2006, 2011, Oracle and/or its affiliates. All rights reserved.This software and related documentation are provided under a license agreement containing restrictions on use and disclosure and are protected by intellectual property laws. Except as expressly permitted in your license agreement or allowed by law, you may not use, copy, reproduce, translate, broadcast, modify, license, transmit, distribute, exhibit, perform, publish, or display any part, in any form, or by any means. Reverse engineering, disassembly, or decompilation of this software, unless required by law for interoperability, is prohibited.The information contained herein is subject to change without notice and is not warranted to be error-free. If you find any errors, please report them to us in writing.If this is software or related documentation that is delivered to the U.S. Government or anyone licensing it on behalf of the U.S. Government, the following notice is applicable:U.S. GOVERNMENT RIGHTS Programs, software, databases, and related documentation and technical data delivered to U.S. Government customers are "commercial computer software" or "commercial technical data" pursuant to the applicable Federal Acquisition Regulation and agency-specific supplemental regulations. As such, the use, duplication, disclosure, modification, and adaptation shall be subject to the restrictions and license terms set forth in the applicable Government contract, and, to the extent applicable by the terms of the Government contract, the additional rights set forth in FAR 52.227-19, Commercial Computer Software License (December 2007). Oracle America, Inc., 500 Oracle Parkway, Redwood City, CA 94065.This software or hardware is developed for general use in a variety of information management applications. It is not developed or intended for use in any inherently dangerous applications, including applications that may create a risk of personal injury. If you use this software or hardware in dangerous applications, then you shall be responsible to take all appropriate fail-safe, backup, redundancy, and other measures to ensure its safe use. Oracle Corporation and its affiliates disclaim any liability for any damages caused by use of this software or hardware in dangerous applications. Oracle and Java are registered trademarks of Oracle and/or its affiliates. Other names may be trademarks of their respective owners.Intel and Intel Xeon are trademarks or registered trademarks of Intel Corporation. All SPARC trademarks are used under license and are trademarks or registered trademarks of SPARC International, Inc. AMD, Opteron, the AMD logo, and the AMD Opteron logo are trademarks or registered trademarks of Advanced Micro Devices. UNIX is a registered trademark of The Open Group.This software or hardware and documentation may provide access to or information on content, products, and services from third parties. Oracle Corporation and its affiliates are not responsible for and expressly disclaim all warranties of any kind with respect to third-party content, products, and services. Oracle Corporation and its affiliates will not be responsible for any loss, costs, or damages incurred due to your access to or use of third-party content, products, or services.。