6509虚拟交换机配置步骤
交换机配置的基本步骤
交换机配置的基本步骤一、连接交换机在进行交换机配置之前,首先要确保交换机与其他设备的连接正常。
可以通过网线将交换机与电脑或其他网络设备连接起来。
同时,还需要将交换机的电源插入电源插座,确保交换机能够正常工作。
二、设置管理IP地址交换机作为网络设备,需要拥有一个唯一的IP地址,以便进行管理和配置。
在交换机上,可以通过命令行界面或者Web界面来设置管理IP地址。
一般情况下,通过命令行界面的方式更为常用。
设置管理IP地址的步骤如下:1. 进入交换机的命令行界面,通过用户名和密码登录。
2. 进入全局配置模式,在该模式下可以配置交换机的各项参数。
3. 输入命令“interface vlan 1”来进入VLAN 1接口配置模式。
4. 输入命令“ip address x.x.x.x y.y.y.y”,其中x.x.x.x代表交换机的IP地址,y.y.y.y代表子网掩码。
5. 输入命令“no shutdown”来启用该接口。
6. 输入命令“exit”退出当前模式。
三、配置VLANVLAN是虚拟局域网的缩写,可以将一个物理局域网划分为多个逻辑上独立的子网。
配置VLAN可以提高网络的安全性和管理灵活性。
配置VLAN的步骤如下:1. 进入交换机的命令行界面,通过用户名和密码登录。
2. 进入全局配置模式。
3. 输入命令“vlan vlan-id”来创建一个VLAN,其中vlan-id代表VLAN的ID号。
4. 输入命令“name vlan-name”来为该VLAN设置一个名称。
5. 输入命令“exit”退出当前模式。
四、配置端口端口是交换机上与其他设备连接的接口,可以对端口进行配置以满足网络需求。
配置端口的步骤如下:1. 进入交换机的命令行界面,通过用户名和密码登录。
2. 进入全局配置模式。
3. 输入命令“interface interface-id”来选择一个端口进行配置,其中interface-id代表端口的ID号。
交换机的基本配置实验步骤
交换机的基本配置实验步骤1.连接交换机:将计算机与交换机通过网线连接,确保连接稳定。
2. 确认网络设备:打开电脑的命令提示符或终端,并输入ipconfig命令(Windows系统)或ifconfig命令(Linux系统),确认计算机连接的交换机的IP地址。
3.登录管理界面:在浏览器的地址栏中输入交换机的IP地址,打开交换机的管理界面。
4. 输入用户名和密码:根据交换机的型号和厂商不同,登录界面的用户名和密码会有所变化。
一般来说,常见的默认用户名是admin,密码可以是admin或空白。
5.创建VLAN:在管理界面中,找到VLAN(虚拟局域网)配置的选项,点击新建VLAN按钮。
输入VLAN的ID和名称,然后保存设置。
重复此步骤可以创建多个VLAN。
6.配置VLAN端口:找到端口配置的选项,选择要配置的端口,并将其绑定到相应的VLAN。
可以将多个端口绑定到同一个VLAN,也可以将端口绑定到不同的VLAN。
7. 配置端口模式:找到端口模式配置的选项,选择要配置的端口,并设置端口的工作模式。
常见的端口模式有access(普通接入模式)和trunk(干道模式)。
选择相应的模式后保存设置。
8.配置端口安全:找到端口安全配置的选项,选择要配置的端口,并设置端口安全的参数。
可以设置最大允许连接的MAC地址数量、报警策略等。
9.配置端口速率限制:找到端口速率限制配置的选项,选择要配置的端口,并设置端口的最大发送和接收速率。
可以根据需要对端口的速率进行限制。
10.保存并应用配置:在所有配置都完成后,需要点击保存或应用配置的按钮,使配置生效。
有些交换机还需要重启才能使新配置生效。
11. 验证配置:在配置应用后,需要验证设备是否按照配置正常工作。
可以通过ping命令或其他网络工具来测试不同设备之间的连通性。
12.备份配置:完成配置后,建议备份交换机的配置文件。
这样,如果需要恢复交换机的配置或将同样的配置应用到其他交换机,就可以方便地进行操作。
tg s6509说明书
tg s6509说明书建立到控制台的连接在进行配置tg s6509和将交换机接入网络前必须通过控制台来进入交换机的CLI,对交换机进行配置。
在进入CLI后,通过命令enable 进入到privileged 模式。
通过以下步骤将终端连接到交换机的控制口描述命令Step 1 终端的参数配置如下: 9600 baud, 8 data bits, no parity, 2 stop bits. - Step 2 打开交换机电源,出现交换机的启动信息. -Step 3 在提示输入密码的提示符下输入回车. -Step 4 进入privileged 模式. enableStep 5 在提示输入密码的提示符下输入回车. -配置交换机的地址在远程登录交换机前你必须为交换机配置地址,掩码和网关等信息在你第一次配置交换机时,将sc0口配置到default VLAN,即VLAN 1中,在你配置了其他VLAN以后,你可以将sc0口配置到其他VLAN 中,但是sc0口的地址和网关必须与所在的VLAN 的网段对应.配置IP地址和网关的步骤如下描述命令Step 1 配置sc0口的地址/掩码set interface sc0ip_addr/netmaskStep 2 (可选) 将sc0口配置到对应的VLAN中set interface sc0 vlan_numStep 3 配置网关set ip route default gatewayStep 4 检查sc0口地址show interfaceStep 5 检查网关地址show ip routeStep 6 测试网络连通性ping [-s] host [packet_size][packet_count]。
Cisco6509-VSS配置
Cisco6509-VSS配置VSS配置一、在核心交换机65-1上配置VSS(1)将核心交换机65-1 上与65-2 相连的接口TenGigabitEthernet5/4 和TenGigabitEthernet5/5配置为EtherChannel:switch-1(config)#interface range tenGigabitEthernet 5/4 - 5 switch-1(config-if-range)#channel-group 10 mode onswitch-1(config-if-range)#no shutdown% Range command terminated because it failed on TenGigabitEthernet5/4switch-1(config-if-range)#exit(2)配置VSS域名与VSS主机号:switch-1(config)#switch virtual domain 100Domain ID 100 config will take effect onlyafter the exec command 'switch convert mode virtual' is issuedswitch-1(config-vs-domain)#switch 1switch-1(config-vs-domain)#switch 1 priority 200switch-1(config-vs-domain)#switch 1 preemptPlease note that Preempt configuration will make the ACTIVE switch with lower priority to reload forcefully when preempt timer expiresswitch-1(config-vs-domain)#exit说明:配置VSS 的域名为100,范围为1-255,两台交换机必须相同;配置VSS的主机号码为1,必须一台为1,另一台为2;并配置VSS 优先级为200,默认为100,数字越大,优先级越高,便能成为主VSS 交换机。
CISCO交换机6509简介(初级学习)
目录第1章CISCO交换机概述 (6)1.1概述 (6)1.2 Cisco交换机产品介绍 (7)1.2.1低端产品 (7)1.2.2中端产品 (7)1.2.3高端产品 (7)1.2.4单板与华为S8016的对比............................................................... 错误!未定义书签。
第2章Catalyst6000系列 (8)2.1特性表与华为S8016的对比...................................................................... 错误!未定义书签。
2.2接口模块与华为S8016的对比.................................................................. 错误!未定义书签。
第3章多层交换技术 (9)3.1概述 (9)3.2 Catalyst交换机的VLAN交换技术 (11)第4章6509的进一步配置 (18)4.1准备 (18)4.1.1网桥或交换机 (18)4.1.2生成树协议 (18)4.1.3 V L A N (18)4.1.4中继 (19)4.1.5捆绑端口 (19)4.1.6配置 (19)4.2 6509配置实战 (20)4.2.1 Catalyst模式 (20)4.2.2控制台波特率 (21)4.2.3 sc0接口 (21)4.2.4 IP允许表 (21)4.2.5 Reset命令 (22)4.2.6配置文件 (22)4.2.7快速以太网和千兆快速以太网端口的配置 (25)4.2.8生成树协议的使用 (26)4.2.9配置VLAN (26)4.2.10配置动态VLAN (26)4.2.11使用外部路由器路由VLAN (26)关键词:Catalyst 6509;S8016;多层交换(MLS);VLAN;6509配置摘要:第一章CISCO交换机概览”,对于想了解cisco的Catalyst系列交换机知识的可以看看;第二章Catalyst6000系列”,着重简述了6000系列交换机的规格。
关于Cisco 65097609 交换机Netflow的配置
关于Cisco 6509/7609 交换机Netflow的配置Netflow 在6500和7209 交换机上配置和路由器上配置有所不同,在公司开发Netflow的应用上,发现现场工程师基本没有配置对,导致流量出不来。
下面列出配置信息;CATOS的配置也的参考该配置1、首先看看Netflow配置是否正常起来:Switch# show mls nde一般看到都是Netflow Data Export disabled 这说明Netflow都没有起来。
参看Cisco 《Configuring NetFlow Data Export》PDf文档,默认是Disabled的2、启动netflowSwitch(config)# mls netflow3、启动netflow 的双向流量Switch(config)# mls flow ip destination-source4、启动NDE发送以及发送版本Switch(config)# mls nde sender [version {5 | 7}]如果只输入mls nde sender系统默认启用的是版本7,如果需要版本5,则mls nde send er version 5,目前版本能配的是5或7,这两个版本WEB均能出现正常的数据。
对于Cisco IOS 12.17以下版本的交换机,只有版本7。
5、进入VLAN,启动接口Netflow(如果在物理接口上其3层,则直接进入物理接口)。
Switch(config)# interface vlan 5Switch(config-if)# ip flow-export ingressSwitch(config-if)# ip route-cache flow6、配置Netflow的数据源,如果没有配置Loopback的接口,可以采用物理接口,建议配置L oopback接口Switch(config)# ip flow-export source loopback 07、检测Switch# show mls nde (能看到如下的信息,而且明确Netflow Data Export enable d )Netflow Data Export enabledExporting flows to 10.110.10.254 (9991)Exporting flows from 10.16.68.72 (55425)Version: 5Include Filter not configuredExclude Filter is:Total Netflow Data Export Packets are:49 packets, 0 no packets, 247 recordsTotal Netflow Data Export Send Errors:IPWRITE_NO_FIB = 0IPWRITE_ADJ_FAILED = 0IPWRITE_PROCESS = 0Switch(config)# show mls netfow ip看到大量的流量信息,大量的滚屏信息。
思科交换机6509配置实例(双机热备)
CISCO 6509配置手册1.设置时间switch#config tswitch(config)# clock timezone GMT 8 ;配置时区switch(config)# clock set 13:30:21 31 JAN 2004 ;配置交换机时间2.设置主机名及密码Switch#congfig tSwitch(config)#hostname 6509a //配置交换机名称6509a(config)#enable password cisco //配置用户密码6509a (config)#enable secret cisco //配置安全密码6509a (config-line)#line vty 0 15 //配置远程访问密码6509a (config-line)#login6509a (config-line)#password cisco6509a (config-line)#login6509a (config-line)#^z6509a #show running-config //查看配置信息6509a #copy running-config startup-config6509a #show startup-config6509a #show bootvar6509a #dir bootflash:6509a #copy system:running-config nvram:startup-config6509a #show fabric status6509a #show hardware3.配置vlan6509a #config t6509a (config)#vlan 3016509a (config-vlan)# name hexinxitong6509a (config)#vlan 3026509a (config-vlan)# name callcenter6509a (config)#vlan 3036509a (config-vlan)# name kuaijicaiwu6509a (config)#vlan 3046509a (config-vlan)# name guojiyewu6509a (config)#vlan 3056509a (config-vlan)# name guanlixitong6509a (config)#vlan 3066509a (config-vlan)# name ceshihuanjing6509a (config)#vlan 3076509a (config-vlan)# name wangluoguanli6509a (config-vlan)#exit6509a (config)#exit6509a #show vlan6509a (config)#interface range giga 2/1 – 8 //配置端口信息6509a (config-if-range)#switchport //二层交换模式6509a (config-if-range)#switchport mode access6509a (config-if-range)#switchport access vlan 3016509a (config-if-range)#exit6509a (config)#interface range giga 2/9– 146509a (config-if-range)#switchport mode access6509a (config-if-range)#switchport access vlan 3026509a (config-if-range)#exit6509a (config)#interface range giga 2/15 – 176509a (config-if-range)#switchport mode access6509a (config-if-range)#switchport access vlan 3036509a (config-if-range)#exit6509a (config)#interface range giga 2/18 – 226509a (config-if-range)#switchport mode access6509a (config-if-range)#switchport access vlan 3046509a (config)#interface range giga 2/23 – 266509a (config-if-range)#switchport mode access6509a (config-if-range)#switchport access vlan 3056509a (config-if-range)#exit6509a (config)#interface range giga 2/27 – 336509a (config-if-range)#switchport mode access6509a (config-if-range)#switchport access vlan 3066509a (config-if-range)#exit6509a (config)#interface range giga 2/34 – 396509a (config-if-range)#switchport mode access6509a (config-if-range)#switchport access vlan 3076509a (config-if-range)#exit6509a (config)#interface giga 2/486509a (config-if)#ip address 12.10.254.2 255.255.255.0 6509a (config-if)#no shut6509a (config)#exit6509a #show vlan4.配置trunk6509a(config)#int giga 5/16509a(config-if)#shut down6509a(config-if)#switchport6509a(config-if)#switchport trunk enca dot1q6509a(config-if)#switchport mode trunk6509a #show int giga 2/48 trunk6509a #show vtp counters6509a #show vtp status6509a(config)#int giga 6/16509a(config-if)#shut down6509a(config-if)#switchport6509a(config-if)#switchport trunk enca dot1q6509a(config-if)#switchport mode trunk6509a(config-if)#no shut down5.设置vlan地址及HSRP6509a #config t6509a(config) #int vlan 3016509a(config-if) #ip address 192.1.2.2 255.255.255.0 6509a(config-if) #no ip redirects6509a(config-if) #standby 1 ip 192.1.2.16509a(config-if) #standby 1 priority 1056509a(config-if) #standby 1 preempt6509a(config-if) #standby 1 track giga 1/486509a(config-if) #no shutdown6509a(config-if) #exit6509a(config) #exit6509a#show ip interface brief6509a #config t6509a(config) #int vlan 3026509a(config-if) #ip address 192.100.4.2 255.255.255.06509a(config-if) #no ip redirects6509a(config-if) #standby 2 ip 192.100.4.16509a(config-if) #standby 2 priority 1056509a(config-if) #standby 2 preempt6509a(config-if) #standby 2 track giga 1/486509a(config-if) #no shutdown6509a(config-if) #exit6509a(config) #exit6509a#show ip interface brief6509a #config t6509a(config) #int vlan 3036509a(config-if) #ip address 192.100.5.2 255.255.255.0 6509a(config-if) #no ip redirects6509a(config-if) #standby 3 ip 192.100.5.16509a(config-if) #standby 3 priority 1056509a(config-if) #standby 3 preempt6509a(config-if) #standby 3 track giga 1/486509a(config-if) #no shutdown6509a(config-if) #exit6509a(config) #exit6509a#show ip interface brief6509a #config t6509a(config) #int vlan 3046509a(config-if) #ip address 192.100.6.2 255.255.255.0 6509a(config-if) #no ip redirects6509a(config-if) #standby 4 ip 192.100.6.16509a(config-if) #standby 4 priority 1056509a(config-if) #standby 4 preempt6509a(config-if) #standby 4 track giga 1/486509a(config-if) #no shutdown6509a(config-if) #exit6509a(config) #exit6509a#show ip interface brief6509a #config t6509a(config) #int vlan 3056509a(config-if) #ip address 192.100.7.2 255.255.255.0 6509a(config-if) #no ip redirects6509a(config-if) #standby 5 ip 192.100.7.16509a(config-if) #standby 5 preempt6509a(config-if) #no shutdown6509a(config-if) #exit6509a(config) #exit6509a#show ip interface brief6509a #config t6509a(config) #int vlan 3066509a(config-if) #ip address 192.100.8.2 255.255.255.0 6509a(config-if) #no ip redirects6509a(config-if) #standby 6 ip 192.100.8.16509a(config-if) #standby 6 preempt6509a(config-if) #no shutdown6509a(config-if) #exit6509a(config) #exit6509a#show ip interface brief6509a #config t6509a(config) #int vlan 3076509a(config-if) #ip address 192.100.9.2 255.255.255.0 6509a(config-if) #no ip redirects6509a(config-if) #standby 7 ip 192.100.9.16509a(config-if) #standby 7 preempt6509a(config-if) #no shutdown6509a(config-if) #exit6509a(config) #exit6509a#show ip interface brief6.配置EIGRP6509a #config t6509a(config) #ip routing eigrp 1006509a(config) #router eigrp 1006509a(config-router) #network 192.1.2.06509a(config-router) #network 192.100.0 .0 255.255.0.0 6509a(config-router) #network 12.0.0.06509a(config-router) #network 192.254.253.06509a(config-router) #no auto-summary6509a(config-router) #^z6509a #show ip proto6509a #show ip route。
Cisco Catalyst 6509交换机FWSM防火墙模块设置资料
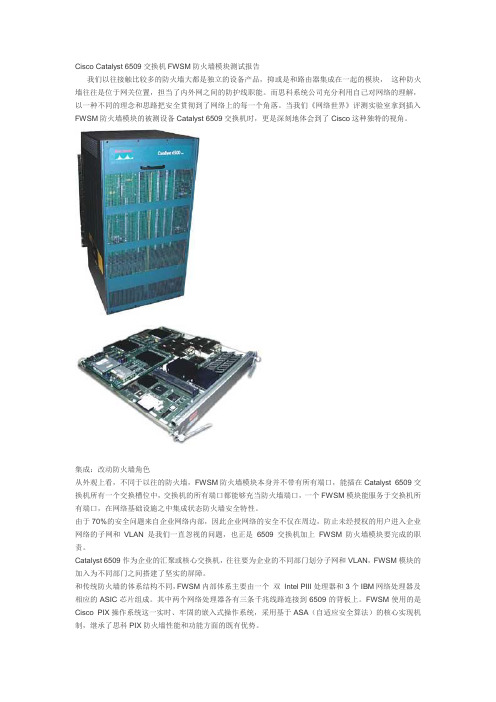
Cisco Catalyst 6509交换机FWSM防火墙模块测试报告我们以往接触比较多的防火墙大都是独立的设备产品,抑或是和路由器集成在一起的模块,这种防火墙往往是位于网关位置,担当了内外网之间的防护线职能。
而思科系统公司充分利用自己对网络的理解,以一种不同的理念和思路把安全贯彻到了网络上的每一个角落。
当我们《网络世界》评测实验室拿到插入FWSM防火墙模块的被测设备Catalyst 6509交换机时,更是深刻地体会到了Cisco这种独特的视角。
集成:改动防火墙角色从外观上看,不同于以往的防火墙,FWSM防火墙模块本身并不带有所有端口,能插在Catalyst 6509交换机所有一个交换槽位中,交换机的所有端口都能够充当防火墙端口,一个FWSM模块能服务于交换机所有端口,在网络基础设施之中集成状态防火墙安全特性。
由于70%的安全问题来自企业网络内部,因此企业网络的安全不仅在周边,防止未经授权的用户进入企业网络的子网和VLAN是我们一直忽视的问题,也正是6509交换机加上FWSM防火墙模块要完成的职责。
Catalyst 6509作为企业的汇聚或核心交换机,往往要为企业的不同部门划分子网和VLAN,FWSM模块的加入为不同部门之间搭建了坚实的屏障。
和传统防火墙的体系结构不同,FWSM内部体系主要由一个双Intel PIII处理器和3个IBM网络处理器及相应的ASIC芯片组成。
其中两个网络处理器各有三条千兆线路连接到6509的背板上。
FWSM使用的是Cisco PIX操作系统这一实时、牢固的嵌入式操作系统,采用基于ASA(自适应安全算法)的核心实现机制,继承了思科PIX防火墙性能和功能方面的既有优势。
对于已购买了Catalyst 6509交换机的用户来说,他们不必对原有产品进行更换,就能通过独立购买FWSM 模块,获得这种防火墙特性,在简化网络结构的同时,真正实现对用户的投资保护。
功能:细致到每一处从FWSM防火墙模块的管理和易用性来看,对于那些非常熟悉Cisco IOS命令行的工程师来说,通过Console或Telnet进行设置非常容易上手,而对于笔者这种对Cisco 命令仅略通一二的人来说,最佳的管理和设置方式莫过于用Web进行管理,Web管理其实是调用了用来管理PIX防火墙的PIX Device Manager(PDM)2.1(1)工具,非常直观地帮助用户进行规则设置、管理和状态监视。
思科交换机6509的配置方法
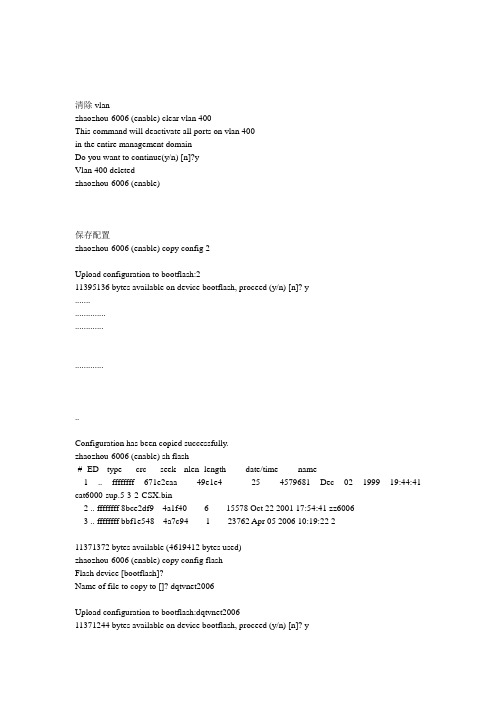
清除vlanzhaozhou-6006 (enable) clear vlan 400This command will deactivate all ports on vlan 400in the entire management domainDo you want to continue(y/n) [n]?yVlan 400 deletedzhaozhou-6006 (enable)保存配置zhaozhou-6006 (enable) copy config 2Upload configuration to bootflash:211395136 bytes available on device bootflash, proceed (y/n) [n]? y.................................................Configuration has been copied successfully.zhaozhou-6006 (enable) sh flash-#- ED --type-- --crc--- -seek-- nlen -length- -----date/time------ name1 .. ffffffff 671e2eaa 49e1e4 25 4579681 Dec 02 1999 19:44:41 cat6000-sup.5-3-2-CSX.bin2 .. ffffffff 8bce2df9 4a1f40 6 15578 Oct 22 2001 17:54:41 zz60063 .. ffffffff bbf1e548 4a7c94 1 23762 Apr 05 2006 10:19:22 211371372 bytes available (4619412 bytes used)zhaozhou-6006 (enable) copy config flashFlash device [bootflash]?Name of file to copy to []? dqtvnet2006Upload configuration to bootflash:dqtvnet200611371244 bytes available on device bootflash, proceed (y/n) [n]? y.................................................Configuration has been copied successfully.zhaozhou-6006 (enable)删除带有名字的vlanzhaozhou-6006 (enable) copy config 2Upload configuration to bootflash:211395136 bytes available on device bootflash, proceed (y/n) [n]? y.................................................Configuration has been copied successfully.zhaozhou-6006 (enable) sh flash-#- ED --type-- --crc--- -seek-- nlen -length- -----date/time------ name1 .. ffffffff 671e2eaa 49e1e4 25 4579681 Dec 02 1999 19:44:41 cat6000-sup.5-3-2-CSX.bin2 .. ffffffff 8bce2df9 4a1f40 6 15578 Oct 22 2001 17:54:41 zz60063 .. ffffffff bbf1e548 4a7c94 1 23762 Apr 05 2006 10:19:22 211371372 bytes available (4619412 bytes used)zhaozhou-6006 (enable) copy config flashFlash device [bootflash]?Name of file to copy to []? dqtvnet2006Upload configuration to bootflash:dqtvnet200611371244 bytes available on device bootflash, proceed (y/n) [n]? y.................................................Configuration has been copied successfully.zhaozhou-6006 (enable)查看端口命令zhaozhou-6006 (enable) sh intsl0: flags=51<UP,POINTOPOINT,RUNNING>slip 0.0.0.0 dest 0.0.0.0sc0: flags=63<UP,BROADCAST,RUNNING>vlan 100 inet 221.209.150.82 netmask 255.255.255.248 broadcast 221.209.150.87 zhaozhou-6006 (enable)通过命令设置多个端口vlanzhaozhou-6006 (enable) set vlan 1 2/1-48VLAN 1 modified.VLAN 100 modified.VLAN Mod/Ports---- -----------------------1 2/1-485/1-48zhaozhou-6006 (enable)vtp清除#vtpset vtp domain zxstkset vtp mode serverset vtp v2 disableset vtp pruning disableset vtp pruneeligible 2-1000clear vtp pruneeligible 1001-1005set vlan 1 name default type ethernet mtu 1500 said 100001 state activeset vlan 1002 name fddi-default type fddi mtu 1500 said 101002 state activeset vlan 1004 name fddinet-default type fddinet mtu 1500 said 101004 state active bridge 0x0 stp ieeeset vlan 1005 name trnet-default type trbrf mtu 1500 said 101005 state active bridge 0x0 stp ibm set vlan 1003 name token-ring-default type trcrf mtu 1500 said 101003 state active parent 0 ring 0x0 mode srb aremaxhop 0 stemaxhop 0!#ipset interface sc0 100 221.209.150.82/255.255.255.248 221.209.150.87set interface sc0 upzhaozhou-6006 (enable) clear vtp domain zxstkUsage: clear vtp statisticsclear vtp pruneeligible <vlans..>(vlans: 1..1005An example of vlans is 2-10,1005)zhaozhou-6006 (enable) clear vtp pruneeligible 2-1000Vlans 1-1005 will not be pruned on this device.VTP domain zxstk modified.zhaozhou-6006 (enable)设置vtp模式透明zhaozhou-6006 (enable) set vtp mode ?Usage: set vtp [domain <name>] [mode <mode>] [passwd <passwd>][pruning <enable|disable>] [v2 <enable|disable>(mode = client|server|transparentUse passwd '0' to clear vtp password)Usage: set vtp pruneeligible <vlans>(vlans = 2..1000An example of vlans is 2-10,1000)zhaozhou-6006 (enable) set vtp mode transparentVTP domain zxstk modifiedzhaozhou-6006 (enable)设置端口汇聚zhaozhou-6006 (enable) set trunk ?Usage: set trunk <mod_num/port_num> [on|off|desirable|auto|nonegotiate] [vlans] [trunk_type] (vlans = 1..1005An example of vlans is 2-10,1005)(trunk_type = isl,dot1q,dot10,lane,negotiate)zhaozhou-6006 (enable) set trunk 2/3 on 1-400Adding vlans 1-400 to allowed list.Please use the 'clear trunk' command to remove vlans from allowed list.Port(s) 2/3 allowed vlans modified to 1-1005.Failed to set port 2/3 to trunk mode on.Trunk mode 'on' not allowed with trunk encapsulation type 'negotiate'.zhaozhou-6006 (enable) set trunk 2/3 on 1-400 dot1qAdding vlans 1-400 to allowed list.Please use the 'clear trunk' command to remove vlans from allowed list.Port(s) 2/3 allowed vlans modified to 1-1005.Port(s) 2/3 trunk mode set to on.Port(s) 2/3 trunk type set to dot1q.zhaozhou-6006 (enable)。
Cisco 6509安装手册

Catalyst 6509 交换机安装手册version 1.0.0金中信息产业有限公司系统工程部2001.2.5目录1产品概述 (3)2系统描述 (4)2.1 系统特征 (4)2.1.1冗余 (4)2.1.2组件热插拔 (5)2.2 交换组件 (5)2.2.1配置选项 (5)2.2.2风扇 (5)2.2.3电源 (6)3安装 (7)1 产品概述●支持带有两个上行链路千兆端口的监控引擎;●支持MSFC及PFC;●支持可选的冗余监控引擎(带两个千兆上行链路接口);●最多支持八个附加的模块(以太网、快速以太网、千兆以太网及ATM);●支持多层交换模块(MSM);●所有的模块都可以热插拔;●支持冗余的、热插拔的AC(交流)电源或DC(直流)电源;●风扇可热插拔;●数据在背板总线上进行转发。
6509的底盘有9个插槽,插槽1保留给监控引擎使用,监控引擎提供交换、本地及远程管理、多个千兆上行链路端口功能。
插槽2可以插入一个附加的冗余监控引擎,如果第一个监控引擎失效,则这个监控引擎可以扮演备份的角色。
如果不需要冗余监控引擎,这个插槽就可以插入其它的模块。
其外形图如下:2 系统描述注:下面的描述适合所有的6000系列,除非有特殊的说明。
2.1 系统特征这个章节描述了6000系列交换机的硬件特征。
对于软件的描述,请参考the Catalyst 6000 Family Software Configuration Guide。
对于模块的描述及安装过程,请参考the Catalyst 6000 Family Module Installation Guide。
2.1.1 冗余6000系列交换机有下列特征:●底盘可放入两个热插拔的监控引擎;●底盘可放入两个冗余的、热插拔的交流或直流并进行负载共享的电源;●风扇是可热插拔的;●底板上的时钟模块是冗余的。
2.1.2 组件热插拔所有的模块(包括监控引擎,如果系统有冗余的监控引擎的话),风扇,电源,都支持热插拔,因此可以在不中断系统或使软件或接口shutdown的情况下对模块进行增加、替换、移动。
6509虚拟交换机配置步骤

1.1.6509虚拟交换机配置1.1.1.交换机1配置1.配置虚拟交换机工作为SSO(stateful switchover)和NSF(nonstopforwarding)冗余模式两台交换机都必须配置启用SSO和NSF。
redundancmode ssoexitrouter ospf 10nsfexit2.分配虚拟交换机域和交换机编号两台交换机的域编号必须一致,交换机编号分别为1和2。
switch virtual domain 100switch 1exit3.配置VSL链路VSL是一个特殊的Port Group,用于虚拟交换机两个机箱之间通讯。
interface port-channel 10switch virtual link 1no shutdownexitinterface tengigabitethernet 5/1channel-group 10 mode onno shutdownexitinterface tengigabitethernet 5/2channel-group 10 mode onno shutdownexit4.将交换机转换为虚拟交换机工作模式。
switch convert mode virtual1.1.2.交换机2配置1.配置虚拟交换机工作为SSO(stateful switchover)和NSF(nonstopforwarding)冗余模式两台交换机都必须配置启用SSO和NSF。
redundancmode ssoexitrouter ospf 10nsfexit2.分配虚拟交换机域和交换机编号。
两台交换机的域编号必须一致,交换机编号分别为1和2。
switch virtual domain 100switch 2exit3.配置VSL链路VSL是一个特殊的Port Group,用于虚拟交换机两个机箱之间通讯。
interface port-channel 20switch virtual link 1no shutdownexitinterface tengigabitethernet 5/1channel-group 20 mode onno shutdownexitinterface tengigabitethernet 5/2channel-group 20 mode onno shutdownexit4.将交换机转换为虚拟交换机工作模式。
交换机配置的基本步骤
交换机配置的基本步骤一、连接设备在进行交换机配置之前,首先需要确保交换机与其他设备的正确连接。
通过网线将交换机的端口与需要连接的设备(如计算机、服务器、打印机等)的网口相连。
确保连接牢固稳定,以避免网络故障。
二、登录交换机使用终端或通过浏览器访问交换机的管理界面,输入正确的用户名和密码进行登录。
通常默认的用户名为admin,密码为空或为admin。
登录成功后,进入交换机的管理界面,可以进行相关的配置操作。
三、配置管理IP地址在交换机中配置管理IP地址是非常重要的一步,它将作为管理交换机的入口。
在管理界面中找到IP地址配置的选项,通常位于网络设置或系统设置等菜单下。
根据网络环境的要求,输入合适的IP地址、子网掩码和网关等信息,确保交换机可以与其他设备正常通信。
四、配置VLANVLAN(Virtual Local Area Network)是一种虚拟局域网技术,可以将一个物理网络划分成多个逻辑上独立的虚拟网络。
通过配置VLAN,可以实现不同VLAN之间的隔离和通信控制。
在交换机的管理界面中,找到VLAN配置的选项,根据需求创建或编辑VLAN,并将端口划分到相应的VLAN中。
五、配置端口交换机的端口配置非常重要,可以通过配置端口实现对网络流量的控制和管理。
在交换机管理界面中,找到端口配置的选项,可以进行端口的开启、关闭、速率限制、双工模式设置等操作。
根据实际需求,对各个端口进行相应的配置。
六、配置链路聚合链路聚合是将多个物理链路捆绑成一个逻辑链路的技术,可以提升网络带宽和冗余性。
在交换机的管理界面中,找到链路聚合的选项,创建聚合组并将需要聚合的端口添加到该组中。
确保各个端口的配置一致,并根据需要选择合适的链路聚合协议。
七、配置路由交换机通常也具备一定的路由功能,可以实现不同子网之间的通信。
在交换机的管理界面中,找到路由配置的选项,根据网络拓扑和路由策略配置相关的路由表和路由规则。
确保路由配置的准确性和一致性,以保证网络的正常通信。
cisco6509配置手册

cisco 6509交换机配置手册一个经典配置包括Catalyst6509 4006交换机配置方案拓扑图如下:一、 Catalyst 6509交换机配置方案1.1 、配置 6509 二层交换Console> (enable) set system name bg-sw-01 /设备名称Bg-sw-01> (enable) set passwordEnter old password:Enter new password: test/ 设备口令Retype new password: testBg-sw-01> (enable) set enablepassEnter old password:Enter new password: test/ 设备口令Retype new password: testBg-sw-01> (enable) set banner motd % Welcome to the c6509 in the office %/提示文本Bg-sw-01> (enable) set interface sc0 10.234.180.21 255.255.255.0/ 设置管理接口#sh intBg-sw-01> (enable) set ip route default 10.234.180.234/ 设置默认网关#sh iprouteBg-sw-01> (enable) set vtp mode server/ 设置 VTP模式 #sh vtpdomainBg-sw-01> (enable) set vtp domain Core_Net/ 设置 VTP域名Bg-sw-01> (enable) set vlan 31 name ZhongSanLu/ 创建 VLAN #sh vlanBg-sw-01> (enable) set vlan 32 name YiYangBg-sw-01> (enable) set vlan 33 name JianXiuBg-sw-01> (enable) set vlan 34 name RaoDianBg-sw-01> (enable) set vlan 35 name JinSanLouBg-sw-01> (enable) set vlan 36 name WuZiBg-sw-01> (enable) set port channel 1/1-2 on/ 设置 Channel #shport channelBg-sw-01> (enable) set trunk 1/1 on dot1q 1-1005Bg-sw-01> (enable) set trunk 2/2 on dot1q 1-1005 /设置trunk口#sh trunk #Bg-sw-01> (enable) set trunk 2/3 on dot1q 1-1005Bg-sw-01> (enable) set trunk 2/4 on dot1q 1-1005Bg-sw-01> (enable) set trunk 2/5 on dot1q 1-1005Bg-sw-01> (enable) set trunk 2/6 on dot1q 1-1005Bg-sw-01> (enable) set trunk 2/7 on dot1q 1-1005Bg-sw-01> (enable) set spantree root 1-40 dia 4 /设为spantree的根#sh spantree Bg-sw-01> (enable) set spantree portfast 1/1-2 enable /设spantree端口快速启用Bg-sw-01> (enable) set spantree portfast 2/1-8 enableBg-sw-01> (enable) set spantree uplinkfast enable /设spantree端口快速切换Bg-sw-01> (enable) set spantree backbonefast enable /设spantree端口快速定位根1.2 、配置路由Console> (enable) session 15/ 进入路由子卡Router(config)# hostname c6509-msfc /设备名c6509-msfc (config)# enable password testc6509-msfc (config)# enable secret testC6509-msfc(config)# banner motd % Welcome to the c6509-msfc in the Office %/ 设口令/设提示文本c6509-msfc (config)# line vty 0 4 /进入VTY模式c6509-msfc (config-line)#login/登入提示c6509-msfc (config-line)#password test/设用户级口令c6509-msfc (config-line)# endC6509-msfc#configure terminal /进入全局模式Enter configuration commands, one per line. End with CNTL/Z.C6509-msfc(config)# interface vlan 1C6509-msfc(config-if)# ip address 10.234.180.232 255.255.255.0 / C6509-msfc(config-if)# no shutdownC6509-msfc(config-if)#standby 1 ip 10.234.180.234虚IP地址/ 进入虚子接口加 ip 地址/ 开启端口/ 建 HSRP组并设C6509-msfc(config-if)# standby 1 priority 110/ 设优先级C6509-msfc(config-if)# standby 1 preempt/ 设切换许可C6509-msfc(config-if)# interface vlan 31C6509-msfc(config-if)# ip address 10.234.181.60 255.255.255.192C6509-msfc(config-if)# no shutdownC6509-msfc(config-if)# standby 31 ip 10.234.181.62C6509-msfc(config-if)# standby 31 priority 110C6509-msfc(config-if)# standby 31 preemptC6509-msfc(config-if)# interfacevlan 32C6509-msfc(config-if)# ip address 10.234.181.124 255.255.255.192C6509-msfc(config-if)# no shutdownC6509-msfc(config-if)# standby 32 ip 10.234.181.126C6509-msfc(config-if)# standby 32 priority 110C6509-msfc(config-if)# standby 32 preemptC6509-msfc(config-if)# interface vlan 33C6509-msfc(config-if)# ip address 10.234.181.188 255.255.255.192C6509-msfc(config-if)# no shutdownC6509-msfc(config-if)# standby 33 ip 10.234.181.190C6509-msfc(config-if)# standby 33 priority 110C6509-msfc(config-if)# standby 33 preemptC6509-msfc(config-if)# interface vlan 34C6509-msfc(config-if)# ip address 10.234.181.220 255.255.255.224C6509-msfc(config-if)# no shutdownC6509-msfc(config-if)# standby 34 ip 10.234.181.222C6509-msfc(config-if)# standby 34 priority 110C6509-msfc(config-if)# standby 34 preemptC6509-msfc(config-if)# interface vlan 35C6509-msfc(config-if)# ip address 10.234.181.254 252.255.255.224C6509-msfc(config-if)# no shutdownC6509-msfc(config-if)# standby 35 ip 10.234.181.254C6509-msfc(config-if)# standby 35 priority 110C6509-msfc(config-if)# standby 35 preemptC6509-msfc(config-if)# interface vlan 36C6509-msfc(config-if)# ip address 10.234.182.28 255.255.255.224C6509-msfc(config-if)# no shutdownC6509-msfc(config-if)# standby 36 ip 10.234.182.30C6509-msfc(config-if)# standby 36 priority 110C6509-msfc(config-if)# standby 36 preemptC6509-msfc(config-if)# exitC6509-msfc #copy running config[page]二、 Catalyst 4006交换机配置方案2.1 、配置 4006 二层交换(三层交换模块安置在第二个槽)Console> (enable) set system name bg-sw-02 /设备名称Bg-sw-02> (enable) set passwordEnter old password:Enter new password: test/ 设备口令Retype new password: testBg-sw-02> (enable) set enablepassEnter old password:Enter new password: test/ 设备口令Retype new password: testBg-sw-02> (enable) set banner motd % Welcome to the c4006 in the office % /提示文本Bg-sw-02> (enable) set interface sc0 10.234.180.22intBg-sw-02> (enable) set ip route default 10.234.180.234 /255.255.255.0 / 设置管理接口#sh 设置默认网关#sh ip routeBg-sw-02> (enable) set vtp mode server /设置VTP模式#sh vtp domain Bg-sw-02> (enable) set vtp domain Core_Net /设置VTP域名Bg-sw-02> (enable) set vlan 31 name ZhongSanLu /创建VLAN #sh vlanBg-sw-02> (enable) set vlan 32 name YiYangBg-sw-02> (enable) set vlan 33 name JianXiuBg-sw-02> (enable) set vlan 34 name RaoDianBg-sw-02> (enable) set vlan 35 name JinSanLouBg-sw-02> (enable) set vlan 36 name WuZiBg-sw-02> (enable) set port channel 1/1-2 on /设置Channel #sh port channel Bg-sw-02> (enable) set trunk 1/1 on dot1q 1-1005Bg-sw-02> (enable) set port channel 2/1-2 on /设置Channel #sh port channelBg-sw-02> (enable) set trunk 2/1 on dot1q 1-1005Bg-sw-02> (enable) set trunk 4/1 on dot1q 1-1005 /设置trunk口#sh trunk # Bg-sw-02> (enable) set trunk 4/3 on dot1q 1-1005Bg-sw-02> (enable) set trunk 4/4 on dot1q 1-1005Bg-sw-02> (enable) set spantree root secondary 1-40 dia 4Bg-sw-02> (enable) set spantree portfast 1/1-2 enable /设spantree端口快速启用Bg-sw-02> (enable) set spantree portfast 2/1-34 enableBg-sw-02> (enable) set spantree portfast 3/1-32 enableBg-sw-02> (enable) set spantree portfast 4/1-6 enableBg-sw-02> (enable) set spantree uplinkfast enable /设spantree端口快速切换Bg-sw-02> (enable) set spantree backbonefast enable /设spantree端口快速定位根2.1 、配置三层交换模块(三层交换模块安置在第二)Console> (enable) session 2 /进入路由子卡Router(config)# hostname c4006-L3 /设备名c4006-L3 (config)# enable password testc4006-L3 (config)# enable secret testc4006-L3(config)# banner motd % Welcome to the c4006-l3 in the Office % // 设口令设提示文本c4006-L3 (config)# line vty 0 4 /进入VTY模式c4006-L3 (config-line)#login/登入提示c4006-L3 (config-line)#password test/设用户级口令c4006-L3 (config-line)# endC4006-L3#configure terminalEnter configuration commands, one per line. End with CNTL/Z.C4006-L3(config)# interface port-channel 1 /建内部虚端口C4006-L3(config)# interface g3/ 进入接口模式C4006-L3(config-if)# channel-group 1/加入到channelC4006-L3(config-if)# exitC4006-L3(config)# interface g4/ 进入接口模式C4006-L3(config-if)# channel-group 1 /加入到channel组中组中C4006-L3(config-if)# exitC4006-L3(config)# interface port-channel 1.1 /进入子接口模式C4006-L3(config-if)# encapsulation dot1q 1 native/封装trunkC4006-L3(config-if)# ip address 10.234.180.233 255.255.255.0/ 加 ip 地址C4006-L3(config-if)# no shutdown/ 开启端口C4006-L3(config-if)# standby 1 ip 10.234.180.234 /建HSRP组并设虚IP 地址C4006-L3(config-if)# standby 1 priority 100 /设优先级C4006-L3(config-if)# standby 1 preempt /设切换许可C4006-L3(config-if)# interface port-channel 1.31C4006-L3(config-if)# encapsulation dot1q 31C4006-L3(config-if)# ip address 10.234.181.61 255.255.255.192C4006-L3(config-if)# no shutdownC4006-L3(config-if)# standby 31 ip 10.234.181.62C4006-L3(config-if)# standby 31 priority 100C4006-L3(config-if)# standby 31 preemptC4006-L3(config-if)# interface port-channel 1.32C4006-L3(config-if)# encapsulation dot1q 32C4006-L3(config-if)# ip address 10.234.181.125 255.255.255.192C4006-L3(config-if)# no shutdownC4006-L3(config-if)# standby 32 ip 10.234.181.126C4006-L3(config-if)# standby 32 priority 100C4006-L3(config-if)# standby 32 preemptC4006-L3(config-if)# interface port-channel 1.33C4006-L3(config-if)# encapsulation dot1q 33C4006-L3(config-if)# ip address 10.234.181.189 255.255.255.192C4006-L3(config-if)# no shutdownC4006-L3(config-if)# standby 33 ip 10.234.181.190C4006-L3(config-if)# standby 33 priority 100C4006-L3(config-if)# standby 33 preemptC4006-L3(config-if)# interface port-channel 1.34C4006-L3(config-if)# encapsulation dot1q 34C4006-L3(config-if)# ip address 10.234.181.221 255.255.255.224C4006-L3(config-if)# no shutdownC4006-L3(config-if)# standby 34 ip 10.234.181.222C4006-L3(config-if)# standby 34 priority 100C4006-L3(config-if)# standby 34 preemptC4006-L3(config-if)# interface port-channel 1.35C4006-L3(config-if)# encapsulation dot1q 35C4006-L3(config-if)# ip address 10.234.181.253 255.255.255.224C4006-L3(config-if)# no shutdownC4006-L3(config-if)# standby 35 ip 10.234.181.254C4006-L3(config-if)# standby 35 priority 100C4006-L3(config-if)# standby 35 preemptC4006-L3(config-if)# interface port-channel 1.36C4006-L3(config-if)# encapsulation dot1q 36C4006-L3(config-if)# ip address 10.234.182.29 255.255.255.224C4006-L3(config-if)# no shutdownC4006-L3(config-if)# standby 36 ip 10.234.182.30C4006-L3(config-if)# standby 36 priority 100C4006-L3(config-if)# standby 36 preemptC4006-L3(config-if)# exitC4006-L3#copy running config[page]三、 Catalyst 3500XL交换机配置方案3.1 、办公楼Catalyst 3500XL交换机配置方案第一台 Catalyst 3548switch#configure terminalEnter configuration commands, one per line. End with CNTL/Z.switch(config)#hostname bg-sw-03 /设备名bg-sw-03(config)#enable password test /设口令bg-sw-03(config)#enable secret testbg-sw-03(config)#banner motd % Welcome to the C3548 in the Office % /提示文本bg-sw-03(config)#line vty 0 4/进入VTY模式bg-sw-03(config.line)#login/登入提示bg-sw-03(config.line)#password test /设用户级口令bg-sw-03(config.line)#exitbg-sw-03 (config)#int vlan 1 /进入内部管理接口bg-sw-03 (config-if)#ip address 10.234.180.23 255.255.255.0bg-sw-03(config-if)#exit bg-sw-03(config)#ip default.gateway 10.234.180.234bg-sw-03(config)#end /加入 IP 地址/ 设网关bg-sw-03#vlan database/进入vtp数据库bg-sw-03(vlan)#vtp domain Corp_Net/ 设vtp域bg-sw-03(vlan)#vtp client /设定vtp模式bg-sw-03(vlan)#exitbg-sw-03(config)#spantree uplinkfast/ 设定端口快速上连bg-sw-03(config)#int g0/1/ 进入接口模式bg-sw-03(config-if)#switchport mode trunk/ 设为trunk模式bg-sw-03(config-if)#switchport trunk encapsulation dot1q/ 设定封装模式bg-sw-03(config-if)#switchport trunk allowed vlan all许可 vlanbg-sw-03(config-if)#spanning-tree portfast /设定端口快速启用/ 设定trunkbg-sw-03(config-if)#int g0/2/ 进入接口模式bg-sw-03(config-if)#switchport mode trunk/ 设为trunk模式bg-sw-03(config-if)#switchport trunk encapsulation dot1q/ 设定封装模式bg-sw-03(config-if)#switchport trunk allowed vlan all/ 设定 trunk许可 vlanbg-sw-03(config-if)#spanning-tree portfast /设定端口快速启用bg-sw-03(config-if)#exitbg-sw-03#write memory第二台 Catalyst 3548switch#configure terminalEnter configuration commands, one per line. End with CNTL/Z.switch(config)#hostname bg-sw-04 /设备名bg-sw-04(config)#enable password test /设口令bg-sw-04(config)#enable secret testbg-sw-04(config)#banner motd % Welcome to the C3548 in the Office % /提示文本bg-sw-04(config)#line vty 0 4 /进入VTY模式bg-sw-04(config.line)#login /登入提示bg-sw-04(config.line)#password test /设用户级口令bg-sw-04(config.line)#exit /进入内部管理接口bg-sw-04(config)#int vlan 1bg-sw-04(config-if)#ip address 10.234.180.24 255.255.255.0bg-sw-04(config-if)#exitbg-sw-04(config)#ip default.gateway 10.234.180.234bg-sw-04(config)#endbg-sw-04#vlan databasebg-sw-04(vlan)#vtp domain Corp_Netbg-sw-04(vlan)#vtp clientbg-sw-04(vlan)#exitbg-sw-04(config)#spantree uplinkfastbg-sw-04(config)#int g0/1bg-sw-04(config-if)#switchport mode trunkbg-sw-04(config-if)#switchport trunk encapsulation dot1qbg-sw-04(config-if)#switchport trunk allowed vlan allbd-sw-03 (config-if)# spanning-tree portfastbg-sw-04(config-if)#exitbg-sw-04(config)#int g0/2bg-sw-04(config-if)#switchport mode trunkbg-sw-04(config-if)#switchport trunk encapsulation dot1qbg-sw-04(config-if)#switchport trunk allowed vlan allbg-sw-04(config-if)#spanning-tree portfastbg-sw-04(config-if)#exitbg-sw-04#write memory3.2办公楼Catalyst 3548XL交换机配置方案switch#configure terminalEnter configuration commands, one per line. End with CNTL/Z.switch(config)#hostname zsr-sw-01zsr-sw-01(config)#enable password testzsr-sw-01(config)#enable secret testzsr-sw-01(config)#banner motd % Welcome to the C3548 in the Zhong San Lu banGong Lou %zsr-sw-01(config)#line vty 0 4zsr-sw-01(config.line)#loginzsr-sw-01(config.line)#password testzsr-sw-01(config.line)#exitzsr-sw-01(config)#int vlan 1zsr-sw-01(config-if)#ip address 10.234.180.25 255.255.255.0zsr-sw-01(config-if)#exitzsr-sw-01(config)#ip default.gateway 10.234.180.234zsr-sw-01(config)#endzsr-sw-01#vlan databasezsr-sw-01(vlan)#vtp domain Corp_Netzsr-sw-01(vlan)#vtp clientzsr-sw-01(vlan)#exitzsr-sw-1#configure terminalzsr-sw-1(config)#int f0/1zsr-sw-1(config-if)#switchport mode accesszsr-sw-1(config-if)#switchport access vlan 31zsr-sw-1(config-if)#exitzsr-sw-1(config)#int f0/2。
radware与化为6509端口聚合配置
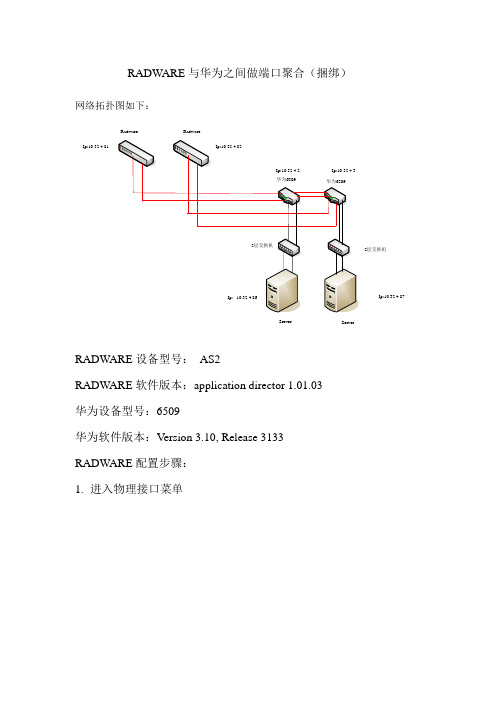
RADW ARE与华为之间做端口聚合(捆绑)网络拓扑图如下:
Radware Radware
Server Server Ip:10.32.4.87
Ip:10.32.4.81
2层交换机
RADW ARE设备型号:AS2
RADW ARE软件版本:application director 1.01.03
华为设备型号:6509
华为软件版本:Version 3.10, Release 3133
RADW ARE配置步骤:
1.进入物理接口菜单
2.查看接口是否为自动协商模式
3.进入链路聚合中的端口列表菜单
4.点击需要聚合的接口,并选择一个trunk序号
5.将另一个需要聚合的接口必须要选择同一个trunk序号
配置注意事项:
1.RADW ARE
在配置RADWARE时,聚合的端口需要配置为自动协商模式(出厂默认)。
如果出现接口无法选择trunk序号的时,重启设备即可配置成功。
2.华为6509
在配置华为6509时,聚合的端口需要配置为自动协商模式,而且要关闭LACP,并且启动国际标准协议802.3ad
注意:如果光纤接口速率配置为强制千兆,则会出现以下问题:
1.拔掉TX(发送)线,RADWARE接口状态为up,华为相对应的接口状态为
down,因此会产生部分网络不通的情况。
2.拔掉RX(接受)线,RADWARE接口状态为down,华为相对性的接口状态
为up,同样会产生部分网络不通的情况。
卓越天成
李金龙
2007-4-5。
CISCO6509 最全配置
l 千兆位防火墙模块--提供接入保护
l 高性能入侵检测系统(IDS)模块--提供入侵检测保护
l 千兆位网络分析模块--提供可管理性更高的基础设施和全面的远程超级(RMON)支持
l 高性能SSL模块--提供安全的高性能电子商务流量
l 千兆位VPN和基于标准的IP Security(IPSec)模块--降低的互联网和内部专网的连接成本。
! ! ! ! ! ! ! ! ! ! ! ! ! ! ! !! ! ! ! ! ! ! ! ! ! ! ! ! ! ! ! ! ! ! ! ! ! ! ! ! ! ! ! ! ! ! ! ! ! ! !! ! ! ! ! ! ! ! ! ! ! ! ! ! ! ! ! ! ! ! !
! ! ! ! ! ! ! ! ! ! ! !! ! ! ! ! ! ! ! ! ! ! ! ! ! ! ! ! ! ! ! ! ! ! ! ! ! ! ! ! ! ! ! ! ! ! !! ! ! ! ! ! ! ! ! ! ! ! ! ! ! ! ! ! ! ! ! ! ! ! !
Copyright (c) 20 03 by cisco Systems, Inc.
Cat6k-Sup720/RP platform with 524288 Kbytes of main memory
Download Start
!! ! ! ! ! ! ! ! ! ! ! ! ! ! ! ! ! ! ! ! ! ! ! ! ! ! ! ! ! ! ! ! ! ! !! ! ! ! ! ! ! ! ! ! ! ! ! ! ! ! ! ! ! ! ! ! ! ! ! ! ! ! ! ! ! ! ! ! ! !!
################################################################### [OK]
Cisco 6509 交换机冗余配置
Cisco 6509 交换机冗余配置具备双引擎冗余配置的Cisco 6509交换机可以使用两种方式配置来实现引擎的高可用功能:1、Daul MSFC +HSRP 模式,该模式两引擎上的MSFC多层交换模块均启用,之间使用HSRP来实现路由的热备份。
2、Single Router模式,该模式只有一引擎上的MSFC模块启用,另一模块为Standby模式,当启用模块失败时备用模块才启用。
配置引擎冗余需要先确定Supervisor Engine和MSFC上的软件版本。
最低要求版本是:Supervisor Engine版本: 6.3(1) 以上MSFC IOS版本:12.1(8a)E4以上Single Router模式配置较为简单,一般建议使用,配置步骤如下:1、首先需要启用Supervisor Engine上的highavailability功能,可以通过Supervisor Engine的Console界面通过set system highavailability enable启用。
2、通过session 15进入designated router(主引擎的MSFC)配置MSFC冗余特性router(config)# redundancyrouter(config-r)#high-availabilityrouter(config-r-ha)#single router mode以上命令启用主引擎MSFC的HA特性,但此时只是管理上配置完成,实际Single Router 模式配置同步并没有启用。
需对session 16的non-designated router(备引擎的MSFC)进行类似配置。
3、通过session 16进入non-designated router配置备引擎MSFC在启用备引擎MSFC的HA特性前,我们需要尽量保证两MSFC的配置基本相同,这样做的原因是MSFC Single Router冗余模式虽然会同步两MSFC的大部分配置,但对部分配置不进行自动同步,如ospf等路由协议的配置。
- 1、下载文档前请自行甄别文档内容的完整性,平台不提供额外的编辑、内容补充、找答案等附加服务。
- 2、"仅部分预览"的文档,不可在线预览部分如存在完整性等问题,可反馈申请退款(可完整预览的文档不适用该条件!)。
- 3、如文档侵犯您的权益,请联系客服反馈,我们会尽快为您处理(人工客服工作时间:9:00-18:30)。
1.1.6509虚拟交换机配置
1.1.1.交换机1配置
1.配置虚拟交换机工作为SSO(stateful switchover)和NSF(nonstop
forwarding)冗余模式
两台交换机都必须配置启用SSO和NSF。
redundanc
mode sso
exit
router ospf 10
nsf
exit
2.分配虚拟交换机域和交换机编号
两台交换机的域编号必须一致,交换机编号分别为1和2。
switch virtual domain 100
switch 1
exit
3.配置VSL链路
VSL是一个特殊的Port Group,用于虚拟交换机两个机箱之间通讯。
interface port-channel 10
switch virtual link 1
no shutdown
exit
interface tengigabitethernet 5/1
channel-group 10 mode on
no shutdown
exit
interface tengigabitethernet 5/2
channel-group 10 mode on
no shutdown
exit
4.将交换机转换为虚拟交换机工作模式。
switch convert mode virtual
1.1.
2.交换机2配置
1.配置虚拟交换机工作为SSO(stateful switchover)和NSF(nonstop
forwarding)冗余模式
两台交换机都必须配置启用SSO和NSF。
redundanc
mode sso
exit
router ospf 10
nsf
exit
2.分配虚拟交换机域和交换机编号。
两台交换机的域编号必须一致,交换机编号分别为1和2。
switch virtual domain 100
switch 2
exit
3.配置VSL链路
VSL是一个特殊的Port Group,用于虚拟交换机两个机箱之间通讯。
interface port-channel 20
switch virtual link 1
no shutdown
exit
interface tengigabitethernet 5/1
channel-group 20 mode on
no shutdown
exit
interface tengigabitethernet 5/2
channel-group 20 mode on
no shutdown
exit
4.将交换机转换为虚拟交换机工作模式。
switch convert mode virtual
1.1.3.虚拟交换机其它配置
1.配置虚拟交换机优先级。
配置机箱优先级,具有较高优先级的交换机启动后成为主交换机。
优先级范围是1(低优先级)到255(最高优先);默认值为100。
switch virtual domain 100
switch 1 priority 200
switch 2 priority 100
2.配置端口激活延时。
当机箱故障重启成为备份交换机后,指定所有的非VSL端口延迟一定的时间激活。
switch virtual domain 100
standby port delay 120
3.配置交换机双活检测。
为了避免VSL链路故障后两台机箱都成为主交换机,两个机箱之间需要配置一条专用链路用于交换特殊的二层Hello信息(包含交换机状态。
switch virtual domain 100
dual-active detection fast-hello
exit
interface fastethernet 1/3/1
dual-active fast-hello
no shutdown
exit
interface fastethernet 2/3/1
dual-active fast-hello
no shutdown
exit
4.虚拟交换机三层接口配置
interface fastethernet 1/3/2
desc “Connect to 对端设备名-端口”
no switch
ip add x.x.x.x y.y.y.y
no shut
interface fastethernet 2/3/2
desc “Connect to 对端设备名-端口”
no switch
ip add x.x.x.x y.y.y.y
no shut
interface Vlan XX
desc “For 用途”
ip add x.x.x.x y.y.y.y
5.虚拟交换机Port Group配置
interface port-channel 1
desc “Connect to 对端设备名-PortGroup”
no switch
ip add x.x.x.x y.y.y.y
no shutdown
exit
interface tengigabitethernet 1/3/X
desc “Connect to 对端设备名-PortGroup”
channel-group 1 mode on
no shutdown
exit
interface tengigabitethernet 2/3/X
desc “Connect to 对端设备名-PortGroup”
channel-group 1 mode on
no shutdown
exit
6.虚拟交换机路由配置
router ospf 10
network X.X.X.X 0.0.0.0 area Y
auto-cost reference-bandwidth 100000。