proxmark3官方驱动安装说明
Microsoft Surface Pro 3 安装指南说明书
microSD™ (behind Kickstand) microSD™ (achter standaard) microSD™ (derrière le support intégré) microSD™ (hinter dem integrierten Tablet-Ständer)
Charging port Oplaadpoort Prise de chargement Ladebuchse
3. Melden Sie sich mit Ihrem Microsoft-Konto an
Melden Sie sich einfach mit Ihrem Microsoft-Konto an. Hierfür können Sie die E-Mail-Adresse und das zugehörige Kennwort aller Microsoft-Dienste verwenden, die Sie bereits nutzen: Hotmail, , Messenger, SkyDrive oder Xbox LIVE. Wenn Sie noch kein Microsoft-Konto haben, können Sie dieses einrichten. Wir empfehlen, vorab ein Microsoft-Konto anzulegen – dann geht alles ganz reibungslos.
Druk op de aan/uit-knop en volg de instructies op het scherm.
Appuyez sur le bouton d’alimentation et suivez les instructions qui s’affichent à l’écran.
TYPE3安装方法

TYPE3安装方法TYPE3是一种用于CAD/CAM软件的插件,可以帮助用户在设计和加工过程中实现更高的精度和效率。
安装TYPE3插件可能对一些用户来说是一项挑战,但只要按照正确的步骤进行操作,就可以顺利完成安装。
本文将介绍TYPE3插件的安装方法,帮助用户顺利使用这一强大的工具。
1. 下载安装程序。
首先,用户需要从官方网站或授权的渠道下载TYPE3的安装程序。
确保下载的安装程序是最新版本,以便获得最新的功能和修复bug。
一旦下载完成,用户可以双击安装程序来开始安装过程。
2. 安装向导。
安装程序会启动一个安装向导,用户需要按照向导的指示逐步进行操作。
首先,用户需要选择安装语言,然后点击“下一步”继续。
接下来,用户需要阅读并接受许可协议,然后点击“下一步”。
3. 选择安装位置。
在安装向导的下一步中,用户需要选择TYPE3插件的安装位置。
通常情况下,安装程序会默认选择一个合适的位置,用户可以选择接受默认设置,也可以点击“浏览”来选择其他位置。
一旦选择好安装位置,用户可以点击“下一步”继续。
4. 完成安装。
安装向导会显示一个安装概要,用户需要确认所选择的安装选项是否正确,然后点击“安装”按钮开始安装过程。
安装程序会自动将文件复制到所选择的安装位置,并创建必要的快捷方式和注册表项。
一旦安装完成,用户可以点击“完成”按钮退出安装向导。
5. 激活插件。
安装完成后,用户需要激活TYPE3插件才能开始使用。
通常情况下,用户会收到一封包含激活码的电子邮件,用户需要将激活码输入到插件中进行激活。
如果用户没有收到激活码,可以联系官方客服进行获取。
6. 配置CAD/CAM软件。
安装完成并激活插件后,用户需要将TYPE3插件与所使用的CAD/CAM软件进行配置。
这通常需要在软件的插件管理界面中添加TYPE3插件,并设置相关参数。
具体的配置步骤可能会因软件版本而异,用户可以参考官方文档或向厂商咨询。
7. 测试和调试。
最后,用户需要对安装的TYPE3插件进行测试和调试,确保插件可以正常工作。
win-xp系统安装驱动说明书.

淄博派帝思连供绘图仪Win-_xp系统驱动安装图解说明首先,感谢您选用我们的产品,我公司将一如既往地为您提供优质的产品和服务!以下是WIN XP系统下安装绘图仪驱动的方法一、准备工作1.1 如何查看计算机是什么操作系统:“我的电脑”—>右键—>“属性”确定是XP系统后,打开XP专用打印中心文件夹。
1、首先运行驱动安装包。
点击图1 “安装驱动”图1点击图2 “下一步”图2点击图3 “下一步”图3点击图4“完成”:图4点击图5“是”重启计算机图 51.3 开始安装前,请将装有WIN-XP位的电脑和绘图仪用USB线连接;1.4 USB线不得超过5 米,建议使用产品配套的连接线;建议使用台式电脑机箱后面的USB 插口。
1.5驱动程序是由两个部分构成的:USB20D Loader 和USB20D Interface,所以必须分两次进行安装。
二、重启电脑后。
1、打开绘图仪开关,电脑的右下角弹出对话框,发现新硬件。
2、弹出(找到新硬件向导)对话框后,点(下一步)手工安装和从列表方式安装都可以,我们先介绍自动安装软件的方法。
注意:驱动分为两部份,按提示安装两次。
3、自动找到驱动,并安装。
4、点击(完成)5、两次提示,并按向导方式自动安装后,提示已安装并可以使用了,安装完成。
在硬件管理器里,看到USB2.0 General Inretface Module 代表安装成功。
手动方式安装:1、选择从列表或指定位置安装,下一步2、如下图所示,点击(浏览),找到驱动所在的位置。
12 33、在系统盘的下找到的,(确定)4、点(下一步)连供绘图仪驱动Win_xp 安装图解说明淄博派帝思数控设备销售有限公司第一个驱动,安装完成后,会再次提示找到新硬件, 指定位置安装并完成,至此XP 下安装驱动完成。
OK。
ProE 野火3.0正式版安装方法
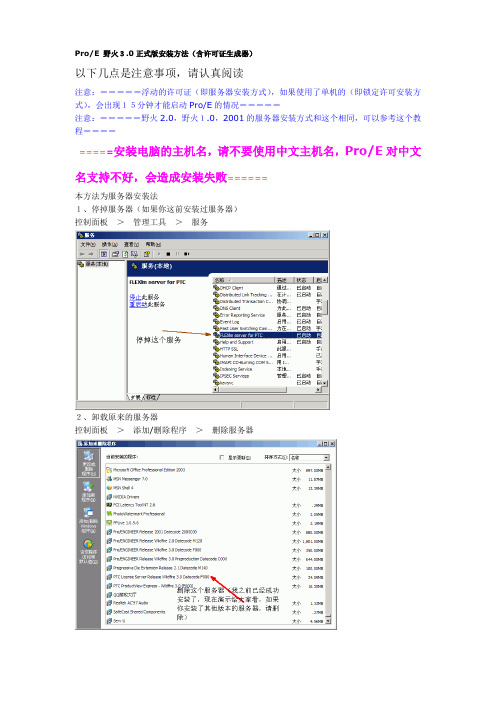
Pro/E 野火3.0正式版安装方法(含许可证生成器)以下几点是注意事项,请认真阅读注意:=====浮动的许可证(即服务器安装方式),如果使用了单机的(即锁定许可安装方式),会出现15分钟才能启动Pro/E的情况=====注意:=====野火2.0,野火1.0,2001的服务器安装方式和这个相同,可以参考这个教程=========安装电脑的主机名,请不要使用中文主机名,Pro/E对中文名支持不好,会造成安装失败======本方法为服务器安装法1、停掉服务器(如果你这前安装过服务器)控制面板>管理工具>服务2、卸载原来的服务器控制面板>添加/删除程序>删除服务器3、运行虚拟光驱,再将BIN文件装入光驱,自动运行安装程序(虚拟光驱推荐使用daemon)4、选择国家:中国5、接受协议6、开始安装服务器关闭杀毒软件的即时监控(我用的是卡巴斯基)7、解压proecncrack.rar(解压时一定要关掉卡巴斯基,卡巴斯基把crack当成病毒的)8、填入你本机的ID(区分大小写)点generate,得到license.dat文件,拷贝文件到根目录中(或一个符合DOS命名规则的目录中)9、用记事本打开license这个文件,修改主机名__HOSTNAME__为你的计算机名字。
之后点安装按钮,点了之后会有几分钟的等待换光盘的时候,建议关闭杀毒,以及其他所有程序,我在安装时,7,8次只有2次通过,否则安装程序死锁了,要重新启动,继续运行安装程序顺利安装后,重新启动电脑查看服务器是否运行(注:到了这里,这个服务一定要成功并保持运行,否则安装好了也无法使用)控制面板>管理工具>服务重新运行安装程序步骤基本相当不过这时安装的是Pro/ENGINEER选择安装组件但中文默认是已经安装的注意:野火3.0中已经不再使用lang=chs也能显示中文自动添加许可服务器剩下一路安装下去就可以了1、Pro/E wildfire 3.0已经可以选择中文安装了,无须再设置环境变量;2、放入CD1,系统自动运行(没自动运行的话就打开CD1里面的setup文件),在setup画面的左下角有一个HOSTID,例如:PTC HOSTID:00-00-00-00-00-00的号码,还有HOSTNAME(主机名),记下备用。
Seagate ST320423A、ST315323A、ST310212A 磁盘驱动家庭安装指南说明
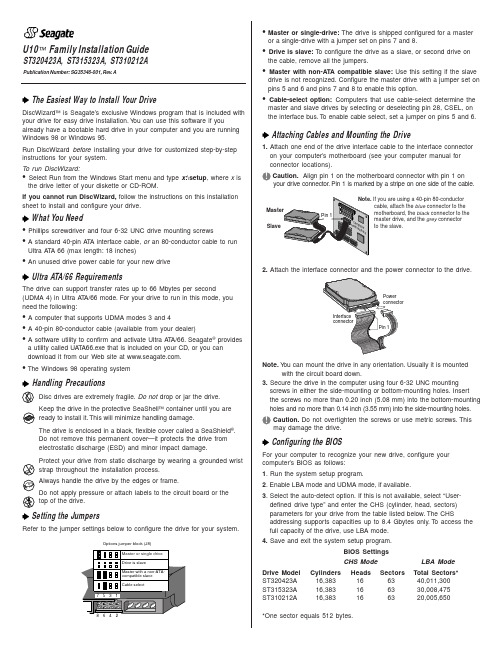
U10™ Family Installation GuideST320423A, ST315323A, ST310212AThe Easiest Way to Install Your DriveDiscWizard ™ is Seagate’s exclusive Windows program that is included with your drive for easy drive installation. Y ou can use this software if youalready have a bootable hard drive in your computer and you are running Windows 98 or Windows 95.Run DiscWizard before installing your drive for customized step-by-step instructions for your system.T o run DiscWizard:• Select Run from the Windows Start menu and type x :\setup , where x is the drive letter of your diskette or CD-ROM.If you cannot run DiscWizard, follow the instructions on this installation sheet to install and configure your drive.What You Need• Phillips screwdriver and four 6-32 UNC drive mounting screws• A standard 40-pin A T A interface cable, or an 80-conductor cable to runUltra A T A 66 (max length: 18 inches)• An unused drive power cable for your new driveUltra ATA/66 RequirementsThe drive can support transfer rates up to 66 Mbytes per second(UDMA 4) in Ultra A T A/66 mode. For your drive to run in this mode, you need the following:• A computer that supports UDMA modes 3 and 4• A 40-pin 80-conductor cable (available from your dealer)• A software utility to confirm and activate Ultra A T A/66. Seagate ®providesa utility called UA T A66.exe that is included on your CD, or you can download it from our Web site at .• The Windows 98 operating systemHandling PrecautionsDisc drives are extremely fragile. Do not drop or jar the drive.Keep the drive in the protective SeaShell ™ container until you are ready to install it. This will minimize handling damage.The drive is enclosed in a black, flexible cover called a SeaShield ®.Do not remove this permanent cover—it protects the drive from electrostatic discharge (ESD) and minor impact damage.Protect your drive from static discharge by wearing a grounded wrist strap throughout the installation process.Always handle the drive by the edges or frame.Do not apply pressure or attach labels to the circuit board or the top of the drive.Setting the JumpersRefer to the jumper settings below to configure the drive for your system.Options jumper block (J8)• Master or single-drive: The drive is shipped configured for a masteror a single-drive with a jumper set on pins 7 and 8.• Drive is slave: T o configure the drive as a slave, or second drive onthe cable, remove all the jumpers.• Master with non-ATA compatible slave: Use this setting if the slavedrive is not recognized. Configure the master drive with a jumper set on pins 5 and 6 and pins 7 and 8 to enable this option.• Cable-select option: Computers that use cable-select determine themaster and slave drives by selecting or deselecting pin 28, CSEL, on the interface bus. T o enable cable select, set a jumper on pins 5 and 6.Attaching Cables and Mounting the Drive1. Attach one end of the drive interface cable to the interface connector on your computer’s motherboard (see your computer manual for connector locations).Caution. Align pin 1 on the motherboard connector with pin 1 onyour drive connector. Pin 1 is marked by a stripe on one side of the cable.2. Attach the interface connector and the power connector to the drive.Note. Y ou can mount the drive in any orientation. Usually it is mounted with the circuit board down.3. Secure the drive in the computer using four 6-32 UNC mounting screws in either the side-mounting or bottom-mounting holes. Insert the screws no more than 0.20 inch (5.08 mm) into the bottom-mounting holes and no more than 0.14 inch (3.55 mm) into the side-mounting holes.! Caution. Do not overtighten the screws or use metric screws. Thismay damage the drive.Configuring the BIOSFor your computer to recognize your new drive, configure your computer’s BIOS as follows:1. Run the system setup program.2. Enable LBA mode and UDMA mode, if available.3. Select the auto-detect option. If this is not available, select “User-defined drive type” and enter the CHS (cylinder, head, sectors)parameters for your drive from the table listed below. The CHSaddressing supports capacities up to 8.4 Gbytes only. T o access the full capacity of the drive, use LBA mode.4. Save and exit the system setup program.BIOS SettingsCHS ModeLBA Mode Drive Model Cylinders Heads Sectors Total Sectors*ST320423A 16,383166340,011,300ST315323A 16,383166330,008,475ST310212A16,383166320,005,650*One sector equals 512 bytes.Publication Number: SG35346-001, Rev. ASlaveIf you are using a 40-pin 80-conductorcable, attach the blue connector to the motherboard, the black connector to the master drive, and the grey connector to the slave.Preparing the Drive with Disk ManagerInstalling a Single DriveIf you are installing a single drive, we recommend using Disk Manager to automatically partition and format your drive. This software is stored on the diskette or CD provided with your drive. T o run Disk Manager:1.Boot your computer from your Windows 98 or 95 startup diskette.2. Insert your DiscWizard diskette or CD. If you are using the CD,change to the drive letter of your CD-ROM.3. At the prompt, type dm. Then press ENTER. Disk Manager will guideyou through the installation process.4. Proceed to the section on “Loading the Operating System.”Installing a Slave DriveIf you are installing a second drive, or slave, to your system, use the DiscWizard software provided with your drive.Note. If you do not want to install your drive using Disk Manager, see “Standard DOS installation” below to partition and formatyour drive.Standard DOS InstallationCaution.Partitioning or formatting a drive erases all data on it.Seagate assumes no liability if you erase your data.Drive PartitioningPartitioning divides the drive into sections or partitions that function as separate logical drives (labeled C,D,E, etc.). T o partition your new drive:1. Insert a bootable DOS diskette and restart your computer.2. T ype fdisk and press ENTER. If you have two drives installed,select your new drive from option five of the FDISK menu.3. Select “Create DOS partition or logical DOS drive” by pressing 1.Then press ENTER.4. Select “Create Primary DOS partition” by pressing 1 again. Createyour first drive partition. T o make the partition bootable, mark thepartition as active.5. Verify that all space on your new drive has been partitioned. If neces-sary, create an extended partition with additional logical drives.Drive FormattingCaution. Use the correct drive letters to prevent formatting a drive that already contains data.At the A: prompt, type format x:/s. where x is the letter of your first new partition. Repeat the format process for all new partitions. Proceed to “Loading the Operating System” below.Loading the Operating System1. Boot your computer from your Windows 98 or 95 startup diskette withthe Windows CD loaded.2. At the prompt, type x:\setup, where x is the drive letter of your CD- ROM drive. Continue with the Windows setup instructions.TroubleshootingIf your drive is not working properly, follow these troubleshooting steps.1. Does the drive spin up? A spinning drive produces a faint whineand clicking noise that begins when power is applied. If your drive does not spin, check that the power connector and interface cable are securely attached and the jumpers are installed correctly.2. Does the computer recognize the drive? Verify that the drive isenabled in the system CMOS or setup program. If not, select theautodetect option and enable it. If your drive has a problem, it may not be recognized by the system.3. Does FDISK detect the drive? Run the FDISK program located onyour Windows startup diskette. T ype fdisk/status to verify thatyour hard drive is present.4. Does Scandisk find the drive defect-free? Scandisk is a utilitylocated on your Windows startup diskette that scans the drive for de-fects. If defects are detected, this may be an indication of a problem. 5. Why won’t the drive format to full capacity? Verify that your BIOShas autodetect and LBA mode enabled. Otherwise you may need to use Disk Manager, located on your diskette or CD, to achieve the full capacity of your drive.Note. If the above steps do not solve the problem, contact your dealer or visit to download SeaT ools discdiagnostics software and more troubleshooting advice.Seagate Support ServicesInternetFor online information about Seagate products, visit or e-mailyourdiscquestionsto:***********************.Technical SupportIf you need further help installing your drive, first consult your dealer. Dealers are familiar with their unique system configurations and can help you with system conflicts and other technical issues. If you need additional help, you can talk to a Seagate technical support specialist. Before calling, note your system configuration and drive model number. Africa+31-20-316-7222Poland00 800-311 12 38 Australia+61-2-9725-3366Spain900-98 31 24Austria0 800-20 12 90Sweden0 207 90 073Belgium0 800-74 876Switzerland0 800-83 84 11 Denmark80 88 12 66Singapore+65-488-7584France0 800-90 90 52T aiwan+886-2-2514-2237 Germany************T urkey00 800-31 92 91 4Hong Kong+852 2368 9918United Kingdom************Ireland 1 800-55 21 22USA/Canada/1-800 SEAGA TE orItaly800-790695Latin America+1-405-936-1234Middle East+31-20-316-7222Other EuropeanNetherlands************Countries+ 31-20-316-7222 Norway800-113 91Warranty T o determine the warranty status of your Seagate disc drive, contact your place of purchase or visit our Web site at for more information. RMA (Return Merchandise Authorization) Run SeaT ools to diagnose your drive before requesting a return authorization. In addition, please verify that your drive is defective by following the troubleshooting checklist in this guide. Seagate offers comprehensive customer support for all Seagate drives worldwide. Seagate customer service centers are the only facilities authorized to service Seagate drives. Drive return procedures vary depending on geographical location and are subject to current International T rade Regulations.Shipping Y our DriveCaution. Back up the data on your drive before shipping it. Seagate assumes no responsibility for data lost during shipping or drive repair. Shipping a drive in an unapproved container voids the warranty. Pack the drive with foam rubber only. Do not use peanuts, bubble wrap or newspapers.Keep your original box and packing materials for storing or shipping your drive. T o preserve the warranty status of your drive, any product returned to Seagate must be properly packaged in the original box or a Seagate-approved container to prevent physical and electrical damage while in transit.Electromagnetic Compliance for the European Union This model complies with the European Union requirements of the Electromagnetic Compatibility Directive 89/336/ EEC of 03 May 1989 as amended by Directive 92/31/EEC of 28 April 1992 and Directive 93/68/EEC of 22 July 1993. Compliance of this drive, as a system component, was confirmed with a test system. We cannot guarantee that your system will comply. The drive is not meant for external use (without properly designed enclosure, shielded I/O cable, etc.). Sicherheitsanleitung 1. Das Gerrät ist ein Einbaugerät, das für eine maximale Umgebungstemperatur von 55°C vorgesehen ist.2. Zur Befestigung des Laufwerks werden 4 Schrauben 6-32 UNC-2A benötigt. Bei seitlicher Befestigung darf die maximale Länge der Schrauben im Chassis nicht mehr als 3,3 mm und bei Befestigung an der Unterseite nicht mehr als 5,08 mm betragen.3. Als Versorgungsspannugen werden benötigt: +5V ± 5% 0,6A; +12V ±% 0,8A (1,9A fur ca. 30 Sek. fur ± 10%)4. Die Versorgungsspannung muss SEL V entsprechen.5. Alle Arbeiten auf dem Festplatte dürfen nur von Ausgebildetem Servicepersonal durchgeführt werden. Bitte entfernen Sie nicht die Aufschriftenschilder des Laufwerkes.6. Der Einbau des Laufwerkes muss den Anforderungen gemäss DIN IEC 950 VDE 0805/05.90 entspreche.© 2000 Seagate T echnology, Inc. All rights reserved.Publication Number: SG35346-001, Rev. A, February 2000Seagate, Seagate T echnology, the Seagate logo, U10, DiscWizard, SeaShell and SeaShield are either registered trademarks or trademarks of Seagate T echnology, Inc. All other trademarks are the property of their respective owners.。
Rapidform XOR3 SP1安装指导
第一部分:软件安装
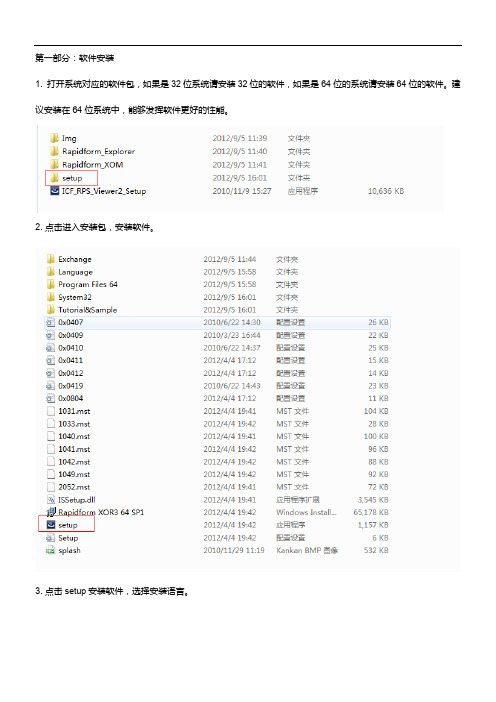
1. 打开系统对应的软件包,如果是32位系统请安装32位的软件,如果是64位的系统请安装64位的软件。
建议安装在64位系统中,能够发挥软件更好的性能。
2. 点击进入安装包,安装软件。
3. 点击setup安装软件,选择安装语言。
4.点击下一步
5. 选择接受许可证协议中的条款,点击下一步。
6. 选择全部安装,点击下一步。
7. 向导就绪,点击“安装”
8. 软件安装进入自动安装阶段,依次会安装exchange模块,案例,以及语言包模块,该过程软件都会自动完成。
9. 安装完成后,运行软件。
如果该系统是第一次安装软件,默认有15天的试用期。
10. 点击“ok”进入软件使用状态。
截止如上软件安装已经完成。
如果15天试用期用完后,请使用license去激活。
第二部分:软件激活
1. 进入“帮助”菜单,选择“激活许可协议”。
2. 录入激活码,点击下一步。
3. 录入使用者信息。
4. 之后激活码管理窗口会显示软件到期时间。
激活步骤完成,您可以尽情地使用了。
备注:双击软件会发现更新报错,请点击“确定”忽略这个报错窗口,软件使用不会受影响。
重点注意:如果您的电脑在有效期内使用需要格式化系统,或者是重装系统,亦或是您想换到另外的一台电脑上,请先将原电脑上的许可证给停止掉,不然将不能被另外台电脑使用。
步骤如下:。
Proxmark3- Radiowar
2012/5/12
1
About RadioWar
• RadioWar估计是国内首个公开专注研究无 线类安全方面的“组织” 。
• 我们主要专注于研究2.4GHz无线网络安全、 RFID安全、NFC安全以及移动终端等等。
2012/5/12
2
RadioWar Research projects
2012/5/12
11
检查和更新PM 3各种程序
• 右击PM3目录,检查更新,再右击一次更新。
2012/5/12
12
Proxmark 3更新记录
2012/5/12
13
编译最新客户端软件
•
•
ProxSpace\pm3\client下就是最新的几个exe程序,proxmark3.exe、 snooper.exe、 flasher.exe、cli.exe、libpthread-2.dll, 可以复制替换掉之前从官方下载的proxmark3_win_bins\bin里面的,
2012/5/12
21
一些高频卡默认的Key
• • • • • • • • • 已知默认Key列表 ffffffffffff b0b1b2b3b4b5 4d3a99c351dd 1a982c7e459a 000000000000 d3f7d3f7d3f7 0a1a2a3a4a5 aabbccddeeff
2012/5/12
14
编译最新PM3客户端软件
2012/5/12
15
编译最新PM3客户端软件
2012/5/12
16
更新PM3固件
• flasher.exe -b bootrom.elf • flasher.exe fullimage.elf • flasher.exe -b fpgaimage.elf
PROEprotoolmaker

PROE3.0安装方法详细图示
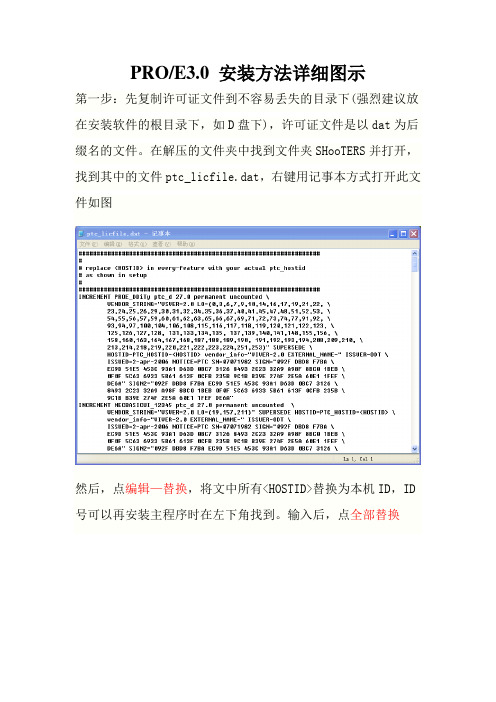
PRO/E3.0 安装方法详细图示
第一步:先复制许可证文件到不容易丢失的目录下(强烈建议放在安装软件的根目录下,如D盘下),许可证文件是以dat为后缀名的文件。
在解压的文件夹中找到文件夹SHooTERS并打开,找到其中的文件ptc_licfile.dat,右键用记事本方式打开此文件如图
然后,点编辑—替换,将文中所有<HOSTID>替换为本机ID,ID 号可以再安装主程序时在左下角找到。
输入后,点全部替换
运行安装程序:运行安装主程序PTC.Setup
点第二行的出现如下图:
单击下一步点界面上的添加
选择第三项,锁定的许可证文件(服务器未运行),然后点击文件夹图标,选择第一步保存的dat文件,点击确定,下一步
启动目录可以自己定义在任意位置,但一定要注意,文件夹里面不能包含中文,不然程序无法识别
点击下一步,出现如下图
一般无特殊要求,不需要选择,默认就可以了,点击安装,程序就开始安装了。
安装结束后单击退出。
不要急于点击快捷启动图标,还没破解,不能打开,会弹出警告窗口。
第三部:破解软件
从安装源文件中找到文件夹SHooTERS并打开,找到其中的文件ptc.pro engineer.wildfire.3.0.generic-patch.exe
,把此文件复制到安装目录下的i486_nt文件夹的obj 文件夹中并运行,出现下图
点Patch,会出现选择,如下图
一直按“否“,直到出现*PATCHING DONE*,就按exit退出,如下图
接着打开Pro/ENGNEER,大功告成,软件可以顺利使用了。
winxpsp3安装图解教程
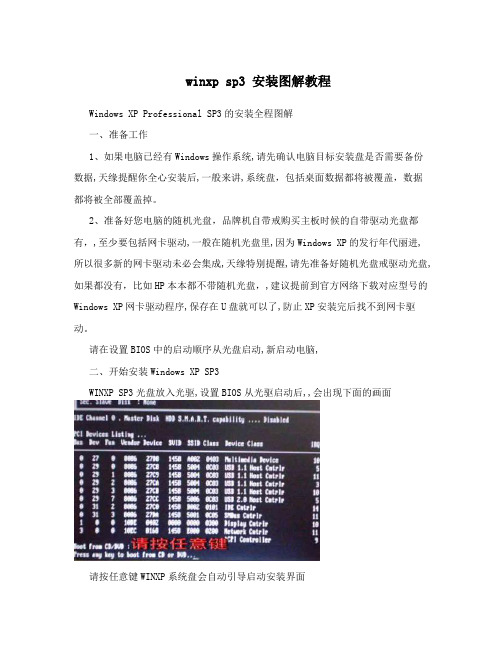
winxp sp3 安装图解教程Windows XP Professional SP3的安装全程图解一、准备工作1、如果电脑已经有Windows操作系统,请先确认电脑目标安装盘是否需要备份数据,天缘提醒你全心安装后,一般来讲,系统盘,包括桌面数据都将被覆盖,数据都将被全部覆盖掉。
2、准备好您电脑的随机光盘,品牌机自带戒购买主板时候的自带驱动光盘都有,,至少要包括网卡驱动,一般在随机光盘里,因为Windows XP的发行年代丽进,所以很多新的网卡驱动未必会集成,天缘特别提醒,请先准备好随机光盘戒驱动光盘,如果都没有,比如HP本本都不带随机光盘,,建议提前到官方网络下载对应型号的Windows XP网卡驱动程序,保存在U盘就可以了,防止XP安装完后找不到网卡驱动。
请在设置BIOS中的启动顺序从光盘启动,新启动电脑,二、开始安装Windows XP SP3WINXP SP3光盘放入光驱,设置BIOS从光驱启动后,,会出现下面的画面请按任意键WINXP系统盘会自动引导启动安装界面speed up technology results into, active guide enterprise will mature technology results into for productivity, and Translate into economic benefits, efforts to solve economic and technological "two peels" phenomenon, says from the Dongping real, is to provide research institutions with more into place. Strengthening the agricultural scientific and technological achievements in the field to improveefforts to help farmers, crop planting, processing, animal husbandry and other agricultural products, increase the intensity of transforming scientific and technological innovation, science and technology to improve agricultural efficiency, improve the mass income and services immigrants safe haven siege works. Wuhan Institute of freshwater should give full play to the Chinese Academy of Sciences, and improving the added value of Dongping Lake aquatic products. 1th, in the middle ofthis yearProposed to increase the level of modernization in agriculture, hoping the county levels to seriously study the documents. 18 plenary session "storing food in, storing food in land", this requirement is very high, population, food is not enough, and not completely rely on imports, has to rely on technology to increase food production and limited land mass, relevant departments at the county level in particular, agricultural sector, active docking tertiary institutions, the Institute took the lead in the以上有三个选项,安装、修复和退出,以后如果XP遇到启动等问题就可以使用修复选项进行修复,现在我们需要全心安装XP故选择第一项,回车即可。
MARK3软件说明书

激光控制软件使用说明书激光打标软件使用说明书南京凯旋电子光学仪器有限公司目录第一章打标软件的安装及运行第二章打标软件的使用说明第一节主窗口第二节主菜单简述第三节工具栏简述第四节功能详述1、环境参数量的设置(1)镜头范围大小设置(2)脚踏开关设置(3)控制卡选择设置(4)输出比例设置(5)镜头失真校正(6)激光器特性设置(7)转换XY轴输出设置2、文档操作(1)文件打开(2)文件导入(3)文件保存3、图形操作(1)图形的鼠标操作(2)图形属性设置(3)图形拉伸、移动(4)图形打散、组合(5)图形复制、删除(6)操作的取消与回撤(7)图形的替换(8)图形颜色的更改(9)选定颜色层的删除(10)图形镜像操作(11)方向键移动图形操作(12)图形填充操作(13)显示区域的放大缩小(14)转化为曲线操作(15)图形的对齐操作4、SHX字串设置5、TTF字串设置6、SDL自定义字串设置7、条形码设置8、自绘图形9、BMP图形设置10、打标输出颜色层参数设置11、打标输出颜色层顺序设置12、打标控制操作13、打标测试操作14、流水线飞行打标操作15、旋转移动打标操作第四章用户自定义字库的编辑与修改第一章打标软件的安装及运行本软件的安装分为两部分:加密狗驱动程序的安装和打标软件的安装。
一、加密狗驱动程序的安装找到安装盘,打开目录下的子目录\Driver,运行Instdrv.exe,出现下面的窗口,(图1-1)驱动状态栏会提示你是否安装过此驱动程序,如果有安装过,可直接退出。
如果没有安装过,则应点击安装按钮,根据提示,完成驱动程序的安装。
二、打标软件的安装运行安装盘中的可执行程序Setup.exe,根据如下画面提示,一步步完成软件的安装。
运行后的第一个画面,如图1-2示:按下一步,出现图1-3画面:这里可以选择目标目录,一般按照默认即可。
按下一步,出现图1-4画面:(图1-4)按下一步,出现安装进度条,稍后结束,并出现如图1-5的画面:(图1-5)按关闭按钮,即告结束。
声卡驱动安装说明
3.安装UFX39.exe插件,运行ufxsetup.39.pre文件,采用默认安装。
4.安装profx38L插件,把Porfx308_38L文件夹里的ProFx308_38L.kxl文件复制粘贴到C:\Program Files\kX Audio Driver目录下,重运行KX.Mixer后,然后双击这个目录下的profx308_38L.kxl文件,完成后会提示注册11个组件。
聊天室网络K歌建议下载安装KX3538L驱动,如果你已经安装了KX3538L驱动,就直接从第2步开始,特别注意的是在你导入DSP之前请先保存好原配置(否则责任自负哟),
【安装步骤】:
1.安装声卡3538L驱动,完成必须重启电脑。
2.安装声卡3538L驱动补丁,先退出KX管理器,然后复制三个文件,覆盖c:\windows\system32文件夹下即可。
5.载入DSP连线图。
ห้องสมุดไป่ตู้6.重启电脑。
至此安装载入DSP后,回过头来再看KX的默认界面,已经面目全非,很多项目都空了,正常哟!以后就可以不用再看KX晦涩难懂的默认界面了!但是“主音量”和“AC97”界面仍然起作用,配合DSP(数字信号处理器)和MX6(调音台)加上你的录音软件即可满足你的网络K歌的需要!
(以上操作一定要在声卡运行的情况下来做才有效)
Orbix 3.3 SP 17安装指南说明书
Micro FocusThe Lawn22-30 Old Bath RoadNewbury, Berkshire RG14 1QNUK© Copyright 2012-2021 Micro Focus or one of its affiliates.MICRO FOCUS, the Micro Focus logo and Orbix are trademarks or registered trademarks of Micro Focus or one of its affiliates.All other marks are the property of their respective owners.2021-03-18iiContentsInstalling Orbix 3.3 SP17 (1)Introduction (1)Prerequisites to Installing Orbix 3.3 SP 17 (2)Installing Orbix 3.3 SP 17 without the GUI (6)Installing Orbix 3.3 SP 17 with the GUI (7)Verifying your Installation (8)Changing Java version after installation (11)Uninstalling Orbix 3.3 SP 17 (12)Further Information (12)Orbix Installation Guide iiiiv Orbix Installation GuideInstalling Orbix 3.3SP17This document provides instructions for installing Orbix 3.3 SP 17on all supported platforms.IntroductionThis document provides instructions for installing Orbix 3.3 SP 17on a wide range of platforms.For a full list of supported platforms, see the "Platforms andCompilers" section of the Orbix 3.3 SP 17 Release Notes.Product setsOrbix 3.3 SP 17 consists of three product sets, each enabled by aseparate license code:• Orbix 3.3 SP 17 Java Edition• Orbix 3.3 SP 17 C++ EditionYou can purchase and license any valid combination of these sets.Product componentsOrbix 3.3 SP 17 comprises the following components:• Development Platform for Java• Development Platform for C++• OrbixNamesIn addition OrbixSSL 3.3 SP 17 is separately available. For detailson how to install OrbixSSL, see the OrbixSSL 3.3 SP 17Installation Guide.JRE requirementsThe Orbix 3.3 SP 17 installation was built with InstallAnywhere,which is a Java application. The installer requires a JRE (JavaRuntime Environment). Before launching the installer, you shouldprovide the JRE yourself (see “Installation prerequisites”), or use apre-installed JRE or JDK.Installation stepsTo install Orbix 3.3 SP 17, follow these steps:• Determine your installation type.• Check the prerequisites for installing Orbix 3.3 SP 17.• Install Orbix 3.3 SP 17 on your host machine.Orbix Installation Guide 12 Orbix Installation Guide• Verify your installation.Before you begin your installationBefore installing Orbix 3.3 SP 17, see the latest version of the Orbix 3.3 SP 17 Release Notes , and check for any updates to this Installation Guide on the following web page:/productdoc.aspxOrbix 3.3 SP 17 license codesYou must have a valid license code to install Orbix 3.3 SP 17 Java Edition or Orbix 3.3 15 C++ Edition. All other components of Orbix 3.3 SP 17 are activated by these license codes. The code is a long numeric string taking the general form:00000000-11111111-22222222-33333333-44444444Your license code should be included in a loose sheet in your Orbix 3.3 SP 17 pack. Otherwise, because Orbix 3.3 SP 17 is a service pack release of Orbix 3.3, the license codes provided for Orbix 3.3 are valid for Orbix 3.3 SP 17. If you do not have any license codes, please contact Support before proceeding further.Determine your installation typeOrbix 3.3 SP 17 comprises two product sets:• Orbix 3.3 SP 17 Java Edition• Orbix 3.3 SP 17 C++ EditionYou can purchase the Java Edition and the C++ Edition separately or together:Prerequisites to Installing Orbix 3.3 SP 17Existing Orbix installationsIf you install Orbix 3.3 SP 17 in the same location as an existing Orbix installation, the existing installation is overwritten. If you have an older version of Orbix on your system and you do notNote:Due to legal restrictions in some countries, OrbixSSL is supplied in a separate installer. OrbixSSL 3.3 SP 17 can beenabled with Orbix 3.3 SP 17 Java Edition or Orbix 3.3 SP 15 C++ Edition license codes.Note:When installing Orbix 3.3 SP 17 using PCAnywhere (aremote client), use a display resolution of type VGA (640 x 480). Component Java Edition C++ EditionDevelopment Platform for JavaEnabled -Development Platform for C++-Enabled OrbixNames Enabled Enabledwant it overwritten, you should install Orbix 3.3 SP 17 in a new location on your file system.Installation prerequisitesThe prerequisites for installing Orbix 3.3 SP 17 are as follows: Prerequisite NotesPrivileges GeneralTo install in a non-default location, you musthave permission to create files and directoriesin that location.WindowsTo install in the default location, Windows usersmust have administrator privileges.UNIXTo install into the default location, UNIX usersmust have root privileges.UNIX DISPLAY The installer was built using InstallAnywhere, which is a GUI application. To install Orbix 3.3 SP 17 without the GUI, see “Installing Orbix 3.3 SP 17 without the GUI”.For a GUI application to run on UNIX, you must install on a UNIX host with X and a windowing environment configured. Ensure your display environment variable is set to the workstation you are logged into. For example, set the following environment variable, substituting the full Domain Name System (DNS) name of your workstation for : export DISPLAY=:0.0 Contact your system administrator if you require assistance.JRE The installer was built using InstallAnywhere,which is a Java application, and requires a JRE.You must provide the location of the JRE for theinstallation to run.You need access on all platforms to an existingJRE (or JDK). Alternatively, you should obtainand install the JRE yourself on your systembefore running the installer. When installing aJRE, install all required patches on all platforms.Domain name The installer requires your domain name forOrbix 3.3 SP 17 configuration to resolve Internet or UNIX computer names. Contactyour network administrator to obtain thedomain name for your TCP/IP internet prior to installing Orbix 3.3 SP 17.Orbix Installation Guide 3Obtaining the installersEnsure that you have the correct installers for your platform.The table below shows the installer file names for eachplatform.Platform Orbix installerAIX microfocus_orbix_3_3_17_aix.binSolaris (Sparc)microfocus_orbix_3_3_17_solaris.binSolaris (x86)microfocus_orbix_3_3_17_solaris_x86.binSolaris (x64)microfocus_orbix_3_3_17_solaris_x64.binHP-UX ia64 11v31microfocus_orbix_3_3_17_hpux_ia_classic.bin (classic 32-bit)HP-UX ia64 11v31microfocus_orbix_3_3_17_hpux_ia_64_classic.bin (classic 64-bit)HP-UX ia64 11v31microfocus_orbix_3_3_17_hpux_ia_standard.bin (standard 32-bit)HP-UX ia64 11v31microfocus_orbix_3_3_17_hpux_ia_64_standard.bin (standard 64-bit)Linux (x86)microfocus_orbix_3_3_17_linux.binLinux (x64)microfocus_orbix_3_3_17_linux_x64.binWindows Visualmicrofocus_orbix_3_3_17_win_32_vs2010.exe Studio 2010 (32-bit)Windows Visualmicrofocus_orbix_3_3_17_win_64_vs2010.exe Studio 2010 (64-bit)Windows Visualmicrofocus_orbix_3_3_17_win_32_vs2012.exe Studio 2012 (32-bit)Windows Visualmicrofocus_orbix_3_3_17_win_64_vs2012.exe Studio 2012 (64-bit)4 Orbix Installation GuideOrbix Installation Guide 5Operating systems and compilersFor the latest supported platform and compiler combinations, please refer to the "Platforms and Compilers" section of the Orbix 3.3 SP 17 Release Notes .Disk space requirementsThe following table lists the approximate amount of disk space taken up by the Orbix 3.3 files. The install program also requires approximately 50 MB of temporary work space.Default locationThe default location of your Orbix 3.3 installation is as follows:Windows Visual Studio 2013 (32-bit)microfocus_orbix_3_3_17_win_32_vs2013.exeWindows Visual Studio 2013 (64-bit)microfocus_orbix_3_3_17_win_64_vs2013.exeWindows VisualStudio 2015 (32-bit), Windows VisualStudio 2017 (32-bit),and Windows Visual Studio 2019 (32-bit)microfocus_orbix_3_3_17_win_32_vs2015.exe Windows VisualStudio 2015 (64-bit),Windows Visual Studio 2017 (64-bit),and Windows VisualStudio 2019 (64-bit)microfocus_orbix_3_3_17_win_64_vs2015.exe Platform Orbix installerComponent Solaris HP-UXDevelopment Environment for Java& C++135 MB 140 MB Documentation 75 MB 75 MBNote:On Windows, please check that you have enough diskspace before starting the installation.Platform Default LocationUNIX main installation /opt/microfocus/orbix33WindowsC:\Program Files\Micro Focus \Orbix3.3 SP17 for Windows6 Orbix Installation Guide Installing Orbix 3.3 SP 17 without the GUIInstalling Orbix 3.3 SP 17 in silent install mode allows you to run the installer without using the GUI. The silent mode installer looks to a template file that provides the required information.Installing in silent mode1To install in silent mode, use the following command:./<installer > -f /path /to /template.fileFor example, to run the Solaris (Sparc) installer silently, issue the following command:./microfocus_orbix_3_3_17_solaris.bin -f /path /to /template.file Windows (installing 32-bit kit on a 64-bitWindows)C:\Program Files (x86)\MicroFocus\Orbix 3.3 SP17 for Windows Platform Default LocationNote:Orbix 3.3 SP 17 installs in a fixed location relative to thepath you specify.Note:When installing Orbix 3.3 SP 17 on Windows in a folderprotected by UAC (such as Program Files or Program Files (x86)), you must ensure that the following access permissions are set forthe "Users" group on the installation folder:• modify• read + execute• list folder contents• read• writeIf these permissions are not set on the installation folder, you will need to ensure that the implementation repository, naming service and IFR run in elevated mode.template.file should contain the following information:2The LICENCE_KEY_1 and LICENCE_KEY_2 lines signify the C++ and Java licence keys respectively. If you want to install just one license set (that is, C++ or Java, but not both), then you can modify the silent installer file as follows:• To license only the C++ runtime:• To license only the Java runtime:Installing Orbix 3.3 SP 17 with the GUIThis section describes how to install Orbix 3.3. SP 17 using the GUI installer, which is based on InstallAnywhere.Installation stepsTo install Orbix 3.3. SP 17 using the GUI, perform the following steps:1In the Select Product screen, select the Orbix 3.3 SP 17 product set that you have purchased (for example, Orbix 3.3 Java Edition). Click Next to continue.2In the License Information screen, enter the license code(s)that you have purchased in the appropriate text field(s). Click Next to continue. The license keys requested here depend on the product set you selected in the previous screen.3In the License Agreement screen, click Yes to agree to the terms of the License Agreement, and click Next to continue.##Specimen properties for Solaris 2.9 silent install with licence codes##-------------------------------------------------------------------------##C++, Java, and OTS##-------------------------------------------------------------------------##Specify the directory where you want Orbix 3.3 SP 17 installedUSER_INSTALL_DIR=/path/to/install/dir##Specify the location of your Java Developemnt KitJAVA_LOCATION=/path/to/jdk/dirJAVA_VERSION=1.6INSTALLER_UI=SILENT##Specify the components of Orbix you want to installPRODUCTS="Orbix 3.3 - Java Edition and C++ Edition"##Specify your licence keys: c++ and javaLICENCE_KEY_1=<Licence Key1>LICENCE_KEY_2=<Licence Key2>##Specify the domain for the installation DOMAIN=PRODUCTS="Orbix 3.3 - C++ Edition"LICENCE_KEY_1=<c++-licence-key>PRODUCTS="Orbix 3.3 - Java Edition"LICENCE_KEY_1=<java-licence-key>4In the Choose Orbix Installation Folder screen, enter the file location that you wish to install Orbix 3.3 SP 17 into (for example, C:\orbix3). Click Next to continue.5In the Domain Information screen, enter your domain name, and click Next to continue.6In the JDK Configuration screen, enter the location of your Java Development Kit. This is not required for Orbix 3.3 SP 17 C++ Edition. Click Install to continue.7 A progress bar is displayed while the files are installed.8After the installation is complete, the Orbix welcome page launches automatically.9In the Reboot Computer screen, choose whether to restart your computer now or later.10The Install Complete screen is displayed to confirm that the installation is finished. Click Done to finish the installation.Verifying your InstallationConfiguration checksWhen the installation is complete, follow these steps to ensure correct operation:1Check the contents of the Orbix configuration files, to ensure that the specified directory paths and domain name match those for your site.2Read the Orbix 3.3 SP 17 Release Notes .3Before attempting to run the Orbix daemon or the Orbix Java activator from a terminal or command shell, run the supplied scripts that set the following environment variables:IT_CONFIG_PATH ORBIX_ROOTNote:You must have permission to create files anddirectories in this location.Platform LocationUNIX$ORBIX_ROOT/config/iona.cfg$ORBIX_ROOT/config/common.cfg$ORBIX_ROOT/config/orbix3.cfg$ORBIX_ROOT/config/orbixweb3.cfg$ORBIX_ROOT/config/orbixnames3.cfg Windows %ORBIX_ROOT%\config\iona.cfg%ORBIX_ROOT%\config\common.cfg%ORBIX_ROOT%\orbix3.cfg%ORBIX_ROOT%\orbixweb3.cfg%ORBIX_ROOT%\orbixnames3.cfgJAVAHOMEPATH .To run these scripts, type the following commands in a terminal:Testing your Orbix 3.3 SP 17 Java Edition installationTo ensure that your installation is fully operational, you should change directory to the demos directory of your Orbix 3.3 SP 17 installation, for example:Read the index.html file for instructions to run the demonstration program.Testing your Orbix 3.3 SP 17 C++ Edition installationTo ensure that your installation is fully operational, you should change directory to the demos directory of your Orbix 3.3 SP 17 installation, for example:Read the index.html file for instructions to run the demonstration program.Platform CommandUNIX $ORBIX_ROOT/setenvs.shUNIX (to source a 64-bit environment in amixed-mode installer)$ORBIX_ROOT/setenvs64.sh Windows %ORBIX_ROOT%\setenvs.bat Platform Location Make commandUNIX $ORBIX_ROOT/demos/common/jumpstart/basic/javamake Windows %ORBIX_ROOT%\demos\common\jumpstart\basic\java nmake Platform Location Make commandUNIX $ORBIX_ROOT/demos/common/jumpstart/basic/cxxmake Windows %ORBIX_ROOT%\demos\common\jumpstart\basic\cxx nmakeNote:If you are building the demos on a Linux system with the -std=c++11 flag, you should set the environment variableORBIXCPP_STD=-std=c++11 before you start building.Reinstalling the license codeIf the licensed applications fail to run (for example, orbixd , idl , idlj ), you may have made an error in entering your licenseauthorization code.You can reinstall the license by changing to the bin directory of your Orbix 3.3 SP 17 installation, and typing the following line, using your authorization code as shown in the following example:You should replace orbixd with the filename of the application that fails to run, and replace licence_code with your licenceauthorization code.The following Orbix 3.3 SP 17 application files are enabled by the corresponding Orbix 3.3 SP 17 product license authorization codes:Structure of installed directoriesA complete installation of Orbix 3.3 SP 17 has the following directory structure in the installation location:Platform CommandUNIX install_license orbixd licence_codeWindows license.exe orbixd LicenceCode Application Java Edition code C++ Edition codeorbixd - Orbix C++ Daemon Code enables Code enables idl - Orbix C++ IDL compiler -Code enables idlj - Orbix Java IDLcompiler Code enables -Directory Description\bin Binary images for all components\config Repositories and configuration files for all components\contrib Utilities contributed by Orbix engineers and partners\demos Demonstrations for all components\docs Links to the latest information on Orbix 3.3 SP 17\idl IDL files\include Header files\lib Development librariesChanging Java version after installationAfter you have installed Orbix 3.3.17, it is possible to alter the version of Java that is used. This may be useful in circumstances where there is a demand to move to another version of Java for improved security features.1Ensure that all Orbix servers and the Orbix daemon are stopped.2Open the common.cfg configuration file located at:<orbix-installation>/config/common.cfg3Change the line:IT_JAVA_INTERPRETER = "c:\java\java8\bin\java.exe";toIT_JAVA_INTERPRETER ="c:\java\updated_java8\bin\java.exe";4Open up the environment script (this may be setenvs.bat file on Windows or a setenvs(64).sh file on Unix systems) located at the root of the installation tree.Change the value that the JAVA_HOME environment variable is set to.5If the JDK being updated is Java 11, then switch to the Changing to Java 11 section before step 6.6This completes migrating to the new version of Java. Re-run theupdated environment scripts.7Restart the Orbix daemon.Changing to Java 11Changing to Java 11 will require some more changes. These extra changes are in the same environment script in which you already updated the JAVA_HOME environment variable.Change the following environment variables:• Change IT_JAVA_MODERN to "true ".• Change JAVA_P_FLAG to "/a ".\OrbixSSL OrbixSSL files, utilities and examples (OrbixSSL installation required)\tools GUI Tools\UninstallOrbixFiles for uninstalling Orbix 3.3 SP 17DirectoryDescription Note:Any Java servers that were registered in the IMR(implementation repository) may need to be recreated.Uninstalling Orbix 3.3 SP 17Uninstalling OrbixTo uninstall Orbix 3.3 SP 17, run the UninstallOrbix file in the UninstallOrbix directory of your Orbix 3.3 SP 17 installation. For examples:Further InformationTechnical supportIf you require further technical assistance with using this product, please see the following web page:https:///Platform Uninstall scriptUNIX $ORBIX_ROOT/UninstallOrbix/UninstallOrbixWindows%ORBIX_ROOT%\UninstallOrbix\UninstallOrbix Note:The uninstaller removes the complete installation of Orbix3.3 SP 17, but does not remove any files added or generated after installation (for example, log files, executables generated in demo runs, implementation repositories, and so on). If OrbixSSL has been installed, it should be uninstalled first.。
UP-三维打印机用户使用手册

运行UP! Setup.exe安装文件,并安装到指定目录(默认安装在C:\Program files\UP下)。注意:安装文件包括UP!启动程序,驱动程序和UP!快速入门说 明书等。
(图7:UP!软件启动程序)
9
UP!三维打印机用户使用手册 3.1.3 安装驱动
用USB连接线连接打印机和电脑。电脑会弹出发现新硬件的提示框,用户可 以取消或者点击下一步进行安装。
15°C~30°C 20%~50%
6
UP!三维打印机用户使用手册
3.操作
3.1 准备工作 3.1.1 安装打印机
(图 4:UP!三维打印机部件示意图)
第一步:安装喷头
请参照以下三步骤组装机器
1)卸下喷头上的塑料外壳;
2)拧下螺丝(见d),对喷头进行调试;
3)确保喷头和挤出轴在同一水平面上;
图文 创新声卡KX驱动安装、调试、使用教程 一

图文创新声卡KX驱动安装、调试、使用教程一[图文]创新声卡KX驱动安装、调试、使用教程一2010年10月29日星期五10:03 A.M.第一节:kX驱动简介SB LIVE!系列可能是全世界卖的最好的娱乐声卡了,它使用与E-MU APS 专业声卡相同的主芯片EMU10k1。
可是创新原厂驱动根本没有发挥EMU10k1芯片强大的运算能力!来自俄罗斯的发烧友Eugene Gavrilov、Max Mikhailov和Hanz Petrov为首,与世界各地的一些编程高手组成了一个驱动开发小组,开始了针对EMU10k1芯片的研究,终于为使用SB Live声卡来制作音乐的无产阶级音乐制作人编写出了一个专门用来进行电脑音乐制作的专业kX驱动。
KX驱动功能之全面,基本可以发挥创新声卡99%以上的性能,支持ASIO、DSP等等功能,而且保留创新原来经典的EAX、A3D等功能!从此创新SB Live可以完全支持低延迟达到10.66ms甚至是惊人的2.66ms的16通道ASIO(Audigy上是32通道),支持GSIF(也就是可以用GigaStudio了),音效插件模块化,优化的DX 接口,图形化的DSP模块操作,软件界面多语言支持,软件界面支持皮肤更换--也就是说你的SB LIVE!已经脱胎换骨成为了"专业音频卡"了!kX驱动以其专业的性能和强大的插件功能,已经被越来越多的人所接受。
我们可以用一个便宜的SB LIVE!声卡也可以使用CUBASE SX、Nuendo等等必须使用ASIO的专业音频软件;也可以使用最经典的软件采样器GIGASTUDIO;甚至已经有"第三方"的软件高手开发了KX驱动下的吉他效果器插件TubeDrive!音色一般,但是仔细调节一下觉得还挺有意思!但它不占用CPU资源,完全是实时的!对演奏延迟感觉敏感的人,非常有帮助!需要注意的是:现在市场上卖得很多的"特惠版"的Live!声卡/X-fi系列声卡/外置USB声卡,因为无法获取与AC97兼容的ADC麦克风的设备控制,因此无法使用!创新外置PCMAI声卡7.1A2 ZS Notebook 0530经过我们测试是可以安装KX驱动(但是改装KX驱动不稳定,建议还是用游飘驱动更好)。
映美打印机说明书

proe 3.0安装方法

是这样的,我安装不了啊,我在CRACK里面的keygen里写下我电脑的ID,然后按generate.结果它显示了这么的一段字,我看不懂“license five created successfully!"我安了确定,但是却没有反应,而那CRACK里也没有什么生成在那儿。这是为什么呢??
我的电脑没有联网,会不会跟这个有关系呢??
第四,如果你之前已经安装过了许可证管理程序(UG,野火2.0,2001等程序服务器安装方式都使用),请不要使用我这种方式安装,否则,原来的程序会不能使用。
第五,安装之前一定关掉防病毒,卡巴斯基会把crack当成病毒(卡巴斯基很敏感,会将注册机误认为是病毒),安装过程中也要关掉防病毒,否则在换光盘时停止响应。
5:升级为完整许可协议(仅限32位)
复制“WF3_VC544.exe”到x:\Program Files\proeWildfire 3.0\i486_nt\obj然后运行。
同样编辑\x:\Program Files\proeWildfire 3.0\bin\proev.bat(右键编辑)打开并且在第三行到最后一行之间 添加注释 "TC_KEY=0".
你试着双击电脑右下角的时间,看能否出现修改时间的对话框,不能的话那你的电脑就是被限制权限了
安装步骤:
从网上下载PRO/E三张虚拟光盘文件,打开第一张盘找到Keygen.exe 复制到其他硬盘如:d盘
添加一个系统变量:右键我的电脑-属性-高级-找到环境变量-新建:变量名LANG 值CHS-确定
好了,现在下一步 在此多说一句,画面中出现Machanica的安装目录,我的是E:\Program Files\mechWildfire 3.0 此处是你要安装的PROE-机构功能.有需要的在安装了Machanica后,一定要运行一次E:\Program Files\proeWildfire 3.0\bin\ 运行ptcsetup.bat 以便PROE 指定Machanica的链接,否则Machanica不好用.请注意这点.
奔图系列产品用户指南说明书

版权本用户指南版权归珠海奔图电子有限公司所有。
未经珠海奔图电子有限公司事先书面同意,禁止以任何手段或形式对本用户指南进行复印、翻译、修改和传送。
版本:V1.3前言法律说明欢迎您使用奔图系列产品!对您使用奔图系列产品我们表示衷心的感谢!为了保障您的切身权益,请认真阅读下面的声明内容。
商标对于本用户指南涉及的软件名称,其所有权根据相应的许可协议由所属公司拥有,引用仅供说明。
本用户指南涉及的其他产品和品牌名称为其相应所有者的注册商标、商标或服务标志,引用仅供说明。
Microsoft®、Windows®、Windows server® 和 Windows Vista® 是微软公司在美国和其他国家注册的商标和注册商标。
Wi-Fi Direct 、Wi-Fi Protected Setup(WPS)、WPA 、WPA2和Wi-Fi Protected Access 是Wi-Fi Alliance 的商标。
Mac and the Mac logo are trademarks of Apple Inc., registered in the U.S. and other countries.Mopria®,the Mopria® Logo and the Mopria® Alliance logo are registered trademarks andservice marks of Mopria Alliance, Inc. in the United States and other countries. Unauthorized use is strictly prohibited.AirPrint 和AirPrint 标识是苹果公司的商标。
Pantum 和 Pantum 标识是珠海奔图电子有限公司注册的商标。
免责声明为了更好的用户体验,珠海奔图电子有限公司保留对本用户指南作出更改的权利。
- 1、下载文档前请自行甄别文档内容的完整性,平台不提供额外的编辑、内容补充、找答案等附加服务。
- 2、"仅部分预览"的文档,不可在线预览部分如存在完整性等问题,可反馈申请退款(可完整预览的文档不适用该条件!)。
- 3、如文档侵犯您的权益,请联系客服反馈,我们会尽快为您处理(人工客服工作时间:9:00-18:30)。
UPDATE PROXMARK3 BOOTLOADER WITH THE NEW CDC (COM/Serial)
RELEASE
(valid from version r655 included)
REQUIREMENTS:
- A PROXMARK3 with OLD bootrom (previous to r655 version, excluded r655)
-The tool included in this file (PM3 Batch Flashers.rar)
PROCEDURE:
1 – Disconnect PM3 form USb
2 -Exctract PM
3 Batch Flashers.rar in a folder of your choice
3 – Launch FLASH NEW Bootrom.bat that you will find in \win32 folder and you will see this screen:
4 - Read the disclaimer and press any keyboard button
5 –You will now see this instruction page:
So, WHILE HOLDING the PM3 BUTTON, CONNECT the PM3 to a USB port, wait that PM3 is recognized by Windows (few seconds –you will hear the classic “usb-connected-windows-sound”) and, ALWAYS HOLDING DOWN the PM3 button (never release it!), press any button to continue flashing.
6 –When you will read the “flashing successful” message (after very few seconds) hit any button to continue
7 –You can now release the PM3 button
Now, connecting PM3 to USB port, it will be recognized as a COM port; you need to know the COM port number in order to execute proxmark3.exe because now it requires the com port parameter as the following example:
Proxmark3.exe com5
To know the port number assigned to it, right-click on “Computer” icon and select “Properties”:
:
You will see the “System” panel; form here click on “Device Manager”:
When “Device Manager” opens up expand the “Ports” settings and read the COM port assigned to the Proxmark3; here is an example (COM5):
After doing that you will need to edit (righ-click -> ”Edit”) the following batch files you extracted from the PM3 Batch Flashers.rar file (under “win32” folder):
Bootrom-Only.bat
FPGA-Only.bat
OS-Only.bat
In those files you need to change the com port number after the “flasher.exe” according to YOUR Proxmark3 current port number !
You will now be able to flash bootloader, OS image and FPGA without holding down the Proxmark3 button !
WINDOWS PROBLEMS IN RECOGNIZING COM PORT
If you still see something like that in “Device Manager” (PM3 still under libusb-win32 devices):
You need to update PM3 drivers as follow:
A – Unplug Procxmark3
B – Plug-in Proxmark3 WHILE HOLDING the PM3 button (keep it pressed!); now PM3 will show up under “Device Manager”
C – while STILL HOLDING the button, right-click on it
D –click on “Properties” (keep the button pressed)
E –click on “Driver” tab and select “Update Driver…” (keep the button pressed)
F –Select “Browse my computer for driver software” (keep the button pres sed):
G – Browse to your compiled PM3 folder and select proxmark3.inf; you can also find that file in ../trunk/driver/proxmark3.inf (keep the button pressed)
H – You can now finally release the button
Now you will be able to lash the OS Image and FPGA with the COM-port number you can read under “Device Manager”。