松下电解水机说明书
水质电解器的使用方法和简介
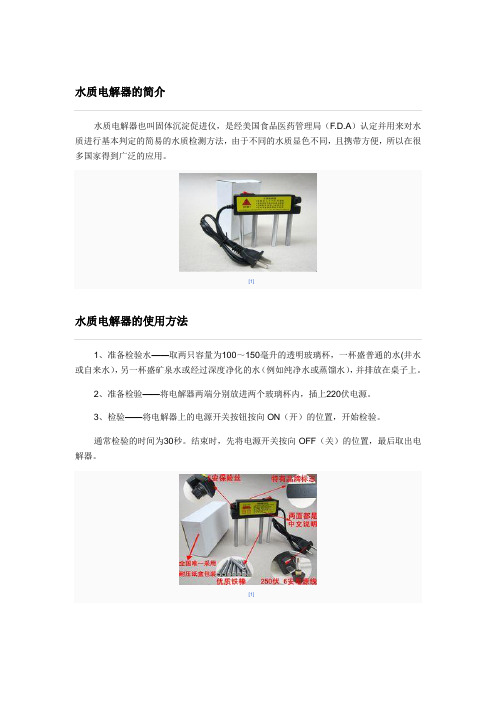
水质电解器的简介水质电解器也叫固体沉淀促进仪,是经美国食品医药管理局(F.D.A)认定并用来对水质进行基本判定的简易的水质检测方法,由于不同的水质显色不同,且携带方便,所以在很多国家得到广泛的应用。
[1]水质电解器的使用方法1、准备检验水——取两只容量为100~150毫升的透明玻璃杯,一杯盛普通的水(井水或自来水),另一杯盛矿泉水或经过深度净化的水(例如纯净水或蒸馏水),并排放在桌子上。
2、准备检验——将电解器两端分别放进两个玻璃杯内,插上220伏电源。
3、检验——将电解器上的电源开关按钮按向ON(开)的位置,开始检验。
通常检验的时间为30秒。
结束时,先将电源开关按向OFF(关)的位置,最后取出电解器。
[1]水质电解器的安全警告接通电源后,双手不得抓在电极上;不得将手指伸入检验水中;不要让儿童玩耍电解器。
电解器用完后,应用干布将电极擦干,并用细纱布将铁质极杆上的水擦净,并妥善保管。
[1]水质电解器的说明水质电解器是把电场置入水中,由正负两个电极(铁棒和铝棒)组成,通电后,带有正电荷的+离子从铁棒中释出,与水中负价的电解质离子进行反应,生成不溶于水的金属团,同时凝聚和吸附了水中的胶质、有机物、无机物。
并且由于电流的作用,原来溶于水中的金属粒子,如铅、砷、铬、锰、钾、钴等被还原出来,并逐渐聚成金属团,由于不同金属离子的显色不同,从而产生颜色的分离。
到目前为止,已知的显色如下,仅供参考:1、绿色: 砷(砒霜)、三氯甲烷、四氯甲烷、氧化铜、二价铁;2、蓝色: 细菌、病毒、有机磷(化肥、洗涤剂和农药)、硫酸铝;3、红色: 一价汞、三价铁;4、白色: 铅、锌、汞、石棉、钙、镁;5、黑色: 重金属(锌、铅、汞、铜、铬、锰、镉);6、黄色: 溶解氧、微量元素、有机矿物质[1]可参考性水质电解器是水质检查人员使用次数最多、携带最方便、最重要的检测工具。
原水通过电解后可初步判断水中的杂质情况。
可是,已知水中的溶解物质有2200多种,仅凭7种颜色(赤橙黄绿青蓝紫)是不能详尽显现各种杂质的名称及含量的。
松下M1D说明书

MID系列变频器操作手册1.布线时的注意事项主电路1)如果把电源输入端子(R、S、T)和电机用输出端子(U、V、W)接反了,则变频器会受到损伤,绝对不可这样接线。
2)请不要让电机输出用端子(图)(U、V、W)接地。
3)请不要让电机输出用端子(U、V、W)之间短路。
4)在开动变频器时,请按照标准接线图使用熔丝断路器和热敏继电器。
请参照5—3“布线用机器的选定”。
5)地线端子(E)为变频器的框架地线(FG),请按第三种接地(100Ω以下,¢1.6mm 以上)的标准接地。
6)请务必将已设置电机的进相电容器取下来。
7)对主电路端子(R、S、T、U、V、W)请务必用绝缘外皮的压焊端子。
控制电路1)加在输出端子(01、COM)上的电流请不要超过DC24V、50MA,也不要加反极性电压。
2)输入端子(11—14)的内部结构是:以大约2.5千兆由大约8V拉制而成,可用接点或敞开式调整器进行控制,请不要由外部加压。
3)请不要把设定频率用电源端子(5V)和控制用地线端子(G)短路。
2854)当用输出端子(01 COM)直接驱动继电器时,请插入续流二极管(FD)。
5)接在控制电路上的电线请用胶合线或屏蔽线。
ERA15-01ERB15-01请注意二极管的极性6)请把屏蔽线的屏蔽部分接地。
7)接在控制电路上的电线要与动力线分离。
8)关于电线的固定,要用螺丝刀垂直对准接线柱加以固定。
2 安全注意事项2-1 MID***W**的情况电源三相/单相单相AC100V50/60Hz单相输入的请接在R、T上正转/反转/286进行外部频率设定的情况* 电机在以最高频率运转,由于外部频率设定标度盘的位置,设定频率用电流接线端子(5V)和控制用地线端子(G)会短路。
因此,请务必把短路棒去掉之后再布线。
* 关于外部频率的设定,请将电位器面板向左旋转到最大限度后再进行。
电源三相/单相单相AC100V50/60Hz单相输入的请接在R、TH标度盘特性正转/反转/2-2 布线用器件的选定(1)熔丝断路器、电磁接触器、热敏继电器(以上为松下电工的商品型号)和电线的选定变频器型号适用电机(KW)熔丝断路器(额定电流值)电磁接触器*1(接点的构成)热敏继电器*1(电流调整范围)电线*2(mm2)MID011A1X 0.1 BBP25 (5A)BMF61824(3P+1a) BMF902E(0.95~1.45A)2.0MID021A1X 0.2 BBP25(5A) BMF61842(3P+1a) BMF904E(1.7~2.6A)2.0MID041A1X 0.4 BBP25(10A) BMF61842(3P+1a) BMF907E(0.98~4.2A)2.02 MID01 *1× 30.1 BBP25(5A)BMF61842(3P+1a)BMF901E(0.5~0.75A)2.02 MID02 *1×0.2 BBP25(5A)BMF61842(3P+1a)BMF902E(0.95~1.45E)2.02873 2MID04 *1× 3 0.4 BBP25(5A) BMF61842 (3P+1a) BMF904E(1.7~2.6A) 2.02MID08 *1× 30.75 BBP25(10A) BMF61842 (3P+1a) BMF907E (2.8~4.2E)2.02 MID15 *1× 31.5 BBP25(15A) BMF61842 (3P+1a) BMF915E(5.0~8.0A) 2.0注)端子盘螺丝钉尺寸 控制电路端子 M3螺丝钉 主电路端子/地线端(E ) M4螺丝钉 (2)继电器的选定 为防止接触不良,用于控制输入端子(“11—14”)等控制电路的继电器请使用小信号用的(最低保证电流在1MA 以下) (参考例)松下电工:DS 形 NK 形 HC 形 欧姆龙: G2A 形 (3)控制电路用开关的选定当用开关代替继电器时,为防止接触不良,请使用微弱电流用的(参考例)日本开关:M-2012J-G注:*1 当有几台机器同时运转时,请结合电机选用电磁接触器和热敏继电器。
松下 电吹风 EH-NA98G EH-NA98Q EH-NA98G 使用说明书
H 手柄
I 挂环 J 套管 K 电源线 L 电源插头 M 电源开关
3 : 速干档 2 : 吹干档 1 : 造型档 0: 关 N 多功能收纳盒
(仅限于EH-NA98Q)
风温显示与模式说明(利用风温切换按钮切换模式)
接通电源后,产品默认设置为热风模式。
热风模式
智能热风模式
[3 速干]档、 [2 吹干]档时
收纳电吹风时,如果仍有护发产品或 化妆品粘附在手柄或机身以及多功能 收纳盒上,可能会使塑料老化,导致 褪色、破裂和故障。
13
定期确认
即使电吹风发生了故障,也有可能会因未注意而继续长期 使用。为了确保安全 , 请定期进行确认。
出风口/入风口/nanoe™(纳诺怡)发射口/ 矿物质负离子发射口是否有灰尘积聚?
请勿在石油气或其它易燃品(例如酒精、汽油、 稀释剂、喷雾器、整发液、洗甲水等)附近使用。 - 否则可能导致爆炸或火灾。
请勿自行改装、拆卸或维修本产品。 - 否则可能因为起火或动作异常而导致受伤。
需要修理时,请联系客户咨询服务中心。
请勿存放在儿童和婴幼儿的接触范围之内。请勿 让儿童和婴幼儿玩耍。 - 否则可能导致烫伤、触电和受伤。
使用温风时,内部会出现火花。 火花是保护装置(热敏开关)启动所导致,并无危险。 热风有时变为冷风。 热风变得异常灼热。
入风口的保养
要求 请勿用指甲或尖锐物体等按压或摩擦入风口,否则可能会 损坏入风口。
机身 多功能收纳盒(EH-NA98Q专用)
nanoe™(纳诺怡) nanoe™(纳诺怡)与矿物质负离子的产生量。 nanoe™(纳诺怡)
产生 nanoe™(纳诺怡)与矿物质负离子时可能会存在 如下情况
使用时,nanoe™(纳诺怡)发射口可能会有水滴飞溅 出来。 可能会从 nanoe™(纳诺怡)发射口与矿物质负离子 发射口发出“叽—”的放电声。 使用时可能会散发出特有的气味。
日本东和电解水机说明书

日本东和电解水机说明书
电解水机—电解净水机使用方法
电解水饮用水温在15℃~40℃最有利于健康,最佳饮用时段和饮用量分别为,其他时间可随时饮用。
碱性水富含许多钙离子,存放过程中会与空气中的氧结合而变成氧化钙(即白色沉淀物),或是在煮沸是亦会有类似情形产生,氧化钙(和钙片成分相同)只是较不易被人体吸收,但却不会对人体造成伤害。
电解水机—电解净水机原理
由于水中的钙、镁、钠、钾等矿物质多聚集在阴极,氢氧离子(OH-)增加而成为弱碱性,学名为“电解水”,日本则称为“碱性离子水”;氧、硫酸、硫黄等则被引致阳极。
电解水不仅适合一般健康人日常饮用,而且特别适合胃肠疾病、高血压、高脂肪、高胆固醇、糖尿病、肾脏病、慢性肝炎、肥胖、特异性体质引起的疾病和便秘等患者饮用。
电解水机—电解净水机特点
安全可靠:还原水采用国家自来水管网之水直接电解而成,不添加任何物质,无任何隐患。
抗氧化:呈负电位,含有丰富的活性氢,可消除人体内过剩的自由基。
代谢速度快:小分子团,溶解力强,易于吸收和排泄。
呈弱碱性:符合人体弱碱性的内环境。
这些特征大大减少了人体患病的几率,能够将人体内长期堆积的体锈进行清除,还原到健康的状态。
电解水机原理

电解水机原理概述电解水机是一种通过电解水来产生氢氧气体的设备。
它利用电解的原理,将水分子分解成氢离子和氧离子,从而产生氢气和氧气。
这种设备被广泛应用于医疗、健康和美容等领域。
电解水基本原理电解是指通过电流使物质发生化学变化的过程。
在电解水机中,将两个金属板(通常是钛或不锈钢)分别连接到直流电源的正负极上,并将它们浸入到含有纯净水的容器中。
当通电时,正极(阳极)上会生成氧离子(O2-),而负极(阴极)上会生成氢离子(H+)。
这些离子随后与水中的其他分子结合,形成氢气和氧气。
具体来说,当正极通电时,金属表面会释放出一些金属离子,并且周围的水分子会发生反应: 2H2O(l) -> O2(g) + 4H+(aq) + 4e-在此反应中,两个水分子被分解成一个氧气分子、四个氢离子和四个电子。
氧气会以气体的形式释放到空气中,而氢离子则在水中溶解。
与此同时,当负极通电时,金属表面也会释放出一些金属离子,并且周围的水分子也会发生反应: 2H2O(l) + 2e- -> H2(g) + 2OH-(aq)在此反应中,两个水分子接收两个电子,形成一个氢气分子和两个氢氧离子(OH-)。
氢气会以气体的形式释放到空气中,而氢氧离子则在水中溶解。
因此,在整个电解过程中,通过正极产生的氧离子和通过负极产生的氢离子结合,最终产生了氧气和氢气。
电解水机的工作原理电解水机通常由以下几个主要部件组成:1. 电源电源是为电解过程提供直流电流的设备。
它可以是内置于机器内部的适配器或外部连接的直流电源。
在工作时,用户需要将适配器插入市电插座,并确保正负极正确连接。
2. 水箱水箱是存放纯净水的容器。
它通常位于机器的顶部或后部,并配有一个注水口。
用户需要将纯净水注入水箱中,并确保水位不低于最低标记线。
3. 电解槽电解槽是放置金属阳极和阴极的区域。
它通常位于机器的中间位置,并且具有良好的密封性能,以防止水溢出。
阳极和阴极之间的距离可以通过调节电解槽上的螺丝进行微调。
水质电解器使用说明
水质电解器使用说明:
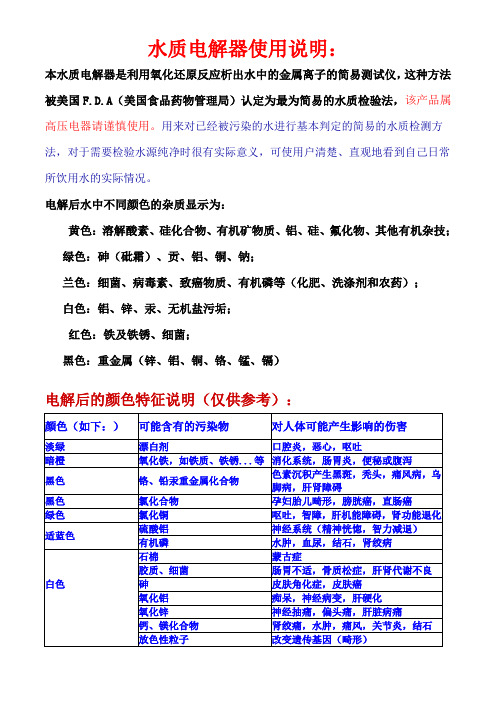
本水质电解器是利用氧化还原反应析出水中的金属离子的简易测试仪,这种方法被美国F.D.A(美国食品药物管理局)认定为最为简易的水质检验法,该产品属高压电器请谨慎使用。
用来对已经被污染的水进行基本判定的简易的水质检测方法,对于需要检验水源纯净时很有实际意义,可使用户清楚、直观地看到自己日常所饮用水的实际情况。
电解后水中不同颜色的杂质显示为:
黄色:溶解酸素、硅化合物、有机矿物质、铝、硅、氟化物、其他有机杂技;
绿色:砷(砒霜)、贡、铝、铜、钠;
兰色:细菌、病毒素、致癌物质、有机磷等(化肥、洗涤剂和农药);
白色:铝、锌、汞、无机盐污垢;
红色:铁及铁锈、细菌;
黑色:重金属(锌、铝、铜、铬、锰、镉)
电解后的颜色特征说明(仅供参考):。
水电解制氢操作手册

一、开车前的检查:1、检查现场工艺流程阀门是否正确。
2、开启水封进水阀,使少量水从水封流出。
3、检查除盐水补水箱、冷却水箱的液位正常,电解液质量符合标准。
4、压缩空气压力正常(0.6-0.8Mpa),保证系统气动阀门正确灵活启闭及正压保护气的供给。
5、电解槽上面不得有杂物,电解槽基础附近及底部绝缘胶木应处于干燥状态。
6、碱液循环泵、补水泵处于良好的备用状态。
7、配电柜电源电压正常,仪表电源正常。
8、在同一信号值下,分别检查气动调节阀开度,手动方式进行变化信号值(0-100%方向变化),相应的气动调节阀开度(氢氧侧调节阀的开度从小到大增大,水阀调节阀的开度从大到小减小)。
可适当进行零点调节。
相应的动作。
9、打开冷却水阀门及给整流柜冷却用的闭式循环冷却水系统。
10、最后证实所有有关的设定值是否正确。
以备开车二、开停车1、在控制柜上将“工作/调试“旋钮打到“工作”。
2、检查上位机的各项参数设置正确无误,运行参数显示正常。
3、若氢氧分离器液位偏高或偏低,将液位联锁解除,补水泵选择手动位置。
4、进行氮气置换。
充氮前将充氮手动阀(SV103)。
在泄压过程中要控制氢氧分离器液位差不得过大,可以通过氢、氧侧手动截止阀SV108A、SV109A进行调节。
5、在上位机上启动碱液循环泵,启动之前,从过滤器上放排气,直到碱液均匀流出,启动碱液循环泵P101A、P102A,调节阀BV101AH、BV102AH的开度,使碱液循环量(14~16m3/h)逐渐达到工艺要求。
观察泵的运行是否正常。
6、将槽温设置在85℃,槽压设置在0.8Mpa,开阀BV114A和保压阀BV111A、BV112A,以便产出的气体排空。
7、将整流柜电流调节电位器反时针方向旋到“0”位,再将选择开关放在稳压档;主回路指示灯亮;合主令开关,控制电源指示灯亮;按下运行按钮(启动的同时氢放空球阀AV103A会自动打开),运行指示灯亮;缓慢地按顺时针方向旋转电流调节电位器,调输出总电压(222V),保持工艺要求的总电压,此时电解开始,分离器中液位上升,槽温逐渐升高。
松下350-500GM3说明书

型号:YD-350/500GM使用说明书● 非常感谢您购买了Panasonic 产品。
● 用前请仔细阅读本说明书并妥善保管,以备今后查阅。
● 产品序列号:YD-350GM3HGE、YD-500GM3HGE唐山松下产业机器有限公司数字IGBT 控制 MIG/MAG 弧焊电源TSM85196■ 特 性● 采用LED 数字显示,轻触按键操作,操作更直观,更方便。
z 送丝装置采用闭环反馈控制,送丝速度更稳定,再现性好。
z 可以存储、调用9种焊接规范,初学者可以轻松焊接。
z强化了可移动性能、紧固性、防尘性。
■ 适用焊接方法●3种焊接方法选择。
(1)CO2焊接 (2)MAG焊接 (3)不锈钢MIG焊接z Y D-350GM3HGE 可以使用的焊接方法。
母材材料焊丝材料保护气体 丝径(mm)0.8 0.9 1.0 CO21.2 0.8 0.9 1.0 实心焊丝MAG 1.2 CO2 1.2 碳钢药芯焊丝MAG 1.2 0.8 0.9 1.0 实心焊丝MIG1.2 0.9 CO2 1.2 不锈钢药芯焊丝MAG1.2z Y D-500GM3HGE 可以使用的焊接方法母材材料焊丝材料保护气体 丝径(mm)1.2 1.4 CO21.6 1.2 1.4 实芯焊丝MAG1.6 1.2 1.4 CO2 1.6 碳钢药芯焊丝MAG1.2 1.2实芯焊丝MIG 1.6 1.2 不锈钢药芯焊丝CO21.6MAG:80% Ar + 20% CO 2 MIG:98% Ar + 2% O 2目录使用前准备1.安全注意事项······················1-12.敬请遵守的安全事项················2-13.搬运、安装场所、电源设备··········3-1■搬运····························3-1■安装场所························3-1 ■电源设备························3-1 4.机器构成··························4-1■焊接施工必要的器材··············4-1 ■电缆连接························4-2 5.各部位的名称和功能················5-1■电源开关(NFB)················5-1 ■输出接线部分····················5-1 ■操作面板························5-2 ■后面板··························5-5 ■控制板··························5-6连 接6.连接······························6-1■输出侧的连接····················6-1 ■送丝装置控制电缆的连接··········6-1 ■母材(-)电压检出线的连接········6-2 ■电源输入的连接··················6-2使用方法7.焊接施工前・后的作业··············7-1■操作前的准备····················7-1 ■操作后的作业····················7-1 8.操作······························8-1■「详细」的设定・确认··············8-1 ■焊接条件的「调用」和「存储」········8-2 ■焊接的准备······················8-3 ■焊接····························8-4 9.负载持续率························9-1应用性能10与其他设备的连接·················10-1 ■YD-350GM3HGE/YD-500GM3HGE······10-1 检查11.日常检查··························11-1■焊接电源(本产品)···············11-1 ■电缆····························11-1 ■除本产品外······················11-1 12.定期检查··························12-1■检查内容························12-1 ■在耐压试验和绝缘电阻测试中应注意的问题······················12-2故障及排除13.故障及排除························13-1■异常代码························13-1 ■焊接故障时的检查项目············13-3 ■查明原因后的处理················13-3技术资料14.参数规格··························14-1■技术规格························14-115.部品配置图························15-116.部品明细表························16-117.电路图····························17-1■YD-350GM3HGE····················17-1 ■YD-500GM3HGE····················17-418.外形尺寸图························18-119.焊接条件表························19-120.用语解说··························20-121.焊接条件记录表····················21-122.有毒有害物质或元素说明············22-1安全使用说明务请遵守下述安全对策,详细阅读使用说明书正文1.必须由电气人员按相关规定进行接地。
Panasonic 基本水浴疗浴机操作手册说明书
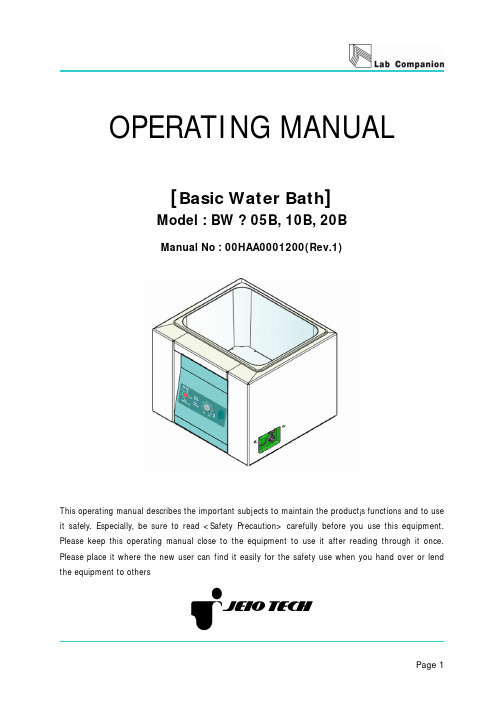
OPERATING MANUAL[Basic Water Bath]Model : BW ? 05B, 10B, 20BManual No : 00HAA0001200(Rev.1)This operating manual describes the important subjects to maintain the product¡s functions and to use it safely. Especially, be sure to read <Safety Precaution> carefully before you use this equipment. Please keep this operating manual close to the equipment to use it after reading through it once. Please place it where the new user can find it easily for the safety use when you hand over or lend the equipment to othersTable of ContentsChapter 1 : Introduction⏹Caution about the operating manual ---------------------------- 4⏹Warning mark ------------------------------------------ 4⏹Caution for safe operation and unauthorized modification ---------5⏹Disclaimer ----------------------------------------------------------------- 5 Chapter 2 : Check the condition of unit ----------------------6,7 Chapter 3 : Installation⏹Contents-------------------------------------------------------------------- 9⏹Installation -----------------------------------------------------------------9 Chapter 4 : Safety Alert and Caution⏹Safety Alert --------------------------------------------------------------- 12⏹Safety Caution ----------------------------------------------------------- 13⏹Warning Label ----------------------------------------------------------- 14 Chapter 5 : Names of each component & functions⏹Part names and functions◆Main Body ---------------------------------------------------------- 16◆Over temp limit ---------------------------------------------------- 17 Chapter 6 : Controls and functional element⏹Operating and functional element------------------------------------ 19⏹Temperature setting procedure----------------------------------------20 Chapter 7 : Maintenance and Troubleshooting⏹Maintenance ------------------------------------------------------------ 22⏹Safekeeping and Cleaning -------------------------------------------- 23⏹Troubleshooting--------------------------------------------------------- 24 Chapter 8 : Specifications and Circuit diagram⏹Specifications ----------------------------------------------------------- 27⏹Circuit diagram --------------------------------------------------------- 28 Chapter 9 : Warranty and Service⏹Warranty service -------------------------------------------------------- 30⏹Exceptions from warranty ----------------------------------------------30⏹Service request ----------------------------------------------------------30⏹Return process ---------------------------------------------------------- 30Chapter 1IntroductionThank you for purchasing the Lab Companion Bath.Lab Companion Baths are realized perfectly the control andBath circumstance related to the operator¡s experimental condition. Excellent Incoloy sheath heater positioned below bath widely and offers prompt temp compensation and accurate temp uniformity. Before using the Bath, please comprehend the manual in detail.Including;●Caution about the operating manual●Warning mark●Caution for safe operation and unauthorized modification●DisclaimerCaution about the operating manual1.Always keep this instruction near to the instrument.2.Copying and distributing part or the whole of this the operating instruction with no permissionare prohibited with the law.3. The operating instruction promised perfection but please ask an agent or us if you have anyquestion about insufficient points, error and omission on the operating instruction. Warning mark1.This operating instruction uses the warning Signal Word for safe operation to prevent theusers from accidents or damage beforehand.2.Defined by the Symbol Mark about the safety caution.¡Warning¡ means that the user may have seriousdamage and even die by improper handling on thisunit.¡Caution¡ means that the user may have minordamage and unit may have physical damage byimproper handling on this unit.Protective Ground TerminalIt marks the terminal must be connected Groundprior to operating the product.It marks additional information on the operation andfeatures of the product.3.Be fully aware of the warning contents during operation.4.Please exchange original label to the new warning label when it is unreadable from warningout.☞ Please request the new label to an agent or us.Caution for safe operation and unauthorized modification1.In order to protect the product and system, please use the product in accordance with theinstructions.2.We shall not be responsible for any incidental or abnormal operation for breach of anyexpress or implied warranty on this product or any part thereof.3.It forbids reorganization of Inside of the product or adds.4.Please contact the agent or us in case of the component and the consumable parts of theproduct will be replaced.5.Do not give a strong shock to the product. It becomes the cause of product damage andwrong operations.Disclaimer1.In no event will Jeio Tech industries be liable for any incidental or consequential damages forbreach of any implied warranty relating to the product.2.Any special indirect or consequential property or commercial damage of any naturewhatsoever. Some cases do not allow the exclusion of incidental or consequential damages, so the above limitation may apply to you.Chapter 2Check the condition of unit Before you install Shaker, inspect it for damage that may have occurred in transportation. Confirm any damage for compensating following the Compensation regulations and transportation of Lab Companion.Check the condition of unit before unpackProtection from any damage occurring in transit, Lab Companion administers excellent packing and radical transportation.Any damage or loss during transit, all responsibility is filled with the delivery carrier.After receiving the unit, carefully unpack and inspect it for damage.If the unit is damaged or loss during transit, Make sure as follows to be protected from the ¡Lab Companion Regulations¡.Confirmation a damaged unit1. Check the front and rear sides of the unit under packed condition.2. Carefully unpack the package.3. Check with care any damage during the transportation of the unit4. Check the parts (i.e. accessories- Page 9) of the unit.Compensation regulation of damaged unitIf the unit is damaged, contact the delivery service company immediately.1. Keep the condition as it delivered and wait for the confirmation by the carrier.2. Within 15 days, submit an application be made in writing to the delivery service company.Do not discard the carton or packing materialfor the unit until you have checked all of thedamaged parts.Compensation regulation of transport1.Any damage that is occurred during the transport is responsible to the delivery servicecompany.2.Except for all damage from the transport, we Jeio T ech will service or return.3. 3. If Jeio Tech or our authorized dealers do not deliver the unit, Jeio Tech disclaims all theresponsibility for the damage.Chapter 3InstallationBefore installation, be sure to check the electric conditions for electric safe. All persons expected to carry out operation, installation and maintenance of the unit, read and understand the safety information and operating instructions.Including;●contents●Installation⏹Check points⏹Select a proper place⏹Level off⏹Power connectionContentsAfter unpacking, Please check listed Bath component description as follows.If you didn¡t receive one or more component as follow, Contact the Jeio Tech Service center or the distributor where you purchased .Operating manualAfter unpacking, check the operating manual. If you receive the operating manual, Contact distributor or the Jeio T ech service center .InstallationThe machine should be installed on a safe and proper environment following to the belowCheck Points- Select a proper place, Level off the machine, - Power connectionSelect a proper place1. Operating conditionRoom condition of temperature and humidity should be normal as 18 ℃ ~ 25℃, below 80%RH.2. Environmental conditionDo not expose the machine to direct ray of light.3. Setting placeThe floor should be on flat and leveled ground.4. SpaceThe machine should be kept at least 1.5m from any illuminators and 20 cm from walls.Level offAll of the bottom sides should be leveled.Power connectionCheck the ID Plate on the back side of the machine to find the electric conditions. Power must be used upper 2 classes grounded.1. Check if the plug condition and electric wires are normal.2. Check the connection of ground wire.Chapter 4Safety Alert and Caution¡Signal Word¡ is used in the operation manual for safe and proper operation and keeps users from being damaged by accidents.Each ¡Symbol Mark¡ is identified following to the degree of importance and danger.Pay attention to the ¡Alert¡ and ¡Notice¡ in the manual to avoid from any accidents.Safety Alert⏹Check the voltage, phase and capacity on the ID plate before installation. Sources of electricity should be separately wired.⏹The sources of electricity should be grounded. The sources of electricity without ground connection can cause serious damage to users or the machine. Don¡t earth the machine to gas pipes or water pipes. ⏹Do not connect multiple power cord. It can cause fire and malfunction.⏹Running water recommended must be non-flammability.In case of flammability, the flashing point of running water must be over 40℃.⏹Running water can be circulated and pumped below 20degrees.⏹Running water circulated and pumped can be used below ambient 20℃. Running water must be lower 5℃ from the flashing point. (Fp-5)⏹Don¡t install the machine near to places where inflammable gas can be leaked .Do not use the machine near to places where explosion can be happened due to organic evaporating gases.Explosive materials: Acid, Esther , Nitro compoundInflammable materials: salt peroxides, inorganic peroxide, salt acids⏹Do not put inflammables and explosives in the machine.⏹Put off the power plug if some sounds and smell, smokes are happened.⏹Keep out the machine from heating source and sun direct. Install the unit ambient 5~40and below ℃℃80%RH.⏹Do not use the machine at places where moisture is high and flooding can be happened.⏹Do not disassemble or fix, change the machine.⏹Do not move the machine when running water heated. Must drain running water completely when moving theMain PowerSafetymachine.Overflowing running water can cause malfunction and burn.⏹At least 2 persons should move the machine when it is necessary.⏹Be careful to enter moisture, organic solvents, dust and corrosiveness gas.Caution⏹Do not put heavy things on the power line. Do not put the machine on the line.It causes fire and electric shock.⏹Connect the plug correctly and do not touch it with hands.It can cause fire if the connection is not fit. It can cause fire and damage to users.⏹Install the machine near to the power cord can be easily reached.⏹Do not install the machine near the high frequency noise place.Keep out a high-frequency welder and mass capacity SCR Controller .⏹Do not put inflammables and explosives in the machine.⏹Do not install the machine near to the organic solvents.It may cause fire and malfunction.⏹ Do not make the machine wet while cleaning. Do notput liquid on the machine.If the machine is wet, off the power and contact where you purchase the machine to check it.⏹ Do not shock the machine or vibrate it.It can cause damage to the machine.⏹Do not clean the machine with solvent abstergent. Use smooth cloths.Cleaning with solvent can cause fire and deformity.Main PowerSafetyAlert LabelAlert labels are attached on the body for informing of safety and danger.Keep the alerts in mind and follow the instructionAsk extra labels to where you purchased the equipment if they¡re damaged.* WarningIt informs not to put flammable or explosive samples in thechamber.* CautionUsers can be burnt by the hot surface of thechamber due to the high temperature.Chapter 5Names of each Component & FunctionsPlease, we recommend that operator learns name of each part of main body and function & and operation of display before using unit.If you do not understand any, please, contact with agent or Jeio tech. Including;●Part names and functions⏹Main Body⏹Over temp. limitPart names and functions1. Main Body3. FuseSafety device is for preventing internal flow from overcuuent.For replacement;Fuse Specification Model 230V 120V 100V BW-05B 5A 8A 8A BW-10B 5A 10A 12A BW-20B10A10A12A4. Main Power Plug & Cable1. Control PanelSetting controls and operating2. Main Power Switch43122. Over Temp. LimitOver Temp. LimitThis safety device cuts mains of equipment andthe unit stops when it detects high temperatureover set temperature.Indication : Buzzer and O/T LED blinking.To start the unit again, press START/STOP key.Note) Please, eliminate the potential dangerousfactor.How to set :1.Turn the knob (red color) of over temperature limit to clockwise with screw driver.℃℃2.Set the value 10~15 higher than set temperature.Chapter 6Controls and functional element Please, learn controls and functional element before operating unit. Including;●Operating and Functional element●Temperature setting procedureOperating and functional element1. Rotary knob for temperatureTuning the aim of analogue rotary knob to set temperature.2. Status indicationRUN LED: operating status.HEAT LED: operating of heating element.O/T LED: It is ON when overtemperature device is activated.3. Over Temp. LimitTo prevent overheat of the unit or higher temperature than set temperature.12Temperature setting procedure① Press Main Power Switch.A. RUN LED is ON.B.The unit starts operating.② Tune the aim (temperature) of rotary knob.Switch Range()℃0 ~ 110A.HEAT LED blinks and is ON after tuning.③ Set Over temp. limit 10 ~ 15℃ higher than set temperature.ValueChapter 7Maintenance & Troubleshooting This chapter shows symptoms while operation. Please contact us referring to the contents when the equipment has problems.Please keep in mind how to clean the equipment and maintain it regularly.Including;●Maintenance⏹Every week/month/quarter/year●Safekeeping and cleaning⏹Storage/Cleaning/Cleaning accessories●TroubleshootingMaintenance⏹ Check the connection of the accessories. ⏹ Keep clean the surface of the equipment..⏹ Check the condition of power plug or wires.⏹ Check the button input condition, set values are input correctly ⏹ Check the condition of ¡Over T emp. Limit¡⏹ Check the every week/month ¡check point¡.⏹ Check if vibration or noise happens in the equipment.⏹ Check the every week/month/quarter ¡check point¡.⏹ Check the temperature is controlled properly. Check if theconstant temperature is maintained.Maintain the equipment following to the maintenance standard for keeping the equipment under the best condition.Every WeekEvery MonthEvery QuarterEvery YearSafekeeping and CleaningStorageKeep the equipment following to the orders below in case no operation for a long time. 1. Power off .2. Get rid of all solvents in the chamber .3. Keep the equipment after packing for dust protection.CleaningExternal cleaning1. Clean the external body by detergent.2. Clean the external body by soft towel with pure water .3. Clean the display with dry towel.Inner cleaning 1. Power off .2. Clean in the bath by soft towel with detergent.3. Clean it with dry towel.Cleaning accessories1. Soak accessories in detergent.2. Clean it with pure water .3. Keep it after drying.Cleaning AccessoriesInner cleaningExternal cleaningStorageTroubleshootingFollow the below when problems happen.Please ask service if problems not included in the table happen or can¡t be solved by the mentioned solutions.SymptomsCausesSolutionsThe equipment is not on.⏹ Wrong electric standard. - Or -⏹Circuit breaker is off or power failure - Or -⏹The plug is not fit into the socket properly . - Or -⏹ Fuses are disconnected. - Or -⏹Socket/plug/power lines are damaged.1.Check the ID plate on the back to find electric condition whether it¡s fit to the socket power . If not sloved¡.2.Check if the power is off. If the circuit breaker is off, fix it and operate the equipment again. If not solved¡3. Plug the power to the socket again. If not solved¡4.Check if the fuse set on the back of the equipment is short circuitted. Replace with a new one when short circuitted. Fuse capacity: Refer to Specifications (Page 27)If not solved¡5. Check the socket/plug/power lines and replce with new one if they are damaged.6.Contact your local dealer to fix the equipment if the problems are not yest solved.Fuses are short circuitted friquently.⏹ Electric standare of fuses are not fit. - Or - ⏹ Wires are damaged or shorted. - Or - ⏹ Power input parts are wet. 1. Connect the fuse tightly after checking voltage and amphere. Refer to ¡Specifications¡ (Page 27) If not solved¡2. Replace with a new wires if they are damaged or shorted.If not solved¡3. If the power connecting parts are wet,dry them and reconnect.4. Contact your local dealer to fix theequipment if the problems are not yet solved.If circuit breakage is shorted continually.⏹T oo many plugs are connected. 1.Check the voltage capacity supplied to the circuit breaker .2.Check many similar equipments are connected on the socket. Use separate socket not exceeded of the voltage capacity . 3.Contact your local dealer to fix the equipment if the problems are not yet solved.Symptoms Causes SolutionsDisplay does not show anything when power is on. ⏹Innter harness fails- Or -⏹Controller & Display fails.1.Check the equipment by contacting thelocal dealer.The equipment stops working automatically. ⏹The equipment is affected bystrong noise.1.Check equipments with strong noises areinstalled near to the equipment and keepit far from them.2.Contact your local dealer to fix theequipment if the problems are not yetsolved.The equipment stops working by ¡Over Temp Limit¡. ⏹Over T emp. Limit is setwrongly.Reset the ¡Over T emp. Limit¡.1.Operate the equipment again to find anyproblems.2.Contact your local dealer to fix theequipment if the problems are not yetsolved.Chapter 8Specifications and Circuit diagramCheck the specifications and circuit diagrams of the basic baths for proper operation.Including;●Specifications●Circuit diagramSpecificationsModelBW-05BBW-10BBW-20BChamber volume3.5ℓ11.5ℓ20ℓRange Amb. +7℃ ~ 100℃(lid off)Accuracy±0.5℃ at 50℃ Uniformity ±0.3℃ at 50℃ Heat up Time 50℃ within 40min TemperatureControllerAnalog controller typePermissibleEnvironment conditionTemperature 5℃ to 40℃ Maximum relative humidity 80%Altitude up to 2,000mInternalStainless steel, 0.6tMaterialExternalSteel, 1.2t, Double painted & bakedHeater 700W/230V 700W/120V 700W/100V1000W/230V 1000W/120V 1000W/100V 2000W/230V 1000W/120V 1000W/100VSensorPt 100 Ω Bath240¡136¡115 300¡240¡165 498¡300¡165 Top open 240¡136 300¡240 498¡300 Size(mm) (W¡D¡H)Overall (Lid off)303¡242¡245357¡330¡290564¡392¡295 Safety deviceOver temp limit / Current fuse230VAC, 60/50Hz 3.0A 4.4A 8.7A 120VAC, 60Hz 5.8A 8.3A 8.3A Electricrequirement100VAC, 60Hz7.0A 10.0A 10.0A Weight(Net)6.5Kg 10Kg18.5KgAccuracy, Uniformity and Heat up time are changed by room temp. condition of heating ※load, power voltages.Circuit diagram Models ?BW-05B, 10B, 20BChapter 9Warranty & ServiceThe equipment is covered by the warranty standard regulated by Jeio tech. Exceptions from the standards can¡t be covered by warranty. Including;●Warranty and Service⏹Warranty service⏹Exceptions from warranty⏹Service request⏹Return processWarranty and ServiceWarranty serviceIf trouble occurs during product use, User can get free service for one year from the date of purchase.Exceptions from warrantyUser can not be credited by warranty in case of as below. 1. If trouble occurs by an act of God.2. If the equipment breaks down due to misusing of availablevoltage.3. If damage occurs by dropping a product, or impact.4. If damage occurs in an appearance by organic solvents such asthinner , benzene.5. If damage occurs without following to notice in themanual6. If damage occurs by fixing the equipment by any personwho is not related with Jeio tech.7. If damage occurs by a mistake of a customerService request1. Contact the local agent with claim form including the belowconditions.* Date of purchase* Name/Address/Contact no./E-mail * Serial Number * SymptomsReturn processContact the local agent with claim form including the below conditions* Date of purchase* Name/Address/Contact no./E-mail * Serial Number * Symptoms* Causes of returns * Forwarder informationReturnsServiceExceptionUnder WarrantyPage 31Service contactKorea (Head office-Overseas department) 4F Hosu B/D, 379-13, Seogyo-dong, Mapo-ku, Seoul,Republic of Korea. (121-839)TEL: +82 - (0)2 - 3143 - 1823 / 1825FAX: +82 - (0)2 - 3143 - 1824E-mail:*********************U.S.A.2400 East Devon Ave, Suite 2005, Des Plaines, IL 60018, USA TEL: 1-847-298-6613FAX: 1-847-699-8487E-mail:********************ChinaRM107,No.68 Line, 569 Xin Hua Road, Shanghai, China Postcode: 200052TEL: 86-21-62940608FAX: 86-21-62940602E-mail:******************South East AsiaNo.7A, Jalan Kemboja 1 B/2, 48300 Bandar BukitBeruntung, Selangor Darul Ehsan, MalaysiaTEL: 603-60285833, 603-60285825FAX: 603-60285822E-mail:********************England (UK)Unit 33 , Monument Business Park Warpsgrove Lane , Chalgrove , Oxfordshire OX44 7RW , UKTEL: +44-1865-400321FAX: +44-1865-400736E-mail:**************************Service contact。
松下ECA-1HM102铝电解电容器数据表-1691033337.839388125651说明书

Aluminum Electrolytic Capacitors/ MDesign, and specifications are each subject to change without notice. Ask factory for the current technical specifications before purchaseand / or use. Should a safety concern arise regarding this product,please be sure to contact us immediately. Mar.2006Aluminum Electrolytic Capacitors/ MDesign, and specifications are each subject to change without notice. Ask factory for the current technical specifications before purchase and / or use. Should a safety concern arise regarding this product,please be sure to contact us immediately. Mar.2006n Standard ProductsWhen requesting taped product, please put the letter "B" or "i" between the "( )". Lead wire pitch B=5mm, 7.5mm,i=2.5mm.The taping dimensions are explained on p.196 of our Catalog. Please use it as a reference guide.Endurance : 85°C 2000h(m m )(m m )(m m )(pcs)(pcs)(µF)(m m )(m m )(mm)(m A )(V)tan δ(120Hz)(+20°C)6.31025i B i i Lead Space Part No.Specification Dia.LengthTapingCase size Cap.(±20%)Lead Dia.W.V.Straight Min. Packaging Q’tyTapingTaping (+85°C)Lead LengthStraight Leads2205112400.280.5 2.0 5.0 2.5ECA0JM221( )2002000470 6.311.23800.280.5 2.5 5.0 2.5ECA0JM471( )20020001000811.55800.280.6 3.5 5.0ECA0JM102( )2001000220010168900.300.6 5.0 5.0ECA0JM222( )2005003300102010200.320.6 5.0 5.0ECA0JM332( )200500470012.52011700.340.6 5.0 5.0ECA0JM472( )200500680012.52512700.380.6 5.0 5.0ECA0JM682( )20050010000162514500.460.87.57.5ECA0JM103( )100250150001631.517000.560.87.5ECA0JM153100220001835.519000.700.87.5ECA0JM22350330 6.311.23300.240.5 2.5 5.0 2.5ECA1AM331( )200200010001012.56300.240.6 5.0 5.0ECA1AM102( )200500220010209200.260.6 5.0 5.0ECA1AM222( )200500330012.52010900.280.6 5.0 5.0ECA1AM332( )200500470012.52512000.300.6 5.0 5.0ECA1AM472( )2005006800162514000.340.87.57.5ECA1AM682( )100250100001631.516000.420.87.5ECA1AM103100150001835.518500.520.87.5ECA1AM1535010511300.200.5 2.0 5.0 2.5ECA1CM100( )200200022511750.200.5 2.0 5.0 2.5ECA1CM220( )2002000335111100.200.5 2.0 5.0 2.5ECA1CM330( )2002000475111300.200.5 2.0 5.0 2.5ECA1CM470( )20020001005111800.200.5 2.0 5.0 2.5ECA1CM101( )20020002206.311.22800.200.5 2.5 5.0 2.5ECA1CM221( )200200016470811.54400.200.6 3.5 5.0ECA1CM471( )2001000100010166800.200.6 5.0 5.0ECA1CM102( )200500220012.52010000.220.6 5.0 5.0ECA1CM222( )200500330012.52512000.240.6 5.0 5.0ECA1CM332( )2005004700162513600.260.87.57.5ECA1CM472( )10025068001631.516000.300.87.5ECA1CM682100100001835.518000.380.87.5ECA1CM10350100 6.311.21800.160.5 2.5 5.0 2.5ECA1EM101( )2002000330811.53900.160.6 3.5 5.0ECA1EM331( )20010004701012.54800.160.6 5.0 5.0ECA1EM471( )200500100010208500.160.6 5.0 5.0ECA1EM102( )200500220012.52512000.180.6 5.0 5.0ECA1EM222( )2005003300162513000.200.87.57.5ECA1EM332( )10025047001631.515000.220.87.5ECA1EM47210068001835.517500.260.87.5ECA1EM68250475111300.140.5 2.0 5.0 2.5ECA1VM470( )2002000 35100 6.311.22100.140.5 2.5 5.0 2.5ECA1VM101( )2002000220811.53500.140.63.55.0ECA1VM221( )2001000Ripple current (120Hz)Aluminum Electrolytic Capacitors/ MDesign, and specifications are each subject to change without notice. Ask factory for the current technical specifications before purchase and / or use. Should a safety concern arise regarding this product,please be sure to contact us immediately. Mar.2006n Standard ProductsWhen requesting taped product, please put the letter "B" or "i" between the "( )". Lead wire pitch B=5mm, 7.5mm,i=2.5mm.The taping dimensions are explained on p.196 of our Catalog. Please use it as a reference guide.Endurance : 85°C 2000h3563(m m )(m m )(m m )(pcs)(pcs)(µF)(m m )(m m )(mm)(m A )(V)i Bi i Lead Space Part No.SpecificationDia.LengthTapingCase sizeCap.(±20%)Lead Dia.W.V.Straight Taping Taping Ripple current(120Hz)(+85°C)Lead LengthStraightLeads3301012.54400.140.6 5.0 5.0ECA1VM331( )20050047010165500.140.6 5.0 5.0ECA1VM471( )200500100012.5209000.140.6 5.0 5.0ECA1VM102( )2005002200162512500.160.87.57.5ECA1VM222( )10025033001631.514000.180.87.5ECA1VM33210047001835.516000.200.87.5ECA1VM472500.1511 1.30.120.5 2.0 5.0 2.5ECA1HM0R1( )20020000.22511 2.90.120.5 2.0 5.0 2.5ECA1HMR22( )20020000.33511 4.40.120.5 2.0 5.0 2.5ECA1HMR33( )20020000.4751150.120.5 2.0 5.0 2.5ECA1HMR47( )20020001511100.120.5 2.0 5.0 2.5ECA1HM010( )20020002.2511200.120.5 2.0 5.0 2.5ECA1HM2R2( )20020003.3511350.120.5 2.0 5.0 2.5ECA1HM3R3( )20020004.7511450.120.5 2.0 5.0 2.5ECA1HM4R7( )200200010511650.120.5 2.0 5.0 2.5ECA1HM100( )2002000 50225111000.120.5 2.0 5.0 2.5ECA1HM220( )2002000335111100.120.5 2.0 5.0 2.5ECA1HM330( )200200047 6.311.21300.120.5 2.5 5.0 2.5ECA1HM470( )2002000100811.52500.120.6 3.5 5.0ECA1HM101( )20010002201012.54000.120.6 5.0 5.0ECA1HM221( )20050033010165000.120.6 5.0 5.0ECA1HM331( )20050047010206500.120.6 5.0 5.0ECA1HM471( )200500100012.52510500.120.6 5.0 5.0ECA1HM102( )20050022001631.513000.140.87.5ECA1HM22210033001835.515000.160.87.5ECA1HM3325010511700.110.5 2.0 5.0 2.5ECA1JM100( )2002000225111050.110.5 2.0 5.0 2.5ECA1JM220( )200200033 6.311.21300.110.5 2.5 5.0 2.5ECA1JM330( )200200047 6.311.21600.110.5 2.5 5.0 2.5ECA1JM470( )2002000100811.52700.110.6 3.5 5.0ECA1JM101( )200100022010164500.110.6 5.0 5.0ECA1JM221( )20050033010205500.110.6 5.0 5.0ECA1JM331( )20050047012.5207500.110.6 5.0 5.0ECA1JM471( )2005001000162511000.110.87.57.5ECA1JM102( )10025022001835.514000.130.87.5ECA1JM222500.47511100.100.5 2.0 5.0 2.5ECA2AMR47( )20020001511200.100.5 2.0 5.0 2.5ECA2AM010( )20020002.2511300.100.5 2.0 5.0 2.5ECA2AM2R2( )2002000 100 3.3511400.100.5 2.0 5.0 2.5ECA2AM3R3( )20020004.7511500.100.5 2.0 5.0 2.5ECA2AM4R7( )200200010511700.100.5 2.0 5.0 2.5ECA2AM100( )2002000226.311.21150.100.52.55.02.5ECA2AM220( )2002000tan δ(120Hz)(+20°C)Min. Packaging Q’tyAluminum Electrolytic Capacitors/ MDesign, and specifications are each subject to change without notice. Ask factory for the current technical specifications before purchase and / or use. Should a safety concern arise regarding this product,please be sure to contact us immediately. Mar.2006160250350n Standard ProductsWhen requesting taped product, please put the letter "B" or "i" between the "( )". Lead wire pitch B=5mm, 7.5mm,i=2.5mm.The taping dimensions are explained on p.196 of our Catalog. Please use it as a reference guide.Endurance : 85°C 2000h(m m )(m m )(m m )(pcs)(pcs)(µF)(m m )(m m )(mm)(m A )(V)i Bi i Lead Space Part No.SpecificationDia.Length TapingCase sizeCap.(±20%)Lead Dia.W.V.Straight Min. Packaging Q ’tyTaping Taping Ripple current(120Hz)(+85°C)Lead LengthStraightLeads33811.51450.100.6 3.5 5.0ECA2AM330( )200100047811.51800.100.6 3.5 5.0ECA2AM470( )200100010010163500.100.6 5.0 5.0ECA2AM101( )200500 10022012.5205500.100.6 5.0 5.0ECA2AM221( )20050033012.5257000.100.6 5.0 5.0ECA2AM331( )20050047016259000.100.87.57.5ECA2AM471( )10025010001835.513000.100.87.5ECA2AM102501 6.311.2360.160.5 2.5 5.0 2.5ECA2CM010( )20020002.2 6.311.2530.160.5 2.5 5.0 2.5ECA2CM2R2( )20020003.3 6.311.2660.160.5 2.5 5.0 2.5ECA2CM3R3( )20020004.7 6.311.2780.160.5 2.5 5.0 2.5ECA2CM4R7( )2002000101012.51050.160.6 5.0 5.0ECA2CM100( )2005002210161750.160.6 5.0 5.0ECA2CM220( )2005003310202350.160.6 5.0 5.0ECA2CM330( )2005004712.5203200.160.6 5.0 5.0ECA2CM470( )20050010012.5255150.160.6 5.0 5.0ECA2CM101( )2005002201631.58300.160.87.5ECA2CM2211003301831.510900.160.87.5ECA2CM33150470184014400.160.87.5ECA2CM471501 6.311.2340.180.5 2.5 5.0 2.5ECA2DM010( )20020002.2 6.311.2500.180.5 2.5 5.0 2.5ECA2DM2R2( )20020003.3 6.311.2620.180.5 2.5 5.0 2.5ECA2DM3R3( )20020004.7811.5860.180.6 3.5 5.0ECA2DM4R7( )2001000101012.51000.180.6 5.0 5.0ECA2DM100( )200500 2002210201800.180.6 5.0 5.0ECA2DM220( )2005003310202200.180.6 5.0 5.0ECA2DM330( )2005004712.5203000.180.6 5.0 5.0ECA2DM470( )20050010016254750.180.87.57.5ECA2DM101( )1002502201831.58350.180.87.5ECA2DM22150330184011400.180.87.5ECA2DM331501 6.311.2340.180.5 2.5 5.0 2.5ECA2EM010( )20020002.2 6.311.2500.180.5 2.5 5.0 2.5ECA2EM2R2( )20020003.3811.5720.180.6 3.5 5.0ECA2EM3R3( )20010004.7811.5860.180.6 3.5 5.0ECA2EM4R7( )20010001010161100.180.6 5.0 5.0ECA2EM100( )2005002210201800.180.6 5.0 5.0ECA2EM220( )2005003312.5202500.180.6 5.0 5.0ECA2EM330( )2005004712.5253300.180.6 5.0 5.0ECA2EM470( )2005001001631.55300.180.87.5ECA2EM10110022018409300.180.87.5ECA2EM221501 6.311.2320.200.5 2.5 5.0 2.5ECA2VM010( )20020002.2811.5550.200.63.55.0ECA2VM2R2( )2001000tan δ(120Hz)(+20°C)Aluminum Electrolytic Capacitors/ MDesign, and specifications are each subject to change without notice. Ask factory for the current technical specifications before purchase and / or use. Should a safety concern arise regarding this product,please be sure to contact us immediately. Mar.2006n Standard ProductsWhen requesting taped product, please put the letter "B" or "i" between the "( )". Lead wire pitch B=5mm, 7.5mm,i=2.5mm The taping dimensions are explained on p.196 of our Catalog. Please use it as a reference guide.Endurance : 85°C 2000h(m m )(m m )(m m )(pcs)(pcs)(µF)(m m )(m m )(mm)(m A )(V)i Bi i Lead Space Part No.SpecificationDia.LengthTapingCase sizeCap.(±20%)Lead Dia.W.V.Straight Min. Packaging Q’tyTaping Taping Ripple current (120Hz)(+85°C)Lead LengthStraightLeads3.3811.5600.200.6 3.5 5.0ECA2VM3R3( )20010004.71012.5650.200.65.0 5.0ECA2VM4R7( )2005001010201150.200.6 5.0 5.0ECA2VM100( )200500 3502212.5201950.200.6 5.0 5.0ECA2VM220( )2005003316253000.200.87.57.5ECA2VM330( )1002504716253250.200.87.57.5ECA2VM470( )1002501001831.55350.200.87.5ECA2VM101501 6.311.2320.200.5 2.5 5.0 2.5ECA2GM010( )20020002.28.011.5500.200.6 3.5 5.0ECA2GM2R2( )20010003.31012.5540.200.6 5.0 5.0ECA2GM3R3( )2005004.71016720.200.6 5.0 5.0ECA2GM4R7( )200500 4001010201150.200.6 5.0 5.0ECA2GM100( )2005002212.5252150.200.6 5.0 5.0ECA2GM220( )2005003316252750.200.87.57.5ECA2GM330( )100250471631.53500.200.87.5ECA2GM47010010018406000.200.87.5ECA2GM101501811.5370.200.6 3.5 5.0ECA2WM010( )20010002.21012.5440.200.6 5.0 5.0ECA2WM2R2( )2005003.31016600.200.6 5.0 5.0ECA2WM3R3( )200500 450 4.71020790.200.6 5.0 5.0ECA2WM4R7( )2005001012.5201300.200.6 5.0 5.0ECA2WM100( )2005002216252100.200.87.57.5ECA2WM220( )100250331631.52850.200.87.5ECA2WM330100tan δ(120Hz)(+20°C)。
松下g5说明书
松下g5说明书篇一:松下EH-SA93中文说明书部件名称本体部分開閉操作部:主机盖开关处お掃除針収納部:清理针存放处フタ:盖子ノズルガード:喷管防护盖ノズル:喷管「ナノイー」発生口:纳米离子滋生口タンクノブ:水箱把手給水タンク:供水箱温スチーム吹出口:暖蒸汽出汽口冷ミスト吹出口:冷雾出风口ノズル調整つまみ:喷管调整处(两处)供水箱水阀往顺时针扭是关,逆时针扭是开首次使用本产品时,可能会发现加水箱周围有残留水。
这是工厂用于质检时残留的蒸馏水,不会产生任何卫生问题。
底部底部带有防倾斜开关,放在不平整的对方,机器将无法启动。
放在垫子,榻榻米或者地毯上都有可能停止运转。
操作示意图電源ボタン:电源开关温感プラス:温感加时键(红色)スタート/ストップボタン:开始/暂停键コース選択:模式选择コース表示ランプ(青):模式指示灯(蓝色)「ナノイー」ランプ(青):纳米离子指示灯(蓝色)(转载自:小草范文网:松下g5说明书) チェックランプ(赤):检查指示灯(红色)ナノイー:纳米离子クリア肌:洁肤ハリ/弾力:弹力皮脂ケア:皮肤护理温スチーム:暖蒸汽温クイック:快速暖蒸汽护理主机背面部分ハンドル:手柄排水レバー:排水阀排水口:排水口排水カバー:排水口挡板器具用プラグ差込口:电源插孔附赠品防水シート:防水垫お掃除針:清理针(收纳在主机盖子里面)距離の目安ガイド:距离测量器(脸和出汽口的距离)关于模式的说明有5种模式可以选择;洁肤、弹力和肌肤护理三个模式可以通过温感加时键调节暖蒸汽护理时间,特别是秋冬低气温季节,可以按照个人需要调节时间。
按下温感加时键之后该按钮会亮红灯,在不同的模式里面也会相应的改变护理时间。
洁肤模式:肌肤更加洁净透亮热蒸汽6分钟、冷雾1分30秒、热蒸汽3分钟、冷雾1分30秒、热蒸汽3分钟,共15分钟左右。
按温感加时键,更新为秋冬模式,热蒸汽6分15秒钟、冷雾45秒、热蒸汽3分钟、冷雾45秒、热蒸汽3分钟,共13分45秒钟左右。
Panasonic EPMS40 说明书

Operating InstructionsHousehold Massage LoungerInstrucciones de UsoMode d’emploiSillón de Masaje Doméstico1English Basic precautions should always be followed when using an electrical unit, including the following.Please ensure that you read all instructions before using the Household Massage Lounger.DANGER– T o reduce the risk of electric shock:1. Always unplug this unit from the electrical outlet immediately after using and before cleaning.WARNING – To reduce the risk of burns, fire, electric shock, or injury to persons:1. Always insert the power plug all the way into the outlet to reduce the risk of short-circuit and fire.2. The unit should never be left unattended when plugged in. Always unplug the unit when not in use.3. The unit is not to be used by people who cannot move or communicate on their own.4. Only use the unit for the purpose described in these instructions.5. Do not stand on the unit.6. Do not use any accessories other than those recommended by the manufacturer.7. Never operate the unit if it has a damaged power cord or plug. Return the unit to the nearest authorized servicecenter if it is not working properly, if it has been dropped or damaged, or if it has been immersed in water.8. Keep power cords away from heated surfaces. Do not carry the unit by the power cord.9. Never block the air openings during operation and make sure that all air openings are kept free of lint and hair,etc. Do not drop or insert anything into any of the openings of the unit.10. Do not use the unit on top of heating appliances, such as electric carpets, etc. Do not operate the unit underblanket or pillow. Excessive heating can occur and cause fire, electric shock, or injury to persons.11. Do not use the unit in bathrooms or other damp or humid places as this may cause electric shock or cause theunit to malfunction. Do not spill water, etc. onto the controller.12. Do not use the unit outdoors.13. Do not use or operate where aerosol spray products are being used or where oxygen is being administered.14. When unplugging the unit, turn off all controls before removing the plug from power outlet. Do not use the unitwith a transformer as this may lead to malfunction or electric shock.15. Connect this unit to a properly grounded outlet only. See Grounding Instructions.SAVE THESE INSTRUCTIONS12E n g l i shCAUTION: To avoid the risk of injury:1. Persons with any of the conditions listed below or who are undergoing medical treatment or suffer from medicalconditions should consult with their physicians before using the unit:a) Pregnant women, people who are ill, in poor physical shape.b) People suffering from back, neck, shoulder, or hip pain.c) People who have a pacemaker, defibrillator, or other personal medical devices prone to electronic interference.d) People suffering from heart disease.e) People who are prohibited from receiving massage by a physician due to thrombosis or aneurism, acute varicose veins, or other circulatory disorders.f) People with irregular curvatures of the spine. 2. This unit should not be used by children. Remove the key when not in use and store out of reach of children. 3. Sit down slowly after checking the position of the massage heads. Never put any part of your body between themassage heads as the squeezing action of the massage heads may cause injury. Never put your hands or feet in the gap between the unit and leg/foot massage section. 4. Do not use the unit against bare skin. While thin clothing may increase effectiveness, exposing the skin directlyto the massager may irritate the skin.Do not use the unit while wearing anything hard on your head like a hair accessory, etc. Do not use the unit for massaging the head, abdomen, front neck, elbows or knees.Do not use excessively strong massage action on the back of the neck. 5. Do not stretch the back muscles for more than approximately 15 minutes at a time. To avoid overstretching themuscles which may result in discomfort, do not use the unit for more than 5 minutes when first using it. Y ou can gradually increase the duration and strength of the massage as you become used to it. Do not massage any one point for more than 5 minutes at a time.Excessive massaging can overstimulate the muscles and nerves and result in an adverse effect.To prevent excessive massaging, do not use the massager for more than a total of 15 minutes each session. After approximately 15 minutes, the massage heads will be retracted and stop moving. 6. While using the massager, if you start feeling sick or if the massage seems painful, stop using it immediately.While using the massager, if the pressure seems too strong, the movement of the massage heads can be stopped at any time by pressing the Quick Stop button. 7. Do not go to sleep while using the unit. Do not use the unit after drinking alcohol.8. Do not unplug the unit or turn it off during operation. Unplug the unit immediately if there is a power outage. 9. Be sure to start on the gentle massage program if using the massager for the first time. The shiatsu massage isstronger and should be enjoyed after one has gotten accustomed to the chair.10. Always fold down the back pad to check that the fabric of the unit itself has not been ripped before using theunit. Please also check other areas to ensure that the fabric has not been ripped. No matter how small the rip, if you find one then immediately stop using the unit, unplug the power cord and have the unit repaired at an authorized service center.11. Sit on the unit after confirming there is no foreign matter between the parts of the unit. (Confirm that there areno foreign objects stuck in the back pad, the seat or the leg/foot massage section.) Failure to observe this precaution may result in accident or injury.12. Always return the leg/foot massage section to its original position before moving the unit.Failure to observe this precaution may result in injury due to the leg/foot massage section returning to its original position when the unit is being moved.English13. Do not drag or push the unit in an installed state.Do not move the unit using the wheels on the floor. (Always place a mat or similar object underneath.)The floor may be damaged.14. Do not stand on the leg/foot massage section.The end portion of the leg/foot massage section may rotate, or the main unit may tip, causing accident or injury.Also, the bottom of the leg/foot massage section may make contact with and scratch the floor.15. Do not insert your feet between the sole section and calf section of the leg/foot massage section and attempt tostand up.Failure to observe this precaution may result in accident or injury in a fall.CAUTION: To avoid damaging the chair, follow these precautions:1. Do not sit on or drop the controller. Do not pull the controller cord or the power cord. Be careful not to catch thecord of the controller between the armrest and the chair back.2. Do not treat the chair roughly, such as turning the chair on its side, turning the chair over or standing on it.3. Do not treat the covering roughly.Keep sharp or pointed objects away from the covering of the chair. Be careful not to drop lit ashes, lit cigarettes or matches on the chair.Exposure to direct sunlight can cause fading or a change in color of the covering.4. If the massager functions abnormally, immediately turn off the power and have the massager checked by anauthorized service center.5. Do not repeatedly operate any switch at short intervals. Such action may cause the switch to malfunction.6. Some noise may be heard coming from the massager while in use. This is due to the structure of the massagerand is normal.7. When excessive pressure is applied to the massage heads, they may stop moving for safety. When moving theheads up from the lowered position, one’s body weight may stop the heads’ movement. In such a case, slightly raise your body and allow the massage heads to move up.8. After each massage, slide the power switch, which is located on the back side of the chair, to the “off” positionand turn its lock switch to the “lock” position. Remove the key and power plug.9. Do not sit on the chair with wet body or hair.10. The unit must not be used in “wet rooms” (sauna, swimming pool) or outdoors.11. Do not attempt to open or disassemble any part of the unit. Only use an authorized Panasonic servicer to fixyour unit.••34E n g l i shThis product must be grounded. If it should malfunction or break down, grounding provides a path of least resistance for electric current to reduce the risk of electric shock. This product is equipped with a cord having an equipment-grounding conductor and a grounding plug. The plug must be plugged into an appropriate outlet that is properly installed and grounded in accordance with all local codes and ordinances.DANGERImproper connection of the equipment-grounding conductor can result in a risk of electric shock. Check with a qualifiedelectrician or serviceman if you are in doubt as to whether the product is properly grounded. Do not modify the plug provided with the product – if it will not fit the outlet, have a proper outlet installed by a qualified electrician.This product is for use on a nominal 120-volt circuit and has a grounding plug that looks like the plug illustrated in Figure A. Make sure that the product is connected to an outlet having the same configuration as the plug.No adapter should be used with this product.Figure AGROUNDED OUTLET GROUNDED OUTLET BOXFor those who weighing 220 lbs (100 k g ) or more, the product operations may make more noise and the fabric cover may wear faster.This product is designed for users of between 61 to 72.8 in. (155 to 185 cm) in height.Users who are taller than approximately 72.8 in. (185 cm) or shorter than approximately 61 in. (155 cm) may not be able to use the upper body massage and leg/foot massage simultaneously.••5English1 Retracted Position of Massage Heads2 Leg/foot massage lock release strap See page 11.3 Seat4 Leg/foot massage sectionIncludes an air massage function.Calf sectionSole section5 Backrest Cushion6 Back Pad7 BackrestIncludes integrated massage heads.•••8 Armrest9 Specification Label 10 Connector11 Power CordCord length: approx. 70.8 in. (1.8 m)12 Power Plug 13 Wheels 14 Controller15 Safety Precaution Label 16 Controller Holder17 Power switch section See page 12.Lock switch is set to “open” and power switch is set to “on” prior to leaving the factory.18 Appliance inlet 19 Lock Switch 20 Power Switch 21 Lock Switch Key22 Lock Switch Key TagTo prevent children from accidentally swallowing the lock switch key.•••• PART NAMES AND FUNCTIONSMain unit12346857912111014152022161719182113FrontBack6E n g l i s hController7EnglishWhere to use the unitLeg/foot massage section Approx. 15.7" (40 cm)massage section touch the floorapprox. 45.3" (115 cm)Do not expose the massage lounger to direct sunlight or high temperatures, such as in front of heating sources, because this can cause discoloration or hardening of the surface material.Placing a mat or cloth under the unit is recommended toprevent floor damage. The size of the mat should be sufficient [at least 25.6 in. × 45.3 in. (65 cm × 115 cm)] to cover theareas where the unit touches and where the leg/foot massage section could touch the floor.•••• See Warning No. 10 and 11 on page 1.8E n g l i s h2 How to move the unitSince the unit is very heavy [approximately 103.4 lbs (47 k g )], be careful to avoid back injuries. (The unit must be carried by two people.)Put the unit down slowly and carefully watch your step. See Caution No. 13 on page 3.Lifting the UnitY ou may damage the floor by dropping the unit if you do not hold it correctly.Check that the leg/foot massage section is stored away and locked.Place the controller and power cord on the seatIn narrow corridors etc., hold the front and rear of themain unit.as that shown in “At the front”.than waist height••9E n g l i s hCheck for dirt and damage 5 Check the power cord and the powerplug.See Warning No. 7 on page 1.EnglishE n g l i s hAfter 15 minutes of use, we recommend that you take a 10 minute e the unit up to twice per day, for a total of 30 minutes. See Caution No. 5 and 9 on page 2.1The menu selection buttons flash.(The power will turn off automatically if you do not select a menu or start a leg/foot massage within 3 minutes after turning on the power.)2 Upper body massageSelect a menu from among Pre-Programs, SelfProgram and Manual operation.Pre-ProgramsSee page 15.You can select from among 4 programs for automatically looseningSelf ProgramSee page 18.YouManual operationSee page 21.Leg/foot massagePress thebutton.See page 23.Leg/foot massage can be used by itself or simultaneously with the upper body massage.••* T he above display appears even when the backrest cushion has been removed and the leg/foot massage section is ejected.EnglishE n g l i s h3)<How to adjust>[Each press moves the massage heads approximately 0.6 in. (1.5 cm).]4) begin the program.buttonis not pressed.•English To change the content of the massageE n g l i s h(The power will turn off automatically if no operation is performed within 3 minutes after entering the program selection mode.)123Note: W hen you change to “SELF PROGRAM” halfway through another typeof massage, you can make selections for the time remaining.4[Program Selection Mode]When you have selected “Back and lower back”The operation to check you are seated (tapping around shoulders) will begin.When the unit has confirmed that you are seated, the massage heads move to your back or lower back and the programbegins.E n g l i s hTo CustomizeTo change the content of the massagebutton again and enter new settings.•English See Caution No. 5 on page 2.12upwards by around 1.2 in. (3 cm).E n g l i s hTo CustomizeTo change the content of the massageEnglishLeg/foot massage durationTo use leg/foot massage only: The massage lasts for approximately 15 minutes.To combine with upper body massage: When the upper body massage ends, the leg/foot massage endssimultaneously.E n g l i shTimer functionThe massage will complete automatically approximately 15 minutes after the start of operations.Interrupting the massageIf you experience any problemsContinue pushing firmly until you hear a click as it locks.2 Put the backrest cushion in place.••EnglishE n g l i s hCautions for washingTo hand wash (avoid machine washing)Wash the backrest cushion cover with the zippers closed.1 Immerse the cover in water of no more than 86 °F (30 °C), and wash by pushing down gently.Caution: Use a mild detergent. Detergents including bleaching agents will bleach the cover.Do not use such detergents.2 Rinse well.3 Gently squeeze out the water.Caution: D o not squeeze the cover tightly as this may damage the fabric or stretch the fiber.4 Gently stretch and hang dry in the shade.Caution: D rying in direct sunlight may cause the fabric to shrink and the color to fade, andshould therefore be avoided.After washing the cover, you can iron it to eliminate fold marks.(Caution regarding use of iron)To dry cleanAt the cleaners, ask for dry cleaning (petroleum based) and make it clear that tumble drying should not be used.EnglishRemovingBackrest cushion coverUnfasten the rear zipper and remove the cushion.1 Unfasten the zippers (3 locations).2E n g l i s hFitting1the cushion.2 zipper opening.3 Close the zipper.4 To ensure the cushion is equally distributed within the cover, pat the front and rear of the cover a few times.1 Close the zippers located to the sides of the seat (2 locations).2 at the bottom section of the seat.3 the back pad.4 and the armrests.Englishamount of wrinkles.1 Wrinkles in the back pad: Gently rub towards the edges.2 Seat wrinkles: Unfasten the velcro fastener, * D If fold marks are noticeable, iron the cover. (See page 26.)30E n g l i s hEnglish3132E n g l i s hError displayExplanationsOperation is terminated because there is a problem with internal communication.Operation is terminated because there is a problem with the massage mechanism.* P lease contact an authorized service center.Service and maintenance will be more efficient if the error number is communicated when contacting.。
电解水机使用方法说明书
电解水机使用方法说明书使用方法说明书一、产品概述电解水机是一种能够将普通自来水通过电解作用分解为酸性水和碱性水的设备。
本说明书将详细介绍电解水机的使用方法。
二、安全须知1. 使用前请仔细阅读说明书,并按照说明正确操作。
2. 请确保电解水机接地良好,以防止电击事故的发生。
3. 请勿将手指或金属物体插入机器内部,以防触电或引起其他危险。
4. 若发现机器有异常情况(如异味、漏电等),请立即停止使用,并联系售后服务中心。
三、使用步骤1. 准备工作a) 将电解水机放置在稳定的平台上,并确保周围无障碍物。
b) 将电解水机与电源插座连接,并打开电源开关。
2. 开始操作a) 打开自来水开关,将自来水通至电解水机。
b) 按下电解水机上的开始按钮,启动电解过程。
c) 电解过程将持续一段时间,请耐心等待。
d) 当电解过程结束后,电解水机将停止工作。
3. 使用酸性水a) 打开酸性水出水阀,取出酸性水。
b) 酸性水适合清洗厨房用具等。
4. 使用碱性水a) 打开碱性水出水阀,取出碱性水。
b) 碱性水可作为清洁剂使用,也可被用于洗澡等个人护理。
4. 关闭电解水机a) 将自来水开关关闭,停止供水。
b) 关闭电解水机的电源开关。
四、注意事项1. 请遵循使用方法操作,不要随意拆卸或改动设备结构。
五、维护与保养1. 每次使用后,请及时关闭水源和电源。
2. 定期清洗电解水机,以保持其正常运行。
3. 若长时间不使用电解水机,请将其包装好,存放在通风干燥的地方。
六、故障排除若电解水机出现以下情况,请联系售后服务中心进行检修:1. 机器不能正常启动或无法停止。
2. 出水口漏水。
3. 出水水质异常。
4. 其他异常情况。
七、售后服务若在使用电解水机的过程中遇到困难或问题,请及时与我们联系,我们将尽力提供帮助与解决方案。
以上为电解水机使用方法的说明书,希望能对您的使用带来帮助。
如有其他疑问,请联系客服中心或参考附带的说明书。
感谢您的选择!。
松下电解水机说明书

中文说明:商品简介:1.采用塑料外壳,机体小巧,自来水通过本机电解槽电解,将水变成可以直接喝对身体有益的碱性水和可用来杀菌消毒的酸性水.分别分为高/中/低三个档位.3、数码显示滤芯更换提示,饮用水音乐提示。
4、吸盘式固定安装,只需连接家中水龙头,直接放在橱柜台面即可,操作简单。
5、采用铂钛合金电解槽,使用寿命长,约可持续电解850小时(按照每日使用15升算10年以上)。
松下制造电解水机已有10多年历史,质量可靠。
6、采用中空纤维加载银活性炭组合滤芯,多级强力净化、水质净化更好、口感更好、产品质量好、信誉高。
7、滤芯更换周期:约2年。
(国内部分地区水质较差,水里沉淀物多,此情况需在机器入水口前再多加一道过滤装置,减轻机器滤芯的负担,让滤芯达到最大寿命)。
8、出水量: 2.0升/分9、进水压力:0.1~0.35Mpa。
10、适用家庭饮水、煮饭、煲汤和小型办公室的饮水。
外观时尚脱俗,设计小巧精致,厚度只有 8.4cm。
是您厨房的精美装饰品!1.可以选择5种不同的水质2.可以使用“连续模式”达到节水效果3.JIS日本工业标准规格认定的优秀的净水性能,高性能滤芯可以除去水中的13种物质:?亚硫酸?泥垢?石油碳氢化合物(Trihalomethane)?哥罗酚(chloroform)?挥发性卤化物BROMODICHLOROMETHANE?水中总三卤甲烷Dibromochloromethane?三溴甲烷Bromoform?四氯乙烯tetrachloroethylene?三氯乙烯trichloroethylene?二氯二苯三氯乙烷trichloroethane又名DDT ? CAT(农药.)?水中土霉味物质?溶解性铅规格电解离子水小知识:碱性水质可以中和体酸含极高之氢氧离子及钙离子,可以将过多的氧还原成水,减少自由基的伤害。
碱性带负电,可以平衡酸化中的正电,以达电位安定的效果。
酸性 3:清洁、洗涤煮汤、去除蔬菜涩味等酸性 5.5:洗脸、收敛 PH5.5弱酸性水,能给细嫩的肌肤最好的呵护。
pdf 水电解制氢设备 说明书
水电解制氢设备说明书一、设备概述水电解制氢设备是一种利用电解水的方法来制备氢气的装置。
该设备具有高效、环保、操作简便等优点,广泛应用于工业、科研、医疗等领域。
二、工作原理水电解制氢设备的工作原理是利用电解水反应制备氢气。
具体来说,设备将水(H2O)通过电解作用分解为氧气(O2)和氢气(H2)。
这个反应过程中,电解作用需要提供外部电源,通常采用直流电。
三、设备组成水电解制氢设备主要由以下几个部分组成:1.电解槽:用于进行电解水反应,产生氢气和氧气。
2.电源:提供电解所需的直流电。
3.控制系统:控制设备的运行,监测电解过程。
4.储气系统:储存生成的氢气和氧气。
5.辅助设备:包括管道、阀门、安全装置等。
四、安装步骤1.确定设备的安装位置,确保有足够的空间和电源。
2.检查设备各部件是否完好无损,如有需要,进行必要的维修或更换。
3.按照设备说明书的指示,连接电源和控制线路。
4.安装储气系统和其他辅助设备。
5.完成安装后,进行必要的调试和测试,确保设备正常运行。
五、操作流程1.开启设备前,检查所有部件是否正常,确保电源已连接。
2.打开电源开关,启动设备。
设备将自动进行电解水反应,生成氢气和氧气。
3.观察电解过程,确保没有异常情况发生。
如有异常,立即关闭电源,检查并排除故障。
4.当储气系统达到一定压力时,可以开始使用氢气或氧气。
5.使用完毕后,关闭电源,结束设备的运行。
六、维护保养为了确保设备的正常运行和使用安全,建议定期进行以下维护保养工作:1.清洁设备表面,保持整洁。
2.检查电解槽和储气系统,确保没有泄漏或损坏。
3.定期检查电源和控制线路,确保连接牢固,没有破损。
4.根据使用情况,适时更换电解槽中的电极。
5.定期对设备进行全面检查和调试,确保设备性能良好。
七、常见问题及处理1.电解效率下降:可能是由于电极老化或电解液浓度降低,需要更换电极或调整电解液浓度。
2.设备漏气:可能是由于密封圈老化或损坏,需要更换密封圈。
YC-300TSPHGE(TSM89469-03)
10.保养和检修………………………………………………………………………… 18
11.售后服务……………………………………………………………………………………… 20
12.引出信号用端子及使用实例 ………………………………………………………21
13.电路图 ………………………………………………………………………………22
2.敬请遵守的安全事项 ………………………………………………………………… 3
3.额定规格……………………………………………………………… 8
4.静外特性及热保护……………………………………………………………………………… 8
5.准备……………………………………………………………………………………9
或重伤等重大人身事故。 3. 输入侧动力源的施工、设置场所的选定、高压气体的使用、保管和配置、焊接后的工件的保管和废
弃物的处理等,请遵照有关规定及贵公司的内部标准进行。 4. 无关人员请勿进入焊接作业场所内。 5. 使用心脏起搏器的人,无医师许可不得靠近使用中的焊机及焊接作业场所周围。焊机通电时产生的
危险危险为避免触电务请遵守以下规定为避免触电务请遵守以下规定触摸任何带电的电器部件都可能引起致命的电击或灼伤触摸任何带电的电器部件都可能引起致命的电击或灼伤4敬请遵守的安全事项续敬请遵守的安全事项续危险危险为避免焊接烟尘及气体危及您及他人请使用保护用具为避免焊接烟尘及气体危及您及他人请使用保护用具焊接烟尘和气体危害健康
注意 为防止气瓶倾倒、气体调节器破裂等,务请遵守以下规定
*气瓶倾倒会造成人身事故。 *气瓶内装有高压气体,错误使用会引起高压气体喷出,造成人身事故。
1.请按规定正确使用气瓶。 2.请使用本公司配带或推荐的气体调节器。 3.用前请阅读气体调节器使用说明书,请遵守注意事项中的规定。 4.使用专用的气瓶固定架将气瓶固定。 5.请勿将气瓶置于高温或阳光照射处。 6.打开气瓶阀时,脸部请勿接近气体出口。 7.不用时,请装上气瓶保护罩。 8.请勿将焊枪放在气瓶上,电极不能接触气瓶。
松下350-500GM3说明书

● 若火花飞溅于机器上,会从吸气口、开口处进入内部造成机器烧损,应尽力避免。
4.一定要着用正确服装,保护用具。
5.换气
焊接烟尘及一氧化碳对人体有害,
焊接时请采取换气措施。
6.确保安全安装 安装在台架上时,应充分注意脚 轮、电焊机本体的地脚螺栓等是 否安全可靠。
(示例) 长袖上衣
帽子或安全帽
手持面罩 (保护眼睛)
【将本产品安装或转移至欧洲各国时的注意事项】
本产品与 EU 的安全法令 EC 指令的要求不符,故不能直接 将本机带入欧洲及欧洲以外的 EEA 协定缔约国。
将本产品安装或转运至欧洲各国或其它 EEA 缔约国时,请 务必事先与本公司协商。
唐山松下产业机器有限公司 地址:河北省唐山市高新技术开发区庆南道 9 号 邮编:063020 电话:(0315)3206017 3206066 传真:(0315)3206070 3206018
技术资料
14.参数规格 ·························· 14-1 ■技术规格 ························ 14-1
15.部品配置图 ························ 15-1 16.部品明细表 ························ 16-1 17.电路图 ···························· 17-1
(3)不锈钢MIG焊接
母材材料
焊丝材料
保护气体
碳钢
实心焊丝
CO2 MAG
药芯焊丝
CO2 MAG
不锈钢
实心焊丝 药芯焊丝
zYD-500GM3HGE 可以使用的焊接方法
MIG
CO2 MAG
丝径(mm)
- 1、下载文档前请自行甄别文档内容的完整性,平台不提供额外的编辑、内容补充、找答案等附加服务。
- 2、"仅部分预览"的文档,不可在线预览部分如存在完整性等问题,可反馈申请退款(可完整预览的文档不适用该条件!)。
- 3、如文档侵犯您的权益,请联系客服反馈,我们会尽快为您处理(人工客服工作时间:9:00-18:30)。
中文说明:
商品简介:
1.采用塑料外壳,机体小巧,自来水通过本机电解槽
电解,
将水变成可以直接喝对身体有益的碱性水和可用来
杀菌消毒
的酸性水.分别分为高/中/低三个档位.
3、数码显示滤芯更换提示,饮用水音乐提示。
4、吸盘式固定安装,只需连接家中水龙头,直接放在橱柜台面即可,操作简单。
5、采用铂钛合金电解槽,使用寿命长,约可持续电解850小时(按照每日使用15升算10年以上)。
松下制造电解水机已有10多年历史,质量可靠。
6、采用中空纤维加载银活性炭组合滤芯,多级强力净化、水质净化更好、口感更好、产品质量好、信誉高。
7、滤芯更换周期:约2年。
(国内部分地区水质较差,水里沉淀物多,此情况需在机器入水口前再多加一道过滤装置,减轻机器滤芯的负担,让滤芯达到最大寿命)。
8、出水量: 2.0升/分
9、进水压力:0.1~0.35Mpa。
10、适用家庭饮水、煮饭、煲汤和小型办公室的饮水。
外观时尚脱俗,设计小巧精致,厚度只有 8.4cm。
是您厨房的精美装饰品!
1.可以选择5种不同的水质
2.可以使用“连续模式”达到节水效果
3.JIS日本工业标准规格认定的优秀的净水性能,高性能滤芯可以除去水中的13种物质:
?亚硫酸
?泥垢
?石油碳氢化合物(Trihalomethane)
?哥罗酚(chloroform)
?挥发性卤化物BROMODICHLOROMETHANE
?水中总三卤甲烷Dibromochloromethane
?三溴甲烷Bromoform
?四氯乙烯tetrachloroethylene
?三氯乙烯trichloroethylene
?二氯二苯三氯乙烷trichloroethane又名DDT ? CAT(农药.)
?水中土霉味物质
?溶解性铅
规格
电解离子水小知识:
碱性水质可以中和体酸
含极高之氢氧离子及钙离子,可以将过多的氧还原成水,减少自由基的伤害。
碱性带负电,可以平衡酸化中的正电,以达电位安定的效果。
酸性 3:清洁、洗涤煮汤、去除蔬菜涩味等
酸性 5.5:洗脸、收敛 PH5.5弱酸性水,能给细嫩的肌肤最好的呵护。
碱性 7:吃药、泡牛奶服药期间或婴儿冲泡牛奶,可使用净水。
碱性 8.5:初期饮用初次饮用,因个人味蕾适应酸、碱性水的时间各有不同,先以弱碱性水PH8.5饮用10天再往上调高碱性强度
碱性 9:饮用、煮饭电解还原水渗透力强、抗氧化;煮的白饭米色白、松软,口感超级棒!
碱性 9.5:饮用、料理食物、煮鱼汤、煮笋汤泡茶、泡咖啡,风味绝佳(因电解还原水可抑制单宁酸过度的释出)。
电解还原水有绝佳的抗氧化性所以风味甘甜(无腥味)。
碱性 10 :农药拔除、野菜清洗在高渗透力的效果下(强碱 PH10以上)蔬果浸泡具有 87% 以上的农药拔除效果。