Fluent 日志文件的使用 英文版
第03章 fluent文件的读写28

第三章读写文件在使用FLUENT时你需要输入和输出几种类型的文件,其中读入的文件包括grid, case, data, profile, Scheme,以及journal文件,还有包括包含case, data, profile, journal,以及transcript 的文件。
FLUENT也可以保存面板的布局以及图形窗口的硬拷贝。
使用各种可视化以及后处理工具可以输出数据。
下面详细介绍一下上述内容。
FLUENT读写的文件表一列出了FLUENT所能读写的文件。
关于各种文件的使用,哪一代码写哪一类型的文件,每一类型的文件的更多信息都可以参阅这个表。
(注意:下表中的一些文件格式并不是FLUENT的格式,但是当它们被读入的时候格式会被自动转换)表一:FLUENT读写的文件读写文件的捷径FLUENT有几个功能使得读写文件很方便,它们分别为:自动添加和检测文件的后缀;二进制文件的读写;文件格式的自动检测(文本文件和二进制文件);压缩文件的读写;Tilde expansion;文件自动编号;使文件覆盖确认的提示失效;默认文件后缀;二进制文件;检测文件格式FLUENT读写的各种类型文件都有默认的后缀(见表一中的FLUENT读写的文件)。
对于某些常用文件,解算器会自动添加或者检测适当的后缀,比如写一个case文件只需要写出文件名myfile之后,FLUENT会自动添加文件名为myfile.cas,对于PDF文件和ray文件也一样。
二进制文件对于case, data, 或者ray文件,FLUENT会默认存为二进制文件。
二进制文件比文本文件占有更少的空间,而且读写更快。
但是需要注意的是,你无法阅读和编辑二进制文件,但可以阅读和编辑文本文件。
如果你要保存文本文件,你只需要在写文件的时候在文件选择对话框中关掉二进制文件选项。
FLUENT可以读入不同平台下的二进制文件,但是其它软件如TGrid不能。
如果你需要在不同平台上将一个case文件读入TGrid,你应该在FLUENT中保存为文本文件检测文件格式读入case, data, grid, PDF, 或者ray文件,解算器会自动检测它是二进制文件还是文本文件读写压缩文件读压缩文件在选择文件对话框中可以读入压缩文件。
Fluent_操作手册
第01章fluent简单算例21FLUENT是用于模拟具有复杂外形的流体流动以及热传导的计算机程序。
对于大梯度区域,如自由剪切层和边界层,为了非常准确的预测流动,自适应网格是非常有用的。
FLUENT解算器有如下模拟能力:●用非结构自适应网格模拟2D或者3D流场,它所使用的非结构网格主要有三角形/五边形、四边形/五边形,或者混合网格,其中混合网格有棱柱形和金字塔形。
(一致网格和悬挂节点网格都可以)●不可压或可压流动●定常状态或者过渡分析●无粘,层流和湍流●牛顿流或者非牛顿流●对流热传导,包括自然对流和强迫对流●耦合热传导和对流●辐射热传导模型●惯性(静止)坐标系非惯性(旋转)坐标系模型●多重运动参考框架,包括滑动网格界面和rotor/stator interaction modeling的混合界面●化学组分混合和反应,包括燃烧子模型和表面沉积反应模型●热,质量,动量,湍流和化学组分的控制体源●粒子,液滴和气泡的离散相的拉格朗日轨迹的计算,包括了和连续相的耦合●多孔流动●一维风扇/热交换模型●两相流,包括气穴现象●复杂外形的自由表面流动上述各功能使得FLUENT具有广泛的应用,主要有以下几个方面●Process and process equipment applications●油/气能量的产生和环境应用●航天和涡轮机械的应用●汽车工业的应用●热交换应用●电子/HV AC/应用●材料处理应用●建筑设计和火灾研究总而言之,对于模拟复杂流场结构的不可压缩/可压缩流动来说,FLUENT是很理想的软件。
当你决定使FLUENT解决某一问题时,首先要考虑如下几点问题:定义模型目标:从CFD模型中需要得到什么样的结果?从模型中需要得到什么样的精度;选择计算模型:你将如何隔绝所需要模拟的物理系统,计算区域的起点和终点是什么?在模型的边界处使用什么样的边界条件?二维问题还是三维问题?什么样的网格拓扑结构适合解决问题?物理模型的选取:无粘,层流还湍流?定常还是非定常?可压流还是不可压流?是否需要应用其它的物理模型?确定解的程序:问题可否简化?是否使用缺省的解的格式与参数值?采用哪种解格式可以加速收敛?使用多重网格计算机的内存是否够用?得到收敛解需要多久的时间?在使用CFD分析之前详细考虑这些问题,对你的模拟来说是很有意义的。
fluent日志格式

Fluentd(通常缩写为Fluent)是一个开源的数据收集器,用于统一日志收集。
它具有灵活的插件系统,可以轻松地与多种数据存储和处理系统集成。
Fluentd的日志格式通常是JSON,这使得日志信息可以以结构化的形式存储和传输。
以下是一般情况下Fluentd的日志格式:```json{"time": "2023-11-19T12:34:56.789000Z","record": {"key1": "value1","key2": "value2",// ... 更多的键值对}}```- `"time"`字段包含了日志事件的时间戳。
时间戳通常采用ISO 8601格式,包括日期和时间,并且可能包含毫秒级的精确度。
-`"record"`字段是一个嵌套的JSON对象,包含实际的日志记录信息。
每个键值对代表一个特定的属性或字段,其值可以是字符串、数字、布尔值等。
这种结构化的日志格式有助于在日志处理和分析阶段更轻松地提取、查询和分析日志信息。
Fluentd的插件系统允许用户根据需要进行自定义,以适应不同的日志源和目标存储系统。
因此,具体的日志格式可能会因配置和插件而有所不同。
请注意,Fluentd支持多种插件,可以用于将日志发送到各种目的地,例如Elasticsearch、MongoDB、Kafka等。
在配置Fluentd时,用户可以指定使用的输入插件和输出插件,以及相应的日志格式。
FLUENT软件操作界面中英文对照
FLUENT软件操作界面中英文对照Fluent Software Operation Interface English-Chinese Pairs1. File 文件2. Open 打开3. Save 存储4. Save As 另存为5. Import 导入6. Export 导出7. Quit 退出9. Preferences 首选项10. View 视图11. Toolbar 工具栏12. Status Bar 状态栏13. Mesh 网格14. Monitor 监视器15. Monitor Plot 监视器绘图16. Monitor Table 监视器表17. Create Monitors 创建监视器18. Zone 专区19. Operation 操作20. Domain 领域21. Manage 管理22. Tables 表23. Solve 解24. Solve Setup 解决设置26. Boundary Conditions 边界条件27. Definitions 定义28. Solution Monitors 解决监视器29. Global Parameters 全局参数30. Flow Models 流动模型31. Turbulence Models 湍流模型32. Species Models 种类模型33. Initialization 初始化34. Time-Scale & Pressure Control 时间尺度压力控制35. Advanced ODE Solver 高级常微分方程求解36. Solution Controls 解决控制37. Residual Controls 残余控制38. Memory & Multigrid Controls 内存&多重网格控制39. Under Relaxation 松弛40. Discrete Transfer 离散传递41. Refine Mesh 细化网格42. Reporting 报告43. Monitors 监视器44. Post Processing 后处理45. Mode 状态46. Graph 语句47. Residuals 残余48. Contours等值线49. Vectors 矢量50. Point Monitors 点监视器51. Interrogate 查询52. Probe Measurements 探针测量53. Construct Geometry 构造几何体54. Geometry 构造55. Extrude 拉伸56. Merge 合并57. Make Map 构建图58. Close Gaps 关闭间隙59. Round Corners 圆角60. Rotate 旋转61. Translate 平移62. Rename 重命名63. Measurements 测量66. Simulation 模拟67. Grid 位格68. Solution 解决69. File Signatures 文件标识70. Tools 工具71. Results 结果72. Data Sets 数据集。
fluent使用流程
fluent使用流程下载温馨提示:该文档是我店铺精心编制而成,希望大家下载以后,能够帮助大家解决实际的问题。
文档下载后可定制随意修改,请根据实际需要进行相应的调整和使用,谢谢!并且,本店铺为大家提供各种各样类型的实用资料,如教育随笔、日记赏析、句子摘抄、古诗大全、经典美文、话题作文、工作总结、词语解析、文案摘录、其他资料等等,如想了解不同资料格式和写法,敬请关注!Download tips: This document is carefully compiled by theeditor. I hope that after you download them,they can help yousolve practical problems. The document can be customized andmodified after downloading,please adjust and use it according toactual needs, thank you!In addition, our shop provides you with various types ofpractical materials,such as educational essays, diaryappreciation,sentence excerpts,ancient poems,classic articles,topic composition,work summary,word parsing,copy excerpts,other materials and so on,want to know different data formats andwriting methods,please pay attention!按照[fluent使用流程]为主题,以实际应用情况写一篇流程,回答要求步骤详细,回答字数不少于800字。
fluentd配置方法总结

一、应用场景介绍
1.某些程序/软件的日志文件名称是固定不变的,这种情况下在配置时,只需要
设定好该固定的日志文件的路径就可以。
2.某些程序/软件是每天(每隔一段时间)就会变更日志文件名,很多情况下是
每天一个日志文件,日志文件名包含当前的时间,也就是日志轮转。
fluentd 的tail也能够适应这种情况,详细配置见后面的配置。
二、配置实例详解
1.输入源配置
1.1.1日志文件名称是固定不变时
<source>
type tail
format/(?<occurtime>([\d]{1,4}/[\d]{1,2}/[\d]{1,2} [\d]{1,2}:[\d]{1,2}:[\d]{1,2})).*(?<event>Connection
refused| failed|Connection timed out)(?<detail>.*)/
path/opt/nginx/logs/error.log
pos_file /home/wuchong/fluent/nginx.pos
time_format %Y-%m-%d %H:%M:%S
tag nginx.error
</source>
如上面的配置,绿色字体为固定文件格式的日志文件路径,tail插件将一直监测/opt/nginx/logs/下的error.log文件。
若一直续写。
fluentd multiline 最后1行日志
fluentd multiline 最后1行日志
在处理多行日志时,Fluentd 的 multiline 插件可以帮助我们有效地解析和收集这些数据。
然而,当遇到最后一行日志字数超过500字的情况时,可能会出现解析问题。
这是因为 multiline 插件通常依赖于特定的模式或正则表达式来识别日志行的开始和结束。
当最后一行日志特别长时,它可能不会被正确地识别为日志的结束,从而导致解析错误或数据丢失。
为了解决这个问题,我们可以采取以下策略:
调整正则表达式:检查并调整用于识别日志行开始和结束的正则表达式。
确保它能够处理较长的行,并正确识别日志的结束。
设置最大行长度:某些 Fluentd 配置允许你设置最大行长度。
如果日志行超过这个长度,它们可能会被截断或忽略。
你可以尝试增加这个值,以容纳更长的日志行。
分割长日志行:如果可能,修改日志生成器以在达到特定长度时分割长日志行。
这样,即使单行日志超过500字,它们也会被分割成多个较短的行,从而更容易被 Fluentd 解析。
自定义解析逻辑:如果以上方法都不适用,你可能需要编写自定义的解析逻辑来处理这种情况。
这可能涉及编写自定义的 Fluentd 插件或修改现有的插件以满足你的需求。
无论采取哪种策略,都需要仔细测试以确保日志数据能够正确、完整地被 Fluentd 收集和处理。
同时,也要注意监控 Fluentd 的性能和稳定性,以确保它能够高效地处理大量的日志数据。
Fluent脚本文件
Fluent脚本文件在Fluent中应用脚本文件不仅可以提高工作效率,而且针对脚本文件可以进行参数化处理,实现仿真优化。
1脚本文件利用Fluent菜单File → Write → Start Journal…可以开始录制jou文件。
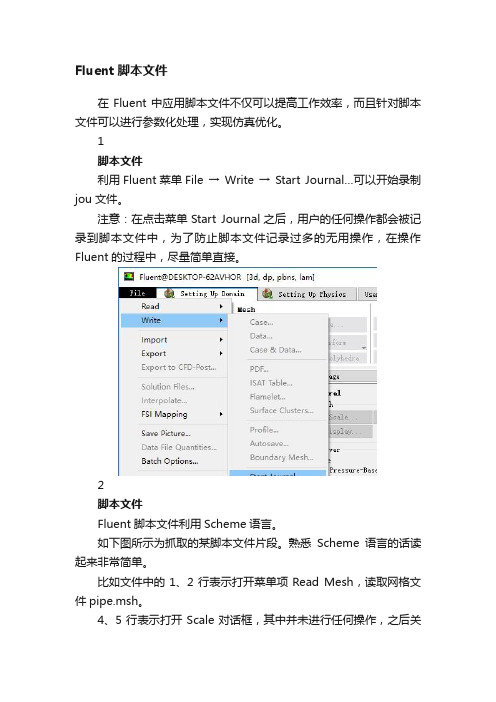
注意:在点击菜单Start Journal之后,用户的任何操作都会被记录到脚本文件中,为了防止脚本文件记录过多的无用操作,在操作Fluent的过程中,尽量简单直接。
2脚本文件Fluent脚本文件利用Scheme语言。
如下图所示为抓取的某脚本文件片段。
熟悉Scheme语言的话读起来非常简单。
比如文件中的1、2行表示打开菜单项Read Mesh,读取网格文件pipe.msh。
4、5行表示打开Scale对话框,其中并未进行任何操作,之后关闭该对话框。
8~20行表示选择湍流模型为Realizable k-epsilon模型。
如果没有参数化需求的话,仅仅只是录制脚本文件方便重复性工作,那么脚本文件通常不需要修改。
若要进行参数化处理,则可以编辑脚本文件使其更加简洁。
当用户对scheme语法非常熟悉时,甚至可以利用文本编辑器手动编写脚本文件。
3脚本文件的使用Fluent脚本文件的加载方式主要有三种。
1、Fluent启动时指定脚本文件如下图所示,在Fluent启动界面中激活选项Use Journal File,并指定录制好的脚本文件路径。
当点击下方的OK按钮后,Fluent会自动执行脚本文件内容。
2、Fluent中读取脚本文件先启动Fluent,在Fluent中利用菜单File → Read → Journal File读取脚本文件3、命令行中读取脚本文件这种方式在服务器中经常会使用。
当Fluent GUI不方便开启时,利用命令行方式运行是比较常用的方式。
在命令行中启动Fluent的方式很多,具体参见Fluent文档中Getting Started Guide部分的4.1.4节。
命令形式如:H:\jour>'D:\ANSYS Inc\v181\fluent\ntbin\win64\fluent.exe' 3d -i pipe.jou启动cmd后,利用cd命令进入当前工作路径,只用利用命令参数-i带上journal文件。
FLUENT软件使用说明(适合初学者)
沿一条边或一个面在其上生成的一个虚拟顶点的位置
平滑顶点 输入顶点位置参数u和v的值。 输入新的点的位置的坐标。
Connect Vertices 连接顶点 Disconnect Vertices 分离顶点
连接实际和/或虚拟顶点,分离 两个或多个实体的公共顶点
连接/分离边
Connect/Disconnect Edges 命令按钮允许用户进行以下操作。
图标
Create Real Conic Arc 命令允许用户生成二次曲线形边。要生成一条二次曲线形边,用户必须设定如 下参数: Start 点——指定起始端点 Shoulder 点——指定弧顶点 End 点——指定末端点 Shape Parameter点——指定弧的一般形状(椭圆形,抛物形或者双曲形)
edit 编辑进程名称 编辑文本文件 建立和编辑参数 编辑程序默认属性
操作工具板
操作工具板在GUI的右上角。它由一系列命令按钮组成,每个 按钮在创建和网格模型过程中起到特定的功能。
总体控制工具板
总体控制工具板在GUI的右下角。它的目的是让你对显示在特殊 象限中的模型控制其版面设计和图形窗口的操作和模型的外观。
分辨率trltrl鼠标右键捕捉点鼠标右键捕捉点由点连成线由点连成线verticesvertices表明组成直线两端点节点的编号表明组成直线两端点节点的编号创建圆弧边鼠标右键创建圆弧边鼠标右键下拉菜单下拉菜单选择点选择点shiftshift鼠标左键鼠标左键创建管嘴创建管嘴由点连成线由点连成线由线组成面由线组成面第三步第三步确定边界线的内部节点分布并创建网格确定边界线的内部节点分布并创建网格successiveradiosuccessiveradio等比序列等比序列doublesideddoublesided内部节点取单双向分布内部节点取单双向分布radioradio内部节点间距间距离的公比内部节点间距间距离的公比spacingspacing分布设置分布设置intervalsizeintervalsize节点间距离节点间距离intervalcountintervalcount节点数量节点数量schemescheme操作方式操作方式applyapply表示不按默认的方式按所设置的方式进行表示不按默认的方式按所设置的方式进行关闭网格显示关闭网格显示第五步第五步输出网格输出网格二平滑和交换网格二平滑和交换网格确保网格质量确保网格质量三确定长度的单位三确定长度的单位四显示网格四显示网格五建立求解模型五建立求解模型segregatedsegregated离散求解离散求解coupledcoupled耦合求解耦合求解implicitimplicit隐式求解器隐式求解器explicitexplicit显示求解器显示求解器求解器求解器离散求解器离散求解器主要用于不可压或主要用于不可压或低马赫数压缩性流体的流动
fluent14.0帮助文档4(英文版)

ANSYS TurboGrid IntroductionRelease 14.0ANSYS, Inc.November 2011Southpointe275 Technology Drive Canonsburg, PA 15317ANSYS, Inc. is certified to ISO 9001:2008.ansysinfo@(T) 724-746-3304(F) 724-514-9494Copyright and Trademark Information© 2011 SAS IP, Inc. All rights reserved. Unauthorized use, distribution or duplication is prohibited.ANSYS, ANSYS Workbench, Ansoft, AUTODYN, EKM, Engineering Knowledge Manager, CFX, FLUENT, HFSS and any and all ANSYS, Inc. brand, product, service and feature names, logos and slogans are registered trademarks or trademarks of ANSYS, Inc. or its subsidiaries in the United States or other countries. ICEM CFD is a trademark used by ANSYS, Inc. under license. CFX is a trademark of Sony Corporation in Japan. All other brand, product, serviceand feature names or trademarks are the property of their respective owners.Disclaimer NoticeTHIS ANSYS SOFTWARE PRODUCT AND PROGRAM DOCUMENTATION INCLUDE TRADE SECRETS AND ARE CONFID-ENTIAL AND PROPRIETARY PRODUCTS OF ANSYS, INC., ITS SUBSIDIARIES, OR LICENSORS.The software productsand documentation are furnished by ANSYS, Inc., its subsidiaries, or affiliates under a software license agreement that contains provisions concerning non-disclosure, copying, length and nature of use, compliance with exporting laws, warranties, disclaimers, limitations of liability, and remedies, and other provisions.The software productsand documentation may be used, disclosed, transferred, or copied only in accordance with the terms and conditions of that software license agreement.ANSYS, Inc. is certified to ISO 9001:2008.U.S. Government RightsFor U.S. Government users, except as specifically granted by the ANSYS, Inc. software license agreement, the use, duplication, or disclosure by the United States Government is subject to restrictions stated in the ANSYS, Inc. software license agreement and FAR 12.212 (for non-DOD licenses).Third-Party SoftwareSee the legal information in the product help files for the complete Legal Notice for ANSYS proprietary software and third-party software. If you are unable to access the Legal Notice, please contact ANSYS, Inc.Published in the U.S.A.Table of Contents1. ANSYS TurboGrid Overview (1)1.1.Valid Decimal Separators (1)2. Using the ANSYS TurboGrid Launcher (3)2.1. Starting the ANSYS TurboGrid Launcher (3)3. ANSYS TurboGrid in ANSYS Workbench (5)3.1.The ANSYS Workbench Interface (5)3.1.1.Toolbox (6)3.1.2. Project Schematic (7)3.1.3.View Bar (8)3.1.4. Properties View (8)3.1.5. Files View (8)3.1.6. Sidebar Help (9)3.1.7. Shortcuts (Context Menu Options) (9)3.1.8. Using Workbench Input Parameters and Workbench Output Parameters (9)3.2. Example Workflow involving ANSYS TurboGrid (9)3.3. Known Limitations of ANSYS TurboGrid Running in ANSYS Workbench (11)4. ANSYS TurboGrid Help and Conventions (13)4.1. Accessing Help (13)4.2. Using the Help Browser Index (14)4.3. Using the Search Feature (14)4.4. Document Conventions (14)4.4.1. File and Directory Names (14)4.4.2. User Input (14)4.4.3. Input Substitution (14)4.4.4. Optional Arguments (14)4.4.5. Long Commands (15)4.4.6. Operating System Names (15)5. Contact Information (17)Index (21)iiiRelease 14.0 - © SAS IP, Inc. All rights reserved. - Contains proprietary and confidential information of ANSYS, Inc. and its subsidiaries and affiliates.Release 14.0 - © SAS IP, Inc. All rights reserved. - Contains proprietary and confidential information ivof ANSYS, Inc. and its subsidiaries and affiliates.Chapter 1: ANSYS TurboGrid OverviewANSYS TurboGrid is a powerful tool that lets designers and analysts of rotating machinery create high-quality hexahedral meshes, while preserving the underlying geometry.These meshes are used in the ANSYS workflow to solve complex blade passage problems.The ANSYS TurboGrid online product documentation is divided into five major areas:1.ANSYS TurboGrid IntroductionA brief introduction, listing of new features, and detailed information about the ANSYS TurboGrid Launcher2.ANSYS TurboGrid Tutorials 3.ANSYS TurboGrid User's GuideInformation about the user interface and workflow4.ANSYS TurboGrid Reference GuideDetailed information about menu items, command actions, syntax, and so on.5.Installation and LicensingHelp on using ANSYS TurboGrid in ANSYS Workbench is provided in ANSYS TurboGrid in ANSYS Work-bench (p.5) and in the TurboSystem > ANSYS TurboGrid section of the ANSYS Workbench help.1.1.Valid Decimal SeparatorsIn ANSYS TurboGrid, only a period is allowed to be used decimal delimiters in fields that accept floating-point input. If your system is set to a European locale that uses a comma separator (such as Germany),fields that accept numeric input will accept a comma, but an error will be returned. If your system is set to a non-European locale, numeric fields will not accept a comma at all.ANSYS Workbench accepts commas as decimal delimiters, but translates these to periods when passing data to ANSYS TurboGrid.1Release 14.0 - © SAS IP, Inc. All rights reserved. - Contains proprietary and confidential information of ANSYS, Inc. and its subsidiaries and affiliates.Release 14.0 - © SAS IP, Inc. All rights reserved. - Contains proprietary and confidential information 2of ANSYS, Inc. and its subsidiaries and affiliates.Chapter 2: Using the ANSYS TurboGrid LauncherANSYS TurboGrid can be run in two modes:•ANSYS TurboGrid stand-alone, which refers to ANSYS TurboGrid running as a stand-alone application independent of the ANSYS Workbench software.•ANSYS TurboGrid Workbench, which refers to ANSYS TurboGrid running as a component inside of theANSYS Workbench software.This is described in ANSYS TurboGrid in ANSYS Workbench (p.5).ANSYS TurboGrid stand-alone has the ANSYS TurboGrid Launcher, which makes it easy to run all the modules of CFX without having to use a command line.The launcher enables you to:•Set the working directory for your project •Start CFX and ANSYS products •Access various other tools, including a command window that enables you to run other utilities •Access the online help and other useful information •Customize the behavior of the launcher to start your own applications.The launcher automatically searches for installations of CFX and ANSYS products including the license manager. Depending on the application, the search includes common installation directories, directories pointed to by environment variables associated with CFX and ANSYS products, and the Windows registry.In the unlikely event that a product is not found, you can configure the launcher using the steps outlined in Customizing the ANSYS TurboGrid Launcher in the TurboGrid Reference Guide .This chapter discusses:2.1. Starting the ANSYS TurboGrid LauncherFor more information about the launcher, see The ANSYS TurboGrid Launcher Interface in the TurboGrid Reference Guide and Customizing the ANSYS TurboGrid Launcher in the TurboGrid Reference Guide .2.1. Starting the ANSYS TurboGrid LauncherYou can run the ANSYS TurboGrid Launcher in any of the following ways:•On Windows:–From the Start menu, go to All Programs > ANSYS 14.0 > Meshing > TurboGrid 14.0.–In a DOS window that has its path set up correctly to run ANSYS TurboGrid, enter cfxlaunch (otherwise, you will need to enter the full pathname of the cfxlaunch command).•On UNIX, enter cfxlaunch in a terminal window that has its path set up to run ANSYS TurboGrid.To run ANSYS TurboGrid, start the launcher, set the working directory, then click TurboGrid 14.0.3Release 14.0 - © SAS IP, Inc. All rights reserved. - Contains proprietary and confidential information of ANSYS, Inc. and its subsidiaries and affiliates.Release 14.0 - © SAS IP, Inc. All rights reserved. - Contains proprietary and confidential information 4of ANSYS, Inc. and its subsidiaries and affiliates.Chapter 3: ANSYS TurboGrid in ANSYS WorkbenchNoteThis chapter assumes that you are familiar with using ANSYS TurboGrid in standalone mode,as described in Using the ANSYS TurboGrid Launcher (p.3), and that you are familiar withANSYS Workbench.This chapter describes using ANSYS TurboGrid in ANSYS Workbench.The following topics are discussed:3.1.The ANSYS Workbench Interface3.2. Example Workflow involving ANSYS TurboGrid3.3. Known Limitations of ANSYS TurboGrid Running in ANSYS WorkbenchFor an example workflow that includes the use of ANSYS TurboGrid, see TurboSystem Workflows in the TurboSystem User Guide .For information about using ANSYS Workbench journaling and scripting with ANSYS TurboGrid, including a special note about playing older journal and session files, see Using ANSYS Workbench Journaling and Scripting with TurboSystem in the TurboSystem User Guide .3.1.The ANSYS Workbench InterfaceTo launch ANSYS Workbench on Windows, click the Start menu, then select All Programs > ANSYS 14.0 > Workbench .To launch ANSYS Workbench on Linux, open a command line interface, type the path to “runwb2” (for example,“~/ansys_inc/v140/Framework/bin/Linux64/runwb2”), then press Enter .The ANSYS Workbench interface is organized to make it easy to choose the tool set that will enableyou to solve particular types of problems. Once you have chosen a system from the Toolbox and moved it into the Project Schematic , supporting features such as Properties and Messages provide orientinginformation.These features and the status indicators in the system cells guide you through the completion of the System steps.The figure that follows shows ANSYS Workbench with a TurboGrid component system open and the properties of cell C2 (Turbo Mesh ) displayed:5Release 14.0 - © SAS IP, Inc. All rights reserved. - Contains proprietary and confidential information of ANSYS, Inc. and its subsidiaries and affiliates.The following sections describe the main ANSYS Workbench features.3.1.1.Toolbox3.1.2. Project Schematic3.1.3.View Bar3.1.4. Properties View3.1.5. Files View3.1.6. Sidebar Help3.1.7. Shortcuts (Context Menu Options)3.1.8. Using Workbench Input Parameters and Workbench Output Parameters3.1.1.ToolboxThe Toolbox shows the systems available to you:Analysis SystemsSystems that match the workflow required to solve particular types of problems. For example, the Fluid Flow (CFX) system contains tools for creating the geometry, performing the meshing, setting up the solver, using the solver to derive the solution, and viewing the results.Release 14.0 - © SAS IP, Inc. All rights reserved. - Contains proprietary and confidential information of ANSYS, Inc. and its subsidiaries and affiliates.6Chapter 3: ANSYS TurboGrid in ANSYS WorkbenchThe ANSYS Workbench Interface Component SystemsSoftware elements upon which Analysis Systems are based. For example, the CFX component system contains Setup (CFX-Pre),Solution (CFX-Solver Manager), and Results (CFD-Post).The Results component system contains only Results (CFD-Post).Custom SystemsSystems that combine separate analysis systems. For example, the FSI: Fluid Flow (CFX) > StaticStructural system combines ANSYS CFX and the Mechanical application to perform a unidirectional (that is, one-way) Fluid Structure Interaction (FSI) analysis.Design ExplorationSystems that enable you to see how changes to parameters affect the performance of the system.NoteWhich systems are shown in the Toolbox depends on the licenses that exist on your system.You can hide systems by enabling View > Toolbox Customization and clearing the checkbox beside the name of the system you want to hide.To begin using a system, drag it into the Project Schematic area.3.1.2. Project SchematicThe Project Schematic enables you to manage the process of solving your problem. It keeps track ofyour files and shows the actions available as you work on a project. At each step you can select the operations that process or modify the case you are solving.When you move a system from the Component Systems toolbox to the Project Schematic, you willsee a set of tools similar to the following:Each white cell represents a step in solving a problem. Right-click the cell to see what options areavailable for you to complete a step.Chapter 3: ANSYS TurboGrid in ANSYS WorkbenchFor example, in a TurboGrid system:•Edit launches ANSYS TurboGrid.•Transfer Data To New > CFX adds a new CFX component system that uses the mesh from the Turbo Mesh cell.3.1.3.View BarYou control which views are displayed by opening the View menu and setting a check mark besidethe view you want to display. If you minimize that view, it appears as a tab in the View Bar and thecheck box is cleared from the View menu.3.1.4. Properties ViewThe Properties view is a table whose entries describe the status of a system.These entries vary between system cells and are affected by the status of the cell. Some entries in the Properties area are writable; others are for information only.To display the Properties for a particular cell, right-click the cell and select Properties. Once the Properties view is open, simply selecting a cell in the Project Schematic will display that cell's properties.The properties specific to the Turbo Mesh cell of the TurboGrid system are documented in ANSYS Help > TurboSystem > ANSYS TurboGrid.3.1.5. Files ViewThe Files view shows the files that are in the current project.The project files are updated constantly,and any “save” operation from ANSYS TurboGrid will save all files associated with the project.3.1.6. Sidebar HelpIn addition to having a visual layout that guides you through completingyour project, you can also access Sidebar Help by pressing F1 while themouse focus is anywhere on ANSYS Workbench. Sidebar Help is a dynam-ically generated set of links to information appropriate for helping youwith questions you have about any of the tools and systems you currentlyhave open.3.1.7. Shortcuts (Context Menu Options)You can access commonly used commands by right-clicking in most areas of ANSYS Workbench.These commands are described in the section Context Menu Options in the ANSYS Workbench help.The only context menu command that is specific to the Turbo Mesh cell is the Edit command, which opens ANSYS TurboGrid.3.1.8. Using W orkbench Input Parameters and W orkbench Output Parameters For information about using and managing Workbench input parameters and Workbench output parameters in ANSYS TurboGrid, see Object Editor in the TurboGrid User's Guide and Expression Editor Dialog Box in the TurboGrid User's Guide .3.2. Example Workflow involving ANSYS TurboGridIn ANSYS Workbench, you can create a CFD simulation of a pump impeller that has the following schematic:Example Workflow involving ANSYS TurboGridChapter 3: ANSYS TurboGrid in ANSYS WorkbenchIn this example, the pump impeller is generated in BladeGen, has fillets added in BladeEditor, and is meshed in ANSYS TurboGrid.The pump diffuser is generated in BladeGen and is meshed in ANSYS TurboGrid. Both meshes are used in a CFD analysis.To set up this schematic, you can follow this general procedure:unch ANSYS Workbench.2.Save the project to a new directory.3.Add a BladeGen system by double-clicking BladeGen in the toolbox, under Component Systems.Alternatively, you can drag a BladeGen system from the toolbox to the Project Schematic.4.Add a Geometry system to the BladeGen system by any one of the following methods:•Double-click a Geometry system in the toolbox to add a Geometry system to the schematic, then drag from the Blade Design cell to the Geometry cell to connect the systems.•Drag a Geometry system from the toolbox to the Project Schematic, then drag from the Blade Design cell to the Geometry cell to connect the systems.•Drag a Geometry system from the toolbox to the Blade Design cell.•Right-click the Blade Design cell and select Transfer Data To New > Geometry.5.Optionally rename the system.You can enter a name for a system when you first create the system.You can also initiate a rename operation by right-clicking the upper-left corner of the system and selecting Rename from theshortcut menu.6.Continue adding systems until the schematic is complete.7.Edit each cell in sequence, starting from the upstream cell, and use the associated software to providethe required data.For example, after editing the Blade Design cell to provide a geometry, edit the Turbo Mesh cell to create a mesh in ANSYS TurboGrid.8.Save the project when finished.Known Limitations of ANSYS TurboGrid Running in ANSYS Workbench ImportantSaving a project enables you to re-open the project on the machine that originally createdit.To make the project available on another machine, you need to use File > Archive tocreate a project archive.To open the project on a different machine, run File > RestoreArchive on that machine.3.3. Known Limitations of ANSYS T urboGrid Running in ANSYS W orkbench •The Units settings in the ANSYS Workbench menu have no effect on the units used in ANSYS TurboGrid.•The mesh is always saved in the “Combined in one domain, one file” mode and in the user-preferred length unit.•Session playback is not supported in ANSYS TurboGrid running in ANSYS Workbench.•ANSYS TurboGrid in ANSYS Workbench does not support the use of filenames or project names that contain either the "$", ”#”, or "," characters anywhere in their file path.•If you play a journal file on a platform that is different from the one used to record it, you might en-counter a problem. For example, a journal file recorded on Windows and played on Linux can result ina different number of outlet points being generated.This can happen due to different amounts ofround-off error, and can lead to errors being generated.•If an upstream or downstream adjacent blade is specified for computing inlet or outlet locations and an error occurs while loading/refreshing the geometry then the inlet/outlet locations will not be computed based on the adjacent blade. Once the cause of the original error is fixed, closing and reopening Tur-boGrid will fix this problem.•If the number of blades in an upstream geometry is changed then TurboGrid may produce some er-ror/warning messages when it is opened.This is not indicative of a real issue. Closing and re-opening TurboGrid will result in everything being updated correctly.Chapter 4: ANSYS TurboGrid Help and ConventionsThis chapter discusses:4.1. Accessing Help4.2. Using the Help Browser Index4.3. Using the Search Feature4.4. Document Conventions4.1. Accessing HelpYou can access the online help in the following ways:•Select the appropriate command from the Help menu of the ANSYS TurboGrid Launcher or ANSYSTurboGrid.Depending on the command you select, you will see help in either online format or PDF format.A PDF file will be opened in Adobe Reader if possible, otherwise it may (with uncertain results) be opened in Xpdf, Gpdf, KPDF, or Evince, depending on which of these viewers have been installed.•Click a feature of the ANSYS TurboGrid interface to make it active and, with the mouse pointer over thefeature, press the F1 key for context-sensitive help (that is, the online help opens at the appropriatepage for the feature under the mouse pointer). Not every area of the interface supports context-sensitive help.For information on using the ANSYS Help Viewer, see:•Using Help •Index Navigation •"Using Help: Searching".You can access the ANSYS TurboGrid documentation in PDF form in <CFXROOT>\..\common-files\help\en-us\pdf\ on Windows and in <CFXROOT>/../commonfiles/help/en-us/pdf/on Linux.The documentation is also available in PDF format on the ANSYS Customer Portal (at ht-tp:///customerportal/index.htm).PDF Name Description Booktg_in-tr.pdf How to run ANSYS TurboGrid.ANSYS TurboGrid Introduc-tiontg_user.pdf How to use ANSYS TurboGrid.ANSYS TurboGrid User’sGuidetg_ref.pdf Complete details for CFX Command Language,CFX Expression Language, Command Actions,and line interface mode.ANSYS TurboGrid ReferenceGuidetg_tutr.pdfA set of tutorials that demonstrate the workflowin ANSYS TurboGrid.ANSYS TurboGrid TutorialsChapter 4: ANSYS TurboGrid Help and Conventions4.2. Using the Help Browser IndexThe Index tab of the help browser enables you to search for index terms and display the associated topics.To find a topic using the index, type the first few letters of a keyword in the field at the top.The list scrolls to the relevant index entry as you type.Results from the Help index will not be exhaustive, so you should consider using the Search function as well.For information on the ANSYS help viewer index, see Index Navigation in the Using Help section.4.3. Using the Search FeatureThe Search tab of the help browser enables you to perform searches through the online help.For information on the ANSYS help viewer search function, see Using Help: Searching in the Using Help section.4.4. Document ConventionsThis section describes the conventions used in this document to distinguish between text, computer file names, system messages, and input that you need to type.4.4.1. File and Directory NamesFile names and directory names appear in a plain fixed-width font (for example,/usr/lib). Note that on Linux, directory names are separated by forward slashes (/) but on Windows, backslashes are used (\). For example, a directory name on Linux might be /CFX/bin whereas on a Windows system, the same directory would be named C:\CFX\bin.4.4.2. User InputInput to be typed verbatim is shown in the following convention:mkdir /usr/local/cfx4.4.3. Input SubstitutionInput substitution is shown in the following convention:cfx5 -def <def_file>you should actually type cfx5 -def, and substitute a suitable file name for <def_file>.4.4.4. Optional ArgumentsOptional arguments are shown using square brackets:cfxlaunch [-help] [-verbose] [-display <display>]Here the arguments -help,-verbose, and -display are optional, but if you specify -display, you must then specify a suitable display server (represented by <display>).Document Conventions 4.4.5. Long CommandsCommands that are too long to display on a printed page are shown with “\” characters at the ends of intermediate lines:mount -r -F hsfs \/dev/dsk/c0t6d0s0 /cdromOn a Linux system, you may type the “\” characters, pressing Enter after each. However, on a Windows machine you must enter the whole command without the “\” characters; continue typing if the command is too long to fit in the command prompt window and press Enter only at the end of the complete command.4.4.6. Operating System NamesWhen we refer to objects that depend on the type of system being used, we will use one of the following symbols in the text:<os> refers to the short form of the name which ANSYS CFX uses to identify the operating system in question.<os> will generally be used for directory names where the contents of the directory dependon the operating system but do not depend on the release of the operating system or on the processor type.Wherever you see <os> in the text you should substitute with the operating system name.The correct value can be determined by running:<CFXROOT>/bin/cfx5info -os<arch> refers to the long form of the name which ANSYS CFX uses to identify the system architecturein question.<arch> will generally be used for directory names where the contents of the directory depend on the operating system and on the release of the operating system or the processor type. Wherever you see <arch> in the text you should substitute the appropriate value for your system,which can be determined by running the command:<CFXROOT>/bin/cfx5info -archChapter 5: Contact InformationTechnical Support for ANSYS, Inc. products is provided either by ANSYS, Inc. directly or by one of our certified ANSYS Support Providers. Please check with the ANSYS Support Coordinator (ASC) at your company to determine who provides support for your company, or go to and select About ANSYS> Contacts and Locations.The direct URL is:/customer/public/sup-portlist.asp. Follow the on-screen instructions to obtain your support provider contact information.You will need your customer number. If you don't know your customer number, contact the ASC at your company.If your support is provided by ANSYS, Inc. directly,Technical Support can be accessed quickly and effi-ciently from the ANSYS Customer Portal, which is available from the ANSYS Website () under Support> Technical Support where the Customer Portal is located.The direct URL is:ht-tp:///customerportal.One of the many useful features of the Customer Portal is the Knowledge Resources Search, which can be found on the Home page of the Customer Portal.Systems and installation Knowledge Resources are easily accessible via the Customer Portal by usingthe following keywords in the search box:Systems/Installation.These Knowledge Resources provide solutions and guidance on how to resolve installation and licensing issues quickly.NORTH AMERICAAll ANSYS, Inc. ProductsWeb: Go to the ANSYS Customer Portal (/customerportal) and select the appropriate option.Toll-Free Telephone: 1.800.711.7199Fax: 1.724.514.5096Support for University customers is provided only through the ANSYS Customer Portal.GERMANYANSYS Mechanical ProductsTelephone: +49 (0) 8092 7005-55Email: support@cadfem.deAll ANSYS ProductsWeb: Go to the ANSYS Customer Portal (/customerportal) and select the appropriate option.National Toll-Free Telephone:German language: 0800 181 8499English language: 0800 181 1565International Telephone:Chapter 5: Contact InformationGerman language: +49 6151 3644 300English language: +49 6151 3644 400Email: support-germany@UNITED KINGDOMAll ANSYS, Inc. ProductsWeb: Go to the ANSYS Customer Portal (/customerportal) and select the appropriate option.Telephone: +44 (0) 870 142 0300Fax: +44 (0) 870 142 0302Email: support-uk@Support for University customers is provided only through the ANSYS Customer Portal.JAPANCFX , ICEM CFD and Mechanical ProductsTelephone: +81-3-5324-8333Fax: +81-3-5324-7308Email:CFX: japan-cfx-support@;Mechanical: japan-ansys-support@FLUENT ProductsTelephone: +81-3-5324-7305Email:FLUENT: japan-fluent-support@;POLYFLOW: japan-polyflow-support@;FfC: japan-ffc-support@;FloWizard: japan-flowizard-support@IcepakTelephone: +81-3-5324-7444Email: japan-icepak-support@Licensing and InstallationEmail: japan-license-support@INDIAANSYS Products (including FLUENT, CFX, ICEM-CFD)Web: Go to the ANSYS Customer Portal (/customerportal) and select the appropriate option.Telephone: +91 1 800 233 3475 (toll free) or +91 1 800 209 3475 (toll free)Fax: +91 80 2529 1271Email:FEA products: feasup-india@;CFD products: cfdsup-india@;Installation: installation-india@FRANCEAll ANSYS, Inc. ProductsWeb: Go to the ANSYS Customer Portal (/customerportal) and select the appropriate option.。
fluent一些笔记

1.提示:Welcome to Fluent 6.3.26Copyright 2006 Fluent IncAll Rights ReservedCannot open dump file "fl_s1119.dmp"Error: Unable to open dump file9Error encountered in critical code sectionHit return to exit.原因:使用优化大师进行系统清理,而优化大师默认是要把lib文件夹下的这三个文件给删除的,这就导致FLUENT启动的时候找不到"fl_s1119.dmp。
处理方法:把lib文件夹做下备份,优化完以后覆盖即可。
(毕竟系统还是要清理的)偶是发现了,备份的时候最好是压缩包,要不然优化大师会把你的备份文件也一起清理掉的。
2.1、输出grid图形2、选择surface---plane,打开plane surface面板3、通过确定三个点来确定平面位置。
单击slect point,出现提示,不点选cancel.在grid 图形的多孔介质区域任意位置右键点选3个点。
4、回到plane surface面板,勾选plane tool,则在grid图形的多孔介质区域出现一个平面。
若出现的平面与我们的预期相差比较大的话,可以单击reset points,可以获得一个特殊位置的平面。
5、打开多孔介质的控制面板,选择porou zone标签,点击update from plane tool按钮,获得方向矢量1,和方向矢量2的原始值,并与左下角的坐标系统比较,确定我们大概的旋转方向。
6、对比grid图形左下角的坐标系统,红线和红色箭头代表的是方向矢量1,绿线和绿色箭头代表的是方向矢量2应该使红线和X正方向平行,绿线和Y正方向平行。
具体的操作应该是:(首先把平面移动到图形外有利于旋转,比较清楚。
平面法线方向的移动是用鼠标右键单击平面阴影部分并拖动,横向移动则需按下shift并进行如上操作。
fluent操作界面中英
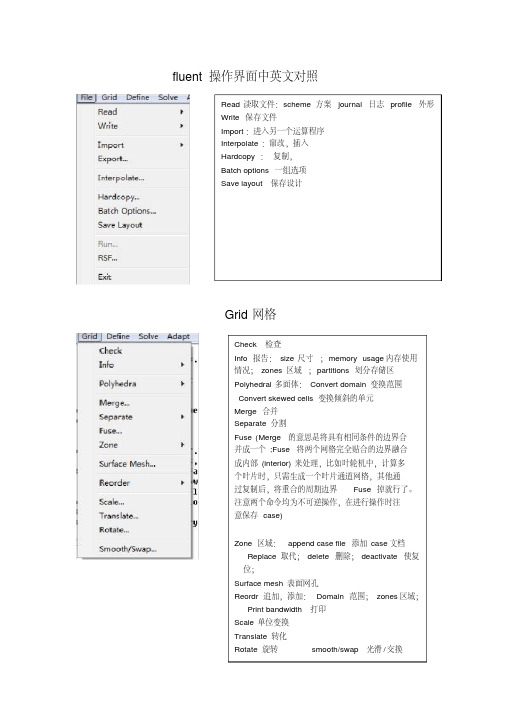
fluent操作界面中英文对照Read 读取文件:scheme 方案journal 日志profile 外形Write 保存文件Import:进入另一个运算程序Interpolate:窜改,插入Hardcopy :复制,Batch options 一组选项Save layout 保存设计Grid网格Check 检查Info 报告:size 尺寸;memory usage内存使用情况;zones 区域;partitions划分存储区Polyhedral多面体:Convert domain变换范围Convert skewed cells 变换倾斜的单元Merge 合并Separate 分割Fuse (Merge的意思是将具有相同条件的边界合并成一个;Fuse将两个网格完全贴合的边界融合成内部(interior)来处理,比如叶轮机中,计算多个叶片时,只需生成一个叶片通道网格,其他通过复制后,将重合的周期边界Fuse掉就行了。
注意两个命令均为不可逆操作,在进行操作时注意保存case)Zone 区域:append case file 添加case文档Replace 取代;delete 删除;deactivate使复位;Surface mesh 表面网孔Reordr 追加,添加:Domain 范围;zones区域;Print bandwidth 打印Scale 单位变换Translate 转化Rotate 旋转smooth/swap 光滑/交换Define Models 模型:solver 解算器Pressure based 基于压力Density based 基于密度implicit 隐式,explicit 显示Space 空间:2D ,axisymmetric (转动轴),axisymmetric swirl (漩涡转动轴);Time 时间:steady 定常,unsteady 非定常Velocity formulation 制定速度:absolute 绝对的;relative 相对的Gradient option 梯度选择:以单元作基础;以节点作基础;以单元作梯度的最小正方形。
Fluent_操作手册
Fluent_操作⼿册第01章fluent简单算例21FLUENT是⽤于模拟具有复杂外形的流体流动以及热传导的计算机程序。
对于⼤梯度区域,如⾃由剪切层和边界层,为了⾮常准确的预测流动,⾃适应⽹格是⾮常有⽤的。
FLUENT解算器有如下模拟能⼒:●⽤⾮结构⾃适应⽹格模拟2D或者3D流场,它所使⽤的⾮结构⽹格主要有三⾓形/五边形、四边形/五边形,或者混合⽹格,其中混合⽹格有棱柱形和⾦字塔形。
(⼀致⽹格和悬挂节点⽹格都可以)●不可压或可压流动●定常状态或者过渡分析●⽆粘,层流和湍流●⽜顿流或者⾮⽜顿流●对流热传导,包括⾃然对流和强迫对流●耦合热传导和对流●辐射热传导模型●惯性(静⽌)坐标系⾮惯性(旋转)坐标系模型●多重运动参考框架,包括滑动⽹格界⾯和rotor/stator interaction modeling的混合界⾯●化学组分混合和反应,包括燃烧⼦模型和表⾯沉积反应模型●热,质量,动量,湍流和化学组分的控制体源●粒⼦,液滴和⽓泡的离散相的拉格朗⽇轨迹的计算,包括了和连续相的耦合●多孔流动●⼀维风扇/热交换模型●两相流,包括⽓⽳现象●复杂外形的⾃由表⾯流动上述各功能使得FLUENT具有⼴泛的应⽤,主要有以下⼏个⽅⾯●Process and process equipment applications●油/⽓能量的产⽣和环境应⽤●航天和涡轮机械的应⽤●汽车⼯业的应⽤●热交换应⽤●电⼦/HV AC/应⽤●材料处理应⽤●建筑设计和⽕灾研究总⽽⾔之,对于模拟复杂流场结构的不可压缩/可压缩流动来说,FLUENT是很理想的软件。
当你决定使FLUENT解决某⼀问题时,⾸先要考虑如下⼏点问题:定义模型⽬标:从CFD模型中需要得到什么样的结果?从模型中需要得到什么样的精度;选择计算模型:你将如何隔绝所需要模拟的物理系统,计算区域的起点和终点是什么?在模型的边界处使⽤什么样的边界条件?⼆维问题还是三维问题?什么样的⽹格拓扑结构适合解决问题?物理模型的选取:⽆粘,层流还湍流?定常还是⾮定常?可压流还是不可压流?是否需要应⽤其它的物理模型?确定解的程序:问题可否简化?是否使⽤缺省的解的格式与参数值?采⽤哪种解格式可以加速收敛?使⽤多重⽹格计算机的内存是否够⽤?得到收敛解需要多久的时间?在使⽤CFD分析之前详细考虑这些问题,对你的模拟来说是很有意义的。
fluent设置界面中英文对照教学提纲

fluent设置界面中英文对照教学提纲Category 类别 Variable 变量表1:物种,反应,pdf,预混和燃烧的列表1、Species...物种Mass fraction of species-n ( sp, pdf, or ppmx; nv)n 种质量分率Mole fraction of species-n ( sp, pdf, or ppmx)n 种摩尔分数Concentration of species-n ( sp, pdf, or ppmx)n 种浓度Lam Diff Coef of species-n ( sp, dil)n 种Lam Diff 系数Eff Diff Coef of species-n ( t, sp, dil)n 种Eff Diff 系数Thermal Diff Coef of species-n ( sp)n 种热量Diff 系数Enthalpy of species-n ( sp)n 种焓species-n Source T erm ( rc, cpl)n 种Source TermSurface Deposition Rate of species-n ( sr)n 种表面沉积率Relative Humidity ( sp, pdf, or ppmx; h2o)相对湿度Time Step Scale ( sp, stcm)Fine Scale Mass fraction of species-n ( edc)n 种精密标度质量分率Fine Scale Transfer Rate ( edc)精密标度传输率1-Fine Scale Volume Fraction ( edc)精密标度体积分率2、Reactions...反应Rate of Reaction-n ( rc)n 反应速度Arrhenius Rate of Reaction-n ( rc)n 反应阿伦纽斯速度Turbulent Rate of Reaction-n ( rc, t)n 反应湍流速度3、Pdf...Mean Mixture Fraction ( pdf or ppmx; nv)平均混合分数Secondary Mean Mixture Fraction ( pdf or ppmx; nv)二级平均混合分数Mixture Fraction Variance ( pdf or ppmx; nv)平均混合分数变量Secondary Mixture Fraction Variance ( pdf or ppmx; nv)二级平均混合分数变量Fvar Prod ( pdf or ppmx)fvar 测试棒Fvar2 Prod ( pdf or ppmx)fvar2 测试棒Scalar Dissipation ( pdf or ppmx)标量逸散4、Premixed 预混和Progress Variable ( pmx or ppmx; nv)进展变量5、Combustion... 燃烧Damkohler Number ( pmx or ppmx)Stretch Factor ( pmx or ppmx)伸长因数Turbulent Flame Speed ( pmx or ppmx)湍流焰速度Static Temperature ( pmx or ppmx)静态温度Product Formation Rate ( pmx or ppmx)生成物形成率Laminar Flame Speed ( pmx or ppmx)层流焰速度Critical Strain Rate ( pmx or ppmx)临界应变率Adiabatic Flame Temperature ( pmx or ppmx)绝热火焰温度Unburnt Fuel Mass Fraction ( pmx or ppmx)未燃烧燃料质量分率表2: NOx, Soot, and Unsteady Statistics Categories(Nox,烟灰和不稳定统计列表)1、NOx...Mass fraction of NO ( nox)NO 质量分率Mass fraction of HCN ( nox)HCN 质量分率Mass fraction of NH3 ( nox)NH3 质量分率Mole fraction of NO ( nox)NO 摩尔分率Mole fraction of HCN ( nox)HCN 摩尔分率Mole fraction of NH3 ( nox)NH3 摩尔分率Concentration of NO ( nox)NO 浓度Concentration of HCN ( nox)HCN 浓度Concentration of NH3 ( nox)NH3 浓度Variance of Temperature ( nox)温度变量Variance of Species ( nox)物种变量Variance of Species 1 ( nox)物种1 变量Variance of Species 2 ( nox)物种2 变量2、Soot...烟灰Mass fraction of soot ( soot)烟灰质量分率Mass fraction of nuclei ( soot)核的质量分率3、Unsteady Statistics...不稳定统计Mean quantity-n ( stat)平均值nRMS quantity-n ( stat)均方根值n表3: Phases, Discrete Phase Model, Granular Pressure, and Granular Temperature Categories(相,分散相模型,颗粒压强,和颗粒温度列表)Phases...相Volume fraction of phase-n ( mp)n 相体积分率Discrete Phase Model...分散相模型DPM Mass Source ( dpm)质量源DPM Erosion ( dpm, cv)腐蚀DPMAccretion ( dpm, cv)增长DPM X Momentum Source ( dpm)X 动量源DPMY Momentum Source ( dpm)Y 动量源DPM Z Momentum Source ( dpm, 3d)Z 动量源DPM Swirl Momentum Source ( dpm, 2dasw)旋转动量源DPM Sensible Enthalpy Source ( dpm, e)显焓源DPM Enthalpy Source ( dpm, e)焓源DPMAbsorption Coefficient ( dpm, rad)吸收系数DPM Emission ( dpm, rad)发散DPM Scattering ( dpm, rad)散射DPM Burnout ( dpm, sp, e)燃尽DPM Evaporation/Devolatilization ( dpm, sp, e)蒸发/液化DPM Concentration ( dpm)浓度DPM species-n Source ( dpm, sp, e)n 种源Granular Pressure...颗粒压强phase-n Granular Pressure ( emm, gran)n 相颗粒压强Granular Temperature... 颗粒温度phase-n Granular T emperature ( emm, gran)n 相颗粒温度表4: Properties, Wall Fluxes, User Defined Scalars, and User Defined MemoryCategories(性质,间隔层通量,用户定义标量和用户定义存储列表)Properties...性质Molecular Viscosity ( v)分子粘度Molecular Viscosity of phase-n ( v, mp)n 相分子粘度Diameter of phase-n ( mix or emm)n 相直径Thermal Conductivity ( e, v)导热性Specific Heat (Cp) ( e)比热Specific Heat Ratio (gamma) ( id)比热比Gas Constant (R) ( id)气体常数Molecular Prandtl Number ( e, v)分子普朗特数Mean MolecularWeight ( seg, pdf)平均分子量Sound Speed ( id)声速Wall Fluxes...间隔层通量Wall Shear Stress ( v, cv)间隔层剪应力phase-nWall Shear Stress ( v, cv, emm)n 相间隔层剪应力X-Wall Shear Stress ( v, cv)X 剪应力Y-Wall Shear Stress ( v, cv)Y 剪应力Z-Wall Shear Stress ( v, 3d, cv)Z 剪应力phase-n X-Wall Shear Stress ( v, cv, emm)n 相X 剪应力phase-n Y-Wall Shear Stress ( v, cv, emm)n 相Y 剪应力phase-n Z-Wall Shear Stress ( v, 3d, cv, emm)n 相Z 剪应力Axial-Wall Shear Stress ( 2da, cv)轴向剪应力Radial-Wall Shear Stress ( 2da, cv)径向剪应力Swirl-Wall Shear Stress ( 2dasw, cv)旋向剪应力Skin Friction Coefficient ( v, cv)表面摩擦系数phase-n Skin Friction Coefficient ( v, cv, emm)n 相表面摩擦系数Total Surface Heat Flux ( e, v, cv)总表面热负荷Radiation Heat Flux ( rad, cv)辐射热负荷Surface Incident Radiation ( do, cv)表面入射辐射Surface Heat Transfer Coef. ( e, v, cv)表面传热系数Surface Nusselt Number ( e, v, cv)表面努珊数Surface Stanton Number ( e, v, cv)表面斯坦顿数User Defined Scalars...用户定义标量Scalar-n ( uds, nv)n 标量Diffusion Coef. of Scalar-n ( uds)n 标量扩散系数User Defined Memory...用户定义存储udm-n ( udm)Cell Info, Grid, and Adaption Categories(控制体积,网络节点,配合列表)Cell Info...控制体积Cell Partition ( np)控制体积分区Active Cell Partition ( p)主动控制体积分区Stored Cell Partition ( p)存储控制体积分区Cell Id ( p)控制体积标识Cell Element Type 控制体积要素种类Cell Zone Type 控制体积区域种类Cell Zone Index 控制体积区域指数Partition Neighbors 邻元素分区Grid...网格节点X-Coordinate ( nv)X 坐标Y-Coordinate ( nv)Y 坐标Z-Coordinate ( 3d, nv)Z 坐标Axial Coordinate ( nv)轴向坐标Radial Coordinate ( nv)径向坐标X SurfaceAreaX 表面面积Y SurfaceAreaY 表面面积Z SurfaceArea ( 3d)Z 表面面积X FaceAreaX 端面面积Y FaceAreaY 端面面积Z Face Area ( 3d)Z 端面面积Cell Equiangle Skew 控制体积等角度倾斜Cell Equivolume Skew 控制体积等量倾斜Cell Volume 控制体积容量2D Cell Volume ( 2da)2D 控制体积容量CellWall Distance 控制体积间隔层距离Face Handedness 端面旋向性Face Squish Index 端面挤压指数Cell Squish Index 控制体积挤压指数Grid Category (Turbomachinery-Specific Variables) and Adaption Category(网络节点列表(涡轮积类变量)和配合列表)Grid...网络节点Meridional Coordinate ( nv, turbo)经纬坐标Abs Meridional Coordinate ( nv, turbo)绝对值经纬坐标Spanwise Coordinate ( nv, turbo)Abs (H-C) Spanwise Coordinate ( nv, turbo)Abs (C-H) Spanwise Coordinate ( nv, turbo)Pitchwise Coordinate ( nv, turbo)Abs Pitchwise Coordinate ( nv, turbo)Adaption...配合Adaption Function 配合功能Existing Value 现存值Boundary Cell Distance 控制体积边界距离Boundary Normal Distance 边界标准距离Boundary Volume Distance ( np)边界容量距离Cell Volume Change 控制体积容积变化Cell Equiangle Skew 控制体积等角度倾斜Cell Equivolume Skew 控制体积等容量倾斜Cell Surface Area 控制体积表面面积CellWarpage 控制体积折曲Residuals Category(残值列表)Residuals...残值Mass Imbalance 质量不稳定Pressure Residual ( cpl)压强残值X-Velocity Residual ( cpl; 2d or 3d)X 速度残值Y-Velocity Residual ( cpl; 2d or 3d)Y 速度残值Z-Velocity Residual ( cpl, 3d)Z 速度残值Axial-Velocity Residual ( cpl, 2da)轴向速度残值Radial-Velocity Residual ( cpl, 2da)径向速度残值Swirl-Velocity Residual ( cpl, 2dasw)旋向速度残值Temperature Residual ( cpl, e)温度残值Species-n Residual ( cpl, sp)n 物种残值Derivatives...导数Strain Rate ( v)应变速率Derivatives...导数Strain Rate of phase-n ( v, emm)n 相应变速率。
fluent常用命令

fluent常用命令Fluent是一种计算流体力学(CFD)软件,用于模拟流体流动和传热问题。
以下是一些Fluent 中常用的命令:1. 文件操作命令:- `file/read-case-data`:读取现有的案例文件。
- `file/write-case-data`:将当前案例数据写入文件。
- `file/import`:导入几何或网格文件。
- `file/export`:导出网格或结果文件。
2. 网格操作命令:- `grid/check`:检查网格质量。
- `grid/modify-zones`:修改网格区域。
- `grid/interpolate`:插值网格数据。
- `grid/surface`:生成或操作表面网格。
3. 物理模型设置命令:- `define/models`:定义物理模型。
- `define/boundary-conditions`:定义边界条件。
- `define/material-properties`:定义材料属性。
4. 求解控制命令:- `solve/initialize`:初始化流场变量。
- `solve/iterate`:进行求解迭代。
- `solve/set`:设置求解器参数。
- `solve/monitors/residuals`:监视残差。
5. 后处理命令:- `display/contour`:显示轮廓图。
- `display/vector`:显示矢量图。
- `report/forces`:报告力和矩。
- `file/export`:导出结果数据。
6. 运行控制命令:- `solve/initialize/compute-defaults`:计算默认的初始化条件。
- `solve/dual-time-iterate`:进行双时间步求解。
- `solve/monitors/residuals`:监视残差。
7. 其他常用命令:- `display/set`:设置图形显示选项。
FLUENT软件操作界面中英文对照

FLUENT软件操作界面中英文对照下面是FLUENT软件操作界面中常见的英文和对应的中文翻译:1. File(文件)- New(新建)- Open(打开)- Save(保存)- Save As(另存为)- Import(导入)- Export(导出)- Print(打印)- Exit(退出)- Undo(撤销)- Redo(重做)- Cut(剪切)- Copy(复制)- Paste(粘贴)- Delete(删除)- Select All(全选)3. View(视图)- Axes(坐标轴)- Legend(图例)- Axis Title(坐标轴标题)- Title(标题)- Zoom In(放大)- Zoom Out(缩小)- Reset(重置)- Pan(平移)4. Mesh(网格)- Generate(生成)- Convert(转换)- Refine(细化)- Smooth(平滑)- Check(检查)- Display(显示)5. Solve(求解)- Initialize(初始化)- Iterate(迭代)- Monitor(监控)- Residuals(残差)- Convergence Criteria(收敛准则)6. Boundary Conditions(边界条件)- Inlet(进口)- Outlet(出口)- Wall(壁面)- Symmetry(对称)- Periodic(周期性)- Pressure Inlet(压力进口)- Pressure Outlet(压力出口)- Velocity Inlet(速度进口)- Velocity Outlet(速度出口)7. Materials(材料)- Define(定义)- Create(创建)- Delete(删除)8. Models(模型)- Turbulence(湍流)- Heat Transfer(传热)- Chemical Reactions(化学反应)- Multiphase(多相流)- Discrete Phase(离散相)- Radiation(辐射)9. Results(结果)- Residuals(残差)- Plots(图表)- Animations(动画)- Reports(报告)- XY Plots(XY图)- Contours(等值线)- Vectors(矢量)- Streamlines(流线)10. Run(运行)- Calculation Activities(计算活动)- Solution Initialization(解的初始化)- Solution Calculation(解的计算)- Monitoring(监控)- Result Calculation(结果计算)- Grid Display(网格显示)。
04Fluent文件的读写

创建和读入日志文件(2)
日志文件的目的通常是自动执行一系列的命令而
不是在命令行重复输入它们。另一个用途就是对 程序进程中的输入作一记录便于以后参考,虽然 transcript文件在这一方面更有用。 命令的输入源于指定的文件直到结束,结束之后 控制回到标准输入(通常是键盘)。日志文件的 每一行的读入和处理时都会响应到标准输出(通 常是显示器)。
读入新的网格文件
用特定网格设定完case文件之后,你可以将新网
格与已知边界条件,材料属性,解参数等结合。 这一功能一般用于产生比正在使用更好的网格, 此时你不用重新输入所有的边界条件,材料属性 和参数。只要新网格和原来的网格有相同的区域 结构即可 新旧网格应该具有同一区域,并具有相同的顺序, 否则会有警告出现,因为相容性可能会造成边界 条件的问题。在文本界面使用file/reread-grid命 令读入新网格
Fluent文件的读写
在使用FLUENT时你需要输入和输出几种
类型的文件,其中读入的文件包括grid, case, data, profile, Scheme,以及journal文 件,还有包括包含case, data, profile, journal,以及transcript的文件。 FLUENT也 可以保存面板的布局以及图形窗口的硬拷 贝。使用各种可视化以及后处理工具可以 输出数据。
读入文件
读入 TGrid网格文件 读入 GAMBIT和GeoMesh网格文件 读入 preBFC非结构网格文件 读入 preBFC结构网格文件 读入 ANSYS 文件 读入 I-DEAS Universal 文件 读入 NASTRAN 文件 读入 PATRAN Neutral 文件 读入 an Unpartitioned Grid File Through the Partition Filter
- 1、下载文档前请自行甄别文档内容的完整性,平台不提供额外的编辑、内容补充、找答案等附加服务。
- 2、"仅部分预览"的文档,不可在线预览部分如存在完整性等问题,可反馈申请退款(可完整预览的文档不适用该条件!)。
- 3、如文档侵犯您的权益,请联系客服反馈,我们会尽快为您处理(人工客服工作时间:9:00-18:30)。
–
Interactive mode (Edit/Run)
5
Journal File: Parametric Modeling
•
Parameters (including arrays), control-blocks, do-loops, arithmetic functions, etc., can be used in the Journal File for simplifying parametric studies.
– –
/ This is a comment line vertex create coordinates \ 0.0 1.0 2.0
Continue statements with \
•
Special commands
reset (deletes all entities) reset mesh (deletes all mesh) read file "filename" (reads a journal file) read pause (pauses journal when using the Run (not Run/Edit) option; click Resume button to continue) All commands and arguments are documented in GAMBIT Command Reference Guide
Think of setting up a complicated matrix of case studies and accomplish the study by not-so-savvy helping hands
Large scale CFD deployment Automate most components of the analysis procedure to maximize analysis productivity and reduce probability of user error Fluent / gambit / Excel
12
Arithmetic Expressions
Outline
•
Journaling in Gambit
– – – – – – – – – – – – –
Basis of Journal Files Parameters: Scalars and Arrays Special Constants Expressions: Arithmetic, Logical and String Functions: String and Arithmetic DO and IF-THEN-ELSE Commands Steps to parameterize GAMBIT Journals Text User Interface (TUI) Parameterize variables in TUI Create your own GUI in Fluent Run Gambit journal in the back ground Post-processing and html reports through journals Easy post-processing of previously stored transient data
Uses:
4
Running Journal Files
•
Journal files can be processed in two ways:
–
Batch modrocessed without interruption "read pause" command will force interrupt with resume option appearing Includes text editor for easy modifications – Mark lines in process field to activate for processing – Editable text field – Right click text field for more options – Auto or Step through activated process lines
Name of parameter
8
Scalar: Pipe
Cylinder: Height = 10, Radius = 2 Axis Location: Positive Z Center of the cylinder is offset (Height / 2) in the + z direction from the origin of the active coordinate system
Centered Z
Array (1)
•
Define arrays by declare $p[{n1}:m1, {n2}:m2, ...]
•
• • • •
– – – – –
Where p is the name of the parameter n is the starting index ({} indicate this is optional; default is 1) m is the range of the dimension Square brackets [] are necessary
1 2 3
$p[1,1]=.5 $p[1,2]=3 $p[2,1]=1 $p[3,1]=2 $p[2,2]=3 $p[3,2]=4
Pipe 1,
2,
3
•
Globally available constants:
– – – –
PI TWOPI DEG2RAD RAD2DEG
3.141592653590 6.283185307180 0.0174532925199 57.29577951308
– – – –
•
7
Parameters
• • • •
Scalar or Array Numeric or string Defined by: $param = value
– – – –
param = name of parameter value = numeric or string value of parameter Must start with $ Is not case sensitive ($length same as $LENGTH)
Exploring Journals with Gambit and Fluent
A. Mukhopadhyay am@
Objectives•••
•
Ease of use during
• • • •
– – – – – – – –
Parametric study Repeat study with changes in process parameters Minor design changes Scale up Sensitivity analysis
11
Expressions
• •
Arithmetic, logical, or string Enclose in parentheses when used as arguments to commands, IF statements, or DO conditions
volume create height $h radius1 $r radius3 $r \ offset 0 0 ($h/2) zaxis frustum
10
Array (2): Multiple Pipes
declare $p[3,2]
1st dimension is the pipe number (1, 2 or 3) 2nd dimension is the radius (1) or height (2) Pipe # Radius Height
•
Journaling in Fluent
•
Excel to drive gambit and fluent
3
Journal Files
•
Journal File:
– – – – – – –
Executable list of Gambit commands
• •
Created automatically by Gambit from GUI and TUI Can be edited or created externally with text editor
offsets in the x, y and z directions
/original journal file
Positive Z
volume create height 10 radius1 2 radius3 2 offset 0 0 0 zaxis frustum volume create height 10 radius1 2 radius3 2 offset 0 0 5 zaxis frustum /modified journal file with parameters for height ($h) & radius ($r) $h = 10 Use Parenthesis $r = 2 volume create height $h radius1 $r radius3 $r offset 0 0 ($h/2) zaxis frustum 9
Parameter names begin with $. Parameters are case sensitive.
GAMBIT Commands are not case sensitive
