老板电器SI手册
BOSS GT-8中文说明书
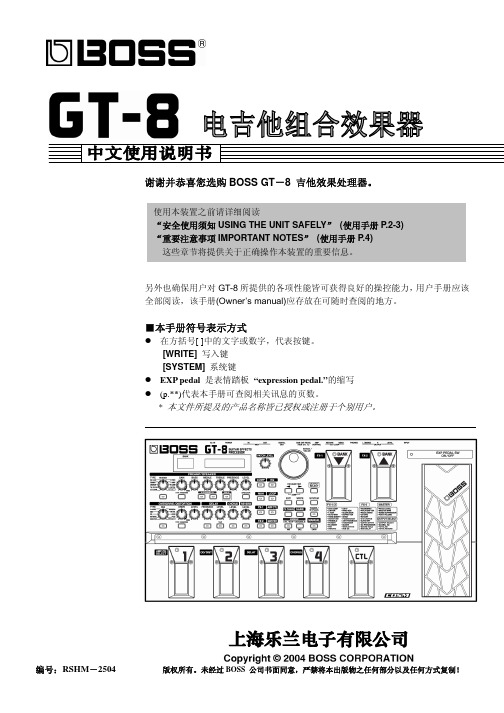
开启电源
14
调整输出音量
14
设定连接设备(功放)(输出选择)
14
关闭电源
15
第2章
建立专属的常用音色…………………………… 16
何谓音色
16
如何切换音色
16
只切换数字
16
切换群组与数字
17
调整音色旋钮
17
效果器的开启及关闭
18
简单设定效果器(QUICK FX)
18
呼叫现有的音色设定
19
进行更精细的效果设定
z 在国外使用本机时,请洽询最近的 Roland 服务中心,或 Roland 授权代理商 (详列于”Information”)。
z 请将本机与 AC 电源变压器置于通风良好 的地方。
z 将插头插入或拔离插座时,一定要握住 AC 电源变压器的插头部分。
z 应该定期将电源插头拔除,用干净的软布擦 拭插头上的灰尘,并用叉状物清除插头凹槽 部位堆积的灰尘。在长期不使用本设备的情 况下,要将电源线拔除防止灰尘堆积。电源 插头和插座之间聚集的灰尘可能造成不良 绝缘,导致火灾发生。
20
改变效果连接顺序(Effect Chain)
20
音色命名(Patch Name)
21
第3章
存储您自己制作的音色………………………… 22
存储音色(Patch Write)
22
复制音色(Patch Copy)
22
调换音色(Patch Exchange)
23
初始化音色
23
将与您理想中类似的音色初始化
版权所有。未经过 BOSS 公司书面同意,严禁将本出版物之任何部分以及任何方式复制!
关于
安全使用须知
电机控制器和电机控制按钮 Leviton Powerswitch 手册说明书

®/powerswitch2Interrupteurs sans boîtier30 A, 40 A et 60 ACommandes de moteurs manuellesSURVOLCes produits Powerswitch MD de qualité industrielle permettent une commande manuelle, sécuritaire et fiable d’une variété de charges motorisées. Pouvant servir de sectionneurs de courant*, ils sont offerts en versions monophasées et triphasées et affichent des valeurs stables à des tensions pouvant atteindre 600 V c.a. et une puissance maximale de 30 ch. Les modèles en boîtiers métalliques et non métalliques de types 1, 3R, 4X, etc. peuvent répondre à un vaste éventail de besoins.* Modèles de 30 et de 40 A seulement.MS603-FWMS303-DSWMS403-DSMS303-DSSpowerswitchMDGUIDE DE COMMANDE/powerswitch 3CARACTÉRISTIQUES• P ièces moulées en thermoplastique résistant aux impacts, aux produits chimiques, aux températures extrêmes, au cheminement et à la formation d’arcs.• M écanisme à cames favorisant les fermetures rapides et les ouvertures lentes des contacts.• H omologation à la norme UL 60947-4-1 (anciennement UL 508).• C ontacts en alliage d’argent, assurant une conductivité et une durabilité maximales.• V ersions de 30 et de 40 A dotées de pinces externes pour le câblage arrière et latéral (les modèles de 60 A permettent les raccordements avant ou arrière, selon le cas).• B arrières entre les bornes qui isolent chaque phase.• B ride, bornes et pinces externes en laiton nickelé pour plus de solidité et une résistance accrue à la corrosion.• L eviers surdimensionnés facilitant la commutation, même par des mains gantées.• V ersions à levier plus court (DSS) pour les modèles de 30 et de 40 A.• G arantie limitée de dix ans.• M odèles de 30 A offerts en versions à levier régulier (DSW) de couleur blanche.‡ Les sectionneurs MS4X sont certifiéspar la NSF.Interrupteurs en boîtier30 A, 40 A et 60 AN1303-TDSMS4X-303N3303-DSN1303-DSGUIDE DE COMMANDE/powerswitch4Sectionneurs en acier inoxydableDessus incliné : 30/32 A et 60 A, sans fusibleDessus plat : 30/32 A, 60 A, 80 A et 100 A, sans fusibleMDS6-AXMDS3-AXMDS8-AXMDS3-ASTSectionneurs de sécuritéSURVOLLes sectionneurs de sécurité Powerswitch MD sont conçus pour offrir un rendement supérieur dans les installations de trans-formation des aliments et boissons, les manufactures, les marinas, les chantiers navals et les usines d’assemblage desintégrateurs de composants (OEM). Offerts dans des boîtiers en PBT ou en acier inoxydable, ces dispositifs sont conçus pour affronter les conditions les plus rigoureuses et répondent aux exigences en matière de sécurité, de résistance aux lavages à grande eau, de réduction des arrêts et de conformité aux codes. Tous les sectionneurs sont également appuyés par une des meilleures garanties de trois ans sur le marché.powerswitchMDIP69KCARACTÉRISTIQUES• A cier inoxydable de type 304 qui résiste à la chaleur, à la corrosion et aux mauvais traitements.• D ispositifs étanches à l’eau et aux particules, submersibles et convenant aux lavages à pressions et à températures élevées.• I P66, IP67, IP68 et IP69K • U L 50E, types 3R, 4X, 12 et 13• V ersions à dessus incliné de 15° vers le mur, faisant glisser l’eau et les débris loin de la porte, de la manette et du joint d’étanchéité à l’avant du dispositif (modèles de 30/32 A et 60 A seulement).• M anette surmoulée qui assure une bonne prise, dure plus longtemps et résiste aux lavages à grande eau.• M anette pouvant être bloquée au moyen de trois cadenas,conformément aux exigences de l’OSHA en matière de verrouillage et d’étiquetage.•C ouvercle amovible qui simplifie et accélère l’installation et l’entretien.• C ertification NSF en ce qui a trait aux exigences en matière d’hygiène des aires de transformation d’aliments et de boissons.• E spacement de près de 2 cm de la surface de fixation qui facilite le nettoyage./powerswitch5GUIDE DE COMMANDELES ACCESSOIRES DES SECTIONNEURS APPARAISSENTSUR LA COUVERTURE ARRIÈREVersions à dessus incliné de 15° vers le mur, faisant glisser l’eau et les débris loin de la porte, de la manette et du joint d’étanchéité à l’avantdu dispositif (modèles de 30/32 A et 60 A seulement)./powerswitch6Sectionneurs non métalliquesModèles avec et sans fusible de 30/32, 60 ou 100 ACARACTÉRISTIQUES• B oîtier en PBT résistant aux impacts, à la corrosion et aux mauvais traitements.• D ispositifs étanches à l’eau et aux particules, submersibles et convenant aux lavages à pressions et à températures élevées.• I P66, IP67, IP68, IP69 et IP69K • U L 50E, types 3R, 4, 4X, 6P , 12 et 13• D essus arrondi faisant tomber l’eau et les débris loin de l’avant du dispositif où se trouvent la porte, la manette et le joint d’étanchéité (modèles de 30/32 A seulement).• M anette surmoulée qui assure une bonne prise, dure plus longtemps et résiste aux lavages à grande eau.• M anette pouvant être bloquée au moyen de trois cadenas,conformément aux exigences de l’OSHA en matière de verrouillage et d’étiquetage.• C ertification NSF en ce qui a trait aux exigences en matière d’hygiène des aires de transformation d’aliments et de boissons.• P lage de températures de fonctionnement de -40 à 75 °C (-40 à 65 °C pour les modèles Inform).• V is en inox captives à fentes triplesAccès en tout temps à des données relativesl’humidité à l’intérieur du boîtier, la continuité vos dispositifs sans avoir à les ouvrir!LDS60-AXLDS30-F AXMODÈLES SANS ÉTIQUETTE!Sectionneurs de sécuritépowerswitchMDTous les sectionneurs de Leviton ont été certifiés aux exigences internationales de la NSF en ce qui a trait à l’hygiène dans la transformation des aliments et boissons de façon àassurer la sécurité et la santé publiques. Les fabricants, les autorités de réglementation et les consommateurs se fient tous à la NSF pour l’élaboration de normes et de programmes de certification qui aident à protéger les aliments, l’eau, les biens de consommation et l’environnement.LDS30-AXCLDS30-CTSIP69KGUIDE DE COMMANDELES ACCESSOIRES DES SECTIONNEURS APPARAISSENT SUR LA COUVERTURE ARRIÈREDessus arrondi faisant tomberl’eau et les débris loin de l’avantdu dispositif où se trouvent la porte, lamanette et le joint d’étanchéité (modèles de30/32 A seulement)./powerswitchAccessoires pour sectionneurs de sécuritéREMARQUE : un support distinct est requis pour fixer les contacts auxiliaires avec fusible. Prière de communiquer avec le service à la clientèle.Dispositifs LEV àinterverrouillage mécanique et technologie Inform Apprenez-en davantage sur /levseries•••••ÉGALEMENT OFFERTS AVEC LA TECHNOLOGIE INFORM!。
电烤箱使用说明书

R015使用产品前请仔细阅读本使用说明书,并请妥善保管本产品执行标准老板厨房电器 为世界构建更多幸福的家目 录1356131414151617安全注意事项产品简介安装说明使用说明常见故障及处理方法维护和保养电气原理图客户服务全国电码电话防伪查询使用说明产品包修卡..............................................................................................................................................................................................................................................................................................................................................................................................................................................................................................................................................................................................................................................................................................................................................................................................................................................................................................安全注意事项根据危害、损害程度进行的内容区分为了避免给使用者及其他人员造成危害或者财产损害,特作如下区分及标志。
Fagor Industrial Simba Mini电锅用户和维护手册说明书
MANUAL DE USO Y DESPIECE TECNICOModelo:SIMBA MINIJulio 2012 JulyFagor IndustrialCONTENTS1 INTRODUCTION2 GENERAL DESCRIPTION3 MACHINEIDENTIFICATION4 TECHNICALFEATURES5 MACHINECOMPONENTS6 MACHINE UNPACKING AND INSTALLATION7 INSTRUCTIONSFORUSE8 TROUBLESHOOTING AND SOLVING9 PRECAUTIONS 10 HAZARDOUS USE11 DIMENSIONS AND TECHNICAL DRAWINGS12 MAINTENANCE PROCEDURES13 DISPOSAL14 HOW TO ORDER SPARE PARTS15 HANDLING AND TRANSPORT16 WARRANTY17 CONFORMITY DECLARATION1 INTRODUCTIONThe present user’s and maintenance manual refers to the electric steam generator “SIMBA mini”.The present user’s and maintenance manual contains important information for the operator’s healthsafeguard and safety.This manual has to be read and kept in a safe place, in order to be always at the operator’s disposal in case of need.FAGOR INDUSTRIAL S.COOP cannot be held liable for any damage to things or injury to persons caused by improperuse of the machine in c ontrast with these instructions.Any possible modifications effected on the components of the machine or its different use without prior written authorization by FAGOR INDUSTRIAL S.COOP relieve the latter of injury to persons and / or damages to things,warranty voiding any b indings, as well.2 GENERAL DESCRIPTIONThe SIMBA MINI boiler produces steam, and must be connected to external electric and water supplies to operate.Its use is simple and efficient thanks to its front control panel.3 MACHINE IDENTIFICATIONOn the left side of the boiler, a metal rating plate quotes the model, serial number, the year of construction and electrical and pressure supply.4 TECHNICAL FEATURESTECHNICAL FEATURESElectrical power supply 230V – 1Ph – 50/60 HzBoiler capacity 5 LMaximum steam pressure 2,8 barBoiler power supply 1450 WIron power supply 800 WSound pressure level < 70 dB(A)Operating temperature + 5 ÷ + 80 COperating humidity 90 % max.Storing temperature -20 ÷ +50 °CNet dimensions 270 x 380 x 110 mm.Net weight 11 KgGross dimensions (with packing) 400 x 300 x 400 mm.Gross weight (with packing) 12 KgNet weight with trolley 18 KgOverall dimensions with trolley (with packing) 460 x 310 x 930 mm.Gross weight with trolley (with packing) 20 KgWARNING: Check that the supplied voltage and pressure correspond to that indicated in the table above.5 MACHINE COMPONENTSThe main parts of the machine are as follows:Pos. CODE DESCRIPTIONPos.CODE DESCRIPTION 1 364253 Iron hose support (antenna) 9 523260 Handle2 39B045 Steam valve 230V 50Hz 10 Z27A07 Complete trolley (optional)3 22K050 Refill and safety cap 11 45G012 Pressure switch4 Z18D00 Iron model K 12 162126 Iron rest tray5 56B010 Swivelling wheels 13 46M028 Boiler casing6 25A001 Silicone iron rest14 201007 Boiler7 43A014 Boiler and iron switch 15 43A061 Boiler thermostat 8 43A016 Double Indicator1643B018Safety thermostat67 18 2 9 10435Iron model K cod. Z18D00COD. DESCRIPTION COD. DESCRIPTION COD. DESCRIPTION 364273 Cable lead for board heater 364278 Screw for back cover 364287 Front handle holder for iron 364256 Electrical cable for iron 364279 Screw for iron microswitch cover 364288 Rear handle holder for iron 364274 Screw for thermostat 364280 Screw for microswitch holder 3.5 x 19 AU 364289 Screw covers for iron 364257 Nickel-plated brass hose holder 364281 Screw for handle fixing M5 x 10 ZNB 364290 Brass washer364258 Complete iron plate 364282 Screw for terminal board fixing 364291 Brass spacers364259 Adjustable thermostat 364283 Handle cover for iron 364267 Complete microswitch for iron 364260 Thermostat with manual reset 364284 Rear cover for iron 364292 Screw for iron handle 364261 Cork grip 364285 Button holder for iron 45H006 Knob made of black bakelite 364275 Handle support for iron 364286 Button holder cover for iron 364293 Washer for screw364270 Casing for iron 364263 Upper button for iron 364294 Washer for knob364262 Cables for iron 364264 Lower button for iron 364268 Cable lead for electrical cable 364276 Insert for iron handle 364265 Plate for handle support 364269 Terminal board with 4 poles 364277 Screw M4 x 22 for thermostat fixing 364266 Cable holder for iron6 MACHINE UNPACKING AND INSTALLATIONWARNING:The unit must be installed, opened and repaired by fully qualified technicians only.6.1 UNPACKINGFind the most suitable place where to put the machine, then remove it from the packaging and check that it is intact. The packing materials do not require special disposal as they are not dangerous or polluting. Refer to the local rules in forceto discard them.6.2 INSTALLATIONThe machine does not need to be anchored to the floor, except for installation on self-moving vehicles, where it is necessary to use the holes on the base for the right attachment.For correct use and operation, as well as for easy maintenance, leave a free space around the machine.Do not put the machine in dangerous or flammable places.6.3 ELECTRICALCONNECTIONConnect the machine to the power line as shown in the diagram, ensuring that the power supply voltage corresponds tothat indicated on the rating plate. To ensure safe connection to the main supply, use a magnetothermal switch or otherwise a switch with fuses.WARNING: At the end of the electrical connection, check that the cables are well fixed, isolated and protected from bumps.7 INSTRUCTIONS FOR USE7.1 OPERATION∙Installation and maintenance must be carried out by qualified technicians only.∙Do not use the machine plunged in fluids, or in dangerous or flammable places.∙Do not ignore the dangers to the operator’s health and follow the hygienic and safety prescriptions.∙Always use piping suitable for operating pressures.∙Make sure that the electrical wiring is carried out correctly according to the current regulations, and that the fuse blocks are closed and complete of fuses.∙Check that the safety and control devices of the boiler (pressure gauge, pressure switch and safety valve) are intact.∙Check that the electrical wiring and the piping of the iron are intact and secure.7.2 USE∙Verify the water level in the tank and add more water if necessary.∙Turn on the boiler and the iron.∙The boiler power supply is fed automatically by turning on the indicator light.∙The boiler reaches the operating pressure of 2.8 bar after a few minutes and the related light turns on automatically.∙The boiler is ready to supply steam.∙Absence of water in the boiler is indicated by the switching off of the two lights (boiler power supply and steam pressure).∙To top up the water it’s necessary to wait 2 or 3 minutes after the lights turn off.∙It’s possible to iron without completely filling the water tank. Using 1 litre of water provides a range of ironing time of 1 to 2 hours. To verify the amount of water added, simply insert the dipstick level into the boiler and cover theupper hole with your finger as you extract it.8 TROUBLESHOOTING AND SOLVINGThe following table shows the main problems and the corresponding causes and solutions. In case of doubts or unresolved problems, do not look for the trouble by removing pieces of the machine, but rather contact the Technical Office or seller of Ghidini products.PROBLEMS AND SOLUTIONSTROUBLES POSSIBLECAUSESSOLUTIONSThe machine does not work. Main power failure Check that the supply terminals are live. Fuses are blown Check fuses.The boiler switch is on but the power supply and steam lamps are turned off. Absence of water in the boiler Refill water tank. Faulty safety thermostat. Replace thermostats.The boiler light and switch are on, but theboiler does not reach the requestedoperating pressure.Heaters are burnt out Check heaters.WARNING: If the safety valve is released, switch the boiler off immediately and contact a qualified technician. Do not block the exhaust and do not underestimate the severity of the problem, as there could be risk of explosion.9 PRECAUTIONSRead carefully the instructions and the risks related to the use of a steam boiler. Operators must know operating system and clearly understand its dangers through the manual.Main electrical supplyPrior to carrying out any inspection or work on the machine, disconnect it from the main electrical supply and make sure that nobody can connect it again during the technical operations. All the electrical or electronic machines or basic structures installed must be connected to the ground line. FlammabilityAdopt all the necessary precautions to avoid any direct contact with hot materials or flames. Put fire extinguishers near the machine for an immediate intervention in the event of fire. Pressure / SteamBefore each intervention switch off the boiler and check that residual pressures are not inside any branch of the hydraulic circuit. They could cause steam sprays in the case of disassembling of pipes or components.NoiseThe noise emission is not excessive, because it remains under 70dB(A).10 HAZARDOUS USEThe verification of conformity to the essential safety rules and to the dispositions enclosed in the machine directive is carried out by filling in the checking lists arranged in advance and included in the technical file. The checking lists are of two kinds:∙ List of dangers (extract from EN 1050 referring to EN 292.∙ Application of the essential safety characteristics (Dir. Machine – encl. 1, part 1)The dangers described in the following items have not been completely eliminated, but they have been considered acceptable:∙ During the maintenance operation there could be some sprays of steam, at low pressure, or of spotting product(maintenance operation must be carried out using suitable protection devices).∙ During use it is possible to accidentally come into contact with surfaces at a temperature of over 80°C. Becareful.∙ Protection against direct and indirect contacts must be adopted by the user.11 DIMENSIONS AND TECHNICAL DRAWINGS12 MAINTENANCE PROCEDURESIn case of troubles, contact the technician for the inspection and, if necessary, for unscheduled maintenance. Periodically it is necessary to carry out the following procedures:OPERATIONS HOURS OF WORK Empty the boiler 150This machine does not require special equipment for check and maintenance operations, but use suitable tools and personal protection in compliance with D.Lgs. 626/94 and in good condition (DPR. 547/55) in order to avoid harm to people and to parts of the machine.Prior to carrying out any inspection or work on the machine, make sure that it is disconnected from the main electrical supply.13 DISPOSALDuring the maintenance operations, or in case of demolition, do not litter the environment with polluting elements. Refer to the local laws in force for appropriate disposal. In case of demolition, it is necessary to destroy the identification rating plate and any other document.14 HOW TO ORDER SPARE PARTSFor the spare parts request it is necessary to quote the model of the machine, the serial number, the quantity of the spare parts requested and their code number. (This data is available on the rating plate, the technical data and on the operating instructions.)If the voltage and frequency of the electrical parts to replace are not V220-380/50Hz (check these particular characteristics on the rating plate of the part to replace), quote the right data.The technical data, the descriptions and pictures included in this manual are not binding. The manufacturer reserves the right to make any necessary modification without notice and without updating these operating instructions.15 HANDLING AND TRANSPORTBefore its transport the machine is carefully packed in a wooden cage. During the transport and the stocking operations, pay attention to warnings printed on the packaging. At the moment of the delivery, check that the packing is intact and put the machine in a dry place.16 WARRANTYAll Ghidini products are supplied with a guarantee for materials and manufacturing failures for a period of maximum 12 months from the date of the delivery.The guarantee is extended as follows:In case of malfunction of the machinery contact Ghidini and quote the trouble, the model, serial number and the operating conditions of the machine. Upon receipt of the machine and after an accurate analysis, Ghidinireserves the right to repair or to replace the product. If the machine is still under guarantee, Ghidini. will repair or replace it free of charge, but if the returned product is not defective, Ghidini reserves the right to charge the freight to the customer (transport, etc.).This warranty must be considered annulled in case of damages caused by incorrect use, negligence, wear and tear, chemical corrosion, or installation contrary to the operating instructions supplied by Ghidini. Any eventual modification or different use of the machine must be previously authorized by Ghidini through a written document, otherwise Ghidini may be considered free even from the guarantee bond.The parts of the machine which are subjected to wear and tear are not included in the guarantee as well as all the items not explicitly cited, or damages and expenses caused by the defects of the product itself. Implicitly the customer accepts the conditions of the present warranty upon purchasing the machine. Eventual modifications to the guarantee must be authorized by Ghidini through a written document.。
ASKO 烤箱 OP8683S BO6PY4F1-42 使用说明书

ZHS 4
您的烤箱
控制面板
2345 1 6 7 8 9
10
11
12 13 14 15 16 17 18 19
1. 功能旋钮(处于“关”位置) 2. 解冻 3. 程序与收藏夹 4. 快速预热 5. 烤箱 6. 节能环形热风 7. 暖盘功能 8. 温热 9. 清洁 10. 显示屏 11. 选择旋钮 12. 开/关按键与停止按键(取消) 13. 烤箱灯按键 14. 定时器按键 15. 左导航键 16. 右导航键 17. 加号按键 18. 童锁保护键(童锁键) 19. 确认键
使用说明书
烤箱
OP8683S / BO6PY4F1-42
ZHS 手册
ZHS 3 - ZHS 41
使用的图示 重要信息
提示
您的烤箱
您的烤箱
介绍 控制面板 说明 导轨/可伸缩导轨 配件 门 冷却风扇 主要功能 按键 导航
初次使用
首先做什么
操作
选择您的功能 功能设置模式 进度模式 结束显示 进度过程中变更设置
功能旋钮
停止键
导航键
确认键
选择旋钮
转动功能旋钮,使其偏离 0 位,所选主要功能的图标即点亮。显示器会
显示此图标以及所启用功能的名称,显示持续时间大约为 1.5 秒。接下
来,您会在反馈栏中的显示器最上方看到所选主要功能和子功能。此外,
功能设置模式启用(灰色背景)。在此启用区域,您可以使用选择旋钮选
择您的设置。
热解导轨; 热自解清洁时,只能使用这些导轨清洁搪瓷烤盘 (用这些专用热解导轨取代导轨/伸缩式导轨)。 •• 请注意;热自解过程中产生的高温可能会导致导轨褪色。
ZHS 7
您的烤箱
电烤箱使用说明书

R015使用产品前请仔细阅读本使用说明书,并请妥善保管本产品执行标准老板厨房电器 为世界构建更多幸福的家目 录1356131414151617安全注意事项产品简介安装说明使用说明常见故障及处理方法维护和保养电气原理图客户服务全国电码电话防伪查询使用说明产品包修卡..............................................................................................................................................................................................................................................................................................................................................................................................................................................................................................................................................................................................................................................................................................................................................................................................................................................................................................安全注意事项根据危害、损害程度进行的内容区分为了避免给使用者及其他人员造成危害或者财产损害,特作如下区分及标志。
老板吸油烟机使用说明书

CXW-CXW-使用产品前请仔细阅读本使用说明书,并妥善保管本产品执行标准 GB/T 17713 GB 4706.1 GB 4706.28 GB 19606 GB 29539老板厨房电器 为世界构建更多幸福的家目 录1.安全注意事项 (1)2.重要信息 (3)3.产品简介 (4)4.装箱单 (4)5.安装说明 (5)6.使用说明 (8)7.维护与保养 (10)8.部件拆卸 (10)9.线路图 (12)10.一般故障的排除 (13)11.客户服务 (14)12.全国电码电话防伪查询使用说明 (15)13.产品包修卡 (16)●吸油烟机的安装及电路设置必须由有经验的专业人员进行,只有经过专业培训的,并具有安装资质的人员,才能对吸油烟机进行安装,非专业人员请勿安装、拆卸及维修吸油烟机。
●安装前请勿接通吸油烟机电源,以免触电。
●如果您的厨房正处于装修状态,请勿将吸油烟机暴露在外,因为建筑材料、灰尘、油漆、涂料以及它们所挥发的气体,会使吸油烟机表面产生腐蚀和失去光泽。
因此建议您在装修完毕后再安装吸油烟机。
●如果在安装吸油烟机前,需要移动燃气灶,则在移动燃气灶前,请先关闭燃气叫阀门。
●请勿将吸油烟机安装在木质等易燃物的墙面上,安装吸油烟机的墙面应为有足够强度的不可燃物,且表面平直。
●吸油烟机可能有非常锋利的边,在移动吸油烟机进行安装、清洁或修理时,请佩戴防护手套。
●在墙壁或天花板等上面钻孔时,应避开墙内埋设的电线及其它隐藏设备,以免引起触电及火灾。
●吸油烟机不要装得太高,也不要受外界气流干扰,以免降低吸烟效果。
●制作橱柜时,请给机体留下装取空间,以利维护保养与检修。
●装机时,请使机体保持水平。
●请使用单相带接地插座,并良好接地(自来水管接地不可靠,煤气管道接地有引发火灾与爆炸的危险)。
●为保证安全和安装顺利,请使用随机附件进行安装,否则吸油烟机可能会有掉下来的危险。
●如电源软线损坏,为了避免危险,必须由制造商、其维修部或类似部门的专业人员进更换。
BOSSMICROBR-80中文使用说明书.pdf

BOSSMICRO BR-80中文使用说明书一、表面键MTR(线性多轨录音)eBand (舞台伴奏或乐句练习)LIVEREC (现场录制)MENU (菜单键)RHYTHM (节拍) COSM(复合声道模拟还原)TUNER(收音信号输入端)SONG(歌曲) REC(录音)SPEED(速度) EXIT(退出)CENTER(中心区) ENTER(确认)CANCEL(删除) INE IN(现场录音输入)TR(轨道) RECLEVEL(录制电平)STOP(停止) PHONES LINE OUT(输出)PLAY(播放) GUITAR/MICIN(吉它或麦克风输入)二、MENU (菜单)三、SONG (歌曲)MENU(菜单)SONG (歌曲)INPUTSENS (输入感觉)TRACKEDIT (编辑轨道)A.PUNCH (打击)MASTERING/BOUNCE (控制/重新恢复)FUNCTION (功能设置)SONG(歌曲)SELECT (选定的)NEW (新的)INFO (提出的要求)ERASE (清除)COPY (复制)OPTIMIZE (使XX 最优化)NO CATEGORY(没有类目)PUSH [ENTER] to CREATE NEW SONG (按ENTER健创造新歌曲) Are you sure? (你确定吗?)[EXIT]:CANCEL (按EXIT 键取消)[ENTER]:OK (按ENTER 键确定)to CREATE New SONG (去创作新歌曲)INPUT SENS (输入感觉)1.SENSITIVITY (敏感度)2.INPUT (输入)3.INTERNAL MIC (内部的麦克风)TRACK EDIT (编辑音轨)1.COPY (复制) SOURCE (源头)[ TR1-V1 ]PEST (网络) [ TR1-V1 ] PUSH [ENTER] to SET TIME (按ENTER键设置时间) 2.MOUE (移动)SOURCE (源头)[ TR1-V1 ]PEST (网络) [ TR1-V1 ]PUSH [ENTER] to SET TIME (按ENTER键设置时间) 3.ERASE (清除)SOURCE (源头)[ TR1-V1 ]PUSH [ENTER] to SET TIME (按ENTER键设置时间) 4.ENCHANGE (替换)SOURCE 1(源头1)[ TR1-V1 ]SOURCE 2(源头2)[ TR1-V1 ]PUSH [ENTER] to ENCHANGE (按ENTER键进行替换) 5.WAV (声音资源文件)IMPORT (输入)控制/重新恢复)MASTERING/BOUNCE (1.BOUNCE (重新恢复)2.MASTERING (控制)FUNCTION (功能设置)1.SYSTEM (系统)LCDCONTRAST (显示屏对比度)LCDBACKLIGHT (显示屏背后照亮)POWER SAVE (功率保存)(自动功率被取消)AUTOPOWER OFFREMAININFO (保存信息)PATCH SYNC (修补同步)BATTERY (电源选择)2.SD INFO (SD卡提出要求)TOTAL SIZE (总计大小)REMAIN SIZE (剩余大小)3.SD FORMAT (SD卡格式化)PUSH [ENTER] to FORMAT SD CARD (按ENTER键SD卡格式化)。
抽油烟机使用说明书 - Power Series PW2300HAS、PW2336HAS
抽油煙機使用說明書極 風 系 列抽油機型號:序 號:Use,Care,and lnstallation GuidePower SeriesPW2300HAS,PW2336HASPW2300HAS,PW2336HASModel number:Serial Number:IMPORTANT SAFETY NOTICEREAD AND SAVE THESE INSTRUCTIONS a) Use this unit only in the manner intended by the manufacturer, if you have questions, contact the manufacturer.b) Before servicing or cleaning unit, switch power off at service panel and lock the service disconnecting means to prevent power from being switched on accidentally. When the service disconnecting means cannot be locked, securely fasten a prominent warning device, such as a tag, to the service panel.a) Never leave surface units unattended at high settings. Boil overs cause smoking and greasy spillovers that may ignite. Heat oils slowly on low or medium settings.b) Always turn hood ON when cooking at high heat or when flaming food.(i.e.Cherries Jubilee, Peppercom Beef Flambe’).c) Clean ventilating fans frequently. Grease should not be allowed to accumulate on fan or filter.d) Use proper pan size. Always use cookware appropriate for the size of the surface element.e) Keep fan, fillters and grease laden surfaces clean.f ) Use high setting on hood only when necessary. g) Don’t leave hood unattended when cooking.h) Always use cookware and utensils appropriate for the type of and amount of food being prepared. a) SMOTHER FLAMES with a close-fitting lid, cookie sheet, or metal tray, then turn off the burner. BE CAREFUL TO PREVENT BURNS. If the flames do not go out immediately, EVACUATE AND CALL THE FIRE DEPARTMENT.b) NEVER PICK UP A FLAMING PAN – You may be burned.c) DO NOT USE WATER, including wet dishcloths or towels – a violent steam explosion will result.d) Use an extinguisher ONLY if:1) You know you have a Class ABC extinguisher, and you already know how to operate it. 2) The fire is small and contained in the area where it started. 3) The fire department is being called.4) You can fight the fire with your back to an exit WARNINGWARNINGTO REDUCE THE RISK OF FIRE, ELECTRIC SHOCK, OR INJURY TO PERSONS, OBSERVE THE FOLLOWING:WARNING -TO REDUCE THE RISK OF A RANGE TOP GREASE FIRE:WARNING -TO REDUCE THE RISK OF INJURY TO PERSONS IN THE EVENT OF A RANGE TOP FIRE, OBSERVE THE FOLLOWING:WARNING -TO REDUCE THE RISK OF FIRE, ELECTRIC SHOCK OR INJURY TO PERSONS, CAUTIONFor General Ventilating Use Only. Do Not Use To Exhaust Hazardous Or Explosive Materials And Vapors. TO REDUCE THE RISK OF FIRE OR ELECTRIC SHOCK, DO NOT USE THIS FAN WITH ANY SOLID-STATE CONTROL DEVICE.IMPORTANT SAFETY NOTICEa) Installation work and electrical wiring must be done by qualified person(s) in accordance with all applicable codes and standards. Including fire-rated construction.b) Sufficient air is needed for power combustion and exhausting of gases through the flue (chimney) of fuel burning equipment to prevent back-drafting. Follow the heating equipment manufacturer’s guideline and safety standards such as those published by the National Fire Protection Association (NFPA) and the American Society for Heating, Refrigeration and Air Conditioning Engineers (ASHRAE) and the local code authorities.c) When cutting or drilling into wall or ceiling, do not damage electrical wiring and other hidden utilities.d) Ducted fans must always vent to the outdoors.e) NEVER place a switch where it can be reached from a tub or shower.f ) Make sure the power is off before installing, wiring or maintenancing.WARNINGTO REDUCE THE RISK OF FIRE, USE ONLY METAL DUCTWORK. ELECTRICAL REQUIREMENTSImportant: Observe all governing codes and ordinances. OPERATIONAlways leave safety grilles and filters in place. Without these components, operating blowers could catch onto hair, fingers and loose clothing.The manufacturer declines all responsibility in the event of failure to observe the instructions given here for installation, maintenance and suitable use of the product. The manufacturer further declines all responsibility for injury due to negligence and the warranty of the unit automatically expires due to improper maintenance. CAUTIONTo reduce risk of fire and to properly exhaust air outside - Do not vent exhaust air into spaces within walls, ceilings, attics, crawl spaces or garages.It is the customer’s responsibility:- To contact a qualified electrical installer.- To assure that the electrical installation is adequate and in conformance with National Electrical Code, ANSI/NFPA 70 latest edition* or CSA standards C22.1-94, Canadian Electrical Code, Part 1 and C22.2 No.0-M91 - latest edition** and all local codes and ordinances.If codes permit and a separate ground wire is used, it is recommended that a qualified electrician determine that the ground path is adequate.*National Fire Protection Association Batterymarch Park, Quincy, Massachusetts 02269** CSA International 8501 East Pleasant Valley Road, Cleveland, Ohio 44131-5575This appliance requires a 120V 60Hz electrical supply and connected to an individual properly grounded branch circuit protected by a 15 or 20 ampere circuit breaker or time delay fuse. Wiring must be 2 wire with ground. Please also refer to Electrical Diagram on product.Do not have a fuse in the neutral or ground circuit.Check with a qualified electrician if you are not sure the range hood is properly grounded.Do not ground to a gas pipe.目錄一.功能簡介/性能規格表………………………....1二.配件說明………………………………………. 2三.安裝原則………………………………………. 3四.安裝步驟………………………………………. 4五.按鍵說明 ….........................................… 5 .......................................5 六.移除燈泡.............................................. 6七.機身表面保養和清潔 ................................ 7八.注意事項...............................................8九.排除故障. (9)Table of ContentI. PRODUCT FEATURES/PERFORMANCE SPECIFICATION CHART..1II. PARTS INSTRUCTIONS ........................................................2III. INSTALLATION GUIDELINES ...........................................3IV. INSTALLATION PROCEDUR ES . (4)V. OPERATING INSTRUCTIONS VI. REPLACING LIGHT BULB ................................................6VII. SURFACE MAINTENANCE ..............................................7VIII. CAUTIONS ....................................................................8IX. TROUBLESHOOTING (9)I. PRODUCT FEATURES/PERFORMANCE SPECIFICATION CHARTA. Product FeaturesModel:PW2300HAS,PW2336HAS 1. 6-speed options.2. Light has varying degrees of brightness: Bright, Dim and Off.3. Delay-off function.4. Display Window: indicates speed levels and delay off, heater.B. Performance Specification Chart PW2336HAS PW2300HAS 2.0A/214W Net Weight(LBS)ModelsMeasurement (inch)Maximum Voltage Exhaust Pipe Diamet AL foil heater powerer LightMaximum consumption powerRound 7 inches, Rectangle 3-1/4"x10 inches LED Light strip 8Wx1120V – 60Hz29-3/4"X24-13/16"X7-7/8"35-11/16"X24-13/16"X7-7/8"37.9 LBS34.1 LBS一.功能簡介/性能規格表1. 6速風速選擇。
Electrolux 电器范 hood 用户手册说明书
2 3WE’RE THINKING OF YOUT hank you for purchasing an Electrolux appliance.You’ve chosen a product that brings with it decadesof professional experience and innovation. Ingeniousand stylish, it has been designed with you in mind.So whenever you use it, you can be safe in theknowledge that you’ll get great results every time.Welcome to Electrolux.BEFORE USING YOUR APPLIANCEB efore you use the rangehood, we recommend that youread through the whole user manual which providesthe description of the rangehood and its functions. Toavoid the risks that are always present when you use anelectrical appliance, it is important that the rangehood isinstalled correctly and that you read the safety instructions carefully to avoid misuse and hazards.F or future reference, please store this booklet in asafe place.CONDITIONS OF USEThis appliance is intended to be used in household andsimilar applications such as:•S taff kitchen areas in shops, offices andother working environments•Farm houses•B y clients in hotels, motels and other residential type environments•Bed and breakfast type environmentsBEFORE YOU CALLPlease ensure you read the instruction manual fully before you call for service, or a full service fee could be applicable. RECORD MODEL AND SERIAL NUMBER HERE:Model:Serial No: CONTENTS3 Safety information4 Product description5 Dimensions6 Rangehood installation10 Using the rangehood11 Maintenance and cleaning12 Troubleshooting13Customer Care CenterLEGENDWARNING!This symbol indicates information concerning yourpersonal safety.CAUTION!This symbol indicates information on how to avoiddamaging the rangehood.IMPORTANT!This symbol indicates tips and information about use ofthe rangehood.ENVIRONMENT!This symbol indicates tips and information abouteconomical and ecological use of the rangehood.SAFETY INFORMATIONThis manual explains the proper use of your new Electroluxcanopy rangehood. Please read this manual carefullybefore using the product. This manual should be kept in asafe place for handy reference.This canopy rangehood is a domestic appliance which hasbeen manufactured and tested to comply with InternationalStandard IEC 60335.2.31.Read the following carefully to avoid damage or injury.This symbol indicates never to do thisThis symbol indicates always do thisWARNING!Follow these instructions carefully to avoid an electricshock orElectrical connectionCheck that the mains voltage matches with the voltage onthe data plate inside the canopy rangehood. Check thatthe installation complies with standards of local building,gas and electrical authorities. Before connecting to themains supply ensure that the mains voltage correspondsto the voltage on the rating plate inside the cooker hood.If the supply cord is damaged, it must be replaced bythe manufacturer or its service agent or similarly qualifiedperson in order to avoid a hazard.Safety warnings – For the installerWhen installing the cooker hood, make sure you adhereto the minimum and maximum distances from the cookerhood base to the hob surface (as per table on page 6).Exhaust installation: The following rules must bestrictly followed to obtain optimal air extraction.•Keep exhaust short and straight•Do not reduce the size or restrict exhaust•Keep bends in the exhaust to a minimum.•W hen using always install duct with helixpulled taut to minimise pressure loss.•F ailure to observe these basic instructions willdrastically reduce the performance and increase thenoise levels of the cooker hood.Exhaust air must not be discharged into a wall cavity,unless the cavity is designed for that purpose. The exhaustfrom the cooker hood must not be discharged into anyheating flue, which may carry combustion products fromother sourcesNOTE: Some installations may require the telescopicexhaust cover to be cut to length. Cut with sharp tinsnips or a fine-tooth hack saw blade, taking care not todistort or dent the exhaust cover.Fig. 24 5PRODUCT DESCRIPTION DIMENSIONS1 Ceiling mount bracket2 Telescopic flue cover set 34 Wall bracket5 Main body and fan housing assemblyGrease filtersadditional items required for installation•i x i F ngs required to attach rangehood body and anti tiltpoints.•i x i F ngs required to attach ceiling mounting bracket andhood bracket to the wall.•a c r o e p a t t c u D ble ties.Technical SpecificationPower supply: 220-240 Volts 50Hz. Connects to 7.5A power point.Lights: LED 1 x 8.5 watt, 12 Volt LEDFig. 3NOTE:1) T he fan housing transition duct is 180mm in diameter.2)Flue transition duct 180mm to 150mm is for external ventingand Recirculation mode.Fig. 56 7RANGEHOOD INSTALLATION WARNING!Refer to “Safety information” chapter.BEFORE INSTALLATIONBefore the installation of the appliance, record the information below from the rating plate. The rating plate is on the bottom of the appliance casing.Model PNC Serial number1. 2. Using a spirit level mark a vertical centre line on the wallwhere the hood is to be positioned, and a horizontal line at the hood base position (refer diagram below).NOTE: The height of the underside of the hood body must be a minimum of 600mm* to a maximum height of 800mm.* If the instructions of the hob specify a greater distance than the minimum above, then that shall be the minimum height for installation.Mark the location for flue cover wall mounting bracketsand cooker hood mounting points and anti-tilt fixing points above the hood base using the hood base as the reference point (Fig. 6).RANGEHOOD INSTALLATION (CONT)3. I nstall flue cover wall mounting brackets with suitablefixings. Install suitable screws for cooker hood mounting points (to support a total weight of 30kg) to the wall as marked (Fig. 6).Depending on the preferred installation/ducting mode,follow step 5a or 5b below.5a. Recirculating mode (Fig. 9).150mmFig 108 9RANGEHOOD INSTALLATION (CONT)RANGEHOOD INSTALLATION (CONT)6.Electrical connectioninstallation of telescopiccoversSeparate the inner and outer flue covers. Carefullyreassemble the upper and lower flue covers sections by sliding the inner into the outer flue cover. Carefully lower the assembled upper and lower flue covers onto the top of the rangehood body. and insert the flue cover into the rangehood body approximately 5mm. Fix upper flue cover to the wall mounting bracket with screws supplied. Ensure that the upper section is extended.NOTE: Carefully remove the plastic protective coating, if present, from the flue covers. Pay particular attention when removing protective plastic coating from decals.IMPORTANT!Care must be taken to ensure the screws are not cross threaded when attaching the upper flue cover. If installed in recirculating mode, insert the carbon filterTo complete the rangehood installation, insert the threefilters to the underside of the hood body. Place back edge of filter into position and push up front edge so that the filter clips into place.10 11MAINTENANCE AND CLEANINGCAUTION!• B efore maintenance or cleaning is carried out,the canopy rangehood should be disconnectedfrom the main power supply. Ensure that therangehood is switched off at the wall socket andthe plug removed.• E xternal surfaces are susceptible to scratchesand abrasions, so please follow the cleaninginstructions to ensure the best possible result is achieved without damage. • T hese instructions must be followed to avoid ariskStainless Steel SurfaceClean stainless steel surfaces using non-abrasive cleaning products that are specifically for use on stainless steel. To ensure best results also use an even pressure and follow the grain of the stainless steel. Use of a soft cloth reduces the risk of scratching. If the cloth is wet ensure that a dry soft cloth is used to wipe down the surface again reducing the risk of any surface rust appearing. Control panel surfaceThe control panel can be cleaned using warm soapywater. Ensure the cloth is well wrung before cleaning. Use a dry soft cloth to remove any excess moisture left after cleaning.Removing the metal grease ltersPush the grease filter towards the left side of the unit and then pull it down.Hand washingThe mesh filters can be cleaned by hand in warm soapy water. Soak in warm water and some washing up liquid. For stubborn grease stains use a soft nylon brush to help remove these stains. After cleaning ensure that the filters are completely dry before refitting.USING THE RANGEHOOD Standby modeWhen connecting the hood to the power supply for the first time or after power is returned after power outage, all symbols on the control panel will light up from left to right and a “beep” will sound once. Following this, the control panel goes to standby mode and the hood will be ready for use. Turning on hoodWhen the hood is in standby mode, user can either press the or button to turn on the fan or light individually. The default factory level is 2, following that, the hoodremembers the last used setting and will start at that level when the user presses the fan or light button. Pressing directly on the slider strip will also allow the user to jump straight into the level pressed.Fan – select speed to suit cooking conditions. – motor on/off 1 – light frying/boiling2 – frying/wok cooking/heavy boiling3 – grilling, intensive frying and wok cooking – stir fryingNOTE: Touch the symbol to turn the fan boost ON, the fan boost starts running at the highest fan speed for 1 minute before reducing to speed 3 automatically. Light – select light level – Light on/off 1 – low-light level 2 – mid-light level 3– high-light levelUsing the TimerAt the end of cooking, if the timer is switched on, therangehood will continue to run for an additional 5 minutes, depending on the selected fan speed. This should ensure the removal of any odours that remain after cooking.FilterThis is the indicator/switch to show when the filter needs to be cleaned. Once the filters are cleaned the “Filter” alert can be deactivated with a single touch.Control LockPress and hold 3 seconds the . button will lock the control panel at any time. The same action will unlock the control panel.When control is locked, pressing any other button will make . button blink and a beep will sound. • W hen the hood is working (light on and fan on) andis touched then hood will stop fan but keep lighting on while lock menu. • W hen the hood is working (lights off and fan on) andthe is touched then hood will stop fan and keep lighting off while lock menu. • W hen is activated when hood is working it will juststatus of lighting. • W hen is touched while hood stops then it will justlock the menuDishwasherPlace grease filters in the dishwasher. Select the mostpowerful washing program and highest temperature, atleast 65°C. Repeat the process. Refit the grease filterswhen they are dry. When washing the metal grease filterin the dishwasher a slight discolouration of the filter canoccur, this does not have any impact on it’s performance.Changing the lamps Lamps are long life LED lamps and should not require service. If there is an issue with lamps please contactService. Service contact details shown on page 13. Charcoal lter • T he charcoal should only be used if you want touse the hood in the recirculation function. • T his cannot be cleaned or re-used and as ageneral rule, the activated charcoal filter should be changed once every four months.• A lways specify the hood model code number andserial number when ordering replacement filters. This information is shown on the registration plate located on the inside of this unit. • R eplacement charcoal can be ordered from yourlocal Spare parts centre, contact details are shown on page 13.12 13TROUBLESHOOTINGIf you have completed all of the above checks and are still experiencing difficulty, please contact your local Electrolux Service Centre.NOTE: This product is fitted with a safety cutout device.•I f the cooker hood is installed too close to the cooktop, flambe cooking, operating the cooktop withoutcooking utensils and blocked filters may activatethe safety cutout device. If the hood stops duringoperation, correct the faults and allow time for thesafety cutout device to reset, the cooker hood will thenfunction correctly.•D o not operate cooktop without pots/pans•D o notunder cooktop。
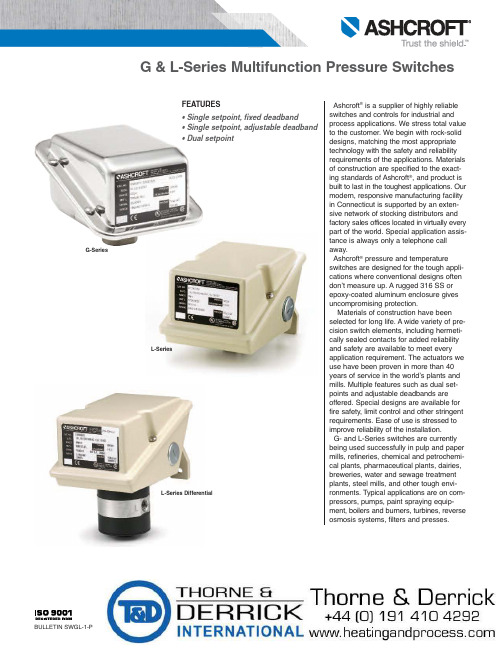
Ashcroft G-Series和L-Series多功能压力开关说明书
FEATURES• Single setpoint, fixed deadband• Single setpoint, adjustable deadband • Dual setpointAshcroft ®is a supplier of highly reliable switches and controls for industrial and process applications. We stress total value to the customer. We begin with rock-solid designs, matching the most appropriate technology with the safety and reliability requirements of the applications. Materials of construction are specified to the exact-ing standards of Ashcroft ®, and product is built to last in the toughest applications. Our modern, responsive manufacturing facility in Connecticut is supported by an exten-sive network of stocking distributors and factory sales offices located in v irtually every part of the world. Special application assis-tance is always only a telephone call away.Ashcroft ®pressure and temperatureswitches are designed for the tough appli-cations where conventional designs often don’t measure up. A rugged 316 SS or epoxy-coated aluminum enclosure gives uncompromising protection.Materials of construction have been selected for long life. A wide variety of pre-cision switch elements, including hermeti-cally sealed contacts for added reliability and safety are available to meet every application requirement. The actuators we use have been proven in more than 40years of service in the world’s plants and mills. Multiple features such as dual set-points and adjustable deadbands are offered. Special designs are available for fire safety, limit control and other stringent requirements. Ease of use is stressed to improve reliability of the installation.G- and L-Series switches are currently being used successfully in pulp and paper mills, refineries, chemical and petrochemi-cal plants, pharmaceutical plants, dairies,breweries, water and sewage treatment plants, steel mills, and other tough envi-ronments. Typical applications are on com-pressors, pumps, paint spraying equip-ment, boilers and burners, turbines, reverse osmosis systems, filters and presses.G-SeriesL-SeriesL-Series DifferentialNOTES:1. Switches may generally be set between 15% and 100% of nominal range on increasing or decreasing pressure.Consult factory for applications where setpoints must be lower.2. All deadbands are give The nominal range column.Deadbands shown are for switches with Buna N diaphragm. Approximate deadbands for optional diaphragms:Viton: Multiply Buna N value by 1.4Teflon: Multiply Buna N value by 1.2Stainless Steel: Multiply Buna N value by 1.7 Monel: Multiply Buna N value by 1.73. Deadbands for LPA, LDA, GPA, and GDA are adjustable between the values shown for all diaphragm materials.4. Deadbands for LPS, LPD, LDS, LDD, and GPS, GPD, GDS, GDD models are fixed within the range of values shown.5. Deadbands given are for zero static working pressure.6. Psid models cannot be used in vacuum applications.7. Proof pressure for stainless steel diaphragms is 4000 psi.G- and L-SERIES PRESSURE SWITCH AND DIFFERENTIAL PRESSURE SWITCH ORDERING INFORMATION1 – FUNCTIONGPS/LPS -Pressure control, single setpoint, fixeddeadband.GPA/LPA -Pressure control, single setpoint,adjustable deadband.GPD/LPD -Pressure control, two independentlyadjustable setpoints, fixed deadband.GDS/LDS -Differential pressure control, singlesetpoint, fixed deadband.GDA/LDA -Differential pressure control, singlesetpoint, adjustable deadband.GDD/LDD - Differential pressure control, two inde-pendently adjustable setpoints, fixed deadband.5 – PRESSURE CONNECTION (1)Order Code25 1⁄4NPT FemaleStandard on Pressure and D/P 06 1⁄4NPT Female and1⁄2NPT Male Combination Pressure Only 07 1⁄2NPT FemaleNOTES:1. These items are wetted by process fluid.2. Ambient operating temperature limits –20 to 150°F, all styles. Setpoint shift of ±1% of range per 50°F tempera-ture change is normal. Switches calibrated at 70°F refer-ence.3. Estimated dc rating, 2.5A, 28 Vdc (not UL listed).4. Estimated dc rating, 4A, 28 Vdc (not UL listed).5. Not UL listed at 480 Vac.6. Standard on G Series ˝H O ranges7. Supply static pressure for D/P switches.8. Stainless steel diaphragm only.9. Not available with Buna-N diaphragm.10. Available with GPS/LPS and GDS/LDS models.11. LDS, Buna N and Viton diaphragm only.12. LPS, stainless steel diaphragm only.13. All welded available on pressure models only.14. Order switch and 15-320SX-02T CG seal.15. Order switch and 20-320SX-02T CG seal.16. Not available for temperature ranges.17. Available on L-Series only.18. Not available with dual setpoints.7 – NOMINAL RANGESee page 3SWITCH ELEMENTS FOR FOR GPD/LPD,GPS/LPS, LDD/GDD & LDS/GDS CONTROLSCodeSingle DualSwitch elements UL/CSA listedK KK Narrow deadband 15A, 125/250 VacF FF Sealed environment 15A, 125/250 Vacproof15A, 125/250/480 Vac G GG General purpose 1/2A, 125 Vdc 1/4A, 250 Vdc Hermetically sealedP PP switch, narrow 5A, 125/250 Vac deadbandHermetically sealedJ JJ switch, general 11A,125/250 Vac purpose 5A, 30 Vdc W WW Ammonia service 15A, 125/250 Vac C CC Heavy duty ac 22A, 125/250 Vac S Heavy duty dc 10A, 125 Vac or dc⁄HP , 125 Vac or dc Y YY High temp. 300°F 15A, 125/250 Vac U UU Manual reset trip on 15A, 125/250 Vac increasingE EE Manual reset trip on 15A, 125/250 Vac decreasingHermetically sealedL LL switch, gold contacts 5A, 125/250 Vac M MM Low level, gold 1A, 125/250 Vac contacts2 – ENCLOSUREN4- NEMA 4, 4XL-Series: Epoxy Coated, Die Cast Aluminum, IP66G-Series: 316 SS IP656 – G-, L-SERIES PRESSURE SWITCH OPTIONSAvailable Differential Series Pressure Pressure Code Description G L psi ˝H O psid ˝H O XCH Chained Cover • • • • • • XFP Fungus Proof • • • • • • XFS Factory-Adjusted Setpoints • • • • • • XG5 Gas/OilUL Limit Control to 150 ˝H2O • •LDS only XG6 Gas/OilUL Limit Control to 600 psi • •LPS only XG8 Steam Limit Control to 300 psi • • XG9 Fire Safe Actuator • • High Operating Pressure for H2O Ranges:XHX 40 PSI Static (Pressure and D/P) • • • • 100 PSI Proof (Pressure) 160 PSI Proof (D/P)XJL ⁄˝ to ⁄˝ Reducing Bushing • • • • • • XK3 Terminal Blocks • • • • • • XNH Tagging Stainless Steel • • • • • • XPK Pilot Lights • • • • • XPM 3/4˝ Sealed Conduit Connectionwith 16˝ Lead Wires • • • • • • XTA 316SS Pressure Connectionfor ˝H2O Ranges • • • • XUD 316SS Pressure Connectionfor psid Ranges • • • X2C DPDT with Single SetpointAdjustment • • • • • • X6B Cleaned for Oxygen Service • • • • XFM FM Approval • • • • • X3A 1⁄˝ Sanitary Seal with Glycerin Fill • •2˝ Sanitary Seal with Glycerin Fill • •XHS High Static Operating Pressurefor PSI Range D/P • • • 4 – ACTUATOR SEAL (1)Process RangeCode Temp.(2) 2000- & Limits Vac 0-600 1000 3000 Material °F ˝H O psi psi psi B-Buna-N 0 to 150 • • • • V-Viton 20 to 300 • • • T-Teflon 0 to 150 • • • • S-St.St 0 to 300 • • P-Monel 0 to 300 •GP D N 4G G 25X K 330 PSIB1 2 3 4 5 6 7Additional options available, consult your Ashcroft representative.3 – SWITCH ELEMENTS FOR GPA/LPA,GDA/LDA CONTROLSDescription/Maximum Electrical Ratings Code UL/CSA listed 10A,125/250 Vac H General purpose 1/2A, 125 Vdc 1/4A, 250 Vdc Hermetically sealedJ switch, general 11A, 125/250 Vac purpose 5A, 30 VdcPressure Switch – psi RangesPressure Switch –Inches Of Water RangesDifferential Pressure Switch – Inches Of Water RangesDifferential Pressure Switch – psi Differential RangesHIGH PRESSURE PORTLOW PRESSURE PORTDimensions – G-SeriesPressure Switch – psi Ranges Pressure Switch –Inches Of Water RangesDifferential Pressure Switch –Inches Of Water Ranges Differential Pressure Switch –psi Differential Ranges4.126.091/4 NPT FEMALE4.12Dimensions – L-Series。
老板家居用钢炉产品说明书

SEASONED CAST IRON COOKWAREThe following is use and care for Seasoned Cast Iron Cookware. By following these instructions, your Cast Iron can last you more than a lifetime.USING YOUR CAST IRONRinse with hot water (do not use soap), and dry thoroughly. Before cooking, apply vegetableoil to the cooking surface of your pan and pre-heat the pan slowly (always start on low heat,increasing the temperature slowly). Once the utensil is properly pre-heated, you are ready tocook.Tip: Avoid cooking very cold food in the pan, as this can promote sticking.WARNING: Handles will become very hot in the oven, and on the stovetop. Always use oven mittsto prevent burns when removing pans from oven or stovetop.CLEANING YOUR CAST IRONAfter cooking, clean utensil with a stiff nylon brush and hot water. Using soap is notrecommended, and harsh detergents should never be used. (Avoid putting a hot utensil intocold water. Thermal shock can occur causing the metal to warp or crack).Tip: If you are having trouble removing stuck-on food, boil some water in your pan for a fewminutes to loosen residue, making it easier to remove.Towel dry immediately and apply a light coating of oil to the utensil while it is still warm.Tip: Do not let your cast iron air dry, as this can promote rust.Store in a cool, dry place. If you have a cover, or lid, for your utensil, place a folded papertowel in between lid and utensil allowing air to circulate. This prevents moisture fromcollecting inside the utensil, which can cause rust.NEVER wash in dishwasher.If for some reason your utensil develops rust spots or a metallic smell or taste, scour off the rustusing a very fine grade of sandpaper or steel wool. Once rust is removed, follow the below instructions for re-seasoning your Cast Iron.RE-SEASONING YOUR CAST IRONWhile maintaining the seasoning (as mentioned above) should keep your Cast Iron in goodcondition, at some point you may need to repeat the seasoning process. If food sticks to thesurface, or you notice a dull, gray color, repeat the seasoning process:1. Wash the cookware with hot, soapy water and a stiff brush. (It is okay to soap this timebecause you are preparing to re-season the cookware).2. Rinse and dry completely.3. Apply a thin, even coating of MELTED solid vegetable shortening (or cooking oil of your choice) tothe cookware (inside and out).4. For Cast Iron that will fit in your kitchen oven:Place aluminum foil on the bottom of the rack of the oven to catch any dripping. Set oventemperature to 350 - 400 degrees F. Place cookware upside down on the top rack of the oven.Bake the cookware for at least one hour. After the hour, turn the oven off and let the cookwarecool in the oven. When pot has cooled completely, store the cookware in a dry area.For Cast Iron that is too large to fit in your kitchen oven:With a large King Kooker cast iron pot, use the outdoor cooker approved for use as the heatsource. Place the pot onto the cooker frame and light according to the instructionsprovided in the cooker manual. Heat cast iron pot for approximately five minutes to remove anyremaining moisture. When pot has cooled completely, store the cookware in a dry area.Distributed byMetal Fusion, Inc.712 St. George AvenueJefferson, LA 70121(504) 736-0201。
老板烤箱使用说明书
老板烤箱使用说明书篇一:烤箱中文说明书-------通用感谢您选用我们的产品。
建议您认真阅读本手册,以便正确的使用烤箱并及时进行保养。
1.安全正确使用指导本手册是烤箱不可分割的一个组成部分,因此在烤箱的使用过程中,都要把这本说明书放在容易拿到的地方。
建议您在使用前,仔细阅读手册中的全部说明。
必须请专业的技工根据当地的电力法规来安装烤箱。
此款烤箱为嵌入式、家用电烤箱,符合当前的法律法规。
电烤箱仅用于烹饪和加热食物,不可用作其他用途。
制造商对因不正确操作所造成的人身伤害和财产损失不负任何法律责任。
不要将烤箱的包装放在家里,将废料分类并将其送到专门的垃圾处理场。
安全规则要求方式规定:电路系统必须接地线。
通过插座与插头连接电源时,要确保两者互相匹配并用用电线正确的连接。
安装烤箱时,必须保证够得着插座。
不要直接拽拉电线来拔掉插头。
不要阻住通风孔和放热口。
安装结束后立即根据下述指导对烤箱进行简单的检查测试。
如果烤箱不工作,马上切断电源,然后给技术服务中心打电话。
绝对不要试着自己维修烤箱。
每次用完烤箱后必须检查控制旋钮是否处于“零”(关闭)位置。
不要把易燃物体放在烤箱内:否则会着火造成火灾。
使用中,烤箱会变得很热。
小心不要触摸烤箱内的加热组件。
烤箱门上贴着铭牌,您可以清楚地看到标有技术数据、登记号码和商标。
不要撕掉此铭牌。
本烤箱是为成人设计的,不要让儿童接近玩耍。
烤箱符合废旧电子及电设备XX/96/EC欧盟标准(WEEE)。
使用烤箱前,必须撕掉所有的标签和烤箱内、外部的保护膜。
制造商对因下列原因造成的人身伤害和财产损失不负任何法律责任:未按照上述指导进行操作、乱拆烤箱的零部件或未使用原厂配件。
2.安装说明2.1接电检查家中电源电压及功率是否与贴在烤箱门框的铭牌上所列的信息一致。
决不要撕掉烤箱的铭牌。
根据安全准则中所描述的方法将烤箱接地。
如果接电方式使用插头和插座,则必须保证插头与插座相匹配。
一定不要使用适配器和分流器,因为这些设备可能因过热而引起着火。
老板蒸汽炉蒸箱使用说明书

ZQB350-S205蒸汽炉S205本产品执行标准 GB4706.1 GB4706.22使用产品前请仔细阅读本使用说明书,并请妥善保管老板厨房电器 为世界构建更多幸福的家目 录12459910111213安全注意事项产品简介安装说明使用说明常见故障及处理方法维护和保养电气原理图客户服务全国电码电话防伪查询使用说明产品包修卡...................................................................................................................................................................................................................................................................................................................................................................................................................................................................................................................................................................................................................................................................................................................................................................................................................................................................................................安全注意事项声明:因违背以上注意事项使用而造成的危险、伤害等不良后果,本公司概不负责。
老板MPV操作说明书
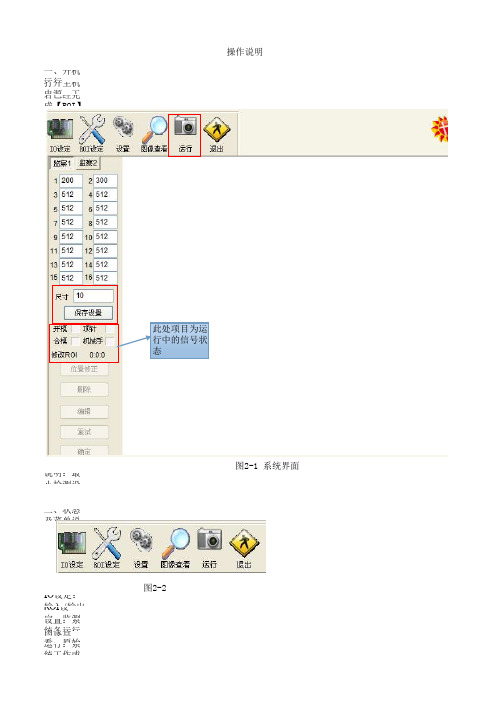
操作说明一、开机运行打开主机电源,工控主机会自动检测并进入至MPV熙视视觉检测软件。
若已经完成【ROI】监测设置,则点击【运行】按钮,即开始监测此处项目为运行中的信号状图2-1 系统界面说明:最小检测设置尺寸范围在4~16之间,且仅为双数。
这取决于产品的检测精度需求,数字越小,精度越高二、状态及菜单说明:图2-2IO设定:输入/输出信号检测及设置ROI设定:监测区域设定设置:系统各运行参数及功能设置图像查看:原始缺陷图像追溯查询运行:系统工作或停止、退出:退出熙视视觉软件并关闭系统三、输入/输出信号查看点击2-2所示菜单条中【IO设定】按钮,将弹出图2-3所示的IO测试界面图2-3如图2-3所示IO设定界面,可以进行信号输入/输出实际测试。
查看状态灯是否正常四、ROI监测区域设置1.点击图2-2所示工具条中【ROI】按钮,进入图2-4 ROI监测初始画面状态,首先观察界面显示的图像是否清晰(若图像模糊,请调整相机焦距),亮度是否合适(若亮度不合适,请调整光圈);需要监视的产品是否在画面显示范围内。
图2-42.上述调整完成后,在机器处于全模状态下,点击【准备就绪】按钮,当模腔打开后,【监察1】按钮将有效,此时按下【监察1】按钮,获取一次图像;3.当监察1按钮按下后,机器机械手和顶针将完成模具取件,【监察2】按钮将有效,此时按下【监察2】按钮,获4.当二次图像获取有效后,系统将彼提取出检测点,并显示在图像上,此时可以人工调整、增、删检测点;5.调整完成后,点击完成按钮。
返回主界面6.若ROI设定失败,系统则会自动提示图像处理失败,原因有2点:1.监察1和监察2图像无区别2.图像识别参数栏的光度极限值设置错误(常见错误为设置数值过大)五、系统运行警报处理当ROI监测区域设定完成后点击运行按钮,系统则进入自动运行监测状态当第一次监测报警时为产品缺失或异常,报警ROI将呈红色“网状格”显示,并报警提示处理。
老板燃气灶JZ(YTR)-9B20使用说明书

禁止将液化气罐放倒使用。 禁止
非专业人员不得擅自安装、拆机修理或
更换零件。 禁止拆卸
安装前请务必核对您所使用的燃气种类是否与灶具铭牌上所标注的一致;若不一致严禁安
装及使用。 禁止
注意
灶具每次点火时间必须小于20秒,以免
灶具在使用期间会发热,注意避免接触
爆燃;连续点火5次不能点燃时,必须
发热单元。金属物体如刀、叉和盖不应
4、应根据挖孔样板上的尺寸挖孔,把灶具嵌入孔内,平整即可。 5、如果采用G1/2’英寸接口连接,必须将φ9.5软管接头旋去,在接口处垫上橡胶垫圈,旋紧螺母、检 漏,无泄漏后方可使用。 6、液化石油气灶必须使用优质合格的减压阀。
严格执行
小心烫伤
请严格按照本说明书规定使用,由于本产品使用不当造成的任何财产损失、人身损害,本
警告
公司不承担责任。
危险
连接气源必须使用燃气专用胶管,且至少一年更换一次;胶管的长度以1-1.5米为宜,不 得硬性折弯、压扁等,禁止使用有缺陷或老化的胶管;胶管连接处应注意检查,务必牢固 严格执行 可靠,并用抱箍锁紧,以防漏气引起中毒、火灾等危险。
燃气灶具与气源连接必须使用燃气专用胶管(如优质的复合层胶或丁腈橡胶管),严禁 使用普通橡胶材料制成的胶管,普通橡胶管与臭氧、液化石油气等会产生反应,使胶管 严格执行 出现老化、裂纹而漏气,引起火灾等危险。
如果采用G1/2’英寸接口连接,必须将φ9.5软管接头旋去,在接口处垫上橡胶垫圈,旋紧螺 母、检漏,无泄漏后方可使用。 严格执行
安装嵌入式灶具的橱柜要有符合通风要求的与大气相通的开孔尺寸(面积不小于100平方厘 米),否则会造成泄漏燃气积沉而引起爆炸。 严格执行
请勿在不放锅的状态下或锅内无任何食物时,就点燃燃气灶具进行加热。如此操作可能导
