100米KVM延长器EX-1000S
迈拓维矩网咖KVM延长器的应用

迈拓维矩网咖KVM延长器的应用现今网咖或高端办公室的电脑都配置极高且昂贵,反复使用容易损坏。
为了保护和延长主机使用寿命,最新解决方案是将主机统一集中机房管理,而用户桌面上使用专业的电脑替身——网咖KVM延长器。
鼠标、键盘接口、USB2.0端口、主机开机键等被完美替代,又节约了空间。
针对网咖电脑在使用中面临的防盗、噪音、散热、占用空间等问题,迈拓维矩推出了网咖电脑延长器的解决方案。
连接和功能迈拓维矩网咖电脑延长器由三部分组成,发射器、接收器和桌面控制器。
发射器可选择插在电脑主板的PCIe插槽上的插卡式发射器,也可选择桌面式发射器。
一个接收器,放在显示器旁,发送器和接收器之间用网线连接,距离可达100米。
而桌面控制器可放置在桌面上供用户开机和连接USB2.0接口设备,桌面控制器需与接收器连接。
网咖可将电脑主机集中放置在带锁的机架上或者机房里。
用户无法直接接触到电脑主机。
有效提升网咖管理效率使用网咖延长器,主机集中放置后,可以有效解决网咖电脑的防盗、防损等问题,降低网咖运营成本。
使用网咖延长器后,电脑主机和用户控制台(显示、键鼠等)之间的对应关系可以通过改变网线的连接,而迅速地改变,便于网咖根据电脑升级速度、用户喜好的变化、和游戏包场等情况,随时改变网咖分区,提高网咖管理效率。
改善网咖客户体验电脑主机从用户身边移开后,用户空间加大,而且将网咖电脑集中放置到单独的机房后,更能显著降低电脑噪音,减少电脑发热,改善网咖人多嘈杂、空气浑浊的形象,提升网咖档次。
数字显示信号HDMI延长传输,完美图像显示MT-HD100-U网咖延长器的是HDMI接口的数字显示信号,并且在延长过程中没有对显卡输出的信号进行压缩、编码操作,没有传输延迟和图像损失,最高支持2560*1600显示分辨率,可以完美支持大屏幕液晶显示器。
网咖延长器技术参数1、采用单根Cat6网线传输100米KVM信号2、支持HDMI信号,支持分辨可达2560*16003、支持标准USB2.0信号传输100米4、远端支持开关近端主机5、远端USB接口支持标准USB2.0设备6、支持R/L音频、Mic传输7、支持UART-legacy设备控制。
DLV-100信号延长器产品介绍
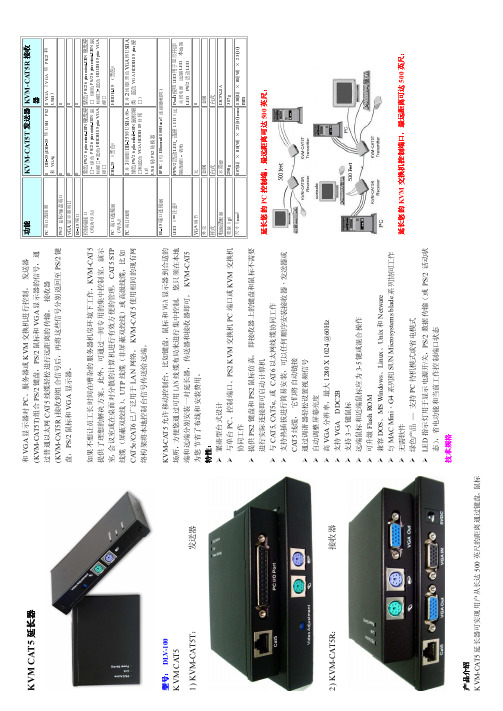
K V M C A T 5延长器型号: D L V -100K V M C A T 51) K V M -C A T 5T : 发送器2) K V M -C A T 5R : 接收器产品介绍K V M -C A T 5延长器可实现用户从长达500英尺的距离通过键盘、鼠标和V G A 显示器对P C 、服务器或K V M 交换机进行控制。
发送器(K V M -C A T 5T )组合P S /2键盘,P S /2鼠标和V G A 显示器的信号,通过普通以太网C A T 5线缆轻松进行远距离的传输。
接收器(K V M -C A T 5R )接收到组合信号后,再将这些信号分别返回至P S /2键盘,P S /2鼠标和V G A 显示器。
如果不想让员工长时间在嘈杂的服务器机房环境下工作,K V M -C A T 5提供了理想的解决方案。
此外,可通过一间专用的集中控制室,演示室,会议室或在桌面对分散的计算机进行有效方便的管理。
C A T 5 S T P 线缆(屏蔽双绞线)、U T P 线缆(非屏蔽双绞线)或高级线缆,比如C A T 5e /C A T 6已广泛用于L A N 网络。
K V M -C A T 5使用相同的现有网络构架将本地控制台信号传送给远端。
K V M -C A T 5允许移动控制台,比如键盘,鼠标和V G A 显示器到合适的场所,方便您通过可用L A N 线缆布局来进行集中控制。
您只须在本地端和远端分别安装一对延长器,传送器和接收器即可。
K V M -C A T 5为您节省了布线和安装费用。
特性: 紧凑型台式设计 与单台P C 、控制端口、P S 2 K V M 交换机P C 端口或K V M 交换机协同工作 提供P S 2键盘和P S 2鼠标仿真。
即接收器上的键盘和鼠标不需要进行实际连接即可启动计算机与C A T 5, C A T 5e , 或 C A T 6以太网线缆协同工作 支持热插拔进行简易安装,可以任何顺序安装接收器、发送器或C A T 5线缆, 它们将自动链接通过调谐器轻松设置视频信号自动调整屏幕亮度 高V G A 分辨率,最大1280 X 1024 @60H z 支持V G A D D C 2B支持3~5键鼠标 远端鼠标和近端鼠标应为3-5键或混合操作 可升级F l a s h R O M 兼容D O S 、M S W i n d o w s 、L i n u x 、U n i x 和N e t w a r e与M A C M i n i 、G 4系列和S U N M i c r o s y s t e m s b l a d e 系列协同工作无需软件 绿色产品 — 支持P C 待机模式或省电模式L E D 指示灯用于显示电源开/关,P S /2数据传输(或P S /2 活动状态),省电功能和当前工作控制端口状态技术规格延长您的P C 控制端,最远距离可达500英尺:延长您的K V M 交换机控制端口,最远距离可达500英尺:功能 K V M -C A T 5T 发送器 K V M -C A T 5R 接收器PC 端口连接器 1D B -25 (D B -25 转U S B ,P S 2 和 V G A ) 1V G A (V G A 转 P S /2 和 U S B ) P S /2 鼠标/键盘端口 1 1 V G A 显示器端口 1 1 R J -45端口 1 1 控制端接口 (均为母头) 紫色P S /2 6 p i n m i n i -D I N 键盘接口,绿色P S /2 6 p i n m i n i -D I N 鼠标接口,蓝色H D D B 15 p i n V G A 接口 紫色P S /2 6 p i n m i n i -D I N 键盘接口,绿色P S /2 6 p i n m i n i -D I N 鼠标接口,蓝色H D D B 15 p i n V G A 接口 PC 端口连接器 (母头)D B -25 (黑色) H D D B -15 (黑色) P C 端口线缆 1并3线缆(D B -25转U S B A 类,绿色P S /2 6 p i n m i n i -D I N 鼠标端口和蓝色V G A H D D B 15针接口) U S B 转P S 2转换器 1并2线缆(黑色V G A 转U S B A 类,蓝色V G A H D D B 15 p i n 接口) RJ -45端口连接器 8P 8C (与E t h e r n e t 100B a s e T 连接器相同) L E D (**注意) PP S /2活动L E D , 连接L E D (远端连接),省电 P u s h 按钮L E D 用于显示开启/关闭电源,远端L E D ,本地端L E D ,P S /2活动L E D VG A 调节 无 1 外壳 金属 金属 样式 台式 台式 电源适配器 不需要 D C 5V , 1A 重量(g ) 258g 317g 尺寸(m m ) 107(L ) × 81(W ) × 23 (H ) m m 138(L ) × 81(W ) × 23 (H ) m mBM N 004330A 00。
日立电梯元件代码及各种牌子电梯型号列表

日立电梯元件代码及各种牌子电梯型号列表日立电梯元件代码1 A 门电机YPVF2 ACR 电流控制调整电子板YPVF、VFM(H)G、HVF、NPX3 AD 模数电子板YPVF4 ALARM 警铃按钮GVF5 ALP 停电柜全梯种6 AM 电流表VFM(H)G、HVF7 AMP 增幅器NPX8 ATD 司机下行按钮全梯种9 ATT 司机开关全梯种10 ATU 司机上行按钮全梯种11 AVR 自动稳压电源YPVF、VFM(G)、HVF、NPX12 B951-CSD 轿顶电器箱数字显示电子板NPH13 B.CON 信号网转换电子板VFM(H)G、HVF、NPX14 BD 基极驱动VFM(H)G、HVF15 BDR 抱闸电阻VFM(H)G、HVF、NPX、G(G)VF16 BD-TR 基极驱动变压器VFM(H)G、HVF、NPX、G(H)VF17 BELL 警铃全梯种18 BGM 背景音乐装置VFM(H)G、HVF、NPX19 BSR 抱闸电阻VFM(H)G、HVF、NPX、G(G)VF20 BZ 蜂鸣器全梯种21 CAGE。
B。
L 内指令应答信号灯YPVF22 CALL 对讲机呼叫按钮YPVF23 CAM 防止手动开门装置VFM(H)G、HVF、NPX24 CDS 关门减速开关VFM(H)G、HVF、NPX25 CFR CFC 制动器阻容组件YPVF26 CLN 轿厢串行通信电子板VFM(H)G、HVF、NPX27 CLOSE 关门按钮全梯种28 CLS 关门限位开关YPVF、G(H)VF29 CNV 整流器YPVF、VFM(G)、HVF、NPX30 CONTROL-1 AC100V电源保险丝YPVF31 CONTROL-2 多重回路电源保险丝YPVF32 CONTROL-3 光电装置电源保险丝YPVF33 COUNT 计数器全梯种34 CP 控制柜全梯种35 CP-FAN 大功率逆变器冷却分扇YPVF、VFM(G)、HVF、NPX36 CPI 轿内指示器全梯种37 CR 阻容组件YPVF38 CRS 阻容组件YPVF39 CRU2 阻容组件YPVF40 D1-D4 二极管YPVF41 D2 二极管桥堆YPVF42 DBR 制动电阻G(H)VF43 DCO 门停止VFM(H)G、HVF、NPX44 DIGITAL CPI 轿内数字式显示全梯种45 DLS 下终端限位开关全梯种46 DM1 电感线圈YPVF47 DM37 副安全触板短接开关G(H)VF48 DM 门电机G(H)VF49 M.MOTOR 门电机VFM(H)G、HVF、NPX50 DMC。
国内KVM切换器十大品牌排名
国内KVM切换器⼗⼤品牌排名第⼀名:AVOCENT(美国)全球知名KVM品牌,AVOCENT品牌的⾼端数字KVM产品在全球范围内的占有率最⾼,其主要客户对象为世界500强企业,国内的主要市场在政府部门。
近期已被Emerson(美国艾默⽣电⽓)收购,未来发展动向尚不明朗。
第⼆名:Raritan(美国⼒登)全球知名KVM品牌,在⾼端数字KVM领域是AVOCENT全球范围的主要竞争对⼿,Raritan品牌的KVM产品性价⽐较⾼,独创的虚拟媒体技术成为其近年来的主要销售亮点和技术性竞争⼿段。
但由于缺乏⼤型数据中⼼管理整体解决⽅案,整体品牌形象上与AVOCENT还有⼀定差距。
第三名:Aten(台湾宏正)较早进⼊KVM市场的⼚家,主要⽣产和销售中、低端模拟KVM产品,销售范围集中在亚太地区,早年在国内有两家代理商:君合达和艾腾世纪,两家合并后由腾达科技统⼀代理和销售。
近年来由于国内本⼟企业的崛起,Aten品牌产品由于⼀直维持其早年较⾼的定价策略,逐渐被其它本⼟品牌挤压,⾃07以来,在国内市场的占有率和品牌价值下降较快。
第四名:Rextron(台湾瑞创)同样是⼀家较早进⼊KVM市场的台湾⼚家,产品性能和外观均不错,但由于其在国内的主要合作代理商推⼴不利及品牌本⾝定位问题等因素,已逐渐成为⼀个被遗忘的品牌,09与其内地代理商分离,由台湾原⼚在内地开设销售机构。
同样由于国内本⼟企业的挤压,难以恢复之前的品牌地位。
第五名:Lanbe(上海蓝宝)早年国内知名品牌,Lanbe品牌KVM切换器⼀度在国内畅销。
近年该品牌主要在视频切换⾏业发展,对KVM产品的研发和推⼴⼏乎停滞,主要以现有产品销售。
第六名:KinAn(深圳秦安)国内较早进⼊KVM市场的⼚家,华为、中兴等⼤型企业的主要KVM供应商,AVOCENT中、低端产品的ODM供应商。
具备⾃主研发和⽣产能⼒,近期推出的CAT5⽹⼝KVM系列产品,以其较⾼的性价⽐在KVM市场引起了较⼤的反响。
Emulex LightPulse 适配器用户指南说明书
Documentation for Emulex® LightPulse® Adapters User GuideVersion 11.4September 11, 2017Documentation for Emulex LightPulse Adapters User GuideSeptember 11, 2017Corporate Headquarters WebsiteSan Jose, CA Broadcom, the pulse logo, Connecting everything, Avago Technologies, Avago, the A logo, Emulex, ExpressLane,LightPulse, and OneCommand are among the trademarks of Broadcom in the United States, certain other countriesand/or the EU.Copyright © 2003-2017 Broadcom. All Rights Reserved.The term “Broadcom” refers to Broadcom Limited and/or its subsidiaries. For more information, please visit.Broadcom reserves the right to make changes without further notice to any products or data herein to improvereliability, function, or design.Information furnished by Broadcom is believed to be accurate and reliable. However, Broadcom does not assume anyliability arising out of the application or use of this information, nor the application or use of any product or circuitdescribed herein, neither does it convey any license under its patent rights nor the rights of others.Table of ContentsDocumentation for Emulex LightPulse Adapters User Guide . . . . . . . . . . . . . . . . . . . . . . . . . . . . . . . . . . . . . . . . . . . . . . . 1 Emulex Software Kit Migration User Guide . . . . . . . . . . . . . . . . . . . . . . . . . . . . . . . . . . . . . . . . . . . . . . . . . . . . . . . . . . . . . . . 19Chapter 1: Introduction . . . . . . . . . . . . . . . . . . . . . . . . . . . . . . . . . . . . . . . . . . . . . . . . . . . . . . . . . . . . . . . . . . . . . . . . . . . . . . . . . . . . . . . . . . . . . . . . . . . . . . . . 211.1 Supported Adapters . . . . . . . . . . . . . . . . . . . . . . . . . . . . . . . . . . . . . . . . . . . . . . . . . . . . . . . . . . . . . . . . . . . . . . . . . . . . . . . . . . . . . . . . . . . . . . . . . . . . . . . . . . . . . . . 211.2 Considerations . . . . . . . . . . . . . . . . . . . . . . . . . . . . . . . . . . . . . . . . . . . . . . . . . . . . . . . . . . . . . . . . . . . . . . . . . . . . . . . . . . . . . . . . . . . . . . . . . . . . . . . . . . . . . . . . . . . . 211.2.1 Inbox Drivers . . . . . . . . . . . . . . . . . . . . . . . . . . . . . . . . . . . . . . . . . . . . . . . . . . . . . . . . . . . . . . . . . . . . . . . . . . . . . . . . . . . . . . . . . . . . . . . . . . . . . . . . . . . . . . . . 221.2.2 Management Applications . . . . . . . . . . . . . . . . . . . . . . . . . . . . . . . . . . . . . . . . . . . . . . . . . . . . . . . . . . . . . . . . . . . . . . . . . . . . . . . . . . . . . . . . . . . . . . . . . . 221.2.3 Firmware . . . . . . . . . . . . . . . . . . . . . . . . . . . . . . . . . . . . . . . . . . . . . . . . . . . . . . . . . . . . . . . . . . . . . . . . . . . . . . . . . . . . . . . . . . . . . . . . . . . . . . . . . . . . . . . . . . . 221.3 Driver Kit Designations and Application Kit Names . . . . . . . . . . . . . . . . . . . . . . . . . . . . . . . . . . . . . . . . . . . . . . . . . . . . . . . . . . . . . . . . . . . . . . . . . . . . . . . . . . 221.4 Additional Information . . . . . . . . . . . . . . . . . . . . . . . . . . . . . . . . . . . . . . . . . . . . . . . . . . . . . . . . . . . . . . . . . . . . . . . . . . . . . . . . . . . . . . . . . . . . . . . . . . . . . . . . . . . . 23 Chapter 2: Installing Drivers . . . . . . . . . . . . . . . . . . . . . . . . . . . . . . . . . . . . . . . . . . . . . . . . . . . . . . . . . . . . . . . . . . . . . . . . . . . . . . . . . . . . . . . . . . . . . . . . . . . . 242.1 Installing Split Out-of-Box Drivers over Inbox Drivers . . . . . . . . . . . . . . . . . . . . . . . . . . . . . . . . . . . . . . . . . . . . . . . . . . . . . . . . . . . . . . . . . . . . . . . . . . . . . . . . 242.1.1 Windows . . . . . . . . . . . . . . . . . . . . . . . . . . . . . . . . . . . . . . . . . . . . . . . . . . . . . . . . . . . . . . . . . . . . . . . . . . . . . . . . . . . . . . . . . . . . . . . . . . . . . . . . . . . . . . . . . . . 242.1.2 Linux . . . . . . . . . . . . . . . . . . . . . . . . . . . . . . . . . . . . . . . . . . . . . . . . . . . . . . . . . . . . . . . . . . . . . . . . . . . . . . . . . . . . . . . . . . . . . . . . . . . . . . . . . . . . . . . . . . . . . . . 242.1.3 VMware Drivers . . . . . . . . . . . . . . . . . . . . . . . . . . . . . . . . . . . . . . . . . . . . . . . . . . . . . . . . . . . . . . . . . . . . . . . . . . . . . . . . . . . . . . . . . . . . . . . . . . . . . . . . . . . . . 262.2 Installing Split Out-of-Box Drivers over Existing 11.1 or Earlier Out-of-Box Drivers . . . . . . . . . . . . . . . . . . . . . . . . . . . . . . . . . . . . . . . . . . . . . . . . . . . . 282.2.1 Windows . . . . . . . . . . . . . . . . . . . . . . . . . . . . . . . . . . . . . . . . . . . . . . . . . . . . . . . . . . . . . . . . . . . . . . . . . . . . . . . . . . . . . . . . . . . . . . . . . . . . . . . . . . . . . . . . . . . 282.2.2 Linux . . . . . . . . . . . . . . . . . . . . . . . . . . . . . . . . . . . . . . . . . . . . . . . . . . . . . . . . . . . . . . . . . . . . . . . . . . . . . . . . . . . . . . . . . . . . . . . . . . . . . . . . . . . . . . . . . . . . . . . 292.2.3 VMware . . . . . . . . . . . . . . . . . . . . . . . . . . . . . . . . . . . . . . . . . . . . . . . . . . . . . . . . . . . . . . . . . . . . . . . . . . . . . . . . . . . . . . . . . . . . . . . . . . . . . . . . . . . . . . . . . . . . . 312.2.4 Solaris . . . . . . . . . . . . . . . . . . . . . . . . . . . . . . . . . . . . . . . . . . . . . . . . . . . . . . . . . . . . . . . . . . . . . . . . . . . . . . . . . . . . . . . . . . . . . . . . . . . . . . . . . . . . . . . . . . . . . . 33 Chapter 3: Reverting Drivers and Applications to Previous Versions . . . . . . . . . . . . . . . . . . . . . . . . . . . . . . . . . . . . . . . . . . . . . . . . . . . . . . . . . . . . . . 363.1 Windows . . . . . . . . . . . . . . . . . . . . . . . . . . . . . . . . . . . . . . . . . . . . . . . . . . . . . . . . . . . . . . . . . . . . . . . . . . . . . . . . . . . . . . . . . . . . . . . . . . . . . . . . . . . . . . . . . . . . . . . . . . 363.2 Linux . . . . . . . . . . . . . . . . . . . . . . . . . . . . . . . . . . . . . . . . . . . . . . . . . . . . . . . . . . . . . . . . . . . . . . . . . . . . . . . . . . . . . . . . . . . . . . . . . . . . . . . . . . . . . . . . . . . . . . . . . . . . . . 383.3 VMware . . . . . . . . . . . . . . . . . . . . . . . . . . . . . . . . . . . . . . . . . . . . . . . . . . . . . . . . . . . . . . . . . . . . . . . . . . . . . . . . . . . . . . . . . . . . . . . . . . . . . . . . . . . . . . . . . . . . . . . . . . . 423.4 Solaris . . . . . . . . . . . . . . . . . . . . . . . . . . . . . . . . . . . . . . . . . . . . . . . . . . . . . . . . . . . . . . . . . . . . . . . . . . . . . . . . . . . . . . . . . . . . . . . . . . . . . . . . . . . . . . . . . . . . . . . . . . . . . 44 Chapter 4: Technical Tips . . . . . . . . . . . . . . . . . . . . . . . . . . . . . . . . . . . . . . . . . . . . . . . . . . . . . . . . . . . . . . . . . . . . . . . . . . . . . . . . . . . . . . . . . . . . . . . . . . . . . . 484.1 General . . . . . . . . . . . . . . . . . . . . . . . . . . . . . . . . . . . . . . . . . . . . . . . . . . . . . . . . . . . . . . . . . . . . . . . . . . . . . . . . . . . . . . . . . . . . . . . . . . . . . . . . . . . . . . . . . . . . . . . . . . . 484.1.1 LightPulse-Specific or OneConnect-Specific Applications . . . . . . . . . . . . . . . . . . . . . . . . . . . . . . . . . . . . . . . . . . . . . . . . . . . . . . . . . . . . . . . . . . . . . 484.1.2 Multiple ASICs . . . . . . . . . . . . . . . . . . . . . . . . . . . . . . . . . . . . . . . . . . . . . . . . . . . . . . . . . . . . . . . . . . . . . . . . . . . . . . . . . . . . . . . . . . . . . . . . . . . . . . . . . . . . . . 484.1.3 Reverting to a Prior Driver Version . . . . . . . . . . . . . . . . . . . . . . . . . . . . . . . . . . . . . . . . . . . . . . . . . . . . . . . . . . . . . . . . . . . . . . . . . . . . . . . . . . . . . . . . . . . 484.1.4 Boot Code Functionality . . . . . . . . . . . . . . . . . . . . . . . . . . . . . . . . . . . . . . . . . . . . . . . . . . . . . . . . . . . . . . . . . . . . . . . . . . . . . . . . . . . . . . . . . . . . . . . . . . . . . 494.2 Windows . . . . . . . . . . . . . . . . . . . . . . . . . . . . . . . . . . . . . . . . . . . . . . . . . . . . . . . . . . . . . . . . . . . . . . . . . . . . . . . . . . . . . . . . . . . . . . . . . . . . . . . . . . . . . . . . . . . . . . . . . . 494.2.1 Windows OneInstall . . . . . . . . . . . . . . . . . . . . . . . . . . . . . . . . . . . . . . . . . . . . . . . . . . . . . . . . . . . . . . . . . . . . . . . . . . . . . . . . . . . . . . . . . . . . . . . . . . . . . . . . . 494.2.2 Downgrading from a LightPulse 11.2 Kit with LPe16000-series Adapters . . . . . . . . . . . . . . . . . . . . . . . . . . . . . . . . . . . . . . . . . . . . . . . . . . . . . . 494.2.3 Downgrading from a LightPulse 11.2 Kit to a 11.0 Kit with LPe12000-Series Adapters . . . . . . . . . . . . . . . . . . . . . . . . . . . . . . . . . . . . . . . . . . 504.3 Linux . . . . . . . . . . . . . . . . . . . . . . . . . . . . . . . . . . . . . . . . . . . . . . . . . . . . . . . . . . . . . . . . . . . . . . . . . . . . . . . . . . . . . . . . . . . . . . . . . . . . . . . . . . . . . . . . . . . . . . . . . . . . . . 504.3.1 Unloading the lpfc and the brcmfcoe Drivers . . . . . . . . . . . . . . . . . . . . . . . . . . . . . . . . . . . . . . . . . . . . . . . . . . . . . . . . . . . . . . . . . . . . . . . . . . . . . . . . . 504.3.2 Installing a pre-11.2 Version of OneCommand Manager . . . . . . . . . . . . . . . . . . . . . . . . . . . . . . . . . . . . . . . . . . . . . . . . . . . . . . . . . . . . . . . . . . . . . . 504.4 VMware . . . . . . . . . . . . . . . . . . . . . . . . . . . . . . . . . . . . . . . . . . . . . . . . . . . . . . . . . . . . . . . . . . . . . . . . . . . . . . . . . . . . . . . . . . . . . . . . . . . . . . . . . . . . . . . . . . . . . . . . . . . 514.4.1 VMware Inbox Driver Installation over 11.2 Drivers . . . . . . . . . . . . . . . . . . . . . . . . . . . . . . . . . . . . . . . . . . . . . . . . . . . . . . . . . . . . . . . . . . . . . . . . . . . 514.5 Solaris . . . . . . . . . . . . . . . . . . . . . . . . . . . . . . . . . . . . . . . . . . . . . . . . . . . . . . . . . . . . . . . . . . . . . . . . . . . . . . . . . . . . . . . . . . . . . . . . . . . . . . . . . . . . . . . . . . . . . . . . . . . . . 524.5.1 Running the Install Script of a pre-11.2 Kit Does Not Uninstall the Broadcom OneCommand CNA Manager . . . . . . . . . . . . . . . . . . . . . 524.6 Dell Applications Downgrade . . . . . . . . . . . . . . . . . . . . . . . . . . . . . . . . . . . . . . . . . . . . . . . . . . . . . . . . . . . . . . . . . . . . . . . . . . . . . . . . . . . . . . . . . . . . . . . . . . . . . . 52 Appendix A: Driver Names . . . . . . . . . . . . . . . . . . . . . . . . . . . . . . . . . . . . . . . . . . . . . . . . . . . . . . . . . . . . . . . . . . . . . . . . . . . . . . . . . . . . . . . . . . . . . . . . . . . . . 54Appendix B: Quick Lookup Guide . . . . . . . . . . . . . . . . . . . . . . . . . . . . . . . . . . . . . . . . . . . . . . . . . . . . . . . . . . . . . . . . . . . . . . . . . . . . . . . . . . . . . . . . . . . . . . . 55B.1 Quick Lookup Guide, LightPulse and OneConnect . . . . . . . . . . . . . . . . . . . . . . . . . . . . . . . . . . . . . . . . . . . . . . . . . . . . . . . . . . . . . . . . . . . . . . . . . . . . . . . . . . 55B.1.1 LightPulse Adapters and Kits . . . . . . . . . . . . . . . . . . . . . . . . . . . . . . . . . . . . . . . . . . . . . . . . . . . . . . . . . . . . . . . . . . . . . . . . . . . . . . . . . . . . . . . . . . . . . . . . 56C.1 Linux . . . . . . . . . . . . . . . . . . . . . . . . . . . . . . . . . . . . . . . . . . . . . . . . . . . . . . . . . . . . . . . . . . . . . . . . . . . . . . . . . . . . . . . . . . . . . . . . . . . . . . . . . . . . . . . . . . . . . . . . . . . . . . 68C.2 VMware . . . . . . . . . . . . . . . . . . . . . . . . . . . . . . . . . . . . . . . . . . . . . . . . . . . . . . . . . . . . . . . . . . . . . . . . . . . . . . . . . . . . . . . . . . . . . . . . . . . . . . . . . . . . . . . . . . . . . . . . . . . 68 Emulex OneCommand Manager Application for LightPulse Adapters User Guide . . . . . . . . . . . . . . . . . . . . . . . . . . . 73Chapter 1: Introduction . . . . . . . . . . . . . . . . . . . . . . . . . . . . . . . . . . . . . . . . . . . . . . . . . . . . . . . . . . . . . . . . . . . . . . . . . . . . . . . . . . . . . . . . . . . . . . . . . . . . . . . . 751.1 Abbreviations . . . . . . . . . . . . . . . . . . . . . . . . . . . . . . . . . . . . . . . . . . . . . . . . . . . . . . . . . . . . . . . . . . . . . . . . . . . . . . . . . . . . . . . . . . . . . . . . . . . . . . . . . . . . . . . . . . . . . 75 Chapter 2: Installing and Uninstalling OneCommand Manager Application Components . . . . . . . . . . . . . . . . . . . . . . . . . . . . . . . . . . . . . . . . . . . 782.1 Installing the OneCommand Manager Application . . . . . . . . . . . . . . . . . . . . . . . . . . . . . . . . . . . . . . . . . . . . . . . . . . . . . . . . . . . . . . . . . . . . . . . . . . . . . . . . . . 782.1.1 In Windows . . . . . . . . . . . . . . . . . . . . . . . . . . . . . . . . . . . . . . . . . . . . . . . . . . . . . . . . . . . . . . . . . . . . . . . . . . . . . . . . . . . . . . . . . . . . . . . . . . . . . . . . . . . . . . . . . 782.1.2 In Linux . . . . . . . . . . . . . . . . . . . . . . . . . . . . . . . . . . . . . . . . . . . . . . . . . . . . . . . . . . . . . . . . . . . . . . . . . . . . . . . . . . . . . . . . . . . . . . . . . . . . . . . . . . . . . . . . . . . . . 802.1.3 In Solaris . . . . . . . . . . . . . . . . . . . . . . . . . . . . . . . . . . . . . . . . . . . . . . . . . . . . . . . . . . . . . . . . . . . . . . . . . . . . . . . . . . . . . . . . . . . . . . . . . . . . . . . . . . . . . . . . . . . . 822.1.4 In VMware . . . . . . . . . . . . . . . . . . . . . . . . . . . . . . . . . . . . . . . . . . . . . . . . . . . . . . . . . . . . . . . . . . . . . . . . . . . . . . . . . . . . . . . . . . . . . . . . . . . . . . . . . . . . . . . . . . 842.2 Uninstalling the OneCommand Manager Application . . . . . . . . . . . . . . . . . . . . . . . . . . . . . . . . . . . . . . . . . . . . . . . . . . . . . . . . . . . . . . . . . . . . . . . . . . . . . . . 84 Chapter 3: Starting and Stopping the OneCommand Manager Application . . . . . . . . . . . . . . . . . . . . . . . . . . . . . . . . . . . . . . . . . . . . . . . . . . . . . . . . 853.1 In Windows . . . . . . . . . . . . . . . . . . . . . . . . . . . . . . . . . . . . . . . . . . . . . . . . . . . . . . . . . . . . . . . . . . . . . . . . . . . . . . . . . . . . . . . . . . . . . . . . . . . . . . . . . . . . . . . . . . . . . . . . 853.2 In Linux and Solaris . . . . . . . . . . . . . . . . . . . . . . . . . . . . . . . . . . . . . . . . . . . . . . . . . . . . . . . . . . . . . . . . . . . . . . . . . . . . . . . . . . . . . . . . . . . . . . . . . . . . . . . . . . . . . . . . 85 Chapter 4: Using the OneCommand Manager Application . . . . . . . . . . . . . . . . . . . . . . . . . . . . . . . . . . . . . . . . . . . . . . . . . . . . . . . . . . . . . . . . . . . . . . . . 874.1 The OneCommand Manager Application Window Element Definitions . . . . . . . . . . . . . . . . . . . . . . . . . . . . . . . . . . . . . . . . . . . . . . . . . . . . . . . . . . . . . . 874.1.1 Menu Bar . . . . . . . . . . . . . . . . . . . . . . . . . . . . . . . . . . . . . . . . . . . . . . . . . . . . . . . . . . . . . . . . . . . . . . . . . . . . . . . . . . . . . . . . . . . . . . . . . . . . . . . . . . . . . . . . . . . 884.1.2 Toolbar . . . . . . . . . . . . . . . . . . . . . . . . . . . . . . . . . . . . . . . . . . . . . . . . . . . . . . . . . . . . . . . . . . . . . . . . . . . . . . . . . . . . . . . . . . . . . . . . . . . . . . . . . . . . . . . . . . . . . 884.1.3 Discovery-Tree . . . . . . . . . . . . . . . . . . . . . . . . . . . . . . . . . . . . . . . . . . . . . . . . . . . . . . . . . . . . . . . . . . . . . . . . . . . . . . . . . . . . . . . . . . . . . . . . . . . . . . . . . . . . . . 894.1.4 Property Tabs . . . . . . . . . . . . . . . . . . . . . . . . . . . . . . . . . . . . . . . . . . . . . . . . . . . . . . . . . . . . . . . . . . . . . . . . . . . . . . . . . . . . . . . . . . . . . . . . . . . . . . . . . . . . . . . 914.1.5 Status Bar . . . . . . . . . . . . . . . . . . . . . . . . . . . . . . . . . . . . . . . . . . . . . . . . . . . . . . . . . . . . . . . . . . . . . . . . . . . . . . . . . . . . . . . . . . . . . . . . . . . . . . . . . . . . . . . . . . . 914.2 Using OneCommand Manager Secure Management . . . . . . . . . . . . . . . . . . . . . . . . . . . . . . . . . . . . . . . . . . . . . . . . . . . . . . . . . . . . . . . . . . . . . . . . . . . . . . . . 924.2.1 OneCommand Manager Secure Management Configuration Requirements . . . . . . . . . . . . . . . . . . . . . . . . . . . . . . . . . . . . . . . . . . . . . . . . . . . 934.3 Changing Management and Read-Only Mode . . . . . . . . . . . . . . . . . . . . . . . . . . . . . . . . . . . . . . . . . . . . . . . . . . . . . . . . . . . . . . . . . . . . . . . . . . . . . . . . . . . . . . 934.3.1 Management Host . . . . . . . . . . . . . . . . . . . . . . . . . . . . . . . . . . . . . . . . . . . . . . . . . . . . . . . . . . . . . . . . . . . . . . . . . . . . . . . . . . . . . . . . . . . . . . . . . . . . . . . . . . 944.4 Using CIM (Windows Only) . . . . . . . . . . . . . . . . . . . . . . . . . . . . . . . . . . . . . . . . . . . . . . . . . . . . . . . . . . . . . . . . . . . . . . . . . . . . . . . . . . . . . . . . . . . . . . . . . . . . . . . . . 95 Chapter 5: Configuring Discovery . . . . . . . . . . . . . . . . . . . . . . . . . . . . . . . . . . . . . . . . . . . . . . . . . . . . . . . . . . . . . . . . . . . . . . . . . . . . . . . . . . . . . . . . . . . . . . 965.1 Discovery Using the TCP/IP Access Protocol . . . . . . . . . . . . . . . . . . . . . . . . . . . . . . . . . . . . . . . . . . . . . . . . . . . . . . . . . . . . . . . . . . . . . . . . . . . . . . . . . . . . . . . . 965.1.1 Hosts File . . . . . . . . . . . . . . . . . . . . . . . . . . . . . . . . . . . . . . . . . . . . . . . . . . . . . . . . . . . . . . . . . . . . . . . . . . . . . . . . . . . . . . . . . . . . . . . . . . . . . . . . . . . . . . . . . . . 975.1.2 Adding a Single Host . . . . . . . . . . . . . . . . . . . . . . . . . . . . . . . . . . . . . . . . . . . . . . . . . . . . . . . . . . . . . . . . . . . . . . . . . . . . . . . . . . . . . . . . . . . . . . . . . . . . . . . . 985.1.3 Adding a Range of Hosts (IPv4 Only) . . . . . . . . . . . . . . . . . . . . . . . . . . . . . . . . . . . . . . . . . . . . . . . . . . . . . . . . . . . . . . . . . . . . . . . . . . . . . . . . . . . . . . . . . 995.1.4 Removing Hosts . . . . . . . . . . . . . . . . . . . . . . . . . . . . . . . . . . . . . . . . . . . . . . . . . . . . . . . . . . . . . . . . . . . . . . . . . . . . . . . . . . . . . . . . . . . . . . . . . . . . . . . . . . . . 1005.2 Configuring Discovery and Default CIM Credentials . . . . . . . . . . . . . . . . . . . . . . . . . . . . . . . . . . . . . . . . . . . . . . . . . . . . . . . . . . . . . . . . . . . . . . . . . . . . . . . . 1015.3 Viewing Discovery Information . . . . . . . . . . . . . . . . . . . . . . . . . . . . . . . . . . . . . . . . . . . . . . . . . . . . . . . . . . . . . . . . . . . . . . . . . . . . . . . . . . . . . . . . . . . . . . . . . . . . 102 Chapter 6: Managing Hosts . . . . . . . . . . . . . . . . . . . . . . . . . . . . . . . . . . . . . . . . . . . . . . . . . . . . . . . . . . . . . . . . . . . . . . . . . . . . . . . . . . . . . . . . . . . . . . . . . . . 1046.1 Viewing Host Information . . . . . . . . . . . . . . . . . . . . . . . . . . . . . . . . . . . . . . . . . . . . . . . . . . . . . . . . . . . . . . . . . . . . . . . . . . . . . . . . . . . . . . . . . . . . . . . . . . . . . . . . . 1046.1.1 Function Summary Area . . . . . . . . . . . . . . . . . . . . . . . . . . . . . . . . . . . . . . . . . . . . . . . . . . . . . . . . . . . . . . . . . . . . . . . . . . . . . . . . . . . . . . . . . . . . . . . . . . . . 1056.2 Viewing Host Grouping Information . . . . . . . . . . . . . . . . . . . . . . . . . . . . . . . . . . . . . . . . . . . . . . . . . . . . . . . . . . . . . . . . . . . . . . . . . . . . . . . . . . . . . . . . . . . . . . . 1056.3 Grouping Hosts . . . . . . . . . . . . . . . . . . . . . . . . . . . . . . . . . . . . . . . . . . . . . . . . . . . . . . . . . . . . . . . . . . . . . . . . . . . . . . . . . . . . . . . . . . . . . . . . . . . . . . . . . . . . . . . . . . . 1066.3.1 Managing Host Groups . . . . . . . . . . . . . . . . . . . . . . . . . . . . . . . . . . . . . . . . . . . . . . . . . . . . . . . . . . . . . . . . . . . . . . . . . . . . . . . . . . . . . . . . . . . . . . . . . . . . . 1076.3.2 Creating a Host Group . . . . . . . . . . . . . . . . . . . . . . . . . . . . . . . . . . . . . . . . . . . . . . . . . . . . . . . . . . . . . . . . . . . . . . . . . . . . . . . . . . . . . . . . . . . . . . . . . . . . . . 1086.3.3 Deleting a Host Group . . . . . . . . . . . . . . . . . . . . . . . . . . . . . . . . . . . . . . . . . . . . . . . . . . . . . . . . . . . . . . . . . . . . . . . . . . . . . . . . . . . . . . . . . . . . . . . . . . . . . . 1086.3.4 Adding a Host to a Host Group . . . . . . . . . . . . . . . . . . . . . . . . . . . . . . . . . . . . . . . . . . . . . . . . . . . . . . . . . . . . . . . . . . . . . . . . . . . . . . . . . . . . . . . . . . . . . 1096.3.5 Removing a Host from a Host Group . . . . . . . . . . . . . . . . . . . . . . . . . . . . . . . . . . . . . . . . . . . . . . . . . . . . . . . . . . . . . . . . . . . . . . . . . . . . . . . . . . . . . . . . 1096.3.6 Restoring a Host Group . . . . . . . . . . . . . . . . . . . . . . . . . . . . . . . . . . . . . . . . . . . . . . . . . . . . . . . . . . . . . . . . . . . . . . . . . . . . . . . . . . . . . . . . . . . . . . . . . . . . . 1096.3.7 Restoring All Host Groups . . . . . . . . . . . . . . . . . . . . . . . . . . . . . . . . . . . . . . . . . . . . . . . . . . . . . . . . . . . . . . . . . . . . . . . . . . . . . . . . . . . . . . . . . . . . . . . . . . 1096.3.8 Exporting Host Grouping Configurations . . . . . . . . . . . . . . . . . . . . . . . . . . . . . . . . . . . . . . . . . . . . . . . . . . . . . . . . . . . . . . . . . . . . . . . . . . . . . . . . . . . . 1096.4 Searching for Hosts in the Discovery-Tree . . . . . . . . . . . . . . . . . . . . . . . . . . . . . . . . . . . . . . . . . . . . . . . . . . . . . . . . . . . . . . . . . . . . . . . . . . . . . . . . . . . . . . . . . 1107.1 FC Adapters . . . . . . . . . . . . . . . . . . . . . . . . . . . . . . . . . . . . . . . . . . . . . . . . . . . . . . . . . . . . . . . . . . . . . . . . . . . . . . . . . . . . . . . . . . . . . . . . . . . . . . . . . . . . . . . . . . . . . . 1117.1.1 Viewing FC Adapter Information . . . . . . . . . . . . . . . . . . . . . . . . . . . . . . . . . . . . . . . . . . . . . . . . . . . . . . . . . . . . . . . . . . . . . . . . . . . . . . . . . . . . . . . . . . . . 1117.1.2 Viewing FC Port Information . . . . . . . . . . . . . . . . . . . . . . . . . . . . . . . . . . . . . . . . . . . . . . . . . . . . . . . . . . . . . . . . . . . . . . . . . . . . . . . . . . . . . . . . . . . . . . . . 1127.1.3 Viewing FC Firmware Parameters . . . . . . . . . . . . . . . . . . . . . . . . . . . . . . . . . . . . . . . . . . . . . . . . . . . . . . . . . . . . . . . . . . . . . . . . . . . . . . . . . . . . . . . . . . . 1137.2 LPe16202/OCe15100 Adapters in NIC+FCoE Mode . . . . . . . . . . . . . . . . . . . . . . . . . . . . . . . . . . . . . . . . . . . . . . . . . . . . . . . . . . . . . . . . . . . . . . . . . . . . . . . . . 1167.2.1 Viewing LPe16202/OCe15100 Adapter Information . . . . . . . . . . . . . . . . . . . . . . . . . . . . . . . . . . . . . . . . . . . . . . . . . . . . . . . . . . . . . . . . . . . . . . . . . 1167.2.2 Viewing Firmware Information . . . . . . . . . . . . . . . . . . . . . . . . . . . . . . . . . . . . . . . . . . . . . . . . . . . . . . . . . . . . . . . . . . . . . . . . . . . . . . . . . . . . . . . . . . . . . 1187.2.3 Viewing Physical Port Information . . . . . . . . . . . . . . . . . . . . . . . . . . . . . . . . . . . . . . . . . . . . . . . . . . . . . . . . . . . . . . . . . . . . . . . . . . . . . . . . . . . . . . . . . . 1197.2.4 Viewing Transceiver Information . . . . . . . . . . . . . . . . . . . . . . . . . . . . . . . . . . . . . . . . . . . . . . . . . . . . . . . . . . . . . . . . . . . . . . . . . . . . . . . . . . . . . . . . . . . 121 Chapter 8: Managing Protocols . . . . . . . . . . . . . . . . . . . . . . . . . . . . . . . . . . . . . . . . . . . . . . . . . . . . . . . . . . . . . . . . . . . . . . . . . . . . . . . . . . . . . . . . . . . . . . . . 1238.1 FC and FCoE Functions . . . . . . . . . . . . . . . . . . . . . . . . . . . . . . . . . . . . . . . . . . . . . . . . . . . . . . . . . . . . . . . . . . . . . . . . . . . . . . . . . . . . . . . . . . . . . . . . . . . . . . . . . . . 1238.1.1 Viewing FCoE Function Information (LPe16202/OCe15100 Adapters) . . . . . . . . . . . . . . . . . . . . . . . . . . . . . . . . . . . . . . . . . . . . . . . . . . . . . . . . 1238.1.2 Viewing and Clearing FC and FCoE Statistics . . . . . . . . . . . . . . . . . . . . . . . . . . . . . . . . . . . . . . . . . . . . . . . . . . . . . . . . . . . . . . . . . . . . . . . . . . . . . . . . 1248.1.3 Viewing FC and FCoE Virtual Port Information . . . . . . . . . . . . . . . . . . . . . . . . . . . . . . . . . . . . . . . . . . . . . . . . . . . . . . . . . . . . . . . . . . . . . . . . . . . . . . . 1268.1.4 Creating and Deleting FC and FCoE Virtual Ports . . . . . . . . . . . . . . . . . . . . . . . . . . . . . . . . . . . . . . . . . . . . . . . . . . . . . . . . . . . . . . . . . . . . . . . . . . . . 1278.1.5 Viewing FC and FCoE Fabric Information . . . . . . . . . . . . . . . . . . . . . . . . . . . . . . . . . . . . . . . . . . . . . . . . . . . . . . . . . . . . . . . . . . . . . . . . . . . . . . . . . . . . 1318.1.6 Viewing FC Port Transceiver Information . . . . . . . . . . . . . . . . . . . . . . . . . . . . . . . . . . . . . . . . . . . . . . . . . . . . . . . . . . . . . . . . . . . . . . . . . . . . . . . . . . . . 1328.1.7 Viewing FC and FCoE VPD Information . . . . . . . . . . . . . . . . . . . . . . . . . . . . . . . . . . . . . . . . . . . . . . . . . . . . . . . . . . . . . . . . . . . . . . . . . . . . . . . . . . . . . . 1338.1.8 Viewing FC Maintenance Information . . . . . . . . . . . . . . . . . . . . . . . . . . . . . . . . . . . . . . . . . . . . . . . . . . . . . . . . . . . . . . . . . . . . . . . . . . . . . . . . . . . . . . . 1348.1.9 Viewing FCoE Maintenance Information . . . . . . . . . . . . . . . . . . . . . . . . . . . . . . . . . . . . . . . . . . . . . . . . . . . . . . . . . . . . . . . . . . . . . . . . . . . . . . . . . . . . 1368.1.10 Viewing FC or FCoE Target Information . . . . . . . . . . . . . . . . . . . . . . . . . . . . . . . . . . . . . . . . . . . . . . . . . . . . . . . . . . . . . . . . . . . . . . . . . . . . . . . . . . . . 1378.1.11 Viewing FC or FCoE LUN Information . . . . . . . . . . . . . . . . . . . . . . . . . . . . . . . . . . . . . . . . . . . . . . . . . . . . . . . . . . . . . . . . . . . . . . . . . . . . . . . . . . . . . . 1388.1.12 Viewing FC and FCoE Target Mapping . . . . . . . . . . . . . . . . . . . . . . . . . . . . . . . . . . . . . . . . . . . . . . . . . . . . . . . . . . . . . . . . . . . . . . . . . . . . . . . . . . . . . 1408.1.13 Using Automapping and Persistent Binding (Windows Only) . . . . . . . . . . . . . . . . . . . . . . . . . . . . . . . . . . . . . . . . . . . . . . . . . . . . . . . . . . . . . . . 1428.1.14 Masking and Unmasking LUNs (Windows) . . . . . . . . . . . . . . . . . . . . . . . . . . . . . . . . . . . . . . . . . . . . . . . . . . . . . . . . . . . . . . . . . . . . . . . . . . . . . . . . . 1458.1.15 Managing ExpressLane LUNs . . . . . . . . . . . . . . . . . . . . . . . . . . . . . . . . . . . . . . . . . . . . . . . . . . . . . . . . . . . . . . . . . . . . . . . . . . . . . . . . . . . . . . . . . . . . . . 1468.1.16 Changing the FC and FCoE WWPN and WWNN . . . . . . . . . . . . . . . . . . . . . . . . . . . . . . . . . . . . . . . . . . . . . . . . . . . . . . . . . . . . . . . . . . . . . . . . . . . . . 1498.1.17 Changing the FC and FCoE Port Names . . . . . . . . . . . . . . . . . . . . . . . . . . . . . . . . . . . . . . . . . . . . . . . . . . . . . . . . . . . . . . . . . . . . . . . . . . . . . . . . . . . . 1528.1.18 Resetting the FC and FCoE Functions . . . . . . . . . . . . . . . . . . . . . . . . . . . . . . . . . . . . . . . . . . . . . . . . . . . . . . . . . . . . . . . . . . . . . . . . . . . . . . . . . . . . . . 1528.1.19 Configuring the FC and FCoE Driver Parameters . . . . . . . . . . . . . . . . . . . . . . . . . . . . . . . . . . . . . . . . . . . . . . . . . . . . . . . . . . . . . . . . . . . . . . . . . . . . 1538.1.20 Creating a Batch Mode Driver Parameters File . . . . . . . . . . . . . . . . . . . . . . . . . . . . . . . . . . . . . . . . . . . . . . . . . . . . . . . . . . . . . . . . . . . . . . . . . . . . . . 1598.1.21 Configuring FIP . . . . . . . . . . . . . . . . . . . . . . . . . . . . . . . . . . . . . . . . . . . . . . . . . . . . . . . . . . . . . . . . . . . . . . . . . . . . . . . . . . . . . . . . . . . . . . . . . . . . . . . . . . . 1618.1.22 Configuring Boot from an FC or FCoE SAN . . . . . . . . . . . . . . . . . . . . . . . . . . . . . . . . . . . . . . . . . . . . . . . . . . . . . . . . . . . . . . . . . . . . . . . . . . . . . . . . . 1628.1.23 Configuring Advanced Settings (Boot from SAN) . . . . . . . . . . . . . . . . . . . . . . . . . . . . . . . . . . . . . . . . . . . . . . . . . . . . . . . . . . . . . . . . . . . . . . . . . . . 1668.1.24 Using FC-SP DHCHAP Authentication (Windows and Solaris) . . . . . . . . . . . . . . . . . . . . . . . . . . . . . . . . . . . . . . . . . . . . . . . . . . . . . . . . . . . . . . . 1698.2 NIC Functions . . . . . . . . . . . . . . . . . . . . . . . . . . . . . . . . . . . . . . . . . . . . . . . . . . . . . . . . . . . . . . . . . . . . . . . . . . . . . . . . . . . . . . . . . . . . . . . . . . . . . . . . . . . . . . . . . . . . 1728.2.1 Viewing NIC Function Information . . . . . . . . . . . . . . . . . . . . . . . . . . . . . . . . . . . . . . . . . . . . . . . . . . . . . . . . . . . . . . . . . . . . . . . . . . . . . . . . . . . . . . . . . . 1738.2.2 Viewing NIC VPD Information . . . . . . . . . . . . . . . . . . . . . . . . . . . . . . . . . . . . . . . . . . . . . . . . . . . . . . . . . . . . . . . . . . . . . . . . . . . . . . . . . . . . . . . . . . . . . . . 1748.2.3 Guest Operating System Discovery and Management from the Base Host Operating System . . . . . . . . . . . . . . . . . . . . . . . . . . . . . . . . . 1768.2.4 Viewing NIC PCI Registers . . . . . . . . . . . . . . . . . . . . . . . . . . . . . . . . . . . . . . . . . . . . . . . . . . . . . . . . . . . . . . . . . . . . . . . . . . . . . . . . . . . . . . . . . . . . . . . . . . 178 Chapter 9: Updating Adapter Firmware . . . . . . . . . . . . . . . . . . . . . . . . . . . . . . . . . . . . . . . . . . . . . . . . . . . . . . . . . . . . . . . . . . . . . . . . . . . . . . . . . . . . . . . . 1799.1 Updating Firmware for a Single Adapter . . . . . . . . . . . . . . . . . . . . . . . . . . . . . . . . . . . . . . . . . . . . . . . . . . . . . . . . . . . . . . . . . . . . . . . . . . . . . . . . . . . . . . . . . . . 1799.2 Updating Firmware for Multiple Adapters . . . . . . . . . . . . . . . . . . . . . . . . . . . . . . . . . . . . . . . . . . . . . . . . . . . . . . . . . . . . . . . . . . . . . . . . . . . . . . . . . . . . . . . . . 180 Chapter 10: DCB Configuration . . . . . . . . . . . . . . . . . . . . . . . . . . . . . . . . . . . . . . . . . . . . . . . . . . . . . . . . . . . . . . . . . . . . . . . . . . . . . . . . . . . . . . . . . . . . . . . . 183Chapter 11: Exporting SAN Information . . . . . . . . . . . . . . . . . . . . . . . . . . . . . . . . . . . . . . . . . . . . . . . . . . . . . . . . . . . . . . . . . . . . . . . . . . . . . . . . . . . . . . . . 18711.1 Creating a SAN Report . . . . . . . . . . . . . . . . . . . . . . . . . . . . . . . . . . . . . . . . . . . . . . . . . . . . . . . . . . . . . . . . . . . . . . . . . . . . . . . . . . . . . . . . . . . . . . . . . . . . . . . . . . . 187 Chapter 12: Diagnostics . . . . . . . . . . . . . . . . . . . . . . . . . . . . . . . . . . . . . . . . . . . . . . . . . . . . . . . . . . . . . . . . . . . . . . . . . . . . . . . . . . . . . . . . . . . . . . . . . . . . . . . 18812.1 FC Diagnostics . . . . . . . . . . . . . . . . . . . . . . . . . . . . . . . . . . . . . . . . . . . . . . . . . . . . . . . . . . . . . . . . . . . . . . . . . . . . . . . . . . . . . . . . . . . . . . . . . . . . . . . . . . . . . . . . . . 18812.1.1 Viewing Flash Contents, PCI Registers, and Wakeup Information . . . . . . . . . . . . . . . . . . . . . . . . . . . . . . . . . . . . . . . . . . . . . . . . . . . . . . . . . . . . 18812.1.2 Running a Quick Test . . . . . . . . . . . . . . . . . . . . . . . . . . . . . . . . . . . . . . . . . . . . . . . . . . . . . . . . . . . . . . . . . . . . . . . . . . . . . . . . . . . . . . . . . . . . . . . . . . . . . . 19012.1.3 Running a POST . . . . . . . . . . . . . . . . . . . . . . . . . . . . . . . . . . . . . . . . . . . . . . . . . . . . . . . . . . . . . . . . . . . . . . . . . . . . . . . . . . . . . . . . . . . . . . . . . . . . . . . . . . . 19012.1.4 Using Beaconing . . . . . . . . . . . . . . . . . . . . . . . . . . . . . . . . . . . . . . . . . . . . . . . . . . . . . . . . . . . . . . . . . . . . . . . . . . . . . . . . . . . . . . . . . . . . . . . . . . . . . . . . . . 190。
北京海视科技有限公司 VGA Extender 600M 使用手册说明书

电脑主机音频视频接口延长控制器 ------------使用手册北京海视科技有限公司声 明本手册依据现有信息制作,其内容如有更改,恕不另行通知。
北京海视科技有限公司在编写该手册的时候已尽最大努力保证其内容准确可靠,本手册仅作为使用指导,本手册中的所有陈述、信息和建议不构成任何明示或暗示的担保。
北京海视科技有限公司地址:北京市海淀区复兴路40号铁建大院3号楼客户服务邮箱:E-Mail:****************感谢您购买了本公司的产品,始终以质量和服务拓展市场,以忠诚守信和客户合作,您的满意就是我们公司的成功。
为了方便,正确地使用本产品,在使用前请仔细阅读说明书。
产品介绍本产品由发送器(标有VGA Extender Sender字样)和接收器(标有VGA Extender Receiver字样)组成,能通过单根网线把计算机主机的音频和视频接口延长最远达600米,用户可以在600米的远端实时接收到电脑主机的图像和声音。
同时在电脑主机的近端,也提供了一个VGA接口,用户也可以在近端使用计算机。
防雷功能:本产品已集成防雷抗干扰电路,可有效防御雷电侵袭。
本产品可以广泛应用于计算机领域和监控领域,大屏幕广告,教育,银行证劵系统等产品规格尺寸110mm(长)X 70mm(宽)X 25mm(高)重量 1.0Kg延长距离VGA-100 1 -100MVGA -200 100 -200MVGA -300 200 -300M网线规格CAT5,CAT5E,CAT6 UTP电缆,一般建议用CAT5E UTP电缆视频规格VGA, SVGA, XGA, SXGA, UXGA, LCD视频标准0.7Vpp音频规格R CA接口类型HDB15, RJ45系统支持与电脑操作系统无关发送器电源AC7.5V 1A接受器电源AC7.5V 1A防雷电指标接触放电8KV,空气放电15KV包装说明在您打开产品包装后,应该清点物品,如有遗失请与经销商联系,物品清单如下:1,发送器一个(标有VGA Extender Sender字样)2,接收器一个(标有VGA Extender Receiver字样)3,AC7.5V 1A电源适配器二个4,使用说明书一本5,质量保修卡一个,附在使用说明书上安装调试安装示意图安装步骤在安装调试前请准备好电脑主机,VGA显示器和所需长度的网线,网线应该压好RJ45头,网线两边的水晶头压线的排列方法一样,第一脚为橙白,压线的顺序为:橙白,橙,绿白,蓝,蓝白,绿,棕白,棕。
120米高清HDMI KVM延长器
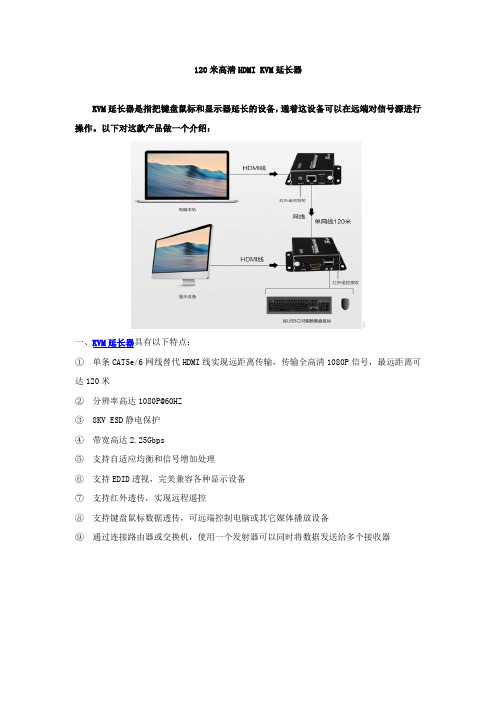
120米高清HDMI KVM延长器KVM延长器是指把键盘鼠标和显示器延长的设备,通着这设备可以在远端对信号源进行操作。
以下对这款产品做一个介绍:一、KVM延长器具有以下特点:①单条CAT5e/6网线替代HDMI线实现远距离传输,传输全高清1080P信号,最远距离可达120米②分辨率高达1080P@60HZ③8KV ESD静电保护④带宽高达2.25Gbps⑤支持自适应均衡和信号增加处理⑥支持EDID透视,完美兼容各种显示设备⑦支持红外透传,实现远程遥控⑧支持键盘鼠标数据透传,可远端控制电脑或其它媒体播放设备⑨通过连接路由器或交换机,使用一个发射器可以同时将数据发送给多个接收器二:延长器连接方式有:第一种接法1.把输入源跟KVM延长器发射端用HDMI线缆连接起来,把IR OUT插在发射端IR IN,把USB 打印线与产品发射端USB连接起来2.发射与接收通过网线连接3.把输出源与KVM延长器接收端用HDMI连接起来,把IR IN插在接收端 IR OUT,USB输出端接键盘鼠标4.最后把发射接收的电源接好第二种接法1.把输入源跟KVM延长器发射端用HDMI线缆连接起来,把IR OUT插在发射端IR IN,把USB 打印线与产品发射端USB连接起来2.用网线把发射端与交换机跟路由器连接起来,接收端与交换机的输出接口连接3.把输出源与KVM延长器接收端用HDMI连接起来,把IR IN插在接收端 IR OUT,USB输出端接键盘鼠标4.最后把发射接收的电源接好三、注意事项:1、这里所说的网线,最低要求达到5类网,是否屏蔽网,根据实际环境是否有干扰来决定。
2、单根网线不能超过120米,需要达到更远,则需要增加路由器或者交换机达到200米、300米,甚至更远。
3、接收端的USB口只能接键盘鼠标,不能接其他的USB设备,比如U盘、打印机等迈拓维矩规模化高端kvm切换器制造商,品质卓越,畅销14年!迈拓维矩主营:lcdkvm 切换器、矩阵切换器、音视频转换器、音视频切换器、音视频延长器等。
迈拓维矩KVM延长器的概述

迈拓维矩KVM延长器的概述
KVM是键盘(Keyboard)、显示设备(Video)、鼠标(Mouse)的简称。
迈拓维矩(MT-VIKI)KVM延长器是将键盘、显示、鼠标乃至音频信号采用特殊技术处理后,通过一根网线实现几种信号的远程传输,并且用户可以在远端进行实时控制操作计算机的一种KVM设备。
迈拓维矩KVM延长器以其计算机信号延长功能来实现人机分离的安全管理模式。
企业在使用迈拓维矩KVM延长器时,应将应用桌面远程接入到一个数据服务中心,把服务器主机放置在一个安全集中的地方,这样不仅方便对数据中心服务器的维护,还加强了数据的安全,并能减少噪音和发热等。
迈拓维矩KVM延长器以广泛应用于数据服务中心,工业控制,矿井油田,视频教育,银
行电讯数据终端,多媒体广播等众多领域当中。
迈拓维矩身为规模化高端KVM切换器的生产制造商,专业提供32路VGA矩阵切换器(MT-VT3232),36进36出混合矩阵(MT-HC3636),16进16出hdmi矩阵切换器(MT-HD1616)等一系列产品。
Invitrogen EnterokinaseMax 用户手册说明书

EnterokinaseMax™ (EKMax™)iiTable of ContentsTable of Contents (iii)Important Information (iv)Methods (1)Overview (1)EKMax™ Digestion (2)Appendix (6)Recipes (6)Technical Service (7)References (8)iiiImportant InformationShipping/Storage EnterokinaseMax™ and the 10X EKMax™ reaction buffer are shipped on blue iceand should be stored at -20°C.Contents EKMax™ in 50 mM potassium phosphate, pH 8.0, 500 mM NaCl and 50%glycerol, is supplied as follows:Catalog no. E180-01:Item AmountVolume EKMax™250 units, 1 unit/µl 250µl10X EKMax™ Reaction Buffer 500 mM Tris-HCl, pH 8.0 (22°C), 10 mM CaCl2, 1% Tween-20 1.5 mlCatalog no. E180-02:Item AmountVolume EKMax™1000 units, 1 unit/µl 1.0 ml10X EKMax™ Reaction Buffer 500 mM Tris-HCl, pH 8.0 (22°C), 10 mM CaCl2, 1% Tween-20 3 x 1.5 mlAdditional Materials Needed You will need to have the following materials:• 37°C water bath or heat block• Deionized water• 1.5 ml microcentrifuge tubes• SDS-PAGE apparatus and buffers (see page 4 for guidelines) • EK-Away™ Resin and buffers (Invitrogen, Catalog no. R180-01) • 15 ml polypropylene tubes (optional)• Chromatography columns (optional, Catalog no. R640-50) • Rocker or rotatorUnit Definition 1 unit is defined as the amount of EKMax™ that will digest 20 µg of BioEase™Mog1 (multicopy suppressor of GSP1, 1)fusion protein to 90% completionin 20 minutes at 37°C in 50 mM Tris-HCl, pH 8.0, 1 mM CaCl2, and0.1% Tween-20 (1X EKMax™ Buffer).For comparison purposes, 1 Invitrogen unit of EKMax™ = ~190 trypsinogenactivation units. Use this conversion only as a rough estimate of how muchEKMax™ to use. It is important to empirically determine the optimal amount ofEKMax™ to digest your fusion protein (see page 2).Limited Label License No. 62: EKMax™Enterokinase This product is sold under patent license from Genetics Institute, Inc. for Research Use Only. Licenses for commercial manufacture or use may be obtained from Genetics Institute, Inc.ivMethodsOverviewIntroduction Enterokinase is a highly specific serine protease that can be used to digest fusion proteins to release the fusion partner or tag from the desired protein. Theenzyme recognizes the sequence -(Asp)4 Lys and cleaves after the lysine residue.This cleavage sequence is present in many expression vectors available fromInvitrogen (contact Technical Service for more information). Genes cloned intothe multiple cloning site of these vectors express recombinant N-terminal fusionproteins. The native proteins can be released from the N-terminal fusion peptideor protein by digesting with enterokinase.EnterokinaseMax™ (EKMax™) is a specially prepared recombinant enzyme,consisting of the catalytic subunit of the holoenzyme. This subunit is expressedand purified from the yeast, Pichia pastoris, yielding an enzyme with higherspecific activity. This results in more efficient cleavage using less enzyme.Description of Enterokinase Enterokinase (enteropeptidase EC 3.4.21.9) is the physiological activator of trypsinogen and a serine protease that exhibits specificity for the sequence (Asp)4 Lys (Anderson et al., 1977). The bovine holoenzyme is a heterodimer consisting of a 115 kDa structural subunit and a 35 kDa catalytic subunit. The larger subunit acts as a membrane anchor and positions the catalytic subunit on the luminal side of the brush border membrane. The catalytic subunit is homologous to other serine proteases and is inhibited by chemical modification of the serine and histidine active site residues (Grant and Hermon-Taylor, 1977; Light and Liepnieks, 1979; Maroux et al., 1971).Specificity of Enterokinase It has been proposed that the active center of enterokinase possesses a distinctive cationic subsite that binds -(Asp)4. Enterokinase is highly specific and tolerates very few changes to its recognition site. If the ionic charge of the recognition site is preserved, enterokinase will recognize the site, but the rate of hydrolysis of the peptide bond will be reduced (Light and Janska, 1989). The four aspartyl residues act as a signal for enterokinase cleavage. It has been reported that with only three aspartyl residues the rate of hydrolysis is reduced. Two aspartyl residues preceding the lysyl residue are the minimum number of acidic residues needed to maintain specificity (Maroux et al., 1971). Non-specific cleavage by enterokinase may occur in the cases described above, but this is usually alleviated by reducing the amount of enzyme used.Expression of the Recombinant Catalytic Subunit EKMax™ is a clone of the catalytic subunit of enterokinase (LaVallie et al., 1993) expressed in the yeast Pichia pastoris. EKMax™ is secreted into the medium, purified, and migrates at 43 kDa on an SDS-PAGE gel. The calculated molecular weight of the protein is 26.3 kDa, but it contains three sites for asparagine-linked glycosylation. The apparent molecular weight of 43 kDa is consistent with previous observations (LaVallie et al., 1993) and is assumed to be because ofN-linked glycosylation.1EKMax™ DigestionIntroduction You will need to have pure or partially pure fusion protein. This sectiondescribes how to digest the fusion protein with EKMax™ to cleave your proteinfrom the fusion partner. This requires setting up a series of pilot reactions todetermine empirically the best conditions for digestion. The efficiency ofcleavage of EKMax™ will differ with each fusion protein. Also, if you areaccustomed to using EK3 (Biozyme), it is still necessary to test differentconcentrations of EKMax™ to determine the right amount for complete digestion.The table below outlines the steps needed to digest your fusion protein andobtain pure protein.Stage Description1 Obtain purified fusion protein at a concentration of > 0.1 mg/ml2 Dialyze (if necessary) into 1X EKMax™ Buffer3 Set up pilot reactions using different amounts of EKMax™ and digestovernight4 Assay reactions on an SDS-PAGE gel and analyze5 Optimize digestion conditions by adjusting amount of enzyme or thetemperature as needed6 Scale-up digestions to produce more of your native protein7 Purify your native protein away from the fusion partner andEKMax™Additional Materials Needed You will need to have the following materials:• 37°C water bath or heat block• Deionized water• 1.5 ml microcentrifuge tubes• SDS-PAGE apparatus and buffers (see page 4 for guidelines) • EK-Away™ Resin and buffers (Invitrogen, Catalog no. R180-01) • 15 ml snap-cap polypropylene tubes (optional)•Chromatography columns (optional, Catalog no. R640-50)• Rocker or rotatorImportantWe have found that EKMax™ will digest fusion proteins bound to theirrespective affinity columns, releasing the desired protein and leaving the fusionpartner bound to the column. For methods to digest Xpress™ fusions bound toProBond™ and thioredoxin fusion proteins in situ on ThioBond™, contactTechnical Service (see page 7).continued on next page2Obtain Purified Fusion Protein Purify at least 120 µg of your fusion protein using your system of choice following the manufacturer's instructions.• To purify thioredoxin fusion proteins, refer to the ThioBond™ manual included with the ThioBond™ resin or contact Invitrogen for information. • To purify Xpress™ fusion proteins, refer to the ProBond™ Purification System manual or contact Invitrogen for informationNote: Both manuals may be downloaded from .EKMax™ will digest fusion proteins in crude cell lysates. Note however, that you will lose your fusion tag and will have to develop a separate protocol for purification of your protein.Dialysis of the Fusion Protein It may be necessary to dialyze your fusion protein against 1X EKMax™ buffer (see Recipes, page 6) before digesting it with EKMax™. EKMax™ is inhibited by high ionic strength. 250 mM NaCl reduces EKMax™ activity to 75% of normal and 2 M NaCl almost completely inhibits enzyme activity (Barratti et al., 1973). Also, EKMax™ is known to be inhibited by > 2 M urea, > 20 mMβ-mercaptoethanol (β-ME), >0.1% SDS, > 50 mM imidazole, and pH values below 6 and above 9.Use the table below to determine if you need to dialyze your fusion protein prior to digestion with EKMax™.If your purified protein ....Then ......contains > 2 M urea, > 250 mM NaCl,> 20 mM -ME, 0.1% SDS, or > 50 mMimidazoledialyze to remove the inhibitorsis in a buffer where the pH is lowerthan 6 or higher than 9dialyze to adjust the pH to between 6and 9.is free from inhibitors and the pH isbetween 6 and 9do not dialyze. Proceed straight toPreparation of Pilot Reactions, below.Recommendation If you are not sure whether you should dialyze your protein or not, dialyze asmall volume of your protein solution and test both dialyzed and undialyzedsamples in a pilot EKMax™ digestion.continued on next page3Preparation of Pilot Reactions You will need at least 120 µg of your fusion protein for the pilot reactions. The ratio of enzyme to fusion protein to achieve complete digestion may vary depending on the protein expressed. It is very important to use only the minimal amount of EKMax™ necessary to completely digest the fusion protein. Excess EKMax™ may cause non-specific cleavage of your fusion protein in some cases.1. To determine the optimal units of EKMax™ needed for complete digestion,use five different amounts of EKMax™ (4 units, 1 unit, 0.1 unit, 0.01 unit,and 0.001 unit). For 4 units of EKMax™, use 4 µl of undiluted EKMax™. Use 1X EKMax™ buffer to make serial 10-fold dilutions of the enzyme.2. Set up 6 reactions, including a reaction without EKMax™ to control forproteases in your protein solution:Fusion Protein 20 µg10X EKMax™ Buffer 3 µlEKMax™1-4 µlDeionized Water to 29 µl(use 30 µl for the no EKMax™ control)Final Volume 30 µl3. Mix well and incubate at 37°C overnight (~16 hours). If your protein isunstable and degrades at 37°C, try incubation at 22°C, 16°C, or +4°C. It is not necessary to increase the time of digestion to compensate for the decrease in temperature.4. Prepare and load 1-20 µl on an SDS-PAGE gel (see next section). For westernblotting, load ~1 µg of your fusion protein, and for Coomassie-stained gels, load ~10 µg.If you wish to digest your fusion protein in a crude lysate, be sure to dialyze toremove any inhibitors of EKMax™. Set up your pilot reactions as described aboveto determine the amount of EKMax™ needed to digest your fusion protein.SDS-PAGEAnalysisUse an SDS-PAGE gel that will allow you to differentiate between undigested anddigested fusion protein. The type of gel and concentration of acrylamide dependson the size of your fusion protein and the fusion partner. Some fusion partners willbe too small to resolve conveniently (i.e. the Xpress™ tag). You should be able todistinguish the removal of the fusion partner from your protein, either byCoomassie-staining or by using antibody detection methods. Choose the dilutionof EKMax™ that gives you complete digestion of your recombinant fusion protein.Recommendationfor ThioredoxinFusion ProteinsA Tricine gradient gel may be necessary to visualize the 14.6 kDa thioredoxinfusion partner (Schagger and von Jagow, 1987). Alternatively, a western blot usingthe Anti-Thio™ Antibody (Catalog no. R920-25) may be used to detect theaccumulation of the thioredoxin fusion partner and/or subsequent loss of signalfrom the native protein.continued on next page4Recommendation for Xpress™Fusion Proteins Since the Xpress™ peptide is less than 4 kDa, a shift in the size of your protein may be undetectable. A western blot using the Anti-Xpress™ Antibody (Catalog no.R910-25) or the Anti-Xpress™-HRP Antibody (Catalog no. R911-25) may be necessary to visualize the cleavage and removal of the Xpress™ fusion peptide from fusion proteins. Perform a western blot and look for the loss of the signal from your protein. The Xpress™ peptide is so small, it may not transfer well to nitrocellulose or nylon, making it difficult to detect.Optimizing EKMax™ Cleavage In some cases, increasing the calcium chloride concentration to 10 mM or the amount of Tween-20 to 1% in the digestion reaction increases the activity of EKMax™. There is a possibility that EKMax™ may recognize sites that are similar to its recognition site; however, the rate of hydrolysis will be reduced. This is usually alleviated by decreasing the amount of EKMax™.Scale-Up of EKMax™ Reaction After you have optimized the EKMax™ reaction, you may scale up your digestion reaction in a linear manner. You may need a concentrated solution of fusion protein in order to scale up your digestion. Use standard ultrafiltration methods to concentrate your protein solution.Removal of EKMax™After digestion, EKMax™ may be removed by affinity chromatography on soybean trypsin inhibitor (STI) resin. For easy removal of EKMax™, EK-Away™Resin (Catalog no. R180-01) is available from Invitrogen. EK-Away™ Resin consists of soybean trypsin inhibitor immobilized on 4% beaded agarose. For a protocol to use EK-Away™ Resin, refer to the EK-Away™ manual. The manual is available at or contacting Technical Service (see page 7).Removal of Fusion Partners Fusion partners may be removed by the same affinity resin as was used to purify the fusion protein. For protocols to remove the Xpress™ tag or the thioredoxin fusion partner after EKMax™ digestion, contact Technical Service (see page 7). For other fusion proteins, consult the manufacturer of your particular system.5Appendix Recipes10X EKMax™Reaction Buffer 500 mM Tris-HCl, pH 8.010 mM CaCl21% Tween-20 (v/v)1. For 1 liter, dissolve 60.5 g Tris base in 950 ml deionized water.2. Adjust pH to 8.0 with concentrated HCl.3. Add 1.47 g CaCl2-2H2O and 10 ml Tween-20 and mix.4. Adjust the volume to 1 liter. Store at room temperature.6Technical ServiceVisit the Invitrogen website at for:• Technical resources, including manuals, vector maps and sequences,application notes, MSDSs, FAQs, formulations, citations, handbooks, etc.• Complete technical service contact information• Access to the Invitrogen Online Catalog• Additional product information and special offersContact Us For more information or technical assistance, call, write, fax, or email. Additional international offices are listed on our website (). Corporate Headquarters:Invitrogen Corporation1600 Faraday AvenueCarlsbad, CA 92008 USATel:176****7200Tel(TollFree):180****6288Fax:176****6500E-mail: ***************************Japanese Headquarters:Invitrogen JapanLOOP-X Bldg. 6F3-9-15, KaiganMinato-ku, Tokyo 108-0022Tel: 81 3 5730 6509Fax: 81 3 5730 6519E-mail: *********************European Headquarters:Invitrogen LtdInchinnan Business Park3 Fountain DrivePaisley PA4 9RF, UKTel: +44 (0) 141 814 6100Tech Fax: +44 (0) 141 814 6117E-mail: ***********************MSDS MSDSs (Material Safety Data Sheets) are available on our website at/msds.Limited Warranty Invitrogen is committed to providing our customers with high-quality goods and services. Our goal is to ensure that every customer is 100% satisfied with ourproducts and our service. If you should have any questions or concerns about anInvitrogen product or service, contact our Technical Service Representatives.Invitrogen warrants that all of its products will perform according tospecifications stated on the certificate of analysis. The company will replace, freeof charge, any product that does not meet those specifications. This warrantylimits Invitrogen Corporation’s liability only to the cost of the product. Nowarranty is granted for products beyond their listed expiration date. No warrantyis applicable unless all product components are stored in accordance withinstructions. Invitrogen reserves the right to select the method(s) used to analyze aproduct unless Invitrogen agrees to a specified method in writing prior toacceptance of the order.Invitrogen makes every effort to ensure the accuracy of its publications, butrealizes that the occasional typographical or other error is inevitable. ThereforeInvitrogen makes no warranty of any kind regarding the contents of anypublications or documentation. If you discover an error in any of our publications,please report it to our Technical Service Representatives.Invitrogen assumes no responsibility or liability for any special, incidental,indirect or consequential loss or damage whatsoever. The above limitedwarranty is sole and exclusive. No other warranty is made, whether expressedor implied, including any warranty of merchantability or fitness for a particularpurpose.continued on next pageReferencesAnderson, L. E., Walsh, K. A., and Neurath, H. (1977). Bovine Enterokinase. Purification, Specificity, and Some Molecular Properties. Biochemistry 16, 3354-3360.Barratti, J., Maroux, S., and Louvard, D. (1973). Effect of Ionic Strength and Calcium Ions on the Activation of Trypsinogen by Enterokinase. A Modified Test for the Quantitative Evaluation of the Enzyme. Biochem. Biophys. ACTA 321, 632-638.Grant, D. A. W., and Hermon-Taylor, J. (1977). Hydrolysis of Artificial Substrates by Enterokinase and Trypsin and the Development of a Sensitive Specific Assay for Enterokinase in Serum. Biochem J. 155, 243-254.LaVallie, E. R., Rehemtulla, A., Racie, L. A., Diblasio, E. A., Ferenz, C., Grant, K. L., Light, A., and McCoy, J. M. (1993). Cloning and Functional Expression of a cDNA Encoding the Catalytic Subunit of Bovine Enterokinase. J. Biol. Chem. 268, 23311-23317.Light, A., and Janska, H. (1989). Enterokinase (enteropeptidase): Comparative Aspects. TIBS 14, 110-112. Light, A., and Liepnieks, J. J. (1979). The Preparation and Purification of Bovine Enterokinase. J. Biol.Chem. 254, 1677-1683.Maroux, S., Baratti, J., and Desnuelle, P. (1971). Purification and Specificity of Porcine Enterokinase. J.Biol. Chem. 246, 5031-5039.Schagger, H., and von Jagow, G. (1987). Tricine-Sodium dodecyl sulfate-Polyacrylamide Gel Electrophoresis for the Separation of Proteins in the Range from 1 to 100 kDa. Anal. Biochem. 166, 368-379.©1998-2006 Invitrogen Corporation. All rights reserved.For research use only. Not intended for any animal or human therapeutic or diagnostic use.。
迷你型KM双绞线延长器PS2接口 0-400米KM中长距离迷你型延长器
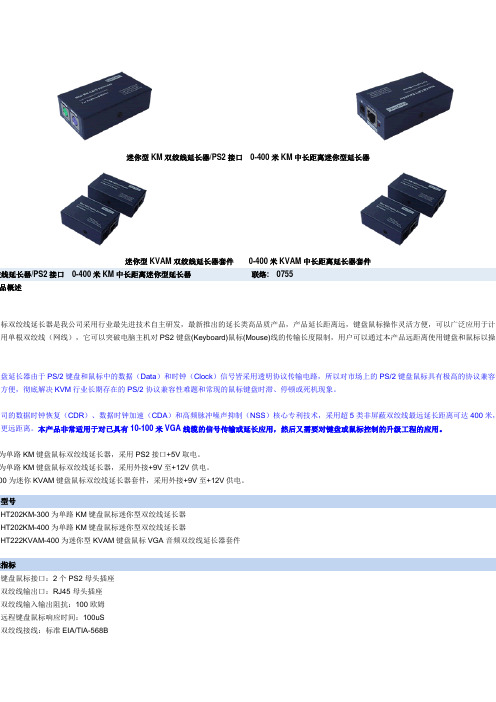
迷你型KM双绞线延长器/PS2接口0-400米KM中长距离迷你型延长器迷你型KVAM双绞线延长器套件0-400米KVAM中长距离延长器套件绞线延长器/PS2接口0-400米KM中长距离迷你型延长器联络:0755品概述鼠标双绞线延长器是我公司采用行业最先进技术自主研发,最新推出的延长类高品质产品,产品延长距离远,键盘鼠标操作灵活方便,可以广泛应用于计算利用单根双绞线(网线),它可以突破电脑主机对PS2键盘(Keyboard)鼠标(Mouse)线的传输长度限制,用户可以通过本产品远距离使用键盘和鼠标以操作键盘延长器由于PS/2键盘和鼠标中的数据(Data)和时钟(Clock)信号皆采用透明协议传输电路,所以对市场上的PS/2键盘鼠标具有极高的协议兼容性活方便,彻底解决KVM行业长期存在的PS/2协议兼容性难题和常现的鼠标键盘时滞、停顿或死机现象。
公司的数据时钟恢复(CDR)、数据时钟加速(CDA)和高频脉冲噪声抑制(NSS)核心专利技术,采用超5类非屏蔽双绞线最远延长距离可达400米,长更远距离。
本产品非常适用于对已具有10-100米VGA线缆的信号传输或延长应用,然后又需要对键盘或鼠标控制的升级工程的应用。
为单路KM键盘鼠标双绞线延长器,采用PS2接口+5V取电。
为单路KM键盘鼠标双绞线延长器,采用外接+9V至+12V供电。
00为迷你KVAM键盘鼠标双绞线延长器套件,采用外接+9V至+12V供电。
品型号HT202KM-300为单路KM键盘鼠标迷你型双绞线延长器HT202KM-400为单路KM键盘鼠标迷你型双绞线延长器HT222KVAM-400为迷你型KVAM键盘鼠标VGA音频双绞线延长器套件能指标键盘鼠标接口:2个PS2母头插座双绞线输出口:RJ45母头插座双绞线输入输出阻抗:100欧姆远程键盘鼠标响应时间:100uS双绞线接线:标准EIA/TIA-568B( 白橙/橙/白绿/蓝/白蓝/绿/白棕/棕)噪声干扰抑制:大于20V-nSESD保护:8kV ESD (HMB) (HT202KM-400)电源供电:12V DC/ 500mA (HT202KM-400)机壳:镀锌铁-金属机壳(防电磁干扰)整机功耗:小于1.5W安装尺寸:81X45X24mm据中心集中化管理:多台远距离服务器集中管理、数据汇总、操作平台及应用程序切换、侦测信息安全化管理:电脑主机置于一个安全的场所,操作人员使用KVM延长器使用电脑主机,则可以杜绝通过电脑主机的USB口,软盘,串口的数据流失安全监控、防护:远距离操作硬盘录像设备、服务器机群及监控画面快速切换、操作视频会议、多媒体教学、平面视频广告:远距离操作电脑显示PPT文件、内容及多媒体广告播放卡拉OK、餐厅点播:电脑主机放置于相对安全地方,使用显示器及键盘鼠标现场操作,经济安全。
STMicroelectronics STPS6M100SF数据手册说明书
STPS6M100SFFeatures•Low profile design – package height of 1.1 mm typ.•Wettable flanks for automatic visual inspection •Low forward voltage drop •Avalanche capability •ECOPACK ®2 compliantApplications•Switching diode •Notebook adapter •LED lighting•DC/DC converterDescriptionThis high voltage Schottky barrier rectifier has been optimized for use in highfrequency miniature DC/DC converters, reverse battery protection, battery chargers and adaptors.Packaged in PSMC (TO-277A), the STPS6M100SF provides a high level ofperformance in a compact and flat package which can withstand very high operating junction temperature.100 V power Schottky rectifierSTPS6M100SFDatasheetSTPS6M100SFCharacteristics 1CharacteristicsTable 1. Absolute ratings (limiting values at 25 °C, unless otherwise specified, anode terminals short-circuited)1.(dP tot/dT j) < (1/R th(j-a)) condition to avoid thermal runaway for a diode on its own heatsink.Table 2. Thermal resistance parametersFor more information, please refer to the following application note:•AN5088: Rectifiers thermal management, handling and mounting recommendationsTable 3. Static electrical characteristics (anode terminals short-circuited)1.Pulse test: t p = 5 ms, δ < 2%2.Pulse test: t p = 380 µs, δ < 2%To evaluate the conduction losses, use the following equation:P = 0.49 x I F(AV) + 0.0267 x I F2(RMS)For more information, please refer to the following application notes related to the power losses:•AN604: Calculation of conduction losses in a power rectifier•AN4021: Calculation of reverse losses in a power diodeSTPS6M100SFCharacteristics (curves) 1.1Characteristics (curves)Figure 7. Thermal resistance junction to ambient versus copper surface under tab (typical values, epoxyprinted board FR4, e Cu= 35 µm) (PSMC (TO-277A))020406080100120012345678910STPS6M100SFCharacteristics (curves)2Package informationIn order to meet environmental requirements, ST offers these devices in different grades of ECOPACK ®packages, depending on their level of environmental compliance. ECOPACK ® specifications, grade definitions and product status are available at: . ECOPACK ® is an ST trademark.2.1PSMC (TO-277A) package information•Epoxy meets UL94,V0•Cooling method : by conduction (C)Figure 8.PSMC (TO-277A) package outlineTable 4. PSMC (TO-277A) package mechanical dataSTPS6M100SFPackage informationFigure 9.PSMC (TO-277A) package footprint in mm (in inches)STPS6M100SFPSMC (TO-277A) package informationSTPS6M100SFOrdering information 3Ordering informationTable 5. Ordering informationSTPS6M100SFRevision historyTable 6. Document revision historySTPS6M100SFIMPORTANT NOTICE – PLEASE READ CAREFULLYSTMicroelectronics NV and its subsidiaries (“ST”) reserve the right to make changes, corrections, enhancements, modifications, and improvements to ST products and/or to this document at any time without notice. Purchasers should obtain the latest relevant information on ST products before placing orders. ST products are sold pursuant to ST’s terms and conditions of sale in place at the time of order acknowledgement.Purchasers are solely responsible for the choice, selection, and use of ST products and ST assumes no liability for application assistance or the design of Purchasers’ products.No license, express or implied, to any intellectual property right is granted by ST herein.Resale of ST products with provisions different from the information set forth herein shall void any warranty granted by ST for such product.ST and the ST logo are trademarks of ST. All other product or service names are the property of their respective owners.Information in this document supersedes and replaces information previously supplied in any prior versions of this document.© 2018 STMicroelectronics – All rights reservedSTPS6M100SF。
第三章谈判项目技术、服务、商务及其他要求

第三章谈判项目技术、服务、商务及其他要求(带“★”的参数需求为实质性要求,供应商必须响应并满足的参数需求,采购人、采购代理机构应当根据项目实际需求合理设定,并明确具体要求。
)3.1、采购项目概况东区疾病预防控制中心信息化建设硬件及软件设备
32、采购内容
采购包1:
采购包预算金额(元):537,557.OO
采购包最高限价(元):537,557.00
3.3、技术参数及要求采购包1:
34、商务要求
3.4.1交货时间
自合同签订之日起30日
3.4.2交货地点和方式
采购包1:
指定地点
3.4.3支付方式
采购包1:
分期付款
3.4.4支付约定
采购包1:付款条件说明:验收合格后,达到付款条件起30日,支付合同总
金额的95.00%o
采购包1:付款条件说明:质保期1年后,达到付款条件起30日,支付合同
总金额的5.00%o
3.4.5验收标准和方法
采购包1:
服务完毕后交付使用进行全面综合验收,如第一次发现验收瑕疵,给与整改期限,在15天内整改完毕进行第二次验收,第二次验收仍不合格,按合同约定追究其违约责任。
3.4.6包装方式及运输
采购包1:
涉及的商品包装和快递包装,均应符合《商品包装政府采购需求标准(试行)》《快递包装政府采购需求标准(试行)》的要求,包装应适应于远距离运输、防潮、防震、防锈和防野蛮装卸,以确保货物安全无损运抵指定地点。
3.4.7质量保修范围和保修期
采购包1:
3年
3.4.8违约责任及解决争议的方法
采购包1:
签订合同时约定
3.5其他要求。
Edimax Gemini RE11S智慧漫遊無線網路訊號延伸器说明书

通用相容性WPS 按鍵一按即連網 適用於各廠牌分享器AC1200 智慧漫遊無線網路訊號延伸器三合一多功能無線訊號延伸模式/無線 基地台模式/無線橋接模式 智慧漫遊搭配Edimax 智慧漫遊分享器 網路連線不中斷 更強的訊號 讓您隨時連接到 最佳的Wi-Fi 訊號 更快的速度升級到11ac 雙頻Wi-Fi 影音串流更順暢 家中無線網路訊號無死角RE11S 無線網路訊號延伸器會隨時檢測Wi-Fi 設備的連線訊號品質及穩定度,並確保它們始終連接到最佳Wi-Fi 訊號。
智慧漫遊 保持Wi-Fi 順暢不間斷獨特的智慧漫遊功能會自動將您的 Wi-Fi 無線網路裝置切換到最佳無線訊號源,讓您不論在家或公司移動時,網路不延遲、不中斷,讓無線網路訊號在分享器和延伸器或基地台間無縫接軌!RE11S自動切換到最好的Wifi 訊號Gemini RE11S 是專為家庭及小公司所設計的無線網路訊號延伸器,適用於各廠牌,無需更換現有的分享器就能提昇上網品質。
Gemini RE11S 智慧漫遊無線網路訊號延伸器構建具有單個SSID (WiFi 網路名稱)的智慧漫遊模式會自動讓您的無線網路裝置切換到最佳無線訊號源,讓您在家中移動時網路不延遲、不中斷,使家中的WiFi 網路訊號無縫接軌!(*建議搭配Edimax Gemini RG21S 智慧漫遊無線網路分享器提升Wi-Fi 效能。
)Gemini RE11S 具備最新802.11ac 傳輸技術。
即插即用就可將11n 網路升級到雙頻11ac 無線網路,速度更高達1200Mbps 非常適合4K 影音串流及檔案文件傳輸。
另外,可根據您家庭或小公司的WiFi 無線網路需求,靈活運用3合1多功能,作為無線訊號延伸器模式、無線基地台模式或無線橋接模式,讓無線效能更好!RE11S 智慧漫遊無線網路訊號延伸器SSID = EdimaxRG21S 智慧漫遊無線網路分享器SSID = EdimaxRE11SSmart iQ SetupEdimax 新一代iQ Setup 快速設定功能,不需使用光碟,也不需另外下載APP ,使用手機即可自動安裝,讓您輕鬆完成設定!三合一多功能RE11S 可作為無線訊號延伸器模式、無線基地台模式或無線橋接模式。
POLYCOM VTX1000扩展型 产品介绍

POLYCOM VTX1000EX产品介绍(适用于150平方米以内的中、小型会议室)具有Acoustic Clarity技术的POLYCOM VTX 1000,在电话会议的技术领域是一次真正的飞跃。
是世界上第一个可以自识应每个会议环境的会议电话,为每一个与会者提供了高保真的清晰语音。
有了POLYCOM VTX 1000,与会者可以用平常的、自然的交谈水平说话,而且即使是在离麦克风0.5米到6米的范围内的大会议室内讲话也可以被远端会议室清晰的听到。
加上扩展麦克风组成POLYCOM VTX 1000 EX型,应用范围迅速增大,可满足超大型会议室的应用。
当两个POLYCOM VTX 1000被连接到一个呼叫中时,电话会自动以VTX宽频模式连接,连接的效果特别的清晰。
POLYCOM VTX 1000是针对未来设计的语音平台。
勿庸置疑,在全球范围内,POLYCOM VTX 1000是会议电话领域的第一选择。
突出特点●Acoustic Clarity技术提供同步自然交谈,业界最佳的全双工质量●无与伦比的房间覆盖能力从150平方米之内用一般音调讲话,可以被远端清晰地听见●革命性的话音质量世界上首部在普通电话线上传送宽频率范围音频的电话。
就象从黑白电视到彩色电视的进步一样!●内置的投资保护世界上首部允许你通过普通电话线远程下载新软件从而获得新特性和应用的会议电话●最大的配置灵活性有独立的输入/输出,高音/低音控制,针对多重应用而设计的内置麦克和扬声器控制,包含外置扬声器。
●轻松安装/简单易用从安装到开始会议只需十分钟!主要技术参数主机尺寸 (L x W x H)• 36.8 x 31.1 x 6.4 cm重量• 0.8 kg电源• 22VDC; 由接口模块供电显示• 高分辨率、背景光、图形化LCD呼叫ID• Bellcore类型1(需要网络支持)键盘• 12键电话键盘• On/off键,会议、静音、音量调节,菜单, 导航键• 3个由内容而定的键,包括重拨、保持主机扩音器• 频率响应:300-3300 Hz 窄频模式260-7000 Hz 宽频模式:• 音量:最大可调整到89分贝 (峰值,0.5米) 高/低音控制• 调整范围: ± 6 dB主机麦克风• 3个心型麦克风:80 Hz - 14 kHz主机接口• RJ-45: 有P8接口连接接口模块• RJ-11: 32 Mbps串连支持未来的扩展• 2 个扩展麦克风连接低音扩音器尺寸(L x W x H)• 2.22 x 1.31 x 2.32 cm重量• 2.61 kg规格•频率响应: 80 to 300 Hz(宽频模式)•电源: 110/220 V, 50/60 Hz包括特定国家使用的交流电缆接口模块尺寸(L x W x H)• 7.9 x 19.7 x 4.8 cm重量• 0.34 kg电源• 90 - 264 VAC, 50 - 60 Hz包括特定国家使用的交流电缆辅助音频输入• 类型: 电话接口• 功能: 可在Polycom无线麦克风和音频开/关之间切换• 可定义功能键的设置菜单输出• 类型: 电话接口• 功能: 连接低音扩音器、外置PA、记录输出和关闭之间切换可定义功能键的设置菜单通讯接口• 网络连接: 双路RJ-11 模拟PBX or PSTN接口• 语音模式-带宽:300 Hz 至 3.3 kHz 或80 Hz至7 kHz (point to-point)• 网络需求: 兼容标准的PSTN 和 PBX 网络, 符合G.711标准• 软件下载模式- 下载协议: 兼容V.34- 链接速率:最高到33 Kbps, 视线路而定- 下载服务器: Polycom下载服务器扩展麦克风• 2 个扩展麦克风(EX标配):80 Hz-7 kHz遵守的标准• 安全- UL 1950- CSA C22.2, no. 950- EN6-950- IEC60950AS/NZS3260• 电磁兼容性- FCC (47 CFR Part 15) Class B- ICES-003 Class B- EN55022 Class B- CISPR 22 Class B- AS/NZS 3548 Class B- VCCI Class B- EN50224环境要求• 工作温度: 40º - 104ºF (5º - 40ºC)• 相对湿度: 20% - 85% (无凝露)• 存储温度: -22º - 131ºF (-30º - 55ºC)建议房间条件• 声音反射时间: <0.54 秒• 噪音级别: <48 dBaPOLYCOM VTX 1000包装含:• 集成了显示屏和键盘的桌面主机• 电源/网络接口模块• 低音扩音器(EX机型)• 2个扩展麦克风(EX机型)• 用户文档(用户手册,快速安装指南,注册卡)• 线缆- 2 根电源线缆 (主机, 低音扩音器)- 1 根21英尺(6.4m) 控制台线缆- 1 根7英尺. (2.1m) 通讯线缆- 2 根7英尺. (2.1m) 扩展麦克风线缆- 1 根10英尺. (3m) RCA低音扩音器线缆增强音频功能• 自动增益控制(AGC)• 动态噪音消除• 智能扩音器和麦克风混响• 80 Hz to 7 kHz VTX宽带音POLYCOM VTX 1000 EX其它特色/优点:●噪音消除技术自动减少PC、投影机和空调等噪音;●自动麦克风选择—同一时刻只有一个麦克风开启以避免浑音;●独立的麦克风、回声消除通道,可以根据不同的环境进行优化,以获得更好的声音;●扩展麦克风为大会议室提供了更大的覆盖面积;●低音炮可将音频向下扩展到80Hz,提供了更清楚、逼真的声音;可选的、可下载的振铃声。
ATEN KH2505 2516 说明书
概述 ............................................... ix
常规用语 ............................................ x
产品信息 ................................................ x
第一章 介绍
概述 .................................................... 1 功能特性 ................................................ 3 硬件需求 ................................................ 4
控制端 .............................................. 4 主机 ................................................ 4 KVM 适配器线缆 ....................................... 4 其他线缆 ............................................ 5 操作系统 ............................................ 5 产品部件 ................................................ 6 前视图 .............................................. 6 后视图 .............................................. 8 近端控制端连接 ...................................... 9
至诺至诺UHD-EX-100CE系列4K UHD HDBaseT 传输器和接收器说明书

4K/UHD HDMI Over 100M HDBaseT TX/RX with Ethernet,Control, and PoEAT-UHD-EX-100CE-TX & AT-UHD-EX-100CE-RXAT-UHD-EX-100CE-KITPlease check/AT-UHD-EX-100CE-TX/ /AT-UHD-EX-100CE-RX/ /AT-UHD-EX-100CE-KIT/ for the most recent firmwareupdate or manualsTable of Contents1. Introduction (3)2. Package Contents (3)3 ................................................................................... Features3.4. Before You Start (3)5. Category Cable (4)6. Panel Descriptionsa. Front Panel (5)b. Rear Panel (6)7. Captive Screw Connectors (7)8. Connection Diagram ................................................................................... 8-99. Specifications (10)10. Safety Information (11)11. Warranty ................................................................................... 12-1312. Atlona Product Registration (13)IntroductionPass through support of 4K (UHD), 2560x2048, IR, RS-232, bi-directional Ethernet, and lossy/lossless audio signals up to 328ft (100m). The 100CE extenders provide an affordable, high quality, solution for your audio and video needs.Package ContentsKitTXRXFeatures• 1 x AT-UHD-EX-100CE-TX • 1 x AT-UHD-EX-100CE-RX • 1 x 48V DC power supply• 5 x Female captive screw connector (2 pin (x1): power, 3 pin (x2): RS-232, and 5 pin (x2): IR)• 2 x Pair of wall/table mount ears• 2 x Pair of screws for wall/mount ears • 1 x IR emitter (AT-IR-CS-TX)• 1 x User manual • 1 x AT-UHD-EX-100CE-RX • 1 x 48V DC power supply• 2 x Female captive screw connector (3 pin: RS-232 and 5 pin: IR)• 1 x Pair of wall/table mount ears• 1 x Pair of screws for wall/mount ears • 1 x IR emitter (AT-IR-CS-TX)• 1 x User manual• 1 x AT-UHD-EX-100CE-RX• 2 x Female captive screw connector (3 pin: RS-232 and 5 pin: IR)• 1 x Pair of wall/table mount ears• 1 x Pair of screws for wall/mount ears • 1 x IR emitter (AT-IR-CS-TX)• 1 x User manual• Extends IR, RS-232, Ethernet, and audio/visual content up to 328ft over a single category cable • Supports resolutions up to 4K (UHD) 60Hz @ chroma sub-sampling 4:2:0 8-bit • IR ports for use with IR remote controls and 3rd party IR controllers • Bi-directional Ethernet pass through • Provides PoE (Power over Ethernet)• Multichannel audio pass through up to Dolby TrueHD, DTS-HD Master Audio, and Dolby Atmos • Full 3D pass through • HDCP 2.2 compliant • Field updatable firmwareBefore You Start• When installing the extenders DO NOT:Cover the ventsInstall into a sealed wallInstall into an area without adequate air ventilationCategory CableFor the category cables used in the installation of these products, please be sure to use a 568B termination as pictured below:Connector type and size is very important to ensure extenders work correctly. Please use the matching cable type with the correct RJ45 connector.CAT5e and CAT 6 cables should use only CAT5e RJ45 connectors CAT6a cables should use only CAT6a connectors CAT7 cables should use only CAT7 connectorsUsing the wrong size of connectors may result in interference causing loss of signal.Important! “EZ RJ45 connectors” are not recommended with HDBaseT extenders. Doing so may result in stray EMI/RFI signals to be picked up and interfere with audio and video transmission.Use the table below to verify the best category cable for the installation.Important! 4K (UHD) signals are sensitive to cable quality and installation technique. It is recommended to use CAT6a/7 solid core cables for best results.Note:For cable distances see the specifications on page 10Performance RatingType of LAN cableWiring Shielding CAT5e/6CAT6a/7SolidShielded (STP/FTP)*******UnShielded (UTP)**N/A Stranded - Patch cable(Not recommended)Unshielded (UTP)*N/A Shielded (STP/FTP)*N/ATermination Please use EIA/TIA-568-B termination1. White - Orange2. Orange3. White - Green4. Blue5. White - Blue6. Green7. White - Brown 8. BrownConnectorPanel DescriptionTX1. Ethernet - Connect to a router to send Ethernet signals2. Firmware - Use a Mini-B USB to USB A cable to connect to a Windows computers for updating3. Yellow Link LED: Signal indicator for the HDBaseT OUT port Solid - Good signal from the CAT port Blinking - Category cable is disconnected or not receiving signals No Light - No signal is being received from the CAT port Green Power LED: Power indicator Solid - Plugged in and receiving power Blinking - Power is intermittent or there is a problem with the cable No Light - No power is passing from the wall outlet to the transmitter (check the cable or outlet)4. DC 48V - Connect included captive screw power adapter here5. RS-232 - Bidirectional RS-232, send signal to or from a control system, PC, source, or display6. IR - Connect IR emitter (included) or 3rd party control box to this port7. HDBaseT OUT - Connect a category cable from here to an AT-UHD-EX-100CE-RX (included in KIT)8. HDMI IN - Connect HDMI or DVI (with adapter) source hereEx. Blu-ray player, cable box, HDDA series, H2H series, etcRX2. Firmware - Use a Mini-B USB to USB A cable to connect to a Windows computers for updating3. Yellow Link LED: Signal indicator for the HDBaseT IN portSolid - Good signal from the CAT portBlinking - CAT port is disconnected or not receiving a signalNo Light - No signal is being received from the CAT portGreen Power LED: Power indicatorSolid - Plugged in and receiving powerBlinking - Power is intermittent or there is a problem with the cableNo Light - No power is passing from the transmitter to the receiverNote:Check the category cable or the AC outlet for the transmitter4. RS-232 - Bidirectional RS-232, send signal to or from a control system, PC, source, or display5. IR - Connect IR emitter (included) or receiver (AT-IR-CS-RX sold separately) to this port6. HDBaseT IN - Connect a category cable from here to an AT-UHD-EX-100CE-TX (included in KIT) orHDBaseT matrix7. HDMI OUT - Connect HDMI or DVI (with adapter) display hereCaptive ScrewConnectingCaptive screw connectors are an added feature on the UHD extender. The captive screw connectors allow you to cut cables down to a suitable length, reduce cable clutter, while providing a more reliable connection.The captive screw connectors have a contact bar that is adjusted to compress the wire against the top contact plate. Use the screws at the top of the connector to compress the wire against the contact plate.When connecting the cables to the female captive screw connector it is important that the wires beterminated correctly. The female captive screw connector has a contact plate at the top and must have the wires touching it for signal to pass. When wired correctly (see picture A) the signal will pass, incorrectly (see picture B) no signal will pass.Female captive screw connectors are included: Power (see picture 1), RS-232 (see picture 2), and IR (see picture 3).The power cable (picture 4) will have exposed wires. Each wire is encased in a different colored cover.1PowerRS-232ClockwiseCounter ClockwiseTurn the screws clockwise to raise the contact bar to the upper contact plate and hold the wires in place.Turn the screws counter clockwise to lower the contact bar to release the wires.2RS-232 pin out will be determined by the RS-232 cable and will connect as Rx (receiver), Tx (transmitter), and (ground). (See picture 5)Pin out color will differ per RS-232 cable.Black : - White : +- +45Note: The IR receiver is optional for the UHD-EX-100CE-KIT and RX box. The compatible IR receiver (AT-IR-CS-RX) can be purchased through .The wires of the emitter and receiver have been marked to differenciate the pin outs.The included IR emitter has two wires: signal and ground. Signal will have a solid line and ground will beblank. The IR emitter will plug into the IR OUT ports.There are three wires on the IR receiver (AT-IR-CS-RX sold separately ): signal, ground, and power. Signal has a dotted line, ground will be blank, and power will have a solid line. The IR receiver will plug into the IR IN ports.IR3Signal (S) Ground ( )Signal (S)Ground ( )Power (P)Power ChainingMultiple kits can be powered by one power supply. The included power supply can support up to 3 kits. To power four kits use the optional power supply AT-PS-483125-C (purchase through ).To chain one power supply to three transmitters (four when using AT-PS-483125-C), use two wago splicing connectors, 18/2 AWG stranded wire, a ventilated 1 RU rack shelf, zip ties, and high temperature hook and loop (velcro) strips will be needed.1. 1 RU rack shelf - Should be at least 10in / 254mm deep, fit in a standard 19” rack, and must be well ventilated. Use the rack screws (included with 19” racks) to secure the rack shelf to the back/front of the rack after power chaining set up is completed.2. Transmitters - Place 3 or 4 units on the rack shelf. Use high temperature (up to 185°F / 85°C) hook and loop (velcro) to secure the transmitters to the rack.3. Power supply - Place the included power supply (or the AT-PS-483125-C) on the rack with enough room to connect the included IEC power cable. Use twist ties to secure the power supply and cable to the rack.4. Wago splicing connectors - Connect the wires from the power supply cable to the wago splicers. Connect (model #: 222-415) the white wire (power/+) to one splicer and the black wire (ground/-) to the second splicer.Note: Only one wire per port.5. 18/2 AWG stranded wire - Connect the individual wires to the wago splicers and the transmitter captive screw connectors. There will be two colors of wires (black/red) which will needto be designated - and +. Each color will need to be the same across all connections to ensure no signals are crossed. Strip the ends of each wire and place one end in the appropriate wago connector and the other to the corresponding captive screw connector. Use the zip ties to keep all wiresin place and organized.Power cable ----++++18/2 AWG stranded wireVideo HDBaseT Control EthernetConnection Diagram (TX connection)SpecificationsVideo ResolutionsVideo 4096x2160@24/25/30/50*/60Hz*, 3840x2160@24/25/30/50*/60Hz************/24/25/29.97/30/50/59.94/60Hz, (UHD),2048x1080p,1080i@50/59.94/60Hz, 720p@50/59.94/60Hz, 576p, 576i, 480p, 480i VESA 2560x2048, 2560x1600, 2048x1536, 1920x1200, 1680x1050,1600x900,1600x1200,1440x900, 1400x1050, 1366x768, 1360x768, 1280x1024, 1280x800,800x600,640x4801024x768,1152x768,1280x768,RGBColorspaceYCbCr,Chroma Subsampling 4:4:4, 4:2:2, 4:2:0Color depth 8-bit, 10-bit, 12-bitAudioFormat - pass through PCM 2Ch, LPCM 5.1, LPCM 7.1, Dolby Digital, DTS 5.1, Dolby DigitalPlus, Dolby TrueHD, DTS-HD Master Audio, Dolby AtmosSample Rate 32kHz, 44.1kHz, 48kHz, 88.2kHz, 96kHz, 176.4kHz, 192kHztoup24-bitBitrateDistanceCAT5e/6 @ 4K up to 70M up to 230 ftCAT6a/7 @ 4K up to 100M up to 328 ftCAT5e/6 @ 1080p up to 100M up to 328 ftHDMI IN/OUT @ 4K up to 5M up to 15 ftHDMI IN/OUT @ 1080p up to 10M up to 30 ftSignalGbps10.2BandwidthYesCEC2.2uptosupportsHDCPTemperature32°Fto122°F50°CtoOperating 0°Cto140°F-4°F60°CtoStorage -20°CHumidity 20 to 90% non-condensingPowerConsumption - Kit 15.2WAC100~240V50/60HzInput:Supply0.83ADC48VOutput:DimensionH x W x D 25 x 109 x 127 (mm) 0.98 x 4.29 x 5.00 (inch)w/ears 27 x 119 x 127 (mm) 1.06 x 4.69 x 5.00 (inch)Weightkg 0.86lbs0.39DeviceCertificationPower Supply CE, FCC, cULus, RoHS, CCC, RCMProduct CE,FCC**4096x2160@50/60Hz & 3840x2160@50/60Hz supported @ chroma subsampling 4:2:0 8-bit onlySafety InformationSafeguardsPrecautionsFCC regulations state that any unauthorized changes or modifications to this equipment, notexpressly approved by the manufacturer, could void the user’s authority to operate this equipment.Operate this product using only the included external power supply. Use of other power supplies could impair performance, damage the product, or cause fires.In the event of an electrostatic discharge this device may automatically turn off. If this occurs, unplug the device and plug it back in.Protect and route power cords so they will not be stepped on or pinched by anything placed on or against them. Be especially careful of plug-ins or cord exit points from this product.Avoid excessive humidity, sudden temperature changes or temperature extremes.Keep this product away from wet locations such as bathtubs, sinks, laundries, wet basements, fish tanks, and swimming pools.Use only accessories recommended by Atlona to avoid fire, shock, or other hazards.Unplug the product before cleaning. Use a damp cloth for cleaning and not cleaning fluid or aerosols. Such products could enter the unit and cause damage, fire, or electric shock. Some substances may also mar the finish of the product.Never open, remove unit panels, or make any adjustments not described in this manual. Attempting to do so could expose you to dangerous electrical shock or other hazards. It may also cause damage to your product. Opening the product will void the warranty.Do not attempt to service the unit. Disconnect the product and contact your authorized Atlona reseller or contact Atlona directly.To reduce the risk of electric shock, do notexpose this product to rain or moistureIf the wall plug does not fit into your localpower socket, hire an electrician to replaceyour obsolete socket.Do not modify the wall plug. Doing so will void the warranty and safety features.This equipment should be installed near the socket outlet and the device should be easily accessible in the case it requiresdisconnection.Atlona, Inc. (“Atlona”) Limited Product Warranty PolicyCoverageAtlona warrants its products will substantially perform to their published specifications and will be free from defects in materials and workmanship under normal use, conditions and service.Under its Limited Product Warranty, Atlona, at its sole discretion, will either:A) repair or facilitate the repair of defective products within a reasonable period of time, restore products to theirproper operating condition and return defective products free of any charge for necessary parts, labor and shippingORB) replace and return, free of charge, any defective products with direct replacement or with similar products deemed by Atlona to perform substantially the same function as the original productsORC) refund the pro-rated value based on the remaining term of the warranty period, not to exceed MSRP, in caseswhere products are beyond repair and/or no direct or substantially similar replacement products exist.Repair, replacement or refund of Atlona’s products is the purchaser’s exclusive remedy and Atlona’s liability does not extend to any other damages, incidental, consequential or otherwise.This Limited Product Warranty extends to the original end-user purchaser of Atlona’s products and is non-transferrable to any subsequent purchaser(s) or owner(s) of these products.Coverage PeriodsAtlona’s Limited Product Warranty Period begins on the date of purchase by the end-purchaser. The date contained on the end-purchaser ‘s sales or delivery receipt is the proof purchase date.Limited Product Warranty Terms – New Products• 10 years from proof of purchase date for hardware/electronics products purchased on or after June 1, 2013• 3 years from proof of purchase date for hardware/electronics products purchased before June 1, 2013• Lifetime Limited Product Warranty for all cable productsLimited Product Warranty Terms – Refurbished (B-Stock) Products and Discontinued Products• 3 years from proof of purchase date for all Refurbished (B-Stock) and Discontinued hardware and electronic products purchased on or after June 1, 2013.RemedyAtlona recommends that end-purchasers contact their authorized Atlona dealer or reseller from whom they purchased their products. Atlona can also be contacted directly. Visit for Atlona’s contact information and hours of operation. Atlona requires that a dated sales or delivery receipt from an authorized dealer, reseller or end-purchaser is provided before Atlona extends its warranty services. Additionally, a return merchandise authorization (RMA) and/or case number, is required to be obtained from Atlona in advance of returns.Atlona requires that products returned are properly packed, preferably in the original carton, for shipping. Cartons not bearing a return authorization or case number will be refused. Atlona, at its sole discretion, reserves the right to reject any products received without advanced authorization. Authorizations can be requested by calling 1-877-536-3976 (US toll free) or 1-408- 962-0515 (US/international) or via Atlona’s website at .ExclusionsThis Limited Product Warranty excludes:• Damage, deterioration or malfunction caused by any alteration, modification, improper use, neglect, improperpacking or shipping (such claims must be presented to the carrier), lightning, power surges, or other acts of nature.• Damage, deterioration or malfunction resulting from the installation or removal of this product from any installation, any unauthorized tampering with this product, any repairs attempted by anyone unauthorized by Atlona to makesuch repairs, or any other cause which does not relate directly to a defect in materials and/or workmanship of thisproduct.• Equipment enclosures, cables, power supplies, batteries, LCD displays, and any accessories used in conjunction with the product(s).• Products purchased from unauthorized distributors, dealers, resellers, auction websites and similar unauthorizedchannels of distribution.DisclaimersThis Limited Product Warranty does not imply that the electronic components contained within Atlona’s products will not become obsolete nor does it imply Atlona products or their electronic components will remain compatible with any other current product, technology or any future products or technologies in which Atlona’s products may be used in conjunction with. Atlona, at its sole discretion, reserves the right not to extend its warranty offering in instances arising outside its normal course of business including, but not limited to, damage inflicted to its products from acts of god. Limitation on LiabilityThe maximum liability of Atlona under this limited product warranty shall not exceed the original Atlona MSRP forits products. To the maximum extent permitted by law, Atlona is not responsible for the direct, special, incidental or consequential damages resulting from any breach of warranty or condition, or under any other legal theory. Some countries, districts or states do not allow the exclusion or limitation of relief, special, incidental, consequential or indirect damages, or the limitation of liability to specified amounts, so the above limitations or exclusions may not apply to you. Exclusive RemedyTo the maximum extent permitted by law, this limited product warranty and the remedies set forth above are exclusive and in lieu of all other warranties, remedies and conditions, whether oral or written, express or implied. To the maximum extent permitted by law, Atlona specifically disclaims all implied warranties, including, without limitation, warranties of merchantability and fitness for a particular purpose. If Atlona cannot lawfully disclaim or exclude implied warranties under applicable law, then all implied warranties covering its products including warranties of merchantability and fitness for a particular purpose, shall provide to its products under applicable law. If any product to which this limited warranty applies is a “Consumer Product” under the Magnuson-Moss Warranty Act (15 U.S.C.A. §2301, ET SEQ.) or other applicable law, the foregoing disclaimer of implied warranties shall not apply, and all implied warranties on its products, including warranties of merchantability and fitness for the particular purpose, shall apply as provided under applicable law.Other ConditionsAtlona’s Limited Product Warranty offering gives legal rights, and other rights may apply and vary from country to country or state to state. This limited warranty is void if (i) the label bearing the serial number of products have been removed or defaced, (ii) products are not purchased from an authorized Atlona dealer or reseller. A comprehensive list of Atlona’s authorized distributors, dealers and resellers can be found at .Atlona, Inc Product RegistrationThank you for purchasing this Atlona product. - We hope you enjoy it and will take an extra few moments to register your new purchase.Registration creates an ownership record if your product is lost or stolen and helps ensure you’ll receive notification of performance issues and firmware updates.At Atlona we respect and protect your privacy, assuring you that your registration information is completely secure. Atlona product registration is completely voluntary and failure to register will not diminish your limited warranty rights.To register go to: /registration。
迈拓维矩延长器该如何分类
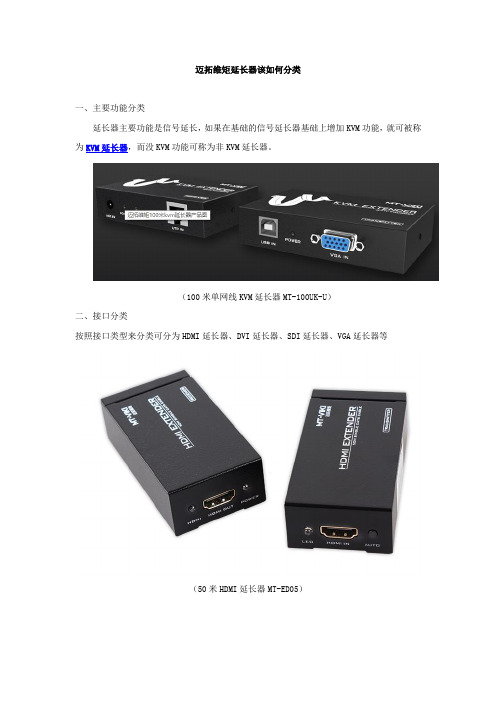
迈拓维矩延长器该如何分类
一、主要功能分类
延长器主要功能是信号延长,如果在基础的信号延长器基础上增加KVM功能,就可被称为KVM延长器,而没KVM功能可称为非KVM延长器。
(100米单网线KVM延长器MT-100UK-U)
二、接口分类
按照接口类型来分类可分为HDMI延长器、DVI延长器、SDI延长器、VGA延长器等
(50米HDMI延长器MT-ED05)
(50米DVI延长器MT-DV50)
(50米VGA延长器MT-50T)
三、传输介质分类
传输介质在延长信号传输中,严重影响了信号传输的距离。
一般的传输介质有光纤和网线两种。
用光纤的称为光纤延长器,而用网线延长的则称为网线延长器
(100米单网线延长器MT-100T)
(20kmHDMI光纤延长器MT-ED020)
四、与其他功能相配对分类
在原来延长器的基础上增加一些功能的延长器,可按照其添加功能进行分类如,添加分配功能的延长分配器
(4路100米VGA延长器MT-104T)。
数位KVM讯号延长器 CE790使用者说明书
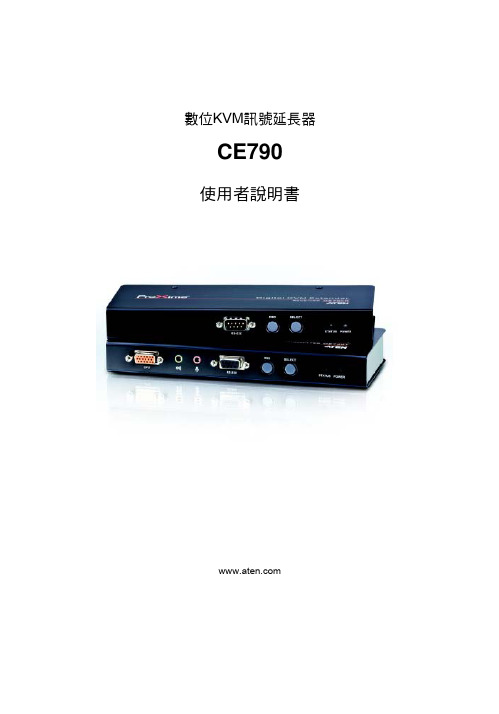
數位KVM訊號延長器CE790使用者說明書CE790 User Manual操作方法 (19)概述 (19)LED指示燈顯示 (19)啟動OSD (19)OSD主視窗 (20)CE790T (20)CE790R (20)OSD操作 (21)OSD功能 (22)視訊品質(只有CE790T) (22)喇叭 (22)麥克風 (22)傳送目標設定(只有CE790T) (23)接收來源設定(只有CE790R) (24)設定功能 (25)Baud Rate設定 (27)Return (返回) (27)預設IP位址 (27)OSD功能簡表 (28)CE790T (28)CE790R (28)第四章 (29)韌體升級功能 (29)更新前準備 (29)附錄 (31)一般 (31)機架安裝 (33)技術支援 (34)全球 (34)北美 (34)產品規格表 (35)疑難排除 (36)保固條件 (36)vi第一章介紹產品介紹CE790是一款具備自動判別連接線(Auto-MDIX),且具備RS-232序列功能的IP-Based KVM訊號延長器,其可讓一組遠端的USB控制端(USB鍵盤、螢幕及USB 滑鼠)透過Intranet企業內部網路存取電腦系統。
CE790系統包含一台連接至電腦系統的傳送裝置(CE790T)及一台可置放於使用者端的接收裝置(CE790R);由於其可讓遠端控制端透過標準的TCP/IP網路存取電腦系統,因此可適用於任何需從便利的地方使用控制端,但必須將系統設備安置在安全地方 – 遠離擁擠、髒亂與忙碌的使用環境,例如工廠或建築工地。
CE790亦可滿足以控制及安全為目的的應用,您可將系統安置在安全的區域,並同時將控制端放置在便於使用者存取的地方,十分適用於高保密性的資料系統管理。
CE790所具備的進階功能包括: 1)訊號傳送裝置(Transmitter)與接收裝置(Receiver)均支援OSD螢幕選單,設定與操作十分簡易; 2) 可使用價格實惠的Cat 5e連接線,透過標準TCP/IP LAN區域網路內,不需額外加裝KVM多電腦切換器即可進行單點對單點、單點對多點、以及多點對多點的管理; 3) Transmitter與Receiver裝置均內建RS-232序列埠,可連接序列終端設備以進行組態設定,或連接如觸控式螢幕與條碼掃瞄器等序列設備;4) 訊號傳送裝置(Transmitter)提供了一組專屬的KVM連接埠,可讓您簡單且容易地將KVM切換器安裝至您的整體架構中;5)使用特製的ASIC可確保可靠度與相容性。
ADderLink INFINITY 100T 网络KVM扩展器说明书

ADDERLink™ INFINITY 100T extension/matrix of video, audio and USB overAbout AdderAdder is a leading developer andthought leader in connectivity solutions. Adder’s advanced range of KVM switches, extenders and IP solutions enable the control of local, remote and global IT systems across the enterprise. Thecompany distributes its products in more than 60 countries through a network of distributors, resellers and OEMs. Adder has offices in the China, Germany, Japan, the Netherlands, Singapore, Spain, Sweden, United Kingdom and United States.To find out more, visit: ConnectorsComputer: DVI-D, DisplayPort™, or VGA, USB Type-A x2Ethernet: 1x 8p8c (RJ45)Power: 2.5mm socketSpecificationUSB: USB2.0 full and low speed (No HS support)USB features: Keyboard, mouse and touch USB device seen as: 7 or 13 port hubMax video resolution: Up to 1920x1200@60Hz Audio: Line in/out USB audio 2 channel 16bit 48KHzDisplayPort™ Audio: NoneEthernet: 1GbE (No 10/100 support)DisplayPort™ version requires source to be DisplayPort™ Dual-Mode (DP++) compliant.Packing BoxDimensions: (L) 292mm /11.5 inch (W) 245mm/9.6inch (D) 55mm/2.1inch Weight: 0.5kg / 1.1lbApprovals / ComplianceCE and FCC: See the compliance web page for the full list.Cable types recommendations Cat5e and above.Cable length rulesEthernet specifications rules apply 100m / 300ft maximum run.Ordering InformationALIF100T-DVI: ADDERLink™ INFINITY TX with DVI videoALIF100T-DP: ADDERLink™ INFINITY TX with DisplayPort™ videoALIF100T-VGA: ADDERLink™ INFINITY TX with VGA videoXX = Mains Lead Country Code:UK = United Kingdom US = United StatesEURO = Europe AUS = Australia JPN = JapanAdditional AccessoriesPSU-IEC-5VDC-2.5A: IEC power supply PSU-RED-RPS: 12v to 5v converter DVA: VGA to DVI converterWhat’s in the Box?ALIF100T unit Quick start guide.Technical SpecificationsOperating/storage conditions Operating temperature: 0 to 50OC Storage temperature: -10 to 60OCStorage and operating relative humidity: 10-90% non-condensing Altitude: < 3000m MTBF: >500,000 hoursPowerUSB power: 2 x USB2.0 (2x 500mA @5V) 5W External power: 5VDC, 1A, (LPS)Typical power consumption: 3W BTU: 10.2BTU/hrPhysicalDimensions: (L)110mm /4.3” x (W)55mm/2.17” x (D)25mm/1” with 30cm cable length Weight: 0.2kg / 0.4lbMaterials: ABS and aluminium construction。
- 1、下载文档前请自行甄别文档内容的完整性,平台不提供额外的编辑、内容补充、找答案等附加服务。
- 2、"仅部分预览"的文档,不可在线预览部分如存在完整性等问题,可反馈申请退款(可完整预览的文档不适用该条件!)。
- 3、如文档侵犯您的权益,请联系客服反馈,我们会尽快为您处理(人工客服工作时间:9:00-18:30)。
EX-1000S 是EAKUN (宜坤)的100米KVM 切换器。
由深圳市宜坤网络科技有限公司研发、生产、销售。
EX-1000S 是支持VGA 视频、USB 鼠键信号延长100米;支持视频分辨率高达
1920*1200。
产品特点
本地远程皆可控制
·EX-1000S 采用CAT5CAT5e 或CAT6网络线连接,可将VGA、USB 鼠键信号源设备与显示设备之间的联机距离延伸最远至100米。
且传输同步无延时。
本套延长器分为传输端EX-1000ST 和接收端
EX-1000SR。
延长距离长达100米
100米KVM 切换器
EX-1000S 产品介绍
本地控制端用于连接被控的电脑主机或服务器,远程控制端用于在远端进行控制。
通过5类UTP CAT5e或CAT6网线连接本地端和远程端,您就可以在最远100米的距离管理您的电脑或服务器。
常用连接方案
本地控制端提供额外键盘、鼠标、和显示器接口,方便您在本地进行控制
质量保证
以稳定、可靠为设计理念,元器件选择严格,生产流程严格遵循ISO质量标准。
产品均通过均通过FCC,CE,ROHS等质量管理认证和出口认证,出厂前均经过48小时老化,确保各种场合下均能稳定工作。
宜坤网络介绍
深圳市宜坤网络科技有限公司(宜坤网络)—EAKUN(宜坤)品牌的所有者,是设立于深圳市南山区南山科技园的新兴高科技公司,专业从事计算机、网络设备、智能家居、人体穿戴设备的研发、生产、及销售。
公司以互联网电子商务为载体,采用O2O电商模式,汇集顶尖研发、生产、销售人才,致力于打造中国最好的计算机及网络信息产品垂直电商平台。