操作安装说明书
软件安装说明书
软件安装说明书为了帮助用户顺利安装我们的软件,我们准备了以下软件安装说明书。
请您按照以下步骤进行安装,以确保您能够成功使用我们的软件。
1. 准备安装文件首先,您需要从我们的官方网站下载软件安装文件。
请确保您选择的是适合您操作系统版本的安装文件,并将其保存在您的计算机硬盘上的一个目录中。
2. 检查系统要求在进行软件安装之前,请您确保您的计算机满足以下最低系统要求:- 操作系统:Windows 7或更高版本,或者Mac OS X 10.10或更高版本- 处理器:双核处理器,建议使用四核或更高性能处理器- 内存:至少4GB内存- 存储空间:至少100MB的可用硬盘空间- 显示器:分辨率为1024x768或更高3. 执行安装程序找到您保存安装文件的目录,双击运行安装程序。
这会打开一个安装向导,您只需按照向导中的指示进行操作即可。
在安装过程中,请确保选择正确的安装路径,并根据需要选择其他自定义设置。
4. 阅读许可协议在安装过程中,您将看到软件使用许可协议。
请仔细阅读所有条款和条件,并在同意之前确保您理解其中的内容。
如果您不同意协议的任何条款,请不要继续安装软件。
5. 等待安装完成一旦您点击了“同意”或“安装”按钮,安装程序将开始复制文件并配置软件。
请耐心等待直到安装完成。
这可能需要一些时间,取决于您的计算机性能和文件大小。
6. 快捷方式创建安装程序将询问您是否要在桌面上创建软件的快捷方式。
如果您想要快速访问软件,您可以选择创建快捷方式。
否则,您可以选择不创建。
7. 完成安装一旦安装完成,您将看到一个安装成功的提示。
点击“完成”按钮关闭安装程序。
8. 启动软件现在,您可以通过双击桌面上的快捷方式或者从“开始”菜单中找到软件并点击打开。
软件将启动并显示欢迎界面。
9. 激活软件有些软件可能需要激活才能正常使用。
请确保您按照软件提供的激活指南进行操作。
通常,您需要输入许可证密钥或注册邮箱,并遵循指示完成激活过程。
手机应用程序安装说明书
手机应用程序安装说明书尊敬的用户:感谢您选择使用我们的手机应用程序!为了让您更方便地安装和使用我们的应用程序,特此提供手机应用程序安装说明书。
请您按照以下步骤进行操作。
第一步:下载应用程序您可以通过以下两种方式下载我们的应用程序:1. 应用商店下载:打开您的手机应用商店(如App Store、华为应用市场、小米应用商店等),在搜索栏中输入“应用程序名称”进行搜索。
找到我们的应用程序后,点击下载并等待安装完成。
2. 扫描二维码下载:在我们的官方网站或宣传资料中,您可以找到应用程序的下载二维码。
使用手机的相机功能扫描二维码,即可跳转至下载页面。
点击下载并等待安装完成。
第二步:安装应用程序在下载完成后,您需要按照以下步骤安装应用程序:1. 打开应用程序:在您的手机主屏幕或应用程序列表中,找到我们的应用程序图标。
点击图标,即可打开应用程序。
2. 安装权限设置:为了应用程序能够正常运行,您需要同意应用程序获取相关权限的请求。
请点击“同意”或“允许”,以便继续安装流程。
3. 安装完成:等待手机自动完成应用程序的安装过程。
安装完成后,您将看到一个成功的提示信息。
第三步:使用应用程序安装完成后,您可以按照以下步骤使用应用程序:1. 注册/登录账号:根据应用程序的要求,您可能需要注册一个新账号或使用已有账号登录。
请按照应用程序的指示,完成账号注册或登录过程。
2. 设置个人偏好:通过进入应用程序的设置页面,您可以根据个人需求设置相应的参数。
例如,语言设置、通知提醒设置、隐私安全设置等。
3. 浏览和使用功能:根据应用程序的导航栏或主界面,您可以浏览和使用各种功能。
按照应用程序提供的指引,您可以尝试不同的功能,探索应用程序的各项服务。
注意事项:- 在安装和使用应用程序的过程中,请确保您的手机处于稳定的网络环境中,避免因网络问题导致安装失败或使用异常。
- 如果您在使用过程中遇到任何问题,请及时联系我们的技术支持团队,我们将竭诚为您提供帮助。
使用安装说明书

2 编辑指纹、3 编辑卡,上下翻选择新增的密钥形式
按“#”键确认, 再选择“增加密码、指
纹、卡”, 按“#”键确认,根据屏幕提示,配置相应的密钥,按“#”键确认,确认成功后按“*”
键退出菜单,如果想输入多个密匙,重复以上操作即可。(如 2.1.1 用户密匙设定) 2.删除密匙的操作方法:在按键面板上输入“0#”,屏幕显示“请输入管理密码(指纹)授权”, 输
用 户 管 理 由 用 户 自 主 管 理 ,管 理 员 、主 人 、客 人 、孩 子 、 用户管理
保 姆 、 钟 点 工 、 临 时 工 。 用 户 数 量 可 设 置 99 个 用 户 。
由管理员限制其它用户时用户和更改用户性质(客人或
6
用户权限
孩子),在设置的有效时间段、周期内可进行开锁。
7
开锁认证 可 支 持 单 验 证 模 式 、 双 秘 钥 验 证 、 双 用 户 验 证 开 锁 。
使用安装说明书
感谢您购买本产品
使用本产品前敬请仔细阅读本说明书 请妥善保管本说明书,以便今后参考
一、智能防盗锁示意图(具体实物为准)
二、技术参数
供应电源 静态电流 动态电流 驱动输出 驱动能力 报警电压 工作温度 储存温度 储存时间 指纹更改 指纹数量 工作湿度 抗静电
4 节 2 串 2 并,7.0V5AH 锂电池 18650 锂电池
指纹修改成功。
2.2 智能防盗锁用户管理操作:主要包括添加用户功能和对已存在的用户进行管理功能 2.2.1 添加用户功能
在按键面板上输入“0#”,屏幕显示“请输入管理密码(指纹)授权”, 输入管理密钥“如
0123456789”, 最后按“#”键确认,进入主菜单页面, 按“#”键进入“用户管理”, 按
产品安装说明

产品安装说明为了确保顾客的使用体验,以下是本产品的安装说明。
请您按照以下步骤进行操作,以便正确和顺利地安装产品。
一、准备工作在安装产品之前,请确保您已经准备好以下物品:1.本产品的包装盒;2.产品说明书;3.安装所需的工具(根据产品的不同可能有所不同,一般包括螺丝刀、扳手等);4.电源线(如果需要连接电源的话)。
二、安装步骤1.打开包装盒,将产品取出。
请注意避免损坏产品或者其配件。
2.仔细阅读产品说明书,了解产品的使用方法、注意事项和安装步骤。
3.根据产品说明书的指引,选择一个合适的安装位置。
请确保该位置稳固且能够满足产品的安装要求。
4.如果产品需要固定在墙壁或其他表面上,请使用适当的工具进行固定。
在固定之前,请确认所选择的位置合适并没有其他障碍物。
5.根据产品说明书中的连接图示,将相关线缆连接到正确的接口上。
请确保连接稳固,没有松动。
6.如果需要连接电源,请将电源线连接到电源插座上。
在连接之前,请关闭电源开关以确保安全。
7.检查所有连接和固定点,确保产品安装牢固且位置正确。
8.根据产品说明书中的操作指引,打开产品的电源开关。
三、注意事项1.在安装产品之前,请仔细阅读产品说明书。
如果有任何疑问或者不明之处,请及时联系厂家或客服进行咨询。
2.请使用正确的工具进行安装,并根据说明书的指引操作。
不要随意更改或拆卸产品的部件。
3.在安装过程中,注意安全。
如果需要操作高处或者使用电源,请采取相应的安全措施。
4.安装完成后,请及时清理安装过程中产生的垃圾和杂物,保持安装环境的整洁。
5.如有其他特殊要求或者注意事项,请参考产品说明书中的相关内容。
四、售后服务如果在使用过程中遇到任何问题或者需要进一步的帮助,请及时联系我们的售后服务部门。
我们将竭诚为您提供最佳的解决方案和服务。
请您按照以上安装说明进行操作,祝您使用愉快!如有任何问题,请随时与我们联系。
感谢您对我们产品的支持!。
Miele嵌入式烤箱操作和安装说明说明书
操作和安装说明嵌入式烤箱为避免发生事故或损坏电器,请务必在安装和首次使用前仔细阅读这些说明。
Miele奉行“不断超越”的理念,故将保留对说明书作出修改的权利。
zh-CN M.-Nr. 11 417 521内容警告和安全说明 (6)环境保护 (12)电器使用说明书 (13)控制鍵 (14)On/Off(开启/关闭)感应控制键 (15)显示屏 (15)感应控制键 (15)符号 (17)使用电器 (18)选择菜单选项 (18)更改列表中的设置 (18)使用分段条更改设置 (18)选择功能或操作模式 (18)输入数字 (19)输入字母 (19)激活 MobileStart (19)特点 (20)铭牌 (20)随机内容 (20)可选配件,可订购 (20)安全性特点 (25)经 PerfectClean 清洁表面处理过的表面 (25)高温热解配件 (25)首次使用前 (26)Miele@home (26)基本设置 (27)首次加热烤箱并冲洗蒸汽释放系统 (28)设置 (30)设置概述 (30)打开“设置”菜单 (32)语言 (32)时间 (32)日期 (32)照明 (32)显示屏 (32)音量 (33)单位 (33)Booster (33)2内容快速冷却阶段 (33)保温 (34)建议温度 (34)热解建议 (34)通风冷却运行 (34)安全性 (34)Miele@home (35)远程控制 (35)激活 MobileStart (35)远程更新 (36)软件版本 (36)演示程序 (36)出厂设置 (36)分钟提示器 (37)主菜单和子菜单 (38)节能提示 (40)操作 (42)更改烹饪程序的数值和设置 (42)更改温度和核心温度 (42)设置烹饪持续时间 (43)更改设置的烹饪持续时间 (43)删除设置的烹饪持续时间 (43)取消烹饪程序 (44)预热烤箱内腔 (44)Booster (44)预热 (45)快速冷却阶段 (45)保温 (45)Crisp function (46)加湿烹调 (47)使用加湿烹调启动烹饪程序 (47)蒸发剩余水分 (49)自动程序 (51)类别 (51)使用自动程序 (51)便利提示 (51)其他应用 (52)解冻 (52)3内容烘干 (53)预热餐具 (54)保温 (54)低温烹饪 (55)冷冻食物/即食食品 (56)用户偏好程序 (57)烘焙 (59)烘焙提示 (59)烹饪图表上的注释 (59)功能注释 (59)烘烤 (61)烘烤提示 (61)烹饪图表上的注释 (61)功能注释 (62)食物烘烤探针 (63)烧烤 (65)烧烤提示 (65)烹饪图表上的注释 (65)功能注释 (66)清洁与保养 (67)不适用的清洁剂 (67)去除正常污渍 (67)去除顽固污渍(不包括 FlexiClip 灵动滑轨) (68)高温热解清洁烤箱内腔 (69)除垢 (71)机门拆卸 (74)拆卸机门 (75)安装机门 (78)拆下带 FlexiClip 灵动滑轨的侧滑轨 (78)调低顶部加热/烧烤元件 (79)故障排除指南 (80)服务 (84)若发生故障,请联系我们 (84)保修 (84)4内容安装 (85)安装尺寸 (85)安装在高柜或基座中 (85)侧视图 (86)接线和通风 (87)安装烤箱 (88)电气连接 (89)烤箱 (89)电气连接 (89)烹饪图表 (90)面糊 (90)揉搓混合物 (91)发酵面团 (92)夸克面团 (93)海绵蛋糕混合物 (93)泡芙面团、千层酥皮、蛋白酥饼 (94)开胃菜 (95)牛肉 (96)小牛肉 (97)猪肉 (98)羊肉,野味 (99)家禽,鱼类 (100)产品标准 (101)有害物质 (102)5警告和安全说明正确使用此烤箱适用于家庭和其他类似环境。
水控机系统安装使用说明书
水控机系统安装使用说明书一、引言水控机系统是一种智能化的管道控制设备,适用于各类液体管道的自动控制与管理。
本文档旨在为用户提供水控机系统的安装和使用指南,以确保系统能够正常运行并发挥其最佳性能。
二、安装前准备在安装水控机系统之前,请确保已经完成以下准备工作:1. 确定安装位置:选择一个稳定、通风良好的位置,以便安装和维护水控机系统。
2. 确保供电条件:水控机系统需要稳定的电源供应,因此请在安装前确保供电电压符合系统要求,并且接地良好。
3. 检查管道连接:确保管道连接紧固,无泄漏情况,并清洁管道以预防污染。
4. 准备所需工具:安装水控机系统可能需要使用螺丝刀、扳手等基本工具。
请确保这些工具已准备就绪。
三、安装步骤1. 安装支架:根据系统的安装指南,安装支架并将其牢固固定在安装位置上。
2. 连接电源:将水控机系统的电源线与供电电源连接。
确保电源线与接线端子紧固并无松动。
3. 连接管道:根据系统的管道连接图,将各个管道与水控机系统连接起来。
确保连接紧密,无泄漏。
4. 安装传感器:根据系统的传感器安装指南,将各个传感器正确安装在管道上,并确保传感器的位置与要求吻合。
5. 连接控制设备:根据系统的连接图,将水控机系统与控制设备(如计算机或显示屏)进行连接,确保连接稳固。
四、系统配置1. 设置参数:在安装完水控机系统后,进入系统配置界面。
根据系统的说明书,设置各项参数,如流量范围、报警阈值等。
2. 校准传感器:根据系统的传感器校准指南,对安装的传感器进行校准,以确保测量的准确性。
3. 学习模式:根据系统的学习模式说明,进行系统的学习。
系统会根据学习模式自动调整管道的控制参数,以达到最佳的管道控制效果。
五、使用说明1. 启动系统:按照系统的启动步骤,依次打开主电源和系统电源,等待系统启动并进入正常工作状态。
2. 监控管道状态:通过连接的控制设备,在监控界面上可以实时显示管道的流量、压力等参数,以及管道的运行状态。
安装流程说明书
安装流程说明书【安装流程说明书】一、前言感谢您选择我们的产品,本安装流程说明书旨在详细介绍产品的安装步骤,以帮助您顺利进行安装并使用。
请您仔细阅读并按照本手册的步骤进行操作,保证安装过程顺利进行。
二、准备工作1.确认产品配送是否完整:请仔细核对产品包装箱内的物品清单,确保配送的产品齐全,并未损坏;2.准备所需工具:根据产品安装所需工具清单,确认是否准备齐全,并确保工具的可用性;3.选择安装位置:根据产品使用要求,选择合适的位置进行安装,并确保该位置符合产品的使用环境要求。
三、安装步骤1.拆箱检查与准备(1) 将产品的包装箱放置在一个平整、宽敞的空间上,并小心地打开包装箱;(2) 将产品及附件取出,并仔细检查产品是否有损坏,同时核对配送清单上的物品是否完整;(3) 为了保证安装的顺利进行,清理安装场地,确保场地干净整洁,为后续的工作做好准备。
2.组装产品(1) 参照附带的安装图纸或说明书,依据所提供的图示步骤,按照顺序进行产品的组装;(2) 使用正确的工具和配件,确保组装过程中的每一个连接点都可靠牢固,以确保产品稳定性和安全性。
3.连接电源和调试(1) 根据产品的电源要求,正确连接产品电源;(2) 按照产品说明书中的相关步骤,进行产品的调试,确保产品的正常运行;(3) 如遇到调试问题,请及时参考产品说明书中的故障排除方案,或联系客户服务中心进行咨询。
4.安装辅助设备(如有)(1) 根据产品配套设备的说明,依据提供的图示或文字步骤,安装和连接辅助设备;(2) 确保辅助设备与产品的连接牢固可靠,并进行相关设置和调试。
5.安装完成与验收(1) 安装完毕后,仔细检查产品的每一个连接点,确认产品已经安装到位,并确保没有松动或未连接好的部分;(2) 做好安装记录,记录产品的型号、序列号以及安装日期等信息;(3) 如已安装辅助设备,进行相关功能测试,确保设备的正常工作;(4) 完成验收后,将安装场地恢复原状,清理残留物并妥善处理废弃物。
控制器安装步骤说明书
控制器安装步骤说明书1. 控制器安装前准备在开始安装控制器之前,请确保以下准备工作已完成:- 确定控制器的型号和规格,以便提供正确的安装指导。
- 了解控制器的功能和特性,并熟悉其相关的操作手册。
- 检查控制器配套的安装工具和材料是否齐全,包括螺丝刀、扳手、螺丝、固定支架等。
2. 安装控制器按照以下步骤来安装控制器:步骤一:确定安装位置- 首先,根据需要和实际情况选择一个合适的安装位置。
确保该位置不会受到震动、灰尘、高温等不利因素的影响。
- 其次,根据控制器的尺寸和重量,选择一个稳固的支架或固定装置,以确保控制器安装牢固可靠。
步骤二:安装支架或固定装置- 如果需要使用支架或固定装置,请根据控制器的尺寸和形状来选择适合的固定支架或装置。
- 使用螺丝刀或扳手,将支架或固定装置固定在已选择的位置上。
确保固定牢固,并能够承受控制器的重量。
步骤三:连接电源- 首先,确认电源线的规格和控制器的电源要求是否匹配。
如果不匹配,需要使用电源适配器或其他方法来调整电源的输入和输出。
- 将电源线插入控制器的电源接口,并插入电源插座。
确保电源线连接牢固,没有松动。
步骤四:连接其他设备- 根据控制器的功能和使用需求,将需要连接的其他设备(如传感器、执行器等)与控制器进行连接。
- 请确保连接正确,插头与接口相匹配,并且插拔过程中要轻柔小心,避免损坏设备或控制器。
3. 控制器设置与调试在完成控制器的安装后,需要进行设置和调试,以确保其正常运行和满足实际需求:步骤一:打开电源- 确保控制器已连接电源,并打开电源开关。
- 检查控制器的指示灯或显示屏,确保有正常的电源供应和工作状态。
步骤二:设定控制参数- 根据实际需求,将控制器所需的参数进行设定。
- 可以参考控制器的操作手册或相关文档,按照要求进行参数设置。
步骤三:调试控制器- 通过手动操作或其他方式,检验控制器的功能是否正常。
- 对于复杂的控制器系统,可能需要进行更复杂的调试过程,包括联接其他设备、程序编写等。
软件操作说明书
软件操作说明书一、简介本软件操作说明书旨在详细介绍软件的操作步骤和功能,帮助用户快速上手并正确使用软件。
请用户仔细阅读本说明书,并按照指导进行操作。
二、安装步骤1. 下载软件安装包用户可以从官方网站下载软件的安装包,确保下载的安装包来源可靠。
2. 运行安装程序双击安装包,运行安装程序。
根据提示,选择安装目录和其他个性化设置。
3. 完成安装等待安装程序自动完成软件的安装过程,安装完成后,用户可以在电脑桌面或开始菜单中找到软件的快捷方式。
三、软件界面1. 主界面软件主界面由若干功能模块组成,每个模块提供不同的功能操作。
用户可以根据需求选择相应的功能模块。
2. 菜单栏软件的菜单栏位于主界面的顶部,包括文件、编辑、查看、工具、帮助等菜单项,用户可以通过菜单栏进行相应的操作。
3. 工具栏软件的工具栏位于主界面的上方或左侧,提供常用的操作按钮,方便用户快速访问常用功能。
四、基本操作1. 登录打开软件后,用户需要输入用户名和密码进行登录。
如果是首次登录,用户需要进行注册并设置密码。
2. 创建新项目在软件主界面中,用户可以点击“新建项目”按钮,填写项目名称和相关信息,然后点击“创建”按钮完成新项目的创建。
3. 导入数据用户可以通过导入功能将已有的数据文件导入到软件中,支持常见的数据格式,如Excel、CSV等。
4. 数据编辑用户可以在软件中对导入的数据进行编辑、添加、删除等操作,确保数据的准确性和完整性。
5. 数据分析软件提供丰富的数据分析功能,用户可以根据需要选择不同的分析方法,生成相应的分析报告和图表。
6. 导出结果用户可以将分析结果导出为Excel、PDF等格式,方便与他人共享和查看。
五、高级功能1. 自定义设置软件提供了丰富的自定义设置选项,用户可以根据自己的需求进行个性化设置,如界面风格、语言设置等。
2. 批量处理用户可以通过批量处理功能对多个数据文件进行统一的操作,提高工作效率。
3. 数据备份与恢复软件支持数据的备份和恢复功能,用户可以定期备份数据,以防数据丢失或损坏。
设备安装说明书模板
设备安装说明书模板一、前言感谢您购买本产品,为了确保您能正确安装和使用该设备,特提供本设备安装说明书。
请在安装前仔细阅读本说明书,并按照步骤进行操作。
二、准备工作1. 工具准备:准备以下工具以便安装设备:- 扳手- 螺丝刀- 小锤子- 电钻- 润滑油2. 环境要求:确保安装环境符合以下要求:- 温度:在设备安装的环境温度范围内- 通风:确保设备在通风良好的环境中安装- 绝缘:确保设备的安装位置与电源之间有足够的绝缘距离三、设备安装步骤1. 打开包装:谨慎打开设备包装,确保不会损坏设备。
2. 放置设备:将设备放置在安装位置上,确保设备与周围环境保持一定的距离,以便设备正常运行和散热。
3. 连接电源:根据设备所需的电源类型,连接适当的电源线,并确保电源线接地可靠。
4. 连接外部设备:如果设备需要连接外部设备(如显示屏、音箱等),请按照设备说明书的要求进行连接。
5. 修整线缆:根据安装环境的要求,修整各种线缆,确保设备线缆整齐、清晰,并避免过度扭曲。
6. 安装螺丝:使用螺丝刀将设备与安装位置固定,确保设备稳固且不易松动。
7. 润滑及保养:根据设备说明书,将设备所需的润滑油添加到指定位置,并定期进行设备保养和维护,以保证设备长时间稳定运行。
8. 电源开启:接通电源,确保设备正常开启,并按照设备说明书进行进一步的操作和设置。
四、安全注意事项1. 在安装设备时,请确保断开电源,以避免电击或其他安全事故的发生。
2. 在安装设备时,请确保设备与安装环境的绝缘距离符合安全标准,以避免可能的漏电风险。
3. 如果您对设备的安装和操作不确定,请咨询专业人士或联系售后服务中心寻求帮助。
4. 在设备安装完成后,检查所有连接和固定螺丝,确保设备稳固且安全。
五、常见问题解决在设备安装和使用过程中,可能会遇到常见问题。
以下是一些常见问题及其解决办法:1. 问题:设备无法打开。
解决办法:检查电源线是否连接良好,确保电源开关处于开启状态。
Miele洗衣机使用与安装说明书

使用与安装说明书洗衣机为避免意外或损坏电器,安装和首次使用之前请务必仔细阅读本使用与安装说明书。
zh-CN M.-Nr. 10 375 711目录______________________________________________________________________________________________________________________________________________环境保护 (6)注意事项与安全说明 (7)操作洗衣机 (14)控制面板 (14)洗衣机操作示例 (16)首次使用前 (17)设定语言 (17)信息 (18)首次运行程序 (18)TwinDos配给系统 (19)洗涤剂 (20)使用配给盒 (21)打开设置菜单........... .. (22)设置UltraPhase 1和UltraPhase 2 (22)设置其他类型洗涤剂 (23)运行第一个程序 (24)环保节能清洗 (25)EcoFeedback节能反馈 (26)1. 准备衣物 (27)2. 选择程序 (28)3. 放入衣物 (29)4. 选择程序设置 (30)5. 添加洗涤剂 (32)TwinDos配给系统 (32)洗涤剂配给抽屉 (33)CapsDosing(胶囊洗涤液配给) (34)6. 启动程序–程序结束 (36)脱水 (37)2目录______________________________________________________________________________________________________________________________________________延迟启动 (39)选择延迟启动 (39)更改延迟启动 (39)取消延迟启动并立即运行程序 (39)程序参照表 (40)选项 (45)快速 (45)增加水量 (45)污渍 (45)衣物护理标签符号 (47)程序序列 (48)更改程序序列 (50)取消程序 (50)中断程序 (50)更改程序 (50)程序开始后添加或取出衣物 (51)安全锁 (52)洗涤剂 (53)正确的洗涤剂 (53)水质软化片 (53)配量辅助用具 (53)衣物柔顺剂或液态粉浆 (53)Miele建议洗涤产品 (54)按照(EU)1015/2010条例建议的洗涤剂 (55)清洁与保养 (58)清洁滚筒(卫生信息) (58)外壳与面板 (58)清洗洗涤剂配给抽屉 (58)清洁TwinDos配给系统 (60)清洁配给器............................................. . (60)清洁进水口过滤器 (61)3目录______________________________________________________________________________________________________________________________________________故障排除指南 (62)程序无法启动 (62)洗衣程序停止且显示屏显示故障代码 (63)程序结束时显示屏显示如下故障信息 (64)TwinDos有关故障 (66)洗衣机常见故障 (67)清洗效果不佳 (69)机门无法打开 (70)排水口堵塞和/或断电时打开机门 (71)售后服务 (73)维修 (73)可选配件 (73)安装和连接 (74)正视图 (74)后视图 (75)安装地面 (76)将机器移至安装地点 (76)卸下运输杆 (76)装回运输杆 (78)放平电器 (79)调整底座 (79)将洗衣机安装在橱柜台面下方或橱柜内部 (80)洗衣机和干衣机组合安装 (80)Miele防漏水保护系统 (81)连接水源 (82)连接排水系统 (83)电气连接 (84)技术参数 (85)能耗参数 (86)检测机构注意事项 (87)45目录 ______________________________________________________________________________________________________________________________________________设置............................................................. 88 语言 . (89)洗涤剂类型/用量...................................................89 污渍程度......................................................... 89 蜂鸣器音量.. (89)按键音 (89)总能耗........................................................... 89 密码. (90)温度单位 (90)显示屏亮度....................................................... 90 显示屏变暗....................................................... 90 机器关闭设置..................................................... 91 记忆功能..........................................................91 预洗棉质衣物..................................................... 91 浸泡时间......................................................... 轻柔动作......................................................... 91 92 降低温度..........................................................92 增加水量..........................................................92 分等级增加水量................................................... 92 最高漂洗水位.....................................................93 洗衣水冷却....................................................... 93 防皱. (93)可选配件..........................................................94 洗涤剂........................................................... 94 专用洗涤剂....................................................... 94 织物护理剂....................................................... 95 辅助剂.. (95)环境保护______________________________________________________________________________________________________________________________________________6注意事项与安全说明______________________________________________________________________________________________________________________________________________7注意事项与安全说明______________________________________________________________________________________________________________________________________________儿童安全注意事项无人看管的情况下,八岁以下的儿童须远离本机器。
安装步骤说明书
安装步骤说明书尊敬的用户,欢迎您购买我们公司的产品。
为了确保您能正确、快速地安装和使用该产品,特别为您准备了详细的安装步骤说明书。
请您仔细阅读以下内容,按照步骤一步一步地操作。
1. 物料准备在开始安装之前,请确保您已经准备齐全所需的物料。
以下是安装所需的物料清单:- 主机设备- 配套配件和固定螺丝- 电源线- 数据线- 安装工具(如螺丝刀、扳手等)2. 安装位置选择选择一个合适的位置安装主机设备,确保其稳固并且便于接入电源和数据线。
请考虑以下几点:- 离电源插座近,方便供电- 通风良好的场所,避免过热- 干燥且避免进水的环境- 尽量避免与其他电子设备过于靠近,以免干扰3. 设备安装使用合适的工具,按照以下步骤将主机设备安装到确定的位置上:- 打开设备包装,取出主机设备和配套配件- 使用固定螺丝将主机设备固定在选择的位置上,确保稳固可靠- 连接电源线和数据线,确保连接牢固且接口无松动4. 电源连接请按照以下步骤正确连接电源线:- 确认电源线的接口与主机设备的电源接口相匹配- 将电源线插头插入主机设备的电源接口- 将电源线的另一端插入电源插座5. 数据线连接请按照以下步骤正确连接数据线:- 确认数据线的接口与主机设备的数据接口相匹配- 将数据线插头插入主机设备的数据接口- 将数据线的另一端插入外部设备的数据接口(如果需要)6. 通电测试完成上述步骤后,您可以执行以下操作进行通电测试:- 确保主机设备的电源开关处于关闭状态- 插入电源线的插头到电源插座中- 打开主机设备的电源开关- 观察设备是否能顺利启动,是否有任何异常声音或指示灯闪烁请注意:如果在通电测试过程中发现任何异常情况,请立即关闭设备电源,并联系我们的客服人员进行咨询和解决。
7. 附加功能设置按照您的需求和产品说明书中的指引,进行附加功能的设置和调整。
根据不同产品的要求,可能会需要进行一些额外的步骤和配置。
至此,您已经完成了产品的安装步骤。
Panasonic FV-15TGUZ 换气扇操作和安装说明书
Operating andInstallation InstructionsVentilating FanModel No. / No. Model / 型号Net Weight / Berat Bersih / 净重 : 1.2 k gTo avoid the possibility of causing injury to users or damage to properties, please follow all theFollow strictly all the instructions given in this manual for installation.Electrical and installation work need to be performed by a quali fi ed individual.Installation error may cause fi re, electricalcapabilities, or lack of experienceand knowledge, unless they have been given supervision or instruction concerning the use of the appliance by a person responsible for theirsafety. Children should be supervised to ensure that they do not play withjobs.May cause injury or electrical shock if Ventilating Fan moves suddenly.Kindly refer to your authorized dealer fordropping.This product must be properly andreliably grounded.Do not switch on or off in case of gas leakage.May cause fi re or explosion due to Overheating may cause electrical shockMust use only supplied parts.May cause fi re, electrical shock, injury orMay cause injury, damage or Ventilating May cause fi re or electrical shock due to short circuit.To avoid the possibility of causing injury to users or damage to properties, please follow all theexplanation written in this manual. The manufacturer will not be responsible for any accidents or injuries caused by defective, de fi cient installation orinstallation which does not follow theThis Ventilating Fan must be installed by a quali fi ed technician.May cause injury if Ventilating Fan e a device for disconnection from the supply, having a contact saparation of at least 3 mm indouble poles switch, which must be incorporated in the fixed wiring in accordance with the local electricalmetallic members in the ceiling, such as metal laths, wire laths and metal plate, it is possible to cause fi re harzards in case of leak.Routine maintenance is required every year. Disconnect the power source before you conduct any maintenance.This product is applicable to living rooms, washrooms and other placeswhere the humidity is not too high.This product is for in house use only.Can cause rust, discolour, damage orUntuk mengelakkan kemungkinan berlakunya kecederaan kepada pengguna atau kerosakan hartaSila rujuk kepada semua arahan yang diberikan dalam panduan ini untuk pemasangan.Kerja elektrikal dan kerja pemasangan mesti dilakukan oleh orang yang bertauliah.Kesilapan pemasangan boleh menyebabkan kebakaran, kejutan elektrik, Kipas Ventilasi terjatuh ataukecacatan anggota, deria atau kebolehan mental, atau kurangpengalaman dan pengetahuan, melainkan mereka telah diberikan pemerhatian atau panduan mengenai penggunaan peralatan ini oleh individu yang bertanggungjawab mengenai keselamatan mereka. Kanak-kanak mestilah diberi pemerhatian untuk memastikan mereka tidak bermain atau membuat kerja penyelenggaraan.Boleh menyebabkan kecederaan atau kejutan elektrik jika Kipas Ventilasi bergerak secara tiba-tiba.Sila rujuk pada wakil penjual anda untuk membaiki atau penyelenggaraan.Apabila produk ini tidak lagi digunakan, ia tidak boleh dibiarkan begitu sahaja, tanggalkan ia untuk mengelakkandaripada terjatuh.Pendawaian produk ini mestilahdilakukan dengan betul dan selamat.Kebakaran atau letupan mungkin berlakuPemanasan yang terlampau boleh menyebabkan kejutan elektrik atau dinyatakan di dalam panduan ini.Hendaklah menggunakan bahagian-bahagian yang dibekalkan sahaja.Boleh menyebabkan kebakaran, kejutan elektrik, kecederaan atau Kipas VentilasiBoleh menyebabkan kecederaan,Boleh menyebabkan kebakaran, atau kejutan elektrik akibat litar pintas.Untuk mengelakkan kemungkinan berlaku kecederaan kepada pengguna atau kerosakan harta benda, sila patuhi semua arahan yang dinyatakan dalam panduan ini. Pengilang tidak akan bertanggungjawab sekiranya berlaku sebarang kemalangan atau kecederaan yang disebabkan oleh kesilapanpemasangan atau pemasangan yangPastikan sekurang-kurangnya 45 cm lubang pemeriksaan segi empat disediakan.Kipas Ventilasi ini mestilah dipasang oleh juruteknik yang berkelayakan.Boleh menyebabkan kecederaan, jika Kipas Ventilasi terjatuh.Gunakan peranti untuk pemutusan dari bekalan, sekurang-kurangnya 3 mmjauh daripada suis dua kutub yang mestidigabungkan dalam pendawaian tetap yang mengikut peraturan pendawaianmenjadi lebih kukuh.bahagian berlogam pada siling seperti logam halus, wayar halus dan platlogam, ia mungkin menyebabkan bahaya kebakaran jika berlaku kebocoran.Penyelenggaraan rutin diperlukan setiap tahun. Putuskan sumber kuasa sebelum anda melakukan apa-apa penyeleggaraan.Produk ini boleh diguna di ruang tamu, bilik air dan tempat lain yang Boleh menyebabkan karat, berubah warna, kerosakan atau kecederaan.serombong terbuka gas atau peralatanVentilasi.为避免导致用户受伤或财物损坏的可能性,请遵守以下所述的所有指示。
方太油烟机系列产品使用安装说明书

操作
警告 1. 防过猛过重操作按键; 2. 防灶具空烧; 3. 防通电拆卸和违嘱拆卸; 4. 防油杯油满外溢; 5. 防非专业人员拆检; 6. 禁止炉火直接烘烤油烟机。
使用方法 操Βιβλιοθήκη 界面描述产品信息型号
EMG9030
净重
76 lbs(34.5 Kg)
油网及蝶翼板中的油脂沉淀物可能着火,绝不 在此产品附近使用明火。请不要在使用固体燃 料(比如木头或煤)的加热设备附近安装此产 品。禁止有飘飞的火花。 请避免在烟机下方使用会产生火焰的食品。 为降低灶台油火风险: 1. 绝不使灶台表面的器具在无人看管下高档位
运行。溢锅造成冒烟和可能起火的油脂外溢, 请在低档或中档设置下缓慢加热油脂。 2. 烹饪时请总是开启烟机。 3. 请清洁油烟机,叶轮、滤网上或在排烟管道 里不应积油。 4. 请使用合适尺寸的锅具。请总是使用与灶台 表面的器具尺寸吻合的炊具。 为降低灶烤一体机上方油火对人身伤害的危 险,请遵守以下说明: 1. 用合身的锅盖、烤板或金属托盘扑灭火焰, 然后关闭灶具。注意谨防烫伤。如果火焰未 立即熄灭,请疏散并报火警。 2. 油锅着火时,请立即关闭油烟机 ( 油烟机的 运行会助燃火势 )。立即采用有效的灭火措 施,如用金属封盖盖住明火、关闭燃气总阀、 使易燃物远离明火等。 3. 绝不拿起着火的锅具,您可能被烫伤。 4. 请勿用水,包括湿抹布或毛巾灭火,这样会 导致猛烈的蒸汽喷发。 仅在以下条件使用灭火器: 1. 当您上过基础的灭火器课程,并且已经知 道如何操作; 2. 当火较小并且控制在火源处; 3. 当您已打火警电话; 4. 当您背向出口时可救火。 人身伤害危险 此产品不适用于(包括儿童在内)身体、感知 或精神能力减弱或缺乏经验或知识的人群,除 非在对其安全负责的人监督或指导如何安全使 用此产品的情况下。孩童应受监管,确保其不 玩弄此产品。 油烟机可能有非常锋利的边,在进行安装、清 洁或修理时,谨防被油烟机内金属板快口等划 伤和擦伤。应佩戴合格的防护手套。 操作中可触及部分会变得很烫。绝不触摸变烫 的部分。保持儿童在安全距离以外。
电源设备安装操作说明说明书
F10 Series C retrofit kit for breakersm warningDO nOT aTTEMPT TO rEPLaCE THE BrEaKEr wHEn THE UniT iS inSErTED in THE MCC. POTEnTiaLLY DangErOUS VOLTagES MaY BE PrESEnT.m CaUTiOniF wOrK iS inVOLVED in COnnECTing THE BUCKET wiTH EXiSTing EQUiPMEnT, EnSUrE THaT inCOMing POwEr iS DiSCOnnECTED BEFOrE wOrK iS BEgUn. DiSCOnnECTing MEanS SHOULD BE LOCKED OUT anD/Or TaggED OUT OF SErViCE. wHErE iT iSnOT FEaSiBLE TO DE-EnErgiZE THE SYSTEM, THE FOLLOwing PrECaUTiOnS SHOULD BE TaKEn:a) PErSOnS wOrKing nEar EXPOSED ParTS THaT arE Or MaY BE EnErgiZED SHOULD BE inSTrUCTED anD SHOULD USE PraCTiCES (inCLUDing aPPrOPriaTED aPParEL, EQUiPMEnT, anD TOOLS) in aCCOrDanCE wiTH THE nESC.B) PErSOnS wOrKing On EXPOSED ParTS THaT arE Or MaY BE EnErgiZED SHOULD, in aDDiTiOn, BE QUaLiFiED PErSOnS wHO HaVE BEEn TrainED TO wOrK On EnErgiZED CirCUiTS.DisclaimerThis electrical control equipment is designed to be installed, operated, and maintained by adequately trained technicians. These instructions do not cover all details, variations, or combinations of the equipment, its storage, delivery, installation, check-out, safe operation, or maintenance. Care must be exercised to comply with local, state, and national regulations, as well as safety practices, for this class of equipment. The maximum short circuit capability of the equipment should not be exceeded by connection to a source with higher capability.Qualified personnelIndividuals who install, operate, or maintain motor control centers must be trained and authorizedto operate the equipment associated with the installation and maintenance of a motor control center, as well as the operation of the equipment that receives its power from controller units in the motor control center.Such individuals must be trained in the proper procedures with respect to disconnecting and locking OFF power to the motor control center, wearing protective clothing and equipment,and following established safety procedures as outlined in the National Electrical Safety Code (ANSI C2) and Electrical Equipment Maintenance (NFPA T 70B).P refaceThese instructions cover the replacement of the older vintage breakers with the new Series C T circuit breakers.The new Series C circuit breaker will provide the following UL T recognized interrupting rating in an F10 MCC.HMCP in the combination size 4–5 FVNR starters—65 k rms at 480 V, 60 Hz.HJD in the combination size 4–5 FVNR starters and feeders—65 k rms at 480 V, 60 Hz.Required toolsThe following tools will be required to perform the replacement:• Flathead screwdriver• 5/16-inch nut driver• #20 metal drill bit (0.161)2Instructional Leaflet IL031001ENEffective May 2014F10 Series C retrofit kit for breakerseaton Instructions for installing retrofit kits with new breakers and doorsStep 1Remove the existing breaker, operating mechanism, and top barrier plate.Because partial disassembly of the unit is necessary, the complete unit must be removed from the motor control center.1. Remove the unit from the motor control center.2. Remove top barrier from the unit.3. Remove the operator by taking out the mounting screws.4. Loosen the stab wire leads from the breaker. Mark the leads toensure reconnection will be correct.5. Remove the old breaker by removing the mounting screws.6. Remove the old breaker mounting brackets.Step 2Modifications of unit for new breaker. To install the new breaker, four holes must be drilled in the unit back. One drilling template has been provided to assist. See Figure 1for identification.Figure 1. Dri lli ng T emplatePlace template for HJD/HMCP 250 A 24–30 inches and 36 inches against the panel back per Figure 1. Mark and drill four holes per the template with 0.161 drill bit.Step 3Installing new breaker.For the following steps, refer to the remaining Figure 2 through Figure 6, as an illustrated guide.1. Mount brackets 79-12716-2 per Figure 2 on the holes drilledfrom the template. Use screws #70010CUC5V (4).Figure 2. Mounting Brackets and Hardware2. Before mounting breaker, tap the holes out using one screw#70010CUC5V perFigure 2.3. Place the insulation paper #56-4534 on the breaker mountingbrackets aligning the breaker holes with those in the mounting brackets. A piece of tape may be helpful to prevent it from moving per Figure 3.Figure 3. Insulation3Instructional Leaflet IL031001ENEffective May 2014F10 Series C retrofit kit for breakerseaton 4. Install lower breaker screws #11-5728 with lock washer#109A894H09 through the bracket #79-12438; do not tighten yet. Insert upper screws and washers same part numbers as above through bracket #79-12439; now tighten screws down. Refer to Figure 4.Figure 4. Breaker Mounting Brackets and Hardware5. Reconnect stab leads to the breaker. Make sure that leads are inthe correct location.m iMPOrTanTEnSUrE THE CaBLES arE TOrQUED aS SHOwn On THE FrOnTnaMEPLaTE OF THE nEw BrEaKEr.Figure 5. Insulation6. Place the insulation #56-4802-2 on the top of the breakerperFigure 5. Turn the breaker to the ON position, then place the operating mechanism #10-7176 on top of the breaker by guiding the bottom of the operator through the slot in the bracket per Figure 6.Figure 6. Operator and HardwareMake sure the mechanism catches the breaker toggle. Then put screw #839A681H03 in the top of the operator.7. If an external overload reset button is required, mark the doorand punch the required hole. Install the reset button.8. Before installing the unit, replace old door with the new doorprovided. This will require replacement of the old mounting hardware with new hardware that is also supplied.9. Mount the door, install the unit, and check for proper dooradjustment. Close the door, latch, and energize the unit.Figure 7. Completed Unit with DoorEaton1000 Eaton Boulevard Cleveland, OH 44122 United States © 2014 EatonAll Rights ReservedPrinted in USAPublication No. IL031001EN / Z15213 May 2014Eaton is a registered trademark.All other trademarks are propertyof their respective owners.F10 Series C retrofit kit for breakersInstructional Leaflet IL031001ENEffective May 2014The instructions for installation, testing, maintenance, orrepair herein are provided for the use of the product in general commercial applications and may not be appropriate for use in nuclear applications. Additional instructions may be availableupon specific request to replace, amend, or supplement these instructions to qualify them for use with the product in safety- related applications in a nuclear facility.The information, recommendations, descriptions, and safety notations in this document are based on Eaton’s experience and judgment with respect to retrofitting of power breakers. This instructional literatureis published solely for information purposes and should not be considered all-inclusive. If further information is required, you should consult an authorized Eaton sales representative.The sale of the product shown in this literature is subject to the terms and conditions outlined in appropriate Eaton selling policies or other contractual agreement between the parties. This literature is not intended to and does not enlarge or add to any such contract. The sole source governing the rights and remedies of any purchaser of this equipment is the contract between the purchaser and Eaton. NO WARRANTIES, EXPRESSED OR IMPLIED, INCLUDING WARRANTIES OF FITNESS FOR A PARTICULAR PURPOSE OR MERCHANTABILITY, OR WARRANTIES ARISING FROM COURSE OF DEALING OR USAGE OF TRADE, ARE MADE REGARDING THE INFORMATION, RECOMMENDATIONS, AND DESCRIPTIONS CONTAINED HEREIN.In no event will Eaton be responsible to the purchaser or user in contract, in tort (including negligence), strict liability or otherwise for any special, indirect, incidental or consequential damage or loss whatsoever, including but not limited to damage or loss of use of equipment, plant or power system, cost of capital, loss of power, additional expenses in the use of existing power facilities,or claims against the purchaser or user by its customers resulting from the use of the information, recommendations and description contained herein.。
Gamma instabus Gamma arina 触摸开关操作与安装手册说明书
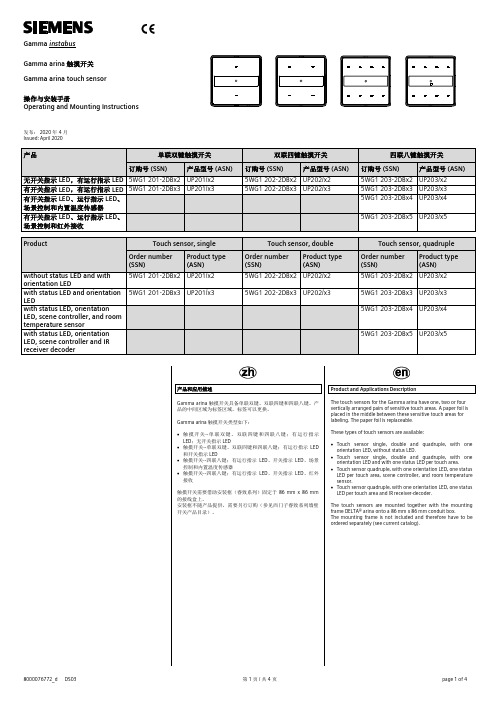
Gamma instabusGamma arina 触摸开关Gamma arina touch sensor操作与安装手册Operating and Mounting Instructions发布: 2020年 4月Issued: April 2020产品单联双键触摸开关双联四键触摸开关四联八键触摸开关订购号 (SSN)产品型号 (ASN)订购号 (SSN)产品型号 (ASN)订购号 (SSN)产品型号 (ASN)无开关指示 LED ,有运行指示 LED 5WG1 201-2DBx2UP201/x25WG1 202-2DBx2UP202/x25WG1 203-2DBx2UP203/x2有开关指示 LED ,有运行指示 LED 5WG1 201-2DBx3UP201/x35WG1 202-2DBx3UP202/x35WG1 203-2DBx3UP203/x3有开关指示 LED 、运行指示 LED 、场景控制和内置温度传感器5WG1 203-2DBx4UP203/x4有开关指示 LED 、运行指示 LED 、场景控制和红外接收5WG1 203-2DBx5UP203/x5Product Touch sensor, singleTouch sensor, double Touch sensor, quadruple Order number(SSN)Product type (ASN)Order number (SSN)Product type (ASN)Order number (SSN)Product type(ASN)without status LED and withorientation LED5WG1 201-2DBx2UP201/x25WG1 202-2DBx2UP202/x25WG1 203-2DBx2UP203/x2with status LED and orientationLED5WG1 201-2DBx3UP201/x35WG1 202-2DBx3UP202/x35WG1 203-2DBx3UP203/x3with status LED, orientationLED, scene controller, and room temperature sensor5WG1 203-2DBx4UP203/x4with status LED, orientationLED, scene controller and IRreceiver decoder 5WG1 203-2DBx5UP203/x5产品和应用描述Gamma arina 触摸开关具备单联双键、双联四键和四联八键。
窗式房间空调操作和安装手册说明书
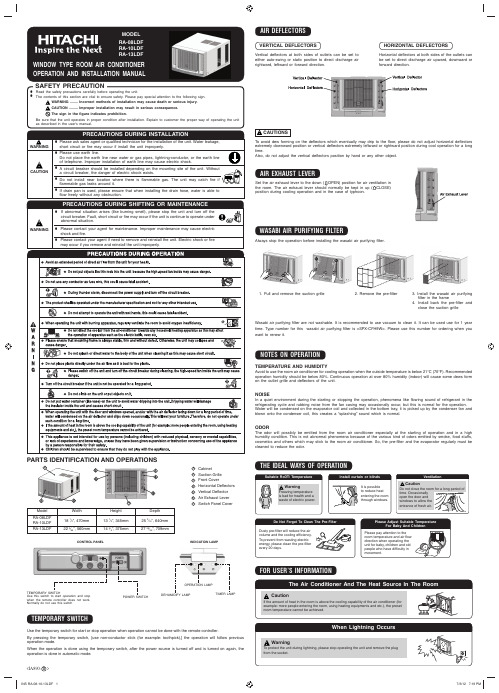
The contents of this section are vital to ensure safety. Please pay special attention to the following sign.WARNING ........ Incorrect methods of installation may cause death or serious injury.CAUTION ......... Improper installation may result in serious consequence.Be sure that the unit operates in proper condition after installation. Explain to customer the proper way of operating the unitPRECAUTIONS DURING INSTALLATIONed technician for the installation of the unit. Water leakage,Do not place the earth line near water or gas pipes, lightning-conductor, or the earth line of telephone. Improper installation of earth line may cause electric shock.PARTS IDENTIFICATION AND OPERATIONS1 Cabinet2 Suction Grille3 Front Cover4 Horizontal De fl ectors5 Vertical De fl ector6 Air Exhaust Lever 7Switch Panel CoverModel RA-08LDF RA-10LDF RA-13LDFWidth 18 1⁄2”, 470mm 22 3⁄64”, 560mmHeight 13 1⁄2”, 345mm 14 3⁄4”, 375mmDepth 253⁄16”, 640mm 27 29⁄32”, 709mmCONTROL PANELINDICATION LAMPTEMPORARY SWITCHUse the temporary switch for start or stop operation when operation cannot be done with the remote controller.By pressing the temporary switch, [use non-conductor stick (for example: toothpick),] the operation will follow previous operation mode.When the operation is done using the temporary switch, after the power source is turned off and is turned on again, the operation is done in automatic mode.AIR DEFLECTORSVertical de fl ectors at both sides of outlets can be set to either auto-swing or static position to direct discharge air rightward, leftward or forward direction.Horizontal de fl ectors at both sides of the outlets can be set to direct discharge air upward, downward or forward direction.VERTICAL DEFLECTORSHORIZONTAL DEFLECTORSTo avoid dew forming on the de fl ectors which eventually may drip to the fl oor, please do not adjust horizontal de flectors extremely downward position or vertical defl ectors extremely leftward or rightward position during cool operation for a long time.Also, do not adjust the vertical de fl ectors position by hand or any other object.AIR EXHAUST LEVERWASABI AIR PURIFYING FILTERSet the air exhaust lever to the down (NOTES ON OPERATIONTEMPERATURE AND HUMIDITYAvoid to use the room air conditioner for cooling operation when the outside temperature is below 21°C (70°F). Recommended operation humidity should be below 80%. Continuous operation at over 80% humidity (indoor) will cause some dews form on the outlet grille and de fl ectors of the unit.NOISEIn a quiet environment during the starting or stopping the operation, phenomena like fl owing sound of refrigerant in therefrigerating cycle and rubbing noise from the fan casing may occasionally occur, but this is normal for the operation.Water will be condensed on the evaporator coil and collected in the bottom tray, it is picked up by the condenser fan and blown onto the condenser coil, this creates a “splashing” sound which is normal.ODORThe odor will possibly be emitted from the room air conditioner especially at the starting of operation and in a high humidity condition. This is not abnormal phenomena because of the various kind of odors emitted by smoke, food stuffs, cosmetics and others which may stick to the room air conditioner. So, the pre-fi lter and the evaporator regularly must be cleaned to reduce the odor.THE IDEAL WAYS OF OPERATIONFOR USER’S INFORMATION<IA890: B >TEMPORARY SWITCHUse this switch to start operation and stop when the remote controller does not work. Normally do not use this switchDEHUMIDIFY LAMPOPERATION LAMPTIMER LAMP1. Pull and remove the suction grille2. Remove the pre-fi lter3. Install the wasabi air purifyingfi lter in the frame4. Install back the pre-fi lter and close the suction grilleWasabi air purifying fi lter are not washable. It is recommended to use vacuum to clean it. It can be used use for 1 year time. Type number for this wasabi air purifying fi lter is <SPX-CFH9W>. Please use this number for ordering when you want to renew it.Never use hot water above 50°C, erosive chemicals or brush to clean the front cover and suction grille because they will damage the plastic surface.● The installation material must be corrosion proof, especially the air conditioner is installed near the sea or hot spring.● Do not install air conditioner in the places where there is a possibility of in fl ammable gas leaks.● Secure tightly the cabinet with screws to the frame. Otherwise there may be danger of the air conditioner dropping.●Please keep the recommended installation dimensions. Otherwise waterdrops or malfunction may occur.●Check the capacity of wiring and power outlet. The power outlet should be used exclusively for the air conditioner. Do not use it with other appliances. Any wiring must follow the national wiring regulation.● Ground the air conditioner to prevent danger of electric shock.● Connect the air conditioner with power source securely.● Use a fuse as below:2 Remove the stopper at front left side of base. (RA-13LDF)DRAIN PANDrain Pan edge shall not exceed the cabinet roller.!CAUTIONS7RS 9LHZINSTALLATION WORK INSPECTION CHECK LISTCAUTIONWhen using the operation of auto swing function, Please manually turn the vertical de fl ector to the utmost right angle before switching on the auto swing function.An abnormal sound will occur when adjusting the vertical de fl ector before switching on the auto swing. This abnormality does not affect the operation.It there is any abnormalities in the vertical movement during the auto swing operation, please do the above setting again.When raining, rain water will enter the outdoor side. An abnormal sound will occur during operation of unit in raining conditions and approximately 10 minutes after rain stop. This will not affect the performance or liability of the room air conditioner.MEMO..................................................................................................................................................................................................... ..................................................................................................................................................................................................... .....................................................................................................................................................................................................Model RA-08LDF RA-10LDF RA-13LDFa 365395* Recommended dimension for performance testing purpose only.b 490580c Over 200Over 200dOver100eOver 1200fOver 150gOver 900hOver 200iOver 200j*130 or more160 or moreDimension (mm)Recommended temperature range for safety testing should be as below:Cold side : Dry bulb 21 – 32°C Wet bulb 15 – 23°CHot side : Dry bulb 21 – 43°CWet bulb15 – 26°C<IA890: B >PRE-FILTERIf the pre-fi lter is clogged with dust, the air fl increased operating noise. Be sure to clean the fi lter about every 20 days. 1 Remove the suction grille by pulling the bottom corner and slightly lift up thesuction grille. 2 - 3 Pull downward to unhook the suction grille and remove the suction grille.● Lift and unhook the bottom of the pre-fi lter and remove it.● Remove dust from the pre-filter by using a vacuum cleaner. If the pre-fi lter is very dirty, wash it with detergent and rinse properly with water. Dry the pre-fi lter with soft cloth and do not expose it to heat or under direct sunlight. ● Install the pre-fi lter by fi tting the top hooks and then hook the bottom ofthe pre-fi lter. ● Attach the suction grille back to its place by hooking at the top side to the front cover, then gently push at bottom corner.Clean the front cover and suction grille with a soft dry cloth. When it is excessively dirty, wipe it with a soft cloth dampened with mild soap, then wipe it again thoroughly with a soft dry cloth.The suction grille can also be removed and be washed with water and mild soap. Remove the suction grille in the following manner.1 Remove the suction grille by pulling the bottom cornerand slightly lift up the suction grille . 2 - 3 Pull downward to unhook the suction grille and removethe suction grille.Does not operate at allPoor cooling performanceCheck the following items before asking for service. If the malfunction persists, please contact service centre.1 Is the power cord loosened or unplugged?2Is the fuse blown out or the circuit breaker tripped? 3 Is the voltage normal?4 Is the main switch set to “OFF” position?1Is the pre-fi lter covered with heavy dust? Clean pre-fi lter and replace it.2 Is the temperature setting correctly?3 Is the sunlight fall directly in the air conditioner?4 Is the air fl ow on the rear side (outdoor) blocked?Leave a space of 900 mm (3 feet) behind the rear side of air conditioner.5 The doors or windows may be opened widely or there are other sources of heat inthe room.6 Is the ventilation damper opened?SymptomCheckRemove all the shipping parts before installation and consult an authorised dealer concerning installation requirements, otherwise may damage the air conditioner.LOCATION● Select a location that can support the weight of the air conditioner and will not cause increased operating noise andvibration.● Select a location to avoid direct sunlight on the air conditioner.● Select a good location for ef fi cient air circulation.●Select a location where there is no obstacles near the air inlet and outlet.INSTALLATION INSTRUCTIONS1 Remove the rubber plug from the base pan.2 Install the drain pan by using 2 pieces of screws (provided) at the cabinet.3Connect the drain pan with the drain hose to drain point. (Drain hose or tubing can be purchase locally. Drain hose inner diameter should be around ø13mm or 1/2 inch.)4 Pour 2 glasses of water into the drain pan to ensure the drainage is functioningnormal.5 Slide the air conditioner unit back into the cabinet.CONDENSED WATER DRAINAGEsurface for maximum cooling ef fi ciency, thus producing a splashing sound.the following procedure which may, reduce the cooling operation performance.Have you removed the shipping parts? Please check the caution sheet which is attached at front cover.Is the incline of room air conditioner regarding front and rear, right and left all right after installation?Is the strength of installation suf fi cient?Have you grounded the room air conditioner?Have you fastened the unit to the cabinet?Have you done a test operation, and are there any abnormal phenomena?ItemNo.123456Check ItemCon fi rmMAINTENANCEBEFORE ASKING FOR SERVICEFRONT COVER AND SUCTION GRILLEThe Drain Pan can be used in any positions as below and be secured by 2 screws to avoid water dropping problem:If power cord is withdrawn from left side of unit, please arrange the power cord as in fi gure after installing the front cover.20mm or more。
银河麒麟高级服务器操作系统 V10 安装手册说明书
银河麒麟高级服务器操作系统V10安装手册麒麟软件有限公司2021年03月目录银河麒麟最终用户使用许可协议 (1)银河麒麟高级服务器操作系统隐私政策声明 (5)第一章概述 (13)第二章安装准备 (13)第三章引导安装 (13)第四章欢迎页面 (15)第五章安装信息摘要 (16)5.1.软件 (16)5.1.1.安装源 (16)5.1.2.软件选择 (17)5.2.系统 (18)5.2.1.安装位置 (18)5.2.2.KDUMP (21)5.2.3.网络和主机名 (22)第六章开始安装 (24)第七章安装完成 (24)尊敬的银河麒麟操作系统及相关产品用户(以下称“您”或“贵机构”):首先感谢您选用由麒麟软件有限公司开发并制作发行的银河麒麟操作系统软件产品。
请在打开本软件介质包之前,仔细阅读本协议条款、提供的所有补充许可条款(统称“协议”)及银河麒麟操作系统隐私政策声明。
一旦您打开本软件介质包,即表明您已接受本协议的条款,本协议将立即生效,对您和本公司双方具有法律约束力。
1.使用许可按照已为之支付费用的用户数目及计算机硬件类型,麒麟软件有限公司(下称“麒麟软件”)向您授予非排他、不可转让的许可,仅允许内部使用由麒麟软件提供的随附软件和文档以及任何错误纠正(统称“本软件”)。
-软件使用许可在遵守本协议的条款和条件的情况下,麒麟软件给予贵机构非独占、不可转让、有限的许可,允许贵机构至多使用软件的五(5)份完整及未经修改的二进制格式副本,而此种软件副本仅可安装于贵机构操作的电脑中。
-教育机构使用许可在遵守本协议的条款和条件的情况下,如果贵机构是教育机构,麒麟软件给予贵机构非独占、不可转让的许可,允许贵机构仅在内部使用随附的未经修改的二进制格式的软件。
此处的“在内部使用”是指由在贵机构入学的学生、贵机构教员和员工使用软件。
-字型软件使用软件中包含生成字体样式的软件(“字型软件”)。
贵机构不可从软件中分离字型软件。
安装说明书模板
安装说明书模板
一、安装概述
1.1 说明安装的目的和重要性
1.2 列出所需的材料和工具清单
1.3 安装的预期结果和效果
二、准备工作
2.1 确保安装环境适合
2.2 安装前的检查和测试
2.3 要求安装人员的资质和技能
三、安装步骤
3.1 步骤一:拆包和查看零件清单
3.2 步骤二:安装基础设施
3.3 步骤三:组装零部件
3.4 步骤四:连接电源和电缆
3.5 步骤五:调整和校准
3.6 步骤六:测试和验收
四、注意事项
4.1 安全注意事项
4.2 可能遇到的常见问题及解决方法
4.3 维护和保养建议
4.4 使用说明和注意事项
五、附录
5.1 安装过程中的图片和图表
5.2 安装的技术参数和规格
5.3 保修和售后服务信息
六、常见问题解答
注意:以上为安装说明书的模板概要,根据具体情况进行调整和完善。
请在编写正式的安装说明书时,按照上述大纲逐步展开详细说明,确保内容的准确性、完整性和易读性。
在每个章节中,可以适当增加
文字或细化步骤,以满足实际需求。
同时,根据目标受众的特点,选
择合适的表格、图表和插图来辅助说明。
安装说明书是非常重要的,它提供了安装过程的详细指导,确保用
户能正确、顺利地安装和操作目标产品。
因此,在编写安装说明书时,一定要严格按照实际情况来进行,确保内容的准确性和可读性,避免
出现任何影响阅读体验的问题。
最后,通过合理的排版和精练的表达,能够使整份安装说明书显得整洁美观,语句通顺,全文表达流畅。
希望以上提供的安装说明书模板能对您有所帮助,谢谢!。
方德桌面操作系统v3.1安装手册说明书
方德桌面操作系统V3.1安装手册版权所有©2019 中科方德软件有限公司联系电话:400-882-8801电子邮件:***********************官方网站:——微信公众号————产品及服务——目录1.适用范围 (1)2.系统安装前期准备工作 (1)2.1运行环境及硬件配置要求 (1)2.2安装方式 (1)2.3数据备份 (1)3.安装实施 (2)3.1启动安装光盘/U盘 (2)3.2安装类型说明及其步骤详解 (7)3.2.1安装类型说明 (7)3.2.2“共存模式”安装方式 (8)3.2.3“清空磁盘”安装方式 (10)3.2.4“自定义”安装方式 (15)3.3系统安装 (17)4.系统启动配置 (19)4.1 在双系统中隐藏/开启Windows系统 (19)4.2 修改开机默认系统顺序 (20)5.应用安装 (21)5.1应用软件安装 (21)5.2在线安装flash插件 (24)6.系统注册 (25)7.常见问题 (28)8.联系方式 (32)版权所有©中科方德软件有限公司1.适用范围本手册仅适用于方德桌面操作系统V3.1的安装、启动配置和应用安装。
如果您在使用过程中有任何问题或建议,欢迎联系我们,感谢支持!2.系统安装前期准备工作2.1运行环境及硬件配置要求方德桌面操作系统的运行环境及硬件配置要求如下:●平台:支持绝大部分X86硬件平台●CPU:支持Intel、AMD和兆芯等X86平台处理器,主频1GHz 以上,推荐双核主频1GHz 以上●内存:1G以上,推荐4G 或更高配置●硬盘:25G 以上空间,推荐50G 或更高配置●显卡:支持主流集显、独显,推荐256MB 独立显卡或更高配置2.2安装方式1)光盘使用原厂提供的系统安装光盘进行安装。
2)U盘使用原厂提供或技术支持人员协助制作的安装U盘进行安装。
2.3数据备份1)目标机器已有系统或有数据需要备份如果预安装的主机,已有Windows或其他系统,则开机进入主机系统(Windows系统),详细了解Windows系统内盘符结构和各个盘符存放的数据情况。
- 1、下载文档前请自行甄别文档内容的完整性,平台不提供额外的编辑、内容补充、找答案等附加服务。
- 2、"仅部分预览"的文档,不可在线预览部分如存在完整性等问题,可反馈申请退款(可完整预览的文档不适用该条件!)。
- 3、如文档侵犯您的权益,请联系客服反馈,我们会尽快为您处理(人工客服工作时间:9:00-18:30)。
安居宝管理软件操作系统安装及使用说明书
第一部分:操作系统安装
安居宝智能小区管理系统网络版包括电子巡更系统、多表
抄集、停车场系统、综合系统(包括门禁系统、住宅监控、
边界报警三个子系统),系统结构为C/S(客户机/服务器
结构的网络版系统),一般数据都放在服务器上,工作站只
是安装管理软件,这样有利保护数据。
下面介绍两种常见
的操作系统安装模式:1、客户机\服务器模式 2、单一
PC使用模式
一、客户机\服务器模式安装方法(此方法适用于大型网
络系统):
1、服务器安装(客户机\服务器模式)
服务器要求运行在Windows 2000 Server以上的网络操作
系统版本,而且服务名建议设置为Server,客户机要求
是Windows98/2000都行。
网络协议采用TCP/IP,如果网
络中有两台以上的PC,建议一台作专门的服务器用或服
务器与工作站并用,用于运行数据库,Windows 2000
Server安装完后,建议为该服务器配置域。
第一次启动
后出现:(图1)
图1
也可以通过打开《实用工具》中的《服务器配置》来完成此项,如果不配置,可以把下面的方框中的勾去掉。
(1)服务器装完后为客户分配用户名,打开《开始》-> 《程序》->《管理工具》 《Active Directory用
户和计算机》菜单上后出现窗口如下(图2):
图2
如上选择《新建》-><Users>后(图3)
其中的(AnJuBao )就是你工作站登录时的用户名,其它都是标识,然后点<下一步>为它设置登录密码即可完成。
2、 客户机安装:工作站可以装Windows98或以上的操作系统
都行,配置一下网络,在登录时,输入在服务器中建的用户登录名<User>,并输入密码即可登录到服务器域中。
二、如果只有一台PC 进行管理,建议操作系统装Windows 2000 Profession 版即可。
第二部份:SQL Server 2000数据库系统安装
(1)服务器端SQL Server2000安装(如果是一台PC 进
行管理,SQL Server 2000数据库只需装这一步即可,第二部份中的其它步骤无需装。
)
把光盘放入光驱中,打开SQL Server 2000安装文件,按照下面图片中所选中的项,进行安装。
第1步第2步
第3步
第5
第6步
结下来就开始复制文件,文件复制完后建议重新启动一下计算机。
(2)、数据库的附加
把光盘中的Data目录拷贝到D盘中,如果你要安装多个软件(如:小区管理、停车场、巡更等),只要在D盘中建一个Data目录,然后把相应软件光盘中的Data目录中的两个文件(*.MDF和*.LOG)都拷到Data中即可。
由于这Data是存放数据库的目录,千万不能把它删掉,如果删除则数据全部丢失,操作一定要谨慎。
拷到D盘后把这个Data目录的属性中的只读去掉,改为存档,方法如图7:
第7步
属性改好后,从开始—>程序中打开Microsoft SQL Server EenterPrise Manager(企业管理器)(图8)
第8步打开后,把所有的+号展开,
选中数据库点右键出的《所有任务》 《附加数据库》
点第9步中的有三个点的按钮,出现文件选择框架,选中Data 目录中的以MDF 结尾的文件后,另外一个以LDF 结尾的文件会自动附加过来。
至此为止,数据库已附加完成。
(3)可选步骤:(如果操作系统采用客户机\服务器模式,要设置此步骤)
1、如果整个网络是带域登录的,管理员通过 Windows 2000 Server 给工作站分配用户后,还在SQL Server2000的<企业管理器>中为新建的域用户(Users)分配登录权限,也就是为用户在工作站上的登录名建立登录到数据库中的权限,这样用户即可以用此登录名进行网络登录和数据库访问。
方法如下:展开 Server 后在《安全性》的《登录》这一项右击后看见《新建登录》 图8中所示。
然后在图9所示的对话框中《常规》 项的<名称>项选择用户名, 在下面的数据库(D )中选 择Xqgl 这个在前面附加进来 数据库。
接下来点旁边的《服务器角 色》后,把图10
中的第一项System Administrators 打勾。
最后点《数据库访问》,如图11,把图中的两项打勾后点《确定》就完成了这个Windows 用户的数据库登录权限设置。
若要设置下一个则重复这一过程。
(4)、客户端数据库安装(如果是一台PC 进行工作的此步骤不用)
客户端操作系统建议用是Windows98或2000,放入SQL Server2000
选择《安装SQL Server 2000》组件(C)后在下一个界面中选《安装数据库服务器》后<下一步>,因为你是安装在Win98桌面板中,所以会出现如下的对话框,如果是安装在Windows NT 或Windows 2000 Server 中就不会出现。
点《确定》后继续安装,无特别说明无需改变选项,待出
现下面对话框时,请选择<仅连接>。
一直下一步结束安装。
OK,到现在为止服务器操作系统、数据库及客户端操作系
统和数据库都安装并配置完成了。
在一般的网络中,建议
服务器端只安装数据库,工作站安装应用软件,因为工作
站的使用频率较高,即使系统出问题,重装也不会影响服
务器端的数据。
第三部份:客户端应用软件安装。
打开安居宝智能小区系统安装光盘开始安装,在安装过程
中无需特别配置,只在出现下面对话框时,把安装目录改
掉。
建议如下:若是安装电子巡更软件则把目录改为C:\
电子巡更系统;多表抄集软件则改为C:\多表抄集等。
安装目录改过来后,点《开始安装》按钮继续安装直到结
束。
特别注意:
1、安居宝智能小区管理系统的数据库名为:
小区管理:AJB_Xq_Data.MDF和AJB_Xq _Log.LDF
抄表系统:AJB_CB_Data.MDF 和AJB_CB_log.LDF
停车场系统:AJB_TC_Data.MDF 和AJB_TC_log.LDF
巡更系统:Xg_Data_Data.MDF 和Xg_Data_log.LDF
2、如果你购买了两套以上软件,建议在D盘新建一个Data目
录,然后把光盘中的Data目录中的数据库都拷贝到D盘中的Data目录中,一定要把只读属性改掉。
