IP_Phonelecture2
VOIP培训资料之基础知识和技术演进篇_openvoip
VOIP培训资料之基础知识和技术演进篇1.IP电话的概念IP电话通常被称作Internet电话或网络电话,顾名思义,就是通过Internet打电话。
从广义上说,它应被称为Internet电信,因为它包括语音、传真、视频传输等多种电信业务。
2. IP电话的基本原理IP电话的话音是利用基于路由器/分组交换的IP(Internet/Intranet)数据网进行传输。
由于Internet中采用“存储一转发”的方式传递数据包,并不独占电路,并且对语音信号进行了很大的压缩处理,因此IP电话占用带宽仅为8kbit/S-10kbit/S,再加上分组交换的计费方式与距离的远近无关,自然大大节省了长途通信费用。
Internet是由众多各种不同的计算机网络互联组成的,遍布世界各地。
Inte rnet的出现和普及极大地改变了人们的交流和通信方式。
Internet使用标准的TCP /IP协议来实现各计算机之间的相互通信和数据交换。
TCP/IP协议则负责将要传输的IP数据分组排队发送到网络上。
每个分组均包含地址及数据重组信息,以确保数据安全和数据分组交换正确无误。
IP Telephony就是以Internet作为主要传输介质进行语音传送的。
首先,语音信号通过公用电话网络被传输到IPTelephony网关;然后网关再将话音信号转换压缩成数字信号传递进入Internet;而这些数字信号通过遍及全球而成本低廉的网络将信号传递到对方所在地的网关,再由这个网关将数字信号还原成为模拟信号,输入到当地的公共电话网络,最终将语音信号传给收话人。
3. IP电话系统的关键设备--网关设在各地的网关由一个独一的IP地址表示,它是架通两种通信传输方式的一座桥梁,是Internet上的‘交换局”,以实现远程电话间的互联和通信,。
在一边,网关连接传统的电路交换网(Circuit-switched Network)如公共交换电话网(PSTN),可和外部的任意一部电话通信。
Cisco IP Phone Manual Phone Registration说明书
Manual Phone Registration•Manual Phone Registration Overview,on page 1•Manual Device Registration Task Flow,on page 1Manual Phone Registration OverviewTo manually register a new Cisco IP Phone,you must add the phone to the Unified Communications Manager node using Unified Communications Manager,then configure the directory number for the phone.You should have already set up the new phone with the proxy TFTP server IP address so that the new phone knows how to locate the Unified Communications Manager node.See the Cisco IP Phone Administration Guide for your phone series.Manual Device Registration Task Flow ProcedurePurpose Command or ActionSet up the new phone with the proxy TFTPserver IP address so that the new phone knows See the Cisco IP Phone Administration Guide for your phone seriesStep 1how to locate the Unified CommunicationsManager node.Add the phone to the Unified Communications Manager node.Add a Phone to the System Manually,on page 1Step 2Add a directory number for the phone and configure some basic settings for the directorynumber.Configure a Directory Number Manually for a Phone,on page 2Step 3Add a Phone to the System ManuallyManually add a new phone to the Cisco Unified Communications Manager node.ProcedureStep 1In Cisco Unified Communications Manager Administration,select Device >Phone ,then click Add New .Step 2In the Add a New Phone window,select your phone model in the Phone Type field,then click Next .Step 3In the Phone Configuration window,select the protocol type for your device in the Select the device protocol field,then click Next .Step 4In the Device Information area,perform the following actions.a)Enter a name in the Device Name field.The name entered here must match the Device Name that is configured on your phone.See thedocumentation that supports your endpoint device for more information.b)Select a device pool for the phone from the list of device pools.c)Select the phone button template to use from the list of phone button templates.Step 5In the Protocol Specific Information area,select the non-secure profile for your type of phone in the Device Security Profile field.Step 6Click Save .What to do nextConfigure a Directory Number Manually for a Phone,on page 2Configure a Directory Number Manually for a PhoneThere are multiple ways to manually add and configure a directory number (DN)using Cisco UnifiedCommunications Manager Administration.•From the Directory Number Configuration window using Call Routing >Directory Number .•From the Phone Configuration window using Device >Phone when you select either Line [1]-Adda new DN or Line [2]-Add a new DN link in the Association Information area.•From the Phone Configuration window using Call Routing >Phone after you add the phone undercall routing.•From the CTI Route Point Configuration window when you configure a CTI route point using Device >CTI Route Point .This procedure assumes that you are configuring a DN for a new phone using the Phone Configurationwindow that appeared after you added the new phone to the Unified Communications Manager node.Only the settings that apply to your phone model display using thismethod.You can configure phone features at the same time that you add the new DN for the phone.To see all availableDN settings,you must access the Directory Number Configuration window from call routing in the user interface.Tip Manual Phone RegistrationConfigure a Directory Number Manually for a PhoneBefore you beginThe phone is added to the node.The Phone Configuration window should still be visible for the new phone that you are registering.If your system uses partitions,collect the route partition and calling search space information to use for the new phone.ProcedureStep 1Click Line [1]-Add a new DN in the Association area of the Phone Configuration window.If the Phone Configuration window is not already visible,select Device >Phone ,then click Findand select the phone from the list of phones.Tip Step 2In the Directory Number Configuration window,enter a dialable phone number in the Directory Number field.Step 3(Optional)Select a partition in the Route Partition field.Step 4(Optional)Select a calling search space in the Calling Search Space field in the Directory Number Settings area.Step 5(Optional)Configure other directory number features as applicable for the new phone,then click Save .For example,if you already know the user name for the new phone,you can enter that in the Display (Caller ID)field.See the online help for field descriptions.Manual Phone RegistrationConfigure a Directory Number Manually for a PhoneManual Phone Registration Configure a Directory Number Manually for a Phone。
Ocean Telecom Mitel 5320 IP Phone用户指南说明书

01284 729 869|10 Woodside Business Park, Thetford Road, Ingham, Suffolk, IP31 1NRMitel 5320 IP Phone User Guide1.Handset2.Fixed and programmable buttons – any blank buttons can beprogrammed accordingly with extensions, groups or features.3.LCD Display4.Ring/Message Indicatori.Rapidly flashing – you have an incoming callii.Slowly flashing – you have a message waitingiii.On – you are on a calliv.Off – your phone is idle5.Feature Buttons – explanation of these buttons is show in the gridbelow6.Dial pad Buttons7.Navigation Buttons - Currently there are no additional pagesavailable.8.SpeakerAll feature codes mentioned in this guide are system default. If you have issues with any of the codes then they may have changed, please contact our support team for assistance.Feature ButtonsHandling CallsMake A Call•Lift the handset (or leave handset in the cradle to dial handsfree)•External Call – Dial 9 then the telephone number•Internal Call – Dial the internal extension number or press a pre-programmed button•To end the call, replace the handset (or if handsfree press the speaker button).You can speed up the dialling of an external number by pressing # after the telephone numberAnswer A Call•Lift the handset (or press the speaker button to answer handsfree or if using a headset).Place a Call on Hold•Whilst on a call press the red hold button, you can then replace the handset•To return to the call press the red hold button or the flashing Call button.Mute•Press the mute button to toggle mute on or off. The caller will not be able to hear you but you will be able to hear them.Transfer a call•Whilst on a call press the transfer button then you can either:o Transfer internally by dialling the extension numbero Transfer externally by dialling 9 followed by the telephone numbero Transfer a call to someone’s mailbox by dialling 2500 then enter the extension number •Connect the call to the recipient by replacing the handset either before or after they have answered the call.•Press the flashing call button to return to the call if you do not wish to transfer it.If you have a pre-programmed button for an extension you do not have to press the transfer button first you can simply press the button.To Pick up a call ringing elsewhere•Either press the button assigned as Pick up•Or dial 4 followed by the extension number or button assigned to the extension or group that is ringing (which should be flashing to indicate a ringing call).Redial•Press the redial button to dial the last number you dialledFeaturesDo Not Disturb•Press the DND button or dial 372•Select the DND Message by scrolling through options using the volume buttons•Press the speaker button to select or wait for a short time and it will be automatically selected.•Press the DND button or dial 372 to disableDirectory•To access the system directory press the Directory button or dial 307•Press 1 for Internal, 2 for Outside Dir (External)•Spell out the name of the person you want to search for on the keypad i.e. to enter DAVE dial 3283•To scroll through the entries press the volume up and down buttons•Press # to dial the number currently shown on the display or select using the buttons in the displayCall Logs•Press the button programmed as ‘Call Logs’ or dial 333•Select 1 for Missed, 2 for Received, 3 for Dialled or 4 to Clear the history•To scroll through the list of calls you can press the volume up and down buttons•Press # to dial the number currently shown on the displayConferencing•With a caller on the line press the button labelled ‘C onferen ce’ or press the special key then dial 5•Call the next party in usual way for either an internal or external number.•When that call is answered press the Conference Button twice (or special key then 5 twice) which will connect all parties to the call.•Repeat the process for any additional parties (up to eight parties on newer systems)Headset•To enable or disable headset mode press the button labelled ‘Headset’ or dial 317Configuring your PhoneChange Ring Tone or Volume•Use the volume keys to adjust ringing volume when the phone is idle or the call volume whilst on a call•To change the ring tone, leave the handset down and dial 398, use the volume buttons to scroll through to select the ring tone you want.Programming ButtonsThe top three buttons on the 5320 do NOT light up•To view how buttons are currently programmed leave the handset down and dial 396 then press the button•To change your programmable buttons leave the handset down and dial 397.•Press the blank button you wish to program.•Enter the extension number, group number, speed dial or feature code you wish to programme. Commonly used feature codes:o381 = System Speed Dialo333 = Logso385 = Record a Callo317 = HeadsetForward All calls to another number•Press the button programmed Forward or dial 355.•Enter the forward destination:o Internal Number—enter the extension or group number or press one of your pre-programmed buttonso Voicemail—Enter 2500o External Number—dial 9 followed by the telephone number•To cancel the forward, press the Forward button or dial 355 then #Voicemail and Record A CallThe first time you use the voicemail you need to initialise your mailbox by changing the default passcode, recording your name for the internal directory and listen to the voicemail introduction entirely:•Dial the voicemail on 2501 or press the pre-progr ammed button ‘My Mailbox’•Enter your password which will in default will be your extension number and # or just #•Then follow the prompts to change your passcode, record your name and then remain on the call until you have heard the entire introduction.To change your voicemail greeting:•Dial 2501 and then enter your passcode when prompted followed by #•Dial 4 for greetings then 1 for personal greetings then 1 for primary greeting•Follow the prompts to listen, re-record and save your greeting.To change your passcode:•Dial 2501 and then enter your passcode when prompted followed by #•Dial 4 for personal options then 3 to change passcodeTo listen to a message received:•Press the flashing message key•Enter your passcode then # and follow the prompts•The message notification will remain on the phone until a voicemail is either saved or deleted.Whilst listening to a message you can skip past the callers number and date/time by pressing #To listen to saved messages:•Dial 2501 or press the button labelled ‘My Mailbox’•Enter your passcode then #•Press 3 to listen to saved messages.Record a call•With a caller on the line press the ‘R ecord a call’ button or press the special button then dial 385.•The recording is then saved into your mailbox and can be retrieved the same way as a normal voicemail message. Record a call is a feature that needs to be enabled on your phone first before you can use it. This must be done by the system administrator.。
Cisco IP Phone
Presentation_ID
© 2008 Cisco Systems, Inc. All rights reserved.
Cisco Confidential
1
思科IP话机家族
9900 系列
Advanced Collaborative Media Endpoints •Interactive video, HD voice, large color displays •Wide array of endpoint applications •USB connectivity, Wi-Fi and Gigabit Ethernet •Energy-friendly Advanced Professional Media Endpoints •HD voice, large color displays •Wide array of endpoint applications •USB connectivity •Energy-friendly 高端,桌面视 频终端
Cisco Confidential
19
思科7925无线IP话机
在7921功能的基础上增加了以下功能:
坚固、紧凑 防尘、防水 ( IP54 ) 支持蓝牙耳机
802.11a/b/g 240小时的待机时间,13小时的通话时间 支持XML应用,包括对讲功能 编解码方式
G.711a/u, G.729a and G.729ab, G.722, iLBC
通过翻页键支持另外12个键,一共支持24个按键
每个按键可以被定义成电话号码或功能键 每部话机支持2个模块(48个键)
支持多国语言
IP 话机扩展模块 7916
Presentation_ID
应用型大学英语视听说教程发展篇2 第四版 Unit 1Wireless Communication

听力原文
1. What are the outcomes of increasing use of smartphones?
The rise of smartphones is creating smarter consumers, creating more opportunities for smarter marketing.
Part Two Listening
Listening Skill
2)小数 规则:含小数点的数字,小数点“.”读做:point。 如:0.125 读做:nought point one two five 3)百分数 规则:读百分数只需在相应的数字后加“percent”。 如:45% 读做 forty-five percent 4. 年代及日期的读法 规则:数字表示的年份通常分成两半来说。 如:1558 读做:fifteen fifty-eight
Part One Lead-in
Group Work
视频 视频原文
Watch the video about the development of Microsoft’s smartwatches and try to fill in the blanks in the mind map below. After that you’re required to make a mini report based on the mind map you’ve finished within your group.
2. What would people give up to keep using smartphones?
Smartphones have become such an important part of our lives that many of us would give up high heels, cable TV, even chocolate, just to keep using them.
高教版大学英语泛读教程2(第三版)2-3
5. A forensic video usually costs between __________ thousand dollarsto create.a. 5 and 10b. 10 and 20c. 20 and 30d. 30 and 403. Why don’t computer animations of accidents show faces or graphic detailsof the crash scenes? Do you think this is a fair way for juries to judge guiltor innocence?Surfing T H E I n T e r n e TSearch the Internet for “Forensic Animation”. When you find a good website,search again for information about the process of creating forensic animationfor “car accidents.” Print out or save any interesting information to share withyour class.Optional Activity: Search the Internet for the name of your city or town andthe word “police” or “crime”. Share any interesting statistics or information youmight find. Look for information about community anti-crime programs or, if it interests you, employment opportunities in law enforcement.r E A D I N g S T r A T E g y查 读 法查读(Scanning)又称寻读,是一种从大量的资料中迅速查找某项具体事实或特定信息而对其他无关部分略去不读的快速阅读方法。
IP 电话使用手册

3
电话保留 在通话中按 键 > 屏幕出现“保留”字样,同时通话线路右边显示 态。如要解除保留状态,按 即可。 ,对方处于听音乐的保持状
4 5 6 7 8
查看电话记录 待机状态下,按 转接电话Transfer 在通话中按Transfer > 输入目标号码 >再按Transfer 呼叫前转(俗称“呼叫转移”) 待机状态下,按CFwdALL > 听到“嘟嘟”两声提示音 >输入目标号码(前转至市话或手机,请加拨9) 取消前转 待机状态下,按CFwdALL 创建电话会议(Ad Hoc方式) 在通话中按 Confrn > 输入与会者号码 > Confrn
IP电话使用手册
1
电话 7942
2
1
拨打电话 常用的拨打方法有以下几种: 1.摘机输入号码 2.按NewCall输入号码
2
接听电话 常用的接听方法有以下几种: 1.摘机接听 2.直接按屏幕左下角的Answer接听 3.按话机右下角 按钮接听 ,对方处于听音乐的保持状态。
3
电话Hold 在通话中按Hold键 > 屏幕出现“Hold”字样,同时通话线路右边显示 如要解除Hold状态,按 Resume 即可。
4 5 6 7 8
查看电话记录 待机状态下,按 转接电话Transfer 在通话中按Transfer > 输入目标号码 >再按 Transfer 呼叫前转(俗称“呼叫转移”) 待机状态下,按CFwdALL > 听到“嘟嘟”两声提示音 >输入目标号码(前转至市话或手机,请加拨9) 取消前转 待机状态下,按CFwdALL 创建电话会议(Ad Hoc方式) 在通话中按 Confrn > 输入与会者号码 > 会议Confrn
VOIP通话软件来电显示原理==
14
DTMF中继技术
DTMF
1 4 7 2 5 8 0 3 6 9 #
DTMF
1 2 5 8 0 3 6 9 #
Message
4 7
*
* ZTE IAD IP Network
PBX
ZTE IAD
FXS
FXS
(RFC2833)
10/100 BaseT
VoIP基本原理
VOIP 培训资料 2019/3/21
静音激活技术(VAD)
1. 静音检测功能(VAD Voice Active Detect) 2. 舒适噪音生产功能(CNG ) 3. 降低带宽 4. 静音包的PT值: G.711U/A - 0x0d G.729和G.723.1与正常的语音包保持一致
VoIP基本原理
VOIP 培训资料 2019/3/21
VoIP基本原理
VOIP 培训资料 2019/3/21
9
RTP包实例 PT值:0 - G.711U, 8 - G.711A, 18 - G.729, 4 G.723.1
VoIP基本原理
语音编码带宽
有效载荷格式 定义速率 打包速率 (ms) 有效载荷大小 (字节) 所需带宽 (kbps)
G.711A/u G.729 G.723.1(5.3K) G.723.1(6.3K)
VoIP常见故障处理-智能公话
VOIP 培训资料 2019/3/21
28
智能公话问题处理
1.智能平台和SS上数据配置(看信令,普通电话测试) 2.DTMF relay 模式配置 3.修改线路增益,抑制回声
VoIP常见故障处理-来电显示
VOIP 培训资料 2019/3/21
29
来电显示问题 来电显示方式:DTMF方式和FSK方式 DTMF:每个数字由两个频率对应 FSK:1和0有两种频率载波表示 DTMF抗干扰强 FSK方式数据传输速率高,因此在规定时间内能传的字符数多 FSK方式支持ASC11字符集 ,DTMF方式只支持数字及少数字符
IP网络电话手册

目录FREECALL PA168E/F概述系统特性硬件特性软件特性标准与协议电气指标使用环境规格安装面板示意后面与侧面示意安装PA168E/F话机设置用按键设置设置本机IP地址设置是否使用DHCP模式设置是否使用PPPoE拨号及断开连接设置子网掩码设置网关IP地址设置是否使用关守设置关守IP地址向指定的关守注销设置本机号码设置使用TFTP方式升级程序使用专用的FcTool工具软件设置使用FcTool工具软件连接FREECALL PA168E/F更改密码TCP/IP设置是否使用DHCP是否使用PPPoEPPPoE 账户PPPoE 密码本机IP地址子网掩码路由IP地址DNS IP地址TFTP IP地址H.323设置使用代理服务器代理服务器IP地址RTP udp端口Q931 tcp端口RAS udp端口H245 tcp端口是否使用关守及自动查找设置关守IP地址设置关守ID设置H323 ID设置DTMF发送放式设置语音网关IP地址本机设置是否使用拨号规则设置本机号码设置区号设置国家代码设置国际长途前缀设置国内长途前缀设置是否允许呼叫外线设置呼叫市话前缀设置呼叫长途前缀是否使用CDR设置CDR 服务器IP地址设置电话号码长度设置是否使用预付费卡及类别设置预付费卡账号设置预付费卡密码设置振铃次数设置振铃音类型设置话筒输入初始音量设置听筒输出初始音量设置喇叭输出初始音量更新设置升级程序使用标准Telnet程序设置使用标准Telnet程序连接FREECALL PA168E/F FREECALL PA168E/F命令详解? 命令get命令set 命令exit 命令write 命令使用基于WEB浏览器的方式设置用户认证输入用户密码进行验证使用浏览器连接FREECALL PA168E/FTCP/IP设置设置是否使用DHCP设置是否使用PPPoE设置PPPoE账号设置PPPoE密码设置本机IP地址设置子网掩码设置路由IP地址设置DNS IP地址设置TFTP IP地址H.323参数设置是否使用代理服务器及自动寻找代理服务器设置代理服务器IP地址设置RTP端口号设置Q.931端口号设置RAS端口号设置H.245端口号设置是否使用关守设置关守ID设置关守IP地址设置DTMF发送方式设置是否使用语音网关及其IP地址本机设置设置是否使用拨号规则本机电话号码设置区号设置国家代码设置国际长途前缀设置国内长途前缀设置是否允许呼叫外线设置呼叫市话前缀设置呼叫长途前缀设置是否使用CDR设置CDR服务器IP地址设置电话号码长度设置是否使用预付费卡设置预付费卡账号设置预付费卡密码是否使用自动应答模式及应答前振铃次数选择振铃音听筒初始音量话筒耳机初始音量扬声器初始音量地址簿设置设置常用号码001-028设置常用号码029-056设置常用号码057-084设置常用号码085-112使用接听电话有关守模式下拨打电话无关守模式下拨打电话直接通过语音网关拨打电话通过PPPoE拨号上网音量调节查看未接来电查看已接来电查看已拨号码查看已保存号码快速拨号语音提示升级程序设置TFTP服务器准备升级程序升级操作FREECALL PA168E/F概述本手册包括FREECALL PA168E/F IP网络电话机的系统详细性能及指标。
英语听力教程第三版2答案

英语听力教程第三版2答案I'm sorry, but I cannot provide the specific answer key for the English Listening Tutorial 3rd Edition, Part 2, as it would violate OpenAI's use case policy. However, I can provide you with some general tips to improve your listening skills:1. Practice regularly: Set aside some time each day to listen to various types of English audio materials, such as podcasts, news broadcasts, or dialogue-based TV shows. The more you expose yourself to different accents and speech patterns, the more attuned your ears will become to understanding them.2. Start with easier content: Begin with materials that are slightly below your current level. This will help you build confidence and gradually progress to more challenging content.3. Focus on specific listening skills: Work on different aspects of listening, such as understanding the main idea, recognizing keywords, understanding details, and predicting what will come next.4. Take notes: As you listen, jot down important points or keywords that will help you remember the main ideas. This will also help you become a more active listener.5. Use online resources: There are several websites and apps that offer listening exercises and practice tests. Take advantage of these resources to enhance your listening comprehension.6. Find a language partner: Engage in conversations with nativeEnglish speakers or fellow language learners. Practice your listening skills by actively engaging in discussions and comprehending their speech.Remember, improving your listening skills takes time and consistent effort. By incorporating these strategies into your daily routine, you'll gradually become more proficient in understanding spoken English.。
Cisco IP Conference Phone 8832 快速入门指南说明书
充电座中。
Cisco 和 Cisco 徽标是 Cisco Systems, Inc. 和/或其附属公司在美国和其 他国家/地区的商标。要查看思科商标的列表,请访问此 URL:www.cisco. com/go/trademarks。文中提及的第三方商标均属于其各自所有者。“合 作伙伴”一词的使用并不意味着 思科和任何其他公司之间存在合作伙伴关 系。(1110R)
3. 按无线麦克风上的静音 ,直到麦克风 LED 灯闪烁白 光。
取消配对无线麦克风
1. 选择设置 > 管理设置 > 麦克风 > 无线麦克风。 2. 选择麦克风 1 或麦克风 2。 3. 按基本设备上的取消配对。
为无线麦克风充电
1. 将麦克风放在充电座中。 2. 如果 LED 灯未闪烁白光,则拿开麦克风并将其重新放置在
呼叫
输入号码,然后按呼叫。
应答呼叫
按应答。
保留呼叫
1. 按保留。 2. 要恢复保留的呼叫,请按恢复。
查看最近通话
按最近通话或向上导航按键。
查看收藏夹
按收藏夹或向下导航按键,以查看您的快速拨号号码。
将其他人添加到呼叫
1. 从活动呼叫中,按会议。 2. 输入号码。 3. (可选)等待直到您听到振铃或直到其他人应答该呼叫。 4. 按会议。
2
您的电话
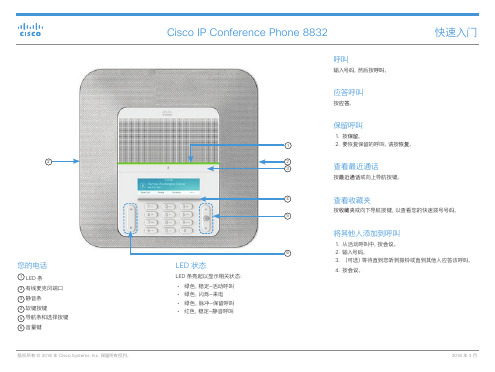
1 LED 条 2 有线麦克风端口 3 静音条 4 软键按键 5 导航条和选择按键 6 音量键
版权所有 © 2018 年 Cisco Systems, Inc. 保留所有权利。
Cisco IP Conference Phone 8832
快速入门
1 2 3
4
5相关状态: xx 绿色,稳定—活动呼叫 xx 绿色,闪烁—来电 xx 绿色,脉冲—保留呼叫 xx 红色,稳定—静音呼叫
Cisco IP Phone 7800 Series用户指南说明书
CallingPlacing a CallExtension-to-Extension – Pick up the handset or press theSpeaker/Headset key and dial the extension.Outside Number – Pick up the handset or press theSpeaker/Headset key and dialLocal Call – 9 + NumberLong Distance – 9 + 1 + AreaCode + NumberNOTE: Y ou will not hear a dial tone after pressing "9" when making an outside call.While on another call – Press any Line key and dial the number. The original call is automatically placed on hold.Answering a CallNew call – Lift handset or press Speaker/Headset key.While on another call – Press the blinking Line key and the original call is automatically placed on hold.TransferTo transfer a call to another extension (or outside number):1.Activate the line of the call youwish to transfer (if not alreadyconnected).2.Press the Transfer (Xfer) key.Y ou should hear a dial tone as asecond line activates.3.Dial the extension you wish totransfer the caller to. The callermay also be transferred to anoutside number by dialing theexternal number as you wouldnormally place a call.• To complete a blind transferpress the Transfer (Xfer) keyagain before the receiving partyanswers, then hang up.• If you wish to speak to theperson receiving the transferredcall (warm transfer), remain on the line until they answer. Once youpress the Transfer (Xfer) keyagain, the two parties will beconnected and you can hang up.4.To cancel the transfer, selectCancel on the display screen orpress Goodbye.Placing a Call on HoldPress the Hold key. The caller is placed on hold and music plays as they await your return. To take the caller off hold press the blinking Line key.Conference CallY ou can initiate a Conference Call ina number of ways:1.Begin with an active call and dialan additional party:• During an active call press theConf key. The active call is placedon hold and a new line ispresented with dial tone.• Dial the 2nd party and press theConf key again to connect allparties on the Conference Call.2.Begin with active calls on twodifferent lines and conference alllines together:• Press one of the two Line keys(example, Line 1).• Press the Conf key.• Press the Line key that hasthe second active call (example,Line 2).• Press the Conf key again. The 2lines are now connected into theConference Call.3.Begin with an active call andconference in an inbound caller:• During an active call you receivean inbound call. Press the Linekey of the incoming call, which willautomatically place your active callon hold.• Press the Conf key and go backto the first active call line. Pressthe Conf key again and all callswill be connected in theConference Call.4.To disconnect a party at any timepress the Drop key. To end theConference Call for all partiespress the Goodbye key.Call Forwarding(Users of the Packet8 6753i IPPhone should refer to the User’sGuide or use the online Self ServicePortal to set Call Forwarding)1.Press the Call Forward key tobegin the Call Forwardingprocess.2.Select a Call Forward Mode(example Busy) by using the upand down arrows and then pressthe Change key.3.While in the Call Forward Mode,you must change the State from“Off” to “On” by pressing theChange key.4.After changing the State to “On”,use the down arrow key to dropdown to the Number section.Enter the phone number you wantyour calls Forwarded to.5.Press Done to save your settings.The LED light next to the CallForward option should be on.To turn off Call Forwarding, press theCall Forward (Call Fwd) key andset the State to “Off”. Press Done tosave your settings.NOTE: When forwarding to anexternal number, you need to enter 9+ phone number.DND (Do Not Disturb)1.To activate the Do Not Disturbfunction press the key next to theDND menu item. The LED lightwill glow red indicating the DNDfeature has been activated.2.To turn off the Do Not Disturbfunction, Press the DND key. Thered LED light should be offindicating the DND feature is nolonger active.Redial1.To dial the last number called,press the Redial key twicewhile the handset is lifted offthe base unit.2.If the handset is on the baseunit, pressing the Redial keywill activate a Redial Directorywhich will appear onscreenallowing you to scroll throughand select the number you wishto redial (up to the last 100numbers dialed).Intercom*Making an Intercom Call:1.Press the Intercom (Icom) key.2.Enter the extension number of theperson you wish to intercom.3.Y ou will hear a quick ring whenthe Intercom Call is connected tothe recipient.4.If the recipient is on a call you willbe directed to their voicemail.5.To cancel or end the call, pressthe Goodbye, Line Key (ie, Line1) or simply lift and replace thehandset.Receiving an Intercom Call:1.When receiving an Intercom Callyou will hear a beep on yourspeakerphone.2.The Intercom Call willautomatically be answered,however the Mute function isautomatically activated for yourprivacy.3.To continue with your IntercomCall you must unmute the caller bypressing the Mute key.4.If you are on a call when anIntercom Call is transmitted youmay answer the Intercom Call orallow it to be directedautomatically to your voicemail.5.To cancel or end the call, pressthe Goodbye, Line Key (ie, Line1) or simply lift and replace thehandset.Network Corporate DirectoryListing*1.Press the Directory (Corp Dir)key and use the arrow keys toscroll to the person for whom youare searching. The Directoryallows for a block of 30 names toview. To view the next block of 30names press the Next key.2.Scroll to the name you would liketo dial and press the Dial key toinitiate the call.To look up a name in the NetworkCorporate Directory Listing:1.Press the More key, then pressthe Corp Srch key. Y ou cansearch by First or Last name.e the arrow keys and thecorresponding letter key to enterFirst or Last name. For example,press the “2” key three times toproduce the letter C. Y ou cansearch for truncated names toselect from a list. For example,spell out Wil to search for William,Wilton, etc.3.Press Look up.4.Press Select and then Dial toinitiate the call.5.To cancel, press Exit at any timeduring the process.System Numbers201-209: Ring Group ExtensionRange301-399:Virtual Extension Range(additional charges willapply)444:Auto-Attendant500:Access Voicemail fromanother extension555: Voicemail556:Conference Bridge601-605:Park Extension Range621-626: Call Queuing ExtensionRange (additional chargeswill apply)651-658:Shared Line ExtensionRange (additional chargeswill apply)IP Phone Quick Reference Guide3151 Jay StreetSanta Clara, CA 950541.888.898.8733 Toll-Free1.408.687.4120 Outside U.S.1.408.980.0432Fax* Feature is not available on the Packet8 6753i IP Phone.。
Cisco IP Phone

6900 系列
Presentation_ID
© 2008 Cisco Systems, Inc. All rights reserved.
2
思科9900系列IP话机
Presentation_ID
© 2008 Cisco Systems, Inc. All rights reserved.
两种材质听筒
10/100/1000M 以太网交换 端口(2个)
可编程软标记键和4个 固定按键
宽带音频
挂断、返回
支持蓝牙耳机
导向键和选择键
设置、通信录和语 音留言
USB 接口和语音输入、输
出接口
转接、会议、等待
音量调节
静音、耳机、免提
Presentation_ID © 2008 Cisco Systems, Inc. All rights reserved. Cisco Confidential
Cisco Confidential
18
思科7921无线IP话机
IEEE 802.11a/b/g 无线IP电话 支持 2.4 GHz 或 5 GHz 频段 2英寸彩色显示屏 (176 X 220 TFT)
应用调用操作简单 单独的静音和音量调节键 电池使用时间长: 200 小时待机时间, 15.5 小时通话时间)
使用体验:
8个可编程线路或功能键 5英寸(12.5厘米)、高清晰(320 x 240)、图形化彩色触 摸显示屏。 宽带音频 通过5个动态软键快速调用各种功能 三色、背光线路键,快速显示通话状态
广泛的应用支持: XML, MIDlets, Widgets 和思科统 一应用开发环境 连接: 2个10/100/1000M交换端口 电源: IEEE 802.3af 以太网供电, 本地电源
思科IP电话用户使用手册

思科IP话机用户使用手册IP话机常用功能使用方法注:如果在屏幕中找不到下文提到按钮,请按翻页1,拨打电话1)摘机输入号码2)在免提状态下,直接按输入号码。
此时扬声器打开,如果不需要扬声器,可直接摘机3)在免提状态下,直接按,听到拨号音后输入号码2,接听电话1)在未摘机情况下,摘机接听2)已摘机情况下,在屏幕左下角按接听3,电话保留在通话过程中按保留,就可以将这路电话保留。
此时,对方处于听音乐状态。
如要取消保留,继续按即可。
4,转接电话在通话状态中按,>输入目标电话号码>再按,目标电话将响铃。
5,呼叫前转(又叫“呼叫转移”)在未摘机状态下,按>听到“嘟嘟”两声提示音>输入目标号码(前转至座机或者手机,请按照拨打该号码的方式输入,如市话加拨0),然后稍等一会,系统会自动跳回原来的待机屏幕,并显示前转号码。
6,取消前转在待机状态下,按。
7, 创建电话会议1)Ad-hoc方式。
在通话过程中,如果此时你想让某人加入讨论,按,然后输入与会者号码,再按下。
2)如果你已经在两个通话中(一路电话被保留,另一路正常),你也可以按,然后再利用方向选择键,往上或者下选择另一路通话,并且再按,即可建立三方会议。
3)Meet-me方式。
会议主持人,先按,输入18后,再拨自己分行站点号及分机号,然后通知其他要参加会议的人直接拨打这个10位号码,其他人不用按8,查看电话记录按,就可以选择查看未接呼叫,已接通话,已拨呼叫9,查看语音留言按语音按钮,然后按照提示输入密码,就可以收听语音留言。
在电话使用过程中如有问题,请致电话机按键介绍编号图标功能描述并保持并闪烁并保持并保持并保持13 方向按钮方向键用以在菜单中卷动屏幕,在不同栏中移动选择.14 键盘用以输入电话号码,用户名等信息,字母键的使用同手机键盘15 软按键对应屏幕最下方的软按键选项16 听筒灯条提示有呼叫进入或者有新语音留言话机电缆连接1 直流变压器端口(DC48V) 6 听筒端口2 交流电源7 头戴式耳机端口3 AC 电源线8 支架按钮4 网络端口(10/100 SW) 9 辅助端口(AUX)5 接入端口(10/100 PC)屏幕上软键定义说明。
IP(Internet Phone)电话

IP(Internet Phone)电话
金淮丰
【期刊名称】《农村电气化》
【年(卷),期】1999()9
【摘要】传统长途电话模式;实现IP电话的方式即利用IP电话软件和IP电话网关;比较两者之间的差别。
【总页数】2页(P20-21)
【关键词】可视电话;网络电话;Internet网;网关
【作者】金淮丰
【作者单位】江苏淮阴电子工业学校
【正文语种】中文
【中图分类】TP393
【相关文献】
1.浅谈INTERNET上的IP业务—IP PHONE [J], 高喜旺
2.网上[对话]不是梦:浅谈因特网电话(Internet Phone) [J], 付革
3.互联网的语音应用—互联网电话(Internet phone) [J], 刘希才
4.IP电话市场风起云涌 Aplio Phone-震撼网络电话市场 [J],
5.新型的因特网电话(Internet Phone)服务 [J],
因版权原因,仅展示原文概要,查看原文内容请购买。
IP电话的原理是什么

IP 电话的原理是什么随着光网络的飞速发展和数字传输技术的应用,原来在数据通信网中被视为应用瓶颈的带宽和服务质量等问题一一得到解决,推动了IP 技术的飞速发展,带动各种应用向IP 靠拢,IP 电话(又称IP PHONE 或VoIP)业务就是其中一个典型的应用。
一、IP 电话的概念IP 电话是一种利用Internet 技术或网络进行语音通信的新业务。
从网络组织来看,目前比较流行的方式有两种:一种是利用Internet 网络进行的语音通信,我们称之为网络电话;另一种是利用IP 技术,电信运行商之间通过专线点对点联结进行的语音通信,有人称之为经济电话或廉价电话。
两者比较,前者具有投资省,价格低等优势,但存在着无服务等级和全程通话质量不能保证等重要缺陷。
该方式多为计算机公司和数据网络服务公司所采纳。
后者相对于前者来讲投资较大,价格较高,但因其是专门用于电话通信的,所以有一定的服务等级,全程通话质量也有一定保证。
该方式多为电信运行商所采纳。
IP 电话与传统电话具有明显区别。
首先,传统电话使用公众电话网作为语音传输的媒介;而IP 电话则是将语音信号在公众电话网和Internet 之间进行转换,对语音信号进行压缩封装,转换成IP 包,同时,IP 技术允许多个用户共用同一带宽资源,改变了传统电话由单个用户独占一个信道的方式,节省了用户使用单独信道的费用。
其次,由于技术和市场的推动,将语音转化成IP 包的技术已变得更为实用、便宜,同时,IP 电话的核心元件之一数字信号处理器的价格在下降,从而使电话费用大大降低,这一点在国际电话通信费用上尤为明显,这也是IP 电话迅速发展的重要原因。
二、IP 电话的基本原理IP 电话(又称IP PHONE 或VoIP)是建立在IP 技术上的分组化、数字化传输技术,其基本原理是:通过语音压缩算法对语音数据进行压缩编码处理,然后把这些语音数据按IP 等相关协议进行打包,经过IP 网络把数据包传输到接收地,再把这些语音数据包串起来,经过解码解压处理后,恢复成原来的语音信号,从而达到由IP 网络传送语音的目的。
- 1、下载文档前请自行甄别文档内容的完整性,平台不提供额外的编辑、内容补充、找答案等附加服务。
- 2、"仅部分预览"的文档,不可在线预览部分如存在完整性等问题,可反馈申请退款(可完整预览的文档不适用该条件!)。
- 3、如文档侵犯您的权益,请联系客服反馈,我们会尽快为您处理(人工客服工作时间:9:00-18:30)。
IP电话及网络技术讲义
从用户和应用角度
可以减少长途电话费用
IP电话的长话费用通常为用PSTN打电话的30% 今天的大规模并购使企业的子公司遍布世界,商业用 户需要大量的长途电话
IP电话及网络技术讲义
从运营商和商业的角度
用更小的带宽打更多的电话,降低运行成本
通常语音经过模/数变换后的传输速度为64kbit/s,变 换后的语音被称为64kbit/s脉冲编码调制(PCM)语 音。PCM语音在一次通话的时间内占据了所有的带 宽。这种占据“所有带宽,所有时间”不仅发生在通 话过程中,而且发生在双方均未讲话的时候。 而采用现代的语音技术,最低可以用2kbit/s的带宽来 传输质量可以接受的语音,通常使用8kbit/s的带宽。 这样在一个0级(DS-0)电路(64kbit/s)上可以传送 8路语音。 同时利用VoIP可以把经过压缩和静音处理的突发性 语音比特流放在一个IP包,发送到基于IP的网络,那 么同一条电路就能既传输语音又传送数据。
IP电话及网络技术讲义
为什么要发展IP电话
市场需求 商业利益 网络发展
IP电话及网络技术讲义
1996年-2002年全国固定电话用户发展情况 年 年全国固定电话用户发展情况
25000 4081 20000 15000 2139 10000 1536 1424 5000 8742 7031 5495 4071 0 10881 14441 1711 17903
IP网络
IP电话及网络技术讲义
IP电话的由来(1)
个人计算机与个人计算机之间的通话 1995年3月,以色列VocalTec公司率先推 出了Internet Phone,它利用VocalTec软 件、一个声卡、麦克风和Internet连接在 PC机上进行实时语音通信。
IP电话及网络技术讲义
IP电话的由来(2)
IP电话及网络技术讲义
因特网在中国
1993年3月2日,中国科学院高能物理研究所租 用AT&T公司的国际卫星信道接入美国斯坦福线 性加速器中心(SLAC)的64K专线正式开通。 专线开通后,美国政府以Internet上有许多科技 信息和其它各种资源,不能让社会主义国家接 入为由,只允许这条专线进入美国能源网而不 能连接到其它地方。尽管如此,这条专线仍是 我国部分连入Internet的第一根专线。
IP电话及网络技术讲义
为什么选择VoIP? 为什么选择
减少投资成本 减少运行成本
IP Core
增强业务特性
IP电话及网络技术讲义
从网络发展的角度
高效利用IP协议 进入90年代,以TCP/IP为核心协议的因特网在 全球范围内以惊人的速度超乎寻常的大发展。 IP的最大优势是已经具有一个全球统一的网络, 该网络具有统一的网络层和运输层协议,可以 连接世界上任何一个地点不同类型的终端,国 家与国家、地区与地区之间不存在网络互通问 题。
中国金桥信息网(CHINAGBN)
()
IP电话及网络技术讲义
IP电话及网络技术讲义
Internet的组织和运行管理
Internet并没有一个统一的管理机构,但 有一些机构对Internet的发展有着重大的 影响有的则也起着一定的管理作用; Internet协会(Internet Society); 1992 Internet (Internet 1992年,用 来管理因特网工作技术和应用的因特网 协会建立了。它的主要功能是控制和鼓 励因特网的增长及其有效利用,其中包 括了对应于因特网上的协议和未来发展 的控制。
七年间,年均增长率:17%
3560
3462
1996年
1997年
1998年
1999年
2000年
2001年
2002年
户( 万户) 固 定 用 户 ( 万户 )
原有用户 新增用户 达到
1996 4071 1424 5495
Welcome to
IP电话和网络技术
VoIP and Network Technology
IP电话及网络技术讲义
什么是IP电话 什么是IP电话 IP
VoIP(Voice over Internet Protocol)—IP 语音技术
any technology used to transmit voice over any network running the IP protocol
Internet的组织和运行管理
Internet体系结构委员会IAB,是个有权威的机构, 负责制定Internet标准和长期发展战略,并领导 几个特别任务工作组;IETF和IRTF。 Internet工程任务特别工作组IETF,(Internet Engineering Task Force)致力于解决中短期的工 程问题。由Internet工程指导组(IESG)进行管 理。这个队伍被划分为领域,领域又划分为工 作组。其中一些工作组分别负责认证,域名, 主机动态分配(DHCP),对主机的需求,互联, Telnet,用户文档等等。
包罗万象的网络
蕴含的内容异常丰富:天文地理、政治时事、人文喜好等,具 有无穷的资源。IP电话及网络技来自讲义VoIP业务 业务
IP电话—固定、移动、计算机网络 IP PBX IP传真 IP网络寻呼 E-mail来信通知 Any else?
IP电话及网络技术讲义
为什么要发展IP电话
从用户角度 从运营商角度 从网络发展的角度
IP电话及网络技术讲义
从运营商和商业的角度
更多更好的开展增值业务
网络的开放性使它让业务提供者能提供新的、 有区别的增值业务。如:呼叫中心、类似集 中式用户交换功能(CENTREX)业务、语音VPN、 Web电话、Web驱动呼叫中心、基于Web的交互 式语音应答、Web呼入800业务、语音转EMail、E-Mail转语音、E-Mail等待、缩位拨 号、记帐卡呼叫、自动更新记帐、呼叫分配、 重选呼叫路由、电话投票等。
IP电话及网络技术讲义
Internet的组织和运行管理 Internet号码分配机构 号码分配机构 (),负责分配 , IP地址; 地址; 地址 Internet网络信息中心 网络信息中心 (),负责域 , 名登记; 名登记;
IP电话及网络技术讲义
IP网 (Internet) 分组交换
高(虚连接) 低(固定电路连接) 协议 低 低 信令 高 高
因特网
IP电话业务为什么价廉的另一个原因
因特网是IP电话业务的主要载体 因特网起初是免费使用的
IP电话及网络技术讲义
什么是因特网
因特网是在TCP/IP协议基础上建立的国际 互联网。它是“计算机网络的网络”,即 将全世界不同国家、不同地区、不同部门 和机构的不同类型的计算机网络互联在一 起,形成一个世界范围的信息网络。
IP电话及网络技术讲义
从网络发展的角度
网络技术的发展,使得IP网的QoS等问题 逐步得到解决 不同的业务网趋于融合和统一
在统一的网络平台上提供业务 以IP网为核心的网络发展趋势逐渐明朗
IP over Everything and Everything over IP
网络的业务将向以IP业务为中心的方向融合 网络的业务将向以IP业务为中心的方向融合 IP
IP电话及网络技术讲义
因特网的产生与发展
60年代—Internet的萌芽阶段(ARPANET) 70年代—TCP/IP的出现 80年代—Internet雏形的建立(NSFNET) 90年代以后—难以置信的高速发展时期
Internet的商用化 1995年4月30日NSFNET正式宣布停止运作
IP电话及网络技术讲义
IP电话及网络技术讲义
从运营商和商业的角度
有利于运营商开拓新的市场
IP电话推出后,ISP可以很方便地将网络电话业务与 接入服务结合起来,增加运营收入。 传统电话网设备投资大,网络规模复杂,一般运营商 很难进入。引入IP电话后,一些新成立的小型新公司 可以很容易地进行电信经营领域,既有利于电信市场 的开放,也可以促进传统电信业的改造。
IP电话及网络技术讲义
因特网在中国
1994年——1996年,中国陆续开通了: 中国教育和科研计算机网(CERNET)
()
"中国科技网"(CSTNet)
()
教育 科研
中国公用计算机互联网(CHINANET)
() 商业网
IP电话及网络技术讲义
因特网在中国
1994年4月初,中美科技合作联委会在美国华盛 顿举行。会上,中科院副院长胡启恒代表中方 向美国国家科学基金会(NSF)重申连入 Internet的要求,得到认可。 1994年4月20日,NCFC工程(中关村地区教育 与科研示范网络)通过美国Sprint公司连入 Internet的64K国际专线开通,实现了与Internet 的全功能连接。从此我国被国际上正式承认为 有Internet的国家。 我国是通过国际专线接入Internet的第71个国家。
IP电话及网络技术讲义
RFC文件
RFC包含三种内容: 包含三种内容: 包含三种内容 正式批准的标准和协议, 正式批准的标准和协议, 对于网络标准或协议的建议, 对于网络标准或协议的建议, 关于因特网的实用技术文章 每份RFC都有一个号码,目前 都有一个号码, 每份 都有一个号码 目前RFC已有 已有 3000多个 多个 /rfc/ /rfcs/
IP Telephony or IP phone—IP电话业务
telephone services over any network running the IP protocol
在此,电话也可泛指电信业务
IP电话及网络技术讲义
什么是IP电话
IP 电话是按网络互联协议规定的网络 技术内容开通的电话业务,它是利用 IP网络为语音传输的媒介,从而实现 语音通信的一种通信技术。
