碧海威应用分流教程
Waves API 550 用户手册说明书

Waves API 550 User ManualTABLE OF CONTENTSCHAPTER 1 – INTRODUCTION (3)1.1W ELCOME (3)1.2P RODUCT O VERVIEW (4)1.3C OMPONENTS (5)CHAPTER 2 – QUICKSTART GUIDE (6)CHAPTER 3 – CONTROLS AND INTERFACE (7)3.1EQ S ECTION (8)3.2O UTPUT S ECTION (12)3.3W AVESYSTEM T OOLBAR (13)APPENDIX A – 550A CONTROLS (14)APPENDIX B – 550B CONTROLS (14)Waves API 550 User ManualChapter 1 – Introduction1.1 WelcomeThank you for choosing Waves! In order to get the most out of your new Waves plugin, please take a moment to read this user guide.To install software and manage your licenses, you need to have a free Waves account. Sign up at . With a Waves account you can keep track of your products, renew your Waves Update Plan, participate in bonus programs, and keep up to date with important information.We suggest that you become familiar with the Waves Support pages: /support. There are technical articles about installation, troubleshooting, specifications, and more. Plus, you’ll find company contact information and Waves Support news.Waves API 550 User Manual1.2 Product OverviewThe Waves API 550 consists of the API 550A, a 3-Band parametric equalizer with 5 fixed cutoff points per band and the API 550B, a 4-Band parametric equalizer with 7 fixed cutoff points per band. Modeled on the late 1960’s legend, the API 550A EQ delivers a sound that has been a hallmark of high end studios for decades. It provides reciprocal equalization at 15 points in 5 steps of boost divided into three overlapping ranges. The high and low frequency ranges are individually selectable as either peaking or shelving, and a band-pass filter can be inserted independently of all other settings. Featuring four overlapped EQ bands, the API 550B features 7 switchable filter frequencies spanning up to 5 octaves per band. “Proportional Q” automatically widens the filter bandwidth at lower settings and narrows it at higher settings. It even lets you undo previous processing, affect or even reverse tonal modifications. With its vast range of tonal possibilities, the API 550B is an exceptionally versatile EQ.Waves API 550 User Manual1.3 ComponentsWaveShell technology enables us to split Waves processors into smaller plug-ins, which we call components. Having a choice of components for a particular processor gives you the flexibility to choose the configuration best suited to your material.The API 550 has four component processors:API 550A Stereo – A 3-Band stereo equalizerAPI 550A Mono – A 3-Band mono equalizerAPI 550B Stereo – A 4-Band stereo equalizerAPI 550B Mono – A 4-Band mono equalizerWaves API 550 User ManualChapter 2 – Quickstart GuideApproach the Waves API 550 as you would any conventional EQ. Since the API 550 features “Proportional Q,” which intuitively widens the filter bandwidth at lower settings and narrows it at higher settings, feel free to push the API 550 harder than you normally would other equalizers. The API 550 will deliver smooth, natural, and musical sound even at the most extreme settings.Waves API 550 User ManualChapter 3 – Controls and InterfaceWaves API 550 User Manual3.1 EQ SectionAPI 550A ControlsLow Band GainRange-12dB to +12dB (2-3dB steps)Default0dBLow Band FrequencyFilter typesShelf, BellDefaultShelfCutoff points50Hz, 100Hz, 200Hz, 300Hz, 400HzDefault50HzMid Band GainRange-12dB to +12dB (2-3dB steps)Default0dBWaves API 550 User ManualMid Band FrequencyRange.4kHz, .8kHz, 1.5kHz, 3kHz, 5kHzDefault1.5kHzFilter typesBellHigh Band GainRange-12dB to +12dB (2-3dB steps)Default0dBHigh Band FrequencyRange5kHz, 7kHz, 10kHz, 12.5kHz, 15kHzDefault7kHzBandpass FilterApplies a 50Hz-15kHz bandpass filter to the entire signalLow Shelf/Bell SelectorRangeShelf or BellDefaultShelfHigh Shelf/Bell SelectorRangeShelf or BellDefaultShelfWaves API 550 User ManualAPI 550B ControlsLow Band GainRange-12dB to +12dB (2-3dB steps)Default0dBLow Band FrequencyRange30Hz, 40Hz, 50Hz, 100Hz, 200Hz, 300Hz, 400HzDefault50HzFilter typesShelf, BellCutoff points30Hz, 40Hz, 50Hz, 100Hz, 200Hz, 300Hz, 400HzLow Mid Band GainRange-12dB to +12dB (2-3dB steps)Default0dBLow Mid Band FrequencyRange75Hz, 150Hz, 180Hz, 240Hz, 500Hz, 700Hz, 1kHzDefault500HzFilter typesBellCutoff points75Hz, 150Hz, 180Hz, 240Hz, 500Hz, 700Hz, 1kHzHigh Mid Band GainRange-12dB to +12dB (2-3dB steps)Default0dBWaves API 550 User ManualHigh Mid Band FrequencyRange0.8kHz, 1.5kHz, 3kHz, 5kHz, 8kHz, 10kHz, 12.5kHzDefault5kHzFilter typesBellCutoff points0.8kHz, 1.5kHz, 3kHz, 5kHz, 8kHz, 10kHz, 12.5kHzHigh Band GainRange-12dB to 12dB (2-3dB steps)DefaultOffHigh Band FrequencyRange2.5kHz, 5kHz, 7kHz, 10kHz, 12.5kHz, 15kHz, 20kHzDefault10kHzFilter typesShelf, BellCutoff points2.5kHz, 5kHz, 7kHz, 10kHz, 12.5kHz, 15kHz, 20kHzLow Shelf/Bell SelectorRangeShelf or BellDefaultShelfHigh Shelf/Bell SelectorRangeShelf or BellDefaultShelfInTurns the EQ On/Off but leaves the Analog modeling.RangeOn/OffDefaultOnWaves API 550 User Manual3.2 Output SectionThe Output section, which is identical on both the API 550A and API 550B, consists of controls for Polarity (Phase Inversion) Analog Modeling, Output Level, and Trim.Pol (Polarity)Shifts the phase by 180 degrees.Range0deg-180degDefault0degAnalogTurns the Analog modeling on and off.RangeOn/OffDefaultO ffWaves API 550 User ManualOutput Controls the output level. Range -18dB to +18dB (in 0.1dB steps)Default 0dB Trim Displays the maximum peak level of the output signal and its distance from nominal gain (-0.1dBfs). Range -inf to 0dB Default -infMetersThe API 550 meters display output level in dBFS. The LED located between the two meters lights up when output signal is clipping.Waves API 550 User Manual3.3 WaveSystem ToolbarUse the bar at the top of the plugin to save and load presets, compare settings, undo and redo steps, and resize the plugin. To learn more, click the icon at the upper-right corner of the window and open the WaveSystem Guide.Appendix A – 550A Controls Control Range Default Low Band Gain -12dB to 12dB (2-3dB’s steps)0dB Low Band Frequency 50Hz,100Hz,200Hz,300Hz,400Hz 50Hz Mid Band Gain -12dB to 12dB(2-3dB’s steps)0dB Mid Band Frequency .4kHz,.8kHz,1.5kHz,3kHz,5kHz. 1.5kHz High Band Gain -12dB to 12dB(2-3dB’s steps)0dB High Band Frequency 5kHz,7kHz,10kHz,12.5kHz,15kHz.7kHz Filter Bandpass 50Hz-15kHz Off Low shelf/bell selector Shelf or Bell Shelf High shelf/bell selector Shelf or Bell Shelf Output -18dB to 18dB 0dB Trim -inf to 0dB -inf AnalogOn/Off O ff Phase 0deg- 180deg 0deg Appendix B – 550B ControlsWaves API 550 User ManualControl Range Default Low Band Gain -12dB to 12dB(2-3dB’s steps)0dB Low Band Frequency 30Hz,40Hz,50Hz,100Hz,200Hz,300Hz,400Hz 50Hz Low Mid Band Gain -12dB to 12dB(2-3dB’s steps)0dB Low Mid Band Frequency 75Hz,150Hz,180Hz,240Hz,500Hz,700Hz,1kHz. 500Hz High Mid Band Gain -12dB to 12dB(2-3dB’s steps)0dB High Mid Band Frequency 0.8kHz,1.5kHz,3kHz,5kHz,8kHz,10kHz,12.5kHz. 5kHz High Band Gain -12dB to 12dB(2-3dB’s steps)Off High Band Frequency 2.5kHz,5kHz,7kHz,10kHz,12.5kHz,15kHz,20kHz. 10kHz Low shelf/bell selector Shelf or Bell Shelf High shelf/bell selector Shelf or Bell Shelf Output -18dB to 18dB 0dB Trim -inf to 0dB -inf AnalogOn/Off O ff Phase 0deg- 180deg0deg。
海康8104HM-M系列车载网络录像机用户操作手册V2.2.1

DS-8104HM-M(/XX)系列嵌入式车载录像机用户操作手册(V2.2.0 版)
第 2 页 共 34册(V2.2.0 版)
目
录
1 产品介绍 ............................................................................................................................................................................................................................. 5 1.1 产品概述 ..................................................................................................................................................................................................................................... 5 1.2 产品主要功能 .............................................................................................................
碧海威TMS系统用户手册20130227

3.5.2 警报日志.........................................................................................................59 3.5.3 事件日志.........................................................................................................60 3.5.4 报表中心.........................................................................................................60 3.5.5 日志设置.........................................................................................................61 3.5.6 存储设置.........................................................................................................61 3.6 系统设置.....................................................................................................................63 3.6.1 设备名设置.....................................................................................................63 3.6.2 网络设置.........................................................................................................63 3.6.3 网络参数设置.................................................................................................64 3.6.4 HA 设置 ..........................................................................................................65 3.6.5 伪 IP 防护 .......................................................................................................66 3.6.6 内网 IP 统计设置 ...........................................................................................66 3.6.7 时间设置.........................................................................................................67 3.6.8 SNMP 设置.....................................................................................................67 3.6.9 Netflow 设置...................................................................................................68 3.6.10 管理员设置.....................................................................................................68 3.7 系统维护.....................................................................................................................70 3.7.1 系统信息.........................................................................................................70 3.7.2 系统升级.........................................................................................................70 3.7.3 系统重启.........................................................................................................71 3.7.4 系统服务.........................................................................................................72 3.7.5 设置旁路.........................................................................................................72 3.7.6 配置维护.........................................................................................................73 3.7.7 配置模板.........................................................................................................74 3.7.8 健康检查.........................................................................................................74 3.7.9 抓包工具.........................................................................................................74 3.7.10 系统调试.........................................................................................................75 3.7.11 命令控制台.....................................................................................................75 4. 配置案例.....................................................................................................................................77 P2P 下载控制 .........................................................................................................................77 迅雷、超级旋风控制 ............................................................................................................. 78 FAQ ................................................................................................................................................. 78
DGS应用程序用户指南说明书

Change your water, Change your lifeTable of ContentsApplication Naming (4)Internet URL (4)Targeted Users (4)Data in DGS Application (4)Support and Inquiries (4)DGS View Concept (5)View Availability (5)’All Bubbles’ View and ‘6A & Above’ View Samples (5)DGS Main Page (6)Modules & Function List (6)Home Link (7)Open View (7)View Control (9)Zoom Slider (10)Other than Zoom Slider (10)Menu Controls (11)Genealogy Module (13)Usage (13)Bubble Size & Data (13)Rank Colors (13)Bubble Details, Sales Unit Count (14)Open View from within Genealogy Module (14)Tabs (14)Hide Trailing 1A bubbles (15)Hide Trailing F bubbles (15)Collapse & Expand (15)Monitor Size (15)Local View Module (16)Search Module (17)Legend Module (17)Details Module (18)Sales Count (19)Display Module (20)Actions Module (21)PDF Output (21)Layers Display Control (22)Timeout Function (22)Footer Area (22)DGS View ConceptDepending on the rank of distributor, there may be one or two views to his or her genealogy. View Availability’All Bubbles’ View and ‘6A & Above’ View Samples’All Bubbles’ View and ‘6A & Above’ View Samples'6A & Above' View6A424A 6A 6A 6A2 6A2 6A 6A6A426A83'All Bubbles' View2A1A 3A 4A 6A325A 6ADGS Main PageWelcome to Distributor Genealogy Solution main page!※The captured image is airbrushed out to protect personal information.DGS Main Page & ModulesModules & Function List•Home Link•Open View•View Control•Zoom Slider•Menu Control•Genealogy module•Local View module•Search module•Legend module•Details module•Display module•Actions moduleGenerate PDFLayers Display Control•Timeout•Footer AreaHome LinkPress the home button to select the source bubble.Home SelectedOpen ViewSelect a bubble out of bubbles in display to load its genealogy. There are two ways to load a genealogy. You can choose from Process 1 of Process 2.Process 1:1.) Enter a distributor ID and press themicroscope button as illustrated on the left.Or press the cross button to clear the input.2.) Exact ID# is required. (cannot search bypartial match). If an ID# cannot be found, a warning popup appears.Distributor ID not foundHome LinkOpen View button3.) If distributor’s rank is above 6A2, two viewswill be available ([All Bubbles] view or [6A & Above] view). Please select one. If rank is 6A or below, only one view is available and it will be loaded into Genealogy module by default.*** For more info on views, please refer to DGS ViewConcept .Process 2:1.) Right-click on the bubble and select [OpenView].On a touchscreen PC device, a right-click on a non-touchscreen PC device can be achieved by tapping and holding on the targeted bubble.Open View2.) If distributor’s rank is above 6A2, two viewswill be available ([All Bubbles] view or [6A & Above] view). Please select one. If rank is 6A or below, only one view is available and it will be loaded intoGenealogy module by default.*** For more info on views, please refer to DGS ViewConcept .View ChoiceView ChoiceView ControlClicking or tapping the ‘HORIZONTAL’ ‘VERTICAL’ switches the type of genealogy displayed horizontally or vertically.View Control ‘HORIZONTAL’View Control ‘VERTICAL’・HORIZONTAL DisplayHORIZONTAL Display・VERTICAL DisplayVERTICAL DisplayZoom Slider•Clicking or tapping the ‘Zoom Slider’ switch at the top right corner enables or disenables zoom slider.Zoom slider controlZoom slider is on by default and it is located at the top-left corner.•Sliding the switch on the zoom slider to either direction controls the zoom level of bubbles in Genealogy module .・Zoom at 35%Zoom at 35%・Zoom at 90%Zoom at 90%Other than Zoom SliderZoom in or out can be achieved by combination usage of keyboard and mouse by press & holding the CTRL key and scrolling up or down the scroll wheel of a mouse at the same time. It can be achieved by pinching in or pinching out with your tablet-like device.Menu ControlsMenu consists of Local View module , Search module , Legend module , Details module , Display module , and Actions module .•Clicking or tapping the control at the top-right corner illustrated below, the right-hand side menu appears or disappears.Menu control•‘Menu Auto’ is enabled or disabled by clicking the switch illustrated below. When ‘Menu Auto’ is on, menu appears when a bubble is selected in Genealogy moduleand disappears when a bubble is not selected.Menu Auto OnAuto menu offAuto menu on with bubble selectedRight-hand side menuMenu Auto Off•Click on the white area in Genealogy module to clear selected bubble.Auto menu on with bubble selected Auto menu off with bubble unselected (clicking white space)Genealogy ModuleUsage• Viewing of distributor’s genealogy.• Details of a selected bubble are displayed in the Details module .• Upline and downline info of a selected bubble are displayed in the Local View module . •Usages of Local View module , Search module , and Display module are reflected in the Genealogy module .Bubble Size & DataAmount of info displays in a bubble varies accordingly to the level of zoom-in and zoom-out.Zoom-inZoom-out1st row : Rank : Distributor ID : Registered branch 2nd row : Distributor name or company name, (Age)3rd row : 8-pt sales (MTD) : Group sales (MTD) : 8-pt accumulated sales 4th row : Registration date*** Note: Canceled customer or canceled distributor’s name is shown as ‘CANCELED’.1st Row : Distributor ID2nd Row : 8-pt sales (MTD) : Group sales (MTD) : 8-pt accumulated salesNo Text is displayed.Bubble Zoom-in, Zoom-outRank ColorsRank ColorsBubble Details, Sales Unit CountPlease refer to Details module for more detailed info of bubbles or sales unit count.SummaryDisplays the count of bubbles by ranks (includes source distributor, its downline bubbles, canceled customers or canceled distributors, and other downline group leaders if any).SummaryOpen View from within Genealogy ModuleAside from using Load Distributor Genealogy function to open a distributor’s genealogy, right- clicking a bubble and choose ‘Open View’ can achieve the same. Please refer to Open View module for more details.Open ViewTabsLoading a distributor’s genealogy generates a new tab. Multiple distributor’s genealogy can be viewed at any time by switching tabs.TabsTo close a tab, press the ‘X’ sign on the tab.Close a tabWhen closing a tab, DGS displays a confirmation popup.Confirmation to close a tabUp to 5 tabs can be displayed. Causes an error indication for trying to open 6th tab.Hide Trailing 1A bubblesYou can hide trailing 1A bubbles by checking the box of [Hide Tralling 1A bubbles]. Un-check the box to unhide the bubbles.Hide Trailing F bubblesYou can hide trailing F status bubbles by checking the box of [Hide Tralling F bubbles]. Un-check the box to unhide the bubbles.Hide Icon will show up inside the bubbles if they contain hidden bubbles underneath.Hide IconCollapse & ExpandAvailable for bubbles with downline distributors. You can collapse or expand bubbles by clicking on -(Minus) or +(Plus). The space made by collapsing will be compressed.CollapseBefore collapsingExpandYou can download the image displayed in Genealogy module and output as a PDF file in Actionsmodule . The layout of the image can be adjusted by collapsing and expanding bubbles.Monitor SizeBubble size is governed by number of pixel. The higher the resolution, the more bubbles are displayed by default.Hide Trailing F bubblesHide Trailing 1A bubblesLocal View ModuleThe Local View module is developed to make it easy to view a specific bubble’s connection (upline & downline) as it may be difficult to view so in the Genealogy module since the upline bubbles are spread widely across the screen as the number of downline bubbles increases.Local View module with Genealogy module•Selected bubble in Genealogy module is displayed inside the Local View module.•Two levels of upline bubbles, one level of downline bubbles(if any) are displayedEnables searching within Genealogy module.Search Module Search Module and Genealogy Module•Partial match, Complete match of Distributor ID•Search module requires at least 3 digit. Error message will appear for insufficient input. •Search result shows ‘Distributor ID’ and ‘Branch’.•By selecting one of the data in the search result within Search module, the targeted bubble inside Genealogy module will be selected. At the same time, the same bubble info will be displayed in Local View module and Detail module .Legend ModuleDescribes Rank ColorsLegend Module Legend Module and Genealogy ModuleDisplays details of a distributor by selecting a bubble either inside Genealogy module or Local View module.Details Module Details Module and Genealogy Module#Display in DGS Descriptions1 ID: Distributor ID2 Name: Distributor name or company name, (Age)*** Canceled customer or distributor’s name is shown as ‘CANCELED’.3 Rank: Sales rank4 Branch: Registered Branch Office5 Sales [Status]: Distributor sales status (ex. F status)6 Sales [8-pt]: 8-point sales unit count [Month to Date]7 Sales [Group]: Group sales unit count [Month to Date] (available for distributorof sale rank 6A & above)8 Sales [8-pt, accumulated]: 8-point accumulated unit count9 Purchase date: Purchase date of access to DGS(E8PA membership)8 BP BP Point *sales unit count of old ID in case of FA9 Last sales date: Date of last direct sale made10 Sales status down: Remaining day count before status down11 Sponsor registered rank: Sponsor’s Sales rank*** Data is based on the Enagic SystemSales CountBelow explains how the sales count is displayed in DGS based on various business situation.You can temporarily hide bubbles you want to omit in Genealogy module for easier overviewing.Display Module and Genealogy Module•Right-click on a bubble and select‘Hide’to hide the targeted bubble and bubbles underneath it.•Hide Icon will show up inside the upper bubble of hidden bubbles. Bubbles with Hide Icon contain hidden bubbles underneath.Before Hide After Hide•Overview of hidden bubbles will be displayed inside Dispay module. Click on ’UnHide’ button to expand hidden bubbles.Actions module contains PDF output and Layers Display Control.Actions module and Genealogy module※Clicking on ’PDF Output Icon’ at the bottom-left corner is shortcut to Actions module.PDF OutputGenerates PDF output of Genealogy module.It is prohibited to share output with personal data to any non-Enagic external party. Handle such information with caution and extreme care.Failure to comply may result in the possibility of legal actions.•Generates PDF file and download it by clicking on ’Generate PDF’ in Actions module.Download process may vary depending on the device you use. Please check the setting of your device if necessary.•The following actions will be reflected in PDF output. (Hidden bubbles remain hidden) Collapse & Expand‘Hide’action in Display moduleHide Trailing 1A bubbleHide Trailing F bubbleLayers Display ControlLayers Display ControlYou can designate the number of layers displayed in Genealogy module .• Example of 2 layers display control is described as below. Hide Icon will show up inside the bubbles if they contain hidden bubbles underneath.Show all layers• Designated number of layers will be shown at the bottom-left corner.Timeout FunctionWhen there is no user action for 20 minutes, browser redirects to https:///mypage/login.php . Re-logon is required to use DGS again.Footer AreaFooter Area contains Contact Info and Enagic links. Footer Area opens by clicking on ’Expand footer’ at the bottom-right corner.Designate 2 layers display control。
Sophos XG Firewall虚拟应用程序Microsoft Hyper-V指南说明书
ContentsPreface (4)Base Configuration (4)Prerequisites (4)Installation Procedure (4)Step 1: Download and Extract VHD Disks (4)Step 2: Connect to Host Server (4)Step 3: Add a new virtual machine (5)Step 4: Name the virtual appliance (6)Step 5: Specify Generation (6)Step 6: Set virtual memory for the appliance (7)Step 7: Choose the network interface for the appliance (7)Step 8: Choose the primary virtual hard disk (8)Step 9: Complete the basic setup (8)Step 10: Configure the settings for virtual appliance (9)Step 11: Add network adapter to the virtual appliance (9)Step 12: Add auxiliary disk to the appliance (10)Step 13: Connect to the virtual appliance (11)Step 14: Accept EULA (12)Configuring XG Firewall (13)Activation and Registration (13)Step 1: License Agreement (13)Step 2: Register Your Firewall (13)Step 3: Complete basic setup (14)Basic Configuration (15)a. Setting up Interfaces (15)b. Creating Zones (15)c. Creating Firewall Rules (15)d. Setting up a Wireless Network (16)Copyright Notice (20)Change LogPrefaceThe Getting Started Guide describes how to download and deploy Sophos XG Firewall Virtual Appliance on Microsoft Hyper-V.Base ConfigurationIf the following minimum server requirements are not met, XG Firewall will go into failsafe mode:1.One vCPU2.2GB vRAM3.2 vNIC4.Primary Disk: Minimum 4GB5.Auxiliary Disk: Minimum 80GBNote: For optimal XG Firewall performance, configure vCPU and vRAM according to the license you have purchased. Do not exceed the maximum number of vCPUs specified in the license.PrerequisitesMake sure that Microsoft Hyper-V Server 2008/2012 has been installed in your network. To install Microsoft Hyper-V Server, refer to the instructions: ∙/en-us/library/dd283085(v=ws.10).aspx ∙/en-us/library/hh831620.aspx Installation ProcedureStep 1: Download and Extract VHD DisksDownload the .zip file containing VHD disks from https:///en-us/products/next-gen-firewall/free-trial.aspx and save it to your machine.Step 2: Connect to Host ServerLaunch the Hyper-V Manager. Go to Action Connect to Server to connect to the host server on which you wish to deploy the VHD template. The following screen appears:Step 3: Add a new virtual machineGo to Action New and select Virtual Machine. It opens New Virtual Machine Wizard.Step 4: Name the virtual applianceStep 5: Specify GenerationSelect Generation 1.Step 6: Set virtual memory for the applianceFor Startup memory (vRAM), enter 2048 MB (recommended) or higher.Step 7: Choose the network interface for the applianceStep 8: Choose the primary virtual hard diskSelect Use an existing virtual hard disk and browse to select the file that you extracted.Step 9: Complete the basic setupVerify the configuration summary and click Finish.Note: This completes the basic setup of VM. To complete the Sophos XG Firewall installation you need to add network interface and auxiliary disk.Step 10: Configure the settings for virtual applianceRight-click the virtual appliance that you created and click Settings.Step 11: Add network adapter to the virtual appliance Under Hardware, select Network Adapter and click Add.To specify the network adapter configurations, refer to the image below.Step 12: Add auxiliary disk to the applianceUnder Add Hardware, click SCSI Controller and select Hard Dive. Click Add and then browse to select the Auxiliary disk.Step 13: Connect to the virtual appliance Right-click the virtual appliance and click Connect.Sophos XG Firewall has been installed on your virtual machine.To continue to the Main Menu. Step 14: Accept EULAConfiguring XG FirewallGo to https://172.16.16.16:4444 from the management computer. Click to begin the wizard and follow the on-screen instructions.Note: The wizard will not start if you have changed the default administrator password from the console.Activation and RegistrationStep 1: License AgreementTo proceed, you must accept the Sophos End User License Agreement (EULA).Step 2: Register Your FirewallEnter the serial number, if you have one. If you are migrating from UTM 9, you can use its license. Alternatively, you can skip registration for 30 days, or start a free trial.You will be redirected to the MySophos portal website. If you have a MySophos account, click Login and enter your credentials. If you are a new user, click Create Sophos ID and enter the details to sign up for a MySophos account.Complete the registration process.Step 3: Complete basic setupAfter you register the device, the license is synchronized and basic setup is complete.Click Continue and complete the configuration through the wizard. After completion, the Network Security Control Center appears.You can use the left navigation pane to configure other settings.Basic Configurationa.Setting up Interfaces1.Add network interfaces and RED connections: Configure > Network > Interfaces.2.Add wireless networks: Protect > Wireless > Wireless Networks. The SSIDs that you create will appear on the interfaces menu.3.Add access points: Protect > Wireless > Access Points.b.Creating ZonesZones are essential to creating firewall rules. The device provides default zones. To create custom zones, go to Configure > Network > Zones.c.Creating Firewall RulesYou can create the following types of firewall rules in Protect > Firewall > Add Firewall Rule:1.Business Application Rule: To secure a server or service, and control access to it.er/Network Rule: To control user access to web and application content, or to control traffic by source, service, destination, zone, and user.d.Setting up a Wireless NetworkTo create wireless networks from the XG Firewall Wizard, refer to the instructions below:1.Go to Protect > Wireless > Wireless Networks.2.Click Add to add a new wireless network.3.Configure the wireless network as shown in the image.The wireless network will be added.4.Similarly, add another wireless network for guest access.You can see both wireless networks on Protect > Network > Wireless Networks.5.Go to Protect > Wireless > Access Point Groups.6.Click Add to add a new access point group.7.Add both the wireless networks, and the new access point.You can view newly-installed APs on the Control Center.8.Click the pending APs to accept the new access points.9.To configure the settings of new APs, refer to the image.10.Click Save.Copyright NoticeCopyright 2015-2017 Sophos Limited. All rights reserved.Sophos is registered trademarks of Sophos Limited and Sophos Group. All other product and company names mentioned are trademarks or registered trademarks of their respective owners.No part of this publication may be reproduced, stored in a retrieval system, or transmitted, in any form or by any means, electronic, mechanical, photocopying, recording or otherwise unless you are either a valid licensee where the documentation can be reproduced in accordance with the license terms or you otherwise have the prior permission in writing of the copyright owner。
NOVELL4.11证券行业服务器安装教程
NOVELL4.11证券行业服务器安装教程NOVELL 4.11证券行业服务器安装教程(本教程适用于HP 370/570/380系列服务器) by王和宇准备工作:服务器启动后,F8做好RAID 1(或5)阵列,F9(CMOS)里关闭超线程、USB接口等、根据客户机房环境关闭RJ45板载千兆网卡、根据需要调整光纤卡、阵列卡IRQ中断等参数设置。
1、重启服务器,放入NOVELL411光盘,自动进入DOS2、校对时间、FDISK分区、C盘划为500M 、激活主分区、其它空间不用分区,重启。
3、FORMAT C: /S4、拷贝光盘中以下几个重要目录至C盘对应的目录:A、MD C:\DRV (RAID卡、板载网卡、光纤卡等驱动都要拷贝到这儿)B、NWPA2K (Netware系统补丁)C、IWSP6A.EXE并解压缩(Netware 系统SP6补丁文件)D、A盘中的所有文件拷贝至C:\DOS (包括License授权许也拷贝到这里)E、A盘中根目录下的AUTOEXEC.BAT、CONFIG.SYS启动文件至硬盘并修改文件中的驱动路径。
5、从光盘INSTALL 安装Netware 4.11。
6、在提示找不到驱动或提示安装其它驱动的时候,先不要自动安装驱动,按ALT+ESC回到DOS7、DOWN掉系统,EXIT退回DOS8、COPY C:\NWPA2K\NWPA*.* C:\NWSERVER9、COPY C:\IWSP6A\BOOT\*.* C:\NWSERVER10、CD C:\NWSERVER 运行LSWAP 进入文件更新。
11、运行SERVER进入系统,然后LOAD INSTALL12、首先LOAD陈列卡驱动,570G3系列服务器陈列驱动为6400卡(驱动名:CPQRAID),570G4到目前的380G5都是P400的陈列卡驱动(驱动名:HPQCISS)。
13、然后在Disk栏里建立NetWare专用分区,如果无法建立则陈列卡驱动没有加载成功,所有硬盘空间全给这个NetWare分区。
碧海威流控L7Cloud抓包方法
如何使用碧海威流控抓包分析网络异常
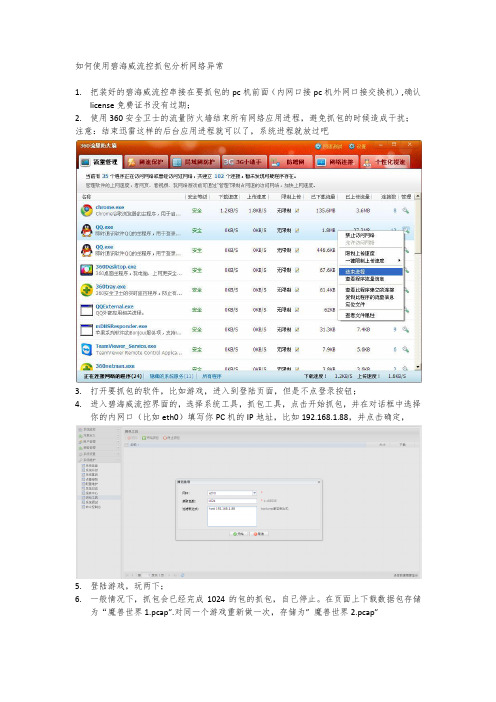
1.把装好的碧海威流控串接在要抓包的pc机前面(内网口接pc机外网口接交换机),确认
license免费证书没有过期;
2.使用360安全卫士的流量防火墙结束所有网络应用进程,避免抓包的时候造成干扰;注意:结束迅雷这样的后台应用进程就可以了,系统进程就放过吧
3.打开要抓包的软件,比如游戏,进入到登陆页面,但是不点登录按钮;
4.进入碧海威流控界面的,选择系统工具,抓包工具,点击开始抓包,并在对话框中选择
你的内网口(比如eth0)填写你PC机的IP地址,比如192.168.1.88,并点击确定,
5.登陆游戏,玩两下;
6.一般情况下,抓包会已经完成1024的包的抓包,自己停止。
在页面上下载数据包存储
为“魔兽世界1.pcap”.对同一个游戏重新做一次,存储为”魔兽世界2.pcap”
7.把上述文件发到碧海威信箱1632411846@里面,以游戏名称作为邮件名字即可。
如果不具备使用碧海威流控抓包的条件,可以使用pc机安装的软件wireshark抓包,其他部分一样。
NBX安装3步曲 红莲版傻瓜式教程

NBX安装3步曲红莲版傻瓜式教程由于大部分人,不去看NBX安装文件里的安装文件,所以我写了个很基本的教程,不过没有原版那样丰富,只限于没有什么耐心的家伙。
详情请去看原版教程。
原版教程在你下载解压缩出来的文件夹中点开后看到的这个就是原版教程了。
好了,接下来红莲NBX速成教程开始了。
1你要去/官方网站下载NBX主程序,和更新的资料声明:这里下的NBX提示有毒,是因为360误杀,也是因为NBX是个带壳程序,毕竟不是带壳的程序是不能挂在QQ上的,人QQ也不让你挂。
不过这只是代表我个人意见,因为我用一年多了,也没有出什么差错过。
好了。
这个日期是指何时在这个里发布的找不到下载哪个的看如下图示这个是指这个资料是什么时候制作的制作出来会很快,但是发布日期会晚起几天,因为可能有BUG,所以需要晚发出来。
工作人员是很忙的。
还有就是,如果你看到这个图后面跟着的那个发布日期变了,就是这里的那个11-21变了的话,就说明是资料更新了。
所以请注意下载。
接下来说正题。
怎么去下载。
找到那个图示那个点进去后。
拉到最下面你会发现下载地址很多这里我表示不要慌不要觉得东西多。
因为只有NBX主程序和资料更新这2个需要下载的,后面HTTP,DBANK,115分流这3个,只是下载方式不同。
内容下载下来是一样的东西。
一般大家选择HTTP就好,有时候HTTP出问题时用其他2个方式下载就行。
下载后,我要说,你玩上NBX对战已经不远了。
当你下载并解压缩后,应该会出现如下内容当你解压缩那个资料更新后会发现你会解压缩出来和NBX解压缩出来的目录名一样的data文件夹所以NBX的更新很简单,只要把你从资料更新解压缩出来的data拖住,拖住的意思就是点住不放。
扔进NBX解压缩出来后的文件夹。
然后系统会问你一句话,是否覆盖,你选择全部覆盖便可。
接下来检测你是否更新正确点开NBX,EXE就是这个选择单机模式单击便可然后从这里找到内置卡查选项并点开什么都别点把进度条拉到最后查看拉到最下确认是否到达了全卡这时候你会发现你和我的不一样你没有卡图(卡图也可下载群共享带有image的文件即为卡图,需要全部下载)2如果你需要下载卡图,就看我接下来的步骤,如果你不需要就跳过2步骤直接看3步骤便可卡图的下载依然是在/官方网站下载在下载中心的公共卡图下载中,点开你会发现这个怎么这么多?还是那句话,别着急,别丧失耐心通过了这步,你就离玩上NBX还有3分之一的路要走你可以选择全卡图下载那个选项,也可以选择分着下载本人推荐分着下,这样会更全些,毕竟全卡图的不一定能跟上最新的更新速度。
Rockwell Automation FactoryTalk Logix Echo 产品说明书

注意:标识可能导致人员伤亡、财物损害或经济损失的做法或环境的相关信息。注意事项可帮助您识别危险,避开 危险,以及意识到后果。
重要 标识对成功应用和了解产品至关重要的信息。 还会在设备上或内部使用标签来提供具体预防措施。
FactoryTalk Logix Echo SDKFra bibliotek附录 A
SDK 文档套件和 NuGet 软件包 .......................................................... 35 API 功能 .................................................................................................... 35
FactoryTalk Logix Echo 获 取结果指南
获取结果指南
Rockwell Automation 出版号 9310-GR001B-ZH-P - 2022 年 11 月 取代出版号 9310-GR001A-ZH-P - 2021 年 8 月
原始说明
FactoryTalk Logix Echo 获取结果指南
章节 3
使用控制器快照 ........................................................................................ 25 添加快照............................................................................................... 25 编辑快照.............................................................................................. 26 恢复快照.............................................................................................. 26 导出快照.............................................................................................. 27 导入快照.............................................................................................. 27
DPtech FW1000系列应用防火墙安装手册v2.01
DPtech FW1000 系列应用防火墙安装手册
2.2.4 抗干扰要求............................................................................................................................... 3 2.2.5 防雷击要求............................................................................................................................... 3 2.2.6 接地要求................................................................................................................................... 3 2.2.7 布线要求................................................................................................................................... 3 2.3 安装工具......................................................................................................................................4
杭州迪普科技有限公司为客户提供全方位的技术支持。 通过杭州迪普科技有限公司代理商购买产品的用户,请直接与销售 代理商联系;直接向杭州迪普科技有限公司购买产品的用户,可直 接与公司联系。
碧海威PPPOE认证的简单调试方法
碧海威PPPOE认证的简单调试方法
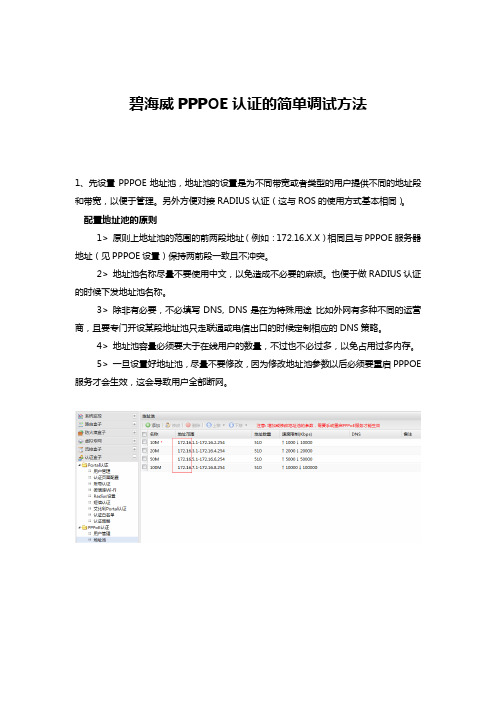
1、先设置PPPOE地址池,地址池的设置是为不同带宽或者类型的用户提供不同的地址段和带宽,以便于管理。
另外方便对接RADIUS认证(这与ROS的使用方式基本相同)。
配置地址池的原则
1> 原则上地址池的范围的前两段地址(例如:172.16.X.X)相同且与PPPOE服务器地址(见PPPOE设置)保持两前段一致且不冲突。
2> 地址池名称尽量不要使用中文,以免造成不必要的麻烦。
也便于做RADIUS认证的时候下发地址池名称。
3> 除非有必要,不必填写DNS, DNS是在为特殊用途比如外网有多种不同的运营商,且要专门开设某段地址池只走联通或电信出口的时候定制相应的DNS策略。
4> 地址池容量必须要大于在线用户的数量,不过也不必过多,以免占用过多内存。
5> 一旦设置好地址池,尽量不要修改,因为修改地址池参数以后必须要重启PPPOE 服务才会生效,这会导致用户全部断网。
2、配置PPPOE服务默认参数见下图,一般不需要修改。
任意账号登录对本地账号与RADIUS认证方式均有效,便于调试和应急时使用。
3、配置本地账号(或配置RADIUS接入方式)
4、有用户发现不需要拨号就能上网。
原因是用户的地址段正好处于本地局域网地址段
5、在认证盒子---PORTAL认证---认证策略只需要将不允许不拨号就上网的内网地址范围加入到认证策略即可。
碧海M1005系列流控路由用户指南20170808

碧海威M1005系列全千兆行为管理流控路由用户指南2022年3月23日产品简介M1005系列产品是碧海威一款基于MIPS平台的一款高性能、基于DPI(应用识别)和行为管理的专业流控路由设备,支持PPTP、L2TP、IPSEC 等VPN类型,支持多达64条外线的负载均衡,自带AC管理、云平台管理。
专为企业、工厂、酒店等中小规模用户设计,其优秀的网络处理能力、优异的网络管理能力与丰富的功能会给您带来极佳的网络体验。
外观图片:M1005A (内置电源)外观图片:M1005B (外置电源)*实图可能与展示图片有细微区别外观图片:M1005C (外置电源)功能特点:1、适用行业:企业办公、酒店、网吧等场所;2、产品基于DPI的应用识别,现在识别超过1900种协议特征,并实现每周自动更新;3、凭借MIPS架构,低功耗,高性能。
整机功耗: 3-5W (典型值),网吧环境带机量100终端左右,酒店、宾馆无线环境200-500终端;4、产品集应用识别、流量控制、行为管理、路由、AC管理、认证等功能于一身;5、充足的网络端口:一共5个千兆端口,内网外网任意组合,最大支持64条外接线路,并支持内网跨VLAN、QING管理;6、配合集成的AC控制模块,最大管理AP数量256个,根据AP的型号的不同,支持对单频和双频2.4G和5G双频AP的配置,最高支持802.11AC协议;7、强劲的转发性能:开启流控功能后吞吐量能达300M以上。
(WAN到LAN* 通过iperf 软件测得)。
运行状态*下表为M1005A 其它型号个别地方略有区别硬件规格软件功能M1005系列简易使用指南1、线路连接:ETH1 为系统默认的内网接口,初次调试时,先将PC的网线接入ETH1口。
如果遇到忘记配置信息,可以在路由正常开机1分钟后,按住RESET十秒后松手,待一分钟左右,系统会初始化至出厂状态。
再将本机电脑网卡IP地址设置为192.168.10.100 ,子网掩码255.255.255.0 或设置为DHCP自动获得,然后将网线接至ETH1口,并使用PING命令测试PING通192.168.10.1,至此可以进行下一步操作。
碧海威TMS流控系统用户手册

Polycom QDX 6000 版本 3.0.1 软件发布说明书
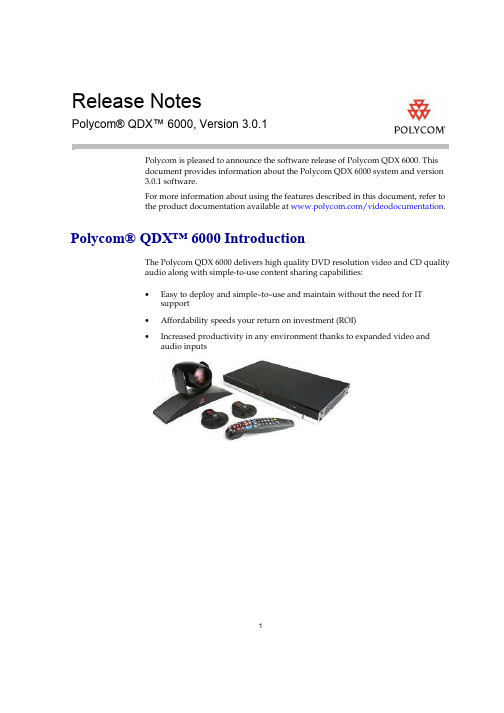
Release Notes ArrayPolycom® QDX™ 6000, Version 3.0.1Polycom is pleased to announce the software release of Polycom QDX 6000. Thisdocument provides information about the Polycom QDX 6000 system and version3.0.1 software.For more information about using the features described in this document, refer tothe product documentation available at /videodocumentation. Polycom® QDX™ 6000 IntroductionThe Polycom QDX 6000 delivers high quality DVD resolution video and CD qualityaudio along with simple-to-use content sharing capabilities:•Easy to deploy and simple–to–use and maintain without the need for ITsupport•Affordability speeds your return on investment (ROI)•Increased productivity in any environment thanks to expanded video andaudio inputs12Inputs and OutputsThe Polycom QDX 6000 has the following interfaces:TypeDescription5 video inputsS-video with RS232 control, IR and power for EagleEye QDX 6000 VGA input S-video2 x composite: VCR and another video source6 video outputsMain Display:ComponentS-VideoComposite 2nd display:VGA 2ndS-video composite4 audio inputsStereo Line in– 2 x RCA Stereo VCR – 2 x RCA2 x Polycom analog microphone - RJ11 2 audio outputsStereo main output – 2 x RCAStereo VCR – 2 x RCAOtherLAN NIC – RJ45 10/100RS 232 - Used for Polycom service Internal universal power supply – Power switch3Polycom EagleEye QDX 6000 CameraPOLYCOM EagleEye QDX 6000 Camera supports 16:9 4CIF/4SIF formats.Remote controlYou use the remote control to place calls, adjust the volume, navigate screens, andselect options.End a callOpen the directory to make a call or work with an entryConfirm your current selection; perform functions on highlighted itemsReturn to the previous screenSelect a far-site camera or video sourceSelect a near-site camera or video sourceCycle through display layoutsStore camera positions (when followed by a number); delete all stored camera positionsEnter a dot in an IP addressEnter numbers or text; move the camera to a stored positionAccess the online help; see currentsystem status while in a call; access the System screenAdjust the camera; navigate throughmenus Return to the Place a Call (home) screenfrom the far sitesZoom the camera image in or outsiteson or offSelect a camera or other video sourcecan enter textDelete letters or numbersStart and stop sending content to far sites4MicrophonesPolycom QDX 6000 system provide 2 analog directional Microphones, QDX 6000 System support stereo surround with 2 microphones.Software FeaturesThe following sections highlight the major software features of Polycom QDX 6000. For more details, please refer to QDX 6000 datasheet, “Administrator’s Guide for Polycom QDX 6000 Systems”, and “User’s Guide for Polycom QDX 6000 Systems”.High quality Standard -Definition VideoQDX 6000 system can deliver high resolution DVD-like resolution video at bandwidth from 256K to 4M.Maximum 4CIF/4SIF capacity for different video protocolBandwidth Resolution/Frame Rate Video Protocol 256K – 2M 4CIF /25fps, 4SIF/30fps H.264 1M-4M4CIF /25fps, 4SIF/30fpsH.263High quality Audio• CD quality audio • Polycom Siren™22• Stereo voice (When using 2 of Polycom microphones) •AEC/AGC/ANSContent sharing• H.239 for content sharing• 5 video inputs, any one of which can dynamically be sent as content input. • Polycom PPCIP as the content input.• People and content video can be displayed on single screen using Dual Monitor Emulation or 2 separate monitors. •H.264 content5Customized LogoYou can customize the following logos shown on your Polycom QDX 6000 system in the on screen UI and the web interface. For more information about logocustomization, please refer to Administrator’s Guide for Polycom QDX 6000 Systems .Splash screen shown on system startupLogo on the top right corner of the home screenLogo on the top left corner of each page on web interfaceImage on the welcome screen on web interfaceScreen saver image on embedded UICaptionQDX 6000 system supports meeting caption and rolling caption with adjustable color and position. •Site name – To indicate who you are or where you are , especially for multipoint conference.6•Share message – To indicate purpose of this meeting or send meeting notice in a big conference. For example, you can send a notice in training “Our trainingwill start at 8:30 am tomorrow morning, not 9:00 am, please join on time. Thanks!”•Compatible with all standard H.323 endpoint and MCU , will not be filtered through MCULPRQDX 6000 Supports Polycom LPR (Lost Packet Recovery) technology to ensure good video quality even in difficult network environment with packet lost.What’s new in V3.0.1The following table lists the new features and bug fixes in V3.0.1.Feature or Bug fixes DescriptionEagleEye QDX camera controlsTo implement the EagleEye HD camera control features of the HDX on the QDX 6000. This is to be implemented in the Web UI only: Including White Balance Brightness etc. Color performance adjustment Add color performance adjustment menus to control color performance of EagleEye on the "Cameras" screen of web UIEnglish string fixes Several strings in English on the UI of the Endpoint Upgrade utility have been modifiedSony Camera integrationThe Sony D70 Camera can't be detected when hot-plug , need to be fixed .7Known LimitationsThe following table lists the known feature limitations for the version 3.0.1 release. If a workaround is available, it is noted in the table.Feature LimitationGlobal Directory The system response to user interactions will be slow when items is above 2000Global DirectoryRequiring patience is needed for thousands of Directory refresh in WEB UI , because it need to take a long time to download the entries , please wait for the downloadcompleted , don’t leave this page , otherwise it has to be download again .“LoginOK” trapsThis trap is not triggered when user log in from the web UI “MainCameraUp and mainCameraDown” trapsThe mainCameraUp trap is always triggered at system startup, regardless of camera connectivity. Neither of the traps is triggered when the camera is plugged or unplugged after system startupHardware Digital Microphone and 3rdmonitor ports are reserved. CamerasYou may see a few seconds of blue video while the Polycom QDX 6000 camera wakes up. The camera will also take a few seconds to focus after waking up.QDX 6000 sends stereo audio from microphones only when both microphones are connectedAudioCan not support stereo audio at 256 kbps call speed and below.Can not get IP address through DHCP when going into rescue mode with 10M LAN connectedNetworkCan not choose Auto as the Duplex Mode when choosing 10 Mbps as the LAN SpeedVideo QDX 6000 might display incomplete video from second VGA monitor when it was set as 640x480.Content share QDX 6000 can not support sending content with call speed of 64K.Rolling caption Rolling caption is not supported when the system language is set to ArabicQDX 6000 does not negotiate siren 14 audio with LifeSize systems, QDX 6000 transmits and receives G722 audio InteroperabilitySony XG80 does not receive video from the QDX 6000 in encrypted calls/Intermittent8InteroperabilityPolycom QDX 6000 systems are tested extensively with a wide range of products. The following list is not a complete inventory of compatible equipment; it simply indicates the products that have been tested for compatibility with the 3.0.1 release. Video conferencing systems use a variety of algorithms to compress audio and video. In a call between two systems, each end transmits audio and video using algorithms supported by the other end. In some cases, a system may transmit a different algorithm than it receives. This process occurs because each system independently selects the optimum algorithms for a particular call, and different products may make different selections. This process should not affect the quality of the call.9Type ProductVersionCameraPolycom EagleEye QDX 6000 Camera system firmware version: 109A Netgear FR114P v1.5-14 09/06/2005 VBP6400LF2 8.11.1 VBP5300E and S/T7.2.2 NAT/Firewall/Border ControllerCisco QOS Router Cisco IOS Software, 2800 Software(C2800NM-ADVIPSERVICESK9-M),V12.4(15)T1Polycom PPCIP 1.2.1 Management Systems and Recorders, ContentRSS 2000 4.0 Polycom CMA4000 4.0 Polycom CMA5000 4.01.00 Polycom SE200 3.0.3/3.00.05 Polycom Pathnavigator V 7.00.03 Polycom RMX 1000 V1.1.2 Polycom RMX 2000 V4.0/V3.0.1 Polycom MGC9.0.1.8 Polycom MGC Gateway 9.0.1.8 Codian MCU 2.4.1 Tandberg Gateway G3.2 Tandberg Gateway N6.0 Radvision ECS 5.6.2.4 Gatekeeper, Gateways, External MCU, Bridges, Call ManagersCisco 3745 GatekeeperV12.4 Polycom HDX9001 2.5.0.2 Polycom HDX9002 2.5.0.2 Polycom HDX9004 2.5.0.2 Polycom HDX8006 2.5.0.2 Polycom HDX8000 2.5.0.2 Polycom HDX4000 2.5.0.2 EndpointsPolycom HDX70042.5.0.21011Copyright Information© 2009 Polycom, Inc. All rights reserved. No part of this document may bereproduced or transmitted in any form or by any means, electronic or mechanical, for any purpose, without the express written permission of Polycom, Inc. Polycom, Inc. retains title to, and ownership of, all proprietary rights with respect to the software contained within its products. The software is protected by United States copyright laws and international treaty provision.License IssuesOpenSSL LicenseCopyright (c) 1998-2007 The OpenSSL Project. All rights reserved.Redistribution and use in source and binary forms, with or without modification, are permitted provided that the following conditions are met:1Redistributions of source code must retain the above copyright notice, this list of conditions and the following disclaimer. 2 Redistributions in binary form must reproduce the above copyright notice, thislist of conditions and the following disclaimer in the documentation and/or other materials provided with the distribution.3 All advertising materials mentioning features or use of this software must display the following acknowledgment:"This product includes software developed by the OpenSSL Project for use in the OpenSSL Toolkit. (/)"4 The names "OpenSSL Toolkit" and "OpenSSL Project" must not be used toendorse or promote products derived from this software without prior written permission.Forwrittenpermission,*************************************.5 roducts derived from this software may not be called "OpenSSL" nor may "OpenSSL" appear in their names without prior written permission of the OpenSSL Project.6Redistributions of any form whatsoever must retain the followingacknowledgment:12"This product includes software developed by the OpenSSL Project for use in the OpenSSL Toolkit (/)"THIS SOFTWARE IS PROVIDED BY THE OpenSSL PROJECT ``AS IS'' AND ANY EXPRESSED OR IMPLIED WARRANTIES, INCLUDING, BUT NOT LIMITED TO, THE IMPLIED WARRANTIES OF MERCHANTABILITY AND FITNESS FOR A PARTICULAR PURPOSE ARE DISCLAIMED. IN NO EVENT SHALL THE OpenSSL PROJECT OR ITS CONTRIBUTORS BE LIABLE FOR ANY DIRECT, INDIRECT, INCIDENTAL, SPECIAL, EXEMPLARY, ORCONSEQUENTIAL DAMAGES (INCLUDING, BUT NOT LIMITED TO,PROCUREMENT OF SUBSTITUTE GOODS OR SERVICES; LOSS OF USE, DATA, OR PROFITS; OR BUSINESS INTERRUPTION) HOWEVER CAUSED AND ON ANY THEORY OF LIABILITY, WHETHER IN CONTRACT, STRICT LIABILITY, OR TORT (INCLUDING NEGLIGENCE OR OTHERWISE)ARISING IN ANY WAY OUT OF THE USE OF THIS SOFTWARE, EVEN IF ADVISED OF THE POSSIBILITY OF SUCH DAMAGE.This product includes cryptographic software written by Eric Young(*****************).ThisproductincludessoftwarewrittenbyTimHudson (*****************).Original SSLeay LicenseCopyright(C)1995-1998EricYoung(*****************)Allrightsreserved.ThispackageisanSSLimplementationwrittenbyEricYoung(*****************).The implementation was written so as to conform with Netscape’s SSL.This library is free for commercial and non-commercial use as long as the following conditions are adhered to. The following conditions apply to all code found in this distribution, be it the RC4, RSA, lhash, DES, etc., code; not just the SSL code. The SSL documentation included with this distribution is covered by the same copyright termsexceptthattheholderisTimHudson(*****************).Copyright remains Eric Young's, and as such any Copyright notices in the code are not to be removed.If this package is used in a product, Eric Young should be given attribution as the author of the parts of the library used. This can be in the form of a textual message at program startup or in documentation (online or textual) provided with the package.Redistribution and use in source and binary forms, with or without modification, are permitted provided that the following conditions are met:1Redistributions of source code must retain the copyright notice, this list of conditions and the following disclaimer. 2 Redistributions in binary form must reproduce the above copyright notice, thislist of conditions and the following disclaimer in the documentation and/or other materials provided with the distribution.3All advertising materials mentioning features or use of this software must13display the following acknowledgement:"This product includes cryptographic software written by Eric Young(*****************)"The word 'cryptographic' can be left out if the routines from the library being used are not cryptographic related :-).4 If you include any Windows specific code (or a derivative thereof) from theapps directory (application code) you must include an acknowledgement: "ThisproductincludessoftwarewrittenbyTimHudson(*****************)" THIS SOFTWARE IS PROVIDED BY ERIC YOUNG ``AS IS'' AND ANYEXPRESS OR IMPLIED WARRANTIES, INCLUDING, BUT NOT LIMITED TO, THE IMPLIED WARRANTIES OF MERCHANTABILITY AND FITNESS FORA PARTICULAR PURPOSE ARE DISCLAIMED. IN NO EVENT SHALL THE AUTHOR OR CONTRIBUTORS BE LIABLE FOR ANY DIRECT, INDIRECT, INCIDENTAL, SPECIAL, EXEMPLARY, OR CONSEQUENTIAL DAMAGES (INCLUDING, BUT NOT LIMITED TO, PROCUREMENT OF SUBSTITUTE GOODS OR SERVICES; LOSS OF USE, DATA, OR PROFITS; OR BUSINESS INTERRUPTION) HOWEVER CAUSED AND ON ANY THEORY OFLIABILITY, WHETHER IN CONTRACT, STRICT LIABILITY, OR TORT(INCLUDING NEGLIGENCE OR OTHERWISE) ARISING IN ANY WAY OUT OF THE USE OF THIS SOFTWARE, EVEN IF ADVISED OF THE POSSIBILITY OF SUCH DAMAGE.The license and distribution terms for any publically available version orderivative of this code cannot be changed. I.e. this code cannot simply be copied and put under another distribution license [including the GNU Public License.]DisclaimerThis software is provided 'as is' with no explicit or implied warranties in respect of its properties, including, but not limited to, correctness and fitness for purpose.Trademark InformationPolycom®, the Polycom logo design, ReadiManager® SE200, and VSX® are registered trademarks of Polycom, Inc. Global Management System™, Polycom QDX 6000™, Polycom MGC™, PathNavigator™, People+Content™, Polycom EagleEye™, Polycom Lost Packet Recovery™, SoundStructure™, andStereoSurround™ are trademarks of Polycom, Inc. in the United States and various other countries. All other trademarks are the property of their respective owners.。
TerraExplorer Pro v7.0用户操作手册-2019v1.0
4.1
启动界面 ......................................................................................................................... 13
4.2
界面布局 ......................................................................................................................... 13
3.1
TerraExplorer 7.0.1 版本新特性 .......................................................................................8
3.1.1 栅格图层改进 ............................................................................................................ 8
3.2.6 分析工具..................................................................................................................10
3.2.7 使用 SkylineGlobe Server– 发布工具 .....................................................................10
1.1
关于本手册 ....................................................................................................................... 1
Ocean Way Audio Pro2A专业音响系统操作手册说明书
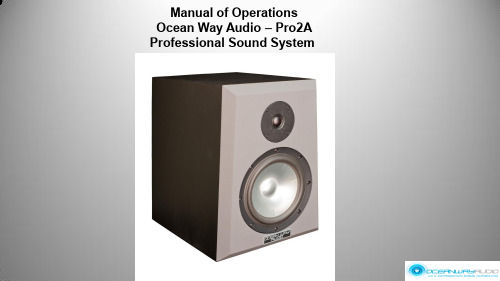
Manual of Operations Ocean Way Audio – Pro2A Professional Sound SystemContents1)Pro2A Description2)Safety Instructions and Warnings! (please read carefully)3)Inputs and Controls4)Input selectors & Legends5)S10A & S12A Sub-Bass options6)Specifications7)Warranty8)Maintenance1)Pro2APro2A is the latest addition to the OWA speaker line achieving efficient distortion-free dynamic range in an aesthetically appealing trapezoidal profile. Its cabinet features a sleek design with attention to time alignment, reduce baffle reflections and materials designed to minimize low frequency resonance. Its port is optimized to increase the woofer's low frequency extension and sound pressure level capacity.Pro2A’s HF driver is a high definition silk fabric dome design with excellent mechanical linearity. The LF driver is geometrically reinforced aluminum cone with a vented cast aluminum chassis yielding optimum strength and “high-power linearity”. Combined with the cabinet, the system offers minimal reflection, high resolution and low listening fatigue over the entire audio spectrum.Our two-way, self-powered design delivers outstanding performance allowing for flexibility of placement in the room with a uniform frequency response of 35Hz to 25kHz, and 110 dB maximum SPL between channels. Its overload protection circuitry ensure that drivers and amplifiers are protected, providing long term system reliability. The speaker allows the professional to hear great detail with a natural, open and accurately image. The Pro2A stands well above competitive monitor speakers in its price range.2) Safety Instructions and WarningsRead the information for usePlease keep this user manual in a safe place during the lifetime of the product.Heed all warnings.Follow all instructions.Do not use this product near water (for example, in damp rooms or near a swimming pool).Clean only with dry cloth.Do not cover the heat sink. Install in accordance with the user manual.Do not install near any heat sources such as radiators, heat registers, stoves, or other apparatus that produce heat.Protect the power cord from being walked on, pinched or damaged in any other way. Pay particular attention to plugs and the point where they exit from the Amplifier Unit.The Amplifier Unit can only be disconnected from the power supply by removing the plug, which must be freely accessible at all times. Unplug this Amplifier Unit during lightning storms or when unused for long periods of time.Refer all servicing to qualified service personnel.ServicingDo not attempt to service this product yourself. As opening or removing covers may expose you to dangerous voltage or other hazards, the amplifier may only be opened by qualified personnel. Pleaserefer to your dealer/distributor.Servicing and Replacement PartsAll service and repair work must be carried out by an authorized dealer/distributor. When replacement parts are required, please ensure that the dealer/distributor only uses replacement parts specified by the manufacturer. The use of unauthorized replacement parts may result in injury and/or damage through fire or electric shock or other electricity -related hazards.Ventilation and heat sinkThe heat sink is provided to ensure reliable operation of the Amplifier Unit and to protect it from overheating. The heat sink must not be blocked or covered. This product should not be installed unless proper ventilation is provided or manufacturer’s instructions have been adhered to.Water and MoistureDo not use this product near water (for example, in damp rooms or near a swimming pool).CleaningUnplug the Amplifier Unit from the wall outlet before cleaning. Do not use liquid or aerosol cleaners.Power -Cord ProtectionPower supply cords should be routed so that they are not likely to be walked on or pinched by items placed upon them or against them, paying particular attention to cords and plugs, and the point where they exit from the Amplifier Unit.LightningFor added protection of the product during lightning storms, or when it is left unattended and unused for long periods of time, unplug it from the wall outlet. This will prevent damage to the product due to lightning and power-line surges. Disconnection from the mains power supply can only be achieved by removing the plug from the mains socket and by external disconnection of all poles from the mains. AccessoriesDo not place this product on an unstable cart, stand, tripod, bracket, or table. The product may fall, causing serious injury, and serious damage to the product.ConnectingWhen you connect this speaker to other equipment, turn off the power and unplug all of the equipment from the supply source. Failure to do so may cause an electric shock and serious personal injury. Read the user's manual of the other equipment carefully and follow the instructions when making the connections.Sound VolumeReduce the system volume to minimum before you turn on the amplifier to prevent sudden high levels of sound which may cause hearing or speaker damage.Precautions when connecting to MAINS INWhen mounting or connecting the product always disconnect it from mains. Only connect the product to an appropriate AC circuit and outlet, according to the requirements indicated on the rating plate. If a power cut occurs while the amplifier is switched on, it will restart automatically once the power supply has been restored. All settings prior to the loss of power will be maintained. IMPORTANT: Always connect the Product to mains through the MAINS IN connector on the Amplifier Unit.DO NOT REMOVE MAINS CONNECTOR GROUND, IT IS ILLEGAL ANDDANGEROUS.AC power 115/230v switchMake sure to correctly configure with the correct voltage for your country.3) Inputs and Controls Pro2A Master VolumeThe Master Volume allows trimming the speaker input gain when desired.4) Input Selection and LegendsPro2ALED 1–when illuminated indicates preset selected requires an analog signalLED2– when illuminated indicates preset selected requires an AES-EBU digital signalLEDS 3 & 4 - will be illuminated or dark in combinations specified in the legend aboveTo indicate which of the 4 presets is currently active.Preset 1– default preset the speaker is shipped with. It is an analog input 2-way (full range)configuration. Use Analog In XLR. (LED 1 on, LED 3 & 4 off).Preset 2- Is an analog 3-way (85Hz 4th order L-R high pass filter) for use with a sub-woofer.Use Analog In XLR (LED 1 on, LED 3 off / LED 4 on).Preset 3– Is an AES-EBU digital left input with 2-way response. Use Digital In XLR (LED 2 on, LED 3 on / LED 4 off). Preset 4– Is an AES-EBU digital right input with 2-way response. Use Digital In XLRSelecting Digital or Analog InputsUsing a small diameter blunt tool (i.e. plain end of a cotton swab), depress the LED Selector pushbutton for a short (1/2 second or less) duration. Each press will toggle the LEDS into different flashing sequences that will match the legend above. When the desired sequence is flashing, depress the switch for a full second. This will load that program and the LEDs will change from flashing to full illumination. N.B. A long push (1 sec or more) without first being preceded by a short push will toggle the input from its alternate state (analog to digital or visa-versa).You’ll see LED 1 or LED 2 change to their opposite state to indicate this. Avoid doing this unintentionally. Begin with short pushes to toggle through the 4 preset options and use the long push to select the desired preset.Signal Flow 2-Way & 3-WayThe Pro2A is configured as a 2-way system with no programmed roll-off in the low end response. There is a factory preset installed that will allow the speaker’s low frequency response to be extended by adding a sub-bass cabinet. Ocean Way Audio offers the S10A and the S12A subwoofer which has been added to create a balanced system response.Select Preset 2 - (LED 1 on, LED 3 off / LED 4 on).5) S10A & S12A Description The Power Switch (toggle) has three positions.1.) In the left most position the unit is powered OFF.2.) In the center position the unit is in Auto mode. It can be powered on uniting the 12V trigger inputs orby feeding audio into the input XLR. In the absence of either it will enter STANDBY mode with the red LED illuminating.When the trigger is activated or audio is supplied it will power up and the green LED will illuminate.3.) The right most position is will power up to ON with the green LED illuminating. It will remain ON in this position.The Voltage auto selects between 100v and 240v-115W 50/60HZS10A & S12A Description GAIN is the volume control. A suggested starting position is 12 o’clock when matched with HR5 speakers. Adjust upor down to suit positioning in your room. (Closer to a wall or a corner on the floor will increase the low frequency response.LF Adjust incorporated a LF shelf @ 45 Hz +/- 5 db in 1 db incrementsCrossover switch selects frequencies from 60 / 65 / 70 / 75 / 80 /85 / 90 /95 / 100 / 110 / 120hzDelay adjusts from 0 to 20 ms.12V trigger (AC or DC) will turn the unit on and off when power switch is in center (Auto) position. The jacks are paralleled to daisy chain to other auto powered products. With switch in center position and no trigger utilized, the unit will power ON when audio is sent to the input XLRs.Balanced XLR IN & OUT jacks are paralleled and a direct feed through. Signal does not go through any electronics.6) SpecificationsTech Specs Pro2APowered YES, Accepts analog/digital inputs 24 bit / 192 kHz Driver Configuration2-wayHF Driver Size1"LF Driver Size8"LF Driver Power Amp125wattsHF Driver Power Amp125wattsAES3 Digital Inputs YesFrequency Range35Hz > 25 kHzMaximum Peak SPL110dbEnclosure Type portedHeight16"Width11.5"Depth13.5"Weight45 lbs7) WarrantyOcean Way Audio speakers are under limited warranty as described in the following conditions.1.Warranty period starts as of date of purchase from the authorized dealer.2.OWA reserves the right to request original purchase receipt as proof of the date of purchase.3.Electronic components and cabinetry are warranted for a period of two (2) years against manufacturing defect, coveringparts and labor for necessary repairs.4.Speaker driver components are warranted for a period of one (1) year against manufacturing defect.5.The manufacturer’s warranties are limited to physical defects in the materials, parts and workmanship used in making theproduct.6.Misuse, incorrect installation, handling, repairs or modifications performed by unauthorized persons, abnormal conditions,damage due to accidents such as power surges, water, fire, or any other are excluded from any warranty claims.7.OWA warrants all service repairs and replacements for 180 days from the date of return to the customer/owner.Technical Support and ServiceFor warranty service and assistance, contact the original authorized dealer/distributor to arrange for return and/ or repair of the product. OWA will strive to satisfy all service requests in the fastest manner possible. Under the warranty, OWA will repair, or atits discretion, replace the product at no charge, provided it is returned (postage paid) to an authorized OWA service center. Any shipping or duties incurred are the customer’s responsibility. Products should be returned suitably packaged to protect from shipping damage, or in their original packaging. OWA shall be the sole and final authority to determine the validity of all warranty issues. All non-warranty repairs for current products will be charged according to the service repair pricing schedule. Repair prices will either be based on a flat fee for repair or replacement, or will be estimated depending on the repair deemed necessary.8)MaintenanceExterior surfaces of this product may be cleaned using a non-abrasive lint-free cloth lightly damped with water. Disconnect the mains power cable when cleaning to avoid risk of electric shock.Do not use alcohol or ammonia based cleaners.Driver active surfaces will not require cleaning as they are deep-set inside horn expansionsOcean Way AudioHistoryAbout Ocean WayIt all started with speakers. Ocean Way Recording began in 1968, as a showcase for Allen’s custom monitors.Allen needed impressive sounding material for his speakers so he began to record music that sounded dramatic! The studio business boomed and he met the demand with many rooms in several locations. At the peak of the studio business, Allen designed and owned four recording studio complexes.Five time Grammy® Award winning Allen Sides has personally recorded over 1,000 albums, many of which have become audiophile classics. He has worked with the finest and most famous artists of the last four decades. Albums recorded in Allen’s studios have sold over a billion copies. Allen’s hearing capabilities enables our engineers to translate every sonic nuance, bringing a new dimension and understanding to what is possible in high-end speaker design. His ears are our final design tool.Ocean Way Hollywood Ocean Way Nashville Ocean Way Record One Ocean Way St. Barts Through-out the history of Ocean Way Studios, we built the monitor systems for all the control roomsand private studios for selected elite cliental.These many accomplishments, paved the way forOcean Way AudioThe HR Series delivers “the” sound of Ocean Way Studios in a free standing design. Engineering speaker systems for professionals; incorporating over 45 years of award winning experience。
碧海威TMS流控系统用户手册

2.1. 启动设备.........................................................................................ቤተ መጻሕፍቲ ባይዱ.............................7 2.2. 配置管理接口...............................................................................................................8 2.3. 连接数据接口.............................................................................................................10 2.4. 快速上线指南............................................................................................................. 11
碧海威科技有限公司
第 2 页/共 53 页
目录
1. 概述...............................................................................................................................................5
碧海路由两条线路分流配置说明

碧海路由两条线路分流配置说明
碧海路由两条线路分流配置说明
一:1:登录路由器查看广域网的网络,这里以一条电信10M一条联通100M的ADSL为例默认路由为电信10M
用通道生成器生成带宽通道导入配置生成带宽通道,带宽通道参数设置如下
2:设置单用户流控,前面两个是通用的策略,第三个可以根据自己的网络带宽来做设置
3:设置分流代理,用一个局域网没有用到的ip地址来做分流代理
4:设置应用分流,分流次低和最低协议组
5:设置策略路由,把默认线路的次低和最低分流到联通ADSL上面
设置完毕。
碧海威流控L7cloud虚拟机安装指南
虚拟机安装L7 Cloud版软件
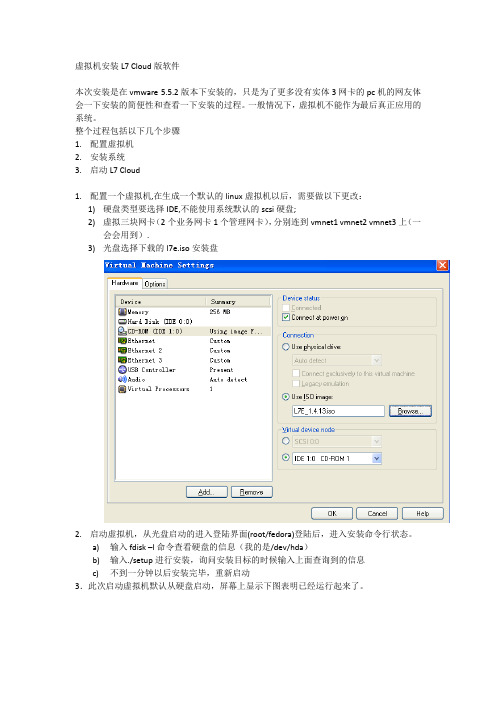
本次安装是在vmware 5.5.2版本下安装的,只是为了更多没有实体3网卡的pc机的网友体会一下安装的简便性和查看一下安装的过程。
一般情况下,虚拟机不能作为最后真正应用的系统。
整个过程包括以下几个步骤
1.配置虚拟机
2.安装系统
3.启动L7 Cloud
1.配置一个虚拟机,在生成一个默认的linux虚拟机以后,需要做以下更改:
1)硬盘类型要选择IDE,不能使用系统默认的scsi硬盘;
2)虚拟三块网卡(2个业务网卡1个管理网卡),分别连到vmnet1 vmnet2 vmnet3上(一
会会用到).
3)光盘选择下载的l7e.iso安装盘
2.启动虚拟机,从光盘启动的进入登陆界面(root/fedora)登陆后,进入安装命令行状态。
a)输入fdisk –l命令查看硬盘的信息(我的是/dev/hda)
b)输入./setup进行安装,询问安装目标的时候输入上面查询到的信息
c)不到一分钟以后安装完毕,重新启动
3.此次启动虚拟机默认从硬盘启动,屏幕上显示下图表明已经运行起来了。
现在ping管理ip地址192.168.0.120(首先把自己的网卡地址配置成192.168.0.x的地址)!
如果ping不通,在windows开始菜单的vmware程序组里面打开vmware的附属程序虚拟网络。
把你的物理网卡(配置了192.168.0.x地址的那个)设置到vmnet1 试一下通不通(因为不知道那个虚拟网卡是eth0)如果不通再试一下vmnet 2 vmnet3,必然有一个会通的。
使用浏览器连接https://192.168.0.120就可以登陆了(浏览器会有一个提示,不用管点继续浏览。
aveva marine initial design操作手册

aveva marine initial design操作手册摘要:一、引言1.介绍aveva marine initial design操作手册2.手册的目的和适用对象二、aveva marine initial design操作手册概述1.操作手册的章节结构2.各章节内容简介三、aveva marine initial design软件安装与配置1.软件安装要求与步骤2.配置环境变量与许可证四、aveva marine initial design主界面介绍1.菜单栏与工具栏2.状态栏与视图控制区五、aveva marine initial design基本操作1.创建新项目2.添加与编辑模型元素3.调整视图与视角六、aveva marine initial design高级功能1.参数化建模2.协同设计与版本控制3.输出与导入数据七、aveva marine initial design应用案例1.船舶设计实例2.设计成果展示八、结论1.总结aveva marine initial design操作手册的主要内容2.展望在实际应用中的优势与前景正文:一、引言aveva marine initial design操作手册,旨在为用户详细介绍这款船舶设计软件的使用方法。
适用于希望快速上手并熟练掌握aveva marine initial design的用户,无论是初学者还是有经验的工程师,都可以从本手册中获取有价值的信息。
二、aveva marine initial design操作手册概述aveva marine initial design操作手册共分为八章,从软件安装与配置、主界面介绍,到基本操作与高级功能,以及应用案例等,全面详细地介绍了软件的使用方法。
用户可以根据自己的需求,快速定位到相关章节进行学习。
三、aveva marine initial design软件安装与配置本章介绍了软件安装的要求与步骤,包括硬件与软件环境,以及如何正确安装并配置许可证。
- 1、下载文档前请自行甄别文档内容的完整性,平台不提供额外的编辑、内容补充、找答案等附加服务。
- 2、"仅部分预览"的文档,不可在线预览部分如存在完整性等问题,可反馈申请退款(可完整预览的文档不适用该条件!)。
- 3、如文档侵犯您的权益,请联系客服反馈,我们会尽快为您处理(人工客服工作时间:9:00-18:30)。
碧海威流控应用分流教程
(适用版本:所有路由版)
修订:2014-06-3
案例:如果我们有一条或多条主光纤另外加一条或多条ADSL,想实现部分应用(本例为让P2P等低等级应用)走ADSL,我们可以采取如下配置方法:
第一步:进入菜单流控盒子---流控对象---分流代理,定义一个分流代理IP
问:什么是分流代理?
答:相当于我们为要分流的应用打一个标签,我们可以认为这个代理名称就是一个流量的标签。
配置项目说明:
代理名称:应用分流的标签,可自定义名称,但不能和配置的其它内容项重名;
IP地址:这个IP地址是符合局域网上网条件的闲置IP,此IP不能被其它机器所占用,在系统内部用这个IP地址来引流我们要分流的流量;
网关:为路由器的内网地址,其实就是我们路由器的LAN口的地址;
DNS服务器地址:为要分流到出口的DNS服务器地址,如果主线路与分流限路是同一家运营商(比如都是电信或联通),这个DNS可以不填,为空,这个地址列表是为DNS管控里的重定向功能准备的,其实在分流里这一项目并无实质意义。
第二步:进入菜单流控盒子---流控对象---协议对象,定义一组要分流的应用。
这里提示一下,一般的操作方法,在分流里,主线路是跑游戏,而分流线路只走应用优先级相对比较低的应用,而且分流应用并不能做到百分百的完全分流(并不是软件问题,而是实际应用的DPI分析的机制原因)所以原则上不要对游戏类应用去做分流!
第三步:进入菜单流控盒子---流控策略---应用分流,定义之前的分流代理与分流应用的对应关系,也就是说,我用哪个代理去分流哪些应用,这里可以发挥一下,
内网用户:在IP分组里定义,我们可以对指定的内网IP段进行分流,
时间:我们可以定义时间对象,在指定的时间内进行分流
第四步:进入菜单路由盒子---路由设置--策略路由,定义之前的分流代理走哪个外网出口。
这里的源网段指的是内网网段,这里填写当时的分流代理IP,注意后面的/32一定不要写错,这里的/32的意思就是只是这一个IP而不是一个IP段,对应的子网掩码是
255.255.255.255这下明白了吧不要犯错写成/24。
而目的网段为空,表示全部IP走指定的外网出口。
而均衡策略指的是如果我选择了多出口,那么这些分流的应用流量(连接)走什么样的负载均衡模式,那么在这里详细说一下三种均衡策略的区别(选择多出口线路才有意义)
1:IP负载均衡:
指源IP负载均衡,实现的结果就是内网IP分流应用只分配一个出口。
2:会话数负载均衡:
指内网IP按会话的数量分配到多出口。
(注意:这就是人们所说的,一台机器下载可以使用多条线路,大白话叫多线汇聚,但这种方式有一个副作用,就是在分流QQ或网银应用会引起上网连接中断、无法发图片或网银上不去的问题)
3:智能负载均衡:分流的应用,P2P走会话数均衡,其它应用走IP负载均衡。
至此全部工作完成,可以在路由里查看分流效果
北京碧海威科技有限公司技术部。
