日本三洋PDG DSU30 投影仪说明书②
投影机操作指导书
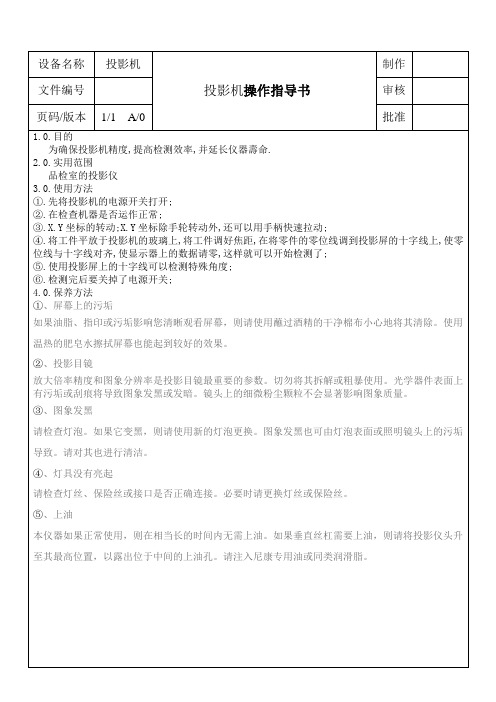
设备名称投影机
投影机操作指导书制作
文件编号审核
页码/版本1/1 A/0 批准
1.0.目的
为确保投影机精度,提高检测效率,并延长仪器壽命.
2.0.实用范围
品检室的投影仪
3.0.使用方法
①.先将投影机的电源开关打开;
②.在检查机器是否运作正常;
③.X.Y坐标的转动;X.Y坐标除手轮转动外,还可以用手柄快速拉动;
④.将工件平放于投影机的玻璃上,将工件调好焦距,在将零件的零位线调到投影屏的十字线上,使零位线与十字线对齐,使显示器上的数据请零,这样就可以开始检测了;
⑤.使用投影屏上的十字线可以检测特殊角度;
⑥.检测完后要关掉了电源开关;
4.0.保养方法
①、屏幕上的污垢
如果油脂、指印或污垢影响您清晰观看屏幕,则请使用蘸过酒精的干净棉布小心地将其清除。
使用温热的肥皂水擦拭屏幕也能起到较好的效果。
②、投影目镜
放大倍率精度和图象分辨率是投影目镜最重要的参数。
切勿将其拆解或粗暴使用。
光学器件表面上有污垢或刮痕将导致图象发黑或发暗。
镜头上的细微粉尘颗粒不会显著影响图象质量。
③、图象发黑
请检查灯泡。
如果它变黑,则请使用新的灯泡更换。
图象发黑也可由灯泡表面或照明镜头上的污垢导致。
请对其也进行清洁。
④、灯具没有亮起
请检查灯丝、保险丝或接口是否正确连接。
必要时请更换灯丝或保险丝。
⑤、上油
本仪器如果正常使用,则在相当长的时间内无需上油。
如果垂直丝杠需要上油,则请将投影仪头升至其最高位置,以露出位于中间的上油孔。
请注入尼康专用油或同类润滑脂。
三洋投影机说明书
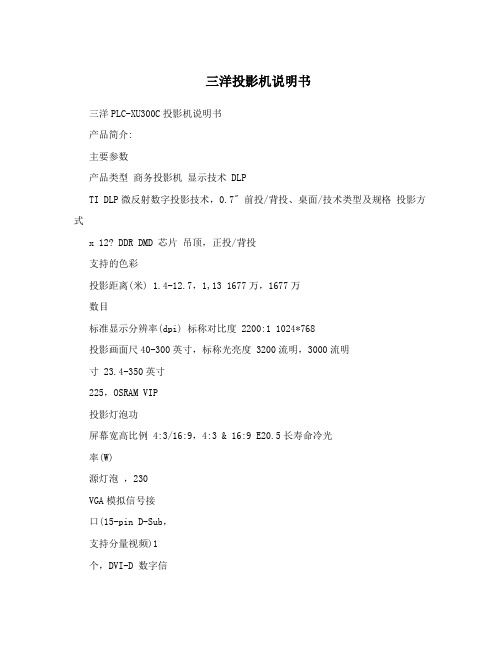
三洋投影机说明书三洋PLC-XU300C投影机说明书产品简介:主要参数产品类型商务投影机显示技术 DLPTI DLP微反射数字投影技术,0.7" 前投/背投、桌面/技术类型及规格投影方式x 12? DDR DMD 芯片吊顶,正投/背投支持的色彩投影距离(米) 1.4-12.7,1,13 1677万,1677万数目标准显示分辨率(dpi) 标称对比度 2200:1 1024*768投影画面尺40-300英寸,标称光亮度 3200流明,3000流明寸 23.4-350英寸225,OSRAM VIP投影灯泡功屏幕宽高比例 4:3/16:9,4:3 & 16:9 E20.5长寿命冷光率(W)源灯泡,230VGA模拟信号接口(15-pin D-Sub,支持分量视频)1个,DVI-D 数字信号接口(24-pin,支持HDCP协议)1个,复合视频接投影灯泡寿命(小时) 3000(标准模式),4500(节能模式) 输入接口口1个 (RCAjack,含左右声道接口2个),S-Video(Mini-DIN4 pin) 接口 1个,Audio(mini jack)接口1个,Audio、RGB、S-Video 输出接口 VGA信号同步输出接口 (D-sub 安全认证 CCCfemale terminal )1个,Audio接口(mini jack)1个,Audio、RCA、USB、RS-232C、RJ-45电源性能标准模式下290+/-10%; 待节能模式下30,标准模式下33,整机功率机模式下5,噪音(dB)300(正常模29 (W)式)/237(ECO模式) 电源性能 100V-240 V AC 其他特点产品尺寸产品重量 300*244*88mm(L*W*H)mm 3.5kg随机附件用户使用手册、电缆线、保修卡投影机接线1 电源线2 vga电缆3 复合视频电缆4 s-视频电缆(可选附件)5 供ypbpr使用的d-15至rca转接器(选件)为确保投影机与计算机正常工作,请对您的图形卡进行配置,使其分辨率小于或者等于1024×768。
投影仪用户手册

版权
©2013 Vivitek Corporation. 是 Vivitek Corporation 的商标。其他商标是其 各自所有者的资产。值、重量和尺寸等均为近似值。规格如有变更,恕不另行通知。
免责声明
本文档中的信息如有变更,恕不另行通知。制造商对于本文档中的内容不提供任何表述或担 保,特别放弃对于适销性或特定用途适用性的任何隐含担保。制造商保留修订本出版物和不 定期更改本文档内容且无须向任何人通知此类修订或更改的权利。
第 1 章 概览 .................................................................................. 1
概览 ........................................................................................................................ 1 附件 ........................................................................................................................ 3 遥控器 .................................................................................................................... 4 Qumi 和遥控器按钮 ................................................................................................ 4 媒体播放器画面 ...................................................................................................... 5
三洋 投影机 说明书
Turning On the Projector
Байду номын сангаас
23
Turning Off the Projector
24
How to Operate the On-Screen Menu
25
Menu Bar
26
Operating with Projector Control
27
Operating with Remote Control
16
Installation . . . . . . . . . . . . . . . . . . . . . . . 17
Lens Installation
17
Positioning Projector
17
Lens Shift Adjustment
18
44
Setting . . . . . . . . . . . . . . . . . . . . . . . . . . 47
Setting
47
Maintenance and Care . . . . . . . . . . . . . 55
◆ Functionally Rich
This projector has many useful functions such as lens shifting, ceiling and rear projection, variety of lens options, etc.
◆ Simple Computer System Setting
The projector has the Multi-scan system to conform to almost all computer output signals quickly (p.33). Up to UXGA resolution can be accepted.
投影仪 说明书

目錄注意事項 (3)眼睛安全性警告 (5)包裝概觀 (6)產品概觀 (7)主機 (7)輸入/輸出連線 (8)91111連接電腦/筆記型電腦 (11)連接影像訊號來源 (12)開啟與關閉投影機電源 (13)開啟投影機電源 (13)關閉投影機 (14)警告指示燈 (14)調整投影的影像 (15)調整投影機的高度 (15)調整投影機的畫面縮放與對焦 (16) (16)操作方式 (17)功能表樹狀結構 (18)影像 (19)顯示設定 (23)設定 (26)功能 (32)附錄 (35)疑難排解 (35)影像問題 (35)其他問題 (38)投影機狀態指示 (38)遙控器問題 (39)更換燈泡 (40)相容性模式 (42)RS232 指令 (44)固定於天花板上的安裝 (48)Optoma 全球辦公室 (49)法規與安全須知 (51)使用須知安全資訊警告:為了避免火災或電擊的風險,請勿將本設備暴露於雨水或溼氣中。
本設備機殼內有危險的高電壓,請勿打開機殼。
唯有合格人員才可進行維修服務。
B 類放射限制此 B 類數位設備符合加拿大干擾產生設備法規 (Canadian Interference-Causing Equipment Regulations) 之規定。
重要的安全指示1. 請勿阻塞任何通風口。
為了確保本投影機的正常操作並防止設備過熱,建議安裝位置不得影響投影機的正常通風。
例如:請勿將本投影機放置在擁擠的咖啡桌、沙發或床上;亦不可將本投機放置在書架或阻礙氣流流通的置物櫃等密閉空間。
2. 請勿在附近有水或濕氣的環境使用本投影機。
為了避免火災和/或電擊的危險,請勿將本投影機置於雨水或濕氣的環境中。
3. 請勿在靠近任何熱源的位置進行安裝,例如散熱器、暖氣機、火爐或任何其他會產生熱度的設備,例如放大器。
4. 僅能以乾布擦拭。
5. 僅能使用製造商規定之附件/配件。
6. 若本裝置受到物理性損壞或濫用,請勿再使用。
物理性損壞/濫用包括 (但不限於):❒裝置掉落。
可攜式投影機使用手冊说明书

在下列情況下需關閉投影機,拔掉電源線並請有維修資格的維修服務人員維修投影機: - 當電源線或插頭損壞或磨損。 - 如果有液體流入投影機或投影機被暴露於雨水。 - 如果您按照使用手冊裡的說明操作,但投影機還不能正常工作。 - 如果投影機被摔到地上或機殼破損。 - 如果投影機性能有顯著改變,表明需要維修了。 移動投影機時斷開電源線和其他電線。 清潔機殼或更換燈泡前應關閉投影機並拔掉電源線。 如果投影機很長時間不使用,請關閉投影機並拔掉電源線。 當使用 LAN 纜線時(僅限於有 RJ-45 LAN 埠槽的型號): 爲了確保安全,切勿將投影機連接到週邊設備配線有可能超壓的連接器上。i重Fra bibliotek資訊 重要安全措施
這些安全指示可令本投影機維持長久的使用壽命,並可防止火災和電擊。請仔細閱讀並留意所有的警告。
安裝
請勿將本投影機放置在下列環境中 - 不穩定的車、架子或桌子。 - 靠近水、浴池或潮濕的房間。 - 陽光直射、靠近加熱裝置或熱輻射裝置的地方。 - 多塵、多煙或多蒸汽的環境。 - 紙張或布上、墊子或地毯上。 若您欲將投影機安裝在天花板上: - 切勿自行安裝。 - 安裝工作必須委託有資格的技術人員進行,以確保規範操作,並可防範人身傷害。 - 此外,天花板必須牢固,能夠充分承受投影機的重量,而且必須依照當地建築規則進行安裝。 - 詳情請向您的經銷商查詢。 警告 在投影機開啓狀態下,切勿使用除投影機的滑動式鏡頭蓋以外的其他任何物體覆蓋鏡頭。 否則,投射光線釋放的熱量可能導致物體變得極熱,並可能會引起火災或損壞。
切勿讓紙夾和紙屑等異物掉入投影機內。切勿試圖找回可能掉入投影機內的任何物品。切勿將鐵絲或者螺絲起子 等金屬物體插入投影機內。若發現有物體掉入投影機內部,須立即斷開電源,然後委託有維修資格的維修服務人 員取出物體。 切勿在投影機上面放置任何物體。 雷雨天不要觸摸電源插頭。此舉可能引起電擊或者火災。 投影機規定操作電源爲 200-240 伏特 50/60 赫茲交流電。在使用投影機之前,須確認所用電源是否符合本投影機 要求。 切勿在投影機啓動狀態下窺視鏡頭。此舉會導致眼睛嚴重受傷。
三洋投影机说明书

三洋投影机说明书三洋PLC-XU300C投影机说明书产品简介:主要参数产品类型商务投影机显示技术 DLPTI DLP微反射数字投影技术,0.7" 前投/背投、桌面/技术类型及规格投影方式x 12? DDR DMD 芯片吊顶,正投/背投支持的色彩投影距离(米) 1.4-12.7,1,13 1677万,1677万数目标准显示分辨率(dpi) 标称对比度 2200:1 1024*768投影画面尺40-300英寸,标称光亮度 3200流明,3000流明寸 23.4-350英寸225,OSRAM VIP投影灯泡功屏幕宽高比例 4:3/16:9,4:3 & 16:9 E20.5长寿命冷光率(W)源灯泡,230VGA模拟信号接口(15-pin D-Sub,支持分量视频)1个,DVI-D 数字信号接口(24-pin,支持HDCP协议)1个,复合视频接投影灯泡寿命(小时) 3000(标准模式),4500(节能模式) 输入接口口1个 (RCAjack,含左右声道接口2个),S-Video(Mini-DIN4 pin) 接口 1个,Audio(mini jack)接口1个,Audio、RGB、S-Video 输出接口 VGA信号同步输出接口 (D-sub 安全认证 CCCfemale terminal )1个,Audio接口(mini jack)1个,Audio、RCA、USB、RS-232C、RJ-45电源性能标准模式下290+/-10%; 待节能模式下30,标准模式下33,整机功率机模式下5,噪音(dB)300(正常模29 (W)式)/237(ECO模式) 电源性能 100V-240 V AC 其他特点产品尺寸产品重量 300*244*88mm(L*W*H)mm 3.5kg随机附件用户使用手册、电缆线、保修卡投影机接线1 电源线2 vga电缆3 复合视频电缆4 s-视频电缆(可选附件)5 供ypbpr使用的d-15至rca转接器(选件)为确保投影机与计算机正常工作,请对您的图形卡进行配置,使其分辨率小于或者等于1024×768。
投影仪使用说明
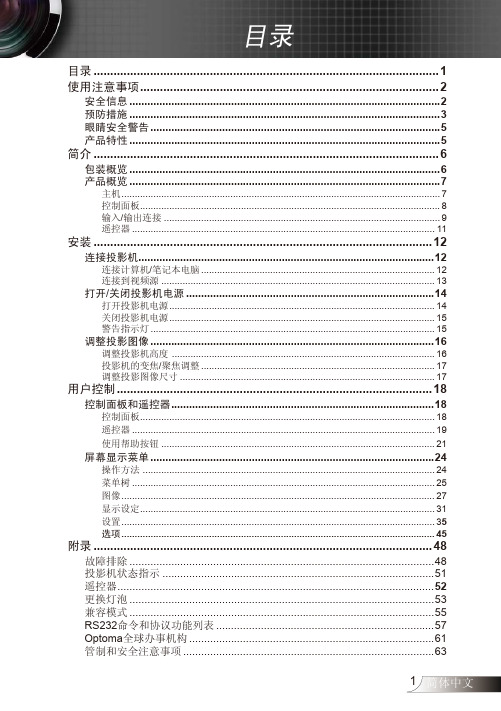
安装 ...................................................................................................... 12
连接投影机...................................................................................................12 打开/关闭投影机电源 ...................................................................................14
连接计算机/笔记本电脑 ........................................................................................ 12 连接到视频源 ....................................................................................................... 13
操作方法 .............................................................................................................. 24 菜单树 .................................................................................................................. 25 图像 ...................................................................................................................... 27 显示设定............................................................................................................... 31 设置 ...................................................................................................................... 35 选项 ...................................................................................................................... 45
投影仪操作说明方法及注意事项
投影仪操作说明方法及注意事项投影仪操作说明方法及注意事项声明:多媒体投影机是一种贵重的教学设备,使用和保养中必须养成良好习惯,严格按操作要求去做,如若操作不当,就会给投影机带来致命损坏。
一、开机:开启设备前,先打开电源插座开关,后开设备。
1.在连接好电脑之后,先打开头投影机,再打开电脑,尤其是windowsXP系统的机器。
2.投影仪开机时,指示灯闪烁说明设备处于启动状态,当指示灯不再闪烁时,方可进行下一步操作。
开机时,机器有个预热的过程,大概有10秒钟。
在这期间,千万不要以为投影仪还没有工作而反复按压启动键,频繁开机产生的冲击电流会影响灯泡的使用寿命。
3.安装银幕的,放下银幕时,银幕开关掷于向下,放下银幕,放到最低后,一定要记得把银幕开关掷于中间停止位置。
(如学校通用技术教室)二、使用:严禁反复开关机,注意多进行画面切换。
1.快速反复开光投影机会损坏灯泡,缩短灯泡寿命,因此平时尽量减少开关机次数。
关机后请至少等待5分钟再打开投影机。
在使用过程中,如出现意外断电却仍需启动投影仪的情况时,要等投影机冷却5—10分钟后,再次启动。
2.连续使用时间不宜过长,一般控制在4小时以内,夏季高温环境中,使用时间应再短些。
3.使用笔记本电脑时,需要链接电源线,防止中途电源用完,而导致投影机灯泡烧坏。
4.开机后,要注意不断切换画面以保护投影机灯泡,不然会使LCD板或DMD板内部局部过热,造成永久性损坏。
5.画面不清楚时,可通过调节投影机上的光圈进行调整。
6.在投影机使用过程若要移动,需轻轻移动,以免振动造成内部部件损坏。
附:投影机使用误区:①开大会时,长时间固定一个标题投影在大屏幕上。
②上课提前0.5小时开机并固定一个画面不动。
③上课中间固定一个画面超过15分钟不切换画面。
④下课后忘记关闭多媒体投影机。
三、关机:关闭设备,先关闭各设备电源,等投影机自动冷却再后关闭插座电源,用遥控器关闭电源(键),指示灯不闪烁时才能关闭投影仪。
三洋PLC-XF70 XGA数字多媒体投影仪说明书
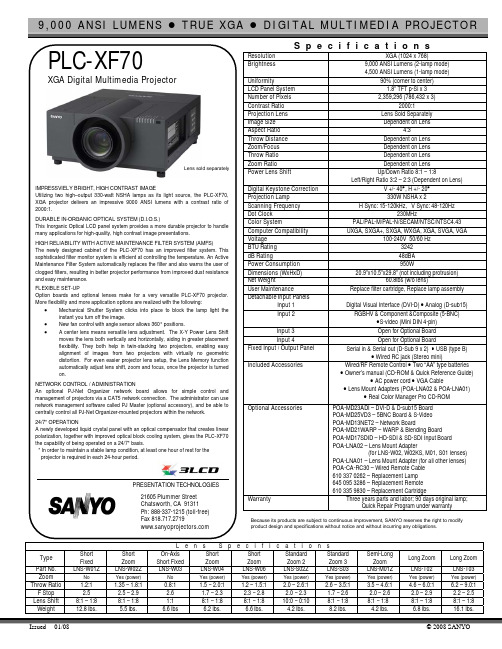
9,000 ANSI LUMENS z TRUE XGA z DIGITAL MULTIMEDIA PROJECTORIssued 01/08 © 2008 SANYOIMPRESSVIELY BRIGHT, HIGH CONTRAST IMAGEUtilizing two high–output 330-watt NSHA lamps as its light source, the PLC-XF70,S p e c i f i c a t i o n sResolution XGA (1024 x 768)Brightness 9,000 ANSI Lumens (2-lamp mode) 4,500 ANSI Lumens (1-lamp mode)Uniformity90% (corner to center) LCD Panel System 1.8” TFT p-Si x 3 Number of Pixels 2,359,296 (786,432 x 3)Contrast Ratio 2000:1Projection Lens Lens Sold Separately Image Size Dependent on LensAspect Ratio 4:3Throw Distance Dependent on Lens Zoom/Focus Dependent on Lens Throw Ratio Dependent on Lens Zoom RatioDependent on Lens Power Lens ShiftUp/Down Ratio 8:1 – 1:8Left/Right Ratio 3:2 – 2:3 (Dependent on Lens)Digital Keystone Correction V +/- 40°, H +/- 20° Projection Lamp 330W NSHA x 2Scanning Frequency H Sync: 15-120kHz, V Sync: 48-120HzDot Clock 230MHzColor SystemPAL/PAL-M/PAL-N/SECAM/NTSC/NTSC4.43 Computer Compatibility UXGA, SXGA+, SXGA, WXGA, XGA , SVGA, VGAVoltage 100-240V 50/60 HzBTU Rating 3242 dB Rating48dBA Power Consumption 950WDimensions (WxHxD) 20.9”x10.5”x29.8” (not including protrusion)Net Weight60.8lbs (w/o lens)User MaintenanceReplace filter cartridge, Replace lamp assemblyDetachable Input Panels Input 1Digital Visual Interface (DVI-D) • Analog (D-sub15) Input 2 RGBHV & Component &Composite (5-BNC)•S-video (Mini DIN 4-pin) Input 3Open for Optional Board Input 4Open for Optional BoardFixed Input / Output Panel Serial in & Serial out (D-Sub 9 x 2) • USB (type B)• Wired RC jack (Stereo mini)Included AccessoriesWired/RF Remote Control • Two “AA” type batteries • Owner’s manual (CD-ROM & Quick Reference Guide)• AC power cord • VGA Cable• Lens Mount Adapters (POA-LNA02 & POA-LNA01)• Real Color Manager Pro CD-ROM Optional AccessoriesPOA-MD23ADI – DVI-D & D-sub15 Board POA-MD25VD3 – 5BNC Board & S-Video POA-MD13NET2 – Network BoardPOA-MD21WARP – WARP & Blending Board POA-MD17SDID – HD-SDI & SD-SDI Input Board POA-LNA02 – Lens Mount Adapter(for LNS-W02, W02KS, M01, S01 lenses) POA-LNA01 – Lens Mount Adapter (for all other lenses) POA-CA-RC30 – Wired Remote Cable 610 337 0262 – Replacement Lamp 645 095 3286 – Replacement Remote 610 335 9830 – Replacement CartridgeWarrantyThree years parts and labor; 90 days original lamp;Quick Repair Program under warrantyBecause its products are subject to continuous improvement, SANYO reserves the right to modify product design and specifications without notice and without incurring any obligations.L e n s S p e c i f i c a t i o n sType Short Fixed Short ZoomOn-AxisShort Fixed Short Zoom Short Zoom Standard Zoom 2 Standard Zoom 3 Semi-LongZoomLong ZoomLong Zoom Part No. LNS-W01Z LNS-W02Z LNS-W03 LNS-W04 LNS-W06 LNS-S02Z LNS-S03LNS-M01Z LNS-T02LNS-T03Zoom NoYes (power)NoYes (power)Yes (power)Yes (power)Yes (power)Yes (power)Yes (power)Yes (power)Throw Ratio 1.2:1 1.35 – 1.8:1 0.8:11.5 –2.0:1 1.2 – 1.5:1 2.0 – 2.6:1 2.6 –3.5:1 3.5 –4.6:1 4.6 – 6.0:1 6.2 – 9.0:1 F Stop 2.5 2.5 – 2.9 2.6 1.7 – 2.3 2.3 – 2.8 2.0 – 2.3 1.7 – 2.6 2.0 – 2.6 2.0 – 2.9 2.2 – 2.5 Lens Shift 8:1 – 1:8 8:1 – 1:8 1:1 8:1 – 1:8 8:1 – 1:8 10:0 – 0:10 8:1 – 1:8 8:1 – 1:8 8:1 – 1:8 8:1 – 1:8 Weight12.8 lbs. 5.5 lbs. 6.6 lbs 6.2 lbs. 6.6 lbs. 4.2 lbs. 8.2 lbs. 4.2 lbs. 6.8 lbs. 16.1 lbs.PRESENTATION TECHNOLOGIES Lens sold separately。
投影机说明书
包装箱内有哪些物件?确认包装箱内下列各项物件是否齐全。
如有任何遗漏,请向您的经销商洽询。
请保存原始包装箱及捆包用物品,以便需运送投影机时之用。
篇二:投影仪使用说明投影仪使用说明1.投以仪大家都认识,下面就是我们公司经常用的投影仪2. 将投影仪连接电源3. 将投影仪与电脑连接,通过vga连接线(也就是两头都是梯形口15针的线)连接到投影仪的vga接口上。
4. 打开投影仪,按电源开机,电源指示灯变为绿色时,投影仪启动5. 进入启动完成界面后,按回车按钮(投影仪上的enter键),进入使用页面。
调试投影仪7. 图像清晰度调节,图像大小调节。
屏幕的大小和投影仪距投以幕布之间的距离理论上是越大图像越大,但是需要根据现场的实际使用情况调试。
8. 通过投影仪上的梯形调试按钮可以调节图像的形状。
以上是对投影仪的简单使用介绍,下面为投影仪控制面板上按钮的实际作用。
笔记本切换不到投影仪上故障解决办法(一)2010-06-04 20:20 1.将vga线(接头为15针的线缆)与笔记本电脑连接。
2.按笔记本电脑的功能键“fn” +“f2”/“f3”/“f4”/“f7”等,不同笔记本,切换键有所不同,但功能键(f1~f8)上会有一个键印有两个屏幕的图标,若按了没有效果,则可能是笔记本的快捷键没有驱动,此时则参考附件解决方法。
3.切换不了有可能是因为笔记本本身的分辨率太高,建议调整为1024*768 。
4.电脑本身的屏幕刷新率可能太高了,建议调成70hz以下。
附件:(1)安装笔记本快捷键驱动,可查看安装盘或到官方网站下载相应驱动。
(2)根据显卡的不同型号,设置方法有所不同ati显卡设定方法:桌面点右键,出现ati 显卡管理程序,选择显示器管理器, 选择主显示器(图标),托到右边的显示器2上, 右键选复制方式, 显示器与投影机屏幕同步。
笔记本接到投影仪上时,桌面上的图标在投影仪上不显示,投影仪只显示笔记本桌面背景,可能在显示属性里面选择了扩展桌面的选项,如果是这样,投影仪上显示的是扩展的桌面,也就是说你的鼠标可以从你的笔记本屏幕移动到投影仪上,所以桌面图标不显示,因为只有一个桌面。
投影机快速参考手册说明书
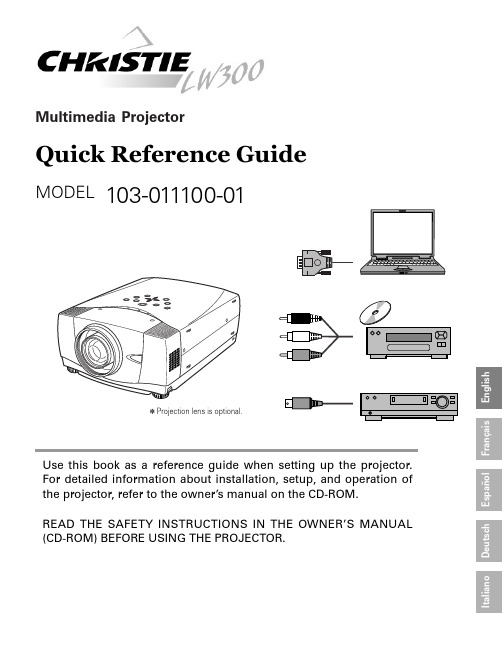
Multimedia ProjectorQuick Reference GuideMODEL103-011100-01Use this book as a reference guid e when setting up the projector.For detailed information about installation, setup, and operation of the projector, refer to the owner’s manual on the CD-ROM.READ THE SAFETY INSTRUCTIONS IN THE OWNER’S MANUAL (CD-ROM) BEFORE USING THE PROJECTOR.E n g l i s hD e u t s c hF r a n ça i s I t a l i a n o E s p a ñol✽Projection lens is optional.E n g l i s hThis projector uses nominal input voltages of 100-120 V or 200-240V AC. This projector automatically selects correct input voltage. It is designed to work with single-phase power systems having a grounded neutral conductor. To reduce risk of electrical shock, do not plug into any other type of power system.Consult your authorized dealer or service station if you are not sure of type of power supply being in use.Connect a projector with a peripheral equipment before turning a projector on.CONNECTING AC POWER CORDAC outlet must be near this equipment and must be easily accessible.LENS SHIFT ADJUSTMENTProjection lens can be moved up and down with motor-driven lens shift function. This function makes it easy to provide projected image where you want.NOTEScreen size and lens shift ratio on the above charts are standard values and they may change by positioning conditions.POSITIONING PROJECTORThis projector is designed to project on a flat projection surface.Before setting up a projector, install Projection Lens on Projector.1.Before installation, check where a projector is used and prepare a suitable lens. For specifications of a Projection Lens, contact sales dealer where you purchased a projector.2.For installation, refer to installation manual in the optional lens.LENS INSTALLATIONWhen installing the lens, remove the cover cap in the projector.NOTE;E n g l i s hADJUSTABLE FEETPicture tilt and projection angle can be adjusted by rotating ADJ USTABLE FEET. Projection angle can be adjusted to 10.5 degrees.Lift front of a projector and pull FEET LOCK LATCHES on both sides of a projector.1Release FEET LOCK LATCHES to lock ADJ USTABLE FEET and rotate ADJ USTABLE FEET to fine tune position and tilt.2To shorten ADJ USTABLE FEET, lift front of a projector and pull and undo FEET LOCK LATCHES.Position and keystone distortion of image can be adjusted using Menu Operation.3INSTALLING PROJECTOR IN PROPER POSITIONInstall the projector properly. Improper installation may reduce the lamp lifetime and cause a fire hazard.Do not tilt the projector more than 10 degrees above and below.Do not point the projector up to project an image.Do not point the projector down to project an image.Do not put the projector on either side to project an image.LATCHESMOVING PROJECTORWhen moving a projector, replace lens cap and retractfeet to prevent damage to lens and cabinet.When this projector is not in use for an extended period,put it into case (not supplied with this projector).E n g l i s hThis projector has input and output terminals on its back for connecting computers and video equipment. Refer to figures on pages 12 to 14 and connect properly.E n g l i s hEn g l i s h●Avoid contact with water or liquid.●Do not expose Remote Control Unit to moisture, or heat.●Do not drop Remote Control Unit.●If a battery has leaked on Remote Control Unit, carefully wipe case clean and install new batteries.●Danger of explosion if battery is incorrectly replaced.●Dispose of used batteries according to batteries manufacturers instructions and local rules.REMOTE CONTROL BATTERIES INSTALLATIONThis projector has CONTROL BUTTONS (TOP CONTROLS) and INDICATORS on its top.En g l i s h HOW TO OPERATE ON-SCREEN MENUFLOW OF ON-SCREEN MENU OPERATIONDisplay ON-SCREEN MENU Press MENU button to display ON-SCREEN MENU (MENU BAR). A red frame is POINTER.Move POINTER (red frame) to MENU ICON that you want to select by pressing POINT RIGHT / LEFT buttons.Adjust ITEM DATA by pressing POINT RIGHT/LEFT buttons.Refer to following pages for details of respective adjustments.Press POINT UP/DOWN buttons and move POINTER (redframe or red arrow)to ITEM that you want to adjust, and then press SELECT button to show ITEM DATA.Select Menu to be adjusted Control or adjust item through ON-SCREEN MENU 1243POINTER (red frame)Press POINT UP/DOWN buttons to move POINTER.POINTER (red frame)ITEMITEM DATAPress POINT LEFT/RIGHTbuttons to adjust value orset function.ContrastAutoTURNING ON THE PROJECTOR Connect the projector's AC power cord into an AC outlet.The LAMP Indicator lights RED, and READY Indicator lights GREEN.Press the POWER ON-OFF button on the top control or onthe remote control to ON. The LAMP Indicator dims, and the cooling fans start to operate. The preparation display appears on the screen and the count down starts. 231The preparation display disappears after 20 ~30 seconds.4After the count-down, the input source that was selected lastand the Lamp control status icon appear on the screen.If the projector is locked with a PIN code, PIN code Input Dialog Box will appear. Enter the PIN code as instructed below.Complete peripheral connections (with a computer, VCR,etc.) before turning on the projector.What is PIN code?PIN code is a security code using Personal Identification Number that allows the person who knows it to operate the projector. Setting PIN code prevents others except the specific users from operating the projector.A PIN code consists of a four-digit number. Refer to PIN Code Lock function in Setting menu in the user’s manual for locking operation of the projector with your PIN code.Pointer PIN code Input Dialog Box Enter a PIN codeSelect a number by pressing the POINT LEFT/RIGHT button and fix the number with the SELECT button. The number will change to "✳". If you fixed a wrong number, move the pointer to "Set" or "Clear" once by pressing the POINT DOWN button, then return to "PIN code". Enter the correct number again.Repeat this step to complete entering a four-digit number.When the four-digit number is fixed, the pointer will automatically move to "Set". Press the SELECT button so that you can start to operate the projector.If you entered a wrong PIN code, "PIN code" and the number (✳✳✳✳) will turn red and disappear. Enter a correct PIN code all over again.After the OK ico n disappears, yo u can operate the projector.En g l i s h Press the POWER ON-OFF button on the top control or onthe remote control, and a message "Power off?" appears on the screen.Press the POWER ON-OFF button again to turn off theprojector. The LAMP Indicator lights bright and READY Indicator turns off. After projector is turned off, Cooling Fans operate (for 90 seconds). During this "Cooling Down" period,this appliance cannot be turned on. 12TO MAINTAIN THE LIFE OF LAMP, ONCE YOU TURN PROJ ECTOR ON, WAIT AT LEAST 5 MINUTES BEFORE TURNING IT OFF.DO NOT DISCONNECT AC POWER CORD WHILE COOLING FANS ARE RUNNING OR BEFORE READY INDICATOR LIGHTS GREEN AGAIN. OTHERWISE IT WILL RESULT IN SHORTENING LAMP LIFE.3When the projector has cooled down, READY Indicator lightsGREEN again and you can turn projector on. After cooling down completely, disconnect AC Power Cord.The message disappears after 4 seconds.• The projector cannot be turned on during the cooling period with the READY indicator turned off. You can turn it on again after the READY indicator GREEN again.• When the On start function is on, this projector is turned on automatically by connecting the AC power cord to an AC outlet.• Do not operate the projector continuously without rest. Continuous use may result in shortening the lamp life. Turn off the projector and give it a rest about an hour in every 24 hours.• This projector monitors internal temperature and automatically controls the running speed of the cooling fans.• If the WARNING TEMP indicator flashes red, see “WARNING TEMP INDICATOR ” in the user’s manual.TURNING OFF THE PROJECTORNOTE;。
SANYO投影仪使用说明书
SANYO投影仪使用说明书第一篇:SANYO投影仪使用说明书第一页三洋多媒体投影仪说明书PLV-Z3000 本说明书是使用投影仪的指南需要了解安装,使用和操作投影仪的具体信息,请查阅在CD-ROM中的用户手册。
使用投影仪以前,请阅读CD-ROM中用户手册里的安全指南。
第二页安装和操作投影仪以前,请通读用户手册,不恰当的操作会导致投影仪寿命减少、故障、火灾及其他事故。
为了减少触电风险,不要移动盖板和背板,里面除了可替换的灯泡以外,没有用户可以自己检修的部件。
检修服务应提交有资质的服务人员。
安全警示:警告:本设备必须接地为减少火灾和触电风险,不要将本设备暴露于雨水和雾气中。
--投影仪从透镜中发出强光,尽可能避免直接注视透镜,否则会导致眼部损害,特别要注意不要让孩子直接注视光束。
--在合适的位置安装投影仪,否则会导致火灾。
--为了空气流通和冷却,在投影仪顶部,四周和背部留下充足的空间是极端重要的。
此处显示的尺寸是需要的最小空间。
如果投影仪置于被格开的一个独立空间内,这个最小距离是必需的。
--不要覆盖投影仪上的通风孔。
升温会降低投影仪使用年限并导致危险。
--如果投影仪长期不使用,请切断电源。
--不要长时间播放一个固定的画面,因为下一幅画面将保留在LCD控制板中,这是由于控制板的特性决定的。
对于悬挂在天花板的警告将投影仪悬挂于天花板时,应当定期使用真空吸尘器清洁空气进出气孔,空气滤纸和投影仪顶部。
如果投影仪长期处于污浊状态,冷却风扇可能因为灰尘而阻塞,并导致故障和灾难。
不要将投影仪置于油污的、潮湿的或者有烟雾的环境,比如厨房。
以此防止故障或者灾难。
如果投影仪沾染油污或者化学品,它的功能将受损。
不要在ANSI/NFPA75定义的电脑/数码处理设备标准项下的电脑房中使用投影仪。
第三页必需在操作产品前阅读所有的安全和操作指引。
阅读这里的所有指引并为今后使用而保留该指引。
清洁前,请切断交流电源,不要使用液体或者气溶清洁剂,请使用湿布进行清洁。
三星Sanyo PLC-WTC500AL 投影仪说明书
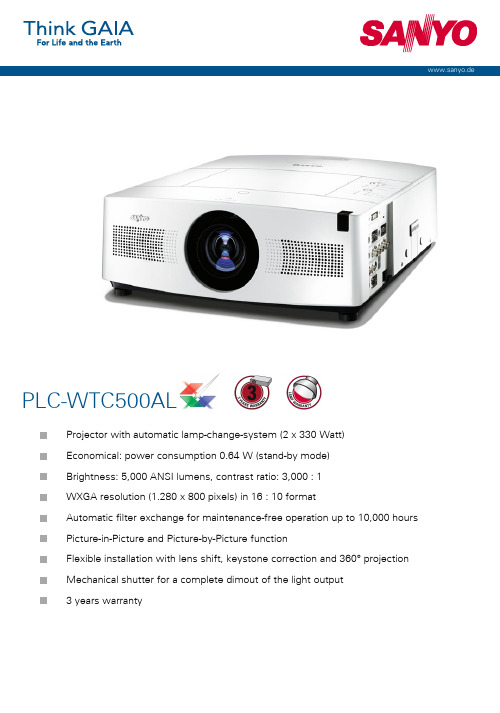
PLC-WTC500ALProjector with automatic lamp-change-system (2 x 330 Watt)Economical: power consumption 0.64 W (stand-by mode)Brightness: 5,000 ANSI lumens, contrast ratio: 3,000 : 1WXGA resolution (1.280 x 800 pixels) in 16 : 10 formatAutomatic filter exchange for maintenance-free operation up to 10,000 hoursPicture-in-Picture and Picture-by-Picture functionFlexible installation with lens shift, keystone correction and 360° projectionMechanical shutter for a complete dimout of the light output3 years warrantyPLC-WTC500ALTECHNICAL DATA PLC-WTC500ALEAN Code4994334272805Category ProfessionalPanel 3 x 0.95 '' TFT p-Si (16:10), Inorganic LCD panelLamp 2 x 330 W NSH (LMP-125)Brightness5000 ANSI lumens, 4000 ANSI lumens (eco mode)Lamp life3000 h (eco mode) / 2500 h (normal mode)Fan noise31 dB (eco mode) / 35 dB (normal mode)Standard lens Delivery without lens *Contrast ratio3000 : 1Resolution in pixels1,280 x 800 (WXGA)Uniformity90 %Bandwidth/Frequency140 MHz, Horizontal frequency: 15 - 100 kHz, Vertical frequency: 50 - 100 HzColor systems PAL, SECAM, NTSC, NTSC4.43, PAL-M/NConnections Input 1: HDMI (HDCP)Input 2: D-Sub15 (RGB)Input 3: 5 x BNC (RGBHV/Video/Y-Pb/Cb-Pr/Cr)Input 4: RCA (composite)Input 5: Mini DIN 4 (S-Video)Audio: 3.5 mm stereo jackAudio: 2 x RCA (R/L mono)Audio output : 3.5 mm stereo jackMonitor output: D-Sub15Control input jack 1: D-Sub9 (RS232)Control input jack 2: USB type BControl input jack 3: 3.5 mm stereo jack (cable remote control)Control input jack 4: D-Sub25 for PJ-Net OrganizerAudio function 2 x 3 W stereoKeystone correction vertical +/- 40°, horizontal +/- 20°Lens shift10 : 0 - 1 : 1 vertical (applies to LNS-S11/W10/T10/T11), 1 : 1 vertical (applies to LNS-W11), 1.857 : 1 - 1 : 1.857horizontal (applies to LNS-S11/W10/T10/T11), 1 : 1 horizontal (applies to LNS-W11)HDTV compatibility480i, 480p, 575i, 575p, 720p, 1,035i, 1,080iComputer compatibility UXGA, SXGA, SXGA+, WXGA, XGA, SVGA, VGA, MacZoom/Focus Depending on lensPower consumption / Voltage400 W (eco mode) / 440 W (normal mode) / 0.64 W (stand-by mode) / 100 - 240 VUnique features Auto Lamp Selection System (ALSS), Automatic air filter replacement (up to 10000 hours), Mechanical shutter, Multi-lamp system, Eco mode, Power management, Multi scan system, Keystone correction, Digital zoom, Motorized lens shift, 360°installation, Picture-in-Picture and Picture-by-Picture function, MyLogo function, Freeze function, Various picturemodes, Picture reverse function, Picture inverse function, Progressive scanning 2-3/2-2 pull down, Remote control code,Key lock function, PIN code lock, Kensington lock, Presentation timer, Real-time data transfer, FTP download function,Web management function, Email error reporting, Network capability/LAN, Administration-and-control-function, Mousefunction, Network timer function, Network communication function, SNMP log function, Multi language menu Warranty 3 years, 24-hr replacement service (D/CH/I/F - except overseas), 90 days lamp warranty (max. 300 hours)Dimensions (W x H x D)451.0 x 175.0 x 550.1 mmWeight (net)14.7 kgStandard accessories IR/cable remote control with laser pointer and mouse function, Batteries, User manual, Power cable, USB cable, D-Sub15 cable, PIN code labelOptional accessories PJ Net Organizer Plus II with video camera (POA-PN03C), Ceiling mount 15 cm (POA-CM01), Ceiling mount 40-70 cm(POA-CM02), Ceiling mount 70-110 cm (POA-CM03), Exchange filter (POA-FIL-100), Ceiling mount (POA-CMP10) Lenses LNS-S11, LNS-T10, LNS-T11, LNS-W10, LNS-W11* You can use the distance calculator at www.sanyo.de to determine exact image sizes and distancesTechnical specifications subject to change without notice. Date 05/2010SANYO Sales & Marketing Europe GmbH · Stahlgruberring 4 · 81829 Munich · Germany。
2008年SANYO PLC-XP200L XGA移动多媒体投影仪产品介绍说明书
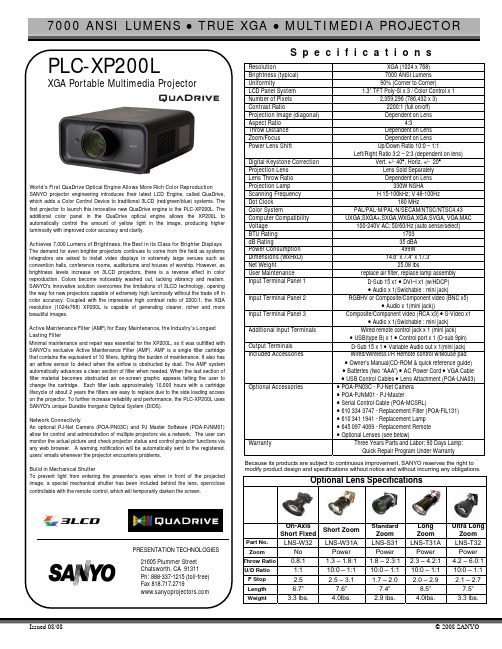
7000 ANSI LUMENS zTRUE XGAz MULTIMEDIA PROJECTORIssued 08/08 © 2008 SANYO World’s First QuaDrive Optical Engine Allows More Rich Color ReproductionSANYO projector engineering introduces their latest LCD Engine, called QuaDrive,which adds a Color Control Device to traditional 3LCD (red/green/blue) systems. TheS p e c i f i c a t i o n sResolution XGA (1024 x 768)Brightness (typical) 7000 ANSI LumensUniformity 90% (Corner to Corner)LCD Panel System 1.3” TFT Poly-Si x 3 / Color Control x 1Number of Pixels 2,359,296 (786,432 x 3)Contrast Ratio 2200:1 (full on/off)Projection Image (diagonal) Dependent on LensAspect Ratio 4:3Throw Distance Dependent on LensZoom/Focus Dependent on LensPower Lens Shift Up/Down Ratio 10:0 – 1:1Left/Right Ratio 3:2 – 2:3 (dependent on lens)Digital Keystone Correction Vert. +/- 40°, Horiz. +/- 20°Projection Lens Lens Sold SeparatelyLens Throw Ratio Dependent on LensProjection Lamp 330W NSHAScanning Frequency H 15-100kHz; V 48-100HzDot Clock 180 MHzColor System PAL/PAL-M/PAL-N/SECAM/NTSC/NTSC4.43Computer Compatibility UXGA,SXGA+,SXGA,WXGA,XGA,SVGA, VGA,MACVoltage 100-240V AC; 50/60/Hz (auto sense/select)BTU Rating 1703dB Rating 35 dBAPower Consumption 499WDimensions (WxHxD) 14.6” x 7.4” x 17.3”Net Weight 25.08 lbsUser Maintenance replace air filter, replace lamp assemblyInput Terminal Panel 1 D-Sub 15 x1 • DVI–I x1 (w/HDCP)• Audio x 1(Swichable : mini jack)Input Terminal Panel 2 RGBHV or Composite/Component video (BNC x5)• Audio x 1(mini jack))Input Terminal Panel 3 Composite/Component video (RCA x3) • S-Video x1• Audio x 1(Swichable : mini jack)Additional Input Terminals Wired remote control jack x 1 (mini jack)• USB(type B) x 1 • Control port x 1 (D-sub 9pin)Output Terminals D-Sub 15 x 1 • Variable Audio out x 1(mini jack)Included Accessories Wired/Wireless I/R Remote control w/Mouse pad• Owner’s Manual(CD-ROM & quick reference guide)• Batteries (two “AAA”) • AC Power Cord • VGA Cable• USB Control Cables • Lens Attachment (POA-LNA03)Optional Accessories • POA-PN03C - PJ-Net Camera• POA-PJNM01 - PJ-Master• Serial Control Cable (POA-MCSRL)• 610 334 3747 - Replacement Filter (POA-FIL131)• 610 341 1941 - Replacement Lamp• 645 097 4069 - Replacement Remote• Optional Lenses (see below)Warranty Three Years Parts and Labor; 90 Days Lamp;Quick Repair Program Under WarrantyBecause its products are subject to continuous improvement, SANYO reserves the right tomodify product design and specifications without notice and without incurring any obligations.Optional Lens SpecificationsOn-AxisShort FixedShort ZoomStandardZoomLongZoomUltra LongZoomPart No. LNS-W32 LNS-W31A LNS-S31 LNS-T31A LNS-T32Zoom No Power PowerPower PowerThrow Ratio0.8:1 1.3 – 1.8:1 1.8 – 2.3:1 2.3 – 4.2:1 4.2 – 6.0:1U/D Ratio 1:1 10:0 – 1:1 10:0 – 1:1 10:0 – 1:1 10:0 – 1:1F Stop 2.5 2.5 – 3.1 1.7 – 2.0 2.0 – 2.9 2.1 – 2.7Length 6.7” 7.6” 7.4” 8.5” 7.5”Weight 3.3 lbs. 4.0lbs. 2.9 lbs. 4.0lbs. 3.3 lbs.。
SANYO PLC-XTC50L 5000 ANSI 光度 XGA 多媒体投影仪说明书

5000 ANSI LUMENS z TRUE XGA z MULTIMEDIA PROJECTORIssued 1/09©2009 SANYOthat makes possible for 24/7 continuous operation.The Industry’s First Auto Lamp Selection SystemIncorporates industry’s first *1 lamp selection system. Lamp selection system Throw RatioS p e c i f i c a t i o n sResolutionXGA (1024 x 768) Brightness (typical) 5000 ANSI LumensContrast Ratio 1100 : 1 Panel System 1.0” TFT P-Si x 3 Number of Pixels 2,359,296 (786,432 x 3)Aspect Ratio 4 : 3Uniformity90% (corner to center)Scanning Frequency H Sync : 15-100kHz, V Sync : 50-100HzDot Clock 140MHzComputer Compatibility UXGA / WXGA / SXGA / SXGA+ / XGA / SVGA / VGA / MAC HDTV Signals 1080i / 50,1080i / 60.1035i,720p iColor System NTSC / PAL / SECAM / NTSC4.43 / PAL-M / PAL-NProjection Lens F 1.7 – 2.1 / f 1.3 - 1.7” Zoom / Focus1.3x ( Motor Driven)Image Size (diagonal) 30” – 300” Throw Distance 10.83’ – 14.11’ Throw Ratio 1.6 - 2.1:1Up/Down Ratio U/D 10 : 0 – 1 : 1 , L/R 13 : 7 – 7 : 13 Digital Keystone Vertical : +/- 40%,Horizontal:+/- 20%Digital Zoom7x - 1/2x Projection Lamp(s) 330W NSHA Voltage100 – 240VPower Consumption 550W High 440W NormalFan Noise 32 dB (eco)BTU Rating 1877 (High),1689 (Normal),1501 (Eco)Speaker Output 3W +3W Stereo SpeakersWeight 32.4 lbs.Dimensions 17.76” x 8.89” x 21.66”(not including protrusion) Computer 1 : D-Sub 15 (Analog) Digital : DVI-D (HDCP) x1 Input1 PC or Video Audio : Stereo Mini-jack Computer 2 : 5 BNC Component : RCA x 3 Composite : RCA x 1 Input2 PC or Video Audio : Stereo Mini-jack Composite : RCA x 1 S-Video : Mini DIN x 1 Input3PC or VideoAudio : RCA x 2 Monitor Out (Common) D-Sub15 (Monitor Out from Input1 or 2) Variable Audio Out Stereo Mini-jack (Audio Out from Audio In 1 or 2) Service Port : USB Communication TerminalsControl Port : D-Sub 9 ( RS232C) Included Accessories1) Owner's Manual (CD-ROM) 2) AC code UL 3P Plug Type 3) PC Cable (Dsub15-Dsub 15) 4) USB Cable 5)Wireless/ Wired Remote Control 6) AAA Battery x 2 7) Pin Code label Optional AccessoriesLamp: 610 342 2626 : Remote: 645 098 1784 Filter : POA-FIL-100: POA-PN03A (PJ Net Organizer Plus2), POA-PN03C (PJ Net Organizer Plus2)Because its products are subject to continuous improvement, SANYO reserves the right to modify product design and specifications without notice and without incurring any obligations.Terminals。
三洋投影机网络控制手册

用户手册
投影机网络管理程序 (Windows 用 )
本手册为投影机网络管理程序软件说明书。 本软件只可在Windows操作平台上使用,不能在Mac操作平台上使用。 操作投影机网络管理程序软件之前,请详尽地阅读本手册。 首先,请阅读投影机用户手册,了解投影机的基本操作和安全指南。 请严格遵守用户手册中的安全指南。
投影机网络管理程序卸载
从电脑中移除投影机网络管理程序,用控制面板上的“Add & Remove Programs”执行操作。
sanyo z3 中文版说明书

装置及推车组合应小心移动,快 停、外力及地面不平均可导致装置 及推车倾覆。
音机或电视机产生干扰,可以尝试打开或关闭从设备。使用者可以尝试通过下列方法来解决干扰。
-调整或重新安装接收天线
-增加从设备和受干扰设备的距离
-将此设备和受干扰设备接于不同的电路
-咨询供应商或有经验的收音机/电视机技术人员。
在 FCC 条款第 15 章要求 B 级限制需使用带有屏蔽网的线材
不要对本产品进行未经认可的改变。如果该项改变必须进行,您可能会被要求停止使用该设备。
携带或运输投影机注意事项 -不要撞击或跌落投影机,投影机可能会发生损毁或
故障。 -携带投影机时,应装入合适的手提箱内。 -不要用不适合运输的箱子运输投影机,以免对投影
机造成损坏。运输投影机时,请向你的供应商请教 如何运输。
翻译:音质+色彩
PDF 文件使用 "pdfFactory Pro" 试用版本创建
正确安装投影机
投影机须正确安装,不当的安装会导致灯泡寿命缩短 或引起火灾。
注意 热空气由排风孔排出,在安装或使用投影机时应注意 下列事项。 -不要将易燃物品放置在排风孔附近 -距离排风孔旁边至少要保持 50cm 的空间不摆放物
品。 -不要触碰排风孔周围的部件,尤其是螺丝和金属部
件,投影机使用过程中,这一区域会变得非常热。 -不要在机壳上放置任何物品,以免导致损坏或由发
雷雨天气、长时间闲置和无人照料的情况下,将投影 机的电源拔掉,以防止雷电从电源线涌入。
SANYO PLC-XT21 L XGA 移动多媒体投影仪说明书

4:3 3.9’-32.8’ Powered (1:1.3 zoom) 10:0 – 1:1 13:7 – 7:13 Vert. + 40°/-40° Dichroic mirror & X prism system w/ PBS F1.7-2.1 / f1.30”-1.70” 1.6 – 2.1: 1 (Standard lens) 300W UHP H 15-100kHz; V 50-100Hzalog), 100MHz(digital) PAL/PAL-M/PAL-N/SECAM/NTSC/NTSC4.43 UXGA(only Analog RGB), WXGA, SXGA+, SXGA, XGA, SVGA, VGA, MAC
Because its products are subject to continuous improvement, SANYO reserves the right to modify product design and specifications without notice and without incurring any obligations.
NETWORK CONNECTIVITY An optional PJ-Net Camera (POA-PN03C) and PJ Master Software (POA-PJNM01) allow for control and administration of projectors via a network. The user can monitor the actual picture and check projector status and control projector functions via any web browser. A warning notification will be automatically sent to the registered users’ emails whenever the projector encounters problems.
- 1、下载文档前请自行甄别文档内容的完整性,平台不提供额外的编辑、内容补充、找答案等附加服务。
- 2、"仅部分预览"的文档,不可在线预览部分如存在完整性等问题,可反馈申请退款(可完整预览的文档不适用该条件!)。
- 3、如文档侵犯您的权益,请联系客服反馈,我们会尽快为您处理(人工客服工作时间:9:00-18:30)。
■ Warning-
■ Warning■ Warning■ Warning-
2
English
Usage Notice
■ WarningAllowing the proper amount of space on the top, sides, and rear of the projector cabinet is critical for proper air circulation and cooling of the unit. The dimensions shown here indicate the minimum space required. If the projector is to be built into a compartment or similarly enclosed, these minimum distances must be maintained. SIDE and TOP
■ Warning■ Warning■ Warning■ Warning■ Warning■ Warning■ WarningThis apparatus must be earthed. Do not look into the projector’s lens when the lamp is on. The bright light may hurt your eyes. To reduce the risk of fire or electric shock, do not expose this projector to rain or moisture. Please do not open or disassemble the projector as this may cause electric shock. When replacing the lamp, please allow unit to cool down, and follow all replacement instructions.. This projector will detect the life of the lamp itself. Please be sure to change the lamp when it shows warning messages. Reset the “Lamp Counter Reset” function from the on-screen display “Options|Lamp Settings” menu after replacing the lamp module (refer to page 32). When switching the projector off, please ensure the cooling cycle has been completed before disconnecting power. Allow 120 seconds for the projector to cool down. Do not use lens cap when projector is powered on. Turn on the projector first and then the signal sources. When the lamp reaches the end of its life, it will burn out and may make a loud popping sound. If this happens, the projector will not turn back on until the lamp module has been replaced. To replace the lamp, follow the procedures listed under “Replacing the Lamp”.
Multimedia Projector
MODEL
PDG-DSU30
Owner's Manual
Table of Contents
Table of Contents Usage Notice
Precautions. ............................................................ 2
1.5' (50 cm)
REAR
3' (1 m)
Installation
Connecting the Projector...................................... 12 Connect to Computer/Notebook........................ 12 Connect to Video............................................... 13 Powering On/Off the Projector. ............................. 14 Powering On the Projector. ................................ 14 Powering Off the Projector. ................................ 15 Warning Indicator. .............................................. 16 Adjusting the Projected Image. ............................. 17 Adjusting the Height of Projector Image............ 17 Adjusting the Projector Zoom and Focus. .......... 18 Adjusting Projection Image Size........................ 18
English English
1
Usage Notice
Precautions
Follow all warnings, precautions and maintenance as recommended in this user’s guide to maximize the life of your unit.
Introduction
Product es.................................................... 5 Package Overview. ................................................. 6 Product Overview................................................... 7 Connection Ports................................................. 8 Remote Control. ................................................... 9 Remote Control Battery Installation................... 11 Remote Control Operating Range..................... 11
User Controls
On Screen Display. ............................................... 19 How to operate.................................................. 19 IMAGE............................................................... 20 IMAGE |Advanced............................................. 22 IMAGE | Advanced | Color................................. 23 IMAGE | Advanced |Input.................................. 23 SCREEN. ........................................................... 24 SETTING | Language........................................ 26 SETTING........................................................... 26 SETTING | Signal.............................................. 28 SETTING | Advanced........................................ 29 OPTIONS. .......................................................... 30 OPTIONS | Advanced. ....................................... 31 OPTIONS | Lamp Settings. ................................ 32
Appendices
Troubleshooting.................................................... 33 Replacing the lamp............................................... 38 Specifications....................................................... 40 Computer Compatibility........................................ 41 Configurations of Terminals.................................. 42 Terminal : Analog RGB (Mini D-sub 15 pin)....... 42 Terminal : Mini DIN 3-pin................................... 42 Regulation & Safety Notices................................. 43 Serial Control Interface......................................... 46 Operation........................................................... 46 Functional Execution Command. ....................... 47 Status Read Command..................................... 48 Dimensions........................................................... 49
