SpringMVC文件上传与下载二(上传成为压缩文件)
SpringMVC文件上传大小和类型限制以及超大文件上传bug问题

SpringMVC⽂件上传⼤⼩和类型限制以及超⼤⽂件上传bug问题在上⼀篇⽂章中,主要介绍了Spirng MVC环境下的正常情况下⽂件上传功能实现。
在实际开发的时候,还会涉及到上传⽂件⼤⼩和类型的限制,接下来就会对Spirng MVC环境下⽂件上传⼤⼩和类型的限制进⾏介绍,还会讲解到⽂件上传⼤⼩tomcat服务器bug问题及解决⽅案。
⼀、⽂件上传⼤⼩限制这⾥还是接着上篇⽂章先介绍Spring MVC下的⽂件上传⼤⼩限制,⽂件上传⼤⼩的限制在springmvc-config.xml中配置⽂件解析器CommonsMultipartResolver时即可配置,⽰例如下:<!-- 配置⽂件上传类型解析器 multipartResolver--><bean id="multipartResolver" class="monsMultipartResolver"><!-- 设置上传⽂件最⼤尺⼨,单位为B --><property name="maxUploadSize" value="5242880" /></bean>关于Spring MVC中⽂件上传⼤⼩的限制就这么简单,问题是Spring MVC并没有像Struts2那样的配置,如果单纯配置⼀个限制⽂件上传⼤⼩的配置,当超过上传限制后就会出现异常:所以当在⽂件解析器中配置了⽂件⼤⼩的限制后,必须将抛出的MaxUploadSizeExceededException(上传⽂件过⼤异常)进⾏接收并跳转。
关于异常接收,在Spring MVC官⽅⽂档中介绍了有3种⽅法,这⾥主要介绍其中2种:(1)直接在配置⽂件spring-config.xml中使⽤Spring MVC提供的SimpleMappingExceptionResolver(异常解析映射器)来接收异常信息:<!-- 1.在⽂件上传解析时发现异常,此时还没有进⼊到Controller⽅法中 --><bean id="exceptionResolver" class= "org.springframework.web.servlet.handler.SimpleMappingExceptionResolver"><property name="exceptionMappings"><props><!-- 遇到MaxUploadSizeExceededException异常时,跳转到error.jsp页⾯ --><prop key= "org.springframework.web.multipart.MaxUploadSizeExceededException">/error </prop></props></property></bean>这样当再出现⽂件上传⼤⼩的异常时,配置⽂件会⾃动捕获异常并进⾏匹配,匹配到对应的MaxUploadSizeExceededException异常,就跳转到指定的error.jsp错误页⾯。
SpringMVC文件上传配置,多文件上传,使用的MultipartFile的实例
SpringMVC⽂件上传配置,多⽂件上传,使⽤的MultipartFile的实例基本的SpringMVC的搭建在我的上⼀篇⽂章⾥已经写过了,这篇⽂章主要说明⼀下如何使⽤SpringMVC进⾏表单上的⽂件上传以及多个⽂件同时上传的步骤⼀、配置⽂件:SpringMVC ⽤的是的MultipartFile来进⾏⽂件上传所以我们⾸先要配置MultipartResolver:⽤于处理表单中的file<!-- 配置MultipartResolver ⽤于⽂件上传使⽤spring的CommosMultipartResolver --><beans:bean id="multipartResolver" class="monsMultipartResolver"p:defaultEncoding="UTF-8"p:maxUploadSize="5400000"p:uploadTempDir="fileUpload/temp"></beans:bean>其中属性详解:defaultEncoding="UTF-8" 是请求的编码格式,默认为iso-8859-1maxUploadSize="5400000" 是上传⽂件的⼤⼩,单位为字节uploadTempDir="fileUpload/temp" 为上传⽂件的临时路径⼆、创建⼀个简单的上传表单:<body><h2>⽂件上传实例</h2><form action="fileUpload.html" method="post" enctype="multipart/form-data">选择⽂件:<input type="file" name="file"><input type="submit" value="提交"></form></body>注意要在form标签中加上enctype="multipart/form-data"表⽰该表单是要处理⽂件的,这是最基本的东西,很多⼈会忘记然⽽当上传出错后则去找程序的错误,却忘了这⼀点三、编写上传控制类1、创建⼀个控制类: FileUploadController和⼀个返回结果的页⾯list.jsp2、编写提交表单的action://通过Spring的autowired注解获取spring默认配置的request@Autowiredprivate HttpServletRequest request;/**** 上传⽂件⽤@RequestParam注解来指定表单上的file为MultipartFile** @param file* @return*/@RequestMapping("fileUpload")public String fileUpload(@RequestParam("file") MultipartFile file) {// 判断⽂件是否为空if (!file.isEmpty()) {try {// ⽂件保存路径String filePath = request.getSession().getServletContext().getRealPath("/") + "upload/"+ file.getOriginalFilename();// 转存⽂件file.transferTo(new File(filePath));} catch (Exception e) {e.printStackTrace();}}// 重定向return "redirect:/list.html";}/**** 读取上传⽂件中得所有⽂件并返回** @return*/@RequestMapping("list")public ModelAndView list() {String filePath = request.getSession().getServletContext().getRealPath("/") + "upload/";ModelAndView mav = new ModelAndView("list");File uploadDest = new File(filePath);String[] fileNames = uploadDest.list();for (int i = 0; i < fileNames.length; i++) {//打印出⽂件名System.out.println(fileNames[i]);}return mav;}3、使⽤SpringMVC注解RequestParam来指定表单中的file参数;4、指定⼀个⽤于保存⽂件的web项⽬路径5、通过MultipartFile的transferTo(File dest)这个⽅法来转存⽂件到指定的路径。
第10章 文件的上传和下载-Spring MVC开发技术指南(微课版)-陈恒-清华大学出版社
总结分析
总结并逐步深入体会文件上传与下载的原理。
2.基于表单的文件上传(5分钟)源自3.MultipartFile接口(5分钟)
4.单文件上传(25分钟)
5.多文件上传(15分钟)
6.文件下载(35分钟)
课后学习
任务布置
1.10.1.6 实践环节。
2.预习第11章。
主要
参考资料
《SpringMVC开发技术指南(微课版)》,陈恒等编著.清华大学出版社,2020。
《Java EE开发(SSM)》课程教案
第19次课2学时
授课内容
文件上传与下载。
教学目的
与要求
通过本次课的学习,掌握Spring MVC框架单文件上传、多文件上传以及文件下载。
重点
难点
重点:文件上传与下载的使用方法。
难点:文件上传与下载的原理。
教学进程
安排
1.commons-fileupload组件(5分钟)
springmvc文件上传与下载

上传样式,中文文件名,文件名重复处理1. [代码]actionpackagecom.action;importjava.io.File;importjava.io.IOException;importjava.util.HashMap;importjava.util.Map;importjavax.servlet.http.HttpServletRequest;importjavax.servlet.http.HttpServletResponse;importorg.springframework.stereotype.Controller;importorg.springframework.web.bind.annotation.RequestMapping; importorg.springframework.web.servlet.ModelAndView;importcom.util.FileOperateUtil;@Controller@RequestMapping(value="fileOperate") publicclassFileOperateAction {@RequestMapping(value="upload")publicString upload(HttpServletRequest request){init(request);try{FileOperateUtil.upload(request);request.setAttribute("msg", "ok");request.setAttribute("map", getMap());} catch(Exception e) {e.printStackTrace();}return"redirect:list";}@RequestMapping(value="list")publicModelAndView list(HttpServletRequest request){init(request);request.setAttribute("map", getMap());returnnewModelAndView("fileOperate/list");}@RequestMapping(value="download")publicvoiddownload(HttpServletRequest request, HttpServletResponseresponse){init(request);try{String downloadfFileName = request.getParameter("filename");downloadfFileName =newString(downloadfFileName.getBytes("iso-8859-1"),"utf-8");String fileName =downloadfFileName.substring(downloadfFileName.indexOf("_")+1);String userAgent = request.getHeader("User-Agent");byte[] bytes = userAgent.contains("MSIE") ? fileName.getBytes() : fileName.getBytes("UTF-8");fileName = newString(bytes, "ISO-8859-1");response.setHeader("Content-disposition", String.format("attachment; filename=\"%s\"", fileName));FileOperateUtil.download(downloadfFileName,response.getOutputStream());} catch(IOException e) {e.printStackTrace();}}privatevoidinit(HttpServletRequest request) {if(FileOperateUtil.FILEDIR == null){FileOperateUtil.FILEDIR =request.getSession().getServletContext().getRealPath("/") + "file/";}}privateMap<String, String> getMap(){Map<String, String> map = newHashMap<String, String>();File[] files = newFile(FileOperateUtil.FILEDIR).listFiles();if(files != null){for(File file : files) {if(file.isDirectory()){File[] files2 = file.listFiles();if(files2 != null){for(File file2 : files2) {String name = file2.getName();map.put(file2.getParentFile().getName() + "/"+ name, name.substring(stIndexOf("_")+1));}}}}}returnmap;}}2. [代码]utilpackagecom.util;importjava.io.File;importjava.io.FileInputStream;importjava.io.FileNotFoundException;importjava.io.FileOutputStream;importjava.io.IOException;importjava.io.InputStream;importjava.io.OutputStream;importjava.util.Date;importjava.util.Iterator;importjava.util.Map;importjavax.servlet.ServletOutputStream; importjavax.servlet.http.HttpServletRequest;importorg.springframework.web.multipart.MultipartFile;importorg.springframework.web.multipart.MultipartHttpServletRequest;publicclassFileOperateUtil {publicstaticString FILEDIR = null;/*** 上传* @param request* @throws IOException*/publicstaticvoidupload(HttpServletRequest request) throwsIOException{ MultipartHttpServletRequest mRequest = (MultipartHttpServletRequest) request;Map<String, MultipartFile> fileMap = mRequest.getFileMap();File file = newFile(FILEDIR);if(!file.exists()) {file.mkdir();}Iterator<Map.Entry<String, MultipartFile>> it = fileMap.entrySet().iterator(); while(it.hasNext()){Map.Entry<String, MultipartFile> entry = it.next();MultipartFile mFile = entry.getValue();if(mFile.getSize() != 0&& !"".equals(mFile.getName())){write(mFile.getInputStream(),newFileOutputStream(initFilePath(mFile.getOriginalFilename())));}}}privatestaticString initFilePath(String name) {String dir = getFileDir(name) + "";File file = newFile(FILEDIR + dir);if(!file.exists()) {file.mkdir();}Long num = newDate().getTime();Double d = Math.random()*num;return(file.getPath() + "/"+ num + d.longValue() + "_"+ name).replaceAll("", "-");}privatestaticintgetFileDir(String name) {returnname.hashCode() & 0xf;}publicstaticvoiddownload(String downloadfFileName, ServletOutputStream out) { try{FileInputStream in = newFileInputStream(newFile(FILEDIR + "/"+downloadfFileName));write(in, out);} catch(FileNotFoundException e) {try{FileInputStream in = newFileInputStream(newFile(FILEDIR + "/"+ newString(downloadfFileName.getBytes("iso-8859-1"),"utf-8"))); write(in, out);} catch(IOException e1) {e1.printStackTrace();}} catch(IOException e) {e.printStackTrace();}}/*** 写入数据* @param in* @param out* @throws IOException*/publicstaticvoidwrite(InputStream in, OutputStream out) throwsIOException{ try{byte[] buffer = newbyte[1024];intbytesRead = -1;while((bytesRead = in.read(buffer)) != -1) { out.write(buffer, 0, bytesRead);}out.flush();} finally{try{in.close();}catch(IOException ex) {}try{out.close();}catch(IOException ex) {}}}}3. [代码]springmvc-context.xml<?xml version="1.0"encoding="UTF-8"?><beans xmlns="/schema/beans"xmlns:xsi="/2001/XMLSchema-instance"xmlns:p="/schema/p"xmlns:mvc="/schema/mvc"xmlns:context="/schema/context"xsi:schemaLocation="/schema/beans/schema/beans/spring-beans.xsd/schema/mvc/schema/mvc/spring-mvc.xsd/schema/context/schema/context/spring-context.xsd"><context:component-scan base-package="com.action"/><mvc:annotation-driven/><beanid="viewResolver"class="org.springframework.web.servlet.view.InternalResourceVi ewResolver"><propertyname="viewClass"value="org.springframework.web.servlet.view.JstlView"/><property name="prefix"value="/"/><property name="suffix"value=".jsp"/></bean><beanid="multipartResolver"class="m onsMultipartResolver"p:defaultEncoding="UTF-8"/></beans>4. [代码]list.jsp<%@ pagelanguage="java"import="java.util.*"pageEncoding="UTF-8"contentType="text/htm l; charset=UTF-8" %><%@ taglib prefix="c"uri="/jsp/jstl/core"%><%String basePath =request.getScheme()+"://"+request.getServerName()+":"+request.getServerPort()+ request.getContextPath()+"/";%><!DOCTYPE HTML PUBLIC "-//W3C//DTD HTML 4.01 Transitional//EN"><html><head><title>list</title><meta http-equiv="pragma"content="no-cache"><meta http-equiv="cache-control"content="no-cache"><style type="text/css">a:link {text-decoration: none;}a:visited {text-decoration: none;}a:hover {color: #999999;text-decoration: underline;}</style></head><body><br/><c:forEach items="${map}"var="v"><ahref="<%=basePath%>fileOperate/download?filename=${v.key}">${v.value}</a>< br/></c:forEach><br/><a href="<%=basePath%>fileOperate/upload.jsp">上传文件</a></body></html>5. [代码]upload.jsp<%@ page language="java"import="java.util.*"pageEncoding="UTF-8"%><%String basePath =request.getScheme()+"://"+request.getServerName()+":"+request.getServerPort()+re quest.getContextPath()+"/";%><!DOCTYPE HTML PUBLIC "-//W3C//DTD HTML 4.01 Transitional//EN"><html><head><title>upload</title><meta http-equiv="pragma"content="no-cache"><meta http-equiv="cache-control"content="no-cache"><style type="text/css">.input {width: 80px;height: 20px;line-height: 20px;background: #0088ff;text-align: center;display: inline-block;overflow: hidden;position: relative;text-decoration: none;top: 5px;}.input:hover {background: #ff8800;}.file {opacity: 0;filter: alpha(opacity = 0); font-size: 50px;position: absolute;top: 0;right: 0;}a:link {text-decoration: none;}a:visited {text-decoration: none;}a:hover {color: #999999;text-decoration: underline;}</style></head><body><form action="<%=basePath %>fileOperate/upload"enctype="multipart/form-data"method="post"><div><input type="text"readonly="readonly"/><ahref="javascript:void(0);"class="input"> 浏览<input type="file" class="file"name="filename1"></a></div><div><input type="text"readonly="readonly"/><ahref="javascript:void(0);"class="input"> 浏览<input type="file" class="file"name="filename2"></a></div><div><input type="text"readonly="readonly"/><ahref="javascript:void(0);"class="input"> 浏览<input type="file" class="file"name="filename3"></a></div><input type="submit"value="上传"></form><br /><a href="<%=basePath %>fileOperate/list">下载文件</a><script type="text/javascript">var nodes = document.getElementsByTagName("input");for( var i = 0; i < nodes.length; i++) {if("file"== nodes[i].type){nodes[i].onchange = function(){var textObj =this.parentNode.parentNode.getElementsByTagName("input")[0];var textvalue = this.value;textvalue = textvalue.substring(stIndexOf("\\")+1,textvalue.length);textObj.value = textvalue;};}}</script></body></html>6. [代码]web.xml<?xml version="1.0"encoding="UTF-8"?><web-app version="2.5"xmlns="/xml/ns/javaee"xmlns:xsi="/2001/XMLSchema-instance"xsi:schemaLocation="/xml/ns/javaee/xml/ns/javaee/web-app_2_5.xsd"><servlet><servlet-name>springmvc</servlet-name><servlet-class>org.springframework.web.servlet.DispatcherServlet</servlet-class> <init-param><param-name>contextConfigLocation</param-name><param-value>classpath:springmvc-context.xml</param-value></init-param><load-on-startup>1</load-on-startup></servlet><servlet-mapping><servlet-name>springmvc</servlet-name><url-pattern>/</url-pattern></servlet-mapping><welcome-file-list><welcome-file>index.jsp</welcome-file></welcome-file-list></web-app>7. [代码]index.jsp<%@ page language="java"import="java.util.*"pageEncoding="UTF-8"%><%String basePath =request.getScheme()+"://"+request.getServerName()+":"+request.getServerPort()+re quest.getContextPath()+"/";%><!DOCTYPE HTML PUBLIC "-//W3C//DTD HTML 4.01 Transitional//EN"> <html><head><base href="<%=basePath%>"><title>index</title><meta http-equiv="pragma"content="no-cache"><meta http-equiv="cache-control"content="no-cache"><style type="text/css">a:link {text-decoration: none;}a:visited {text-decoration: none;}a:hover {color: #999999;text-decoration: underline;}</style></head><body>This is my JSP page. <br><br/><a href="<%=basePath%>fileOperate/upload.jsp">上传文件</a> </body></html>8. [图片]项目.png。
SpringMVC文件上传下载

SpringMVC文件上传下载今天我们来讲讲spring mvc中的文件上传和下载的几种方法。
首先附上文件目录->我们需要配置的我做了记号->一、文件上传首先为了方便后续的操作,以及精简代码,我们在Utils包下封装一个文件上传下载的帮助类: Files_Helper_DG1package Utils;2 3import org.springframework.web.multipart.MultipartFile;4 5 import javax.servlet.http.HttpServletRequest; 6importjavax.servlet.http.HttpServletResponse; 7import java.io.*; 8importjava.text.SimpleDateFormat;9import java.util.Date;10import java.util.UUID;1112 /**13 * Author:qixiao14 * Time:2016年9月2日23:47:5115*/16public final class Files_Helper_DG {17/**18 * 私有构造方法,限制该类不能被实例化19*/20private Files_Helper_DG() {21throw new Error("The class Cannot beinstance !");22 }2324/**25 * spring mvc files Upload method (transferTo method)26 * spring mvc 中的文件上传方法 trasferTo 的方式上传,参数为MultipartFile27 *28 * @param request HttpServletRequest29 * @param multipartFile MultipartFile(spring)30 * @param filePath filePath example"/files/Upload"31 * @return32*/33public static StringFilesUpload_transferTo_spring(HttpServletRequest request, MultipartFile multipartFile, String filePath) {34//get Date path35 String DatePath = new SimpleDateFormat("yyyyMMdd").format(new Date());36//get server path (real path)37 String savePath =request.getSession().getServletContext().getRealPath(filePath) + File.separator + DatePath;38// if dir not exists , mkdir39System.out.println(savePath);40 File saveDir = new File(savePath);41if (!saveDir.exists() || !saveDir.isDirectory()) {42//create dir43 saveDir.mkdir();44 }45if(multipartFile != null) {46//get files suffix47 String suffix =multipartFile.getOriginalFilename().substring(multipartFile.getOriginalFilename ().lastIndexOf("."));48//use UUID get uuid string49 String uuidName = UUID.randomUUID().toString() + suffix;// make new file name50//filePath+fileName the complex file Name51 String fileName = savePath + File.separator + uuidName;52//return relative Path53 String relativePath = filePath + File.separator + DatePath + File.separator + uuidName;54 try {55//save file56 multipartFile.transferTo(newFile(fileName));57//return relative Path58returnrelativePath;59 } catch (IOException e) {60e.printStackTrace();61return null;62 }63 } else64 return null;65 }6667/**68 * @param request HttpServletRequest69 * @param response HttpServletResponse70 * @param filePath example"/filesOut/Download/mst.txt"71 * @return72*/73public static void FilesDownload_servlet(HttpServletRequest request, HttpServletResponse response, String filePath) {74//get server path (real path)75 String realPath = request.getSession().getServletContext().getRealPath(filePath);76 File file = new File(realPath);77 String filenames = file.getName();78 InputStream inputStream;79try {80 inputStream = new BufferedInputStream(new FileInputStream(file));81byte[] buffer = new byte[inputStream.available()];82 inputStream.read(buffer);83 inputStream.close();84 response.reset();85// 先去掉文件名称中的空格,然后转换编码格式为utf-8,保证不出现乱码,这个文件名称用于浏览器的下载框中自动显示的文件名86 response.addHeader("Content-Disposition", "attachment;filename=" + new String(filenames.replaceAll(" ", "").getBytes("utf-8"), "iso8859-1"));87 response.addHeader("Content-Length", "" + file.length());88OutputStream os = new BufferedOutputStream(response.getOutputStream());89 response.setContentType("application/octet-stream");90os.write(buffer);// 输出文件91 os.flush();92os.close();93 } catch (Exception e) {94e.printStackTrace();95 }96 }97 }然后我们新建一个控制器类FileUploadController首先我们先展示出全部的代码,然后我们进行分步说明--->FileUploadController方式一:采用fileUpload_multipartFile ,file.transferTo 来保存上传的文件1/* 2 * 方式一 3 * 采用 fileUpload_multipartFile , file.transferTo 来保存上传的文件 4*/ 5 @RequestMapping(value = "fileUpload_multipartFile") 6@ResponseBody 7public String fileUpload_multipartFile(HttpServletRequest request, @RequestParam("file_upload") MultipartFile multipartFile) { 8//调用保存文件的帮助类进行保存文件,并返回文件的相对路径 9 String filePath =Files_Helper_DG.FilesUpload_transferTo_spring(request, multipartFile,"/filesOut/Upload");10return "{\"TFMark\":\"true\",\"Msg\":\"upload success !\",\"filePath\":\"" + filePath + "\"}";11 }方式二:采用fileUpload_multipartRequest file.transferTo 来保存上传文件1 @RequestMapping(value = "fileUpload_multipartRequest")2 @ResponseBody3 public String fileUpload_multipartRequest(HttpServletRequest request) {4//将request转成MultipartHttpServletRequest 5 MultipartHttpServletRequest multipartRequest = (MultipartHttpServletRequest) request; 6//页面控件的文件流,对应页面控件 input file_upload 7 MultipartFile multipartFile = multipartRequest.getFile("file_upload"); 8//调用保存文件的帮助类进行保存文件,并返回文件的相对路径 9 String filePath =Files_Helper_DG.FilesUpload_transferTo_spring(request, multipartFile,"/filesOut/Upload");10return "{\"TFMark\":\"true\",\"Msg\":\"upload success !\",\"filePath\":\"" + filePath + "\"}";11 }方式三:采用CommonsMultipartResolver file.transferTo 来保存上传文件---自动扫描全部的input表单1 @RequestMapping(value = "fileUpload_CommonsMultipartResolver") 2@ResponseBody 3public StringfileUpload_CommonsMultipartResolver(HttpServletRequest request) { 4//将当前上下文初始化给 CommonsMultipartResolver (多部分解析器) 5CommonsMultipartResolver multipartResolver = newCommonsMultipartResolver(request.getSession().getServletContext()); 6//检查form中是否有enctype="multipart/form-data" 7if(multipartResolver.isMultipart(request)) { 8//将request变成多部分request 9 MultipartHttpServletRequest multipartRequest = (MultipartHttpServletRequest) request;10//获取multiRequest 中所有的文件名11 Iterator iter = multipartRequest.getFileNames();12while (iter.hasNext()) {13//一次遍历所有文件14 MultipartFile multipartFile = multipartRequest.getFile(iter.next().toString());15//调用保存文件的帮助类进行保存文件,并返回文件的相对路径16 String fileName = Files_Helper_DG.FilesUpload_transferTo_spring(request, multipartFile,"/filesOut/Upload");17System.out.println(fileName);18 }19 }20return "upload success ! ";21 }方式四:通过流的方式上传文件(这种方法和servlet里面上传文件的方法类似,但本人这种方法存在上传文件损坏的问题,希望大神们能帮本人解决,感激不尽!~~~)1 @RequestMapping(value = "fileUpload_stream")2 @ResponseBody 3public String fileUpload_stream(HttpServletRequest request) { 4//得到上传文件的保存目录,将上传的文件存放于WEB-INF目录下,不允许外界直接访问,保证上传文件的安全 5 String savePath =request.getSession().getServletContext().getRealPath("/filesOut/Upload"); 6File file = new File(savePath); 7//判断上传文件的保存目录是否存在 8if (!file.exists() && !file.isDirectory()) { 9//创建目录10file.mkdir();11 }12try {13//使用Apache文件上传组件处理文件上传步骤:14//1、创建一个DiskFileItemFactory工厂15DiskFileItemFactory factory = new DiskFileItemFactory();16//2、创建一个文件上传解析器17 ServletFileUpload upload = newServletFileUpload(factory);18//解决上传文件名的中文乱码19upload.setHeaderEncoding("UTF-8");20//3、判断提交上来的数据是否是上传表单的数据21if (!ServletFileUpload.isMultipartContent(request)) {22//按照传统方式获取数据23return "is not form upload data";24 }25//4、使用ServletFileUpload解析器解析上传数据,解析结果返回的是一个List<FileItem>集合,每一个FileItem对应一个Form表单的输入项26List<FileItem> list = upload.parseRequest(request);27System.out.println("start---------");28 System.out.println(list);29for (FileItem item : list) {30 System.out.println("begin ----");31 //如果fileitem中封装的是普通输入项的数据32if (item.isFormField()) {33 String name = item.getFieldName();34//解决普通输入项的数据的中文乱码问题35 String value = item.getString("UTF-8");36//value = new String(value.getBytes("iso8859-1"),"UTF-8");37System.out.println(name + "=" + value);38 } else {//如果fileitem中封装的是上传文件39//得到上传的文件名称,40 String filename = item.getName();41 System.out.println(filename);42if (filename == null || filename.trim().equals("")) {43continue;44 }45//注意:不同的浏览器提交的文件名是不一样的,有些浏览器提交上来的文件名是带有路径的,如: c:\a\b\1.txt,而有些只是单纯的文件名,如:1.txt46//处理获取到的上传文件的文件名的路径部分,只保留文件名部分47String suffix = item.getName().substring(item.getName().lastIndexOf("."));48//获取item中的上传文件的输入流49 InputStream in =item.getInputStream();50//创建一个文件输出流51FileOutputStream out = new FileOutputStream(savePath + "/123" + suffix);52//创建一个缓冲区53byte buffer[] = new byte[1024];54//判断输入流中的数据是否已经读完的标识55int len = 0;56//循环将输入流读入到缓冲区当中,(len=in.read(buffer))>0就表示in里面还有数据57while((len = in.read(buffer)) > 0) {58//使用FileOutputStream 输出流将缓冲区的数据写入到指定的目录(savePath + "\\" + filename)当中59out.write(buffer, 0, len);60 }61//关闭输入流62 in.close();63//关闭输出流64 out.close();65//删除处理文件上传时生成的临时文件66item.delete();67 }68 }69return "uploadsuccess !";70 } catch (Exception e) {71e.printStackTrace();72 }73return "upload fail";74 }多文件上传(其实是将上面的1 @RequestMapping(value = "fileUpload_spring_list")2 @ResponseBody 3public String fileUpload_spring_list(HttpServletRequest request,@RequestParam("file_upload") MultipartFile[] multipartFile) { 4//判断file 数组不能为空并且长度大于05if(multipartFile != null&& multipartFile.length >0) {6//循环获取file数组中得文件 7try{8for(inti = 0; i < multipartFile.length; i++) { 9 MultipartFile file = multipartFile[i];10//保存文件11 String fileName = Files_Helper_DG.FilesUpload_transferTo_spring(request, file,"/filesOut/Upload");12System.out.println(fileName);13 }14return "{\"TFMark\":\"true\",\"Msg\":\"upload success !\"}";15 } catch (Exception ee) {16return "{\"TFMark\":\"false\",\"Msg\":\"参数传递有误!\"}";17 }18 }19return"{\"TFMark\":\"false\",\"Msg\":\"参数传递有误!\"}";20 }下面我们进行测试:首先在webapp下新建文件夹目录/filesOut/Upload,并且新建一个/FileUpload/FileUpload.jspFileUpload.jsp代码如下1 <%@ page contentType="text/html;charset=UTF-8" language="java" %>2 <% 3String path = request.getContextPath(); 4String basePath =request.getScheme()+"://"+request.getServerName()+":"+request.getServerPort()+p ath+"/"; 5 %> 6<html> 7<head> 8<base href="<%=basePath%>"> 9<title>fileUpload</title>10</head>11<body>12<h3>文件上传</h3><br>1314<h3>采用fileUpload_multipartFile , file.transferTo 来保存上传的文件</h3>15<formname="form1" action="/FileUpload/fileUpload_multipartFile" method="post"enctype="multipart/form-data">16<input type="file" name="file_upload">17<input type="submit" value="upload"/>18</form>19<hr>2021<h3>采用fileUpload_multipartRequest file.transferTo 来保存上传文件</h3>22<form name="form2"action="/FileUpload/fileUpload_multipartRequest"method="post" enctype="multipart/form-data">23<input type="file" name="file_upload">24<input type="submit" value="upload"/>25</form>26<hr>2728<h3>采用CommonsMultipartResolver file.transferTo 来保存上传文件</h3>29<form name="form3" action="/FileUpload/fileUpload_CommonsMultipartResolver" method="post"enctype="multipart/form-data">30<input type="file" name="file_upload">31<input type="submit" value="upload"/>32</form>33<hr>3435<h3>使通过流的方式上传文件--存在上传后无法使用的问题</h3>36<form name="form4"action="/FileUpload/fileUpload_stream" method="post"enctype="multipart/form-data">37<input type="file" name="file_upload">38<input type="submit" value="upload"/>39</form>40<hr>4142<h3>多文件上传采用MultipartFile[] multipartFile 上传文件方法</h3>43<form name="form5"action="/FileUpload/fileUpload_spring_list" method="post"enctype="multipart/form-data">44<input type="file" name="file_upload">45<input type="file" name="file_upload">46<input type="file"name="file_upload">47<input type="submit"value="upload"/>48</form>49<hr>50 51<h3>通过 a 标签的方式进行文件下载</h3><br>52<ahref="<%=basePath%>filesOut/Download/mst.txt">通过 a 标签下载文件 mst.txt</a>53<hr>54<h3>通过 Response 文件流的方式下载文件</h3>55<ahref="/FileUpload/fileDownload_servlet">通过文件流的方式下载文件 mst.txt</a>5657</body>58</html>这里一定要记得在spring-servlet.xml里面配置访问静态路径方法->下面我附上spring-servlet.xml1<?xml version="1.0" encoding="UTF-8"?> 2<beansxmlns="/schema/beans" 3xmlns:xsi="/2001/XMLSchema-instance" 4xmlns:context="/schema/context" 5xmlns:mvc="/schema/mvc" 6xsi:schemaLocation="/schema/beans 7/schema/beans/spring-beans-3.1.xsd 8/schema/context 9/schema/context/spring-context-3.1.xsd10/schema/mvc11/schema/mvc/spring-mvc-3.1.xsd">1213<!-- 启动注解驱动的Spring MVC功能,注册请求url和注解POJO类方法的映射-->14<mvc:annotation-driven >1516</mvc:annotation-driven>1718<!-- 启动包扫描功能,以便注册带有@Controller、@service、@repository、@Component等注解的类成为spring的bean -->19<context:component-scanbase-package="HelloSpringMVC.controller"/>20<!-- 对模型视图名称的解析,在请求时模型视图名称添加前后缀 -->21<beanclass="org.springframework.web.servlet.view.InternalResourceViewResolver">22<property name="viewClass"value="org.springframework.web.servlet.view.JstlView"/>23<propertyname="prefix" value="/"/><!-- 前缀 -->24<property name="suffix"value=".jsp"/><!-- 后缀 -->25</bean>26<!-- 访问静态文件(jpg,js,css)的方法 -->27<mvc:resources location="/files/" mapping="/files/**"/>28<mvc:resources location="/filesOut/" mapping="/filesOut/**"/>29<mvc:resources location="/scripts/" mapping="/scripts/**"/>30<mvc:resources location="/styles/" mapping="/styles/**"/>31<mvc:resourceslocation="/Views/"mapping="/Views/**"/>3233<!-- 多部分文件上传 -->34<bean id="multipartResolver"class="monsMultipartResolver">35<property name="maxUploadSize" value="104857600"/>36<propertyname="maxInMemorySize" value="4096"/>37<property name="defaultEncoding" value="UTF-8"></property>38</bean>39</beans>然后我们运行tomcat进入http://localhost:8080/Views/FileUpload/FileUpload.jsp打开后,页面如下:我们依次选择文件->然后依次点击upload按钮,进行文件的上传->可见,5种上传都已经执行成功!下面我们打开文件目录查看一下上传的文件->细心的同志们会发现使用流上传的并没有成功,这种方式仍然存在bug待调试,有成功的记得联系我哦~那么我们其他的方式执行已经都成功了!二、文件下载在控制器类FileUploadController里面继续添加代码->1 @RequestMapping(value = "fileDownload_servlet")2public voidfileDownload_servlet(HttpServletRequest request, HttpServletResponse response) {3 Files_Helper_DG.FilesDownload_servlet(request,response,"/filesOut/Download/mst. txt");4 }这里调用了帮助类Files_Helper_DG.FilesDownload_servlet(request,response,"/filesOut/ Download/mst.txt");然后我们进行测试->前面我们新建的文件夹/filesOut/Download,在里面放一个文件mst.txt,代码访问的就是这个文件!然后是我们FileUpload.jsp,前面已经拷贝过了这段代码->1<h3>通过 a 标签的方式进行文件下载</h3><br>2<ahref="<%=basePath%>filesOut/Download/mst.txt">通过 a 标签下载文件 mst.txt</a>3<hr>4<h3>通过 Response 文件流的方式下载文件</h3>5<ahref="/FileUpload/fileDownload_servlet">通过文件流的方式下载文件 mst.txt</a>首先是第一种直接访问文件目录,此方式有缺陷,暴露了项目文件结构,造成安全隐患!点击便可下载!(如果浏览器可以读取文件,则会直接浏览器打开,我们可以右键->链接另存为选择路径保存)然后我们点击第二种下载方式->实际项目中,我们应该优先选择第二种方式,提高了安全性!从服务器直接下载到浏览器默认的保存文件目录!(本人在F:)到此,我们的spring mvc 文件上传下载已经实现!。
SpringMVC上传下载

SpringMVC上传下载,页面不刷新提交带附件的form表单周所周知,如果要提交的form表单内带有附件,那么需要设置属性enctype="multipart/form-data"当我们要实现页面不刷新提交form表单的时候需要用到ajax,但是ajax提交form表单的时候需要将表单值进行序列化操作($(formId).formSerialize())。
所以问题出现了,表单序列化后form表单内的文件在后台就接不到了。
所以带有附件的form表单不能用ajax提交。
既然我们要实现页面不刷新,那就需要模拟ajax进行提交form表单。
我是用隐藏的iframe实现的:前提条件:springmvc配置文件中加上<bean id="multipartResolver" class="monsMultipar tResolver"/>需要jar包:ant-1.6.5.jar;commons-fileupload-1.2.2.jar;commons-io-2.0.1.jar代码示例:上传文件jsp页面:<form id="form2"name="form2"target="hidden_frame"enctype="multipart/form-data"method="post"><!--two end--><h4 class="title_bg_b"><span class="title_left">软件升级</span></h4><ul class="form_list_ul clear"><li class="clear"><span class="list_li_span">软件安装包:</span><input type="file"id="file1"name="file1"/><input type="button"name="button2"onclick="up loadFile()"class="blue_btn"value="上传"/><span id="msgspan"></s pan><input type="button"name="button2"id="shengji" class="blue_btn"onclick="Upgrade()"title="正在实现"value="升级" /></li></ul></form><iframe name='hidden_frame'id="hidden_frame"style='display:none' width="99%"></iframe>js函数:function createPrompt(info){var msgw,msgh,bordercolor;msgw=400;//提示窗口的宽度msgh=100;//提示窗口的高度titleheight=25//提示窗口标题高度bordercolor="#336699";//提示窗口的边框颜色titlecolor="#99CCFF";//提示窗口的标题颜色var sWidth,sHeight;sWidth=document.body.offsetWidth;//浏览器工作区域内页面宽度或使用screen.width//屏幕的宽度sHeight=screen.height;//屏幕高度(垂直分辨率)//背景层(大小与窗口有效区域相同,即当弹出对话框时,背景显示为放射状透明灰色)var bgObj=document.createElement("div");//创建一个div对象(背景层)//动态创建元素,这里创建的是div//定义div属性,即相当于(相当于,但确不是,必须对对象属性进行定义//<div id="bgDiv"style="position:absolute; top:0; background-colo r:#777; filter:progid:DXImagesTransform.Microsoft.Alpha(style=3,opacit y=25,finishOpacity=75); opacity:0.6; left:0; width:918px; height:768px; z-index:10000;"></div>bgObj.setAttribute('id','bgDiv');bgObj.style.position="absolute";bgObj.style.top="0";bgObj.style.background="#777";bgObj.style.filter="progid:DXImageTransform.Microsoft.Alpha(style=3,opacity=25,finishOpacity=75";bgObj.style.opacity="0.6";bgObj.style.left="0";bgObj.style.width=sWidth + "px";bgObj.style.height=sHeight + "px";bgObj.style.zIndex = "10000";document.body.appendChild(bgObj);//在body内添加该div对象//创建一个div对象(提示框层)var msgObj=document.createElement("div")//定义div属性,即相当于//<div id="msgDiv"align="center"style="background-color:white; border:1px solid #336699; position:absolute; left:50%; top:50%; font:1 2px/1.6em Verdana,Geneva,Arial,Helvetica,sans-serif; margin-left:-225p x; margin-top:npx; width:400px; height:100px; text-align:center; line-h eight:25px; z-index:100001;"></div>msgObj.setAttribute("id","msgDiv");msgObj.setAttribute("align","center");msgObj.style.background="white";msgObj.style.border="1px solid " + bordercolor;msgObj.style.position = "absolute";msgObj.style.left = "50%";msgObj.style.top = "50%";msgObj.style.font="12px/1.6em Verdana, Geneva, Arial, Helvetica, s ans-serif";msgObj.style.marginLeft = "-225px" ;msgObj.style.marginTop = -75+document.documentElement.scrollTo p+"px";msgObj.style.width = msgw + "px";msgObj.style.height =msgh + "px";msgObj.style.textAlign = "center";msgObj.style.lineHeight ="25px";msgObj.style.zIndex = "10001";document.body.appendChild(msgObj);//在body内添加提示框div对象msgObjvar txt=document.createElement("p");//创建一个p对象(提示框提示信息)//定义p的属性,即相当于//<p style="margin:1em 0;"id="msgTxt">测试效果</p>txt.style.margin="1em 0"txt.setAttribute("id","msgTxt");txt.innerHTML=info;//来源于函数调用时的参数值document.getElementById("msgDiv" ).appendChild(txt);//在提示框div 中添加提示信息对象txtvar img=document.createElement("img");img.src="/resources/images/waiting.gif";img.style.width="150";img.style.height="25";img.style.align="center";document.getElementById("msgDiv").appendChild(img);}后台控制类:package mon;import javax.servlet.http.HttpServletRequest;import javax.servlet.http.HttpServletResponse;import org.springframework.stereotype.Controller;import org.springframework.web.bind.annotation.RequestMapping; import org.springframework.web.servlet.ModelAndView;import com.bohui.ipview.bean.FileUploadBean;/*** @author caohaicheng* @date 2014-3-20 上午11:56:35*/@Controller@RequestMapping(value = "fileOperate") public class FileOperateController {/*** 上传文件** @author caohaicheng* @date 2014-3-20 上午11:56:35* @param request* @return* @throws Exception@RequestMapping(value = "upload1")public ModelAndView upload(HttpServletRequest request) throws Exception {ModelAndView mv=new ModelAndView("sysconfig/fileUploadRes ult");FileUploadBean fup = new FileUploadBean();fup=FileOperateUtil.upload(request );mv.addObject("fileName",fup.getFileName() );mv.addObject("fileSize",fup.getFileSize() );mv.addObject("FileCreateDate", fup.getFileCreateDate());mv.addObject("returnDesc", fup.getReturnDesc());mv.addObject("returnFlag",fup.getReturnFlag() );return mv;}/*** 下载** @author caohaicheng* @date 2014-3-20 上午11:56:35* @param attachment* @param request* @param response* @return* @throws Exception*/@RequestMapping(value = "download")public ModelAndView download(HttpServletRequest request,HttpServletResponse response) throws Exception {String storeName = "201205051340364510870879724.zip";String realName = "Java设计模式.zip";String contentType = "application/octet-stream";FileOperateUtil.download(request, response, storeName, contentT ype,realName);return null;}}实现类:package mon;import java.io.BufferedInputStream;import java.io.BufferedOutputStream;import java.io.File;import java.io.FileInputStream;import java.text.SimpleDateFormat;import java.util.Date;import java.util.Iterator;import java.util.Map;import javax.servlet.http.HttpServletRequest;import javax.servlet.http.HttpServletResponse;import org.springframework.util.FileCopyUtils;import org.springframework.web.multipart.MultipartFile;import org.springframework.web.multipart.MultipartHttpServletReques t;import com.bohui.ipview.bean.FileUploadBean;import com.bohui.ipview.util.DateTimeUtil;/**** @author caohaicheng* @date 2014-3-20 上午11:56:35*/public class FileOperateUtil {private static final String UPLOADDIR = "/bh/update/";// 上传后放在哪个位置(linux)private static final String UPLOADDIR1 = "/bh/backup/";// 上传后放在哪个位置(linux)/*** 将上传的文件进行重命名** @author caohaicheng* @date 2014-3-20 上午11:56:35* @param name* @return*/private static String rename(String name) {Long now = Long.parseLong(new SimpleDateFormat("yyyyMMdd HHmmss").format(new Date()));Long random = (long) (Math.random() * now);String fileName = now + ""+ random;if(name.indexOf(".") != -1) {fileName += name.substring(stIndexOf("."));}return fileName;}/*** 压缩后的文件名** @author caohaicheng* @date 2014-3-20 上午11:56:35* @param name* @return*/private static String zipName(String name) { String prefix = "";if(name.indexOf(".") != -1) {prefix = name.substring(0, stIndexOf(".")); } else{prefix = name;}return prefix + ".zip";}/*** 上传文件** @author caohaicheng* @date 2014-3-20 上午11:56:35* @param request* @param params* @param values* @return* @throws Exception*/public static FileUploadBean upload(HttpServletRequest request) t hrows Exception {FileUploadBean fup = new FileUploadBean();MultipartHttpServletRequest mRequest = (MultipartHttpServletRe quest) request;Map<String, MultipartFile> fileMap = mRequest.getFileMap();//String uploadDir = request.getSession().getServletContext().getR ealPath("/")+ FileOperateUtil.UPLOADDIR; //上传至相对路径String uploadDir = FileOperateUtil.UPLOADDIR; //上传至绝对路径String uploadDir1 = FileOperateUtil.UPLOADDIR1; //上传至绝对路径,这个是备份文件夹File file = new File(uploadDir);File file1 = new File(uploadDir1);//如果不存在该路径就创建if(!file.exists()) {file.mkdir();}if(!file1.exists()) {file1.mkdir();}delAllFile(uploadDir); //删除完里面所有内容String fileName = null;int i = 0;for(Iterator<Map.Entry<String, MultipartFile>> it = fileMap.entr ySet().iterator(); it.hasNext(); i++) {Map.Entry<String, MultipartFile> entry = it.next();MultipartFile mFile = entry.getValue();fileName = mFile.getOriginalFilename();//获得文件名字//String storeName = rename(fileName);//对文件进行重命名String noZipName = uploadDir + fileName;//文件路径String noZipName1 = uploadDir1 + fileName;File uploadFile = new File(noZipName);File uploadFile1 = new File(noZipName1);//String zipName = zipName(noZipName);//获得压缩后的文件名字// 上传成为压缩文件/*ZipOutputStream outputStream = new ZipOutputStream(new BufferedOutputStream(new FileOutputStream(noZipName)));outputStream.putNextEntry(new ZipEntry(fileName));outputStream.setEncoding("GBK");FileCopyUtils.copy(mFile.getInputStream(), outputStream);*/try{FileCopyUtils.copy(mFile.getBytes(), uploadFile); } catch(Exception e) {fup.setReturnDesc("升级文件上传失败");fup.setReturnFlag(false);e.printStackTrace();return fup;}try{FileCopyUtils.copy(mFile.getBytes(), uploadFile1); } catch(Exception e) {fup.setReturnDesc("升级文件备份失败");fup.setReturnFlag(false);e.printStackTrace();return fup;}fup.setReturnFlag(true);fup.setFileName(fileName);fup.setFileCreateDate(DateTimeUtil.nowToString());fup.setFileSize( new File(noZipName).length());}return fup;}/*** 下载** @author caohaicheng* @date 2014-3-20 上午11:56:35* @param request* @param response* @param storeName* @param contentType* @param realName* @throws Exception*/public static void download(HttpServletRequest request, HttpServletResponse response, String storeName, String conten tType,String realName) throws Exception {response.setContentType("text/html;charset=UTF-8");request.setCharacterEncoding("UTF-8");BufferedInputStream bis = null;BufferedOutputStream bos = null;String ctxPath = request.getSession().getServletContext().getRealPath("/")+ FileOperateUtil.UPLOADDIR;String downLoadPath = ctxPath + storeName;long fileLength = new File(downLoadPath).length();response.setContentType(contentType);response.setHeader("Content-disposition", "attachment; filename= "+ new String(realName.getBytes("utf-8"), "ISO8859-1"));response.setHeader("Content-Length", String.valueOf(fileLength));bis = new BufferedInputStream(new FileInputStream(downLoadPath));bos = new BufferedOutputStream(response.getOutputStream());byte[] buff = new byte[2048];int bytesRead;while(-1!= (bytesRead = bis.read(buff, 0, buff.length))) {bos.write(buff, 0, bytesRead);}bis.close();bos.close();}//删除指定文件夹下所有文件//param path 文件夹完整绝对路径public static boolean delAllFile(String path) {boolean flag = false;File file = new File(path);if(!file.exists()) {return flag;}if(!file.isDirectory()) {return flag;}String[] tempList = file.list();File temp = null;for(int i = 0; i < tempList.length; i++) {if(path.endsWith(File.separator)) {temp = new File(path + tempList[i]);} else{temp = new File(path + File.separator + tempList[i]);}if(temp.isFile()) {temp.delete();}if(temp.isDirectory()) {delAllFile(path + "/"+ tempList[i]);//先删除文件夹里面的文件flag = true;}}return flag;}}上传状态实体类:package com.bohui.ipview.bean;public class FileUploadBean {private String fileName;private Long fileSize;private String FileCreateDate;private String returnDesc;private Boolean returnFlag;public String getFileName() {return fileName;}public void setFileName(String fileName) { this.fileName = fileName;}public String getFileCreateDate() {return FileCreateDate;}public void setFileCreateDate(String fileCreateDate) { FileCreateDate = fileCreateDate;}public String getReturnDesc() {return returnDesc;}public void setReturnDesc(String returnDesc) { this.returnDesc = returnDesc;}public Boolean getReturnFlag() {return returnFlag;}public void setReturnFlag(Boolean returnFlag) { this.returnFlag = returnFlag;}public long getFileSize() {return fileSize;}public void setFileSize(long l) {this.fileSize = l;}}子页面jsp文件fileUploadResult.jsp:<%@ page language="java"contentType="text/html; charset=UTF-8" pageEncoding="ISO-8859-1"%><!DOCTYPE html PUBLIC "-//W3C//DTD HTML 4.01Transitional//EN" "/TR/html4/loose.dtd"><html><head><meta http-equiv="Content-Type"content="text/html; charset=UTF-8"><title>Insert title here</title><script type="text/javascript">function parentTishi(){parent.tishi("${fileName}","${fileSize}","${FileCreateDate}","${returnDesc} ","${returnFlag}");}</script></head><body onload="parentTishi()" >这里是上传文件的返回页面.....</body> </html>。
springmvc_文件上传

<propertyname="maxInMemorySize"value="40960"/>
<propertyname="defaultEncoding"value="UTF-8"></property>
@RequestMapping("/upload")
publicStringfileUpload(@RequestParam("file")CommonsMultipartFilefile,HttpServletRequestrequest)throwsException{
//获e =file.getOriginalFilename();
intlen=0;
byte[]buffer=newbyte[400];
while((len=is.read(buffer))!=-1){
os.write(buffer, 0,len);
}
os.close();
is.close();
}catch(Exceptione) {
e.printStackTrace();
SpringMVC实现文件上传
1.通过commons-fileupload来实现
1)导入jar包,commons-fileupload-1.2.1.jar,
commons-io-2.0.1.jar
2)配置springmvc的配置解析器
<beanid="multipartResolver"class="monsMultipartResolver">
SpringBoot的文件上传功能与下载方式

SpringBoot的⽂件上传功能与下载⽅式Spring对⽂件上传做了简单的封装,就是⽤MultipartFile这个对象去接收⽂件,当然有很多种写法,下⾯会⼀⼀介绍。
⽂件的下载很简单,给⼀个链接就⾏,⽽这个链接怎么⽣成,也有很多⽅式,下⾯也会讲解下常⽤的⽅式。
application.properties 中需要添加下⾯的配置:spring.servlet.multipart.enabled=truespring.servlet.multipart.max-file-size=20MBspring.servlet.multipart.max-request-size=50MB这⾥,spring.servlet.multipart.max-file-size是对单个⽂件⼤⼩的限制。
spring.servlet.multipart.max-request-size是对单次请求的⼤⼩进⾏限制⾄此,已经可以正常的进⾏上传下载了,就剩下写代码了。
⽂件上传的⼏种⽅式在Controller的RequestMapping注解的⽅法参数中,直接将MultipartFile作为参数传递进来。
package com.cff.springbootwork.web.file;import org.slf4j.Logger;import org.slf4j.LoggerFactory;import org.springframework.beans.factory.annotation.Autowired;import org.springframework.beans.factory.annotation.Value;import org.springframework.web.bind.annotation.RequestMapping;import org.springframework.web.bind.annotation.RequestParam;import org.springframework.web.bind.annotation.RestController;import org.springframework.web.multipart.MultipartFile;import com.cff.springbootwork.dto.ResultModel;import com.cff.springbootwork.service.UploadService;@RestController@RequestMapping("/file")public class FileRest {private Logger log = LoggerFactory.getLogger(this.getClass());@Value("${upload.static.url}")private String uploadStaticUrl;@AutowiredUploadService uploadService;@RequestMapping("/upload")public ResultModel upload(@RequestParam("files") MultipartFile file) {try {if (file.isEmpty()) {return ResultModel.error("⽂件不能为空!");}String fileName = uploadService.saveUploadFile(file);return ResultModel.ok(uploadStaticUrl + fileName);} catch (Exception e) {e.printStackTrace();log.error("⽂件上传失败!", e);return ResultModel.error("⽂件上传失败!");}}}测试的时候,使⽤postman可以这样传参:2.2 多个⽂件上传在Controller的RequestMapping注解的⽅法参数中,直接将MultipartFile作为list传递进来。
SpringMVC实现文件下载功能

SpringMVC实现⽂件下载功能本⽂实例为⼤家分享了SpringMVC⽂件下载的具体代码,供⼤家参考,具体内容如下两个案例 1.为登录⽤户提供下载服务。
2.阻⽌仅通过输⼊⽹址即可获取下载。
⽂件下载概览 为了将⽂件发送给浏览器,我们需要在控制器中完成以下操作:对请求处理⽅法使⽤void返回类型,并且在⽅法中添加HttpServletResponse参数。
将响应的内容类型设为⽂件的内容类型。
Content-Type标题在某个实体的body中定义数据的类型,并包含媒体类型和⼦类型标识符。
如果不清楚内容类型,并且希望浏览器失始终显⽰保存对话框,则将它设为APPLICATION/OCTET-STREAM。
这个值时不区分⼤⼩写的。
添加⼀个名为Content-Disposition的HTTP响应标题,并赋值attachment;filename=fileName,这⾥的fileName是默认的⽂件名。
案例1:为登录⽤户提供下载服务Domain类package domain;public class Login {private String username;private String password;public String getUsername() {return username;}public void setUsername(String username) {ername = username;}public String getPassword() {return password;}public void setPassword(String password) {this.password = password;}}Controller控制器package controller;import domain.Login;import mons.logging.Log;import mons.logging.LogFactory;import org.springframework.stereotype.Controller;import org.springframework.ui.Model;import org.springframework.web.bind.annotation.ModelAttribute;import org.springframework.web.bind.annotation.RequestMapping;import javax.servlet.http.HttpServletRequest;import javax.servlet.http.HttpServletResponse;import javax.servlet.http.HttpSession;import java.io.*;@Controllerpublic class ResourceController {private static final Log logger = LogFactory.getLog(ResourceController.class);@RequestMapping(value = "/login")public String login(@ModelAttribute Login login, HttpSession session, Model model){model.addAttribute("login",new Login());if("ms".equals(login.getUsername())&&"123".equals(login.getPassword())){session.setAttribute("loggedIn",Boolean.TRUE);return "Main";}else{return "LoginForm";}}@RequestMapping(value = "/resource_download")public String downloadResource(HttpSession session, HttpServletRequest request, HttpServletResponse response) {if(session==null||session.getAttribute("loggedIn")==null){return "LoginForm";}String dataDirectory = request.getServletContext().getRealPath("/WEB-INF/data");File file = new File(dataDirectory,"Blog.zip");if(file.exists()){response.setContentType("application/octet-stream");response.addHeader("Content-Disposition","attachment;filename=Blog.zip");byte[] buffer = new byte[1024];FileInputStream fis =null;BufferedInputStream bis =null;try {fis = new FileInputStream(file);bis = new BufferedInputStream(fis);OutputStream os =response.getOutputStream();int i =bis.read(buffer);while (i!=-1) {os.write(buffer, 0, i);i=bis.read(buffer);}} catch (FileNotFoundException e) {e.printStackTrace();} catch (IOException e) {e.printStackTrace();}finally {try {bis.close();} catch (IOException e) {e.printStackTrace();}try {fis.close();} catch (IOException e) {e.printStackTrace();}}}return null;}}编写视图Main.jsp<%@ page contentType="text/html;charset=UTF-8" language="java" %><html><head><title>DownPage</title></head><body><h4>点击链接下载⽂件</h4><p><a href="resource_download" rel="external nofollow" >Down</a></p></body></html>LoginForm.jsp<%@ page contentType="text/html;charset=UTF-8" language="java" %><html><head><title>登录页⾯</title></head><body><form:form commandName="login" action="login" method="post">账号: <br><form:input path="username" cssErrorClass="error" id="username"/><br> 密码: <br><form:input path="password" cssErrorClass="error" id="password"/><br> <input type="submit" value="提交"></form:form></body></html>案例2:阻⽌仅通过输⼊⽹址即可获取下载@RequestMapping(value = "/resource_download")public String downloadResource(HttpSession session, HttpServletRequest request, HttpServletResponse response,@RequestHeader String refuer ){if(refer==null) //通过判断refer来浏览器输⼊⽹址就能下载图⽚的情况{ return "LoginForm";}String dataDirectory = request.getServletContext().getRealPath("/WEB-INF/data");File file = new File(dataDirectory,"Blog.zip");if(file.exists()){response.setContentType("application/octet-stream");response.addHeader("Content-Disposition","attachment;filename=Blog.zip");byte[] buffer = new byte[1024];FileInputStream fis =null;BufferedInputStream bis =null;try {fis = new FileInputStream(file);bis = new BufferedInputStream(fis);OutputStream os =response.getOutputStream();int i =bis.read(buffer);while (i!=-1) {os.write(buffer, 0, i);i=bis.read(buffer);}} catch (FileNotFoundException e) {e.printStackTrace();} catch (IOException e) {e.printStackTrace();}finally {try {bis.close();} catch (IOException e) {e.printStackTrace();}try {fis.close();} catch (IOException e) {e.printStackTrace();}}}return null;}}以上就是本⽂的全部内容,希望对⼤家的学习有所帮助,也希望⼤家多多⽀持。
springmvc文件下载

springmvc⽂件下载⽂件下载就是将⽂件服务器中的⽂件下载到本地,在springmvc中要实现⽂件下载可分为两个步骤:第⼀步:在客户端使⽤⼀个⽂件下载超链接,链接⾥⾯的href属性指向后台下载⽂件的⽅法以及⽂件名;第⼆步:在后台controller类中,使⽤springmvc提供的⽂件下载⽅法进⾏下载。
springmvc提供了⼀个ResponseEntity类型的对象,使⽤它可以很⽅便的定义返回的HttpHeaders对象和HttpStatus对象,通过对这两个对象的设置,即可完成下载⽂件时所需的配置信息。
⽂件下载的代码如下所⽰:public ResponseEntity<byte[]> downFile(HttpServletRequest request, String filename) throws IOException {//指定要下载的⽂件所在路径String path = request.getServletContext().getRealPath("/upload/");//创建该⽂件对象File file = new File(path + File.separator + filename);//设置响应头HttpHeaders headers = new HttpHeaders();//通知浏览器以下载的⽅式打开⽂件headers.setContentDispositionFormData("attachment", filename);//定义以流的形式下载返回⽂件数据headers.setContentType(MediaType.APPLICATION_OCTET_STREAM);//使⽤springmvc框架的ResponseEntity对象封装返回数据return new ResponseEntity<byte[]>(FileUtils.readFileToByteArray(file), headers, HttpStatus.OK);}说明:在downFile⽅法中,⾸先根据⽂件路径和需要下载的⽂件名来创建⽂件对象,然后对响应头中⽂件下载时的打开⽅式以及下载⽅式进⾏了设置,最后返回ResponseEntity封装的下载结果对象。
关于springmvc下服务器文件打包成zip格式下载功能
关于springmvc下服务器文件打包成zip格式下载功能近期,项目要求把服务器存储的上传文件,批量下载到本地.参考网上资料,实现了服务器文件打包成压缩文件然后down到本地功能.具体代码实现:1、在服务器端创建一个临时zip格式文件2、用jdk自带的API将服务器所有文件输入到zip文件中3、将zip文件下载到本地,并删除服务器端zip文件@RequestMapping(value = "/downloadZip.do")public String downloadFiles(String tcLwIds, HttpServletRequ est request, HttpServletResponse response)throws ServletException, IOException {List<File> files = new ArrayList<File>();File Allfile = new File(request.getSession().getServletContext ().getRealPath("/") + "upload/");if (Allfile.exists()) {File[] fileArr = Allfile.listFiles();for (File file2 : fileArr) {files.add(file2);}}String fileName = UUID.randomUUID().toString() + ".zip";// 在服务器端创建打包下载的临时文件String outFilePath = request.getSession().getServletContext ().getRealPath("/") + "upload/";File fileZip = new File(outFilePath + fileName);// 文件输出流FileOutputStream outStream = new FileOutputStream(fileZip);// 压缩流ZipOutputStream toClient = new ZipOutputStream(outStrea m);// toClient.setEncoding("gbk");zipFile(files, toClient);toClient.close();outStream.close();this.downloadFile(fileZip, response, true);return null;}•1•2•3•4•5•6•7•8•9•10•11•12•13•14•15•16•17•18•19•20•21•22•23•24•25•26•27•28将服务器文件存到压缩包中public static void zipFile(List<File> files, ZipOutputStream o utputStream) throws IOException, ServletException { try {int size = files.size();// 压缩列表中的文件for (int i = 0; i < size; i++) {File file = (File) files.get(i);zipFile(file, outputStream);}} catch (IOException e) {throw e;}}public static void zipFile(File inputFile, ZipOutputStream out putstream) throws IOException, ServletException {try {if (inputFile.exists()) {if (inputFile.isFile()) {FileInputStream inStream = new FileInputStream(inputFile);BufferedInputStream bInStream = new BufferedInputStream(inStream);ZipEntry entry = new ZipEntry(inputFile.getName());outputstream.putNextEntry(entry);final int MAX_BYTE = 10 * 1024 * 1024; // 最大的流为10Mlong streamT otal = 0; // 接受流的容量int streamNum = 0; // 流需要分开的数量int leaveByte = 0; // 文件剩下的字符数byte[] inOutbyte; // byte数组接受文件的数据streamTotal = bInStream.available(); // 通过available方法取得流的最大字符数streamNum = (int) Math.floor(streamTotal / MAX_BYTE); // 取得流文件需要分开的数量leaveByte = (int) streamTotal % MAX_BYTE; // 分开文件之后,剩余的数量if (streamNum > 0) {for (int j = 0; j < streamNum; ++j) {inOutbyte = new byte[MAX_BYTE];// 读入流,保存在byte数组bInStream.read(inOutbyte, 0, MAX_BYTE);outputstream.write(inOutbyte, 0, MAX_BYTE); // 写出流}}// 写出剩下的流数据inOutbyte = new byte[leaveByte];bInStream.read(inOutbyte, 0, leaveByte);outputstream.write(inOutbyte);outputstream.closeEntry(); // Closes the current ZIP entry// and positions the stream for// writing the next entrybInStream.close(); // 关闭inStream.close();}} else {throw new ServletException("文件不存在!"); }} catch (IOException e) {throw e;}}•1•2•3•4•5•6•7•8•9•10•11•12•13•14•15•16•17•18•20 •21 •22 •23 •24 •25 •26 •27 •28 •29 •30 •31 •32 •33 •34 •35 •36 •37 •38 •39 •40 •41 •42 •43 •44 •45 •46 •47 •48•50•51•52•53•54•55•56下载文件public void downloadFile(File file,HttpServletResponse resp onse,boolean isDelete) {try {// 以流的形式下载文件。
springmvc文件上传

一、单个文件上传,除了常规引用jar包外,还需要在spring配置文件中加上如下的配置:第一步:<!-- 支持文件上传 --><bean id="multipartResolver"class="monsMultipart Resolver"><property name="defaultEncoding"value="utf-8"></property><!-- 上传文件的最大值 --><property name="maxUploadSize"value="10485760000"></property><!-- 缓存大小 --><property name="maxInMemorySize"value="40960"></property> </bean>第二步:Upload.jsp<form action="udLoad/upload.do"method="post"enctype="multipart/form-data">选择:<input type="file"name="myfile"id="myfile"><br/><input type="submit"value="提交"></form>第三步:controller@RequestMapping("/upload")public String upload(Model model, HttpServletRequest request, //此时传的是参数,不是对象@RequestParam(value = "myfile") MultipartFile multipartFile)throws IOException {System.out.println("进入该方法");// 获取上传的文件保存的路径String path =request.getSession().getServletContext().getRealPath("upload");// 获取上传的文件的名称String filename = multipartFile.getOriginalFilename();//创建文件夹uploadFile targetFile = new File(path, filename);//判断文件夹是否已经存在,如果已经存在了重新建if (!targetFile.exists()) {targetFile.mkdirs();}multipartFile.transferTo(targetFile);model.addAttribute("fileUrl", request.getContextPath() +"/upload/" + filename);return"voteCount/result";}。
Springmvc实现文件下载2种实现方法

Springmvc实现⽂件下载2种实现⽅法使⽤springmvc实现⽂件下载有两种⽅式,都需要设置response的Content-Disposition为attachment;filename=test2.png 第⼀种可以直接向response的输出流中写⼊对应的⽂件流第⼆种可以使⽤ ResponseEntity<byte[]>来向前端返回⽂件⼀、使⽤response@RestController@RequestMapping("/download")public class DownloadController {@RequestMapping("/d1")public ResultVo<String> downloadFile(HttpServletResponse response){String fileName="test.png";try {//获取页⾯输出流ServletOutputStream outputStream = response.getOutputStream();//读取⽂件byte[] bytes = FileUtils.readFileToByteArray(new File("D:\\my-study\\test2.png"));//向输出流写⽂件//写之前设置响应流以附件的形式打开返回值,这样可以保证前边打开⽂件出错时异常可以返回给前台response.setHeader("Content-Disposition","attachment;filename="+fileName);outputStream.write(bytes);outputStream.flush();outputStream.close();return ResultVoUtil.success("success");} catch (IOException e) {return ResultVoUtil.error(e);}}}推荐使⽤这种⽅式,这种⽅式可以以json形式给前台返回提⽰信息。
【SpringFramework】SpringMVC实现文件上传

【SpringFramework】SpringMVC实现⽂件上传SpringMVC 实现⽂件上传⽂件上传回顾实现步骤:客户端:发送 post 请求,告诉服务器要上传什么⽂件服务器:要有⼀个 form 标签,method=post 请求,form 标签的 encType 属性值必须为 multipart/form-data 值在 form 标签中使⽤ input type=file 添加上传的⽂件接收并处理上传的⽂件⽂件上传时 HTTP 协议说明:Content-type 表⽰提交的数据类型multipart/form-data 表⽰提交的数据,以多段(每⼀个表单项代表⼀个数据段)的形式进⾏拼接,然后以⼆进制流的形式发送给服务器boundary 表⽰每段数据的分隔符,它的值是有浏览器随机⽣成的,它是每段数据的分割符实现上传下载功能常⽤两个包:commons-fileupload-1.3.1.jarcommons-io-2.4.jarFileUploadController.java@Controller@RequestMapping("/file")public class FileUploadController {/*** ⽂件上传回顾* @return*/@RequestMapping(path = {"/upload1"})public String upload1(HttpServletRequest request) throws Exception {System.out.println("called upload1...");String path = request.getSession().getServletContext().getRealPath("/uploads"); // 获取到要上传的⽂件⽬录System.out.println(path);File file = new File(path);if (!file.exists()) {file.mkdirs();}DiskFileItemFactory factory = new DiskFileItemFactory(); // 创建磁盘⽂件项⼯⼚ServletFileUpload fileUpload = new ServletFileUpload(factory);List<FileItem> fileItems = fileUpload.parseRequest(request); // 解析request对象for (FileItem fileItem : fileItems) {if (fileItem.isFormField()) { // 判断⽂件项是普通字段,还是上传的⽂件System.out.println(fileItem.getName());} else {String itemName = fileItem.getName(); // 获取到上传⽂件的名称itemName = UUID.randomUUID().toString() + "-" + itemName; // 把⽂件名唯⼀化fileItem.write(new File(file, itemName)); // 上传⽂件fileItem.delete();}}return "success";}}index.jsp<%@ page contentType="text/html;charset=UTF-8" language="java" %><html><head><title>⽂件上传</title></head><body><h3>⽂件上传回顾</h3><form action="file/upload1" method="post" enctype="multipart/form-data">名称:<input type="text" name="picName"/><br/>图⽚:<input type="file" name="picFile"/><br><input type="submit" value="上传⽂件"/></form></body></html>SpringMVC 传统⽅式的⽂件上传传统⽅式的⽂件上传,指的是我们上传的⽂件和访问的应⽤存在于同⼀台服务器上。
详解SpringMVC使用MultipartFile实现文件的上传
详解SpringMVC使⽤MultipartFile实现⽂件的上传如果需要实现跨服务器上传⽂件,就是将我们本地的⽂件上传到资源服务器上,⽐较好的办法就是通过ftp上传。
这⾥是结合SpringMVC+ftp的形式上传的。
我们需要先懂得如何配置springMVC,然后在配置ftp,最后再结合MultipartFile上传⽂件。
springMVC上传需要⼏个关键jar包,spring以及关联包可以⾃⼰配置,这⾥主要说明关键的jar包1:spring-web-3.2.9.RELEASE.jar (spring的关键jar包,版本可以⾃⼰选择)2:commons-io-2.2.jar (项⽬中⽤来处理IO的⼀些⼯具类包)配置⽂件SpringMVC是⽤MultipartFile来进⾏⽂件上传的,因此我们先要配置MultipartResolver,⽤于处理表单中的file<!-- 上传⽂件解释器 --><bean id="multipartResolver" class="monsMultipartResolver"><property name="defaultEncoding" value="utf-8" /><property name="maxUploadSize" value="10485760" /><property name="maxInMemorySize" value="4096" /><property name="resolveLazily" value="true" /></bean>其中属性详解:defaultEncoding配置请求的编码格式,默认为iso-8859-1maxUploadSize配置⽂件的最⼤单位,单位为字节maxInMemorySize配置上传⽂件的缓存,单位为字节resolveLazily属性启⽤是为了推迟⽂件解析,以便在UploadAction 中捕获⽂件⼤⼩异常页⾯配置在页⾯的form中加上enctype="multipart/form-data"<form id="" name="" method="post" action="" enctype="multipart/form-data">表单标签中设置enctype="multipart/form-data"来确保匿名上载⽂件的正确编码。
SpringBoot上传和下载文件的原理解析
SpringBoot上传和下载⽂件的原理解析技术概述我们的项⽬是实现⼀个论坛。
在论坛上发布博客时应该要可以上传⽂件,⽤户阅读博客是应该要可以下载⽂件。
于是我去学习了SpringBoot的上传和下载⽂件,我感觉技术的难点在于使⽤图床并隐藏⽂件真实的存放地址。
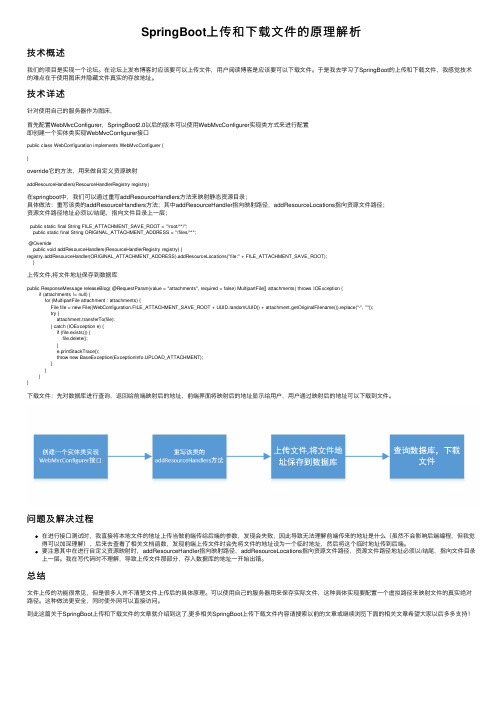
技术详述针对使⽤⾃⼰的服务器作为图床,⾸先配置WebMvcConfigurer,SpringBoot2.0以后的版本可以使⽤WebMvcConfigurer实现类⽅式来进⾏配置即创建⼀个实体类实现WebMvcConfigurer接⼝public class WebConfiguration implements WebMvcConfigurer {}override它的⽅法,⽤来做⾃定义资源映射addResourceHandlers(ResourceHandlerRegistry registry)在springboot中,我们可以通过重写addResourceHandlers⽅法来映射静态资源⽬录;具体做法:重写该类的addResourceHandlers⽅法;其中addResourceHandler指向映射路径,addResourceLocations指向资源⽂件路径;资源⽂件路径地址必须以/结尾,指向⽂件⽬录上⼀层;public static final String FILE_ATTACHMENT_SAVE_ROOT = "/root/**/";public static final String ORIGINAL_ATTACHMENT_ADDRESS = "/files/**";@Overridepublic void addResourceHandlers(ResourceHandlerRegistry registry) {registry.addResourceHandler(ORIGINAL_ATTACHMENT_ADDRESS).addResourceLocations("file:" + FILE_ATTACHMENT_SAVE_ROOT);}上传⽂件,将⽂件地址保存到数据库public ResponseMessage releaseBlog( @RequestParam(value = "attachments", required = false) MultipartFile[] attachments) throws IOException {if (attachments != null) {for (MultipartFile attachment : attachments) {File file = new File((WebConfiguration.FILE_ATTACHMENT_SAVE_ROOT + UUID.randomUUID() + attachment.getOriginalFilename()).replace("-", ""));try {attachment.transferTo(file);} catch (IOException e) {if (file.exists()) {file.delete();}e.printStackTrace();throw new BaseException(ExceptionInfo.UPLOAD_ATTACHMENT);}}}}下载⽂件:先对数据库进⾏查询,返回给前端映射后的地址,前端界⾯将映射后的地址显⽰给⽤户,⽤户通过映射后的地址可以下载到⽂件。
SpringMVC基于注解方式实现上传下载
SpringMVC基于注解⽅式实现上传下载⽬录⼀、⽂件下载1-1、servlet原⽣⽅式下载1-2、使⽤ResponseEntity实现下载⼆、⽂件上传2-1、添加commons-fileupload依赖2-2、配置spring.xml注⼊CommonsMultipartResolver⽂件上传解析器2-3、⽂件上传⼀、⽂件下载1-1、servlet原⽣⽅式下载/*** 基于servlet api的⽂件下载*/@RequestMapping("/download")public String download(HttpServletRequest request,HttpServletResponse response) throws IOException {// 获得当前项⽬路径下的下载⽂件(真实开发中⽂件名肯定是从数据中读取的)String realPath =request.getServletContext().getRealPath("/file/20181129204254948.png");// 根据⽂件路径封装成了File对象File tmpFile=new File(realPath);// 可以直接根据File对象获得⽂件名String fileName = tmpFile.getName();// 设置响应头 content-disposition:就是设置⽂件下载的打开⽅式,默认会在⽹页上打开,// 设置attachment;filename= 就是为了以下载⽅式来打开⽂件// "UTF-8"设置如果⽂件名有中⽂就不会乱码response.setHeader("content-disposition", "attachment;filename="+ URLEncoder.encode(fileName, "UTF-8"));// 根据⽂件路径封装成⽂件输⼊流InputStream in = new FileInputStream(realPath);int len = 0;// 声明了⼀个1KB的字节的缓冲区byte[] buffer = new byte[1024];// 获取输出流OutputStream out = response.getOutputStream();// 循环读取⽂件,每次读1KB,避免内存溢出while ((len = in.read(buffer)) > 0) {// 往客户端写⼊out.write(buffer,0,len);//将缓冲区的数据输出到客户端浏览器}in.close();return null;}以上代码中需要注意的地⽅我们设置了响应头response.setHeader("content-disposition", "attachment;filename="+ URLEncoder.encode(fileName, "UTF-8"));其中content-disposition可以让前端以⽂件的形式下载,否则就会直接在浏览器打开了1-2、使⽤ResponseEntity实现下载可以同时定制响应数据的内容、响应头以及响应状态码1-2-1、使⽤ResponseEntity实现响应内容的定制。
SpringMVC-文件上传和下载
SpringMVC-⽂件上传和下载⽂件上传和下载⽬录1. ⽂件上传1. 前端设计前端表单要求:为了能上传⽂件,必须将表单的method设置为POST,并将enctype设置为multipart/form-data。
只有在这样的情况下,浏览器才会把⽤户选择的⽂件以⼆进制数据发送给服务器;<%--Created by IntelliJ IDEA.User: WangDate: 2020/9/11Time: 16:48To change this template use File | Settings | File Templates.--%><%@ page contentType="text/html;charset=UTF-8" language="java" %><html><head><title>$Title$</title></head><body><form action="${pageContext.request.contextPath}/upload" enctype="multipart/form-data" method="post"><input type="file" name="file"><input type="submit" value="upload"></form></body></html>2. 导⼊依赖commons-fileupload<dependencies><!--⽂件上传--><dependency><groupId>commons-fileupload</groupId><artifactId>commons-fileupload</artifactId><version>1.4</version></dependency><!--servlet-api导⼊⾼版本的--><dependency><groupId>javax.servlet</groupId><artifactId>javax.servlet-api</artifactId><version>4.0.1</version></dependency></dependencies>3. 配置Spring<?xml version="1.0" encoding="UTF-8"?><beans xmlns="/schema/beans"xmlns:xsi="/2001/XMLSchema-instance"xmlns:context="/schema/context"xmlns:mvc="/schema/mvc"xsi:schemaLocation="/schema/beans/schema/beans/spring-beans.xsd/schema/contexthttps:///schema/context/spring-context.xsd/schema/mvchttps:///schema/mvc/spring-mvc.xsd"><context:component-scan base-package="com.wang.controller"/><mvc:annotation-driven/><mvc:default-servlet-handler/><bean class="org.springframework.web.servlet.view.InternalResourceViewResolver"id="internalResourceViewResolver"><property name="prefix" value="/WEB-INF/jsp/"/><property name="suffix" value=".jsp"/></bean><mvc:annotation-driven><mvc:message-converters register-defaults="true"><bean class="org.springframework.http.converter.StringHttpMessageConverter"><constructor-arg value="UTF-8"/></bean><bean class="org.springframework.http.converter.json.MappingJackson2HttpMessageConverter"><property name="objectMapper"><bean class="org.springframework.http.converter.json.Jackson2ObjectMapperFactoryBean"><property name="failOnEmptyBeans" value="false"/></bean></property></bean></mvc:message-converters></mvc:annotation-driven><!--⽂件上传配置--><bean id="multipartResolver" class="monsMultipartResolver"><!-- 请求的编码格式, 必须和jsp的pageEncoding属性⼀致, 以便正确读取表单的内容, 默认为ISO-8859-1 --><property name="defaultEncoding" value="utf-8"/><!-- 上传⽂件⼤⼩上限, 单位为字节 (10485760 = 10M) --><property name="maxUploadSize" value="10485760"/><property name="maxInMemorySize" value="40960"/></bean></beans>注意这个bena的id必须为:multipartResolver ,否则上传⽂件会报400的错误!4. 编写controller有两种上传的⽅式1. getOriginalFilename⽅法package com.wang.controller;import org.springframework.web.bind.annotation.RequestMapping;import org.springframework.web.bind.annotation.RequestParam;import org.springframework.web.bind.annotation.RestController;import monsMultipartFile;import javax.servlet.http.HttpServletRequest;import javax.servlet.http.HttpServletResponse;import java.io.*;import .URLEncoder;@RestControllerpublic class FileController {//@RequestParam("file") 将name=file控件得到的⽂件封装成CommonsMultipartFile 对象//批量上传CommonsMultipartFile则为数组即可@RequestMapping("/upload")public String fileUpload(@RequestParam("file") CommonsMultipartFile file, HttpServletRequest request) throws IOException { //获取⽂件名 : file.getOriginalFilename();String uploadFileName = file.getOriginalFilename();//如果⽂件名为空,直接回到⾸页!if ("".equals(uploadFileName)) {return "redirect:/index.jsp";}System.out.println("上传⽂件名 : " + uploadFileName);//上传路径保存设置String path = request.getServletContext().getRealPath("/upload");//如果路径不存在,创建⼀个File realPath = new File(path);if (!realPath.exists()) {realPath.mkdir();}System.out.println("上传⽂件保存地址:" + realPath);InputStream is = file.getInputStream(); //⽂件输⼊流OutputStream os = new FileOutputStream(new File(realPath, uploadFileName)); //⽂件输出流//读取写出int len = 0;byte[] buffer = new byte[1024];while ((len = is.read(buffer)) != -1) {os.write(buffer, 0, len);os.flush();}os.close();is.close();return "redirect:/index.jsp";}}2. Tansto⽅法package com.wang.controller;import org.springframework.web.bind.annotation.RequestMapping;import org.springframework.web.bind.annotation.RequestParam;import org.springframework.web.bind.annotation.RestController;import monsMultipartFile;import javax.servlet.http.HttpServletRequest;import javax.servlet.http.HttpServletResponse;import java.io.*;import .URLEncoder;@RestControllerpublic class FileController {/** 采⽤file.Transto 来保存上传的⽂件*/@RequestMapping("/upload2")public String fileUpload2(@RequestParam("file") CommonsMultipartFile file, HttpServletRequest request) throws IOException { //上传路径保存设置String path = request.getServletContext().getRealPath("/upload");File realPath = new File(path);if (!realPath.exists()) {realPath.mkdir();}//上传⽂件地址System.out.println("上传⽂件保存地址:" + realPath);//通过CommonsMultipartFile的⽅法直接写⽂件(注意这个时候)file.transferTo(new File(realPath + "/" + file.getOriginalFilename()));return "redirect:/index.jsp";}}2. ⽂件下载1. 前端设计利⽤a标签实现跳转<%--Created by IntelliJ IDEA.User: WangDate: 2020/9/11Time: 16:48To change this template use File | Settings | File Templates.--%><%@ page contentType="text/html;charset=UTF-8" language="java" %><html><head><title>$Title$</title></head><body><a href="${pageContext.request.contextPath}/download">点击下载</a></body></html>2. controller设置⽂件下载步骤:1、设置 response 响应头2、读取⽂件 -- InputStream3、写出⽂件 -- OutputStream4、执⾏操作5、关闭流(先开后关)package com.wang.controller;import org.springframework.web.bind.annotation.RequestMapping;import org.springframework.web.bind.annotation.RequestParam;import org.springframework.web.bind.annotation.RestController;import monsMultipartFile;import javax.servlet.http.HttpServletRequest;import javax.servlet.http.HttpServletResponse;import java.io.*;import .URLEncoder;@RestControllerpublic class FileController {@RequestMapping(value="/download")public String downloads(HttpServletResponse response , HttpServletRequest request) throws Exception {//要下载的图⽚地址String path = request.getServletContext().getRealPath("/upload");String fileName = "基础语法.jpg";//1、设置response 响应头response.reset(); //设置页⾯不缓存,清空bufferresponse.setCharacterEncoding("UTF-8"); //字符编码response.setContentType("multipart/form-data"); //⼆进制传输数据//设置响应头response.setHeader("Content-Disposition","attachment;fileName=" + URLEncoder.encode(fileName, "UTF-8")); File file = new File(path, fileName);//2、读取⽂件--输⼊流InputStream input = new FileInputStream(file);//3、写出⽂件--输出流OutputStream out = response.getOutputStream();byte[] buff = new byte[1024];int index = 0;//4、执⾏写出操作while ((index = input.read(buff)) != -1) {out.write(buff, 0, index);out.flush();}out.close();input.close();return null;}}。
- 1、下载文档前请自行甄别文档内容的完整性,平台不提供额外的编辑、内容补充、找答案等附加服务。
- 2、"仅部分预览"的文档,不可在线预览部分如存在完整性等问题,可反馈申请退款(可完整预览的文档不适用该条件!)。
- 3、如文档侵犯您的权益,请联系客服反馈,我们会尽快为您处理(人工客服工作时间:9:00-18:30)。
相关资源下载地址:/detail/geloin/4506561本文基于Spring MVC 注解,让Spring跑起来。
(1) 导入jar包:ant.jar、commons-fileupload.jar、connom-io.jar。
(2) 在src/context/dispatcher.xml中添加[java]view plaincopyprint?1.<bean id="multipartResolver"2.class="monsMultipartResolver"3. p:defaultEncoding="UTF-8" />注意,需要在头部添加内容,添加后如下所示:[java]view plaincopyprint?1.<beans default-lazy-init="true"2. xmlns="/schema/beans"3. xmlns:p="/schema/p"4. xmlns:xsi="/2001/XMLSchema-instance"5. xmlns:context="/schema/context"6. xmlns:mvc="/schema/mvc"7. xsi:schemaLocation="8. /schema/beans9. /schema/beans/spring-beans-3.0.xsd10. /schema/mvc11. /schema/mvc/spring-mvc-3.0.xsd12. /schema/context13. /schema/context/spring-context-3.0.xsd">(3) 添加工具类FileOperateUtil.java[java]view plaincopyprint?1./**2. *3. * @author geloin4. * @date 2012-5-5 下午12:05:575. */6.package com.geloin.spring.util;7.8.import java.io.BufferedInputStream;9.import java.io.BufferedOutputStream;10.import java.io.File;11.import java.io.FileInputStream;12.import java.io.FileOutputStream;13.import java.text.SimpleDateFormat;14.import java.util.ArrayList;15.import java.util.Date;16.import java.util.HashMap;17.import java.util.Iterator;18.import java.util.List;19.import java.util.Map;20.21.import javax.servlet.http.HttpServletRequest;22.import javax.servlet.http.HttpServletResponse;23.24.import org.apache.tools.zip.ZipEntry;25.import org.apache.tools.zip.ZipOutputStream;26.import org.springframework.util.FileCopyUtils;27.import org.springframework.web.multipart.MultipartFile;28.import org.springframework.web.multipart.MultipartHttpServletRequest;29.30./**31. *32. * @author geloin33. * @date 2012-5-5 下午12:05:5734. */35.public class FileOperateUtil {36.private static final String REALNAME = "realName";37.private static final String STORENAME = "storeName";38.private static final String SIZE = "size";39.private static final String SUFFIX = "suffix";40.private static final String CONTENTTYPE = "contentType";41.private static final String CREATETIME = "createTime";42.private static final String UPLOADDIR = "uploadDir/";43.44./**45. * 将上传的文件进行重命名46. *47. * @author geloin48. * @date 2012-3-29 下午3:39:5349. * @param name50. * @return51. */52.private static String rename(String name) {53.54. Long now = Long.parseLong(new SimpleDateFormat("yyyyMMddHHmmss")55. .format(new Date()));56. Long random = (long) (Math.random() * now);57. String fileName = now + "" + random;59.if (name.indexOf(".") != -1) {60. fileName += name.substring(stIndexOf("."));61. }62.63.return fileName;64. }65.66./**67. * 压缩后的文件名68. *69. * @author geloin70. * @date 2012-3-29 下午6:21:3271. * @param name72. * @return73. */74.private static String zipName(String name) {75. String prefix = "";76.if (name.indexOf(".") != -1) {77. prefix = name.substring(0, stIndexOf("."));78. } else {79. prefix = name;80. }81.return prefix + ".zip";82. }83.84./**85. * 上传文件86. *87. * @author geloin88. * @date 2012-5-5 下午12:25:4789. * @param request90. * @param params91. * @param values92. * @return93. * @throws Exception94. */95.public static List<Map<String, Object>> upload(HttpServletRequest request,96. String[] params, Map<String, Object[]> values) throws Exception {97.98. List<Map<String, Object>> result = new ArrayList<Map<String, Object>>();100. MultipartHttpServletRequest mRequest = (MultipartHttpServletReq uest) request;101. Map<String, MultipartFile> fileMap = mRequest.getFileMap(); 102.103. String uploadDir = request.getSession().getServletContext() 104. .getRealPath("/")105. + FileOperateUtil.UPLOADDIR;106. File file = new File(uploadDir);107.108.if (!file.exists()) {109. file.mkdir();110. }111.112. String fileName = null;113.int i = 0;114.for (Iterator<Map.Entry<String, MultipartFile>> it = fileMap.entrySet ()115. .iterator(); it.hasNext(); i++) {116.117. Map.Entry<String, MultipartFile> entry = it.next();118. MultipartFile mFile = entry.getValue();119.120. fileName = mFile.getOriginalFilename();121.122. String storeName = rename(fileName);123.124. String noZipName = uploadDir + storeName;125. String zipName = zipName(noZipName);126.127.// 上传成为压缩文件128. ZipOutputStream outputStream = new ZipOutputStream( 129.new BufferedOutputStream(new FileOutputStream(zipName)));130. outputStream.putNextEntry(new ZipEntry(fileName));131. outputStream.setEncoding("GBK");132.133. FileCopyUtils.copy(mFile.getInputStream(), outputStream); 134.135. Map<String, Object> map = new HashMap<String, Object>(); 136.// 固定参数值对137. map.put(FileOperateUtil.REALNAME, zipName(fileName)); 138. map.put(FileOperateUtil.STORENAME, zipName(storeName)); 139. map.put(FileOperateUtil.SIZE, new File(zipName).length());140. map.put(FileOperateUtil.SUFFIX, "zip");141. map.put(FileOperateUtil.CONTENTTYPE, "application/octet-stre am");142. map.put(FileOperateUtil.CREATETIME, new Date());143.144.// 自定义参数值对145.for (String param : params) {146. map.put(param, values.get(param)[i]);147. }148.149. result.add(map);150. }151.return result;152. }153.154./**155. * 下载156. *157. * @author geloin158. * @date 2012-5-5 下午12:25:39159. * @param request160. * @param response161. * @param storeName162. * @param contentType163. * @param realName164. * @throws Exception165. */166.public static void download(HttpServletRequest request,167. HttpServletResponse response, String storeName, String conten tType,168. String realName) throws Exception {169. response.setContentType("text/html;charset=UTF-8");170. request.setCharacterEncoding("UTF-8");171. BufferedInputStream bis = null;172. BufferedOutputStream bos = null;173.174. String ctxPath = request.getSession().getServletContext() 175. .getRealPath("/")176. + FileOperateUtil.UPLOADDIR;177. String downLoadPath = ctxPath + storeName;178.179.long fileLength = new File(downLoadPath).length();180.181. response.setContentType(contentType);182. response.setHeader("Content-disposition", "attachment; filename="183. + new String(realName.getBytes("utf-8"), "ISO8859-1"));184. response.setHeader("Content-Length", String.valueOf(fileLength));185.186. bis = new BufferedInputStream(new FileInputStream(downLoadPa th));187. bos = new BufferedOutputStream(response.getOutputStream());188.byte[] buff = new byte[2048];189.int bytesRead;190.while (-1 != (bytesRead = bis.read(buff, 0, buff.length))) {191. bos.write(buff, 0, bytesRead);192. }193. bis.close();194. bos.close();195. }196.}可完全使用而不必改变该类,需要注意的是,该类中设定将上传后的文件放置在WebContent/uploadDir下。
