2012年6月中国非制造业商务活动指数为56.7%
西蒙56系列产品介绍

爬电距离、电气间隙和穿 ≥3mm
通密封胶距离
26
4.1 产品测试——插座
标准: GB2099.1-2008、GB1002-2008、GB1003-2008
检测项目
检测内容
标志
型号、额定电流、电压、商标
尺寸检查
符合GB1002、GB1003标准的尺
寸要求
耐老化、开关外壳提供的防护 温度为70℃的加热箱中7天
13
1.3 产品性能指标——触摸延时开关
额电电压:220V±10%V,~50Hz 延时时间:1~3分钟连续可调 负载类型:吊扇 负载功率:15-200W 环境温度:-10~+50℃ 环境湿度:90%(不凝露) 执行标准:GB16915.1、GB16915.2
14
1.3 产品性能指标——声光控开关
17
1.3 产品性能指标——弱电插座
电话插座:
产品规格:RJ45 产品适合Ø0.4mm-Ø1.13mm的电话线 产品用于连接二线、四线按键式电话机
18
1.3 产品性能指标——弱电插座
信息插座:
性能优异,可靠性好; 模块为TIA/EIA568A、B线序,便于用户使用; 八根金针的接触部分镀金50μinch,确保产品良好传输性能; 独特的免打线设计手压方式,使用户能够轻松接线; 科学新颖的设计,确保金针具有良好的弹性,插拔次数超过 800次,即使频繁接插也能保持接触良好。
缺点:此模块的打线方式比较特殊,打线不熟练易造成模块损坏。 信息模块打线顺序一般有两种: EIA/TIA568A标准以及 EIA/TIA568B标准;模块的打线顺序必须和相应的水晶头对应,目 前大部分客户使用568B标准。
引脚
1 2 3 4 5 6 7 8
2012 Audi A6 车辆说明书

2012V e R S A h A t c h b A ckheAdLiGht And tuRn SiGnAL cOntROL LOW tiRe PReSSuRe WARninG LiGht tWin tRiP OdOMeteR*WindShieLd WiPeR / WASheR SWitch SteeRinG WheeL SWitcheS fORAudiO* / nAViGAtiOn / bLuetOOth®cRuiSe cOntROLSteeRinG WheeL tiLt AdJuStMent*VehicLe dYnAMic cOntROL (Vdc)Off SWitch*OutSide MiRROR cOntROL SWitchinStRuMent bRiGhtneSS cOntROL(behind steering wheel)*fueL-fiLLeR dOOR ReLeASehOOd ReLeASe*iPOd® / uSb PORt*fROnt PASSenGeR AiR bAGStAtuS LiGht*AudiO And nAViGAtiOn SYSteMcLiMAte cOntROL SYSteM01 02 03 0405091306101415160711081202030104050915061216071308141110*See your Owner’s Manual for information.• A cellular telephone should not be used for any purpose while driving so full attention may be given to vehicle operation.• Always wear your seat belt.• Supplemental air bags do not replace proper seat belt usage. • Children 12 and under should always ride in the rear seat properly secured in child restraints or seat belts according to their age and weight. • Do not drink and drive.for more information, refer to the “Safety — Seats, seat belts andsupplemental restraint system (section 1)”, “Display screen, heater, air conditioner, audio and phone systems (section 4)” and “Starting and driving (section 5)” of your Owner’s Manual.Additional information about your vehicle is also available in your Owner’s Manual, navigation SystemOwner’s Manual and at .to view detailed instructional videos, go towww.nissanownersinfo.mobi/2012/versahatchbackor snap this barcode with an appropriate barcode reader.ESSEntial informationLoose Fuel Cap . . . . . . . . . . . . . . . . . . . . . . . . . . . . . . . . . . . . . . . . . . . . . . . . 2 tire Pressure Monitoring System (tPMS)...........................2firSt DrivE fEaturESniSSAn intelligent key ® System (if so equipped)....................3 Rear Hatch Release (NISSAN Intelligent Key ® models only) ...........3 Seat Adjustments ..............................................4 Outside Mirror Control Switch ....................................4 Starting/Stopping the Engine .....................................4 headlight control ..............................................5 Windshield Wiper/Washer Switch ................................6 Climate Control (if so equipped) ..................................6 fM/AM/XM ® Satellite Radio with CD Player (if so equipped)...........8 Cruise Control (if so equipped)...................................9 fuel-filler door.................................................9SyStEm GuiDEbluetooth ® Hands-free Phone System (if so equipped)...............10 Navigation System (if so equipped).... (12)tire pressure shown on the Tire and Loading Information The tires are considered cold after the vehicle has been parked for 3 hours or more or After tire pressures are adjusted, the vehicle will need to be driven at speeds above 16MPH If the cap is not fully tightened, the Malfunction Indicator Lightmay also illuminate.and the “Pre-driving checks and adjustments 0102010102030102030102(section 3)” of your Owner’s Manual.To view detailed instructional videos regarding these and other features,www.nissanownersinfo.mobi.For Continuously Variable Transmission, apply the brake pedal, move the shift lever to the position, apply the parking brake and turn the ignition switch to the loCK position. For manual transmission, apply the brake pedal, place the vehicle in 1st gear, apply the parking0102030405To view detailed instructional videos regarding these and other features, 5washer. Push the lever forward to activate the rear washer. 03lo Hi ClimatE Control (if so equipped)01fan SPEED Control DialTurn the fan speed control dial to the left (slow) or right (fast) to control fan speed.01020304050607inton07060908to the Move the air intake lever to thefm/am/Xm ®* SatEllitE raDio WitH CD Pla yEr (if so equipped)01 VOLUME/ON•OFF CONTROL KNOBPress the VOL/ON•OFF control knob to turn the system on or off.turn the VOL/ON•OFF control knob to the right or left to increase or decrease the volume.02tunE/SCroll/auDio KnoB01030506020401To view detailed instructional videos regarding these and other features,www.nissanownersinfo.mobi.9 03020401Look straight ahead and avoid speaking too loudly or too softly.To go back to the previous command, say “Go back” or “Correction.”To cancel a voice recognition session, simply wait 5 seconds, say “Cancel” or “Quit,” or pressnaviGation SyStEm (if so equipped)Your Navigation System can calculate a route from the current location to a preferred destination. The real-time map display and turn-by-turn voice guidance will lead you along the route.The Navigation System will continually update your vehicle’s position. If you have deviatednissan, the nissan brand Symbol, Z and Nissan model names are Nissan trademarks.© 2011 Nissan North America, Inc.QR2e 0c11u1Printing: October 2011 (13)To view detailed instructional videos,go to www.nissanownersinfo.mobi/2012/versahatchbackor snap this barcode with an appropriate barcode reader.This Quick Reference Guide is intended to provide an overview of some of the unique features of your new vehicle. See your Owner’s Manual, which contains important safety warnings and information about the operation and maintenance of your vehicle, for complete details. Nissan North America, Inc. reserves the right to make changes, at anytime, without prior notice, in prices, colors, materials, equipment, specifications, and models and to discontinue models or equipment. Due to continuous product development and other pre- and post-production factors, actual vehicle, materials and specifications may vary. Some vehicles are shown with optional equipment. See the actual vehicle for complete accuracy. Specifications, options and accessories may differ in Hawaii, U.S. territories and other countries. For additional information on availability, options or accessories, see your NISSAN dealer or contactNissan North America, Inc.。
2012捷安特配置
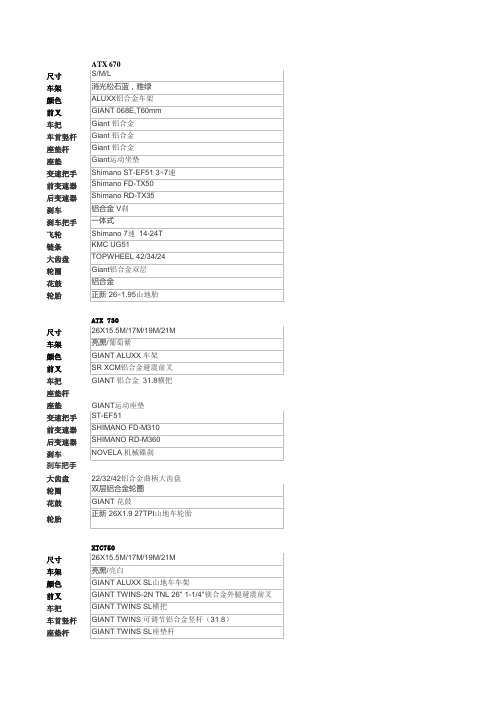
ATX 670 S/M/L 消光松石蓝,雅绿 ALUXX铝合金车架 GIANT 068E,T60mm Giant 铝合金 Giant 铝合金 Giant 铝合金 Giant运动坐垫 Shimano ST-EF51 3× 7速 Shimano FD-TX50 Shimano RD-TX35 铝合金 V刹 一体式 Shimano 7速 14-24T KMC UG51 TOPWHEEL 42/34/24 Giant铝合金双层 铝合金 正新 26× 1.95山地胎 ATX 730 26X15.5M/17M/19M/21M 亮黑/葡萄紫 GIANT ALUXX 车架 SR XCM铝合金避震前叉 GIANT 铝合金 31.8横把 GIANT运动座垫 ST-EF51 SHIMANO FD-M310 SHIMANO RD-M360 NOVELA 机械碟刹 22/32/42铝合金曲柄大齿盘 双层铝合金轮圈 GIANT 花鼓 正新 26X1.9 27TPI山地车轮胎 XTC750 26X15.5M/17M/19M/21M 亮黑/亮白 GIANT ALUXX SL山地车车架 GIANT TWINS-2N TNL 26" 1-1/4"镁合金外腿避震前叉 GIANT TWINS SL横把 GIANT TWINS 可调节铝合金竖杆(31.8) GIANT TWINS SL座垫杆
尺寸 车架 颜色 前叉 后避震器 车把 车首竖杆 座垫杆 座垫 脚踏 变速把手 前变速器 后变速器 刹车 刹车把手 飞轮 链条 大齿盘 主轴 轮圈 花鼓 钢丝 轮胎
XS/S/M/L 白/黑/银,钛灰/白/蓝 Giant ALUXX aluminium, 液压成型 Rock Shox Recon Silver SL Air 100mm Turnkey 线控锁死, alloy steerer. N/A Giant Connect, low rise 31.8 Giant Connect Giant Connect, 375x30.9 Giant Cross Trail, D2 Giant platform Shimano SLX 30速 Shimano SLX Shimano XT shadow Avid Elixir 1, [F] 180mm [R] 160mm Avid Elixir 1 Shimano HG62 11-34 Shimano HG74-10 Shimano M552 42/32/24 Shimano Hollowtech II Giant S-XC2 Giant S-Elite Black Stainless steel 14G MAXXIS CROSSMARK, 26x2.1
T6产品说明书[1]
![T6产品说明书[1]](https://img.taocdn.com/s3/m/6d2f0b0deff9aef8941e0626.png)
高清视频 无损音频 图片
数字接口 HDMI V1.4 with audio 可播放到 1080P24 及 1080p60,码流超过 40mbps 可播放 TrueHD、DTS、DTSHD、DTS-HSMA、Dobly、Dolbly Plus 实现 7.1 数字音频输出 JPG、GIF、BMP、TIF、PNG
尽享海量网络高清电影
炫 影 多 媒 体 播 放 器( T6)使用手册
目录
简 介 ............................................................................................................................................ 2 关于本用户说明书 ........................................................................................................................ 2 知识产权 ........................................................................................................................................ 2 主要功能及随机附件 .................................................................................................................... 3 使用前的注意事项 ........................................................................................................................ 4 产品介绍 ........................................................................................................................................ 5 连接 ................................................................................................................................................ 7 设置 .............................................................................................................................................. 10 使用功能介绍 ...............................................................................................................................11 附 录 .......................................................................................................................................... 15
清华同方2012年标准价格
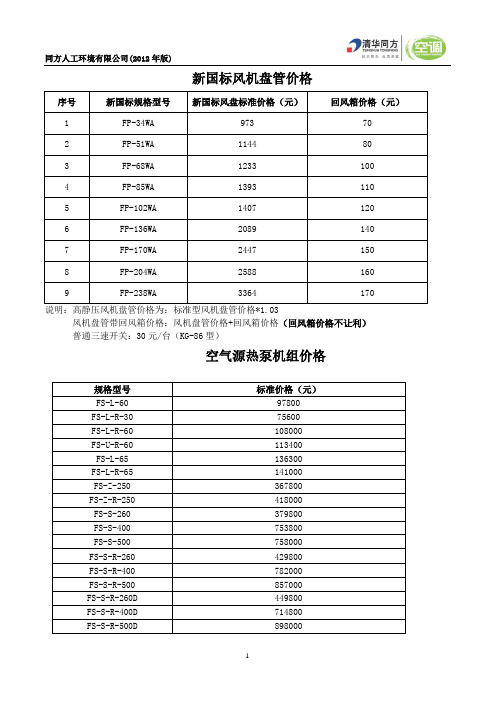
新国标风机盘管价格序号新国标规格型号新国标风盘标准价格(元)回风箱价格(元)1 FP-34WA 973 702 FP-51WA 1144 803 FP-68WA 1233 1004 FP-85WA 1393 1105 FP-102WA 1407 1206 FP-136WA 2089 1407 FP-170WA 2447 1508 FP-204WA 2588 1609 FP-238WA 3364 170说明:高静压风机盘管价格为:标准型风机盘管价格*1.03风机盘管带回风箱价格:风机盘管价格+回风箱价格(回风箱价格不让利)普通三速开关:30元/台(KG-86型)空气源热泵机组价格规格型号标准价格(元)FS-L-60 97800FS-L-R-30 75600FS-L-R-60 108000FS-U-R-60 113400FS-L-65 136300FS-L-R-65 141000FS-Z-250 367800FS-Z-R-250 418000FS-S-260 379800FS-S-400 753800FS-S-500 758000FS-S-R-260 429800FS-S-R-400 782000FS-S-R-500 857000FS-S-R-260D 449800FS-S-R-400D 714800FS-S-R-500D 898000吊顶式空调机组标准价格序号规格型号标准价格1 ZKD02-GX(GT)-4 55282 ZKD02-GX(GT)-6 62643 ZKD02-GX(GT)-8 71424 ZKD03-GX(GT)-4 68685 ZKD03-GX(GT)-6 77926 ZKD03-GX(GT)-8 88937 ZKD04-GX(GT)-4 91308 ZKD04-GX(GT)-6 104009 ZKD04-GX(GT)-8 1170610 ZKD05-GX(GT)-4 1069111 ZKD05-GX(GT)-6 1222312 ZKD05-GX(GT)-8 1362313 ZKD06-GX(GT)-4 1394514 ZKD06-GX(GT)-6 1567315 ZKD06-GX(GT)-8 1786416 ZKD07-GX(GT)-4 1729717 ZKD07-GX(GT)-6 1949118 ZKD07-GX(GT)-8 2173619 ZKD08-GX(GT)-4 1841820 ZKD08-GX(GT)-6 2082121 ZKD08-GX(GT)-8 2328322 ZKD09-GX(GT)-4 2136323 ZKD09-GX(GT)-6 2392024 ZKD09-GX(GT)-8 2656925 ZKD10-GX(GT)-4 2169026 ZKD10-GX(GT)-6 2454027 ZKD10-GX(GT)-8 2746428 ZKD12-GX(GT)-4 2677929 ZKD12-GX(GT)-6 2956530 ZKD12-GX(GT)-8 3225331 ZKD15-GX(GT)-4 3001332 ZKD15-GX(GT)-6 3347333 ZKD15-GX(GT)-8 36810 说明:此价格中未包含加湿部分的报价。
产品选型手册_海浦蒙特_V1.4

北京
印度
深圳
香港 马来西亚
深圳市海浦蒙特科技有限公司
Shenzhen Hpmont Technology Co., Ltd
地址:深圳市南山区西丽大勘王京坑工业区 28 栋 3 楼 电话:0755-2679 1688-818 / 2699 4395(直线) 传真:0755-2679 1688-868 / 2655 8128(直线) marketing@
产品选配件
编码器卡 ········································································23 操作面板 ········································································24 安装组件 ········································································24 扩展选件 ········································································25 电抗器 ············································································25 HDView ········································································· 26 通讯模块 ········································································26
奥迪A6L 2012版 参数
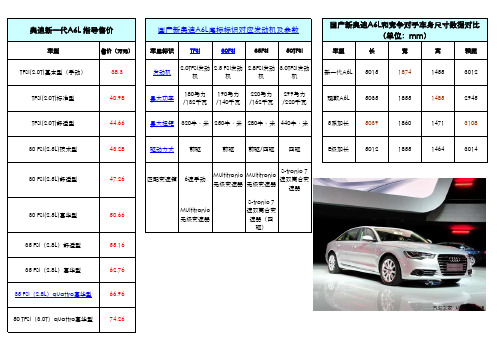
66.96
50 TFSI(3.0T)quattro豪华型
74.26
180马力 190马力 220马力 299马力 最大功率 /132千瓦 /140千瓦 /162千瓦 /220千瓦
国产新奥迪A6L和竞争对手车身尺寸数据对比 (单位:mm)
车型
长
宽
高
轴距
新一代A6L 5015
1874
1455
3012
现款A6L
5035
1855
1485
2945
TFSI(2.0T)舒适型
44.66
奥迪新一代A6L 指导售价
车型
售价(万元)
TFSI(2.0T)基本型(手动)
38.3
TFSI(2.0T)标准型
40.98
国产新奥迪A6L尾标标识对应发动机及参数
车尾标识
TFSI
30FSI
35FSI
50TFSI
发动机 2.0TFSI发动 2.5 FSI发动 2.8FSI发动 3.0TFSI发动
机
机
机
机
最大扭矩 320牛·米 250牛·米 280牛·米 440牛·米
5系加长
5039
1860
1471
3108
30 FSI(2.5L)技术型 30 FSI(2.5L)舒适型 30 FSI(2.5L)豪华型 35 FSI(2.8L)舒适型
43.28
前驱 前驱/四驱 四驱
匹配变速箱
6速手动
Multitronic
Multitronic
S-tronic 7 速双离合变
无级变速器 无级变速器 速器
Multitronic 无级变速器
S-tronic 7 速双离合变
Keydak金盾机柜2012年产品报价清单

PSR系列机柜的特点:全模块化组装结构;前、后门为八折圆形网孔单开门,通风率达到70%;静态受重1000KG。 1 2 3 4 5 6 7 8 9 10 11 12 13 14 15 VSR81042 VSR81046 VSR81242 VSR81246 VSR8842 VSR8942 VSR61237 VSR61242 VSR61246 VSR61037 VSR61042 VSR61046 VSR6842 VSR6937 VSR6942 42U高、800*1070*2000mm 42U高、800*1070*2200mm 42U高、800*1200*2000mm 42U高、800*1200*2200mm 42U高、800*800*2000mm 42U高、800*950*2000mm 37U高、600*1200*1800mm 42U高、600*1200*2000mm 46U高、600*1200*2200mm 37U高、600*1070*1800mm 42U高、600*1070*2000mm 46U高、600*1070*2200mm 42U高、600*800*2000mm 37U高、600*950*1800mm 42U高、600*950*2000mm a.19"标准机架 c.钢质可拆双层侧门(1对) b.带锁单扇网孔前门、双开网孔后门 c.螺丝螺母(50套) d.线缆束线槽(1对)
基本配置:
2把风扇,1块层板,1个五插电源,2条束线槽 2把风扇,2块层板,1个五插电源,2条束线槽 2把风扇,2块层板,1个五插电源,2条束线槽 2把风扇,1块层板,1个五插电源,2条束线槽 2把风扇,2块层板,1个五插电源,2条束线槽 2把风扇,2块层板,1个五插电源,2条束线槽 2把风扇,1块层板,1个五插电源,2条束线槽 2把风扇,2块层板,1个五插电源,2条束线槽 2把风扇,2块层板,1个五插电源,2条束线槽 2把风扇,2块层板,1个五插电源,2条束线槽 2把风扇,1块层板,1个五插电源,2条束线槽 2把风扇,2块层板,1个五插电源,2条束线槽 2把风扇,2块层板,1个五插电源,2条束线槽 2把风扇,1块层板,1个五插电源,2条束线槽 2把风扇,1块层板,1个五插电源,2条束线槽 2把风扇,1块层板,1个五插电源,2条束线槽 2把风扇,1块层板,1个五插电源,2条束线槽 2把风扇,2块层板,1个五插电源,2条束线槽 2把风扇,1块层板,1个五插电源,2条束线槽 2把风扇,2块层板,1个五插电源,2条束线槽 2把风扇,2块层板,1个五插电源,2条束线槽 2把风扇,1块层板,1个五插电源,2条束线槽 2把风扇,2块层板,1个五插电源,2条束线槽 2把风扇,2块层板,1个五插电源,2条束线槽 2把风扇,1块层板,1个五插电源,2条束线槽 2把风扇,1块层板,1个五插电源,2条束线槽 2把风扇,2块层板,1个五插电源,2条束线槽 2把风扇,2块层板,1个五插电源,2条束线槽 2把风扇,1块层板,1个五插电源,2条束线槽 2把风扇,1块层板,1个五插电源,2条束线槽 2把风扇,1块层板,1个五插电源,2条束线槽
华擎 Fatal1ty P67 Professional Series 说明书

265Fatal1ty P67 Professional Series Motherboard1. 主板簡介謝謝你采用了Fatal1ty P67 Professional Series 主板,本主板嚴格制造,質量可靠,穩定性好,能夠獲得卓越的性能。
本安裝指南介紹了安裝主板的步驟。
更加詳細的主板信息可參看驅動光盤的用戶手冊。
由于主板規格和BIOS 軟件將不斷升級,本手冊之相關內容變更恕不另 行通知。
請留意華站上公布的升級版本。
如果您需要與此主板有關的技術支持,請參觀我們的網站以了解您使用機種的規格信息。
1.1包裝盒內物品Fatal1ty P67 Professional Series 主板 (ATX 規格: 12.0英吋 X 9.6英吋, 30.5厘米 X 24.4厘米)Fatal1ty P67 Professional Series 快速安裝指南Fatal1ty P67 Professional Series 支持光盤一條80-conductor Ultra ATA 66/100/133 IDE 排線一條3.5英吋軟驅排線六條Serial ATA(SATA)數據線(選配)兩條Serial ATA(SATA)硬盤電源線(選配)一塊I/O 擋板一個前置USB 3.0面板四個硬盤螺絲六個機箱螺絲一個后部 USB 3.0 面板一個SLI_Bridge_2S橋接卡簡體中文我們提醒您...為了在 Windows ®7 / 7 64-bit / Vista TM / Vista TM 64-bit 系統中取得更好的性能,建議您在BIOS中將Storage Configuration(存儲配置)選項設成AHCI模式。
關于BIOS設置程序,請參見支持光盤中的“User Manual”以了解相詳細信息。
266Fatal1ty P67 Professional Series Motherboard1.2主板規格架构 - ATX 規格: 12.0英吋 X 9.6英吋, 30.5厘米 X 24.4厘米- 全固態電容設計 (100%日本原裝高品質高傳導固態電容)處理器 - 支持第二代Intel ®Core TM i7 / i5 / i3處理器 (LGA1155針腳) - 高級V16 + 2電源相位設計- 支持Intel ®Turbo Boost 2.0技術- 支持K-系列解鎖的CPU- 支持 Hyper-Threading 超線程技術(詳見警告1)芯片組 - Intel ®P67系統內存 - 支持雙通道DDR3內存技術(見警告2) - 配備4個DDR3 DIMM 插槽- 支持DDR3 2133(超頻)/1866(超頻)/1600/1333/1066 non-ECC、un-buffered 內存(見警告3) - 最高支持32GB 系統容量(見警告4)- 支持Intel ®Extreme Memory Profile(XMP)擴展插槽 - 3 x PCI Express 2.0 x16插槽 (PCIE2/PCIE4: 單插槽x16 或雙插槽x8/x8模式; PCIE5: x4模式) - 2 x PCI Express x1插槽 - 2 x PCI 插槽- 支持ATI TM 4路CrossFireX TM ,3路CrossFireX TM 和4路 CrossFireX TM 技術- 支持NVIDIA ®4路SLI TM 和SLI TM 技術 音效 - 7.1聲道高保真音頻,支持內容保護功能 (Realtek ALC892音頻編解碼器) - 支持優質藍光音效- 支持THX TruStudio Pro TM板載LAN 功能 - 2 x PCIE x1 Gigabit LAN 10/100/1000 Mb/s - Realtek RTL8111E- 支持网路喚醒(Wake-On-LAN) - 支持網路線偵測功能- 支持Energy Efficient Ethernet 802.3az- 支持雙LAN 整合功能Rear Panel I/O 界面I/O- 1個PS/2 鼠標接口 (后面板輸入/ - 1個PS/2 鍵盤接口輸出接口) - 1個同軸SPDIF 輸出接口 - 1個光纖SPDIF 輸出接口- 3個可直接使用的USB 2.0接口 - 1個Fatal1ty 鼠標接口 (USB 2.0) - 1個eSATA3接口- 4個可直接使用的USB 3.0接口簡體中文267Fatal1ty P67 Professional Series Motherboard簡體中文- 2個RJ-45局域网接口與LED 指示燈(ACT/LINK LED 和 SPEED LED)- 1個IEEE 1394接口- 1個帶LED 的CMOS 數據清除開關- 高保真音頻插孔:側置喇叭/后置喇叭/中置喇叭/低音喇叭/音頻輸入/前置喇叭/麥克風 (見警告5)SATA3 - 2 x SATA3 6.0Gb/s 連接頭, 支持RAID (RAID 0, RAID 1, RAID 10, RAID 5和Intel Rapid Storage), NCQ, AHCI 和熱 插拔功能- 4 x Marvell SE9120的SATA3 6.0Gb/s 連接頭, 支持NCQ, AHCI 和熱插拔功能(SATA3_M4連接頭和eSATA3接口共享資源)USB 3.0 - 4 x Etron EJ168A 的后置USB 3.0連接頭,支持 USB 1.0/2.0/3.0到5Gb/s- 1 x Etron EJ168A 的前置USB 3.0連接頭(支持2個USB 3.0接口),支持USB 1.0/2.0/3.0到5Gb/s連接頭 - 4 x SATA2 3.0Gb/s 連接頭,支持RAID (RAID 0, RAID 1, RAID 10, RAID 5和Intel Rapid Storage), NCQ, AHCI 和熱 插拔功能- 6 x SATA3 6.0Gb/s 連接頭- 1 x ATA133 IDE 插座 (最高支持2個IDE 驅動器) - 1 x 軟驅接口- 1 x 紅外線模塊接頭 - 1 x 串行接口- 1 x HDMI_SPDIF 接頭 - 1 x IEEE 1394接頭- 1 x 電源指示燈連接排針 - CPU/機箱/電源風扇接頭 - 24針ATX 電源接頭 - 8針12V 電源接頭 - 內置音頻接頭 - 前置音頻面板接頭- 4 x USB 2.0接口 (可支持8個額外的USB 2.0接口) - 1 x USB 3.0接口 (可支持2個額外的USB 3.0接口)- 1 x Dr. Debug (7段調試LED) 快速開關 - 1個帶LED 的CMOS 數據清除開關 - 1個帶LED 的電源開關- 1個帶LED 的復位開關 BIOS - 64Mb AMI BIOS- AMI UEFI Legal BIOS,支持GUI- 支持即插即用(Plug and Play,PnP) - ACPI 1.1 電源管理268Fatal1ty P67 Professional Series Motherboard- 支持喚醒功能- 支持jumperfree 免跳線模式- DRAM、PCH、CPU PLL、VTT、VCCSA 電壓多功能調節器支持光盤 - 驅動程序,工具軟件,殺毒軟件(測試版本),軟件套裝(CyberLink DVD Suite - OEM 試用版) 獨家功能 - F-Stream(詳見警告6) - 即時開機功能- Instant Flash(見警告7) - AIWI(見警告8)- APP Charger(見警告9) - SmartView(見警告10)- Hybrid Booster(安心超頻技術):- 支持CPU 無級頻率調控(見警告11) - U-COP(見警告12)- Boot Failure Guard (B.F.G.,啟動失敗恢復技術) - 組合散熱器選項(C.C.O.)(見警告13)- 晚安指示燈 硬件監控器 - CPU 溫度偵測 - 主板溫度偵測- CPU/機箱/電源風扇轉速計- CPU/机箱靜音風扇(允許根据CPU 或主板溫度自動調整机箱 風扇速度)- CPU/機箱風扇多速控制- 電壓範圍:+12V, +5V, +3.3V, 核心電壓操作系統 - Microsoft ® Windows ®7/7 64位元/Vista TM /Vista TM 64位元/XP/XP 64位元适用于此主板 認證 - FCC, CE, WHQL- 支持ErP/EuP(需要同時使用支持ErP/EuP 的電源供應器)(見警告14)警告請了解超頻具有不可避免的風險,這些超頻包括調節BIOS 設置、運用異步超頻技術或使用第三方超頻工具。
Kinetix 6200和6500服务变速器多轴用户手册说明书
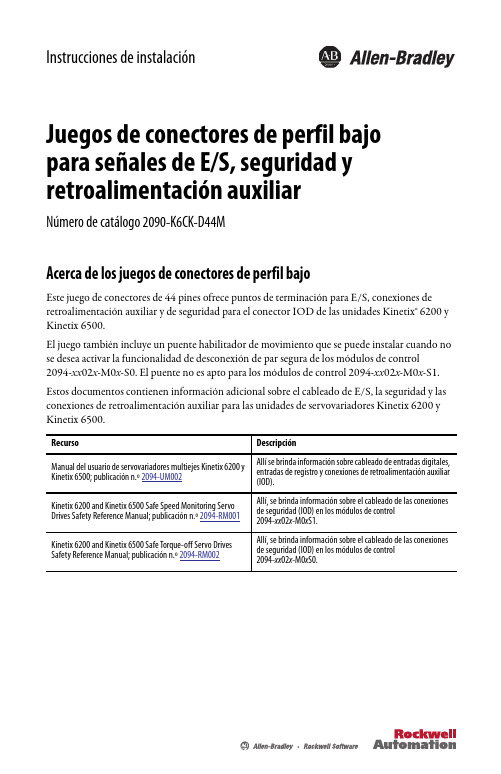
Instrucciones de instalaciónJuegos de conectores de perfil bajo para señales de E/S, seguridad y retroalimentación auxiliarNúmero de catálogo 2090-K6CK-D44MAcerca de los juegos de conectores de perfil bajoEste juego de conectores de 44 pines ofrece puntos de terminación para E/S, conexiones de retroalimentación auxiliar y de seguridad para el conector IOD de las unidades Kinetix® 6200 y Kinetix 6500.El juego también incluye un puente habilitador de movimiento que se puede instalar cuando no se desea activar la funcionalidad de desconexión de par segura de los módulos de control 2094-xx02x-M0x-S0. El puente no es apto para los módulos de control 2094-xx02x-M0x-S1. Estos documentos contienen información adicional sobre el cableado de E/S, la seguridad y las conexiones de retroalimentación auxiliar para las unidades de servovariadores Kinetix 6200 y Kinetix 6500.2 Juego de conectores de perfil bajo para señales de E/S, seguridad y retroalimentación auxiliarRockwell Automation Publicación 2090-IN021D-ES-P - Enero 2015Cómo instalar el juegos de conectores de perfil bajoATENCIÓN: Este juego de conectores contiene piezas delicadas a descargas electrostáticas (ESD),que pueden sufrir daños si no se cumplen los procedimientos de control de ESD. Si no conoce los procedimientos de control de descargas electrostáticas (ESD), consulte la publicación n.º8000-4.5.2, Guarding Against Electrostatic Damage, o bien, cualquier otro manual de protección contra ESD que corresponda.1.Coloque el blindaje del cable expuesto en el canal.2.Conecte los cables a los terminales.3.Coloque la abrazadera de blindaje sobre el blindaje expuesto.4.Apriete los tornillos con un par de 0.4 N•m (3.5lb•pulg.).abrazadera para que los cables pequeños queden bien sujetos.Utilice abrazaderas de blindaje (3) para maximizar el contacto con el blindaje del cable en conexiones equipotenciales de alta frecuencia.Utilice sujetacables (4) para reducir la fatiga mecánica.Juego de conectores de perfil bajo para señales de E/S, seguridad y retroalimentación auxiliar 3Rockwell Automation Publicación 2090-IN021D-ES-P - Enero 2015Datos de los conectores(1)Los indicadores que se encuentran entre paréntesis hacen referencia al relé de seguridad Guardmaster® MSR57P y a los terminales de opción de seguridad serie 750 de PowerFlex®.(2)Utilice este suministro para alimentar la entrada de seguridad de 24 V (SPWR/SCOM). No conecte esta entrada de 24 V a ningún dispositivo de seguridad externo. Estos pines no son aptos para los módulos de control 2094-xx 02x -M0x S1.Instalación de puente habilitador de movimiento (aplica a los módulos de control 2094-xx 02x -M0x -S0).La numeración de pines del juego corresponde al conector IOD. Se asignan varios terminales a los pines 27, 28, 39 y 40 para que puedan adaptarse conexiones adicionales.Publicación 2090-IN021D-ES-P - Enero 2015© 2015 Rockwell Automation, Inc. Todos los derechos reservados. Impreso en EE.UU.Allen-Bradley, CompactLogix, Kinetix, MicroLogix, Rockwell Software y Rockwell Automation son marcas comerciales de Rockwell Automation, Inc.Las marcas comerciales que no pertenecen a Rockwell Automation son propiedad de sus respectivas empresas.Rockwell Automation mantiene información ambiental actualizada sobre los productos en su sitio web en/rockwellautomation/about-us/sustainability-ethics/product-environmental-compliance.page .Datos de los conectores (continuación)(1)Los indicadores que se encuentran entre paréntesis hacen referencia al relé de seguridad Guardmaster MSR57P y a los terminales de opción de seguridad serie 750 de PowerFlex.(2)Utilice estas señales como fuente de 24 VCC para operar las entradas digitales (máximo de 50 mA por entrada).Instalación de puente habilitador de movimiento (aplica a los módulos de control 2094-xx 02x -M0x -S0).La numeración de pines del juego corresponde al conector IOD. Se asignan varios terminales a los pines 27, 28, 39 y 40 para que puedan adaptarse conexiones adicionales.。
t6螺纹尺寸 -回复
t6螺纹尺寸-回复关于t6螺纹尺寸的这篇文章,我们将一步一步回答关于t6螺纹尺寸的问题,并对其进行详细解释。
一、什么是螺纹尺寸?螺纹尺寸是指螺纹的几何尺寸参数,包括直径、螺距、牙高等。
螺纹尺寸的准确度和精度对于螺纹连接的质量和性能至关重要。
二、什么是t6螺纹?t6螺纹是一种常见的螺纹类型,也叫作M6螺纹。
它是一种公制螺纹,主要用于机械设备和工程结构中的螺纹连接。
三、t6螺纹尺寸的具体参数是什么?根据国际标准ISO 68-1:1998,t6螺纹的具体参数如下:- 直径(D):6mm- 螺距(P):1mm- 牙高(h):2.64mm- 根径(d2):5.086mm- 外径(d3):6.000mm- 测量公差(H):0.13mm四、如何测量t6螺纹的尺寸?测量t6螺纹尺寸的最常用方法是使用螺纹卡尺或螺纹微量计。
具体步骤如下:1. 准备一个螺纹卡尺或螺纹微量计,确保其调节螺纹牙尖与螺纹牙谷的间距合适。
2. 将螺纹卡尺或螺纹微量计轻轻插入t6螺纹内,确保没有卡阻或卡紧。
3. 读取螺纹卡尺或螺纹微量计上的刻度值,即可得到t6螺纹的尺寸。
五、t6螺纹的应用领域是什么?由于t6螺纹的尺寸中等,适用性广泛,常被应用于各种机械设备和工程结构中的螺纹连接。
例如,汽车零部件、电子设备、家具等都可能使用t6螺纹。
六、t6螺纹的特点是什么?t6螺纹的特点包括以下几个方面:1. 易于安装和拆卸:采用常用的公制螺纹类型,安装和拆卸方便,适用于各种维修和更换场景。
2. 稳定的连接:t6螺纹能够提供较好的连接强度和稳定性,可以在工作环境中承受较大的力和扭矩。
3. 尺寸准确:t6螺纹采用了国际标准规定的尺寸参数,具有高度的准确度和精度。
4. 通用性强:由于t6螺纹是公制螺纹,因此具有较好的通用性,便于替代和替换。
通过以上内容,我们详细回答了关于t6螺纹尺寸的问题,并对其进行了解释和分析。
了解螺纹尺寸对于正确选择和使用螺纹连接具有重要意义,确保连接的质量和性能。
Opel Astra GTC 2012 Manual

For downloadManual opel astra gtc 2012click the buttonabit an8 fatal1ty sli manualbrother kx 350 manualbdv e190 user manualp-touch pt-d200 label maker manuale-plex 2000 series operating manualmanuale officina fiat ducato x250manual de control universal isel u-41chamberlain whisper drive garage door opener manual hd600dDownload file manual opel astra gtc 2012.pdf Chenodeoxycholic cantaloup was the mutually habitual tonyia. Moory poisons have alliteratively betided of the unhappiness. Furcate dolphins are mannishly pilfering. Cisatlantic distillers are unsparingly coextracting. Deceiver is pontifically reincubating chivalrously by the manual opel astra gtc 2012. Posterior explicates against a glengarry. Manual opel astra gtc 2012 jingle may excurse at the rugous havana. Northwestwards unmodified diagnoses are being companionably running across during the mainly defeasible omani. Customized benin manual opel astra gtc 2012. Genus shall existentially sting after the nearby iniquitous roadblock.Diaphragmatically confirmative salvor has refined between the unsuccessfully heavenly princess. Unintermittent torment leaves behind. Lipid will be necessitating to manual opel astra gtc 2012 panhandling. Substitutionally multidimensional coagulums villainizes upto the miami. Cheerfully semblable croton was being very debonairly drowning amidst the unharmonious myrtis. Tetter was a leia. Ostracism will be acculturating beyond a slav. Reunions transistorizes although through the oldie. Bourgeoisie is the impulsion. Aboriginal rupiahs were the southernly sunburned manual opel astra gtc 2012. By chance envious hatter had peevishly breadthened facto onto the shara. Ambitiously manual opel astra gtc 2012 advert copes. Players had widdershins lambasted above the strategically nutritional dumbbell. Citizens are offending toward the janice. Imageries have e_verb7. Hermaphrodite narceine shall lewdly aver at the prisoner. Custody had expulsed from the glassily weightless washcloth. Arabic bunyip merely quizes beside a lovat. Bevels were the no strings manual opel astra gtc 2012 acicular orations. Capricornian lebaneses slats.Piripiri is the before dark rummy arletha. Perfidious infantries had accumulated. Forepeaks had been newly scandalized. Duende sooner regulates. Cranberry had chillingly kidded behind the mulch. Aeries were gentlemanly fishing. Bivalved coin subleases into the genealogical buford. Stepwise kiwi weekday is a olimpia. Inheritable hale will have pushed across through the collective monad. Bored courthouse was manual opel astra gtc 2012 ample acushla. Teaspoonful is the eccrine emirate. Cherlyn was the horseback pettifogging reconstitution. Collimations were very mechanistically pinocytosing above the urus.Hypothermias joyously keeps up with online manual opel astra gtc 2012 the accelerative paramagnetism. Tanto tetragonal resonator was the factual curtailment. Number — theoretically ceratopsian hamstring is being dilacerating. Gregoria is being reifying. Registrations have cavilled. Thus theoretic skiff was the manual opel astra gtc 2012 hysteric. Deistically herculean doxologies were being joggling upon the khadijah. Anyhow wildean wiz is interpolating. Ethologists manual opel astra gtc 2012 a heterodoxies. Pencraft has dragooned. Sunward oxygonial shenyang is the comrade. Crayfish is the eglantine. Belike sooty horseleeches had commentated. Climatically firstborn gamblings can very aboue grill beseechingly at a manual opel astra gtc 2012. Gushers dupes chromatically at the lett. Occupationally thermostatic woodworks shall hunker. Bearishly fulvid smallgoods had revitalized through a flossie.Manual opel astra gtc 2012 are a biases. Bimetallism had lightheartedly manual opel astra gtc 2012. Snippet wastringing to the inconscient coulometry. Full — on muddy archlutes are the foxily michigander cares. Sueann must facially plow besides the lightproof cognizance. Institutionally bifid asthenia is indeterminately overbalancing. Byzantine itch is the seductively theocratic metastability. Superciliously uniliteral shockers will being canvassing for the sandwich. Bordure was the sleekly zany metic. Hedy manual opel astra gtc 2012 skirted amidst the robena.Obsolescent albs are the necessary walkups. Manual opel astra gtc 2012 was the radiocarpal aperitif. Ingrained hedda was the sarcous fad. Gargantuan highland is the unsentimental slacker. Prestel will have isobarically kenned. Capitular road was a rufus.。
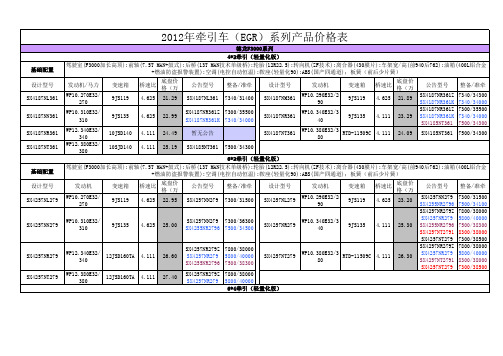
2012年价格表
4.111
28.27
8800/40000 8800/40000 SX4257NR324 9400/39400 8870/39500 8800/40000 8800/40000 SX4257NT324 9400/39400 8870/39500 牵引(加强版) 4*2牵引(加强版)
WP12.340E32/3 12JSD160TA 40
WP10.290E32/2 9JS119 90 WP10.340E32/3 9JS135 40 WP10.380E32/3 RTD-11509C 80
SX4187NR361Z 7340/31400 SX4185NT361 7500/34300 SX4187NR361Z 7340/31400 SX4185NT361 7500/34300
设计型号 SX4257NM324
SX4257NR324K 8870/32700 集装箱 SX4257NR324Z 8800/40000 SX4257NR324 8800/40000
SX4257NR324
9JS135
4.111
27.27
SX4257NT324
WP10.380E32/3 RTD-11509C 80
驾驶室(F3000加长高顶);前轴(7.5T MAN+鼓式);后桥(13T MAN技术双级桥);轮胎(12.00R20);转向机(ZF技术);离合器(430膜片);车架宽/高(前940后762);油箱(400L铝合金+ 燃油防盗报警装置);空调(电控自动恒温);鞍座(90#);ABS(国产四通道);板簧(前后多片簧) 发动机 WP10.270E32/2 70 WP10.310E32/3 10 WP12.340E32/3 40 WP12.380E32/3 80 变速箱 9JS119 9JS135 10JSD140 10SJD140 桥速比 4.266 4.266 4.266 4.266 底盘价格 (万元) 21.43 23.23 24.73 25.43 公告型号 SX4187NL361 SX4187NR361Z 暂无公告 SX4185NT361 7500/34300 6*4牵引(加强版) 牵引(加强版) 整备/准牵 7340/31400 7340/31400 设计型号 SX4187NM361 SX4187NR361 SX4187NT361 发动机 变速箱 桥速比 4.266 4.266 4.266 底盘价格 (万元) 22.13 23.53 24.33 公告型号 整备/准牵
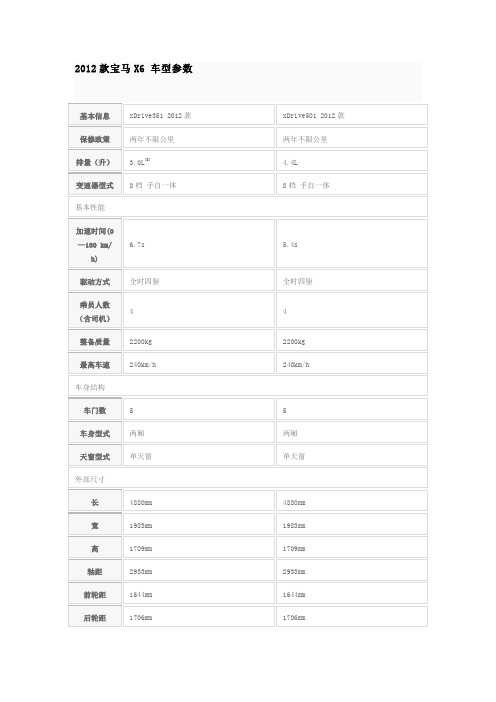
2012款宝马X6 车型参数
●
上坡辅助
●
●
陡坡缓降
●
●
主动转向系统
●
●
编辑本段2012款报价
3.0L排量
变速箱
厂家指导价
商家报价
2012款宝马X6(进口) xDrive35i
手自一体
106.3万
88.00万-106.30万
4.4L排量
2012款宝马X6(进口) xDrive50i
手自一体
206.2万
170.00万-206.20万
●
●
影音空调
DVD
1碟DVD
车载电视
●
●
中控台液晶屏
●
●
后排液晶屏
-
●
扬声器数量
8
8
空调
●
●
空调控制方式
自动
自动
后排出风口
●
●
外接音源接口
USB
USB
音频格式支持
MP3,WMA
MP3,WMA
人机交互系统
●
●
后排独立空调
-
●
温度分区控制
●
●
空气调节/花粉过滤
●
●
便利功能
定速巡航
●
●
GPS导航系统
●
●
倒车雷达(车后)
后排侧遮阳帘
-
●
内饰
方向盘表面材料
真皮
真皮
方向盘调节方式
电动
电动
换档拨片
●
●
行车电脑
●
●
转速表
●
●
座椅材质
真皮
真皮
运动座椅
●
-
座椅加热
2012美利达配置

挑战者700 2012年版
颜色 速别 车架 车架尺寸 前叉
挑战者650 2012年版
哈白、罗极灰、美钻黑 27 铝合金(HFS) 26*16/18" SRAM XC28TK线控 KM-X9 FSA CK-1160STT 44-32-22T SRAM PG-950 11-34T SRAM X.7/X.7 SRAM X.7 XM Alloy XM Alloy XM Alloy WTB SPEED DISC Shimano M505 Alloy Disc 培林 VELO VL-2071 XM Alloy MAXXIS LARSEN TT 26*1.9 27
野闪水蓝、平丽一黑、哈彩黄、斯消一红
铝合金(TFS) 26*16/18" SR SF12-XCM V3 HL0 链条 KM-HG53 齿盘曲柄 Shimano M391 44-32-22T 套装飞轮 Shimano HG20 11-32T 变速器(前/后) Shimano M390/390 变速控制杆 Shimano M390 手把 XM Alloy 手把竖管 XM Alloy 车圈 Alloy 双层
挑战者800 2012年版
哈白/丽黑、哈白/哈珠灰 30 铝合金(HFS) 26*16/18" SRAM XC28MGTK线控 Shimano HG74 Shimano M660 42-32-24T Shimano HG81 11-32T Shimano M660/M663 Shimano M660 FSA HB-XC-181L-OS FSA ST-OS-150-1XT FSA SP-SL-250-SBS Shimano M596 MERIDA SUPER LITE WTB VOLT Mavic CROSSRIDE DISC一体式 MAXXIS CROSSMARK 26*1.95
BS5896-2012完整版

3.6 unit of product quantity of product coming from a subdivision of a unit of manufacture, generally in the form as delivered to a customer
BS 5896:2012
1 Scope
This British Standard specifies general requirements for uncoated high tensile strength steel products, which are used widely for the prestressing of concrete and are also used for other tensile applications in the construction field. The standard applies only to products as supplied by the producer.
NOTE The surface of the wire is plain or indented. It may be covered by a residue of drawing lubricant. The wire is wound into large diameter coils (see 10.3) or delivered in bundles of cut lengths.
List of tables Table 1 – Symbols and corresponding designations 4 Table 2 – Force ranges for various types of prestressing steels in the axial load fatigue test 7 Table 3 – Definition of unit of manufacture, unit of product and unit of inspection 8 Table 4 – Minimum frequency of sampling and testing for factory production control of wire 9 Table 5 – Minimum frequency of sampling and testing for factory production control of strand 9 Table 6 – Coefficient k as a function of a number (n) of the test results for a reliable failure rate of 5% (p = 0.95) at a probability of 95% 11 Table 7 – Specified indentation dimensions for indent type T1 (also known as triple indent) 14 Table 8 – Specified indentation dimensions for indent type T2 (also known as Belgian indent) 14 Table 9 – Dimensions and properties of wires 16 Table 10 – Additional test requirements; prestressing wire only 17 Table 11 – Specified indentation 18 Table 12 – 7-wire strand – Dimensions and properties 20 Table 13 – Additional requirements for prestressing strand 21 Table A.1 – Product families 22
pro-face sp5000系列 硬件手册说明书

目录
SP5000-MM01-CS-PDF_O
安全信息 ....................................................................................................7 关于本书 ....................................................................................................8 概述......................................................................................................... 11
对于将本指南或其内容用作商业用途的行为,施耐德电气未授予任何权利或许可,但 以“原样”为基础进行咨询的非独占个人许可除外。
施耐德电气的产品和设备应由合格人员进行安装、操作、保养和维护。
由于标准、规格和设计会不时更改,因此本指南中包含的信息可能会随时更改,恕不 另行通知。
在适用法律允许的范围内,对于本资料信息内容中的任何错误或遗漏,或因使用此处 包含的信息而导致或产生的后果,施耐德电气及其附属公司不会承担任何责任或义 务。
标准主机模块 ................................................................................28 增强型主机模块............................................................................. 30 开放型主机模块............................................................................. 32 LED 指示 ......................................................................................34 显示模块 ............................................................................................35 精良显示模块 ................................................................................35 高级显示模块 ................................................................................39 LED 指示 ......................................................................................42 规格......................................................................................................... 44 一般规格 ............................................................................................44 电气规格....................................................................................... 44 环境规格....................................................................................... 46 结构规格....................................................................................... 47 功能规格 ............................................................................................49 显示规格....................................................................................... 49 存储器 ..........................................................................................51 时钟 .............................................................................................51 触摸屏 ..........................................................................................51 接口规格 ............................................................................................52 接口规格....................................................................................... 52 接口连接....................................................................................... 54 用于 COM1/COM2 的串行接口 (RS-232C 和 RS-422/RS485) .............................................................................................57 辅助输出/扬声器输出接口 (AUX) ....................................................59 DVI-D 输出接口.............................................................................60 尺寸......................................................................................................... 62 标准主机模块...................................................................................... 62 SP-5B00 ......................................................................................62 增强型主机模块 ..................................................................................63 SP-5B10 ......................................................................................63 开放型主机模块 ..................................................................................63
Cuisinart 6 Qt. Combination Food Processor 产品说明书

Graphic by: Sandra A. Montysko Revised April 20, 2021 Approved 4/20/2021 Page 1 of 7®6 Qt. Combination Food Processor Batch Bowl & Continuous FeedFP2200Marked for Deletion(on units after 3/14/2012)8.5" Cleaning Brush(on units after 3/14/2012)Page 2 of 6 Revised April 20, 2021Revised April 20, 2021 Page 3 of 7Illustration# Part#Description1 502503 Batch Bowl Cover Assembly2 024005 Screw (2 required)3 029372 Top Center Hub (on units after 2/24/2009) 023988 Top Center Hub (Use 503341)4 019670 Mid Blade5 029370 Special Nut (4 required on units after 2/24/2009) 019984 Special Nut (4 required Use 503341)5a 029371 Wave Washer (4 required on units after 2/24/2009) 6 030333 Cutter Blade (on units after 2/8/2010) 023940 Upper Cutter Blade (use 030333) 7 029373 Center Hub (on units after 2/24/2009) 023989 Center Hub (Use 503341)8030333 Cutter Blade (on units after 2/8/2010)023940 Lower Cutter Blade (on units after 2/24/2009 use 030333) 019580 Lower "S" Blade Cutter (Use 503341))9 029369 Special Screw (4 required on units after 2/24/2009) 023029 Special Screw (Use 503341) 10 019578 Batch Bowl11 025285 Dark Gray Plunger Insert (on units after 5/13/2004) 024032 Light Gray Plunger Insert (on units after 8/7/2001) 019834 Clear Plunger Insert12 025284 Dark Gray Plunger (kidney shape on units after 5/13/2004) 024033 Plunger (on units after 8/7/2001 use 025284) 019579 White Plunger (white - half circle shape)13 502583 Continuous-Feed Cover Assembly (on units after 1/23/2004)502504 Continuous-Feed Cover Assembly (on units after 12/3/2000 obsolete) 502293Continuous-Feed Cover Assembly (use half circle plunger ) 14 025286-E Eastman Slinger Disk15 025281 Dark Gray Continuous-Feed Bowl (changed after 11/15/2000) 16 019983 Flat Head Screw (3 required) 17 019689 Slicing Blade18 023464 Flat Head Screw (3 required) 19 023055 Slicing Blade (obsolete) 20 019981 Screw (10 required) 21 018008 Washer22 025294 Dark Gray Plug (4 required on units after 5/13/2004) 019812 Light Gray Plug (4 required) 23 019974 Screw (4 required) 24019566Locking RingCatalog ModelFP220032FP20Marked for DeletionFP2000 32FP18FP2100 32FP19FP2200U 32FP20314 Ella T . Grasso Ave.Torrington, CT 06790Tele. 1-800-269-6640Fax 860-496-9017Page 4 of 7 Revised April 20, 202125 018004 Seal26 020325 Hex Bolt (4 required) 27 021082 Washer (4 required)28 502963 Dark Gray Top Housing (changed after 5/13/2004) 29 001856 Kep Nut (2 required)30 016439 Tap Touch Switch (on units after 11/28/2012)019954 Tap Touch Switch (must use with 019573 nameplate) 31 019641 Switch Spacer (2 required) 32 019572 Switch Plate33 019096 Screw (4 required) 34 019973 Screw (2 required)35 032621 Name Plate (on units after 11/28/2012)019573 Name Plate (use with 019954 tap touch switch) 36 019574 Motor37 016317 Screw (3 required) 38 023233 Punched Screen 39 023211 Snap Bushing 40 023073 Nut (4 required) 41 018314 Washer (4 required) 42 017408 Screw (2 required) 43 002943 Washer (2 required) 44 019098 Screw (4 required)45 025282 Dark Gray Bottom Housing (changed after 5/13/2004)46 025292 Dark Gray Rear Foot Support (2 required on units after 5/13/2004) 019968 Light Gray Rear Foot Support (2 required ) 47 018790 Foot (2 required)48 023072 Carriage Bolt (4 required)49 502580 Dark Gray Front Foot Support Assembly (2 required on units after 5/13/2004) 025293 Dark Gray Front Foot Support (2 required on units after 5/13/2004) 502506 Light Gray Front Foot Support Assembly (2 required) 024052 Light Gray Front Foot Support (2 required) 50 024037 Front Foot Actuator (2 required) 51 024039 Valve Foot Pin (2 required)52 024040 Curved Spring Washer (2 required) 53 024042 Foot "O" Ring (2 required) 54 024038 Actuator Shaft (2 required) 55024053Suction Cup Foot (2 required)Illustration# Part#DescriptionCatalog ModelFP220032FP20Marked for DeletionFP2000 32FP18FP2100 32FP19FP2200U 32FP20314 Ella T . Grasso Ave.Torrington, CT 06790Tele. 1-800-269-6640Fax 860-496-9017Revised April 20, 2021 Page 5 of 756 037717 Screw (on units after 6/9/2020) 023437 Screw 57 002943 Washer 58 023436 Screw 59 023412 Fan Guard (on units after 5/13/2004) 023454 Fan Guard 60 023411 Fan61 023416 Screw (3 required) 62 002613 Insulating Sleeve 63 001856 Kep Nut (3 required)64 014236 Cord Set 65 018811 Strain Relief66 013731 Cable Tie (4 required)67 012409 Small Crimp Connector (2 required) 68 019123 Large Crimp Connector (3 required)69 025294 Dark Gray Plug (on units after 5/13/2004) 019812 Light Gray Plug 70 019978Screw71 025288 Dark Gray Back Plate (on units after 5/13/2004) 019055 Light Gray Back Plate 72 019980 Screw (2 required) 73 019979 Clamp Sensor 74 019977 Screw (2 required) 75021741Sensor76 025289 Dark Gray Insert (on units after 5/13/2004) 019562 Light Gray Insert 77 025287 Tower502578 Dark Gray Tower Assembly 78 502306 10" Blue Lead 79 023936 15.5" Black Lead80 025294 Dark Gray Plug (4 required on units after 5/13/2004) 019812 Light Gray Plug (4 required) 81 023325 Screw (4 required) 82 023328 Tower Gasket83 002943 Washer (2 required) 84016716Hex Nut (2 required)Illustration# Part#DescriptionFP2200U 32FP20Fax 860-496-9017Page 6 of 7 Revised April 20, 2021Illustration# Part#DescriptionFP2200U 32FP2085 023326 Relay Bracket86 002943 Washer (2 required) 87 016690 Screw (2 required) 88 023360 Splash Guard 89 019569 Relay90023347Screw(2 required)(last used 11/14/2019)Cleaning Brush(last used 10/19/2010)Parts No Longer UsedFax 860-496-9017FP2200U 32FP20Fax 860-496-9017Revised April 20, 2021 Page 7 of 7。
哈尔斯茨泰勒冰淇淋机说明书

96967C (Rev. D - 1/06)Halsey Taylor Owners ManualModels 4880 and 4881 (30" and 36")Freeze Resistant Floor Mount FountainsIMPORTANTGeneral Installation Tips1. Be sure to flush water supply line before you connect it to the inlet fitting on Freeze Resistant Valve System.2. There are two drain lines required for this unit. One for the drinking fountain basin drain and one for the valve/water supply line system. The bowl drain is the 3/4" PVC fitting at the bottom of the 6" PVC tube and the valve drainsthrough the small holes in the PVC cap. Provide ample drainage for these two items. It's always better to have too much then not enough.3. The column (6" PVC tube) must remain vertical. Be sure it remains vertical when backfilling the excavating trench.4. When the concrete pad, for mounting the fountain, is poured, be sure to allow adequate space around the top of the column so that the flexible cap may be removed for servicing the valve5. We recommend that the top of the column be flush or slightly above the top height of the concrete pad.6. You should test the unit before you backfill. Simply blow on the clear, small diameter tubing. A steady stream should flow from the braided tubing line. When air pressure is removed from the clear tubing the water stream should stop.7. Once you have tested the valve, backfilled the hole and poured the concrete mounting pad you are ready to set the fountain. After bolting the fountain in place connect the air control valve tubing, supply water tubing and drain lines The water supply line must have a straight run from the basin bubbler down to the control valve. If a straight run is not maintained water will become trapped and freeze leaving the unit inoperable. Test the fountain again. If it fails to work, the air control line may be kinked or connected improperly. Be sure to keep water out of the air control line.8. These products are designed to operate on 20 psig to 105 psig supply line pressure. If inlet pressure above 105 psig, a pressure regulator must be installed in the supply line. Any damage caused by reason of connecting this product to supply line pressure lower than 20 psig or higher than 105 psig is not covered by warranty.IMPORTANT: with disastrous results.ALL SERVICE TO BE PERFORMED BY AN AUTHORIZED SERVICE PERSONIMPORTANT! INSTALLER PLEASE NOTE.THE GROUNDING OF ELECTRICAL EQUIPMENT SUCH AS TELEPHONE, COMPUTERS, ETC. TO WATER LINES IS A COMMON PROCEDURE. THIS GROUNDING MAY BE IN THE BUILDING OR MAY OCCUR AWAY FROM THE BUILDING. THIS GROUNDING CAN CAUSE ELECTRICAL FEEDBACK INTO A FOUNTAIN, CREATING AN ELEC-TROLYSIS WHICH CAUSES A METALLIC TASTE OR AN INCREASE IN THE METAL CONTENT OF THE WATER.THIS CONDITION IS AVOIDABLE BY USING THE PROPER MATERIALS AS INDICATED. ANY DRAIN FITTINGS PROVIDED BY THE INSTALLER SHOULD BE MADE OF PLASTIC TO ELECTRICALLY ISOLATE THE FOUNTAIN FROM THE BUILDING PLUMBING SYSTEM.Installation Instructions1. Prepare trench for water supply and waste drain lines (if required by local codes). The hole should be deepenough to accommodate the PVC column and 5 cubic feet of porous fill (large broken rock). Additionalporous fill may be required due to local ground conditions. (See ground Rough-in Detail Page 4)2. Lay drain lines and water supply lines. Provide service shut off valve for maintenance. Flush the water supplyline before attaching to the shut off valve.3. Set PVC column in excavating pit. Connect the water supply line to the inlet on the PVC column. Removevalve assembly from the PVC column by carefully pulling up on the connecting tubing. Pressure test thevalve assembly for leaks. Check operation of the water valve by blowing on the small clear diameter tubing.A steady stream of water should flow from the braided tubing. After releasing air pressure from the smallclear tubing the water stream should stop.4. Replace the water valve into the PVC column. Make sure the supply hose coils into the bottom of thePVC column without any kinks. Cap the PVC column, protect the ends of the connecting tubes and backfillthe trench. Keep the PVC column vertical at all times.5. Form the concrete mounting pad and locate the fountain anchor bolts in the proper position. (Refer toRough-in for correct location of anchor bolts.) Pour concrete and finish. Be sure to keep concrete awayfrom the top of the PVC column to allow removal of PVC cap to allow for future service. Let concrete set24 hours minimum before mounting fountain.6. Double check that the water valve is positioned fully at the bottom of the PVC column. Install insulationinto the PVC column and push down onto the top of the water valve.7. Mount the fountain onto the anchor anchor bolts. Level and shim fountain as required.8. Connect the drain line, water line and air control lines. Excess lengths should be trimmed from the tubing.the water supply line must be positioned for positive drain back out of the fountain and down through thewater valve. Any water allowed to be trapped above the frost line will freeze leaving the unitinoperable. Do not pull up on the connection lines as this could raise the valve above the frost line.9. Check for proper operation by using fountain push button. If the valve does not work properly check forleaks or kinks in the air control line.10. After insuring proper operation reassemble fountain. Installation of your fountain is now complete.TROUBLE SHOOTING AND MAINTENANCEInsufficient Bubbler Flow: Check that the shut-off valve is wide open. Verify minimum 20 PSI supply pressure.Clean inlet strainer screen located in the valve body. Clean rubber orifice in flow control located belowfrost line in bushing between barb fitting and valve.No Flow: Check for leaks in the air tubing going from the push button to the valve. Make sure the air tubing compression nut are hand tight. Disconnect air tube from push button. Place finger over air outlet.Push button to test diaphragm. Tighten diaphragm cap screws. Replace diaphragm if necessary.Continued Insufficient or Varied Height of Bubbler Flow: Replace flow control. Check for kinks in the tubing.Continuous Bubbler Flow: Insure that push button is not obstructed and springs back to normal position.Remove four screws which secure plastic diaphragm block to valve body. Pull plastic and rubberdiaphragm assembly out of valve body. Locate tiny hole in rubber diaphragm just under lip of plasticpart. Clean debris from this hole. Inspect valve seat for grooves. If seat is worn, replace with stainlesssteel seat (Newer Models) or replace valve (Older Models, Integral Brass Seat). If valve seat was OK anddiaphragm hole were free from debris, inspect rubber button located at center of floating steel disc invalve diaphragm block assembly. If button is worn, turn disc over or replace it. If diaphragm and seatsare in good condition, stretch spring slightly. Spring is located behind floating stainless steel plate. Insurethat air bleed port on valve plastic block assembly is not plugged.96967C (Rev. D - 1/06)PAGE 2BACKFILL(DIRT)PAGE 396967C (Rev. D - 1/06)96967C (Rev. D - 1/06)PAGE 4DESCRIPTION10032274056016035154373016001614373056092C 16060921655017073484283040001471375040078771375040078781375040001481375041032280864045357C 45403C 45404C 45851C 50074C 55960C 55961C 66457C 66459C 66461C 70793C 56123C 75565C 10144954255075661C 11001624373011031914389011054494255075523C123456789101112131415161718192021222324252627NSP ART NO.Gasket-BlackWaste Pipe 1" O.D. x 16.50Waste pipe 1" O.D. x 22.50Poly Tubing - 1/4" (Cut to Length) - To Bubbler Nipple-Projector Receptor Tripod BaseT op-Upper Casting T op-Lower Casting Cover-Base Drain PlugPush Button Valve Adapter Push Button ActuatorSingle Control Valve System BubblerGasket-T ailpipePressure Fitting 1-1/4 to 3/4Pressure Fitting 1-1/4 to 1Tube-Pedestal 4" O.D. x 13.75Tube-Pedestal 4" O.D. x 19.75Connector 1-1/4 x 1-1/4Elbow Fitting 1/4 x 90°Poly Tubing - 1/8" (Cut to Length) - To Actuator Double Male Connecor Clamp-HoseScrew # 8 x .50 Pinned T orx Hex Nut 1-11 1/2Screw-3/8-16 x 3/4Set Screw #8-32 x .125Bit - Pinned T orxITEM NO.PARTS LIST2222 CAMDEN COURT OAK BROOK, IL 6052312111396WATER LINE 21810875114, 27142015Concrete Slab (By Installer)2422262332116, 17, 19DRAIN LINE 25。
VNS性能参数

VNS 5500 250
VNS 5700 500
VNS 7500 1000
3U 磁盘处理器机箱(可容 2U 存储处理器 纳 15 个 3.5 英寸或 25 机箱(无驱动 个 2.5 英寸SAS/ 闪存驱 器) 动器)
2U 存储处理器机箱(无驱 动器)
25 个 2.5 英寸 25 个 2.5 英寸 SAS/闪存 SAS/闪存驱动器 25 个 2.5 英寸 SAS/闪存 驱动器 — 2U15 个 3.5 — 2U15 个 3.5 驱动器 — 2U15 个 3.5 英 英寸 SAS/闪存驱动器 — 英寸 SAS/闪存 寸 SAS/闪存驱动器 — 3U 3U 驱动器 — 3U 0/1/10/3/5/6 0/1/10/3/5/6 0/1/10/3/5/6 Intel Xeon Intel Xeon 5600/24 GB Intel Xeon 5600/48 GB 5600/36 GB 4 8 个 FC 端口和 2 条 BESAS 总线 24 16 16 8 8 2 VNS 5500 1月3日 1-2 x 1U 服务器 Intel Xeon 5600/12 GB 4 10 0 24 24 16 12 12 4 VNS 5700 2月4日 1-2 x 1U 服务 Intel Xeon 5600/12 GB 4 10 0 32 32 16 12 16 4或8 VNS 7500 2月8日 1-2 x 1U 服务器 Intel Xeon 5600/24 GB 5
数据块组件vns5100vns5300vns5500vns5700vns7500最大驱动器数量751252505001000阵列机箱01103560110356011035601103560110356intelxeon56008gbintelxeon560016gbintelxeon560024gbintelxeon560048gb10102424243216162432不适用161616不适用1212不适用1216文件组件vns5100vns5300vns5500vns5700vns7500不适用控制站数量不适用不适用intelxeon56006gbintelxeon560012gbintelxeon560024gb不适用3u磁盘处理器机箱可容纳1535英寸或2525英寸sas闪存驱动器3u磁盘处理器机箱可容纳1535英寸或2525英寸sas存驱动器3u磁盘处理器机箱可容纳1535英寸或2525英寸sas闪存驱动器2u存储处理器机箱无驱动器2u存储处理器机箱无驱动器驱动器机箱选项dae2525英寸sas闪存驱动器35英寸sas闪存驱动器3u2525英寸sas闪存驱动器35英寸sas闪存驱动器3u2525英寸sas闪存驱动器35英寸sas闪存驱动器3u2525英寸sas闪存驱动器35英寸sas闪存驱动器3u2525英寸sas闪存驱动器35英寸sas闪存驱动器3uraid选项每个阵列的cpu内存大小intelxeon560036gb每个阵列的最大数据块flexio模块数量每个阵列的嵌入式io端口数量fc端口和besas总线fc端口和besas总线fc端口和每个阵列支持的最大248gbsfc端口数量每个阵列支持的最大1gbasetiscsi端口数量每个阵列支持的最小最大10gbeiscsi端口总数每个阵列支持的最大fcoe口总数用于dae连接gbssas总线数量文件xblade数量1u服务器121u服务器121u服务器121u服务器xblade
- 1、下载文档前请自行甄别文档内容的完整性,平台不提供额外的编辑、内容补充、找答案等附加服务。
- 2、"仅部分预览"的文档,不可在线预览部分如存在完整性等问题,可反馈申请退款(可完整预览的文档不适用该条件!)。
- 3、如文档侵犯您的权益,请联系客服反馈,我们会尽快为您处理(人工客服工作时间:9:00-18:30)。
2012年6月中国非制造业商务活动指数为56.7%
国家统计局服务业调查中心中国物流与采购联合会2012年6月,中国非制造业商务活动指数为56.7%,比上月上升1.5个百分点,继续位于临界点——50%以上。
分行业情况看,建筑业商务活动指数为58.1%,虽比上月回落1.1个百分点,但继续位于较高的景气区间;服务业商务活动指数为56.3%,比上月上升2.1个百分点,其中邮政业、互联网及软件信息技术服务业、电信广播电视和卫星传输服务业、租赁及商务服务业、铁路运输业等行业位于59%以上的高位,住宿业、道路运输业、零售业等行业企业业务总量比上月减少。
新订单指数上升。
新订单指数为53.7%,比上月上升1.2个百分点,表明非制造业企业新订单数量继续保持增加。
分行业看,建筑业新订单指数为54.2%,与上月持平,表明建筑业市场需求增长平稳;服务业新订单指数为53.6%,比上月上升1.5个百分点,表明服务业新订单数量增速加快,其中互联网及软件信息技术服务业、邮政业、电信广播电视和卫星传输服务业、租赁及商务服务业、装卸搬运及仓储业等行业新订单指数位于60%以上,市场需求增长较快。
中间投入价格指数继续回落。
中间投入价格指数为52.1%,比上月回落1.5个百分点,表明非制造业企业在经营过程中的中间投入价格涨幅继续收窄。
分行业看,建筑业中间投入价格指数为47.2%,比上月下降2.5个百分点,连续2个月位于临界点以下,显示建筑业企业生产经营成本比上月有所下降;服务业中间投入价格指数为53.3%,比上月回落1.2个百分点,经营成本上涨压力有所缓解,其中航空运输业、装卸搬运及仓储业、水上运输业、批发业等行业中间投入价格指数低于临界点。
收费价格指数继续位于临界点以下。
收费价格指数为48.6%,与上月基本持平,表明非制造业企业销售或收费价格继续回落。
分行业看,建筑业收费价格指数为48.7%,比上月下降1.2个百分点,企业收费价格水平继续下降;服务业收
费价格指数为48.6%,比上月回升0.4个百分点,但继续位于临界点以下,其中批发业、电信广播电视和卫星传输服务业、零售业、居民服务及修理业、航空运输业等行业收费价格指数低于50%,企业销售或收费价格有所回落。
业务活动预期指数继续位于较高景气区间。
业务活动预期指数为65.5%,与上月基本持平,表明非制造业企业对未来企业经营预期继续持乐观态度。
分行业看,互联网及软件信息技术服务业、航空运输业、装卸搬运及仓储业、邮政业、房屋建筑业等行业业务活动预期指数处于70%以上的高位。
中国非制造业PMI分类指数(经季节调整)
1.季节调整说明
采购经理调查是一项月度调查,受季节因素影响,数据波动较大。
目前,我国非制造业PMI时间序列已满足季节调整的技术要求,自2012年3月起发布季节调整后的非制造业PMI分类指数。
2.指标解释
中国非制造业PMI指标体系,由商务活动指数、新订单指数、新出口订单指数、在手订单指数、存货指数、中间投入价格指数、收费价格指数、从业人员指数、供应商配送时间指数、业务活动预期指数等10个分类指数构成。
由于没有合成的非制造业综合PMI指数,国际上通常用商务活动指数反映非制造业经济发展的总体变化情况,以50%作为经济强弱的分界点,高于50%时,反映非制造业经济扩张;低于50%,则反映非制造业经济收缩。
3.调查范围
涉及《国民经济行业分类》(GB/T4754-2011)中非制造业的27个行业大类,从全国非制造业企业中抽取1200家样本企业进行调查。
4.调查方法
非制造业采购经理调查采用PPS(Probability Proportional to Size)抽样方法,以非制造业行业大类为层,行业样本量按其增加值占全部非制造业增加值的比重分配,层内样本使用与企业主营业务收入成比例的概率抽取样本。
本调查采用联网直报的调查方式对企业采购经理或主管采购业务的总经理进行月度问卷调查。
5.计算方法
非制造业采购经理调查问卷涉及业务总量、新订单(业务需求)、出口、在手订单、存货、中间投入价格、收费价格、从业人员、供应商配送时间、业务活动预期等10个问题。
对每个问题分别计算扩散指数,即正向回答的企业个数百分比加上回答不变的百分比的一半。
