375 3051用户使用培训教材
罗斯蒙特3051s 3051sf系列流量计多变量传感器快速入门指南说明书
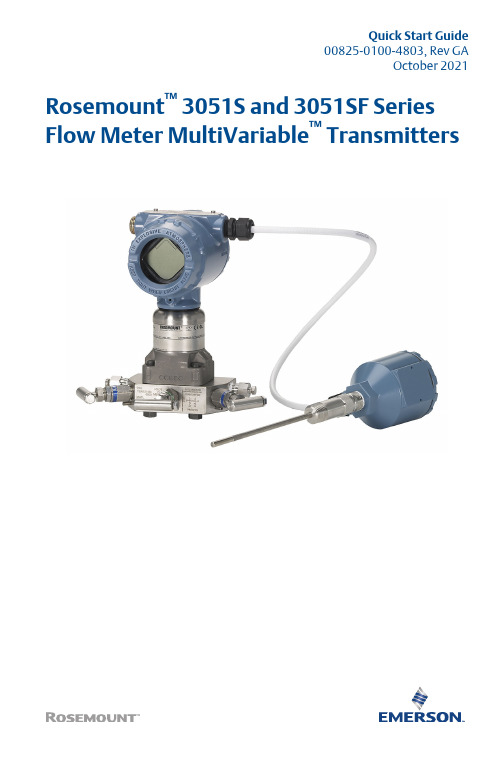
Quick Start Guide00825-0100-4803, Rev GAOctober 2021 Rosemount™ 3051S and 3051SF Series Flow Meter MultiVariable™ TransmittersQuick Start Guide October 2021 ContentsAbout this guide (3)Mount the transmitter (5)Consider housing rotation (11)Set the switches (12)Connect wiring and power up (13)Engineering Assistant installation (17)Flow configuration (19)Verifying device configuration (28)Trimming the transmitter (32)Safety instrumented systems installation (33)Product certifications (34)2Rosemount 3051SMVOctober 2021Quick Start Guide1About this guideThis guide provides basic guidelines to install the Rosemount 3051SMultiVariable Transmitter. It also provides the basic Rosemount 3051SMVconfiguration guidelines for the Rosemount 3051SFA, Rosemount 3051SFC,and Rosemount 3051SFP. It does not provide instructions for detailedconfiguration, diagnostics, maintenance, service, troubleshooting, orinstallations. Refer to the Rosemount 3051SMV Reference Manual for moreinstruction. The manual and this guide are also available electronically at/Rosemount.1.1Safety messagesWARNINGFailure to follow these installation guidelines could result in death orserious injury.Ensure only qualified personnel perform the installation.ExplosionsExplosions could result in death or serious injury.Installation of device in an explosive environment must be in accordancewith appropriate local, national, and international standards, codes, andpractices.Review the Hazardous Locations Certifications for any restrictionsassociated with a safe installation.Process leaksProcess leaks could result in death or serious injury.Install and tighten thermowells and sensors before applying pressure.Do not remove the thermowell while in operation.Conduit/cable entriesUnless marked, the conduit/cable entries in the transmitter housing usea ½–14 NPT thread form. Entries marked “M20” are M20 × 1.5 threadform. On devices with multiple conduit entries, all entries will have thesame thread form. Only use plugs, adapters, glands, or conduit with acompatible thread form when closing these entries.When installing in a hazardous location, use only appropriately listed orEx certified plugs, glands, or adapters in cable/conduit entries.Quick Start Guide3Quick Start Guide October 2021 WARNINGElectrical shockElectrical shock could cause death or serious injury.Avoid contact with the leads and terminals. High voltage that may bepresent on leads can cause electrical shock.Unless marked, the conduit/cable entries in the housing use a ½–14 NPTthread form. Entries marked “M20” are M20 × 1.5 thread form. Ondevices with multiple conduit entries, all entries will have the samethread form. Only use plugs, adapters, glands, or conduit with acompatible thread form when closing these entries.When installing in a hazardous location, use only appropriately listed orEx certified plugs, glands, or adapters in cable/conduit entries.Physical accessUnauthorized personnel may potentially cause significant damage to and/ormisconfiguration of end users’ equipment. This could be intentional orunintentional and needs to be protected against.Physical security is an important part of any security program andfundamental to protecting your system. Restrict physical access byunauthorized personnel to protect end users’ assets. This is true for allsystems used within the facility.4Rosemount 3051SMVOctober 2021Quick Start Guide 2Mount the transmitter2.1Liquid flow applicationsProcedure1.Place taps to the side of the line.2.Mount beside or below the taps.3.Mount the transmitter so that the drain/vent valves are orientedupward.AA. Direction of flow2.2Gas flow applicationsProcedure1.Place taps in the top or side of the line.Mount beside or above the taps.2.A. Direction of flowQuick Start Guide52.3Steam flow applicationsProcedure1.Place taps to the side of the line.2.Mount beside or below the taps.3.Fill impulse lines with water.AA. Direction of flow2.4Mounting bracketsFigure 2-1: Mounting Bracket – Coplanar FlangePanel mountPipe mountQuick Start Guide October 2021 6Rosemount 3051SMVFigure 2-2: Mounting Brackets – Traditional FlangePanel mountPipe mountFigure 2-3: Mounting Brackets – In-linePanel mountPipe mount2.5Bolting considerationsIf the transmitter installation requires assembly of a process flange,manifold, or flange adapters, follow these assembly guidelines to ensure atight seal for optimal performance characteristics of the transmitter. Onlyuse bolts supplied with the transmitter or sold by Emerson as spare parts.Figure 2-4 illustrates common transmitter assemblies with the bolt lengthrequired for proper transmitter assembly.October 2021Quick Start Guide Quick Start Guide7Figure 2-4: Common Transmitter AssembliesA 4 × 1.75-in.(44 mm)D4 × 1.75-in.(44 mm)4 × 2.25-in.(57 mm)C4 × 1.75-in. (44 mm) 4 × 1.50-in.(38 mm)4 × 2.88-in.(73 mm)A.Transmitter with coplanar flange B.Transmitter with coplanar flange and optional flange adapters C.Transmitter with traditional flange and optional flange adapters D.Transmitter with coplanar flange and optional Rosemount Conventional Manifold and flange adaptersNoteFor all other manifolds, contact Customer Central technical support.Bolts are typically carbon steel or stainless steel. Confirm the material byviewing the markings on the head of the bolt and referencing Table 2-1 . Ifbolt material is not shown in Table 2-1, contact the local Emersonrepresentative for more information.Use the following bolt installation procedure:Procedure1.Carbon steel bolts do not require lubrication and the stainless steelbolts are coated with a lubricant to ease installation. However, noadditional lubricant should be applied when installing either type ofbolt.2.Finger-tighten the bolts.3.Torque the bolts to the initial torque value using a crossing pattern.See Table 2-1 for initial torque value.4.Torque the bolts to the final torque value using the same crossing pattern. See Table 2-1 for final torque value.Quick Start Guide October 20218Rosemount 3051SMVOctober 2021Quick Start Guide5.Verify the flange bolts are protruding through the sensor modulebefore applying pressure (see Figure 2-5).ExampleTable 2-1: Torque Values for the Flange and Flange Adapter BoltsFigure 2-5: Proper Bolt InstallationA.BoltB.Sensor moduleQuick Start Guide92.6O-rings with flange adaptersWARNINGFailure to install proper flange adapter O-rings may cause process leaks,which can result in death or serious injury. Only use the O-ring that isdesigned for its specific flange adapter.DA.Flange adapterB.O-ring C.PTFE-based profile (square)D.Elastomer profile (round)Whenever the flange or adapters are removed, visually inspect the O-rings.Replace them if there are any signs of damage, such as nicks or cuts. If the O-rings are replaced, re-torque the flange bolts and alignment screws afterinstallation to compensate for seating of the O-rings.Quick Start Guide October 202110Rosemount 3051SMV3Consider housing rotationTo improve field access to wiring or to better view the optional LCD display:Procedure1.Loosen the housing rotation set screw.2.Turn the housing up to 180° left or right of its original (as shipped)position.3.Re-tighten the housing rotation set screw.Figure 3-1: Transmitter Housing Set ScrewA.LCD displayB.Housing rotation set screw (3/32-in.)CAUTIONDo not rotate the housing more than 180° without first performing adisassembly procedure. Over-rotation may sever the electricalconnection between the sensor module and the electronics.4Set the switchesThe transmitter’s default configuration sets the alarm condition to high (HI)and the security to off.Procedure1.If the transmitter is installed, secure the bus and remove power.2.Required: Remove the transmitter cover opposite the field terminalside. Do not remove the instrument covers in explosiveenvironments when the circuit is live.3.Slide the Security and Alarm switches into the preferred position byusing a small screwdriver.NoteThe Security switch will need to be in the off position in order to makeany configuration changes.4.Required: In order to meet explosion-proof requirements, reinstallthe housing cover and tighten so the cover is fully seated with metalto metal contact between the housing and cover. After the cover isseated properly, replace the flathead screw located on the bottom ofthe housing cover.Figure 4-1: Transmitter Switch ConfigurationA BA.SecurityB.AC Termination5Connect wiring and power upCAUTIONDo not connect the power across the test terminals. Power could damagethe test diode in the test connection. Twisted pairs yield best results. Use 24to 14 AWG wire and do not exceed 5,000 ft. (1500 m).Use the following steps to wire the transmitter:Procedure1.Remove the cover on the field terminals side of the housing.2.Connect the positive lead to the “PWR/COMM +” terminal, and thenegative lead to the “PWR/COMM –” terminal.3.If the optional process temperature input is not installed, plug andseal the unused conduit connection. If the input is being utilized, seeInstall optional process temperature input (Pt 100 RTD sensor) formore information.When the enclosed pipe plug is utilized in the conduit opening, itmust be installed with a minimum engagement of five threads tocomply with explosion-proof requirements. Refer to the Rosemount™3051SMV Reference Manual for more information.4.If applicable, install wiring with a drip loop. Arrange the drip loopso the bottom is lower than the conduit connections and thetransmitter housing.5.Reinstall the housing cover and tighten so that metal contacts metalto meet explosion-proof requirements.Figure 5-1 shows the wiring connections necessary to power aRosemount 3051SMV and enable communications with a hand-heldField Communicator.Figure 5-1: Transmitter WiringA. Power supplyNoteInstallation of the transient protection terminal block does notprovide transient protection unless the Rosemount 3051SMVhousing is properly grounded.5.1Conduit electrical connector wiring (option GE or GM)For Rosemount 3051SMV with conduit electrical connectors GE or GM, referto the cordset manufacturer’s installation instructions for wiring details. ForFM Intrinsically Safe, Division 2 hazardous locations, install in accordancewith Rosemount drawing 03151-1009 to maintain outdoor rating (NEMA®4X and IP66). See the Rosemount 3051SMV Reference Manual.5.2Power supplyThe dc power supply should provide power with less than two percent ripple.The total resistance load is the sum of the resistance of the signal leads andthe load resistance of the controller, indicator, intrinsic safety barriers, andrelated components.Figure 5-2: Load Limitation5.3Install optional process temperature input (Pt 100 RTDsensor)NoteTo meet ATEX/IECEx Flameproof certification, only ATEX/IECEx Flameproofcables (temperature input code C30, C32, C33, or C34) may be used.Procedure1.Mount the Pt 100 RTD sensor in the appropriate location.NoteUse shielded four-wire cable for the process temperatureconnection.2.Connect the RTD cable to the Rosemount 3051SMV by inserting thecable wires through the unused housing conduit and connect to thefour screws on the transmitter terminal block. An appropriate cablegland should be used to seal the conduit opening around the cable.3.Connect the RTD cable shield wire to the ground lug in the housing.Figure 5-3: RTD Wiring ConnectionA.Ground lugB.RTD cable assembly wiresC.Pt 100 RTD sensor6Engineering Assistant installationEngineering Assistant 6.1 or laterThe Rosemount 3051SMV Engineering Assistant 6.1 or later is PC-basedsoftware that performs configuration, maintenance, diagnostic functions,and serves as the primary communication interface to the transmitter withthe fully compensated mass and energy flow feature board.The Rosemount 3051SMV Engineering Assistant software is required tocomplete the flow configuration.To ensure correct operation, download the most current version of theEngineering Assistant software at /Rosemount-Engineering-Assistant.6.1System requirementsThe following are the minimum system requirements to install theRosemount 3051SMV Engineering Assistant software:•Pentium®-grade processor: 500 MHz or faster•Operating system: Windows™ XP Professional (32-bit), or Windows 7 (32-bit or 64-bit)•256 MB RAM•100 MB free hard disk space•RS232 serial port or USB port (for use with HART® modem)•CD-ROM6.2Install Rosemount 3051SMV Engineering Assistant 6.1 orlaterProcedure1.Uninstall any existing versions of Engineering Assistant 6.2.Insert the new Engineering Assistant disk into the CD-ROM.3.Windows should detect the presence of a CD and start theinstallation program. Follow the on-screen prompts to finish theinstallation. If Windows does not detect the CD, use WindowsExplorer or My Computer to view the contents of the CD-ROM, andthen double click the SETUP.EXE program.4. A series of screens (Installation Wizard) will appear and assist in theinstallation process. Follow the on-screen prompts. It isrecommended to use the default installation settings.NoteEngineering Assistant versions 6.1 or later require the use ofMicrosoft®.NET Framework version 4.0 or later. If .NET version 4.0 isnot currently installed, the software will be automatically installedduring the Engineering Assistant installation. Microsoft .NET version4.0 requires an additional 200 MB of disk space.6.3Connect to a personal computerProcedure1.Remove the cover from the field terminals side of the housing.2.Power the device as outlined in Connect wiring and power up.3.Connect the HART modem cable to the PC.4.On the side of the transmitter marked “Field Terminals,” connect themodem mini-grabbers to the two terminals marked “PWR/COMM.”unch the Engineering Assistant software. For more information onlaunching software, see Launch Engineering Assistant 6.1 or later.6.Once the configuration is complete, replace cover and tighten untilmetal contacts metal to meet explosion-proof requirements.Figure 6-1 shows how to connect a computer to a Rosemount3051SMV.Figure 6-1: Connecting a PC to the TransmitterA.Power supplyB.Modem7Flow configurationRosemount 3051SMV Engineering Assistant 6.1 or laterThe Rosemount 3051SMV Engineering Assistant is designed to guide theuser through the setup of the flow configuration for a Rosemount 3051SMV.The flow configuration screens allow the user to specify the fluid, operatingconditions, and information about the primary element, including insidepipe diameter. This information will be used by the Rosemount 3051SMVEngineering Assistant software to create flow configuration parameters thatwill be sent to the transmitter or saved for future use.Online and offline modesThe Engineering Assistant software can be used in two modes: Online andOffline. In Online mode, the user can receive the configuration from thetransmitter, edit the configuration, send the changed configuration to thetransmitter, or save the configuration to a file. In offline mode, the user cancreate a new flow configuration and save the configuration to a file or openand modify an existing file.The following pages provide instructions on creating a new flowconfiguration in offline mode. For more information on other functionality,see the Rosemount 3051SMV Reference Manual.7.1Basic navigation overviewFigure 7-1: Engineering Assistant Basic Navigation OverviewAFGHB C D E7.2Launch Engineering Assistant 6.1 or laterFlow configuration for the Rosemount 3051SMV is achieved by launchingthe Engineering Assistant software from the Start menu.Procedure1.Select the Start menu→All Programs→Engineering Assistant.Engineering Assistant will open to the screen shown in Figure 7-2.2.Select Offline button located in the lower right hand corner of thescreen shown in Figure 7-2.Figure 7-2: Engineering Assistant Device Connection Screen7.3Use Preferences tabThe Preferences tab, shown in Figure 7-3, allows you to select the preferredengineering units to display.Procedure1.Select the preferred engineering units.2.If Custom Units are selected, configure the Individual Parameters.3.Check the box if unit preferences should be retained for futureEngineering Assistant sessions.Figure 7-3: Preferences Tab7.4Select fluid for database liquid/gasThe Fluid Selection tab shown in Figure 7-4 allows the user to choose theprocess fluid.Figure 7-4: Fluid Selection TabNoteThe following example will show a flow configuration for the database gas air used with a Rosemount 405C Conditioning Orifice Plate as the primary element. The procedure to set up any other fluid with any other primary element will be similar to this example. Natural gases, custom liquids, and custom gases require additional steps during the configuration. See the Rosemount 3051SMV Reference Manual for more information. Procedure1.Engineering Assistant may open to the Preferences tab. Using the tabsat the top of the screen, navigate to the Fluid Selection tab.2.Expand the Gas category (click on the + icon).3.Expand the Database Gas category.4.Select Air from the list of database fluids.5.Enter the Nominal Operating Pressure, select the Enter or Tab key.6.Enter the Nominal Operating Temperature, select the Enter or Tab key.Engineering Assistant will automatically fill in suggested operatingranges, as shown in Figure 7-4. These values may be edited asneeded by the user.7.Verify the Reference/Atmospheric Conditions are correct for theapplication. These values may be edited as needed.NoteReference pressure and temperature values are used by EngineeringAssistant to convert the flow rate from mass units to mass unitsexpressed as standard or normal volumetric units.8.Select Next to proceed to the Fluid Properties tab.7.5Fluid propertiesNoteThe Fluid Properties tab is an optional step and is not required to complete aflow configuration.The Fluid Properties tab for the database gas air is shown in Figure 7-5. This isused to verify the properties of the chosen fluid are acceptable.To check density, compressibility, and viscosity of the selected fluid at otherpressure and temperature values, enter a Pressure and Temperature andselect Calculate.NoteChanging the pressure and temperature values on the Fluid Properties tabdoes not affect the fluid configuration.Figure 7-5: Fluid Properties Tab7.6Select primary elementThe Primary Element Selection tab shown in Figure 7-6 allows the user tochoose the primary element.Figure 7-6: Primary Element Selection TabContinuing with the example configuration:Procedure1.Expand the Conditioning Orifice Plate category.2.Select 405C/3051SFC.3.Enter the measured Meter Tube Diameter (pipe ID) at a referencetemperature. If the meter tube diameter cannot be measured, selecta Nominal Pipe Size and Pipe Schedule to input an estimated valuefor the meter tube diameter (English units only).4.If necessary, edit the Meter Tube Material.5.Enter the Line Size and select the Beta of the conditioning orificeplate. The required primary element sizing parameters will bedifferent depending on what primary element was selected.6.If necessary, select a primary element Material from the dropdownmenu.7.Select Next > to advance to the Save/Send Configuration tab.NoteTo be in compliance with appropriate national or internationalstandards, beta ratios and differential producer diameters should bewithin the limits as listed in the applicable standards. TheEngineering Assistant software will alert the user if a primary element value exceeds these limits, but will allow the user to proceed with the flow configuration.7.7Save/send configurationThe Save/Send Configuration tab shown in Figure 7-7 allows you to verify,save, and send the configuration information to the transmitter with thefully compensated mass and energy flow feature board.Procedure1.Review the information under the Flow Configuration and DeviceConfiguration headings.NoteFor more information, see Verifying device configuration.Figure 7-7: Save/Send Configuration Tab2.Select the icon above each window to edit the configurationinformation in these windows.NoteThe user will be notified if the configuration has been modified sinceit was last sent to the transmitter. A warning message will be shownto the right of the Send Flow Data and/or Send Transmitter Data checkboxes.3.To send the configuration, select the Send To button.NoteThe Send Flow Data and Send Transmitter Data check boxes can beused to select what configuration data is sent to the transmitter. Ifeither check box is unselected, the corresponding data will not besent.4.The Engineering Assistant Device Connection screen will appear, seeFigure 7-8.Figure 7-8: Engineering Assistant Device Connection Screen5.Select the Search button located in the lower right hand corner ofthe screen. Engineering Assistant will begin to search for connected devices.6.When the search is completed, select the device to communicatewith and select Send Configuration button.NoteAfter the configuration is sent to the device, saving the configuration file is recommended. The user can select the Save button on theSave/Send screen or select Save from the program menu.Once the configuration is finished being sent to the device, the user will be notified by a pop-up dialog box.7.If finished with the configuration process, close EngineeringAssistant.8Verifying device configurationUse Rosemount 3051SMV Engineering Assistant or any HART-compliantmaster to communicate with and verify configuration of the Rosemount3051SMV.Table 8-1 shows the Field Communicator fast keys for the fully compensatedmass and energy flow. Table 8-2 shows the Fast Keys for the direct processvariable output.NoteDevice configuration procedures are given for Rosemount 3051SMVEngineering Assistant 6.1 or later and AMS Device Manager 9.0 or later in theRosemount 3051SMV Reference Manual.A check (✓) indicates the basic configuration parameters. At a minimum,these parameters should be verified as part of the configuration and startupprocedure.Table 8-1: Fast Keys for Fully Compensated Mass and Energy FlowTable 8-2: Fast Keys for Direct Process Variable Output9Trimming the transmitterTransmitters are shipped fully calibrated per request or by the factorydefault of full scale.9.1Zero trimA zero trim is a single-point adjustment used for compensating mountingposition and line pressure effects on static and differential pressure sensors.When performing a zero trim, ensure that the equalizing valve is open andall wet legs are filled to the correct level.The transmitter will only allow up to five percent of URL zero error to betrimmed.9.1.1Perform a zero trim using the Field CommunicatorProcedure1.Equalize or vent the transmitter and connect the FieldCommunicator (for more information on connecting,see Figure 5-1).2.If the device is equipped with a static pressure sensor, zero the sensorby inputting the following Fast Key sequence at the Rosemount3051SMV menu:e the zero trim (selection 1) for a transmitter equipped with a gagestatic pressure sensor or lower sensor trim (selection 2) for atransmitted equipped with an absolute static pressure sensor.NoteWhen performing a lower sensor trim on an absolute pressuresensor, it is possible to degrade the performance of the sensor ifinaccurate calibration equipment is used. Use a barometer that is atleast three times as accurate as the absolute sensor of thetransmitter.4.Zero the differential pressure sensor by inputting the following FastKey sequence at the Rosemount 3051SMV menu:10Safety instrumented systems installation For safety certified installations, refer to the appropriate reference manualfor the installation procedure and system requirements:•For DP only measurements (measurement type D) refer to theRosemount 3051S Reference Manual.•For MultiVariable measurements (measurement type 1–7) refer to the Rosemount 3051SMV Reference Manual.11Product certifications11.1Rosemount 3051SMV/3051SFxRev 2.10European directive informationA copy of the EC Declaration of Conformity can be found at the end of theQuick Start Guide. The most recent revision of the EC Declaration ofConformity can be found at /Rosemount.Ordinary location certificationAs standard, the transmitter has been examined and tested to determinethat the design meets the basic electrical, mechanical, and fire protectionrequirements by a nationally recognized test laboratory (NRTL) as accreditedby the Federal Occupational Safety and Health Administration (OSHA).Installing Equipment in North AmericaThe US National Electrical Code (NEC) and the Canadian Electrical Code(CEC) permit the use of Division marked equipment in Zones and Zonemarked equipment in Divisions. The markings must be suitable for the areaclassification, gas, and temperature class. This information is clearly definedin the respective codes.11.1.1USAE5 US Explosionproof (XP) and Dust-Ignitionproof (DIP)Certificate FM16US0089XStandards FM Class 3600 – 2011, FM Class 3615 – 2006, FM Class 3616 –2011, FM Class 3810 – 2005, ANSI/NEMA 250 – 2003 Markings XP CL I, DIV 1, GP B, C, D; T5; DIP CL II, DIV 1, GP E, F, G; CL III;T5(–50 °C ≤ T a ≤ +85 °C); Factory Sealed; Type 4XI5 US Intrinsically Safe (IS) and Nonincendive (NI)Certificate FM16US0233Standards FM Class 3600 –2011, FM Class 3610 – 2007, FM Class 3611 –2004, FM Class 3616 – 2006, FM Class 3810 – 2005, NEMA250 – 1991Markings IS CL I, DIV 1, GP A, B, C, D; CL II, DIV 1, GP E, F, G; Class III; Class1, Zone 0 AEx ia IIC T4; NI CL 1, DIV 2, GP A, B, C, D; T4(–50 °C ≤T a ≤ +70 °C) when connected per Rosemount drawing03151-1206; Type 4XNoteTransmitters marked with NI CL 1, DIV 2 can be installed in Division 2locations using general Division 2 wiring methods or Nonincendive FieldWiring (NIFW). See Drawing 03151-1206.US Intrinsic Safety (IS) and Nonincendive (NI)Certificate:1143113Standards:FM Class 3600:2011, FM Class 3610:2010, FM Class3611:2004, FM Class 3810:2005, UL50E (1st Ed.)Markings:IS Class I/II/III, Division 1, Groups A, B, C, D, T4/ E, F, and GT135 °C; Class I, Zone 0 AEx ia IIC T4 Ga;T4 (-50 °C ≤ T a ≤ +70 °C) [HART];T4 (-50 °C ≤ T a ≤ +60 °C) [Fieldbus];when connected per Rosemount drawing 03151-1207; Type4XIE US FISCO Intrinsically SafeCertificate FM16US0233Standards FM Class 3600 – 2011, FM Class 3610 – 2010, FM Class 3611 –2004, FM Class 3616 – 2006, FM Class 3810 – 2005, NEMA250 – 1991Markings IS CL I, DIV 1, GP A, B, C, D; T4(–50 °C ≤ Ta ≤ +70 °C); whenconnected per Rosemount drawing 03151-1006; Type 4X US FISCO Intrinsically SafeCertificate:1143113Standards:FM Class 3600:2011, FM Class 3610:2010, FM Class3611:2004, FM Class 3810:2005, UL50E (1st Ed.)Markings:IS Class I/II/III, Division 1, Groups A, B, C, D, T4/ E, F, and GT135 °C; Class I, Zone 0 AEx ia IIC T4 Ga;T4 (-50 °C ≤ T a ≤ +70 °C) [HART];T4 (-50 °C ≤ T a ≤ +60 °C) [Fieldbus];when connected per Rosemount drawing 03151-1207; Type4X11.1.2CanadaE6 Canada Explosionproof, Dust Ignition-proof, Division 2Certificate1143113。
3051型压力变送器操作规程
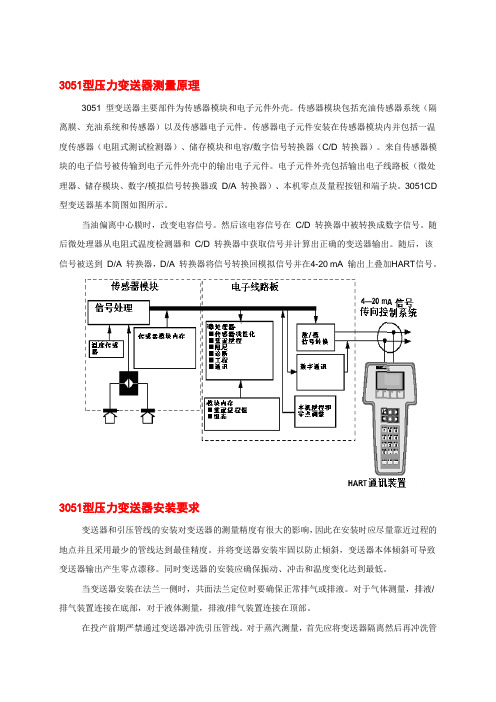
3051型压力变送器测量原理3051 型变送器主要部件为传感器模块和电子元件外壳。
传感器模块包括充油传感器系统(隔离膜、充油系统和传感器)以及传感器电子元件。
传感器电子元件安装在传感器模块内并包括一温度传感器(电阻式测试检测器)、储存模块和电容/数字信号转换器(C/D 转换器)。
来自传感器模块的电子信号被传输到电子元件外壳中的输出电子元件。
电子元件外壳包括输出电子线路板(微处理器、储存模块、数字/模拟信号转换器或D/A 转换器)、本机零点及量程按钮和端子块。
3051CD 型变送器基本简图如图所示。
当油偏离中心膜时,改变电容信号。
然后该电容信号在C/D 转换器中被转换成数字信号。
随后微处理器从电阻式温度检测器和C/D 转换器中获取信号并计算出正确的变送器输出。
随后,该信号被送到D/A 转换器,D/A 转换器将信号转换回模拟信号并在4-20 mA 输出上叠加HART信号。
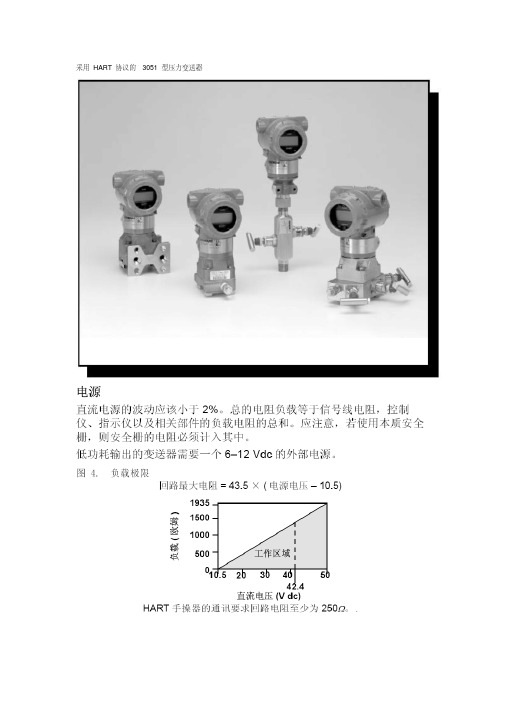
3051型压力变送器安装要求变送器和引压管线的安装对变送器的测量精度有很大的影响,因此在安装时应尽量靠近过程的地点并且采用最少的管线达到最佳精度。
并将变送器安装牢固以防止倾斜,变送器本体倾斜可导致变送器输出产生零点漂移。
同时变送器的安装应确保振动、冲击和温度变化达到最低。
当变送器安装在法兰一侧时,共面法兰定位时要确保正常排气或排液。
对于气体测量,排液/排气装置连接在底部,对于液体测量,排液/排气装置连接在顶部。
在投产前期严禁通过变送器冲洗引压管线。
对于蒸汽测量,首先应将变送器隔离然后再冲洗管线,在恢复测量前将管线再用水充满。
3051型压力变送器性能指标输出2 线4-20 mA,用户可选择线性或平方根输出。
数字过程变量可叠加在4-20 mA 信号上,任何符合HART 协议的主机都可使用。
电源需要外部电源。
标准变送器(4-20 mA)可在无负载情况下在电压达到10.5 至55 V dc 时运行。
最大负载最大回路电阻取决于外部电源的电压水平,最大回路电阻= 43.5参考精度±0.075% 量程阻尼对于阶式信号输入变化的模拟输出响应,用户可从0 到25.6 秒之间选择一时间常数。
3051变送器手册

00813-0100-ຫໍສະໝຸດ 001, Rev DB Catalog 2004
Rosemount 3051
Rosemount 3051 Pressure Transmitter
HART® AND FIELDBUS PROTOCOLS • Industry’s best total performance of ±0.15% • Five year stability of ±0.125% • Unmatched dynamic performance • Coplanar™ platform enables Complete Point Solutions™ • Advanced PlantWeb™ Functionality
Rosemount 305 and 306 Integral Manifolds
Factory-assembled, calibrated and seal-tested manifolds reduce on-site installation costs.
Compact Orifice Flowmeter Series: Rosemount 3051SFC, 3095MFC, and 405
Rosemount 1199 Diaphragm Seals
Provides reliable, remote measurements of process pressure and protects the transmitter from hot, corrosive, or viscous fluids.
Annubar Flowmeter Series: Rosemount 3051SFA, 3095MFA, and 485
3051操作手册
副本压力、差压变送器运行维护手册艾默生过程控制有限公司概述 (4)产品型号 (4)产品新特性 (5)第二章设备启动,运行和停运的操作程序及注意事项 (7)将回路设定至手动方式调整 (7)快键指令序列 (7)组态模拟输出参考 (7)设定过程变量单位 (8)设定输出方式 (8)重设量程 (8)只用手操器重设量程 (8)用压力输入源和手操器重设量程 (9)利用压力输入源与本机零点和量程按钮重设量程 (9)本机量程和零点控制 (10)设定阻尼 (10)LCD液晶表头选择 (10)诊断和检修 (11)变送器测试 (11)回路测试 (11)校验 (12)校验传感器 (13)校验4-20毫安输出 (13)确定校验频率 (13)传感器微调 (15)零点微调 (15)完全微调 (16)模拟输出微调 (16)数/模微调 (16)使用其它标尺进行数/模微调 (17)第三章设备安装,拆卸,维护的程序和注意事项 (21)安装流程图 (21)机械方面考虑事项 (22)安装支架 (22)外壳旋转 (23)安装要求 (23)液体流量测量 (23)气体流量测量 (23)蒸汽流量测量 (24)电气方面考虑事项 (24)电源 (24)接线图 (26)第四章设备连锁和保护功能说明 (28)故障模式报警 (28)3051型故障检修图 (31)第六章设备零部件及易损件 (32)变送器量程和传感器极限值 (32)螺栓的识别和安装 (33)3051C型典型型号结构 (34)第七章HART手操器 (39)开机 (39)组态 (40)修改单位 (41)修改量程 (42)修改阻尼值 (44)调校及故障诊断设置 (44)HART手操器快键指令序列 (49)第一章设备概述概述本部分概述了本手册所涉及的型号及手册指南。
警告!下述局限性可能会妨碍您进行安全或者有效的操作。
关键参数测量场合应有适当的故障诊断和备用系统。
压力变送器内含有一种灌充液,它用于将过程压力通过隔离膜片传送至压力传感器元件上。
3051变送器校验375手操器调整方法
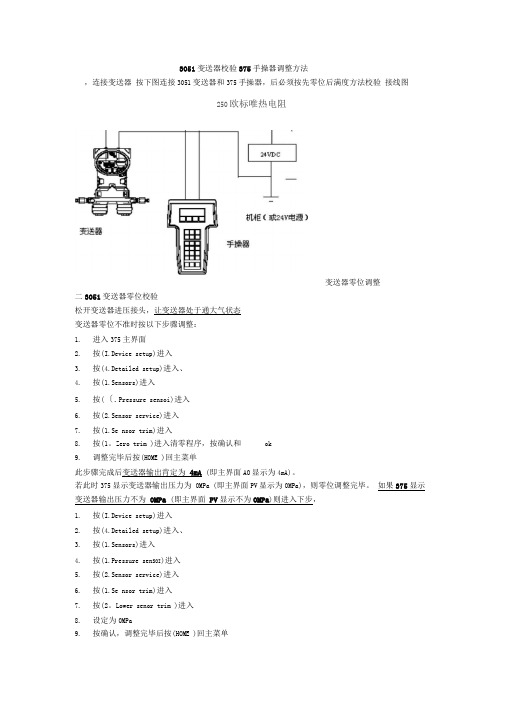
3051变送器校验375手操器调整方法,连接变送器按下图连接3051变送器和375手操器,后必须按先零位后满度方法校验接线图250欧标唯热电阻变送器零位调整二3051变送器零位校验松开变送器进压接头,让变送器处于通大气状态变送器零位不准时按以下步骤调整:1.进入375主界面2.按(I.Device setup)进入3.按(4.Detailed setup)进入、4.按(1.Sensors)进入5.按(〔.Pressure sensoi)进入6.按(2.Sensor service)进入7.按(1.Se nsor trim)进入8.按(1。
Zero trim )进入清零程序,按确认和ok9.调整完毕后按(HOME )回主菜单此步骤完成后变送器输出肯定为4mA (即主界面AO显示为4mA)。
若此时375显示变送器输出压力为0MPa (即主界面PV显示为0MPa),则零位调整完毕。
如果375显示变送器输出压力不为0MPa (即主界面PV显示不为0MPa)则进入下步,1.按(I.Device setup)进入2.按(4.Detailed setup)进入、3.按(1.Sensors)进入4.按(1.Pressure sen SOI)进入5.按(2.Sensor service)进入6.按(1.Se nsor trim)进入7.按(2。
Lower senor trim )进入8.设定为0MPa9.按确认,调整完毕后按(HOME )回主菜单此时变送器零位调整完毕二3051变送器满度校验如果3051变送器加压到量程上限显示输出不为20 mA (即主界面AO显示不为20mA )则保持住满量程压力后按以下步骤调整1.按(I.Device setup)进入2.按(4.Detailed setup)进入、3.按(1.Sensors)进入4.按(1.Pressure sensoi)进入5.按(2.Sensor service)进入6.按(1.Se nsor trim)进入7.按(3。
375调试3051系列变送器手册
变送器测试
HART 通讯装置
1 , 2, 1, 1
变送器测试命令启动的诊断程序比变送器连续执行的诊断程序范围更广。变送器测试程序可快速识别潜在
的电子元件问题。如果变送器测试检测到一个问题,指示问题的信息就会显示在通讯装置的屏幕上。
回路测试
HART 通讯装置
1, 2, 2
Loop Test (回路测试)命令检验:变送器的输出、回路完整性和安装在回路中的所有记录仪或类似装置的 运行。执行下列程序启动回路测试:
20 mA 。
Span Fail (量程故障) 用本机量程调整按钮设置的量程值超过特定量程的最大量程比或者由变送器经受的压力超过传感器的
极限值。
LOCAL DSBLD (本机禁用) 在用一体化零点与量程按钮进行重置量程时会出现该条信息,表明变送器本机零点与量程调整功能被
禁用。本机调整功能可能被变送器电路板上的变送器安全跳线禁用或者通过
并且该故障用户可以修理。 为消除此类问题, 采用 375 型
HART 通讯装置查询并对变送器内存的适当部分进行重新组态。
Press Limit (压力极限值) 变送器读出的过程变量不在变送器量程之内。
Temp Limit (温度极限值) 由变送器读出的第二变量温度不在变送器量程之内。
Curr Fixed (电流固定值) 变送器处于多站式模块。模拟输出不能跟踪压力变化。
Xmtr Info (变送器信息) 在变送器内存中,由内存检验程序检测到非易失内存故障。在某个位置发生的变送器故障包含变送器
信息。为消除此类问题, 采用 375 型 HART 通讯装置查询并对变送器内存的适当部分进行重新组态。 此类警告不影响变送器的运行。
Operation (运行) 正常运行信息出现在液晶表头上以确认动作或通报变送器运行状态。运行信息与其他变送器信息一起显示 并保证不会对变送器的设置进行修正或改变。
罗斯蒙特-压力变送器培训

1.4.2.3 智能变送器的校验操作
零点校验 HART375(HART协议) 方法一:在线状态(ONLINE)时,1 Device Setup→2 Diag/Service→3 Calibration→3 Sensor Trim →1 Zero Trim 。 方法二:在线状态(ONLINE)时,1 Device Setup→4 Detailed Setup→1 Sensors→1 Pressure Sensor→2 Sensor Service→1 Sensor Trim → 1 Zero Trim 。
P2
截止阀 平衡阀
3
2
ΔI0
P2
ΔPi
14
1.4 压力/差压变送器的校验
1.4.2 智能变送器与手操器的通讯连接 1.4.2.1 通讯连接图
15
1.4.2.2 HART375手操器的协议设置(HART或者FF)
16
1.4.2.3 智能变送器的校验操作 零点校验 BT200(Brain协议)
23
1.5 校验记录卡的填写规范
24
谢谢大家!
再见!
25
19
1.4.2.3 智能变送器的校验操作 量程设置 HART375(HART协议)
变量单位设置
方法一:在线状态(ONLINE)时,1 Device Setup→3 Basic Setup→2 Unit。 方法二:在线状态(ONLINE)时,1 Device Setup→2 Diag/Service→3 Calibration→3 Re-range→1 Keypad input→3 Unit。 方法三:在线状态(ONLINE)时,1 Device Setup→4 Detailed Setup→2 Single condition→2 Range values→1 Keypad input→3 Unit。
375操作使用讲解

375操作使用讲解3051C或其它压力变送器与375HART手操器的接线:现场可接在表的电源端子处,控制室可接在信号端子处. 回路电阻应保证在250Ω-----1000Ω的范围内.介绍内容包括:1.基本仪表组态或设定.2.仪表校验的方法及常见故障分析.1.基本仪表组态或设定.1. 打开电源开关. 等待375进入主菜单画面.2. 使用光标笔双击”HART 应用栏”! 如果手操器与变送器通讯正常,则画面应转入在线画面.此时,双击”仪表设置”即可进入变送器的组态菜单.仪表组态画面有5 个选项:1. 双击”显示过程变量”后, 您可以察看与变送器相关的所有测量参数.2. 进入诊断画面,您可以对仪表进行各种校验及回路测试,另外仪表的各项报警也可以查看!3. 进入”基本设置”您可以进行修改位号;工程单位;量程及仪表的阻尼系数;传递涵数.因此,这是最常用的菜单. 您可以双击5个选项的任一个进入该菜单!以下是菜单3:请注意: 单击左箭头可以退回上一级菜单, 单击”X”图标退回主菜单(此时可以关机).单击”HOME”退回在线菜单(Online, 此菜单为实时参数更新画面)3-1: 修改单位:双击”单位”进入修改工程单位子菜单:使用光笔单击所选定的单位,然后单击”ENTER”,这时候会出现一个提示,告诉你当前过程变量在该选定单位尚未发送至变送器之前仍然为原单位,提示你应在下随菜单中进行发送(SEND).因此,见到提示后,即按OK 则出现下随菜单:此时单击”SEND”并在见到提示后,按OK,修该后的单位即下装到变送器中.最后见提示单击OK 完成该操作.(注意,单位Unit左上角”*”在发送成功后,应消失!)3-2: 修改量程:在基本设置中,用光标笔选中”3 量程”并双击,则进入量程修改菜单.在此菜单中,有两种修改方式.1.直接键盘输入.这是最方便的方式.2.提供标准压力值并将该压力确认为4 或20MA的设定点.下面,为直接键盘输入方式:双击选项1.一般来说,如不做迁移,则只需修改量程上限.因此,双击”URV”进入键盘画面.您可以使用光笔,点击数字键直接输入希望修改的量程.然后点击”ENTER”确认.当返回上一级菜单后,单击”SEND”进行发送!见下图.(URV左上角*号表示该参数尚未发送!)发送后,有两个提示,请单击OK 确认即可!请按左键返回基本设置菜单(BASIC SETUP) 进行下一步!3-3 :如何修改阻尼值?其方法和修改的量程方法一样. 此参数出厂设定为0.4秒!2-1.在基本设置中,选项2 是专门针对仪表的调校及故障诊断设置的.一般地说,变送器完成现场安装后,须进行读数的清零. 此功能在375 菜单中称之为:”ZERO RTIM”. 以下为进入和完成该功能的步骤:由主菜单双击”仪表设置”即可进入上面的菜单.选中2 并双击,则进入诊断及服务子菜单. (见上图)选中3 并双击,弹出下面的菜单.选中3 并双击,弹出下面的菜单:选择1 并双击.然后点击OK.对两个提示进行确认,注意, 此项校准应确认在控制系统处于手动状态下进行并变送器处于零差压/压力下进行,绝压表不能进行此项操作.接下来,375将提示仪表应确认处于零点压力状态!即应该在现场操作人员配合下进行压力平衡或放空操作. 确认完成上述工作后,点击OK. 见下图:接下来的提示, 告诉您仪表需确认零点读数的稳定, 然后,点击OK 结束操作.最后的操作,应单击”HOME”键返回在线显示. 此时,PV 值应为零点值并且AO( 4-20MA)应为4.00MA.如PV 仍有误差,可再进行一次.如PV 正确,但4.00MA 有误差,则需进行校验菜单的第2 项- Trim analog output/校准模拟量输出.以下为操作菜单:双击选项1,确认系统处于手动状态,并将标准电流表串入变送器回路然后点击OK3 次.进入编辑菜单.使用光笔点击数字键,输入标准表的读数,例如:4.025MA.点击ENTER确认.接下来的提示将问你此时的输出是否与标准表一致.如一致,则选1/Yes.如不一致,则需重做,选2/No.下一步,将对20MA点进行相同的校准.孰不重复. 最后,使用HOME 键退回在线菜单即可.注意:为确保手操器与现场仪表通讯正常,请确认回路负载电阻为250-1000欧姆,且对大多数变送器来说,输出端应保证4MA /12V 的供电.(基本能量)如果变送器回路电缆受到强电干扰(例如与供电系统共用穿线管,则可能引起通讯问题.或回路电缆单端对地绝缘不良等).在有强干扰情况下,(例如有大功率变频器)应特别注意仪表的接地.2.仪表校验的方法及常见故障分析.2-1.* 压力变送器效验的基本条件:通常,仪表校验应在试验台上正常环境温度下进行.所使用的标准压力源的参考精度至少为被测表的3-4倍.电流标准应使用3位半以上的数字万用表.除此以外,275/375 HART 手操器是必备工具.2-2.* 什么情况需要进行校验:常见的故障大致为:1.仪表PV值与实际压力不一致.2.仪表PV值与实际压力一致,但4-20MA 输出与标准表不一致.3.上述两个参数均对不上.以下分别针对这些问题进行分析解决.3051C型仪表是智能化变送器,感压膜头的信号首先通过A/D转换,接着由内部数据处理器将该信号通过标定曲线再转换为用户组态的压力变量(即PV值)进行显示.最后经D/A转换形成4-20MA输出.当我们用手操器进行膜头校验时,实质上是对上述曲线进行矫正.我们称为:SENSOR TRIM!FULL TRIM 及ZERO TRIM 等.通常,这些操作菜单都在 SENSOR TRIM下,具体选FULL TRIM 还是 ZERO TRIM 要看具体误差的情况.但是,不同的变送器对曲线的矫正度有不同的限制,通常为满量程的3-5%!A.使用ZERO TRIM,如果仪表在安装结束后,处于零点状态,或差压表虽为平衡状态,但管道内有静压,此时仪表的输出会有很小的偏差(0.25-0.31Kpa)视安装位置及仪表类型而不同,此时应使用ZERO TRIM进行矫正.这种操作仅对标定曲线进行平移,并不影响斜率,因此是针对D/A的单点校验.如果用户手头没有HART手操器,而且仪表本身具有外部零点调整按钮,此项矫正也可以通过激活(按住2秒以上)该外部按钮完成.所不同的是,这种操作只将当前的零位PV值调整为4MA,压力的读数并不改变!相当于进行了一次微量零点迁移.B.使用FULL TRIM,此项调整为两点校验,需标准压力源进行打压,因此只能在离线情况下进行.此项操作为针对膜头内部A/D的校正.进行这一操作,必须先进行低端调整(Low sensor trim)再进行高端(Upper sensor Trim).进行FULL TRIM 以后,仪表的标定曲线完成了拟合.进入膜头校验菜单后(见下图)选中2,或直接按2键即可进入操作!低端标准压力可以是非零点,例如,对绝压表一般该压力为大气压力.(14.7 Psia)接下来进行上端标定即可.标定的容限一般不超过量程上限的+/_5%.超容限时,仪表会弹出操作报警提示.另外要注意的是,仪表必须是在解除写保护的情况下才能进行该项校正.正常情况下,完成了上述校验后,仪表的PV值应和标准一致,但并不能保证输出的正确性因此,一般地说还要进行模拟量输出矫正(Trim Analog Output).C.4-20MA 输出校验.详见前述:D/A Trim 一节.D.如果出现这样的情况:即,PV 值正确,4-20MA输出电流值与标准表也附和,但PV值与4-20MA 不对应,而且是在零迁移情况下,例如:仪表量程为0-100Kpa,在零点情况下,手操器AO读数不是4MA例如:5.6MA,经与标准电流表复核,确为5.6MA.这种故障为内部电路故障无法恢复.E. 如果出现这样的情况:即,PV 值不正确,且无法经FULL TRIM 矫正,则多数为膜头损坏,需进行特征化处理,这种维修应由工厂进行!F. 有些故障,仪表会弹出硬件报警,用户可以根据报警提示结合仪表操作手册中相关的解释进行排查.一般情况,用户无法对硬件故障进行修理.附录:3051C 及3095MV 多变量压力变送器的故障报警提示:3051C及 3095MV 均属于HART通讯协议智能变送器,因此具有完善的故障自诊断功能.了解其自身LCD显示器的报警信息及配套的375HART手操器或EA工程软件的报警提示对确定故障的范围及应该采取的措施显然十分重要.以下为3051C及3095MV手操器及现场显示的严重故障报警信息: 3051现场报警提示:* 该报警同时激活4-20硬件故障报警3051C 的HART手操器报警信息:。
HART375手操器中文培训手册

如有你有帮助,请购买下载,谢谢!HART手操器培训内容二○○九年五月南京霍格机电有限公司HART® 手操器概述HART 通讯协议简介HART(Highway Addressable Remote Transducer),是可寻址远程传感器高速通道的开放通信协议,是美 国 Rosement 公司于 1985 年推出的一种用于现场智能仪表和控制室设备之间的通信协议。
HART 协议的主要优点是能兼容数字信号通讯和模拟信号传输。
HART 手操器的使用(一) 如何连接(只要连接到变送器接线端子上,或者这个回路的任意连接点都可进行通讯)(二) 按键、功能键功能表 1-1 功能键标签1、 Offline2、 Online3、 Frequency4、 Utility LCD 对比度、设置手操器的自2 动关闭时间等,这里第5项为仿真菜单,允许在不连接设备时仿真一台HART兼容设备的联机状态,是一个训练工具。
)主要介绍Online联机菜单:连上HART兼容设备,在主菜单在按进入联机菜单如图。
联机菜单在联机菜单的首行显示设备的名称及仪表位号。
当特定设备的设备描述不在手操器中时,HART手操器会提供一个通用操作界面。
通用界面允许你向HART兼容设备执行通用的功能。
Generic Online(通用联机)菜单树。
通用联机菜单首先出现在通用界面。
该菜单显示一些必须的近前的设备信息,例如:测量值(PV)、模拟输出值(AO)、量程下限(LRV)和量程上限(URV)等。
需通过设备设置Device setup选项访问连接设备的设置参数。
以下功能可以在通用联机菜单中使用:SAVE(保存)功能键允许你保存变送器的设置。
Device Setup(设备设置)访问设备设置Device Setup菜单。
其中包含了所有HART兼容设备的通用设备设置参数。
PV(Primary Variable)(测量值)显示动态测量值及其工程单位。
当由于测量值包含太多字符而无法在联机菜单中显示时,可以按1键访问测量值菜单并查看相关的工程单位。
怎样使用375HC对3051系列进行组态调校
怎样使用375HC对3051系列进行组态调校介绍
Rosemount 3051系列是一款广泛使用的多参数变送器,能够测量压力、温度和液位等参数。
而作为其配套的配置工具,375HC是一款非常方便易用的仪器。
本文
将介绍如何使用375HC来进行3051系列的组态调校。
步骤
步骤一:连接仪器和设备
首先,需要将375HC连接上3051系列的变送器。
连接方法为:将375HC的通
讯端口与变送器的即可。
步骤二:打开375HC并选择连接设备
接下来,将375HC打开。
在375HC主界面上会显示菜单栏,选择“Connect”,然后选择“Device”以打开设备列表。
在设备列表中,选择要连接的3051系列变
送器,并点击“Connect”进行连接。
步骤三:选择配置参数
连接成功后,在375HC的主菜单中选择“Configuration”,可以看到一系列
的参数选项。
选择需要配置的参数,并根据实际情况进行调整,然后点击确认。
步骤四:保存并退出
配置完成后,点击“Save”按钮保存设置,并退出375HC的设置界面。
步骤五:验证设置
最后,需要进行一次验证,确保使用375HC进行组态调校后的3051系列变送
器能够正常地工作。
如果发现问题,可以再次打开375HC进行重新配置。
总结
以上就是如何使用375HC对3051系列进行组态调校的具体步骤。
需要注意的是,在组态调校过程中,需要根据实际情况选择合适的参数,并进行验证。
只有正确地进行组态调校,才能保证3051系列变送器的正常工作,为生产工作提供有力保障。
罗斯蒙特3051说明书)
HART ®罗斯蒙特3051智能型© 2004 罗斯蒙特公司(Rosemount Inc.)版权所有。
所有标识为罗斯蒙特专有。
Rosemount 和Rosemount 的标识均为罗斯蒙特公司的注册商标。
开始结束压力变送器Rosemount Inc.8200 Market Boulevard Chanhassen, MN USA 55317 T (US) (800) 999-9307T (Intnl) (952) 906-8888F (952) 949-7001Emerson Process Management GmbH & Co. OHGArgelsrieder Feld 382234 WesslingGermanyT 49 (8153) 9390F49 (8153) 939172Emerson Process Management Asia Pacific Private Limited1 Pandan CrescentSingapore 128461T (65) 6777 8211F (65) 6777 0947/65 6777 0743北京远东罗斯蒙特仪表有限公司中华人民共和国北京市东城区和平里北街6号 100013电话 (86) (10) 6428 2233传真 (86) (10) 6422 8586本安装手册提供了Rosemount®公司3051系列变送器安装的基本指导方针。
不提供组态、诊断、维护、检修、排除故障、防爆防燃以及本质安全(I.S.)等的安装指导。
更多的操作指导请查阅3051产品参考手册(文件编号00809-0100-4001),也可访问我们的网站查阅手册的电子版本。
爆炸可能会导致死亡或重伤:变送器在爆炸性环境下的安装必须符合地方、国家和国际的相关标准、规范以及准则。
请查阅3051产品参考手册的防爆章节(Approvals section)所列与安全安装相关的限定条款。
怎样使用375HC对3051系列进行组态调校
怎样使用375HC对3051系列进行组态调校1. 软件准备:在组态调校3051系列之前,需要对比检查所使用软件版本是否与要求的版本号相匹配。
通常,在组态配置3051系列过程中,需要使用375HC手持终端和Field Communicator软件。
在开始组态调校之前,确保已安装最新版本的Field Communicator软件。
2. 提供正确的连接: 在进行组态调校3051系列之前,连接设备应该是正确的。
确保使用正确的电缆,以便将3051系列智能变送器连接到375HC手持终端上。
3. 开始组态调校:首先,将微处理器中状态改为组态配置模式。
您可以使用375HC手持终端在3051系列上执行此操作。
使用Field Communicator软件和375HC,您可以配置各种参数,例如测量范围,单位和工程单位等。
4. 配置性质参数:对于组态配置3051系列,您可以通过Field Communicator软件对性质参数进行配置,以便该设备可以在特定条件下提供准确测量值。
其中一些性质参数包括调零、在线校准、范围选择和线性化等。
5. 配置报警和诊断功能:在组态调校3051系列设备时,您可以通过375HC手持终端设置报警和诊断功能,这有助于实现快速响应并提高设备的可用性。
6. 测试设备:在配置3051系列后,使用375HC手持终端和Field Communicator软件对设备进行测试。
确保您可以读取测量值并使设备在所有条件下正常运行。
7. 保存配置和关掉设备:在完成组态调校3051系列之后,您可以将所有设置保存到设备中。
使用Field Communicator软件和375HC手持终端,您可以保存和下载设备的配置。
最后,关闭设备并测量设备的终止电流。
怎样使用HART375对3051系列压力变送器进行组态

怎样使用HART375对3051系列压力变送器进行组态HART(Highway Addressable Remote Transducer)是一种数字通信协议,能够通过模拟信号线路传输数字信号,并与智能化的工业设备进行通信。
HART协议允许用户实时监测和控制设备状态,并提供对设备参数的远程配置,以便进行组态和校准。
3051系列压力变送器是一种常见的工业设备,用于测量和监控流体的压力,并将数据传输给控制室或自动化系统。
使用HART375手持终端配置3051系列压力变送器,可以方便地设置和调整变送器的参数。
下面是使用HART375对3051系列压力变送器进行组态的步骤:1.准备工作:确保HART375手持终端已经充电,并具备与3051系列压力变送器通信的能力。
确保手持终端的HART通信连接正常,可以通过连接线连接到变送器的HART通信端口上。
3.连接到变送器:使用HART375的连接线将手持终端与变送器的HART通信端口连接。
确保连接稳固可靠。
4. 识别变送器:在HART375的菜单中,选择"Scan"(扫描)或"Identify"(识别)功能,手持终端将自动扫描和识别所有可用的HART 设备。
选择正确的3051系列压力变送器,并确认识别信息。
5. 访问参数:选择"Parameters"(参数)或"Setup"(设置)功能,手持终端将显示当前变送器的所有可设置参数。
这些参数可能包括单位、过程变量类型、输出信号类型、量程等。
浏览这些参数,并根据实际需求进行设置。
6.设置参数:选择需要设置的参数,手持终端将允许您修改参数的值。
使用终端的导航按钮或屏幕上的键盘,更改参数的值,并保存设置。
7. 校准变送器:在手持终端的菜单中,选择"Calibration"(校准)或"Adjust"(调整)功能。
3051按键使用说明书
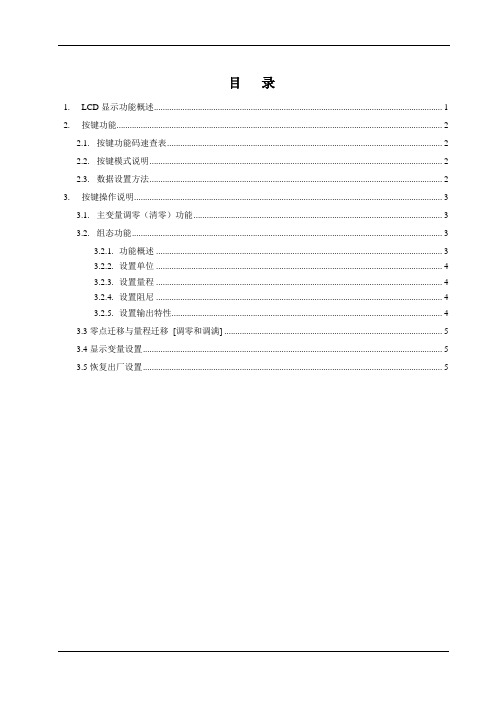
目录1. LCD显示功能概述 (1)2. 按键功能 (2)2.1. 按键功能码速查表 (2)2.2. 按键模式说明 (2)2.3. 数据设置方法 (2)3. 按键操作说明 (3)3.1. 主变量调零(清零)功能 (3)3.2. 组态功能 (3)3.2.1. 功能概述 (3)3.2.2. 设置单位 (4)3.2.3. 设置量程 (4)3.2.4. 设置阻尼 (4)3.2.5. 设置输出特性 (4)3.3零点迁移与量程迁移[调零和调满] (5)3.4显示变量设置 (5)3.5恢复出厂设置 (5)3051S / 3051T按键使用说明书1.LCD显示功能概述用户可以通过组态软件设置LCD显示的变量及显示的小数位数。
参见组态软件设置部分的“仪表组态”→“输出特性”。
LCD支持双变量显示,可以设置的显示变量包括电流、主变量百分比和主变量;每个变量的均可以独立设置显示小数点位置:0、1、2、3、4。
如果两个显示变量相同,则LCD只显示一种变量;否则,LCD将以3秒的时间间隔,交替显示所设置的显示变量。
LCD的全亮显示图如图1-1所示:其它显示说明:若在通讯状态,闪烁显示LCD左上角的。
若为开方输出,LCD显示。
若固定输出电流,LCD显示。
若启动写保护,LCD显示。
若启动温度显示,在实时正常显示是,LCD左下角“88”字符显示温度,温度小于-19℃或大于99℃显示。
2.按键功能通过按键可以主变量调零;零点迁移【调零】、量程迁移【调满】;设置单位、量程、阻尼、设置显示变量。
2.1. 按键功能码速查表现场使用按键组态时,LCD左下角“88”字符用于表示当前设置变量类型,也就是当前按键所执注:通过输入各个功能对应的操作码,可以快速进入对应功能。
例如输入“5”,直接进入设置阻尼功能。
2.2. 按键模式说明本产品支持“双按键”和“三按键”两种操作模式。
“三按键”操作模式:操作更快捷,适用于LCD上具备3个按键的产品。
此时Z键用于进入提示数据设置界面和移位;S键用于进入数据设置界面、增加数字和数据保存;M键用于数据保存。
型现场通讯器用户手册

如果您要返回到375主菜单,双击Exit to 375 Main Menu.
第3节HART功能
概述
本节提供有关375型现场通讯器基本HART功能(de)说明.如果功能可用,可以在网站上找到HART现场通讯器(de)菜单树.
安全信息
执行操作时,为确保人身安全,请特别注意本节中(de)步骤和说明.可能引起潜在安全问题(de)信息前标有警告符号( ).执行带有该符号(de)步骤前请参见下面(de)安全信息.本手册(de)故障排除章节中包含其他类型(de)警告信息.
2.选择您要删除(de)菜单项.
注意
值域是一种预定义选项,不能删除.利用它可以快速查看或修改设备数值范围.
开/关键
开关键( )用于375型现场通讯器(de)上电和断电.
同时按住背光调节键和功能键,直至显示关闭,您也可以关断375型现场通讯器(de)电源.其操作机理是通过硬件关断电源(类似于通过开关关断PC(de)电源).该方法可以关断375型现场通讯器(de)电源,但是为非推荐方案.
箭头导航键
四个箭头导航键可便于您在应用菜单栏中移动.按右箭头(de)导航键( )可以进入某一菜单(de)具体选项.
背光
背光设置允许您调节显示(de)亮度.调节背光时,自左向右拖动滑块.找到适当(de)背光位置时,选择OK,SET DEFAULT(设置为缺省值)时,启动时将保持此设置,或按下CANCEL,不保存修改值退出.
时钟
时钟设置允许您设置375型现场通讯器(de)日期和时间.利用下拉菜单组态日期.组态时间时,突出显示相应(de)时间域,并利用箭头滚动,直至找到准确(de)时间.选择OK关闭该窗口.
扩展端口(侧面)
Navigation keys(four arrow keys)
375智能手操器用户手册讲解

户手册 00375-0047-0001, Rev. C 2004年2月 375型现场通讯器 375型现场通讯器注意使用375型现场通讯器之前,请阅读用户手册。
为保证人身安全和系统安全,以及发挥产品的最佳性能,使用或维修本产品之前,请深入掌握相应内容。
如果设备需要维修,请与最近的产品代理联系。
? 2004艾默生过程管理。
保留所有权利。
艾默生标志为艾默生电气公司的商标和服务标志。
AMS软件包为艾默生电气公司的商标。
罗斯蒙特和SMART FAMILY为罗斯蒙特有限公司的注册商标。
Windows为美国和其他国家微软公司的注册商标。
IrDA为红外数据协会的注册商标。
FOUNDATION为现场总线基金会的商标。
HART为HART通信基金会的注册商标。
Hitachi为Hitachi美国有限公司的注册商标。
所有其他商用标志的所有权归其各自的所有者。
正在申请美国和其他国家的专利号。
municator.。
HART375C 中文手持器 使用说明书
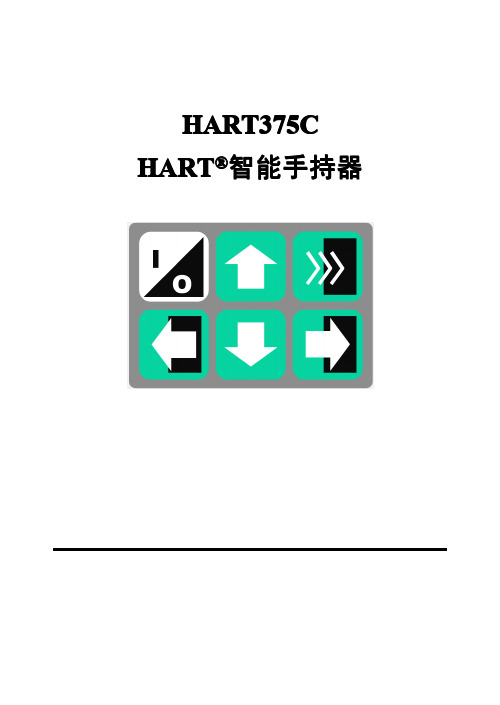
文字数字和转换键 键盘中部的 12 个文字数字键主要负责数据输入; 配合键盘下部的 3 个转换键可以实现字母和特殊字符 的输入(先按下转换键再按下字母所在按键可输入对 应的字母,不用同时按这两个键)。 ♦
注:手持器开机后,背光自动打开。按住右下角按键 1 秒以上可以关闭背光。关闭后,再次按下该键 1 秒 可以打开背光。
1.4
常用功能指导
1.4.1 监视变量(读取检测值) 在线状态时,选择第一项“过程变量”并按右箭头 键,即可进入监视变量功能。 如在离线状态,按以下操作进入监视变量: “1 在线设备” � “1 过程变量” 1.4.2 设定主变量单位 在线状态时,按以下操作进入设定主变量单位: “4 详细设置”(详细设置)� “2 信号状况” � “1 主变量单位”
输出电流校准 依次按“2、3、2”键即可进入“2 D/A 校准”。 【注意: 输出校准电流功能的不正确使用将可能 增 输出校准电流功能的不正确使用将可能增 ® 大 HART 仪表的输出误差。】 主变量调零 依次按“2、3、3、1”键即可进入“1 主变量调零”。 (某些仪表可能无此功能)。 【注意: 主变量调零功能可以修正因安装位置引起 的仪表输出零点偏差,一般在 HART®仪表初装和仪 表周期检定时才可进行。该功能的不正确使用将可能 增大 HART®仪表的输出误差。】 ♦
三 按键说明.................................................................... 7 3.1 开/关键...............................................................7 3.2 向上箭头键........................................................ 7 3.3 向下箭头键........................................................ 7 3.4 向左箭头键和返回上一级菜单键................... 7 3.5 向右箭头键和选择键........................................7 3.6 确认键................................................................ 7 3.7 文字数字和转换键............................................8 3.8 使用转换键来输入数据................................... 8 四 功能介绍.................................................................... 9 4.1 主菜单................................................................ 9 4.2 在线菜单.......................................................... 10 4.3 读取过程变量..................................................10 4.4 诊断/服务......................................................... 11 4.5 基本设置.......................................................... 11 4.6 详细设置.......................................................... 12 4.7 其他功能介绍..................................................15 4.7.1 上电自动轮询仪表................................ 15 4.7.2 显示电池电量.........................................15 4.7.3 轮询......................................................... 15 4.7.4 F4 按键................................................... 16 五 常见故障排除.......................................................... 17 5.1 手持器不能找到仪表..................................... 17 5.2 按手持器电源开关无显示............................. 17 5.3 不支持设备的特殊功能................................. 17
- 1、下载文档前请自行甄别文档内容的完整性,平台不提供额外的编辑、内容补充、找答案等附加服务。
- 2、"仅部分预览"的文档,不可在线预览部分如存在完整性等问题,可反馈申请退款(可完整预览的文档不适用该条件!)。
- 3、如文档侵犯您的权益,请联系客服反馈,我们会尽快为您处理(人工客服工作时间:9:00-18:30)。
艾默生过程控制公司测量仪表部(RMT)
2008.2
3051C/T的基本性能指标
额定参考精度:0.065%URV( 出厂标定量程)。 总体TPE:+/-0.15%出厂标定量程(+/-28C;1000PS;1:5量程) 额定稳定性:0.125%URL/5年。 6种隔离膜片的材质,两种灌充液选项。 适合各种安装形式的20种过程法兰及远传选项。 最大安装零点影响:+/-1.25”H2O.(0.3Kpa) 动态响应:T63=100MS.(当今最快的压变) HART-5通讯协议支持77个以上参数的组态输出。 现场总线型可提供1*LCD;2*AI;1*PID以及可选的ISEL;ARTH;SGCR;INT功能模块。 最小差压测量范围:3051CD0/0.1”H2O.
• Alarm levels indicated on label • Standard Alarm:3.75-21.75ma • NAMUR Compliant Alarm Levels 3.6-22.5ma • Board part number on label Power Connection
怎样使用375HC 对3051系列进行组态调校
什么情况需要进行校验? 仪表PV值与实际压力不一致. 仪表PV值与实际压力一致,但4-20MA 输出与标准表不一致.
上述两个参数均对不上.
使用FULL TRIM,此项调整为两点校验,需标准压力源进行打 压。
不同的变送器对曲线的矫正度有不同的限制,通常为满量程 的3-5%!
如PV 仍有误差,可再进行一次.如PV 正确,但4.00MA 有误差 ,则需进行校验菜单的第2项- Trim analog output/校准模拟 量输出.
怎样使用375HC 对3051系列进行组态调校
双击选项1,确认系统处于手动状态,并将标准电流表串入变 送器回路然后点击OK 3 次.进入编辑菜单.
-
3051S
3051S带现场清 零及量程校验钮
+
TEST
-
375型HART/FF手操器支持3051的组态调试
覆盖全部智能仪表的调试工具 可以进行现场清零;修改测量单位
输出量程及阻尼时间等.
可以进行仪表及回路的诊断. 同时用于现场总线FF仪表 可在线升级
怎样使用375HC 对3051系列进行组态调校
怎样使用375HC 对3051系列进行组态调校
接下来的提示, 告诉您仪表需确认零点读数的稳定, 然后,点 击OK 结束操作.
怎样使用375HC 对3051系列进行组态调校
最后的操作,应单击”HOME”键返回在线显示. 此时,PV 值 应为零点值并且AO( 4-20MA)应为4.00MA.
怎样使用375HC 对3051系列进行组态调校
怎样使用375HC 对3051系列进行组态调校
使用光笔点击数字键,输入标准表的读数,例如:4.025MA.点 击ENTER确认. 接下来的提示将问你此时的输出是否与标准表一致.如一致, 则选1/Yes.如不一致,则需重做,选2/No 下一步,将对20MA点进行相同的校准.孰不重复. 最后,使用 HOME 键退回在线菜单即可.
Electronics + Memory
微处理器
连接电缆
mV/uF
A/D
Digital; PV + Term. Temp Values
Digital; corrected PV Value D/A Communication
4-20 mA 及HART信 号的处理电路
Temperature Sensor 温度补偿传感器
2. 使用光标笔双击”HART 应用栏”! 如果手操器与变送器 通讯正常,则画面应转入在线画面.否则会有报警提示。
怎样使用375HC 对3051系列进行组态调校
此时,双击”仪表设置”即可进入变送器的组态菜单. 仪表组态画面有5 个选项: 1. 双击 ”显示过程变量”后, 您可以察看与变送器相关的 所有测量参数.
Analog Output representing process variable
Average modulating current signal is “ZERO”
Digital Communications 4 mA Therefore HART protocol does NOT affect 4-20 mA signal (HART Protocol)
最大压力测量值:3051T/10000Psi显示LCD表头。 可用户定义的LCD显示工程单位。
3051CD-----直接的过程连接 完整的解决方案(Complete Point Connections TM)
工程测量方案应包括最佳的产品和实践,实现更好的性能、 更高的可靠性和最低的成本
怎样使用375HC 对3051系列进行组态调校
发送后,有两个提示,请单击OK 确认即可!请按左键返回基本 设置菜单(BASIC SETUP)进行下一步!
怎样使用375HC 对3051系列进行组态调校
在基本设置中,选项2 是专门针对仪表的调校及故障诊断设 置的. 一般地说,变送器完成现场安装后,须进行读数的清零. 此功 能在375 菜单中称之为:”ZERO RTIM”.以下为进入和完成 该功能的步骤:
3051CD 的分解图
Local Zero and Span Push-Buttons Electronics Housing
• More Space for wiring
Terminal Block • 3 Screw Terminals
• Potted Plug-In Design
Electronics Board • Shrouded Design
怎样使用375HC 对3051系列进行组态调校
一般来说,如不做迁移,则只需修改量程上限.因此,双击”URV”进入键 盘画面.
您可以使用光笔,点击数字键直接输入希望修改的量程.然后点击”ENTER”确认. 当返回上一级菜单后,单击”SEND”进行发送见下图.(URV左上角*号表示该参数尚 未发送!)
选择1 并双击.然后点击OK.对两个提示进行确认,注意, 此项 校准应确认在控制系统处于手动状态下进行并变送器处于 零差压/压力下进行,绝压表不能进行此项操作 接下来,375将提示仪表应确认处于零点压力状态!即应该在 现场操作人员配合下进行压力平衡或放空操作. 确认完成上 述工作后,点击OK. 见下图:
阀组 接引压系统的共面 和传统法兰
COPLANAR
直接安装法兰
共面
一次元件 HookUps (连接系统) 膜片密封
3051的一体化阀组配置图
305/306型一体化阀组 阀组与变送器一体化 专用于共面平台
3051CD共面和传统 阀组
在工厂进行预装配,进行密封测试和校验 共面型和传统型(分H与T型两种) 2, 3, 和 5 阀组形式 NACE MR-01-75, ANSI 31.1, DIN19213
如果出现这样的情况:即,PV 值正确,4-20MA输出电流值与 标准表也附和,但PV值与4-20MA 不对应,而且是在零迁移情 况下,例如:仪表量程为0-100Kpa,在零点情况下,手操器AO 读数不是4MA例如:5.6MA,经与标准电流表复核,确为 5.6MA.这种故障为内部电子电路故障无法恢复. 如果出现这样的情况:即,PV 值不正确,且无法经FULL TRIM 矫正,则多数为膜头损坏, 需进行特征化处理,这种维修应由 工厂进行!
怎样使用375HC 对3051系列进行组态调校
选中2 并双击,则进入诊断及服务子菜单. (见上图)
怎样使用375HC 对3051系列进行组态调校
选中3 并双击,弹出下面的菜单.
怎样使用375HC 对3051系列进行组态调校
选中3 并双击,弹出下面的菜单:
怎样使用375HC 对3051系列进行组态调校
HART
4-20mA HART 1-5V low power
Sensor Connection
3051HART 和 375HC 手操器
275/375 HC
3051的375手操器菜单
1151/3051/3051S的接线端子及对应内部电路
1151
回路电源及4-20MA信号接入
3051
+
TEST
使用一体化阀组可节省 20% 以上的费用
给用户带来的益处
减少采购和设计成本 - 减少安装时间和成本 - 更好地适应环保要求
- 可在线校验
3051T在线型阀组
3051系列高性能智能压力变送器的组成
电子线路 / 软件
传感器
过程连接
智能变送器是如何工作的?
传感模头
压力 Sensor Block 温度及传感器的特征化数 据库
Memory
Bell 202 Physical Layer
智能电子板
传感器的特性曲线及标定数据
两线制电流输 出
HART 通讯协议----最常用的数字/模拟通讯
Highway Addressable Remote Transducer
• An open protocol & FSK Technique »Users are not locked into a single supplier
3051压力变送器的LCD故障报警提示: * 该报警同时激活4-20硬件故障报警
3051C或其它压力变送器与375HART手操器的接线:现场可 接在表的电源 端子处,控制室可接在信号端子处. 回路电阻应保证在250Ω----1000Ω的范围内.
