VisualBasic数据库系统开发完全手册光盘使用说明
光盘使用说明
光盘使用说明程序运行需要的软件环境操作系统:Windows 98及其以上版本(需要安装插件)。
网页浏览器:IE 4.0及其以上版本。
代码编辑器:各种文本编辑软件,比如:记事本、UltraEdit等等,比较专业的编辑软件有Microsoft FrontPage、Macromedia Dreamweaver以及Microsoft Visual InterDev等等,但是不能使用Word、WPS等文字排版工具进行编辑。
数据库系统:Microsoft Acess 2000或更高版本。
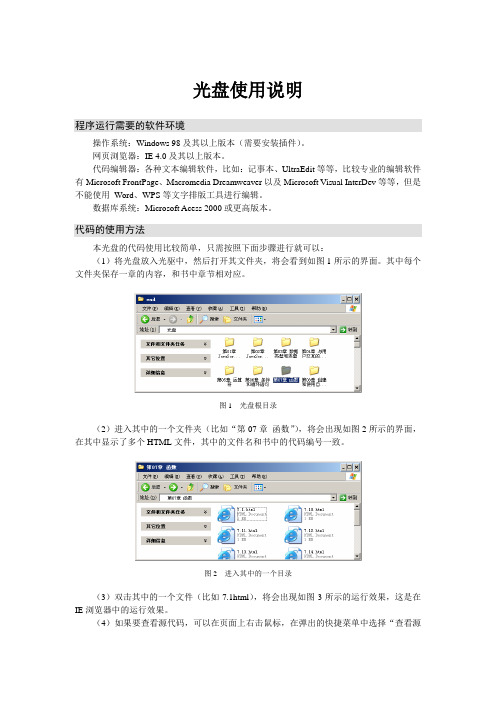
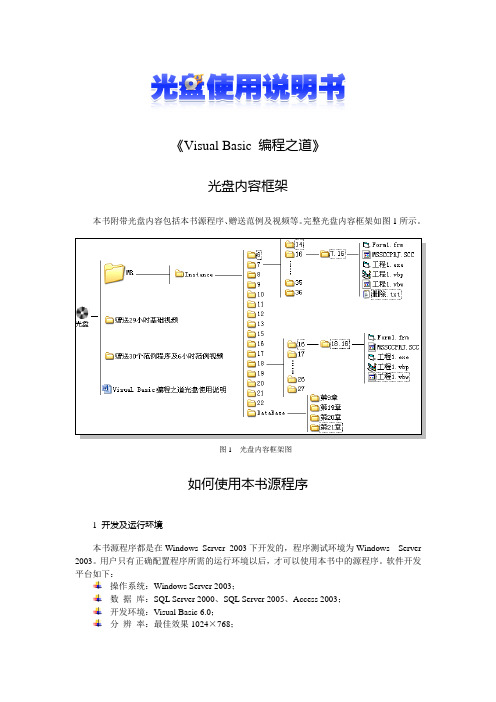
代码的使用方法本光盘的代码使用比较简单,只需按照下面步骤进行就可以:(1)将光盘放入光驱中,然后打开其文件夹,将会看到如图1所示的界面。
其中每个文件夹保存一章的内容,和书中章节相对应。
图1 光盘根目录(2)进入其中的一个文件夹(比如“第07章函数”),将会出现如图2所示的界面,在其中显示了多个HTML文件,其中的文件名和书中的代码编号一致。
图2 进入其中的一个目录(3)双击其中的一个文件(比如7.1html),将会出现如图3所示的运行效果,这是在IE浏览器中的运行效果。
(4)如果要查看源代码,可以在页面上右击鼠标,在弹出的快捷菜单中选择“查看源文件”命令,将会出现图4所示的窗口,这是一个文本编辑器,读者可以在其中进行编辑。
图3 运行效果图4 查看源文件查看实例过程中可能会遇到的问题在读者使用源代码的过程中可能会遇到以下问题:(1)html文件执行被拦截:因为html文件中含有脚本代码,所以在执行时IE会弹出安全提示信息,如图5所示。
图5安全提示信息图6 选择“允许阻止的内容”答复:右键单击IE中的黄色信息条,在弹出菜单中选择“允许阻止的内容”并在弹出的对话框中选择“确定”即可,如图6所示。
(2)程序执行与书中结果不同,如实例“19.4.4 Clone方法.html”,多次执行时可能会出现不一样的结果,后半部分没有执行。
答复:这是因为JavaScript代码中执行了数据插入操作,而数据库中又不允许重复插入导致的,此时,可以打开数据库并将相应的内容删除,再运行该程序即可。
microsoft visual basic使用指南

microsoft visual basic使用指南Microsoft Visual Basic是一种事件驱动的编程语言,广泛用于Windows操作系统中的软件开发。
它基于基本语言,但也具有许多面向对象编程的特性。
以下是使用Microsoft Visual Basic的一些重要指南:1. 安装和设置Visual Basic:首先,您需要安装Visual Studio软件包,其中包括Visual Basic。
安装后,您可以开始创建新项目并开始编写代码。
2. 学习Visual Basic语法:了解Visual Basic的语法是入门的关键。
通过学习变量、数据类型、运算符、条件语句和循环语句等基本概念,您可以开始编写简单的程序。
3. 使用IDE:Visual Basic提供了一个集成开发环境(IDE),用于编写和调试代码。
熟悉IDE的各种工具,如代码编辑器、调试器和窗体设计器,可以提高您的开发效率。
4. 编写事件处理程序:Visual Basic是一个事件驱动的编程语言,您可以编写事件处理程序来响应用户的操作。
了解如何编写按钮点击、菜单选择、文本框输入等事件处理程序是非常重要的。
5. 使用控件和窗体:Visual Basic提供了许多控件和窗体,用于构建用户界面。
了解如何在窗体上添加控件、设置属性、处理事件以及进行布局和对齐操作是重要的。
6. 数据库连接和操作:Visual Basic还支持数据库连接和操作。
学习如何连接到数据库、执行SQL查询、插入、更新和删除数据等操作是开发数据库应用程序的关键。
7. 调试和错误处理:在开发过程中,调试是一个重要的环节。
学习如何使用调试器进行单步调试、设置断点和查看变量的值等技巧可以帮助您找到并解决代码中的错误。
8. 学习其他相关技术:Visual Basic与其他技术和框架集成良好。
学习如何使用.NET框架、、Windows Forms、WPF等可以扩展您的开发能力。
二级C、C++、VB、VF安装使用说明
光盘安装使用说明本丛书的随书光盘是根据“全国计算机等级考试无纸化考试指南”开发的,与丛书试题配套,内容丰富,功能强大,界面清晰简洁,方便实用。
不仅丛书中试题均可在全真模拟考试系统中进行练习,光盘还包含了比丛书本身更大数量的真题和模拟题,考题类型、考试环境、评分标准与实际考试完全一致。
注:本安装使用说明适用于二级C、二级C++、二级Visual Basic、二级Visual FoxPro。
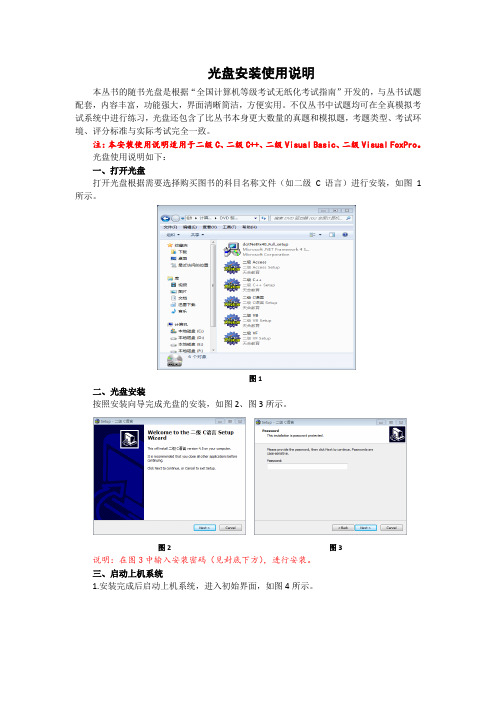
光盘使用说明如下:一、打开光盘打开光盘根据需要选择购买图书的科目名称文件(如二级C语言)进行安装,如图1所示。
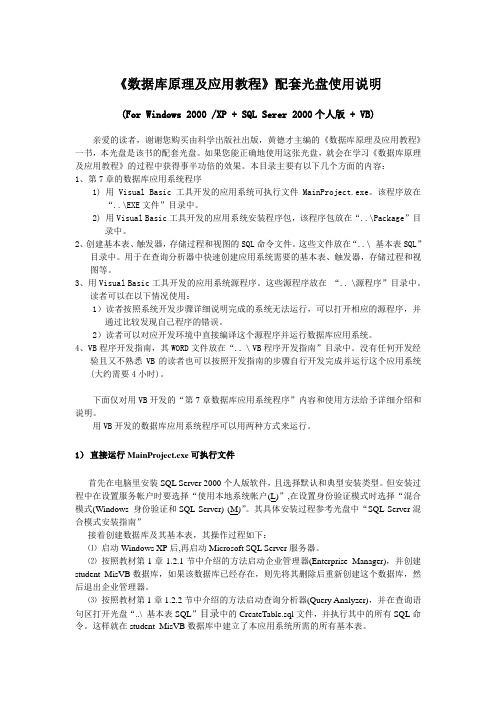
图1二、光盘安装按照安装向导完成光盘的安装,如图2、图3所示。
图2 图3说明:在图3中输入安装密码(见封底下方),进行安装。
三、启动上机系统1.安装完成后启动上机系统,进入初始界面,如图4所示。
图42.在图4中单击“开始进入”按钮,进入考试模拟界面,如图5所示。
在图5中,考生需要先单击“考试模拟”按钮,弹出图6所示界面,才可以进行作答。
图5 图6四、答题1.本软件提供“固定抽题”、“随机抽题”、“重复抽题”和“继续做题”的相应操作,考生只需在图6中单击相应按钮即可进入抽题或答题界面,如图7所示。
图72.在图7中,应答选择题时,考生可单击“上一题”“下一题”按钮进行作答,也可以直接单击界面下方的数字按钮进行;应答“基本操作题”“简单应用题”“综合应用题”时,考生需要在考生文件夹下操作,需要单击界面右上方的“文件”按钮打开相应文件进行操作,完成后保存即可。
3.考生开始答题后,桌面的正上方会显示考生信息、考试倒计时等信息,如图8所示。
考生可随时查看相关信息,也可单击“隐藏窗口”按钮,将其隐藏。
图8五、交卷答题结束后,考生须单击图8右方的“交卷”按钮,进行考试评分。
本软件在考生交卷后,提供考试得分、正确答案和试题解析等信息,如图9所示。
在图9中,考生除可以查看相应题目的答案、解析外,还可以查看试题评析和生成答案等操作。
ReadmeForVB
《数据库原理及应用教程》配套光盘使用说明(For Windows 2000 /XP + SQL Serer 2000个人版 + VB)亲爱的读者,谢谢您购买由科学出版社出版,黄德才主编的《数据库原理及应用教程》一书,本光盘是该书的配套光盘。
如果您能正确地使用这张光盘,就会在学习《数据库原理及应用教程》的过程中获得事半功倍的效果。
本目录主要有以下几个方面的内容:1、第7章的数据库应用系统程序1) 用Visual Basic工具开发的应用系统可执行文件MainProject.exe。
该程序放在“..\EXE文件”目录中。
2) 用Visual Basic工具开发的应用系统安装程序包,该程序包放在“..\Package”目录中。
2、创建基本表、触发器,存储过程和视图的SQL命令文件。
这些文件放在“..\基本表SQL”目录中。
用于在查询分析器中快速创建应用系统需要的基本表、触发器,存储过程和视图等。
3、用Visual Basic工具开发的应用系统源程序。
这些源程序放在“.. \源程序”目录中。
读者可以在以下情况使用:1)读者按照系统开发步骤详细说明完成的系统无法运行,可以打开相应的源程序,并通过比较发现自己程序的错误。
2)读者可以对应开发环境中直接编译这个源程序并运行数据库应用系统。
4、VB程序开发指南,其WORD文件放在“.. \ VB程序开发指南”目录中。
没有任何开发经验且又不熟悉VB的读者也可以按照开发指南的步骤自行开发完成并运行这个应用系统(大约需要4小时)。
下面仅对用VB开发的“第7章数据库应用系统程序”内容和使用方法给予详细介绍和说明。
用VB开发的数据库应用系统程序可以用两种方式来运行。
1)直接运行MainProject.exe可执行文件首先在电脑里安装SQL Server 2000个人版软件,且选择默认和典型安装类型。
但安装过程中在设置服务帐户时要选择“使用本地系统帐户(L)”,在设置身份验证模式时选择“混合模式(Windows 身份验证和SQL Server) (M)”。
Visual_Basic_实用教程_第1章

隐藏的切换。工具栏可以紧贴在菜单栏之下,也可拖放到窗体
的其它任何地方。
第1章 Visual Basic 概 述
图 标 名 称 与 功 能 添加标准 EXE 工程——添加新的工程到工作组中,单击其右边的箭头,将弹出一个下 拉菜单,可以从中选择需要添加的工程类型 添加窗体——添加新的窗体到工程中,单击右边的下拉箭头,将弹出一个下拉菜单,可 以从中选择需要添加的窗体类型 菜单编辑器——显示菜单编辑器对话框 打开工程——打开已有的工程文件 保存工程——保存当前的工程文件 启动——开始运行当前的工程 中断——暂时中断当前工程的运行 结束——结束当前工程的运行 工程资源管理器——打开工程资源管理器窗口 属性窗口——打开属性窗口 窗体布局窗口——打开窗体布局窗口 对象浏览器——打开对象浏览器对话框 工具箱——打开工具箱窗口 数据视图窗口——打开数据视图窗口 可视化部件管理器——打开可视化部件管理器
1.1.3 标题栏
标题栏显示的是窗体控制菜单图标,当前激活的工程名称, 当前工作模式以及最小化、最大化/还原、关闭按钮。
VB的三种工作模式(标题栏总显示当前模式) (1)设计模式:创建应用程序的大多数工作都是在设计时完成的。 在设计时,可以设计窗体、绘制控件、编写代码并使用“属性”窗口来 设置或查看属性设置值。 (2)运行模式:代码正在运行的时期,用户可与应用程序交流。可 查看代码,但不能改动它。
1.1.7 窗口
1)工程资源管理器 工程是指用于创建一个应用程序的文件的集合。 工程资源管理器列出了当前工程中的窗体和模块
第1章 Visual Basic 概 述
1.1.7 窗口
2)属性窗口
属性是指对象的特征,如大
小、标题或颜色等数据。在 Visual Basic6.0设计模式中,属性 窗口列出了当前选定窗体或控件 的属性的值,用户可以对这些属 性值进行设置。
[visual basic 6.0 完全自学手册]
![[visual basic 6.0 完全自学手册]](https://img.taocdn.com/s3/m/60526a29647d27284b7351dd.png)
Visual Basic应用软件开发规范 网址 木瓜软件工作室附录1 Visual Basic应用软件开发规范Visual Basic应用软件开发规范的目的,是使应用程序的结构和编码风格标准化,以便于阅读和理解,使代码更健壮,同时易于后期维护。
本开发规范主要规定了编写Visual Basic应用程序时,在命名约定、代码格式、代码注释、错误处理和界面设计方面的规范。
这些规范不是一成不变的,我们也不可能样样都要标准化,但保持原则上的代码结构清晰,便于自己和他人的阅读理解,就足够了。
1.1 命名约定1、变量命名约定(1)变量应该被定义在尽可能小的范围内。
全局(Public)变量可以导致极其复杂的状态,并且使一个应用程序的逻辑非常难于理解。
全局变量也使代码的重用和维护更加困难。
范围声明位置可见位置(引用位置)过程级 过程、子过程或函数过程中的Private、Dim 在声明它的过程中模块级 窗体或代码模块(frm、bas)的声明部分中的 Private、Dim 窗体或代码模块中的每一个过程全局 代码模块(bas)的声明部分中的 Public 应用程序中的每一处 (2)随着工程大小的增长,划分变量范围的工作也迅速增加。
在类型前缀的前面放置单字母范围前缀标明了这种增长,但变量名的长度并没有增加很多。
如果一个变量在标准模块或窗体模块中被声明为 Public,那么该变量具有全局范围。
如果一个变量在标准模块或窗体模块中被分别声明为 Private,那么该变量有模块级范围。
此用法一般用在大型程序中。
范围前缀示例过程级 无 dblPayee模块级 m mlngProceedID全局 g glngRollID (3)变量数据类型,其前缀由三个字母组成,均需小写。
而且前缀可以被扩展,用来指明变量范围。
变量命名一律使用前缀+用途的命名方式。
变量类型前缀描述示例Array arr 数组arrDynaBoolean bln 布尔值blnFoundByte byt 字节型bytRasterDataCurrency cur 货币型curProductDate dat 日期型datStartRunDouble dbl 双精度dblPayeeError err 错误对象errLoadDataHandle hnd 句柄hndFormInteger int 整型intCounterLong lng 长整型lngDistanceObject obj 对象objCurrentSingle sng 单精度sngAverageString str 字符型strFirstNameTime tim 时间timEnd网址 《Visual Basic 6.0 完全自学手册》热销中·2·Visual Basic应用软件开发规范 网址 木瓜软件工作室2、控件命名约定控件命名约定与变量命名相似,一律使用前缀+用途的命名方式。
VSS使用手册————助你快速掌握
VSS使用手册1 VSS概述版本控制是工作组软件开发中的重要方面,它能防止意外的文件丢失、允许反追踪到早期版本、并能对版本进行分支、合并和管理。
在软件开发和您需要比较两种版本的文件或找回早期版本的文件时,源代码的控制是非常有用的。
Visual SourceSafe 是一种源代码控制系统,它提供了完善的版本和配置管理功能,以及安全保护和跟踪检查功能。
VSS通过将有关项目文档(包括文本文件、图象文件、二进制文件、声音文件、视屏文件)存入数据库进行项目研发管理工作。
用户可以根据需要随时快速有效地共享文件。
文件一旦被添加进VSS,它的每次改动都会被记录下来,用户可以恢复文件的早期版本,项目组的其他成员也可以看到有关文档的最新版本,并对它们进行修改,VSS也同样会将新的改动记录下来。
你还会发现,用VSS来组织管理项目,使得项目组间的沟通与合作更简易而且直观。
VSS可以同Visual Basic、Visual C++、Visual J++、Visual InterDev、Visual FoxPro 开发环境以及Microsoft Office 应用程序集成在一起,提供了方便易用、面向项目的版本控制功能。
Visual SourceSafe 可以处理由各种开发语言、创作工具或应用程序所创建的任何文件类型。
在提倡文件再使用的今天,用户可以同时在文件和项目级进行工作。
Visual SourceSafe 面向项目的特性能更有效地管理工作组应用程序开发工作中的日常任务。
1.1 VSS中的文件当你要修改某个文档时,需要先从数据库中将它签出(check out),或者告诉VSS你要编辑该文档。
VSS会将该文档的副本从数据库中拿到你的工作文件夹(working folder)中,你就可以修改你的文档了。
如果其他用户再想对同一文档进行修改,VSS会产生一个信息,告诉他,该文档已被签出(check out),从而避免多人同时修改文档,以保证文档的安全性。
Visual Basic 编程之道光盘使用说明
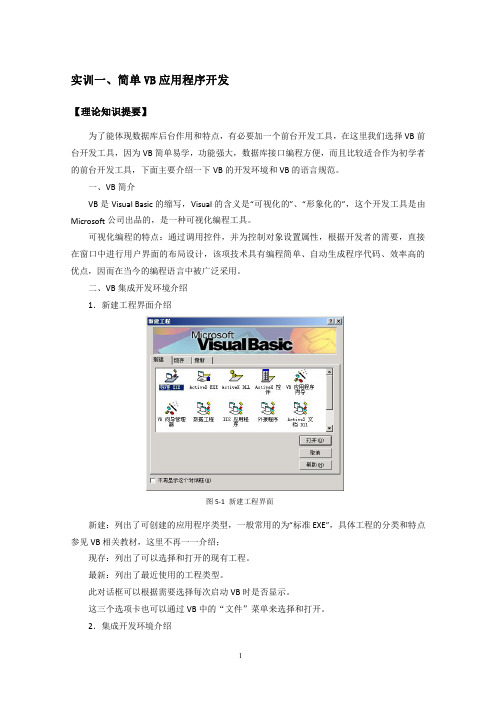
《Visual Basic 编程之道》光盘内容框架本书附带光盘内容包括本书源程序、赠送范例及视频等。
完整光盘内容框架如图1所示。
图1 光盘内容框架图如何使用本书源程序1 开发及运行环境本书源程序都是在Windows Server 2003下开发的,程序测试环境为Windows Server 2003。
用户只有正确配置程序所需的运行环境以后,才可以使用本书中的源程序。
软件开发平台如下:操作系统:Windows Server 2003;数据库:SQL Server 2000、SQL Server 2005、Access 2003;开发环境:Visual Basic 6.0;分辨率:最佳效果1024×768;2. 源程序使用方法(1)使用本书中源程序时,请将源程序文件夹下的所有文件拷贝到计算机硬盘上,并去掉所有文件的只读属性。
(2)在系统上安装Visual Basic 6.0、SQL Server 2000、SQL Server 2005、Access 2003。
3. 附加SQL Server 2000 数据库选择“开始”/“程序”/Microsoft SQL Server 2005/SQL Server Management Studio命令,进入到“连接到服务器”界面,如图2所示。
图2 连接到服务器(3)在“服务器名称”下拉列表中选择SQL Server 2005服务器名称,然后单击“连接”按钮。
:其中“a\mr”为本机SQL Server2005 服务器名称。
(4)在“对象资源管理器”中右击“数据库”节点,在弹出的快捷菜单中选择“附加”命令,弹出“附加数据库”对话框,如图3所示。
图3 附加数据库(5)单击“添加”按钮,在弹出的“定位数据库文件”对话框中选择数据库文件路径,如图4所示。
图4 定位数据库文件(6)依次单击“确定”按钮,完成数据库附加操作。
注意:为了方便读者学习和使用本书中的源程序,特为需要特殊配置的程序提供了“程序使用说明”,读者可参照本说明进行配置。
Visual Basic最全版

及 Back Office 工具,例如 SQL Server、Microsoft Transaction Server、Internet Information Server、Visual SourceSafe、SNA Server,以及其他。
应用程序窗口,由标题栏、菜单栏和工具栏组成。
2.窗体(Form)窗口
设计VB程序的界面。
3.属性(Properties)窗口
所有窗体或控件的属性设置。
4.工程资源管理器(Project Explorer)窗口
保存一个应用程序所有的文件。
5.代码(Code)窗口
编辑窗体、标准模块中的代码。
6.工具箱(ToolBox)窗口
以及 ActiveX 控件、Internet Information Server Application Designer、集成的 Visual Database Tools 和 Data Environment、 Active Data Objects、和 Dynamic HTML Page Designer。
11
海南师范大学信息科学技术学院
工具箱窗口
标准工具箱内只包含了 20 个控件(指 针不是控件,其作用仅用于窗体和控 件的移动或调整它们的大小),用户 可根据需要添加其它控件到工具箱中。 具体方法是选择 “工程” |“ 部件” 命令打开“部件”对话框,在控件标 签页中选择需要的部件,然后单击 “确定”按钮,此时工具箱中将显示 新添加的控件图标按钮。
软件要求:Windows 95/98以上版本。 现在的一般的PC机基本上都满足安装与运行VB的要求。
6
海南师范大学信息科学技术学院
Visual Basic for Applications(VBA)基础教程说明书

About the T utorialVBA stands for V isual B asic for A pplications, an event-driven programming language from Microsoft. It is now predominantly used with Microsoft Office applications such as MS-Excel, MS-Word and MS-Access.This tutorial teaches the basics of VBA. Each of the sections contain related topics with simple and useful examples.AudienceThis reference has been prepared for the beginners to help them understand the basics of VBA. This tutorial will provide enough understanding on VBA from where you can take yourself to a higher level of expertise.PrerequisitesBefore proceeding with this tutorial, you should install MS Office, particularly MS-Excel.Disclaimer & CopyrightCopyright 2016 by Tutorials Point (I) Pvt. Ltd.All the content and graphics published in this e-book are the property of Tutorials Point (I) Pvt. Ltd. The user of this e-book is prohibited to reuse, retain, copy, distribute or republish any contents or a part of contents of this e-book in any manner without written consent of the publisher.We strive to update the contents of our website and tutorials as timely and as precisely as possible, however, the contents may contain inaccuracies or errors. Tutorials Point (I) Pvt. Ltd. provides no guarantee regarding the accuracy, timeliness or completeness of our website or its contents including this tutorial. If you discover any errors on our website or inthistutorial,******************************************.T able of ContentsAbout the Tutorial (i)Audience (i)Prerequisites (i)Disclaimer & Copyright (i)Table of Contents .................................................................................................................................... i i1.VBA ─ O VERVIEW (1)2.VBA ─ EXCEL MACROS (3)3.VBA ─ EXCEL TERMS (8)Modules (8)Procedure (9)4.VBA ─ MACRO COMME NTS (10)5.VBA ─ MESSAGE BOX (11)6.VBA ─ INPUTBOX (16)7.VBA ─ V ARIABLES (19)Data Types (19)8.VBA ─ CONSTANTS (22)9.VBA ─ O PERATORS (24)The Arithmetic Operators (24)The Comparison Operators (26)The Logical Operators (29)The Concatenation Operators (32)10.VBA ─ DECISIONS (35)If Statement (36)If Else Statement (37)If Elseif - Else statement (40)Nested If Statement (42)Switch Statement (44)11.VBA ─ LOOPS (47)For Loop (48)For Each Loops (50)While Wend Loops (52)Do While Loops (54)Do Until Loops (57)Loop Control Statements (61)Exit For (61)Exit Do (63)12.VBA ─ STRINGS (65)Instr (66)InString Reverse (67)LCase (69)UCase (70)Left (70)Right (72)Mid (73)Ltrim (74)Rtrim (74)Trim (75)Len (75)Space (78)StrComp (79)String Function (80)String Reverse Function (81)13.VBA ─ DATE-TIME FUNCTION (83)Date Functions (83)Date Function (84)CDate Function (84)DateAdd Function (85)DateDiff Function (87)DatePart Function (90)DateSerial Function (91)Format DateTime Function (92)IsDate Function (93)Day Function (94)Month Function (95)Year Function (95)Month Name (96)WeekDay (97)WeekDay Name (98)Time Functions (99)Now Function (100)Hour Function (100)Minute Function (101)Second Function (102)Time Function (102)Time Serial Function (103)TimeValue Function (104)14.VBA ─ ARRAYS (106)Array Declaration (106)Assigning Values to an Array (106)Multi-Dimensional Arrays (107)ReDim Statement (109)Array Methods (110)LBound Function (111)UBound Function (112)Split Function (113)Join Function (115)Filter Function (116)IsArray Function (117)Erase Function (118)15.VBA – USER-DEFINED FUNCTIONS (120)Function Definition (120)Calling a Function (121)16.VBA ─ SUB PROCEDURE (123)Calling Procedures (123)17.VBA ─ EVENTS (125)Worksheet Events (125)Workbook Events (126)18.VBA ─ ERRO R HANDLING (129)Syntax Errors (129)Runtime Errors (129)Logical Errors (130)Err Object (130)Error Handling (130)19.VBA ─ EXCEL OBJECTS (132)Application Objects (132)Workbook Objects (132)Worksheet Objects (133)Range Objects (133)20.VBA ─ TEXT FILES (134)File System Object (FSO) (134)Write Command (139)21.VBA ─ PROGRAMMING CH ARTS (141)22.VBA ─ USER FORMS (144)VBA7VBA stands for V isual B asic for A pplications an event-driven programming language from Microsoft that is now predominantly used with Microsoft office applications such as MS-Excel, MS-Word, and MS-Access.It helps techies to build customized applications and solutions to enhance the capabilities of those applications. The advantage of this facility is that you NEED NOT have visual basic installed on our PC, however, installing Office will implicitly help in achieving the purpose. You can use VBA in all office versions, right from MS-Office 97 to MS-Office 2013 and also with any of the latest versions available. Among VBA, Excel VBA is the most popular. The advantage of using VBA is that you can build very powerful tools in MS Excel using linear programming.Application of VBAYou might wonder why to use VBA in Excel as MS-Excel itself provides loads of inbuilt functions. MS-Excel provides only basic inbuilt functions which might not be sufficient to perform complex calculations. Under such circumstances, VBA becomes the most obvious solution.For example, it is very hard to calculate the monthly repayment of a loan using Excel's built-in formulas. Rather, it is easy to program a VBA for such a calculation.1.VBAAccessing VBA EditorIn Excel window, press "ALT+F11". A VBA window opens up as shown in the following screenshot.8VBA9In this chapter, you will learn how to write a simple macro in a step by step manner.Step 1: First, enable 'Developer' menu in Excel 20XX. To do the same, click File -> Options. Step 2: Click ‘Customize the Ribbon ’ tab and check 'Developer'. Click 'OK'.Step 3: The 'Developer' ribbon appears in the menu bar.2.VBA Step 4: Click the 'Visual Basic' button to open the VBA Editor.Step 5: Start scripting by adding a button. Click Insert -> Select the button.Step 6: Perform a right-click and choose 'properties'.10Step 7: Edit the name and caption as shown in the following screenshot.11Step 8: Now double-click the button and the sub-procedure outline will be displayed as shown in the following screenshot.12Step 9: Start coding by simply adding a message.Step 10: Click the button to execute the sub-procedure. The output of the sub-procedure is shown in the following screenshot.Note: In further chapters, we will demonstrate using a simple button, as explained from step#1 to 10. Hence , it is important to understand this chapter thoroughly.13VBA14In this chapter, you will acquaint yourself with the commonly used excel VBA terminologies. These terminologies will be used in further modules, hence understanding each one of these is important.ModulesModules is the area where the code is written. This is a new Workbook, hence there aren't any Modules.To insert a Module, navigate to Insert -> Module. Once a module is inserted 'module1' is created.Within the modules, we can write VBA code and the code is written within a Procedure. A Procedure/Sub Procedure is a series of VBA statements instructing what to do.3.VBAProcedureProcedures are a group of statements executed as a whole, which instructs Excel how to perform a specific task. The task performed can be a very simple or a very complicated task. However, it is a good practice to break down complicated procedures into smaller ones.The two main types of Procedures are Sub and Function.FunctionA function is a group of reusable code, which can be called anywhere in your program. This eliminates the need of writing the same code over and over again. This helps the programmers to divide a big program into a number of small and manageable functions.Apart from inbuilt Functions, VBA allows to write user-defined functions as well and statements are written between Function and End Function.Sub-proceduresSub-procedures work similar to functions. While sub procedures DO NOT Return a value, functions may or may not return a value. Sub procedures CAN be called without call keyword. Sub procedures are always enclosed within Sub and End Sub statements.15Comments are used to document the program logic and the user information with which other programmers can seamlessly work on the same code in future.It includes information such as developed by, modified by, and can also include incorporated logic. Comments are ignored by the interpreter while execution.Comments in VBA are denoted by two methods.∙Any statement that starts with a Single Quote (�) is treated as comment. Following is an example.∙Any statement that starts with the keyword "REM". Following is an example.16The MsgBox function displays a message box and waits for the user to click a button and then an action is performed based on the button clicked by the user.SyntaxParameter Description∙Prompt - A Required Parameter. A String that is displayed as a message in the dialog box. The maximum length of prompt is approximately 1024 characters. If the message extends to more than a line, then the lines can be separated using a carriage return character (Chr(13)) or a linefeed character (Chr(10)) between each line.∙Buttons- An Optional Parameter. A Numeric expression that specifies the type of buttons to display, the icon style to use, the identity of the default button, and the modality of the message box. If left blank, the default value for buttons is 0.∙Title - An Optional Parameter. A String expression displayed in the title bar of the dialog box. If the title is left blank, the application name is placed in the title bar.∙Helpfile - An Optional Parameter. A String expression that identifies the Help file to use for providing context-sensitive help for the dialog box.∙Context- An Optional Parameter. A Numeric expression that identifies the Help context number assigned by the Help author to the appropriate Help topic. If context is provided, helpfile must also be provided.The Buttons parameter can take any of the following values:∙0 vbOKOnly - Displays OK button only.∙ 1 vbOKCancel - Displays OK and Cancel buttons.∙ 2 vbAbortRetryIgnore - Displays Abort, Retry, and Ignore buttons.∙ 3 vbYesNoCancel - Displays Yes, No, and Cancel buttons.∙ 4 vbYesNo - Displays Yes and No buttons.∙ 5 vbRetryCancel - Displays Retry and Cancel buttons.∙16 vbCritical - Displays Critical Message icon.∙32 vbQuestion - Displays Warning Query icon.∙48 vbExclamation - Displays Warning Message icon.17∙64 vbInformation - Displays Information Message icon.∙0 vbDefaultButton1 - First button is default.∙256 vbDefaultButton2 - Second button is default.∙512 vbDefaultButton3 - Third button is default.∙768 vbDefaultButton4 - Fourth button is default.∙0 vbApplicationModal Application modal - The current application will not work until the user responds to the message box.∙4096 vbSystemModal System modal - All applications will not work until the user responds to the message box.The above values are logically divided into four groups: The first group (0 to 5) indicates the buttons to be displayed in the message box. The second group (16, 32, 48, 64) describes the style of the icon to be displayed, the third group (0, 256, 512, 768) indicates which button must be the default, and the fourth group (0, 4096) determines the modality of the message box.Return ValuesThe MsgBox function can return one of the following values which can be used to identify the button the user has clicked in the message box.∙ 1 - vbOK - OK was clicked∙ 2 - vbCancel - Cancel was clicked∙ 3 - vbAbort - Abort was clicked∙ 4 - vbRetry - Retry was clicked∙ 5 - vbIgnore - Ignore was clicked∙ 6 - vbYes - Yes was clicked∙7 - vbNo - No was clickedExampleOutputStep 1: The above Function can be executed either by clicking the "Run" button on VBA Window or by calling the function from Excel Worksheet as shown in the following screenshot. Step 2: A Simple Message box is displayed with a message "Welcome" and an "OK" Button19VBA Step 3: After Clicking OK, yet another dialog box is displayed with a message along with "yes, no, and cancel" buttons.Step 4: After clicking the ‘No’ button, the value of that button (7) is stored as an integer and displayed as a message box to the user as shown in the following screenshot. Using this value, it can be understood which button the user has clicked.20VBA21The InputBox function prompts the users to enter values. After entering the values, if the user clicks the OK button or presses ENTER on the keyboard, the InputBox function will return the text in the text box. If the user clicks the Cancel button, the function will return an empty string ("").SyntaxParameter Description∙Prompt - A required parameter. A String that is displayed as a message in the dialog box. The maximum length of prompt is approximately 1024 characters. If the message extends to more than a line, then the lines can be separated using a carriage return character (Chr(13)) or a linefeed character (Chr(10)) between each line.∙Title - An optional parameter. A String expression displayed in the title bar of the dialog box. If the title is left blank, the application name is placed in the title bar.∙Default - An optional parameter. A default text in the text box that the user would like to be displayed.∙XPos - An optional parameter. The position of X axis represents the prompt distance from the left side of the screen horizontally. If left blank, the input box is horizontally centered.∙YPos - An optional parameter. The position of Y axis represents the prompt distance from the left side of the screen vertically. If left blank, the input box is vertically centered.∙Helpfile - An optional parameter. A String expression that identifies the helpfile to be used to provide context-sensitive Help for the dialog box.∙Context - An optional parameter. A Numeric expression that identifies the Help context number assigned by the Help author to the appropriate Help topic. If context is provided, helpfile must also be provided.6.ExampleLet us calculate the area of a rectangle by getting values from the user at run time with the help of two input boxes (one for length and one for width).OutputStep 1: To execute the same, call using the function name and press Enter as shown in the following screenshot.22Step 2: Upon execution, the First input box (length) is displayed. Enter a value into the input box.Step 3: After entering the first value, the second input box (width) is displayed.Step 4: Upon entering the second number, click the OK button. The area is displayed as shown in the following screenshot.23VBA24Variable is a named memory location used to hold a value that can be changed during the script execution. Following are the basic rules for naming a variable.∙ You must use a letter as the first character.∙You can't use a space, period (.), exclamation mark (!), or the characters @, &, $, # in the name.∙ Name can't exceed 255 characters in length.∙You cannot use Visual Basic reserved keywords as variable name.SyntaxIn VBA, you need to declare the variables before using them. Data T ypesThere are many VBA data types, which can be divided into two main categories, namely numeric and non-numeric data types.Numeric Data TypesFollowing table displays the numeric data types and the allowed range of values.7.Non-Numeric Data TypesFollowing table displays the non-numeric data types and the allowed range of values.ExampleLet us create a button and name it as 'Variables_demo' to demonstrate the use of variables.OutputUpon executing the script, the output will be as shown in the following screenshot.26VBA27Constant is a named memory location used to hold a value that CANNOT be changed during the script execution. If a user tries to change a Constant value, the script execution ends up with an error. Constants are declared the same way the variables are declared. Following are the rules for naming a constant.∙ You must use a letter as the first character.∙You can't use a space, period (.), exclamation mark (!), or the characters @, &, $, # in the name.∙ Name can't exceed 255 characters in length.∙You cannot use Visual Basic reserved keywords as variable name.SyntaxIn VBA, we need to assign a value to the declared Constants. An error is thrown, if we try to change the value of the constant.ExampleLet us create a button "Constant_demo" to demonstrate how to work with constants.8.VBAOutputUpon executing the script, the output will be displayed as shown in the following screenshot.28VBA29An Operator can be defined using a simple expression - 4 + 5 is equal to 9. Here, 4 and 5 are called operands and + is called operator . VBA supports following types of operators:∙ Arithmetic Operators ∙ Comparison Operators∙ Logical (or Relational) Operators ∙Concatenation OperatorsThe Arithmetic OperatorsFollowing arithmetic operators are supported by VBA: Assume variable A holds 5 and variable B holds 10, then -9.Arithmetic Operators ─ ExampleAdd a button and try the following example to understand all the arithmetic operators available in VBA.When you click the button or execute the above script, it will produce the following result.30The Comparison OperatorsThere are following comparison operators supported by VBA.Assume variable A holds 10 and variable B holds 20, then -Comparison Operators ─ ExampleTry the following example to understand all the Comparison operators available in VBA.31When you execute the above script, it will produce the following result.The Logical OperatorsFollowing logical operators are supported by VBA.Assume variable A holds 10 and variable B holds 0, then -33Logical Operators ─ ExampleTry the following example to understand all the Logical operators available in VBA by creating a button and adding the following function.When you save it as .html and execute it in the Internet Explorer, then the above script will produce the following result.The Concatenation OperatorsFollowing Concatenation operators are supported by VBA.Assume variable A holds 5 and variable B holds 10 then -Assume variable A = "Microsoft" and variable B = "VBScript", then -Note: Concatenation Operators can be used for both numbers and strings. The output depends on the context, if the variables hold numeric value or string value.Concatenation OperatorsFollowing table shows all the Concatenation operators supported by VBScript language. Assume variable A holds 5 and variable B holds 10, then -35ExampleTry the following example to understand the Concatenation operator available in VBScript:Try the following example to understand all the Logical operators available in VBA by creating a button and adding the following function.Concatenation can also be used for concatenating two strings. Assume variable A = "Microsoft" and variable B = "VBScript" then -Example36Try the following example to understand all the Logical operators available in VBA by creating a button and adding the following function.When you save it as .html and execute it in the Internet Explorer, then the above script will produce the following result.37End of ebook previewIf you liked what you saw…Buy it from our store @ https://38。
VisualBasic数据库系统开发完全手册光盘使用说明
光盘使用说明一、本书光盘内容本书光盘包含Visual Basic 视频辅助学习程序、程序设计速查宝典、实用工具和本书实例的源程序。
Visual Basic 视频辅助学习程序只能在光盘上运行,程序设计速查宝典和实用工具程序需安装到计算机上方可使用。
本书实例的源程序在光盘中对应的源程序和数据库文件路径如下。
章节源程序路径数据库文件路径第16章\采购管理系统\program\\采购管理系统\database\第17章\商品销售管理系统\program\\商品销售管理系统\database\第18章\库存管理系统\program\\库存管理系统\database\第19章\人事档案管理系统\program\\人事档案管理系统\ database\第20章\固定资产及设备管理系统\program\\固定资产及设备管理系统\ database\第21章\物资管理系统\program\\物资管理系统\ database\第22章\医院门诊管理系统\program\\医院门诊管理系统\ database\第23章\医院住院管理系统\program\\医院住院管理系统\ database\二、源程序使用说明1、运行环境设置本实例是在Windows 2000下开发的,程序测试环境为Windows2000和WindowsXP。
用户在Windows 98、Windows 2000和Windows XP下都可使用本实例。
为保证程序中的查询功能能够正常使用,请将系统时间格式改为“yyyy-MM-dd”日期格式。
设置(Windows XP下)步骤如下。
1)打开控制面板,选择“区域与语言选项”,选择“区域选项”选项卡。
2)在“区域选项”选项卡选择“自定义”按钮,将弹出“自定义区域”对话框。
3)在“自定义区域”对话框中选择“日期”选项卡,将“短日期格式”设置为“yyyy-MM-dd”日期格式。
注意:在Windows 2000下,打开控制面板后,直接选择“区域选项”,在打开的对话框中选择“日期”选项卡,将“短日期格式”设置为“yyyy-MM-dd”日期格式。
Visual Basic最全版
3
VB的版本
VB
6.0包括三个版本: 学习版(Learning):该版本包括所有的内部控件以及网格、
选项卡和数据绑定控件。学习版提供的文档有 Learn VB Now CD 和包含全部联机文档的 Microsoft Developer Network CD。
专业版(Professional):该版本包括学习版的全部功能
在窗口内单击鼠 标右键,可以弹 出快捷菜单,通 过此菜单可以完 成添加、移去文 件等操作。
海南师范大学信息科学技术学院
14
代码窗口
代码窗口是专门用来进行程序设计
的窗口,显示和编辑程序代码。每个 窗体都有各自的代码窗口。 打开代码窗口的方法: (1)在工程管理窗口选择一个窗体 或标准模块,并选择“查看代码”按 钮。 (2) 在窗体窗口双击控件或窗体本 身。 (3) 选择“视图”|“代码窗口”命 令。
手工方式编程
2 结构化(SPP)程序设计
“自顶向下,逐步求精”的程序设计方法; “单入口单出口”的控制结构
3 面向对象(OOP)程序设计
以对象为基础、以事件来驱动对象执行的程序设计技术。
19
海南师范大学信息科学技术学院
2.2
对象的概念及其三要素
1. 类 类是创建对象实例的模板,是同种对象的集合和抽象, 包含了创建对象的属性描述和行为特征的定义。 2. 对象 是类的一个实例,继承了类的属性、方法。 3. 对象的建立和编辑 建立 选定 复制和删除 命名:由字母、汉字、数字、下划线组成,长度<=255
VB的安装和启动
1、运行环境
硬件要求:
(1)微处理器:486DX/66 MHz 或更高的处理器。 (2)内存:Windows 95至少需要24M的内存;Windows NT Workstation至少需要32M内存;更高版本如Windows 2000/XP则需要大于128M的内存。 (3)磁盘空间:安装企业版:典型安装需要128M的磁盘空间,完 全安装需要147MB的磁盘空间。
vb 6.0入门到精通光盘使用说明

系统要求⑴ 硬件要求CPU:PentiumⅡ及以上。
内存:128MB及以上。
光驱:16倍速DVD及以上。
声卡:16位及以上声卡(完全兼容Sound Blaster 16)。
鼠标:Microsoft兼容鼠标。
⑵ 软件要求操作系统:可在Windows 98/Me/2000/XP/2003/Vista/7中文版环境下运行。
颜色:16位颜色及以上。
分辨率:1024×768及以上(推荐1024×768)PDF阅读器:推荐Adobe Reader 8及以上。
在Windows XP系统中运行方法➊将光盘印有文字的一面朝上放入光驱中,几秒钟后光盘就会自动运行。
➋若光盘没有自动运行,可以双击桌面上的【我的电脑】图标,打开【我的电脑】窗口,然后双击光盘图标,或者在光盘图标上单击鼠标右键,在弹出的快捷菜单中选择【自动播放】选项,光盘就会运行。
在Windows Vista系统中运行方法注意:如果需要在Windows Vista中文版操作系统下使用本光盘,应在第一次运行光盘时采用【以管理员身份运行】的模式,以后则可以直接运行。
➊将光盘印有文字的一面朝上放入光驱中,几秒钟后系统会弹出【自动播放】对话框。
➌单击【用户账户控制】对话框中的【允许】选项,光盘即可自动播放。
➍再次使用本光盘时,将光盘放入光驱后,可以通过双击光驱盘符或单击系统弹出的【自动播放】对话中【运行MyBook.exe】链接的方法,运行光盘。
光盘使用说明➊光盘运行后,经过片头动画后便可进入光盘的主界面。
➋单击【25小时同步教学录像】按钮,在右侧弹出的菜单中依次选择相应的篇、章、录像名称,2➌选择光盘主界面菜单栏中的相应菜单命令也可播放同步教学录像。
➍选择菜单栏中的【王牌资源】菜单项,在弹出的菜单中选择王牌资源的名称,即可打开相应的王牌资源电子书(需安装PDF阅读器)。
➎ 如果需要使用本书范例的源码和素材,可单击【范例源码】按钮和【范例参考文件】按钮,可打开相应的范例源码文件夹(Final)和范例素材文件夹(Sample)。
Microsoft Visual Basic工具的使用及简单程序开发
举例 Abs(-5) Cos(0) Exp(3) Fix(3.14) Hex[$](255) Int(2.9) Int(-2.9) Lcase$(“XYZ”) Log(10) Oct(100) Rnd Sin(0) Sgn(-2.9) Sqr(25) Tan(0) Ucase$(“xyz”)
返回值 5 1 20.086 3 FF 2 -3 “xyz” 2.3 144 0~1 之间的 数 0 -1 5 0 “XYZ”
工具箱中的工具就像机械零件的模具一样,利用模具作出零件,利用工具作出控件。 添加控件方法:双击工具箱中的某个图标;或者单击某个图标,在窗体上按住鼠标左键
3
拖动,也可作出这种控件。 属性:对象的特征,如大小、名称、标题、颜色等。在对象下拉列表框中可以选择要设 置属性的对象,属性列表包括两部分信息,左边所选对象的所有属性名称,右边是可以查看 和修改的属性值 3.设计 VB 程序的一般步骤 设计用户界面(界面设计要友好,通过向窗体上添加控件及调整控件位置来实现) 设置属性(设置对象的特征,有四种方法打开属性窗口: “视图”菜单->“属性窗口” ; F4 键;工具栏“属性”按钮;使用对象的上下文菜单,掌握一种即可) 编写代码(为对象编写代码,代码要正确易读同时运行效率高;打开代码窗口有多 种方法:双击对象; “视图”菜单->“代码窗口” ;使用对象的上下文菜单;在工程窗 口单击查看代码图标等等) 保存和运行调试程序,生成 EXE 文件(注意保存时要根据提示一一保存,对于生成的 EXE 文件是不可编辑的) 三、基本概念 对象:事物都可称作对象,比如计算机、鼠标就是对象,在 Visual Basic 里对象主要分为 两类:窗体(Form)和控件(Control) 。 窗体(Form) :窗体或称表单,其实指的就是 Window。 控件(Control) :控件,指的是各种按钮、选项卡、对话框等。 事件:事件是发生在对象上的动作。每个对象能识别的只是一组预先定义好的事件。但 并非每个事件都会产生结果 事件过程:对象感应到某一事件时所执行的程序。 方法:VB 提供的特殊的子程序,用户看不到,但可以直接调用,比如显示、隐藏对象, 打印等。 四、VB 数据类型
- 1、下载文档前请自行甄别文档内容的完整性,平台不提供额外的编辑、内容补充、找答案等附加服务。
- 2、"仅部分预览"的文档,不可在线预览部分如存在完整性等问题,可反馈申请退款(可完整预览的文档不适用该条件!)。
- 3、如文档侵犯您的权益,请联系客服反馈,我们会尽快为您处理(人工客服工作时间:9:00-18:30)。
光盘使用说明
一、本书光盘内容
本书光盘包含Visual Basic 视频辅助学习程序、程序设计速查宝典、实用工具和本书实例的源程序。
Visual Basic 视频辅助学习程序只能在光盘上运行,程序设计速查宝典和实用工具程序需安装到计算机上方可使用。
本书实例的源程序在光盘中对应的源程序和数据库文件路径如下。
章节
源程序路径
数据库文件路径
第16章
\采购管理系统\program\
\采购管理系统\database\
第17章
\商品销售管理系统\program\
\商品销售管理系统\database\
第18章
\库存管理系统\program\
\库存管理系统\database\
第19章
\人事档案管理系统\program\
\人事档案管理系统\ database\
第20章
\固定资产及设备管理系统\program\
\固定资产及设备管理系统\ database\
第21章
\物资管理系统\program\
\物资管理系统\ database\
第22章
\医院门诊管理系统\program\
\医院门诊管理系统\ database\
第23章
\医院住院管理系统\program\
\医院住院管理系统\ database\
二、源程序使用说明
1、运行环境设置
本实例是在Windows 2000下开发的,程序测试环境为Windows2000和WindowsXP。
用户在Windows 98、Windows 2000和Windows XP下都可使用本实例。
为保证程序中的查询功能能够正常使用,请将系统时间格式改为“yyyy-MM-dd”日期格式。
设置(Windows XP下)步骤如下。
1)打开控制面板,选择“区域与语言选项”,选择“区域选项”选项卡。
2)在“区域选项”选项卡选择“自定义”按钮,将弹出“自定义区域”对话框。
3)在“自定义区域”对话框中选择“日期”选项卡,将“短日期格式”设置为“yyyy-MM-dd”日期格式。
注意:在Windows 2000下,打开控制面板后,直接选择“区域选项”,在打开的对话框中选择“日期”选项卡,将“短日期格式”设置为“yyyy-MM-dd”日期格式。
2、源程序使用方法
如果用户要使用源程序,计算机除了满足上面要求的配置外,还需要完成如下工作。
(1)在系统上安装Visual Basic 6.0。
(2)使用本书中源程序时,请将该文件夹下的所有文件拷贝到计算机硬盘上,并去掉所有文件的只读属性。
(3)如果后台数据库为SQL Server 2000,请在系统上安装SQLServer2000。
关于数据库方面的说明参见下一节。
(4)本书中的8个案例程序统一用户名及密码,用户名:mr,密码:mingrisoft。
2、使用数据库
书中包括8个案例程序,使用了Access或SQL Server2000数据库。
下面分别介绍各个案例程序的数据库环境配置。
Access数据库
本书中的“库存管理系统”为Access数据库,数据库文件放在与程序相同的目录下,案例程序能够自动识别数据库路径,无须读者做任何配置工作。
注意:请不要随意改动Access数据库文件的路径,如果要改动,请将数据库文件与程序文件放在同一路径下,以免程序运行时,找不到数据库。
SQL Server2000数据库
本书中“采购管理系统”、“商品销售管理系统”、“人事档案管理系统”、“固定资产及设备管理系统”、“物资管理系统”、“医院门诊管理系统”和“医院住院管理系统”为SQL Server2000数据库,它们的数据库文件均被放在“database”文件夹下,使用程序时应首先在SQL Server2000的企业管理器中附加数据库,然后配置ODBC。
其中物资管理系统不需要配置ODBC。
3、附加数据库
(1)将实例目录“database”文件夹下扩展名为“.MDF”和“.LDF”的两个文件拷贝到SQL Server 2000安装路径下的“MSSQL”/“Data”目录下。
(2)打开SQL Server 2000中的“企业管理器”,然后展开本地服务器,在“数据库”数据项上单击鼠标右键,在弹出的快捷菜单中选择“所有任务”/“附加数据库”菜单项,如图1所示。
图1 附加数据库
(3)将弹出“附加数据库”对话框,如图2所示。
图2 附加数据库对话框
(4)在该对话框中单击“…”按钮选择所要附加数据库的.mdf文件的路径,例:附加采购管理系统的数据库可以选择“C:\sql\MSSQL\Data\Data_cggl_Data.MDF”,如图3所示。
单击【确定】按钮,即可完成数据库的附加操作。
图3 选择所要附加的数据库
4、配置ODBC
下面以门诊计价收费管理系统为例,讲解配置ODBC的方法。
(1)单击“控制面板”/“ODBC数据源”,打开“ODBC数据源管理器”。
(2)单击“添加”按钮,打开“创建新数据源”窗口,在此选择“SQL Server”。
(3)单击“完成”按钮,打开“建立新的数据源到SQL Server”窗口,在“名称”文本框中输入“MZJJSFXT”(数据库名称);在“服务器”下拉列表框中输入想连接的SQL Server服务器。
如果要连接的SQL Server是安装在本地机上的,那么可以选择local,local表示连接到本地的服务器。
如果要连接的SQL Server是安装在其他的服务器上的,则选择所需的服务器名称。
(4)单击“下一步”按钮,打开“创建到SQL Server 的新数据源”窗口,选定“使用用户输入登录ID和密码的SQL Server验证”选项,在“登录ID”文本框中输入“sa”;“密码”
文本框为空。
(5)单击“下一步”按钮,在弹出的对话框中勾选“更改默认的数据库为”选项,在下拉列表中选择“MZJJSFXT”数据库,单击“下一步”按钮,再单击“完成”按钮,数据源便配置成功了。
本书光盘中需要配置ODBC数据源的实例如下表所示:
程序
ODBC数据源名称
采购管理系统
cggl
商品销售管理系统
xsgl
人事档案管理系统
RSDAGLXT
固定资产及设备管理系统
MRSOFT
医院门诊管理系统
MZJJSFXT
医院住院管理系统
ZYGL。