R软件作图命令汇总
R软件画图常用函数及全参数
R的基本画图函数非常容易学,看上去也很普通。
然而适当的参数设置,有意义的颜色设置,不同基本图间的互相组合,会使你的图更漂亮也更有力的表达数据。
下面介绍一些R基本包里画图函数的参数:hist():breaks设置每个柱的间距;freq柱图表示count或frequency;polt设置是否画图;density和angle可以设置柱上的斜线;axes设置是否需要画坐标轴;cor设置柱图的颜色;border设置柱图边界的颜色;xlim设置横轴范围;ylim设置纵轴范围。
R的许多函数都有类似的参数名,这些函数往往有同样的功能。
因此后面就只介绍比较特殊的参数。
layout():mat用矩阵设置窗口的划分,矩阵的0元素表示该位置不画图,非0元素必须包括从1开始的连续的整数值,比如:1……N,按非0元素的大小设置图形的顺序。
widths用来设置窗口不同列的宽度,heights设置不同行的高度。
par()的mfcol,和mfrow参数也有类似layout的功能,不过相对layout就逊色多了。
par():mar设置图离四个边缘的距离;bg设置背景颜色;xaxt 和yaxt设置坐标轴标签的类型(=”n”表示不画轴标签);xlim 和ylim设置坐标轴的范围。
axis():las设置坐标轴标签的方式(水平,垂直……)。
mtext():为四个坐标轴添加标签。
text():在给定坐标的位置写字。
lines():lty设置线的类型;lwd设置线的宽度。
points():pch设置点的类型。
plot():最简单的画图函数。
type设置画图的类型(type=”n”表示不画数据);axes设置是否画坐标轴。
常用的参数还有:xlim 和ylim,xaxt和yaxt。
barplot():space设置bar图间的间距;horiz设置bar的方向是垂直或水平;beside设置height为矩阵时,每列元素的bar 排列方式;add设置是否将barplot加在当前已有的图上。
R语言绘图详解

# 绘制直方图
curve(dnorm(x),add=T) # 添加曲线
h <- hist(x, plot=F) # 绘制直方图
ylim <- range(0, h$density, dnorm(0)) #设定纵轴的取值范围
hist(x, freq=F, ylim=ylim) #绘制直方图
curve(dnorm(x),add=T,col="red") #添加曲线
23
R网络资源
R主页: R资源列表 NCEAS /scicomp/software/r R Graphical Manual http://bm2.genes.nig.ac.jp/RGM2/index.php 统计之都: / QuikR / 丁国徽的R文档: /R/R-doc/ R语言中文论坛 /Rbbs/forums/list.page
20
1
2
3
4
5
6
图7 分步绘图
21
主要讲了什么?
1. R是开源的统计绘图软件,也是一种脚本语言,有大量的程序包可以利 用。
2. R中的向量、列表、数组、函数等都是对象,可以方便的查询和引用, 并进行条件筛选。
3. R具有精确控制的绘图功能,生成的图可以另存为多种格式。 4. R编写函数无需声明变量的类型,能利用循环、条件语句,控制程序的
11
图6 绘图举例
12
试一试其他绘图函数
boxplot(x) barplot(y) stripchart(x)
例:分步绘图
1.打开绘图窗口,不绘制任何对象 plot(x, y, type="n", xlab="", ylab="", axes=F) 2.添加坐标点 points(x,y) 3.添加坐标轴 axis(1); axis(at=seq(0.2,1.8,0.2), side=2) 4.补齐散点图的边框 box() 5.添加标题、副标题、横轴说明、纵轴说明 title(main="Main title", sub="subtitle", xlab="x-label", ylab="y-label")
使用R进行数据可视化的入门教程
使用R进行数据可视化的入门教程R是一种用于统计分析和数据可视化的编程语言和软件环境。
它提供了强大的数据处理和可视化功能,使用户能够更好地理解和解释数据。
本文将介绍如何使用R进行数据可视化的入门方法,包括数据导入、基本绘图函数的使用、常用图形类型和高级可视化技巧。
第一章:数据导入与准备数据导入是数据可视化的第一步。
R支持多种数据格式,包括CSV、Excel、SQL数据库等。
在R中,可以使用read.csv()、read.xlsx()、read.sql()等函数来读取不同格式的数据。
读取数据之后,可以使用head()函数来查看数据的前几行,使用str()函数来查看数据的结构和类型。
第二章:基本绘图函数的使用R中提供了一些基本的绘图函数,如plot()、hist()、boxplot()等,用于绘制散点图、直方图、箱线图等常见的图形。
使用这些函数只需要指定输入数据和一些基本参数,就能生成对应的图形。
例如,使用plot()函数可以将数据中的两个变量绘制成散点图,使用hist()函数可以将数据绘制成直方图。
第三章:常用图形类型除了基本的散点图、直方图和箱线图外,R还支持绘制多种常用图形类型,如折线图、条形图、饼图等。
可以使用ggplot2包中的函数来实现这些图形的绘制。
ggplot2具有丰富的功能和灵活的图形组织方式,可以轻松地定制图形的样式和布局。
通过调整参数和添加图层,可以进一步增强图形的表达力。
第四章:高级可视化技巧除了基本的绘图函数和常用图形类型外,R还支持一些高级的可视化技巧,用于展示更复杂的数据关系和模式。
例如,可以使用ggplot2包中的geom_smooth()函数来绘制平滑曲线,以显示变量之间的趋势。
此外,还可以使用ggplot2包中的facet_grid()函数来创建分面图,将数据按照指定的变量进行分组显示。
第五章:交互式可视化交互式可视化允许用户与图形进行交互,从而更深入地探索数据。
R中的shiny包提供了一种创建交互式应用程序的方法。
R命令
AutoCAD 2011命令速查手册
RENDERCROP
渲染视口内指定的矩形区域(称为修剪窗口)。 访问方法
按钮 功能区:“渲染”选项卡 “渲染”面板 “渲染面域”
概要 渲染视口中指定矩形区域内的内容,而保留渲染窗口的其他部分不变。 在需要渲染模型的某一部分以测试设置和效果时使用此命令。 命令行提示 将显示以下提示:
命令行提示 将显示以下提示:
选择参照:在当前图形中选择一个外部参照或块 如果在功能区处于激活状态时编辑外部参照,则将显示“编辑参照”功能区上下文选项卡。 如果在命令提示下输入-refedit,则将显示选项。
REFSET
在位编辑参照(外部参照或块定义)时从工作集添加或删除对象。
访问方法 464
R命令
REDRAW
刷新当前视口中的显示。 访问方法
命令条目:'redraw 用于透明使用 概要 当 BLIPMODE 打开时,将从当前视口中删除编辑命令留下的点标记。
REDRAWALL
刷新所有视口中的显示。 访问方法
菜单:“视图” “重画” 命令条目:'redrawall 用于透明使用 概要 当 BLIPMODE 打开时,将从所有视口中删除编辑命令留下的点标记。
菜单:“工具” “外部参照和块在位编辑” “添加到工作集或外部参照和块在位编辑” “从工 作集删除”
概要 作为工作集组成部分的对象与当前图形中的其他对象明显不同。在当前图形中,工作集以外的 所有对象都将呈淡入显示。
命令行提示 将显示以下提示:
在参照编辑工作集和宿主图形之间传输对象... 输入选项[添加(A)/删除(R)]<添加>:输入选项或按 Enter 键
另一个角点 使用指定的点作为对角点创建矩形。
r语言plot函数画拟合曲线
R语言中的plot函数是一个非常实用的绘图函数,可以用来制作各种类型的图形,包括散点图、曲线图、直方图等。
在本文中,我将带领你深入探讨R语言中plot函数的使用,特别是在画拟合曲线方面的应用。
我们需要了解如何使用plot函数来绘制基本的散点图。
在R语言中,我们可以使用以下的命令来创建一个简单的散点图:```Rplot(x, y, main="Scatterplot Example", xlab="X axis label",ylab="Y axis label", pch=19, col="blue")```在这个命令中,x和y分别代表了需要绘制的数据的x轴和y轴的值,main参数用来设置图形的标题,xlab和ylab参数分别用来设置x轴和y轴的标签,pch参数用来设置散点的形状,col参数用来设置散点的颜色。
除了简单的散点图外,plot函数还可以用来绘制拟合曲线。
在R语言中,我们可以使用以下的命令来绘制拟合曲线:```Rplot(x, y, main="Fitted Curve Example", xlab="X axis label",ylab="Y axis label", pch=19, col="blue")fit <- lm(y ~ x)abline(fit, col="red")```在这个命令中,我们首先使用plot函数创建了一个散点图,然后使用lm函数来进行线性回归分析,得到拟合曲线的参数,最后使用abline 函数来绘制拟合曲线。
通过这样的方式,我们可以很方便地在R语言中绘制出带有拟合曲线的散点图。
不仅如此,plot函数还可以用来绘制多条拟合曲线。
在R语言中,我们可以使用以下的命令来绘制多条拟合曲线:```Rplot(x, y, main="Multiple Fitted Curves Example", xlab="X axis label", ylab="Y axis label", pch=19, col="blue")fit1 <- lm(y ~ poly(x, 1))fit2 <- lm(y ~ poly(x, 2))fit3 <- lm(y ~ poly(x, 3))lines(sort(x), fitted(fit1)[order(x)], col="red")lines(sort(x), fitted(fit2)[order(x)], col="green")lines(sort(x), fitted(fit3)[order(x)], col="blue")```在这个命令中,我们首先使用plot函数创建了一个散点图,然后分别使用lm函数和poly函数进行多项式回归分析,得到多条拟合曲线的参数,最后使用lines函数来绘制多条拟合曲线。
R绘图笔记R语言绘图系统与常见绘图函数及参数
R绘图笔记R语言绘图系统与常见绘图函数及参数一. R语言绘图系统在R 里,主要有两大底层图形系统,一是base 图形系统,二是grid 图形系统。
lattice 包与 ggplot2包正是基于 grid 图形系统构建的,它们都有自己独特的图形语法。
•••install.packages("shiny")install.packages("ggsci")install.pack ages("esquisse")1.base系统· 由Ross Ihaka编写· base图形是最古老的系统,在R的初期就存在· 容易上手· 修改方便,使用灵活· 不一定非常美观,需要调整参数修改· 使用较多2.grid系统grid 图形系统可以很容易地控制图形基础单元,由Paul Murrell (2006)编写,给予编程者创作图形极大的灵活性。
grid 图形系统还可以产生可编辑的图形组件,这些图形组件可以被复用和重组,并能通过yout()等函数,把图形输出到指定的位置上。
但是因为grid 包中没有提供生成统计图形及完整绘图的函数,因此很少直接采用 grid 包来分析与展示数据。
ttice系统lattice 包通过一维、二维或三维条件绘图,即所谓的栅栏(trellis)图来对多元变量关系进行直观展示。
相比于base()函数是直接在图形设备上绘图的,lattice()函数是返回 trellis 对象。
在命令执行的时候,栅栏图会被自动打印,所以看起来就像是lattice()函数直接完成了绘图。
更多关于 base、grid 和 lattice 的语法可以参考 Murrell 和 Paul 所撰写的书籍 R graphics。
4.ggplot2系统ggplot2 包则基于一种全面的图形语法,提供了一种全新的图形创建方式,这套图形语法把绘图过程归纳为数据(data)、转换(transformation)、度量(scale)、坐标系(coordinate)、元素(element)、指引(guide)、显示(display)等一系列独立的步骤,通过将这些步骤搭配组合,来实现个性化的统计绘图。
cad 中r的用法 -回复
cad 中r的用法-回复CAD(计算机辅助设计)是一种广泛应用于工程、建筑、制造业的技术工具。
而R是统计计算和图形展示的编程语言。
本文将讨论CAD中如何使用R编程语言,以提高设计工程师的工作效率、数据处理能力和可视化展示。
CAD中可以使用R的情况非常多样。
它可以帮助设计师自动化繁琐的计算过程、优化设计、进行统计分析、生成高质量的图形和报告等等。
接下来,我将逐步介绍CAD中R的几个主要用法。
首先,R在CAD中最常用的功能之一是进行统计分析。
设计工程师通常需要对各种工程数据进行分析,以评估设计参数的影响和优化设计方案。
R提供了丰富的统计分析函数和包,可以帮助工程师进行各种统计方法的计算和模型建立。
比如,可以使用R进行回归分析、方差分析、非参数统计等等,从而得出基于数据的结论和建议。
其次,R在CAD中的另一个主要用途是数据处理和可视化展示。
CAD软件通常可以将设计数据导出为表格形式的数据文件,而R则是处理这些数据的强大工具。
设计师可以使用R来预处理数据,比如进行缺失值处理、异常值检测、数据规范化等等。
此外,R还可以进行数据分组、计算衍生变量、合并数据等等操作。
最重要的是,R可以通过绘图函数和包来展示处理后的数据。
设计工程师可以使用R生成各种类型的图形,如折线图、柱状图、散点图等等,以便更好地理解和表达数据。
在CAD中使用R的第三个主要功能是优化设计。
设计工程师通常需要通过优化算法搜索设计参数的最佳组合,以满足给定的设计要求和约束条件。
而R则提供了一系列的优化函数和包,可以进行单目标优化、多目标优化、约束优化等等。
设计工程师可以使用R编写优化算法,通过迭代计算寻找最佳的设计参数组合。
同时,R还可以与CAD软件进行交互,实时更新和验证设计方案。
最后,R还可以在CAD中进行自动化计算和生成。
设计工程师通常需要进行大量的计算和报告生成,而R可以帮助工程师提高计算的效率和报告的质量。
设计工程师可以编写R脚本来执行重复性的计算过程,从而节省时间和精力。
cad 中r的用法 -回复
cad 中r的用法-回复CAD中的R是指旋转命令(Rotate),这是一种在CAD软件中常用的功能,用于将物体在二维或三维空间中沿着一个轴线进行旋转。
在本文中,我将逐步介绍CAD中R命令的用法,并提供一些实际应用示例。
一、基本用法在CAD软件中,通过以下步骤来使用R命令:1.选择要旋转的物体:在R命令激活后,您需要在CAD软件中选择要旋转的物体。
可以通过鼠标点击或绘制一个选择框来选择物体。
2.指定旋转中心:选择完物体后,您需要指定一个旋转中心。
旋转中心可以是物体上的一个点,也可以是任意一个点。
3.指定旋转角度:指定旋转中心后,您需要输入旋转角度。
您可以直接输入角度值,也可以选择旋转中心为基准点进行相对旋转。
4.完成旋转:输入完角度值后,按下“Enter”键或点击“完成”按钮,CAD软件将根据您所指定的旋转角度对该物体进行旋转。
二、实际应用示例下面将介绍几个常见的应用示例,以展示R命令在CAD中的实际用途。
1.旋转文本或图形在CAD中,您可以使用R命令来旋转文本或图形,以便更好地适应绘图的要求。
例如,您可以将文本旋转为水平显示,或将图形按照需要进行任意角度的旋转。
2.调整对象位置通过R命令,您可以将对象按照指定角度进行旋转,以便将其定位于更合适的位置。
例如,在建筑设计中,您可以将窗户或门旋转到正确的位置。
3.制作旋转尺寸图在制作旋转尺寸图时,您可以使用R命令来旋转维度线和尺寸线。
通过旋转,您可以实现更好的尺寸显示,使其更符合绘图规范。
4.创建复杂图形通过多次使用R命令,您可以在CAD中创建复杂的旋转图形。
通过旋转和偏移,您可以将基本图形组合起来,创造出更加复杂和多样化的设计。
5.绘制三维模型在CAD的三维环境中,R命令也非常有用。
您可以使用R命令来旋转三维模型,以便从不同角度查看和分析建筑、机械等三维设计。
三、常见问题及解决方法在使用R命令时,有一些常见问题和解决方法需要注意:1.旋转的物体变形:在旋转物体时,可能会出现物体变形的情况。
常用的R绘图
c 林建甫(October27,2006)·2·6.1繪圖簡介c Jeff Lin醫學統計與R第6章:常用的R繪圖程式·3·醫學統計與R c Jeff Lin·4·6.1繪圖簡介Therapy1:合成胰島素;2:一般胰島素Sex1:男性;2:女性Age發生糖尿病之年齡;1:20-39;2:40-59TC1總膽固醇,基線測量TC2總膽固醇,治療12個月後測量FBS1空腹血糖,基線測量FBS2空腹血糖,治療12個月後測量c Jeff Lin醫學統計與R第6章:常用的R繪圖程式·5·醫學統計與R c Jeff Lin·6·6.2高階繪圖c Jeff Lin醫學統計與R第6章:常用的R繪圖程式·7·R函式說明·8·6.2高階繪圖c Jeff Lin醫學統計與R第6章:常用的R繪圖程式·9·醫學統計與R c Jeff Lin·10·6.2高階繪圖c Jeff Lin醫學統計與R醫學統計與R c Jeff Linc Jeff Lin醫學統計與R醫學統計與R c Jeff Linc Jeff Lin醫學統計與R醫學統計與R c Jeff Linc Jeff Lin醫學統計與R引數說明c Jeff Lin醫學統計與R醫學統計與R c Jeff Linc Jeff Lin醫學統計與R醫學統計與R c Jeff Linc Jeff Lin醫學統計與R醫學統計與R c Jeff Linc Jeff Lin醫學統計與R醫學統計與R c Jeff Linc Jeff Lin醫學統計與RR Commands Short description6.3.2互動式繪圖函式Interactive Graphics FunctionsR有兩個函式locator()和identify()可以使用者用滑鼠遊標在圖形中,點擊所想知道的坐標位置,然後R回傳圖形中滑鼠遊標所點擊的位置的確定坐標.locator(n,type)函式locator(n,type)指令執行時,會停下來等待使用者在現有圖形中,用滑鼠左鍵與遊標點擊現有的圖上的特定位置,這個過容許n個點(內佈自動設定為512個點),用滑鼠中鍵點擊可以選擇停止,引數type容許在選擇的特定之點位置上作指定繪圖,在滑鼠遊標點擊處繪點(線)等,高級繪圖指令的功能.locator()回傳是一個列表(list),有兩個成分,x和y,分別表示點擊位置的x-(橫)坐標和y−(縱)坐標.當使用者需要設定一些圖形元素(如圖例與標籤)在現有的圖上之放置位置時,互動式選取特定位置,是一種可行的方法.c Jeff Lin醫學統計與RSub/Scuperscriptx[i]x i x subscript ix^2x2x superscript2Radicalsqrt(x)√x yth root of x醫學統計與R c Jeff LinListlist(x,y,z)x,y,z comma-separated list ...···ellipsis(height varies) cdots···ellipsis(vertically centred) ldots...ellipsis(at baseline)Accentshat(x)ˆx x with a circumflextilde(x)˜x x with a tildedot(x)˙x x with a dotring(A)˚A x with a ringbar(xy)¯xy xy with barwidehat(xy) x y xy with a wide circumflex widetilde(xy) x y xy with a wide tilde underline(x)xSpacingx~~y x y第6章:常用的R繪圖程式·31·Symbolic Namesalpha-omegaα−ωGreek symbols’Sigma’-’Omega’Σ−Ωuppercase Greek symbolstheta1,phi1,sigma1,omega1ϑ,ϕ,ς,̟cursive Greek symbolsUpsilon1Υcapital upsilon with hookinfinity∞infinity symbolpartialdiff∂partial differential symbol32*degree32◦32degrees60*minute60′60minutes of angle30*second30”30seconds of angle醫學統計與R c Jeff Lin·32·6.4圖形引數leave vertical gap for”0”,don’tdrawfrac(x,y)xx over yyatop(x,y)xx over y(no horizontal bar)ysum(x[i],i==1,n)∑n i=1x i sum x[i]for i equals1to nprod(plain(P)(X==x),x)∏x P(X=x)product of P(X=x)for all values of x integral(f(x)*dx,a,b) b a f(x)dx definite integral of f(x)wrt xunion(A[i],i==1,n)∪n i=1A i union of A[i]for i equals1to nintersect(A[i],i==1,n)∩n i=1A i intersection of A[i]lim(f(x),x%->%0)lim x→0f(x)limit of f(x)as x tends to0min(g(x),x>0)min(x)g(x)min.of g(x)for x greater than0x>0inf(S)inf S infimum of Ssup(S)sup S supremum of Sx^y+z x y+z normal operator precedencex^(y+z)x(x+y)visible grouping of operandsx^{y+z}x y+z invisible grouping of operandsgroup("(",list(a,b),"]")(a,b]specify left and right delimiters)use scalable delimiters bgroup("(",atop(x,y),")")(xygroup(lceil,x,rceil)⌈x⌉special delimitersgroup(lfloor,x,rfloor)⌊x⌋special delimitersgroup(|,x,|)|x|special delimiters6.4圖形引數Graphics Parameters:par()Function當R的內部自動設定之繪圖無法達成使用者之要求,特別是發表論文之圖形要求,R提供許多“圖形引數”(graphics parameters)可以控制特別需求,如色彩,此尺寸等.R圖形引數都有一特定名稱,透過par(),更改設定.圖形引數設定有兩種方式:(a)對目前的使用的繪圖裝置設定永遠改變設定,所有利用此繪圖裝置輸出之繪圖,都受影響;(b)暫時改變設定,僅對單一使用的繪圖函式做改變.在此將要具體描述一些常用的圖形引數,函式par()可顯示完整的圖形引數,函式par()也可用來更改內部自動設定之圖形引數.在本章第6.2.2小節中,簡要說明一些常用高階繪圖引數,如表6.3,其中部分引數屬於par()圖形引數,但有些如axes()不是圖形引數,而是一些高階繪圖函式如plot()函式的引數.第6章:常用的R繪圖程式·33·醫學統計與R c Jeff Lin·34·6.4圖形引數c Jeff Lin醫學統計與R第6章:常用的R繪圖程式·35·圖形元素用法說明6.5座標軸和座標刻度設定Axes and Tick MarksR的高階繪圖函式內設坐標軸(axis),可以用低階繪圖函式axis()設置使用者的坐標軸,參見表6.10與圖6.15.坐標軸包括3個主要部分:1.坐標軸線(axis line)(線條格式由圖形引數lty,lwd等設定).2.坐標軸刻度(tick mark)(劃分坐標軸線上的刻度).3.坐標軸刻度標記(tick label)(坐標軸線刻度上的單位).axis(side,at=NULL,labels=TRUE,tick=TRUE,line=NA,pos=NA,outer=FALSE,font=NA,vfont=NULL,lty="solid",lwd=1,col=NULL,padj=NA,...)axis引數如下;bty="o",bty=l",···,etc.設定圖形座標軸外框(box)的類型,選項共有"o","l","7","c","u",or"]",座標軸外框的類型類似所選之文字.·36·6.5座標軸和座標刻度設定Axes:第6章:常用的R繪圖程式·37·醫學統計與R c Jeff Lin·38·6.5座標軸和座標刻度設定din,fin,pin fin=c(6,4)Absolute device size,figure sizeand plot region size in inches.fig fig=c(0,0.5,0,1)Define thefigure region as a frac-tion of the device region.font font=3Small positive integer determininga text font for characters and hencean interline spacing.In R font1is plain,font2italic,font3bold,font4bold italic and font5is the symbol font.mai,mar mar=c(3,3,1,1)+0.1The four margin sizes,in inches(mai),or in text line units(mar,thatis,relative to the current font size).Note that mar need not be an inte-ger.mex mex=0.7&Number of text Lines per interline spacing.mfg mfg=c(2,2,3,2)Define a position within a specifiedmulti-figure display.mfrow,mfcol mfrow=c(2,2)Define a multi-figure display.new new=T Logical value indicating whetherthe currentfigure has been used. oma,omi,omd oma=c(0,0,4,0)Define outer margins in text lines orinches,or by defining the size of thearray offigures as a fraction of thedevice region.plt plt=c(0.1,0.9,0.1,0.9)Define the plot region as a fractionof thefigure region.pty pty="s"Plot type,or shape of plotting re-gion,”s”or”m”usr usr=c(0.5,1.5,0.75,10.25)Limits for the plot region in user co-ordinatesc Jeff Lin醫學統計與R第6章:常用的R繪圖程式·39·醫學統計與R c Jeff Lin·40·6.5座標軸和座標刻度設定c Jeff Lin醫學統計與R第6章:常用的R繪圖程式·41··42·6.5座標軸和座標刻度設定第6章:常用的R繪圖程式·43··44·6.7常用圖形裝置。
统计软件R基本操作及简单画图

灵活的编程语言
R语言是一种解释型语言,语法 简洁,易于学习和掌握。
R软件的应用领域
数据挖掘与机器学习
R软件广泛应用于数据挖掘、机器学习和人 工智能领域。
生物信息学
在生物信息学领域,R软件被广泛用于基因 组学、蛋白质组学等数据分析。
金融
R软件在金融领域中用于风险评估、投资组 合优化等方面。
社会科学
在社会科学研究中,R软件常用于调查数据 分析、经济建模等。
统计软件R基本操作及简单画 图
• R软件简介 • R语言基础 • R语言基本操作 • R语言简单画图
01
R软件简介
R软件的发展历程
起源
R软件起源于1993年,由新西兰奥克兰大学的Ross Ihaka和 Robert Gentleman共同开发。
成长
随着R软件的开源性质,越来越多的开发者为其贡献代码和功能, 使其成为统计分析领域的强大工具。
除法
使用“/”进行除法运算。例 如,`x / y`将x除以y。
逻辑运算符和比较运算符
逻辑运算符
使用“&”表示逻辑与,使用“|”表示逻辑或。例如,`x > y & x < z`表示x 大于y并且x小于z。
比较运算符
使用“>”、“<”、“>=”、“<=”等比较运算符进行比较。例如,`x > y` 表示x大于y。
总结词:用于展示数据的分布、 中位数、四分位数等统计指标。
boxplot(data$income) ```
饼图
总结词
用于展示各部分在总体中所占的比例。
详细描述
在R中,可以使用`pie()`函数来创建饼图。例如,要绘制一个饼图展示各年龄段人口比 例,可以使用以下代码
R语言的基础绘图技术
R语言的基础绘图技术高水平绘图函数x <- 1:100 #生成1-100的向量y <- 100 + x*5 #100是截距,5是斜率#windows是生成一个窗口更,plot是绘图windows(300,200);plot(y) #散点图windows(300,200);plot(y,type="l") #直线# 生成100个正态分布随机数并绘图x <- rnorm(100,10,5) #均值为10,标准差为5plot(x)# 绘制1000个正态分布随机数的频数直方图x <- rnorm(1000,30,10)hist(x)# 使用核密度估计函数density(),在直方图上绘制密度曲线# hist()函数必须设置freq参数为F才能显示密度曲线x <- rnorm(1000,30,10)hist(x,freq=F)lines(density(x),col="blue")box() #给图加一个方框,看起来完整一些# 茎叶图很直观的表现出数据的分布情况x <- rnorm(100,5,1)stem(x)# 绘制10个正态分布随机数的条形图x <- rnorm(10,30,10);barplot(x)box() # 在当前图上加个方框# 绘制饼图x <-1:5;pie(x,col=rainbow(5)) #rainbow,向量有5个值,不会自己选颜色,系统自动分配box()# 绘制箱线图# 中间黑线为中位数位置;上下框线为上下四分位数位置;上下触须为1.5倍四分位数间距;如果有孤立点表示异常值x <-rnorm(10,10,3);boxplot(x)# 绘制向日葵图data(iris)sunflowerplot(iris[,3:4])# 绘制矩阵或数据框的二元图data(iris)pairs(iris[1:4], main = "Anderson's Iris Data -- 3 species",pch= 21, bg = c("red", "green3", "blue")[unclass(iris$Species)])# 绘制QQ图# 如果向量为正态分布则数据点基本在一条直线上x <- rnorm(500,10,5);qqnorm(x)# 根据指定函数绘制指定范围的曲线图curve(sin, -2*pi, 2*pi, xname = "t")低水平绘图函数在高水平绘图函数绘制的图形上做补充和修饰# 生成50个正态分布随机数并绘图x <- 1:50y <- rnorm(50,10,5)#横坐标#纵坐标#type="n"表示开始不绘图#横坐标的名称#纵坐标的名称#横坐标的范围#纵坐标的范围#main表示主名称#sub表示副标题plot(x,y,type="n",xlab="数据索引",ylab="随机数点",xlim=c(1,50),ylim=c(-20,20),main="实验图",sub="随机数绘图") #高水平绘图points(x,y,col="blue") #低水平绘图,绘制所有的点lines(x,y,col="red") #将所有的点连成线text(5,max(y),"随机数据点") # 在指定坐标位置放置文本mtext("横轴下方文字",side=1) # 横轴、纵轴上放置文字mtext("纵轴左方文字",side=2)mtext("横轴上方文字",side=3)mtext("纵轴右方文字",side=4)segments(10,10,50,-10) # 根据起点、终点坐标绘制线段#15表示箭头的角度arrows(10,-10,40,20,angle=15,code=1) # 绘制带箭头线段,可以设置箭头角度,有几个箭头(1起点箭头、2终点箭头,3双箭头)abline(-20,.5) # 在图上绘制直线,第一个参数为截距,第二个参数为斜率abline(h=0,col="red") # 在图上绘制水平线或垂直线,可以标示临界位置,很好用的功能legend(0,max(y),"随机点连线") #图例# 坐标定位模式获得鼠标点击位置的坐标x <- 1:50y <- rnorm(50,10,5)plot(x,y,type="n",xlab="数据索引",ylab="随机数点",xlim=c(1,50),ylim=c(-20,20),main="实验图")print(locator(3,type="p")) # 图像进入定位模式,第一个参数决定获取几个点的坐标信息,第二个参数决定绘图方式rect(5,5,20,20) # 在已经成功绘制的图形内部绘制一个长方形polygon(c(20,10,30,40,45),c(-10,0,15,4,-10)) # 在高级图形内部绘制多边形setwd("D:/rstudiodir") #设置当前工作目录# 生成一个绘图窗口在其中绘制图形后用savePlot()函数保存windows()plot(1:10)rect(1, 5, 3, 7, col="blue")savePlot("test01",type="jpg",device=dev.cur(),restoreConsole=TRUE)# 直接在jpeg设备上绘制图形,完成后使用dev.off()关闭设备,存盘退出jpeg(file="myplot.jpeg")plot(1:10)rect(1, 5, 3, 7, col="blue")dev.off()。
R软件画图常用函数及参数
R软件画图常用函数及参数R语言是一种强大的统计和绘图语言,它提供了丰富的函数和参数来进行数据可视化。
下面是一些常用的R软件画图函数及其参数的介绍:1. plot(函数:plot(函数是R中最基本的绘图函数之一,可以绘制散点图、折线图、柱状图等各种类型的图形。
参数:-x:要绘制的数据的x轴值-y:要绘制的数据的y轴值- type:图形类型,例如"p"代表散点图,"l"代表折线图- main:图形的主标题- col:点或线的颜色- pch:点的形状- lwd:线的宽度- xlim:x轴的范围- ylim:y轴的范围2. hist(函数:hist(函数用于绘制直方图,可以展示数据的分布情况。
参数:-x:要绘制直方图的数据- breaks:直方图的分割数,或者是分割点的向量- main:图形的主标题- col:直方图的颜色- xlim:x轴的范围- ylim:y轴的范围3. boxplot(函数:boxplot(函数用于绘制箱线图,可以显示数据的分布、中位数、四分位数等统计信息。
参数:-x:要绘制箱线图的数据- main:图形的主标题- col:箱线图的颜色- xlim:x轴的范围- ylim:y轴的范围4. barplot(函数:barplot(函数用于绘制柱状图,可以展示不同组别之间的比较。
参数:-x:柱状图的高度或数据- main:图形的主标题- col:柱状图的颜色- xlim:x轴的范围- ylim:y轴的范围5. plotly(函数:plotly(函数用于创建交互式的图形,可以通过鼠标和键盘进行缩放、旋转和放大等操作。
参数:-x:要绘制的数据的x轴值-y:要绘制的数据的y轴值- type:图形类型,例如"scatter"代表散点图,"line"代表折线图- mode:交互模式,例如"lines"代表线条,"markers"代表点- marker:点的样式参数,如颜色、大小等- hoverinfo:鼠标悬停时显示的信息。
R语言基本画图函数与多图多线的用法
R语⾔基本画图函数与多图多线的⽤法常⽤统计作图函数汇总plot()hist() 直⽅图stem() 茎叶图boxplot() 箱线图(盒形图)coplot() 协同图qqnorm() 正态qq图qqplot() 两总体qq图1. ⾼级低级图形函数的常⽤选项⾼、低级图形函数概述⾼级图形函数可以迅速简便地绘制常见类型的图形,但是,某些情况下你可能希望绘制⼀些有特殊要求的图形。
⽐如,你希望坐标轴按照⾃⼰的设计绘制,在已有的图上增加另⼀组数据,在图中加⼊⼀⾏⽂本注释,绘出多个曲线代表的数据的标签,等等。
低级图形函数让你在已有的图的基础上进⾏添加。
低级图形函数⼀般需要指定位置信息,其中的坐标指的是所谓⽤户坐标,即前⾯的⾼级图形函数所建⽴的坐标系中的坐标。
坐标可以⽤两个向量x和y给出,也可以由⼀个两列的矩阵给出。
如果交互作图可以⽤下⾯介绍的locator()函数来交互地从图形中直接输⼊坐标位置。
最常⽤⾼级函数的是plot()函数。
⽐如,- plot(x,y)(其中x,y是向量)对两个变量画散点图。
- ⽤plot(z) (其中z是⼀个定义了x变量和y变量的列表,或者⼀个两列的矩阵)也可以达到同样⽬的。
如果x是⼀个时间序列对象(时间序列对象⽤ts()函数⽣成),plot(x)绘制时间序列曲线图。
- 如果x是⼀个普通向量,则绘制x的值对其下标的散点图。
- 如果x是复数向量则绘制虚部对实部的散点图。
- 如果f是⼀个因⼦,则plot(f)绘制f的条形图(每个因⼦⽔平的个数)。
- 如果f是因⼦,y是同长度的数值向量,则plot(f,y)对f的每⼀因⼦⽔平绘制y中相应数值的盒形图。
- 如果d是⼀个数值型数据框,则plot(d)对d的每两个变量之间作图(散点图等)load("F:/R/cl.RData")plot(cl$Sex)⾼级绘图函数常⽤选项低级绘图函数常⽤选项低级图形函数⼀般需要指定位置信息,其中的坐标指的是所谓⽤户坐标,即前⾯的⾼级图形函数所建⽴的坐标系中的坐标。
R语言做图plot参数
R语言做图plot参数R语言做图plot参数函数名称:plot用途:作图用法:plot(x, y, ……)参数:1、符号和线条pch:指定绘制点所使用的符号,取值范围[0, 24],其中4是“差号”,20是“点”cex:指定符号的大小。
cex是一个数值,表示pch的倍数,默认是1.5倍lty:指定线条类型。
lty=1代表实线,2至6都是虚线,虚的程度不一样lwd:指定线条宽度,默认值为lwd=1,可以适当修改1.5倍、2倍等2、颜色col:默认绘图颜色。
某些函数(如lines、pie)可以接受一个含有颜色值的向量,并自动循环使用。
例如:col=c("red", "blue")需要绘制三条线,那么三条颜色分别为red、blue、redcol.axis:坐标轴刻度文字的颜色,不是坐标轴的颜色b:坐标轴标签(名称)的颜色col.main:标题的颜色col.sub:副标题的颜色fg:图形的前景色bg:图形的背景色3、文本属性(用来指定字号、字体、字样)cex.axis:坐标轴刻度文字的缩放倍数b:坐标轴标签(名称)的缩放倍数cex.main:标题的缩放倍数cex.sub:副标题的缩放倍数font:整数。
用于指定字体样式。
1常规、2粗体、3斜体、4粗斜体4、图形尺寸与图形边界pin:以英寸表示图形的宽和高mai:以数值向量表示边界大小,顺序为"下、左、上、右",单位为英寸mar:以数值向量表示边界大小,顺序为"下、左、上、右",单位为英分,默认值c(5, 4, 4, 2)+0.15、标题可以使用函数title,格式为:title(main = " ", sub = " ", xlab = " ", ylab = " ")也可以直接把title里面的参数直接放在plot()里面6、坐标轴plot参数axes=FALSE 将禁用全部坐标轴,框架和刻度全部没有了xaxt="n" 禁用x轴的刻度线yaxt="n" 禁用y轴的刻度线xlim x坐标轴的范围,只写出最小值和最大值ylim y坐标轴的范围,只写出最小值和最大值例如:plot(1:10, xlim = c(-10, 10), ylim = c(0, 10)) xlim和ylim 只是坐标轴的范围,与每个点的x和y坐标没有关系也可以通过axis函数自定义axis(……)side:一个整数。
r语言常用函数和命令 -回复
r语言常用函数和命令-回复【R语言常用函数和命令】R语言是一种非常受欢迎的开源编程语言和环境,广泛应用于数据分析、统计建模、数据可视化和机器学习等领域。
本文将介绍一些常用的R 语言函数和命令,帮助读者更好地利用R语言进行数据处理和分析。
一、数据读取与导入在R中,可以使用以下命令读取和导入数据:1. read.table:用于读取以制表符分隔的文本文件,并创建一个数据框。
2. read.csv:用于读取逗号分隔的文本文件,并创建一个数据框。
3. read.xlsx:用于读取Microsoft Excel文件,并创建一个数据框。
4. readRDS:用于读取R保存的二进制R数据文件。
5. load:用于读取保存的R工作空间(.RData文件)。
二、数据处理与转换处理和转换数据是数据分析的重要一步。
以下是一些常用的数据处理函数和命令:1. subset:用于从数据框中选择满足特定条件的观测值。
2. merge:用于合并两个或多个数据框,根据特定的列进行匹配。
3. dplyr包:包含一系列用于数据处理的高效函数,如filter、select、mutate等。
4. aggregate:用于对数据进行汇总统计,如求和、平均值等。
5. apply函数:用于在矩阵或数据框上逐行或逐列应用函数。
6. reshape2包:用于数据重塑和转换,如melt和dcast函数。
三、数据分析与统计R语言提供了丰富的统计分析函数和命令,可以满足各种数据分析需求。
以下是一些常用的函数和命令:1. summary:用于计算数据的统计描述,如最小值、最大值、均值、中位数等。
2. lm函数:用于拟合线性回归模型。
3. glm函数:用于拟合广义线性模型,如逻辑回归、泊松回归等。
4. t.test:用于进行一样本或双样本t检验。
5. wilcox.test:用于进行非参数的Wilcoxon检验。
6. chisq.test:用于进行卡方检验。
R语言常用绘图
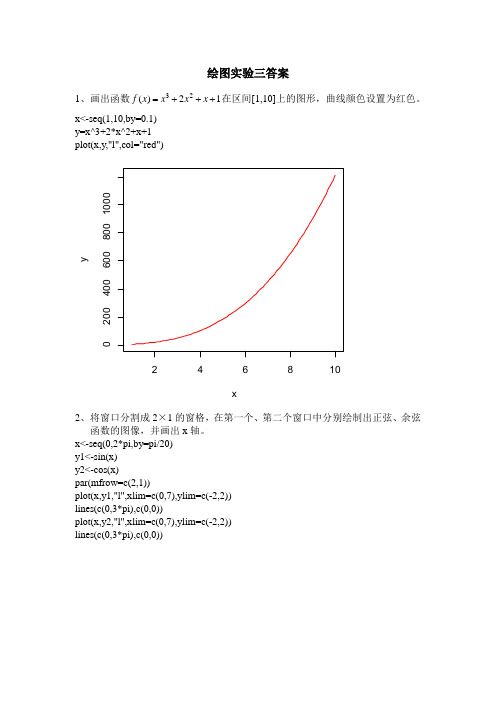
绘图实验三答案1、画出函数32()21f x x x x =+++在区间[1,10]上的图形,曲线颜色设置为红色。
x<-seq(1,10,by=0.1)y=x^3+2*x^2+x+1plot(x,y,"l",col="red")2468100200400600800100x y2、将窗口分割成2×1的窗格,在第一个、第二个窗口中分别绘制出正弦、余弦函数的图像,并画出x 轴。
x<-seq(0,2*pi,by=pi/20)y1<-sin(x)y2<-cos(x)par(mfrow=c(2,1))plot(x,y1,"l",xlim=c(0,7),ylim=c(-2,2))lines(c(0,3*pi),c(0,0))plot(x,y2,"l",xlim=c(0,7),ylim=c(-2,2))lines(c(0,3*pi),c(0,0))01234567-202x y101234567-202x y23、在同一张图上画出函数2122,y x y x ==的曲线并利用legend 函数对曲线加标注“2122,y x y x == ”,并加上标题 “ 22x x 和的曲线”。
x<-seq(0,10,by=0.5)y1=2*xy2=x^2plot(x,y1,"o",main="2*x 和x^2 的曲线",pch=8)lines(x,y2,"o",pch=24,col="red")legend("topright",legend=c("2*x","x^2"),col=c("black","red"),pch=c(8,24),lty=1)024681051015202*x 和x^2 的曲线x y 12*xx^24、将屏幕分割为四块,并分别画出y=sin(x);z=cos(x);a=sin(x)*cos(x);b=sin(x)/cos(x)。
最全面的R软件画图—所有的函数和指令说明
最全面的R软件画图—所有的函数和指令说明R软件画图—所有的函数和指令详细介绍1、abline {graphics}这个函数是在现有的表格中增一条或多条直线abline(a = NULL, b = NULL, h = NULL, v = NULL, reg = NULL, coef = NULL, untf = FALSE, ...)a, b the intercept (截距)and slope, single values.untf logical asking whether to untransform. See ‘Details’.h the y-value(s) for horizontal line(s).(水平线)是直线(0,h)v the x-value(s) for vertical line(s).(垂直线),是直线(v,0)coef a vector of length two giving the intercept(截距)and slope(斜率).Coef是一个二维的向量,其中直线的截距和斜率的,reg an object with a coef method. See ‘Details’.... graphica l parameters such as col, lty and lwd (possibly as vectors: see ‘Details’) and the line characteristics lend, ljoin and lmitre.abline(a, b, untf = FALSE, \dots)abline(h=, untf = FALSE, \dots)abline(v=, untf = FALSE, \dots)abline(coef=, untf = FALSE, \dots)abline(reg=, untf = FALSE, \dots)The first form specifies the line in intercept/slope form (alternatively a can be specified on its own and is taken to contain the slope and intercept in vector form).reg is a regression object with a coef method. If this returns a vector of length 1 then the value is taken to be the slope of a line through the origin, otherwise, the first 2 values are taken tobe the intercept and slope.If untf is true, and one or both axes(坐标轴)are log-transformed, then a curve is drawn corresponding to a line in original coordinates(坐标), otherwise a line is drawn in the transformed coordinate system(转变后的坐标系统). The h and v parameters always refer to original coordinates.The graphical(图解的,绘画的)parameters col, lty and lwd can be specified; see par for details. For the h= and v= usages they can be vectors of length greater than one, recycled as necessary. lines and segments for connected and arbitrary lines given by their endpoints. par.eg## Setup up coordinate system (with x==y aspect ratio):plot(c(-2,3), c(-1,5), type = "n", xlab="x", ylab="y", asp = 1) ## the x- and y-axis, and an integer gridabline(h=0, v=0, col = "gray60")text(1,0, "abline( h = 0 )", col = "gray60", adj = c(0, -.1))abline(h = -1:5, v = -2:3, col = "lightgray", lty=3)abline(a=1, b=2, col = 2)text(1,3, "abline( 1, 2 )", col=2, adj=c(-.1,-.1))## Simple Regression Lines:require(stats)sale5 <- c(6, 4, 9, 7, 6, 12, 8, 10, 9, 13)plot(sale5)abline(lsfit(1:10,sale5))abline(lsfit(1:10,sale5, intercept = FALSE), col= 4) # less fitting z <- lm(dist ~ speed, data = cars)plot(cars)abline(z) # equivalent to abline(reg = z) orabline(coef = coef(z))## trivial intercept modelabline(mC <- lm(dist ~ 1, data = cars)) ## the same asabline(a = coef(mC), b = 0, col = "blue")2、arrows {graphics}Draw arrows(箭头)between pairs of points.arrows(x0, y0, x1 = x0, y1 = y0, length = 0.25, angle = 30, code = 2,col = par("fg"), lty = par("lty"), lwd = par("lwd"), ...) x0, y0 coordinates of points from which to draw.x1, y1 coordinates of points to which to draw. At least one must the suppliedlength length of the edges of the arrow head (in inches).angle angle from the shaft(轴,箭杆)of the arrow to the edge of the arrow head.Code integer code, determining kind of arrows to be drawn.col, lty, lwd graphical parameters, possible vectors. NA values in col cause the arrow to be omitted.... graphical parameters such as xpd and the line characteristics lend, ljoin and lmitre: see par.For each i, an arrow is drawn between the point (x0[i], y0[i]) and the point (x1[i],y1[i]). The coordinate vectors will be recycled to the length of the longest.If code=1 an arrowhead is drawn at (x0[i],y0[i]) and if code=2 an arrowhead is drawn at (x1[i],y1[i]). If code=3 a head is drawn at both ends of the arrow. Unless length = 0, when no head is drawn. The graphical parameters col, lty and lwd can be vectors of length greater than one and will be recycled if necessary.The direction of a zero-length arrow is indeterminate, and hence so is the direction of the arrowheads. To allow for rounding error, arrowheads are omitted (with a warning) on any arrow of length less than 1/1000 inch.The first four arguments in the comparable S function are named x1,y1,x2,y2.x <- stats::runif(12); y <- stats::rnorm(12)i <- order(x,y); x <- x[i]; y <- y[i]#order returns a permutation(排列,置换)which rearranges(重新排列)its first argument into ascending or descending order, breaking ties by further arguments plot(x,y, main="arrows(.) and segments(.)")## draw arrows from point to point :s <- seq(length(x)-1)# one shorter than dataarrows(x[s], y[s], x[s+1], y[s+1], col= 1:3)s <- s[-length(s)]segments(x[s], y[s], x[s+2], y[s+2], col= 'pink')3、plot.window {graphics}This function sets up the world coordinate system for a graphics window. It is called by higher level functions such as plot.default (after plot.new).plot.window(xlim, ylim, log = "", asp = NA, ...)xlim, ylim numeric vectors of length 2, giving the x and y coordinates ranges.是二维的数值向量,给出x和y轴变化的范围,log character; indicating which axes should be in log scale.asp numeric, giving the aspect ratio y/x, see below.... further graphical parameters as in par. The relevant ones are xaxs, yaxs and lab.asp:If asp is a finite positive value then the window is set up so that one data unit in the x direction is equal in length to asp * one data unit in the y direction.Note that in this case, par("usr") is no longer determined by, e.g., par("xaxs"), but rather by asp and the device's aspect ratio.(See what happens if you interactively resize the plot device after running the example below!)The special case asp == 1 produces plots where distances between points are represented accurately on screen.Values with asp > 1 can be used to produce more accurate maps when using latitude and longitude. To reverse an axis, use xlim or ylim of the form c(hi, lo).The function attempts to produce a plausible set of scales if one or both of xlim and ylim is of length one or the two values given are identical, but it is better to avoid that case. Usually, one should rather use the higher level functions such as plot, hist, image, ..., instead and refer to their help pages for explanation of the arguments. A side-effect of the call is to set up the usr, xaxp and yaxp graphical parameters. (It is for the latter two that lab is used.)##--- An example for the use of 'asp' :require(stats) # normally loadedloc <- cmdscale(eurodist)rx <- range(x <- loc[,1])ry <- range(y <- -loc[,2])plot(x, y, type="n", asp=1, xlab="", ylab="")abline(h = pretty(rx, 10), v = pretty(ry, 10), col = "lightgray") text(x, y, labels(eurodist), cex=0.8)assocplot {graphics}Produce a Cohen-Friendly association plot indicating deviations from independence of rows and columns in a 2-dimensional contingency table.assocplot(x, col = c("black", "red"), space = 0.3,main = NULL, xlab = NULL, ylab = NULL)x a two-dimensional contingency table in matrix form.(是2维的列联表)col a character vector of length two giving the colors used for drawing positive and negative Pearson residuals, respectively.space the amount of space (as a fraction of the average rectangle width and height) left between each rectangle(矩形).main overall title for the plot.xlab a label for the x axis. Defaults to the name (if any) of the row dimension in x.ylab a label for the y axis. Defaults to the name (if any) of the column dimension in x.For a two-way contingency table, the signed contribution to Pearson's chi^2 for cell i, j is d_{ij} = (f_{ij} - e_{ij}) / sqrt(e_{ij}), where f_{ij} and e_{ij} are the observed and expected counts corresponding to the cell.In the Cohen-Friendly association plot, each cell is represented by a rectangle that has (signed) height proportional to d_{ij} and width proportional to sqrt(e_{ij}), so that the area of the box is proportional to the difference in observed and expected frequencies. The rectangles in each row are positioned relative to a baseline indicating independence (d_{ij} = 0). If the observed frequency of a cell is greater than the expected one, the box rises above the baseline and is shaded in the color specified by the first element of col, which defaults to black; otherwise, the box falls below the baseline and is shaded in the color specified by the second element of col, which defaults to red.A more flexible and extensible implementation of association plots written in the grid graphics system is provided in the function assoc in the contributed package vcd (Meyer, Zeileis and Hornik, 2005).## Aggregate over sex:x <- margin.table(HairEyeColor, c(1, 2))xassocplot(x, main = "Relation between hair and eye color") Axis {graphics} 、Generic(一般的)function to add a suitable axis to the current plot.Axis(x = NULL, at = NULL, ..., side, labels = NULL)x an object which indicates the range over which an axis should be drawnat the points at which tick-marks (刻度线)are to be drawn.side an integer specifying which side of the plot the axis is to be drawn on. The axis is placed as follows: 1=below, 2=left, 3=above and 4=right.labels this can either be a logical value specifying whether (numerical) annotations are to be made at the tickmarks, or a character or expression vector of labels to be placed at the tickpoints. If this is specified as a character or expression vector, at should be supplied and they should be the same length.... Arguments to be passed to methods and perhaps then to axis.This is a generic function. It works in a slightly non-standard way: if x is supplied and non-NULL it dispatches on x, otherwise if at is supplied and non-NULL it dispatches on at, and the default action is to call axis, omitting argument x.The idea is that for plots for which either or both of the axes are numerical but with a special interpretation, the standard plotting functions (including boxplot, contour, coplot, filled.contour, pairs, plot.default, rug and stripchart) will set up user coordinates and Axis will be called to label themappropriately.There are "Date" and "POSIXt" methods which can pass an argument format on to the appropriate axis method (see axis.POSIXct).The numeric locations on the axis scale at which tick marks were drawn when the plot was first drawn (see ‘Details’).This function is usually invoked for its side effect, which is to add an axis to an already existing plot.axis {graphics}Adds an axis to the current plot, allowing the specification of the side, position, labels, and other options. (将一个坐标轴增加到现有图表)axis(side, at = NULL, labels = TRUE, tick = TRUE, line = NA, pos = NA, outer = FALSE, font = NA, lty = "solid",lwd = 1, lwd.ticks = lwd, col = NULL, col.ticks = NULL, hadj = NA, padj = NA, ...)side an integer specifying which side of the plot the axis is to be drawn on. The axis is placed as follows: 1=below, 2=left, 3=above and 4=right.at the points at which tick-marks are to be drawn. Non-finite (infinite, NaN or NA) values are omitted. By default (when NULL) tickmark locations are computed, see ‘Details’ below.labels this can either be a logical value specifying whether (numerical) annotations are to be made at the tickmarks, or a character or expression vector of labels to be placed at the tickpoints. (Other objects are coerced by as.graphicsAnnot.) If this is not logical, at should also be supplied and of the same length. If labels is of length zero after coercion, it has the same effect as supplying TRUE.tick a logical value specifying whether tickmarks and an axisline should be drawn.(是逻辑值,详细说明是否刻度线和轴心线是不是画)line the number of lines into the margin at which the axis line will be drawn, if not NA.(在坐标轴的边界上画直线数)pos the coordinate at which the axis line is to be drawn: if not NA this overrides the value of line. 在轴心线上的坐标标出:如果不是,outer a logical value indicating whether the axis should be drawn in the outer plot margin, rather than the standard plot margin.font font for text. Defaults to par("font").lty line type for both the axis line and the tick marks.(轴心线的类型)lwd, lwd.ticks line widths for the axis line and the tick marks. Zero or negative values will suppress the line or ticks. (轴线心的宽度,col, col.ticks colors for the axis line and the tick marks respectively. col = NULL means to use par("fg"), possibly specified inline, and col=NULL means to use whatever color col resolved to. hadj adjustment (see par("adj")) for all labels parallel (‘horizontal’) to the reading direction. If this is not a finite value, the default is used (centring for strings parallel to the axis, justification of the end nearest the axis otherwise).padj adjustment for each tick label perpendicular to the reading direction. For labels parallel to the axes,padj=0 means right or top alignment, andpadj=1 means left or bottom alignment. This can be a vector given a value for each string, and will be recycled as necessary.If padj is not a finite value (the default), the value of par("las") determines the adjustment. For strings plotted perpendicular tothe axis the default is to centre the string.... other graphical parameters may also be passed as arguments to this function, particularly, cex.axis, col.axis and font.axis for axis annotation, mgp and xaxp or yaxp for positioning, tck or tcl for tick mark length and direction, las for vertical/horizontal label orientation, or fg instead of col, and xpd for clipping. See par on these.Parameters xaxt (sides 1 and 3) and yaxt (sides 2 and 4) control if the axis is plotted at all.Note that lab will partial match to argument labels unless the latter is also supplied. (Since thedefault axes have already been set up by plot.window, lab will not be acted on by axis.)The axis line is drawn from the lowest to the highest value of at, but will be clipped at the plot region. By default, only ticks which are drawn from points within the plot region (up to a tolerance for rounding error) are plotted, but the ticks and their labels may well extend outside the plot region. Use xpd=TRUE or xpd=NA to allow axes to extend further.When at = NULL, pretty tick mark locations are computed internally (the same way axTicks(side) would) from par("xaxp") or "yaxp" and par("xlog") (or "ylog"). Note that these locations may change if an on-screen plot is resized (for example, if the plot argument asp (see plot.window) is set.)If labels is not specified, the numeric values supplied or calculated for at are converted to character strings as if they were a numeric vector printed by print.default(digits=7).The code tries hard not to draw overlapping tick labels, and so will omit labels where they would abut or overlap previously drawn labels. This can result in, for example, every other tickbeing labelled. (The ticks are drawn left to right or bottom to top, and space at least the size of an ‘m’ is left between labels.) If either line or pos is set, they (rather than par("mgp")[3]) determine the position of the axis line and tick marks, and the tick labels are placed par("mgp")[2] further lines into (or towards for pos) the margin.Several of the graphics parameters affect the way axes are drawn. The vertical (for sides 1 and 3) positions of the axis and the tick labels are controlled by mgp[2:3] and mex, the size and direction of the ticks is controlled by tck and tcl and the appearance of the tick labels by cex.axis, col.axis and font.axis with orientation controlled by las (but not srt, unlike S which uses srt if at is supplied and las if it is not). Note that adj is not supported and labels are always centered. See par for details. The numeric locations on the axis scale at which tick marks were drawn when the plot was first drawn (s ee ‘Details’). This function is usually invoked for its side effect, which is to add an axis to an already existing plot.require(stats) # for rnormplot(1:4, rnorm(4), axes = FALSE)axis(1, 1:4, LETTERS[1:4])axis(2)box() #- to make it look "as usual"plot(1:7, rnorm(7), main = "axis() examples",type = "s", xaxt = "n", frame = FALSE, col = "red")axis(1, 1:7, LETTERS[1:7], col.axis = "blue")# unusual options:axis(4, col = "violet", col.axis="dark violet", lwd = 2)axis(3, col = "gold", lty = 2, lwd = 0.5)# one way to have a custom x axisplot(1:10, xaxt = "n")axis(1, xaxp=c(2, 9, 7))axis.POSIXct {graphics}Functions to plot objects of classes "POSIXlt", "POSIXct" and "Date" representing calendar dates and times.axis.POSIXct(side, x, at, format, labels = TRUE, ...)axis.Date(side, x, at, format, labels = TRUE, ...)x, at A date-time or date object.side See axis.format See strptime.labels Either a logical value specifying whether annotations are to be made at the tickmarks, or a vector of character strings to be placed at the tickpoints.... Further arguments to be passed from or to other methods, typically graphical parameters. axis.POSIXct and axis.Date work quite hard to choose suitable time units (years, months, days, hours, minutes or seconds) and a sensible output format, but this can be overridden by supplying a format specification. If at is supplied it specifies the locations of the ticks and labels whereas if x is specified a suitable grid of labels is chosen. Printing of tick labels can be suppressed by using labels = FALSE. The date-times for a "POSIXct" input are interpreted in the timezone give by the "tzone" attribute if there is one, otherwise the current timezone. The way the date-times are rendered (especially month names) is controlled by the locale setting of category "LC_TIME" (see Sys.setlocale. )The locations on the axis scale at which tick marks were drawn. These functions are the workhorse for methods for Axis. Prior to R 2.12.0 there were also plot methods for the date-time classes, but the default method has also handled those for a long time.Exampleswith(beaver1, {time <- strptime(paste(1990, day, time %/% 100, time %% 100), "%Y %j %H %M")plot(time, temp, type="l") # axis at 4-hour intervals.# now label every hour on the time axisplot(time, temp, type="l", xaxt="n")r <- as.POSIXct(round(range(time), "hours"))axis.POSIXct(1, at=seq(r[1], r[2], by="hour"), format="%H") })plot(.leap.seconds, seq_along(.leap.seconds), type="n", yaxt="n",xlab="leap seconds", ylab="", bty="n")rug(.leap.seconds)## or as dateslps <- as.Date(.leap.seconds)plot(lps, seq_along(.leap.seconds),type = "n", yaxt = "n", xlab = "leap seconds",ylab = "", bty = "n")rug(lps)## 100 random dates in a 10-week periodrandom.dates <- as.Date("2001/1/1") + 70*sort(stats::runif(100))plot(random.dates, 1:100)# or for a better axis labellingplot(random.dates, 1:100, xaxt="n")axis.Date(1, at=seq(as.Date("2001/1/1"), max(random.dates)+6, "weeks"))axis.Date(1, at=seq(as.Date("2001/1/1"), max(random.dates)+6, "days"),labels = FALSE, tcl = -0.2) axTicks{graphics}Compute pretty tickmark locations, the same way as R does internally. This is only non-trivial when log coordinates are active. By default, gives the at values which axis(side) would use.axTicks(side, axp = NULL, usr = NULL, log = NULL)side integer in 1:4, as for axis.axp numeric vector of length three, defaulting to par("xaxp") or par("yaxp") depending on the side argument.usr numeric vector of length four, defaulting to par("usr") giving horizontal (‘x’) and vertical (‘y’) user coordinate limits.log logical indicating if log coordinates are active; defaults to par("xlog") or par("ylog").The axp, usr, and log arguments must be consistent as their default values (the par(..) results) are. If you specify all three (as non-NULL), the graphics environment is not used at all. Note that the meaning of axp alters very much when log is TRUE, see the documentation on par(xaxp=.). axTicks() can be regarded as an R implementation of the C function CreateAtVector() in ‘..../src/main/plot.c’ which is called by axis(side,*) when no argument at is specified.numeric vector of coordinate values at which axis tickmarks can be drawn. By default, when only the first argument is specified, these values should be identical to those that axis(side) would use or has used.Examplesplot(1:7, 10*21:27)axTicks(1)axTicks(2)stopifnot(identical(axTicks(1), axTicks(3)),identical(axTicks(2), axTicks(4)))## Show how axTicks() and axis() correspond :op <- par(mfrow = c(3,1))for(x in 9999*c(1,2,8)) {plot(x,9, log = "x")cat(formatC(par("xaxp"), width=5),";", T <- axTicks(1),"\n")rug(T, col="red")}par(op)barplot {graphics}Creates a bar plot with vertical or horizontal bars.barplot(height, ...)## Default S3 method:barplot(height, width = 1, space = NULL,names.arg = NULL, legend.text = NULL, beside = FALSE,horiz = FALSE, density = NULL, angle = 45,col = NULL, border = par("fg"),main = NULL, sub = NULL, xlab = NULL, ylab = NULL,xlim = NULL, ylim = NULL, xpd = TRUE, log = "",axes = TRUE, axisnames = TRUE,cex.axis = par("cex.axis"), /doc/f62803304.html,s = par("cex.axis"), inside = TRUE, plot = TRUE, axis.lty = 0, offset = 0,add = FALSE, args.legend = NULL, ...)height either a vector or matrix of values describing the bars which make up the plot. If height is a vector, the plot consists of a sequence of rectangular bars with heights given by the values in the vector. If height is a matrix and beside is FALSE then each bar of the plot corresponds to a column of height, with the values in the column giving the heights of stacked sub-bars making upthe bar. If height is a matrix and beside is TRUE, then the values in each column are juxtaposed rather than stacked.width optional vector of bar widths. Re-cycled to length the number of bars drawn. Specifying a single value will have no visible effect unless xlim is specified.space the amount of space (as a fraction of the average bar width) left before each bar. May be given as a single number or one number per bar. If height is a matrix and beside is TRUE, space may be specified by two numbers, where the first is the space between bars in the same group, and the second the space between the groups. If not given explicitly, it defaults to c(0,1) if height is a matrix and beside is TRUE, and to 0.2 otherwise.names.arg a vector of names to be plotted below each bar or group of bars. If this argument is omitted, then the names are taken from the names attribute of height if this is a vector, or the column names if it is a matrix.legend.text a vector of text used to construct a legend for the plot, or a logical indicating whether a legend should be included. This is only useful when height is a matrix. In that case given legend labels should correspond to the rows of height; if legend.text is true, the row names of height will be used as labels if they are non-null.beside a logical value. If FALSE, the columns of height are portrayed as stacked bars, and if TRUE the columns are portrayed as juxtaposed bars.horiz a logical value. If FALSE, the bars are drawn vertically with the first bar to the left. If TRUE, the bars are drawn horizontally with the first at the bottom.density a vector giving the density of shading lines, in lines per inch, for the bars or bar components. The default value ofNULL means that no shading lines are drawn. Non-positive values of density also inhibit the drawing of shading lines.angle the slope of shading lines, given as an angle in degrees (counter-clockwise), for the bars or bar components.col a vector of colors for the bars or bar components. By default, grey is used if height is a vector, and a gamma-corrected grey palette if height is a matrix.border the color to be used for the border of the bars. Use border = NA to omit borders. If there are shading lines, border = TRUE means use the same colour for the border as for the shading lines. main,sub overall and sub title for the plot.xlab a label for the x axis.ylab a label for the y axis.xlim limits for the x axis.ylim limits for the y axis.xpd logical. Should bars be allowed to go outside region?log string specifying if axis scales should be logarithmic; see plot.default.axes logical. If TRUE, a vertical (or horizontal, if horiz is true) axis is drawn.axisnames logical. If TRUE, and if there are names.arg (see above), the other axis is drawn (with lty=0) and labeled.cex.axis expansion factor for numeric axis labels./doc/f62803304.html,s expansion factor for axis names (bar labels).inside logical. If TRUE, the lines which divide adjacent (non-stacked!) bars will be drawn. Only applies when space = 0 (which it partly is when beside = TRUE).plot logical. If FALSE, nothing is plotted.axis.lty the graphics parameter lty applied to the axis and tickmarks of the categorical (default horizontal) axis. Note that by default the axis is suppressed.offset a vector indicating how much the bars should be shifted relative to the x axis.add logical specifying if bars should be added to an already existing plot; defaults to FALSE. args.legend list of additional arguments to pass to legend(); names of the list are used as argument names. Only used if legend.text is supplied.... arguments to be passed to/from other methods. For the default method these can include further arguments (such as axes, asp and main) and graphical parameters (see par) which are passed to plot.window(), title() and axis.This is a generic function, it currently only has a default method. A formula interface may be added eventually.A numeric vector (or matrix, when beside = TRUE), say mp, giving the coordinates of all the bar midpoints drawn, useful for adding to the graph.If beside is true, use colMeans(mp) for the midpoints of each group of bars, see example. require(grDevices) # for colours tN <- table(Ni <- stats::rpois(100, lambda=5))r <- barplot(tN, col=rainbow(20))#- type = "h" plotting *is* 'bar'plotlines(r, tN, type='h', col='red', lwd=2)barplot(tN, space = 1.5, axisnames=FALSE,sub = "barplot(..., space= 1.5, axisnames = FALSE)")barplot(VADeaths, plot = FALSE)barplot(VADeaths, plot = FALSE, beside = TRUE)mp <- barplot(VADeaths) # defaulttot <- colMeans(VADeaths)text(mp, tot + 3, format(tot), xpd = TRUE, col = "blue")barplot(VADeaths, beside = TRUE,col = c("lightblue", "mistyrose", "lightcyan","lavender", "cornsilk"),legend = rownames(VADeaths), ylim = c(0, 100))title(main = "Death Rates in Virginia", font.main = 4)hh <- t(VADeaths)[, 5:1]mybarcol <- "gray20"mp <- barplot(hh, beside = TRUE,col = c("lightblue", "mistyrose","lightcyan", "lavender"),legend = colnames(VADeaths), ylim= c(0,100),main = "Death Rates in Virginia", font.main = 4,sub = "Faked upper 2*sigma error bars", col.sub = mybarcol, /doc/f62803304.html,s = 1.5)segments(mp, hh, mp, hh + 2*sqrt(1000*hh/100), col = mybarcol, lwd = 1.5)stopifnot(dim(mp) == dim(hh))# corresponding matricesmtext(side = 1, at = colMeans(mp), line = -2,text = paste("Mean", formatC(colMeans(hh))), col = "red")# Bar shading examplebarplot(VADeaths, angle = 15+10*1:5, density = 20, col = "black",legend = rownames(VADeaths))title(main = list("Death Rates in Virginia", font = 4))# border :barplot(VADeaths, border = "dark blue")# log scales (not much sense here):barplot(tN, col=heat.colors(12), log = "y")barplot(tN, col=gray.colors(20), log = "xy")# args.legend。
R语言的绘图功能及应用案例
R语言的绘图功能及应用案例R语言是一种统计分析软件和编程语言,而且R语言还拥有强大的绘图功能,可以帮助用户可视化数据,发现隐藏在数据背后的规律和趋势。
下面将介绍R语言的绘图功能及应用案例。
一、R语言的绘图功能1. plot(:绘制散点图或折线图。
可以通过该函数创建直方图和饼图。
2. hist(:绘制直方图。
直方图是表示数据变量频率分布的图形。
3. boxplot(:绘制盒图。
盒图可以反映数据的分散程度和异常值。
4. barplot(:绘制条形图。
用于比较不同类别之间的数值,例如不同产品的销售额等。
5. pie(:绘制饼图。
饼图可以显示不同类别的占比情况。
除了以上基本绘图函数外,R还有很多其他高级绘图函数,例如:1. ggplot2包:ggplot2是R语言中非常著名的绘图包,可以绘制出更美观且富有层次感的图形。
2. lattice包:lattice是另一个常用的绘图包,可以绘制出多面板的散点图、线图、柱状图等。
3. heatmap函数:可以绘制热力图,用于显示数据的关联程度。
4. ggmap包:可以基于地理坐标数据,绘制地图和地理信息图。
二、R语言绘图的应用案例1.数据可视化数据可视化是R语言绘图最常见的应用之一、例如,我们可以使用R 语言中的绘图函数将公司的销售额数据制作成折线图或者柱状图,从而直观地了解销售额的变化趋势和不同产品的销售额情况。
2.统计分析的结果展示R语言在统计分析领域非常流行,其绘图功能可以用来展示统计分析的结果。
例如,在进行回归分析时,我们可以使用R语言绘制出散点图、拟合曲线图等,从而直观地展示出自变量和因变量之间的关系。
3.地理信息可视化4.生物信息学数据可视化生物信息学是一个涉及大量数据的领域,而R语言的绘图功能可以帮助生物信息学研究人员将复杂的数据可视化。
例如,我们可以使用ggplot2包将基因表达数据制作成热图,从而显示出不同基因在不同条件下的表达水平。
综上所述,R语言的绘图功能非常强大,可以将数据以直观的方式展示出来,帮助用户更好地理解数据背后的规律和趋势。
- 1、下载文档前请自行甄别文档内容的完整性,平台不提供额外的编辑、内容补充、找答案等附加服务。
- 2、"仅部分预览"的文档,不可在线预览部分如存在完整性等问题,可反馈申请退款(可完整预览的文档不适用该条件!)。
- 3、如文档侵犯您的权益,请联系客服反馈,我们会尽快为您处理(人工客服工作时间:9:00-18:30)。
setwd( ):设定R软件当前工作目录。
getwd( ):查看R软件当前工作目录。
list.files( ): 查看当前目录下文件。
file.show( ): 显示文件。
file.access( ): 查看文件是否可读可写。
file.create( ): 创建一个文件。
例如:file.create(“D:/lesong.xls”). dir.create( ): 创建一个目录。
例如:dir.create(D:/lesong).file.remove( ):删除一个文件。
File.choose( ):选择一个文件。
读数据函数read.table( )主要参数解释:read.table(file, header = FALSE, sep = "", quote = ""'",dec = ".", s, s,as.is = !stringsAsFactors,na.strings = "NA", colClasses = NA, nrows = -1,skip = 0, s = TRUE, fill= !blank.lines.skip,strip.white = FALSE, blank.lines.skip = TRUE,comment.char = "#",allowEscapes = FALSE, flush = FALSE,stringsAsFactors = default.stringsAsFactors(),fileEncoding = "", encoding = "unknown") header:逻辑参数。
指定是否文件第一行为变量名。
na.strings:指定缺失文字。
skip:指定读数据跳过的行数。
nrows:指定数据读入最大的行数。
dec:指定小数点记号。
sep:指定数据分割字符。
s与s:赋予数据行名和列名。
读入数据其他相关函数:readLines():按行读入数据文件。
类似perl读数据方式。
scan( ):将数据读作一行向量形式。
read.delim("educ_scores.txt"):读入文本文件(制表符分隔)。
read.csv("educ_scores1.csv"):读入CSV(逗号分割)。
readBin( ):读入二进制数据。
readChar( ):读入字符型数据。
attach( ): 把数据框的变量链接到内存中.一般作图函数plot()主要参数解释:plot(x, y = NULL, type = "p", xlim = NULL, ylim = NULL,log = "", main = NULL, sub = NULL, xlab = NULL, ylab = NULL,ann = par("ann"), axes = TRUE, frame.plot = axes,panel.first = NULL, st = NULL, asp = NA, ...)type:设置图形类型。
具体为:type=“p“点图type=“l“线图type=“b“点和线type=“c“去掉点只有线段type=“o“线穿过点type=“h“从各点到x轴的垂线段type=“s“基于左侧值的阶段图type=“S“基于右侧值的阶段图type=“n“只有轴,没有具体图形xlim和ylim:设置图形x轴与y轴的范围。
比如xlim(0,30).log:数据取对数。
main:设置图形的上标题。
比如说:main=”Genomics analysis”sub: 设置图形的小标题。
比如说:sub=”another title”.ann: 逻辑参数。
设置是否将系统默认的图形标签显示出来。
比如:ann=F. lty: 设置线的类型。
比如:lty=4.xlab和ylab:设置x轴与y轴的lable。
比如xlab=”sample one”. frame.plot:逻辑参数。
设置图形是否输出外框。
比如:frame.plot=F. axes:逻辑参数。
设置图形是否显示x轴和y轴。
比如:axes=F.asp:设置图形屏幕高宽比(y/x).lwd:设置线条的粗细。
比如:lwd=4.bg:设置数据点的填充颜色。
比如:bg=”pink”.col:设置数据点的外圈颜色。
比如:col=”blue”.cex:设置数据点的大小。
比如:cex=2.7。
pch:设置数据点的形状。
具体为:•pch=19: solid circle,•pch=20: bullet (smaller solid circle, 2/3 the size of 19), •pch=21: filled circle,•pch=22: filled square,•pch=23: filled diamond,•pch=24: filled triangle point-up,•pch=25: filled triangle point down.add:逻辑参数。
设置图形是否重合。
font.main与font.sub:设置上标题和小标题的字体格式。
col.main与col.sub :设置上标题和小标题的字体颜色。
实例演习:使用给定数据(testfile.txt)用R软件作出以下图形并保存为PDF格式和jpg格式。
参考程序:setwd('E:/')file=read.table('testfile.txt')attach(file)jpeg(file='plot one.jpg')plot(V1,V2,type='l',xlim=c(30,75),frame.plot=F,lwd=2,xlab='横坐标 ',ylab='纵坐标' ,main='PLOTONE',sub='2010/3/12',col='pink',font.main=9,col.main=4,font.sub=9,col.sub='red') dev.off()pdf(file='plot one.pdf')plot(V1,V2,type='l',xlim=c(30,75),frame.plot=F,lwd=2,xlab='横坐标 ',ylab='纵坐标' ,main='PLOTONE',sub='2010/3/12',col='pink',font.main=9,col.main=4,font.sub=9,col.sub='red') dev.off()饼图函数pie( )主要参数解释:pie(x, labels = names(x), edges = 200, radius = 0.8,clockwise = FALSE, init.angle = if(clockwise) 90 else 0,density = NULL, angle = 45, col = NULL, border = NULL,lty = NULL, main = NULL, ...)x: 指定作饼图的数据。
labels:设置各个分割区的标签。
edges:设置多边形的边数(圆的轮廓是具有很多边的多边形近似)。
radius:设置饼图的半径。
特别是在字符标签过长的情况。
clockwise:逻辑参数。
设置饼图是否顺时针作出分割区。
init.angle:设置开始画分割区的角度。
即对饼图进行旋转。
density:底纹的密度。
默认值为NULL。
angle:设置底纹的斜率。
col:设置各个分割区的填充颜色。
main:设置饼图的总标题。
实例演习:本年度某商品在中国的销售额占其总销售额的12%,在美国为30%,在日本为16%,在欧洲为26%,在台湾为4%,在其他地区为16%。
用饼图描述以上数据,作出以下饼图:参考程序:pie.sales <- c(0.12, 0.3, 0.26, 0.16, 0.04, 0.12)names(pie.sales) <- c("China", "USA","Japanese", "Europe", "Taiwan", "Others")pdf(file='plot two.pdf')pie(pie.sales,col = c("purple", "violetred1", "green3", "cornsilk", "cyan", "white"),main='PLot Two', sub='2010/3/12',col.main=4,col.sub='red') dev.off()直方图函数hist()主要参数解释:hist(x, breaks = "Sturges",freq = NULL, probability = !freq,include.lowest = TRUE, right = TRUE,density = NULL, angle = 45, col = NULL, border = NULL,main = paste("Histogram of" , xname),xlim = range(breaks), ylim = NULL,xlab = xname, ylab,axes = TRUE, plot = TRUE, labels = FALSE,nclass = NULL, ...)x:作直方图所需的数据。
breaks:用一个向量指定各个单元格的断点;用单个值指定单元格个数;用字符串命名的算法来计算单元格的数量;用函数计算单元格的数量。
density:底纹的密度。
默认值为NULL。
angle:设置底纹的斜率。
col:设置各个条形的填充颜色。
border:设置条形的轮廓颜色。
axes:逻辑参数。
设置图形是否显示x轴与y轴。
比如:axes=Fmain:设置直方图的主标题。
