cvim用户手册(翻译)
opencv中文手册
目录• 1 梯度、边缘和角点o 1.1 Sobelo 1.2 Laplaceo 1.3 Cannyo 1.4 PreCornerDetecto 1.5 CornerEigenValsAndVecso 1.6 CornerMinEigenValo 1.7 CornerHarriso 1.8 FindCornerSubPixo 1.9 GoodFeaturesToTrack • 2 采样、插值和几何变换o 2.1 InitLineIteratoro 2.2 SampleLineo 2.3 GetRectSubPixo 2.4 GetQuadrangleSubPixo 2.5 Resizeo 2.6 WarpAffineo 2.7 GetAffineTransformo 2.8 2DRotationMatrixo 2.9 WarpPerspectiveo 2.10 WarpPerspectiveQMatrixo 2.11 GetPerspectiveTransformo 2.12 Remapo 2.13 LogPolar• 3 形态学操作o 3.1 CreateStructuringElementExo 3.2 ReleaseStructuringElemento 3.3 Erodeo 3.4 Dilateo 3.5 MorphologyEx• 4 滤波器与色彩空间变换o 4.1 Smootho 4.2 Filter2Do 4.3 CopyMakeBordero 4.4 Integralo 4.5 CvtColoro 4.6 Thresholdo 4.7 AdaptiveThreshold• 5 金字塔及其应用o 5.1 PyrDowno 5.2 PyrUp• 6 连接部件o 6.1 CvConnectedCompo 6.2 FloodFillo 6.3 FindContourso 6.4 StartFindContourso 6.5 FindNextContouro 6.6 SubstituteContouro 6.7 EndFindContourso 6.8 PyrSegmentationo 6.9 PyrMeanShiftFilteringo 6.10 Watershed•7 图像与轮廓矩o7.1 Momentso7.2 GetSpatialMomento7.3 GetCentralMomento7.4 GetNormalizedCentralMomento7.5 GetHuMoments•8 特殊图像变换o8.1 HoughLineso8.2 HoughCircleso8.3 DistTransformo8.4 Inpaint•9 直方图o9.1 CvHistogramo9.2 CreateHisto9.3 SetHistBinRangeso9.4 ReleaseHisto9.5 ClearHisto9.6 MakeHistHeaderForArrayo9.7 QueryHistValue_1Do9.8 GetHistValue_1Do9.9 GetMinMaxHistValueo9.10 NormalizeHisto9.11 ThreshHisto9.12 CompareHisto9.13 CopyHisto9.14 CalcHisto9.15 CalcBackProjecto9.16 CalcBackProjectPatcho9.17 CalcProbDensityo9.18 EqualizeHist•10 匹配o10.1 MatchTemplateo10.2 MatchShapeso10.3 CalcEMD2梯度、边缘和角点Sobel使用扩展 Sobel 算子计算一阶、二阶、三阶或混合图像差分void cvSobel( const CvArr* src, CvArr* dst, int xorder, int yorder, int aperture_size=3 );src输入图像.dst输出图像.xorderx 方向上的差分阶数yordery 方向上的差分阶数aperture_size扩展 Sobel 核的大小,必须是 1, 3, 5 或 7。
OpenCv参考手册-CvImage类参考手册
OpenCv参考手册-CvImage类参考手册CvImage类参考手册Wikipedia,自由的百科全书CvImage使用前需要包含 cv.h 头文件#include目录1 CvImage::CvImage2 CvImage::~CvImage3 CvImage::clone4 CvImage::create5 CvImage::release6 CvImage::clear7 CvImage::attach8 CvImage::detach9 CvImage::load10 CvImage::read11 CvImage::save12 CvImage::write13 CvImage::show14 CvImage::is_valid15 CvImage::width16 CvImage::height17 CvImage::size18 CvImage::roi_size19 CvImage::roi20 CvImage::coi21 CvImage::set_roi22 CvImage::reset_roi23 CvImage::set_coi24 CvImage::depth25 CvImage::channels26 CvImage::pix_size27 CvImage::data28 CvImage::step29 CvImage::origin30 CvImage::roi_row31 运算符重载32 编写者[编辑]CvImage::CvImagebool CvImage::CvImage();bool CvImage::CvImage(CvSize size, int depth, int channels);bool CvImage::CvImage(IplImage* pIplImg);bool CvImage::CvImage(const CvImage& cvImg);bool CvImage::CvImage(const char* filename, const char* imgname=0, int color=-1);bool CvImage::CvImage(CvFileStorage* fs, const char* mapname, const char* imgname);bool CvImage::CvImage(CvFileStorage* fs, const char* seqname, int idx);默认构造函数,创建一个图像。
National Instruments LabWindows CVI 8.0 用户手册说明书
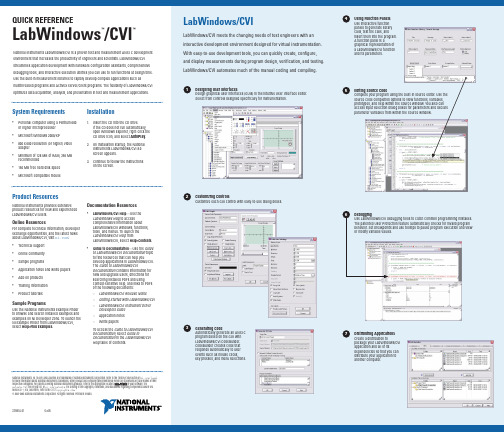
QUICK REFERENCE LabWindows/CVI™™System Requirements •Personal computer using a Pentium 600 or higher microprocessor• Microsoft Windows 2000/XP• 800 x 600 resolution (or higher) video adapter• Minimum of 128 MB of RAM, 256 MB recommended•150 MB free hard disk space •Microsoft-compatible mouse Installation1.Insert the CD into the CD drive.If the CD does not run automatically,open Windows Explorer, right-click the CD drive icon, and select AutoPlay.2. On installation startup, the NationalInstruments LabWindows/CVI 8.0screen appears.3. Continue to follow the instructionson the screen.National Instruments LabWindows/CVI is a proven test and measurement ANSI C development environment that increases the productivity of engineers and scientists. LabWindows/CVI streamlines application development with hardware configuration assistants, comprehensive debugging tools, and interactive execution utilities you can use to run functions at design time. Use the built-in measurement libraries to rapidly develop complex applications such as multithreaded programs and ActiveX server/client programs. The flexibility of LabWindows/CVI optimizes data acquisition, analysis, and presentation in test and measurement applications. LabWindows/CVILabWindows/CVI meets the changing needs of test engineers with an interactive development environment designed for virtual instrumentation. With easy-to-use development tools, you can quickly create, configure, and display measurements during program design, verification, and testing. LabWindows/CVI automates much of the manual coding and compiling.Product ResourcesNational Instruments provides extensive product resources for new and experienced LabWindows/CVI users.Online ResourcesFor complete technical information, developer exchange opportunities, and the latest news about LabWindows/CVI, visit :•Technical support•Online community•Sample programs•Application notes and white papers•Add-on products•Training information•Product tutorialsSample ProgramsUse the National Instruments Example Finder to browse and search installed examples and examples on NI Developer Zone. To launch the NI Example Finder from LabWindows/CVI, select Help»Find Examples.Documentation Resources•LabWindows/CVI Help—Use theLabWindows Help to accesscomprehensive information aboutLabWindows/CVI windows, functions,tools, and menus. To launch theLabWindows/CVI Help fromLabWindows/CVI, select Help»Contents.•Guide to Documentation—Use the Guideto LabWindows/CVI Documentation topicto find resources that can help youdevelop applications in LabWindows/CVI.The Guide to LabWindows/CVIDocumentation contains information fornew and upgrade users, directions forsearching installed PDFs and usingcontext-sensitive help, and links to PDFsof the following documents:–LabWindows/CVI Release Notes–Getting Started with LabWindows/CVI–LabWindows/CVI Instrument DriverDevelopers Guide–Application notes–White papersTo access the Guide to LabWindows/CVIDocumentation, select Guide toDocumentation in the LabWindows/CVIHelp table of contents.Designing User InterfacesDesign graphical user interfaces (GUIs) in the intuitive User Interface Editor.Select from controls designed specifically for instrumentation.1Customizing ControlsCustomize each GUI control with easy-to-use dialog boxes.2Generating CodeAutomatically generate an ANSI Cprogram based on the GUI withLabWindows/CVI CodeBuilder.CodeBuilder creates code thatresponds automatically to userevents such as mouse clicks,key presses, and menu selections.3Using Function PanelsUse interactive functionpanels to generate librarycalls, test the calls, andinsert them into the program.A function panel is agraphical representation ofa LabWindows/CVI functionand its parameters.4Editing Source CodeComplete your program using the built-in source editor. Use thesource code completion options to view functions, variables,prototypes, and help within the Source window. You also canaccess input selection dialog boxes for parameters and declareparameter variables from within the Source window.5Distributing ApplicationsCreate a distribution topackage your LabWindows/CVIapplication and all of itsdependencies so that you candistribute your application toanother computer.7DebuggingUse LabWindows/CVI debugging tools to catch common programming mistakes.The patented User Protection feature automatically checks for invalid programbehavior. Set breakpoints and use tooltips to pause program execution and viewor modify variable values.6National Instruments, NI, , and LabVIEW are trademarks of National Instruments Corporation. Refer to the Terms of Use section on /legal for more information about National Instruments trademarks. Other product and company names mentioned herein are trademarks or trade names of their respective companies. For patents covering National Instruments products, refer to the appropriate location: H H e l p»P a t e n t s in your software, the patents.txt file on your CD, or /patents. For a listing of the copyrights, conditions, and disclaimers regarding components used in USI (Xerces C++, ICU, and HDF5), refer to the USICopyrights.chm.© 2003–2005 National Instruments Corporation. All rights reserved. Printed in Ireland.373551A-01Oct05LabWindows/CVIUse built-in instrumentation libraries to interface test applications to the outside world. LabWindows/CVI includes a large set of run-time libraries for instrument control, data acquisition, analysis, and user interface creation. This chart illustrates the classes in each library. To find specific functions, press <Ctrl-Shift-P> in the Source window. You also can use the Library Tree to browse to and search for functions.L a b W i n d o w s /C V I L i b r a r y R e f e r e n c e。
MATLAB中文手册簿
Matlab中文手册目录 (1)第1章MATLAB 6.5环境 (6)1.1 MA TLAB简介 (6)1.1.1 MATLAB工具箱 (6)1.1.2 MATLAB功能和特点 (6)1.2 MA TLAB 6.5环境设置 (7)1.2.1 菜单栏 (7)1.2.2 工具栏 (10)1.2.3 通用操作界面窗口 (10)1.3 MA TLAB 6.5帮助 (19)1.4 MATLAB 6.5其他管理 (20)1.4.1 MATLAB用户文件格式 (20)1.4.2设置搜索路径 (21)1.4.3文件管理命令 (22)1.4.4 退出MA TLAB (23)1.5 一个实例 (23)第2章MATLAB数值计算 (26)2.1 变量和数据 (26)2.1.1数据类型 (26)2.1.2数据 (26)2.1.3变量 (27)2.2 矩阵和数组 (28)2.2.1矩阵输入 (28)2.2.2矩阵元素和操作 (31)2.2.3字符串 (37)2.2.4矩阵和数组运算 (41)2.2.5多维数组 (52)2.3稀疏矩阵 (55)2.3.1稀疏矩阵的建立 (55)2.3.2稀疏矩阵的存储空间 (58)2.3.3稀疏矩阵的运算 (59)2.4多项式 (59)2.4.1多项式的求值、求根和部分分式展开 (59)2.4.2多项式的乘除法和微积分 (61)2.4.3多项式拟合和插值 (63)2.5元胞数组和结构数组 (65)2.5.1元胞数组 (65)2.5.2结构数组 (68)2.6数据分析 (71)2.6.1数据统计和相关分析 (71)2.6.2差分和积分 (72)2.6.3卷积和快速傅里叶变换 (74)2.6.4向量函数 (76)第3章MATLAB符号计算 (77)3.1 符号表达式的建立 (77)3.1.1 创建符号常量 (77)3.1.2 创建符号变量和表达式 (78)3.1.3 符号矩阵 (79)3.2符号表达式的代数运算 (81)3.2.1符号表达式的代数运算 (81)3.2.2 符号数值任意精度控制和运算 (83)3.2.3 符号对象与数值对象的转换 (84)3.3符号表达式的操作和转换 (85)3.3.1符号表达式中自由变量的确定 (85)3.3.2符号表达式的化简 (86)3.3.3符号表达式的替换 (89)3.3.4求反函数和复合函数 (90)3.3.5 符号表达式的转换 (92)3.4 符号极限、微积分和级数求和 (93)3.4.1符号极限 (93)3.4.2符号微分 (94)3.4.3符号积分 (96)3.4.4符号级数 (97)3.5 符号积分变换 (98)3.5.1傅里叶(Fourier)变换及其反变换 (98)3.5.2拉普拉斯(Laplace)变换及其反变换 (99)3.5.3 Z变换及其反变换 (100)3.6符号方程的求解 (101)3.6.1代数方程 (101)3.6.2符号常微分方程 (102)3.7符号函数的可视化 (103)3.7.1符号函数的绘图命令 (103)3.7.2图形化的符号函数计算器 (105)3.8 Maple函数的使用 (105)3.8.1访问Maple函数 (105)3.8.2 获得Maple的帮助 (106)第4章MA TLAB计算的可视化和GUI设计 (107)4.1二维曲线的绘制 (107)4.1.1基本绘图命令plot (107)4.1.2绘制曲线的一般步骤 (111)4.1.3多个图形绘制的方法 (112)4.1.4曲线的线型、颜色和数据点形 (114)4.1.5设置坐标轴和文字标注 (115)4.2 MA TLAB的三维图形绘制 (119)4.2.1绘制三维线图命令plot3 (119)4.2.2绘制三维网线图和曲面图 (120)4.2.3立体图形与图轴的控制 (123)4.2.4色彩的控制 (125)4.3 MA TLAB的特殊图形绘制 (128)4.3.1条形图 (128)4.3.2面积图和实心图 (129)4.3.3直方图 (130)4.3.4饼图 (131)4.3.5离散数据图 (132)4.3.6对数坐标和极坐标图 (132)4.3.7等高线图 (133)4.3.8复向量图 (134)4.4图形窗口的功能 (135)4.5对话框 (136)4.6句柄图形 (138)4.6.1句柄图形体系 (138)4.6.2图形对象的操作 (139)4.6.3图形对象属性的获取和设置 (142)4.7图形用户界面(GUI)设计 (144)4.7.1可视化的界面环境 (144)4.7.2菜单 (145)4.7.3控件 (146)4.7.5回调函数 (148)4.7.6 GUI应用举例 (148)4.8动画 (151)4.8.1以电影方式产生动画 (151)4.8.2以对象方式产生动画 (151)第5章MATLAB程序设计 (153)5.1脚本文件和函数文件 (153)5.1.1 M文本编辑器 (153)5.1.2 M文件的基本格式 (153)5.1.3 M脚本文件 (154)5.1.4 M函数文件 (155)5.2程序流程控制 (156)5.2.1 for ... end循环结构 (156)5.2.2 while ... end循环结构 .. (157)5.2.3 If...else...end条件转移结构 (158)5.2.4 switch...case开关结构 (158)5.2.5 try... catch... end试探结构 . (160)5.2.6流程控制语句 (160)5.3函数调用和参数传递 (162)5.3.2局部变量和全局变量 (163)5.3.3函数的参数 (164)5.3.4程序举例 (167)5.4 M文件性能的优化和加速 (169)5.4.1 P码文件 (169)5.4.2 M文件性能优化 (169)5.4.3 JIT和加速器 (170)5.5内联函数 (173)5.6利用函数句柄执行函数 (174)5.6.1函数句柄的创建 (174)5.6.2用feval命令执行函数 (175)5.7利用泛函命令进行数值分析 (176)5.7.1求极小值 (177)5.7.2求过零点 (178)5.7.3数值积分 (179)5.7.4微分方程的数值解 (179)第6章线性控制系统分析与设计 (181)6.1线性系统的描述 (181)6.1.1状态空间描述法 (181)6.1.2传递函数描述法 (182)6.1.3零极点描述法 (183)6.1.4离散系统的数学描述 (183)6.2线性系统模型之间的转换 (186)6.2.1连续系统模型之间的转换 (186)6.2.2连续系统与离散系统之间的转换 (189)6.2.3模型对象的属性 (192)6.3结构框图的模型表示 (194)6.4线性系统的时域分析 (202)6.4.1零输入响应分析 (202)6.4.2脉冲响应分析 (203)6.4.3阶跃响应分析 (204)6.4.4任意输入的响应 (205)6.4.5系统的结构参数 (207)6.5线性系统的频域分析 (208)6.5.1频域特性 (208)6.5.2连续系统频域特性 (209)6.5.3幅值裕度和相角裕度 (212)6.5.4离散系统频域分析 (213)6.6线性系统的根轨迹分析 (213)6.6.1绘制根轨迹 (213)6.6.2根轨迹的其它工具 (215)6.7线性系统的状态空间设计 (218)6.7.1极点配置法 (218)第7章Simulink仿真环境 (220)7.1演示一个Simulink的简单程序 (220)7.2 Simulink的文件操作和模型窗口 (222)7.2.1 Simulink的文件操作 (222)7.2.2 Simulink的模型窗口 (222)7.3 模型的创建 (224)7.3.1模块的操作 (224)7.3.2信号线的操作 (226)7.3.3给模型添加文本注释 (227)7.4 Simulink的基本模块 (227)7.4.1基本模块 (227)7.4.2常用模块的参数和属性设置 (229)7.5复杂系统的仿真与分析 (232)7.5.1仿真的设置 (232)7.5.2连续系统仿真 (233)7.5.3离散系统仿真 (236)7.5.4仿真结构参数化 (238)7.6子系统与封装 (238)7.6.1建立子系统 (238)7.6.2条件执行子系统 (240)7.6.3子系统的封装 (241)7.7用MA TLAB命令创建和运行Simulink模型 (245)7.7.1用MA TLAB命令创建Simulink模型 (245)7.7.2用MA TLAB命令运行Simulink模块 (247)7.8以Simulink为基础的模块工具箱简介 (248)第8章MA TLAB高级应用 (248)8.1 MA TLAB应用接口 (248)8.1.1 MEX文件 (248)8.1.2 使用MA TLAB编译器生成MEX和EXE文件 (252)8.2 低级文件的输入输出 (254)8.2.1打开和关闭文件 (254)8.2.2读写格式化文件 (255)8.2.3读写二进制数据 (257)8.2.4文件定位 (258)8.3 图形文件的转储 (260)8.4 Notebook (260)8.4.1 Notebook的安装 (260)8.4.2 Notebook的启动 (261)8.4.3 Notebook的使用 (262)8.4.4 Notebook中MA TLAB的使用 (265)第1章MATLAB 6.5环境1.1MATLAB简介●MATLAB(Matrix Laborator)是MathWorks公司开发科学与工程计算软件;●广泛应用于自动控制、数学运算、信号分析、计算机技术、图像信号处理、财务分析、航天工业、汽车工业、生物医学工程、语音处理和雷达工程等行业;●国内外高校和研究部门科学研究的重要工具;●MATLIB 已成为数学计算工具方面事实上的标准,MATLIB 6.5是最新版本。
TimeCOSSIM标准指令参考标准手册
TimeCOS_SIM标准指令参照手册TimeCOS/SIM2003/3/TimeCOS/SIMManual10-6-29WWWTIMECOS/SIMPHASE 2.........................................................61.CHANGECHV.................................................................... (61)).定义和范围................................................................................................................................62).命令报文....................................................................................................................................63).命令报文数据域..................................................................... (7)4). 响应报文数据域..................................................................... (7)5). 响应报文状态码..................................................................... (7)2.DISABLECHVCHV..................................................................................................81).定义和范围..................................... ...........................................................................................82).命令报文..................................... ...............................................................................................83).命令报文数据域..................................... ............................................................................. (8)4 ).响应报文数据域..................................... ............................................................................. (9)5 ).响应报文状态码..................................................................... (9)3.ENABLECHVCHV.................................................................................................101).定义和范围..................................... .........................................................................................102).命令报文..................................... .............................................................................................103).命令报文数据域..................................... ............................................................................. (10)4 ).响应报文数据域..................................... ............................................................................. (11)5 ).响应报文状态码..................................... ............................................................................. (11)4.GETRESPONSE()...................................................................................................121).定义和范围..................................... .........................................................................................122).命令报文..................................... ...................................................................123).命.......... .......... ......令报文数据域..................................................................... . (12)4). 响应报文数据域..................................................................... . (12)5 ).响应报文状态码................................................. ................................................................. (12)5.INCREASE........................................... .........................................................................141).定义和范围................................................. ...................................142).命令报..........................................文................................................. .................................................................................143).命令报文数据域................................................. ................................................................. (14)4 ).响应报文数据域..................................................................... . (14)2TimeCOS/SIMManual10-6-29WWW5). 响应报文状态码..................................................................... . (14)6.INVALIDATE.............................................................................. .....................161).定义和范围....................... ...................................................................... .................................162).命令报文....................... ....................................................................... ....................................163).命令报文数据域....................... .................................................................... (16)4 ).响应报文数据域....................... ............................... ..................................... (16)5 ).响应报文状态码....................... ............................... ..................................... (16)7.READBIN ARY................................... .........................................................181).定义和范围....................... ...................................................................... .................................182).命令报文................................... ...............................................................................................183).命令报文数据域................................... ............................................................................... (18)4 ).响应报文数据域................................... ............................................................................... (18)5 ).响应报文状态码................................... ............................................................................... (18)8.READRECORD..............................................................................................201).定义和范围................................... ...........................................................................................202).命令报文................................... ...............................................................................................203).命令报文数据域................................... ............................................................................... (20)4 ).响应报文数据域................................... ............................................................................... (21)5). 响应报文状态码..................................................................... . (21)9.REHABILITATE.............................................................................................221).定义和范围....................................... .......................................................................................222).命令报文....................................... ...........................................................................................223).命令报文数据域....................................... ........................................................................... (22)4 ).响应报文数据域....................................... ........................................................................... (22)5 ).响应报文状态码..................................................................... . (22)10.RUNGSMALGORITHMGSM........................................................... (24)1).定义和范围..............................................................................................................................242).命令报文........................................... .......................................................................................243).命令报文数据域........................................... ....................................................................... (24)4 ).响应报文数据域........................................... ....................................................................... (24)5 ).响应报文状态码........................................... ....................................................................... (24)11.SEEK....................................................................................................................261).定义和范围..............................................................................................................................262).命令报文............................................................................................................................ (26)3TimeCOS/SIMManual10-6-29WWW3). 命令报文数据域..................................................................... (27)4). 响应报文数据域..................................................................... . (27)5 ).响应报文状态码................................... ............................................................................... (27)12.SELECTFILE.................................. ..................................................................281).定义和范围................................... ...........................................................................................282).命令报文................................... ................................................................................283).命令报文数据域................................... ............................................................................... (28)4 ).响应报文数据域................................... ............................................................................... (28)5 ).响应报文状态码..................................................................... . (31)13.SLEEP...........................................................................................................321).定义和范围...................................... ........................................................................................322).命令报文...................................... ............................................................................................323).命令报文数据域...................................... ............................................................................ (32)4 ).响应报文数据域...................................... ............................................................. (32)5 ).响应报文状态码...................................... ............................................................................ (32)14.STATUS..................................................................................................341).定义和范围...................................... ........................................................................................342).命令报文...................................... ..................................................................343).命..........................令报文数据域..................................................................... (34)4). 响应报文数据域..................................................................... . (34)5). 响应报文状态码..................................................................... . (34)15.UNBLOCKCHV................................................................................................361).定义和范围................................................................................................. .............................362).命令报文.................................................... ............................................... ...............................363).命令报文数据域..................................................................... . (36)4). 响应报文数据域..................................................................... (36)5). 响应报文状态码..................................................................... . (37)16.UPDATEBINARY.....................................................................................381).定义和范围................................................ ................................................ ..............................382).命令报文..................................................................................................................................383).命令报文数据域..................................................................... (38)4). 响应报文数据域..................................................................... . (38)5). 响应报文状态码..................................................................... . (38)17.UPDATE RECORD................................................................. . (40)4TimeCOS/SIMManual10-6-29WWW1). 定义和范围..................................................................... (40)2). 命令报文..................................................................... . (40)3). 命令报文数据域..................................................................... . (41)4). 响应报文数据域..................................................................... . (41)5). 响应报文状态码..................................................................... . (41)18.VERIFY CHV.................................................................... . (42)1). 定义和范围..................................................................... (42)2). 命令报文..................................................................... . (42)3). 命令报文数据域..................................................................... (42)4). 响应报文数据域..................................................................... . (42)5). 响应报文状态码..................................................................... . (43)5TimeCOS/SIMManual10-6-29WWWTimeCOS/SIMPHASE21.CHANGECHV1). 定义和范围CHANGECHV(CardHolderVerificationinformation )命令用于改正持卡人口令,并将安全状态存放器设置成相应的值。
CIMS说明手册(中文版)
CIMS说明手册(中文版)页次: 1CIMS MKII规格安装维护调整任何有关CERAMAX○R集成的测量系统的运行和修理的文件应呈递给:HYDRAUDYNE CYLINDER B.V.Postbus 325280 AA BOXTELTHE NETHERLANDS(荷兰)Telephone(电话):+341411651951Telecopier(电传):+31411674125*请以书面或电传形式证实电话请求。
页次: 2页次1.总论 32.运行原理 33.电气接口 33.1 电缆 43.2 电缆端子 43.3 屏蔽和接地 44.机械接口 45.电源 56.位置输出 57.运行条件 68.油缸条件 69.工具710.CIMS定货信息711.注意事项812.安装和维护913.CIMS传感器的安装914.传感器的调整914.1传感器的电阻平衡的调整1014.2传感器的信号振幅的调整1014.3调整的顺序1015.储藏条件12图表12 3-033、800-A2图纸19 列表20页次: 31.总论本系统以它的前身,一种用于CERAMAX○R液压缸高度集成的位移测量系统为基础研制的。
带有磁阻元件的传感器装在油缸头部的不锈钢外壳中,其中也包含磁敏二极管(SMD)技术的全部电子设备。
各传感元件和电子设备的保护级别为IP68,直至10巴。
电源电压是24V DC,输出是增量的正交的RS-422特性的信号。
测量系统和CERAMAX○R油缸一起在工厂调整获得最佳性能。
2.运行原理运行原理示于图1。
4个磁阻元件构成两个一半的惠斯登(Wheatston)电桥,用来检测交变的磁场。
这种交变磁场产生在永久磁铁和绝缘的CERAMAX○R活塞杆涂层下面的带沟槽的活塞杆之间。
传感元件由高频正弦信号激励。
由活塞杆位移信息调制输出信号。
这两种输出信号连同参考的激励信号变换为增量的A和B计数脉冲。
3.电气接口作为必要的内部电压,供给位移系统的24V DC电源具有宽的容限,由于它是在板式稳压转换器/调节器上。
OpenCv参考手册-机器学习中文参考手册
CvStatModel::save
将模型保存到文件
void CvStatModel::save( const char* filename, const char* name=0 );
save 方法将整个模型状态以指定名称或默认名称(取决于特定的类)保存到指 定的 XML 或 YAML 文件中。该方法使用的是 cxcore 中的数据保存功能。
如果两种排布方式都支持这个函数的参数tflag可以使用下面的取值tflagcvrowsample表示特征向量以行向量存储tflagcvcolsample表示特征向量以列向量存储训练数据必须是32fc132位的浮点数单通道格式响应值通常是以向量方式存储一个行或者一个列向量存储格式为32sc1仅在分类问题中或者32fc1格式每个输入特征向量对应一个值虽然一些算法比如某几种神经网络响应值为向量
virtual void write( CvFileStorage* storage, const char* name )=0; virtual void read( CvFileStorage* storage, CvFileNode* node )=0; };
在上面的声明中,一些函数被注释掉。实际上,一些函数没有一个单一的 API (缺省的构造函数除外),然而,在本节后面描述的语法和定义方面有一些相 似之处,好像他们是基类的一部分一样。
2 Normal Bayes 分类器 o 2.1 CvNormalBayesClassifier o 2.2 CvNormalBayesClassifier::train o 2.3 CvNormalBayesClassifier::predict
3 K 近邻算法 o 3.1 CvKNearest o 3.2 CvKNearest::train o 3.3 CvKNearest::find_nearest o 3.4 例程:使用 kNN 进行 2 维样本集的分类,样本集的分布为混 合高斯分布
Matrox Corona JAI CV-M90应用说明书
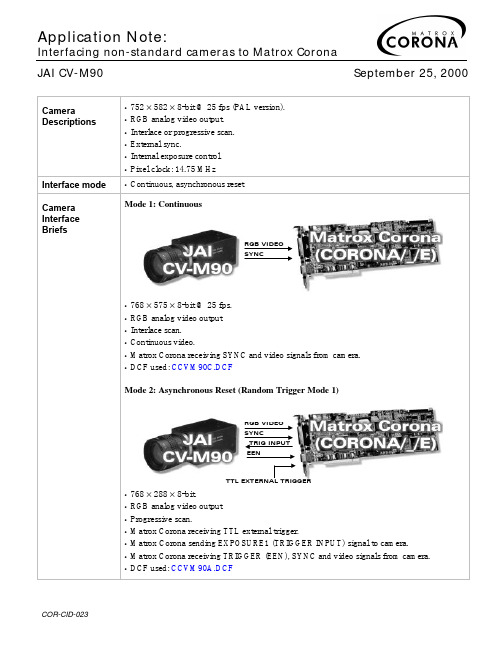
OFF ON
•
1
•
2
•
3
•
4
•
5
•
6
•
7
•
8
Shutter data 2SB* Shutter data 1SB* Shutter data LSB* Electronic shutter Scanning system Gamma correction
Mode 2: Asynchronous Reset (Random Trigger Mode 1)
RGB VIDEO SYNC
TRIG INPUT EEN
TTL EXTERNAL TRIGGER
• 768 × 288 × 8-bit. • RGB analog video output • Progressive scan. • Matrox Corona receiving TTL external trigger. • Matrox Corona sending EXPOSURE1 (TRIGGER INPUT) signal to camera. • Matrox Corona receiving TRIGGER (EEN), SYNC and video signals from camera. • DCF used: CCVM90A.DCF
are as follows:
H/W Trigger Source
CORONA/_/E
(44-pin connector)
Pin name H/W TRIG Cable GND
Cv中文参考手册之二------图像轮廓处理
Cv中文参考手册之二------图像轮廓处理Cv中文参考手册之二 - Cv结构分析下面的链接是OPENCV之CV部分用户参考手册的中文翻译,在此感谢Z.M.Zhang对模式识别、照相机定标与三维重建部分所做的翻译,Y.C.WEI对全文做了统一细致的更改Cv结构分析目录• 1 轮廓处理函数o 1.1 ApproxChainso 1.2 StartReadChainPointso 1.3 ReadChainPointo 1.4 ApproxPolyo 1.5 BoundingRecto 1.6 ContourAreao 1.7 ArcLengtho 1.8 CreateContourTreeo 1.9 ContourFromContourTreeo 1.10 MatchContourTrees• 2 计算几何o 2.1 MaxRecto 2.2 CvBox2Do 2.3 PointSeqFromMato 2.4 BoxPointso 2.5 FitEllipseo 2.6 FitLineo 2.7 ConvexHull2o 2.8 CheckContourConvexityo 2.9 CvConvexityDefecto 2.10 ConvexityDefectso 2.11 PointPolygonTesto 2.12 MinAreaRect2o 2.13 MinEnclosingCircleo 2.14 CalcPGH• 3 平面划分o 3.1 CvSubdiv2Do 3.2 CvQuadEdge2Do 3.3 CvSubdiv2DPointo 3.4 Subdiv2DGetEdgeo 3.5 Subdiv2DRotateEdgeo 3.6 Subdiv2DEdgeOrgo 3.7 Subdiv2DEdgeDsto 3.8 CreateSubdivDelaunay2Do 3.9 SubdivDelaunay2DInserto 3.10 Subdiv2DLocateo 3.11 FindNearestPoint2Do 3.12 CalcSubdivVoronoi2Do 3.13 ClearSubdivVoronoi2D轮廓处理函数ApproxChains用多边形曲线逼近 Freeman 链CvSeq* cvApproxChains( CvSeq* src_seq, CvMemStorage* storage,int method=CV_CHAIN_APPROX_SIMPLE,double parameter=0, int minimal_perimeter=0, int recursive=0 );src_seq•涉及其它链的链指针storage•存储多边形线段位置的缓存method•逼近方法 (见函数 cvFindContours 的描述).parameter•方法参数(现在不用).minimal_perimeter•仅逼近周长大于minimal_perimeter 轮廓。
CVIC 2 控制器中文操作手册
5.5 - SPINDLE(作业轴)菜单...................... 25
5.6 - STATION(作业站)菜单...................... 26 5.6.1 - STATION(作业站) – 全局参数........... 26 5.6.2 - 输入/输出端子配置................................. 28 5.6.3 - INPUT(输入)菜单.............................. 29 5.6.4 - OUTPUT(输出)菜单.......................... 31 5.6.5 - RUN REVERSE (反向转动)菜单....... 32
7.2 - 使多台 CVIC 控制器同步........................ 44 7.2.1 - 端子连接示例图..................................... 44
7.3 - 工具连接线............................................. 45 7.3.1 - EC 型工具连接线................................... 45 7.3.2 - MC 型工具连接线.................................. 45 7.3.3 - EC - MC 型工具扩展连接线................... 45
6.4 - 配件........................................................ 43
CVIM MATH-PAK 产品类型管理手册说明书
1CVIM MATH–PAK Firmware Release Notes This document lists and describes changes and enhancements to the MATH-PAK firmware. The information in this document should be considered as additional to the CVIM MATH-PAK User Manual, Catalog No. 5370–ND005 (Series A).This section contains changes and enhancements that are effective with the A04 release of the CVIM MATH–PAK firmware.Firmware CompatibilityMATH–PAK firmware revision A04 requires CVIM firmware revision C05(or higher). Also, if used with other CVIM packages, USER–PAKfirmware must be revision A03 (or higher), and OCR–PAK firmware mustbe revision B03 (or higher).Corrupt Formula DetectionMATH–PAK formulas can be corrupted by CVIM USER–PAK and CVIMOCR–PAK options. The corruption has been eliminated in USER–PAKfirmware revision A03 and in OCR–PAK firmware revision B03.However, if an old configuration containing a corrupt formula is archivedinternally, all formulas (and any templates, OCR match strings, andUSER–PAK configuration data) will be erased and set to their defaultsettings. The Configuration Fault bit will be set to allow a host computer todetect this condition. At this time, you will have to re–enter the lostconfiguration data.Formula Results From Other ToolsetsThe MATH–PAK User’s Manual indicates that when a simultaneous triggeris used for Toolset 1 and Toolset 2, formulas in Toolset 2 can access formularesults in Toolset 1. CVIM firmware revision C05 is required to ensure thatthe formula results from Toolset 1 are valid. Attempts to read formula resultsfrom Toolset 1 with CVIM firmware revision C04A or earlier revisions couldproduce inconsistent results.Enhancements inBulletin 5370–MPKMATH–PAKFirmware Revision A042Null Formula Name DisplayIf a formula name is entered as a “null string” (just a carriage return), the number of the formula will be displayed on the Results Page display panel. Access to Additional Inspection DataMATH–PAK formulas can now be used to access additional inspection data. The following information is provided as a supplement to the table on page 20 of the MATH–PAK User’s Manual.operand appears when entered into a formula.3Results Page DisplayIn earlier versions of MATH –PAK, the range limits for a formula could be displayed incorrectly when the Results Page was displayed before the first inspection. The range limits could be displayed as integer data instead of fixed point data, or vice versa. This problem has been corrected in MATH –PAK revision A04.This section contains enhancements that were effective with the A03 release of the CVIM MATH –PAK firmware.Resolution of Rounding Errors for Fixed Point ResultsIn MATH-PAK Series A02, more pronounced rounding inaccuracies occur informula results, when fixed point results are yielded for the multiplication,squaring, and distance functions. In Series A03, these rounding inaccuracieshave been addressed, so that Series A03 accuracy is consistent with that ofSeries A01. MATH-PAK Series A02 and A03 releases are otherwisefunctionally equivalent, and the information in this release note appliesequally to both.Installation of Series A03 SoftwareYou can install MATH-PAK Series A03, into a CVIM module, as you wouldthe original MATH-PAK option. Refer to the MATH-PAK User ’s Manualfor installation instructions.A03 Series Indication: When the MATH-PAK Series A03 software issuccessfully installed, the MATH-PAK series is indicated in the power-uptitle banner, along with the listing of the installed packages.Installation Compatibility with the USER-PAK TM OptionWith the Series A01 release, if you wanted to retain the use of yourpreviously- installed USER-PAK option, you would have had to reinstall theUSER-PAK option after installing the MATH-PAK option.You can install MATH-PAK Series A03 into a CVIM module when theUSER-PAK option, Catalog. No. 5370-UPK is currently resident, and retainthe USER-PAK option, without having to reinstall the USER-PAK option.Conversion of Range Limits SettingsWhen you define a formula, the formula result is expressed in either integeror fixed point (decimal) format, as appropriate for the type of formulaoperator(s) and operand(s).Enhancements inBulletin 5370–MPKMATH –PAKFirmware Revision A034In MATH-PAK Series A03, when you define range limits for the formula results, the limits you define are automatically entered as either integers, or as fixed point values, according to the type of results the formula provides. If you enter the range limit values for one type of result (integer or fixed point), then later change the formula so that the type of results changes to the other type, the range limit value entered will be converted automatically to the appropriate value type (integer or fixed point).When a fixed point range limit value is converted to integer, the value is rounded to the nearest integer. A value with a decimal portion of “.500” is rounded upward (if a positive value), or downward (if a negative value). Clearing the Output Assignment and Range Limits when Formula EnabledIn both MATH-PAK Series A01 and A03, when you enable a formula, the output for a corresponding tool (gage or window) is disabled (see Table 1 for the cross-listing of formulas and the corresponding tools).In addition, in MATH-PAK Series A03, when you enable a formula, any range limits which have been assigned to the tool results are cleared, and any output assignments to the range limits are cleared as well. Thus, if you assign outputs and/or define range limits for a tool, and you then enable the corresponding formula, range limits and output assignment(s) for the tool are reset to default values (no output assignments, and range limits set to 0). Table 1Formula numbers and corresponding gage/window numbers5Results Out of RangeIn MATH-PAK Series A03, when formula results are beyond the allowablerange of values, the result of 0 is returned for the formula. In MATH-PAKSeries A01, when formula results are beyond the allowable range, the resultreturned is unpredictable.Performance of Larger-numbered FormulasIn MATH-PAK Series A01, performance of formulas numbered 32-56 hasbeen inconsistent in some cases. In MATH-PAK Series A03, theseperformance inconsistencies have been resolved.Resolution of Errors Caused by Downloading of CorruptedConfigurationWith MATH-PAK Series A03 installed in the CVIM module, when aconfiguration is downloaded to the module – from a memory card, or from ahost device through a port or backplane – certain types of configuration datacorruption can be detected by the module.If such a corruption of the data is detected during a download, and if theCVIM module is configured to enter run mode, the following will occur:•All formulas are disabled.•The configuration fault bit is set.•All “corrupted ” formulas are erased, and the content replaced by the open parenthesis “(” symbol.•The CVIM module will halt operation, and display the following message on the monitor:ERROR: CVIM Processor halted.A CVIM system fault has occurred.ERROR: The formula is too large.At this point, if a corrupt configuration is not archived internally in theCVIM module (in EEPROM), you can simply cycle power to the CVIMmodule off, then on again. Then you can reload the configuration andcorrect the configuration in setup mode.6If a corruption of the configuration data is detected during a download, and the CVIM module is not configured to enter run mode, the following occurs:•All formulas are disabled.•The configuration fault bit is set.•All “corrupted” formulas are erased, and the content replaced by the open parenthesis “(” symbol.Re-entering Erased FormulasAfter the configuration error has occurred, and the setup mode is entered, when the Config. Results menu is activated, the following message is displayed on the monitor:Formula is too large.While in setup mode, you can check for and edit any of the “erased”formulas – any “corrupted” formulas will have been erased, and when the Set Formula feature is activated for a corrupted formula, the displayed formula will consist only of the open parenthesis “(” symbol.When the “erased” formulas have been either cleared or re-entered, the “Formula is too large.” message is no longer displayed during setup, when the Config. Results menu is activated. Thus you can access the Config. Results menu to confirm that your configuration is free of corrupt formulas.78CVIM, MATH –PAK, USER –PAK, and OCR –PAK are trademarks of Allen –Bradley Company, Inc.Catalog Number 5370–ND005–RN1 — July 199440062–293–01(A)Supersedes Catalog Number 5370–ND005–RN2Copyright 1994 Allen-Bradley Company, Inc. Printed in USAAlgeria • Argentina • Australia • Austria • Bahrain • Belgium • Brazil • Bulgaria • Canada • Chile • China, PRC • Colombia • Costa Rica • Croatia • Cyprus • Czech Republic • Denmark • Ecuador • Egypt • El Salvador • Finland • France • Germany • Greece • Guatemala • Honduras • Hong Kong • Hungary • Iceland • India •Indonesia • Israel • Italy • Jamaica • Japan • Jordan • Korea • Kuwait • Lebanon • Malaysia • Mexico • New Zealand • Norway • Oman • Pakistan • Peru • Philippines • Poland • Portugal • Puerto Rico • Qatar • Romania • Russia –CIS • Saudi Arabia • Singapore • Slovakia • Slovenia • South Africa, Republic • Spain • Switzerland •Taiwan • Thailand • The Netherlands • Turkey • United Arab Emirates • United Kingdom • United States • Uruguay • Venezuela • YugoslaviaWorld Headquarters, Allen-Bradley, 1201 South Second Street, Milwaukee, WI 53204 USA, Tel: (1) 414 382-2000 Fax: (1) 414 382-4444Allen-Bradley has been helping its customers improve productivity and quality for 90 years.A-B designs, manufactures and supports a broad range of control and automation productsworldwide. They include logic processors, power and motion control devices, man-machineinterfaces and sensors. Allen-Bradley is a subsidiary of Rockwell International, one of the。
卡莫齐自动化 - 概览说明书
OVERVIEWCOMPONENTSAND SOLUTIONS FOR INDUSTRIAL AUTOMATIONCamozzi Automation Division’s product range includes components, systems and technologies for the Industrial Automation field, the control of fluids– liquids and gases – and applications dedicatedto the Transportation and Health Industry.Camozzi Automation’s offering includes ever more IIoT products and solutions. We work on both the digitalisation of production processes and the creation of real cyber-physical systems, to enable the integration of mechanical, electronic and digital elements, constantly improving process performance.The added value customers derive from Camozzi Automation arises from our in-depth expertise of the industrial sector and our knowledge of implementing cutting-edge technologies.We help businesses to achieve industrial excellenceso they can deliver customer satisfaction to their markets. This excellence is realised through our innovative solutions, ongoing research, continuous product developmentand industrial processes improvement. It is implementedby the integration of technical processes (CIS) with industrial processes (CMS) where human control remains the central element for the governance of growth.This growth involves products, services and production methodologies, connecting the real world of industrial plants with the virtual world of integrated intelligent systems. The resulting systems make it possible to connect things, people and places, creating a ‘smart’ factory, where robots work in close proximity with human operators and where machines are able to self-correct any errors. A digital factory where everything contributes to the creation of added value.MULTI-TECHNOLOGICALSYSTEMS FOR SMART SOLUTIONS02• •• • •• • • E LE C T RI CP R O P O R T I O N A L• • • • •TECHNOLOGYOverview / Camozzi AutomationCamozzi’s multi-technological approach makes it possible to offer an optimal solution for everyapplication by choosing from the best pneumatic,electric and proportional technologies available. This process requires a depth of expertise that includes not only addresses both the characteristics of the technologies and products, but also considers the functional requirements of the application.In use it combines the reliability of pneumatic valves, actuators and components; with the accuracy in control of proportional regulators and valves as well as speed and accuracy in the positioning of electromechanical cylinders and axes. This optimises the individual movements and actions required by an application and represents the competitive advantage that CamozziAutomation can provide to its customers.Product linesPneumatic actuationElectric actuationHandling and vacuumValves and solenoid valves· Cylinders according standards · Compact cylinders· Stainless steel cylinders · Guided cylinders· Cylinders not according standards · Rotary cylinders · Rodless cylinders · Proximity switches· Clamping elements and shock absorbers· Electromechanical cylinders · Electromechanical axes · Drives · Motors· Grippers · Suction pads · Ejectors· Vacuum accessories · Vacuum filters· Directly and indirectly operated 2/2, 3/2 solenoid valves· Solenoid valves, pneumatic valves · Mechanical and manual valves · Logic valves· Automatic valves · Flow control valves · Silencers04Fieldbus and multipole systemsProportional technologyAir treatmentPneumatic connection· Valve islands· Multi-serial modules· Proportional valves · Proportional regulators· Series MX Modular FRL Units · Series MC Modular FRL Units · Series MD Modular FRL Units · Series N FRL Units · Pressure regulators· Pressure switches and vacuum switches · Accessories for air treatment· Super-rapid fittings · Rapid fittings · Universal fittings · Fittings accessories· Quick-release couplings· Tubing, spirals and accessoriesOverview / Camozzi Automation0506Solutions for the control of fluids– liquids and gases – for the life science and industrial sectors.INDUSTRIAL SOLUTIONS · Micro_controls · General purpose · Process control LIFE SCIENCE SOLUTIONS · Biotechnologies · Medical devicesFully integrated systems and complete solutions for pneumatic automation, focusing on innovation, operational efficiency and total quality.PRE-ASSEMBLED KITS· Reliable products that are ready to install SPECIAL PRODUCTS· Compact technical solutions thatcan be easily integrated and customised CONTROL CABINETS AND SYSTEMS· Quality components, robust assembly and optimum designSOLUTIONS FOR FLUID CONTROLCUSTOMISED SOLUTIONSA Camozzi Group Company 9 3 -1 5 0 0 -0 GB 0 2 4 0 3 / 2 0 1 9ContactsCamozzi Automation S.p.A. Società UnipersonaleVia Eritrea, 20/I25126 BresciaItalyTel. +39 030 37921****************。
Color CVIM 预设打包选项的软件版本发布说明书
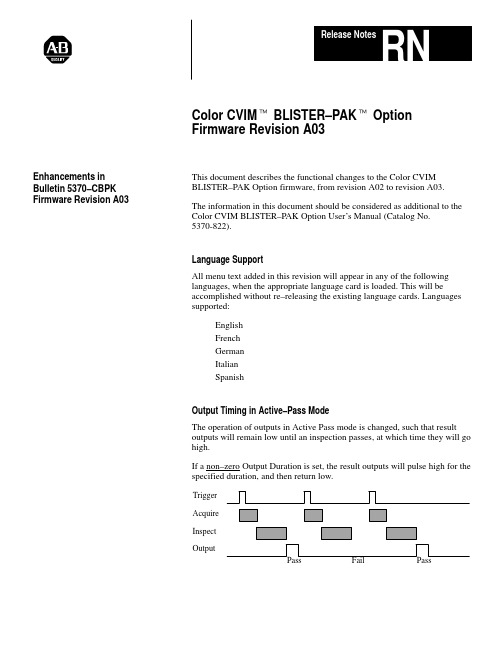
Color CVIM t BLISTER–PAK t Option Firmware Revision A03This document describes the functional changes to the Color CVIM BLISTER–PAK Option firmware, from revision A02 to revision A03.The information in this document should be considered as additional to theColor CVIM BLISTER–PAK Option User’s Manual (Catalog No.5370-822).Language SupportAll menu text added in this revision will appear in any of the followinglanguages, when the appropriate language card is loaded. This will beaccomplished without re–releasing the existing language cards. Languagessupported:EnglishFrenchGermanItalianSpanishOutput Timing in Active–Pass ModeThe operation of outputs in Active Pass mode is changed, such that resultoutputs will remain low until an inspection passes, at which time they will gohigh.If a non–zero Output Duration is set, the result outputs will pulse high for thespecified duration, and then return low.OutputInspectAcquireTriggerEnhancements inBulletin 5370–CBPKFirmware Revision A032If a zero Output Duration is set, the result outputs will remain high until an inspection fails, or the module is put into setup mode.OutputInspectAcquireTriggerIn Active Pass mode, the machine stop signal will go high as soon as the module enters run mode, and go low if a machine–stop condition occurs or the module is put into setup mode.If a non–zero Output Duration is set, the machine–stop output will pulse low for the specified duration, and then return high.InspectAcquireTriggerIf a zero Output Duration is set, the machine–stop output will remain low until the completion of the next inspection for which there is nomachine–stop condition, or the module is put into setup mode and then backinto run mode.InspectAcquireTriggerIn setup mode, the Machine Stop signal will be active (machine run) whenever the system is waiting for external machine triggers or during the Teach–in process.Contour Theta ComputationThe theta parameter of a contour was sometimes computed incorrectly when it was oriented near zero degrees. This has been corrected in revision A03.3Color –Teach Contour SelectionDuring color –teach, the A02 software automatically highlighted onlycontours whose area was at least 1/2 the area of the largest contour. UnderA03, the system will process contours which are at least 5% the area of thelargest contour, in order to teach the colors of tablets which differ greatly insize.Auto –Setup Task PriorityDuring the color –teach operations, the task priority is lowered so thatRS –232 communications will keep working.Entry Limit for Position ToleranceThe limit for entry of the position tolerance is increased to ±200%.Problems with Hiding Menu ItemsSome menus could be hidden properly via the Color CVIM USER –PAK tOption. This is corrected.When loading a configuration from a memory card, the system will nowremain in either Blister Setup or System Setup mode, whichever was activewhen the configuration was loaded.Contour Border ColorA new menu item is provided on the Adjust menu, to switch the windowborder color from black to white. Selecting a white border means thatcontours which touch the edge of the window are ignored. This is useful insome applications.Contour Length ToleranceA new tolerance is added, for the contour length. This functions similarly tothe area tolerance, but will operate on the length of the contour, defined asthe maximum of the length and height of the contour bounding box. TheH –Size measurement is not used, because it would require substantialadditional processing time.Contour Results in Math FormulasBLISTER –PAK revision A02 was not fully compatible with the Color CVIMMATH –PAK t Option, revision A02, in that some contour results of awindow could not be correctly accessed. This has been corrected inBLISTER –PAK revision A03.4Color –coding of Contours During Tolerance AdjustmentWhen a tolerance is being adjusted, contours will be displayed such that allcontours within the tolerance are displayed in green, and all others aredisplayed in red. This was not precisely the case in revision A02. Anycontours which are found but do not match a stored object will be shown inred.Mouse Responsivity During Image AcquisitionWhen images are being acquired during auto –setup, the mouse is nowresponsive. Under revision A02 the mouse cursor would only move everysecond or so.Rockwell Automation helps its customers receive a superior return on their investment by bringingtogether leading brands in industrial automation, creating a broad spectrum of easy-to-integrateproducts. These are supported by local technical resources available worldwide, a global networkof system solutions providers, and the advanced technology resources of Rockwell.Worldwide representation.Argentina • Australia • Austria • Bahrain • Belgium • Bolivia • Brazil • Bulgaria • Canada • Chile • China, People ’s Republic of • Colombia • Costa Rica • Croatia • Cyprus Czech Republic • Denmark • Dominican Republic • Ecuador • Egypt • El Salvador • Finland • France • Germany • Ghana • Greece • Guatemala • Honduras • Hong Kong Hungary • Iceland • India • Indonesia • Iran • Ireland •Israel • Italy • Jamaica • Japan • Jordan • Korea • Kuwait • Lebanon • Macau • Malaysia • Malta • Mexico •Morocco The Netherlands •New Zealand • Nigeria • Norway • Oman • Pakistan • Panama • Peru • Philippines • Poland • Portugal • Puerto Rico • Qatar • Romania • Russia • Saudi Arabia • Singapore • Slovakia • Slovenia • South Africa, Republic of • Spain • Sweden •Switzerland • Taiwan • Thailand • Trinidad • Tunisia • Turkey • United Arab Emirates United Kingdom • United States • Uruguay • VenezuelaRockwell Automation Headquarters, 1201 South Second Street, Milwaukee, WI 53204-2496 USA, Tel: (1) 414 382-2000 Fax: (1) 414 382-4444Rockwell Automation European Headquarters, Avenue Hermann Debroux, 46, 1160 Brussels, Belgium, Tel: (32) 2 663 06 00, Fax: (32) 2 663 06 40Rockwell Automation Asia Pacific Headquarters, 27/F Citicorp Centre, 18 Whitfield Road, Causeway Bay, Hong Kong, Tel: (852) 2887 4788, Fax: (852) 2508 1846World Wide Web: Publication 5370-822–RN1 – December 199741062-043-01(A)Copyright 1997 Allen-Bradley Company, Inc. Printed in USA。
LabWindows CVI 2017 发布说明说明书
RELEASE NOTESLabWindows/CVI™™Version 2017These release notes introduce LabWindows™/CVI™ 2017. Refer to this document for system requirements, installation and activation instructions, and information about new features in LabWindows/CVI.ContentsLabWindows/CVI System Requirements (1)Installing LabWindows/CVI (2)Before Installation (3)Running the Installation (3)Activating LabWindows/CVI (4)What’s New in LabWindows/CVI? (5)Tracepoints (5)Thread-specific Breakpoints (5)Highlight All Instances of Selected Word in Source Window (5)UI Events Logger (5)Close Button on Tabs (5)Change Source Code Editor Font Size Using Mouse Wheel (6)Comment/Uncomment Selected Lines in Source Code Editor (6)Highlight Matching Parentheses (6)LabWindows/CVI Resources (6)LabWindows/CVI System Requirements LabWindows/CVI has the following requirements:•Personal computer using a Pentium 4/M or equivalent processor•1024 × 768 resolution (or higher) video adapter•Minimum of 1 GB of RAM, 2 GB recommended•7 GB free hard disk space for full installation, which includes the Windows SDK 8.1 and the Microsoft .NET Framework 4.6.2; additional space needed for National Instruments Device DriversLabWindows/CVI supports the following operating systems:•Windows 10/8.11/7 SP12Windows Embedded Standard 7 SP12•Windows Server 2012 R21•Windows Server 2008 R2 SP12physical address extension (PAE). To learn how this might affect your system andwhat actions you might need to take, visit /info and enter the Info CodePAESupport.Installing LabWindows/CVIThe LabWindows/CVI Platform DVD includes LabWindows/CVI and the following modules and toolkits:Modules•Real-Time Module•Vision Development ModuleToolkits•Real-Time Execution Trace Toolkit•SQL Toolkit•Signal Processing Toolkit•PID Toolkit•Execution Profiler Toolkit•ECU Measurement and Calibration Toolkit•Automotive Diagnostic Command SetIf you purchased any of these modules or toolkits, you can install them using the LabWindows/CVI Platform DVD. If you want to evaluate any of these modules or toolkits before purchasing them, you can install these add-ons from the LabWindows/CVIPlatform DVD.1 NI software installs Microsoft Visual C++ 2015 Runtime and .NET 4.6.2. Windows 8.1 and Windows Server 2012 R2 require Microsoft updates to support these items. Refer to Microsoft KB2919442 and KB2919355 for more information about how to install these updates.2 NI software is signed with a SHA-256 certificate. Windows 7 SP1, Windows Embedded Standard 7 SP1,and Windows Server 2008 R2 SP1 require Microsoft updates to support SHA-256. Refer to MicrosoftKB3033929 for more information about how to install this security update.2||LabWindows/CVI Release NotesLabWindows/CVI Release Notes |© National Instruments |3Before InstallationKeep the following points in mind before you install LabWindows/CVI:•If you already have a different version of LabWindows/CVI installed on your computer, besure to install version 2017 in a different directory. If you want to install to an existing directory, uninstall the other version before installing LabWindows/CVI 2017.•You must have administrator privileges to install LabWindows/CVI.•If your software is part of a V olume License Agreement (VLA), contact your VLA administrator for installation instructions.Running the InstallationComplete the following steps to install LabWindows/CVI:CautionInstalling LabWindows/CVI 2017 replaces any previous version of theLabWindows/CVI Shared Runtime with the LabWindows/CVI 2017 SharedRuntime. To restore the previous runtime, uninstall LabWindows/CVI 2017, theLabWindows/CVI 2017 Shared Runtime, and any previous versions ofLabWindows/CVI and LabWindows/CVI Shared Runtimes on the computer. Thenreinstall the LabWindows/CVI version you want to use, along with any additionalNational Instruments software you might have installed.1.Insert the LabWindows/CVI media into the disk drive. If the media does not runautomatically, open Windows Explorer, right-click the disk drive icon, and selectAutoPlay .2.On installation startup, the National Instruments LabWindows/CVI 2017 screen appears. Click Install LabWindows/CVI, Modules, and Toolkits .3.Continue to follow the instructions on the screen.Note If you have a serial number for the product you want to install, enter thenumber during installation when you are prompted. You also can activate the product after installation. For more information about finding serial numbers, refer to/info and enter SerialNumbers_en as the Info Code.Each product on the LabWindows/CVI Platform DVD has a different serial number, with the possible exception of the LabWindows/CVI Execution Profiler Toolkit.The Execution Profiler Toolkit does not require a separate license if youhave a LabWindows/CVI Full Development System license. If you have theLabWindows/CVI Base Package, you can install the Execution Profiler Toolkit forevaluation.4| |LabWindows/CVI Release Notes4.If you select Device Drivers in the Features panel, the LabWindows/CVI installer promptsyou to insert the National Instruments Device Drivers media, which is available on . The NI Device Drivers media is required only if you want to upgrade existing driver software to the latest version. Otherwise, you can ignore this prompt.5.If you have an active Internet connection, the installer prompts you to select Windows SDK components to install. The components you select are downloaded and installed from the Microsoft website. For more information about the components, refer to /info and enter the Info CVI_Windows81SDK .If you do not have an active Internet connection, LabWindows/CVI installs all Windows SDK components, which might not be the latest components available on the Microsoft website.Note If you cancel the Windows SDK installation, LabWindows/CVI will notfunction properly. You can download the Windows SDK from one of the following places:•The Microsoft website• —Visit /info and enter the Info CodeDownloadMSDTWindowsSDK 6.Install hardware. Refer to your device documentation, such as printed manuals or PDFs, for information about installing your NI hardware.7.To activate a National Instruments product, refer to the Activating LabWindows/CVI section of this document.Activating LabWindows/CVIThe NI Licensing Wizard guides you through the activation process. If you installed your NI software for the first time, the installer may automatically launch the NI Licensing Wizard. Otherwise, launch your software and choose to activate when prompted. If you are not prompted, perform the following steps:1.Launch NI License Manager by selecting Start»All Programs»National Instruments»NI License Manager .2.Click Activate Software on the ribbon.Follow the instructions on the screen to activate LabWindows/CVI. For more information about activation, refer to the Activating Your Software topic in the LabWindows/CVI Help .Note If you are unable to activate LabWindows/CVI, refer to the web page at/activate.What’s New in LabWindows/CVI?This section includes information about changes and enhancements in LabWindows/CVI 2017.T racepointsLabWindows/CVI updated automatic debugging capabilities by adding tracepoints. Tracepoints are breakpoints associated with user-specified actions. This update allows you to set automatic debug logging when a particular source code location is executed and allows you to alter the execution flow of the application. Tracepoints can answer the following questions:•Which function does my program execute?•What values does my variable have at that source location?•What is my current call stack, thread ID, and so on at that source location?•How did the value of my variable change over time at that source location?Thread-specific BreakpointsIn addition to tracepoints, thread-specific breakpoints also enhance debugging capabilities for multithreaded applications. This feature allows you to stop your applications on a desired thread. Set the breakpoint on the preferred code line in the Edit Breakpoint dialog box. Thethread-specific breakpoint will be hit only by the selected thread(s).Highlight All Instances of Selected Word in Source WindowSemantic highlighting and word highlighting simplify writing code. When you select a partial word or whole word, LabWindows/CVI highlights every occurrence of that symbol or string. You can customize the highlight color by selecting Options»Colors.UI Events LoggerYou can use the User Interface Events Logger to track your exact steps when you test a user interface file in Operate mode. You can specify which events to record and which to swallow when troubleshooting. A log panel displays relevant event information and allows you to save the events log to a file.Close Button on T absThis feature allows you to add a close button to each tab in LabWindows/CVI applications. You can enable this button in the Edit Tab dialog box for tabs in user applications.Note You can also close workspace tabs and runtime tab controls using the mousemiddle click.LabWindows/CVI Release Notes|© National Instruments|5Change Source Code Editor Font Size Using Mouse WheelYou can now change source code font size using the mouse wheel. To increase or decrease font size, press <Ctrl> and scroll the mouse wheel up or down.Comment/Uncomment Selected Lines in Source Code EditorYou can select a block of lines to comment and uncomment in the Source window. You can comment or uncomment using the toolbar, the Edit menu, or the Source Editor Context menu. Highlight Matching ParenthesesMatching parentheses now highlight when the cursor is before an open or close parentheses. LabWindows/CVI ResourcesHow do I get started?Read the Getting Started with LabWindows/CVI manual, which provides a tutorial for learning basic LabWindows/CVI program development techniques.Are there known issues or late-breaking information?Refer to the LabWindows/CVI Readme, which you can access from Start»All Programs»National Instruments»LabWindows CVI 2017»LabWindows CVI 2017 Documentation. The readme file contains information about known issues.Where can I find reference information?The LabWindows/CVI Help contains complete reference information. Use the Search tab in the LabWindows/CVI Help to quickly locate specific information.Where can I find examples?Find examples with the NI Example Finder, which you can access by selecting Help»Find Examples.LabWindows/CVI example programs are located in the following location:C:\Users\Public\Documents\National Instruments\CVI2017\samples.6||LabWindows/CVI Release NotesIs there a list of LabWindows/CVI documentation?The Guide to LabWindows/CVI Documentation topic describes documentation available for new users and upgrade users. In addition, this topic provides links to LabWindows/CVI documentation, including manuals and web resources. You can access the Guide to LabWindows/CVI Documentation topic through the LabWindows/CVI Help.Where else can I go for LabWindows/CVI information?Visit the LabWindows/CVI w ebsite at for the most up-to-date information about LabWindows/CVI.LabWindows/CVI Release Notes|© National Instruments|7Refer to the NI Trademarks and Logo Guidelines at /trademarks for more information on National Instruments trademarks. Other product and company names mentioned herein are trademarks or trade names of their respective companies. For patents covering National Instruments products/technology, refer to the appropriate location: Help»Patents in your software, the patents.txt file on your media, or the National Instruments Patents Notice at /patents. You can find information about end-user license agreements (EULAs) and third-party legal notices in the readme file for your NI product. Refer to the Export Compliance Information at /legal/export-compliance for the National Instruments global trade compliance policy and how to obtain relevant HTS codes, ECCNs, and other import/export data. NI MAKES NO EXPRESS OR IMPLIED WARRANTIES AS TO THE ACCURACY OF THE INFORMATION CONTAINED HEREIN AND SHALL NOT BE LIABLE FOR ANY ERRORS. U.S. Government Customers: The data contained in this manual was developed at private expense and is subject to the applicable limited rights and restricted data rights as set forth in FAR 52.227-14, DFAR 252.227-7014, and DFAR 252.227-7015.© 2003–2017 National Instruments. All rights reserved.373607P-01May17。
YoloLiv VertiCam PTZ Camera用户手册(英语版V1.0)说明书
YoloLiv VertiCam PTZ CameraUser ManualEnglish (V1.0)CopyrightAll contents of this manual, whose copyright belongs to our corporation, cannot be cloned, copied or translated without the permission of our corporation.NoticeProduct specifications and information which were referred to in this document are for reference only. We may change, delete, or update any content at any time and without prior notice.FCC NOTICE (Class A)This device complies with Part 15 of the FCC Rules. The operation is subject to thefollowing two conditions: (1) this device may not cause harmful interference, and (2)this device must accept any interference received, including interference that maycause undesired operation.This equipment has been tested and found to comply with the limits for a Class A digital device,pursuantto Part15of the FCC Rules.These limits are designed to provide reasonable protection against harmful interference in a residential installation.This equipment generates uses and can radiate radio frequencyenergy and,if not installed and used in accordance with the instructions,may cause harmful interference to radio communications.However,there is no guarantee that interference will not occur in a particular installation.If this equipment does cause harmful interference to radio or television reception,which can be determined by turning the equipment offand on,the user is encouraged to try to correct the interference by one or more of the following measures:●Reorient or relocate the receiving antenna.●Increase the separation between the equipment and receiver.●Connect the equipment into an outlet on a circuit different from that to which the receiver isconnected.●Consult the dealer or an experienced radio/television technician for help.Class A ITEClass A ITE is a category of all other ITE which satisfies the class A ITE limits but not the class B ITE limits. Such equipment should not be restricted in its sale but the following warning shall be included in the instructions for use:Operating this equipment in a residential environment may cause radio interference. European Community Compliance Statement (Class A)This product is herewith confirmed to comply with the requirements set out in theCouncil Directives on the Approximation of the laws of the Member States relating toElectromagnetic Compatibility Directive 2014/30/EU.1Safety Precautions●During the installation and operation, all electrical safety regulations of the country and region of use must be strictly observed.●Please use the power adapter that comes standard with this product.●Do not connect multiple devices to the same power adapter (exceeding capacity of the adapter may generate excessive heat or cause fire).●Do not rotate the camera by hand, otherwise it may cause mechanical failure.●When installing this product on a wall or ceiling, make sure the device securely and there are no obstacles within the rotation range; Do not power on until all installations are completed.●To avoid heat build-up, please keep smooth ventilation around the device.●If the device smokes, smells, or makes noises,please turn off the power and unplug the power cord immediately, then contact the dealer in time.●This device is not waterproof, please keep the device dry.●This product has no user serviceable parts,damage caused by disassembly by the user is not covered by the warranty.Specific frequencies of electromagnetic field may affect the image of the camera!2Packing ListName QuantityCamera 1Power Adapter 1Remote Control 1USB Cable 1User Manual13Quick Start1)Please check connections are correct before starting.1)Connect the power adapter to the powerconnector on the rear panel of camera. Thepower indicator on the front panel of thecamera turns on.2)A er the camera is powered on, it starts toinitialize, right up to the limit position, andthen both horizontal and vertical go to themiddle position. When the motor stopsrunning, it indicates the initialization iscompleted.4About Product4.1Features●Full Function USB InterfaceFull function USB interface, compatible with USB3.0 and USB2.0, support UVC v1.1 and UAC 1.0 protocol, support video raw image and encoding output.●1080P Full HDThe new 1/2.8-inch high-quality HD CMOS sensor with 2.07 million effective pixels enableshigh-quality images up to 1920x1080. Output frame rate is up to 60 frames/s to present clear and realistic HD video, vividly showing the expression and action of the characters.●72.5° Wide-angle LensThe exclusively customized 72.5° high-quality ultra-wide angle lens with optical zoom up to 12x.●Low IlluminationThe new CMOS image sensor with ultra-high SNR can effectively reduce the image noise under low illumination. The application of 2D and 3D noise reduction algorithm greatly reduces the image noise even under the condition of ultra-low illumination, it keeps the picture clean and clear, and the SNR of image is as high as 55dB.●Remote ControlThe camera can be controlled remotely through the RS232 and USB port.●Leading Auto Focus TechnologyUsing the advanced focusing algorithm and TOF module assists focusing, lens can focus quickly, accurately and stably.●Multiple & Complete InterfacesSupport audio and video output via HDMI (optional) and USB 3.0 interface.●PortraitSupport portrait output.●Easy to UseNo need to download the driver, plug and play USB output to take a convenient and simple user experience.4.2Product SpecificationCameraVideo System1080P60, 1080P50,1080P30, 1080P25, 720P60,720P50Sensor1/2.8-inch, CMOS,Effective Pixel: 2.07M Scanning Mode ProgressiveLens12x, f=3.5mm ~ 42.3mm,F1.8 ~ F2.8Digital Zoom16xMinimumIllumination0.5 Lux @ (F1.8, AGC ON) Shutter1/30s ~ 1/10000sWhite Balance Auto, Indoor, Outdoor,One Push, Manual, VAR BacklightCompensation SupportDigital NoiseReduction2D&3D Digital NoiseReductionSNR≥55dBHorizontal FOV72.5° ~ 6.9°Vertical FOV44.8° ~ 3.9°Pan Angle±170°Tilt Angle-25° ~ +30°Pan Speed 1.61° ~ 75.56°/sTilt Speed0.44° ~ 15°/sImage Flip SupportImage Freeze SupportPreset Position255Preset Accuracy0.1°MIC Pick-upDistance6m USB FeaturesOperate System Windows 7, Windows 8, Windows 10, Mac OS X, Linux, AndroidColor System/Compression MJPG/YUY2Video Format ●YUY2 (ISOC):1080P@60fps (max.)●MJPEG: 1080P@60fps(max.)USB Audio SupportUSB VideoCommunicationProtocolUVC 1.1UVC PTZ Support InterfacesUSB Interface 1 x USB3.0: Type-B HDMI Interface 1 x HDMI 1.4b Audio Interface 1 x LINE IN, 3.5mmCommunication Interface 1 x RS232 IN: 8pin min DIN; Max. Distance: 30m; Protocol: VISCA/Pelco-D/ Pelco-P1 x RS232 OUT: 8pin min DIN; Max. Distance: 30m; Protocol: VISCA network use onlyPower Jack JEITA type (DC IN 12V) General SpecificationsInput Voltage DC 12VInput Current 1.5A (max.) OperatingTemperature-10°C ~ 40°C StorageTemperature-40°C ~ 60°CPowerConsumption12W (max.)Dimension128mm x 118mm x157.9mmNet Weight 1.0Kg4.3Interfaces and Buttons Item Name1USB3.0 Interface 2HDMI Interface 3LINE IN InterfaceRS232 IN InterfaceRS232 OUT InterfaceDC 12V Interface4.4Dimension4.5InstallationThe installation diagram is for reference only. The brackets and screws are not standard. Forpacking accessories, please refer to the actual product.4.6Remote ControlKey Description1.(Standby) KeyPress to enter standby mode 2. Number KeyTo set preset or call preset 3. * KeyUse with other keys 4. PRESET KeySet preset: [PRESET] + Number key (0-9)5. HOME KeyConfirm selection or press to turn PTZ back to the middle position6.(Return) KeyPress to return to the previous menu 7. ZOOM Key●SLOW: Zoom In [+] or Zoom Out [-] slowly ●FAST: Zoom In [+] or Zoom Out [-] fast 8. L/R SET Key●Standard: Simultaneously press L/R SET + 1●Reverse: Simultaneously press L/R SET + 29. FOCUS KeyAuto/Manual/Far/Near focus 10. CAMERA SELECT KeyPress to select and control the camera 11. # KeyUse with other keys12. IR Remote Control Key [*] + [#] + [F1]: Address 1[*] + [#] + [F2]: Address 2[*] + [#] + [F3]: Address 3[*] + [#] + [F4]: Address 413. RESET KeyClear the preset position: [RESET] + Number key(0-9)14. PTZ Control KeyPTZ moved according to the arrow indicates 15. MENU KeyEnter or exit OSD MENU 16. BACKLIGHT KeyBacklight ON/OFF: Press repeatedly to enable or disable the backlight compensation.NOTE:●Effective only in auto exposure mode.●If there is a light behind the subject, thesubject will become dark, press the backlight key to enable the backlight compensation.Press again to disable this function.17. P/T RST (PTZ Reset) Key Press to preset Pan/Tilt self-test.Shortcut Set[*] + [#] + [1]: OSD menu default English [*] + [#] + [3]: OSD menu default Chinese [*] + [#] + [6]: Quickly recover the default [*] + [#] + [8]: Check the camera version [*] + [#] + [9]: Quickly set up inversion5GUI Settings5.1MENUPress [MENU] key to display the main menu on the screen. Use the arrow key to move the cursor to desired item and press the [HOME] key to confirm to enter the corresponding sub-menu.MENUExposure ColorImageP/T/ZNoise Reduction Audio SetupCommunication SetupInformationRestore Default [Home] Enter [Menu] Exit5.2EXPOSUREWhen in main menu page, move the cursor to [Exposure] and press [HOME] key to confirm to enter the Exposure page as below.EXPOSUREModeAuto ExpCompMode OffGain Limit 1Meter Average Backlight OffDRC3Anti-Flicker50HzSelect Item Change Value [Menu] ExitMode : Auto, Manual, SAE, AAE, Bright.ExpCompMode (Exposure Compensation Mode):On, Off (Effective only in Auto mode).ExpComp (Exposure Compensation Value):-7 ~ 7 (Effective only in ExpCompMode On).Gain Limit : 0 ~ 15 (Effective in Auto, SAE, AAE,Bright mode).Meter : Average, Center, Bottom, Top (Effective in Auto, SAE, AAE, Bright mode).Backlight : On, Off (Effective only in Auto mode).Bright : 0~17 (Effective only in Bright mode).Anti-Flicker :Off,50Hz,60Hz (Effective in Auto,AAE, Bright mode).Iris :F1.8,F2.0,F2.4,F2.8,F3.4,F4.0,F4.8,F5.6,F6.8,F8.0,F9.6,F11.0,Close (Effective in Manual,AAE mode).Shutter : 1/30, 1/60, 1/90, 1/100, 1/125, 1/200,1/250, 1/350, 1/500, 1/725, 1/1000, 1/1500,1/2000, 1/3000, 1/4000, 1/6000, 1/10000 (Effective in Manual, SAE mode).Gain : 0 ~ 7 (Effective only in Manual mode).DRC : 0 ~ 8.5.3COLORWhen in main menu page, move the cursor to [Color] and press [HOME] key to confirm to enter the Color page as below.COLORWB Mode Auto AWB Sens Low RG Tuning 0BG Tuning 1Saturation 100%Hue7Select Item Change Value [Menu] ExitWB-Mode (White Balance Mode): Auto, Indoor,Outdoor, One Push, Manual, VAR.AWB Sens (The White Balance Sensitivity): Low,Middle, High (Effective in Auto, One Push mode).RG (Red Gain): 0~255 (Effective only in Manual mode).BG (Blue Gain): 0~255 (Effective only in Manual mode).RG Tuning (Red Gain Tuning): -10 ~ +10 (Effective in Auto, One Push, VAR mode).BG Tuning (Blue Gain Tuning): -10 ~ +10 (Effective in Auto, One Push, VAR mode).Saturation : 60% ~ 200%.Hue : 0 ~ 14.Color Temp : 2500K ~ 8000K (Effective only in VAR mode).5.4IMAGEWhen in main menu page, move the cursor to [Image] and press [HOME] key to confirm to enter the Image page as below.IMAGELuminance 7Contrast 7Sharpness 15B&W-Mode OffFlip-H OffFlip-VOffGamma Ext Image Style DefaultSelect Item Change Value [Menu] ExitLuminance : 0 ~ 14.Contrast : 0 ~ 14.Sharpness : 0 ~ 63.B&W-Mode : On, Off.Flip-H : On, Off.Flip-V : On, Off.Gamma : Ext, Default, 0.45, 0.5, 0.56, 0.63.Style : Default, Norm.5.5P/T/ZWhen in main menu page, move the cursor to [P/T/Z] and press [HOME] key to confirm to enter the P/T/Z page as below.P/T/ZTOF FocusOnAF-Sense High AF-ZoneFrontSpeed By Zoom On L/R Set STD Display InfoOnCall Preset Speed 18Pre Zoom Speed 5Select Item Change Value [Menu] ExitTOF Focus : On, Off.AF-Sense (Auto Focus Sensitivity):Low,Normal,High.AF-Zone (Auto Focus Area):Front,Top,Middle,Bottom.Speed By Zoom (The Depth of Field Ratio):On,Off.L/R Set : STD, REV.Display Info : On, Off.Call Preset Speed : 1 ~ 24.Pre Zoom Speed : 0 ~ 7.5.6NOISE REDUCTIONWhen in main menu page, move the cursor to [Noise Reduction] and press [HOME] key to confirm to enter the Noise Reduction page as below.NOISE REDUCTION2D NRAuto 3D NRAuto Select ItemChange Value [Menu] Exit2D NR (2D Noise Reduction): Auto, Off, 1 ~ 5.3D NR : (3D Noise Reduction): Auto, Off, 1 ~ 8.5.7AUDIOWhen in main menu page, move the cursor to [Audio] and press [HOME] key to confirm to enter the Audio page as below.AUDIOAudio Source LINESelect Item Change Value [Menu] ExitAudio Source : Off, LINE, MIC.NR-Switch : On, Off (Effective only in MIC audio source)5.8SETUPWhen in main menu page, move the cursor to [Setup] and press [HOME] key to confirm to enter the Setup page as below.SETUPLanguage EnglishVideo Format 1080P60USB Mode BULKOSD FlipOffUVC Standby ModeOffWakeup Pos Preset 0Select Item Change Value[Menu] ExitLanguage : English, Chinese.Video Format : 1080P60, 1080P50, 1080P30,720P60, 720P50.USB Mode : ISOC, BULK.OSD Flip : On, Off.UVC Standby Mode : On, Off.Wakeup Pos : Preset 0, Preset UVC.5.9COMMUNICATION SETUPWhen in main menu page, move the cursor to [Communication Setup] and press [HOME] key to confirm to enter the Communication setup page as below.COMMUNICATION SETUPProtocol VISCA V_Address 1V_AddrFixOffNet Mode Serial Baudrate9600Select Item Change Value [Menu] ExitProtocol : VISCA, PELCO-D, PELCO-P.V_Address :1~7(Effective only in VISCA protocol).V_AddrFix : On, Off (When set to On, the 88 30 01FF command does not work. Effective only in VISCA protocol).P_D_Address : 0 ~ 254 (Effective only in PELCO-D protocol).P_P_Address : 0 ~ 31 (Effective only in PELCO-P protocol).Net Mode : Serial, Paral (Effective only in VISCA protocol).Baudrate : 2400, 4800, 9600, 19200, 38400.5.10INFORMATIONWhen in main menu page, move the cursor to [Information] and press [HOME] key to confirm to enter the Information page to check the product information.INFORMATIONVersion 9.0.03Model G56.YXDate2022-04-18AF Version7.3.25Select Item Change Value [Menu] ExitThe above information is for reference only,please refer to the real product for the actual specification.5.11RESTORE DEFAULTWhen in main menu page, move the cursor to [Restore Default] and press [HOME] key to confirm to enter the restore default page asbelow.RESTORE DEFAUL TYesNoChange Value [Home] OK [Menu] ExitRestore : Yes, No.When selected “Yes” and confirm with [HOME]key, all parameters will restore to default, include the IR Remote address and VISICA address.GUI menu and parameters are subject to change without notice.6TroubleshootingImage●The monitor shows no image1)Check that the camera power supply is connected, the voltage is normal, and the power indicator is always on.2)Turn off the power switch to check whether the camera is self-testing.3)Check the cable of video platform and TV whether in correct connection.●Image jitters a er the camera is properly connected1)Check that the camera installation position is stable.2)Check that any vibrating machinery or object near the camera.Control●Remote control does not work1)Check and replace with new batteries.2)Check that the camera is in normal workingmode.3)Check the address key of remote control can match the camera.●Serial port cannot control1)Check the protocol, address and bit rate of the camara are consistent.2)Check the control cable is properly connected.079.79.1101XXX_V1.0。
8134453 VTEM Motion Terminal 移动终端说明书
关于本文件............................................................ 7 适用文件.............................................................. 7 产品版本.............................................................. 7
应用参数........................................................... 29 整定参数........................................................... 30 传感器参数......................................................... 30 用于描述自定义驱动器的参数......................................... 31 示教数据........................................................... 32 参数组............................................................. 33 额定值和实际值..................................................... 34 Motion App 之间的等待时间.......................................... 34 PLC 与 Motion Terminal(数字控制终端)之间的通信....................... 34 数字表示........................................................... 35 运行 Motion App 时的过程数据结构................................... 35 输出数据 (PDO) 的结构.............................................. 35 输入数据 (PDI) 的结构.............................................. 37 运行 Motion App.................................................... 38 前提条件........................................................... 39 启动 Motion App.................................................... 39 控制 Motion App.................................................... 40 结束 Motion App.................................................... 40 输出数据无效时的反馈............................................... 40 传输模式........................................................... 41 传输模式下的过程数据结构........................................... 41 有关 Motion Terminal(数字控制终端)状态的信息(信息通道)..........48 输出数据无效时的反馈............................................... 58 永久保存设置....................................................... 59 Motion App #01:方向控制阀功能......................................... 63 功能说明........................................................... 63 必需的传感器....................................................... 63 使用的系统参数..................................................... 63 用于返回终端位置识别的传感器输入((2) 供气,(4) 排气)..............64 用于伸出终端位置识别的传感器输入((4) 供气,(2) 排气)..............64 所用的应用参数..................................................... 65 默认值............................................................. 65 Motion App 的设置 (app option)..................................... 65 Motion App 的控制 (app control).................................... 66 额定值 1 和 2 (setpoint value 1, setpoint value 2)..................70 返回值............................................................. 71 Motion App 的状态 (app state)...................................... 71 实际值 1 和 2 (actual value 1, actual value 2)......................72 示教运行............................................................... 72 启动示教运行的前提条件............................................. 72
易驱CV用户手册
易驱CV用户手册一、产品概述易驱CV是一款高性能的数据转换器,旨在满足用户在各种复杂环境下的数据转换需求。
本产品具有即插即用、方便携带、兼容性强等特点,是专业技术人员和普通用户理想的数据转换工具。
二、产品特点1、高速传输:易驱CV采用最新的USB3.0技术,支持高速数据传输,极大提高了数据转换的效率。
2、全面兼容:本产品兼容多种操作系统,无需安装驱动程序,即可在任何计算机上使用。
3、便携设计:易驱CV采用轻便、耐用的设计,方便用户随时随地使用。
4、稳定可靠:经过严格的质量控制和测试,易驱CV具有高度的稳定性和可靠性,确保数据传输的安全。
三、使用步骤1、将易驱CV插入计算机的USB端口。
2等待系统自动识别并安装驱动程序,如有需要,手动安装驱动程序。
3、在计算机上打开文件管理器,找到并打开易驱CV的存储设备。
4、将需要转换的数据文件复制到易驱CV的存储设备中。
5、完成数据转换后,将转换后的数据文件从易驱CV的存储设备中复制到目标位置。
四、注意事项1、请勿在易驱CV工作时断开连接,以免造成数据丢失或设备损坏。
2、请勿将易驱CV暴露在高温、高湿、多尘的环境中,以免影响其正常工作或缩短使用寿命。
3、请定期对易驱CV进行清理和保养,以保证其良好的工作状态。
4、如遇到任何使用问题或故障,请及时售后服务中心获取帮助。
五、售后服务我们提供全面的售后服务,包括产品咨询、使用指导、故障排除等。
如遇到任何问题,欢迎我们的客服团队,我们将尽快为大家解决。
我们还提供产品保修服务,如产品在正常使用下出现质量问题,我们将免费为大家维修或更换。
vacon变频器用户手册标题:Vacon变频器用户手册一、引言本用户手册旨在为使用Vacon变频器的用户提供详细的使用指南和操作建议。
Vacon变频器是一种广泛使用的电力转换设备,可实现交流电源频率的稳定输出,适用于各种工业和商业应用。
在阅读本手册之前,我们建议用户仔细阅读本手册,并按照指南进行操作,以确保安全和设备正常运行。
CVI2工具使用说明书
第三章 - 初次开机
1 -控制器接收验货单........................................................................................................................................ 2 -安装 .............................................................................................................................................................. 2.1 -电源接线 ........................................................................................................................................... 2.2 -急停接线 ........................................................................................................................................... 2.3 -功率消耗 ........................................................................................................................................... 2.4 -总体尺寸、 重量和紧固类型 ............................................................................................................. 3 -开机 .............................................................................................................................................................. 3.1 -控制屏幕 ......................................................................................................................................... 3.1.1 -TWINCVI II 控制屏幕 ............................................................................................................ 3.1.2 -CVI II 控制屏幕...................................................................................................................... 3.2 -初次开机流程图 ............................................................................................................................... 3.3 -“服务Service”菜单 ..................................................................................................................... 3.3.1 -选择语言 ............................................................................................................................ 3.3.2 -调整对比度 ...................................................................................................................... 3.3.3 -设置日期时间.................................................................................................................. 3.3.4 -访问代码.............................................................................................................................. 17 17 17 17 17 17 18 19 19 20 21 21 21 22 22 22
- 1、下载文档前请自行甄别文档内容的完整性,平台不提供额外的编辑、内容补充、找答案等附加服务。
- 2、"仅部分预览"的文档,不可在线预览部分如存在完整性等问题,可反馈申请退款(可完整预览的文档不适用该条件!)。
- 3、如文档侵犯您的权益,请联系客服反馈,我们会尽快为您处理(人工客服工作时间:9:00-18:30)。
cvim用户手册∗Yang Cheng†2010.8.12cvim是Vim的一个插件,用于支持C/C++的开发。
可以方便的支持插入声明(statements),惯用语法(idioms),代码片段(code snippets),模板(templates)和注释(comments);并且支持语法检查(Syntax checking),编译(compiling)及运行(running)程序,也可以通过按键操作检查和格式化代码。
此插件可同时支持Vim/gVim,但由于gVim中是以菜单(Menus)的形式提供各种功能,故使用起来也很方便,无须多作介绍。
下面仅以Vim来做介绍。
1无GUI界面的用法USAGE WITHOUT GUI(Vim)常见的功能可以通过键盘映射的方式被插入。
这些键映射在文档c-hot-keys.pdf1中描述。
如果需要修改映射的头‘\’,可以通过在.vimrc中设置全局变量(global variable)来修改。
let g:C MapLeader=‘,’这样就映射的头就是‘,’(comma)了。
例如你可以这样用,cl来插入行末的注释。
∗此手册参考VIM的插件cvim的文档写成,该插件是一个C/C++-IDE for Vim/gVim。
本文基于版本version5.10。
†E-mail:ustbyangcheng@1Hint:该pdf中以‘\’开头和后面字符的组合只有在一个short time内才能被识别。
在插入模式下这些映射可以以‘`’(backtick)开头(不过经过试验,貌似也不必如此,直接输入也可以,但速度要快。
)。
读者可以参考该pdf文档,本文下一页就罗列这些key mapping了。
1V IM-P LUGINc-support.vimV ERSION5.10H OT KEYSKey mappings for Vim with and without GUI.Plugin:(i)insert mode,(n)normal mode,(v)visual modeC omments \cl end-of-line comment(n,v,i) \cj adjust end-of-line comment(n,v,i) \cs set end-of-line comment column(n) \c*code⇒comment/**/(n,v) \cc code⇒comment//(n,v) \co comment⇒code(n,v) \cfr frame comment(n,i) \cfu function comment(n,i) \cme method description(n,i) \ccl class description(n,i) \cfdifile description(implementation)(n,i) \cfdhfile description(header)(n,i) \ccs C/C++–file sections(tab compl.)(n,i) \chs H–file sections(tab compl.)(n,i) \ckc keyword comment(tab compl.)(n,i) \csc special comment(tab compl.)(n,i) \cd date(n,v,i) \ct date&time(n,v,i)S tatements\sd do{}while(n,v,i)\sf for(n,i)\sfo for{}(n,v,i)\si if(n,i)\sif if{}(n,v,i)\sie if else(n,v,i)\sife if{}else{}(n,v,i)\se else{}(n,v,i)\sw while(n,i)\swh while{}(n,v,i)\ss switch(n,v,i)\sc case(n,i)\s{\sb{}(n,v,i)P reprocessor\ps choose a Std.Lib.include(n,i)\pc choose a C99include(n,i)\p<#include<...>(n,i)\p"#include"..."(n,i)\pd#define(n,i)\pu#undef(n,i)\pie#if#else#endif(n,v,i)\pid#ifdef#else#endif(n,v,i)\pin#ifndef#else#endif(n,v,i)\pind#ifndef#def#endif(n,v,i)\pi0#if0#endif(n,v,i)\pr0remove#if0#endif(n,i)\pe#error(n,i)\pl#line(n,i)\pp#pragma(n,i)S n ippet\nr read code snippet(n,i)\nw write code snippet(n,v,i)\ne edit code snippet(n,i)\np pick up prototype(n,v,i)\ni insert prototype(s)(n,i)\nc clear prototype(s)(n,i)\ns show prototype(s)(n,i)\ntl edit local templates(n,i)\ntg edit global templates(n,i)\ntr reread the templates(n,i)\nts change templates style(n,i)I dioms\if function(n,v,i)\isf static function(n,v,i)\im main()(n,v,i)\i0for(x=0;x<n;x+=1)(n,v,i)\in for(x=n-1;x>=0;x-=1)(n,v,i)\ie enum+typedef(n,v,i)\is struct+typedef(n,v,i)\iu union+typedef(n,v,i)\ip printf()(n,i)\isc scanf()(n,i)\ica p=calloc()(n,i)\ima p=malloc()(n,i)\isi sizeof()(n,v,i)\ias assert()(n,v,i)\ii open inputfile(n,v,i)\io open outputfile(n,v,i)February2010c-support.vim Page1/2C++ \+co cout<<<<endl;(n,i) \+c class(n,i) \+ps#include<...>STL(n,i) \+pc#include<c..>C(n,i) \+cn class(using new)(n,i) \+ci class implementation(n,i) \+cni class(using new)implementation(n,i) \+mi method implementation(n,i) \+ai accessor implementation(n,i) \+tc template class(n,i) \+tcn template class(using new)(n,i) \+tci template class implementation(n,i) \+tcni template class(using new)impl.(n,i) \+tmi template method implementation(n,i) \+tai template accessor implementation(n,i) \+tf template function(n,i) \+ec error class(n,i) \+tr try...catch(n,v,i) \+ca catch(n,v,i) \+c.catch(...)(n,v,i)R un \rc save and compile(n,i) \rl link(n,i) \rr run(n,i) \ra set comand line arguments(n,i) \rm run make(n,i) \rg cmd.line arg.for make(n,i) \rp run splint1(n,i) \ri cmd.line arg.for splint(n,i) \rk run CodeCheck2(n,i) \re cmd.line arg.for CodeCheck(n,i) \rd run indent(n,i) \rh hardcopy buffer(n,i,v) \rs show plugin settings(n,i) \rx set xterm size(n,i,only Unix&GUI) \ro change output destination(n,i)H elp and Menus\hm show manual(n,i)\hp help(c-support)(n,i)\lcs load Menus(n&GUI only)\ucs unload Menus(n&GUI only)Ex commands:CFileSection C/C++–file sections(same as\ccs)HFileSection H–file sections(same as\chs)KeywordComment keyword comment(same as\ckc)SpecialComment special comment(same as\csc)IncludeStdLibrary standard libraryincludes(same as\ps)IncludeC99Library C99includes(sameas\pc)IncludeCppLibrary STL includes(same as\+ps)IncludeCppCLibrary C includes(sameas\+pc)CStyle C99include(same as\nts)Use tab expansion to show the items tochoose from.2CodeCheck T M is a product of Abraxas Software,Inc.Additional Mappingstyping expansion/*/**/(i)/*/*(multiline)marked text*/(v)/*<CR>/*(i)*|*/{<CR>{(i)|}{<CR>{(v)(multiline)marked text}February2010c-support.vim Page2/22快捷键HOTKEYS下面的快捷键在三种模式下均可使用:F9编译和链接compile and linkAlt-F9保存并编译write buffer and compileCtrl-F9运行run executableShift-F9设置命令参数set command line argumentsShift-F22在源文件和头文件之间切换switch betweensourcefiles and headerfiles为了防止在切换一个源文件时出现新的头文件,可以在.vimrc中包含下面这一行:let g:alternateNoDefaultAlternate=1这样只有存在的头文件才会被打开。
