091027_kyeutd_notworking
okuma报警代码_1089~1945

报警 & 异常列表 (报警 A) 1089PLC给出的报警号超出规定范围。
[代码]XYYYYX:给出的报警级别A->A类报警B->B类报警C->C类报警D->D类报警YYYY:给出的报警号(16进制)1091因为无PLC警告信息文件,报警处理无法进行。
[代码]PLC警告信息文件的装入状态(16进制)1->没有装入任何字符,就接收到结束信号。
3->文件装入过程中,接收到结束信号。
9->指定的设备名出错。
A->指定的文件名出错。
B->文件没有找到。
1092PLC备份数据文件装入失败。
[代码]XXXXYYYYXXXX->备份过程的错误状态YYYY->备份循环的编号1093因为PLC没有备份数据文件,备份处理无法进行。
[代码]PLC备份数据文件的装入状态(16进制)1->没有装入任何字符,就接收到结束信号。
3->文件装入过程中,接收到结束信号。
9->指定的设备名出错。
A->指定的文件名出错。
B->文件没有找到。
100->PLC的机床类型错误200->PLC级别错误300->文件的版本错误1094PLC备份数据文件不能从存储器中读出。
[代码]XXX2->文件打开错误(没有文件)3->文件读入错误(没有数据)4->文件属性错误(不是‘PBU1’)5->文件关闭错误6->文件大小错误(文件小)7->文件大小错误(文件大)100->PLC的机床类型错误。
200->PLC的级别错误。
300->文件的版本错。
1097在加工方式保护关闭时检查安全速度监视处理时,在指定的时间内,安全速度监视错误信号一次也没有打开。
或者,告知NC在并不存在的加工调整测试方式。
[代码]X1->在加工方式保护关闭时检查安全速度监视处理时,在指定的时间内,安全速度监视错误信号一次也没有打开。
R U U 刷机工具错误代码的中文翻译
注: 在这个状况下, 已写入设备的内容被毁坏(?); 反之, 它是在正常的升级方式下运行。
ERROR [264, 274] : CONNECTION*连接错误
这个错误信息意味着由于未知的错误您的ROM镜像无法在手机上读取运行。请下载全部RUU程序 并再尝试。
ERROR [240] : FILE OPEN*文件打开错误
When this error message appears, check whether the downloaded image is placed in the directory of RUU. If, for some unknown reason, you find that the ROM image is not located in the RUU folder, you have to download the RUU and retry again.
当您看到这条信息,清关闭您计算机上运行的其他程序,然后再尝试RUU更新程序
ERROR [208] : FILE OPEN*文件打开错误(?)
ERROR [210] : FILE READ*文件读取错误(?)
These error messages indicate that RUU lacks certain important files and cannot continue with the update. Please get the complete RUU package again.
这个错误信息将出现您使用不正确RUU版本(连接软件?)升级。
Ghost所有运行错误代码

Ghost所有运行错误代码Ghot所有运行错误代码完全大揭秘使用Ghot时,发生错误,Ghot会返回一个错误代码给用户,很多人并不知道代码的意思。
现在把它们一一列出,供大家在使用中参考,以做到对症下药,排除故障。
错误代码:10000原因或对策:不正确的路径/文件语法。
请确保路径及文件名是否正确,同时确定如果你正在网络上建立映像文件你是否有写权限。
错误代码:10001原因或对策:使用者放弃了操作。
错误代码:10060错误代码:10082原因或对策:Ghot的共享版本已过期,必须购买才能够使用。
错误代码:10170原因或对策:拒绝检查映像文件或磁盘。
请使用更新的版本以解决此问题。
错误代码:10180原因或对策:硬盘没有响应。
请检查电缆线、电源连接、跳线及基本输出入单元(BIOS)设置。
确定你的系统已经由FDISK给硬盘正确分了区。
错误代码:10210原因或对策:无效的扩充分区信息,可能你的硬盘分区已经被硬盘压缩软件压缩。
如果它们是由此类型的驱动器所控制,Ghot无法完全将硬盘定位。
请先把分区解压缩,再执行Ghot程序。
错误代码:10220原因或对策:返回这个错误代码,是因为你正在Window的Do窗口下执行Ghot程序。
请试着在纯DOS下使用Ghot,最好用DOS盘启动机器,然后再执行Ghot程序。
错误代码:10600原因或对策:Ghot无法适当地继续由于缺乏内存,请参阅下面15040错误代码。
错误代码:11000原因或对策:无效的备份映像文件,请重新指定备份映像文件。
错误代码:12080原因或对策:一般是企图在网络之上克隆磁盘对磁盘所致。
Ghot仅仅能够通过NetBIOS协议在网络上进行磁盘对磁盘克隆操作。
错误代码:12090原因或对策:读取或写入硬盘发生错误,请尝试先扫描硬盘,并修复操作再执行Ghot。
错误代码:14030原因或对策:未注册的Ghot版本遭遇文件的日期超过它的终止日期,请购买新的Ghot版本。
Atlas错误代码

Atlas错误代码E001-E009 0 拧紧操作失败E100-E199 1 事件相关错误E200-E299 2 ⽤户输⼊事件E300-E399 3 统计事件E400-E499 4 通信事件E500-E599 5 硬件事件(⼯具)E600-E699 6 硬件事件(DC3000/MC3000)E700-E799 7 硬件事件E800-E899 8 软件事件E900-E999 9 事件MMI3000事件代码E003 扭矩测量值可能⽆效编程错误。
请检查程序并保证在第⼆操作阶段套筒转动过。
E102 由于参数lock on reject,拧紧操作被禁⽌当参数lock on reject[C130]设置为禁⽌拧紧操作,则欲进⾏⼀个拧紧操作时会显⽰此事件代码.E103 通过数字输⼊锁定⼯具⼯具通过数字输⼊被锁定。
——实际紧固位置与设定位置不同E107 由于采⽤线体控制⽽未打开批处理功能,拧紧操作被禁⽌若选择使⽤⽣产线控制⼀个⼯作,则当收到⼀个⾏控制起动信号时,⼯作才启动。
E112 重复拧紧重复拧紧⼀个已经拧紧过的螺拴E113 电流达到极限,退出拧紧操作当电流超过极限时,驱动器被禁⽌使⽤。
E117 ⼯具锁定-不能访问RBU Power Focus不能与RBB之间进⾏通信,且必须重启保护数据。
E120 电机调整失败电机调整失败。
可能是在电机调整完成以前释放了扳机或⼯具产⽣故障。
E121 开⼝调整失败此事件表明开⼝调整命令未能成功地执⾏。
E125 超时警报或扭矩丢失警报当在Pset中启动超时报警功能,此事件代码表明由于超时拧紧操作退出。
此警报启动表明引起拧紧操作退出的基本原因是超时。
E126 多步拧紧操作退出此事件表明当前运⾏的多步拧紧未完全执⾏(在拧紧操作完成前驱动器被关闭或⼯具扳机被释放)。
E127 PVT关闭此事件表明在⾃攻中或拧紧操作的现⾏阶段驱动被关闭E128 扳机过早释放当在Pset中启动扳机释放功能时,此事件表明⼯具扳机在拧紧操作达到最终⽬标以前被释放E129 扭矩低于⽬标值当在Pset中启动“扭矩低于⽬标值”功能时,此事件表明扭矩结果值低于最终⽬标值,即使扭矩结果值⼤于最终扭矩最⼩值,扭矩状态也是NOK。
KDS USB FW Update User Manual
111-38-URM-011KDS USB FW UpdateUser ManualKDS USB FW Update 111-38-URM-011Table of Contents1. Introduction (3)2. Process under Microsoft Windows (4)3. Process under Mac OS (5)KDS USB FW Update 111-38-URM-0111. IntroductionThe Epson Kitchen Display System (henceforth KDS) is preferably updated using the KDS Utility. However, an alternate update method using a USB flash drive can be employed as fallback if required, and is typically faster than with the KDS Utility, albeit at the cost of losing any configuration from the KDs device. This document describes the typical process to set up a USB flash drive for the firmware update.The same firmware update process is used for printers and controllers (henceforth called display box). Once set up, the USB flash drive can be used to sequentially update multiple devices.IMPORTANT NOTES:i. Before you proceed, note that updating the KDS using this method erases allconfiguration from the target device(s). The KDS Utility may be used to re-configure the system.ii. There are certain flash drives that may not work with this method and would fail the update process verification step in the procedures. Some models tested include:a. Kingston DataTraveler 8GB/16GBb. Transcend JetFlash V70 16GBc. Axiom Stealth 2 USBFD2 2GBd. SanDisk Cruzer Dial USB 16GBe. Misc. brands like AData, Samsung, Verbatim, Sony etc. USB 2.0 flash drivesKDS USB FW Update 111-38-URM-0112. Process under Microsoft WindowsThe following process has been verified under Microsoft Windows 7 and Windows 10. Most failures with the method can be attributed to user permissions (inability to modify USB flash drive) incompatible or corrupted USB flash drives.Here are the basic instructions for flashing the printer/display box FW:1. Get a USB flash drive of 1GB or more with no contents you care about, as everything on it will beerased.2. Plug the USB flash drive into a Windows PC.3. Run dd_win.exe (provided in the firmware update package)o Click on “File select…” and browse to the file “usb_boot_image_v26.ubi”o Click on “Drive select…” and specify the drive letter of the USB sticko Hit 'Run' and wait until completed.4. ***IMPORTANT*** Safely eject the USB flash drive from Windows, then unplug it, wait a fewseconds, then plug it back in again.5. Unzip the “KDS Image.zip” file onto the USB flash drive. The final layout of the USB stick should be:\|- autooperation|- uImage|- BOOT.BIN|- images\|-- control.tar.gz|-- hibdrv|-- hibernation|-- hibernationinfo|-- rootfs|-- uImage|-- writable-region6. Eject the USB stick from the PC again.7. Label the USB stick with ‘KDS Image’ to indicate what image is on it in case it is requ ired for otherdisplay boxes/printers or in future.Follow these instructions for each printer/display box that needs to be updated:1. With the printer/display box turned off, plug the USB flash drive into the Interface card at the back.2. Use a pen or paper clip to press the button on the BACK of the printer/display box, and keep itpressed while turning the board on. Keep holding the button down for three or four seconds until the LED near the button goes out.3. The LED light will then show orange for about 45 seconds, and then green for about 5 seconds, thenflash orange for about 60 seconds. Once the FW update is complete, the LED will flash green.4. Turn off the printer.5. Remove the USB flash drive from the back.6. Turn the printer/display box back on and wait for it to boot up; the LED on the back turns solid green.The KDS splash screen will show the new FW version on the attached monitor.7. The system should be ready to go.KDS USB FW Update 111-38-URM-0113. Process under Mac OSThe following process has been verified under Mac OS 10 and 11. Most failures with the method can be attributed to user permissions (inability to modify USB flash drive) incompatible or corrupted USB flash drives.Here are the basic instructions for flashing the printer/display box FW:1. Save the firmware update package (which includes the file usb_boot_image_v26.ubi) in the Desktopor Downloads folder.2. Get a USB flash drive of 1GB or more with no contents you care about, as everything on it will beerased. Do NOT plug it in yet.3. On the Mac, open a new terminal (iTerm).4. Type the command “diskutil list”to get the current list of devices.5. Now plug the USB flash drive into the Mac.6. Type the command “diskutil list”again and note the additional device, which is the USB flashdrive (e.g. /dev/disk2).7. Type the command “diskutil unmountDisk /dev/diskX”, where X is the number from Step 5.8. Type the following command:sudo dd if=$(find ~ -name usb_boot_image_v26.ubi | head -n 1) of=/dev/diskX bs=1m(again, substitute the X in the command with the number you learned from Step 5.)Please note:i. The command above will ask for the user (or administrator) password once; this is normal.ii. The command, when run for the first time, will trigger several pop-up dialogs requesting access to some folders. See Figure 3.1.iii. The command will output several lines with the text “Operation not permitted” when trying to search certain inaccessible folders; this is normal.Figure 3.1: Mac OS pop-ups requesting user permission to access some folders.(c ontinued…)KDS USB FW Update 111-38-URM-0119. ***IMPORTANT*** Safely eject the USB stick from the Mac, then unplug it, wait a fewseconds, then plug it back in again.10. Unzip the KDS Image.zip file into USB stick. This means the final layout for the USB stick should be:\|- autooperation|- uImage|- BOOT.BIN|- images\|-- control.tar.gz|-- hibdrv|-- hibernation|-- hibernationinfo|-- rootfs|-- uImage|-- writable-region11. Eject the USB stick from the Mac again.12. Label the USB stick with ‘KDS Image’ to indicate what image is on it in case it is required for otherdisplay boxes/printers or in future.Follow these instructions for each printer/display box that needs to be updated:1. With the printer/display box turned off, plug the USB flash drive into the Interface card at the back.2. Use a pen or paper clip to press the button on the BACK of the printer/display box, and keep itpressed while turning the board on. Keep holding the button down for three or four seconds until the LED near the button goes out.3. The LED light will then show orange for about 45 seconds, and then green for about 5 seconds, thenflash orange for about 60 seconds. Once the FW update is complete, the LED will flash green.4. Turn off the printer.5. Remove the USB flash drive from the back.6. Turn the printer/display box back on and wait for it to boot up; the LED on the back turns solid green.The KDS splash screen will show the new FW version on the attached monitor.7. The system should be ready to go.KDS USB FW Update 111-38-URM-011This page intentionally left blank.KDS USB FW Update 111-38-URM-011。
IBM错误代码解释以及解决方法

IBM错误代码解释以及解决方法在使用IBM产品或服务的过程中,有时可能会遇到各种错误代码。
这些错误代码可能涉及到不同的问题,需要我们仔细检查和解决。
在本文中,我们将解释一些常见的IBM错误代码,并提供相应的解决方法。
1. 500 - Internal Server Error(内部服务器错误)这个错误代码表示服务器遇到了一个无法处理的问题。
可能的原因包括服务器配置错误、网络连接问题或应用程序错误。
解决方法包括:-检查服务器配置文件,确保配置正确。
-检查网络连接是否正常,尝试重启网络设备。
-使用日志文件来查找潜在的应用程序错误,并修复相应的代码。
2. 404 - Not Found(未找到)这个错误代码表示请求的资源在服务器上不存在。
可能的原因包括文件被误删除、链接错误或服务器配置问题。
解决方法包括:-检查请求的资源是否存在于服务器上。
如果不存在,可以尝试恢复文件或重新上传文件。
-检查链接是否正确。
如果链接错误,可以尝试修复链接或更改链接地址。
-检查服务器配置文件,确保资源的路径和文件名称正确。
3. 403 - Forbidden(禁止访问)这个错误代码表示服务器拒绝了对请求资源的访问。
可能的原因包括权限不足、IP地址被拦截或访问规则被禁止。
解决方法包括:-检查访问权限,确保用户有足够的权限来访问资源。
-检查IP地址是否被服务器拦截。
如果是,则可以尝试解除拦截或添加到允许访问列表。
-检查访问规则,确保没有禁止访问请求资源的规则。
4. 502 - Bad Gateway(网关错误)这个错误代码表示作为代理或网关的服务器从上游服务器接收到了一条无效的响应。
可能的原因包括上游服务器故障、网络连接问题或配置错误。
解决方法包括:-检查网络连接是否正常。
如果网络连接有问题,可以尝试重启网络设备或使用其他网络连接。
-检查代理或网关服务器的配置文件,确保配置正确。
5. 503 - Service Unavailable(服务不可用)这个错误代码表示服务器当前无法处理请求,可能是因为过载或维护。
IBM启动故障错误代码大全
Symptom / Error (开机错误代码)FRU / Action in Sequence(检查范围及解决方法)10X101: Interrupt failure;(中断故障)102: Timer failure;(计时器故障)103: Timer interrupt failure;(计时器中断故障)104: Protected mode failure;(保护模式故障)105: Last 8042 command not accepted;107: NMI test failure;(NMI 测试失败)108: Timer bus test failure.109: Low meg-chip select test. 1. System board. (主板问题)110(Planar parity.) (内存奇偶校验出错)1. Go to Memory Checkout2. DIMM card.3. Detach the expansion unit if it is attached to the computer.4. System board.111(I/O parity.) 1. Go to Memory Checkout2. Expansion unit or port replicator.3. System board.11XX1101: Serial_A test failure.(A 串行口测试失败)1. Serial device (串行设备)2. Communication cable (相关通讯电缆)3. System board (主板)12XX1201: Serial_B test failure.(B 串行口测试失败)1. System board (infrared) (检查主板:红外线口)158(Hard disk password was not set even though the supervisor password is set.) (超级用户密码已设,但硬盘密码没有设置) 1. Set the password for hard disk drive.(设置硬盘密码)159(Hard disk password is not set the same as the supervisor password.) (硬盘密码与超级用户密码不一样) 1. Set the correct password for hard disk drive.(设置正确的硬盘密码)161(Dead battery.) (CMOS 电池不行)1. Go to Checking the Backup Battery2. Backup battery.(CMOS 备份电池,在内存插槽旁边)3. System board. (主板)163(Time and date were not set.) (系统时间没有设好或混乱)1. Set time and date.(设置正确的系统时间)2. System board. (主板问题)173(Configuration data was lost.) (CMOS 设备配置信息丢失)1. Select OK in the error screen; then set the time and date.(在开机ERROR 画面上按OK,然后设置系统时间)2. Backup battery. (CMOS 电池需要更换)3. System board. (主板问题)174(Configuration error: Perform Checking the Installed Devices List before changing any FRUs.) 1. Check device configuration.2. Hard disk drive assembly.3. System board.175, 177, 178175: EEPROM CRC #1 error.177: Supervisor password check sum error.178: EEPROM is not functional. 1. System board. (检查主板)17XX1701: Hard disk controller failure. (硬盘控制器故障)1780, 1790: Hard disk 0 error. (主硬盘有问题)1781, 1791: Hard disk 1 error.(从硬盘有问题)1. Hard disk drive (检查硬盘)2. System board (检查主板)183(Incorrect password entered at the supervisor password prompt.) (超级用户开机密码不对)1. Have the user examine the password.(请用户检查密码)184(Power-on password check sum error.) (Power-on 密码有误)1. Reset the power-on password in Easy-Setup.(重设Power-on 密码)185(The startup sequence is not valid. Suspect that power was off when the startup sequence was being updated.) (系统启动顺序无效,怀疑是更新启动顺序时电源关掉)1. Reset the startup sequence in Easy-Setup.(在Easy-Setup 重设启动顺序)186 1. System board. (检查主板)190(A depleted battery pack was installed when the power was on.)(开机时,机内笔记本电池已快耗尽了) 1. Go to Checking the Battery Pack.(更换机内笔记本电池)191XX(PM initialization error.) (PM 初始化错误)1. System board. (检查主板)192(Fan error.) (CPU 散热风扇故障)1. Measure the voltage of the backup battery. If thevoltage is not correct, replace the backup battery.(检查CMOS 备份电池的电压,电压不行时更换电池)2. Fan (要更换CPU风扇)3. System board (主板问题)195(The configuration read from the hibernation area does not match the actual configuration.) (从休眠区域读到的系统配置信息与实际配置不同)1. Check if the configuration was changed. For example, check if the DIMM card is added.(检查配置是否改动,内存有无增加等)196(A read error occurred in the hibernation area of the hard disk drive.)(从硬盘的休眠区域中读写时,发生错误)1. Run the hard disk drive test. (测试硬盘)2. Hard disk drive.(检查硬盘)199XX(Resume error.) 1. System board.1XX 1. System board.2XX (内存问题)201: Memory data error.202: Memory line error 00-15.203: Memory line error 16-23.205: Memory test failure on on-boardmemory.221: ROM to RAM remap error. 1. Go to Memory Checkout.2. DIMM card.3. System board.225(Unsupported memory module.) 1. Check if the supported DIMM is installed.2. DIMM card.3. System board.301, 303, 304, 305, 3XX(301: Keyboard error.) (笔记本键盘故障,301这个故障经常出现,往往是笔记本刚开机时,不小心按住键盘所造成的,一般只要重启电脑即可;) 1. Go to Keyboard or Auxiliary Input Device Checkout2. Keyboard.3. External numeric keypad.4. External keyboard.5. Keyboard/mouse cable.6. System board.601, 6XX(601: Diskette drive or controller error.)(软驱或软驱控制器故障)1. Go to Diskette Drive Checkout.2. Diskette drive assembly. (软驱有没有装配好?)3. Diskette.4. System board. (检查主板)602(Diskette read error.);(软驱读故障)1. Go to Diskette Drive Checkout2. Diskette.3. Diskette drive assembly.(软驱有没有装配好?)604(Unacceptable ID was read from the diskette drive.);1. Go to Diskette Drive Checkout2. Diskette drive assembly.3. System board.2402 1. TV Out Card24XX(2401: System board video error.) ;(主板显示部分有问题)1. System board. (检查主板相关部分)808X8081: PCMCIA presence test failure.(PCMCIA revision number also checked.)8082: PCMCIA register test failure. 1. PC Card slot assembly.2. PCMCIA device.3. System board.860X(Pointing device error when TrackPoint is disabled.)(当指点杆禁用时,外接的指点设备有故障);8601: System bus error-8042 mouse interface.8602: External mouse error.(外接鼠标故障);8603: System bus error or mouse error. (总线或鼠标故障);1. External mouse. (检查外接鼠标);2. External keyboard. (检查外接键盘);3. System board.(检查主板);861X(Pointing device error when TrackPoint is enabled.)(当指点杆启用时,外接的指点设备有故障);8611: System bus error-I/F between 8042 and IPDC.8612: TrackPoint error.8613: System board or TrackPoint error. 1. Reseat the keyboard cable on the sub card.(把键盘连接主板的线,重插拔一下);2. Keyboard (检查键盘);3. External mouse (检查外接鼠标);4. Sub card (主板上连接键盘的子卡);5. System board (主板);I9990301I9990302I9990305I9990301: Hard disk error. (硬盘有故障);I9990302: Invalid hard disk boot record. (无效的硬盘引导纪录);I9990305: No bootable device. (无可用的启动引导设备);1. Check that the operating system is installed in the hard disk drive. If not, install the operating system.(检查硬盘上有否安装操作系统);2. Reseat the boot device.(重新设置可启动的设备);3. Check the startup sequence for the correct boot device.(检查启动顺序是否跟设备正确对应);4. Check that the operating system has no failure and is installed correctly.(检查电脑的操作系统是否安装正确);I9990303(Bank-2 flash ROM check sum error.) 1. System board.Other codes not listed above. 1. Go to Undetermined Problems。
黑莓手机所有软硬件错误代码中译参考
黑莓手机所有软硬件错误代码中译参考现在国内使用黑莓手机的玩家是越来越多了,但很多玩家在使用的过程中遇上了一些错误提示时不明白提示的内容。
下面小编就提供从网络上收集到的黑莓BlackBerry 手持设备所有软/硬件在使用过程中出现的错误提示代码的翻译参考资料及部分问题的解决办法。
下列表格将列出在BlackBerry手持设备上java虚拟机可能出现的错误代码和详细信息!101 Previous startup failed当jvm启动过程中,前一个启动的项目失败了,设备已经被重置。
这个错误表明jvm在启动时找到“启动进行中”这个标志位已经设置了,当前屏幕信息为:有意停止“系统继续重置”这个死循环,来纠正系统当前不正确的启动操作102 Invalid code in filesystem在文件系统中发现无效的代码。
手持设备的系统检查.cod文件的变动时,在一些.cod文件中检测到这个问题。
他肯可能是表明生成过程中发生了错误,即在cod文件中存在一个有问题的签名。
如果一些用户操作设备导致这个问题的发生,文件系统的代码被破坏,复位的周期将是连续循环的。
唯一的恢复方法是擦去设备并且恢复一个新的系统。
103 Cannot find starting address找不到启动的地址,用于启动系统的引导cod文件找不到。
这个错误表明一个用于引导系统的cod文件没有安装到设备上,或者格式不正确。
104 Uncaught:非预期:《java模块名》jvm诊断出一个非预期的java代码异常错误抛出,程序可以继续执行,或者手持设备可以用桌面管理器连是USB线安装一个程序调试器来查看这些错误信息。
事件日志里应该包含了异常错误的信息105 Example, DbRecSize( %d ) -> %d举例,DbRecSize( %d ) -> %d文件系统API已经为一种特定的操作返回一种错误状态码,他可能表明在jvm上存在一个无效的或者错误的文件系统106 Graphics system error图形系统错误,在设备的图形系统里一个错误发生并被检测到107 operator new() called在jvm里,操作new()回调一个c++类,该函数代码没有被正确的从VMRamObject 对象来继承,新操作符需要被正确的继承。
MTK平台HDT故障代码表
ERROR_CODE_BACKUP_DATA_FAIL,(备份数据失败) ERROR_CODE_LOCK_OTP_FAIL=55, ERROR_CODE_SECU_CHECK_FAIL, ERROR_CODE_INVALID_TPVER, ERROR_CODE_INVALID_FLASHID,(FLASH ID无效) ERROR_CODE_LOCK_SW_FAIL, ERROR_CODE_DWL_FORBIDDEN_FAIL=60, ERROR_CODE_PREFORMAT_FAIL, ERROR_CODE_OTP_SIMLOCK_FAIL,(锁卡标识位与软件不符) ERROR_CODE_INVALID_SRVER, ERROR_CODE_INVALID_TRVER, ERROR_CODE_INVALID_BUTVER=65, ERROR_CODE_INVALID_EXTBUTVER, ERROR_CODE_INVALID_DPVER,
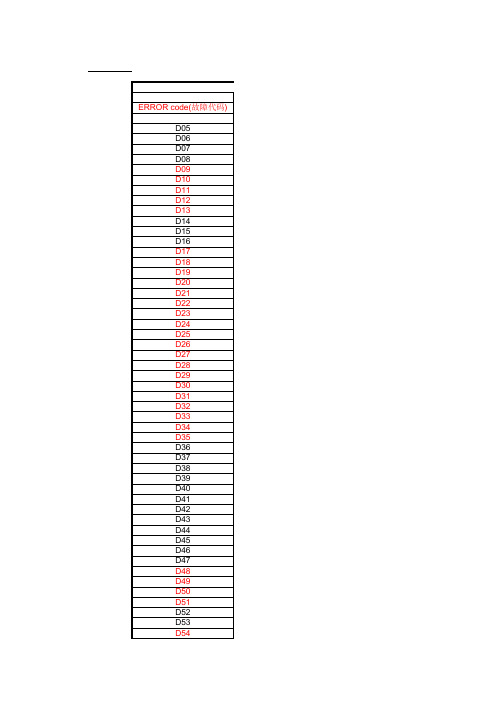
HDT(B) ERROR code ERROR code(故障代码) D05 D06 D07 D08 D09 D10 D11 D12 D13 D14 D15 D16 D17 D18 D19 D20 D21 D22 D23 D24 D25 D26 D27 D28 D29 D30 D31 D32 D33 D34 D35 D36 D37 D38 D39 D40 D4 D49 D50 D51 D52 D53
D54 D55 D56 D57 D58 D59 D60 D61 D62 D63 D64 D65 D66 D67
HDT(B) ERROR code Description(描述) ERROR_CODE_SETPRODNAME_FAIL=0x5, ERROR_CODE_COMCONF_FAIL, ERROR_CODE_SETSCATTERFILE_FAIL, ERROR_CODE_SETERASEMODE_FAIL, ERROR_CODE_ONTERMINAL_FAIL,(打开通讯端口失败) ERROR_CODE_READ_TRACE_FAIL=10,(读机头TRACE信息失败) ERROR_CODE_INVALID_INDREF,(3DS号与软件要求不符) ERROR_CODE_INVALID_SC_OR_ICS,(PCB短码或ICS与软件要求不符) ERROR_CODE_INVALID_COLOUR,(3DS号中的颜色信息与软件要求不符) ERROR_CODE_INVALID_MSITE, ERROR_CODE_INVALID_PRODDATE=15, ERROR_CODE_INVALID_PCBASER, ERROR_CODE_INVALID_PTM,(机头硬件与软件要求不符) ERROR_CODE_INVALID_PTS,(机头mini软件版本与软件要求不符) ERROR_CODE_INVALID_TESTHISTORY,(机头测试历史与product中的检测项不符) ERROR_CODE_READ_BDADDR_FAIL=20,(读蓝牙地址失败) ERROR_CODE_READ_IMEI_FAIL,(读取IMEI失败) ERROR_CODE_GET_IMEI_FAIL,(获取IMEI失败) ERROR_CODE_LACK_IMEI_FAIL,(IMEI缺乏) ERROR_CODE_WRITE_IMEI_FAIL,(写IMEI失败) ERROR_CODE_CHECK_WRITE_IMEI_FAIL=25,(核对写IMEI失败) ERROR_CODE_WRITTEN_IMEI_MISMATCH,(机内IMEI与软件要求TAC、FAC不符) ERROR_CODE_INVALID_IMEI,(无效的IMEI) ERROR_CODE_RESIGN_IMEI_FAIL,(重新标记IMEI失败) ERROR_CODE_DOWNLOAD_FAIL,(下载失败) ERROR_CODE_DOWNLOAD_META_FAIL=30,(下载META失败) ERROR_CODE_GET_BDADDR_FAIL,(获取蓝牙失败) ERROR_CODE_LACK_BDADDR_FAIL,(蓝牙缺乏) ERROR_CODE_WRITE_BDADDR,(写蓝牙失败) ERROR_CODE_WRITTEN_BDADDR_MISMATCH,(机内蓝牙与软件要求不符) ERROR_CODE_CHECK_WRITE_BDADDR=35,(核对写蓝牙失败) ERROR_CODE_INVALID_COMMREF, ERROR_CODE_INVALID_SWLEV, ERROR_CODE_INVALID_BENCHNAME, ERROR_CODE_INVALID_ASTEC_DATA, ERROR_CODE_INVALID_MCVER=40, ERROR_CODE_INVALID_LPVER, ERROR_CODE_INVALID_CPVER, ERROR_CODE_INVALID_SPVER, ERROR_CODE_INVALID_SECUVER, ERROR_CODE_INVALID_JTVER=45, ERROR_CODE_INVALID_SCATTVER, ERROR_CODE_INVALID_RPVER, ERROR_CODE_WRITE_TRACE_FAIL,(写TRACE失败) ERROR_CODE_CHECK_WRITE_TRACE_FAIL,(核对写TRACE失败) ERROR_CODE_WRITTEN_TRACE_MISMATCH=50,(机内TRACE与软件要求不符) ERROR_CODE_OFFTERMINAL_FAIL,(关闭通讯端口失败) ERROR_CODE_RF_COMM_FAIL, ERROR_CODE_COMM_DATA_FAIL,
IBM错误代码表

0200硬盘错。
该硬盘非工作中。
∙重新安装该硬盘(拆卸)∙在BIOS设置工具中恢复缺省设置∙硬盘驱动器∙系统主板021x 键盘错∙运行交互式的键盘和辅助输入设备的测试0220监视器类型错误。
监视器类型与CMOS定义的不匹配.∙在BIOS设置工具中恢复缺省设置0230映射内存错。
映射内存在offsetnnnn出错.∙系统主板0231系统内存错。
系统内存在offset nnnn出错.∙内存∙系统主板0232扩展内存错。
扩展内存在offset nnnn出错.∙内存.∙系统主板0250系统电池错-- 系统电池损坏∙更换备用电池,运行IBM BIOS 设置工具重置日期和时间。
0251系统CMOS 校验错--缺省设置使用∙更换备用电池,运行IBM BIOS 设置工具重置日期和时间。
0252密码校验错-- 密码被清除∙进入IBM BIOS设置工具清除密码(Reset)0260系统时间错∙更换备用电池,运行IBM BIOS 设置工具重置日期和时间。
∙系统主板0270实时时钟错∙更换备用电池,运行IBM BIOS 设置工具重置日期和时间。
∙系统主板0271日期和时间错。
计算机有日期或时间未设置。
∙运行IBM BIOS设置工具重置日期和时间0280启动不完整错误-- 缺省设置使用∙进入IBM BIOS 设置工具恢复缺省设置∙内存.∙系统主板02B2驱动器A不正确∙磁盘驱动器∙外接软盘驱动器∙I/O 卡02F4EISA CMOS 不可写入∙进入IBM BIOS 设置工具恢复缺省设置∙更换备用电池∙系统主板02F5内存测试失败∙内存.∙系统主板02F6软件 NMI失败∙内存.∙系统主板02F7Fail-safe timer NMI 失败∙内存.∙系统主板1801接上的坞站不支持∙关闭电脑然后移开它1802未经授权的网卡插入--装机然后移除miniPCI网卡∙移除miniPCI网卡. ∙系统主板。
磁盘检测
如果我们意外断电或者非正常关机,则下次重启windows时会被要求检测硬盘,蓝色的界面,一大堆的英文字母。如果能顺利通过也就罢了。我就碰到一个情况,它要求检测H:盘,我允许了,结果0%,怎么也止开机自检硬盘:
运行Regedit,进入注册表然后找到下面的键值:
这里的E是表示盘符。这里的utocheck autochk /k:E *是表示不检测E盘。
其中我一不小心,将BootExecute的键值也删除了,于是,在开机时出现“au program not found—skipping AUTOCHECK”,解决方法:在注册表中增加相关的键值
BootExecute——它位于注册表中〔HKEY_LOCAL_MACHINE\\System\\ControlSet001\\Session Manager\\〕下面,有一个名为BootExecute的多字符串值键,它的默认值是"autocheck autochk *",用于系统启动时的某些自动检查。这个启动项目里的程序是在系统图形界面完成前就被执行的,所以具有很高的优先级。
HKEY_LOCAL_MACHINE\SYSTEM\CurrentControlSet\Control\Session Manager 再找到右边
这个值:BootExecute把里面的数据全部删除,这样就可以彻底禁止重启的时候运行磁盘扫描程序。
不过也可以改参数,把BootExecute里面的autocheck autochk * 改成autocheck autochk /k:E *
windows有自带的硬盘扫描程序
在开始-运行里输入cmd
然后输入chkdsk x:就会扫描硬盘,如果有报错的话就改为chkdsk x:/f
IBM报错代码及解决方法

IBM报错代码及解错误代码解释<T40>2010HDD与机器不匹配(微码)0271、0251时间错,sys tem,com check svm bad0175CRCI错,停止了POST任务,EEPROW检验出错8011、8611键盘报错0189码片与BIOS资料不符合1802、1803未经授权的网卡插入0190Criticallpow batter terror锁头BIOS+码片Power on password 开机口令Super user password 超级用户口令HARD DISK password HDD密码1801接上的扩展坞不支持FAN ERROR风扇报错184开机密码检验错误0196安全硬件被移除0193RF ANTENNA HAS……012X键盘报错0188解除方法同0175Termal Sensing error热感应错误(Hard disk drive) initialization error (1)码及解决方法解决方案T43刷更低版本的BIOS,让HDD与之相匹配时间报错,更改时间,更改CMOS电池,再不行就要修时钟电路0175解密狗→码片→BIOSK/B坏,K/B未插,启动过程中某键被压住刷码片/BIOS取下网卡(非集成)→系统→运行→CMD→JMP 1802 <详见前期资料>电池有问题,拔掉电池有问题,则H8坏刷码片+BIOS刷码片+BIOS硬盘解密移除清洁更换风扇进BIOS重设不行就重刷码片进BIOS--CONFIG--IBM SECURISY CHIP--CLEAR IBM SECUFISY CHIP--OK 保存退出进BIOS--设置RF无线为DISABLE时间报错,更改时间,更改CMOS电池,再不行就要修时钟电路更换H8。
ruking伺服驱动器代码大全

ruking伺服驱动器报警代码
ruking伺服驱动器报警代码如下:
1、A.020:参数和校验异常(伺服单元内部参数的数据异常)
2、A.021:参数格式异常(伺服单元内部参数的数据格式异常)
3、A.022:系统和校验异常(伺服单元内部参数的数据异常)
4、A.024:系统警报(伺服单元内部程序发生异常)
5、A.025:系统警报(伺服单元内部程序发生异常)
6、A.030:主电路检出部异常
7、A.040:参数设定异常(超出设定范围)
8、A.042:参数组合异常
9、A.04A:参数设定异常
10、A.050:组合错误(在可组合的电机容量范围外。
)
11、A.051:产品未支持警报
12、A.070:电机类型变更检出(连接与前次连接电机不同类型的电机)
13、A.080:线性编码器光栅尺节距设定异常
14、A.0b0:伺服ON指令无效警报
15、A.100:过电流检出(功率晶体管过电流或散热片过热)
16、A.101:电机过电流检出(电机中流过超出容许电流的电流)
17、A.300:再生异常
18、A.320:再生过载
19、A.330:主电路电源接线错误(主回路电源接通时检出)
20、A.400:过电压(伺服单元内部的主回路电源部检出过电压)
21、A.410:欠电压(伺服单元内部的主回路电源部检出欠电压)。
worker exited prematurely signal9 -回复
worker exited prematurely signal9 -回复[worker exited prematurely signal9]在计算机科学中,信号是用于与操作系统进行通信的一种机制。
常见的信号之一是"SIGKILL",又称为信号9(signal9),它表示终止进程。
当一个进程收到SIGKILL信号时,它将立即终止执行并退出。
然而,有时候进程会出现"worker exited prematurely signal9"的消息,表示进程提前退出了。
本文将详细探讨这个问题,并提供解决方案。
一、什么是"worker exited prematurely signal9"错误?当一个进程非正常退出并收到信号9时,系统会输出"worker exited prematurely signal9"的错误消息。
这通常发生在以下情况下:1. 内存错误:进程试图访问未分配给它的内存区域,导致操作系统强制终止进程。
2. 无限循环:进程可能进入了一个无限循环,无法正常退出。
3. 资源不足:进程可能由于资源不足而被系统强制终止,例如文件句柄或内存不足。
二、如何解决"worker exited prematurely signal9"错误?1. 检查代码逻辑:首先,检查代码并确保没有无限循环或其他可能导致进程异常退出的逻辑问题。
使用调试器和日志记录来帮助定位问题,并尽可能详细地分析代码。
2. 检查内存使用:内存错误是最常见的导致signal9错误的原因之一。
使用工具如Valgrind可以帮助检查内存泄漏和越界访问等问题。
确保分配和释放内存的操作正确无误。
3. 检查资源限制:在一些情况下,操作系统强制终止进程是因为它超过了系统分配给它的资源限制。
检查进程使用的文件句柄、内存和其他资源,并确保在合理范围内使用。
尽量避免打开过多的文件句柄或使用过多的内存等。
WAS全套错误代码整理

ADMA5ADMA5104I=ADMA5104I: 已成功更新 {0} 的服务器索引条目。
此参考消息表明程序状态。
用户无需执行任何操作。
ADMA0014E=ADMA0014E: 验证失败。
{0}准备应用程序时发生验证错误。
此消息后跟详细错误消息。
请参阅此详细消息,以获取如何更正问题的指示信息。
ADMA6001I=ADMA6001I: 将开始应用程序准备工作-此参考消息表明程序状态。
用户无需执行任何操作。
ADMA0158I=ADMA0158I: [EJBDeploy] {0}当运行 DeployEJBTask 时,此消息将写入日志文件。
请检查参考消息和 DeployEJBTask 以前的消息,以确定是否需要执行任何更正操作。
ADMA5103E=ADMA5103E: 从配置库删除 {0} 的配置数据失败。
卸载过程无法成功删除应用程序配置数据。
应用程序卸载仍将继续。
If the problem persists, additional information might be available if you search for the message ID on the following Web sites: WebSphere Application Server Supportpage: .ibm./software/webservers/appserv/was/support/ WebSphere Application Server for z/OS Support page: .ibm./software/webservers/appserv/zos_os390/support/ .ADMA0122E=ADMA0122E: 在获取应用程序 {0} 时发生意外的异常。
异常:{1}。
在获取指定的应用程序作用域时发生意外错误。
请查看并调查最初的异常。
ADMA0013E=ADMA0013E: 找不到任务 {0} 的依赖性辅助控件。
WindowsNT错误代码(一)-电脑资料

WindowsNT错误代码(一)-电脑资料这篇文章中的信息适用于:Microsoft Windows NT ServerMicrosoft Windows NT Workstation--------------------------------------------------------------------------------代码名称说明---------------------------------------------------------------------------8 LZERROR_UNKNOWNALG 不识别压缩算法,。
-7 LZERROR_BADVALUE 输入参数超出可接受范围。
-6 LZERROR_GLOBLOCK 全局句柄错误。
-5 LZERROR_GLOBALLOC LZFile 结构的内存不足。
-4 LZERROR_WRITE 输出文件的空间不足。
-3 LZERROR_READ 压缩文件格式被破坏。
-2 LZERROR_BADOUTHANDLE 输出句柄无效。
-1 LZERROR_BADINHANDLE 输入句柄无效。
0L NO_ERROR 没有错误。
0L ERROR_SUCCESS 操作成功执行完毕。
1L ERROR_INVALID_FUNCTION 函数不正确。
2L ERROR_FILE_NOT_FOUND 系统无法找到指定的文件。
3L ERROR_PATH_NOT_FOUND 系统无法找到指定的路径。
4L ERROR_TOO_MANY_OPEN_FILES 系统无法打开文件。
5L ERROR_ACCESS_DENIED 访问被拒绝。
6L ERROR_INVALID_HANDLE 内部文件标识符不正确。
7L ERROR_ARENA_TRASHED 存储控制块被破坏。
8L ERROR_NOT_ENOUGH_MEMORY 处理该命令没有足够的存储可用。
JUKI机的错误代码【范本模板】
JUKI机的错误代码E250001Emergenoy stop switch has been pressed已按下紧急停止开关。
E25OO2Gopy pneumatic pressure has dropped Do you ignoreit?气动压力有所下降。
Will return to Home position是否回原点。
Z2020Return to Home position is not finished yet返回到初始位置尚未完成。
E007001Origin retrieval has not yet been completed原产地检索尚未完成。
W210001Remove nozzle and returnit to the previous position on ATC删除吸嘴,并回到先前的ATC位置上。
E200092Origin retriexal is interrupted since error has occurrd when checking nozzle during origin retrievalTurn OFF the power to the machine and perfom inspecton原产地检索中断已经发生错误,请关闭电源检查吸嘴对机器执行检查。
E004219Return to home has not yet been completed返回首页尚未完成。
E004225MTC is disableMTC 是禁用的。
Q004301Rxit machine setup Set value is aved退出机器的设置保存设定值。
E006049It failed to the centering by laser lode;98。
75 confirm pick position or comonent data <outcine caser position,Algorithmetc〉激光代码中心失败,98。
【教程】 UT常见错误和解决办法
【教程】UT 常见错误和解决办法μTorrent(由于μTorrent 不便于书写常作UT ) 是一个小巧强劲,全功能,用C++编写,支持Windows 、Mac OS X 和GNU/Linux 平台的免费BitTorrent 客户端。
以下是其在使用过程中常出现的错误以及相应的解决办法:1.错误:失败:You already are downloading the same torrent.You may only leech from one location at a time.原因:意外断网,意外重启,非法关闭客户端软件造成的服务器数据不同步,通常表现为:任务重复。
解决方法:耐心等待半小时即可。
2.错误:Sorry ,minimum announce interval=30 sec.Plesae retry after 30 sec原因:频繁更新TRACKER 地址导致,在手工更新TRACKER 地址后,停止任务,且马上重新开始任务,就会造成minimum announce interval=30 sec 的红种解决方法:勿频繁更新TRACKER ,停止任务后不要急于手工更新tracker3.错误:connection limit exceeded=Connection limit execeeded!You may only leech from one location at a time原因:连接受限,据分析与最大连接数,以及TRACKER 能承受的最大连接数有关 解决方法:手动更新TRACKER 即可解决4.错误:Invalid passkey!Please re-download .torrent file原因:PASSKEY 泄露或被盗,或者重置自己的PASSKEY 之后没有重新下载种子解决方法:重置自己的PASSKEY 之后右键你的任务属性中填入修改后的PASSKEY 即可。
monkey常见问题和解决办法
monkey常见问题和解决办法常见问题一:error:device not found1、执行adb shell,提示error:device not found解决方法:1)检查电脑是否正常识别当前接入设备、设备上调试模式是否打开、设备是否root说明:若是真机,则用usb线与电脑连接,安装手机驱动,确认电脑可正常识别当前设备若是模拟器,则需先启动Eclipse,设置好模拟器后进入模拟器测试状态2)排除第1点后,可将设备对应的VenderID写入到adb_usb.ini文件中2、安装apk文件时,提示error:device not found解决方法:执行以下命令后,再安装adb kill-serveradb remount常见问题二:error:device offline1、安装apk文件时,提示error:device offline解决方法:执行以下命令后,再安装adb kill-serveradb start-serveradb remount常见问题三:error: more than one device and emulator1、执行adb shell,提示error: more than one device and emulator第一种情况:确实有多台设备或模拟器解决方法:1)获取设备(真机&模拟器)列表执行命令:adb devices,查看实际存在几台设备2)指定设备执行adb shell(用参数-s指定device)执行命令:adb -s devicename shell第二种情况:实际只有一台设备或模拟器可能原因:当前设备使用过2次,有2种状态(执行命令:adb devices,可查看该设备的状态)解决方法一:重启adb.exe服务执行命令:adb start-server,重新启动adb.exe服务解决方法二:结束adb进程(终极方法,一般方法一不可用时再使用该方法)在进程中,找到adb.exe进程,结束进程后重新启动或执行命令:adb kill-server常见问题四:ADB server didn't ACK fail to start daemon1、执行adb命令时,提示如下错误:errors:*daemon not running. starting it now *ADB server didn't ACK*failed to start daemon *可能原因:有另外一个应用占用了adb server的端口(可能是adb shell本身)解决方法:1)查看adb.exe使用的5037端口被谁占用了在cmd中,执行命令:netstat -aon|findstr "5037",查看占用5037端口的PID(所查询结果中最后一个值)在cmd中,执行命令:tasklist|findstr "PID",查看该值对应的应用程序2)结束占用端口的进程在进程中,找到占用端口的进程,结束进程后重新启动说明:若占用端口的就是adb.exe本身,可直接执行命令:adb kill-server,结束进程若占用端口的是其他进程,也可在cmd中,直接执行命令:taskkill /f /t /im 进程名,结束进程常见问题五:D:\android\android-sdk-windows\tools目录中没有adb.exe解决方法:1、检查android-sdk-windows目录下,有没有platform-tools目录2、检查访目录下是否有adb.exe常见问题六:No activities found to run, monkey aborted.1、执行命令:adb -s test shell monkey -v -v -p com.test 100,提示No activities found to run, monkey aborted.前提情况:原先通过模拟器环境测试,后改用真机测试解决方法:1、打开Eclipse的Run Configurations2、将“Target”选项卡下的Deployment Target Selection Mode,由“Automatic”项改为“Manual”3、切换到“Android”选项卡,点击“Run”执行4、执行成功后,点击"OK",程序会将apk写入设备5、执行命令:adb -s test shell monkey -v -v -p com.test 100,可正常在真机下进行测试。
connection died in state handshaking
connection died in state handshaking
"Connection died in state handshaking" 是一个常见的网络错误消息,通常表示在尝试建立网络连接时出现了问题。
这个问题可能由多种原因引起,例如网络不稳定、服务器故障、防火墙设置不正确等。
当您遇到这个错误消息时,可以尝试以下几种解决方法:
检查网络连接:确保您的设备已连接到稳定的网络,并且网络连接没有被阻止或中断。
尝试重新连接:如果您的连接已经断开,可以尝试重新启动您的设备或等待一段时间后再次尝试连接。
检查服务器状态:如果问题与特定的服务器相关,您可以检查该服务器的状态,并确保它正在运行且没有遇到任何问题。
更新软件:确保您的设备和应用程序都是最新版本,以避免由于软件问题而引起的连接问题。
检查防火墙设置:确保您的防火墙设置不会阻止您的设备与目标服务器之间的连接。
- 1、下载文档前请自行甄别文档内容的完整性,平台不提供额外的编辑、内容补充、找答案等附加服务。
- 2、"仅部分预览"的文档,不可在线预览部分如存在完整性等问题,可反馈申请退款(可完整预览的文档不适用该条件!)。
- 3、如文档侵犯您的权益,请联系客服反馈,我们会尽快为您处理(人工客服工作时间:9:00-18:30)。
BBC Learning English
Keep Your English Up To Date
27th October 2009
Social notworking
Keep Your English Up To Date
© British Broadcasting Corporation 2009
Page 1 of 2
If you want to be successful in business, I’m told that it’s very important to make a lot of effort to meet new people, to socialise and create a network of useful contacts which you can then exploit to advance your career. You meet and make friends with people who might be able to help you later on in your professional life. This is called social networking, and it was one of the buzzwords in business in the 1980s and 90s.
Well, with new technology come new words. After social networking, we now have social NOTworking. Increasingly, people are meeting other people online using websites that intended to make social networking easier. These sites, things like MySpace, Facebook, Bebo, LinkedIn, Twitter and others – have become incredibly popular. Most people use them as a way of chatting with their friends, and sharing photographs and information about social events – parties, birthdays etc. Some people are even using them to provide regular updates about what they’re doing, often many times each hour. Well, when you do this at work, instead of the many things you should be doing, it’s not social networking, it’s social NOTworking.
If you’re one of those people that use these sites a lot, it can be very tempting to check what your friends are doing tonight while nobody else is in the office, or to see if your friend has put those photos from the last trip you took together on the site yet. It might only take a second … and no-one will ever know. My advice is to check your company’s internet policy and to think about your boss’s attitude before you log in to your favourite site – some employers take a very dim view about social NOTworking!
Mark Shea has been a teacher and teacher trainer for eighteen years. He has taught English and trained teachers extensively in Asia and South America, and is a qualified examiner for
the University of Cambridge oral examinations. He is currently working with journalists at the World Service and is the author of the BBC College of Journalism's online English tutor.
Keep Your English Up To Date © British Broadcasting Corporation 2009
Page 2 of 2。
