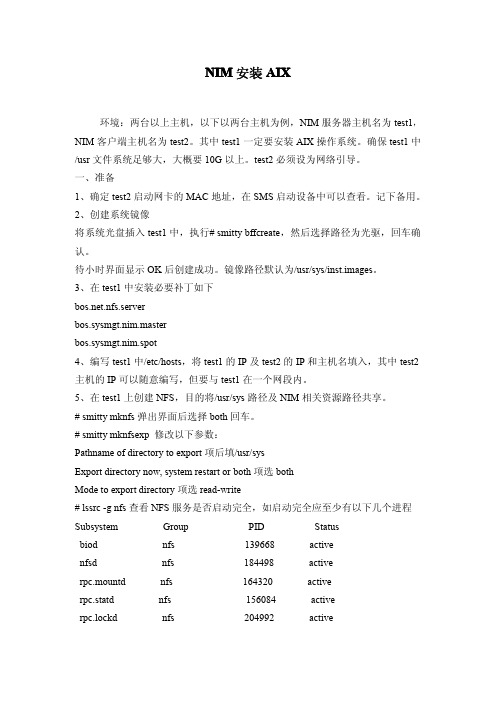
IBMAIXNIM安装实例_6563
AIX上NIM的基本安装方法

本文举例说明AIX上NIM的基本安装方法正文AIX NIM安装实例基本操作系统的安装一环境:两台f50 :test1 172.16.3.201test2 172.16.3.202操作系统; aix 5.2 ml01其中:test1 作为servertest2 作为client二在aix 5.2 的操作系统上默认客户端的软件就已经安装了。
bos.sysmgt.nim.client 5.2.0.10 COMMITTED Network Install Manager三在server上安装nim server 软件bos.sysmgt ALL@ 5.2.0.0 Filesystem Quota Commands@ 5.2.0.0 License Management@ 5.2.0.10 Network Install Manager - Client Tools+ 5.2.0.10 Network Install Manager - Master Tools+ 5.2.0.10 Network Install Manager - SPOT@ 5.2.0.10 Software Error Logging and Dump Service Aids@ 5.2.0.10 Software Trace Service Aids@ 5.2.0.10 System Backup and BOS Install Utilities@ 5.2.0.10 System Management Interface Tool (SMIT)+ 5.2.0.0 Trace Report GUI四配置nim server .在test1 上:smitty nim >> config nim environment >>config a basic nim environment (easy startup > >Initialize the NIM Master:* Primary Network Interface for the NIM Master [en0]Basic Installation Resources:* Input device for installation images [cd0]* LPP_SOURCE Name [lpp_source1]* LPP_SOURCE Directory [/export/lpp_source]Create new filesystem for LPP_SOURCE? [yes]Filesystem SIZE (MB) [650]VOLUME GROUP for new filesystem [rootvg]* SPOT Name [spot1]* SPOT Directory [/export/spot]Create new filesystem for SPOT? [yes]Filesystem SIZE (MB) [350]VOLUME GROUP for new filesystem [rootvg]Create Diskless/Dataless Machine Resources? [no]Specify Resource Name to Define:ROOT (required for diskless and dataless) [root1]DUMP (required for diskless and dataless) [dump1]PAGING (required for diskless) [paging1]HOME (optional) [home1]SHARED_HOME (optional) [shared_home1]TMP (optional) [tmp1]Diskless/Dataless resource directory [/export/dd_resource]Create new filesystem for resources? [yes]Filesystem SIZE (MB) [150]回车后,系统开始自己创建jfs : /export/lpp_source从cd0 上向; /export/lpp_source/lpp_source1 复制安装映像。
IBM小型机通过NIM安装AIX
IBM小型机通过NIM安装AIX在P6 550服务器上安装NIM Server包。
安装完毕后,如下操作:1、使用smitty eznim创建Master环境。
使用默认文件系统和路径安装。
不创建系统备份镜像。
经过一段时间,创建完成后,生成安装点为:/export/eznim和/tftpboot 的两个文件系统。
2、/etc/hosts文件,将准备安装系统的客户机主机名与IP地址关联添加上。
使用smitty eznim向NIM环境中添加client。
添加主机名和网络类型后进入主要菜单页。
填写相应IP地址和掩码,其它可以默认。
确认后,系统自动添加client。
3、在client机器上,启动并进入SMS菜单,配置IPL部分,填写Master的IP 地址、子网掩码、路由网关等信息。
修改接口配置,确保网络类型与Master上的一致(Master默认是standand,SMS中默认是802.3,要改成一致)。
关闭spanning tree 功能,否则要等待60秒来生成网络关系树。
4、修改client机器SMS中的启动顺序,将联网的网卡作为首选启动设备。
安装时可以采取两种方法,分别是从客户机和Master端进行安装。
1、从client端进行安装。
启动client设备,系统将自动从网络引导启动进行安装。
注意如果Master上创建了mksysb,使用默认设置,则client会试图进行restore,这当然不是我们需要的。
2、从Master端完成安装。
方法是:1)smitty eznimconfigure as a NIM MasterReinstall clients如果安装Master上的mksysb,选择“Select backup to restore”,这里我们选“Perform. a native(rte) install”。
确认后立即进行安装。
2)smitty nimPerform. NIM Software Installation and Maintenance TasksInstall and Update SoftwareInstall the Base Operating System on Standalone Clients选择要安装的client,并选择安装rte - Install from installation images 进行全新安装或选择mksysb - Install from a mksysb进行系统restore。
NIM安装流程
NIM安装流程根据XXX的具体要求,特编写本文介绍如何使用NIM安装操作系统,并给出详细的步骤。
在开始安装设置NIM之前须完成服务器分区工作,并在其中的一个分区上完成操作系统安装,同时还应该完成网络连接工作。
与NIM相关工作可以分为几个部分:1.在NIM服务器上完成基本配置(主机名、IP地址、磁盘空间及文件系统)2.在NIM服务器上安装NIM Server软件3.在选定的NIM服务器上配置NIM Server4.从安装、配置好的服务器制作mksysb映像,传到NIM服务器上并设置为NIM Server的mksysb类型的resource5.在NIM Server上增加clients,为Client分配资源,并执行安装操作;6.从客户机安装操作系统。
一、在NIM服务器进行基本系统配置1.使用date命令修改系统时间(#date 06011500.2006)2.修改hostnamea.执行smitty hostname,出现下面菜单:b.选择―Set the Hostname‖,按―Enter‖键,出现下面菜单:c.修改主机名后,出现下面菜单:d.按―Enter‖键,等待出现下面菜单即可3.给ent0配置IP地址a.执行smitty chinet出现下面的菜单b.选择―en0‖,按―Enter‖键出现下面的菜单:c.在菜单里输入IP地址、网络掩码并将―Current State‖改为―Up‖:d.按―Enter‖键,出现下面的画面即可:4.修改/etc/hosts,使得hostname与ent0的IP地址对应。
5.将/tmp文件系统扩到2GB (可选,防止某些操作的临时空间不够用)a)执行smitty chjfs,出现下面菜单:b)选择/tmp文件系统,敲―Enter‖键,出现下面的画面:c)如下图将―Unit Size‖改为Gigabyte,将―Number of Units‖改为2,d)敲―Enter‖键,就可以了6.选择合适的硬盘,创建用于保存mksysb系统映像的磁盘组和逻辑卷a)使用lspv命令列出系统里所有物理硬盘,然后选择一个没有使用的硬盘,分配给NIM使用(在我们的例子里是hdisk2)。
IBM AIX命令手册:IBM MQ管理、安装和卸载说明书

Summary of AIX commands to administrate MQhttps:///support/pages/node/6407842Date last updated: 17-Jun-2021Angel Rivera –*************.comIBM MQ Support+++ Objective +++T o provide the most common AIX commands to administrate, install and uninstall MQ.The organization of the sections is based on what will be the commands to start the installation of MQ from scratch:- ensuring that you have a supported version of AIX: uname, oslevel- create the group “mqm” (mkgroup) and the user “mqm” (mkuser),- unpack the .Z or tar.gz file downloaded from IBM Passport Advantage or IBM Fix Central: gunzip, uncompress, zcat, tar- install/uninstall via installp- querying filesets via lslpp- create (mkusil), list (lsusil), remove (rmusil) a USIL, and- specifying USILs (-R ALL or -R /usr/mqm92) with installp and lslpp++ Update from 17-Jun-2021The AIX command “install -r” that is discussed in this chapter will REJECT all the fix packs installed in the server. If you have only 1 fix pack or if you want to delete at the same time all the fix packs, then the procedure in this chapter is fine.But if you have multiples fix packs and you want to uninstall ONL Y the LATEST one, then you need to use another procedure, which is documented in the article:https:///support/pages/node/6464857Uninstalling only the latest fix pack for MQ in AIX and leaving behind other previous fix packs+++ Related tutorials +++https:///support/pages/node/6405792Customization of an AIX server for using MQ+ Customization of Putty for using Function Key F3 with smitty+ Creating groups and userids+ Downloading, customizing and using the sample scripts+ Customization of bash login for root+ Customization of set-mq-xxx scripts in /usr/local/bin to reflect MQ installations+ Customize the bash login for user "mqm" or the normal user "fulanohttps:///support/pages/node/6407850Installing in AIX - MQ 9.0.0.1 LTS, applying Fix Pack 9.0.0.11, Uninstalling MQChapter 1: How to get the installation imagesChapter 2: Create userid "mqm" and group "mqmChapter 3: Installation of MQ 9.0.0.1 (Installation1 in /usr/mqm)Chapter 4: Setting the environment for MQChapter 5: Creating a test queue manager, quick verification testChapter 6: Installation of the Fix Pack 9.0.0.11Chapter 7: Uninstallation of the Fix Pack 9.0.0.11Chapter 8: Uninstallation of the base 9.0.0.1Chapter 9: Appendices showing full output from installp for the scenarioshttps:///support/pages/node/6415777Upgrading in AIX from MQ 9.0.0.1 to MQ 9.1.0.0 LTSChapter 1: How to get the installation imagesChapter 2: T ake a backup of the queue manager data and recovery logsChapter 3: Uninstalling MQ 9.0Chapter 4: Installing MQ 9.1.0.0 LTSChapter 5: Running setmqenv to use MQ 9.1 commandsChapter 6: Creating a queue manager under 9.1Chapter 7: Upgrading an existing queue manager to MQ 9.1https:///support/pages/node/6415921Installing in AIX - MQ 9.2 LTS to coexist with MQ 9.1 LTS, including applying Fix Packs 9.1.0.7 and 9.2.0.1 Chapter 1: How to get the installation imagesChapter 2: Creating USIL and installing MQ 9.2 side-by-side to MQ 9.1Chapter 3: Need to run setmqenv to use MQ 9.1 or MQ 9.2 commandsChapter 4: Creating a queue manager under MQ 9.2Chapter 5: Migrating an MQ 9.1 queue manager to MQ 9.2Chapter 6: Installing Fix Pack 9.1.0.7 in Installation1 (default location)Chapter 7: Installing Fix Pack 9.2.0.1 in Installation2 (USIL /usr/mqm92)Chapter 8: Uninstallation of MQ 9.2Chapter 9: Deleting the USIL /opt/mqm92https:///support/pages/node/6429607Life cycle for a USIL in AIX for non-default installations of MQ++ Displaying version of operating systemDisplaying the platform and hostname+ROOT+ aglet: /downloads# uname -aAIX aglet 2 7 00F944604C00Displaying the version (high lievel)# oslevel7.2.0.0Displaying the detailed version# oslevel -s7200-05-01-2038+++ Creating group ‘mqm’ and user ‘mqm’The following steps show how to create:- a group “mqm” (gid 202),- a user “mqm” (userid 205),- under /home/mqmLogin as user: rootCreate a group called “mqm” with groupid of 202:mkgroup -'A' id='202' mqmCreate a user also called “mqm” with userid of 205 and who belongs to group “mqm”: mkuser id='205' pgrp='mqm' home='/home/mqm' mqmYou can assign the password:passwd mqmYou can use the command “id” to find out the ids and the group membership:$ id mqmuid=205(mqm) gid=202(mqm) groups=1(staff)+++ How to unpack tar.Z and tar.gz filesWhen you download MQ files from IBM Passport Advantage or IBM Fix Central, there are 2 possible suffixes for the file names:tar.Ztar.gzThe tar options are:-x T o extract members from the archive into the file system.-v T o be verbose about the operation being performed.-f FileArchive T o use the specified file archive as the tar archive.The rest of this section provides more details on how to unpack the files.a) Suffix: tar.ZThe most common ways to unpack this type of files are:a.1) One (1) long compound command (it preserves the file tar.Z)zcat MQ_V9.0_F_AIX_EIMAGE.tar.Z | tar -xvf -The output of zcat is sent to the standard output file (i.e., stdout).This allows the user to decompress the compressed tar file (leaving the compressed file unchanged), and then to expand the tar file to the current directory.The "f -" tar command line option tells the tar command to read its input from the standard input file (i.e., stdin).a.2) T wo (2) simpler commands (the tar.Z is uncompressed, leaving a .tar file) Decompress the file tar.Z by issuing:uncompress MQ_V9.0_F_AIX_EIMAGE.tarThen unpack the file:tar -xvf MQ_V9.0_F_AIX_EIMAGE.tarb) Suffix: tar.gzb.1) One (1) long compound command (it preserves the file tar.gz)gunzip -c IBM_MQ_9.1_AIX.tar.gz | tar -xvf -A common convention is to use the "-c" command line option on the gunzip command so that instead of replacing the tar.gz, the output of the command is sent to the standard output file (i.e., stdout). This allows the user to decompress the compressed tar file (leaving the compressed file unchanged), and expand the tar file to the current directory. The "f -" tar command line option tells the tar command to read its input from the standard input file (i.e., stdin).b.2) T wo (2) simpler commands (the tar.gz is uncompressed, leaving a .tar file) Decompress the file tar.gz by issuing:gunzip IBM_MQ_9.1_AIX.tar.gzThen unpack the file:tar -xvf IBM_MQ_9.1_AIX.tar+++ Creating a USIL to install in a non-default location, such as /usr/mqm92+ Create a dedicated installation directory and designate it as a USILLogin as userid root to create the USIL- Create directory for the USIL.This directory will be designated to be a USIL in a step mentioned later on.# mkdir /usr/mqm92- List the subdirectories that will have the MQ code.Note that /usr/mqm is the default location for Installation1 (in this case,it already has MQ 9.1)# ls -dl /usr/mq*dr-xr-xr-x 20 mqm mqm 4096 Jan 27 07:34 /usr/mqmdrwxr-xr-x 2 root system 256 Jan 27 09:17 /usr/mqm92- So far, we do not have any USI Ls. Let’s verify by issuing the following command:# lsusil(empty)- Make the newly created directory a USIL.Note that the directory will be known as: INSTALL_ROOT_PATH# mkusil -R /usr/mqm92 -c 'MQ 9.2' -Xmkusil: Return Status = SUCCESSWhere:-R /usr/mqm92 => usil location-c comment-X Expands the space needed automatically.- List the USILs and note the new one:# lsusilINSTALL PATH = /usr/mqm92COMMENTS = MQ 9.2- Proceed to use the USIL with installp and lslpp.- If you uninstall MQ from the USIL and if you decide to not use the USIL anymore, then delete it.Please keep in mind that rmusil does not delete the directory structure for the USIL! # rmusil -R /usr/mqm92rmusil: Return Status = SUCCESS- List the USILs (it should show no USILs)# lsusil(empty)- Remove the directory structure that was associated with the USIL:# rm -fr /usr/mqm92+++ Using installp to install and uninstallAfter using “tar -xvf” to unpack the base code to install, you need to go to the newly created directory “MQServer”# cd MQServer++ Install the base code:T o install the base code in the default location /usr/mqm:# installp -acgXYd . all- T o install the base code in a non-default location such as /usr/mqm92# installp -R /usr/mqm92 -acgXYd . allWhere “-R usil” is the path of the User Specified Installation Location (USIL) specified when the product was installed.++ Install the fix pack code on top of an existing installation:T o install the fix pack code in the default location /usr/mqm:# installp -agXYd . all- T o install the fix pack code in a non-default location# installp -R /usr/mqm92 -agXYd . allWhere “-R usil” is the path of the User Specified Installation Location (USIL) specified when the product was installed.++ Reject ALL the Updates (uninstall all the Fix Packs)From the default location:# installp -r "mqm*"From a USIL:# installp -R /usr/mqm92 -r "mqm*"++ Update from 17-Jun-2021The AIX command “install -r” that is discussed in this chapter will REJECT all th e fix packs installed in the server. If you have only 1 fix pack or if you want to delete at the same time all the fix packs, then the procedure in this chapter is fine.But if you have multiples fix packs and you want to uninstall ONL Y the LATEST one, then you need to use another procedure, which is documented in the article:https:///support/pages/node/6464857Uninstalling only the latest fix pack for MQ in AIX and leaving behind other previous fix packs++ Uninstalling the base code:T o uninstall or modify IBM MQ by using installp, enter one of the following commands:- T o uninstall an installation in the default location /usr/mqm:installp -u mqm- T o uninstall an installation in a non-default location:installp -R /usr/mqm92 -u mqmWhere “-R usil” is the path of the User Specified Installation Location (USIL) specified when the product was installed.+++ Using lslpp to list the MQ filesetsa) This is the most comprehensive command to list all the installed MQ filesets ACROSS the different USILs and including the normal location of /usr/mqm.The following shows the output when MQ is not installed at all and there are no USILs. Note that ALL is in UPPERCASE!# lslpp -R ALL -la "mqm.*"+-----------------------------------------------------------------------------+INSTALL ROOT PATH = /+-----------------------------------------------------------------------------+lslpp: 0504-132 Fileset mqm.* not installed.If there are no USILs, then this is the command.In this case, no MQ filesets are installed.# lslpp -la "mqm.*"lslpp: 0504-132 Fileset mqm.* not installed.b) Listing the file sets from the default location /usr/mqm# lslpp -la "mqm*"Fileset Level State Description----------------------------------------------------------------------------Path: /usr/lib/objreposmqm.amqp.rte 9.0.0.1 COMMITTED IBM MQ AMQP Service9.0.0.11 APPLIED IBM MQ AMQP Servicemqm.ams.rte 9.0.0.1 COMMITTED IBM MQ Advanced MessageSecurity9.0.0.11 APPLIED IBM MQ Advanced MessageSecurityc) Listing the file sets for the USIL# lslpp -R /usr/mqm92 -la "mqm*"Fileset Level State Description----------------------------------------------------------------------------Path: /usr/mqm92/usr/lib/objreposmqm.amqp.rte 9.2.0.0 COMMITTED IBM MQ AMQP Servicemqm.ams.rte 9.2.0.0 COMMITTED IBM MQ Advanced - AdvancedMessage Securitymqm.base.runtime 9.2.0.0 COMMITTED IBM MQ Runtime for Client andServerServer+++ References+++ AIX 7.1 documentationhttps:///support/knowledgecenter/en/ssw_aix_71/m_commands/mkusil.htmlAIX 7.1 / Commands / m /mkusil Command.Creates or attaches a new user-specified installation location (USIL) instance.Syntaxmkusil -R RelocatePath -c Comments [-XFa]DescriptionThe mkusil command creates or attaches a new USIL instance.A user-specified installation location (USIL) is a tracked, relocated installation path that is created by the administrator. The location is tracked by the system and can be used as an alternate installation path for packages that use relocation of file sets or software. Multiple instances or versions of the same software package can be installed on a single system by delegating each installation to a separate USIL.An existing USIL instance can be attached or detached from any given system.Each USIL instance maintains its own set of Software Vital Product Data (SWVPD) in three installp parts:InstallRoot/etc/objreposInstallRoot/usr/lib/objreposInstallRoot/usr/share/lib/objrepos++ Information about the flags for the AIX command: installpThe flags for installp mentioned in the online manual for MQ indicate to apply, commit, expand file system, agree with license, using the .toc (table of contents) file and filesets in the current directory:installp -acgXYd . allhttps:///support/knowledgecenter/en/ssw_aix_72/i_commands/installp.htm lAIX 7.2 / Commands / i /installp CommandPurposeInstalls available software products in a compatible installation package.Flags:-R path Indicates a user-specified installation location.-a Applies one or more software products or updates. This is the default action. This flag can be used with the -c flag to apply and commit a software product update when installed.-c Commits all specified updates that are currently applied but not committed. When an update is committed all other software products it is dependent on must also be committed (unless they are already in the committed state). The specified software product is dependent on any software product that is a prerequisite or corequisite of the specified product. If the requisite software products are not in the committed state, the commit fails and error messages are displayed. The -g flag can be used to automatically commit requisite software product updates.-g When used to install or commit, this flag automatically installs or commits, respectively, any software products or updates that are requisites of the specified software product. When used to remove or reject software, this flag automatically removes or rejects dependents of the specified software.-X Attempts to expand any file systems where there is insufficient space to do the installation. This option expands file systems based on current available space and size estimates that are provided by the software product package. Note that it is possible to exhaust available disk space during an installation even if the -X flag is specified, especially if other files are being created or expanded in the same file systems during an installation. Also note that any remote file systems cannot be expanded.-Y Agrees to required software license agreements for software to be installed. This flag is only valid with the -a flag.-d Device Specifies where the installation media can be found.Notice that "d ." means: current directory-r Rejects all specified software updates that are currently applied but not committed. When a software update is rejected any other software product that is dependent on it (that is, those software products that have the specified software product as a requisite) must also be rejected. The -g flag can be used to reject automatically dependent software updates.-u Removes the specified software product and any of its installed updates from the system. The product can be in either the committed or broken state.https:///support/knowledgecenter/ssw_aix_72/l_commands/lslpp.htmlAIX 7.2 /lslpp Command-R { path | ALL } Indicates a user-specified installation location.-a Displays all the information about filesets specified when combined with other flags. This flag shows all updates when combined with the -l flag and all history when combined with the -h flag.-l (lowercase L) Displays the name, most recent level, state, and description of the specified fileset.++ MQ Documentationhttps:///support/knowledgecenter/SSFKSJ_9.2.0/com.ibm.mq.ins.doc/q008600_.htm IBM MQ 9.2.x / Installing and uninstalling IBM MQ / Installing and uninstalling IBM MQ on AIX /Installing IBM MQ server on AIX.You must install the second version of the product in a location that is not the default. To create the non-default installation location you must use the mkusil command, which is available only from the command line..Install the whole product in a non-default location using the -R flag:installp -R USIL_Directory -acgXYd . allhttps:///support/knowledgecenter/SSFKSJ_9.2.0/com.ibm.mq.mig.doc/q008 010_.htmlIBM MQ 9.2.x / IBM MQ / Maintaining and migrating / Applying maintenance to IBM MQ / Applying and removing maintenance on UNIX and Linux /Applying maintenance level updates on AIX (Installation of Fix Packs)*** Note: The components will be either COMMITTED or APPLIED depending on the options chosen when applying the fix pack.https:///support/knowledgecenter/SSFKSJ_9.2.0/com.ibm.mq.mig.doc/q008 020_.htmlIBM MQ 9.2.x / IBM MQ / Maintaining and migrating / Applying maintenance to IBM MQ / Applying and removing maintenance on AIX and Linux /Reverting to the previous maintenance level on AIXT o back out ALL maintenance updates, as the user root, issue the command:installp [ -R usil ] -r "mqm*"https:///support/knowledgecenter/SSFKSJ_9.2.0/com.ibm.mq.ins.doc/q0094 20_.htmlIBM MQ 9.2.x / IBM MQ / Installing and uninstalling / Installing and uninstalling IBM MQ on AIX /Uninstalling or modifying IBM MQ on AIXT o uninstall an installation in the default location /usr/mqm:installp -u mqm+++ end。
IBM_AIX5.3_6.1操作系统Initiator_软件安装和配置指导书
AIX 5.3/6.1操作系统Initiator软件安装和配置指导书1 安装环境:1.1 应用系统信息操作系统版本:IBM AIX 5.3(补丁级别:5300-02)内核版本:Initiator版本:AIX iSCSI SW (Ethernet SAN) Initiator for AIX 5.3.0.20操作系统版本:IBM AIX 6.1(补丁级别:6100-00-01-0748)内核版本:Initiator版本:AIX iSCSI SW (Ethernet SAN) Initiator for AIX 6.1.0.02 Initiator安装过程2.1 软件安装AIX 5.3/6.1 默认安装iscsi initiator软件。
如下命令确认系统是否安装相应软件包:AIX 5.3AIX 6.1也可执行下列命令查看,显示Available即为已安装iscsi软件。
说明:●如果系统没有安装iSCSI HBA卡,则软件iSCSI initiator对应为iscsi0,否则则往后递推:如果安装2块iSCSI HBA卡,则HBA对应为iscsi0和iscsi1,软件iSCSI initiator对应为iscsi2。
3 软件配置过程3.1 配置initiator名称(1) step1(进入配置界面)(2) step2(选择适配器)执行smit iscsi之后,会进入如下界面,选择“iSCSI Protocol Device”(3) step3(选择适配器)确定后会进入如下界面,选择“Change / Show Characteristics of an iSCSI Protocol Device”(4) step4(选择适配器)确定之后会进入如下界面,如果没有安装HBA卡的话iscsi software intiator应该对应为iscsi0。
本系统安装了2块iSCSI HBA卡(对应为iscsi0和iscsi1),所以iscsisoftware intiator对应变为iscsi2。
IBM AIX 安装图解
IBM AIX 安装图解 一、准备工作 1、 检查显示器、键盘、鼠标十分雨主机正确连接。
【我这里是笔记本通过 console 连接主机的来安装的】 2、 把介质(操作系统光盘第一张)插入驱动器。
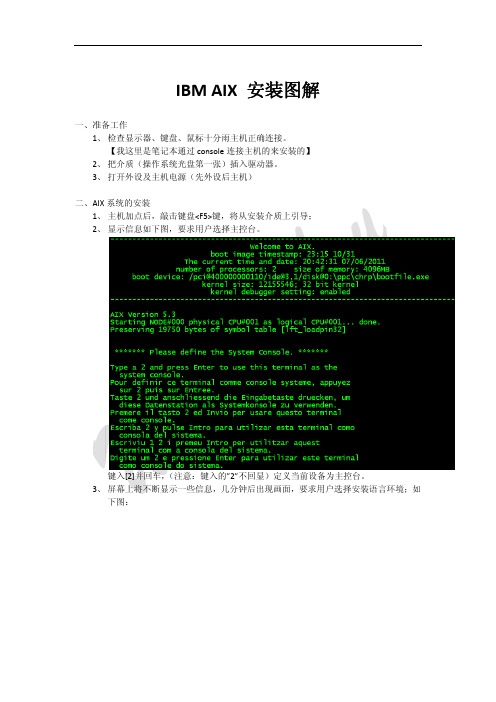
3、 打开外设及主机电源(先外设后主机) 二、AIX 系统的安装 1、 主机加点后,敲击键盘<F5>键,将从安装介质上引导; 2、 显示信息如下图,要求用户选择主控台。
键入[2]并回车, (注意:键入的”2”不回显)定义当前设备为主控台。
3、 屏幕上将不断显示一些信息,几分钟后出现画面,要求用户选择安装语言环境;如 下图: 键入[1]后回车,选择语言环境为 english。
4、 此后屏幕出现下图: 这是系统安装和维护的主菜单。
我们需要改变一些设置选项在进行基本操作系统的 安装: 5、 改变安装设置,在上面菜单中键入【2】并回车;如下图: 这是系统安装的默认设置,用户应根据需要进行改变。
与此同时,屏幕的右下角会出现如上的警告信息,此为提醒用户安装系统的后果将 破坏用户原有的硬盘上的数据。
6、 这里我们选择【3】对安装选项进行设置,因此键入【3】并回车,根据自己的环境 需求对其进行设置;如下图: 7、 安装选项设置完成后,键入【99】回到安装设置菜单;键入【0】开始安装;如下 图: 8、 确认安装概要,键入【1】后回车,开始安装;如下图: 9、 安装进程进行中;如下图: 10、安装光盘第 1 张安装完成,提示插入第 2 张安装光盘;如下图: 11、AIX 安装完毕;如下图: AIX 安装完成后系统自动重启,然后对其系统相关参数进行设置。
nim安装文档
NIM安装AIX环境:两台以上主机,以下以两台主机为例,NIM服务器主机名为test1,NIM客户端主机名为test2。
其中test1一定要安装AIX操作系统。
确保test1中/usr文件系统足够大,大概要10G以上。
test2必须设为网络引导。
一、准备1、确定test2启动网卡的MAC地址,在SMS启动设备中可以查看。
记下备用。
2、创建系统镜像将系统光盘插入test1中,执行#smitty bffcreate,然后选择路径为光驱,回车确认。
待小时界面显示OK后创建成功。
镜像路径默认为/usr/sys/inst.images。
3、在test1中安装必要补丁如下.nfs.serverbos.sysmgt.nim.masterbos.sysmgt.nim.spot4、编写test1中/etc/hosts,将test1的IP及test2的IP和主机名填入,其中test2主机的IP可以随意编写,但要与test1在一个网段内。
5、在test1上创建NFS,目的将/usr/sys路径及NIM相关资源路径共享。
#smitty mknfs弹出界面后选择both回车。
#smitty mknfsexp修改以下参数:Pathname of directory to export项后填/usr/sysExport directory now,system restart or both项选bothMode to export directory项选read-write#lssrc-g nfs查看NFS服务是否启动完全,如启动完全应至少有以下几个进程Subsystem Group PID Statusbiod nfs139668activenfsd nfs184498activerpc.mountd nfs164320activerpc.statd nfs156084activerpc.lockd nfs204992active二、配置NIM Master#smitty nimconfig以下项目需要填写Network Name处填入ethernet0Primary Network Install Interface处填入test1所用的网络接口名,本例填en0回车即可。
aix操作系统nim安装配置
aix操作系统nim安装配置一.nim server安装配置:1.在nim server上使用lslpp –l|grep bos.sysgmt查找系统中是否安装nim master tools bos.sysmgt.nim.client 6.1.3.5 APPLIED Network Install Manager -bos.sysmgt.nim.master 6.1.3.4 COMMITTED Network Install Manager -bos.sysmgt.nim.spot 6.1.3.4 COMMITTED Network Install Manager - SPOT2.nim server rootvg剩余空间至少要5G以上。
3.开始配置:使用smitty nim进入一下界面4.选择configure the nim environment进行nim server的建立5.选择configure a basic nim environment,回车进入下一窗口,在以下窗口中选择使用的网络接口和光盘所在位置按F4选择完成后,显示如下:回车以后,将开始创建:大约20分钟,成功后显示ok3.在aix命令行输入df -g可以看到生成了两个文件系统:4.在nim server的网络配置文件/etc/hosts中增加客户端的ip地址和解析名,如:10.63.30.214 nimtest5.在nim server中增加nim client回车后,进入继续回车,定义一个机器;选择以后,回车进入,在表中输入/etc/hots中新增的client对应ip地址的主机名:输入完成后,回车进入下一个界面,该界面不需改变,直接回车即可,至此nim client创建完成。
6.Nim client创建完成以后,就可以创建nim resourse,回退到上一级目录,界面如下:选中manager resourse,回车;选择define a resource,回车后在弹出的界面中选择mksysb,继续回车在以下界面中,只需要填以下三个选项,resource name可以随便命名;server of resource选择master,location of resource填上mksysb镜像所在的位置。
NIM的安装

NIM中常用的资源类型
SPOT
. 表示 Shared Product Object Tree . 指向一个目录, 其中存放了NIM client在引导时需要用到的代码程序.与 AIX 5L中 /usr 文件系统的内容大致相同 . 包含: 设备驱动程序, BOS 的安装程序, 和 其他与安装相关的代码.
Smitty nim -- > Perform NIM administration Tasks
定义资源
选择 Manage resorce -- > 选择Define resource
定义 lpp_source
选择 定义 lpp_source类型的 资源
定义lpp_source
给lpp_source 资源一个名字, 该资源存放在哪台服务 器上, 存放到哪个目录下, 它的安装介质在哪 (cd0)
引导 NIM Client
开启nim client 服务器或分区 进入 SMS 菜单, 选择 Setup Remote IPL
选择网卡
选择与NIM master 通讯的网卡
在很多环境中,可能会有多块网卡, 请使用 位置码来确定所使用的网卡
设置相关的网络参数
NIM master 和 NIM client 的IP 地址,网关 和 子网掩码 回上层菜单,做与NIM master 连通测试
定义NIM client
为 communication protocol used by client 选择 nimsh 然后回车, NIM client 的设置就完成了.
为 nim client 系统安装做准备
回到 NIM software installation and maintenance tasks 菜单, 选择install and update software条目
IBM服务器系统安装教程
IBM服务器系统安装教程步步图解 IBM服务器系统安装傻瓜教程用IBM引导盘装系统前请备份你服务器硬盘上的所有资料,因为整个安装过程相当于把硬盘重新分区~~一定要记住,备份所有资料~~在给服务器安装操作系统的时候会用到两张光盘,第一张是引导盘,第二张是我们的操作系统光盘,要先把引导盘放进去,进行一些安装过程的设置和驱动的安装,如果直接把操作系统光盘放进去安装的话,之后还要再装驱动,很麻烦的。
找出IBM安装光盘服务器的安装与PC的安装基本相同,但也有不同。
我们就把这台服务器当成是新机来安装。
也就是说不管硬盘中的数据了,如果您的硬盘中有别的数据,请自行备份。
首先,找出IBM随机安装光盘,诺,就是这张:放大一些看看对,就是这张,因为我们这次准备安装的是WINDOWS 2003系统,所以就是它了 from oil conservator rated. 4.1.12.10.3 oil is finished, should beset aside for 24 hours. 4.1.12.10.4 can be replaced after the transformer, cooling unit, gas relays and pressure release valve devices, exhaust gas related sites multiple times. 4.1.13 electric overall construction process chart, see next page. Turn off the security system, access to the site had to wear a helmet, aerial work have to fasten your seat belt. Using power tools, the shell shall be reliable grounding to prevent electric shock, do the construction site security, preventing mounted electrical components and material damage, such as lost,electrical simulation test and operation of the transmission, and carry out the operation and the tone system; ongoing safety and quality education, improving safety awareness to ensure smooth and safe, high quality finish. 4.3 projects 4.3.1 quality assurance measurespreparation of construction organization design and construction program. Careful review of the drawings, in-depth understanding of site, construction workers doing construction gives the low-down, prior to construction as far as possible the problems right. 4.3.2 compliancewith specifications, in accordance with the drawings, encountered in the process of unclear are not free to change, must inform the unilateral changes by the design department to modify. 4.3.3 site full-time quality inspector and team part-time Inspector on construction quality of electrical installation check, nonconforming areas for correctiveactions in a timely manner until it reaches the required. 4.3.4installed in well construction record, done self-inspection, mutual,total work quality appraisal work, improve the quality of workers and ensure the project progress in order将那张光盘插入服务器的DVDROM中,启动服务器。
AIX安装过程..
pSeries AIX安装注:本文档安装AIX主要依据:在gz office demo room的170上通过串口安装AIX5.3后完成初稿,以后在p561和p570上通过console安装AIX,对初稿各章节进行了补充,补充了做mirror,打补丁等步骤的细节。
一.在新机器上安装AIX1. 机器加电机器加电后,其内部的Service Processor就开始运作,此时只有电源模块和FSP卡加电,由于显卡还没有加电,所以在直连的console上看不到图像。
对于直接串口连接可以看到菜单如下:这个SP菜单功能类似于ASMI的管理界面标题是当前的微码版本,一定要确认微码版本支持AIX5.3(使用命令lsmcode,然后去fixcenter查看这个微码版本是否支持AIX5.3),否则安装操作系统之前一定要升级微码;当微码版本支持AIX5.3时也可能要升级到稳定版本,这个工作也可以留到装过操作系统后做。
●第二项是电源控制,可以控制power on和power off,和fast/slow power on选项●第三项显示系统信息,进入后如下在这个菜单中可以通过SP查看POST错误、机器cpu、mem的configuration情况等。
补充:给系统加电后,如果不使用串口的话:a. 如果连有HMC,则用HMC操作a.如果没有HMC,则可以用网线对于p5机器,用网线连FSP上的HMC口,对于两个HMC口,上面一个默认的ip为192.168.2.147,下面一个默认的ip为192.168.3.147。
连上后在浏览器中访问ASMI,地址为https://192.168.2.147,https://192.168.3.1472.机器power on对于直连串口连接,可以1通过SP管理菜单的Power选项进行power on,以前的机器可以直接按面板上的power on 按钮。
这里在Service Processor界面―― 4. System power control menu-- 4. Power-On System此时出现信息如下确定后机器启动,控制台和机器面板上出现代码E206E204E20AE213。
ibm aix安装教程
ibm aix安装教程一、安装基本操作系统(BOS)打开计算机或在开机状态下重新启动(#reboot)将AIX安装盘放入光驱当系统自检keyboard 通过后,按"5"(从光驱引导)系统提示:Please define the system Console后,按"1"(确认终端)系统提示:Type a "1" and press Enter to use this terminal as the system console后按1(选择英语为安装语言)进入安装程序,按系统提示操作:选择" 2 Chang/show Installation Settings and Install" 其它选项不需改变,只需改以下两项:将安装方式改为"New and Complete Installation"选择所要安装系统的disk开始install。
二、设置终端类型(TTY)结束安装后,第一次启动时,系统提示选择终端类型,应选择ibm3151用"root"登录,接着出现系统设置(时间,密码等),直接退出即可#export TERM=ibm3151(设置终端类型,否则无法进入smit)#smit tty (设置终端类型,否则以后启动还会要求选择终端类型)选择chang/show characeristics of a TTY (修改)修改ENABLE LOGIN 为"enable"修改TERMINAL type 为ibm3151三、安装Bundle#smit easy_install选择INPUT device / directory for software 为[/dev/cd0](按F4选择)选择Select a FileSet Bundle 为Server 及App-Dev(有图形设备需选Graphics-Startup)四、选择安装软件#smit进入Software Installation and Maintenance-〉Install and Update-〉SoftwareInstall and Updata from LAT EST Available Software选择INPUT device / directory for software 为[/dev/cd0](按F4选择)进入SOFTWARE to install选择所需安装的软件开头有"@"符即已安装过开头有"+"符即未安装过如不装图形终端,则以"X11"开头的不装以下必须装:pat (兼容AIX 3)bos.databos.dosutil (dos utility)有关info,msg的必须装五、设置TCP/IP#lsdev -Cc adapter查看网卡设置(选择IBM 10/100 Mbps Ethernet PCI Adapter)#smit tcpip选择"Minimum Configuration & Startup"在"Available Network Interfaces"对话框中选择"en0 Standard Ethernet Network Interface"注意:如有多块网卡,根据前面查看的设置,选择正确的网卡,一般不选"et0 IEEE 802.3 Ethernet Network Inte rface"在HOSTNAME中填入所起的主机名(F50-CMIS).在Internet ADDRESS (dotted decimal)设IP地址(16.54.2.7)在Network MASK (dotted decimal)设掩码(255.255.255.0)在Default GATEWAY Address设网关在Your CABLE Type选择"TP"全部选定后按回车(Enter)运行六、设置VG(卷组)#smit vg选择Add a Volume Group设置Volume Grorp Name设置Physical partition Size in megabytes(PP值,一般2.2G可设4,4.5G可设8,9.1G可设16)设置Physical Volume Names(选择所需disk)全部选定后按回车(Enter)运行七、设置LV(逻辑卷)#smit lv选择Add a Logical VolumeVOLUME GROUP name中选择VG nameLogical volume NAME中填入所起的LV 的名字Number of LOGICAL PARTITIONS中填入LV大小(这里的数量为Logical Partition数量,一块LP缺省值等于一块PP)全部选定后按回车(Enter)运行八、设置File Systems#smit进入System Storage Management (Physical & Logical Storage)->File Systems->Add/Chang/Show/De lete File Systems->Journaled File System->Add Journaled File System修改本文件系统块数(Size of File System),一块为512 Bytes修改Mount Point(为文件系统指定PATHS,如[/oracle])决定是否在系统启动时自动Mount该文件系统全部选定后按回车(Enter)运行九、安装C及C++语言查看C安装手册中安装C语言所必须先安装的软件(Software Must be Installed)#lslpp -l|grep bos.adt.include#lslpp -l|grep bos.adt.lib用上述两条命令查看这些文件是否Comitted#smit install_latest将C/C++语言安装盘放入光驱进入INPUT device / directory for software 选择"/dev/cd0 (SCSI Multimedia CD-ROM Drive)",SOFTW ARE to install按"F4",系统显示选择安装文件选择以xlc开头的所有文件全部选定后按回车(Enter)运行十、连接7133磁盘阵列中的磁盘将7133中磁盘连上(具体连接方法可查看7133/Model600随机资料)注意:7133 SSA接口的磁盘为回路连接,从主机后SSA ADAPTER连出后从另一根线连进,此回路中所串联的硬盘即该主机所使用硬盘#cfgmgr (激活系统,配置磁盘)注意:在关机状态下连接后再开系统自动调用cfgmgr十一、系统磁盘热插拔必须将所需拔出的磁盘中所在VG中的LV(Logical Volume)与File System进行umount#lsvg -l datavg (查看datavg中的详细信息).#df -k (查看文件系统的信息)#umount /cmis (umount 文件系统cmis)#varyoffvg datavg (切断datavg)#lsvg -o (查看当前激活的VG)#exportvg datavg.(输出datavg)此时可以拿出该磁盘(该磁盘可以为内置式).将该磁盘放入另外一台主机#importvg -y datavg hdisk1(在另外一台主机上键入该命令).十二、备份策略rootvg可采用#smit mksysb 来备份datavg 中的文件系统可进入smit->System Storage Management (Physical & Logical Storage)->File Systems->Backup a File System,选定预备份的文件系统,回车确认即可datavg可采用smit命令smit vg->Back Up a Volume Group,选定预备份的vg,回车确认即可AIX安装后的基本系统设置,补丁,优化等等的东西,确实有用哈----许多用户在*作系统安装完后,不对系统进行一些基本设置,而使用系统的缺省参数。
IBM小型机安装指导书
IBM小型机安装指导书IBM小型机安装指导书xx技术有限公司版权所有侵权必究修订记录第一章AIX安装配置 (5)1.1安装准备 (5)1.1.1系统版本号 (5)1.1.2安装需要的软件包 (5)1.2安装base os (7)1.2.1安装步骤 (7)1.3系统设置 (14)1.3.1OS 初始时间、时区设置 (15)1.3.2修改Root用户的口令 (15)1.3.3安装额外所需的Fileset (16)1.3.4安装系统补丁 (16)1.3.5设置登陆用户数、用户进程数 (17)1.3.6配置主机解析顺序 (18)1.3.7OS 基本分区调整(rootvg) (18)1.3.8镜像rootvg (19)2第二章备份与恢复 (20)2.1rootvg的备份与恢复 (20)2.1.1准备系统备份 (20)2.1.2rootvg的备份 (20)2.1.3rootvg的恢复 (21)2.1.4系统恢复后应用数据的恢复 (22)2.2非rootvg卷组的备份与恢复 (22)2.2.1非rootvg卷组的备份 (22)2.2.2非rootvg卷组的恢复 (23)2.3基于文件和目录的备份与恢复 (23)2.3.1使用tar命令进行文件的备份恢复 (23)2.3.2使用backup命令对文件目录进行备份 (24)2.3.3使用restore命令进行文件恢复 (24)2.3.4使用smit菜单进行文件目录恢复 (25)3第三章系统维护 (25)3.1巡检内容 (25)3.1.1机房要求 (25)3.1.2设备故障灯分类• (25)3.1.3系统错误报告的检查 (26)3.1.4有否发给root用户的错误报告(mail): (26)3.1.5文件系统的检查: (26)3.1.6磁带机清洁的检查: (26)3.1.7网络的检测: (27)3.1.8HACMP 配置检测 (27)3.1.9系统硬件诊断: (27)3.1.10补丁程序(PTF)的检查 (27)3.2文件系统管理 (28)3.2.1创建pv (28)3.2.2创建VG (30)3.2.3创建LV (31)3.2.4创建FS (32)3.3网络管理 (32)3.3.1网卡速率和通讯方式 (32)3.4日志管理 (38)3.4.1日志进程 (38)3.4.2查看日志 (39)3.4.3清理日志 (40)3.5性能调优 (41)3.5.1性能调优流程图 (41)3.5.2性能分析工具 (42)3.5.3核心参数的调整 (48)3.5.4交换区的设置 (49)3.6故障定位 (50)3.6.1故障的定义 (50)3.6.2故障信息的收集 (50)3.6.3硬件故障定位方法 (51)3.6.47133 磁盘柜的故障定位 (52)3.6.5软件故障定位方法 (52)3.7经典案例 (53)3.7.1在根目录执行rm *的恢复 (53)3.7.2无法使用root帐户登陆的恢复 (54)3.7.3替换损坏的镜像卷组硬盘 (56)3.7.4无法创建文件系统 (56)3.7.5无法卸载文件系统 (57)3.7.6系统启动引导故障 (57)4第四章hacmp安装配置 (60)4.1Hacmp 的软件安装 (60)4.1.1安装前提 (60)4.1.2开始安装 (60)4.1.3打补丁 (61)4.1.4重启机器 (61)4.2hacmp5.1 的配置 (61)4.2.1双机信任关系配置 (61)4.2.2配置ip (61)4.2.3添加cluster和node (63)4.2.5添加application server (65)4.2.6添加共享vg , jfs (65)4.2.7创建资源组 (68)4.2.8检查和同步hacmp配置 (69)4.2.9扩展配置 (71)4.2.10添加hdisk heart beat 网络和设备 (73)4.2.11配置永久的IP标识(persistent IP label) (75)4.3Hacmp 的监控和问题诊断 (77)4.3.1Clstat 监控hacmp (77)4.3.2启动hacmp时选择 (77)4.3.3执行clstat (78)4.4hacmp开关机 (78)4.4.1hacmp开机 (78)4.4.2hacmp关机 (79)参考书目 (79)第一章AIX安装配置1.1 安装准备1.1.1系统版本号系统版本号AIX5.2-04HACMP版本号HACMP5.1&PATCH1.1.2安装需要的软件包Java131.adtJava131.extJava131.rteX11.DtX11.adtX11.appsX11.basepatX11.vsmX11.motifbosbos.64bitbos.INedbos.acctbos.adtbos.alt_disk_install bos.cdmount bos.cifs_fsX11.vsmX11.motifbosbos.64bitbos.INedbos.acctbos.adtbos.alt_disk_install bos.cdmount bos.cifs_fsbos.perfbos.pkcs11bos.pmapibos.svpkgbos.sysmgtbos.txtbos.upifor_ls.baseifor_ls.java perfagent.tools perl.rteperl.man.en_US ppe.xprofiler rsct.basicpat.basic pat.clientsrsct.coresysmgt.sguidesysmgt.websmsysmgt.websm.diskarray1.2 安装base os1.2.1安装步骤(1)主机加电后,敲击键盘<5>键,RS/6000将从安装介质上引导;(2)显示器显示如下信息,要求用户选择主控台。
AIX环境下IBMIHS安装手册

AIX环境下IBMIHS-2.0.47.1(Apache2.0 AIX版本)安装手册上海建行信息技术部2007年7月文档修订记录修订日期版本号修订内容简述修订者审核2007-07-07 1.0 建立文档目 录1安装IBMIHS (2)1.1 以console方式安装 (2)1.2 以X-windows方式安装 (2)2配置IBMIHS (8)2.1 更改启动用户 (8)2.1.1 以root用户启动IBMIHS (8)2.1.2 以其他用户启动IBMIHS (9)2.2 对WebLogic集群的支持 (9)3通过浏览器对apache进行监控 (10)4让apache支持通过不同端口访问不同应用 (11)1安装IBMIHS1.1 以console方式安装1.解压安装程序使用root用户以X-windows方式登录AIX系统,变更当前目录到IBMIHS安装包目录下并执行命令“tar xvf IHS-2.0.47.1” ,将IBMIHS2.0.47.1安装包解压到当前目录。
2.执行以下命令进行安装:“cd IHS-2.0.47.1”“java –jar setup.jar”注:安装目录默认/usr/IBMIHS/,可以根据实际情况进行更改。
通过console 方式安装尚未成功过。
1.2 以X-windows方式安装1.解压安装程序使用root用户以X-windows方式登录AIX系统,变更当前目录到IBMIHS安装包目录下并执行命令“tar xvf IHS-2.0.47.1” ,将IBMIHS2.0.47.1安装包解压到当前目录。
2.运行X-manager图1-1 X-manager运行界面3.创建新的连接图1-2 创建X-manager连接1图1-3 创建X-manager连接2 4.登录AIX系统图1-4 登录界面5.单击Terminal图1-5 运行菜单打开Terminal6.进入解压后的目录并执行java –jar setup.jar安装程序图1-6 运行命令7.执行安装图1-7 安装界面1图1-8 安装界面28.更改安装路径:目录默认/usr/IBMIHS/ 改为/home/ap/ssbp/IHS图1-9 安装界面39.选择安装类型图1-10 安装界面4图1-11 安装界面5 10.更改HTTP端口为8080(默认为80)图1-12 安装界面611.单击next,结束程序安装2配置IBMIHS2.1 更改启动用户2.1.1以root用户启动IBMIHS1.修改配置文件执行命令“vi /usr/IBMIHS/conf/httpd.conf”,修改ServerName节点,把本机器hosts 文件里面对应ip的hostname填写进去例如:ServerName hdyIBMIHS默认端口为80,如果需要改动,那么修改Listen节点2.验证配置文件执行以下命令以检查httpd.conf文件是否存在格式错误cd /usr/IBMIHS/bin./apachectl –t3.启动IHS如果没有错误,执行以下命令启动IBMIHS./apachectl start使用以下命令查看IBMIHS进程ps –ef|grep httpd如果出现启动失败,访问以下文件查看出错信息vi /usr/IBMIHS/logs/error_log4.停止IBMIHS./apachectl stop2.1.2以其他用户启动IBMIHS1.修改相关文件的权限如果以root以外的用户启动IBMIHS,那么需要在启动前执行以下操作(假设使用informix用户组的ssbp用户启动IBMIHS):将conf目录以及该目录下面的文件所属的组改为今后需要启动HIS的用户所在的组 chgrp informix /usr/IBMIHS/conf /usr/IBMIHS/conf/*将conf目录以及该目录下面的文件增加组对其的写权限chmod g+w /usr/IBMIHS/conf /usr/IBMIHS/conf/*将logs目录以及该目录下面的文件所属的组改为今后需要启动HIS的用户所在的组 chgrp informix /usr/IBMIHS/logs /usr/IBMIHS/logs/*将logs目录以及该目录下面的文件增加组对其的写权限chmod g+w /usr/IBMIHS/logs /usr/IBMIHS/logs/*2.修改配置文件修改httpd.conf文件,将Listen节点的端口号改为1024以上。
IBM-AIX-NIM-安装实例
IBM AIX NIM 安装实例基本操作系统的安装一环境:两台f50 :test1 172.16.3.201test2 172.16.3.202操作系统; AIX 5.2 ml01其中:test1 作为servertest2 作为client二在AIX 5.2 的操作系统上默认客户端的软件就已经安装了。
bos.sysmgt.nim.client 5.2.0.10 COMMITTED Network Install Manager 三在server上安装nim server 软件bos.sysmgt ALL@ 5.2.0.0 Filesystem Quota Commands@ 5.2.0.0 License Management@ 5.2.0.10 Network Install Manager - Client Tools+ 5.2.0.10 Network Install Manager - Master Tools+ 5.2.0.10 Network Install Manager - SPOT@ 5.2.0.10 Software Error Logging and Dump Service Aids@ 5.2.0.10 Software Trace Service Aids@ 5.2.0.10 System Backup and BOS Install Utilities@ 5.2.0.10 System Management Interface Tool (SMIT)+ 5.2.0.0 Trace Report GUI四配置nim server.在test1 上:smitty nim >> config nim environment >>config a basic nim environment (easy startup > >Initialize the NIM Master:* Primary Network Interface for the NIM Master [en0]Basic Installation Resources:* Input device for installation images [cd0]* LPP_SOURCE Name [lpp_source1]* LPP_SOURCE Directory [/export/lpp_source]Create new filesystem for LPP_SOURCE? [yes]Filesystem SIZE (MB) [650]VOLUME GROUP for new filesystem [rootvg]* SPOT Name [spot1]* SPOT Directory [/export/spot]Create new filesystem for SPOT? [yes]Filesystem SIZE (MB) [350]VOLUME GROUP for new filesystem [rootvg]Create Diskless/Dataless Machine Resources? [no]Specify Resource Name to Define:ROOT (required for diskless and dataless) [root1]DUMP (required for diskless and dataless) [dump1]PAGING (required for diskless) [paging1]HOME (optional) [home1]SHARED_HOME (optional) [shared_home1]TMP (optional) [tmp1]Diskless/Dataless resource directory [/export/dd_resource]Create new filesystem for resources? [yes]Filesystem SIZE (MB) [150]回车后,系统开始自己创建jfs : /export/lpp_source从cd0 上向; /export/lpp_source/lpp_source1 复制安装映像。
在AIX5.3下配置、安装NIM (图文并茂)
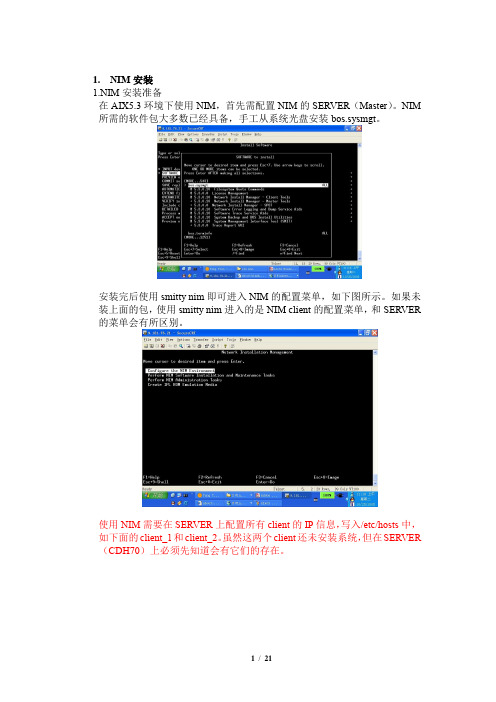
1.NIM安装1.NIM安装准备在AIX5.3环境下使用NIM,首先需配置NIM的SERVER(Master)。
NIM 所需的软件包大多数已经具备,手工从系统光盘安装bos.sysmgt。
安装完后使用smitty nim即可进入NIM的配置菜单,如下图所示。
如果未装上面的包,使用smitty nim进入的是NIM client的配置菜单,和SERVER 的菜单会有所区别。
使用NIM需要在SERVER上配置所有client的IP信息,写入/etc/hosts中,如下面的client_1和client_2。
虽然这两个client还未安装系统,但在SERVER (CDH70)上必须先知道会有它们的存在。
NIM服务器配置在NIM 服务器上需配置的内容主要有网络,NIM的安装资源和客户端的管理。
以下是配置基本操作系统(BOS)安装环境的步骤。
首先配置网络,使用smitty nim进入,选择环境配置:选择Advanced Configuration,配置NIM Master,此时可设定NIM的网络名,SERVER上使用的网络接口。
回车后,SERVER完成配置,会启动NIM服务。
接下来,退回到环境配置的菜单中,配置NIM安装资源。
为了安装基本操作系统,需同时创建LPP和SPOT资源。
选择资源的SERVER,这里只配置了一台master。
在创建资源详细信息中,设置创建路径为cd0(在光驱中放入安装盘),分别输入所创建LPP和SPOT资源的名称,NIM默认会创建新的文件系统来存放这些资源。
创建BOS资源的时间会比较长,之后就可以退回前面菜单配置client了。
选择添加客户端。
输入客户端的名称,这里输入的名称最好已经在/etc/hosts中定义,否则会在详细信息中提示输入网关。
修改客户端的详细信息,大多数可以用默认的。
在创建完所有的客户端后,可以为客户端分组,同一组的机器就可以一起分配资源了。
退回到最初的菜单,选择NIM管理任务,定义组。
IBM-AIX操作系统的安装
AIX 操作系统的安装步骤一、AIX 操作系统的安装步骤二、扩展一个文件系统的大小三、安装Bundle四、安装Oracle 所需要的操作系统包五、安装操作系统补丁六、如何做系统镜像七、更改主机名八、如何给网卡配置IP 地址九、修改系统的配置参数一、AIX 操作系统的安装步骤我们使用来安装操作系统的。
主机接好电源,主机不开机(开关下的绿灯闪烁,LED 显示01 N V=F的状态。
T根据提示按2确认控制台(有时也可能提示按其他数字键如1或0等)一会会出现如下图所示界面,这时可以按5键直接进入光盘引导(一般机器出厂设置都是默认从光盘起),如果不能确定可以不按5,按1键进入如下图所示界面下面则选择5 S elect Boot Options进入下图所示界面按1 (Select Install/Boot Device) 并按Enter回车键进入下图所示界面按3 CD/DVD并按Enter回车键进入下图所示界面按4 IDE 并按Enter回车键进入下图所示界面按1并按Enter回车键进入下图所示界面按2并按Enter回车键进入下图所示界面按1并按Enter回车键进入下图所示界面前面黑色字体所说的按5如果能够直接进入也会进入如下图所示界面等待片刻,会出现绿色字体的界面如下图所示则根据提示键入1(注意根据提示键入,有时可能时提示键入别的数字键)并回车,确认控制台,一会出现如下图所示界面、选择“1”,安装期间使用英语。
选择“2”,改变安装设置。
选择“1”,系统设置选择“1”,进行新的完全安装。
选择安装到那块硬盘,通常是选择hdisk0。
选中的磁盘前有三个“>>>”符号选择完硬盘回车继续又出现如下图所示如果2中的语言不是English(United States)请进入2选择第48项的英文的1那一项即为English(United States),选择完毕进入3中More options 如下图根据用户需求选择系统内核和JFS 类型,然后再选择“7”选择“3”,把Server Bundle 安装上。
IBM AIX 系统安装详细过程及注意事项
第一章是考试内容的说明,省略。
2、系统安装+++++++++++++++++++++++++++++++++注意:在安装AIX之前,要保证系统有足够的磁盘空间,否则安装会失败。
[安装启动方法]安装AIX,系统需要从CD-ROM启动。
如果是MCA机器,把钥匙面板转到Service的位置。
1、打开系统电源2、放入安装光盘入CD-ROM。
3、如果是MCA机器,这一步省略。
如果是PCI机器:当Keyborad指示出现在屏幕上时(在ASCII终端上是一个keyboard单词,在图形终端上是一个keyboard图标);按F5或5(直接连接的键盘按F5,ASCII终端按5),这将临时修改bootlist而从CD-ROM启动。
4、此时,系统将从CD-ROM启动,如果系统没有系统并且进入了SMS,则说明安装CD有问题。
检查其是否正确,重试。
5、之后就到选择控制台和语言的屏幕等等。
6、在所有的安装定制选择完毕,开始安装时,MCA机器应该把钥匙面板转到Normal位置。
TCB(信任计算环境):提供一个安全的计算环境,必须要在最初安装BOS的时候选择,以后不能安装。
AIX的3种安装方法全新安装:适用于之前没有安装AIX或是想重装整个rootvg或是要装TCB而不得不安新安装的情况。
完全覆盖rootvg的内容。
移植安装:适用于想保存rootvg并升级到新版AIX的情况。
只覆盖/tmp文件系统的内容。
在安装过程中,安装程序将确定哪些软件必须被安装。
而之前被安装的软件均被保留。
当从AIX3.2升级时,/usr/lib/drivers, /usr/lib/microcode, /usr/lib/methods, /dev中的文件被删除。
因此所有相关的设备驱动必须被重装。
不管怎样,移植安装需要至少8MB的磁盘未用空间。
否则安装会报错。
如果是从AIX4.3或以上升级,会出现一个配置屏幕给你选择,包括:列出目前系统上已经安装且与新版本AIX不兼容的软件;列出将被删除的文件;取消安装等。
IBM小型机安装AIX 5.3操作系统
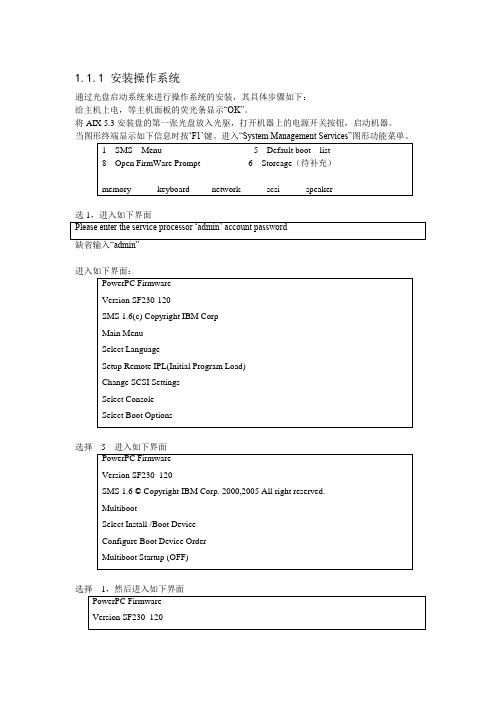
1.1.1安装操作系统通过光盘启动系统来进行操作系统的安装,其具体步骤如下:给主机上电,等主机面板的荧光条显示“OK”。
将AIX 5.3安装盘的第一张光盘放入光驱,打开机器上的电源开关按钮,启动机器。
当图形终端显示如下信息时按…F1‟键。
进入“System Management Services”图形功能菜单。
选1,进入如下界面进入如下界面:选择5进入如下界面选择1,然后进入如下界面选择4,进入如下界面选择1,然后进入如下界面:选择1,然后进入软件安装启动界面,系统在通过光盘引导下开始操作系统系统的安装。
设定安装参数在如下的安装界面中首先按…F1‟键,然后按回车键设置系统控制台按安装方式选项1:按照缺省方式安装操作系统。
选项2:如果要改变安装方式和系统设置。
选项3:进入系统维护模式。
在如上的安装界面中选择“1”,重新设置系统的安装方式后有两个功能选项可以供安装者对系统的安装方式进行重新设置。
A、“Method of Installation”(安装方式),其中有三种安装方式可供选择:- New and Complete Overwrite Installation.(完全覆盖)- Migration Installation.(升级安装)来安装操作系统,即选择“1”,然后进入如下界面选择hdisk0作为安装的目标盘。
安装选择完成后,系统将安装选择小计如下:在完成系统安装方式后将正式开始从光盘安装操作系统系统进入安装工程。
安装过程历时约半个小时左右操作系统安装完成之后系统将自动重新启动,待系统重启后将进行系统配置和操作系统扩展包的安装。
1.1.2安装后系统配置操作系统BOS安装完毕后,机器会自动启动进入“系统配置”界面,选择“接收许可证”选项,以接受操作系统的电子许可证。
选择“Exit the Configuration Assistant”选择next。
operatingsystem“,完成。
此时,新建和完全覆盖BOS安装完成了,并且系统的初始配置也完成了。
IBM小型机安装部署

AIX HACMP安装部署2目录第 1 章小型机系统安装 (1)1.1 启动服务器 ...............................................................................................16 1.2 选择安装控制台 .......................................................................................16 1.3 安装 AIX 操作系统....................................................................................16 1.4 给 rootvg 做镜像 ......................................................................................20 第 2 章 设备连接、启动 .........................................................................................1 2.1 拓扑图 .........................................................................................................1 2.2 设备启动顺序 (1)第 3 章 HMC 配置 ...................................................................................................2 3.1 HMC 启动 .................................................................................................... 3.2 HMC 网络配置 ............................................................................................3 3.3 添加受管服务器 .........................................................................................5 3.4 登陆受管服务器 .........................................................................................8 3.5 添加另一台受管服务器 .............................................................................9 3.6 登陆另一台受管服务器 ...........................................................................13 3.7 注销 HMC ..................................................................................................15 3.8 关闭 HMC ..................................................................................................15 第 4 章 操作系统环境配置 ...................................................................................21 4.1 文件集以及补丁安装 . (21)4.1.1 所需安装的 bundle ........................................................................21 4.1.2 所需安装的文件集. (21)4.1.3 修改 limits 文件和 hosts 文件 (25)4.2添加 tty 设备 (25)第 5 章 HACMP 安装配置 (27)5.1 HACMP 软件安装......................................................................................27 5.2 配置共享卷组 . (28)5.2.1 非并发卷组 (28)5.2.2文件系统创建 (29)5.2.3导入卷组 (29)5.3HACMP配置 (30)5.3.1添加集群 (30)5.3.2添加节点 (30)5.3.3Discover配置 (32)5.3.4添加网络 (32)5.3.5添加通信接口和设备 (35)5.3.6添加管理IP (36)5.3.7App-server配置 (38)5.3.8服务IP配置 (39)5.3.9资源组配置 (40)5.3.10效验同步 (42)5.3.11集群功能测试 (44)第6章Oracle10g安装 (45)6.1.1Oracle用户和组的创建 (45)6.1.2环境变量设置 (45)6.1.3Oracle软件安装 (46)6.1.4建库 (57)6.1.5监听配置 (63)6.1.6备机上oracle安装配置 (75)第1章设备连接、启动1.1拓扑图以太网络System x3550HMC1.2设备启动顺序首先启动HMC,在HMC进入系统后,并配置HMC的网卡,配置完成后再启动存储设备,存储设备启动3分钟后再启动光纤交换机,光纤交换机启动3分钟后最后给小型机加电,加电正常后启动小型机。
- 1、下载文档前请自行甄别文档内容的完整性,平台不提供额外的编辑、内容补充、找答案等附加服务。
- 2、"仅部分预览"的文档,不可在线预览部分如存在完整性等问题,可反馈申请退款(可完整预览的文档不适用该条件!)。
- 3、如文档侵犯您的权益,请联系客服反馈,我们会尽快为您处理(人工客服工作时间:9:00-18:30)。
IBM AIX NIM 安装实例基本操作系统的安装一环境:两台f50 : test1 172.16.3.201test2 172.16.3.202操作系统; AIX 5.2 ml01其中:test1 作为servertest2 作为client二在AIX 5.2 的操作系统上默认客户端的软件就已经安装了。
bos.sysmgt.nim.client 5.2.0.10 COMMITTED Network Install Manager 三在server上安装nim server 软件bos.sysmgt ALL@ 5.2.0.0 Filesystem Quota Commands@ 5.2.0.0 License Management@ 5.2.0.10 Network Install Manager - Client Tools+ 5.2.0.10 Network Install Manager - Master Tools+ 5.2.0.10 Network Install Manager - SPOT@ 5.2.0.10 Software Error Logging and Dump Service Aids@ 5.2.0.10 Software Trace Service Aids@ 5.2.0.10 System Backup and BOS Install Utilities@ 5.2.0.10 System Management Interface Tool (SMIT)+ 5.2.0.0 Trace Report GUI四配置nim server.在test1 上:smitty nim >> config nim environment >>config a basic nim environment (easy startup > >Initialize the NIM Master:* Primary Network Interface for the NIM Master [en0]Basic Installation Resources:* Input device for installation images [cd0]* LPP_SOURCE Name [lpp_source1]* LPP_SOURCE Directory [/export/lpp_source]Create new filesystem for LPP_SOURCE? [yes]Filesystem SIZE (MB) [650]VOLUME GROUP for new filesystem [rootvg]* SPOT Name [spot1]* SPOT Directory [/export/spot]Create new filesystem for SPOT? [yes]Filesystem SIZE (MB) [350]VOLUME GROUP for new filesystem [rootvg]Create Diskless/Dataless Machine Resources? [no]Specify Resource Name to Define:ROOT (required for diskless and dataless) [root1]DUMP (required for diskless and dataless) [dump1]PAGING (required for diskless) [paging1]HOME (optional) [home1]SHARED_HOME (optional) [shared_home1]TMP (optional) [tmp1]Diskless/Dataless resource directory [/export/dd_resource]Create new filesystem for resources? [yes]Filesystem SIZE (MB) [150]回车后,系统开始自己创建jfs : /export/lpp_source从cd0 上向; /export/lpp_source/lpp_source1 复制安装映像。
创建jfs :/export/spot从映像资源:lpp_source 安装spot 资源,并且存储在:/export/spot/spot1 中五添加客户机到nim环境客户机在不同的状态会有不同的添加方法。
并且在同一状态也有两种不同方法。
我们先介绍客户机上有操作系统的情况。
在这种情况下,客户机本身有操作系统,我们可以从客户机上经过配置把自己加入到nim环境中,也可以从nim server上把客户机加入。
同时如果我们的客户机上有多块硬盘,我们可以选择从nim server 上覆盖安装有操作系统的硬盘或者把基本操作系统安装到其他硬盘上。
1.在客户机上:smitty nim >> Configure Network InstallationManagement Client Fileset* Machine Name [test2]* Primary Network Install Interface [en0]* Host Name of Network Install Master [test1]Hardware Platform Type [chrp]Kernel to use for Network Boot [mp]IPL ROM Emulation Device []Comments []Alternate Port Numbers for Network Communications (reserved values will be used if left blank)Client Registration []注意,在两台机器的/etc/hosts 要可以彼此正确解析这里我们/etc/hosts172.16.3.201 test1172.16.3.202 test2回车命令成功后,会在/etc/下生成 niminfo 文件如下:#------------------ Network Install Manager ---------------# warning - this file contains NIM configuration information# and should only be updated by NIMexport NIM_NAME=test2export NIM_HOSTNAME=test2export NIM_CONFIGURATION=standaloneexport NIM_MASTER_HOSTNAME=test1export NIM_MASTER_PORT=1058export NIM_REGISTRATION_PORT=1059export NIM_LICENSE_ACCEPT=yesexport RC_CONFIG=rc.bos_instexport NIM_BOSINST_RECOVER="/../SPOT/usr/lpp/bos.sysmgt/nim/methods/c_bosinst_env -a hostname=test2"export SPOT=tscf50:/export/spot/spot1/usrexport NIM_CUSTOM="/../SPOT/usr/lpp/bos.sysmgt/nim/ methods/c_script -a location=test1:/export/nim/scripts/test2.script"export NIM_BOS_IMAGE=/SPOT/usr/sys/inst.images/bos export NIM_BOS_FORMAT=rteexport NIM_HOSTS=" 172.16.3.202:test2 172.16.3.201:test1 " export NIM_MOUNTS=" test1:/export/lpp_source/lpp_source1:/SPOT/usr/sys/inst.images:dir "2 。
我们也可以选择在nim server 上加入客户机。
Smitty nim >> Perform NIM Administration Tasks>>Manage Machines>>Define a Machine* Host Name of Machine [test2](Primary Network Install Interface)选择网络为ent* NIM Machine Name [test2]* Machine Type [standalone]* Hardware Platform Type [chrp]Kernel to use for Network Boot [mp]Primary Network Install Interface* Cable Type [tp]Network Speed Setting []Network Duplex Setting []* NIM Network [ent-Network1]* Network Type ent* Ethernet Type Standard* Subnetmask []* Default Gateway Used by Machine []* Default Gateway Used by Master []* Host Name test2Network Adapter Hardware Address [0]Network Adapter Logical Device Name []IPL ROM Emulation Device []CPU Id []Machine Group []六从nim server 向客户机安装基本操作系统1.从test1 上:smitty nim_bosinst >> r6f50 machines standalone>> rte - Install from installation images >>>> lpp_source1 resources lpp_sourc >>>> spot1 resources spot回车后等到ok 出现,接下来,test2 客户机上就会出现警示:nim 服务已经启用,机器将被安装操作系统。
