微软IAS接入配置手册
补充资料-网络安全-第6章-使用Windows系统IAS服务搭建AAA服务器-V1.0
使用Windows系统IAS服务搭建AAA服务器——实现802.1x认证2网络安全高级应用6在课程中讲解了使用ACS软件搭建AAA服务器实现802.1x认证。
那么,如果有些公司不想使用ACS软件搭建AAA服务器进行认证,有没有其他的方法来配置AAA服务器呢?下面将要讲解的是使用Windows Serve系统中提供的IAS服务来构建AAA服务器。
在一个使用Windows域管理的公司中,如果使用IAS搭建AAA服务器可以直接使用AD中的账户和组而不必另外重新配置组合账号。
在用户登陆的过程中将用户登陆的账号和密码发送到AAA服务器进行认证,如果登陆成功则认证也会成功,AAA服务器就会为主机授权(VLAN、IP等);如果登录失败认证也会失败。
这样在用户登陆的过程中就完成了认证过程。
使用IAS服务搭建AAA服务器的配置过程如下:1、安装Windows相关服务主要包括Windows域、IIS、CA、IAS,在安装时需要按照上述所排顺序进行安装。
可以最后安装DHCP服务器,并配置地址池。
具体服务器与客户端的安装和配置如下所示:1)安装域,域名为:;添加用户benet,密码test;新建组vlan 7;将benet加入vlan7;然后配置域策略。
2)将域策略中“计算机配置→Windows设置→安全设置→账户策略→密码策略”,启用“用可还原的加密来储存密码”图6.1 配置域1 图6.2 配置域23)配置benet用户属性,在账户选项中选中使用可逆的加密保存密码。
4)配置benet用户,允许其进行拨入访问。
6使用Windows系统IAS服务搭建AAA服务器图6.3 配置用户1 图6.4 配置用户25)安装IIS和CA服务器,参考《Windows网络服务》相关章节6)安装IAS(Internet 验证服务)图6.5 安装IAS7)配置IAS服务8)建立新的Radius客户端(即接入设备):填入IP地址。
34网络安全高级应用6图6.6 新建RADIUS 客户端1图6.7 新建RADIUS 客户端29)建立新的Radius 客户端:选择使用的协议,此处选择RADIUS Standard ,并配置共享密码10)建立新的访问策略图6.8 新建RADIUS 客户端3图6.9 新建远程访问策略111)命名策略名为vlan 712)选择以太网连接6使用Windows系统IAS服务搭建AAA服务器图6.10 新建远程访问策略2 图6.11 新建远程访问策略313)选择组并添加在域中创建的组vlan 7,表示组中包含的用户名和密码都可以通过认证。
案例:配置和部署IAS RADIUS
配置和部署IAS RADIUS在Windows Server 2003中,附带了一款稳定,安全和强健的RADIUS(也被称作AAA)服务器。
如果你在互联网上搜索有关Microsoft IAS的漏洞,你会发现根本找不到。
IAS服务已经安全的运行了数年而没有进行任何修补工作了。
如果你的Windows Server 2003主机已经设置成只允许IAS请求,同时防火墙也封闭了其它的端口,并且Windows Server 2003系统上没有运行其它服务,那么你可以确保这个IAS RADIUS服务器可以无故障的持续运行数年而不需要重新启动。
安装IAS插入Windows Server 2003的安装光盘,在控制面板区域打开“添加和删除程序”,并选择“安装和卸载Windows组件”即可。
之后你会看到如图一所示的窗口,通过下拉滚动条,找到“网络服务”。
由于我们不需要安装全部网络服务,因此应该高亮该项目,并选择“详细信息”按钮。
(图1.1)网络服务接下来你会看到如图 1.2所示的窗口,向下滚动,找到"Internet验证服务" (Internet Authentication Service)IAS 并选中。
(图1.2)选择IAS安装IAS后,你就可以通过管理工具或者开始菜单来启动IAS 了。
(图1.3)设置日志策略我们首先要做的是检查并设置日志策(图1.4)。
右键点击“Internet验证服务(本地)”,然后选择属性。
(图1.4)IAS 属性接下来会看到如图五所示的窗口。
如果选择了窗口下方的两个复选框,那么就可以通过Windows的事件查看器看到成功和失败的IAS验证请求了。
如果你喜欢使用文本或基于SQL的日志,就不需要选择这两项了,除非你希望通过各种途径都能查看到IAS的日志。
(图1.5)本地属性如果选择了“端口”标签,你会看到如(图1.6)所示的窗口。
其中显示了默认的RADIUS 端口,一般来说,我们都采用这些端口作为标准的RADIUS通信端口。
IAS-3操作说明书V1.0

目录一、 操作面板--------------------------------------------2二、 触摸屏操作------------------------------------------2三、 报警、状态提示极其处理------------------------------12四、 其他画面-------------------------------------------13五、 电气原理图-----------------------------------------17前言:此版本为IAS-3系列三轴机械手的操作说明,IAS-3三轴机械手为天通吉成机器技术有限公司自主开发的经济型机械手,主要用于配套我公司生产的粉末成型机,实现自动取件、自动质检、产品归类、自动排列、自动换舟皿,并反馈产品质量情况,实现粉末成型机在线自动调整功能。
该产品主要部件伺服定位电缸全部采用标准型整体式电缸,防尘性能优良,采购知名品牌(SMC)电缸,质量保证,相对市场同类产品具有美观大方,可靠性好,配套性强、经济实用、操作简便直观等特点。
一、 操作面板启动按钮:机械手完成原点回归准备就绪后,按启动则机械手开始自动运行。
停止按钮:按下后机械手系统自动停止至安全位置。
复位按钮:消除报警。
急停按钮:按下后整机停机,通过旋转复位。
触摸屏:集中了操作IAS机械手自动排坯系统的主要操作,在第二部分详细说明。
二、 触摸屏操作1)开机画面在此界面按任意位置切换到主菜单画面2)主菜单画面触摸屏窗口切换的主菜单,可通过按【运行监视画面】等按键分别切换至对应视窗口,同时在分窗口分别设有主菜单按钮,可返回次画面。
3)运行监视画面主要作为自动运行时查看生产情况,随时掌握产量与设备良品率等情况。
按钮说明:主菜单:返回主菜单画面(注:以此类推,后面画面不再说明)。
点位校准:进入点位校准画面。
取件计数:显示总共拾取产品数量,包含良品与不良品。
IAS服务器配置
IAS服务器配置一、简介IAS(Internet Authentication Service)服务器是一种基于Windows 操作系统的RADIUS服务器,用于提供认证、授权和会计(AAA)服务。
在网络环境中,IAS服务器辅助实现用户认证和访问控制,保障网络安全和资源利用的有效性。
本文将介绍IAS服务器的配置步骤和要点。
二、硬件要求在进行IAS服务器配置前,首先需要确保服务器硬件符合要求。
通常要求服务器具备以下硬件配置:1. 处理器:建议使用最新的多核处理器,以提供更好的性能;2. 内存:建议使用至少8GB内存,以确保服务器能够运行起来;3. 硬盘空间:需要足够的硬盘空间来存储IAS服务器所需的各种文件和日志。
三、操作系统要求IAS服务器的配置需要基于特定版本的Windows操作系统进行,以下是常用的操作系统版本及要求:1. Windows Server 2008及更高版本:支持32位和64位版本的Windows Server操作系统,确保安装了最新的服务包和更新;2. Windows 7及更高版本:用于搭建IAS服务器测试环境,提供给非商业用户使用。
四、安装IAS服务器1. 打开控制面板,选择“程序”→“打开或关闭Windows功能”,找到“Internet信息服务(IIS)”并选择;2. 单击“详细信息”,在列表中勾选“Internet认证服务”;3. 单击“确定”并等待安装完成。
五、配置IAS服务器1. 打开IAS管理控制台,单击“规则”节点,在右侧面板右键单击并选择“新建RADIUS客户端”;2. 在“名称和地址”页面,填写名称和IP地址,用于标识和识别客户端;3. 在“权限”页面,指定客户端使用的共享密钥,并确保此密钥在客户端和服务器之间保持一致;4. 在“RADIUS属性”页面,选择要发送给客户端的RADIUS属性,如需要具体的认证方式或属性,请按照实际需求进行配置;5. 单击“确定”完成客户端的配置。
Internet Authentication Service (IAS)
Configuring an IAS Server
Add RADIUS Client Client Information Specify information regarding the client.
Use an IP address, if possible
Client address (IP or DNS): 192.168.1.200 Client-Vendor
Verify…
Select Microsoft if Microsoft using Routing and Client must always send the signature attribute in the request Remote Access
Shared secret: Confirm shared secret:
Windows Components Wizard Windows Components You can add or remove components of Windows 2000. To add or remove a component, click the check box. A shaded box means that only part of the component will be installed. To see what's included in a component, click Details. Networking Services Components: To add or remove a component, click the check box. A shaded box Management and Monitoring Tools means that only part of the component will be installed. To 5.0 MB see what's included in a component, click Details. Message Queuing Services 2.6 MB Networking Services 3.5 MB Subcomponents of Networking Services: 0.0 MB Other Network File and Print Services COM Internet Services Proxy 0.0 MB 1.1 MB Domain Name System (DNS) Description: Contains a variety of specialized, network-related Dynamic Host Configuration Protocol (DHCP) 0.0 MB services and protocols. Internet Authentication Service 0.0 MB Total disk space required: 0.8 MB Details… QoS Admission Control Service 0.0 MB Space available on disk: 5962.6 MB Simple TCP/IP Services 0.0 MB Description: Enables authentication, authorization and accounting Next of dial-up and PN users. IAS supports the RADIUS > Cancel < Back protocol Total disk space required: 0.8 MB Details… Space available on disk: 5962.6 MB OK Cancel
域无线安全认证方案附配置(AD IAS)
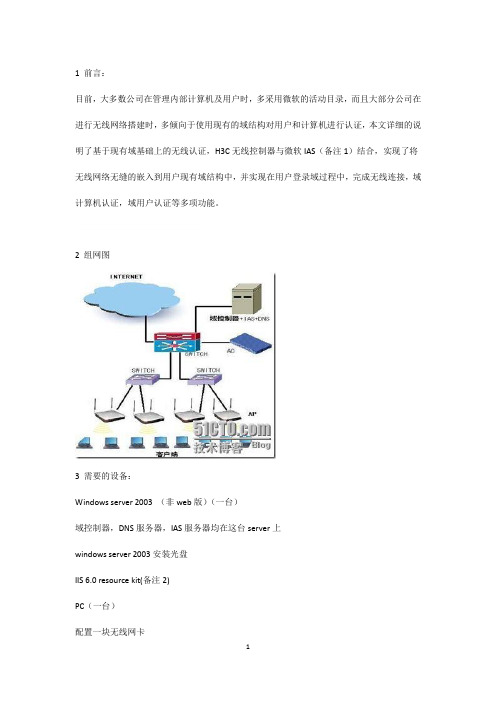
目前,大多数公司在管理内部计算机及用户时,多采用微软的活动目录,而且大部分公司在进行无线网络搭建时,多倾向于使用现有的域结构对用户和计算机进行认证,本文详细的说明了基于现有域基础上的无线认证,H3C无线控制器与微软IAS(备注1)结合,实现了将无线网络无缝的嵌入到用户现有域结构中,并实现在用户登录域过程中,完成无线连接,域计算机认证,域用户认证等多项功能。
2组网图
3需要的设备:
Windows server 2003(非web版)(一台)
域控制器,DNS服务器,IAS服务器均在这台server上
windows server 2003安装光盘
IIS 6.0 resource kit(备注2)
PC(一台)
配置一块无线网卡
AC(任意型号)(一台)
AP(任意型号)(若干)
4.2.1配置端口
#
interface WLAN-ESS1
port-security port-mode psk
port-security tx-key-type 11key
port-security preshared-key pass-phrase 12345678
undo dot1x handshake
注意,上图中我们看到允许访问的计算机组和用户组,这两个组之间的关系是“或“,即符合其中任意一项都可以成功接入,如果仅想使用计算机验证,则删除掉用户组验证就可以。反之亦然。
点击下一步
在点击下一步前,请先进行备注2的操作,备注2的操作是为了生成一个自签名证书,按照备注2操作完成后,点击配置(如果没有进行操作2,则会报告未找到证书)。
4详细配置:4.1 Windows server 2003端配置:
IAS安装配置文档

目录0介绍 (2)1安装IAS (2)2设置IAS (5)2.1在AD中注册 (5)2.2添加远程原称访问能策略 (9)2.2.1设置管理员组VPNAdmins远程管理策略 (9)2.2.2设置普通用户组VPNusers策略 (17)2.5创建远程请求策略, (20)0介绍IAS是微软Windows2000,Windows2003操作系统自带的一个服务,该服务可以作为一个RADIUS服务器来使用。
本项目中最终vpn客户端的身份认证考虑采用如下方式进行认证。
PIX接受vpn客户端连接请求,随后将用户输入的帐号信息传递到IAS,IAS检查其访问控制策略看用户是否符合,如符合则将用户帐号信息传递给AD,如帐号合法且远程拨入属性置为允许,则返回PIX认证成功,并且如果配置了可下载的访问列表,则所配置可下载ACL将被下载到客户端PIX上,最终形成每用户的访问控制列表。
1安装IAS进入控制面板,选择添加删除应用程序,添加Windows组件,选择网络服务,屏幕如下:按下详细信息,屏幕如下:按下确定按钮,开始安装,最后屏幕如下:安装完成2设置IAS2.1在AD中注册为了使作为RADIUS服务器的IAS能够使用AD中的用户帐号信息进行认证,需要将IAS在AD中进行注册。
本例中IAS安装在AD服务器上。
进入IAS服务,界面如下:鼠标右键点击Internet验证服务,选择在Active Directory中注册,屏幕显示如下:按下确定按钮,按下确定按钮。
添加客户端鼠标右键选择RADIUS客户端,选择新建RADIUS客户端,输入好记的名称,并输入客户端地址,按下下一步,屏幕如下:该输入,随后按下完成。
按下下一步,完成客户端添加。
2.2添加远程原称访问能策略2.2.1设置管理员组VPNAdmins远程管理策略2.2.1.1设置管理员组VPNAdmins远程管理策略输入策略名称,随后按下下一步,屏幕如下:策略名称根据实际情况修改为自己所需要的策略名称。
IAS的配置
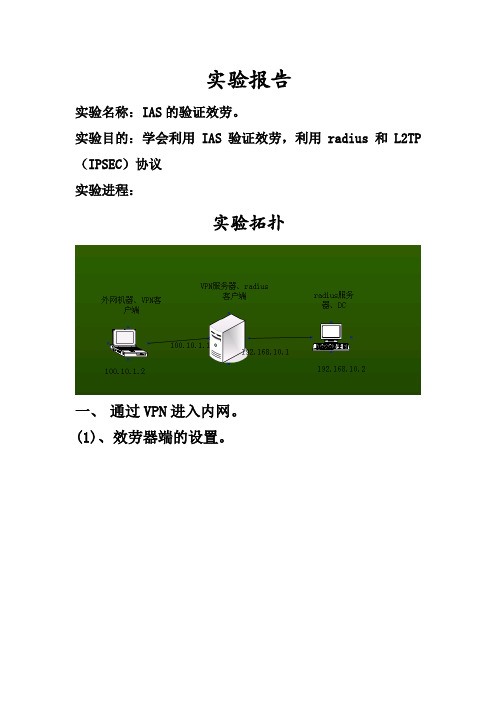
实验报告实验名称:IAS的验证效劳。
实验目的:学会利用IAS验证效劳,利用radius和L2TP (IPSEC)协议实验进程:实验拓扑一、通过VPN进入内网。
(1)、效劳器端的设置。
打开路由和远程访问操纵面板。
右击本地机械—配置并启用路由和远程访问选择远程访问。
同意VPN连接。
VPN的外网地址,选择“设置静态数据包挑选器来对选择的接口进行爱惜”,那么只许诺VPN通信通过选定的接口访问此效劳器,icmp包等不能够通过。
选择指定内网地址范围。
指定内网IP地址。
选择利用路由和远程访问来对连接请求进行身份验证。
若是选择设置效劳器和RADIUS效劳器一路工作那么会利用RADIUS效劳器进行身份验证设置RADIUS效劳器地址和RADIUS 一路工作的共享机密开启DHCP中继。
在VPN效劳器上添加能够登岸的用户。
设置此用户的拨入权限。
(2)、客户端的设置。
右击网上邻居点击新建连接向导。
选择连接到我的工作场所。
选择通过虚拟专用网(VPN)填写要连接到的公司名。
要连接到的主机(VPN效劳器地址)。
选择谁能够利用。
能够在桌面上添加一个快捷方式。
填写能够登岸到VPN的用户名和密码--连接登岸成功,已连接到公司ldf。
现在在外网机械上查看地址发觉有了内网地址。
内网的VPN效劳器保留一个内网地址。
右击端口—属性能够修改最多端口数。
在操纵台能够发觉有了一个活动的端口。
二、利用RADIUS效劳器和VPN效劳器一起利用。
(1)、RADIUS效劳器的配置。
添加INTERNET验证效劳打开Internet验证效劳。
右击RADUIS客户端—新建RADUIS客户端。
指定RADUIS的客户端(VPN效劳器)的名字和IP地址。
选择客户端供给商,填写共享机密(和客户端相同)。
请求必需包括消息验证程序属性能够不选(保证客户端也不选)。
添加能够登岸到内网的用户修该拨入的权限。
(2)、RADIUS客户端的配置。
右击本地机械—属性。
切换到平安选项卡,修改身份验证提供程序为RADIUS 身份验证。
IAS-L100 SIP融合通信系统用户手册说明书
目录第一章概述 (1)1.1、产品介绍 (1)1.2、产品规格 (1)第二章系统基本配置 (1)2.1、配置系统之前 (1)2.2 使用控制平台工作之前 (2)2.2.1登录系统 (2)2.2.2创建SIP账号 (6)2.2.3配置终端 (7)2.2.4配置分组 (10)2.2.5创建操作员 (12)2.3登录控制平台软件 (13)第三章电话系统配置 (15)3.1拨打电话 (15)3.1.1外部线路 (15)3.1.2拨号规则 (16)3.2接听电话 (17)3.2.1呼入路由 (17)3.2.2自动话务员 (18)第四章日志报表 (19)4.1通话日志 (19)4.2录音列表 (19)4.2.1通话录音 (19)4.2.2喊话录音 (20)4.2.3对讲录音 (20)4.2.4会议录音 (20)第五章系统配置 (22)5.1全局配置 (22)5.1.1缺省喊话音量 (22)5.1.2缺省告警音量 (22)5.1.3喊话提示音 (22)5.1.4振铃时长 (23)5.1.5 SIP设置 (23)5.1.6 SIP NAT设置 (24)5.1.7 Modbus设置 (24)5.1.8功能码 (25)5.2录音配置 (26)5.3提示音管理 (26)5.4标签管理 (27)5.5安全中心 (28)5.5.1入侵保护 (28)5.5.2 IP黑名单 (29)5.5.3 IP白名单 (29)第一章概述本文档主要是对成都智科通信技术股份有限公司(以下简称成都智科)的IAS-L100融合通信服务器的功能要点和功能配置等进行一个简要的说明,引导用户更好的使用融合通信广播系统。
该文档不涉及IAS-L100的硬件安装,关于IAS-L100的硬件安装说明请参考包装盒中的快速安装向导。
1.1、产品介绍IAS-L100是智科通信推出的一款基于SIP协议的智能化融合通信一体机,为用户提供开箱即用的一体化系统服务器。
IAS-L100安装的系统是整个智科SIP融合通信解决方案的核心,是所有融合通信业务功能的一个交互平台,通过这个平台可以实现广播,对讲,喊话,视频联动等一系列的业务功能。
iboss windows agent配置指南说明书
Table of ContentsOverviewLicensing RequirementsPrerequisites and GuidelinesPreparing the Web GatewaySteps Specific to Gen. 4 Agent SetupSteps Specific to Gen. 2/Gen. 3 Agent SetupAdditional ReferencesOverviewMost commonly, Agents are used to secure devices that leave the traditional local network boundary, for example, when a user takes their office laptop computer home with them. Historically, devices that were taken outside of the enterprise network would have required the use of a VPN with default routes to backhaul all data to the location where the physical gateway(s) and other services resided to ensure that the security policy was applied consistently. As drivers for VPN diminish (adoption of cloud SaaS solutions replace locally hosted services), residential bandwidth throughput increases and price decreases, cloud secure web gateway have become a more attractive option.VPNs may still be used for any locally hosted services that have not yet been migrated to the cloud, but all internet traffic can egress through the commodity Internet Service Provider and still be secured using iboss’distributed cloud gateways. The other common use case for deploying security agents is in circumstances where no local gateway is desired or necessary. An example use case for this is a satellite office or retail store. Licensing RequirementsCore, Malware Defense, or Data Loss Prevention iboss Cloud subscription.Prerequisites and GuidelinesAt least one local or cloud gateway with Mobile Agent licenses enabled.While it is possible to backhaul data to a local gateway, it is highly recommended to redirect mobile endpoint traffic to cloud gateways.It is recommended to leverage the inherent fault tolerance of the iboss distributed gateway platform by ensuring that more than one cloud gateway be used to secure mobile devices.Preparing the Web GatewayThe instructions for configuring Windows Mobile Client consist of preparing the web gateway to support offsite web security, decrypting traffic, and identifying the logged in user.Login to https://Navigate to Data Redirection > AgentsSelect the Default group, 1, from the group selection drop-down and choose the filtering group you are deploying the Windows Agent to.Enable Security Agent Filtering for the filtering groups you intend to support and click Save.Setting DescriptionUse session Encryption This toggle will activate the service.Enable VPN Auto Registration This toggle is not necessarily required (the toggle shown above demonstrates this disabled) but is an optional step for use with VPN mode.Configure Auto Login Agents to use Key for Group Switching this toggle to "Yes" causes users to be placed into groups based on the security key (parameter in the agent MSI setup file) rather than the group name.Use session Encryption When this feature is enabled AES encryption will be used. All new agentregistrations will be encrypted (when enabled) and all existing sessions thatare not encrypted will still function properly.Define a custom security key. Note this key as it will be necessary for agent configuration in later steps.Select your LDAP server from the "Extract Group From LDAP" setting.Note: If you do not have a centralized directory or prefer to decouple NetID SSO from the directory, skip this step as Gen. 4 agents do not support thisSave the settingsSteps Specific to Gen. 4 Agent SetupOption 1- Windows Agent via SAML and ProxyThe Generation 4 Windows agent accelerates proxy data redirection by automatically configuring the proxy settings on the workstation and injecting proxy authentication information and SAML authentication cookies into the proxy requests.Note: Proxy-based filtering will still work without agents but the agents will speed up the performance and reduce the number of logins the user will need to enter.Web Gateway Setup InformationThe Web Gateway must be configured to proxy with SAML-based authentication. To do this, log in to iboss Cloud and navigate to Data Redirection > Proxy > User Authentication Method > SAML. Click the Save when finished to preserve these settings.Agent SetupThe Download Windows Agent button will allow you to download the installation and configuration files for the Windows Mobile Client Agent.Extract the archive from the Windows folder. The archive contains a Windows Installation file (.msi) and a registry update file (.reg). Installation may be done manually or pushed via the publishing feature of Windows Server (/kb/816102). The latest installation files are always available via the 'Download Agent' button.Select the OS that you would like to use (taking care to select the appropriate 32- or 64-bit installer).Note: You’ll find a win7 and win8 install folder. The win7 installer folder is compatible with all Windows versions up to and including Windows 7. The win8 installer folder is compatible with Windows 7 and aboveSave the .msi to your desktop for quick access in the next steps.The Windows agent is configured through the system registry. The MSI file used to install the Windows agent may be pre-configured to set the desired values using an MSI editing tool such as Orca.Installing and Using OrcaOrca is a widely available tool used for editing the properties .msi files. Once Orca is installed on the system, you can use it to modify the .msi file that you just downloaded. Right click on the extracted file and choose Edit with Orca as shown here.This will bring up the interface shown below.Click on "Property" in the list of tables, then click on Property at the head of the table to organize it alphabetically. Edit the appropriate parameters (explained below) by typing in the corresponding field in the "Value" column. The following registry values are used to configure Gen 4 Proxy mode:Parameter DescriptionPARAM_RUNTIME_MODE Set to “gen4_saml”PARAM_GATEWAY_HOST Enter the Web Gateway address or cluster address here.E.g. PARAM_GATEWAY_PORT Enter the proxy port (available on the Proxy page under Settings). The default is 8009.PARAM_PROXY_MONITOR_INTERVAL This value (in milliseconds) controls how often the proxy settings will be checked by the agent (default and minimum is 1000 ms). If the settings are found to be different from what is configured in the registry, then the agent will update them.PARAM_PROXY_OVERRIDE These are addresses that will bypass the proxy server. At a minimum, every web gateway in the cluster must be added. E.g. cluster1 contains the web gateway *. Multiple server names must be separated by semi-colons.PARAM_SAML_SESSION_COOKIE Optional, if a SAML session cookie is known ahead of time then it can be specified here and the user would not need to log in. If unused, then set to null. If set in Orca and deployed to multiple workstations, all users would be deployed similarly.After the necessary parameters have been edited in Orca, save the file by clicking File > Save.Once you have modified the installer, install the appropriate .msi (either ibsa32.msi or ibsa64.msi) onyour computer by double-clicking the installer and following any prompts.Note: You can also push the installer via Active Directory. Make sure that the 64-bit installer is used for 64-bit systems and the 32-bit installer is used for 32-bit systems.This completes the install of the agent in SAML Proxy Mode.Option 2- Windows Agent Auto-Login ModeThe Generation 4 Windows agent accelerates proxy-based redirection by automatically configuring the proxy settings on the workstation and injecting cookies into traffic that will authenticate the endpoint and gateway to each other. Auto-Login mode allows iboss Agents and endpoints to be automatically registered and secured by a configured gateway without the need for manual input of login credentials.Note: The Auto Login Proxy configuration requires the use of Agents to work.Web Gateway Setup InformationThe Web Gateway must be set to use a proxy data redirection method, with the "User Authentication Method" set to Auto-Login Agents. to do this, log into your iboss Cloud Account and navigate to Data Redirection > Proxy > Enable Proxy Settings (if not already active) >User Authentication Method > Auto Login Agents). Click the Save when finished to preserve these settings.Agent SetupThe Download Windows Agent button will allow you to download the installation and configuration files for the Windows Mobile Client Agent.It will appear on your computer compressed into a .zip file. Extract the contents of the file and save to your preferred location.In this folder, right-click the file called install_ibsa.bat > Run as an Administrator certifying that you are sure you want to run the file. The batch file will be presented to you as shown below.If this is the first time an iboss agent is being installed on this device, enter a number 1-4 corresponding to the windows version present on the device.If this device has had another version of the iboss agent previously installed on it, enter the "u" command to fully uninstall any agents on the device, followed by the "r" command to remove the iboss registry key. After this, enter a number 1-4 corresponding to the windows version present on the device.Within a few minutes, your device will now direct all web traffic (unless otherwise specified) to thegateway/cluster from which the agent was downloaded. All applicable policy is now being applied.To verify that the agent is running, you can navigate to your computer's "Services" interface (Search "Services" from the Start menu) and check to see that "IBSA" (iboss Security Agent) is present and running. To ensure the parameters of the agent have been correctly set, open up your computer's Registry Editor (search "regedit" from the start menu) and navigate through the registry path Computer > HKEY_LOCAL_MACHINE > SYSTEM > CurrentControlSet > Services > iboss Security Agent > Parameters. The address of the web gateway cluster will display in the "GatewayHost" parameter, the "RuntimeMode" parameter will be "gen4_auto", and the "Version" parameter will be "4.0.0". If you edit any of the parameters in the Registry Editor, be sure to restart the IBSA service.If you check your Proxy settings through either your computer or your browser, you will notice that traffic is being directed to a proxy- the same iboss web gateway cluster address will appear here as well.In the event that the agent does not detect any groups pertinent to the device, the device will appear in the table under Users, Groups & Devices > Users and Devices. From here the device can be moved from the default group to an appropriate one.Note: You can also push the installer via Active Directory. Make sure that the 64-bit installer is used for 64-bit systems and the 32-bit installer is used for 32-bit systems.This completes the install of the agent.Acquiring Group InformationAt the initial startup of the agent or upon a user-changed event, the agent checks whether the device is joined to a domain and if the current user is a domain user. If so, it retrieves the group information from the domaincontroller. If the computer is not joined to a domain or the user is logging into a local account on a domain-joined computer, then the group information will be retrieved from the local user groups.In the event that the agent does not detect any groups pertinent to the device, the device will fall into your default group and appear in the table under Users, Groups & Devices > Users and Devices. From here the device can be moved from the default group to an appropriate one.Steps Specific to Gen. 2/Gen. 3 Agent SetupThe parameters below must be entered via the Registry Editor or Orca when setting up the Gen. 2/Gen. 3 Agent. Of all the properties, there are only a few which need to be changed to match your network configuration. Parameter DescriptionPARAM_GATEWAY_HOST This should be the IP Address (or DNS Hostname) of the iboss as visible by mobile computers when OUTSIDE of your network. This IP must be publically accessible on TCP ports 8025 and 8026.PARAM_SECURITY_KEY Change this to match the security key on the iBoss Mobile Client configuration page that corresponds to the filtering group you would like the mobile client filtered by when outside of your network.PARAM_OUTSIDE_NETWORK_IP The public IP Address (or addresses) of the localnetwork to which the private IP Addresses are translated via NAT when on the local network. Enter single IPs or IPranges in the following format (38.50.10.5,38.50.10-7-38.50.10.12). If there is only one public IP, enter it byitself.If you will be using the agent to perform LOCAL network SSL content inspection (NOT REQUIRED for mobile filtering/security or SSL blocking), the following options should be set (available in gen3 agents only): Parameter DescriptionPARAM_LOCAL_GATEWAY_HOST (gen3) This should be the local IP Address of the iboss as seen on the local network.PARAM_LOCAL_GATEWAY_SECURITY_KEY (gen3) Change this to match the security key on the Mobile Client/Local SSL Inspection configuration page for “Local SSL Agent Security Key”. This key is not group specific.PARAM_LOCAL_SSL_AGENT (gen3) Set this to 1 if the agent will be used for local SSL inspection. If the agent will only be used for mobile filtering/security, leave this set to 0 and do not enter values for any of the values in this sectionPARAM_ALWAYS_LOCAL (gen3) Set this to 1 if the agent will ONLY be used for local SSL inspection and will not be used for mobile security.The rest of the properties are optional and are typically not modified. If you would like the agent to perform a system reboot after detecting an upgrade, set the following property: PARAM_RESTART_AFTER_UPGRADE = 1This option is available on Gen. 3 installers only. A restart is required when moving from a Gen. 2 agent to a Gen. 3 agent. This option can be used if moving between Gen. 2 and Gen. 3 is necessary.After the necessary parameters have been edited in Orca, save the file by clicking File > Save.Once you have modified the installer, install the appropriate .msi (either ibsa32.msi or ibsa64.msi) on your computer by double-clicking the installer and following any prompts.Note: You can also push the installer via Active Directory. Make sure that the 64-bit installer is used for 64-bit systems and the 32-bit installer is used for 32-bit systems.This completes the install of the agent.Additional ReferencesLegacy Windows and Mac Agent DocumentationNote: This article was last updated in conjunction with the iboss version 9.0.90.200 firmware (released09/26/2017). You may be using a different version of firmware than the one featured in this article.。
IAD中文版配置手册
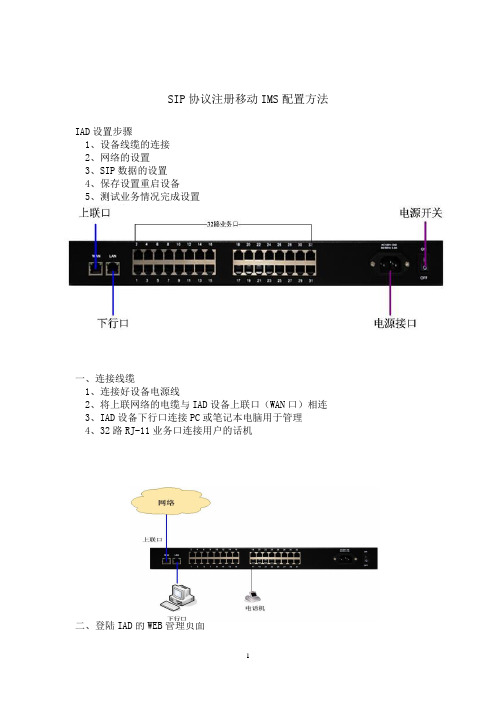
SIP协议注册移动IMS配置方法IAD设置步骤1、设备线缆的连接2、网络的设置3、SIP数据的设置4、保存设置重启设备5、测试业务情况完成设置一、设备线缆的连接一、连接线缆1、连接好设备电源线2、将上联网络的电缆与IAD设备上联口(WAN口)相连3、IAD设备下行口连接PC或笔记本电脑用于管理4、32路RJ-11业务口连接用户的话机二、登陆IAD的WEB管理页面通过LAN口登陆IAD,将电脑连至IAD LAN口并将电脑IP设置为192.169.0.X,打开IE浏览器在地址栏中输入LAN IP 192.169.0.1(默认)。
输入用户名和密码,默认均为admin。
三、网络设置对WAN口配置相应的IP地址、子网掩码和出口网,然后点保存。
网络设置>W AN口设置IP地址、子网掩码、出口网关DNS服务:启用首选DNS地址:211.138.91.1四、设置SIP数据1.SIP基本设置,点击左侧项目栏中的“SIP配置”中的“基本配置”,在右侧项目中设置具体主备服务器、端口、本地域名参数然后点保存SIP设置>基本设置主用服务器地址:本地域名:注册刷新时间:18002.设置SIP帐号和密码:SIP IAD是按端口进来注册,需要为每个端口设置帐号和验证密码。
点击左侧项目栏中的“用户端口配置”中的“基本配置”,在基本设置中填写用户名、密码、认证名,然后点保存。
用户端口设置>基本设置用户名为:+86472+电话号码密码:(15位数字字母大小写)移动的客户经理会告诉认证名为:86472+电话号码@ 3.语音传真设置用户端口设置>语音传真设置选择配置端口:选择所有端口传真纠错:勾选传真模式:Bypass然后点保存。
其他默认。
五、呼叫转移在话机上拨号配合实现平台的呼叫转移功能拨号路由设置>网络数图数图:X.|E57EX.F|F57F|然后点保存。
六、重启IAD重启IAD, 点击左侧项目栏中的“系统功能”中的“重启网关”六、查看IAD状态IAD重启完成后,使用IE浏览器通过LAN IP重新登陆IAD,并查看IAD状态。
微软IAS接入配置手册

目录第一章IAS安装和配置 (2)1.1M ICROSOFT IAS安装和配置 (2)1.2在AD中创建用户需要特别注意 (11)1.3IAS的动态VLAN和802.1X相关配置 (12)第二章CA证书安装 (15)2.1CA证书安装 (15)第三章8021X 接入交换机配置 (18)第一章IAS安装和配置1.1 Microsoft IAS安装和配置安装Microsoft IAS service注意:IAS最新的补丁和升级包必须要打上,包括最新的service pack。
IAS配置1、IAS 和AD结合起来(IAS在AD中注册)2、设置RADIUS server参数.右键点击Internet 验证服务(本地),选择属性设置radius Server 的Authentication port: 1812,1645 Accounting port: 1813,16463、设置802.1x NAS:4、创建新的远程访问策略选择添加选择确定选择客户端可以请求一个IP地址确定5、远程访问记录:每天产生一个日志文件,以IAS格式进行保存1.2 在AD中创建用户需要特别注意在AD中创建用户需要特别注意:远程访问权限要设置成允许访问或通过远程访问策略控制访问(建议)1.3 IAS的动态vlan和802.1x相关配置首先在AD上创建相应vlan group,同时把属于这个vlan的用户放到该vlan group中;在IAS中创建新的远程访问策略(动态vlan ),策略状况选择Windows-Groups 把AD上创建相应vlan group 对应起来。
下面以vlan23 group为例:(设置成受保护的EAP验证模式)动态vlan 需要使用到IAS 的标准RADIUS attributes中的以下三个属性:Tunnel-Type 064 13 (decimal) – VLANTunnel-Medium-Type 065 6 (decimal) – 802Tunnel-Private-Group-ID 081 <vlan-name> (string) – vlan name(注意:实际情况这里一定要vlan name,vlan id无效)Vlan23 group设置成受保护的EAP验证模式。
IAS服务器配置
3.3.2 添加IAS服务IAS是一种远程身份验证拨号用户服务,它实现了用户身份验证,授权以及帐号的集中管理等功能。
步骤 1从“开始”菜单中,依次选择“设置→控制面板→添加或删除程序”。
然后单击“添加/删除Windows组件”,进入Windows组件向导。
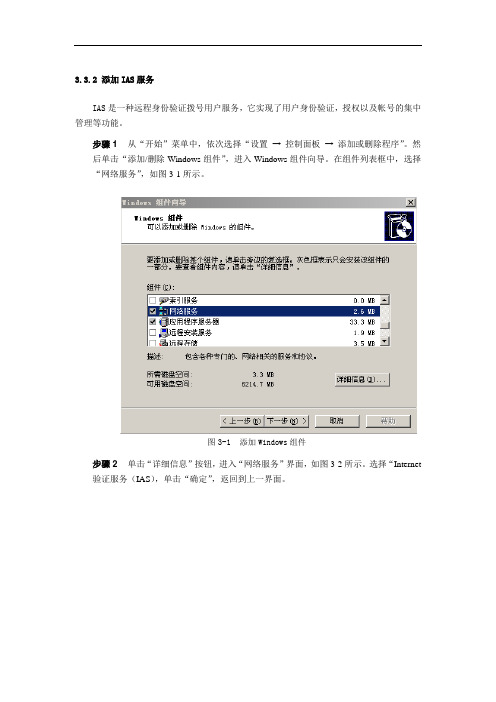
在组件列表框中,选择“网络服务”,如图3-1所示。
图3-1添加Windows组件步骤 2单击“详细信息”按钮,进入“网络服务”界面,如图3-2所示。
选择“Internet 验证服务(IAS),单击“确定”,返回到上一界面。
图3-2 选择Internet验证服务(IAS)步骤 3在Windows组件界面中,单击“下一步”,开始配置组件,如图3-3所示。
图3-3 正在配置组件步骤 4完成Windows组件安装后,单击“完成”按钮退出,如图3-4所示。
图3-4 完成Windows组件安装提示:安装完成后,在管理工具中出现“Internet验证服务”程序项,请查看。
3.3.3 配置IAS服务器单击开始→程序→管理工具→Internet验证服务,进入Internet验证服务配置界面,如图3-5所示。
图3-5 Internet验证服务增加Radius客户端步骤 1在Internet验证服务界面中,右击左边的RADIUS客户端,选择新建Radius 客户端,进入“新建Radius客户端”界面。
输入好记的名称和客户端的IP地址:好记的名称如“交换机1”;客户端IP地址在这里一定要输入交换机的IP地址,如“192.168.13.232”,如图3-6所示。
图3-6增加Radius客户端步骤 2点击“下一步”,进入其他信息页面,如图3-7所示。
在下拉框中,选择客户端-供应商为“RADIUS Standard”;输入共享机密(共享机密为交换机中radius服务器的key,例如我们在交换机配置中,设置的testing123);选中“请求必须消息验证程序属性”。
最后点击“完成”按钮,即完成RADIUS客户端的添加。
作为 RADIUS 服务器的 IAS 的疑难解答
作为RADIUS 服务器的IAS 的疑难解答更新日期: 01/21/2005作为RADIUS 服务器的IAS 的疑难解答您遇到什么问题?•连接尝试失败。
•使用“受保护的可扩展身份验证协议(PEAP)”的连接尝试失败。
•新近加入域的计算机无法注册证书。
•使用“密码身份验证协议(PAP)”的连接尝试失败。
•使用“Microsoft 质询握手身份验证协议(MS-CHAP)”的连接尝试失败。
•用户通过EAP 或PEAP 与交换机客户端的连接已通过802.1x 身份验证,但系统不提示其输入凭据,无法登录。
•没有远程访问权限的用户却能够登录。
•用户能够成功登录,但是它们的登录尝试不显示在日志文件中。
•已将Active Directory 域从Windows 2000 混合域更改为Windows 2000 本机域或Windows Server 2003 域,而IAS 服务器无法再验证有效的连接请求。
•远程访问日志文件未记录临时记帐消息。
•第三方网络访问服务器(NAS) 断开连接,IAS 将Microsoft 供应商专用的属性(MS-RAS-MPPE-Encryption-Policy) 发送到网络访问服务器,而不是NAS 的供应商ID。
•MS-CHAP v2 或EAP-TLS 身份验证被拒绝用于有效的连接尝试。
•再也无法看到“路由和远程访问”中的“远程访问策略”节点。
•尝试打开IAS 控制台时,收到错误消息,控制台无法打开。
连接尝试失败。
原因:IAS 由于多种原因拒绝或放弃了连接尝试。
解决方案:验证已将IAS 配置为将被拒绝的身份验证尝试记录到事件日志中。
再次尝试连接,然后检查系统事件日志中的连接尝试的IAS 事件。
使用日志中的信息,确定连接尝试被拒绝或放弃的原因,以及解决问题的方法。
另请参阅:IAS 的事件日志记录;配置IAS 的事件日志记录使用“受保护的可扩展身份验证协议(PEAP)”的连接尝试失败。
原因:未将IAS 服务器上的无线远程访问策略配置为使用PEAP 作为身份验证方法。
IASP-IS30 B3326版本说明书

IASP-IS30 B3326 版本说明书非经本公司书面许可,任何单位和个人不得擅自摘抄、复制本文档内容的部分或全部,并不得以任何形式传播。
本文档中的信息可能变动,恕不另行通知。
关键词:版本信息、版本特性说明、版本变更说明、使用限制及注意事项、配套资料及获取方式摘要:本文档详细描述了IASP-IS3.0 B3326本的相关信息,包括版本信息、版本特性说明、版本变更说明、使用限制及注意事项和配套资料及获取方式等信息,以供市场、用服、用户参考。
缩略语:目录1 版本信息 (3)1.1 版本及发布原因 (3)1.2 软件运行环境 (4)1.3 版本配套表 (5)1.4 版本配套说明 (5)2 版本使用注意事项 (5)2.1 注意事项 (5)2.1.1 版本升级兼容情况 (6)3 版本重要更新 (6)3.1 可视化报警管理平台和停车场管理客户端合入新界面 ···································错误!未定义书签。
3.2 B3315版本合入数据生命周期管理 ··························································错误!未定义书签。
IAS快速入门共25页

4
QuickStart模板库的优点
► 先进的对象到对象的设备集成 ► 在部署周期内► 以S95为标准的工厂模型例子 ► 系统对象的工厂模型 ► 标准化工程的最佳实践例子 ► 所有功能都以标准产品功能实现
设备集成 为在企业范围内执行标准,提供最佳实践方法
3
什么是Quick Start模板库?
► 预定义的Industrial Application Server Galaxy、模 板库和相关文档使新用户在开发基于ArchestrA的 系统时有一个好的开端。
► 为新的IAS用户提供了更加完善的起点,因为 Wonderware开发了更加完整的标准基础系统模板 。
5
IAS的基础 –Galaxy
►我►对想于要我得们到来一说个,Galaxy完成安装后,下一步是什么?
G的al功ax能y…是真正的价值所在
HMI
Active Factory
历史数据库 Web入口
SV Web Portal InSQL Server MS SQL Server Windows OS
G.R.
9
工厂模型例子
10
库中的派生层次
主模板的功能被锁住
基保来本存自来对在派于自象其生这于为各出些这只自主基些读的模本主,工板对对并具。象象。。 派生集出中应用模板。
以”a”开头的模板是为 你的具体应用的需要
定制的。
11
设备集成
典型的HMI连接设备数据的方法
只有标签值可为IO, 标签属性不能定义成IO
QuickStart模板库 – IAS快速入门
Wonderware
呼吁最终用户行动起来
► 应用Wonderware系统平台以改善TCO ► 在12至18个月内升级基础架构
WindowsServer2003关于IAS(Radius)域用户认证方式
WindowsServer2003关于IAS(Radius)域⽤户认证⽅式Windows Server 2003 关于IAS(Radius)+域⽤户的配置
⼀、安装Internet验证服务(IAS),略
⼆、配置IAS服务
新建Radius客户端
对应防⽕墙的IP,注意输⼊的共享密码与防⽕墙中输⼊的密码⼀致。
使IAS产⽣“远程访问记录”,以便于观察哪些⽤户使⽤VRC登录过VPN设备:
设置记录的内容选项:
设置⽇志⽂件的相关参数:
访问记录的范本:
设置远程访问策略:
设备访问策略的内容为:
1、加⼊域控制器上的VPN⽤户特定的⽤户组:radius(Windows-Groups 是由域控制器中⽣成,见下⾯新建域⽤户);
2、规定可访问的时间:周⼀⾄周⽇所有时间(像防⽕墙中的时间策略);
3、特别注意连接请求匹配条件;
4、编辑配置⽂件:
应该把所有加密选项全部去掉,使⽤未加密的⾝份验证:
配置“连接请求处理”:
对所有⽤户使⽤周⼀⾄周⽇的所有时间:
到⽬前为⽌,Radius服务器配置完毕。
只需要在域控制器上新建⽤户即可。
三、新建域⽤户
新建‘组织单位’,在其下⾯新‘安全组-全局’(在编辑配置⽂件时使⽤过)
新建⽤户,加⼊上述全局组中,并对⽤户设置相关权限:
远程访问权限需要设置成“允许访问”:
全部完成后,使⽤At-Vrc+Radius登录VPN设备就可以实现。
- 1、下载文档前请自行甄别文档内容的完整性,平台不提供额外的编辑、内容补充、找答案等附加服务。
- 2、"仅部分预览"的文档,不可在线预览部分如存在完整性等问题,可反馈申请退款(可完整预览的文档不适用该条件!)。
- 3、如文档侵犯您的权益,请联系客服反馈,我们会尽快为您处理(人工客服工作时间:9:00-18:30)。
目录
第一章IAS安装和配置 (2)
1.1M ICROSOFT IAS安装和配置 (2)
1.2在AD中创建用户需要特别注意 (11)
1.3IAS的动态VLAN和802.1X相关配置 (12)
第二章CA证书安装 (15)
2.1CA证书安装 (15)
第三章8021X 接入交换机配置 (18)
第一章IAS安装和配置
1.1 Microsoft IAS安装和配置
安装Microsoft IAS service
注意:IAS最新的补丁和升级包必须要打上,包括最新的service pack。
IAS配置
1、IAS 和AD结合起来(IAS在AD中注册)
2、设置RADIUS server参数.
右键点击Internet 验证服务(本地),选择属性
设置radius Server 的Authentication port: 1812,1645 Accounting port: 1813,1646
3、设置802.1x NAS:
4、创建新的远程访问策略
选择添加
选择确定
选择客户端可以请求一个IP地址
确定
5、远程访问记录:
每天产生一个日志文件,以IAS格式进行保存
1.2 在AD中创建用户需要特别注意
在AD中创建用户需要特别注意:
远程访问权限要设置成允许访问或通过远程访问策略控制访问(建议)
1.3 IAS的动态vlan和80
2.1x相关配置
首先在AD上创建相应vlan group,同时把属于这个vlan的用户放到该vlan group中;
在IAS中
创建新的远程访问策略(动态vlan ),策略状况选择Windows-Groups 把AD上创建相应vlan group 对应起来。
下面以vlan23 group为例:(设置成受保护的EAP验证模式)
动态vlan 需要使用到IAS 的标准RADIUS attributes中的以下三个属性:
Tunnel-Type 064 13 (decimal) – VLAN
Tunnel-Medium-Type 065 6 (decimal) – 802
Tunnel-Private-Group-ID 081 <vlan-name> (string) – vlan name(注意:实际情况这里一定要vlan name,vlan id无效)
Vlan23 group设置成受保护的EAP验证模式。
第二章CA证书安装
2.1 CA证书安装
一、安装和配置企业根CA
以系统管理员登录
1、单击“开始”,再单击“控制面版”,再单击“添加和删除程序”,然后单击“添加Windows 组件”。
2、在“Windows 组件向导”中,选中“证书服务”复选框。
然后会出现一个对话框,通知您在证书服务安装之后计算机不能被重新命名以及计算机不能加入域或从域中删除。
单击“是”。
注意:如果要使用证书服务的Web 组件,应单击“应用程序服务器”(但不要选中它的复选框)以确保“IIS”复选框已选中。
然后单击“详细信息”,选中“Internet 信息服务(IIS)”,然后单击“确定”。
单击“下一步”
3、在“CA 类型”页面上,选择“企业根CA”,然后单击“下一步”。
4、在“CA 信息标识”页面提供适于您的站点和组织的信息标识。
在“此CA 的公用名称”中,输入证书颁发机构的公用名称。
CA 名称(或公用名称)很重要,因为要用它来标识在Active Directory 中创建的CA 对象。
在“有效期”中选择接受5年的默认选项(在本项目选择了5年),然后单击“下一步”,
其中“有效期”是CA 有效的时间,即安全和管理之间的权衡。
请记住,在每次根证书到期的时候,管理员必须更新所有信任关系,并要采取一些管理性步骤把CA 转移到新的证书上。
在大多数企业环境中,通常的时间期限是 5 年或更多,但是要符合正式的IT 策略和程序。
同时向您的律师咨询,以确保CA 配置符合所有法律要求。
6、在“证书数据库设置”页面,单击“下一步”接受证书数据库的默认存储路径和证书数据库日志,然后确认“将配置信息存储在共享文件夹内”没有选中。
注意:安装程序可能会给出“不能创建共享文件夹”的警告信息,这是预料中的,因为所有网络接口都已禁用。
安全的做法是忽略这一警告,继续进行后面的操作。
此外一定要将证书数据库和证书数据库日志存储在本地NTFS 驱动器上。
7、如果IIS 正在运行,将会有信息提示您停止该设备。
单击“是”停止IIS。
必须在Web 组件安装之前停止IIS。
注意:如果没有安装IIS,则不会显示该消息,Web 注册也不可用,除非已安装IIS。
然后,可选组件管理器将安装证书服务组件。
如果需要Windows Server 2003 安装媒体(CD),请将Windows Server 2003 产品CD 插到CD 驱动器中。
8、单击“确定”完成安装。
单击“完成”关闭向导。
二、验证CA 安装
验证CA 安装是否成功的最简单的方法是输入net start ,看CA 是否运行。
如要进一步验证或要处理中间出现的故障错误,还可以在systemroot\certocm.log 中查看CA 安装日志。
还可以采用以下的步骤
必须以管理员组的成员帐户在运行CA 的计算机上登录。
验证根CA 已正确安装
1、单击“开始”,再单击“控制面版”,然后单击“管理工具”,然后再单击“证书颁发机构”。
2、确认“证书服务”已启动,然后可以查看CA 的属性。
还可以查看用选中标记列出的CA。
3、用右键单击CA,然后单击“属性”。
4、在“常规”选项卡上选中“CA 证书”列表中的Certificate #0 ,然后单击“查看证书”。
5、单击CA 证书中的“详细信息”选项卡,然后验证显示的值与以下表中的值是否相匹配。
证书详细信息默认设置
注意:基本约束条件主题类型的存在非常重要。
该值可将CA 证书与最终实体证书区分开来,此外,不应列出任何CDP 或AIA 的扩展名。
第三章8021X 接入交换机配置
aaa new-model
aaa authentication dot1x default group radius
aaa authorization network default group radius
dot1x system-auth-control
interface FastEthernet 0/x (在端口)
switchport mode access
dot1x port-control auto
spanning-tree portfast
dot1x guest-vlan 99(可以不需要)
ip radius source-interface Vlan_id
radius-server host *.*.*.*auth-port 1812 acct-port 1813 radius-server key *****。
