MSK_Book_EN_A4
联想 ThinkBook 13s 14s IML 系列 用户指南
Lenovo ThinkBook13s14s IML系列用户指南用前必读使用本文档及其支持的产品之前,请务必先阅读和了解以下信息:•第27页附录A“重要安全信息”•《安全与保修指南》•《设置指南》第一版(2019年10月)©Copyright Lenovo2019.有限权利声明:如果数据或软件依照美国总务署(GSA)合同提供,其使用、复制或公开受编号为GS-35F-05925的合同的条款的约束。
目录关于本文档 (iii)第1章了解计算机 (1)前视图 (1)底座视图 (2)左视图 (3)右视图 (4)底视图 (5)功能部件和规格 (6)USB传输速率声明 (7)运行环境 (7)第2章开始使用您的计算机 (9)Windows10入门 (9)Windows帐户 (9)Windows用户界面 (11)Lenovo Vantage和联想电脑管家 (12)连接到网络 (12)连接到Wi-Fi网络 (12)与计算机交互 (13)键盘热键 (13)第3章了解您的计算机 (15)管理电源 (15)检查电池状态 (15)为电池充电 (15)检查电池温度 (15)设置电源按钮行为 (15)更改或创建电源计划 (15)设置性能模式 (16)更改UEFI/BIOS Setup Utility中的设置..16 UEFI/BIOS Setup Utility是什么 (16)打开UEFI/BIOS Setup Utility (16)更改启动顺序 (16)更改Hotkey Mode (16)启用或禁用Always-on(持续供电) (17)在UEFI/BIOS Setup Utility中设置密码..17密码类型 (17)设置管理员密码 (17)更改或删除管理员密码 (18)设置用户密码 (18)启用开机密码 (18)设置硬盘密码 (18)更改或删除硬盘密码 (19)重置或还原Windows (19)Windows10恢复选项 (19)Windows系统还原 (20)重置Windows (20)创建恢复驱动器 (20)使用恢复驱动器还原或重置Windows (21)第4章帮助和支持 (23)常见问题 (23)自助资源 (23)致电Lenovo (25)联系Lenovo之前 (25)Lenovo客户支持中心 (25)购买附加服务 (26)附录A重要安全信息 (27)附录B辅助功能和人体工程学信息 (37)附录C合规性信息 (41)附录D声明和商标 (55)©Copyright Lenovo2019iii Lenovo ThinkBook13s14s IML系列用户指南关于本文档•本文档中插图的外观可能与您的产品不同。
微软无线光学桌面4000系列说明书
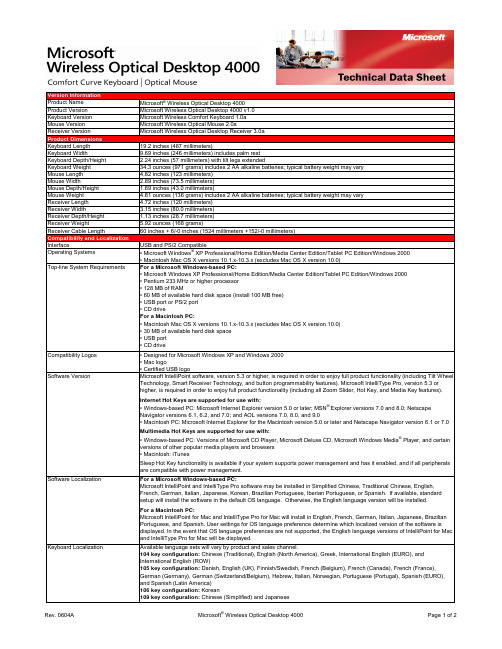
Version InformationProduct Name Microsoft® Wireless Optical Desktop 4000Product Version Microsoft Wireless Optical Desktop 4000 v1.0Keyboard Version Microsoft Wireless Comfort Keyboard 1.0aMouse Version Microsoft Wireless Optical Mouse 2.0aReceiver Version Microsoft Wireless Optical Desktop Receiver 3.0aProduct DimensionsKeyboard Length19.2 inches (487 millimeters)Keyboard Width9.69 inches (246 millimeters) includes palm restKeyboard Depth/Height 2.24 inches (57 millimeters) with tilt legs extendedKeyboard Weight34.3 ounces (971 grams) includes 2 AA alkaline batteries; typical battery weight may varyMouse Length 4.82 inches (123 millimeters)Mouse Width 2.89 inches (73.5 millimeters)Mouse Depth/Height 1.69 inches (43.0 millimeters)Mouse Weight 4.81 ounces (136 grams) includes 2 AA alkaline batteries; typical battery weight may varyReceiver Length 4.72 inches (120 millimeters)Receiver Width 3.15 inches (80.0 millimeters)Receiver Depth/Height 1.13 inches (28.7 millimeters)Receiver Weight 5.92 ounces (168 grams)Receiver Cable Length60 inches + 6/-0 inches (1524 millimeters +152/-0 millimeters)Compatibility and LocalizationInterface USB and PS/2 CompatibleOperating Systems• Microsoft Windows® XP Professional/Home Edition/Media Center Edition/Tablet PC Edition/Windows 2000• Macintosh Mac OS X versions 10.1.x-10.3.x (excludes Mac OS X version 10.0)Top-line System Requirements For a Microsoft Windows-based PC:• Microsoft Windows XP Professional/Home Edition/Media Center Edition/Tablet PC Edition/Windows 2000• Pentium 233 MHz or higher processor• 128 MB of RAM• 60 MB of available hard disk space (install 100 MB free)• USB port or PS/2 port• CD driveFor a Macintosh PC:• Macintosh Mac OS X versions 10.1.x-10.3.x (excludes Mac OS X version 10.0)• 30 MB of available hard disk space• USB port• CD driveCompatibility Logos• Designed for Microsoft Windows XP and Windows 2000• Mac logo• Certified USB logoSoftware Version Microsoft IntelliPoint software, version 5.3 or higher, is required in order to enjoy full product functionality (including Tilt Wheel Technology, Smart Receiver Technology, and button programmability features). Microsoft IntelliType Pro, version 5.3 orhigher, is required in order to enjoy full product functionality (including all Zoom Slider, Hot Key, and Media Key features).Internet Hot Keys are supported for use with:• Windows-based PC: Microsoft Internet Explorer version 5.0 or later; MSN® Explorer versions 7.0 and 8.0; NetscapeNavigator versions 6.1, 6.2, and 7.0; and AOL versions 7.0, 8.0, and 9.0• Macintosh PC: Microsoft Internet Explorer for the Macintosh version 5.0 or later and Netscape Navigator version 6.1 or 7.0Multimedia Hot Keys are supported for use with:• Windows-based PC: Versions of Microsoft CD Player, Microsoft Deluxe CD, Microsoft Windows Media® Player, and certainversions of other popular media players and browsers• Macintosh: iTunesSleep Hot Key functionality is available if your system supports power management and has it enabled, and if all peripheralsare compatible with power management.Software Localization For a Microsoft Windows-based PC:Microsoft IntelliPoint and IntelliType Pro software may be installed in Simplified Chinese, Traditional Chinese, English,French, German, Italian, Japanese, Korean, Brazilian Portuguese, Iberian Portuguese, or Spanish. If available, standardsetup will install the software in the default OS language. Otherwise, the English language version will be installed.For a Macintosh PC:Microsoft IntelliPoint for Mac and IntelliType Pro for Mac will install in English, French, German, Italian, Japanese, BrazilianPortuguese, and Spanish. User settings for OS language preference determine which localized version of the software isdisplayed. In the event that OS language preferences are not supported, the English language versions of IntelliPoint for Macand IntelliType Pro for Mac will be displayed.Keyboard Localization Available language sets will vary by product and sales channel.104 key configuration: Chinese (Traditional), English (North America), Greek, International English (EURO), andInternational English (ROW)105 key configuration: Danish, English (UK), Finnish/Swedish, French (Belgium), French (Canada), French (France),German (Germany), German (Switzerland/Belgium), Hebrew, Italian, Norwegian, Portuguese (Portugal), Spanish (EURO),and Spanish (Latin America)106 key configuration: Korean109 key configuration: Chinese (Simplified)and JapaneseTracking TechnologyMouse Tracking System Microsoft-proprietary optical technologyImaging Rate Dynamically adaptable to 6000 frames per secondX-Y Resolution400 points per inch (15.75 points per millimeter)Tracking Speed Up to 36 inches (914 millimeters) per secondWireless TechnologyWireless Platform27 MHz Radio Frequency (RF)Wireless Channels• Keyboard: 27.095 MHz channel 0, 27.195 MHz channel 1• Mouse: 27.145 MHz Mouse channel 1Wireless IDs• Keyboard: Over 65,000 random identification codes• Mouse: Over 65,000 random identification codesWireless Range 6 feet (1.83 meters) typical. Note: RF range is affected by many factors, such as nearby metallic objects and relativepositioning of the keyboard, mouse, and receiver.Product Feature PerformanceQWERTY Key Life1,000,000 actuations per keyZoom Slider Life250,000 actuations in either directionHot Key Features Web/Home, Calendar, Mail, Messenger, My Documents, Show My Favorites, My Favorites 1, My Favorites 2, My Favorites 3, My Favorites 4, My Favorites 5, Calculator, Log Off, and SleepHot Key Life500,000 actuations per keyMedia Key Features Mute, Volume -, Volume +, Play/Pause, Stop (Media), Previous Track, and Next TrackMedia Key Life500,000 actuations per keyEnhanced Function Key Features Help, Undo, Redo, New, Open, Close, Reply, Forward, Send, Spell, Save, and PrintTyping Speed1000 characters per minuteMouse Button Features 3 buttons including scroll wheel buttonRight & Left Button Life1,000,000 actuations at no more than 4 actuations per secondWheel Button Life150,000 actuations at no more than 4 actuations per secondMouse Scrolling Features Tilt wheel enables vertical and horizontal scrollingWheel Vertical Scrolling Life• 100,000 revolutions (away from user)• 100,000 revolutions (towards user)Wheel Horizontal Scrolling Life350,000 actuations per side at no more than 4 actuations per secondStorage Temperature & Humidity-40 °F (-40 °C) to 140 °F (60 °C) at < 5% to 65% relative humidity (non-condensing)Operating Temperature & Humidity14 °F (-10 °C) to 104 °F (40 °C) at <5% to 80% relative humidity (non-condensing)Power RequirementsBattery Type and Quantity• Keyboard: 2 AA alkaline batteries (included)• Mouse: 2 AA alkaline batteries (included)Battery Life• Keyboard: 6 months typical• Mouse: 6 months typicalCertification InformationCountry of Manufacture Keyboard and Receiver: Thailand and Mouse: People's Republic of China (PRC)ISO 9002 Qualified Manufacturer YesFCC ID This device complies with part 15 of the FCC Rules and Industry Canada RSS-210. Operation is subject to the following two conditions: (1) This device may not cause harmful interference, and (2) this device must accept any interference received,including interference that may cause undesired operation. Tested to comply with FCC standards. For home and office use.Model numbers: 1027, Wireless Optical Comfort Keyboard 1.0; 1008, Wireless Optical Mouse 2.0; and 1029, WirelessOptical Desktop Receiver 3.0. FCC IDs: C3K1027 and C3K1008.Agency and Regulatory Approvals• FCC Declaration of Conformity (USA)• UL and cUL Listed Accessory (USA and Canada)• RSS-210 and ICES-003 data on file (Canada)• TUV-T Certificate (European Union)• R&TTE Declaration of Conformity, Safety and EMC (European Union)• GOST Certificate (Russia)• VCCI Certificate (Japan)• ACA/MED Declaration of Conformity (Australia and New Zealand)• BSMI and DGT Certificates (Taiwan)• MIC Certificate (Korea)• CMII Certificate (China)• NOM Certificates (Mexico)• SABS Certificate (South Africa)• CB Scheme Certificate (International)• WHQL (International) ID: 890572Results stated herein are based on internal Microsoft testing. Individual results and performance may vary. Any device images shown are not actual size. This document is provided for informational purposes only and is subject to change without notice. Microsoft makes no warranty, express or implied, with this document or the information contained herein. Review any public use or publications of any data herein with your local legal counsel.©2006 Microsoft Corporation. All rights reserved. Microsoft, the IntelliEye logo, IntelliMouse, MSN, the Laser Technology logo, the Optical Technology logo, Natural, Windows, and Windows NT are either registered trademarks or trademarks of Microsoft Corporation in the U.S. and/or other countries. Mac and the Mac logo are trademarks of Apple Computer, Inc., registered in the U.S. and/or other countries. The names of actual companies and products mentioned herein may be trademarks of their respective owners.。
英文打印用纸 A4黑白版可直接打印

英文打印用纸 A4黑白版可直接打印概述
本文档介绍了适用于英文打印的A4黑白版可直接打印的纸张。
纸张规格
- 类型:A4
- 颜色:黑白
- 适用打印方式:直接打印
特点
- 高质量:该纸张为专为打印而设计,保证打印效果的清晰、
锐利。
- 适用范围广:适用于各种英文文档的打印需求,包括办公文件、报告、信函等。
- 容易获取:该纸张在市场上容易获得,可以从办公用品店或
在线购买。
使用建议
为了确保最佳打印效果,请遵循以下建议:
1. 打印设置:在打印时,请选择黑白打印模式,并根据打印机型号和软件进行适当的设置。
2. 打印质量:选择适当的打印质量,以满足您的需求。
不同机型的打印质量设置可能有所不同。
3. 页面边距:确保文档中的内容不会超出纸张边界,请适当设置页面边距。
4. 文件格式:使用常见的文件格式,如PDF或DOCX,以确保兼容性和准确打印。
注意事项
- 此纸张适用于黑白打印,不适用于彩色打印。
- 在打印之前,请检查打印机是否有足够的墨水/碳粉,并确保打印机处于正常工作状态。
- 如需进一步的打印设置或技术支持,请参考打印机的使用手册或咨询相关技术支持人员。
以上是关于英文打印用纸A4黑白版可直接打印的介绍。
如果您有任何疑问或需要进一步的帮助,请随时与我们联系。
注意:请勿引用未经确认的内容。
打印工具用户指南:微软Windows操作系统0700001版E说明书

Printing ToolsUser GuideFor Microsoft WindowsOperating Systems0700001 Rev E© Copyright 2008 Hewlett-Packard Development Company, L.P .Confidential computer software. Valid license from HP required for posses-sion, use or copying. Consistent with FAR 12.211 and 12.212, Commercial Computer Software, Computer Software Documentation, and Technical Data for Commercial Items are licensed to the U.S. Government under vendor's standard commercial license.The information contained herein is subject to change without notice. The only warranties for HP products and services are set forth in the express war-ranty statements accompanying such products and services. Nothing herein should be construed as constituting an additional warranty. HP shall not be liable for technical or editorial errors or omissions contained herein.Adobe®, Adobe® PostScript® 3™, Acrobat®, and PostScript® are trade-marks of Adobe Systems Incorporated.Microsoft®, Windows® and Windows® XP are U.S. registered trademarks of Microsoft Corporation.Printed in the USHewlett-Packard Company 11311 K-Tel DriveMinnetonka, Minnesota 55343United States of AmericaWorld Wide Web: Technical SupportWorld Wide Web: E-mail:*****************North AmericaVoice.........+1 800.925.0563 or +1 952.944.4040Fax.............+1 952.943.3611 or +1 952.944.8509Latin America (Español)Voice..........................................+1 952.943.3627Fax.............................................+1 952.944.8509Europe, Middle East, and AfricaVoice...........................................+31 23.5622000Fax..............................................+31 23.5627944Ink SalesNorth AmericaVoice.........+1 800.723.3002 or +1 952.944.9330Fax.............................................+1 952.943.8622Europe, Middle East, and AfricaVoice...........................................+31 23.5622000Fax..............................................+31 23.5631240About This Manual Read this User Guide to learn how to install and use the Printing Toolssoftware and fonts for Microsoft Windows operating systems.•Chapter 1 explains how to install and uninstall the Printing Toolssoftware and the DTC fonts.•Chapter 2 shows how to use the Downloader Utility.•Appendix A contains support information and how to contact techni-cal support.About This Manual iiiiv About This ManualTable of ContentsAbout This Manual. . . . . . . . . . . . . . . . . . . . . . . . . . . . . . . . . . . . . . . . . . . . . . . iiiGetting StartedIntroduction . . . . . . . . . . . . . . . . . . . . . . . . . . . . . . . . . . . . . . . . . . . . . . . . . . .1-2System Requirements. . . . . . . . . . . . . . . . . . . . . . . . . . . . . . . . . . . . . . . . . . .1-3Installing the Image Utility . . . . . . . . . . . . . . . . . . . . . . . . . . . . . . . . . . . . . . . .1-4Installing and Using Fonts. . . . . . . . . . . . . . . . . . . . . . . . . . . . . . . . . . . . . . . .1-5Image UtilityWhat is the Image Utility? . . . . . . . . . . . . . . . . . . . . . . . . . . . . . . . . . . . . . . . .2-2System Requirements. . . . . . . . . . . . . . . . . . . . . . . . . . . . . . . . . . . . . . . . .2-2Configuring the Image Utility . . . . . . . . . . . . . . . . . . . . . . . . . . . . . . . . . . . . . .2-3Using the Image Utility. . . . . . . . . . . . . . . . . . . . . . . . . . . . . . . . . . . . . . . . .2-7Transformation . . . . . . . . . . . . . . . . . . . . . . . . . . . . . . . . . . . . . . . . . . . . . .2-7Batch Processing. . . . . . . . . . . . . . . . . . . . . . . . . . . . . . . . . . . . . . . . . . . . . .2-11Support InformationSoftware DVD-ROM Layout. . . . . . . . . . . . . . . . . . . . . . . . . . . . . . . . . . . . . . A-2Technical Services. . . . . . . . . . . . . . . . . . . . . . . . . . . . . . . . . . . . . . . . . . . . . A-3IndexTable of Contents vvi Table of ContentsChapter1Getting StartedThis chapter explains how to install the Printing Tools software and fonts.It is based on the assumption that you have already followed the instruc-tions for setting up the print server and output devices.This chapter includes the following topics:•Introduction (page 1-2)•System Requirements (page 1-3)•Installing the Image Utility (page 1-4)•Installing and Using Fonts (page 1-5)Getting Started1-1Introduction The Printing Tools are a collection of printer description files,applications, and fonts.•The Image Utility enables you to transfer (download) files invarious formats directly to the RIP for printing. This is sim-pler and faster than opening an application program anddocument file, and then printing the file. This utility can alsodownload PostScript Type 1 compatible fonts to the RIP, andapply transformations (such as scaling or rotating) to theimage before downloading. See Chapter 2, Image Utility, forinstructions.•Digital Typeface Corporation (DTC) MasterWorks fontsare a collection of PostScript Type 1 compatible fonts. Thesefonts are factory-installed on the RIP, but you must alsoinstall a font on your computer to use and display it on yourcomputer’s monitor. See “Installing and Using Fonts” onpage 1-5, for further information.•Printer Description Files are used by applications, operat-ing systems, and printer drivers to determine valid pagesizes and special device options available for each printer.See Appendix B, PostScript Printer Description Files, for fur-ther information.1-2IntroductionSystem Requirements The Printing Tools and DTC MasterWorks fonts have the follow-ing system requirements:•Operating System — Microsoft Windows Vista, XP, Win-dows 2000, Windows NT 4 (with Service Pack 6), or Win-dows 95/98/Me.•Network protocol — to connect to the RIP over your local area network, you must have a network protocol installed on your Windows workstation: TCP/IP, NetBEUI, or Novell Net-Ware. (Windows XP does not support NetBEUI.) For instruc-tions on installing the appropriate protocol in Windows, see your operating system online help or network administrator.•Print Server — before you install the Printing Tools, the RIP must be installed and properly configured, according to the procedures in the RIP User Guide. In particular, the port(s) you plan to use.System Requirements1-3Installing the Image Utility 1.Load the software DVD-ROM into the DVD-ROM drive of thecomputer.2.Open the Printing Tools folder.3.Copy the file hpiu.exe to any location on your computer.4.Add a printer to the operating system.See the RIP User Guide for instructions.To uninstall the Image Utility, simply delete it (drag it to the Recycle Bin).1-4Installing the Image UtilityInstalling and Using Fonts The RIP includes a set of PostScript-compatible printer fonts factory-installed on its hard disk. The font set installed varies by print server product, and may include one or more of the follow-ing:•The standard 35 fonts found on most PostScript-compatible printers•DTC MasterWorks Type Library Volumes 1 and 3The DTC (Digital Typeface Corporation) MasterWorks fonts are located on the software DVD-ROM.Installing the fonts on your computer is necessary to display and make them available in the applications you use to create documents. You can install all or any number of individual fonts on your computer.To install fonts, use a font installer such as Adobe Type Man-ager. Depending on the version of installer you use, you may have one or more of the following font handling options available when you install the font:•Autodownload - automatically downloads the entire font with the print job, which results in a relatively large print file if the document contains a large amount of text. Such a file takes longer to spool and RIP compared to files using residentfonts. Install a font as autodownload if you will use it onlyoccasionally and don’t want it to take up disk space on the server.•Resident - uses the font installed on the print server hard disk drive. Resident fonts are not sent with the print job to the server. You can use the Downloader Utility to download frequently-used fonts to the server.•Not installed - downloads only that portion of a font needed to print a document. This option may not produce accurate results in some applications, including Adobe PageMaker and QuarkXPress.If you print a document and the Courier font is substituted for the font specified in the document, try reinstalling the font as autodownload and reprinting the document.HP printers are also compatible with TrueType fonts. Refer to your operating system documentation for further information about TrueType fonts.Installing and Using Fonts1-5Fig. 1-1. DTC MasterWorks Volume 1 fonts1-6Installing and Using FontsFig. 1-2. DTC MasterWorks Volume 3 fontsInstalling and Using Fonts1-71-8Installing and Using FontsChapter2Image UtilityThis chapter shows you how to use the Image Utility. The Image Utilityenables you to download files to the print server, save image files asPostScript language files, and apply image transformations prior to send-ing them to the print server.Image Utility2-1What is the Image Utility?The Image Utility enables you to perform the following opera-tions on TIFF, JPEG, Encapsulated PostScript (EPS), PostScript (PS), and Adobe Acrobat Portable Document Format (PDF) files:•Download supported file types directly to the print server •Save the file to a PostScript language file, for subsequent transfer to the print server (not applicable to PS files)•Optionally apply cropping, tiling, and scaling transformations to the file before sending to the print server (not supported for PS and PDF file types)System Requirements The Image Utility runs under Microsoft Windows Vista, XP, andWindows 2000.2-2What is the Image Utility?Configuring the Image Utility 1.Run the Image Utility.Double-click the file hpui.exe or the shortcut to it.The Image Utility window appears.2.To set the preferences, select Preferences from the Filemenu.The Preferences dialog box appears. Click the tab corre-sponding to the preferences you want to change. When you change a setting, it is applied immediately.3.Specify an output option.•Directly to print server — The Image Utility sends print files to the Windows default printer (Windows printing orTCP/IP). To change the destination printer, change thedefault printer in the Windows Printers Control Panel.You can change the timeout value, which is the numberof minutes the Image Utility will attempt to send a printjob before it assumes that the print server is offline. If thetimeout is set too low, you may get an error messagewhile the file is still being sent. More time will be neededto send larger files over slower networks. If the timeout isset too high, it will take longer for you receive an errormessage indicating an offline server. You can set the tim-eout for between five and forty minutes; the default fiveminutes.Fig. 2-1. General optionsConfiguring the Image Utility2-3•Save to a PostScript file on disk — a PostScript orPDF file can be saved to disk, and transferred subse-quently to the print server via DiskDirect (removeablemedia or network). Refer to the System Control UserGuide for instructions.Click the Change button to change the destination. Toreset the output file location to the default location, clickthe Reset button.4.Specify the default measurement units for the scalingfeature.Select pixels, inches, or millimeters to display by defaultwhen scaling an image.5.Specify the other options.•Display TIFF/JPEG previews — specify whether to dis-play TIFF and JPEG preview images in the transforma-tion dialog boxes. If you do not want to wait for largeimages to display, uncheck the “Display TIFF/JPEG pre-views” checkbox. If previews are enabled and youattempt to open an image that is very large, a warning willbe displayed that allows you to proceed anyway or can-cel (see page 2-6).•Use passthrough mode — passes files through directlyto file output, without any processing.•Strip EXIF tags automatically — image files containingEXIF (Exchangeable Image File) data, which is descrip-tive data added by digital cameras, can cause the RIP togenerate PostScript errors. When you check this box, aduplicate of the image with the EXIF data removed from itis sent to the print server. The original is left unchanged.If downloaded images taken by digital cameras are gen-erating PostScript errors, check this box and try down-loading again.2-4Configuring the Image UtilityConfiguring the Image Utility 2-56.Click the Logging tab to specify logging options.The Logging tab appears.The software can keep a record, or log, of its activity. This is useful for troubleshooting (to determine the cause of a prob-lem or error).•Log activity to a file — check this box to enable logging.•Detailed logging — check this box to increase the detail included in the log file, uncheck to decrease.•To change the output file location shown, click the Change button.•To reset the output file location to the default location, click the Resetbutton.Fig. 2-2. Log options2-6Configuring the Image Utility 7.Click the Warnings tab to specify Warning options.The Warnings tab appears. Warnings alert you to potential problems, and give you the option of cancelling or continuing anyway. Check each box to enable the warning, uncheck the box to disable it.•Warn about presence of EXIF tags — image files con-taining EXIF (Exchangeable Image File) data, which is descriptive data added by digital cameras, can cause the RIP to generate PostScript errors. See also “Strip EXIF tags automatically“ page 2-4.•Warn about large images — if previews are enabled (see page 2-4) and you attempt to open a large image, a warning will be displayed that allows you to proceed any-way or cancel. Large images may take a long time to dis-play. You can define the threshold for what is considered “large” by selecting a value from the Threshold drop-down menu.•Warn about QuickTime installation — the Image Utility uses Apple QuickTime to generate certain image pre-views, and will warn you if it is not installed.Fig. 2-3. Warnings options•Warn about progressive JPEG files — some JPEGfiles are saved in a progressive format for the World WideWeb browsers that displays the image in a progressivelyhigher quality as the image is downloaded. This has noapplication when printing, and it can cause PostScripterrors.8.Click the Close button to save your changes.Using the Image Utility 1.Run the Image Utility.Double-click the file csui.exe or the shortcut to it.The Image Utility window appears.2.Open the folder containing a supported file type.3.Drag the file icon to the Image Utility window.•If the file is a bitmap image (TIFF, JPEG, EPS), the trans-formations dialog box appears with a preview of theimage. Go to step 4. (If Passthrough was selected in thePreferences dialog box, this dialog box does not appear.)•If the file is a PostScript (PS) or Adobe Acrobat PortableDocument Format (PDF) file, the software displays a dia-log box that asks whether you want to save the file to thedestination shown on the Preferences > General tab.Click Save or Cancel.Transformation 4.Optionally, crop the image.•Using the mouse, click and drag the corner handles ofthe red cropping box as desired.•To return the cropping box to its original size and shape,click the Reset button.The pixel dimensions, resolution, and format of the originalimage are shown for your reference.Configuring the Image Utility2-72-8Configuring the Image UtilityFig. 2-4. Cropping tabConfiguring the Image Utility 2-95.Optionally, flip, rotate, or scale the image.Click the Transformation tab.•Flip — check the Horizontal checkbox to create a right-to-left mirror image, check Vertical to create a top-down mirror image.•Rotate — click 90, 180, or 270 to rotate the image coun-terclockwise by the corresponding number of degrees.•Scaling — drag the slider or enter a scaling percentage, or enter the desired width or height. The aspect ratio of the image is automatically preserved. The resolution ofthe printed image is updated as you change the scaling.Fig. 2-5. Transformation tab6.Click Save or Cancel.•To save your changes and output the file to the printserver or disk, click Save. The PostScript file will be out-put according to the settings on the File - General Prefer-ences tab.•To cancel your changes, click Cancel. The file is not out-put.If you save the file to disk, use DiskDirect to print the file.Refer to the System Control User Guide for instructions.2-10Configuring the Image UtilityBatch Processing Batch processing allows you process a group of TIFF or JPEGall at once with a set of parameters that you define once. Forexample, you could download a batch of images, then arrangethem on the server as a MediaSaver or N-UP job (refer to theSystem Control User Guide for instructions).When you drag multiple image files onto the regular Image Utilitywindow (instead of the Batch Processing window), the Croppingand Transformation dialog box appears for each image. To auto-matically apply the same settings to an entire group of images,use Batch Processing.1.Select an output option.See page 2-3 for instructions. The selected option will be shownat the bottom of the Batch Processing window.2.Open the Batch Processing window.From the Window menu, select Batch TIFF/JPEG. The BatchProcessing window appears.3.Set the Print Mode.•Best Fit — the image will be proportionately scaled to fitas closely as possible within the page size.•Fit Horizontal — the horizontal dimension of the imagewill be scaled to fit the horizontal dimension of the pagesize. The vertical dimension will not be scaled.•Fit Vertical — the vertical dimension of the image will bescaled to fit the vertical dimension of the page size. Thehorizontal dimension will not be scaled.•Stretch to Fit — to image will be scaled to fit as closelyas possible within the page size, without necessarily pre-serving the aspect ratio of the image.4.Set the Page Size.Select a page size from the drop-down list, or click the Setbutton to specify a page size.5.Optionally, select Snap page size options.Batch Processing2-11When you check the Snap page size to fit image check-box, the page size is set to the same size as the image. Thefollowing options are available:•Respecting image resolution — the image is down-loaded at the resolution found in the image file.•At 72 dpi PostScript resolution — the image is down-loaded at 72 dpi.•At a fixed resolution — the image is scaled (enlarged orreduced) then downloaded so it prints at the resolutionyou specify.•At a fixed scale factor — the image is scaled by thescaling percentage you specify, at the resolution found inthe image file, then downloaded.6.Set the Flip options.The image can be flipped or mirrored horizontally or verti-cally.7.Set the Rotate options.The image can be rotated in 90 degree increments.8.Optionally, select Confirm Images Individually.If you enable this option, as each image is opened, a dialogbox appears with the file name. You must confirm or cancelthe selection of each file before downloading will proceed.9.Drag a group of files to the Batch Processing window.The files are processed according to the Batch Processingsettings, then sent to the printer. You can cancel the batchprocess at any time by clicking the image in the upper por-tion of the dialog box.2-12Batch ProcessingAppendix ASupport Information•Software DVD-ROM Layout (page A-2)•Technical Services (page A-3)Support Information A-1Software DVD-ROM Layout Root Directorysetup.exe - installs the Software RIP \Documentation\Drivers\netcard\DTC Fonts\Fonts\gator-other\colorspan\icc\gatorsi-other\colorspan\icc\Printing ToolsHPIU.exe (Windows)\PPDs\Windows 2000\Windows XPVideoNet\Windows 2000\Windows NT\Windows XPA-2Software DVD-ROM LayoutTechnical Services For service and support, contact HP Technical Services:•World Wide Web: •Internet E-mail: *****************United States and Canada:•Telephone: (800) 925-0563 or (952) 944-4040•Fax: (952) 944-8509Latin America:•Telephone: +1 (952) 943-3427 or +1 (952) 943-3627•Fax: +1 (952) 944-8509Europe/Middle East/Africa:•Telephone: +31 23.5622000•Fax: +31 23.5627944Asia/Pacific:•Telephone: +1 (952) 943-3320•Fax: +1 (952) 943-3313Technical Services A-3A-4Technical ServicesIndexIndex-1DDownloader Utility 1-2DTC fonts 1-5DTC MasterWorks Type Library 1-5 EEXIF tags 2-4FFlip 2-9Fontsinstallation 1-5IImage Utility 2-1configuring 2-3cropping 2-7EXIF tags 2-4overview 2-2passthrough mode 2-4Preferences 2-3progressive JPEG files 2-7QuickTime installation 2-6transformation 2-9 Installationfonts 1-5Printing Tools 1-1 Introduction 1-2OOverview 1-2PPassthrough mode 2-4 Progressive JPEG files 2-7QQuickTime installation 2-6RRotate 2-9SScale 2-9Software installation 1-1System requirements 1-3TTechnical Support A-3 Transformation 2-9 Troubleshootingprinting problems A-2 Type 1 fontssee FontsIndex-2。
三星台式电脑Galaxy Book Flex使用说明

三星台式电脑Galaxy Book Flex使用说明随着科技的不断发展,人们对于电脑的需求也越来越高。
作为一款新型的台式电脑,三星Galaxy Book Flex凭借其卓越的性能和创新的设计,成为了用户心目中的理想之选。
本文将为您详细介绍Galaxy Book Flex的使用说明,帮助您更好地了解和使用这款电脑。
一、外观与设计Galaxy Book Flex采用了一体化金属机身设计,外观简洁大方,给人一种高端大气的感觉。
机身厚度仅为18.5mm,重量也相对较轻,便于携带。
其独特的360度可旋转屏幕设计,使得用户可以随时随地切换为平板模式,提供更加便捷的使用体验。
二、屏幕与触控Galaxy Book Flex配备了一块13.3英寸的Full HD触控屏幕,色彩鲜艳,显示效果出色。
同时,该屏幕还支持触控功能,用户可以通过手指的触摸来进行操作,提供更加直观的交互体验。
此外,屏幕还支持S Pen,用户可以通过书写或绘画来表达自己的创意。
三、性能与硬件Galaxy Book Flex搭载了英特尔第十代酷睿处理器,配备了8GB的内存和512GB的固态硬盘,拥有强大的计算和存储能力。
此外,该电脑还支持Wi-Fi 6和蓝牙5.0等无线连接技术,使得用户可以更加便捷地进行网络连接和数据传输。
四、操作系统与软件Galaxy Book Flex预装了Windows 10操作系统,用户可以通过熟悉的界面和操作习惯来进行使用。
此外,三星还为该电脑提供了一系列的软件和应用,例如三星笔记、三星画廊等,满足用户的各种需求。
五、电池与续航Galaxy Book Flex配备了一块54Wh的大容量电池,可以满足用户一整天的使用需求。
同时,该电脑还支持快速充电技术,只需短时间充电即可恢复电量,方便用户的日常使用。
六、安全与隐私Galaxy Book Flex提供了多种安全功能,例如指纹识别和面部识别等,保障用户的个人信息和数据安全。
图书管理中的打印书标

打印书标(索书号)及报表和其它方法:1、登陆/portal/FQA_1.aspx?recordid=4202、标签打印程序1.条件A.计算机必须安装.net framework 4.0环境,微软官方下载地址:/downloads/zh-cn/details.aspx?FamilyID=0A391ABD-25C1-4FC 0-919F-B21F31AB88B7双击下载安装。
B.必须在浏览器中添加信任站点http://182.140.144.209/方法:打开浏览器,点击“工具”—>“Internet选项”,进入“Internet选项”对话框,点击“安全”选项卡,如图1.1所示:图1.1在安全选项卡里,点击“站点”按钮,如图1.2所示:图1.2进入可信站点对话框后,在文本区域输入http://182.140.144.209/点击“添加”,添加服务器IP为可信站点。
并将“对该区域中的所有站点要求服务器验证(https:)”复选框去掉勾选。
图1.34、打印入口:使用系统管理员账户登录系统后进入管藏查询界面在馆藏查询的定向查询界面,点击“典藏查询”,如图1.5所示:图1.5进入典藏查询界面,输入要打印书标的登录号(条形码)范围,如我的图书馆标签纸是一张纸40枚小标签,要打印标签的登录号范围011860-011899的书标如图1.6输入登录号范围并清空编目日期:图1.6点击查询,系统会列出要打印书标的数据,可以看到右上方有一个“标签打印”按钮,如图1. 7所示:图1.7点击“标签打印”按钮后,就会打开csln标签报表打印系统。
可以按照左下方使用提示的步骤进行设置。
第一步,选择打印项目:是打印标签还是财产账。
点击标签前面的“+”号,展开标签下的内容,根据具体需要进行选择。
例如,索书号下面的“索书号分行”,若前面打勾则索书号分成两行,若没有勾选则索书号打印在一行。
图1.8第二步,设计打印页面:在“页面设置”页进行设置。
3030 型打印机 扫描器单元 操作说明书 打印机参考

简介 本手册包含本设备操作使用的详细说明和注意事项。为了您的安全和利益, 请在使用本设备之前仔细阅 读本手册。将本手册放在垂手可得之处以备快速参考。 重要事项 本手册的内容如有变动,恕不另行通知。对于因操作和使用本设备而导致的直接的、间接的、特殊的、 偶然的或必然的损失,本公司概不负责。 切勿复制或印刷法律禁止翻印的任何项目。 通常,本地法律禁止复制或印刷以下项目: 纸币,印花税票,债券,股票,银行汇票,支票,护照,驾驶执照。 以上只是举例并不包括所有项目。 我们对其完整和精确不承担责任。 如果您对复制或印刷某些项目的 法律性有任何疑问,请联络您的法律顾问。 警告 如果不按照本手册所述控制、调整或执行步骤,则可能导致危险的辐射伤害。 本手册内使用两种尺寸标注。对于本设备,请参照公制尺寸标注。 商标 Microsoft®、 Windows® 和 Windows NT® 是 Microsoft Corporation 在美国和 / 或其它国家的注册商标。 Adobe®、PostScript®、Acrobat®、PageMaker® 和 Adobe Type Manager 是 Adobe Systems Incorporated 的注 册商标。 PCL® 是 Hewlett-Packard Company 的注册商标。 Apple、AppleTalk、EtherTalk、Macintosh、Mac OS 和 TrueType 是 Apple Computer, Inc. 在美国和其他国 家注册的商标。 Rendezvous 是 Apple Computer, Inc. 的商标。 IPS-PRINTTM Printer Language Emulation© 版权所有 2000, Oak Technology, Inc. 保留所有权利。 UNIX 是在美国和其他国家的注册商标,通过 X/Open Company Limited 获得专有许可。 Bluetooth® 字标和标示属 Bluetooth SIG, Inc. 所有,Ricoh Company, Ltd. 对此类标示的使用已经过许可。 NetWare 是 Novell, Inc. 的注册商标。 本手册涉及的其它产品名称只用作识别目的, 有可能分别是相应公司的商标。我们否认对这些标记拥有 任何部分或全部权利。 Windows 操作系统的正确名称如下所示: • Windows® 95 的产品名称是 Microsoft® Windows® 95 • Windows® 98 的产品名称是 Microsoft® Windows® 98 • Windows® Me 的产品名称是 Microsoft® Windows® Millennium Edition (Windows Me) • Windows® 2000 的产品名称如下所示: Microsoft® Windows® 2000 Professional Microsoft® Windows® 2000 Server Microsoft® Windows® 2000 Advanced Server • Windows® XP 的产品名称如下所示: Microsoft® Windows® XP Home Edition Microsoft® Windows® XP Professional • Windows ServerTM 2003 的产品名称如下: Microsoft® Windows ServerTM 2003 Standard Edition Microsoft® Windows ServerTM 2003 Enterprise Edition Microsoft® Windows ServerTM 2003 Web Edition • Windows NT® 4.0 的产品名称如下: Microsoft® Windows NT® Workstation 4.0 Microsoft® Windows NT® Server 4.0 注 本手册中的一些图例可能会因机器不同而略有差异。 在某些国家出售的机型上可能没有某些选购件。更详细的信息,请您与当地的经销商联系。
电脑打印A4怎么操作步骤

电脑打印A4纸操作步骤电脑打印是我们日常生活和工作中经常使用的功能之一。
在本文中,我将为您介绍如何在电脑上打印A4纸,并提供详细的步骤说明。
步骤一:准备工作在开始打印之前,您需要做一些准备工作,以确保一切顺利进行:1.检查打印机连接:确保您的打印机正确连接到电脑,并且处于正常工作状态。
您可以通过观察打印机面板上的指示灯或者在电脑上查看打印机状态来确认。
2.安装打印机驱动程序:如果您是第一次使用这台打印机,或者换了一台新的电脑,您可能需要安装打印机驱动程序。
通常情况下,当您将打印机与电脑连接时,操作系统会自动检测并提示您安装相应的驱动程序。
如果没有弹出提示,请访问打印机制造商的官方网站,下载并安装最新的驱动程序。
3.注意纸张尺寸:在打印A4纸之前,请确保打印机设置为适应A4纸尺寸。
您可以在打印机面板上或者打印偏好设置中进行调整。
步骤二:选择文件和打印设置在准备工作完成后,您可以选择要打印的文件,并进行一些打印设置:1.选择文件:首先,打开您想要打印的文件。
它可以是一个文档、电子表格、图片或其他支持打印功能的文件格式。
2.打印设置:在文件打开后,点击顶部菜单栏中的“文件”选项,然后选择“打印”或按下快捷键“Ctrl + P”来进入打印设置。
3.选择打印机:在打印设置窗口中,您可以选择要使用的打印机。
如果您有多台打印机连接到电脑上,确保选择正确的打印机。
4.选择纸张尺寸:在打印设置窗口中的“纸张尺寸”或类似选项中,选择“A4”。
这将确保打印机适应A4纸的尺寸。
5.调整打印布局:根据需要,您可以在打印设置窗口中调整打印布局,如页面方向(横向或纵向)、边距大小和页面数量等。
步骤三:打印文件当您完成了打印设置后,可以开始打印文件了:1.确认设置:在点击打印按钮之前,再次确认打印设置是否正确。
您可以预览打印效果,确保没有错误或内容被截断。
2.点击打印:点击打印设置窗口中的“打印”按钮,或按下快捷键“Ctrl +P”来开始打印文件。
莫贾V2416A系列迷你型无风扇、振动防护计算机产品介绍说明书

V2416A SeriesCompact,fanless,vibration-proof computers for rolling stock applicationsFeatures and Benefits•Intel Celeron/Core i7processor•Two hot-swappable2.5-inch HDD or SSD storage expansion trays•Dual independent DVI-I displays•2Gigabit Ethernet ports with M12X-coded connectors•2CFast sockets for OS backup•M12A-coded power connector•Compliant with EN50121-4•Complies with all EN50155mandatory test items1•IEC61373certified for shock and vibration resistance•Ready-to-run Debian7,Windows Embedded Standard7,and Windows10Embedded IoT Enterprise2016LTSB platforms•-40to70°C wide-temperature models available•Supports SNMP-based system configuration,control,and monitoring(Windows only)CertificationsIntroductionThe V2416A Series embedded computers are based on the Intel3rd Gen processor and feature4RS-232/422/485serial ports,dual LAN ports,and 3USB2.0hosts.In addition,the V2416A computers provide dual DVI-I outputs and comply with the mandatory test items of the EN50155 standard,making them suitable for a variety of industrial applications.The CFast socket,SATA connectors,and USB sockets provide the V2416A computers with the reliability needed for industrial applications that require data buffering and storage expansion.Most importantly,the V2416A computers come with2hot-swappable storage trays for inserting additional storage media,such as hard disk or solid-state drives,and support hot swapping for convenient,fast,and easy storage replacement. Each storage tray has its own LED to indicate whether or not a storage module is plugged in.The V2416A Series computers come preinstalled with a choice of Linux Debian7or Windows Embedded Standard7to provide programmers with a familiar environment in which to develop sophisticated,bug-free application software at a low cost.1.This product is suitable for rolling stock railway applications,as defined by the EN50155standard.For a more detailed statement,click here:/doc/specs/EN_50155_Compliance.pdfAppearanceFront View Rear ViewSpecificationsComputerCPU V2416A-C2Series:Intel®Celeron®Processor1047UE(2M cache,1.40GHz)V2416A-C7Series:Intel®Core™i7-3517UE Processor(4M cache,up to2.80GHz) System Chipset Mobile Intel®HM65Express ChipsetGraphics Controller Intel®HD Graphics4000(integrated)System Memory Pre-installed4GB DDR3System Memory Slot SODIMM DDR3/DDR3L slot x1Supported OS Linux Debian7Windows Embedded Standard7(WS7E)32-bitWindows Embedded Standard7(WS7E)64-bitStorage Slot CFast slot x2Computer InterfaceEthernet Ports Auto-sensing10/100/1000Mbps ports(M12X-coded)x2Serial Ports RS-232/422/485ports x4,software selectable(DB9male)USB2.0USB2.0hosts x1,M12D-coded connectorUSB2.0hosts x2,type-A connectorsAudio Input/Output Line in x1,Line out x1,M12D-codedDigital Input DIs x6Digital Output DOs x2Video Input DVI-I x2,29-pin DVI-D connectors(female)Digital InputsIsolation3k VDCConnector Screw-fastened Euroblock terminalDry Contact On:short to GNDOff:openI/O Mode DISensor Type Dry contactWet Contact(NPN or PNP)Wet Contact(DI to COM)On:10to30VDCOff:0to3VDCDigital OutputsConnector Screw-fastened Euroblock terminalCurrent Rating200mA per channelI/O Type SinkVoltage24to40VDCLED IndicatorsSystem Power x1Storage x1Hot-swappable2LAN2per port(10/100/1000Mbps)Serial2per port(Tx,Rx)Serial InterfaceBaudrate50bps to921.6kbpsFlow Control RTS/CTS,XON/XOFF,ADDC®(automatic data direction control)for RS-485,RTSToggle(RS-232only)Isolation N/AParity None,Even,Odd,Space,MarkData Bits5,6,7,8Stop Bits1,1.5,2Serial SignalsRS-232TxD,RxD,RTS,CTS,DTR,DSR,DCD,GNDRS-422Tx+,Tx-,Rx+,Rx-,GNDRS-485-2w Data+,Data-,GNDRS-485-4w Tx+,Tx-,Rx+,Rx-,GNDPower ParametersInput Voltage12to48VDCPower Connector M12A-coded male connectorPower Consumption(Max.) 3.3A@12VDC0.82A@48VDCPower Consumption40W(max.)Physical CharacteristicsHousing AluminumIP Rating IP30Dimensions(with ears)250x86x154mm(9.84x3.38x6.06in)Dimensions(without ears)275x92x154mm(10.83x3.62x6.06in)Weight4,000g(8.98lb)Installation DIN-rail mounting(optional),Wall mounting(standard) Protection-CT models:PCB conformal coating Environmental LimitsOperating Temperature Standard Models:-25to55°C(-13to131°F)Wide Temp.Models:-40to70°C(-40to158°F) Storage Temperature(package included)-40to85°C(-40to185°F)Ambient Relative Humidity5to95%(non-condensing)Standards and CertificationsEMC EN55032/24EMI CISPR32,FCC Part15B Class AEMS IEC61000-4-2ESD:Contact:6kV;Air:8kVIEC61000-4-3RS:80MHz to1GHz:20V/mIEC61000-4-4EFT:Power:2kV;Signal:2kVIEC61000-4-5Surge:Power:2kVIEC61000-4-6CS:10VIEC61000-4-8PFMFRailway EN50121-4,IEC60571Railway Fire Protection EN45545-2Safety EN60950-1,IEC60950-1Shock IEC60068-2-27,IEC61373,EN50155Vibration IEC60068-2-64,IEC61373,EN50155DeclarationGreen Product RoHS,CRoHS,WEEEMTBFTime332,173hrsStandards Telcordia(Bellcore),GBWarrantyWarranty Period3yearsDetails See /warrantyPackage ContentsDevice1x V2416A Series computerInstallation Kit8x screw,for storage installation2x storage key1x wall-mounting kit8x washer,for HDD/SSDDocumentation1x document and software CD1x quick installation guide1x warranty cardDimensionsOrdering InformationModel Name CPU Memory(Default)OS CFast(CTO)Backup CFast(CTO)Hot-SwappableSSD/HDD Tray(CTO)Operating Temp.ConformalCoatingV2416A-C2Celeron1047UE4GB or optional1(Optional)1(Optional)2(Optional)-25to55°C–V2416A-C2-T Celeron1047UE4GB or optional1(Optional)1(Optional)2(Optional)-40to70°C–V2416A-C2-CT-T Celeron1047UE4GB or optional1(Optional)1(Optional)2(Optional)-40to70°C✓V2416A-C7i7-3517UE4GB or optional1(Optional)1(Optional)2(Optional)-25to55°C–V2416A-C7-T i7-3517UE4GB or optional1(Optional)1(Optional)2(Optional)-40to70°C–V2416A-C7-CT-T i7-3517UE4GB or optional1(Optional)1(Optional)2(Optional)-40to70°C✓V2416A-C2-W7E Celeron1047UE4GB8GB1(Optional)2(Optional)-25to55°C–V2416A-C2-T-W7E Celeron1047UE4GB8GB1(Optional)2(Optional)-40to70°C–V2416A-C7-T-W7E Core i7-3517UE4GB8GB1(Optional)2(Optional)-40to70°C–Accessories(sold separately)Battery KitsRTC Battery Kit Lithium battery with built-in connectorCablesCBL-M12XMM8PRJ45-BK-100-IP67M12-to-RJ45Cat-5E UTP gigabit Ethernet cable,8-pin X-coded male connector,IP67,1mCBL-M12(FF5P)/Open-100IP67A-coded M12-to-5-pin power cable,IP67-rated5-pin female M12connector,1mConnectorsM12A-5PMM-IP685-pin male circular threaded D-coded M12USB connector,IP68M12X-8PMM-IP678-pin male X-coded circular threaded gigabit Ethernet connector,IP67M12A-5P-IP68A-coded screw-in sensor connector,female,IP68,4.05cmM12A-8PMM-IP678-pin male circular threaded A-codes M12connector,IP67-rated(for field-installation)Power AdaptersPWR-24270-DT-S1Power adapter,input voltage90to264VAC,output voltage24V with2.5A DC loadPower CordsPWC-C7AU-2B-183Power cord with Australian(AU)plug,2.5A/250V,1.83mPWC-C7CN-2B-183Power cord with two-prong China(CN)plug,1.83mPWC-C7EU-2B-183Power cord with Continental Europe(EU)plug,2.5A/250V,1.83mPWC-C7UK-2B-183Power cord with United Kingdom(UK)plug,2.5A/250V,1.83mPWC-C7US-2B-183Power cord with United States(US)plug,10A/125V,1.83mAntennasANT-WDB-ANF-0407 2.4/5GHz,omni-directional antenna,4/7dBi,N-type(male)Wall-Mounting KitsV2400Isolated Wall Mount Kit Wall-mounting kit with isolation protection,2wall-mounting brackets,4screwsDIN-Rail Mounting KitsDK-DC50131DIN-rail mounting kit,6screws©Moxa Inc.All rights reserved.Updated Jun12,2019.This document and any portion thereof may not be reproduced or used in any manner whatsoever without the express written permission of Moxa Inc.Product specifications subject to change without notice.Visit our website for the most up-to-date product information.。
Kyocera FS-6970DN 说明书

i
ii
法律和安全信息
请在使用本机之前阅读此信息。本章节介绍有关以下主题的信息:
法律信息
iv
许可证协议
v
安全信息
xi
符号
xv
安装注意事项
xvi
使用注意事项
xviii
关于本操作手册
xx
本手册中使用的规范
xxi
iii
法律信息
小心 因安装不当引起的任何损坏,本公司概不负责。
软件声明
本打印机使用的软件必须支持打印机的仿真模式。打印机出厂时设定为 PCL 仿真。可更改仿真模式。
֡ቤተ መጻሕፍቲ ባይዱ֩
๑ᆩԨऐമ൩ለ֡܁ፕ֩ă൩ॽഄݣዃሞऐഗৎᅜՍֱለă
目录
1 机器部件 ....................................................................................... 1-1 打印机正面的部件 ......................................................................... 1-2 打印机左侧部件和内部部件 .......................................................... 1-2 打印机背面的部件 ......................................................................... 1-3 操作面板 ....................................................................................... 1-4
乔思伯-A4机箱说明书
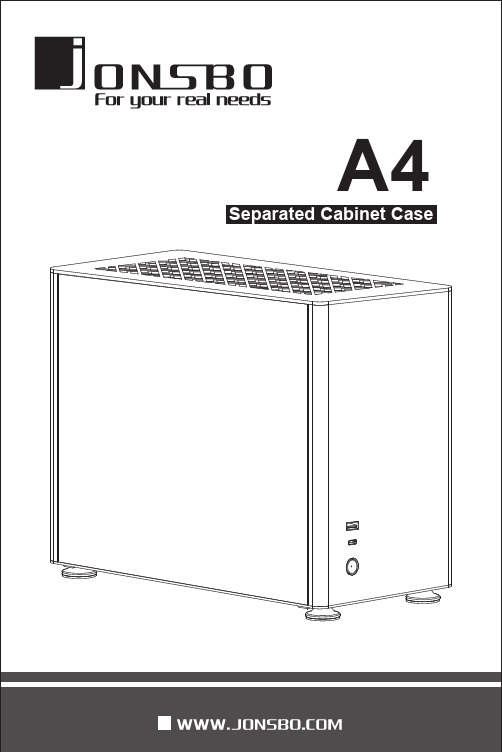
A4 Separated Cabinet CaseMotherboardMax. CPU Cooler Height71mm Max. Display Card LengthDrive Bay Front I/O Port Cooling System PSU Support PCI Expansion Slot Material DimensionITX 169mm(W)*273mm(H)*340mm(D)325mm 2*2.5+1*3.5POWER*1 USB3.0*1 USB3.1 GEN2*1SFX/SFX-L2top plate 顶盖电源固定架Power Fixer硬盘架HDD Bracket全钢化玻璃Tempered Glass 可拆卸滤网Detachable FilterPCI 卡条*2PCI Slot Cover*2全铝脚垫All aluminum foot padPCI 盖板PCI Cover 显卡托架Video card Trailer Top plate 3mm aluminum magnesium alloy Front plate/back plate/bottom plate 2mm aluminum magnesium alloy Hardware 1.5mm all black steel plate Side plate 3.00mm all tempered glassTop: 120mm*2 (optional) Bottom: 120mm*2 (optional)688主板*4+PCI*2(M3*5)/PCI (M3*5-细)6HDD 固定螺丝HDD PSU*6(#6-32*6)PSU (#6-32*6-粗)41按压-向后窗推动开启顶盖 向上提拉去除玻璃侧板开启机箱Press-then push backward to take out top plate Push upward and take out side plates Take out HDD rack (PSU cover) and removable display card rack Open the caseUSB3.1 GEN2 Connection USB3.0 Connection Power Button Connection Power LED Connection Preparation before installation安装前准备拆掉硬盘架(电源罩)及显卡托架①2Take out PSU rack 底板(Bottom):Fan 120mm*2底板(Bottom ):Fan 120mm*1 HDD*1拆掉电源固定架②Take out bottom dust filter 拆掉底部防尘网③After installation of radiator, fixed with screws 散热器安装完毕,固定主板螺丝Install Radiator/FanInstall motherboard 安装冷排/风扇安装主板3电源安装在电源支架上,装回机箱固定Install PSU on PSU rack, then install into the case and fix it①Screw pass through rubber gasket and fix into SSD Slide into calabash holes to fix it 螺丝穿过胶圈固定在SSD上①滑入葫芦孔固定②Install PSU安装电源Install SSD安装SSD 装回电源罩Install PSU cover②4松开PCI盖板Take out PCI cover①固定显卡转接线Fix display card cable②先插入主板PCI插槽,再固定螺丝First insert the PCI slot of the motherboard, then fix the screw 装入显卡固定Install display card and fix it③Install display card安装显卡5固定PCI盖板,调节显卡托架Fix PCI cover, adjust display card stand④Install side plates, top plate, dust filter, feet pad 装回侧板、顶盖、防尘网、脚垫Installation complete 安装完成。
联想 ThinkPad T14s Gen 4 系列用户指南

ThinkPad T14s Gen4系列用户指南用前必读在参考此资料使用相关产品之前,请务必阅读并了解以下信息:•《安全与保修指南》•《设置指南》•《常规安全与合规性声明》第二版(2023年7月)©Copyright Lenovo2023.有限权利声明:如果数据或软件依照美国总务署(GSA)合同提供,则其使用、复制或披露将受到GS-35F-05925号合同的约束。
目录了解您的Lenovo笔记本 (iii)第1章认识您的计算机 (1)前视图 (1)侧视图 (3)底视图 (6)后视图 (7)功能部件和规格 (8)USB规格 (8)第2章开始使用您的计算机 (11)访问网络 (11)连接到Wi-Fi网络 (11)连接到有线以太网 (11)连接到蜂窝网络(适用于特定型号) (12)开启飞行模式 (13)与计算机交互 (13)使用键盘快捷键 (13)使用TrackPoint指针设备 (14)使用轨迹板 (16)使用触摸屏(适用于特定型号) (17)连接到外接显示屏 (18)第3章探索您的计算机 (21)Lenovo应用程序 (21)Lenovo Commercial Vantage或联想电脑管家 (21)Lenovo View(适用于特定型号) (22)智能散热 (24)管理电源 (25)检查电池状态 (25)为计算机充电 (25)更改电源设置 (26)传输数据 (27)设置蓝牙连接 (27)设置NFC连接(适用于特定型号) (27)使用智能卡(适用于特定型号) (28)附件 (29)购买附件 (29)第4章保护计算机和信息安全..31锁定计算机 (31)使用指纹登录(适用于特定型号) (31)使用面部ID登录(适用于特定型号) (32)离机锁定功能(适用于红外摄像头型号)..32隐私保护(适用于特定型号) (32)断电数据保护(适用于特定型号) (33)UEFI BIOS密码 (33)密码类型 (33)设置、更改和删除密码 (34)将指纹与密码关联(适用于特定型号) (35)在线快速身份认证(FIDO) (35)第5章配置高级设置 (37)UEFI BIOS (37)进入UEFI BIOS菜单 (37)UEFI BIOS界面导航 (37)设置系统日期和时间 (37)更改启动顺序 (37)查看UEFI BIOS事件日志 (38)检测内存重新训练(仅适用于Intel型号).39自定义BIOS默认设置 (39)切换安全芯片 (39)将系统重置为出厂默认设置 (40)恢复UEFI BIOS (40)更新UEFI BIOS (40)云端裸机恢复(适用于特定型号) (41)安装Windows操作系统和驱动程序 (41)第6章更换CRU (43)CRU列表 (43)禁用快速启动和内置电池 (43)更换CRU (44)底盖组合件 (44)M.2固态驱动器和M.2固态驱动器支架(适用于特定型号) (45)无线广域网卡和无线广域网卡支架(适用于特定型号) (46)第7章帮助和支持 (49)常见问题 (49)错误消息 (50)蜂鸣声错误 (51)自助资源 (52)Windows标签 (53)致电Lenovo (53)联系Lenovo之前 (53)Lenovo客户支持中心 (54)购买附加服务 (55)©Copyright Lenovo2023i附录A合规性信息.........57附录B声明和商标 (61)ii ThinkPad T14s Gen4系列用户指南了解您的Lenovo笔记本感谢您选择Lenovo®笔记本电脑!我们致力于为您提供最佳解决方案。
HP LaserJet M3027 M3035多功能一体机 说明书
HP LaserJet M3027/M3035 多功能一体机用户指南版权与许可© 2006 Copyright Hewlett-Packard Development Company, L.P.未经事先书面许可,严禁进行任何形式的复制、改编或翻译,除非版权法另有规定。
此处包含的信息如有更改,恕不另行通知。
HP 产品及服务的保修仅以随该产品及服务提供的书面保修声明为准。
本文所述任何内容不应被视为附加保修。
对任何技术或编辑错误或者本文所述内容的遗漏,HP 不承担任何责任。
部件号: CB414-90934Edition 1, 10/2006商标声明Adobe®、Acrobat®和 PostScript®是 Adobe Systems Incorporated 的商标。
Linux 是 Linus Torvalds 在美国的注册商标。
Microsoft®、Windows®和 Windows NT®均为 Microsoft Corporation 在美国的注册商标。
UNIX®是 The Open Group 的注册商标。
ENERGY STAR®和 ENERGY STAR 徽标®均为美国环保署在美国的注册标志。
目录1 设备基本信息设备比较 (2)功能比较 (3)打印机视图 (4)设备部件 (4)接口端口 (5)设备软件 (6)支持的操作系统 (6)支持的打印机驱动程序 (6)选择正确的打印机驱动程序 (6)通用打印机驱动程序 (7)驱动程序自动配置 (7)立即更新 (7)HP 驱动程序预配置 (7)打印设置优先级 (7)打开打印机驱动程序 (8)用于 Macintosh 计算机的软件 (8)从 Macintosh 操作系统中删除软件 (9)实用程序 (9)HP Web Jetadmin (9)内嵌式 Web 服务器 (9)HP Easy Printer Care 软件 (9)支持的操作系统 (9)支持的浏览器 (10)其它组件和实用程序 (10)2 控制面板使用控制面板 (12)控制面板布局 (12)主页屏幕 (12)触摸屏上的按钮 (13)控制面板帮助系统 (14)使用管理菜单 (15)导航管理菜单 (15)信息菜单 (15)默认作业选项菜单 (16)默认原件选项 (16)默认复印选项 (17)默认传真选项 (17)ZHCN iii默认电子邮件选项 (18)默认发送到文件夹选项 (19)默认打印选项 (19)时间/计划菜单 (20)管理菜单 (21)初始设置菜单 (22)联网和 I/O (22)传真设置 (28)电子邮件设置 (29)发送设置菜单 (29)设备动作菜单 (30)打印质量菜单 (33)故障排除菜单 (35)重置菜单 (36)服务菜单 (36)3 输入/输出 (I/O) 配置USB 配置 (38)网络配置 (39)配置 TCP/IPv4 参数 (39)设置 IP 地址 (39)设置子网掩码 (40)设置默认网关 (40)配置 TCP/IPv6 参数 (41)禁用网络协议(可选) (41)禁用 IPX/SPX (41)禁用 AppleTalk (41)禁用 DLC/LLC (42)HP Jetdirect EIO 打印服务器 (42)4 介质和纸盘一般介质准则 (44)避免使用的纸张 (44)可损坏设备的纸张 (44)一般介质规格 (45)介质注意事项 (46)信封 (46)双侧接缝的信封 (46)带粘性封条或封盖的信封 (47)信封边距 (47)信封存放 (47)标签 (47)标签结构 (48)投影胶片 (48)卡片纸和重磅介质 (48)卡片纸结构 (48)卡片纸准则 (48)信头纸和预印表格 (49)选择正确的热凝器模式 (49)iv ZHCN选择打印介质 (51)支持的介质尺寸 (51)支持的介质类型 (52)打印和纸张存放环境 (53)装入介质 (54)将介质放在扫描仪玻璃板上 (54)装入自动文档进纸器 (ADF) (54)装入纸盘 1(多用途纸盘) (55)自定义纸盘 1 操作 (56)装入纸盘 2 和可选纸盘 3 (57)装入特殊介质 (58)控制打印作业 (60)选择出纸槽 (61)打印到顶部出纸槽 (61)打印到后出纸槽 (62)5 设备功能使用便捷订书机 (64)装订介质 (64)装入订书钉 (65)使用作业存储功能 (67)访问作业存储功能 (67)使用审阅待打印功能 (67)创建审阅待打印作业 (67)打印审阅待打印作业的剩余份数 (68)删除审阅待打印作业 (68)使用专用作业功能 (68)创建专用作业 (68)打印专用作业 (68)删除专用作业 (69)使用快速复印功能 (69)创建快速复印作业 (69)打印更多份快速复印作业 (69)删除快速复印作业 (70)使用存储的作业功能 (70)创建存储的复印作业 (70)创建存储的打印作业 (70)打印存储的作业 (71)删除存储的作业 (71)6 打印使用 Windows 打印机驱动程序中的功能 (74)创建和使用快速设置 (74)使用水印 (75)调整文档大小 (75)从打印机驱动程序设置自定义纸张尺寸 (75)使用不同纸张和打印封面 (76)打印空白的第一页 (76)在一张纸上打印多个页面 (76)ZHCN v在纸张两面打印 (77)使用自动双面打印 (77)手动双面打印 (78)双面打印的布局选项 (78)使用维修选项卡 (79)使用 Macintosh 打印机驱动程序中的功能 (80)创建和使用预置 (80)打印封面 (80)在一张纸上打印多个页面 (80)在纸张两面打印 (81)取消打印作业 (83)从控制面板停止当前打印作业 (83)使用软件程序停止当前打印作业 (83)7 复印使用复印屏幕 (86)设置默认复印选项 (87)基本复印说明 (88)从扫描仪玻璃板复印 (88)从文档进纸器复印 (88)调整复印设置 (89)复印双面文档 (90)手动复印双面文档 (90)自动复印双面文档(只限双面打印机型) (90)复印包含多种尺寸的原文档 (92)更改复印自动分页设置 (93)复印照片和书籍 (94)使用“作业构建”功能组合复印作业 (95)取消复印作业 (96)8 扫描和发送电子邮件配置电子邮件设置 (98)支持的协议 (98)配置电子邮件服务器设置 (98)查找网关 (99)从设备控制面板查找 SMTP 网关 (99)从电子邮件程序查找 SMTP 网关 (99)使用“发送电子邮件”屏幕 (100)执行基本电子邮件功能 (101)装入文档 (101)发送文档 (101)发送文档 (101)使用自动填写功能 (101)使用通讯簿 (102)创建收件人列表 (102)使用本地通讯簿 (102)将电子邮件地址添加到本地通讯簿 (102)从本地通讯簿删除电子邮件地址 (103)更改当前作业的电子邮件设置 (104)vi ZHCN9 传真模拟传真 (108)将传真附件连接到电话线 (108)配置和使用传真功能 (108)数字传真 (109)10 管理和维护设备使用信息页 (112)配置电子邮件警报 (114)使用 HP Easy Printer Care 软件 (115)打开 HP Easy Printer Care 软件 (115)HP Easy Printer Care 软件各部分 (115)使用内嵌式 Web 服务器 (117)通过网络连接打开内嵌式 Web 服务器 (117)内嵌式 Web 服务器各部分 (117)使用 HP Web Jetadmin 软件 (119)使用适用于 Macintosh 的 HP Printer Utility (120)打开 HP Printer Utility (120)HP Printer Utility 功能 (120)管理耗材 (122)耗材寿命 (122)打印碳粉盒大致更换时间间隔 (122)管理打印碳粉盒 (122)打印碳粉盒存放 (122)使用原装 HP 打印碳粉盒 (122)HP 对非 HP 打印碳粉盒的策略 (122)打印碳粉盒鉴别 (123)HP 打假热线和网站 (123)更换耗材和部件 (124)耗材更换准则 (124)更换打印碳粉盒 (124)清洁设备 (127)清洁外部 (127)清洁扫描仪玻璃板 (127)清洁扫描仪盖板衬底 (128)清洁 ADF (128)清洁送纸道 (130)校准扫描仪 (131)11 故障排除故障排除检查表 (134)影响性能的因素 (134)问题解决流程图 (135)解决一般设备问题 (138)控制面板消息类型 (141)控制面板消息 (142)ZHCN vii卡塞恢复 (151)清除卡纸 (152)从 ADF 清除卡纸 (152)从进纸盘区域清除卡纸 (154)从打印碳粉盒区域清除卡纸 (155)从出纸槽区域清除卡纸 (156)从双面打印器清除卡纸 (157)解决重复卡纸 (158)清除订书机卡塞 (160)解决打印质量问题 (163)与介质有关的打印质量问题 (163)与环境有关的打印质量问题 (163)与卡纸有关的打印质量问题 (163)图像缺陷示例 (163)打印颜色浅(部分页面) (165)打印浓度淡(整个页面) (165)斑点 (165)丢字 (166)线条 (166)灰色背景 (166)碳粉污迹 (167)松散的碳粉 (167)重复缺陷 (168)重复图像 (168)变形字符 (168)页面倾斜 (169)卷曲或呈波形 (169)皱纹或折痕 (170)白色垂直线 (170)胎迹 (170)黑底上的白色斑点 (171)分散的线条 (171)模糊打印 (172)随机图像重复 (172)解决网络打印问题 (173)解决复印问题 (174)防止出现复印问题 (174)图像问题 (174)介质处理问题 (175)执行问题 (177)解决传真问题 (178)解决发送问题 (178)解决接收问题 (179)解决电子邮件问题 (180)验证 SMTP 网关地址 (180)验证 LDAP 网关地址 (180)解决常见的 Windows 问题 (181)解决常见的 Macintosh 问题 (182)viii ZHCN解决 Linux 问题 (184)解决 PostScript 问题 (185)一般问题 (185)附录 A 耗材和附件订购部件、附件和耗材 (188)直接从 HP 订购 (188)通过服务或支持提供商订购 (188)通过嵌入式 Web 服务器直接订购(适用于连接到网络上的打印机) (188)通过 HP Easy Printer Care 软件直接订购 (188)产品号 (189)纸张处理附件 (189)打印碳粉盒 (189)内存 (189)电缆和接口 (189)订书机附件 (190)打印介质 (190)附录 B 服务与支持Hewlett-Packard 有限保修声明 (193)客户自助维修保修服务 (194)打印碳粉盒有限保修声明 (195)HP 客户服务 (196)联机服务 (196)电话支持 (196)软件实用程序、驱动程序和电子信息 (196)直接订购 HP 附件或耗材 (196)HP 服务信息 (196)HP 服务协议 (196)HP Easy Printer Care 软件 (196)有关 Macintosh 计算机的 HP 支持及信息 (197)HP 维护协议 (198)现场服务协议 (198)次日现场服务 (198)每周(批量)现场服务 (198)重新包装设备 (198)延长保修期 (198)附录 C 规格物理规格 (200)电气规格 (201)声音排放 (202)操作环境 (203)附录 D 规范信息FCC 规则 (206)环境产品管理计划 (207)保护环境 (207)ZHCN ix产生臭氧 (207)能耗 (207)碳粉消耗 (207)纸张使用 (207)塑料 (207)HP LaserJet 打印耗材 (207)HP 打印耗材的退回和回收利用计划信息 (208)纸张 (208)材料限制 (208)欧盟用户丢弃私人废弃设备的规定 (209)材料安全数据表 (MSDS) (209)更多信息 (209)电信服务声明 (210)一致性声明 (211)安全声明 (212)激光安全 (212)加拿大 DOC 规则 (212)VCCI 声明(日本) (212)电源线声明(日本) (212)EMI 声明(韩国) (212)EMI 声明(台湾) (212)芬兰激光声明 (213)附录 E 处理内存和打印服务器卡概述 (216)安装内存 (217)安装设备内存 (217)检查 DIMM 安装 (221)保存资源(永久资源) (222)为 Windows 启用内存 (223)使用 HP Jetdirect 打印服务器卡 (224)安装 HP Jetdirect 打印服务器卡 (224)取出 HP Jetdirect 打印服务器卡 (225)词汇 (227)索引 (229)x ZHCN1设备基本信息本章包含有关设备功能的基本信息:●设备比较●功能比较●打印机视图●设备软件ZHCN1HP LaserJet M3027HP LaserJet M3027x HP LaserJet M3035HP LaserJet M3035xs●在 letter 尺寸介质上打印时,速度可达每分钟 27 页(ppm);在 A4 尺寸介质上打印时,速度可达 25 ppm●总计 256 兆字节 (MB) 随机存储内存 (RAM),最大可升级至 512 MB●内部 40 千兆字节 (GB) 或更大硬盘●100 页多用途纸盘(纸盘 1)、500 页进纸盘(纸盘 2)、50 页自动文档进纸器 (ADF) 和 250 页出纸槽●高速通用串行总线 (USB) 2.0 端口和增强的输入/输出(EIO) 插槽●HP Jetdirect 嵌入式打印服务器,用于连接至以太网 10/100Base-T 网络●一个开放式双列直插式内存模块 (DIMM) 插槽HP LaserJet M3027,外加:●自动双面打印附件●33.6 kpbs 模拟传真●在 letter 尺寸介质上打印时,速度可达 35 ppm;在A4 尺寸介质上打印时,速度可达 33 ppm●总计 256 MB RAM,最大可升级至 512 MB●内部 40 GB 或更大硬盘●100 页纸盘 1、500 页纸盘 2、50 页 ADF 和 250 页出纸槽●高速 USB 2.0 端口和 EIO 插槽●HP Jetdirect 嵌入式打印服务器,用于连接至以太网 10/100Base-T 网络●一个开式 DIMM 插槽●自动双面打印附件HP LaserJet M3035,外加:●33.6 kpbs 模拟传真●20 页便捷订书机●500 页进纸盘(纸盘 3)2第 1 章设备基本信息ZHCN功能说明性能●400 MHz 处理器用户界面●控制面板帮助●Windows® 和 Macintosh 打印机驱动程序●内嵌式 Web 服务器,可用于获得支持和订购耗材(只适用于联网型号的管理工具)●HP Easy Printer Care 软件(一种基于 Web 的状态和故障排除工具)打印机驱动程序●HP PCL 5●HP PCL 6●HP postscript level 3 仿真分辨率●FastRes 1200 - 可提供 1200 点/英寸 (dpi) 的打印分辨率,可快速、高质量地打印商业文本和图形●ProRes 1200 - 可提供 1200 dpi 的打印分辨率,可打印出最佳质量的艺术线条和图形图像存储功能●内部 40 GB 或更大硬盘驱动器●字体、表格和其它宏●作业保留字体●93 种内置字体,供 PCL 使用●软件解决方案提供 80 种 TrueType 格式的与打印机匹配的屏幕字体●可添加其它字体。
HP Business Desktop Hard Drive SMART IV技术概述说明书
SMART IV Technology on HP Business Desktop Hard DrivesHistory of SMART (2)Why SMART IV? (2)How SMART IV works (2)How to identify a SMART IV hard drive (3)History of SMARTFor the past several years, hard drives have incorporated a feature known as Self-Monitoring Analysis and Reporting Technology (SMART). The advantage of SMART technology is that it provides an early warning system of imminent hard drive failure so that the drive can be replaced before it actually fails. Hard drives equipped with SMART technology automatically monitor certain key parameters for potential drive failure without affecting hard drive performance. If an error is detected, a failure message is displayed on the user’s screen.There are several iterations, or versions of SMART:•SMART: Originally named Drive Failure Prediction (DFP) and invented by Compaq Computer Corporation in 1995, SMART tracks certain drive attributes and parameters during drive activity. If any of these parameters being monitored by the drive exceed certain defined limits, an imminent hard drive failure message is displayed to the user by the BIOS or Client Management Software. •SMART II: Improves upon the reliability of the original SMART technology by adding the capability to use “off-line data collection” to check the hard drive health even during periods of inactivity. •SMART III: Supports SMART I and II. With SMART III, the hard drive does a complete media self-scan every 60 hours. Any questionable sectors can be either validated or remapped. The latest implementation of SMART III includes enforcement of coverage even during heavy-duty cycle usage of the drive.Why SMART IV?Starting in late 2007, new HP business desktops and Workstations will begin incorporating SMART IV technology in hard drives. While the current versions of SMART do a good job monitoring the data on the hard drive media, the ever increasing emphasis on reliability and quality led Hewlett-Packard and hard drive manufacturers to better ensure that the data flow from host interface to media and media to host interface is not compromised. This is done by adding a parity code to every 512 byte block in the data path of the hard drive's Cache RAM. This parity checking, which is called SMART IV by HP, provides more complete error detection coverage of the entire data path between the host and the hard drive. In the hard drive industry, SMART IV is also known as End-to-End Error Detection.How SMART IV works•SMART IV uses a 2 byte parity code to enable it to better detect if data is valid during transfers to and from the data buffer of the hard drive. If the parity data does not match after transferring through the cache RAM data buffer, then depending upon the command, the drive can do abackground retry to get data again or report the error message to the host.•During a disk read, a 2 byte parity code is generated after the data is transferred from the disk.After transfer from the data buffer to the drive interface, the parity data is checked (see Figure 1). •During a disk write, a 2 byte parity code is generated and appended to the data going into the data buffer. The parity code is checked before it goes into the data buffer and before it is written to the disk (see Figure 2).•If an error is detected by the drive and the data cannot be retrieved or sent without failure, a protocol is in place to notify the host operating system of the error. The host operating system can then decide to resend the command or notify the user that a data error may have occurred.•If errors are detected, a SMART attribute called End-to-End Error Detection Count is updated. If the SMART threshold is crossed, an imminent failure error message is reported to the user eitherthrough Client Management Software that has been installed in the operating system or by the HP BIOS on the next reboot. Since all HP BIOS issue the SMART status command, no additionalsoftware is required.How to identify a SMART IV hard driveOpen the Computer Setup (F10) utility in the system BIOS to determine if the system has a SMART IV hard drive.1.Turn on the computer and press the F10 key during boot to access the Computer Setup utility.2.In Computer Setup, select “Device Configuration” from the “Storage” menu. If the hard drivesupports SMART IV technology it will be identified as SMART IV in the description. If the hard drive supports SMART III technology it will be identified as SMART III in the description. Older hard drives prior to SMART III technology will not reference SMART in the description, but all shipping HP business desktop hard drives support prior versions of SMART.3.Select “Ignore Changes and Exit” from the “File” menu to exit Computer Setup.Note:If the drive indicates SMART IV support, it also supports SMART III.© 2007 Hewlett-Packard Development Company, L.P. The information contained herein is subject to change without notice. The only warranties for HP products and services are set forth in the express warranty statements accompanying such products and services. Nothing herein should be construed as constituting an additional warranty. HP shall not be liable for technical or editorial errors or omissions contained herein.Microsoft, Windows, and Windows Vista are either trademarks or registeredtrademarks of Microsoft Corporation in the United States and/or other countries. 458436-001, August 2007。
A4TECH 无线键盘使用说明书

Radio Wireless Keyboard User’s GuideBrand : A4TECHModel: RFKB-23THIS DEVICE COMPLIES WITH PART 15 OF THE FCC RULES. OPERATION IS SUBJECT TO THE FOLLOWING TWO CONDITIONS: (1) THIS DEVICE MAY NOT CAUSE HARMFUL INTERFERENCE AND (2) THIS DEVICE MUST ACCEPT ANY INTERFERENCE RECEIVED, INCLUDING INTERFERENCE THAT MAY CAUSE UNDESIRED OPERATION.Federal Communications Commission RequirementsThe equipment has been tested and found to comply with the limits for Class B Digital Device, pursuant to part 15 of the FCC Rules. These limits are designed to provide reasonable protection against harmful interference in a residential installation. This equipment generates, uses and can radiate radio frequency energy and, if not installed and used in accordance with the instruction, may cause harmful interference to radio communication. However, there is no guarantee that interference will not occur in a particular installation. If this equipment does cause harmful interference to radio or television reception, which can be determined by turning the equipment off and on, the user is encouraged to try to correct the interference by one or more of the following measures:z Reorient of relocate the receiving antenna.z Increase the separation between the equipment and receiver.z Connect the equipment into an outlet on a circuit different from that to which the receiver is connected.z Consult the dealer or an experienced radio/TV technician for help.The changes or modifications not expressly approved by the party responsible for compliance could void the user's authority to operate the equipment.Getting Ready1.Turn off the power of your computer.2.Remove the existing keyboard (and mouse for the A4Tech® WirelessDesktop).3.Install the AA alkaline batteries in the Wireless keyboard. Remove the batterycompartment cover on the bottom of the keyboard by squeezing the cover infrom the tab to release it.4.Install the AAA alkaline batteries in the Wireless mouse (for the A4Tech WirelessDesktop).(a) Remove the battery compartment cover on the bottom of the mouse bypressing down on the tab. Insert the batteries as shown in side the batterycompartment. Replace the cover.(b)Or press the up cover and move backward as shown here, and by sliding the cover off. Insert thebatteries as shown inside the battery compartment. Replace the cover.Setting Up the Keyboard or Wireless Desktop1.Make sure that your computer is turned off.2.Connecting the Receiver’s Keyboard Cable:(a)When connecting to an IBM AT keyboard port, use the 5-pin DIN connector already attached to the keyboard cable.(b)When connecting to a PS/2-style with adapter, 6-pin DIN keyboard port, it work only for the signal of keyboard..(c)When connecting to USB port, it can work to receive the signal of keyboard and mouse.3.Connecting the Receiver’s Mouse Cable (Wireless Desktop): Connect the receiver’s green mouse cable to the computer’s PS/2 mouse port4.Place the receiver eight inches (20 centimeters) from anyelectromechanical device.Installing the Mouse Software-iWheelWorks andKeyboard software-iKeyWorksOfficeBefore you can take advantage of the many features your mouse and keyboardoffers, you must install the driver. The driver is in the installation diskette thatcame packaged with your mouse and keyboardWindows 95/98/Me/2000/NT4.0 installationInsert the installation diskette into your floppy disk drive.Click the Start button and then click Run.In the Run dialog window, type A:\setup, where “A” is the letter of your floppy disk drive.Click OK and follow the instructions on your screen to complete the installation.Selecting the Frequency ChannelThe Wireless keyboard and Mouse operates on two frequency channels. To prevent interference when using twoRF Mice in close proximity a different frequency channel should be used for each mouse. Refer to thefollowing to change the frequency channel for your keyboard and mouse: Set the frequency channel on the receiver to 1 or 2. Set the frequency channel on the keyboard and mouse to 1 or 2.The Wireless keyboard and mouse ID codeEach keyboard and mouse is assigned a unique ID code at manufacture, so the receiver only picks up the signal from your mouse and prevents other Wireless keyboard or mouse radio signals from operating on your computer. This feature can also be disabled, allowing other Wireless pointingdevices to operate your computer.Connecting the Wireless Mouse ID CodeWhen the driver installation is finished your computer reboots and the Wireless Mouse window (shown on the right)appears.CONNECT ID: Move the Wireless Mouse for a few seconds to establish a connection, then click Connect ID. Theunique ID code of your mouse is recognized and another RF pointing device will not function on your computer.Exit: Click Exit if no other RF pointing devices are within 3 meters range or if you want other RF pointing devices to beable to access your computer.Changing the Wireless Mouse ID CodeYou can use a new Wireless Mouse on your computer without changing the Radio receiver; you just need to change the ID code. Refer to the following:1. Press [Shift + Alt + F11] or [Shift + Alt + F12] to call up the Wireless Mouse ID Code window.2. Move the Wireless Mouse for a few seconds to establish a connection, then click Connect ID.3. The new ID code is connected and the Wireless Mouse window closes.4. Click Exit to close the Wireless Mouse ID code window.Connecting the Wireless Keyboard ID CodeManually establish communication between the receiver and keyboard.(a) Press any key from the keyboard(b) Press the ID Connect button on the receiver the green LED light will show you the keyboard ID be connect. If the green LED light is off then keyboard ID is disconnect.。
联想 ThinkBook K4-IAP 用户指南

用户指南Lenovo ThinkBook K4用前必读使用本文档及其支持的产品之前,请务必先阅读和了解以下信息:•《常规安全与合规性声明》•《安全与保修指南》•《设置指南》第一版(2022年3月)©Copyright Lenovo2022.有限权利声明:如果数据或软件依照美国总务署(GSA)合同提供,其使用、复制或公开受编号为GS-35F-05925的合同的条款的约束。
目录关于本指南 (iii)第1章了解计算机 (1)前视图 (1)底座视图 (2)左视图 (3)右视图 (5)底视图 (6)功能部件和规格 (7)USB传输速率声明 (8)运行环境 (8)ToF传感器的激光安全性 (9)第2章开始使用您的计算机 (11)使用Windows (11)Windows帮助信息 (11)Lenovo Vantage和联想电脑管家 (12)Novo按钮菜单 (12)打开Novo按钮菜单 (12)与计算机交互 (13)键盘热键 (13)第3章了解您的计算机 (15)使用Glance by Mirametrix (15)打开Glance by Mirametrix (15)禁用或启用扫视检测 (15)校准头部位置 (16)使用智能指针 (16)使用贴靠窗口 (16)管理电源 (17)检查电池状态 (17)为电池充电 (17)将无线接收器插入隐藏式USB端口 (17)设置电源按钮行为 (18)电源计划 (18)设置性能模式 (18)更改UEFI/BIOS Setup Utility中的设置..18 UEFI/BIOS Setup Utility是什么 (19)打开UEFI/BIOS Setup Utility (19)选择引导设备 (19)更改热键模式 (19)启用或禁用Always-on (19)启用或禁用Flip to Boot (19)在UEFI/BIOS Setup Utility中设置密码..20密码类型 (20)设置管理员密码 (20)更改或删除管理员密码 (20)设置用户密码 (21)启用开机密码 (21)设置硬盘密码 (21)更改或删除硬盘密码 (22)第4章帮助和支持 (23)常见问题 (23)自助资源 (23)CRU是什么? (24)您的产品型号适用的CRU (24)致电Lenovo (25)联系Lenovo之前 (25)Lenovo客户支持中心 (25)购买附加服务 (26)附录A声明和商标 (27)©Copyright Lenovo2022iii用户指南关于本指南•本指南适用于下面列出的Lenovo产品型号。
联想MX Key Management Server软件版本4.10.2发布说明说明书
Document Release Date:December2021 Software Release Date:December2021Legal noticesCopyright notice©Copyright2016,2018-2021Micro Focus or one of its affiliates.The only warranties for products and services of Micro Focus and its affiliates and licensors(“Micro Focus”)are as may be set forth in the express warranty statements accompanying such products and services.Nothing herein should be construed as constituting an additional warranty.Micro Focus shall not be liable for technical or editorial errors or omissions contained herein.The information contained herein is subject to change without notice.AcknowledgementsThis product includes software written by Eric Young(*****************). Documentation updatesThe title page of this document contains the following identifying information:l Software Version number,which indicates the software version.l Document Release Date,which changes each time the document is updated.l Software Release Date,which indicates the release date of this version of the software.To check for updated documentation,visit https:///documentation/connected-mx/. SupportVisit the MySupport portal to access contact information and details about the products,services,and support that Micro Focus offers.This portal also provides customer self-solve capabilities.It gives you a fast and efficient way to access interactive technical support tools needed to manage your business.As a valued support customer,you can benefit by using the MySupport portal to:l Search for knowledge documents of interestl View software vulnerability alertsl Enter into discussions with other software customersl Manage software licenses and support contractsl Submit and track service requestsl Contact customer supportl View information about all services that Support offersMany areas of the portal require you to sign in.If you need an account,you can create one when prompted to sign in.To learn about the different access levels the portal uses,see the Access Levels descriptions.ContentsCMX Key Management Server Release Notes4Enhancements in this release5 Fixed defects in this release5 Open defects5Installation6 Update cacert.pem6Send documentation feedback7CMX Key Management Server Release NotesSoftware version:4.10.2Publication date:December2021This document is an overview of the changes made to Micro Focus CMX Key Management Server (CMX-KMS).It contains important information that is not included in books or Help.You can find information about the following in this document:l Enhancements in this release,on the next pagel Fixed defects in this release,on the next pagel Open defects,on the next pagel Installation,on page 6Support matrixFor information about the installation requirements and compatibility with other products,see the Micro Focus CMX-KMS Support Matrix.The support matrix may be updated between releases,and so is available only from the Connected MX documentation site.The support matrix includes the following information:l Requirementso Hardwareo Softwareo Third-party componentsl Compatibilityo Languageso Virtualization productso Micro Focus software coexistenceo Other software coexistenceEnhancements in this releaseThis release contains the following enhancement:l Optional support SSL overload by an Web Application Firewall(WAF)in front of the CMX KMS cluster.The WAF must be configured to pass the base64-encoded X.509client certificate in a Client-Cert HTTP header when forwarding the request to a CMX-KMS server.Fixed defects in this releaseThe reference number for each fixed defect is its defect number.For more information about fixed defects,contact your Micro Focus Support representative directly.l Vault authentication fails after the Vault token maximum Time-to-live(TTL)has been reached.(TT-36159)l Vault authentication fails when the renew token background thread is not scheduled.(TT-36406)Open defectsThis release contains the following open defects:l An additional change to the/usr/share/tomcat/conf/server.xml is necessary when using a Web Application Firewall(WAF)with SSL offload.The clientAuth attribute must be set tofalse while configuring the server.xml.CMX-KMS continues to validate the X.509certificate passed by CMX agents,etc.To set the clientAuth attribute to false,1.Open the file/usr/share/tomcat/conf/server.xml in a text editor.2.Locate the clientAuth attribute and set the value to false.For example,<Connector port="8443"…scheme="https"secure="true"clientAuth="false"sslEnabledProtocols="TLSv1.2"server="Apache Tomcat"/>3.Restart Tomcat if it was already running after making the above modifications.l Micro Focus Connected MX is re-branded as Connected with a new Connected logo().The change is reflected in the installation paths and executable names.Install the certificate for AgentsIf you are using Connected MX and installing the certificate for agents,then there is no change in the system-specific location and user-specific location.But,if you are using Connected, the Connected MX folder is renamed as Connected.You can place the certificate into one of the following new locations:o On Windows-based computers.n system-specific location-%ALLUSERSPROFILE%\Connectedn user-specific location-%LOCALAPPDATA%\Connectedo On macOS-based computersn system-specific location-/Library/Application Support/Connectedn user-specific location-$HOME/Library/Application Support/Connected InstallationTo install CMX-KMS4.10.2or upgrade to it,see the Micro Focus CMX-KMS Installation and Upgrade Guide,available from the Connected MX documentation site.Update cacert.pemIf the cmxDevice.p12is signed by the CA other than list of CAs present in cacert.pem,append the RootCA that signed the certificate to cacert.pem.This file is present in the following locations: l%ALLUSERSPROFILE%\Connected MX for pre connected10agentsl%ALLUSERSPROFILE%\Connected for connected10and above agentsSend documentation feedbackSend documentation feedbackIf you have comments about this document,you can contact the documentation team by email.If an email client is configured on this system,click the link above and an email window opens with the following information in the subject line:Feedback on Micro Focus Connected MX Key Management Server4.10.2Release Notes Add your feedback to the email and click Send.If no email client is available,copy the information above to a new message in a web mail client,and send your feedback to********************************************.We appreciate your feedback!。
Dell Client Management Pack 版本 4.0 适用于 Microsoft S

Dell™ Client ManagementPack 版本 4.0适用于Microsoft® SystemCenter OperationsManager2007 和System Center Essentials 2007用户指南注和小心注:“注”表示可以帮助您更好地使用计算机的重要信息。
小心:“小心”表示如果不遵循说明,就有可能损坏硬件或导致数据丢失。
____________________本说明文件中的信息如有更改,恕不另行通知。
© 2009Dell Inc.版权所有,翻印必究。
未经 Dell Inc. 书面许可,严禁以任何形式复制这些材料。
本文中使用的商标:Dell、DELL徽标、Latitude、OpenManage、Optiplex、Precision和Vostro是Dell Inc.的商标;Microsoft、Vista、Windows和 Windows Server是Microsoft Corporation 在美国和/或其它国家/地区的商标或注册商标。
本说明文件中述及的其它商标和产品名称是指拥有相应商标和产品名称的公司或其制造的产品。
Dell Inc. 对其它公司的商标和产品名称不拥有任何所有权。
Dell 对外部网站及其内容的可用性不负任何责任。
2009 年 10 月目录1简介. . . . . . . . . . . . . . . . . . . . . . . . . . . . . . 7访问管理包和说明文件. . . . . . . . . . . . . . . . . . . . . . . . . . . . . . 7Dell Client Management Pack新功能. . . . . . . . . . . . . . . . . . 8了解 Dell Client Management Pack. . . . . . . . . . . . . . . . . . . . 8Dell 硬件组定义 . . . . . . . . . . . . . . . . . . . . . . . . . . . . . . . .8Windows 客户端. . . . . . . . . . . . . . . . . . . . . . . . . . . . . . . .8支持的Dell客户端系统 . . . . . . . . . . . . . . . . . . . . . . . . . . . . . 9支持的操作系统 . . . . . . . . . . . . . . . . . . . . . . . . . . . . . . . . . . . 10您可能需要的其它说明文件 . . . . . . . . . . . . . . . . . . . . . . . . 10获得技术帮助. . . . . . . . . . . . . . . . . . . . . . . . . . . . . . . . . . . . . . 102系统. . . . . . . . . . . . . . . . . . . . . . . . . . . . . . 11Management Station要求 . . . . . . . . . . . . . . . . . . . . . . . . . . . 11一般要求. . . . . . . . . . . . . . . . . . . . . . . . . . . . . . . . . . . . . . 11Managed System要求. . . . . . . . . . . . . . . . . . . . . . . . . . . . . . . 11以正常用户权限配置 Management Server Action帐户 . . . . . . . . . . . . . . . . . . . . . . . . . . . . . . . . . . . . . . . . . . 12将Client Management Pack 导入 SCOM中 . . . . . . . . . . . 12Microsoft SCOM性能和可扩展性指导 . . . . . . . . . . . . . . . 13从之前版本的管理包升级 . . . . . . . . . . . . . . . . . . . . . . . . . . 14目录3删除管理包. . . . . . . . . . . . . . . . . . . . . . . . . . . . . . . . . . . . . . . . .14安全注意事项 . . . . . . . . . . . . . . . . . . . . . . . . . . . . . . . . . . . . . .143Dell™ Client Management Pack 操作. . . . . .15概览 . . . . . . . . . . . . . . . . . . . . . . . . . . . . . . . . . . . . . . . . . . . . . . .15Web 控制台 . . . . . . . . . . . . . . . . . . . . . . . . . . . . . . . . . . . . . . . .16发现 . . . . . . . . . . . . . . . . . . . . . . . . . . . . . . . . . . . . . . . . . . . . . . .16监视 . . . . . . . . . . . . . . . . . . . . . . . . . . . . . . . . . . . . . . . . . . . . . . .18警报视图 . . . . . . . . . . . . . . . . . . . . . . . . . . . . . . . . . . . . .18图表视图 . . . . . . . . . . . . . . . . . . . . . . . . . . . . . . . . . . . . .19状态视图 . . . . . . . . . . . . . . . . . . . . . . . . . . . . . . . . . . . . .21任务 . . . . . . . . . . . . . . . . . . . . . . . . . . . . . . . . . . . . . . . . . . . . . . 22Dell 客户端任务 . . . . . . . . . . . . . . . . . . . . . . . . . . . . . . .22报告 . . . . . . . . . . . . . . . . . . . . . . . . . . . . . . . . . . . . . . . . . . . . . . 23OpenManage Windows 事件日志. . . . . . . . . . . . . . . .23自定义 Client Management Pack. . . . . . . . . . . . . . . . . . . . . 24设备监测器 . . . . . . . . . . . . . . . . . . . . . . . . . . . . . . . . . . . 24对象发现 . . . . . . . . . . . . . . . . . . . . . . . . . . . . . . . . . . . . . 25规则. . . . . . . . . . . . . . . . . . . . . . . . . . . . . . . . . . . . . . . . . .26OMCI . . . . . . . . . . . . . . . . . . . . . . . . . . . . . . . . . . . . . . . . .27目录4A附录. . . . . . . . . . . . . . . . . . . . . . . . . . . . . . . . . . . . . . . 29 SCOM的已知问题. . . . . . . . . . . . . . . . . . . . . . . . . . . . . . . . . . 29已知限制 . . . . . . . . . . . . . . . . . . . . . . . . . . . . . . . . . . . . . . . . . . 30Dell Client Management Pack 版本 4.0 . . . . . . . . . . . .30 Microsoft®提供的SCOM修复 . . . . . . . . . . . . . . . . . . . . . . 30目录5目录6简介71简介本说明文件面向使用 Dell™ Client Management Pack 4.0 来管理和监测Dell 客户端系统的系统管理员。
卡巴斯基打印空白

卡巴斯基打印空白1. 任务背景卡巴斯基是一家知名的网络安全公司,提供各种安全解决方案和产品。
在网络安全领域,打印空白是指打印机在打印时只输出空白纸张,而不是正常的图像或文字。
这种情况可能是由于多种原因引起的,例如打印机设置错误、驱动程序问题、硬件故障等。
本文将深入探讨卡巴斯基打印空白问题,并提供相关解决方案。
2. 可能原因卡巴斯基打印空白问题可能有多种原因,下面列举了一些常见的可能性:2.1 打印机设置错误•纸张类型选择错误:如果选择的纸张类型与实际使用的纸张类型不匹配,可能导致打印空白。
正确选择纸张类型可以在打印设置中进行调整。
•打印质量设置错误:如果打印质量设置过低,可能导致打印空白。
可以尝试调整打印质量设置为更高的级别。
2.2 驱动程序问题•驱动程序过时:如果打印机的驱动程序过时,可能导致打印空白。
可以尝试更新打印机的驱动程序。
•驱动程序损坏:如果驱动程序损坏,可能导致打印空白。
可以尝试重新安装打印机的驱动程序。
2.3 硬件故障•墨盒或墨粉用尽:如果墨盒或墨粉已经用尽,可能导致打印空白。
可以尝试更换墨盒或墨粉。
•打印头堵塞:如果打印头堵塞,可能导致打印空白。
可以尝试清洁打印头。
3. 解决方案针对卡巴斯基打印空白问题,可以尝试以下解决方案:3.1 检查打印机设置•确认选择的纸张类型与实际使用的纸张类型匹配。
•调整打印质量设置为更高的级别。
3.2 更新驱动程序•访问打印机制造商的官方网站,下载最新的驱动程序。
•安装最新的驱动程序,并按照提示完成安装过程。
3.3 清洁打印头•关闭打印机,打开打印机盖子。
•找到打印头位置,使用柔软的布料蘸取少量清洁剂,轻轻擦拭打印头。
•等待清洁剂干燥后,关闭打印机盖子,重新启动打印机。
3.4 更换墨盒或墨粉•检查墨盒或墨粉的剩余量,如果已经用尽,及时更换新的墨盒或墨粉。
4. 预防措施为了避免卡巴斯基打印空白问题的发生,可以采取以下预防措施:•定期清洁打印头,避免堵塞。
