Vodafone Smart Tab4(3G)说明书
Vodafone Mobile Wi-Fi R209-Z 快速指南说明书

R209-Z1 Benvenuti2 Descrizione del dispositivo3 Operazioni preliminari 5 App Web Mobile Wi-Fi 6 Descrizione dell'app Web 7 Riquadro della rete in uso 8 App Mobile Wi-Fi Monitor 9 Aiuto 11 GlossarioBenvenutinel mondo della comunicazione in mobilità1Vodafone Mobile Wi-Fi crea una rete Wi-Fi portatile personale che consente lacondivisione della connessione Internet su rete cellulare a banda larga protetta con altri dispositivi dotati di connettività Wi-Fi, ad esempio computer, Apple ® iPhone, iPad o iPod Touch, smartphone e tablet Android quali Samsung ® Galaxy Tab o console per giochi quali Nintendo ® DSi.Vodafone Mobile Wi-Fi può essere alimentato da una batteria interna, da unalimentatore o da un cavo USB. Questa versatilità ne permette un posizionamento ottimale per godere della massima copertura della rete cellulare.Vodafone Mobile Wi-Fi utilizza programmi open source concessi in licenza da GNU GPL (versione 2.0), BSD (versione 3.0), OpenSSL, Zlib/libpng, LGPL e Apache.È possibile scaricare gratuitamente il codice sorgente dalla pagina/r209-z per un periodo di tre anni dalla distribuzione del prodotto.Copyright © ZTE 2014.Tutti i diritti riservatiVodafone Mobile Wi-Fi è prodotto in esclusiva per Vodafone da ZTE.È vietata la riproduzione o la trasmissione della presente guida in qualsiasi forma o con qualsiasi mezzo senza l'autorizzazione scritta di ZTE.BenvenutiAvvisoLicenze2Spie LED Pulsante di accensione Pulsante WPS Porta micro USB Alloggiamento SIM Alloggiamento scheda MicroSDDescrizione del dispositivo456312Segnale rete cellulare a banda largaGiallo: basso Verde: ottimoLivello di carica della batteriaVerde: OKVerde lampeggiante: in carica Rosso lampeggiante: in esaurimentoStandby: non in caricaMessaggi di testo SMSBlu: SMS non letto Blu lampeggiante: casella SMS pienaNessun SMS3Fase 1Inserire la SIM, la batteria e una scheda MicroSD, se necessaria.Fase 2Collegare Vodafone Mobile Wi-Fi all'alimentazione di rete* o al computer per caricarlo durante l'utilizzo.OperazionipreliminariRimuovere il coperchio posterioreInserire la SIMInserire la scheda MicroSDInserire la batteriaRimontare il coperchio posterioreSuggerimento:Caricarecompletamente Mobile Wi-Fi(alimentazione di rete: 3,5 ore) prima di utilizzarlo in modalità batteria.* Utilizzare solo il caricabatterie in dotazione al dispositivo.4Fase 3Per accendere Vodafone Mobile Wi-Fi, premere il pulsante di accensione per 3 secondi. Il dispositivo inizierà a connettersi alla rete cellulare a banda larga.Fase 4Per sbloccare la SIM, è necessario digitare il PIN.Inoltre, quando Vodafone Mobile Wi-Fi si connette per la prima volta alla rete cellulare, potrebbe essere richiesto di attivare la SIM. L'attivazione non è sempre necessaria.Fase 5Sul computer o sul dispositivo in uso, selezionare Vodafone Mobile Wi-Fi (SSID) dall'elenco di reti disponibili, fare clic su Connetti e immettere la chiave di rete Wi-Fi protetta (password WPA2). Il nome e la chiave della rete sono riportati sul coperchio posteriore di Vodafone Mobile Wi-Fi e sono anche indicati sulla scheda promemoria.Operazioni preliminari completate . Il dispositivo in uso è ora connesso a Internet tramite Vodafone Mobile Wi-Fi.Operazioni preliminari5Per veri fi care lo stato delle reti Wi-Fi e delle reti cellulari a banda larga, gestire i messaggi di testo SMS o modi fi care le impostazioni di Mobile Wi-Fi, è possibile utilizzare l'app Web Vodafone Mobile Wi-Fi:Connettersi a Vodafone Mobile Wi-Fi tramite Wi-Fi o cavo USB–Se Vodafone Mobile Wi-Fi era stato installato tramite USB, fare doppio clic –sull'icona di Vodafone Mobile Wi-Fi creata sul desktopIn alternativa, e in particolare se non era stato installato tramite USB, aprire–la pagina http://VodafoneMobile.wi fio http://192.168.0.1 nel browser Web.Per utilizzare l'app Web Vodafone Mobile Wi-Fi tramite un cavo USB o una reteWi-Fi, è necessario quanto segue:Un computer con sistema operativo Windows XP –® SP3 o versioni successive oppureUn computer Apple Mac con sistema operativo OS X –® 10.6 Snow Leopard o versioni successive.È inoltre possibile gestire Vodafone Mobile Wi-Fi tramite la sua rete Wi-Fi, ma non tramite un cavo USB, utilizzando quanto segue:Linux o Windows –® 8 RT oppureiPhone, iPad, iPod Touch o qualsiasi altro smartphone o tablet.–App Web Mobile Wi-FiSuggerimento:Salvare gli indirizzi di Mobile Wi-Fi nei Preferiti del browser Web.6Opzioni di pagina: scegliere tra Mobile Wi-Fi, Archiviazione, SMS o Account.Barra di spostamento: selezionare un'area in ogni fi nestra.Riquadro della rete in uso: stato della rete cellulare a banda larga, della rete Wi-Fi, della batteria e dei dispositivi connessi.Area del contenuto: contenuto dell'area corrente.Guida nella pagina corrente: guida per l'area corrente.Scelta della lingua: l'impostazione prede fi nita è la lingua del browser.Area di accesso: per le impostazioni avanzate. La password prede fi nita è "admin".Descrizione dell'app Web45673124536127Sul lato destro di ogni fi nestra dell'app Web Vodafone Mobile Wi-Fi èvisualizzato il riquadro della rete in uso con un breve riepilogo dello stato di Mobile Wi-Fi, seguito da altri riquadri con l'indicazione dello stato della batteria, del Wi-Fi e degli altri dispositivi che condividono la rete Wi-Fi.Riquadro della retein uso8App Mobile Wi-Fi MonitorSe si utilizza un dispositivo Apple iOS ® o Android, è inoltre possibile veri fi care lo stato di Mobile Wi-Fi utilizzando l'app Vodafone Mobile Wi-Fi Monitor. Scaricare l'app dall'app store di iTunes o di Google Play.iPad/tabletiPhone/smartphoneAiuto Sicurezza Wi-FiAssicurarsi che le impostazioni di protezione Wi-Fi soddisfino i requisitipersonali. Per modificare la password di amministrazione, aprire l'app WebVodafone Mobile Wi-Fi:– I mmettere "admin" nel campo Password e fare clic su "Login".– S elezionare Router nella barra di spostamento.– S elezionare "Impostazioni router" nella barra dei menu a sinistra.Per modificare il nome (SSID) della rete Wi-Fi e la relativa chiave:– S elezionare Wi-Fi nella barra di spostamento.– S elezionare "Protezione" nella barra dei menu a sinistra.WPS (Wireless Protected Setup)Tenere premuto il pulsante WPS di Vodafone Mobile Wi-Fi per 5 secondi perattivare WPS (tutti e tre i LED lampeggiano contemporaneamente). Sarà quindipossibile connettere qualsiasi dispositivo con funzionalità WPS senza dovereimmettere la chiave di rete.9Aiuto Ulteriore assistenza– S elezionare Guida nella barra di spostamento dell'app Web Vodafone MobileWi-Fi.– S elezionare "Assistenza" nella barra dei menu a sinistra.Nell'area del contenuto viene indicato come contattare l'operatore della retecellulare.Per una guida completa con ulteriori consigli e suggerimenti, visitare la pagina/r209-z10GlossarioPortante/Rete Metodo di comunicazione utilizzato per il trasferimento dei dati sulla rete cellulare, ad esempio 3G a banda larga, HSPA, 3G e così via.Rete nazionale Rete dell'operatore cellulare che ha fornito la SIM.Roaming L'utente può usare il dispositivo cellulare per connettersi ad una retediversa con cui il proprio operatore di rete cellulare abbia un accordodi roaming, nel proprio Paese o all'estero.Scheda SIM La scheda SIM è il processore in plastica di piccole dimensioni che viene fornito contestualmente al contratto di abbonamento alla rete cellulare.Su un lato della SIM sono presenti dei contatti dorati.WPA2Nome alternativo per chiave di rete Wi-Fi. Su Mac con OS X viene chiamata "WPA2 personale".1112。
Vodafone Mobile Wi-Fi R209-Z 快速入门指南说明书
R209-Z1 Welcome2 Device overview3 Getting started5 Mobile Wi-Fi Web app6 Web app overview7 Current network panel8 Mobile Wi-Fi Monitor app9 Hints and tips 10 GlossaryWelcometo the world of mobile communications1Your Vodafone Mobile Wi-Fi creates a personal portable Wi-Fi network. Use it to share your secure mobile broadband internet connection with other Wi-Fi-enabled devices, such as computers, Apple ® iPhone, iPad or iPod touch, Android smartphones and tablets like the Samsung ® Galaxy Tab, or mobile gaming devices like Nintendo ® DSi.You can use battery, mains or USB to power your Vodafone Mobile Wi-Fi. This fl exibility makes it easy to position your Vodafone Mobile Wi-Fi to get the best mobile coverage.Your Vodafone Mobile Wi-Fi uses open source programs licensed under the GNU GPL (Version 2.0), BSD (Version 3.0), OpenSSL, Zlib/libpng, LGPL and Apache License.You can download the source code free of charge from: /r209-z for a period of three years from the distribution of this product.Copyright © ZTE 2014.All Rights ReservedYour Vodafone Mobile Wi-Fi is made exclusively for Vodafone by ZTE.No part of this guide may be reproduced or transmitted in any form or by any means without prior written consent of ZTE.WelcomeNoticeLicenses2LED indicators Power button WPS button Micro USB port SIM slot MicroSD card slotDevice overview456312Mobile broadband signalAmber - low Green - excellent Battery chargeGreen - OKGreen blinking - charging Red blinking - lowStandby - not chargingSMS text messagesBlue - unread SMSBlue blinking - SMS Inbox fullNo SMS3Step 1Insert your SIM, battery and optionally a MicroSD card.Step 2Plug your Vodafone Mobile Wi-Fi into the mains* or your computer to charge it while you are using it.GettingstartedRemove back coverInsert SIMInsert MicroSD cardInsert batteryReplace back coverTip:Charge your Mobile Wi-Fi fully (mains: 3.5 hours) before using it in battery mode.*Please only use the charger supplied with this device.4Step 3Press and hold the power button for 3 seconds to switch on your Vodafone Mobile Wi-Fi. It will begin connecting to the mobile broadband network.Step 4You may need to enter your PIN to unlock your SIM.Also, when your Vodafone Mobile Wi-Fi connects to the mobile network for the fi rst time, you may be asked to activate your SIM. Activation is not always necessary, so you may not see this.Step 5On your computer or device, select your Vodafone Mobile Wi-Fi network’s name (its ‘SSID’) from the list of available networks, click Connect and enter the secure Wi-Fi network key (the ‘WPA2 password’). The name and key are inside the back cover of your Vodafone Mobile Wi-Fi and also on a printed reminder card.Congratulations - you are connected to the internet via Vodafone Mobile Wi-Fi.Getting started5To check the status of your mobile broadband and Wi-Fi networks, manage SMS text messages or change the settings of your Mobile Wi-Fi, you can use the Vodafone Mobile Wi-Fi Web app:Connect to your Vodafone Mobile Wi-Fi via Wi-Fi or with a USB cable –If you installed your Vodafone Mobile Wi-Fi via USB, double-click the –Vodafone Mobile Wi-Fi icon that was created on your desktop Alternatively - and particularly if you did not install via USB - open –http://VodafoneMobile.wi fi or http://192.168.0.1 in your web browser.To use the Vodafone Mobile Wi-Fi Web app via a USB cable or via Wi-Fi, you need:A computer with at least Windows XP –® SP3, orAn Apple Mac with at least OS X –® 10.6 Snow Leopard.You can also manage your Vodafone Mobile Wi-Fi via its Wi-Fi network, but not via a USB cable, using:Linux or Windows –® 8 RT, oriPhone, iPad, iPod touch, or any other smartphone or tablet.–Mobile Wi-Fi Web appTip:Save the addresses for your Mobile Wi-Fi as favourites in your web browser.6Navigation tabs: Select Mobile Wi-Fi, Storage, SMS or Account view Navigation bar: Select an area within each viewCurrent network panel: Status of mobile broadband network, Wi-Fi network, battery and connected devices Content area: Content for current area Context help: Help for current areaLanguage selection: Defaults to browser languageLogin/Logout: For advanced settings. The default password is ‘admin’.Web app overview45673124536127The Current network panel appears on the right-hand side of every view in the Mobile Wi-Fi Web app, giving you a quick summary of the status of your Mobile Wi-Fi. Below it are additional panels for battery, Wi-Fi and the status of other devices sharing your Wi-Fi network.Current networkpanel8Mobile Wi-Fi Monitor appIf you have an Apple iOS ® or Android device, you can also check the status of your Mobile Wi-Fi using the Vodafone Mobile Wi-Fi Monitor app. Download the app from the iTunes or Google Play app stores.iPad / tabletiPhone / smartphoneHints and tips Wi-Fi securityPlease ensure that the Wi-Fi security settings meet your personal requirements. To change the admin password, open the Vodafone Mobile Wi-Fi Web app:– E nter ‘admin’ into the Password fi eld and click ‘Login’– S elect Router on the Navigation bar– S elect ‘Router Settings’ from the left-hand Menu bar.To change your Wi-Fi network name (SSID) and the key:– S elect Wi-Fi on the Navigation bar– S elect ‘Security’ from the left-hand Menu bar.Wireless Protected Setup (WPS)Pressing and holding the WPS button on your Vodafone Mobile Wi-Fi for 5 seconds will switch WPS on (all 3 LEDs flash simultaneously). You can then connect any WPS-enabled device without having to enter the network key. Further Support– S elect Help on the Navigation bar in the Vodafone Mobile Wi-Fi Web app– S elect ‘Support’ from the left-hand Menu.The Content area will show how to contact your mobile network operator.For a full user guide including further hints and tips, visit:/r209-z9GlossaryBearer Communication method used for data transport over the mobile network, eg. 3G Broadband, HSPA, 3G, etc.Home network The network of the mobile operator who provided your SIM.Roaming You can use your mobile device on any other mobile network that has a roaming agreement with your operator, whether in your country or abroad.SIM Your Subscriber Identity Module is the small plastic chip that you will have received together with your mobile contract. Your SIM has gold contactson one side.WPA2An alternative name for the Wi-Fi network key. On Macs with OS X this is called ‘WPA2 personal’.1011Notes。
Vodafone Mobile Wi-Fi R216-Z 快速指南说明书

R216-Z1 Benvenuti2 Descrizione del dispositivo3 Operazioni preliminari 5 App Web Mobile Wi-Fi 6 Descrizione dell'app Web 7 Riquadro della rete in uso 8 App Mobile Wi-Fi Monitor 9 Aiuto 11 GlossarioBenvenutinel mondo di Internet in mobilità1Vodafone Mobile Wi-Fi crea una rete Wi-Fi portatile personale che consente lacondivisione della connessione Internet su rete cellulare a banda larga protetta con altri dispositivi dotati di connettività Wi-Fi, ad esempio computer, Apple ® iPhone, iPad o iPod Touch, smartphone e tablet Android quali Samsung ® Galaxy Tab o console per giochi quali Nintendo ® DSi.Vodafone Mobile Wi-Fi può essere alimentato da una batteria interna, da unalimentatore o da un cavo USB. Questa versatilità ne permette un posizionamento ottimale per godere della massima copertura della rete cellulare.Vodafone Mobile Wi-Fi utilizza programmi open source concessi in licenza da GNU GPL (versione 2.0), BSD (versione 3.0), OpenSSL, Zlib/libpng, LGPL e Apache License.È possibile scaricare gratuitamente il codice sorgente dalla pagina/r216-z per un periodo di tre anni dalla distribuzione del prodotto.Copyright © ZTE 2014.Tutti i diritti riservatiVodafone Mobile Wi-Fi è prodotto in esclusiva per Vodafone da ZTE.È vietata la riproduzione o la trasmissione della presente guida in qualsiasi forma o con qualsiasi mezzo senza l'autorizzazione scritta di ZTE.BenvenutiAvvisoLicenze2Descrizione del dispositivoCoperchio scheda SIM e pulsante di ripristino Pulsante WPS e Wi-Fi Pulsante di accensione LED di stato Presa Micro USB Prese antenna esterna456312Rosso lampeggiante: ricerca della rete Rosso: SIM o PIN richiesti Giallo: segnale bassoVerde lampeggiante: 2G o 3G disponibile Verde: connesso a 2G o 3G Blu lampeggiante: LTE disponibile Blu: connesso a LTE Blu: Wi-Fi attivoBlu lampeggiante: WPS attivoVerde: OKVerde lampeggiante: in carica Rosso lampeggiante: in esaurimento Standby: non in carica Messaggi di testo SMSBlu: SMS non lettoBlu lampeggiante: casella SMS piena Nessun SMS3Fase 1Inserire la SIM.Fase 2Collegare Vodafone Mobile Wi-Fi all'alimentazione di rete* o al computer per caricarlo durante l'utilizzo.Operazioni preliminariSuggerimento:Caricarecompletamente Mobile Wi-Fi (alimentazione di rete*: 3,5 ore) prima di utilizzarlo in modalità batteria.*Utilizzare solo il caricabatteria in dotazione aldispositivo.4Fase 3Per accendere Vodafone Mobile Wi-Fi, premere il pulsante di accensione per 5 secondi. Il dispositivo inizierà a connettersi alla rete cellulare a banda larga.Fase 4Per sbloccare la SIM, è necessario digitare il PIN.Inoltre, quando Vodafone Mobile Wi-Fi si connette per la prima volta alla rete cellulare, potrebbe essere richiesto di attivare la SIM. L'attivazione non è sempre necessaria.Fase 5Sul computer o sul dispositivo in uso, selezionare Vodafone Mobile Wi-Fi (SSID) dall'elenco di reti disponibili, fare clic su Connetti e immettere la chiave di rete Wi-Fi protetta (password WPA2). Il nome e la chiave della rete sono riportati sul coperchio posteriore di Vodafone Mobile Wi-Fi e sono anche indicati sulla scheda promemoria.Operazioni preliminari completate . Il dispositivo in uso è ora connesso a Internet tramite Vodafone Mobile Wi-Fi.Operazioni preliminari5Per veri fi care lo stato delle reti Wi-Fi e delle reti cellulari a banda larga, gestire i messaggi di testo SMS o modi fi care le impostazioni di Mobile Wi-Fi, è possibile utilizzare l'app Web Vodafone Mobile Wi-Fi:Connettersi a Vodafone Mobile Wi-Fi tramite Wi-Fi o cavo USB–Se Vodafone Mobile Wi-Fi era stato installato tramite USB, fare doppio clic –sull'icona di Vodafone Mobile Wi-Fi creata sul desktopIn alternativa, e in particolare se non era stato installato tramite USB, aprire–la pagina http://VodafoneMobile.wi fio http://192.168.0.1 nel browser Web.Per utilizzare l'app Web Vodafone Mobile Wi-Fi tramite un cavo USB o una reteWi-FI, è necessario quanto segue:Un computer con sistema operativo Windows XP –® SP3 o versioni successive oppureUn computer Apple Mac con sistema operativo OS X –® 10.6 Snow Leopard o versioni successive.È inoltre possibile gestire Vodafone Mobile Wi-Fi tramite la sua rete Wi-Fi, ma non tramite un cavo USB, utilizzando quanto segue:Linux o Windows –® 8 RT oppureiPhone, iPad, iPod Touch o qualsiasi altro smartphone o tablet.–App Web Mobile Wi-FiSuggerimento:Salvare gli indirizzi di Mobile Wi-Fi come Preferiti nel browser Web in uso.6Opzioni di pagina: scegliere tra Mobile Wi-Fi, SMS o Account.Barra di spostamento: selezionare un'area in ogni fi nestra.Riquadro della rete in uso: stato della rete cellulare a banda larga, della rete Wi-Fi, della batteria e dei dispositivi connessi.Area del contenuto: contenuto dell'area corrente.Guida nella pagina corrente: guida per l'area corrente.Scelta della lingua: selezionare una lingua diversa per l'app.Area di accesso: per le impostazioni avanzate. La password prede fi nita è "admin".Descrizione dell'app Web456731245361277Sul lato destro di ogni fi nestra dell'app Web Vodafone Mobile Wi-Fi èvisualizzato il riquadro della "rete in uso" con un breve riepilogo dello stato di Mobile Wi-Fi, seguito da altri riquadri con l'indicazione dello stato della batteria, del Wi-Fi e degli altri dispositivi che condividono la rete Wi-Fi.Riquadro della retein uso8App Mobile Wi-Fi MonitorSe si utilizza un dispositivo Apple iOS o Android, è inoltre possibile veri fi care lo stato di Mobile Wi-Fi utilizzando l'app Vodafone Mobile Wi-Fi Monitor. Scaricare l'app dall'app store di iTunes o Google Play.iPad/tabletiPhone/smartphoneAiuto Sicurezza Wi-FiAssicurarsi che le impostazioni di protezione Wi-Fi soddisfino i requisiti personali.Per modificare la password di amministrazione, aprire l'app Web VodafoneMobile Wi-Fi:– I mmettere "admin" nel campo "Password" e fare clic su "Login".– S elezionare "Router" nella barra di spostamento.– S elezionare "Impostazioni router" nella barra dei menu a sinistra.Per modificare il nome (SSID) della rete Wi-Fi e la relativa chiave:– S elezionare "Wi-Fi" nella barra di spostamento.– S elezionare "Protezione" nella barra dei menu a sinistra.Wireless Protected Setup (WPS)Tenere premuto il pulsante WPS e Wi-Fi di Vodafone Mobile Wi-Fi per 5 secondiper attivare WPS (i LED WPS e Wi-FI iniziano a lampeggiare). Sarà quindipossibile connettere qualsiasi dispositivo con funzionalità WPS senza dovereimmettere la chiave di rete entro 2 minuti.9Aiuto Ulteriore assistenza– S elezionare "Guida" nella barra di spostamento dell'app Web VodafoneMobile Wi-Fi.– S elezionare "Assistenza" nella barra dei menu a sinistra.Nell'area del contenuto viene indicato come contattare l'operatore della retecellulare.Per una guida completa con ulteriori consigli e suggerimenti, visitare la pagina/r216-z10GlossarioPortante/Rete Metodo di comunicazione utilizzato per il trasferimento dei dati sulla rete cellulare, ad esempio 3G a banda larga, HSPA, 3G e così via.Rete nazionale Rete dell'operatore cellulare che ha fornito la SIM.Roaming L'utente può usare il dispositivo cellulare per connettersi ad una rete diversa con cui il proprio operatore di rete cellulare abbia un accordo di roaming,nel proprio Paese o all'estero.Scheda SIM La scheda SIM è il processore in plastica di piccole dimensioni che viene fornito contestualmente al contratto di abbonamento alla rete cellulare.Su un lato della SIM sono presenti dei contatti dorati.WPA2Nome alternativo per chiave di rete Wi-Fi. Sui computer Mac con OS X viene chiamata "WPA2 personale".1112。
Vodafone Mobile Wi-Fi R207-Z 快速用户指南说明书
R207-Z1 Willkommen2 Geräteübersicht3 Erste Schritte5 Mobile Wi-Fi Web App6 Übersicht über die Web App7 Bereich …Aktuelles Netz“8 Mobile Wi-Fi Monitor App9 Hinweise 10 GlossarWillkommenin der Welt der Mobilkommunikation1Mit dem Vodafone Mobile Wi-Fi wird ein persönliches mobiles W-LAN-Netzwerk eingerichtet. Damit können Sie anderen W-LAN-fähigen Geräten wie beispielsweise Computern, Apple ® iPhone, iPad oder iPod touch, Android-Smartphones und Tablets wie das Samsung ® Galaxy Tab oder mobilen Spielekonsolen wie Nintendo ® DSi Zugriff auf Ihre sichere mobile Breitband-Internetverbindung gewähren.Da das Vodafone Mobile Wi-Fi wahlweise mit Akku, Netzteil oder USB-Kabel betrieben werden kann, kann es zur Gewährleistung eines optimalen Netzempfangs fl exibel überall positioniert werden.Sofern Ihnen die jeweilige Lizenz den Zugang zum Quellcode der entsprechenden Software und/oder zu weiteren Daten gestattet, können Sie ihn innerhalb eines Zeitraums von drei Jahren ab Erwerb des Produktes beziehen und, falls dieLizenzbedingungen dies erfordern, für die Dauer, für die wir Support für das Produkt anbieten, darüber verfügen.Sie können die Quellcodes unter /R207-Z herunterladen.Copyright © ZTE 2015.Alle Rechte vorbehalten.Das Vodafone Mobile Wi-Fi wird von ZTE ausschließlich für Vodafone hergestellt.Diese Anleitung darf ohne die vorherige schriftliche Genehmigung von ZTE weder vollständig noch teilweise in irgendeiner Form oder irgendeinem Format vervielfältigt oder weiterverbreitet werden.WillkommenHinweisLizenzenGeräteüber-sichtLED-AnzeigenNetztasteWPS-TasteMicro-USB-AnschlussSIM-KartensteckplatzMicroSD-Kartenhalterung456312Blinkt rot – NetzsucheRot – SIM-Karte oder PIN erforderlichGelb – schwaches SignalBlinkt grün – EDGE oder UMTS verfügbarGrün – EDGE- oder UMTS-VerbindungWPS und W-LANBlau – W-LAN aktivBlinkt blau – W-LAN und WPS aktivAkkuladungGrün – OKBlinkt grün – wird aufgeladenBlinkt rot – niedrigStandby – kein LadevorgangSMS-TextnachrichtenBlau – ungelesene SMSBlinkt blau – SMS-Posteingang vollKeine SMS23Schritt 1Legen Sie die SIM-Karte, den Akku sowie (optional) eine MicroSD-Speicherkarte ein.Schritt 2Stecken Sie das Vodafone Mobile Wi-Fi zum Au fl aden während des Betriebs in die Netzsteckdose* oder in den Computer ein.ErsteSchritteAbdeckung entfernenSIM-Karte einlegenMicroSD-Karte einlegenAkku einlegenAbdeckung wieder anbringenTipp:Laden Sie vor dem Betrieb mit Akku das Mobile Wi-Fi vollständig auf (Netzstrom: 3,5 Stunden).* Verwenden Sie fürdieses Gerät bitte nur das mitgelieferte Ladegerät.4Schritt 3Halten Sie zum Einschalten des Vodafone Mobile Wi-Fi die Einschalttaste drei Sekunden lang gedrückt. Dann stellt das Gerät eine Verbindung zum mobilen Breitbandnetz her.Schritt 4 – USBWenn Sie das Vodafone Mobile Wi-Fi mit einem USB-Kabel an Ihren Computer anschließen, müssen Sie möglicherweise zum Entsperren der SIM-Karte Ihre PIN eingeben. Auf dem Desktop erscheint ein Symbol für die Vodafone Mobile Wi-Fi Web App.Schritt 4 – W-LANWählen Sie bei einer W-LAN-Verbindung zu Ihrem Computer bzw. zu einem anderen Gerät den Namen (die SSID) des …Vodafone Mobile Wi-Fi“-Netzwerks aus der Liste der verfügbaren Netzwerke aus, klicken Sie auf …Verbinden“ und geben Sie den sicheren W-LAN-Netzwerkschlüssel (das WPA2-Kennwort) ein. Den Namen und Netzwerkschlüssel fi nden Sie innen auf der Abdeckung an der Rückseite des Vodafone Mobile Wi-Fi und auf der Erinnerungskarte. Zum Entsperren der SIM-Karte müssen Sie möglicherweise die PIN eingegeben.Glückwunsch! Sie sind über Vodafone Mobile Wi-Fi mit dem Internet verbunden.Erste Schritte5Mit der Vodafone Mobile Wi-Fi Web App können Sie den Status des mobilen Breitbandnetzes und des W-LAN-Netzwerks überprüfen, SMS-Textnachrichten verwalten und die Einstellungen des Mobile Wi-Fi ändern:Stellen Sie über W-LAN oder über ein USB-Kabel eine Verbindung zum –Mobile Wi-Fi herKlicken Sie bei Installation des Vodafone Mobile Wi-Fi über USB das auf –Ihrem Desktop abgelegte Symbol des Vodafone Mobile Wi-Fi doppelt an Alternativ – und vor allem bei einer Nicht-USB-Installation – können Sie –http://VodafoneMobile.wi fi oder http://192.168.0.1 in Ihren Webbrowser eingeben.Zur Verwendung der Vodafone Mobile Wi-Fi Web App über ein USB-Kabel oder über W-LAN benötigen Sie Folgendes:Einen Computer mit Microsoft Windows XP –® SP3 oder höher bzw.Einen Apple Mac mit mindestens Mac OS X –® 10.6 Snow Leopard.Das Vodafone Mobile Wi-Fi kann über W-LAN, aber nicht über USB-Kabel, auch verwendet werden mit:Linux oder Windows –® 8 RT oderiPhone, iPad, iPod touch oder anderen Smartphones oder Tablets.–Mobile Wi-Fi Web AppTipp:Speichern Sie die Adressen Ihres Mobile Wi-Fi als Favoriten in Ihrem Webbrowser.6Navigationsregisterkarten: Zum Auswählen der Mobile-Wi-Fi-, Speicher-, SMS- oder Konto-AnsichtNavigationsleiste: Zum Auswählen eines Bereichs in den einzelnen Ansichten Bereich Aktuelles Netz: Status des mobilen Breitbandnetzes, des W-LAN-Netzwerks, des Akkus sowie der verbundenen Geräte Inhaltsbereich: Inhalte für den aktuellen Bereich Kontexthilfe: Hilfe für den aktuellen BereichSprachauswahl: Standardmäßig wird die Sprache des Browsers eingestelltAnmeldung/Abmeldung: Für erweiterte Einstellungen. Das Standardkennwort ist …admin“.Übersicht über die Web App456731245361277Der Bereich …Aktuelles Netz“ wird in jeder Ansicht in der Mobile Wi-Fi Web App auf der rechten Seite angezeigt. Er enthält eine Übersicht über den Status des Mobile Wi-Fi. Darunter gibt es weitere Bereiche für den Akku, das W-LAN und den Status anderer in das W-LAN-Netzwerk eingebundener Geräte.Bereich …AktuellesNetz“8Mobile Wi-Fi Monitor AppWenn Sie ein Gerät mit Apple iOS ® oder ein Android-Gerät haben, können Sie den Status des Mobile Wi-Fi auch mit der Vodafone Mobile Wi-Fi Monitor App überprüfen. Laden Sie dazu die App aus den App Stores iTunes oder Google Play herunter.iPad/TabletiPhone/SmartphoneHinweise W-LAN-SicherheitWir empfehlen Ihnen, zu überprüfen, ob die W-LAN-Sicherheitseinstellungen Ihrenpersönlichen Anforderungen entsprechen. Öffnen Sie zum Ändern des Admin-Kennwortsdie Vodafone Mobile Wi-Fi Web App:– G eben Sie in das Kennwort-Feld …admin“ ein und klicken Sie auf …Anmeldung“– Wählen Sie in der Navigationsleiste …Router“ aus– Wählen Sie in der Menüleiste links …Router-Einstellungen“ ausSo ändern Sie den Namen (SSID) und den Netzwerkschlüssel des W-LAN-Netzwerks:– Wählen Sie in der Navigationsleiste …W-LAN“ aus– Wählen Sie in der Menüleiste links …Sicherheit“ ausWPS (Wireless Protected Setup)Wenn Sie die WPS-Taste auf Ihrem Vodafone Mobile Wi-Fi 5 Sekunden lang gedrückt halten,wird WPS aktiviert (die WPS/W-LAN-LED beginnt zu blinken). Anschließend können Sie einbeliebiges WPS-fähiges Gerät anschließen, ohne dafür den Netzwerkschlüssel eingebenzu müssen.Weiterer Support– Wählen Sie in der Navigationsleiste der Vodafone Mobile Wi-Fi Web App …Hilfe“ aus– Wählen Sie in der Menüleiste links …Support“ ausIm Inhaltsbereich werden entsprechende Informationen für die Kontaktaufnahmezu Ihrem Netzbetreiber angezeigt.Sie können eine elektronische Version dieser Bedienungsanleitung unter/r207-z herunterladen.9GlossarDatentechnologie Die Technologie für den Datentransport über ein Mobilfunknetz,z.B. UMTS Broadband, HSPA, UMTS etc.Heimisches Netz Das Netz des Mobilfunknetzbetreibers, der die SIM-Karte geliefert hat.Roaming Mit Ihrem Mobilfunkgerät können Sie in jedem anderen Mobilfunknetz im In- und Ausland, für das Ihr Mobilfunknetzbetreiber einen Roaming-Vertrag abgeschlossen hat, eine Verbindung herstellen.SIM Die SIM-Karte (Subscriber Identity Module) ist der kleineKunststoffchip, den Sie zusammen mit Ihrem Mobilfunkvertragerhalten haben. Diese Karte hat auf einer Seite Goldkontakte.WPA2Ein anderer Name für den W-LAN-Netzwerkschlüssel. Bei Macsmit OS X wird dieser als …persönlicher WPA2“ bezeichnet.1011Notizen。
魔屏产品使用说明
家庭信息机超级第四屏用户使用手册Super Forth Screen User Manual.中国电信股份有限公司上海分公司版本号:V1.0目录1. 简介 (3)1.1. 配件介绍 (3)1.2. 重要提示 (3)1.3. 按键及连接说明 (4)2. 使用入门 (5)2.1. 连接电池 (5)2.2. 为电池充电 (5)2.3. 首次开机 (6)3. 产品功能 (8)3.1. 功能简介 (8)3.1.1.首页 (8)3.1.2.通讯频道 (8)3.1.3.世博频道 (11)3.1.4.娱乐频道 (12)3.1.5.资讯频道 (20)3.1.6.生活频道 (22)3.1.7.其他 (28)3.1.8.意见反馈 (29)3.1.9.业务提供说明 (29)3.2. 操作图标列表 (30)3.3. 状态图示 (31)4. 疑难解答 (32)5. 产品规格 (33)6. 警告及安全说明 (34)7. 客服咨询 (36)8. 家庭信息机—超级第四屏的网站结构图 (37)1.简介欢迎使用触摸本服务。
本产品采用触摸屏和无线连接方式,支持先进的视音频编解码技术,使您能够随时随地享受高质量的影音效果。
同时还具有MP4、游戏、电子图书、电子相册、新闻等服务,是一款多功能、高质量的娱乐终端产品。
1.1.配件介绍您的触摸本包装盒内包括以下物品:●触摸本无线主机一部,内置锂离子电池一块。
●充电底座一个。
●AC—DC直流电源一个。
●用户手册一本。
●使用贴士一张。
●保修卡一张。
1.2.重要提示1.初次使用触摸本,请将锂离子电池充电至少8小时。
2.要达到较佳的无线接收效果,请将触摸本尽量靠近无线网关。
3.在软件升级过程中,请保持触摸本为开机状态。
1.3. 按键及连接说明[OK]按钮及电源开关键2.使用入门2.1.连接电池初次使用触摸本,请您结合图示按照以下步骤连接电池:1.抬起触摸本背部的支撑架,您可看见电池槽的滑盖;2.按照箭头指示方向打开电池槽的滑盖;3.将电池连线按照主机内的连线颜色标识对应插入;4.关上电池槽的滑盖。
Vodafone Mobile Wi-Fi R218用户手册说明书
Roaming configurations for Vodafone Mobile Wi-Fi R218
It is important when using the Vodafone Mobile Wi-Fi R218 abroad (Roaming) that the settings are correctly entered. Go to the menu “Mobile Broadband” and click on “Connection”. In the Connection Settings it is important when using the device abroad to click on “Automatically connect even when roaming” and then click on “Save”.
™ The term “Mobile Broadband” together
with the ‘birds’ design is a trademark of GSMC Limited.
© Vodafone Group 2016. Vodafone and the Vodafone logos are trade marks of Vodafone Group. Any product or company names mentioned herein may be the trade marks of their respective owners.
iOS (iPhone or
iPad)
Android (smartphone or
tablet)
LED overview
Battery Low Charging Good
Vodafone Mobile Wi-Fi R207-Z 快速入门指南说明书
R207-Z1 Welcome2 Device overview3 Getting started5 Mobile Wi-Fi Web app6 Web app overview7 Current network panel8 Mobile Wi-Fi Monitor app9 Hints and tips 10 GlossaryWelcometo the world of mobile communications1Your Vodafone Mobile Wi-Fi creates a personal portable Wi-Fi network. Use it to share your secure mobile broadband internet connection with other Wi-Fi-enabled devices, such as computers, Apple ® iPhone, iPad or iPod touch, Android smartphones and tablets like the Samsung ® Galaxy Tab, or mobile gaming devices like Nintendo ® DSi.You can use battery, mains or USB to power your Vodafone Mobile Wi-Fi. This fl exibility makes it easy to position your Vodafone Mobile Wi-Fi to get the best mobile coverage.Where the applicable license entitles you to the source code of such software and/or other additional data, you may obtain it for a period of three years after purchasing this product, and, if required by the license conditions, for as long as we offer customer support for the product.You may download the source codes from /R207-Z .Copyright © ZTE 2015.All Rights ReservedYour Vodafone Mobile Wi-Fi is made exclusively for Vodafone by ZTE.No part of this guide may be reproduced or transmitted in any form or by any means without prior written consent of ZTE.WelcomeNoticeLicensesDevice overviewLED indicatorsPower buttonWPS buttonMicro USB socketSIM slotMicroSD card socket456312Red blinking - searching for networkRed - SIM or PIN requiredAmber - low signalGreen blinking - 2G or 3G availableGreen - connected to 2G or 3GWPS & Wi-FiBlue - Wi-Fi activeBlue blinking - Wi-Fi and WPS activeBattery chargeGreen - OKGreen blinking - chargingRed blinking - lowStandby - not chargingSMS text messagesBlue - unread SMSBlue blinking - SMS Inbox fullNo SMS23Step 1Insert your SIM, battery and optionally a MicroSD card.Step 2Plug your Vodafone Mobile Wi-Fi into the mains* or your computer to charge it while you are using it.GettingstartedRemove back coverInsert SIMInsert MicroSD cardInsert batteryReplace back coverTip:Charge your Mobile Wi-Fi fully (mains: 3.5 hours) before using it in battery mode.*Please only use the charger supplied with this device.4Step 3Press and hold the power button for 3 seconds to switch on your Vodafone Mobile Wi-Fi. It will begin connecting to the mobile broadband network.Step 4 - USBIf you plug your Vodafone Mobile Wi-Fi into your computer with a USB cable, you may be asked to enter your PIN to unlock your SIM. An icon for the Vodafone Mobile Wi-Fi Web app will appear on your desktop.Step 4 - Wi-FiWhen connecting your computer or another device via Wi-Fi, select your Vodafone Mobile Wi-Fi network’s name (its ‘SSID’) from the list of available networks, click Connect and enter the secure Wi-Fi network key (the ‘WPA2password’). The name and key are inside the back cover of your Vodafone Mobile Wi-Fi and also on a printed reminder card. You may be asked to enter your PIN to unlock your SIM.Congratulations - you are connected to the internet via Vodafone Mobile Wi-Fi.Getting started5To check the status of your mobile broadband and Wi-Fi networks, manage SMS text messages or change the settings of your Mobile Wi-Fi, you can use the Vodafone Mobile Wi-Fi Web app:Connect to your Vodafone Mobile Wi-Fi via Wi-Fi or with a USB cable –If you installed your Vodafone Mobile Wi-Fi via USB, double-click the –Vodafone Mobile Wi-Fi icon that was created on your desktop Alternatively - and particularly if you did not install via USB - open –http://VodafoneMobile.wi fi or http://192.168.0.1 in your web browser.To use the Vodafone Mobile Wi-Fi Web app via a USB cable or via Wi-Fi, you need:A computer with at least Windows XP –® SP3, orAn Apple Mac with at least OS X –® 10.6 Snow Leopard.You can also manage your Vodafone Mobile Wi-Fi via its Wi-Fi network, but not via a USB cable, using:Linux or Windows –® 8 RT, oriPhone, iPad, iPod touch, or any other smartphone or tablet.–Mobile Wi-Fi Web appTip:Save the addresses for your Mobile Wi-Fi as favourites in your web browser.6Navigation tabs: Select Mobile Wi-Fi, Storage, SMS or Account view Navigation bar: Select an area within each viewCurrent network panel: Status of mobile broadband network, Wi-Fi network, battery and connected devices Content area: Content for current area Context help: Help for current areaLanguage selection: Defaults to browser languageLogin/Logout: For advanced settings. The default password is ‘admin’.Web app overview45673127The Current network panel appears on the right-hand side of every view in the Mobile Wi-Fi Web app, giving you a quick summary of the status of your Mobile Wi-Fi. Below it are additional panels for battery, Wi-Fi and the status of other devices sharing your Wi-Fi network.Current networkpanel8Mobile Wi-Fi Monitor appIf you have an Apple iOS ® or Android device, you can also check the status of your Mobile Wi-Fi using the Vodafone Mobile Wi-Fi Monitor app. Download the app from the iTunes or Google Play app stores.iPad / tabletiPhone / smartphoneHints and tips Wi-Fi securityPlease ensure that the Wi-Fi security settings meet your personal requirements. To change the admin password, open the Vodafone Mobile Wi-Fi Web app:– E nter ‘admin’ into the Password fi eld and click ‘Login’– S elect Router on the Navigation bar– S elect ‘Router Settings’ from the left-hand Menu bar.To change your Wi-Fi network name (SSID) and the key:– S elect Wi-Fi on the Navigation bar– S elect ‘Security’ from the left-hand Menu bar.Wireless Protected Setup (WPS)Pressing and holding the WPS button on your Vodafone Mobile Wi-Fi for 5 seconds will switch WPS on (the WPS & Wi-Fi LED starts flashing). You can then connect any WPS-enabled device without having to enter the network key. Further Support– S elect Help on the Navigation bar in the Vodafone Mobile Wi-Fi Web app– S elect ‘Support’ from the left-hand Menu.The Content area will show how to contact your mobile network operator. You can download an electronic version of this user guide at/r207-z9GlossaryBearer Communication method used for data transport over the mobile network, eg. 3G Broadband, HSPA, 3G, etc.Home network The network of the mobile operator who provided your SIM.Roaming You can use your mobile device on any other mobile network that has a roaming agreement with your operator, whether in your country or abroad.SIM Your Subscriber Identity Module is the small plastic chip that you will have received together with your mobile contract. Your SIM has gold contactson one side.WPA2An alternative name for the Wi-Fi network key. On Macs with OS X this is called ‘WPA2 personal’.1011Notes。
威伯斯特 4G-X 手机信号增强器使用说明书
866.294.1660User ManualMobile Cellular S ignal Booster KitT ruckEditionDRIVE 4G-X OTRA WILSON ELECTRONICS, LLC COMPANY_____IndexPackage Content 1 Quick Installation 2 Signal Booster Specifications 4 Frequently Asked Questions 5 Safety Guidelines 6 Light Patterns 7 Troubleshooting 7 Mobile Antenna Kit Options 8 Warranty 9CELL PHONE SIGNAL BOOSTER1________Package ContentInstallation Instructions for the Following weBoost Signal Booster:DRIVE 4G-X™OTR 700 MHz Band 12/17 & 13800 / 1900 (Excluding B25) AWS (1700 / 2100)Drive 4G-X SignalBooster 4G-OTR Antenna & Mount Slim Low ProfileAntennaMountingBracket DC PowerSupply2CELL PHONE SIGNAL BOOSTER2RUNNING ANTENNA CABLE Run the Outside Antenna cable into the vehicle. The cable is strong enough that it may be shut in most vehicle doors without damaging the cable. For a cleaner look, carefully pull down the door seal, run the cable under the seal, and push the seal back into place. This method reduces wear on the cable as the door opens and closes.3INSIDE ANTENNA INSTALLATIONIdentify a place on the side of the seat to mount the Slim Low Profile Antenna. The location should be at least 18 inches but no more than 36 inches from where the cellular device will be used. Peel off the backing of the Velcro® and attach to seat.Slim Low Profile Antenna14G-OTR ANTENNA INSTALLATIONSelect a location on one of the mirror rails to mount the 4G-OTR Antenna that is:• A t least 12 inches from any other antennas.• F ree of obstructions. • A t least 6 inches from any windows (including sunroofs).Remove existing nut from mount as shown. Mount antenna with fitted disc washer and nut provided in package. Add included thread lock on all threads.4G-OTR AntennaCELL PHONE SIGNAL BOOSTER34CONNECT COAX CABLES TO DRIVE 4G-X Select a location for the Drive 4G-X that is free from excessive heat, direct sunlight and moisture and that has proper ventilation. Good locations include underneath a seat or under the dashboard. Connect the cable from the 4G-OTR Antenna to the port labeled “Outside Antenna” on the Drive 4G-X and connect the cable from the Slim Low Profile Antenna to the port labeled “Inside Antenna” on the booster.5CONNECT TO POWER SUPPLYConnect the power supply cord to the end of the Drive 4G-X labeled “Power.” NOTE: Do NOT connect the power to the Signal Booster until you have connected both the Inside and Outside Antennas.6CONNECT TO POWER SUPPLYPlug the power adapter into vehicle’s 12V DC power supply. Power up your Drive 4G-X by flipping the switch on the back of the DC power adapter on. If your Drive 4G-X is working correctly, the light will be green.NOTE: If light is not green on your weBoost booster, please refer to the troubleshooting section on page 8 or contact customer support at 1-866-294-1660 or email at *******************.switchVehicle’s PowerSupplyIC Note #1: The term “IC” before the radio certification number only signifies that Industry Canada technical specifications were met.4CELL PHONE SIGNAL BOOSTER(SPECIFICATIONS cont.)Each Signal Booster is individually tested and factory set to ensure FCC compliance. The Signal Booster cannot be adjusted without factory reprogramming or disabling the hardware. The Signal Booster will amplify, but not alter incoming and outgoing signals in order to increase coverage of authorized frequency bands only. If the Signal Booster is not in use for five minutes, it will reduce gain until a signal is detected. If a detected signal is too high in a frequency band, or if the Signal Booster detects an oscillation, the Signal Booster will automatically turn the power off on that band. For a detected oscillation the Signal Booster will automatically resume normal operation after a minimum of 1 minute. After 5 (five) such automatic restarts, any problematic bands are permanently shut off until the Signal Booster has been manually restarted by momentarily removing power from the Signal Booster. Noise power, gain, and linearity are maintained by the Signal Booster’s microprocessor.The Manufacturer’s rated output power of this equipment is for single carrier operation. For situations when multiple carrier signals are present, the rating would have to be reduced by 3.5 dB, especially where the output signal is re-radiated and can cause interference to adjacent band users. This power reduction is to be by means of input power or gain reduction and not by an attenuator at the output of the device. Frequently AskedQuestionsWhat hours can I contact customer support?Customer Support can be reached 7 days a week by calling 866.294.1660, or through our support site at Why do I need to create distance between the booster and the antenna? Antennas connected to a booster create spheres of signal. When these spheres overlap, a condition called oscillation occurs. Oscillation can be thought of as noise, which causes the booster to shut down to prevent damage. The best way to keep these spheres of signal from overlapping is to maximize separation between the Booster and Antenna.5 CELL PHONE SIGNAL BOOSTERSafety GuidelinesWarningsUse only the power supply provided in this package. Use of a non-weBoost product may damage your equipment.The Signal Booster unit is designed for use in an indoor, temperature-controlled environment (less than 150 degrees Fahrenheit). It is not intended for use in atticsor similar locations subject to temperatures in excess of that range.The inside panel and dome antennas must have 6’ of separation distance from all active users, and the low profile antennas must have 18” of separation distance from all active users.Connecting the Signal Booster directly to the cell phone with use of an adapter will damage the cell phone.The Outside Antenna must be installed no higher than 10 meters (32’9”) above ground. Any antenna used with this device must be located at least 8 inches from all persons RF Safety Warning: Any antenna used with this device must be located at least 8 inches from all persons.This is a CONSUMER device.BEFORE USE, you MUST REGISTER THIS DEVICE with your wireless provider andhave your provider’s consent. Most wireless providers consent to the use of signalboosters. Some providers may not consent to the use of this device on their network.If you are unsure, contact your provider.You MUST operate this device with approved antennas and cables as specified by themanufacturer. Antennas MUST be installed at least 20 cm (8 inches) from any person.You MUST cease operating this device immediately if requested by the FCC or alicensed wireless service provider.WARNING. E911 location information may not be provided or may be inaccurate forcalls served by using this device.This device complies with Part 15 of FCC rules. Operation is subject to two conditions: (1) This device may not cause harmful interference, and (2) this device must accept any interference received, including interference that may cause undesired operation. Changes or modifications not expressly approved by weBoost could void the authority to operate this equipment.6CELL PHONE SIGNAL BOOSTERLight PatternsSOLID GREEN — This indicates that your booster is functioning properly and there are no issues with installation.BLINKING RED, THEN SOLID GREEN —This indicates that one or more of the booster bands has reduced power due to a feedback loop condition called oscillation. This is a built in safety feature to prevent harmful interference with a nearby cell tower. If you are already experiencing the desired signal boost, then no further adjustments are necessary. If you are not experiencing the desired boost in coverage then refer to the Troubleshooting section below.SOLID RED — This is due to a feedback loop condition called oscillation. This is a built in safety feature that causes a band to shut off to prevent harmful interference with a nearby cell tower. Refer to Troubleshooting section below. TroubleshootingFixing Blinking or Solid Red Issues This section is only applicable if the booster is red or blinking red and you are not experiencing the desired signal boost.1.U nplug the Booster’s power supply.2. Relocate the inside and outside antenna further from each other. The objective is to increase the separation distance between them, so that they will not create this feedback condition discussed before.3. Plug power supply back in.4. Monitor the indicator light on your booster. If, after a few seconds of ‘power on’, a solid or blinking red light appears, repeat steps 1 through 3. Increase the separation distance until the condition is corrected and/or desired coverage area is achieved. Note: Parallel separation of the two antennas typically requires a shorter separation distance than perpendicular separation. A combination of vertical and horizontal separation distance also works to prevent oscillation.5. If you are having any difficulties while testing or installing your booster, contact our weBoost Customer Support team for assistance (866.294.1660).7 CELL PHONE SIGNAL BOOSTER(TROUBLESHOOTING cont.)Light OffIf the Drive 4G-X Signal Booster’s light is off, verify your power supply has power. NOTE: The Signal Booster can be reset by disconnecting and reconnectingthe power supply.After troubleshooting you must initiate a new power cycle by disconnecting and then reconnecting power to the Booster.ALWAYS disconnect and reconnect power from the power supply adapter, NEVER from the Booster.Mobile Antenna Kit OptionsINSIDE ANTENNA OPTIONS Slim Low Profile301152 - w/ 10’ RG174Low Profile311106 - w/ 10’ RG58OUTSIDE ANTENNA OPTIONSMini-Mag301126 w/ 12.5 RG174 cable- SMA12” Mag Mount311128 w/ 12.5’ RG174314202 w/ 12.5’ RG174311703 w/ 12.5’ RG1744G Trucker Antenna304415 w/15’ RG58304414 w/15’ RG58Trucker Antenna311701 w/10.5’ RG58311101 w/10.5’ RG58Trucker Antenna311119 w/13.5’ RG58311133 w/13.5’ RG58Marine Antenna311130-5810 w/10.5’ RG584G Marine Antenna304416 w/20’ RG58304420 w/20’ RG58Glass Mount311102 w/14’ RG58NMO AntennaKit 314203-5810• 800/900/1900 NMO Antenna• 10’ RG58 CableKit 311112-17410• 800/1900 NMO Antenna• 14’ RG174 CableKit 314203-17410• 800/900/1900 NMO Antenna• 14’ RG174 CableKit 311104-17410• 800/900/1900 NMO Antenna• 10’ RG174 CableKit 311104-5810• 800/900/1900 NMO Antenna• 10’ RG58 CableKit 311112-5810• 800/1900 NMO Antenna• 10’ RG58 Cable8CELL PHONE SIGNAL BOOSTERCELL PHONE SIGNAL BOOSTER 9DISCLAIMER: The information provided by weBoost is believed to be complete andaccurate. However, no responsibility is assumed by weBoost for any business orpersonal losses arising from its use, or for any infringements of patents or other rights of third parties that may result from its use.WarrantyNEED HELP? 866.294.1660FOR MORE INFORMATION ON REGISTERING YOUR SIGNAL BOOSTER WITH YOUR WIRELESS PROVIDER, PLEASE SEE BELOW:Sprint: /legal/fcc_boosters.htmlT-Mobile/MetroPCS: https:///docs/DOC-9827Verizon Wireless: /wcms/consumer/register-signal-booster.html AT&T: https:////U.S. Cellular: /uscellular/support/fcc-booster-registration.jsp3301 East Deseret Drive, St. George, UT | Copyright © 2015 weBoost. All rights reserved.weBoost products covered by U.S. patent(s) and pending application(s)For patents go to: /us/patentsNOT AFFILIATED WITH WILSON ANTENNA 111923_Rev 02_05.13.16。
Vodafone Smart III 手册说明书

Einige Dienste und Anwendungen sind ggf. nicht in allen Ländern verfügbar.Details hierzu erhalten Sie beim Händler.Facebook ist eine Marke von Facebook, Inc.Google, Android, YouTube und andere Marken sind Marken von Google, Inc.© Vodafone Group 2013. Vodafone und die Vodafone-Logos sind Markender Vodafone Group. Andere Produkt- und Firmennamen, die in diesem Dokument genannt werden, können Marken ihrer jeweiligen Inhaber sein.Startbildschirm-TasteEs wird empfohlen, den Akku immer vollständig zu laden (Der PegelGoogle-Einrichtungsbildschirmüberspringen und später über Einstellungen\Konto hinzufügenAuch wenn keine SIM-Karte eingesetzt ist, können Sie auf dem Startbildschirm eine Verbindungum sich in Ihrem Google-KontoMit dieser Funktion können Sie das Telefon über Einstellungen\Schnellstart Aktivieren Sie dazu das Kontrollkästchen.a bBerühren: Kontakte öffnenBerühren: AnruflisteBerühren: Wählbildschirm öffnenDer Startbildschirm ist auf beiden Seiten des Bildschirms erweitert, sodass Ihnen mehr Platz für Anwendungen und Verknüpfungen zur Verfügung steht. Ziehen Sie den Startbildschirm nachDurch Berühren von können Sie alle terminbasierten Benachrichtigungen löschen (nur die Benachrichtigung wird gelöscht).1.2.3Suchleisteac,Bildschirmsperre mit PIN oder Passwort einrichten Berühren Sie auf dem Startbildschirm das Symbol , Bildschirmsperre einrichten\PIN oder Passwort. Erstellen Sie die PIN oder das Passwort.zum Entsperren nach rechts.Startbildschirm personalisieren1.2.5Elemente hinzufügenkönnen dem Startbildschirm Verknüpfungen, Widgets (Anwendungen)hinzufügen, indem Sie berühren. Berühren und halten Sie das Element, das Sie hinzufügen möchten, und lassen es los. Das Element wird auf dem aktuellen Startbildschirm angezeigt.ziehen es nach oben aufWenn Sie zum Startbildschirm zurückkehren möchten, berühren Sie die Startbildschirm-Taste.und wählen eine Option aus.Lautstärke einstellenLauter-/Leiser-Taste, um die Lautstärkeniedrigsten Einstellung der Lautstärke (Lautlosmodus (1)) einmal die Lauter-Taste drücken, wird der Vibrationsmodus aktiviert. Wenn Sie im Vibrationsmodus einmal die Leiser-Taste drücken, das Benachrichtigungsfeld nach unten und berühren , um den Klingelton, Medien und die Lautstärke des Klingeltons einzustellen.Die Einstellungen variieren entsprechend den Veränderungen, die Sie an den StandardeinstellungenText bearbeitenSie können den von Ihnen eingegebenen Text bearbeiten..Berühren Sie auf dem Startbildschirm das Hauptmenü und wählenGeben Sie die gewünschte Nummer direkt über die Tastatur ein oder wählen Sie unterindem Sie die entsprechendeden Anruf zu tätigen. Diegespeichert werden. Berühren Sie dazu undFalsch eingegebene Ziffern können durch das Berühren von gelöscht werden. Berühren Sie zum Beenden eines Anrufs, umLandesvorwahl und die vollständige Telefonnummer ein und berühren zum Wählen ., um deneingehenden Anruf das grüne entgegenzunehmen. Beenden Sie den Anruf durch Berühren des SymbolsWenn Sie einen eingehenden Anruf nicht entgegennehmen möchten, können Sie ihn ablehnen, indem Sie nach oben ziehen und eine Mitteilung auswählen. Der Anrufer wird direkt mit Ihrer Mailbox verbunden, um eine Nachricht zu hinterlassen.Berühren und halten SieFestlegenWenn Sie eine Sprachnachricht erhalten, wird je nach Land und Netzbetreiber das Symbol auf der Statusleiste angezeigt. Andernfalls erhalten Sie eine SMS von Ihrer Mailbox. Öffnen SieBerühren: aktuellen Anruf halten. Erneut berühren: Anruf wieder aufnehmenBerühren: aktuellen Anruf stummschalten. Erneut berühren: Stummschaltung des Anrufs Lautsprecher währendwird gehaltenden anderen Anruf eingeschaltet. Berühren Sie , um das in der Warteschleife befindlicheSie dieund wählenberühren Sie ,Warteschleife beenden und die Verbindung mit allen Anrufern zu trennen.Falls Sie einen eingehenden Anruf nicht entgegennehmen möchten, können Sie das SymbolAnrufe und EingehendeBerühren Sie zum Löschen der gesamten Anrufliste und dann .Sie können auch berühren, um die Optionen für die Kontaktliste anzuzeigen.Berühren Sie zum Speichernberühren, um den Kontakt den Favoriten hinzuzufügen (das Sternsymbol wird weiß angezeigt).berühren Sieund auf dem Bildschirm mit den Kontaktdetailsberührenberühren, um die zu löschenden Kontakte auszuwählen. Berühren Sie zum Bestätigen .Berühren Sie zum Anrufen eines Kontakts .Um eine Mitteilung an einen Kontakt zu senden, berühren Sie zum Erstellen das Symbol, um das Optionsmenü derwählenKarte den gewünschten Kontakt und zum BestätigenBerühren Sie zum Importieren/Exportieren aller Kontakte von der bzw. auf die SIM-KarteSie können Kontakte als vCard per Bluetooth, MMS, E-Mail usw. an andere Personen senden. Berühren Sie den Kontakt, den Sie senden möchten, berühren Sie und auf dem Bildschirm mit. Wählen Sie danach die gewünschte Anwendung zum Senden aus., um die Option jeweils zu aktivieren oder zu deaktivieren.und dannsynchronisierenund greifen auf, berühren Sie das zu löschende Konto und zum,,, um den Text der. einzugeben. Berühren Sie , um die Optionen zu öffnen, und anschließendum eine Betreffzeile einzufügen. Berühren SieDias anzuhängen. Berühren Sie abschließendMitteilungen verwalten4.1.2Wenn S ie e ine M itteilung e mpfangen, w ymbolangezeigt. Ziehen Sie die Statusleiste Benachrichtigungsfeldund berühren Sie die neue Mitteilung,Anwendung Mitteilungen öffnen und die Mitteilung berühren, um sie zu öffnen. Mitteilungen werden in chronologischer Reihenfolge angezeigt.Berühren Sie zum Beantworten einer Mitteilung die aktuelle Mitteilung, um den Bildschirm zum Schreiben der Mitteilung zu öffnen, geben Sie den Text ein und berühren dann ., um aus einer Konversation zur Mitteilungsliste zurückzukehren.und danndes TelefonsGmail-Konto im WebE-Mail und die,Posteingang und.E-MailPosteingangund anschließendangezeigt.Statusleiste undkönnen Sie die Zurücktaste oder oben linksjeweilsBerühren Sie dieses Kontaktbild, um die Schnellkontaktoption zu öffnen..Geben Sie das zu suchende Stichwort im Suchfeld ein und berühren Sie das Suchsymbol.Texteingabemodus und,oder alleE-Mail-Adresse des neuen Empfängers ein und berühren Sie zumSenden dann .Sie zumKonversation und wählen Sie anschließend das Label für die Konversation aus.,KonversationslisteNeben Ihrem Gmail-Konto können Sie auf dem Telefon auch andere POP3- oder IMAP-E-Mail-.Wenn die E-Mail nicht sofort gesendet werden soll, können Sie undjederzeit mit Ihren Berühren Sie , um Ihren Onlinestatus festzulegen.。
vodafone netbook vitesse 说明书
用戶手冊本公司已盡力確保本手冊內資訊為精確及可靠,但本手冊資訊若有更改,恕不另行通知。
本公司對使用本手冊資訊或有侵犯專利或第三者權利等事情,概不負責。
©2009 鼎天國際股份有限公司(Royaltek)版權所有,翻印必究。
事前未經鼎天國際股份有限公司(Royaltek)書面同意,不得以任何形式重製、影印或傳遞本刊物任何內容。
鼎天國際股份有限公司(Royaltek)保留可在毫無保留及不必通知使用者的情形下進行修改產品規格之權利。
聲明版權聲明1.02009年7月用戶手冊翻印必究。
事前未經鼎天國際股份有限公司(Royaltek)書面同意,不得以任何形式重製、影印或翻譯本手冊之任何內容。
歡迎多謝你購買Vodafone Netbook Vitesse。
這部筆記型電腦著重速度和方便,機身輕巧,易於攜帶。
內置隨身寬頻,透過3G或HSPA網絡,上網速度高達7.2Mbps 下載及5.76Mbps上載,另配備Wi-Fi裝置。
這本簡單易明的用戶手冊,會幫你一步步學會怎樣把Vitesse融入你的日常生活,成為不可或缺的一部份。
無論工作或閒時,你都可查閱電郵和上Facebook,以IM或Twitter與朋友保持聯繫,瀏覽心水網站及上網欣賞喜愛的短片。
目錄歡迎第1章第2章第3章介紹Vodafone Netbook Vitesse1.1 關於本用戶手冊1.2 安全注意事項1.3 免責聲明及安全聲明產品套裝及概覽2.1 拆開Vodafone Netbook Vitesse2.2 上視圖2.3 下視圖2.4 右視圖2.5 左視圖2.6 電源系統2.7 使用Kensington電腦鎖2.8 多功能讀咭機使用Vodafone Netbook Vitesse3.1 開啟Vodafone Netbook Vitesse電源3.2 觸控板的使用方式3.3 鍵盤的使用方式3.4 調整屏幕亮度3.5 關閉Vodafone Netbook Vitesse電源14445667899101213141414151717第4章附錄A 附錄B 寬頻上網4.1 設定3G或HSPA寬頻上網i 已預先完成設定的Vitesseii 要自行設定的Vitesse4.2 於海外使用寬頻上網4.3 連接Wi-Fi無線網絡4.4 收發短訊(SMS)產品規格保用及維修181818202425262829第1章介紹Vodafone Netbook Vitesse本章將提供使用之前應注意的各種可用資訊及安全注意事項。
Vodafone Mobile Broadband K4203-Z 快速入门指南说明书
Quickstart Guide K4203-Z USB StickDesigned by Vodafone1 Welcome2 Set up your USB Stick4 W indows 7, Windows VistaWindows XP6 W indows 88 Apple Mac10 L inux – and all othersystems12 USB Stick LED lights13 Hints and tips16 Glossary Welcometo the world of mobile communications1Your new Vodafone Mobile Broadband USB Stick connects your computer to the internet over the Vodafone mobile phone network. You can now browse the web, pick up emails, and use any other internet service wherever there’s a mobile phone network, plus you can send, receive and manage SMS text messages directly on your computer.Where the applicable license entitles you to the source code of such software and/or other additional data, you may obtain it for a period of three years after purchasing this product, and, if required by the license conditions, for as long as we offer customer support for the product.You may download the source codes from /k4203-z Copyright © ZTE 2015.All Rights ReservedYour Vodafone USB Stick is made exclusively for Vodafone by ZTE.No part of this guide may be reproduced or transmitted in any form or by any means without prior written consent of ZTE.WelcomeNotice Licenses2Slide the front cover off the USB Stick, and insert your SIM and SD card as shown.Step 2Plug the USB Stick fi rmly into your computer’s USB port.USB StickUSB StickOn Windows 8, you can open the charms by sliding your finger in from the right-hand border of your touchscreen, orby pressing the Windows and C keys.On Windows XP, Windows Vista and Windows 7The installer for the Vodafone Mobile Broadband application should start automatically. If it does not, browse to your USB stick in Windows and double-click the setup program.On Windows 8Open the Settings charm, select Networks and then Mobile Broadband. After you have clicked Connect, the Vodafone Mobile Broadband application will be downloaded automatically.On Apple MacDouble-click the Vodafone Mobile Broadband app icon to install it and start it. On LinuxInstallation guidelines can be found at/QuickStart/Linux3Windows 7 Windows Vista Windows XPConnect/DisconnectConnect to the internet via the mobile phone network or Wi-Fi, to browse the web or use emailStatusCheck the status of the current connectionShortcutsSelect further apps and servicesMenu bar*Send, receive and manage SMS, manage your account, and view further settingsAlways Best ConnectedView and edit your connection preferencesHelpView Help topics453126* If you are a Contract customer, you can send and receive SMS. With Pay as You Go, network notifications will be delivered, but sending and receiving SMS is not supported.45Windows 7Windows VistaWindows XP6Windows 8On Windows 8, the operating system looks after your connectivity, but you can use the Vodafone application to monitor the connection and manage your account.Status Check the status of the current connection Account Status Check your account status Online Account Log in and manage your account online Discover View details of further apps and services Help and Support View Help topics 453127Windows 88Apple Mac Connect/Disconnect Connect to the internet via the mobile phone network or AirPort (Wi-Fi), to browse the web or use email Status Check the status of the current connection SMS*Open the SMS app to send, receive and manage messages Navigation tabs Manage your connection preferences, view your usage, and manage your devices Always Best Connected Control automatic connection management 31245* Please see SMS note on page 4.5 431 2Apple Mac910You can open the QuickStart application in your browser on Linux, or any other supported operating system.Status Check the status of the current connection Navigation*View your QuickStart settings, use SMS and manage your account Current view Displays the area of QuickStart that you selected Help View Help topics 312Linux – and all other systems4* Please see SMSnote on page 4.111234Linux – and all other systems12The LED light on your USB Stick shows which kind of mobile network hasbeen found, and whether the USB Stick is connected to that network.Red blinkingSearching for mobile networkGreen blinkingA GPRS network has been found – you could connectGreen solidConnected via GPRSBlue blinkingA 3G network has been found – you could connectBlue solidConnected via 3GLight blue solidConnected via 3G Broadband.USB Stick LED lightsHints and tips Install problems on Windows 7, Windows Vista or Windows XPThe following problems may be caused by an older release of the Vodafone Mobile Broadband application that was installed previously:No icon was created for the app on your desktop, or–You double-click the desktop icon but the app doesn’t seem to start, or–When you plug in your Stick, no CD-ROM appears, or–The app starts but then shows “Device Not Detected”.–To make sure any older release is completely uninstalled:Download the Vodafone Mobile Broadband Cleanup app:–/vmb_cleanup.Use Windows as normal to uninstall the Vodafone Mobile Broadband app–Double-click the zip archive to unpack Cleanup–Run VmbCleanup.exe and select all three options:–Settings, Data and Device RegistrationRestart your computer–Plug in your new USB Stick–The correct app should then install automatically.–1314If no network can be found Change your physical location: in a building, move closer to a window, move higher up, or go outside.On Windows 7, Windows Vista, Windows XP or Linux:– Open the QuickStart application window – Select the Settings heading on the Navigation bar – Select the Network entry in the Menu bar on the left – Click ‘Search’ to search for available networks – Connect to one of the allowed networks – Click ‘Save’ to save your change On Apple Mac:– Select the Connections tab – Select Mobile Connections – Click the magnifying glass ‘Search’ button – Select one of the allowed networks.If you are abroad, contact Support, and check that data services and roaming are enabled on your account.Hints and tips15If no connection can be opened– C heck the status of your USB Stick in the Diagnostics window of your Vodafone Mobile Broadband app– Wait a few minutes and try to connect again– Close the application window and then re-open it– Restart your computer– S elect an exclusive option in the connection or bearer settings, eg. ‘3G Only’ instead of ‘3G Preferred‘– I f you are using a VPN (Virtual Private Network), contact the administrator of your VPN– C heck that the type of account you have with your mobile network operator is selected in your app, eg. ‘Prepaid‘.SupportAs well as the Help documentation, your Vodafone Mobile Broadband app will include details of how to contact the Support team at your mobile network operator.Hints and tipsGlossaryBearer Communication method used for data transport over the mobile network, eg. 3G Broadband, HSPA, 3G, etc.Home network The network of the mobile operator who provided your SIM.Roaming You can use your mobile device on any other mobile network that has a roaming agreement with your operator, whether in your country or abroad.SIM Your Subscriber Identity Module is the small plastic chip that you will have received together with your mobile contract. Your SIM has gold contactson one side.1617。
Vodafone MachineLink 4G 产品说明书
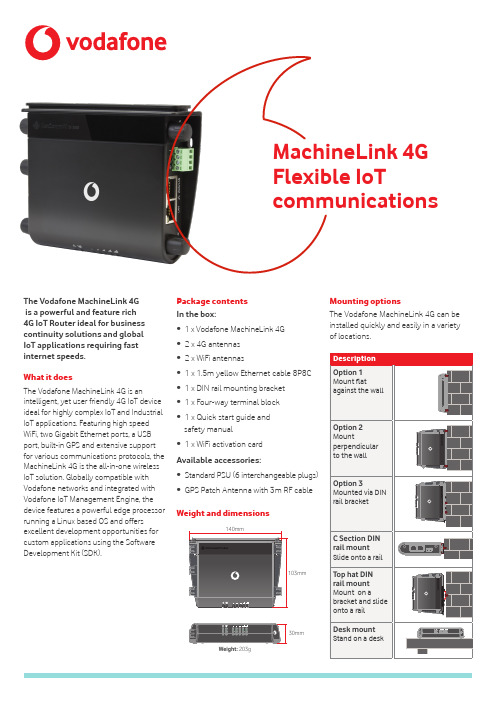
The Vodafone MachineLink 4Gis a powerful and feature rich4G IoT Router ideal for business continuity solutions and globalIoT applications requiring fast internet speeds.What it doesThe Vodafone MachineLink 4G is an intelligent, yet user friendly 4G IoT device ideal for highly complex IoT and Industrial IoT applications. Featuring high speed WiFi, two Gigabit Ethernet ports, a USB port, built-in GPS and extensive support for various communications protocols, the MachineLink 4G is the all-in-one wireless IoT solution. Globally compatible with Vodafone networks and integrated with Vodafone IoT Management Engine, the device features a powerful edge processor running a Linux based OS and offers excellent development opportunities for custom applications using the Software Development Kit (SDK).Package contentsIn the box:• 1 x Vodafone MachineLink 4G• 2 x 4G antennas• 2 x WiFi antennas• 1 x 1.5m yellow Ethernet cable 8P8C• 1 x DIN rail mounting bracket• 1 x Four-way terminal block• 1 x Quick start guide andsafety manual• 1 x WiFi activation cardAvailable accessories:• S tandard PSU (6 interchangeable plugs)• G PS Patch Antenna with 3m RF cableWeight and dimensionsMounting optionsThe Vodafone MachineLink 4G can beinstalled quickly and easily in a varietyof locations.Weight: 203gProcessor and storage• Powerful 800Mhz ARM8 processor with128MByte DDR3 RAM • 256MByte Flash memory storage (~120MB available on board space for user storage)• microSD card slot for expandable storageOperating system• Embedded Linux 3.2.0 & Software Development Kit (SDK) Peak data speedLTE data rates:Category 3• Downlink: Up to 100 Mbps (20 MHz bandwidth)Up to 50 Mbps (10 MHz bandwidth)• Uplink: Up to 50 Mbps (20 MHz bandwidth)Up to 25 Mbps (10 MHz bandwidth)UMTS (WCDMA)/HSDPA/HSUPA/HSPA+/ DC-HSPA+: HSPA+ rates• Downlink: Up to 42 Mbps (category 24)• Uplink: Up to 5.76 Mbps (category 6)GSM/GPRS/EDGE:• EDGE throughput up to 236 kbpsCellular bands• Multi-band FDD capableLTE:• Band 1 (2100 MHz)• Band 3 (1800 MHz)• Band 7 (2600 MHz)• Band 8 (900 MHz)• Band 20 (800 MHz)UMTS/HSDPA/HSUPA/HSPA+/DC-HSPA+:• Band 1 (2100 MHz)• Band 2 (1900 MHz)• Band 5 (850 MHz)• Band 8 (900 MHz)GSM/GPRS/EDGE:• GSM 850 (850 MHz)• EGSM 900 (900 MHz)• DCS 1800 (1800 MHz)• PCS 1900 (1900 MHz)GNSS:• GPS: 1575.42 MHzConnectivity• 2 x 10/100/1000 Base-T Ethernet RJ45 ports with Auto MDIX • Micro USB 2.0 (type AB) OTG interface with 0.5A supply capability • Micro USB 2.0 OTG feature control• 1 x 1-Wire® interface1-Wire® interface• Supports the 1-Wire® bus system to communicate with devices such as digital thermometers and weather instruments.• Provides low-speed data, signaling andpower over a single line.• Supports the ability to act as the master controllerin a 1-Wire® system.• Configurable as digital input and digital output.Multi-SIM & Network Support• 1 x Embedded Global SIM via Secure soldered-down SIM (ETSI MFF2 DFN-8 USIM)• 1 x SIM Card Reader; mini USIM/SIM format (2FF) with Lockable tray, push-button-to-release• Automatic detection and switch-over when an optional 2FF SIM is inserted.• Dual SIM Network Failover/Failback Intelligence• User configurable SIM preferenceReset button• Reset button (recessed, requiring pen/paperclip) with three functions: reboot, reboot into recovery mode, and reset unit to factory defaults.• Reset button override w/event alert notificationAntenna connectors• 2 x SMA connectors for 3G/4G (1x Main and 1x RX Diversity) • 2 x Reverse polarity female SMA connectors for Wireless LAN (MIMO)• 1 x SMA connector for GPSLED indicators• 8 x Tri-colour (Red/Amber/Green) LEDs. Power, Network and 5 x Signal Strength indicators on the front panel, and WLAN LED on the left side endplate.• Easy and clear LED status display for connection status, connected network type, WLAN connection mode and connection errors.Cellular• Profile managed packet data connections – configuration of up to six profiles.• NAT disable for framed route configuration• Transparent bridge mode using PPPoE to allow the router to transparently forward public WAN IP address to a downstream device • SIM security management (PIN configuration, enable anddisable)• Automatic and manual cellular band selection• Automatic and manual operator selectionCustomised roaming algorithm**This feature works with Vodafone roaming SIM cards only.• Prioritised network connection across the globe.• Network access technology preference• Cost effective mode that allows cellular connection to hopamong different networks of the same carrier, before moving onto another carrier’s more expensive option.• Signal assurance watchdog that allows the router toautomatically ignore poor cellular connections if the receivedsignal falls below a configured threshold.• Embedded and manually configured preferred roaming lists• Filterable system roaming logGPS• Embedded GPS receiver (1575.42Mhz)• Stand-alone GPS• SMA connector for external active GPS antenna• Active antenna voltage: 3.05V• Maximum current: 50mA• Tracking sensitivity under open sky: -161dBm• Acquisition (standalone) sensitivity: -145dBm• Time to first fix (TTFF): Cold 32s, Warm 29s, Hot 1s• Odometer reading available via Web-UI, CLI and SDK• Geofence definition and entry/exit notificationWi-Fi/WLAN• 802.11n 2T2R WiFi with transmission speeds up to 300Mbps.• Simultaneous access point/wireless client modes.• Multiple configurable SSID networks• MAC-based client filtering security• AP hotspot with configurable landing/redirect page URL• WiFi bridge mode (WDS one-to-one)• Public hotspot service (client mode)• AP hotspot ACLNetwork and routing• Static routing, RIP (v1/v2), port forwarding and DMZ• Dynamic DNS• Intelligent VRRP w/event alert engine support• DHCP server, including :• Address reservation by MAC address• Custom DNS server definitions• DHCP relay• DHCP list display in Web-UI• Advanced DHCP option configuration (option 42 NTP, option66 TFTP, option 150, option 160)• Data stream manager providing ability to create mappingsbetween input and output ports (e.g. SMS, GPS, and USB) andperform required translation or data processing by each virtualtunnel.• Modbus server TCP/IP gateway and client TCP/IP agent with upto 247 slaves connected to the serial TCP/IP Gateway.• Modbus RTU/ASCII frames support.• VLAN supportWAN failover/fall back• Business continuity guarantee for wired networks viainstantaneous failover/failback to/from 4G/3G/2G networks• Intelligent delay mechanism for controlling failover/failbackprocedure• Autonomous fixed line modem power reset algorithmVPN• PPTP client for VPN connectivity to remote PPTP VPN server• IPSec tunnel termination (for up to 5 tunnels)• GRE tunneling• OpenVPN (client, server and P2P)• SCEP VPN supportAdministration and configuration• Web-based user interface (HTTP/HTTPS) for full device statusand configuration• Password protected configuration file backup and restore forquick device configuration and device cloning• Telnet command line interface for status monitoring,configuration and control• SNMP v1/v2 including cellular specific MIB, config and firmwaredownload• TR-069 client for remote device configuration, configurationbackup and restore, and firmware upgrade• SMS client (send/receive) including inbox, sent items• Ping monitor watchdog (Reset connection on repeated pingfailure)• Diagnostic Log Viewer (Remote and local)• System status and security logs• NTP server support for network time sync of device’s systemclock• Device user guide stored on the device and accessible via theWeb-based user interface (HTTP/HTTPS)• Advanced diagnostics and control via SMS• Query status information – such as signal strength, WAN IP,uptime, and many more• Configure device remotely via SMS – such as APN,authentication settings, and many more• Execute commands via SMS – such as reboot, reset to defaults,go offline, and many more• Secure SMS management using sender whitelisting andpassword management• SMS acknowledgement replies for queries and commands• Remote network quality diagnosticsFirmware management• Firmware upgrade locally via LAN or remotely over-the-air(HTTP/ HTTPS, SNMP, TR-069)• Multiple firmware image storage on device and dynamic install• Triggered firmware upgrade via SMS (initiate download & installfrom HTTP/HTTPS)Event Alert Engine• Receive proactive network & device alerts• User configurable• Support for SMS / SMTP / TCP / UDP• Support for commands• I/O event notificationSoftware development kit• Develop and install custom software applications• Open Linux standard development environment• Develop applications/scripting in standard ANSI C/Shell scriptand LUA• Package manager built into Web-UI for Application installation/removal• API (C, LUA and Shell libraries) to the unit’s internal runtimedatabase to allow full status monitoring configuration andcontrol of the device from custom applicationsTemperature• Operating temperature range (class A): -30ºC to +70ºC• Operating temperature range (class B): -40°C to +85°C*(* with possible performance deviation)Environmental conditions• Operating humidity 0-95% (RH)• Storage humidity 0-95% (RH)• Ingress Protection rating (IP52)Power supply• Power input and I/O via 4 way termination block receptacle• Field terminable power input via screw type terminal blockincluded• DC power (8 - 40V DC)• 1 x Dedicated ignition input on 4 way connector• Power consumption 6W, recommended DC supply via terminalblock (12V 1.5A)• Vehicle compatible protection on DC Input Jack. (ISO7637standard)Dimensions & weight• Device dimensions (excluding external antenna): 140mm (L) x103mm (W) x 30mm (D) / 210gMounting options• Wall mount support in multiple orientations via embeddedmounting holes• DIN rail mount support via plastic bracket included in box (tophat section rail TH 35 IEC60715)• C rail mount support via mounting rail built into housing(C section rail C30 IEC60715)Certifications• CE (Europe)• eMark (Europe)• RoHS (Europe)• WEEE (Europe)• REACH (Europe)• IC (Canada)• FCC (USA)• RCM (Australia) - Pending• ICASA (South Africa) - Pending• GCF (Europe)Only Vodafone can offer you a complete IoT solution on aglobal scale.For more information about our IoT solutions, please contactyour Vodafone account manager,email. ****************,or visit /iot。
Vodafone Mobile Wi-Fi R216用户手册说明书
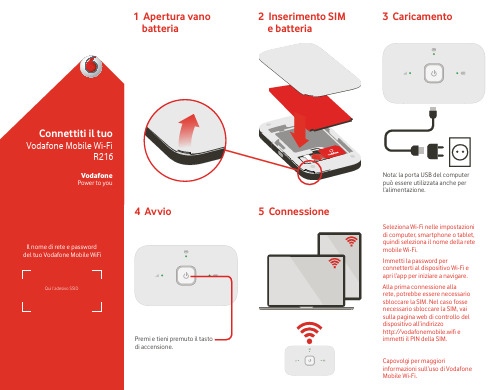
5 Connessione
Premi e tieni premuto il tasto di accensione.
Nota: la porta USB del computer può essere utilizzata anche per l’alimentazione.
Posta in arrivo Consente di visualizzare i messaggi SMS.
Guida Questa sezione offre tutti i dettagli su come risolvere eventuali problemi.
Scarica l’app di monitoraggio
Seleziona Wi-Fi nelle impostazioni di computer, smartphone o tablet, quindi seleziona il nome della rete mobile Wi-Fi. Immetti la password per connetterti al dispositivo Wi-Fi e apri l’app per iniziare a navigare. Alla prima connessione alla rete, potrebbe essere necessario sbloccare la SIM. Nel caso fosse necessario sbloccare la SIM, vai sulla pagina web di controllo del dispositivo all’indirizzo http://vodafonemobile.wifi e immetti il PIN della SIM.
Vodafone Mobile Wi-Fi R216 用户指南说明书
5 Conectividad
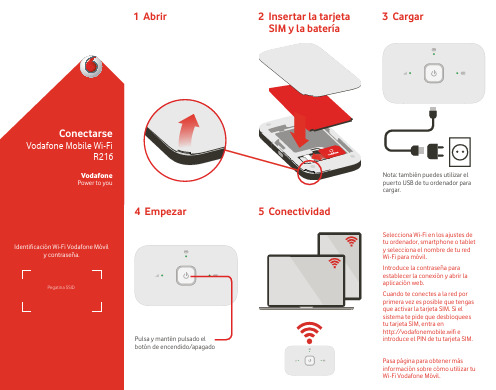
Pulsa y mantén pulsado el botón de encendido/apagado
NUSB de tu ordenador para cargar.
™ ‘El término “Banda ancha móvil” junto con
el diseño de los ‘pájaros’ es una marca comercial de GSMC Limited. You have purchased a product which uses source code of software licensed under the GNU General Public License (GPL) or Lesser GNU General Public License (LGPL) or some other open source licenses allowing source code distribution to you. We offer you a complete copy of the corresponding source code, which is available for download within a period of three years from the distribution of the product and is free of charge. You may download the source codes from /R216 © Vodafone Group 2015. Vodafone y los logotipos Vodafone son marcas comerciales del Vodafone Group. Otros productos y nombres de empresas mencionados en este documento pueden ser marcas comerciales de sus respectivos propietarios.
Vodafone Mobile Wi-Fi R216用户手册说明书
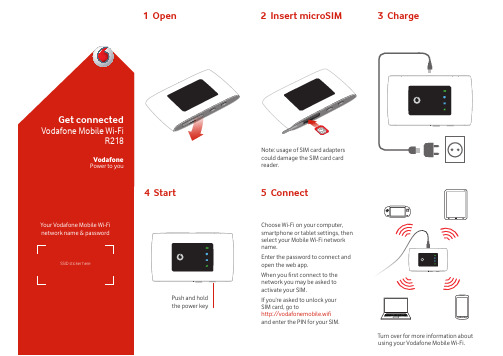
2 Insert SIM & battery
3 Charge
Get connected
Vodafone Mobile Wi-Fi R216
Vodafone Power to you
4 Start
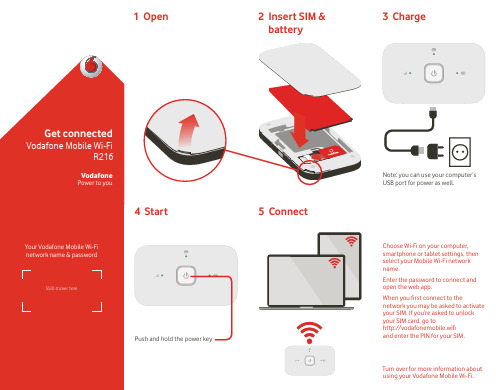
Your Vodafone Mobile Wi-Fi network name & password
Note: while updating your R216 all the lights will blink green until restarting. To find out more about your device, please visit /R216
™ The term “Mobile Broadband” together
Download the app from your device’s app store, or scan the appropriate QR code here to take you to the app store.
in This lets you see additional information and make changes. Use the password ‘admin’ to log in.
Help This section gives you full details of how to resolve any issues.
Download the monitor app
The Vodafone Mobile Wi-Fi Monitor app is a quick and easy way to monitor your network on a smartphone or tablet.
Vodafone Mobile Wi-Fi R226 用户手册说明书

Einfach die App aus dem App-Store Ihres Geräts herunterladen oder den entsprechenden QR-Code hier einscannen, um zum App-Store zu gelangen.
iOS (iPhone oder
SSSIDSIADusfktilcekber hgehret hier
micro SIM
micro SD
(microSD -Karte optional)
5 Verbindung
Ein-/Austaste gedrückt halten
Hinweis: Sie können auch den USBAnschluss Ihres Rechners verwenden.
Hilfe In diesem Abschnitt finden Sie ausführliche Informationen zur Behebung von Problemen.
Überwachungs-App herunterladen
Mit der Vodafone Mobile Wi-Fi Überwachungs-App können Sie Ihr Netzwerk schnell und mühelos von Ihrem Smartphone oder Tablet aus überwachen.
Wählen Sie in Ihren Rechner-, Smartphone- oder TabletEinstellungen die Option „WLAN“ oder „Wi-Fi“ und dann den Namen Ihres mobilen WLAN-Netzwerks. Geben Sie das Passwort ein, um die Verbindung herzustellen und die Internet-App zu öffnen. Sobald Sie sich im Netzwerk anmelden, können Sie gebeten werden, Ihre SIM zu aktivieren. Sollten Sie gebeten werden, Ihre SIMKarte zu entsperren, gehen Sie zu http://vodafonemobile.wifi und geben Sie die PIN für Ihre SIMKarte ein. Auf der Rückseite finden Sie weitere Informationen zu Ihrem Vodafone Mobile Wi-Fi Service.
