IBM小型机微码升级详细的升级过程
IBM小型机微码升级详细的升级过程
微码升级详细的升级过程如下:Special Instructions for Models 9117-570, 9116-561 and 9406-570下面三个菜单是让你确认设备配置是否给Deconfigured 。
是做升级微码前的准备确认工作。
Model 9117-570, 9116-561 and 9406-570 systems with any level of SF240 installed must be checked for GARDed out nodes, processors and memory before applying a new level of SF240 firmware. Following are instructions to determine if any nodes, processors or memory is GARDed out. If any hardware resource are found to be GARDed, contact your next level of support and have the situation corrected before applying this service pack.1. Log on to ASM as "admin".2. Click on the "Expand all menus" link to make all options visible.3. Navigate down to the options under "System Configuration" followed by "Hardware Deconfiguration".4. Click on the link "Processor Deconfiguration" to bring up the page that shows the number of processors present and whether or not they areconfigured.5. Click on the link "Memory Deconfiguration" to bring up the page thatshows the total amount of memory present and if any is presentlydeconfigured.6. Click on the link "Processing unit Deconfiguration" to bring up thepage that shows the processing units in the system and if any ispresently deconfigured.7. Log off.从IBM官网下载最新的01SF240_338_201版本的微码,文件下载下来是一个rpm包,01SF240_338_201.rpm,FTP 到AIX系统上找到AIX下微码的目录,进入,在命令行下运行命令:rpm -Uvh --ignoreos 01SF240_338_201.rpm微码文件会被解压到/tmp/fwupdate目录下,文件名是01SF240_338_201到/tmp/fwupdate目录下,运行命令:/usr/lpp/diagnostics/bin/update_flash -f 01SF240_338_201系统提示如果要继续更新微码需要重新启动,按下1并回车,机器重新启动并自动进入微码更新进程在更新过程中液晶面板会有CA2799FD 和CA2799FF 交替显示,更新完毕后系统自动关机,然后启动。
IBM小型机(7026-6H1)微码升级文档(微码版本CM060505)
7026-H80, 7026-6H0 and 7026-6H1 小型机微码升级文档(微码版本: CM060505)Applies to : RS/6000 7026-H80, pSeries 660 Models 6H0 and 6H1This document describes the installation of Licensed Machine Code, which is sometimes referred to generically as microcode or firmware.Contents∙ 1.0 Systems Affected∙ 2.0 Firmware Description and Revision History∙ 3.0 Cautions and Important Notes∙ 4.0 How to Determine Currently Installed Firmware Level∙ 5.0 Downloading and Unpacking the Firmware Update Package∙ 5.1 Internet Package∙ 5.1.1 AIX Package∙ 5.1.2 DOS Package∙ 5.2 Remote Installation of Firmware∙ 6.0 Updating the Firmware∙ 6.1 Using the AIX Command-Line Method∙ 6.2 Using the Update Flash Diagnostic Service Aid Method∙ 6.3 Using the Service Processor Menus Method∙ 6.4 Verifying the Update∙ 6.5 Archiving the Update Files1.0 Systems AffectedThis update provides new firmware (FW) for RS/6000 7026-H80 and pSeries 660 Model 6H0 (7026-6H0) and Model 6H1 (7026-6H1) Servers only. Do not use on any other systems.The firmware level contained in this update is:∙ CM060505The typical time to install this firmware is one hour. The firmware does not become active when installed and requires a system reboot to become active. This reboot time will vary depending on the system and the amount of features installed. This estimate is for an average system.2.0 Firmware Description and Revision History Table 2.1 lists the levels and descriptions for the firmware.3.0 Cautions and Important NotesATTENTION: The firmware levels contained in this package MUST be installed before installing AIX 5.3.The System, Service Processor (SvP) and System Power Control Network (SPCN) firmware are combined into a single file. This allows all the firmware to be updated together and assures they are compatible.Don't be alarmed at the length of this document! For any given download/unpacking/update environment, the process is short. This document describes processes for several environments. One should be suitable for your needs, and these instructions guide you through just the environment you choose.Service Processor Menu Update MethodThis method of updating the firmware requires the update file to be on diskettes. Details for creating these diskettes are contained in the download instructions.Note: If the update file will be downloaded directly to the target server, diskettes will have to be made in order to update the firmware from the SP Menus.Recovery ModeIf the service processor detects that its programming has been corrupted when it is powering up to standby mode, it will enter recovery mode. In recovery mode, it will ask for the firmware update diskettes by putting eight-digit codes on the operator panel. For more details, see the RS/6000 Enterprise Server 7026 Model H80, eServer pSeries 660 Models 6H0 and 6H1 Service Guide.Firmware Update Installation Is Not ConcurrentInstallation of the firmware will cause an unconditional reboot of the system. Therefore, all user operations should be gracefully terminated before firmware updates are to be applied.Never Power Off the System During the Firmware Update ProcessThe update will fail, and the process must be repeated.Replacement Parts May Require UpdatingWhen a system planar is replaced, the firmware must be checked to ensure it is at the latest level. Table 3.1 lists the released levels of firmware.AIX Instructions are CASE SENSITIVEIn the instructions that follow are specific AIX and DOS commands. AIX commands are CASE (lower and upper) SENSITIVE, and must be entered exactly as shown, including the filenames. DOS commands are not case sensitive, and may be entered without regard to the cases shown.How to Determine the Firmware Release DateFirmware level identifiers use the 8-digit Gregorian date code method in terms of year, month, and day (such as 20060505 for CM060505 level).4.0 How to Determine Currently Installed Firmware LevelDO NOT rely on the part number or firmware level marking/label on an EPROM/FLASH module because the content of the module may have been updated to a different level. To be safe, always check the firmware level electronically.Use the following AIX command for checking the firmware level.Enter:lscfg -vp | grep -F .CMThis command will produce a system configuration report similar to the following.ROM Level.(alterable).......CM030829The ROM Level line lists the level of the currently installed firmware. In the above example, the current firmware level is CM030829.If the right-most six characters (date) of the firmware level is earlier than 060505, you should consider installing the update.If you find the firmware must be updated, proceed to Section 5.0. If the firmware level is correct and no update is needed, installation is complete.5.0 Downloading and Unpacking the Firmware Update PackageInstructions for downloading and unpacking the firmware update package follow.5.1 Internet PackageThe firmware, in AIX and DOS packages, is located at the web site/webapp/set2/firmware/gjsnFollow the instructions on this web page. You must read and agree to the license agreement to obtain the firmware package.In the drop-down box, choose the entry for your specific machine type and model.The download choices at that entry are:∙Desc (Instructions document)∙AIX (For downloading to an AIX server or system)∙DOS (For downloading to a Windows workstation)You will want a copy of the instructions document and one of the download choices. You may transfer files to the target server in one of several ways.∙By downloading files directly to the target server.∙By downloading files to an intermediate AIX system and then using either ftp or diskettes for transferring to the target server.∙By downloading files to a Windows workstation from which you can use diskettes for transferring to the target server.Detailed download/unpacking instructions follow for each of the downloading preferences.∙If using an AIX system for downloading, continue to paragraph 5.1.1.∙If using a Windows workstation for downloading, skip to paragraph5.1.2.5.1.1 Downloading the AIX PackageUse this method to download to an AIX system.Note: In the instructions that follow are specific AIX commands. AIX commands are CASE (lower and upper) SENSITIVE, and must beentered exactly as shown, including the filenames.a) Provide a directory on an AIX system to receive the AIX format file.Enter:mkdir /tmp/fwupdateNote: If the directory /tmp/fwupdate already exists,make sure it is empty before proceeding.b) Transfer the AIX package to the /tmp/fwupdate directory (using "Save as ...").You'll see that the filename is 7026HM80.BINc) Unpack the file by executing the instructions below.Enter the commands:cd /tmp/fwupdatechmod +x 7026HM80.BIN./7026HM80.BIN[Don't overlook the periods (.) in the above command.]This files will be added to /tmp/fwupdate:CM_MM_060505.imgIf the above procedure was used to transfer the AIX package directly to the target server, proceed to Section 6.0, Updating the Firmware.Otherwise, on the intermediate AIX system, choose one of the following methods for transferring files to the target server.∙To transfer files to the target server via the ftp method, continue to paragraph 5.1.1.1.∙To transfer files to the target server via the diskettes method, skip to paragraph 5.1.1.2.5.1.1.1 The FTP Transfer MethodThis method presumes you have ftp access to the target server.On the intermediate AIX system,Enter the commands:ftp {name of target server}{Login with a valid userid and password}binlcd /tmp/fwupdatemkdir /tmp/fwupdatecd /tmp/fwupdateput CM_MM_060505.imgquitProceed to Section 6.0, Updating the Firmware.5.1.1.2 The Diskette Transfer MethodThis method can be used for cases in which electronic connections between the intermediate AIX system and the target server are inconvenient.Four 2MB (HD) new or freshly formatted diskettes are required.With a diskette loaded in the drive,Enter the commands (this process will request additional diskettes as each is filled):cd /tmp/fwupdatels *.img | backup -i -v -f/dev/rfd0This will produce AIX backup diskettes. Label these diskettes, respectively,"Volume 1: FW (CM060505) for 7026-H80, 7026-6H0 and 7026-6H1""Volume 2: FW (CM060505) for 7026-H80, 7026-6H0 and 7026-6H1""Volume 3: FW (CM060505) for 7026-H80, 7026-6H0 and 7026-6H1""Volume 4: FW (CM060505) for 7026-H80, 7026-6H0 and 7026-6H1"Proceed to Section 6.0, Updating the Firmware.5.1.2 Downloading the DOS PackageUse this file to download to a Windows workstation.a) Prepare a directory for receiving the DOS package.This directory can be in any partition with 12MB available space. Executing in such a partition, called [path] in these instructions (ex. c:\download),Enter:md [path]\fwupdateNote: If the directory [path]\fwupdate already exists,make sure it is empty before proceeding.b) Transfer the DOS package to the [path]\fwupdate directory (using "Save as ...").You'll see the filename is 7026HM80.EXEc) Unpack the file by executing the instructions below.Enter the commands:cd [path]\fwupdate7026HM80These files will be added to the fwupdate subdirectory:HM_80_B1.EXEHM_80_B2.EXEHM_80_B3.EXEHM_80_B4.EXE5.1.2.1 Diskettes for Firmware UpdatesFour 2MB (HD) new or freshly formatted DOS diskettes are required.Note:The diskettes produced below will be in a format that can be used directly with a computer running AIX as it's operating system. Thesediskettes, once made on a PC platform, cannot be read using normal PCplatform tools or command line operations.a) With a diskette loaded in the drive,Enter the commands:cd [path]\fwupdateHM_80_B1Label this diskette,"Volume 1: FW (CM060505) for 7026-H80,7026-6H0 and 7026-6H1"b) With a second diskette loaded in the drive,Enter:HM_80_B2Label this diskette,"Volume 2: FW (CM060505) for 7026-H80, 7026-6H0 and 7026-6H1"c) With a third diskette loaded in the drive,Enter:HM_80_B3Label this diskette,"Volume 3: FW (CM060505) for 7026-H80, 7026-6H0 and 7026-6H1"d) With a fourth diskette loaded in the drive,Enter:HM_80_B4Label this diskette,"Volume 4: FW (CM060505) for 7026-H80, 7026-6H0 and 7026-6H1" Proceed to Section 6.0 Updating the Firmware.5.2 Remote Installation of FirmwareTo install firmware on a remote system, login to the remote system as root. Copy (in binary format) the firmware file, CM_MM_060505.img, to the /tmp/fwupdate directory on the remote system. Proceed to Section 6.0 Updating the Firmware.6.0 Updating the FirmwareThe System, Service Processor (SvP) and System Power Control Network (SPCN) firmware are combined into a single file. This allows all the firmware to be updated together and assures they are compatible.***WARNING:Do not power off the target server at any time before the updateprocess completes. Be sure the system is NOT running any userapplications.***Note: Checksums can be used to verify files have not been corrupted or altered during transmission.At the AIX command line, enter:sum CM_MM_060505.imgThis command will produce the following output:28838 4985 CM_MM_060505.imgThe checksum is ---------------> 28838You must have root authority on the target server to update its firmware.As the firmware update takes place (during the automatic shutdown sequence), progress can be monitored from the operator panel. The checkpoints 99FF and 99FD alternately appear while the update is in progress.At some points in the update process, these checkpoints may not change for ten to thirty minutes. If this occurs, be patient and allow time for the update process to complete.Updating firmware in the 7026-H80, 7026-6H0 and 7026-6H1 must be initiated either directly from the AIX command line, from the Update Flash Diagnostic Service Aid, or from the Service Processor Menu.Note: In the instructions that follow are specific AIX commands.AIX commands are CASE (lower and upper) SENSITIVE, and must beentered exactly as shown, including the filenames.6.1 Using the AIX Command Line MethodThis method allows updating either from files already loaded into the target server or from diskettes.∙If the files are loaded in the target server, continue to paragraph6.1.1.∙If the files are on diskettes, skip to paragraph 6.1.2.6.1.1 Updating With Files Already Loaded in the Target Server With the files located in the /tmp/fwupdate subdirectory,Enter the commands:cd /usr/lpp/diagnostics/bin./update_flash -f /tmp/fwupdate/CM_MM_060505.img[Don't overlook the periods (.) in the above command.]You will be asked for confirmation to proceed with the firmware update and the required reboot. If you confirm, the server will apply the new firmware, reboot and return to the AIX prompt. This may take ten to thirty minutes (or more), depending on the configuration of the target server.Having successfully executed the above commands, the server automatically performs the update and reboots. Since the update occurs during this shutdown/reboot sequence, it is important to protect the server from interruptions. The checkpoints 99FF and 99FD alternately appear while the update is in progress.The update of the firmware is complete. You will want to verify this update as shown in paragraph 6.4.6.1.2 Updating from DiskettesOn the target server,Enter the commands:mkdir /tmp/fwupdateNote: If the directory /tmp/fwupdate already exists,make sure it is empty before proceeding.cd /tmp/fwupdateEnter :restoreYou will be prompted to mount volume 1 on /dev/rfd0In the drive of the target server, put the AIX backup diskette labeled:"Volume 1: FW (CM060505) for 7026-H80, 7026-6H0 and 7026-6H1"When prompted for volume 2,In the drive of the target server, put the AIX backup diskette labeled:"Volume 2: (CM060505) FW for 7026-H80, 7026-6H0 and 7026-6H1"When prompted for volume 3,In the drive of the target server, put the AIX backup diskette labeled:"Volume 3: (CM060505) FW for 7026-H80, 7026-6H0 and 7026-6H1"When prompted for volume 4,In the drive of the target server, put the AIX backup diskette labeled:"Volume 4: (CM060505) FW for 7026-H80, 7026-6H0 and 7026-6H1"The file is now located in the /tmp/fwupdate subdirectory.Enter the commands:cd /usr/lpp/diagnostics/bin./update_flash -f /tmp/fwupdate/CM_MM_060505.img[Don't overlook the periods (.) in the above command.]You will be asked for confirmation to proceed with the firmware update and the required reboot. If you confirm, the server will apply the newfirmware, reboot and return to the AIX prompt. This may take ten to thirty minutes (or more), depending on the configuration of the target server.Having successfully executed the above commands, the server automatically performs the update and reboots. Since the update occurs during this shutdown/reboot sequence, it is important to protect the server from interruptions. The checkpoints 99FF and 99FD alternately appear while the update is in progress.Don't forget to retrieve and file any firmware update diskette that may still be in the server's diskette drive. A good time to do this is after the reboot has completed.The update of the firmware is complete. You will want to verify this update as shown in paragraph 6.4.6.2 Using the Update Flash Diagnostic Service Aid MethodThis method allows updating from files already loaded into the target server or from diskettes.Note: Review "Update System or Service Processor Flash" in the Service Aidssection of the RS/6000 Enterprise Server 7026 Model H80, eServer pSeries 660 Model 6H0 and Model 6H1User's Guide for more information about using this utility.∙If the file is loaded in the target server, skip to paragraph 6.2.2.∙If the file is on diskettes, continue to paragraph 6.2.1.6.2.1 File on DiskettesEnter the commands:mkdir /tmp/fwupdateNote: If the directory /tmp/fwupdate already exists,make sure it is empty before proceeding.cd /tmp/fwupdaterestoreYou will be prompted to mount volume 1 on /dev/rfd0In the drive of the target server, put the AIX backup diskette labeled: "Volume 1: FW (CM060505) for 7026-H80, 7026-6H0 and 7026-6H1" When prompted for volume 2,In the drive of the target server, put the AIX backup diskette labeled: "Volume 2: FW (CM060505) for 7026-H80, 7026-6H0 and 7026-6H1" When prompted for volume 3,In the drive of the target server, put the AIX backup diskette labeled: "Volume 3: FW (CM060505) for 7026-H80, 7026-6H0 and 7026-6H1" When prompted for volume 4,In the drive of the target server, put the AIX backup diskette labeled: "Volume 4: FW (CM060505) for 7026-H80, 7026-6H0 and 7026-6H1"The file is now located in the /tmp/fwupdate subdirectory. Continue to paragraph 6.2.2.6.2.2 Updating with the Diagnostics Service Aida) Invoke the Service Aids from either on-line or standalone diagnostics.b) Choose Update System or Service Processor Flash.c) Select 'File System' as the source of the flash update image file.The fully qualified path name of the update file is /tmp/fwupdate /CM_MM_060505.imgd) Press 'F7' key to 'Commit' the update.The server automatically performs the update and reboots. Since the update occurs during this shutdown/reboot sequence, it is important to protect the server from interruptions. The checkpoints 99FF and 99FD alternately appear while the update is in progress.Don't forget to retrieve and file any firmware update diskette that may still be in the server's diskette drive. A good time to do this is after the reboot has completed.The update of the firmware is complete. You will want to verify this update as shown in paragraph 6.4.6.3 Using the Service Processor Menu MethodService Processor Menus allow updating from diskettes only.Note: All firmware (System, Service Processor and SPCN) will be updated when using this method.Note: Access to the Service Processor Menus is not available on serial port (S4).a. Power on or shutdown and restart the system.b. When the operator panel on the server says OK, press Enter, to bring up the Service ProcessorMenu.c. Choose 1 for Service Processor Setup Menu. <Enter>d. Choose 7 for Reprogram Flash EPROM Menu. <Enter>e. Type y to continue. <Enter>f. Follow on-screen update steps as they are presented.g. The 'Rebooting Service Processor ' message appears on the screen.h. Begin watching the operator panel.i. When the panel says 'OK', press Enter.The Service Processor Menu appears on the screen.The second line of the title, Version: CM060505, should match the firmware level you justinstalled.j. To restart AIX, choose 2 for System Power Control Menu. <Enter>k. Choose 4 for Power-On System. <Enter>l. Type y to confirm. <Enter>If you confirm, the server will reboot and return to the AIX prompt. This may take ten to thirty minutes (or more), depending on the configuration of the target server. Since the update occurs during thisshutdown/reboot sequence, it is important to protect the server from interruptions. The checkpoints 99FF and 99FD alternately appear while the update is in progress.Don't forget to retrieve and file any firmware update diskette that may still be in the system's diskette drive. A good time to do this is after the reboot has completed.The firmware update is complete. You will want to verify this update as shown in paragraph 6.4.6.4 Verifying the UpdateTo verify the update was successful, use the following AIX command after the automatic reboot.Enter:lscfg -vp | grep -F .CMThis command will produce a system configuration report containing sections similar to the following.ROM Level.(alterable).......CM060505The ROM Level line should match the level you just installed, namely, CM060505.6.5 Archiving the Update FilesIn the event it becomes necessary to restore the server to a certain firmware level, it is suggested you identify and archive the materials for each update you install.If the download process produced diskettes, label and store them in a safe place.If the download process produced files, archive and identify the files for convenient retrieval.End of Installation Instructions。
IBM DS 5020微码升级图文说明
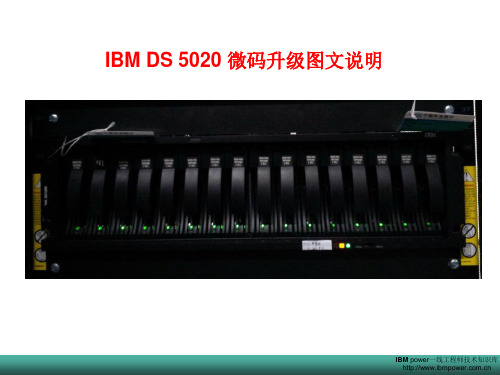
出现一个统一的界面,先后将Firmware和NVSRAM的微码文件选择好,然后点 OK,经过确认后升级就会开始
IBM IBM power power 一线工程师技术知识库 一线工程师技术知库
完成确认,微码开始升级
IBM IBM power power 一线工程师技术知识库 一线工程师技术知库
首先是微码上传到控制器,然后是控制器的微码升级和先后重启
IBM IBM power power 一线工程师技术知识库 一线工程师技术知库
IBM IBM power powr 一线工程师技术知识库 一线工程师技术知库
硬盘微码升级步骤
菜单:选择Advanccd-Maintenancc-Download-Drive Finmware/Mode Pages….
IBM IBM power power 一线工程师技术知识库 一线工程师技术知库
IBM IBM power power 一线工程师技术知识库 一线工程师技术知库
IBM IBM power power 一线工程师技术知识库 一线工程师技术知库
IBM DS 5020 微码升级图文说明
IBM power一线工程师技术知识库
IBM DS 5020 微码升级步骤
微码升级顺序:先升级磁盘扩展柜ESM微码, 在升级控制器微码,最后升级硬盘的微码
IBM IBM power power 一线工程师技术知识库 一线工程师技术知库
IBM IBM power power 一线工程师技术知识库 一线工程师技术知库
IBM IBM power power 一线工程师技术知识库 一线工程师技术知库
IBM IBM power power 一线工程师技术知识库 一线工程师技术知库
IBM DS8000微码升级步骤
DS8000微码升级步骤1系统情况检查 (1)1.1运行end of call. (1)1.2检查当前微码版本,确定微码升级方式 (2)2数据备份及应急方法 (2)3停DS8000 COPY SERVICE服务 (2)3.1升级灾备中心DS8000前PPRC操作 (2)3.2升级生产中心DS8000前PPRC操作 (2)4微码升级 (3)4.1当前版本与目标版本 (3)4.2 code升级时间需求 (3)4.3升级顺序 (3)4.4升级步骤 (3)5 COPY SERVICE的恢复 (5)5.1升级灾备中心DS8000后PPRC操作 (5)5.2升级生产中心DS8000后PPRC操作 (5)1系统情况检查1.1运行end of call.检查是否有open call。
如存在问题需先行解决,再进行微码升级。
Run end of callFrom WebSM,Select: Service Applications1) Select: Service Focal Point2) Select: Service UtilitiesHighlight the SF: (2107-9xx---)Choose: “Selected” from the tool bar3)Select: View Storage Facility StateAll sections should report with passed in the status column.Failed status can be viewed by highlighting the System Check Type and thenselect details.4)If this is a multiple SF machine return to step A. above and check that SF’sresources.1.2检查当前微码版本,确定微码升级方式。
P6小型机—微码升级
IBM POWER6 服务器 Firmware 升级与维护李光成, 软件工程师, IBM中国软件开发中心曹立, 软件工程师, IBM 中国软件开发中心余长勇 (yuchangy@), 软件工程师, IBM 中国软件开发中心赵杨 (zhaoyang@), 部门经理, IBM 中国软件开发中心王磊 (cdlwlbj@), 软件工程师, IBM 中国软件开发中心简介:服务器的 Firmware 升级和维护是系统管理员重要的日常工作之一,周期性的 Firmware 升级是提高系统稳定性,可用性和功能性的关键内容。
本文将针对 IBM POWER6 服务器 Firmware 升级和维护的方法和过程进行详细的阐述。
本文的重点将集中在 Firmware 升级和维护的技术实施层面,关于 Firmware 升级和维护的策略以及准则,可参阅文档《IBM System p Firmware / Microcode Service Strategies and Best Practices》,该文档可以从 IBM 公司的网站上下载。
本文的标签:firmware, power6, upgrade标记本文!发布日期: 2008 年 7 月 16 日访问情况 2263 次浏览建议: 0 (添加评论)平均分(共 8 个评分)IBM POWER 6® 服务器的 Firmware 升级可以通过多种途径来完成,如 HMC、IVM、运行中的 Linux/AIX 操作系统、诊断光盘、系统管理软件 ( 如 IBM Cluster System Management) 等。
本文将重点论述使用频率较高的两种方法:HMC 和 IBM Cluster System Management。
POWER 6® 服务器 Firmware 升级相关的术语和概念1.Firmware:一种嵌入到硬件设备中的程序,用于提供软件和硬件之间的接口。
630机器升级微码

630机器升级微码这次是要将一台630微码升级到07045这个版本。
首先下载微码了,这个不用说了,到IBM的网站上一步一步找就可以了。
下载完是一个70286C4F.BIN 的文件然后在机器的 /tmp目录下新建目录/fwupdate ,如果存在这个目录就一定要清空里面的内容,然后把70286C4F.BIN 上传到这个目录。
Ftp的命令都会哈:ftpopen ***.***.***.***user/passwordprompt 关回显bin 二进制lcd F:/cd /tmp/fwupdatemput 70286C4F.BINbye-----------------------------------------------------------升级前需要注意几个问题:1.系统必须升级到5103版本以后2.HMC的版本必须是3.12 或更高,我这里用KVM,所有不管这个事情现在要确认客户已经停了所有业务,并且有除rootvg外其他的VG都没已经umount下去了。
确认OK后,如下:#cd /tmp/fwupdate#chmod +x 70286C4F.BIN 加上执行权限#./70286C4F.BIN 解压缩解压缩后会出来一个文件3R070425.img然后最好校验一下这个文件#sum 3R070425.img对比微码给出的校验值,这个最好还是要做,我们一个老大经常教导我们:警钟长鸣,事故为零这个的校验码好像是47728,详细的自己再查一下,以网站上的为准校验没问题,现在就开始升微码#cd /usr/lpp/diagnostics/bin#./update_flash –f /tmp/fwupdate/3R070425.img这个两个命令下去,机器重新启动,要大概半个小时,启动后就是新的微码了。
启动后:#lsmcode –c那么Platform firmware level is 3R070425。
IBMx3650M4微码升级immv2uefiimmupdate
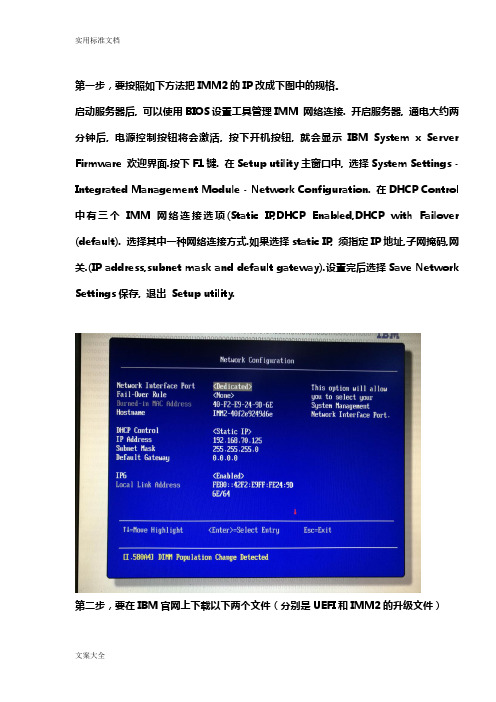
第一步,要按照如下方法把IMM2的IP改成下图中的规格。
启动服务器后, 可以使用BIOS设置工具管理IMM 网络连接. 开启服务器, 通电大约两分钟后, 电源控制按钮将会激活, 按下开机按钮, 就会显示IBM System x Server Firmware 欢迎界面.按下F1键. 在Setup utility主窗口中, 选择System Settings - Integrated Management Module - Network Configuration. 在DHCP Control 中有三个IMM 网络连接选项(Static IP,DHCP Enabled,DHCP with Failover (default). 选择其中一种网络连接方式.如果选择static IP, 须指定IP地址,子网掩码,网关.(IP address,subnet mask and default gateway).设置完后选择Save Network Settings保存, 退出Setup utility.第二步,要在IBM官网上下载以下两个文件(分别是UEFI和IMM2的升级文件)第三步,升级(以下是升级过程)1.升级IMM primary和backup bank到1.851)网线连到服务器IMM端口和笔记本网口,笔记本网络做好如下配置,如已经做好,则跳过第一步。
2)上电开机,等待大概5-6分钟之后,IMM能ping 通。
可以通过以下步骤测试,打开CMD命令行敲入ping 192.168.70.125,如果能连上服务器的Imm,则可以ping通,就是出现下图方框里面的信息。
3)打开浏览器窗口,地址栏输入192.168.70.125,按下回车键4)User Name : USERID.Password : PASSW0RD(“0”是数字不是字母)输入用户名和密码(用户名及密码全是大写)之后,登陆IMM管理界面。
IBM-HMC升级主机微码
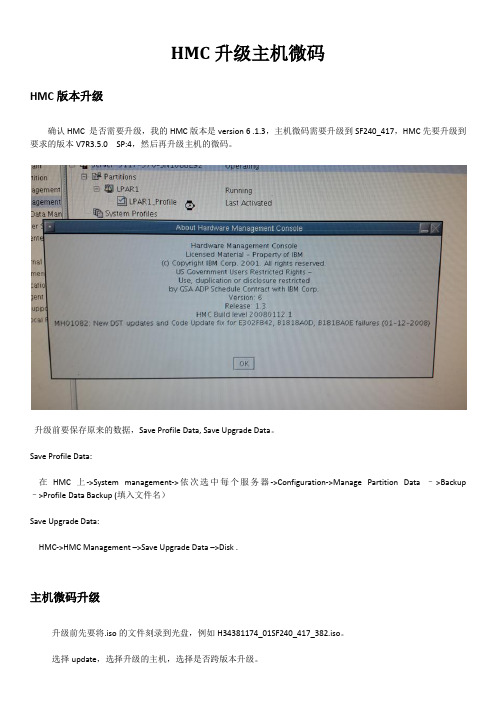
HMC升级主机微码HMC版本升级确认HMC 是否需要升级,我的HMC版本是version 6 .1.3,主机微码需要升级到SF240_417,HMC先要升级到要求的版本V7R3.5.0 SP:4,然后再升级主机的微码。
升级前要保存原来的数据,Save Profile Data, Save Upgrade Data。
Save Profile Data:在HMC上->System management->依次选中每个服务器->Configuration->Manage Partition Data –>Backup –>Profile Data Backup (填入文件名)Save Upgrade Data:HMC->HMC Management –>Save Upgrade Data –>Disk .主机微码升级升级前先要将.iso的文件刻录到光盘,例如H34381174_01SF240_417_382.iso。
不垮版本升级:->Change Internal Code for the current release (如果当前微码版本是SF240_XXX,选择该项) 跨版本升级:->Upgrade Licensed Internal Code to a new release(如果当前微码版本是SF240_XXX之前的版本,需要跨版本升级,我的是SF235需要跨版本升级。
)确认服务器状态是Power Off, Standby, or Operating,我在Operating进行的升级。
选择升级的的介质选择升级的微码选择升级过程中自动关闭电源再次确认信息,点OK开始升级微码。
升级过程升级完成,用时31分,升级过程中会自动启停服务器。
以上升级过程作为参考,未涉及到的相关细节请参考官方文档。
/support/knowledgecenter/POWER5/ipha5_p5/fix_firm_hmc_no_internet.htm?cp=POWER5%2F1 -7-5-9-0-5-1-1-3。
IBM X3850 服务器微码升级步骤
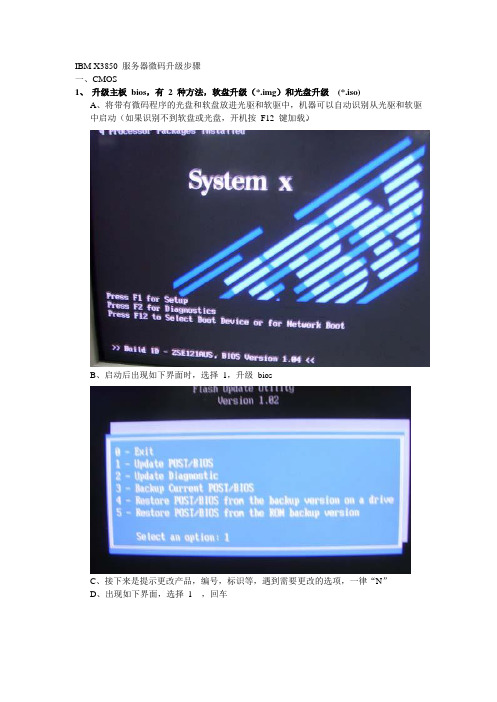
IBM X3850 服务器微码升级步骤一、CMOS1、升级主板bios,有2 种方法,软盘升级(*.img)和光盘升级(*.iso)A、将带有微码程序的光盘和软盘放进光驱和软驱中,机器可以自动识别从光驱和软驱中启动(如果识别不到软盘或光盘,开机按F12 键加载)。
B、启动后出现如下界面时,选择1,升级biosC、接下来是提示更改产品,编号,标识等,遇到需要更改的选项,一律“N”D、出现如下界面,选择1 ,回车E、读取软盘或光盘的文件,并进行清除和更新微码程序F、升级结束,提示取出光盘或软盘,按回车进行重起2、BMC(bmc 是服务器的逻辑部件之一,和系统日志有关)A、同样把光盘或软盘放进指定的驱动器,从软盘或光盘启动B、读取软盘或光盘微码文件,后提示是否要清除老的微码程序,选择“Y”,并进行升级,升级过程中有风扇响动,是正常现象,直到响声停止,出现C:,升级完毕3、CPLD(cpld 也是计算机的逻辑部件,是和硬盘较关联,硬盘黄灯闪烁,阵列掉线,可能是此服务器的微码版本过低所致)A、把软盘放进指定的驱动器,从软盘启动(IBM 官网没有光盘版的升级文件)B、拷贝文件,提示是否清除原来的数据,选择Y,然后选择A 进行升级C、升级过程中不要断4、DIAG(服务器的一个诊断工具,可以不升级,此升级程序没有光盘版)A、把升级bios 软盘或者光盘放进指定驱动器中引导,出现升级桌面,选择2,然后把diag 软盘插入软驱。
B、把指定软盘放进软驱,进行升级,完毕后重新启动计算机二、DERVER RAID 8I(阵列卡的微码程序,同步更新对阵列卡的稳定性有帮助,特别是阵列掉线重建的问题)A、把升级阵列卡的软盘或者光盘放进指定驱动器中引导,机器在开机过程中可以看到原来的老的版本程序B、插入升级的光盘,出现 linux 界面程序,不需要动任何键,可自动启动到升级界面,选择UPDATE,此时也能看到新旧版本的对比C、升级完毕后,点击finish,重新启动,可在启动窗口下看到最新版本程序D、如果是windows操作系统,还须进入系统中升级一下阵列的驱动程序ibm_dd_aacraid_5.2.0.12913_windows_32-64(8i卡驱动程序12913)三、SAS/SATA hard driver(对于不是同一批购买的机器,微码的版本可能部一致,这也是硬盘掉线的原因之一)A、把升级阵列卡的软盘或者光盘放进指定驱动器中引导,出现新的界面,可以看到硬盘的微码型号及版本B、点击update,进行升级,可以看到升级的具体状态。
HMCV7版本微码升级步骤-IBM-2022-9-28-图文
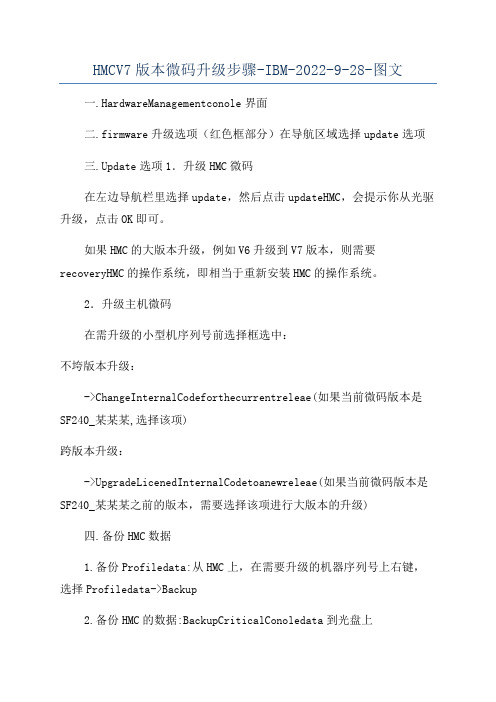
HMCV7版本微码升级步骤-IBM-2022-9-28-图文一.HardwareManagementconole界面二.firmware升级选项(红色框部分)在导航区域选择update选项三.Update选项1.升级HMC微码在左边导航栏里选择update,然后点击updateHMC,会提示你从光驱升级,点击OK即可。
如果HMC的大版本升级,例如V6升级到V7版本,则需要recoveryHMC的操作系统,即相当于重新安装HMC的操作系统。
2.升级主机微码在需升级的小型机序列号前选择框选中:不垮版本升级:->ChangeInternalCodeforthecurrentreleae(如果当前微码版本是SF240_某某某,选择该项)跨版本升级:->UpgradeLicenedInternalCodetoanewreleae(如果当前微码版本是SF240_某某某之前的版本,需要选择该项进行大版本的升级)四.备份HMC数据1.备份Profiledata:从HMC上,在需要升级的机器序列号上右键,选择Profiledata->Backup2.备份HMC的数据:BackupCriticalConoledata到光盘上五.升级事项1.hutdownServer(P59某系列需要关掉UEPO1分钟再拉起)2.通过HMC升级微码:3.Poweronerver4.察看版本信息六.回退事项1.分区信息丢失后回退步骤(出现分区信息丢失可能性较小)选择LicenedInternalCodeMaintenance->HMCCodeUpdate->RemoteRetoreofCriticalConoleData2.因为P5/P6主机在大版本相同的情况下可同时存两份微码,只升级temporary,permanent暂时不变,所以只需利用原微码启动机器即可。
进入ASMI后将poweron/off选项里选择利用permanent微码启动机器。
IBM_P750主机大版本微码升级步骤 图文说明
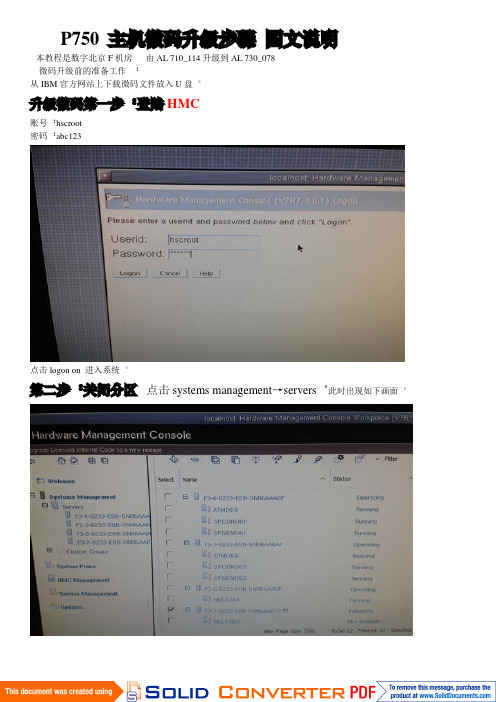
P750主机微码升级步骤图文说明本教程是数字北京F机房由AL 710_114升级到AL 730_078微码升级前的准备工作:从IBM官方网站上下载微码文件放入U盘。
升级微码第一步:登陆HMC账号:hscroot密码:abc123点击logon on进入系统。
第二步:关闭分区点击systems management→servers,此时出现如下画面。
此时我们要升级的这台F3-4-8233-E8B-SN06AAA8P主机的分区都是启动的状态,通知机房管理员,让其关闭分区(关闭分区存在一定的风险,所以请银行员工自行关闭,以免发生不必要的麻烦。
)此时我们可以观察一下当前主机的微码。
选中所要升级的主机,在之前打上√随后选择launch advanced system management(ASM)进入ASMI系统。
我们看到当前版本是AL710_114.确定后我们关闭ASMI。
此时我们所要升级的主机的分区已经被机房管理员关闭(如图所示)第三步:POWER OFF主机选中主机→点击右边的双箭头→operations→power off。
然后选择FAST POWER OFF随后插入U盘等待机器POWER OFF,当机器POWER OFF后,会显示如下画面。
第四步:升级微码选择upgrade licensed internal code to a new release (注:因为我们要升级的是大版本,所以选择upgrade licensed internal code to a new release,如果要升级小的版本请点击change licensed internal code for the current.根据提示完成升级步骤。
点击OK选择removeable media后点击OK选择USB flash memory driver点击OK(我们使用是U盘,所以选择USB,如果要是用光盘升级微码的话,请选择DVD-RAM Driver)此时屏幕上会出现我们U盘里的微码版本01AL730选中它点击OK随后出现这个IBM的协议,点击accept接受。
[整理版]ibmp系列升级微码全过程
![[整理版]ibmp系列升级微码全过程](https://img.taocdn.com/s3/m/ff65527e1fd9ad51f01dc281e53a580216fc503a.png)
000升级微码全过程对于rs6000和p的机器微码升级的过程不尽相同,各有区别,在此本人以7025-f50机器为对象详细讲述升级微码的过程:00001.确定当前微码版本0000读出当前安装的FIRMWARE的版本。
0000lscfg -vp | grep alterable000使用这个命令后将会得到如下的信息:0000ROM Level (alterable).......L02113000ROM Level (non-alterable)...wc010*******ROM Level (alterable).......wc010*******第一行表示当前安装的FIRMWARE(installed firmware)的版本。
如果最右边的六位数字早于03323就应该考虑安装这个升级。
0000第二行表示当前服务处理器(Service Processor FW)的版本。
如果最右边的六位数字早于010611就应该考虑安装这个升级。
00002.上传微码升级文件0000Mkdir /tmp/updata0000Cd /tmp/updata0000ftp {F50}0000bin0000lcd /tmp/updata0000mkdir /tmp/fwupdate0000cd /tmp/fwupdate0000put WIL03323.img0000quit0000通过FTP将7025F50F.BIN文件传到F50的/tmp/updata中去0003.解开、校验升级文件0000Chomod +x 7025F50F.BIN0000./7025F50F.BIN0000运行后将会产生三个文件:0000WIL03323.img0000Wc010611.img0000ReadMe.TXT0000sum WIL03323.img0000将会有如下显示:000054524 1024 WIL03323.img000054524就是效验码0000sum wc010611.img0000将会有如下显示:000021507 363 wc010611.img000021507就是效验码0000比对下表看效验码是否一致!0000System Firmware Service Processor Firmware0000Distribution Date Filename Size Check Sum Filename Size Check Sum0000 December 2003 WIL03323.img 1048576 54524 wc010611.img 370800 215070000November 2003 WIL03273.img 1048576 41606 wc010611.img 370800 215070000June 2003 WIL03115.img 1048576 09107 wc010611.img 370800 215070000 June 2002 WIL02113.img 1048576 63736 wc010611.img 370800 215070000 January 2002 WIL01337.img 1048576 18006 wc010611.img 370800 215070000 November 2001 WIL01269.img 1048576 41611 wc010611.img 370800 215070000August 2001 WIL01159.img 1048576 15085 wc010611.img 370800 21507000 Dec 2000 WIL00278.img 1048576 06894 wc000901.img 371056 249340000Dec 1999 WIL99308.img 1048576 56934 wc990831.img 371048 115910000Oct 1999 WIL99253.img 1048576 26469 wc990831.img 371048 115910000May 1999 WIL99071.img 1048576 44450 wc990315.img 346192 113040000Jan 1999 WIL99005.img 1048576 32964 wc981228.img 346192 56282000Dec 1998 WIL98303.img 1048576 28887 wc981123.img 341892 586800000Jul 1998 WIL98091.img 1048576 00766 wc980619.img 332580 435920000Apr 1998 WIL98091.img 1048576 00766 wc980413.img 332256 117640000Jan 1998 WIL97285.img 0990063 10507 wc980105.img 325552 41505000Oct 1997 WIL97285.img 0990063 10507 wc970409.img 289308 606790000Apr 1997 WIL97094.img 0989738 07321 wc970409.img 289308 606790000Original (GA) WIL97091.img 0989738 12966 wc970409.img 289308 6067900004.升级F50微码0000全部一致以后准备升级FIRMWARE。
AIX微码升级步骤
微码升级步骤:首先是把微码补丁从IBM网站下到个人电脑里(微码下载地址:/webapp/set2/firmware/gjsn),然后进入小机的cd /tmp目录,在该目录下创建firmware文件夹,然后在个人电脑的运行中进“ftp”,进入到cd /tmp/firmware目录下ftp> cd /tmp/firmware再用lcd命令进入补丁存放的当前目录(我们前面说过补丁存在C盘根目录下)。
ftp> lcd C:\二进制传输模式执行传输ftp> bin200 Type set to I.然后使用PUT命令把补丁从C盘中复制到小机的cd /tmp/firmware文件夹中ftp> put 123.bin然后进入小机的cd /tmp/firmware目录,再LS查看是否复制成功。
# cd /tmp/firmware# ls123.bin然后查看文件的权限,ls -l-rw-r-r--- 1 root system 0 Jan 03 18:50 123.bin没有执行权限就要用chmod命令添加该权限。
# chmod u+x 123.bin在查看是否成功# ls -ltotal 8-rwxr--r-- 1 root system 0 Jan 03 18:56 123.bin权限添加成功后,开始本地执行该文件(相当于解压),执行后文件变成img格式。
# ./123.bin然后使用sum命令查看补丁序号和ibm网站的对照看是否正确# sum 123.img对照无误后进入cd /usr/lpp/diagnostics/bin目录。
# cd /usr/lpp/diagnostics/bin在该目录下执行update_flash命令# ./update_flash -f /tmp/firmwire/123.img执行完该命令后系统会提示是否重起,选择是,机器便自动重起,在重起的过程中自动写入微码。
升级微码
一.有HMC情况下二.无HMC情况下内容提要:主机的高版本微码除了提供对一些新硬件和高版本操作系统的支持之外,还修补了一些已经发现的硬件隐患。
所以在进行主机维护时将主机微码升级到最新版本能够更好地保证系统稳定运行。
HMC介绍 -- IBM硬件管理控制台(Hardware Management Console)提供了标准的用户接口来配置和管理Power System系列服务器以及服务器上的分区。
系统管理员通过HMC对Power System服务器上的分区进行配置和日常管理。
HMC的功能包括:.创建分区,维护分区.显示每个分区上虚拟的操作系统会话终端.显示每个分区的虚拟操作面板.监控,记录以及汇报硬件的更换.服务器开/关机.作为Service Focal Point设备提供远程管理和Service Agent Call-Home功能.激活服务器上的CUoD部件一.有HMC情况下说明:下面介绍一下升级主机微码的具体步骤1. 把微码补丁从网站下到个人电脑里。
所有的公网用户都可以通过IBM的英文网站/webapp/set2/firmware/gjsn完成微码的下载。
2. 老款Pseries主机的微码下载通常提供三种格式:AIX,DOS和RPM;而新款主机的微码格式则为RPM 和ISO。
对于使用HMC升级微码来讲,应该选用RPM和ISO两种格式的文件。
把它们刻录到光盘中以备接下来的操作。
下面介绍一下这两种文件:A. 对应于RPM格式:此方式下载之后文件为.rpm格式。
实际上由于老机型的下载列表里可能只有rpm 格式的微码文件,所以需要下载之后把该文件刻录到CD中,然后通过HMC来升级。
B. 对应于ISO格式:此方式下载之后为一个.iso格式文件。
如果是新机型的微码升级,那么由于这种格式的文件在windows里很方便地可以进行刻录,所以通常都下载此格式来刻录光盘。
3. 在将微码文件刻录到光盘之后,将光盘插入HMC的光驱就可以进行升级了,步骤如下:打开Licensed Internal Code Maintenance的目录树点击Licensed Internal Code Updates标签在Contents区域里点击Change Internal Code.在Target Object Selection窗口中选择要升级微码的系统,然后点OK.在Change Internal Code窗口里选择Select advanced features然后点击OK.在Advanced Features窗口中选择Accept,然后点击OK.在Confirm the Action窗口中选择OK.升级操作大概需要持续10分钟左右即可完成。
IBM DS4700微码升级
关于微码升级顺序的建议:a.一般顺序是先升级磁盘扩展柜ESM的微码,再升级控制器微码,最后升级硬盘的微码(除以下两个微码版本);b.在有硬件故障(电池过期Near Expiration报警不算)的情况下禁止升微码,必须先把故障修复之后才能升微码。
除非有JFQ3/JFQ4/S707微码的硬盘(先升硬盘微码)。
c. 例外情况:如果有硬盘在JFQ3/JFQ4/S707微码版本,除非有坏盘,其余任何情况下都要首先把JFQ3/JFQ4/S707微码的硬盘升到JFQ8/S708版本。
如果目前控制器的微码是如果目前控制器的微码是.00以下版本,又连接了ESM微码版本在9661以下版本的EXP710扩展柜,那么必须先升级控制器的微码,才能升级EXP710的ESM微码。
也就是说,EXP710 ESM微码9661,要求的最低控制器微码版本是06.。
几点注意:正常升级微码大概需要30分钟左右,需要提前申请停机时间,停机时间最好长一些,防止出现意外情况。
准备串口线,防止升级过程中IP地址变成其他地址,连接不上。
升级步骤请参考《IBM DS4000存储的快速维护手册》,升级过程中一定要选择正确的升级包。
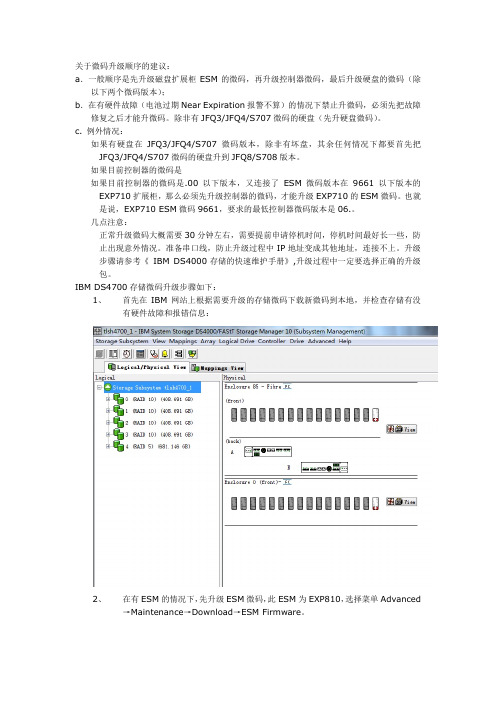
IBM DS4700存储微码升级步骤如下:1、首先在IBM网站上根据需要升级的存储微码下载新微码到本地,并检查存储有没有硬件故障和报错信息:2、在有ESM的情况下,先升级ESM微码,此ESM为EXP810,选择菜单Advanced→Maintenance→Download→ESM Firmware。
3、点击Select File选择ESM微码文件,确认选择正确微码文件后,点击Start,在弹出的对话框里输入yes并点击OK。
升级过程约几分钟,直到Status状态为Completed为止,点击Close并查看ESM微码是否已经更新。
4、升级Controller微码(此处控制器微码和NVSRAM微码同时升级),选择菜单Advanced→Maintenance→Download→Controller Firmware。
IBM小型机CPU、内存升级激活文档(图)
1.一定要让客户把机器关机,再启动一次确保硬件及业务都正常才开始升级硬件。
2.关机添加硬件,内存顺序是2,7-4,9-3,5-6,8;同一个CPU板上尽量加相同类型的内
存条。
比如:4条2G,,6条4G的内存共32G,正确安装是,第一个CPU板上2G插在2,7,4,9上;第二三四个CPU板上插4G在2,7槽上。
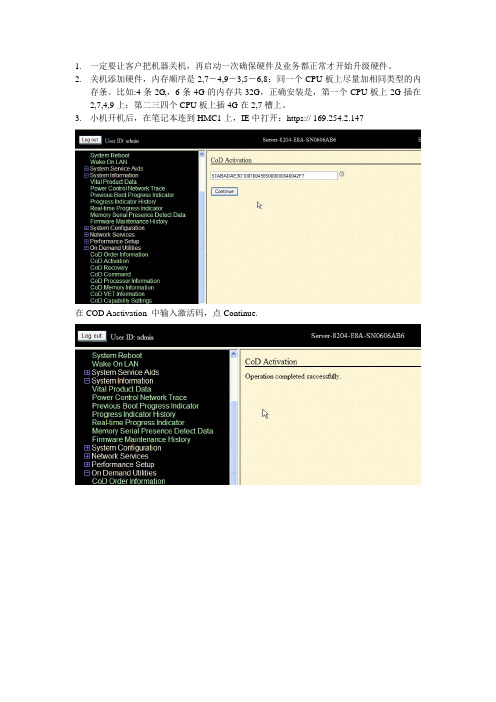
3.小机开机后,在笔记本连到HMC1上,IE中打开:https:// 169.25
4.2.147
在COD Aactivation 中输入激活码,点Continue.
在COD Memory Information中查看Installed memory 和Permanent memory已安装内存和永久生效内存是否一样,以及Inactive memory 失效内存是否为0000。
在COD Processor Information中查看Installed processors 和Permanent processors已安装CPU 和永久生效CPU是否一样,以及Inactive procwssors 失效CPU是否为0000。
在PowerRestartControl 中点Save settings and power off ,点continue 到次为至基本上没问题了,要是不放心,可以进入系统用以下命令查看
#lsdev -Cc processor 查看CPU个数# lsdev -Cc memory 查看内存容量。
小机主板微码升级过程 1
本人亲历的升级微码详细过程(一头汗啊)先介绍一下背景信息:客户是西安市内的一家大型连锁商场,有一台Power550小型机,出现报错。
IBM POWER6 550型号:8204-E8A;序列号:XXXXXXX设备情况:2C,3.5GHz Power550,4G内存,146x4硬盘; AIX版本:6100-03-01-0921;微码版本号:EL340_075;用途:POS机数据备份。
分析过程:1、机器前面板显示报错B181F126,当前的FW是340-075。
从错误日志上看是一个未知的系统平台错误。
2、联系IBM工程师被告知可能是微码问题或机器主板问题,建议先升级系统微码,然后观察,如果继续报错就的更换主板了。
3、经过IBM工程师确认,“建议您升级机器的fw到340的最新版即可解决,该错误属于fw误报,不会对机器运行产生任何影响。
”操作过程我先去IBM网站下载合适的微码版本(http://www-/support.fixcentral/)发现有2个版本:Power6 System Firmware EL340_122、Power6 System Firmware EL340_132,都下载下来,计划安装132版本。
经过和客户交流,发现前面板无HMC的连接,在服务器上没有保留与HMC连接的记录信息,OK,升级变简单了。
一、首先查看目前微码的版本AIX Version 6Copyright IBM Corporation, 1982, 2009.login: rootroot's Password:************************************************************** ****************** ** ** Welcome to AIX Version 6.1! ** ** ** Please see the README file in /usr/lpp/bos for information pertinent to * * this release of the AIX Operating System. ** ** *************************************************************** *****************Last unsuccessful login: Sun Mar 13 22:56:39 GMT+08:00 2011 on/dev/pts/1 from 192.168.20.64Last login: Sun Mar 13 23:58:53 GMT+08:00 2011 on /dev/pts/1 from 192.168.20.64# lsmcode -cThe current permanent system firmware image is SF340_075The current temporary system firmware image is SF340_075The system is currently booted from the permanent firmware image.二、将微码的RPM文件上传到/tmp/fwupdate目录中,用FTP工具的BIN模式。
9133-55A微码升级技术方案
9133 55A微码升级技术解决方案适用范围:1,适用于P5系列的IBM小型机微码的升级主要技术步骤:1.查看当前的微码:#lsmcodeThe current permanent system firmware image is SF220_005. 永久性的firmwareThe current temporary system firmware image is SF220_006. 临时性的firmwareThe system is currently booted from the temporary image. 当前使用的firmware2.把RPM文件拷入/tmp/fwupdate目录#ls /tmp/fwupdate01SF240_299_201.rpm3. 解压#rpm -Uvh --ignoreos /tmp/fwupdate/01SF240_299_201.rpmNote: When you unpack the RPM file, the server firmware update file is saved in the /tmp/fwupdate directory on the server's hard drive in the followingformat: 01SF2xx_yyy_zzz.4.查看解压后的文件(多了一个01SF240_299_201)#ls /tmp/fwupdate01SF240_299_201.rpm01SF240_299_2015.安装firmwareTo install the server firmware update, choose from the following options:enter the following at an AIX command prompt:#cd /tmp/fwupdate#/usr/lpp/diagnostics/bin/update_flash -f 01SF240_299_2016.再次较验一下微码,查看是否已经安装上lsmcodeThe current permanent system firmware image is SF235_214The current temporary system firmware image is SF240_299The system is currently booted from the temporary image.7.更新为永久性的firmwarea:第一种方法Using the flash commandAt an AIX command prompt, type the following:#/usr/lpp/diagnostics/bin/update_flash -cThe update_flash -c command might run for 10 or more minutes.After the update completes, choose from the following options:If you are committing a firmware update level that begins with SF220, use the manual process to shut down and restart the server. This ends the procedure.If you are committing a firmware update level that begins with SF222 or higher, there is no need to shut down and restart the server. This ends the procedure.Using the AIX diagnostic service aidsb:第二种方法At the AIX command prompt, type diag.Initialize the terminal type, if requested.On the function selection screen, select Tasks and Service Aids.On the task selection screen, scroll to the bottom of the list of options, and select Update and Manage Flash. A screen similar to the following is displayed:UPDATE AND MANAGE SYSTEM FLASHThe current permanent system firmware image is SF235_214The current temporary system firmware image is SF240_299The system is currently booted from the temporary image.Validate and Update System FirmwareUpdate System FirmwareCommit the Temporary ImageSelect Commit the Temporary Image, and press Enter. The process might run for 10 or more minutes.After the update is complete, choose from the following options:If you are committing a firmware update level that begins with SF220, use the manual process to shut down and restart the server. This ends the procedure.If you are committing a firmware update level that begins with SF222 or higher, there is no needto shut down and restart the server. This ends the procedure.注意问题整个微码升级的过程中严禁断电,掉电。
IBM P260和P460刀箱CMM模块微码升级,配置文件备份与还原图文说明详细步骤
CMM模块配置文件备份步骤
选择此项
此文档献给那些苦B 的IBM 一线SSR,我们实践中锻炼成长,在点滴积累中增长知识,在艰苦环境中成就事业 。
IBM power一线工程师技术知识库
选择此项
此文档献给那些苦B 的IBM 一线SSR,我们实践中锻炼成长,在点滴积累中增长知识,在艰苦环境中成就事业 。
此文档献给那些苦B 的IBM 一线SSR,我们实践中锻炼成长,在点滴积累中增长知识,在艰苦环境中成就事业 。
IBM power一线工程师技术知识库
此文档献给那些苦B 的IBM 一线SSR,我们实践中锻炼成长,在点滴积累中增长知识,在艰苦环境中成就事业 。
点击进入微码升级
此文档献给那些苦B 的IBM 一线SSR,我们实践中锻炼成长,在点滴积累中增长知识,在艰苦环境中成就事业 。
IBM power一线工程师技术知识库
选择本地
此文档献给那些苦B 的IBM 一线SSR,我们实践中锻炼成长,在点滴积累中增长知识,在艰苦环境中成就事业 。
我这里把文件保存到了桌面上
此文档献给那些苦B 的IBM 一线SSR,我们实践中锻炼成长,在点滴积累中增长知识,在艰苦环境中成就事业 。
IBM power一线工程师技术知识库
保存后的文件
此文档献给那些苦B 的IBM 一线SSR,我们实践中锻炼成长,在点滴积累中增长知识,在艰苦环境中成就事业 。
P260/460刀箱CMM模块微码升级,配置文件 备份与还原步骤
此文档献给那些苦B 的IBM 一线SSR,我们实践中锻炼成长,在点滴积 累中增长知识,在艰苦环境中成就事业 。
• 更换Pure Flex的CMM模块是一件说难不难说容 易也不容易的事情,如果赶上点背新旧模块无法 同步那就是一件很痛苦的事。 • 如果更换后手动重新配置CMM是比较费时费力的, 而且还容易出错。CMM本身带有配置文件备份我 们可以充分利用这个便利的小功能叫我们的工作 变得更轻松
- 1、下载文档前请自行甄别文档内容的完整性,平台不提供额外的编辑、内容补充、找答案等附加服务。
- 2、"仅部分预览"的文档,不可在线预览部分如存在完整性等问题,可反馈申请退款(可完整预览的文档不适用该条件!)。
- 3、如文档侵犯您的权益,请联系客服反馈,我们会尽快为您处理(人工客服工作时间:9:00-18:30)。
微码升级详细的升级过程如下:
Special Instructions for Models 9117-570, 9116-561 and 9406-570
下面三个菜单是让你确认设备配置是否给Deconfigured 。
是做升级微码前的准备确认工作。
Model 9117-570, 9116-561 and 9406-570 systems with any level of SF240 installed must be checked for GARDed out nodes, processors and memory before applying a new level of SF240 firmware. Following are instructions to determine if any nodes, processors or memory is GARDed out. If any hardware resource are found to be GARDed, contact your next level of support and have the situation corrected before applying this service pack.
1. Log on to ASM as "admin".
2. Click on the "Expand all menus" link to make all options visible.
3. Navigate down to the options under "System Configuration" followed by "Hardware Deconfiguration".
4. Click on the link "Processor Deconfiguration" to bring up the page that shows the number of processors present and whether or not they are
configured.
5. Click on the link "Memory Deconfiguration" to bring up the page that
shows the total amount of memory present and if any is presently
deconfigured.
6. Click on the link "Processing unit Deconfiguration" to bring up the
page that shows the processing units in the system and if any is
presently deconfigured.
7. Log off.
从IBM官网下载最新的01SF240_338_201版本的微码,文件下载下来是一个rpm包,01SF240_338_201.rpm,FTP 到AIX系统上
找到AIX下微码的目录,进入,在命令行下运行命令:
rpm -Uvh --ignoreos 01SF240_338_201.rpm
微码文件会被解压到/tmp/fwupdate目录下,文件名是01SF240_338_201
到/tmp/fwupdate目录下,运行命令:
/usr/lpp/diagnostics/bin/update_flash -f 01SF240_338_201
系统提示如果要继续更新微码需要重新启动,按下1并回车,机器重新启动并自动进入微码更新进程
在更新过程中液晶面板会有CA2799FD 和CA2799FF 交替显示,更新完毕后系统自动关机,然后启动。
启动后登陆进去,使用命令lsmcode 查看微码版本,你将会看到以下输出:
The current permanent system firmware image is 01SF240_219
The current temporary system firmware image is 01SF240_338
The system is currently booted from the temporary firmware image.
他表示,系统永久微码的版本是01SF240_219,临时微码版本是01SF240_338,系统当前使用临时微码启动
IBM的文档显示,这种情况是正常的,因为刚刚更新过的微码不一定和当前的系统相适应,可能需要换回原来的微码。
这种情况就是为了当更新的微码和系统不适用时,可以还有补救措施。
如果更新过微码后,系统使用了一段时间了,可以认为更新的微码适用于当前系统,那么就可以把临时微码刷新到永久微码了,步骤如下
第一种方法:
在命令行下运行:
/usr/lpp/diagnostics/bin/update_flash -c
这个命令将会把临时微码更新为永久微码,这个过程可能需要10分钟,命令成功完成之后,如果提交的微码版本是SF220,那么需要手动关机,并重新启动机器,如果提交的微码版本是SF222或更高,就不需要关机和重启了。
使用命令#lsmcode查看当前的微码
The current permanent system firmware image is 01SF240_338
The current temporary system firmware image is 01SF240_338
The system is currently booted from the temporary firmware image.
第二种方法:
运行diag诊断程序,选择选项“ Task Selection (Diagnostics, Advanced Diagnostics, Service Aids, etc.)”,并选择“ Microcode Tasks”,之后选择“Update and Manage System Flash”出现如下界面
UPDATE AND MANAGE FLASH
The current permanent system firmware image is SF240_219
The current temporary system firmware image is SF240_338
The system is currently booted from the temporary firmware image.
Move cursor to selection, then press 'Enter'.
Validate and Update System Firmware
Validate System Firmware
Commit the Temporary Image
选择最后一项Commit the Temporary Image,开始更新微码。
注意:此选项不会要求确认,除非你确定要这样做,否则不要选择此项
这个过程将会运行10分钟左右,成功完成之后,如果提交的微码版本是SF220,那么需要手动关机,并重新启动机器,如果提交的微码版本是SF222或更高,就不需要关机和重启了。
使用命令#lsmcode查看当前的微码
The current permanent system firmware image is 01SF240_338
The current temporary system firmware image is 01SF240_338
The system is currently booted from the temporary firmware image.。
