xenDesktop5产品文档——自定义环境
Citrix XenDesktop _功能参数
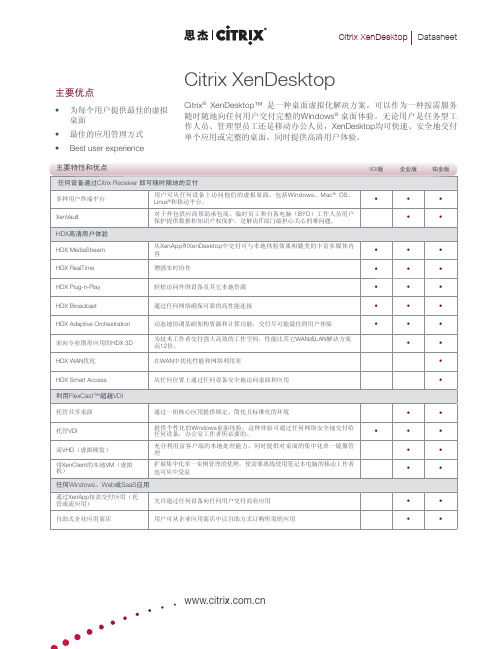
• • • • •
• • • • • •
• • • • • • • •
利用FlexCast™超越VDI
托管共享桌面 托管VDI 流VHD(虚拟硬盘) 带XenClient的本地VM(虚拟 机) 通过一组核心应用提供锁定、简化且标准化的环境 提供个性化的Windows桌面体验。这种体验可通过任何网络安全地交付给 任何设备,办公室工作者所必要的。 充分利用富客户端的本地处理能力,同时提供对桌面的集中化单一镜像管 理 扩展集中化单一实例管理的优势,使需要离线使用笔记本电脑的移动工作者 也可从中受益
• • • • •
• • • •
任何Windows、Web或SaaS应用
通过XenApp按需交付应用(托 管或流应用) 自助式企业应用商店 允许通过任何设备向任何用户交付商业应用 用户可从企业应用商店中以自助方式订购所需的应用
• •
• •
Citrix XenDes
关于思杰系统公司 思杰系统(Citrix Systems)公司(纳斯达克股票代码:CTXS)是全球领先的虚拟计算解决方案提供商,帮 助企业以按需服务的方式构建IT架构。思杰公司创立于1989年,致力于将虚拟化、网络和云计算技术全面 整合,打造全方位的产品线,以帮助用户实现虚拟工作方式,同时帮助IT部门构建虚拟数据中心。思杰公司 在全球拥有超过23万个企业客户,这些客户用思杰产品建立了更简单、更具成本效益的IT环境。思杰公司在 100多个国家拥有超过1万家合作伙伴,2009年的总收入达16.1亿美元。 ©2010 思杰系统公司版权所有。Citrix®、HDX™、NetScaler™、Workflow Studio™、XenApp™、XenDesktop™ 和 XenServer™ 是思杰系统公司和/或一个或多个分公司在美国和其它国家的商标或注册商标。 所有其它商标 和注册商标分属于他们各自的所有者。 0410/PDF
Citrix_XenDesktop安装图文教程
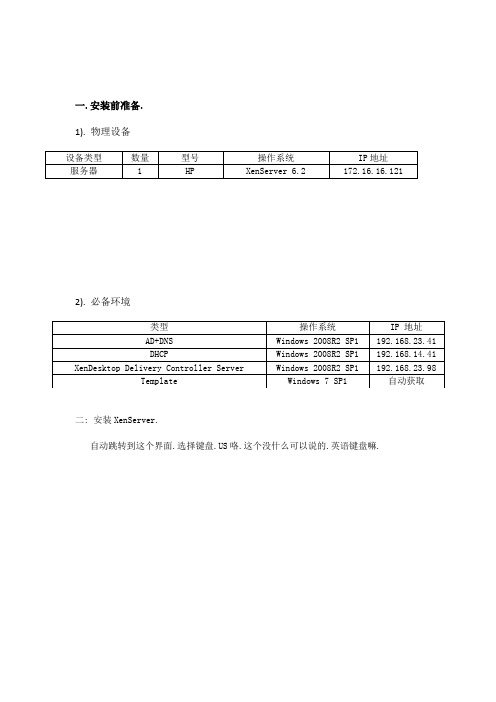
一.安装前准备.1). 物理设备设备类型数量型号操作系统IP地址服务器 1 HP XenServer 6.2 172.16.16.1212). 必备环境类型操作系统IP 地址AD+DNS Windows 2008R2 SP1 192.168.23.41DHCP Windows 2008R2 SP1 192.168.14.41 XenDesktop Delivery Controller Server Windows 2008R2 SP1 192.168.23.98 Template Windows 7 SP1 自动获取二: 安装XenServer.自动跳转到这个界面.选择键盘.US咯.这个没什么可以说的.英语键盘嘛.我是直接无视掉了.呃.这个.好吧.许可.这个也可以无视掉.NND,这就是废话.话,你最好选择上.曾经我没选.然后,说多了都是泪…不说了.选择安装源.这个就看你安装源在哪里.我用光盘.肯定是本地.嗯,这个是问你是否安装补丁包.,跳过.间.自己考虑是否需要.然后输入管理员密码.root密码选择网卡.IP地址.自己填写.嗯.DNS以及HostName.选择时区.我选择Asia (亚洲)- Shanghai嗯,配置完成了.开始安装.可以泡一杯咖啡等了.安装中,等啊,等啊设置时间.安装完成.重启.在IE浏览器里面输入XenServer的IP地址.下载XenCenter.安装.具体怎么安装就不做太多描述.一直next下去就行了.无脑.打开XenCenter.然后ADD a Server.输入XenServer的地址,账户和密码.连接成功后你就可以看到你所要的服务器了.了留一手.为了安全,老老实实做一个bond.选左边选中这台服务器,然后右边选中networking.然后在选择右边下面的Add Network…在弹出的对话框里面选择Bonded Network. 然后下一步.勾选你需要做bond的网卡.其他保持默认.然后点Finish.会提示警告.因为是全新的机器.啥东西都没有,什么网络都没连接.所以,直接无视…点击Create bond anyway.再点击Finish.现在,我们就能在我们的networks里面看到bond了.稍微等一会,然后它会自动启用.我们可以做我们自己的.不用管它.接下来要做的是挂载我们ISO.左边选中服务器.右边点击New Storeage.在弹出框里面选择 Windows FileSharing (CIFS).点击Next.输入想要的名字.标签继续Next.输入共享地址,访问用户名和密码.然后点击Finish.这样,ISO就挂载完毕.我这里是挂载的ISO所在的目录.这样,只要在这个目录下的ISO,我都可以使用了.现在,才是安装模板和XenDesktop所需要的操作系统.右键服务器.点击New VM选择所需要的操作系统虚拟机名字.起一个自己能分辨的名字就可以了.选择ISO目录所在的ISO文件.机.划分VCPU和内存划分硬盘选择网络.如果你有多个bond或者多个网卡的话,这里记得删掉不需要的.完成后会自动启动这台虚拟机.然后看看摘要.有没有错误.默认是勾选了Start the mew VM automatically…创建完成后会自动启动这台虚拟机.然后看看摘要.有没有错误.默认是勾选了Start the mew VM automatically…创建完成后会自动启动这台虚拟机.因为我要在这台服务器上面安装Windows 7和windows 2008R2.所以,上面的流程跑2次就OK了.操作系统安装完成后,接下来,升级操作系统到最新.把机器加入域关闭掉windows 防火墙XenDesktop Delivery Controller安装现在,我们要在安装XenDesktop Delivery Controller的服务器上.也就是那台Windows 2008R2SP1.安装一些角色.这台服务器我已经加入域,我就称呼这台机器为XD.接下来,就是最最神秘的XenDesktop 7 出场了.在虚拟机的DVD里面插入XenDesktop 7的光盘.点击启动.选择Delivery Controller软件许可.得,勾选允许.然后下一步.勾选所需要的核心组件.在这里要申明一下.如果你有正版的License的话,你最好自己装一台虚拟机专门用来做License服务器.能不集合在XD上就不要集合在XD上.以为Citrix的License是根据你的HostName来定义的.所以.能不集成就不要集成的好.当然,我这里是实验,所以全部勾选了.防火墙端口配置来了.我是取消了Windows 防火墙.所以,直接就下一步.检查一下.看有没有错.没有就点安装吧.好了,现在就开始安装了.XenDesktop VDI 桌面安装我们已经准备好了Windows 7作为我们的VDI桌面.老规矩,加域,关掉不需要的一些服务.然后,同样,把XenDesktop光盘插进去.然后点启动.点击Agent for Windows Desktop然后是让你选择是用标准安装呢,还是启用HDX 3D.这个,如果你没有受支持的3D显卡.你可以直接无视掉 .然后点击下一步.Citrix Receiver.一般来说,我不建议在VDI桌面上安装这玩意,除非有需求.下一步.选择你Delivery Controller.在这里,IP地址和FQN都可以,我建议用FQN.选择功能.默认就好.如果你需要做一个专门的硬盘来保存数据的话,记得勾选vdisk.我不勾选是因为我会在我的环境中专门用一个存储共享来做个人用户的存储地方.防火墙配置.检查安装.如果没错,点击安装.安装完成,重启.重启完成后,Windows 登陆界面就变了.这样安装后的好处是对于网络的消耗要下降很多.所以,我习惯性的会把常用软件都打入桌面模板.关机,快照.模板完成.配置 XenDesktop Delivery Controller打开Desktop Studio点入门,创建一个站点.保持默认,给站点输入一个名字.随意.你想怎么样就怎么样配置数据库,默认,下一步.除非你有自己的SQL Server.否则,保持默认就可以了.我有100台左右的VDI桌面.我也就用的是自带的数据库.够用了.下一步.配置License 服务器.我在这里用的是我自己的License Server连接.连接服务器.输入服务器IP,账户,密码.起一个名字.我选择用MCS创建桌面.选择网络资源,最好是全部勾选上.说不定哪天能用上呢.选择存储资源.我一般不用这个.嘿嘿.所以,选否.下一步看有没有错.如果没有,点击完成.表示我们基本的配置已经完了.然后再托管里面添加“连接资源”创建目录.下一步.选择计算机类型. Windows 桌面操作系统.下一步选择虚拟机.然后选择MCS来管理因为我是测试环境,所以,我选择了静态.这里,可以看你自己的需求来选择.选择虚拟机主映象.也就是我们安装完Agent和所有软件以后的快照.下一步选择网络选择虚拟机的数量,以及CPU,内存配置.一般来说,CPU和内存是不更改.在模板安装的时候就已经做好.为了避免出错.所以,这里除了数量,一般不更改.下一步.AD账户.也就是计算机名存放的位置.我已经在域控上建立了一个新的OU.以便保存这些VDI桌面的HostName.并且做好命名方案.查看摘要.并且,填写计算机目录名称.必须是唯一标示.开始创建桌面,我们能做的,就是等待.等待完成.交付组.在VMware 里面,我们只需要授权给某个组或者账户,就可以访问桌面了.在Citrix里面,用户登录和VDI电源策略都是用交付组来控制.下一步.选择你需要管理的桌面组以及桌面数量.Citrix允许你N个交付组控制一个桌面组.下一步.授权用户访问.给交付组起一个名称.点击完成.等待交付组创建完成..选择右边的编辑策略.找到相关策略.启用.测试。
Citrix_XD5安装部署
Citrix XenDesktop 5安装配置手册V 1.1文档名称 创建日期 文档版本文档说明Citrix XD5安装部署 2010‐1‐10 V1.0 介绍了XD5安装要求和快速部署文档 CitrixXD5安装部署 2010‐1‐16 V1.1 增加XD5白金版安装部署和VMware主机添加目录前言 (3)配置模板主映像 (4)XenServer虚拟服务器系统要求 (4)安装XenDesktop5Agent前的准备工作: (4)安装XenDesktop5Agent组件 (4)XenDesktop5安装要求 (9)系统要求 (9)数据库要求 (10)快速部署 (10)安装XenDesktop服务器端组件 (10)完成快速部署XenDesktop5的配置工作 (15)登陆快速部署发布的虚拟桌面 (21)白金版桌面部署 (23)配置模板主镜像 (23)安装XenDesktop软件 (26)配置XenDesktop5站点 (26)配置计算机 (32)配置User assignment (38)客户端方式登陆虚拟桌面 (41)添加主机 (45)XenDesktop与VMware的结合 (45)虚拟主机系统要求 (45)安装和配置虚拟机监控程序 (45)安装证书 (45)添加VMware集群 (49)前言Citrix XenDesktop桌面虚拟化是一个在架构上比较复杂的软件,其中包含了Windows域控服务器、DHCP 服务器、SQl数据库服务器等非Citrix软件自己的服务器。
Citrix XenDesktop软件自身还有License服务器、PVS服务器、WebInterface服务器、DDC服务器等多个组建,在XenDestkop4的安装文档中对以上各部分的组件都有较为详细的说明,在XD5的文档中就不再做详细的说明,Windows域控服务器、DHCP服务器、SQl数据库的知识请查看相关文档,Citrix License服务器、PVS服务器的安装请查看我们以前的XD4的安装文档,XD4时候的DDC服务器在XD5中做了更改,Citrix直接命名为XD5服务器。
XenDesktop介绍
XenDesktop介绍XenDesktop是Citrix更新发布的一款产品,目前版本为2.0,采用Citrix XenDesktop可直接从您的数据中心,以更安全、更可靠、成本更低的方式交付虚拟Windows桌面,有效降低数据丢失的商业风险,并减少分布式PC 管理的复杂性提高扩展的灵活性,同时将总拥有成本降低高达40%。
全球化趋势、灵活的工作方式、业务连续性以及兼并和收购都意味着员工要在不同地点开展工作,这就需要采用全新的方式实现快速、安全的桌面交付。
桌面虚拟化包括将PC桌面从用户访问的PC上分离开来。
采用Citrix XenDesktop解决方案,所有桌面将在数据中心进行集中化保存和管理,并虚拟交付到终端用户,这是将Windows桌面交付到办公场所、分支机构、外包工作人员最好的、最经济的方式,有利于业务的快速拓展,例如分支机构扩张、业务外包、法规遵从以及实现业务连续性。
XenDesktop的特点:下一个IT基础架构的发展热点适合所有类型的员工信息保存在数据中心保证了数据的安全性桌面的性能能够得到提升,因为它和应用后端的服务器都运行在数据中心桌面可以分享最新最强大的服务器硬件可以从任何地点远程访问桌面维护桌面的费用大大降低此次我将针对XenDesktop进行一次安装试用,并将整个步骤写出来供大家参考,由于也是初次实验,也请各位提出你们的意见,大家共同学习进步。
关于Xendesktop的相关介绍和下载试用,请浏览Citrix网站:/xendesktop此次实验需要用到的产品:Citrix Desktop Delivery Controller 2.0:此控制组件可以控管用户和虚拟桌面之间的联机, 客户能在数据中心集中化管理应用和桌面,并且控制通过网络向终端用户的交付。
Citrix Provisioning Server 4.5 with Service Pack 1:通过网络按需交付组成完整的服务器的各个部分(包括操作系统、应用和配置)。
Citrix虚拟桌面解决方案-XenDesktop-技术方案

Citrix虚拟桌面解决方案2012年04月目录1.背景 (3)2。
目标 (3)3。
解决方案 (3)1)桌面虚拟化(XenDesktop) (4)2)虚拟桌面镜像管理 (6)3)智能访问控制(SmartAccess) (7)4)性能监控(EdgeSight) (8)5)Citrix桌面交付主要特性及优点 (9)6)技术部署 (10)7)方案优势 (10)4.安全访问过程 (11)5。
结论 (18)1.背景目前,XXX银行网络是由内网和外网两套网络架构组成,如果信息中心的员工要到每个购物中心维护当地的PC机,将面临很大的维护工作量.同时,企业的销售和客户数据存在知识产权的外泄和一定的安全隐患,主要体现在如下方面:1)内、外网的环境中均需要有独立的PC系统.2)需要更多的维护人员进行系统维护,以保证业务的稳定性、连续性和安全性。
2.目标因此,为了帮助银行更顺畅的使用桌面系统,同时降低维护工作量和保证数据的安全,同时还能遵守安全规定。
建议在内网和外网分别搭建两套虚拟桌面的方案,将软件和文档都放置到数据中心,只有授权的用户才能使用相应软件、才能拷贝重要文档,防止了信息的泄漏和丢失.3.解决方案对那些希望在全公司范围有效保护企业和客户信息的现代企业来说,坚不可摧的安全性已成了万能钥匙。
日益普遍的全球化和员工移动性的不断提高使数据的分布范围日益扩大,敏感数据越来越多地传播到企业网络范围之外,这无疑增加了数据安全漏洞.保护企业数据变得越来越难,安全性理所当然地成了大多数IT机构工作的重中之重。
然而,单靠部署最新的防火墙、防病毒或加密工具并不能拒日益狡猾的入侵者于网络之外.不光是黑客,有组织的犯罪、心怀不轨的内部员工和不经意间的错误都会使这些防线形同虚设;当关键数据不在IT部门控制范围之内时尤其如此。
而且,应对安全威胁的重任使IT部门疲于应付,已到了黔驴技穷的境地。
要求定期进行及时更新和维护的传统安全控制解决方案显得无能为力。
XenDesktop5使用RDP访问虚拟桌面配置指导书
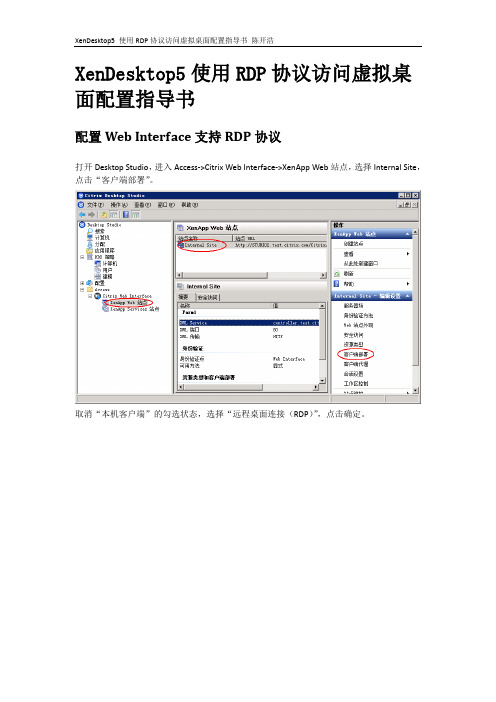
XenDesktop5使用RDP协议访问虚拟桌面配置指导书配置Web Interface支持RDP协议打开Desktop Studio,进入Access->Citrix Web Interface->XenApp Web站点,选择Internal Site,点击“客户端部署”。
取消“本机客户端”的勾选状态,选择“远程桌面连接(RDP)”,点击确定。
为桌面组配置RDP协议支持使用域帐号管理员登录Controller机器,打开“开始->所有程序->附件->Windows PowerShell”。
在PowerShell窗口中执行:(1)执行Asnp Citrix.*(2)执行Get-BrokerDesktopGroup -name “Desktop Group Name”命令查看桌面组Desktop Group Name的属性信息。
注: Desktop Group Name是桌面组的名称,需要根据实际情况修改,如下图,查看桌面组agent1的信息可查看到ProtocolPriority的值为空。
(3)执行Set-BrokerDesktopGroup -Name “Desktop Group Name” -ProtocolPriority RDP=$true此时,再次通过Get-BrokerDesktopGroup -name “Desktop Group Name”命令查看桌面组信息,可发现ProtocolPriority的值为RDP=TRUE,如下图配置虚拟机接受远程桌面连接此步骤应该在虚拟机模板中配置。
这样批量发布出来的每个虚拟机都能接受远程连接。
如果虚拟机数量少并且已经发布完毕,也可以直接修改虚拟机。
以管理员帐号登录虚拟机,右击我的电脑->属性->远程,设置运行用户远程连接到此计算机。
为登录虚拟机的域帐号配置远程桌面连接权限以域管理员帐号登录域服务器,开始->管理工具->组策略管理,打开组策略编辑器找到目标OU找到桌面虚拟机所在的目标OU。
CitrixXenDesktop桌面虚拟化解决方案

.Citrix XenDesktop桌面虚拟化解决方案技术顾问部Technical Consultant Dept.版本修订时间更新作者部分、页面、校订初始化文档标准方案内容撰写目录第1章文档概要 (5)1.1行业背景 (5)1.2方案适用范围 (5)1.3术语解释 (6)第2章项目建设目标 (6)第3章系统整体技术框架 (7)3.1设计遵循的原则 (7)3.1.1安全性 (7)3.1.2及时性 (7)3.1.3持续性和高可靠性 (7)3.1.4高效性 (7)3.2XenDesktop技术原理 (8)3.3系统具备的功能 (9)3.3.1集中管理 (9)3.3.2高效率的数据交换 (10)3.3.3存储隔离 (10)3.3.4远程接入访问控制............................................................................ 错误!未定义书签。
3.3.5水平扩展 (11)3.3.6负载均衡 (11)3.3.7FlexCast交付技术 (11)3.3.8HDX用户体验 .................................................................................. 错误!未定义书签。
3.3.9外设即插即用 (11)3.3.10广域网加速 .................................................................................... 错误!未定义书签。
3.3.11应用按需交付 (11)3.4应用场景描述 (12)3.4.1手持智能终端用户接入..................................................................... 错误!未定义书签。
Citrix XenDeskTop 5.6虚拟桌面系统部署文档
Citrix XenDeskTop 5.6虚拟桌面系统部署手册曙光信息产业(北京)有限公司杨龑骄2013-5-21一、环境介绍1.1 物理环境此次部署环境较为简单,利用一台TC3600刀片作为主机,另一台TC3600作为NFS服务器;1.2 软件环境1.3 环境配置二、环境部署2.1XenServer安装安装过程与装普通操作系统一样。
2.2 存储配置及ISO镜像上传Citrix虚拟桌面环境中支持ISO有三种方式,一是主机本地的光驱;二是NFS共享存储中的ISO镜像文件;三是Windows共享文件夹中的ISO镜像文件;环境中采用NFS服务器中的ISO镜像文件;第一步:登录XenCenter添加主机登录XenCenter登录以后添加主机完成添加第二步:配置NFS存储(已经在环境中建立NFS服务器)查看当前存储点击“New SR。
”选择NFS VHD后下一步点击“next”填写NFS服务器共享出来的路径(必须严格一致)添加完成利用相同的方法,再添加一个NFS ISO存储,即在ISO library中选择NFS ISO。
然后利用其它上传工具往NFS存储中上付ISO镜像文件第三步:创建虚拟机选择操作系统命名虚拟机为虚拟机选择安装ISO启动虚拟机完成安装安装完成之后,为虚拟机安装Tools提示需要安装.net framework 3.5 在功能选项中,点击“添加功能”选中第一个选项安装完成之后重新运行Tools安装完成安装后重启虚拟机第四步:配置sysprep以生成具有新的SSID的虚拟机运行中打开“sysprep”双击“sysprep”勾选“通用”;关机选项可以随便选,如果不需要继续其它配置可以直接选择关机完成配置后会自动关机!最后在XenCenter中将刚才配置好的虚拟机转换为模板!2.3功能服务器配置此次部署涉及的功能服务器主要有两个:AD服务器和DDC服务器。
2.3.1 AD服务器安装配置使用之前创建好的模板快速生成虚拟机,由于配置了sysprep因此虚拟机就和新创建的一样,需要进行一些必要的配置设置密码完成创建!在“角色”中添加AD角色完成之后,在运行中输入“dcpromo”默认选项即可同时安装DNS选择“是”输入系统管理员密码等待其完成创建之后,重启虚拟机!启动之后,配置DHCP服务器添加服务器角色-DHCP添加IP段!禁用DHCP V6使用当前凭据完成配置2.3.2 DDC服务器安装配置由模板生成一个新的虚拟机。
Citrix XenDesktop产品方案手册
目前,快速变化的业务环境需要一套灵活的基础架构来快速支持员工对桌面、应用和信息访问的各种需求,同时确保战略计划的安全性和保密性,如收购、合并、合作和快速扩展。
此外,由于当代员工希望使用他们的智能电话、平板电脑、上网本和笔记本电脑将他们的办公场所延伸到家里或路途中,办公室和家之间的距离正在变得越来越模糊,而且可能会将个人资料和企业数据混起来。
在传统基于办公室的环境中,即使是可管理性和标准化程度最高的PC部署也会影响生产力,阻碍用户进行刷新、替换、打补丁和更新。
有远见的员工都知道,解决这些桌面计算问题能够帮助他们在这个不断变化的世界里,更快、更高效地移动,吸引并留住最佳员工,提高他们的生产力。
Citrix XenDesktopCitrix®XenDesktop®可将Windows®桌面转变为一种任何用户、任何设备、任何地点都可以使用的按需服务。
XenDesktop可以快速、安全地向所有PC、Mac、平板电脑、智能电话、笔记本电脑和瘦客户端交付任何类型的虚拟桌面或Windows、Web和SaaS应用—而且都能够为用户带来高清的体验。
Citrix®FlexCast™交付技术可以帮助IT员工跨越VDI,向任何类型的用户提供虚拟桌面,包括任务型员工、移动员工、知识型员工和合同型员工。
XenDesktop可以通过简化桌面交付并支持用户自助服务,帮助IT员工快速适应各种业务计划,如外包、运营管理和分支机构扩展等。
其开放、可扩展和经过验证的架构可以大幅简化虚拟桌面的管理、支持和系统集成工作,优化性能,提高安全性,降低成本。
在任何地点通过任何设备使用Citrix Receiver目前,数字化员工需要能够灵活、非常安全地在任何地点、任何时间、使用任何设备办公。
将Citrix Receiver™用作一种轻型的通用客户端,XenDesktop 用户可以通过任何平板电脑、智能电话、PC、Mac和瘦客户端访问他们的桌面和企业应用。
XenDesktop 5 Service Pack 1
© 2011 Citrix Systems, Inc. All rights reserved. Terms of Use | Trademarks | Privacy StatementContentsXenDesktop 5 Service Pack 13 XenDesktop 5 Service Pack 15 Installing and Upgrading to XenDesktop 5 Service Pack 18Managing Licensing11Using IntelliCache with XenDesktop13XenDesktop 5 Service Pack 1This service pack provides the following server-side quality improvements to XenDesktop 5:q Licensing enhancements. Version 11.9 of the License Server supports user/device licensing, manages license checkout information, and provides information that enablesyou to check out the least number of licenses. For further details, including anychanges to system requirements, see Licensing Your Product. You can use DesktopStudio to track and manage license usage and license models, and also to access theLicense Administration Console; for further details, see Managing Licensing.q Support for:q XenServer 5.6 Service Pack 2. This includes support for IntelliCache. For further details, see Using IntelliCache with XenDesktop.q Microsoft SCVMM R2 Service Pack 1.q Microsoft Hyper-V 2008 R2 Service Pack 1.q Microsoft Windows Server 2008 R2 Service Pack 1.q Microsoft Windows 7 Service Pack 1.q VMware vSphere 4.1 Update 1.For more information on hypervisor support in XenDesktop, see/article/CTX131239.q Blade power management. Support is provided for third party plug-ins for blade servers.You can add machines to an Existing catalog by using the Import List option to specify a.csv file in which machines are specified by unique ID instead of by name. The set ofpower management options available in Desktop Studio is based on the capabilitiesreported by the plug-in.q Fixes for the XenDesktop 5 issues listed at/article/CTX124164.For details of how to install this service pack, see Installing and Upgrading to XenDesktop 5Service Pack 1.Known issues specific to this service pack are listed below. For details of known issues withXenDesktop 5, see Known Issues in XenDesktop 5.Known Issuesq When you install the license server using the XenDesktop installation wizard, it is installed silently. If the license server install is unsuccessful, there is no indication ofthis in the XenDesktop user interface. If, after installing XenDesktop, you find that theXenDesktop 5 Service Pack 1license server has not been installed, check the event log for relevant error messages.[BUG0032837]q XenDesktop silently installs Citrix Licensing using hardcoded port values of 27000, 7279, and 8082. If any of these ports is already in use, license server configuration fails andDesktop Studio will be unable to contact the license server. To resolve this issue,uninstall Citrix Licensing then reinstall using ctx_licensing.msi and changing the portnumbers as necessary. For details of how to use ctx_licensing.msi, see Licensing YourProduct. [BUG0032837]q When you install the license server on a Windows 2003 server and change the licenseserver from a local license server to a remote license server using Desktop Studio, the'Sequence contains no elements' error message may appear. To resolve this issue:1.Replace the contents of this file:C:\ProgramFiles\Citrix\Licensing\LicensingConfig\Service\Citrix.LicensingConfig.SdkWcfEndpoint.exe.configwith the contents of this file:C:\ProgramFiles\Citrix\Licensing\LicensingConfig\Service\Citrix.LicensingConfig.SdkWcfEndpoint.config2.Stop and restart the License Configuration Service in the services list on the Windows 2003server.[BUG0034298]Installing and Upgrading to XenDesktop 5 Service Pack 1If you have already installed XenDesktop 5, you can install Service Pack 1 as an upgrade. Ifyou have not previously installed XenDesktop 5, you can perform a single installation thatincorporates both XenDesktop 5 and Service Pack 1. Both options are available as ISOimages from the Citrix download page.To upgrade to Service Pack 1Citrix recommends that you upgrade your site in two stages, as described below.The new features provided by the service pack will not be available until both thecontroller and the database schema have been upgraded, even though the controller willcontinue to function. The upgrade is not complete until all controllers in the site have beenupgraded; until this happens some features may give inconsistent results.Before you upgrade Desktop Studio or the Controller services, close Desktop Studio on themachine you are upgrading, otherwise Desktop Studio may stop responding.1.Upgrade the license server. This is mandatory; you may encounter issues during thesubsequent steps of the upgrade process if you have not updated the license server.If the license server is on a XenDesktop controller, ensure that this is the first controlleryou upgrade; the license server is automatically upgraded as part of the upgrade toService Pack 1.If the license server is on a different machine, upgrade it before you upgrade any of theXenDesktop controllers. To upgrade the license server, run the Service Pack 1installation wizard as described in steps 4 to 6 below: Citrix Licensing is automaticallyupgraded.If you are upgrading the license server from a version earlier than 11.6.1, the LicenseAdministration Console is not enabled by default. You can enable the console throughDesktop Studio, as described in Managing Licensing, provided the license server is in thesame domain as Desktop Studio, or in a trusted domain. If the necessary trusts are notpossible, you must install the license server using ctx_licensing.msi, which enables theconsole by default.2.Make sure your SQL database has a recent successful backup.3.Log on to the controller you want to upgrade as a local administrator.4.Mount the ISO.5.Select Upgrade XenDesktop.6.Follow the steps in the wizard. When the installation is complete, ensure that theConfigure XenDesktop after closing check box is cleared, then click Close.7.Restart the controller.8.Repeat steps 3 through 7 on half of your controllers.The upgraded controllers are now incompatible with the database. The site can,however, continue to function using the non-upgraded controllers until the database is upgraded.9.Validate the health of your site by:q Checking that users are able to connect to desktops by logging on to Web Interface and starting a sample desktop.q Using the Desktop Director dashboard to verify that the site is operating normally.In particular, check for desktops in the Unregistered or Last connection failedstates and check the Infrastructure health panel for any alerts.q Checking that there is no increase in the number of unregistered desktops in the Desktop Studio dashboard. When you do this, ensure that you are using DesktopStudio on a machine that has been upgraded to Service Pack 1.10.Apply the database schema upgrade as follows:a.Start Desktop Studio on a machine that has been upgraded to Service Pack 1 andview the dashboard for your site. You must either log on as a user with thedb_owner role on the database, or you must know the credentials of an accountthat does have the necessary permissions.b.Click Upgrade.c.You can choose to either upgrade the database automatically, or use scripts toupgrade it manually later. If you choose to upgrade it automatically, the upgradetakes place immediately.If you choose to upgrade it manually, each script then appears in a MicrosoftNotepad window that includes a header with instructions describing how to use the script. Remember that you should not upgrade the other controllers on your siteuntil you have upgraded the database schema.The database is now incompatible with the non-upgraded controllers. The database is, however, compatible with the upgraded controllers, which should allow the site to continue to function while you upgrade the remaining controllers.11.Validate the health of your site again as described in step 9.12.Repeat steps 3 through 7 on your remaining controllers.13.Upgrade any machines that are running Desktop Studio remotely. To do this, run theService Pack 1 installation wizard as described in steps 4 to 6: Desktop Studio isautomatically upgraded.14.Validate the health of your site again as described in step 9.When you upgrade XenDesktop, the default licensing model changes to user/device. If youhave only concurrent licenses installed you must reconfigure the licensing modelappropriately, as described in Managing Licensing.Note: If you have a proof-of-concept site with only one controller, upgrade the licenseserver and the controller by following steps 1 through 7. Then upgrade the database asdescribed in step 10. Finally, validate the health of your site as described in step 9.To install XenDesktop 5 With Service Pack 1For a fresh installation of XenDesktop 5 with Service Pack 1 on a machine that does notalready have XenDesktop 5 installed, follow the same steps as for installing XenDesktop 5server components. For details, see Installing and Removing XenDesktop Components.Installing and Upgrading to XenDesktop 5 Service Pack 1If you have already installed XenDesktop 5, you can install Service Pack 1 as an upgrade. Ifyou have not previously installed XenDesktop 5, you can perform a single installation thatincorporates both XenDesktop 5 and Service Pack 1. Both options are available as ISOimages from the Citrix download page.To upgrade to Service Pack 1Citrix recommends that you upgrade your site in two stages, as described below.The new features provided by the service pack will not be available until both thecontroller and the database schema have been upgraded, even though the controller willcontinue to function. The upgrade is not complete until all controllers in the site have beenupgraded; until this happens some features may give inconsistent results.Before you upgrade Desktop Studio or the Controller services, close Desktop Studio on themachine you are upgrading, otherwise Desktop Studio may stop responding.1.Upgrade the license server. This is mandatory; you may encounter issues during thesubsequent steps of the upgrade process if you have not updated the license server.If the license server is on a XenDesktop controller, ensure that this is the first controlleryou upgrade; the license server is automatically upgraded as part of the upgrade toService Pack 1.If the license server is on a different machine, upgrade it before you upgrade any of theXenDesktop controllers. To upgrade the license server, run the Service Pack 1installation wizard as described in steps 4 to 6 below: Citrix Licensing is automaticallyupgraded.If you are upgrading the license server from a version earlier than 11.6.1, the LicenseAdministration Console is not enabled by default. You can enable the console throughDesktop Studio, as described in Managing Licensing, provided the license server is in thesame domain as Desktop Studio, or in a trusted domain. If the necessary trusts are notpossible, you must install the license server using ctx_licensing.msi, which enables theconsole by default.2.Make sure your SQL database has a recent successful backup.3.Log on to the controller you want to upgrade as a local administrator.4.Mount the ISO.5.Select Upgrade XenDesktop.6.Follow the steps in the wizard. When the installation is complete, ensure that theConfigure XenDesktop after closing check box is cleared, then click Close.7.Restart the controller.8.Repeat steps 3 through 7 on half of your controllers.The upgraded controllers are now incompatible with the database. The site can,however, continue to function using the non-upgraded controllers until the database is upgraded.9.Validate the health of your site by:q Checking that users are able to connect to desktops by logging on to Web Interface and starting a sample desktop.q Using the Desktop Director dashboard to verify that the site is operating normally.In particular, check for desktops in the Unregistered or Last connection failedstates and check the Infrastructure health panel for any alerts.q Checking that there is no increase in the number of unregistered desktops in the Desktop Studio dashboard. When you do this, ensure that you are using DesktopStudio on a machine that has been upgraded to Service Pack 1.10.Apply the database schema upgrade as follows:a.Start Desktop Studio on a machine that has been upgraded to Service Pack 1 andview the dashboard for your site. You must either log on as a user with thedb_owner role on the database, or you must know the credentials of an accountthat does have the necessary permissions.b.Click Upgrade.c.You can choose to either upgrade the database automatically, or use scripts toupgrade it manually later. If you choose to upgrade it automatically, the upgradetakes place immediately.If you choose to upgrade it manually, each script then appears in a MicrosoftNotepad window that includes a header with instructions describing how to use the script. Remember that you should not upgrade the other controllers on your siteuntil you have upgraded the database schema.The database is now incompatible with the non-upgraded controllers. The database is, however, compatible with the upgraded controllers, which should allow the site to continue to function while you upgrade the remaining controllers.11.Validate the health of your site again as described in step 9.12.Repeat steps 3 through 7 on your remaining controllers.13.Upgrade any machines that are running Desktop Studio remotely. To do this, run theService Pack 1 installation wizard as described in steps 4 to 6: Desktop Studio isautomatically upgraded.14.Validate the health of your site again as described in step 9.When you upgrade XenDesktop, the default licensing model changes to user/device. If youhave only concurrent licenses installed you must reconfigure the licensing modelappropriately, as described in Managing Licensing.Note: If you have a proof-of-concept site with only one controller, upgrade the licenseserver and the controller by following steps 1 through 7. Then upgrade the database asdescribed in step 10. Finally, validate the health of your site as described in step 9.To install XenDesktop 5 With Service Pack 1For a fresh installation of XenDesktop 5 with Service Pack 1 on a machine that does notalready have XenDesktop 5 installed, follow the same steps as for installing XenDesktop 5server components. For details, see Installing and Removing XenDesktop Components.Managing LicensingYou can use Desktop Studio to manage and track licensing as described in this topic,provided the license server is in the same domain as Desktop Studio, or in a trusted domain.For information about other licensing tasks, see Licensing Your Product.You must be a full XenDesktop administrator to carry out the tasks described below, exceptfor viewing license information, which any type of XenDesktop administrator can do.To access the License Administration ConsoleNote: By default, the License Administration Console is configured for access only fromthe machine on which it is installed. To enable remote access, disable the inbound CitrixLicensing Web Port rule.1.Select the Configuration node in the left pane of Desktop Studio.2.Select Licensing.3.From the Actions list in the right pane select License Administration Console.4.If you are the first user to access the License Administration Console after it wasinstalled, you are prompted to set the password for the default console administratoraccount, which is automatically created when the console is installed (the user namefor this account is 'admin'). The console then appears. If other XenDesktop users willneed to access the console, you must create License Administration Console useraccounts for them as described in the topic about configuring console users in LicensingYour Product.Note: After you have enabled the console by creating the admin password, youcannot disable it.If the default administrator account and password have already been created when youselect to access the License Administration Console, either the console appearsimmediately, or, if the dashboard has been configured to be password-protected, youare prompted for your License Administration Console credentials.For details of how to use the console, see Licensing Your Product.Note: If you upgraded the license server from version 11.6.1, or if you installed itusing ctx_licensing.msi, you do not need to enable the License AdministrationConsole.To select the type of license to useWhen configuring the site, after you specify the license server you are prompted to selectthe type of license to use. If there are no licenses on the server, the option to use theproduct for a 30-day trial period without a license is automatically selected.Managing LicensingIf there are licenses on the server, their details are displayed and you can select one ofthem. Both concurrent licenses and user/device licenses are displayed. Alternatively, youcan add a license file to the server and then select that one.To change the product edition and licensing model1.Select the Configuration node in the left pane of Desktop Studio.2.Select Licensing.3.Select Edit product edition. All product editions and licensing models available forXenDesktop are displayed, with the current configuration selected.4.Update the appropriate options, then click OK.To change the license server1.Select the Configuration node in the left pane of Desktop Studio.2.Select Licensing.3.Select Change license server.4.Type the address of the license server to use, then click OK. You must specify theaddress as name:port, where name can be a DNS, NetBIOS, or IP address. If you do notspecify a port number, the default port (27000) is assumed.To view license information1.Select the Configuration node in the left pane of Desktop Studio.2.Select Licensing. A summary of XenDesktop license usage and settings for the site isdisplayed together with a list of all the XenDesktop licenses currently installed on thespecified license server.To add a license1.Select the Configuration node in the left pane of Desktop Studio.2.Select Licensing.3.Select Add license.4.Browse to a license file and add it to the license server.Using IntelliCache with XenDesktopIntelliCache makes hosted VDI deployments more cost-effective by enabling you to use acombination of shared storage and local storage. Performance is enhanced, and networktraffic is reduced. The local storage caches the master image from the shared storage; thisreduces the amount of reads on the shared storage. For shared desktops, writes to thedifferencing disks are written to local storage on the host and not to shared storage.Your shared storage must be NFS if you are using IntelliCache.Citrix recommends that you use a high performance local storage device to ensure thefastest possible data transfer.To use IntelliCache you must enable it in both XenServer and XenDesktop.To enable IntelliCache in XenServerSelect Enable thin provisioning (Optimized storage for XenDesktop) when installingXenServer. Citrix does not support mixed pools of servers that have Intellicache enabledand servers that do not.For further information on using IntelliCache, refer to the chapter called XenServer andIntelliCache in the Citrix XenServer 5.6 Service Pack 2 Installation Guide, available from/article/CTX129387.To enable IntelliCache in XenDesktopIntelliCache is disabled by default in XenDesktop. You can enable it when you are adding ahost, provided the XenServer pool is XenServer 5.6 Service Pack 2 or later. You can updatethe setting only when the host is created; you cannot disable IntelliCache at a later date.The option to enable IntelliCache is not available if you are configuring a site using QuickDeploy.1.When you are adding a XenServer host and you are prompted for the type of storage touse, select Shared.2.Select Use IntelliCache to reduce load on the shared storage.。
XenDesktop完全教学手册
控制场主服务器选择桌面启动请求是Desktop Delivery Controller场主服务器的唯一功能,负责处理启动连接的逻辑。
将Web Interface配置为指向Desktop Delivery Controller 成员时,Web Interface会将启动请求转发给Desktop Delivery Controller场主服务器。
如果Desktop Delivery Controller场主服务器变为不可用,会进行一次选择,另外一个成员服务器会承担Desktop Delivery Controller场主服务器的角色。
Desktop Delivery Controller与虚拟桌面建立连接后,ICA会在虚拟桌面与端点系统之间建立直接连接。
Desktop Delivery Controller不再处于通信线路中。
这样,对它的需求会减少,它也可以充分进行调整。
使用多个Desktop Delivery Controller时,Citrix 建议指定一台服务器作为主控制器,所有其他服务器应配置为成员服务器。
Web Interface服务器应配置为指向成员服务器,以便在登录率非常高的时段将控制器服务器上的CPU负载降至最低。
配置Delivery Controller 选择管理员可以按照下列步骤将Desktop Delivery Controller服务器配置为具有“主服务器”,“备份服务器”或者“成员服务器”设置。
1打开注册表编辑器2浏览到以下位置:HKLM\Software\Citrix\IMA\RUNTIME\UseRegistrySetting. 3将DWORD注册表项的值设置为1.4浏览到以下位置:HKLM\Software\Citrix\IMA\RUNTIME\MasterRanking.5将DWORD注册表项的值设置为以下任意数字:1表示主服务器,2表示备份服务器,3表示成员服务器。
CitrixXenDesktop体验环境搭建指南
CitrixXenDesktop体验环境搭建指南一个做桌面虚拟化行业的人,没玩过Citrix的老大哥的产品,那简直就是没有基本的常识。
但事实上就是有很多人没有上手玩过,为什么?因为Citrix的Xen系列是出了名的实施复杂,据说,代理商卖给了客户一套,实施了半年都还没实施完,最终客户没退货,他们自己崩溃了,主动给客户退了货(也有可能是夸张的故事啦),其实施难度可见一斑。
凭我一个操作系统高手,桌面虚拟化从业人员,我从前到后也花了3天的时间才完成这个具备初步功能的环境的搭建,的确还是有点难度的,不过也跟我不好的习惯有关,我是盲搭的,不懂才看教程,所以中间有好几次推翻。
于是我决定把这个过程写下来,如果再有人想搭建,看看也好。
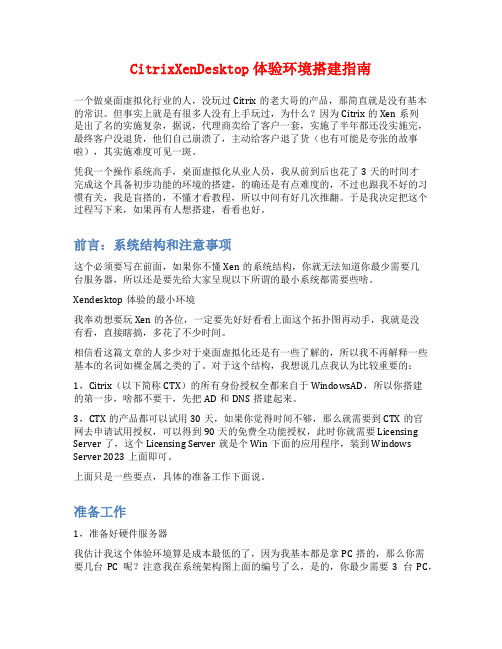
前言:系统结构和注意事项这个必须要写在前面,如果你不懂Xen的系统结构,你就无法知道你最少需要几台服务器,所以还是要先给大家呈现以下所谓的最小系统都需要些啥。
Xendesktop体验的最小环境我奉劝想要玩Xen的各位,一定要先好好看看上面这个拓扑图再动手,我就是没有看,直接瞎搞,多花了不少时间。
相信看这篇文章的人多少对于桌面虚拟化还是有一些了解的,所以我不再解释一些基本的名词如裸金属之类的了。
对于这个结构,我想说几点我认为比较重要的:1,Citrix(以下简称CTX)的所有身份授权全都来自于WindowsAD,所以你搭建的第一步,啥都不要干,先把AD和DNS搭建起来。
3,CTX的产品都可以试用30天,如果你觉得时间不够,那么就需要到CTX的官网去申请试用授权,可以得到90天的免费全功能授权,此时你就需要Licensing Server了,这个Licensing Server就是个Win下面的应用程序,装到Windows Server 2023上面即可。
上面只是一些要点,具体的准备工作下面说。
准备工作1,准备好硬件服务器我估计我这个体验环境算是成本最低的了,因为我基本都是拿PC搭的,那么你需要几台PC呢?注意我在系统架构图上面的编号了么,是的,你最少需要3台PC,至少4G以上的内存(XenServer那台最好8G以上,因为你体验用的虚机都跑在上面)。
XenDesktop概述-BYOD

XenDesktop-BYODXenDesktop® 是一种桌面虚拟化解决方案,可以将 Windows 桌面作为一种按需服务随时随地交付给任何用户。
以下是它的特点。
利用 Citrix Receiver和 Dazzle——第一种自助式企业应用商店,XenDesktop 用户可以从任何 PC、Mac、瘦客户端或智能电话上访问他们的虚拟桌面并按需订购使用企业应用。
这样便可实现全面的工作空间灵活性、业务连续性和用户移动性。
Citrix® HDX™ 技术可以为用户带来与本地 PC 相媲美的体验,即使在使用 Flash 等多媒体、协作应用、USB 外围设备和3D图形应用时也是如此。
Citrix FlexCast 交付技术使您可以利用单一解决方案,交付适合任何情况下使用的桌面—从简单、标准化的桌面直到高性能和个性化桌面。
有了FlexCast技术,IT部门可以交付任何类型的虚拟桌面–均专门定制用于满足每位用户的性能、安全性和灵活性要求。
有了 XenDesktop,您可以为员工提供他们所需的任何类型的应用,包括 Windows、Web 和 SaaS 应用。
Citrix Receiver 可以无缝地将它们集成到单一界面中,因此用户只需登录一次就可以安全地访问所有应用。
XenDesktop 提供了一种功能强大又易于管理和支持的桌面计算基础架构。
这种开放架构可兼容您现有的系统管理程序、存储设备、Microsoft 和系统管理基础架构,而且可通过完整的SDK实现全面集成和自动化。
IT 可以维护桌面镜像的一份主拷贝,同时保留用户需要的个性化,而不必同时应付数千个静态镜像。
这样便可减轻维护工作,节约90%的数据中心存储成本。
采用了基于策略的先进访问控制技术并经过强化的集成 SSL VPN 使用户以加密方式随时随地访问桌面、应用及其它宝贵的知识产权,同时避免数据丢失或被盗的风险。
-全文完-。
XenDeskTop
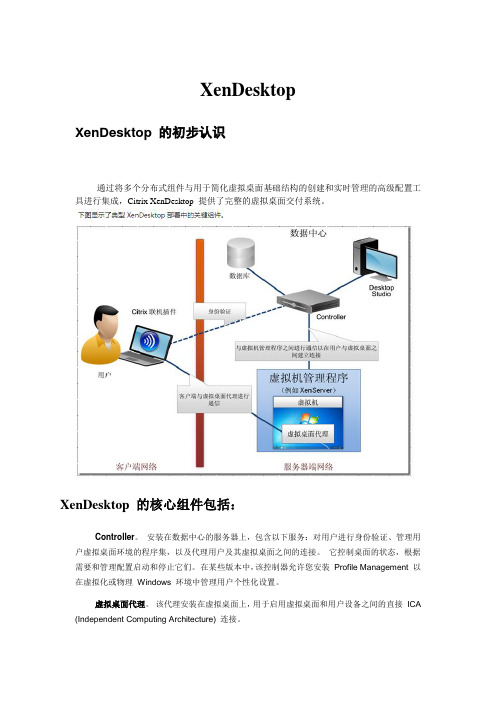
XenDesktopXenDesktop 的初步认识通过将多个分布式组件与用于简化虚拟桌面基础结构的创建和实时管理的高级配置工具进行集成,Citrix XenDesktop 提供了完整的虚拟桌面交付系统。
XenDesktop 的核心组件包括:Controller。
安装在数据中心的服务器上,包含以下服务:对用户进行身份验证、管理用户虚拟桌面环境的程序集,以及代理用户及其虚拟桌面之间的连接。
它控制桌面的状态,根据需要和管理配置启动和停止它们。
在某些版本中,该控制器允许您安装Profile Management 以在虚拟化或物理Windows 环境中管理用户个性化设置。
虚拟桌面代理。
该代理安装在虚拟桌面上,用于启用虚拟桌面和用户设备之间的直接ICA (Independent Computing Architecture) 连接。
Citrix 联机插件。
安装在用户设备上的Citrix 联机插件允许在用户设备和虚拟桌面之间建立直接ICA 连接。
Machine Creation Services。
根据需要从主桌面映像创建虚拟桌面、优化存储利用率并在每个用户每次登录时为其提供原始虚拟桌面的协同工作的各种服务的集合。
Desktop Studio。
使您能够配置和管理XenDesktop 部署。
Desktop Studio 提供多种向导来引导您完成设置环境、创建桌面并将桌面分配给用户的过程。
Desktop Director。
使1 级和2 级IT 支持人员能够监视XenDesktop 部署并执行日常维护任务。
还可以使用Microsoft 远程协助功能查看用户会话并与之交互,以解决问题。
Citrix XenApp。
可以在XenDesktop 部署中使用XenApp,以体验应用程序流技术推送和虚拟化所带来的工作效率提升。
XenApp 为用户和管理员提供了比安装应用程序更好的体验。
应用程序启动速度更快、用户体验得到显著改进,并且应用程序管理成本显著降低。
XenDesktop安装与桌面维护手册
XenDesktop安装与维护手册目录第1章环境描述 (3)第2章基本过程概述 (3)第3章AD、DNS等基础架构搭建 (4)第4章安装配置许可证服务器 (4)4.1安装配置许可证服务器 (4)4.2授权XenServer6.2 (9)第5章安装配置虚拟桌面控制器(DDC) (11)5.1安装DDC (11)5.2配置站点 (16)5.3添加主机及资源 (20)第6章准备模板虚拟机 (22)第7章部署虚拟桌面 (28)7.1创建计算机目录 (28)7.2分配虚拟桌面 (34)7.3验证虚拟桌面 (37)产品版本 (39)第1章环境描述XenServer 6.2 上运行如下虚拟机:第2章基本过程概述本章节介绍了安装XenDesktop虚拟主机基础构架搭建的基本过程。
其包括了:∙AD、DNS等基础架构搭建∙虚拟桌面许可文件的导入∙XenDesktop虚拟主机组件安装∙Windows 客户端的虚拟连接代理安装.∙发布虚拟桌面∙连接虚拟桌面测试第3章AD、DNS等基础架构搭建步骤略第4章安装配置许可证服务器4.1 安装配置许可证服务器1.下载最新的License Server 11.11.12.在AD上运行安装程序3.选择默认安装路径进行安装4.许可证服务器配置工具,选择默认配置5.登录许可证服务器输入http://CTXAD:80826.输入登录信息7.导航到“供应商守护程序配置”,选择“导入许可证”8.浏览到许可文件,选择导入许可证9.为了使导入的许可文件生效,需要重启“C itrix Licensing”服务10.查看生效后的许可4.2 授权XenServer6.21.通过XenCenter指定许可证服务器,并选择XenServer for XenDesktop版本注:新版的XenServer授权已经有了变化。
2.授权后XeenServer状态3.授权后的XenServer才可以更新补丁(补丁XS62E001)第5章安装配置虚拟桌面控制器(DDC)5.1 安装DDC1.挂载XenDesktop 7 ISO2.双击光盘,选择启动3.选择Delivery Controller4.接受许可协议,选择下一步5.选择安装组件此处没有选择安装许可证服务器,许可证服务器与AD服务器部署在一起。
Citrix_XenDesktop 数据手册
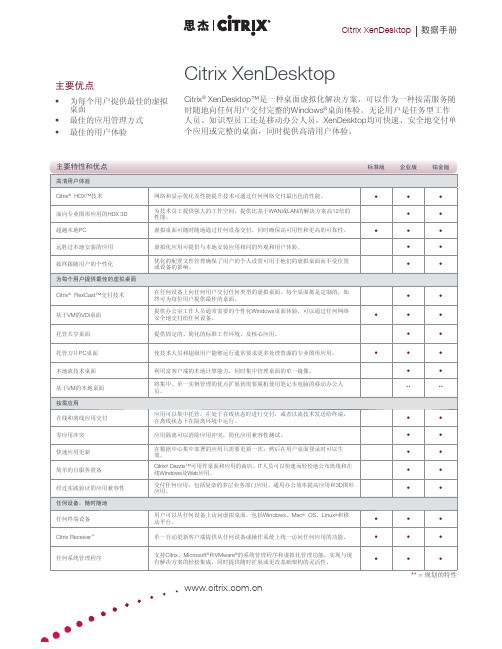
Citrix XenDesktopCitrix ® XenDesktop™是一种桌面虚拟化解决方案,可以作为一种按需服务随时随地向任何用户交付完整的Windows ®桌面体验。
无论用户是任务型工作人员、知识型员工还是移动办公人员,XenDesktop 均可快速、安全地交付单个应用或完整的桌面,同时提供高清用户体验。
主要优点为每个用户提供最佳的虚拟• 桌面最佳的应用管理方式 • 最佳的用户体验•关于思杰系统公司思杰系统公司(纳斯达克股票代码:CTXS)是全球虚拟化、网络及软件即服务领域的领先技术提供商,全球客户超过23 万家,包括全球最大的互联网公司,99%的全球财富500 强企业,以及成千上万家小企业和个人用户。
思杰旗下的Citrix Delivery Center、Citrix Cloud Center(C3)和Citrix Online Services 产品系列从根本上简化了数百万用户的计算过程,可将应用作为一种服务按需交付给身处任何地方、使用任何设备的任何用户。
目前,思杰与全球100 多个国家的1 万多家公司建立了合作伙伴关系。
思杰创建于1989 年,2008 年年收入达到16 亿美元。
欲了解更多信息,请登陆。
©2009 思杰系统公司版权所有。
Citrix®、Citrix D elivery C enter TM、Citrix C loud C enter TM、XenApp TM、XenServer TM、NetScaler®、XenDesktop TM、Citrix Ready TM、Citrix Repeater TM、Citrix Receiver TM、Citrix Workfl ow Studio TM、GoToMyPC®、GoToAssist®、GoToMeeting®、GoToWebinar®、GoView TM和HiDef Corporate TM是思杰系统公司和/或一个或多个分公司在美国和其它国家的商标或注册商标。
思杰桌面安装与设置
© 2011 Citrix Systems, Inc. All rights reserved. Terms of Use | Trademarks | Privacy Statement目录安装和设置3 XenDesktop 安装介质和下载内容4安装和删除 XenDesktop 服务器组件6安装和删除虚拟桌面代理8手动配置防火墙10将 Windows XP 虚拟桌面与单点登录结合使用11安装和删除 Wyse Xenith12配置 XenDesktop 站点13替换默认的 XenServer SSL 证书15安装和设置 XenDesktop 5已更新: 2010-10-15若要执行 XenDesktop 的全新安装,Citrix 建议您按照下列顺序执行以下任务:1.安装 XenDesktop 的服务器端组件。
2.启动 Desktop Studio 并配置站点。
站点配置包括:q许可使用该站点并指定要使用的 XenDesktop 版本q设置站点数据库q提供有关虚拟基础结构的信息已配置站点后,如有必要,可以向其添加更多控制器,有关如何执行此操作的信息,请参阅添加控制器。
3.要远程管理您的部署,请在相应的计算机上安装 Desktop Studio。
4.在虚拟桌面或基础映像上安装虚拟桌面代理。
安装虚拟桌面代理时,也可以安装插件,以便能够将 XenApp 应用程序交付给用户。
命令行工具(XenDesktopServerSetup.exe 和 XenDesktopVdaSetup.exe)也可用于安装任务。
XenDesktop 安装介质和下载内容已更新: 2010-11-29以下组件以磁盘和 Web 下载的形式提供:磁盘名称目录XenDesktop XenDesktop 核心组件:Controller、Web Interface、Desktop Studio、Desktop Director、许可证服务器、SDK、虚拟桌面代理、Wyse Xenith 管理插件。
xendesktop
Xendesktop简介Xendesktop 是一款由Citrix 公司开发的虚拟桌面解决方案,能够实现将桌面操作系统和应用程序虚拟化,使用户可以通过任何设备和网络连接访问其个人桌面。
Xendesktop 提供高度可定制的用户界面和管理工具,使 IT 管理人员能够轻松管理和部署虚拟桌面环境。
主要功能1. 虚拟桌面提供Xendesktop 允许用户通过任何设备(如 PC、Mac、平板电脑和手机)通过网络访问虚拟桌面。
虚拟桌面与传统的桌面操作系统相似,包括桌面背景、文件夹、应用程序等。
用户可以根据自己的需求进行个性化设置,如更改背景、设置桌面图标等。
虚拟桌面的一个主要优势是可在任何设备上公用。
用户可以在办公室使用 PC 访问虚拟桌面,然后在家里用自己的 Mac 访问相同的桌面,无需重新配置和安装应用程序。
2. 应用程序虚拟化除了提供虚拟桌面,Xendesktop 还支持应用程序虚拟化。
这意味着应用程序可以在服务器上运行,并通过网络传送到用户设备上的虚拟桌面。
用户无需在本地安装应用程序,而是直接在虚拟桌面上使用它们。
这样可以减少终端设备上的资源占用,并简化软件更新和应用程序管理。
应用程序虚拟化还增强了安全性,因为敏感数据不会在本地设备上存储。
应用程序数据都在服务器上存储,并在用户使用时传输到虚拟桌面。
通过这种方式,即使用户的设备被盗或丢失,敏感数据也不会泄露。
3. 高级管理和部署工具Xendesktop 提供一套高级的管理和部署工具,帮助 IT 管理人员简化和自动化虚拟桌面环境的管理。
这些工具包括:•虚拟桌面管理器(Desktop Studio):用于创建和管理虚拟桌面,可配置用于用户访问的硬件资源、桌面个性化设置等。
•应用程序管理器(App Studio):用于管理和分发应用程序,支持自动化软件更新和应用程序配置。
•用户配置工具(Profile Manager):用于管理用户配置文件,确保用户在不同设备上的一致性体验。
如何运用simplicity studio5中的例程
Simplicity Studio5是一个集成开发环境(IDE),它提供了许多示例代码和项目模板,可以帮助开发人员快速创建应用程序。
以下是如何运用Simplicity Studio5中的例程的步骤:
1. 打开Simplicity Studio5并选择“File”>“New”>“Project”。
2. 在弹出的窗口中,选择所需的项目类型(例如:Android应用程序、iOS应用程序等)。
3. 点击“Next”按钮,然后选择所需的平台和配置选项。
4. 点击“Finish”按钮以创建新项目。
5. 在解决方案资源管理器中,右键单击“src”文件夹,然后选择“New”>“Folder”,输入文件夹名称(例如:“examples”)并按Enter键。
6. 将Simplicity Studio5提供的示例代码或项目模板复制到新创建的文件夹中。
7. 在解决方案资源管理器中,双击“examples”文件夹下的代码文件或项目文件以打开它们。
8. 根据需要修改代码或项目设置。
9. 点击工具栏上的“Build”按钮(或按F7键)以编译代码。
10. 如果编译成功,点击工具栏上的“Run”按钮(或按F5键)以运行程序。
11. 查看输出窗口以查看程序的输出结果。
XenDesktop 5.0快速部署指南
XenDesktop 5.0快速部署指南本文档将指导完成设置XenDesktop评估环境以及使用该环境交付虚拟桌面。
配置虚拟机基础结构●为物理服务器pHost设置隔离的LAN环境,并使用以太网交换机连接硬件,在 pHost 上安装Citrix XenServer 5.6 标准版和企业版;●在物理机 pCenter 上安装 XenCenter;●建议为 pHost 和 pCenter配置静态 IP 地址;●配置 Active Directory,在XenDesktop部署中,需要使用Active Directory 验证组件的身份并允许组件安全通信。
虚拟桌面也可以使用Active Directory来实现控制器检测(可选),但评估环境中的桌面使用基于注册表的检测,这种模式在默认情况下处于启用状态;●使用管理工具和虚拟机监控程序,在 pHost 上创建名为 vDmC 并运行 Windows Server 操作系统的虚拟机。
●将 vDmC 配置为域控制器。
在评估环境中,建议为vDmC配置静态IP地址。
按以下指导原则在域控制器上配置 Active Directory:●创建带有单个域控制器的Active Directory域,XenDesktop既支持本机模式又支持混合模式;●将Active Directory配置为包括DNS服务器,必须将该服务器配置为包括正向和反向查找区域●指定DHCP作用域,其地址范围不包括基础结构组件所用的静态IP地址。
这样 DHCP 便能够将IP地址动态分配给虚拟桌面,同时又能保护基础结构组件的静态IP地址;●将 pCenter 添加到域中。
创建主虚拟机主VM用于创建虚拟桌面,它包含所有桌面通用的元素,例如防病毒软件和其他默认程序。
●使用管理工具和虚拟机监控程序在pHost上创建名为vMaster虚拟机●分配给主vMaster的vCPU 数和内存量在这一阶段并不重要,只要足够运行虚拟机即可,因为可以在置备桌面时更改这些设置。
- 1、下载文档前请自行甄别文档内容的完整性,平台不提供额外的编辑、内容补充、找答案等附加服务。
- 2、"仅部分预览"的文档,不可在线预览部分如存在完整性等问题,可反馈申请退款(可完整预览的文档不适用该条件!)。
- 3、如文档侵犯您的权益,请联系客服反馈,我们会尽快为您处理(人工客服工作时间:9:00-18:30)。
1. 2. 3. 1. 2. 3. CitrixeDocs product documentation library©2010, Citrix Systems, Inc. All rights reserved.自定义Contents1. 委派管理任务2. 使用 XenDesktop 打印3. 配置 USB 支持4. 对 USB 大容量存储设备的支持5. 优化用户体验5.1. 通过 HDX 增强用户体验5.1.1. 配置 HDX MediaStream Flash 重定向5.1.1.1. 在服务器上配置 HDX MediaStream Flash 重定向5.1.1.2. 在用户设备上配置 HDX MediaStream Flash 重定向5.1.2. 配置音频5.1.2.1. 在多媒体会议期间使用 HDX RealTime 避免回音5.1.3. 用于视频会议的 HDX RealTime Webcam Video Compression5.1.4. 提高 2D 和 3D 应用程序可扩展性及性能5.1.5. 通过压缩颜色提高低带宽条件下的响应能力5.2. 配置时区设置5.3. 配置连接计时器5.4. XenDesktop 中的工作区控制5.5. 删除关机命令自定义 XenDesktop 环境已更新: 2010-08-11完成初始安装任务后,您可以自定义并优化您的 XenDesktop 部署:根据需要为站点创建其他管理员。
设置您需要的任何常规 Citrix 策略,包括打印策略。
有关配置策略的详细信息,请参阅。
使用 XenDesktop 策略配置 USB 支持。
通过确保使用适当的桌面和用户设置来优化用户体验。
1. 委派管理任务已更新: 2010-10-20本主题介绍了如何显示有关管理权限的信息,以及如何创建其他 XenDesktop 管理员。
显示管理权限可以使用 Desktop Studio 显示与特定管理员相关联的管理权限。
显示管理权限启动 Desktop Studio。
选择“Configuration”(配置)>“Administrators”(管理员)。
管理员列表将随其角色一起显示。
选择要显示其角色和权限的相关信息的管理员。
委派管理任务若要高效管理 XenDesktop 环境,您可能需要创建其他管理员。
只有拥有完全管理权限的管理员可以进一步创建完全权限管理员或委派的管理员。
有关不同 XenDesktop 管理员角色的详细信息,请参阅。
委派管理创建 XenDesktop 管理员:启动 Desktop Studio。
选择“Configuration”(配置)>“Administrators”(管理员)。
选择“Action”(操作)>“Add Administrator”(添加管理员)。
此时将显示“Add Administrator”(添加管理员)对话框。
按照屏幕上的说明进行操作。
1. 2. 3. 1. 2. 3. 4. 编辑 XenDesktop 管理员:启动 Desktop Studio。
选择“Configuration”(配置)>“Administrators”(管理员)。
选择要编辑的管理员,然后选择“Action”(操作)>“Edit”(编辑)。
此时将显示“Edit Administrator”(编辑管理员)对话框。
按照屏幕上的说明进行操作。
删除 XenDesktop 管理员:启动 Desktop Studio。
选择“Configuration”(配置)>“Administrators”(管理员)。
选择要删除的管理员,然后选择“Action”(操作)>“Delete Administrator”(删除管理员)。
单击“Yes”(是)确认删除。
2. 使用 XenDesktop 打印已更新: 2010-08-27XenDesktop 提供了与 XenApp 相同的打印功能。
有关如何配置和管理打印的详细信息,请参阅 XenApp 6 for Windows中的相关主题。
中介绍了 Citrix 打印策略。
Server 2008 R2策略设置引用XenDesktop 5 包含了 XenApp Printing Optimization Pack 中提供的功能。
3. 配置 USB 支持已更新: 2010-11-18您可以使用户在 XenDesktop 会话期间与大量 USB 设备进行交互。
提供的支持级别取决于安装在用户设备上的客户端;有关详细信息,请参阅相关客户端文档。
此外还支持典型低延迟/高速 LAN 环境中的 USB 同步设备,例如网络摄像头、麦克风、扬声器和耳机。
这样,这些设备可使用如 Microsoft Office Communicator 和 Skype 此类的软件包进行交互。
XenDesktop 会话不直接支持下列类型的设备,也不使用 USB 支持:键盘鼠标智能卡注: 可将特殊键盘和鼠标(例如,Bloomberg 键盘和 3D 鼠标)配置为使用 USB 支持。
有关配置 Bloomberg 键盘的详细信息,请参阅 。
/article/ctx122615默认情况下,不支持通过 XenDesktop 对特定类型的 USB 设备进行远程连接。
例如,用户可能有通过内部 USB 连接到系统板的网络接口卡。
对这种设备进行远程连接是不适合的。
默认情况下,不支持将下列类型的 USB 设备用于 XenDesktop 会话:蓝牙适配器集成的网络接口卡USB 集线器USB 图形适配器连接到集线器的 USB 设备可远程处理,但集线器本身无法远程处理。
USB 支持允许虚拟桌面访问连接到用户设备的 USB 设备。
在需要将客户端和服务器安全分离的环境中,用户只应连接到相应的 USB 设备。
您还可以在虚拟桌面和用户设备处设置策略,限制虚拟桌面可使用的 USB 设备的类型。
有关针对 XenDesktop 测试的所有 USB 设备的信息,请参阅 。
/article/ctx123569有关设置 Citrix 策略的进一步信息,请参阅。
使用 XenDesktop 策略如果您使用的是 XenApp,请参阅 。
USB 驱动器映射限制如果您使用的是瘦客户端,请向制造商咨询有关 USB 支持以及您可能需要执行的任何配置的详细信息。
启用 USB 支持启用 USB 策略规则,该规则位于 ICA 策略设置的“ USB 设备策略设置”部分。
在用户设备上安装客户端时,启用 USB 支持。
警告:Flash 重定向需要用户设备和服务器组件之间的大量交互。
因此,只能在用户设备和服务器之间无需安全分隔的环境中使用此功能。
用户设备应配置为只在信任的服务器上使用 Flash 重定向功能。
Flash 重定向要求在用户设备上安装 FlashPlayer。
因此,只有在 Flash Player 本身安全的情况下,才应启用 Flash 重定向。
5.1.1.1. 在服务器上配置 HDX MediaStream Flash 重定向已更新: 2010-09-15可以通过 Citrix Desktop Studio 的“Policies”(策略)节点,在服务器上配置 HDX MediaStream Flash 重定向设置。
通过以下 Citrix 用户策略设置控制 Flash 重定向功能的设置:Flash 加速Flash 事件日志记录Flash 延迟阈值Flash 服务器端内容提取白名单Flash URL 黑名单从服务器启用和禁用 HDX MediaStream Flash 重定向默认情况下,Flash 重定向在服务器上处于启用状态,以便实现客户端呈现。
可以从服务器通过 HDX MediaStream for Flash (客户端)类别中的 Citrix 用户策略设置 Flash 加速来启用和禁用 Flash 重定向。
启用禁用Flash 加速可以选择(默认设置)或来配置 设置。
启用禁用如果选择,未被 Flash URL 黑名单阻止的站点中的所有 Flash 内容都将呈现在用户设备上。
如果选择,则所有 Flash 内容都将呈现在服务器上。
启用服务器端事件记录Flash 重定向使用服务器上的 Windows 事件记录来记录 Flash 事件。
您可以查看事件日志,以判断是否正在使用 Flash 重定向,并了解有关任何问题的详细信息。
Flash 重定向记录的所有事件都具有以下共性:Flash 重定向向应用程序日志报告事件“源”值为 Flash“类别”值为“无”除 Windows 事件日志外,在 Windows 7 或 Windows Vista 计算机上,Flash 重定向专用日志会显示在“Applicationsand Services Logs”(应用程序和服务日志)节点中。
如果使用 Windows XP,Flash 重定向日志信息仅存在于 Windows 事件日志中。
启用禁用Flash 事件日志记录可以选择(默认设置)或来配置 设置。
设置 Flash 延迟阀值当单个浏览器或浏览器选项卡首次访问嵌入的 Flash Player 时,Flash 重定向将检测服务器与用户设备之间的往返程延迟。
此检测包括网络连接的延迟和数据路径中的任何其他延迟。
如果判定延迟在可接受的阈值内,系统便会使用 Flash 重定向在用户设备上呈现 Flash 内容。
如果延迟超出了该阈值,则将在网络服务器上呈现 Flash 内容,条件是 Flash Player 安装在该网络服务器上并且通过虚拟通道交付。
默认阈值设置为 30 毫秒。
如果将该值增加为大于 30 毫秒的值,可能导致用户体验下降。
对于常规用途,最佳做法是不要增加延迟阈值设置。
值Flash 延迟阈值通过在字段中键入 0 到 30 之间的值来配置 设置。
为服务器端内容提取标识 Web 站点Flash 服务器端内容提取白名单Flash 重定向将 Flash 内容下载到用来进行播放的用户设备。
设置允许指定那些 Web 站点,启用服务器端内容提取其 Flash 内容可以被下载到服务器然后发送到用户设备上。
该设置与用户设备上的设置配合工作。
用户设备无法直接访问 Internet 时,经常使用此设置。
XenApp 或 XenDesktop 服务器会提供该连接。
配置 设置时,请考虑以下内容:Flash 服务器端内容提取白名单将 Flash 应用程序的 URL(而不是用于实例化 Flash Player 的顶层 .html 页面)添加到白名单中。
在 URL 的开头或结尾处使用星号作为通配符,以扩展该名单。
