静电释放测试管理系统操作说明(英文翻译)
静电放电(ESD)测试操作指引

5.6.1进入用户自定义设置,可自由设置测试条件(电压、放电网络、间隔时间、次数);
5.6.2测试方法和步骤和HBM模式一样;
5.7静电放电(ESD)测试完后,再测试LED光电参数和性能,以判定LED是否失效或劣化;
6.注意事项
6.1为了避免伤害,仪器必须可靠接地;
6.2在测试状态下,请勿用手触摸测试平台面板上的接线柱、测试夹具和短接插针;
7.面板说明
①高压及控制信号的输出端:用于连接IEC的放电枪或HBM、MM放电模块的高压及控制信号的输入端;
②操作键;
③液晶:显示相关信息;
④启动键:当启动时,可输出高压进行放电试验,相应警示指示灯点亮,此时不能进行模式选择、参数设定;
⑤复位键:当复位有效时,可进行极性和模式选择、参数设定等;
⑥静电放电发生器主电源开关。
6.3在使用平台上的测试夹具时,请不要在不装任何试品的情况下作ESD测试,特别市在4KV以上,否则夹具管脚间会放电;
6.4在使用WY305电源点亮LED时,请将“取样选择开关”按键按至“INNER”内取样,如用光谱分析系统点亮时,选择“OUTER”外取样开关;
6.5当LED闪烁时,按WY305电源“DISPLAY SETTING”(显示设置)调设其电流及电压的参数;
5.4.5测试完成后,静电测试平台高压灯灭,按“RESET”复位键EMS61000-2A高压灯灭,测试停止;
5.4.6按WY305电源“OUTPUT”键关闭电源输出,LED灯灭后更换LED,重复5.4步骤进行下一个测试;
5.5机器模型(MM)测试
5.5.1进入“MM测试等级”界面,重复5.4.3-5.4.5步骤。
8.相关文件
8.1《监控和测量仪器管理程序》的电极保持与受试设备的接触并由发生器内的放电开关激励放电的一种试验方法。
静电测试仪TB-9016用户指南说明书

Figure 1. (Left to right) SCS 718 Static Sensor and SCS 718A Air Ionizer Test Kit.718 is a portable handheld instrument used for locating and measuring electrostatic charges. It can be used to locate ESD trouble-areas, and is a valuable tool for the ESD-control engineer. Used in conjunction with the SCS Air Ionizer Test Kit 718A (sold separately), it can be used for verification and auditing of air ionizers. The Static Sensor 718 is battery-powered and has several measurement features:measurements can be taken in a 0 to ±1.999 kVThe SCS Static Sensor 718 has a Low Batteryindicator. Once the battery is depleted toapproximately 6.5 volts, the instrument will showBAT in the display. At this time, the Static Sensor718 will not produce accurate results and the batteryOperation of the Static Sensor 718For accurate measurements during usage, it is recommended that the outside housing of the Static Sensor 718 be connected to an electrical ground.This can be accomplished by having the user holding Figure 2. SCS 718 and 718A Battery Replacementand Indicators.Made in theUnited States of AmericaTo shut off the Static Sensor 718, momentarily press down on the membrane switch labeled POWER. Determining that the power is off can be verified by seeing that the liquid-crystal display (LCD) is off. Making Electrostatic Voltage Measurements: hold the instrument 1-inch (2.54 cm) away from the object being measured. The display will update with the voltage measurement in kilovolts. If the measured voltage is greater than the measurement range of the instrument, a -1. Will be displayed. At this time, switch to a greater range. If over-ranging occurs even with the high range activated, the static charge on the object cannot be measured with the Static Sensor 718.Measurement Range: all measurements are in kilovolts (kV) as stated on the front label of the unit. The StaticSensor 718 has two measurement ranges: 0 to ±1.999kV and 0 to ±19.99 kV. The unit’s current measurementrange mode can be verified by checking the display.Three digits following the decimal point indicate that theunit is in 0 to ±1.999 kV range. Two digits following thedecimal point indicate that the sensor is in 0 to ±19.99kV range. To change between measurement ranges, press the RANGE/HOLD button once, momentarily.HOLD Function: in the event that the user wishes to freeze the current measurement, the HOLD function of the Static Sensor 718 may be used. Simply press the HOLD switch momentarily and the currently displayed voltage will be frozen. A HOLD notice will also bedisplayed to alert the user that the instrument is currently in HOLD status. To unfreeze the display and return tofloating measurement, momentarily press the HOLDswitch once again.Note: During HOLD condition the distance indicatingLED’s are turned off.Zero Adjustment: the SCS Static Sensor 718 has azero adjustment function, which sets a zero referencepoint for all subsequent measurements. This zeroreference can be set by pointing the instrument at aknown zero-voltage surface, and holding down the RANGE/ZERO button for longer than 3 seconds. After 3 seconds, the display will flash and adjust to zero. Repeat this step for both the low and the high ranges. The zero adjustment should be performed every time the unit is turned on.Measurement Accuracy: Distance Indicator: theStatic Sensor 718 is factory calibrated to give accurate measurements when it is placed one inch (2.54 cm) away from the object to be measured. To assist the user in gauging this distance, two light-emitting diodes (LED’s) are present on the front face of the instrument. These LED’s emit two red, bull’s-eye targets on thesurface of the object being measured. As the instrument gets closer to the one inch measurement distance, the bull’s-eyes begin to converge. When they converge and become one, the instrument is approximately one inch away, and the measurement can be made. For more accurate measurements, it is recommended that the user manually measure the distance between the front housing of the instrument and the object being measured.Accuracy and Size of Object to be Measured: the minimum surface area on an electrostatically chargedobject which can be accurately measured is a 5 squareinch (32.3 cm 2) area.Measurements from Greater than One Inch (2.54 cm) Away: in the event that a one inch separation between object-to-be measured and the Static Sensor 718 cannot be achieved, it is possible to get approximate readings.Continuous Output: an output jack is provided on the front of the SCS Static Sensor 718. This output can be used to feed a continuous signal into a data storage device for continuous monitoring of measured voltages. Please use a 3/32 inch (2.5 mm) mono-phone plug to connect into the output jack. The output signal is dependent on the measurement range currently selected. For the low range, the output signal is 1/1000 of the measured electrostatic voltage. For the high range, the output signal is 1/10,000 of the measured voltage.Figure 4. 718 Static Sensor showing hold function and Figure 5. 718 Static Sensor has a continuos output range.Figure 3. Using 718 Static Sensor to take measurements.Automatic Shut-Off: the Static Sensor 718 willautomatically shut-off 20 minutes after the last switch activity. This is done in order to conserve battery power. In the event that the user needs to have the unit stay ON continuously, when turning the unit on press the POWER AND RANGE switches simultaneously. This deactivates the Automatic Shut-Off feature. The BAT indicator will then flash three times to indicate that the automatic shut-off features has been disabled. The Automatic Shut-Off feature will reset itself the next time the instrument is turned on.Operation and Use of SCS Air Ionizer Kit 718A It is recommended that the user be familiar with ionizer test standards ANSI/ESD S3.1 and draft standard ANSI/ESD SP3.3 if the Air Ionizer Test Kit 718A is used to perform verification testing on ionizer performance.Assembly: slide the charge plate over the Static Sensor 718 until it stops. The charge plate slides onto the lower groove, on the sides of the Static Sensor 718.Charging the Plate: holding the Static Sensor 718 (with charge plate attached) in one hand, use the other handto touch the probe of the SCS Air Ionizer Test Kit 718Ato the charge plate. Press either the + button (for apositive voltage) or the – button (for a negative voltage), then remove the probe from the charge plate. Be sureto keep the button pressed while removing the probefrom the charge plate. The display on the Static Sensor 718 will indicate a positive or negative charging voltage (1.1kV minimum). If a voltage of less than ±1.1kV is displayed, check to see if the low battery indicator on the SCS Charger 718A is illuminated. If illuminated, replace the battery in the charger. If the unit continues to supply an incorrect voltage to the charge plate, please contact SCS for additional instructions.Testing ionizer discharge time: after charging the plate, hold the SCS Static Sensor 718 approximately one foot (30.5 cm) away from the ionizer. Monitor the display to see how quickly the 1.1 kV charge is dissipated to 0.1 kV. The speed at which this occurs (the discharge time) indicates how well the ionizer is operating. Please referto the specific ionizer’s operating manual or consultwith the ionizer manufacturer to determine what thisdischarge time should be. Repeat this procedure for both a positively and a negatively charged plate.Testing Ionizer Discharge Time: after charging theplate, hold the SCS Static Sensor 718 approximately onefoot (30.5 cm) away from the ionizer. Monitor the displayto see how quickly the 1.1 kV charge is dissipated to 0.1 kV. The speed at which this occurs (the discharge time) indicates how well the ionizer is operating. Please refer to the specific ionizer’s operating manual or consult with the ionizer manufacturer to determine what thisdischarge time should be. Repeat this procedure for botha positively and a negatively charged plate.Testing ionizer offset balance: zero the charge plateby touching it with a grounded object. This can either be the finger of a grounded person or some other item which is connected to electrical ground. In either case, zeroing the charge plate should make the display on the Static Sensor 718 read zero. Hold the Static Sensor 718 approximately one foot (30.5 cm) in front of the ionizer. Monitor the display. The value displayed is the offset balance of the ionizer, which is the difference between the number of positive and negative ions being emitted. Please refer to the specific ionizer’s operating manual or consult with the ionizer manufacturer to determine what this offset balance should be.Service/Calibration Service and Repair: in the event that you believe the Static Sensor 718 or the SCS Air Ionizer Test Kit 718Ais in need of repair, please contact your local SCS representative for troubleshooting help, and, as needed, repair information. There are no user-serviceable parts on either product. Figure 6. 718 Static Sensor charging plate in use.Figure 7. Testing Ionizer Offset Balance.Figure 8. 718 Static Sensor on test fixture.Static Sensor adjustable screw for display.。
【精品】静电放电测试仪操作规程
静电放电测试仪(三基)操作规程为正确、安全、规范的使用SKS-0230,以评定样机在经受静电放电干扰时的性能,特制定本操作规程。
一、【操作程序】1、按SKS-0230使用说明书接好放电枪,并接通电源。
2、给被试样机施加额定电压。
3、打开静电放电发生器电源开关,将开关拨动到上方CONTACT位置。
按下HV ON 开关,接通直流高压电源,按顺时针方向调节VOLTS ADJUST调节旋钮,使表头显示的电压值为8kV。
4、持枪,将放电枪垂直于被试品表面,按下REDAY键,再按下“枪机”对样机进行放电试验。
按下STOP键并结束该极性放电试验。
5、换极性(+←→-),按3、4重复试验,注意应确保电压调节旋钮逆时针旋转到底且高压开关处于OFF状态方可转换电压极性。
6、试验结束后,应将电压调节旋钮逆时针调到底,使高压开关处于OFF状态,按下“枪机”对着铝板放完电。
然后断开工作电源,拔掉电源插头,撤去电表工作电源,清理好现场。
二、【测试条件】1、环境温度:15℃~35℃;相对湿度2、相对湿度:30%~60%(如果湿度过大,必须经过除湿处理再进行试验);三、【注意事项】1、试验人员必须经培训后才能进行设备操作,操作前应阅读设备使用说明书;2、仪器的F.G端子要良好接地;3、仪器通电后,不得用手触摸放电电极,以防电击;4、仪器使用过程中,不得随意切换量程,如需切换量程,务必先将电压调节旋钮逆时针旋转到底,使高压开关处于OFF状态。
以免在量程切换过程中电压突变损坏高压电源。
5、关机时也必须先将电压调节旋钮逆时针旋转到底,使高压开关处于OFF状态,然后才能切断主机的工作电源,否则关机瞬间电压的突变可能会损坏高压电源。
6、非有关人员严禁操作本仪器。
设施验收单设施日常保养项目表注:保养后,用“V”表示日保,“ ”为周保、“ ”为月保,“X”表示有异常情况,应在“异常情况记录”栏予以记录。
静电释放测试 中英文对照全面

Electrostatic Discharge test Condition5PCS /2014-9-22The electrostatic voltage tester 静电电压测试机Test environment 测试环境Drawing NO.工程图号HDMI 19P A/M CONN.Ye Yong Tai Sample Q'ty 样品数量Part/No.产品料号Test machine 测试设备温度:28℃/湿度:75%SHENZHEN EAST-TOPTECH ELECTRONIC TECHNOLOGY CO.,LTD深圳市东景盛电子技术有限公司Electrostatic Discharge test静 电 释 放 测 试 报 告Sample name 样品名称Product spec.产品规格HDMI AM TO AM 30AWG 1.4REV. OD :5.0mm Length :1.5/2.0M ( HDMI 19PIN CONNECTOR)Supplier 供应商名称/Test date测试日期Note 备注According to IEC-801-2Test Item测试项目Electrostatic Discharge test 静 电 释 放 测 试Result of measurement 测 试 结 果Test Requirement 测 试 要 求1.Test unmated each connectors from 1 kVolt to 8kVolts in 1 kVolt steps using 8mm ball probe. No evidence of Discharge to Contacts at 8 kVolts测试未对插连接器从1kV 到 8kV ,在1kV 段使用球状探头挥测,在8kV 段接触PIN 无静电排出;1. Electrostatic Discharge test 静电释放测试:No evidence of Discharge to Contacts at 8 kVolts ,It's OK在8kV 段接触PIN 无静电排出,判定为OK ;Judgement综合判定■ PASS 合格 □ NG 不合格NO.报告编号:DJS-LQC-20140922A014 表单编号:DJS-QR-045。
ANSI-ESD S20.20 2014(中文版)
权责声明本文件是为了促进国内电子行业静电防护水平的提高,恒信静电中心通过对ESDA新版标准ANSI/ESD S20.20-2014研讨的解读文件,并不保证本文件的准确性,其中可能存在理解偏差或错误,对于任何个人或单位因此而引发的损失,本中心将不承担任何责任和任何赔偿,当本文件与标准发生矛盾时请以ANSI/ESD S20.20-2014标准为准。
我们欢迎阅读者对我们译文指导和纠正,交流与探讨,促进我们防静电措施符合性。
标准制定是为了保护静电敏感件(电子电气零部件、组件和装置(排除电动引爆装置))建立一套静电防护管理控制程序,系统化地采取防护措施,从而减少静电敏感件受到静电放电损害。
前言新标准范围涵盖了静电放电控制程序的设计、建立、实施和维持所必要的要求,控制程序适用于静电放电敏感度大于等于人体模型的100伏和带电器件模型200伏的电气或电子零件、装置和设备等的制造、处理、组装、安装、包装、标签、服务、测试、检验或其它处理活动。
200伏限值是基于减少可能产生场感应导致损坏的必要的绝缘体的处理程序。
今后设备的静电放电稳健性将完全由人体模型和带电器件模型表示,因为带电器件模型描述导体与导体接触与原来机器模型有关,也因此机器模型测试将不再要求设备资格,同时测试数据也将不可用。
新版标准范围有较大变化,在原范围基础上增加了带电器件模型限值,以及定义了孤立导体的要求,孤立导体具体可参考原标准机器模型。
标准仍然是根据军方和商业组织的历史经验来建立一个处理静电放电敏感件程序的要求。
参考文献包括静电放电协会、美国军方和美国国家标准局批准的关于材料特性标准和测试方法。
静电放电控制基本原理是未发生大变化,仍然是:A.环境内所有导体(包括人体)应该连结或电气联接在一起并与已知接地或人造接地(如在船或飞机上)相连。
这个连接将所有物体和人体之间建立了一个等电位平衡,只要系统中所有物体都处在同一个电位上,就可以在高出地电位“零伏特”时仍然可以维持静电保护。
ESD国际标准
LIMITATION OF LIABILITYTHIS DOCUMENT IS A TRANSLATION OF THE ENGLISH STANDARD ANSI/ESD S20.20 – 2007. THE ESD ASSOCIATION, ITS OFFICERS, MEMBERS AND EMPLOYEES HAVE BEEN DILIGENT IN SECURING AND PROVIDING THIS TRANSLATED DOCUMENT BUT DO NOT GUARANTEE THE ACCURACY OF THE TRANSLATION. THE ESD ASSOCIATION, ITS OFFICERS, MEMBERS AND EMPLOYEES SHALL NOT BE LIABLE FOR ANY CLAIMS AGAINST OR DAMAGES OR LOSSES (DIRECT OR INDIRECT, ACTUAL OR CONSEQUENTIAL) SUFFERED BY ANYONE DUE TO ERRORS OR MISTAKES IN TRANSLATION WHO RELIES ON THIS TRANSLATED VERSION OF THE STANDARD. IN THE CASE OF ANY CONFLICT BETWEEN THIS TRANSLATED DOCUMENT AND THE ENGLISH VERSION OF THE STANDARD, THE ENGLISH VERSION SHALL CONTROL.责任限制此文件为英文版的标准ANSI/ESD S20.20 – 2007之翻译版本。
静电放电协会和它的工作人员,会员及雇员都在不断地致力于完善和提供这份文件,但并不保证此翻译版本的精确性。
翻译版本中会有错误的地方,对于任何个人或单位因依赖此标准的翻译版本而引发的损失和伤害,静电放电协会和它的工作人员,会员及雇员将不会承担任何责任和任何赔偿(包括直接的,间接的,现时的或是以后可能发生的)。
静电放电模拟器使用手册
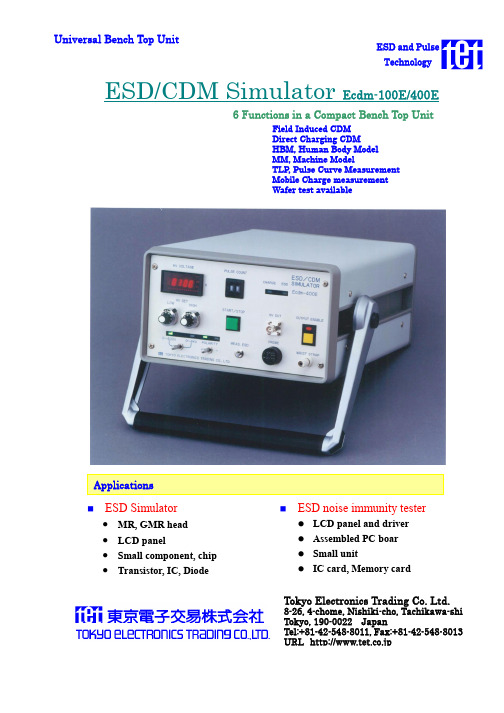
ESD and Pulse TechnologyUniversal Bench Top UnitESD/CDM Simulator Ecdm-100E/400EESD Simulator• MR, GMR head • LCD panel• Small component, chip •Transistor, IC, DiodeESD noise immunity testerLCD panel and driver Assembled PC boar Small unitIC card, Memory cardTokyo Electronics Trading Co. Ltd.8-26, 4-chome, Nishiki-cho, Tachikawa-shi Tokyo, 190-0022 JapanTel:+81-42-548-8011, Fax:+81-42-548-8013URL http://www.tet.co.jp6 Functions in a Compact Bench Top UnitField Induced CDM Direct Charging CDMHBM, Human Body Model MM, Machine ModelTLP , Pulse Curve Measurement Mobile Charge measurement Wafer test availableElectro-Static Discharge (ESD) is the major reason of the breakage, degradation or malfunction of the semiconductor devices,as design rule bench top and manually operated simulator that allows ESD simulation such as Charged Device Model (CDM) discharge. To zap, touch the probe tip at DUT pin or PC board pattern, then depress the front panelswitch or foot switch. It is easy to zap the location that is not flat. TheModel Ecdm-100E/400E simulates both direct charge method andfield-induced method of CDM. The direct charge method is major in Japan though field-induced method is mainly used in the US. The Model Ecdm-100E/400E simulates Human Body Model (HBM) andMachine Model (MM) as well, by replacing the probe, as an option.This is the only universal ESD simulator in the market.The Ecdm-100E has two voltage ranges, 100V and 1000V and is useful to test the strength against ESD stress of the MR/GMR head, small chip component and LCD panel module. It is also useful to perform●Standard Specifications Zap Voltage: 0 to +/-100V or 1000V (Ecdm-100E): 0 to +/-400V or 4000V(Ecdm-400E)Voltage display: Digital panel meterVoltage programming: By PotentiometerVoltage Range: 2 Ranges (Low/High by Switch)Voltage resolution: 0.1V(100E), 1V(400E) Polarity: Positive, Negative and Off Repetitions: 1 to 99 or continuous Output Enable : Push SwitchWrist Strap terminal :AvailableAC Power: 100V+/-10%, 200VA, 50/60HzSize, Weight: Mainbody 257W, 362D,145H(mm),●OptionsRemote Control: GP-IB Probes① HBM Type E-3H( ESDA STD) ② MM Type E-7M)(ESDA STD)③ D-CDM Type P-3A(Metal tool dischargemodel)④ F-CDM Type P-4F) ● Jig/Others① Probe Mounting Stand Type ICJ-1 ② X-Y Stage Type TST-1③ DUT Jig: Made for each DUT ④ Needle Tip: 0.3, 0.5, 1.0 (mm)⑤ Wafer test jig, Manipulator availablethe ESD noise immunity test of the LCD panel, PC board and other module. Model Ecdm-400E has 400V and 4000V ranges and higher stress test is possible.Ecdm series optionally equipped with a coulomb measurement probe that allows the charged or discharged amount of charge to/from the DUT that depends on the charged voltage. Recently, it has been found that this amount of charge that kills the DUT will decide the maximum allowable discharge level in the field so that it will not be damaged.TLP (Transmission Line Pulse) configuration is available to verify the I/V curve as well as its robustness of the ESD protection circuit. Ask TLP literature if you need detail information of the TLP test.Tokyo Electronics Trading Co. Ltd. (TET) has been developed fully automated ESD test system including CDM test system in these more than 10 years. The Model Ecdm-100/400E has been developed above this background, for the applications that is not suitable for the expensive and automated test system.HBM(E-3H) or MM(E-7M) Probe. Type name on case identify HBM or MM.Automatic curve tracer connection after zap is available upon request.D-CDM probe (P-3A). 2 Types with upper ground plane (ESDA STD) and without upper ground plane (Metal tool discharge simulation) are available.HBM or MM probe for wafer or die test. Model name on case identify HBM or MM probe.Automatic curve tracer connection after zap is available upon request.F-CDM probe (P-4F) and control box. Top ground plane size depend on the standard such as ESDA STD or JEDEC STD. This picture shows Probe Mounting Stand (ICJ-1), X-Y stage, CDM base and DUT jig.Mobile charge measurement probe (H-1KV) and nano-coulomb meter.This picture shows Probe Mounting Stand (ICJ-1), X-Y stage,CDM base and DUT jig. CDM base and DUT jig are common for those of CDM test.If Host PC controls the Model Ecdm-100E/400E-TLP via the optional GP-IB Interface, it allows the automatic I-V curve measurement for the ESD protection devices. This page describes an example of it.Picture below shows an example of PC monitor.TLP Pulse Curve Tracer configurationTLP test headSpecification subject to change without notice.。
AUMA说明书中英文对照文稿world版可编辑

操作说明手册的封面内容翻译(中英文对照):Multi-turn actuators万向驱动装置SA07.1-SA48.1 (产品型号)SAR 07.1-SAR 30.1 (产品型号)AUMA NORM (AUMA是这个阀门生产厂的品牌名称)AUMA标准Operation instructions (操作手册)目录内容:Scope of these instructions:本手册内容介绍的范围包括:These instructions are valid for multi-turn actuators for Open-close duty, SA 07.1-SA 48.1 ,and multi-turn actuators for modulating duty, SA07.1-SA 30.1.本手册的说明适应型号为SA 07.1-SA 48.1、具有开启-关闭功能系列的万向驱动装置和型号为SA07.1-SA 30.1、具有调节功能系列的万向驱动装置有效。
These operations instructions are only valid for “clockwise closing”, i.e. drivenshaft turns clockwise to close the valve.这些操作说明只对"顺时针关闭"有效,即:驱动轴顺时针转动关闭阀门。
.Safety instructions (安全说明 )1.1 Range of application (应用的范围 ) AUMQ multi-turn actuators are designed for the operation of industrial valves, e.g, globe valves, butterfly valves and ball valves. For other applications, please consult us. AUMA is not liable for any applications. Such risk lies entirely with the user. AUMQ万向驱动装置是为工业用阀所设计的,例如:工业生产常用球瓣阀,蝶阀和球阀。
Anti-Mode 2.0 中文说明书

Anti-Mode 2.0 Dual Core Owner's Manual﹝翻译版﹞用户手册你购买的产品是根据废弃电子电气设备指令(WEEE指令)标记。
当产品被适当地处理时,有回收系统的地方,有助于保护自然和自然资源。
如果您需要处理此产品,使用带回系统有专门的电子设备收集设施。
不要把产品变成家庭废物处理!同时,该产品已被使用的零件和过程,遵循在电子电气设备中限制使用某些有害物质指令(RoHS)制造。
预定用途本产品设计为室内正常使用,与设备其他连接的电缆不超过3米(10英尺)长。
如果你使用延伸长度电缆,请检查其质量是否足够合格,并注意观察静电放电时连接或断开。
设备的使用在户外,在潮湿或其他极端环境中,可能会导致性能降低或用户设备的风险。
1引言 (4)1.1什么是包含在框 (4)2概述 (5)2.1前面板 (5)2.2后面板 (5)2.3入门 (6)2.4种典型的室内校准 (7)3.主屏幕视图 (10)4.设置菜单 (12)4.1家曲线工具 (13)4.2倾斜曲线工具 (14)4.3次声滤波器 (15)4.4高/低通滤波器 (16)4.5自定义参数均衡器 (16)4.6主屏幕和quicktone (19)4.7音频设置 (20)4.8输入设置 (21)4.9语言选择 (22)4.10工厂复位 (22)4.11信息 (22)4.12电脑连接 (22)5.使用声音文件 (23)6.高级校准 (24)7.多点校准(大范围) (25)8.房间响应菜单(测量) (26)9.音频连接 (28)10.故障排除 (29)11.技术规范 (32)11.1接口 (32)11.2模拟规格 (32)11.3固件规格 (32)12.联系方式 (32)你现在拥有了一个卓越的音频设备,能够把大多数音频系统调试出“创造奇迹”般的声音质量。
Anti-Mode 2.0的先进功能很多:包括无抖动的数字输出,发烧级D/A转换器与数字控制的模拟量控制等等,遗憾的是,如何正确纠正听音环境的房间共振和其他不良影响而产生的声音劣化,也许有些最重要的事情经常被业界所忽视。
ESD测试作业指导书(中英文)
ESD测试作业指导书ESD Testing Work Instruction1.环境控制I. Environmental Control:1)所有工作区的相对湿度和温度应该保持在一定的范围并进行监测。
一旦相对湿度百分比降至限度以下,立即通知QC和工程部进行处理。
Relative Humidity andtemperature in all works areas shall be monitored and maintained. If % relative humidity falls beyond the limits, immediately inform QC and engineering for disposition.2)在将装配的产品置于无静电工作站前,在整个生产期间,使用离子发生器的生产线都应处于工作状态。
离子发生器被安装在容易发生静电的区域。
检测其衰减时间,小于或等于5秒钟,或者根据客户要求;检测平衡电压,小于或等于5伏,或者根据客户要求。
Lines that uses Ionizers shall be in operations prior to handling of assembled products to static free work stations and shall be operating during the entire period ofproduction. Ionizers are installed on areas where the chances of static build up occur.Check for the decay time , =/ < 5 seconds or as required by the customer, and thebalance voltage =/< 5 volts or as required by the customer.2.个人接地线系统Personnel Grounding System1)在生产线的不同站点,随机抽检十个员工。
EMS61000-2A静电放电发生器操作步骤
图 6.8 按“ ”、“ ”键可以使电压增加或减小 0.1kV,长按则以 0.1kV 的步 进逐渐增加或减小,按“ ”、“ ”键可以使电压增加或减小 1kV,在没有进 行放电的状态下长按枪机电压也会逐渐上升;1.000S/pulse 是在自动模式下,放 电间隔为 1.000S,如果在手动模式下,显示 manu-trigger;CTC of IEC 表示 IEC 工作模式下的接触放电;58 of 1000 分别是已完成放电次数和设定放电次数。当 达到设定放电次数时,自动停止放电,此时如果按下枪机,蜂鸣器短叫一声,放 电次数闪烁,电压下降。如果再按下枪机,放电次数清零,自动切换极性并升压, 升压后可以继续进行测试。测试完毕,按“RESET”键退出测试界面。 在 ESD Main 菜单被选中时按“确定”键跳出一个如图 6.9 所示的对话框:
操作说明
开机,初始化完成后显示选择语言的操作界面,如图 6.1 所示:
图 6.1 选好后按“确定”键进入,如果没按“确定”键则等待 4s 后自动进入默认 的语言系统,图 6.1 默认的语言是简体中文。
英文界面操作说明
图 6.2 此时 ESD Main1 处于选中的状态,按“ ”键可以进入 Main2 界面,按“确 定” 键则跳出一个是否要进入等级测试的对话框,如图 6.9 所示。通过方向键选 中要编辑的菜单,按“确定”键进入编辑状态。 V-Charge:电压设置选项,图 6.3 是电压设置选项被选中,此时按“确定” 键就可以进行电压的设定。
4
Level of HBM:包含了 6 组 HBM 放电网络的标准测试等级。 Level of MM: 包含了 4 组 MM 放电网络的标志测试等级。 User-Defined:用户自定义模式,客户可以根据自己的需要设置各个测试等 级,总共有 9 组。 如上图选中“Air of IEC”,按“确定”键则进入空气放电的等级测试模式。 如图 6.11 所示,在选中<Level_1>时按“ ”、“ ”键选择不同的测试等级。 通过方向键选中其它可以设置的菜单,可根据用户的需要设定。
全面版ESD防静电检测操作手册英文版

全面版ESD防静电检测操作手册英文版Comprehensive ESD Anti-Static Testing Operation ManualWelcome to the Comprehensive ESD Anti-Static Testing Operation Manual. This manual provides detailed instructions on how to conduct ESD anti-static testing to prevent damage to electronic components. It covers a wide range of topics related to ESD prevention and testing procedures.Table of Contents:1. Introduction2. Importance of ESD Testing3. ESD Prevention Methods4. Equipment Required5. Testing Procedures6. ConclusionIntroductionESD (Electrostatic Discharge) is a significant threat to electronic components, causing damage and malfunctions. This manual aims to guide users in implementing effective ESD prevention measures through proper testing procedures.Importance of ESD TestingESD testing is crucial to ensure the reliability and functionality of electronic devices. By conducting regular ESD tests, you can identify potential risks and take necessary actions to prevent damage.ESD Prevention MethodsThere are various methods to prevent ESD, including using anti-static wrist straps, ESD mats, and proper grounding techniques. It is essential to follow these prevention methods to protect electronic components.Equipment RequiredTo perform ESD testing, you will need the following equipment: - ESD wrist straps- ESD mats- Grounding cords- Multimeter- ESD testing devicesTesting Procedures1. Ensure that the testing area is free from static electricity.2. Wear an ESD wrist strap and connect it to a grounded source.3. Place electronic components on an ESD mat.4. Use an ESD testing device to check for any static charges.5. Record the test results and take necessary actions if any issues are identified.ConclusionESD prevention is essential in maintaining the integrity of electronic components. By following the procedures outlined in this manual, you can effectively prevent ESD damage and ensure the reliability of your electronic devices.This manual serves as a comprehensive guide for conducting ESD anti-static testing. By implementing the procedures and recommendations provided, you can protect your electronic components from ESD damage and ensure their longevity.。
ESD防静电检测操作指南(全方位)英文版
ESD防静电检测操作指南(全方位)英文版ESD Prevention and Detection Operation Guide (Comprehensive)Introduction:This document provides a comprehensive guide for ESD prevention and detection operations in various settings.1. Importance of ESD Prevention:ESD (Electrostatic Discharge) can cause damage to electronic components, leading to costly repairs or replacements. It is crucial to prevent ESD incidents to ensure the proper functioning of electronic devices.2. ESD Prevention Measures:- Use ESD protective equipment such as wrist straps, mats, and clothing.- Keep work areas clean and uncluttered to minimize the risk of ESD.- Ground all electronic equipment and components to prevent static buildup.3. ESD Detection Equipment:- Use ESD testers to check the effectiveness of ESD prevention measures.- Conduct regular audits and inspections to ensure compliance with ESD prevention protocols.- Train employees on proper ESD detection procedures to maintain a safe working environment.4. Best Practices for ESD Prevention:- Implement ESD control programs and policies to standardize prevention measures.- Encourage employees to report any ESD incidents or potential risks to prevent future occurrences.- Continuously monitor and evaluate the effectiveness of ESD prevention measures to improve overall safety.Conclusion:By following the guidelines outlined in this document, organizations can effectively prevent and detect ESD incidents, ensuring the longevity and reliability of electronic equipment.。
全面的ESD防静电检测作业手册英文版

全面的ESD防静电检测作业手册英文版Comprehensive ESD Anti-static Testing Operation ManualWelcome to the Comprehensive ESD Anti-static Testing Operation Manual. This manual aims to provide detailed instructions on how to effectively conduct ESD anti-static testing to ensure the safety and reliability of electronic devices.1. Introduction to ESD:ESD (Electrostatic Discharge) can cause damage to electronic components and devices, leading to malfunctions and failures. It is crucial to implement proper ESD prevention measures to protect sensitive equipment.2. Importance of ESD Testing:ESD testing is essential to identify potential risks and vulnerabilities in electronic systems. By conducting regular testing, youcan mitigate the impact of electrostatic discharge and prevent costly damages.3. ESD Prevention Measures:- Grounding: Ensuring proper grounding of equipment and personnel is crucial to prevent static electricity buildup.- ESD Protective Equipment: Using ESD protective equipment such as wrist straps, mats, and clothing can help minimize the risk of static discharge.- ESD Control Procedures: Implementing strict ESD control procedures in the workplace can reduce the likelihood of ESD incidents.4. ESD Testing Procedures:- Pre-Testing Preparation: Before conducting ESD testing, ensure that all equipment is properly grounded and that ESD protective measures are in place.- Testing Methods: There are various testing methods available, including air discharge, contact discharge, and direct discharge testing. Choose the appropriate method based on the equipment being tested.- Data Collection: Record all testing results accurately and maintain detailed documentation for future reference.5. ESD Testing Equipment:- ESD Testers: Use specialized ESD testers to accurately measure electrostatic discharge levels and identify potential risks.- Grounding Devices: Ensure that all grounding devices are functioning correctly and are properly connected to prevent static electricity buildup.- Protective Gear: Provide personnel with adequate protective gear, including wrist straps, mats, and clothing, to minimize the risk of ESD incidents.6. Conclusion:Effective ESD anti-static testing is essential for maintaining the integrity and reliability of electronic devices. By following the guidelines outlined in this manual, you can ensure that your equipment is protected from the damaging effects of electrostatic discharge.Remember to prioritize safety and follow best practices when conducting ESD testing. Thank you for using the Comprehensive ESD Anti-static Testing Operation Manual.。
ESD防静电检测流程指南英文版

ESD防静电检测流程指南英文版ESD Anti-Static Testing Procedure Guide (Complete Version)In this document, we will outline the comprehensive procedure for conducting ESD anti-static testing. It is crucial to follow these steps carefully to ensure the safety and effectiveness of the testing process.1. Preparation:- Gather all necessary equipment, including wrist straps, ESD mats, and testing devices.- Ensure that the testing environment is free from any potential sources of static electricity.- Educate all personnel involved in the testing on proper ESD safety protocols.2. Testing Procedure:- Before beginning the testing, discharge any static electricity by touching a grounded metal object.- Put on the wrist strap and connect it to a grounded point to ensure personal grounding.- Place the ESD mat on a flat, non-conductive surface for testing electronic devices.- Use the testing device to measure the static charge on the electronic device or surface.- Record the readings and compare them to the acceptable range for ESD safety.3. Troubleshooting:- If the readings are outside the acceptable range, retest the area after ensuring proper grounding.- Check for any potential sources of static electricity in the testing environment.- Replace any faulty equipment or components that may be contributing to the high static charge.4. Maintenance:- Regularly inspect and maintain all ESD testing equipment to ensure accurate readings.- Train all personnel on proper ESD safety procedures and the importance of anti-static testing.- Keep detailed records of all testing results and maintenance activities for future reference.5. Conclusion:- Following this comprehensive ESD anti-static testing procedure will help prevent damage to sensitive electronic devices and ensure a safe working environment.- Regular testing and maintenance are essential to maintaining ESD safety standards and protecting valuable equipment.- Be proactive in addressing any issues or concerns related to static electricity to prevent potential hazards in the workplace.By following these guidelines, you can effectively implement an ESD anti-static testing program to safeguard your electronic devices and equipment from static electricity damage.。
人体静电释放器说明书 英文版

人体静电释放器说明书英文版User Manual for Human Body Static Discharger.Introduction:The Human Body Static Discharger is a device designed to safely and effectively dissipate static electricity from the human body. This user manual provides detailed instructions on how to use the discharger correctly and explains its functions, features, and precautions. Please read this manual carefully before using the device to ensure safe and proper operation.Table of Contents:1. Safety Precautions.2. Product Overview.3. How to Use.4. Maintenance and Cleaning.5. Troubleshooting.6. Technical Specifications.7. Warranty and Support.1. Safety Precautions:Please read and understand all instructions before using the discharger.Keep the discharger away from water, moisture, and extreme temperatures.Do not use the discharger near flammable materials or in explosive environments.Avoid using the discharger on sensitive electronic devices or near pacemakers.Keep the discharger out of reach of children.If the discharger shows any signs of damage, do not use it and contact customer support.2. Product Overview:The Human Body Static Discharger is a handheld device with a comfortable grip.It is equipped with a grounding cable and a discharge point.The discharger is powered by batteries and does not require an external power source.The device is lightweight and portable, making it convenient for daily use.3. How to Use:Before using the discharger, ensure that the grounding cable is securely attached to a grounded object.Hold the discharger firmly and touch the discharge point to any metal object or grounded surface.Slowly move the discharge point along the surface of the object to effectively dissipate static electricity.Repeat the process as needed to ensure complete static discharge.4. Maintenance and Cleaning:Regularly check the discharger for any signs of wear or damage.Clean the discharge point with a soft, dry cloth to remove any dirt or debris.Avoid using harsh chemicals or solvents to clean the discharger.Store the discharger in a dry and dust-free environment when not in use.5. Troubleshooting:If the discharger fails to function properly, check the batteries and ensure they are correctly installed.Verify that the grounding cable is securely connected to a grounded object.If issues persist, refer to the warranty section for further assistance.6. Technical Specifications:Power Source: Battery operated (batteries included)。
阀岛 Festo VTSA-ASI 翻译操作手册说明书

1EX 标记2适用文件3认证的产品4安全4.1安全注意事项–本设备在规定的运行条件下可应用于爆炸性气体环境 2区。
–仅使用符合规格说明的介质 è9 技术参数。
–本产品不能用于其它介质。
–本产品不能用于真空。
–请在原装状态下使用本装置,切勿擅自进行任何改动。
–该设备只能以交付的配置在爆危环境中使用。
–允许更换模块。
仅使用经认证的组件。
–只能在潜在爆炸性区域以外执行所有作业。
–在易爆区域外产生压缩空气。
–关于产品的一切工作仅允许由具备资质的专业人员进行,这些专业人员对工作进行评估并识别出危险。
4.2按规定使用阀岛规定用于工业领域中的压缩空气开关和控制。
4.3标记 X:特殊条件–根据 EN60079-0,将设备安装在防护等级至少为 IP54 的壳体中。
–不能在有电压时断开或打开。
–通过带有特殊锁的外壳来避免脱开快插接头或外壳部件。
–在所有插头前使用电缆应力消除装置。
–采取适当的安装措施防止壳体带静电。
–每次只能给一个两位五通阀或三位五通阀的一个线圈通电。
–环境温度:–5°C £ T a£+50°C–防止设备受到紫外线辐射。
–防止设备受到任何冲击载荷影响。
–该设备只能在污染等级不超过 2(依据 IEC 60664-1 定义)的区域中使用。
5功能阀岛将多个阀与一个共用的气源和电源相结合。
通过 AS-i 进行电气连接。
AS-i 的特点是通过一根 2 芯电缆同时传输数据和电流。
6调试•将所有电源电压接地。
•请用堵头密封所有未使用的电接口。
•用盖板 AK-8KL 密封气路板模块 CPX-AB-8-KL-4POL。
7运行8维护在个别情况下可以更换易损件及备件。
此类工作只能由经过培训并授权的专业人员执行。
•每半年检查一次所有壳体螺丝的紧固扭矩。
•每半年检查一次设备是否正常运行。
9技术参数。
静电放电测试仪SKS使用规程(精)
静电放电测试仪SKS-0230试验步骤(1)通过后面板上的"POWERIN"插座将仪器与外部电源相连。
(2)将放电枪插入"OUTPUT"插口,注意插入时放电枪插口凹槽在正上方方向。
然后将连接套顺时针方向旋紧。
(3)选择放电模式,如果要做接触放电试验,选用尖锥形的放电电极,拨动开关(前面板(5))拨到上方"CONTACT"位置,如果要做气隙放电试验,选用球形的放电电极,拨动开关拨到下方"AIR"位置,注意,换放电电极及插入放电枪必须在断电情况下进行,以免遭到电击。
(4)将"VOLTSADJUST"旋钮逆时针方向旋到底(应听到旋钮内微动开关咔嗒一声)。
(5)将"POWER"开关选择在"ON"状态。
此时面板上"STOP"指示灯亮。
(6)通过"P-"和"P+"(极性)按钮来选择试验极性。
(7) 通过"SINGLE"、"REPEAT"、"COUNT"和"20PPS"四个按钮来选择放电模式。
(8)如果在"COUNT"放电状态下,设置"DISCHARGE"置数开关确定放电数。
如果在"REPEAT","COUNT"放电状态下,用"INTERVAL"置数开关选择放电时间间隔。
*注意:步骤(6)~(8)均应在"HVOFF"及"VOLTSADJUST”逆时针旋至最小状态时进行。
(9)按下"HVON"按钮。
(10)调节"VOLTSADJUST"旋钮,使数字电压表内的读数达到所需要的值。
美国SESCO静电测试仪使用说明书
美国SESCO静电测试仪使用说明书美国SESCO静电测试仪中文操作使用说明书:在你试图安装或者操作之前仔细阅读和理解这些指导是非常重要的。
没有这么做可能会造成严重的个人受伤及[或]损坏仪器。
在这一本手册最后部分提供有一手写的保证证书。
请小心地保存起来。
此仪器没有设计在机密的(危险的)环境下使用。
它不能够被暴露用于易起火的或腐蚀的材料和气体中。
此仪器专门用于静电的处理,需要远离水,油,溶剂和其他具有传导性的污染物。
对暴露在如此的污染物中将会引起产品的电气绝缘故障。
特别小心确定环境没有露珠形成。
此仪器应该在一个湿度小于60%的环境下保存和使用。
不要插入任何的物体于用于固定感应器的口子里;不要有任何异物进入感应器的开口。
这个仪器不能在有腐蚀性的酸/碱烟或腐蚀性的气体如氯之类的环境中使用操作。
这个仪器是用电池操作的,不要连接任何其他电线。
正常的操作条件在它的上有列出。
当不使用的时候,请关闭仪器。
为了仪器精确的测量请将他正确的接地。
如果跌落,此仪器很容易损坏。
如果发生此类事情,它应该交由好的技术人员做仔细的检查和必要的修理。
此仪器为电子设备,其包含的传感器可能对机械的震动和冲击非常敏感。
当然它也包含有一个微型处理芯片和电子电路,所以它不能在有许多电子噪音的环境中使用。
当电压读数超出测定范围之外的时候会中止测量。
如果超过量程使用,有可能损坏感应器。
在离子化的空气中使用该产品是可能的。
但是在这种情况下正描述的10%精度不能够被保证。
不要在LCD屏幕的上方施加任何压力。
此仪器在25±0.5毫米的测定距离已经被校正。
对于超出此距离校正是无效的。
不要干预感应器位置和LED方向,否则可能改变测定距离。
- 1、下载文档前请自行甄别文档内容的完整性,平台不提供额外的编辑、内容补充、找答案等附加服务。
- 2、"仅部分预览"的文档,不可在线预览部分如存在完整性等问题,可反馈申请退款(可完整预览的文档不适用该条件!)。
- 3、如文档侵犯您的权益,请联系客服反馈,我们会尽快为您处理(人工客服工作时间:9:00-18:30)。
静电释放测试管理系统操作说明
1、在测试前请用接地半球进行静电释放。
2、在指定区域进行刷卡。
3、待进度条出现后,根据屏幕提示进行手腕测试,根据提示,进行防静电鞋左右脚测试。
4、测试全部合格显示“PASS”,绿色显示;测试未全部合格显示“FALL”,红色显示;未测试黄色显示。
5、如在测试中遇到测试不合格问题,请先进行手腕调整或者清洁防静电鞋底。
调整后仍无法通过测试,其及时和质量工程师进行联系,若机器故障,请到其他楼层测试。
Operating Instruction for Static Discharge Testing Management System
1.Before the test, please use the hemispherical ground electrode to discharge the static
electricity;
2.Please punch-in in the designated area;
3.When the progress bar pops out, please do the anti-static wrist strap test and two-feet
anti-static shoe test by following the tips from the window;
4.If the test result is acceptable, it shows “PASS” and the indicator turns green; if the test result
is not acceptable, it shows “FAIL”and the indicator turns red; if the test is not done, the indicator is yellow.
5.If you fail in the test, please firstly adjust the anti-static wrist strap or clean the sole of the
anti-static shoes. If you still fail after the adjustment, please contact the quality engineer at the earliest. If there is any problem with the machine, please do the test on another floor.。
