左栏收起代码
JavaScript实现的展开与收起

JavaScript实现的展开与收起在网页开发中,经常会遇到需要展开和收起内容的需求,比如文字过长时,只显示一部分内容,点击按钮后展开全部内容;或者是显示的内容过多,点击按钮后收起部分内容。
这种功能可以通过JavaScript来实现,下面我将为大家介绍一种实现方法。
首先,我们需要在HTML中创建一个用于展示内容的容器,并为其设置一定的高度,以便初始状态下只显示一部分内容。
比如:```html<div id="content" style="height: 200px; overflow: hidden;"><!--这里是需要展示的内容--></div>```其中,`content`是容器的id,`height`属性设置了容器的高度,`overflow: hidden;`则表示超出容器高度的内容将被隐藏。
接下来,我们创建两个按钮,一个用于展开内容,一个用于收起内容。
比如:```html<button id="expandBtn">展开</button><button id="collapseBtn">收起</button>```然后,在JavaScript中获取这两个按钮的元素,并为它们分别绑定点击事件。
比如:```javascriptvar expandBtn = document.getElementById('expandBtn');var collapseBtn = document.getElementById('collapseBtn');expandBtn.addEventListener('click', expandContent);collapseBtn.addEventListener('click', collapseContent);```在这里,`expandBtn`和`collapseBtn`分别代表展开和收起按钮的元素,`addEventListener`方法可以为元素绑定事件。
C#展开和折叠代码的快捷键

C#展开和折叠代码的快捷键VS2005代码编辑器的展开和折叠代码确实很⽅便和实⽤。
以下是展开代码和折叠代码所⽤到的快捷键,很常⽤:Ctrl + M + O: 折叠所有⽅法Ctrl + M + M: 折叠或者展开当前⽅法Ctrl + M + L: 展开所有⽅法解决VS2010中⼯具箱的的不见的问题:按快捷键Ctrl+Alt+X全屏:Shift+Alt+Enter注释选定内容:Ctrl+E+C/Crtr+E+U代码格式化:ctrl+E+F===================================VS2008 使⽤⼩技巧——快捷键1. 怎样调整代码排版的格式?选择:编辑—>⾼级—>设置⽂档的格式或编辑—>⾼级—>设置选中代码的格式。
格式化cs代码:Ctrl+k+f格式化aspx代码:Ctrl+k+d2. 怎样跳转到指定的某⼀⾏?两种⽅法:Ⅰ. Ctrl+G Ⅱ. 双击状态栏中的⾏号3. 怎样创建矩形选区?两种⽅法:Ⅰ. 摁住alt键,然后拖动⿏标即可。
Ⅱ. 按住Shift+Alt点击矩形的左上和右下位置即可。
4. 怎样快速隐藏或显⽰当前代码段?Ctrl+MM5. 怎样快速切换不同的窗⼝?Ctrl+Tab6. 怎样⽣成解决⽅案?Ctrl+Shift+B7. 怎样快速添加代码段?输⼊prop然后按两次tab即可插⼊⾃动属性public int MyProperty { get; set;}(输⼊tryclassforeach等等,按两次tab也有类似效果。
)8. 怎样调⽤智能提⽰?两种⽅法:Ⅰ. Ctrl+J Ⅱ. Alt+→9. 怎样调⽤参数信息提⽰?光标放到参数名上⾯,然后输⼊Ctrl+Shif+空格。
10. 怎样查看代码的详细定义?打开:视图—>代码定义窗⼝然后你再在页⾯中把⿏标点到某个⽅法上。
11. 怎样创建区域以⽅便代码的阅读?#region代码区域#endregion12. 怎样同时修改多个控件的属性?选中多个控件,然后右键属性,这个时候这些控件共有的属性就会出现,修改之后所有的控件都会变化。
网页浮动窗口代码

1. 右栏浮动广告QUOTE:<script language=javascript>var specialcode="<DIV id=searchspe style='Z-INDEX: 100; right: 1px; POSITION: absolute; TOP: 180px;'><TABLE cellSpacing=0 cellPadding=0 width=150 style='border-left:1px solid #2E6287;border-top:1px solid #2E6287;border-right:1px solid #2E6287;font-size:12px;color:#ffffff; border-bottom-color:#2E6287; border-bottom-width:1px'><TR bgcolor=#2E6287><TD height=20> 推荐↓</TD><TD style='CURSOR: hand' onclick=searchspe.style.visibility='hidden' width=30>关闭</TD></TR></TABLE><table border='1' width='150' id='table1' height='500' bordercolor='#2E6287'><tr><td>广告内容</td></tr></table></DIV>";document.write(specialcode);lastScrollY=0;functionheartBeat0(){diffY=document.body.scrollTop;percent=.1*(diffY-lastScrollY);if(percent>0)percen t=Math.ceil(percent);elsepercent=Math.floor(percent);document.all.searchspe.style.pixelTop+=percent;lastScrollY=lastScr ollY+percent;}window.setInterval("heartBeat0()",1);</script>2.左栏浮动广告QUOTE:<script language=javascript>var specialcode="<DI V id=searchspe style='Z-INDEX: 100; left: 1px; POSITION: absolute; TOP: 50px;'><TABLE cellSpacing=0 cellPadding=0 width=360 style='border-left:1px solid #333333;border-top:1px solid #333333;border-right:1px solid #333333;font-size:12px;color:#ffffff'><TR bgcolor=#2E6287><TD height=20> 推荐↓</TD><TD style='CURSOR: hand' onclick=searchspe.style.visibility='hidden' width=30>关闭</TD></TR></TABLE><table border='1' width='150' id='table1' bordercolor='#2E6287' height='500'><tr><td>广告内容</td></tr></table></DIV>";document.write(specialcode);lastScrollY=0;functionheartBeat0(){diffY=document.body.scrollTop;percent=.1*(diffY-lastScrollY);if(percent>0)percen t=Math.ceil(percent);elsepercent=Math.floor(percent);document.all.searchspe.style.pixelTop+=percent;lastScrollY=lastScr ollY+percent;}window.setInterval("heartBeat0()",1);</script>3.左栏固定广告QUOTE:<DIV id=searchspe style='Z-INDEX: 100; left: 1px; POSITION: absolute; TOP: 50px;'><TABLE cellSpacing=0 cellPadding=0 width=360 style='border-left:1px solid #333333;border-top:1px solid #333333;border-right:1px solid #333333;font-size:12px;color:#ffffff'><TR bgcolor=#2E6287><TD height=20> 推荐↓</TD><TD style='CURSOR: hand' onclick=searchspe.style.visibility='hidden' width=30>关闭</TD></TR></TABLE>广告内容</DIV>4.右栏固定广告QUOTE:<DIV id=searchspe style='Z-INDEX: 100; right: 1px; POSITION: absolute; TOP: 50px;'><TABLE cellSpacing=0 cellPadding=0 width=360 style='border-left:1px solid #333333;border-top:1px solid #333333;border-right:1px solid #333333;font-size:12px;color:#ffffff'><TR bgcolor=#2E6287><TD height=20> 推荐↓</TD><TD style='CURSOR: hand' onclick=searchspe.style.visibility='hidden' width=30>关闭</TD></TR></TABLE>广告内容</DIV>5.漂浮广告代码QUOTE:<div id="img" style="position:absolute;; width: 200; height: 151">广告内容</div><script LANGUAGE="JavaScript">var xPos = 20;var yPos = 10;img.style.left= xPos;img.style.top = yPos;var step = 1;var delay = 30;var width,height,Hoffset,Woffset;var y = 1;var x = 1;var interval;img.visibility = "visible";function changePos(){width = document.body.clientWidth;height = document.body.clientHeight;Hoffset = img.offsetHeight;Woffset = img.offsetWidth;if (y){yPos = yPos + step;}else{yPos = yPos - step;}if (yPos < 0){y = 1;yPos = 0;}if (yPos >= (height - Hoffset)){y = 0;yPos = (height - Hoffset);}if (x){xPos = xPos + step;}else{xPos = xPos - step;}if (xPos < 0){x = 1;xPos = 0;}if (xPos >= (width - Woffset)){x = 0;xPos = (width - Woffset);}img.style.left = xPos + document.body.scrollLeft; img.style.top = yPos + document.body.scrollTop; }function start(){interval = setInterval('changePos()', delay);}function pause_resume(){clearInterval(interval);}start();</script>6.固定对联QUOTE:<DIV id=searchspe style='Z-INDEX: 100; right: 5px; POSITION: absolute; TOP: 50px;'><TABLE cellSpac ing=0 cellPadding=0 width=150 style='font-size:12px;color:#ffffff'><TR bgcolor=#C54A00><TD height=20> 推荐↓</TD><TD style='CURSOR: hand' onclick=searchspe.style.visibility='hidden' width=30>关闭</TD></TR></TABLE>广告内容</DIV><DIV id=searchspe2 style='Z-INDEX: 100; left: 5px; POSITION: absolute; TOP: 50px;'><TABLE cellSpacing=0 cellPadding=0 width=150 style='font-size:12px;color:#ffffff'><TR bgcolor=#12BDFF><TD height=20> 推荐↓</TD><TD style='CURSOR: hand' onclick=searchspe2.style.visibility='hidden' width=30>关闭</TD></TR></TABLE>广告内容</DIV>7.随动对联QUOTE:<script language=javascript>function close163news(){searchspe.style.visibility='hidden';searchspe2.style.visibility='hidden';} var specialcode="<DIV id=searchspe style='Z-INDEX: 100; right: 1px; POSITION: absolute; TOP: 30px;'><TABLE cellSpac ing=0 cellPadding=0 width=150 style='font-size:12px;color:#ffffff'><TR bgcolor=#C54A00><TD height=20> 推荐↓</TD><TD style='CURSOR: hand' onclick='close163news()' width=30>关闭</TD></TR></TABLE>广告内容</DIV>";document.write(specialcode);lastScrollX=0;function heartBeat0(){diffY=document.body.scrollTop;percent=.1*(diffY-lastScrollX);if(percent>0)percen t=Math.ceil(percent);elsepercent=Math.floor(percent);document.all.searchspe.style.pixelTop+=percent;lastScrollX=lastScr ollX+percent;}window.setInterval("heartBeat0()",1);var specialcode2="<DIV id=searchspe2 style='Z-INDEX: 100; left: 1px; POSITION: absolute; TOP: 30px;'><TABLE cellSpacing=0 cellPadding=0 width=150 style='font-size:12px;color:#ffffff'><TR bgcolor=#12BDFF><TD height=20> 推荐↓</TD><TD style='CURSOR: hand' onclick='close163news()' width=30>关闭</TD></TR></TABLE>广告内容</DIV>";document.write(specialcode2);lastScrollY=0;function heartBeat1(){diffY=document.body.scrollTop;percent=.1*(diffY-lastScrollY);if(percent>0)percen t=Math.ceil(percent);elsepercent=Math.floor(percent);document.all.searchspe2.style.pixelTop+=percent;lastScrollY=lastSc rollY+percent;}window.setInterval("heartBeat1()",1);</script>8.qq好友上线广告代码QUOTE:<!-- 代码开始请将下面的代码放到body结束标签之前--><DIV id=eMengstyle="BORDER-RIGHT: #455690 1px solid; BORDER-TOP: #a6b4cf 1px solid; Z-INDEX: 99999; LEFT: 64px; VISIBILITY: hidden; BORDER-LEFT: #a6b4cf 1px solid; WIDTH: 168px; BORDER-BOTTOM: #455690 1px solid; POSITION: absolute; TOP: 374px; HEIGHT: 115px; BACKGROUND-COLOR: #c9d3f3"><TABLE style="BORDER-TOP: #ffffff 1px solid; BORDER-LEFT: #ffffff 1px solid" cellSpacing=0 cellPadding=0 width="100%" bgColor=#cfdef4 border=0><TBODY><TR><TDstyle="FONT-SIZE: 12px; BACKGROUND-IMAGE: none; COLOR: #0f2c8c"width=30 height=24> </TD><TDstyle="PADDING-LEFT: 4px; FONT-WEIGHT: normal; FONT-SIZE: 12px; BACKGROUND-IMAGE: none; COLOR: #1f336b; PADDING-TOP: 4px"vAlign=center width="100%"><span class="style13">本站提示</span></TD><TD vAlign=center align=right width=19 2px? padding-top: 2px;padding-right:><SPAN title=关闭style="FONT-WEIGHT: bold; FONT-SIZE: 12px; CURSOR: hand; COLOR: red; MARGIN-RIGHT: 4px"onclick=closeDiv()>×</SPAN></TD></TR><TR><TDstyle="PADDING-RIGHT: 1px; BACKGROUND-IMAGE: none; PADDING-BOTTOM: 1px" colSpan=3 height=90><DIVstyle="BORDER-RIGHT: #b9c9ef 1px solid; PADDING-RIGHT: 13px; BORDER-TOP: #728eb8 1px solid; PADDING-LEFT: 13px; FONT-SIZE: 12px; PADDING-BOTTOM: 13px; BORDER-LEFT: #728eb8 1px solid; WIDTH: 100%; COLOR: #1f336b; PADDING-TOP: 18px; BORDER-BOTTOM: #b9c9ef 1px solid; HEIGHT: 100%"><div align="left"> <span style="text-decoration: none"><FONTcolor=#FF0000>仿造qq好友上线<br><center> </center></FONT></span></div></DIV></td></tr></table><SCRIPT language=JavaScript>window.onload = getMsg;window.onresize = resizeDiv;window.onerror = function(){}var divTop,divLeft,divWidth,divHeight,docHeight,docWidth,objTimer,i = 0;function getMsg(){try{divTop = parseInt(document.getElementById("eMeng").style.top,10)divLeft = parseInt(document.getElementById("eMeng").style.left,10)divHeight = parseInt(document.getElementById("eMeng").offsetHeight,10)divWidth = parseInt(document.getElementById("eMeng").offsetWidth,10)docWidth = document.body.clientWidth;docHeight = document.body.clientHeight;document.getElementById("eMeng").style.top = parseInt(document.body.scrollTop,10) + docHeight + 10;// divHeightdocument.getElementById("eMeng").style.left = parseInt(document.body.scrollLeft,10) + docWidth - divWidthdocument.getElementById("eMeng").style.visibility="visible"objTimer = window.setInterval("moveDiv()",10)}catch(e){}}function resizeDiv(){try{divHeight = parseInt(document.getElementById("eMeng").offsetHeight,10)divWidth = parseInt(document.getElementById("eMeng").offsetWidth,10)docWidth = document.body.clientWidth;docHeight = document.body.clientHeight;document.getElementById("eMeng").style.top = docHeight - divHeight + parseInt(document.body.scrollTop,10)document.getElementById("eMeng").style.left = docWidth - divWidth + parseInt(document.body.scrollLeft,10)}catch(e){}}function moveDiv(){try{if(parseInt(document.getElementById("eMeng").style.top,10) <= (docHeight - divHeight + parseInt(document.body.scrollTop,10))){window.clearInterval(objTimer)objTimer = window.setInterval("resizeDiv()",1)}divTop = parseInt(document.getElementById("eMeng").style.top,10)document.getElementById("eMeng").style.top = divTop - 1}catch(e){}}function closeDiv(){document.getElementById('eMeng').style.visibility='hidden';if(objTimer) window.clearInterval(objTimer)}</SCRIPT>9:网页中的分享代码:<div id="ckepop"><a title="分享到新浪微博" class="jiathis_button_tsina"></a><a title="分享到QQ收藏" class="jiathis_button_qq"></a><a title="分享到开心网" class="jiathis_button_kaixin001"></a><a title="分享到人人网" class="jiathis_button_renren"></a><span class="separator">|</span><a href="/share/" class="jiathis button jtico jtico_more" target="_blank">更多</a> </div> <script type="text/javascript" src="/code/jia.js" charset="utf-8 "></script>是不是觉得图标太少了?来分析下这段JS。
vue项目侧边栏折叠和展开效果应用

在Vue项目中实现侧边栏的折叠和展开效果,可以通过Vue的动态组件和CSS样式来实现。
下面是一个简单的示例,演示如何使用Vue和CSS实现侧边栏的折叠和展开效果:1. 首先,在Vue项目中创建一个新的组件,比如`Sidebar.vue`,用于表示侧边栏。
在该组件中,你可以使用Vue的动态组件来控制侧边栏的显示和隐藏。
```vue<template><div class="sidebar" :class="{ 'sidebar-collapsed': isCollapsed }"><div class="sidebar-header"><button @click="toggleSidebar"><span v-if="isCollapsed">展开</span><span v-else>折叠</span></button></div><slot></slot></div></template><script>export default {data() {return {isCollapsed: false,};},methods: {toggleSidebar() {this.isCollapsed = !this.isCollapsed;},},};</script>```2. 在CSS样式中,你可以使用媒体查询来定义侧边栏在不同屏幕尺寸下的样式。
通过使用CSS的`transform`属性,可以轻松地实现折叠和展开效果。
```css.sidebar {width: 200px; /* 侧边栏的宽度 */height: 100vh; /* 侧边栏的高度与视口高度一致 */background-color: #f5f5f5; /* 侧边栏的背景色 */position: fixed; /* 固定位置 */top: 0; /* 顶部对齐 */left: 0; /* 左侧对齐 */transition: transform 0.3s ease; /* 过渡效果 */}.sidebar-collapsed {transform: translateX(-200px); /* 折叠后向左移动200px */}```3. 在需要使用侧边栏的地方,引入并注册`Sidebar.vue`组件。
JAVASWING布局管理器实例之GRIDBAGLAYOUT,实现左右选择框

说来惭愧,使用Swing快2年了,一直没有深入研究Swing中著名的布局管理器GridBagLayout,说他著名是因为他布局灵活,可以适用各种复杂的布局要求,当然也因为他是著名的复杂,这次由于过几天一次重要的面试,“迫使”我不得不好好研究一下(哈哈,其前太懒了,以后一定多注意。
先来分享一下我的学习成果,对一些重要参数进行说明:1. gridx,gridy 设置组件的位置:其实就是组件行列的设置,注意都是从0开始的,比如 gridx=0,gridy=1时放在0行1列。
2.gridwidth,gridheight—设置组件跨越的行列,默认值为1;GridBagConstraints.REMAINDER常量,代表此组件为此行或此列的最后一个组件,会占据所有剩余的空间。
3. weightx,weighty——用来设置窗口变大时,各组件跟着变大的比例。
比如组件A的weightx=0.5,组件B的weightx=1,那么窗口X轴变大时剩余的空间就会以1:2的比例分配给组件A和B.4.anchor —当组件空间大于组件本身时,要将组件置于何处。
有CENTER (默认值)、NORTH、NORTHEAST、EAST、SOUTHEAST、WEST、NORTHWEST选择。
5.insets ——设置组件之间彼此的间距。
它有四个参数,分别是上,左,下,右,默认为(0,0,0,0)。
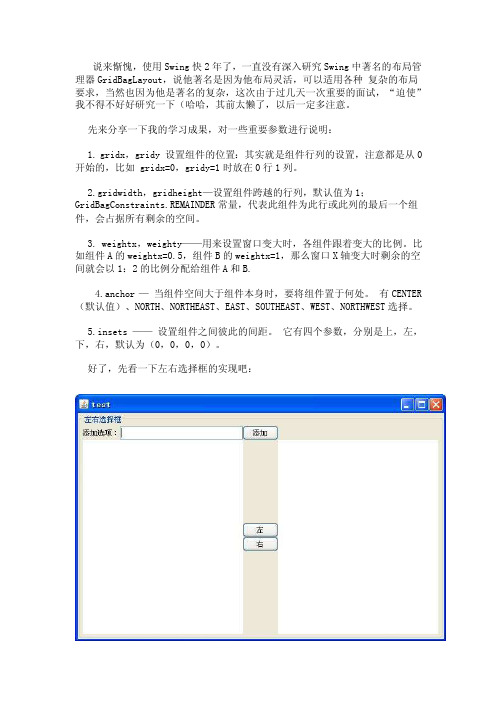
好了,先看一下左右选择框的实现吧:import java.awt.Dimension;import java.awt.GridBagConstraints;import java.awt.GridBagLayout;import java.awt.event.ActionEvent;import java.awt.event.ActionListener;import javax.swing.BorderFactory;import javax.swing.DefaultListModel;import javax.swing.JButton;import javax.swing.JFrame;import javax.swing.JLabel;import javax.swing.JList;import javax.swing.JPanel;import javax.swing.JTextField;import javax.swing.UIManager;import javax.swing.UnsupportedLookAndFeelException;public class MyFrame extends JFrame {JPanel mainPanel = new JPanel();JButton add = new JButton();JButton left = new JButton();JButton right = new JButton();JLabel label = new JLabel();JTextField field = new JTextField();DefaultListModel leftModel = new DefaultListModel(); DefaultListModel rightMOdel = new DefaultListModel(); JList leftList = new JList(leftModel);JList rightList = new JList(rightMOdel);JPanel left_Right_Panel = new JPanel();public MyFrame() {this.setTitle("test");this.setPreferredSize(new Dimension(600, 400)); this.initComponent();this.addData();this.setVisible(true);this.pack();}/*** 初始化组件*/private void initComponent() {label.setText("添加选项:");add.setText("添加");leftList.setPreferredSize(new Dimension(150, 150));rightList.setPreferredSize(leftList.getPreferredSize());left.setText("左");right.setText("右");mainPanel.setBorder(BorderFactory.createTitledBorder("左右选择框"));mainPanel.setLayout(new GridBagLayout());GridBagConstraints c = new GridBagConstraints();c.gridx = 0; // 0行0列c.gridy = 0;c.gridwidth = 1;c.gridheight = 1;c.fill = GridBagConstraints.HORIZONTAL;c.weightx = 0;c.weighty = 0;mainPanel.add(label, c);c.gridx++;c.weightx = 1;mainPanel.add(field, c);c.gridx++;c.weightx = 0;c.gridwidth = 1;c.gridheight = 1;// c.fill = GridBagConstraints.HORIZONTAL;mainPanel.add(add, c);c.gridx = 0;c.gridy = 1;c.weightx = 1;c.weighty = 1;c.gridwidth = 2;c.gridheight = 2;c.fill = GridBagConstraints.BOTH;mainPanel.add(leftList, c);c.gridx = 2;c.gridy = 1;c.gridwidth = 1;c.gridheight = 1;c.weightx = 0;c.weighty = 0.5;c.anchor = GridBagConstraints.SOUTH;c.fill = GridBagConstraints.HORIZONTAL;mainPanel.add(left, c);c.gridx = 2;c.gridy = 2;c.anchor = GridBagConstraints.NORTH;c.fill = GridBagConstraints.HORIZONTAL;mainPanel.add(right, c);c.gridx = 3;c.gridy = 1;c.gridwidth = 1;c.gridheight = 2;c.weightx = 1;c.weighty = 1;c.fill = GridBagConstraints.BOTH;mainPanel.add(rightList, c);this.getContentPane().add(mainPanel);}private void addData() {add.addActionListener(new ActionListener() {@Overridepublic void actionPerformed(ActionEvent e) { // TODO Auto-generated method stubaddItem();}});left.addActionListener(new ActionListener() {@Overridepublic void actionPerformed(ActionEvent e) { // TODO Auto-generated method stubleftItem();}});right.addActionListener(new ActionListener() {@Overridepublic void actionPerformed(ActionEvent e) { // TODO Auto-generated method stubrightItem();}});}/*** 增加项*/private void addItem() {if (field.getText() != null&& !field.getText().equals("")) {((DefaultListModel) leftList.getModel()).addElement(field.getText()); field.setText("");}}/*** 左移项*/private void leftItem() {if (rightList.getSelectedIndex() != -1) {Object o = rightList.getSelectedValue();((DefaultListModel)rightList.getModel()).remove(rightList.getSelectedIndex());((DefaultListModel)leftList.getModel()).addElement(o);}}/*** 右移项*/private void rightItem() {if (leftList.getSelectedIndex() != -1) {Object o = leftList.getSelectedValue();((DefaultListModel)leftList.getModel()).remove(leftList.getSelectedIndex());((DefaultListModel)rightList.getModel()).addElement(o);}}public static void main(String args[]) {try {UIManager.setLookAndFeel(UIManager.getSystemLookAndFeelClassName()); } catch (ClassNotFoundException e) {// TODO Auto-generated catch blocke.printStackTrace();} catch (InstantiationException e) {// TODO Auto-generated catch blocke.printStackTrace();} catch (IllegalAccessException e) {// TODO Auto-generated catch blocke.printStackTrace();} catch (UnsupportedLookAndFeelException e) {// TODO Auto-generated catch blocke.printStackTrace();}MyFrame frame = new MyFrame();}}。
基于HTML5代码实现折叠菜单附源码下载

基于HTML5代码实现折叠菜单附源码下载折叠菜单是网页开发中常见的交互功能,在HTML5中可以通过使用CSS和JavaScript来实现。
以下是一个基于HTML5的折叠菜单的源代码示例:```<!DOCTYPE html><html><head><style>/*折叠菜单的样式*/.collapsiblebackground-color: #eee;color: ;cursor: pointer;padding: 18px;width: 100%;border: none;text-align: left;outline: none;font-size: 15px;transition: 0.4s;}/*设置折叠菜单的激活状态样式*/.active, .collapsible:hoverbackground-color: #ccc;}/*设置折叠菜单的内容区域样式*/.contentpadding: 0 18px;display: none; /* 默认情况下内容区域隐藏 */ overflow: hidden;background-color: #f1f1f1;}</style></head><body><!--折叠菜单--><button class="collapsible">点击展开菜单</button><div class="content"><p>菜单内容可以在这里添加。
</p></div><script>//获取折叠菜单元素var coll = document.getElementsByClassName("collapsible"); var i;//为每个折叠菜单添加点击事件处理程序for (i = 0; i < coll.length; i++)coll[i].addEventListener("click", functiothis.classList.toggle("active");var content = this.nextElementSibling;if (content.style.display === "block")content.style.display = "none";} elsecontent.style.display = "block";}});}</script></body></html>```以上代码实现了一个基础的折叠菜单功能。
c#实现可折叠导航栏

先上张效果图,依次为全展开图,部分折叠图,全部折叠图时间仓促,功能相对简单,也未经过详细测试,不支持设计期操作,这里提供思路给大家,有时间完善吧,上代码:代码文件介绍NavBar.cs 导航栏主体,继承自PanelNavGroup.cs NavBar中的分组,即(控制面板,我的电脑等),继承自Control NavBarItem.cs 分组中的小项(即区域选项,字体等),继承自Control NavBarButton.cs 导航栏主体右边的圆形按钮NavGroupCollection.cs 分组的集合NavBarItemCollection.cs 分组中小项的集合NavGroupState.cs 组的状态,收缩还是展开NavBar.cs[csharp]view plaincopying System;ing System.Collections.Generic;ing System.Drawing.Design;ing ponentModel.Design;ing ponentModel;ing System.Data;ing System.Drawing;ing System.Linq;ing System.Text;ing System.Windows.Forms;11.space WindowsApplication113.{14.public partial class NavBar : Panel15. {16.private NavGroupCollection _groups;17.public NavGroupCollection Groups18. {19.get { return this._groups; }20. }21.public NavGroup this[int index]22. {23.get24. {25.if (index > -1)26.return this._groups[index];27.else28.return null;29. }30. }31.private int _selectedIndex = -1;32./// <summary>33./// 选择组的索引34./// </summary>35. [DefaultValue(-1)]36.public int SelectedIndex37. {38.get { return this._selectedIndex; }39.set40. {41.this._selectedIndex = value;42.this.SelectGroup(value);43. }44. }45.private int _groupSpace = 20;46./// <summary>47./// Group间距48./// </summary>49.public int GroupSpace50. {51.get { return this._groupSpace; }52.set { this._groupSpace = value; }53. }54.private int _groupMargin = 5;55./// <summary>56./// Group边距57./// </summary>58.public int GroupMargin59. {60.get { return this._groupMargin; }61.set { this._groupMargin = value; }62. }63.private ImageList _smallImageList;64./// <summary>65./// 设置图像列表66./// </summary>67.public ImageList SmallImageList68. {69.get { return this._smallImageList; }70.set { this._smallImageList = value; }71. }72.public NavBar()73. {74. InitializeComponent();75.76.this.BackColor = Color.FromArgb(112, 140, 225);77.this._groups = new NavGroupCollection(this);78.this.AutoScroll = true;79. }80./// <summary>81./// 根据添加的项,布局82./// </summary>83./// <param name="item"></param>84.public void SetLayOut(NavGroup item)85. {86.this.SuspendLayout();87.this.Controls.Add(item);88.if (this._groups.Count == 0)89. {90. item.Top = 10;91. }92.else93. {94. item.Top = this[this._groups.Count - 1].Bottom + this.GroupSpace;96. item.Width = this.Width - 2 * this.GroupMargin;97. item.Left = (this.Width - item.Width) / 2;98. item.Height = item.TitleHeight;99.this.ResumeLayout();100.//item.Anchor = AnchorStyles.Top | AnchorStyles.Left | AnchorSt yles.Right;101. }102./// <summary>103./// 重新布局组件104./// </summary>105.public void SetLayOut()106. {107.for (int i = 0; i < this._groups.Count; i++)108. {109.if (i == 0)110.this._groups[i].Top = 10;111.else112. {113.this._groups[i].Top = this._groups[i - 1].Bottom + this ._groupSpace;114.this._groups[i].GroupIndex = i;115. }116. }117. }118./// <summary>119./// 添加分组120./// </summary>121./// <returns></returns>122.public NavGroup AddGroup()123. {124.this._groups.Add();125.return this._groups[this._groups.Count - 1];126. }127./// <summary>128./// 删除分组129./// </summary>130./// <param name="item"></param>131.public void RemoveGroup(NavGroup item)132. {133.int i = item.GroupIndex;134.this._groups.Remove(item);135.this.Controls.Remove(item);136.this.SetLayOut();138./// <summary>139./// 删除指定索引的分组140./// </summary>141./// <param name="index"></param>142.public void RemoveGroupAt(int index)143. {144.this.Controls.Remove(this._groups[index]);145.this._groups.RemoveAt(index);146.this.SetLayOut();147. }148./// <summary>149./// 选中指定索引的分组150./// </summary>151./// <param name="index"></param>152.private void SelectGroup(int index)153. {154.foreach (NavGroup g in this._groups)155. {156.if (g.GroupIndex == this._selectedIndex) continue;157. g.IsSelected = false;158. }159. }160.161.protected override void OnPaint(PaintEventArgs e)162. {163.base.OnPaint(e);164. }165. }166.}NavGroup.cs[csharp]view plaincopying System;ing System.Collections.Generic;ing ponentModel;ing System.Data;ing System.Drawing;ing System.Drawing.Drawing2D;ing System.Linq;ing System.Text;ing System.Windows.Forms;10.space WindowsApplication112.{13.public partial class NavGroup : Control14. {15.private Rectangle _titleRectangle;16.private NavBar _ownerBar;17.private NavBarButton _button;18.private NavBarItemCollection _items;19.public NavBarItemCollection Items20. {21.get { return this._items; }22.set { this._items = value; }23. }24.public NavBarItem this[int index]25. {26.get27. {28.if (index > -1)29.return this._items[index];30.else31.return null;32. }33. }34.private NavGroupState _groupState = NavGroupState.expand;35./// <summary>36./// 组的状态37./// </summary>38.public NavGroupState GroupState39. {40.get { return this._groupState; }41.set42. {43.this._groupState = value;44.this.SetGroupState(value);45. }46. }47.private int _groupIndex;48./// <summary>49./// 组索引50./// </summary>51.public int GroupIndex52. {53.get { return this._groupIndex; }54.set { this._groupIndex = value; }55. }56.private int _titleHeight = 20;57./// <summary>58./// 标题高度59./// </summary>60.public int TitleHeight61. {62.get { return this._titleHeight; }63.set64. {65.this._titleHeight = value;66.this.SetTitleRectangle();67. }68. }69.private string _title;70./// <summary>71./// 标题72./// </summary>73.public string Title74. {75.get { return this._title; }76.set { this._title = value; }77. }78.private Color _titleStartColor = Color.White;79./// <summary>80./// 标题渐变开始色81./// </summary>82.public Color TitleStartColor83. {84.get { return this._titleStartColor; }85.set86. {87.this._titleStartColor = value;88. }89. }90.private Color _titleEndColor = Color.FromArgb(199, 211, 247);91./// <summary>92./// 标题渐变结束色93./// </summary>94.public Color TitleEndColor95. {96.get { return this._titleEndColor; }97.set98. {99.this._titleEndColor = value;100. }101. }102.private int _itemSpace = 5;103./// <summary>104./// Item间距105./// </summary>106.public int ItempSpace107. {108.get { return this._itemSpace; }109.set { this._itemSpace = value; } 110. }111.private int _itemMargin = 5;112./// <summary>113./// Item边距114./// </summary>115.public int ItemMargin116. {117.get { return this._itemMargin; } 118.set { this._itemMargin = value; } 119. }120.private bool _isSelected = false;121./// <summary>122./// 是否选中123./// </summary>124.public bool IsSelected125. {126.get { return this._isSelected; } 127.set128. {129.this._isSelected = value;130.this.Invalidate();131. }132. }133.private ImageList _smallImageList;134.public ImageList SmallImageList135. {136.get { return this._smallImageList; } 137.set { this._smallImageList = value; } 138. }139.140.public NavGroup()141. {142. InitializeComponent();143.this._title = "新建组";144.this.BackColor = Color.FromArgb(214,223,247);145. SetTitleRectangle();146.this._button = new NavBarButton(this);147.this._button.Click += new EventHandler148. (149.delegate(object sender, EventArgs e)150. {151.if (this._groupState == NavGroupState.collapse)152.this.GroupState = NavGroupState.expand;153.else154.this.GroupState = NavGroupState.collapse;155. });156.this._items = new NavBarItemCollection(this);157. }158.public NavGroup(NavBar ownerbar):this()159. {160.this._ownerBar = ownerbar;161. }162./// <summary>163./// 设置标题区域164./// </summary>165.private void SetTitleRectangle()166. {167.this._titleRectangle = new Rectangle(0, 0, this.Width, _titleHe ight);168. }169./// <summary>170./// 添加项目171./// </summary>172./// <returns></returns>173.public NavBarItem AddItem()174. {175.this._items.Add();176.return this._items[this._items.Count - 1];177. }178./// <summary>179./// 设置组状态180./// </summary>181./// <param name="value"></param>182.private void SetGroupState(NavGroupState value)183. {184.if (value == NavGroupState.collapse)185. {186.this.Height = this._titleHeight;187. }188.else189. {190.if (this._items.Count > 0)191. {192.this.Height = this._items[this._items.Count - 1].Bottom + this._itemSpace;193. }194. }195.this._ownerBar.SetLayOut();196. }197./// <summary>198./// 根据新增项布局199./// </summary>200./// <param name="item"></param>201.public void SetLayOut(NavBarItem item)202. {203.this.SuspendLayout();204.this.Controls.Add(item);205.if (this._items.Count == 0)206. {207. item.Top = this._titleHeight + 10;208. }209.else210. {211. item.Top = this[this._items.Count - 1].Bottom + this.ItempS pace;212. }213. item.Width = this.Width - 2 * this.ItemMargin;214. item.Left = (this.Width - item.Width) / 2;215.this.Height = item.Bottom + this.ItempSpace;216.this._ownerBar.SetLayOut();217.this.ResumeLayout();218. }219./// <summary>220./// 重新布局,这个需要完善221./// </summary>222./// <param name="index"></param>223.public void SetLayOut(int index)224. {225.for (int i = index + 1; i < this._items.Count; i++)226. {227.this._items[i].Top = this._items[i-1].Bottom + this._itemSp ace;228. }229. }230.231.protected override void OnClick(EventArgs e)232. {233.base.OnClick(e);234.this.IsSelected = true;235.this._ownerBar.SelectedIndex = this._groupIndex;236. }237.protected override void OnMouseUp(MouseEventArgs e)238. {239.base.OnMouseUp(e);240.if (this._button.ClientRectangle.Contains(e.Location))241. {242.this._button.DoClick();243.this.Invalidate();244. }245. }246.protected override void OnPaint(PaintEventArgs e)247. {248.base.OnPaint(e);249. SizeF size = e.Graphics.MeasureString(this._title, this.Font);250. Font titlefont = new Font(this.Font.FontFamily,this.Font.Size, this.Font.Style | FontStyle.Bold);251.//未选中252.if (!this._isSelected)253. {254. LinearGradientBrush brush = new LinearGradientBrush(this._t itleRectangle, this._titleStartColor, this._titleEndColor, 0f);255. e.Graphics.FillRectangle(brush, this._titleRectangle); 256. e.Graphics.DrawString(this._title, titlefont, Brushes.Black , this._titleRectangle.X, this._titleRectangle.Top + (this._titleRectangle.H eight - size.Height) / 2);257. }258.else259. {260. e.Graphics.FillRectangle(new SolidBrush(Color.FromArgb(35, 90, 200)), this._titleRectangle);261. e.Graphics.DrawString(this._title, titlefont, Brushes.White , this._titleRectangle.X, this._titleRectangle.Top + (this._titleRectangle.H eight - size.Height) / 2);262. }263. e.Graphics.DrawRectangle(Pens.White, new Rectangle(0, 0, this.W idth - 1, this.Height - 1));264.//绘制右侧原型按钮265.this._button.Draw(e.Graphics);266.267. }268.protected override void OnResize(EventArgs e)269. {270.base.OnResize(e);271. SetTitleRectangle();272.this._button.SetClientRectangle(this._titleRectangle);273. }274. }275.}NavBarItem.cs,这里偷了个懒,该组件包含一个PictureBox和Label组件,PictureBox用来显示图标,Lable用来显示文字[csharp]view plaincopying System;ing System.Collections.Generic;ing ponentModel;ing System.Diagnostics;ing System.Linq;ing System.Text;ing System.Windows.Forms;ing System.Drawing;9.space WindowsApplication111.{12.public partial class NavBarItem : Control13. {14./// <summary>15./// 供外部调用项的点击事件16./// </summary>17. [Browsable(false)]18.public event EventHandler ItemClick;19.20.private Rectangle _imageRectangle;21.private PictureBox _picbox;22.private Label _titlebox;23.24.private NavGroup _ownerGroup;25./// <summary>26./// 所属组27./// </summary>28.public NavGroup OwnerGroup29. {30.get { return this._ownerGroup; }31.set { this._ownerGroup = value; }32. }33.private int _itemIndex;34.public int ItemIndex35. {36.get { return this._itemIndex; }37.set { this._itemIndex = value; }38. }39.private int _imageIndex = -1;40./// <summary>41./// 图标的索引42./// </summary>43.public int ImageIndex44. {45.get { return this._imageIndex; }46.set47. {48.if (this._ownerGroup.SmallImageList == null) return;49.if (value >= this._ownerGroup.SmallImageList.Images.Count) return;50.this._imageIndex = value;51.this._picbox.Image = this._ownerGroup.SmallImageList.Images[this._imageIndex];52.this.Invalidate();53. }54. }55.private new string _text;56./// <summary>57./// 设置显示文字58./// </summary>59.public new string Text60. {61.get { return this._text; }62.set63. {64.this._text = value;65.this._titlebox.Text = value;66.this.Invalidate();68. }69.public NavBarItem()70. {71. InitializeComponent();72.this.AutoSize = false;73.this.Height = 22;74.this.Cursor = Cursors.Hand;75.this._titlebox = new Label();76.this._titlebox.Parent = this;77.this._titlebox.Dock = DockStyle.Fill;78.this._titlebox.TextAlign = ContentAlignment.MiddleLeft;79.this._titlebox.MouseHover += new EventHandler(this.OnTitleMouseHover);80.this._titlebox.MouseLeave += new EventHandler(this.OnTitleMouseLeave);81.this._titlebox.Click += new EventHandler(this.OnTitleClick);82.this._picbox = new PictureBox();83.this._picbox.Parent = this;84.this._picbox.Dock = DockStyle.Left;85.this._picbox.Width = this.Height;86.this._picbox.SizeMode = PictureBoxSizeMode.CenterImage;87.this.Text = "新建项目";88. }89.public NavBarItem(NavGroup ownergroup)90. : this()91. {92.this._ownerGroup = ownergroup;93. }94.95.private void OnTitleClick(object sender, EventArgs e)96. {97.base.OnClick(e);98.if (this.ItemClick != null)99. {100.this.ItemClick(this, new EventArgs());101. }102. }103.private void OnTitleMouseHover(object sender,EventArgs e)104. {105. Control c = (Control)sender;106. c.ForeColor = Color.Blue;107. c.Font = new Font(c.Font.FontFamily, c.Font.Size, c.Font.Style | FontStyle.Underline);109.private void OnTitleMouseLeave(object sender, EventArgs e)110. {111. Control c = (Control)sender;112. c.ForeColor = SystemColors.ControlText;113. c.Font = new Font(c.Font.FontFamily, c.Font.Size, FontStyle.Reg ular);114. }115. }116.}NavBarButton.cs[csharp]view plaincopying System;ing System.Collections.Generic;ing System.Linq;ing System.Text;ing System.Drawing;ing System.Drawing.Drawing2D;7.space WindowsApplication19.{10.public class NavBarButton11. {12.private NavGroup _navgroup;13.private Rectangle _clientRectangle;14.public Rectangle ClientRectangle15. {16.get { return this._clientRectangle; }17.set { this._clientRectangle = value; }18. }19.20.public NavBarButton() { }21.public NavBarButton(NavGroup navgroup)22. {23.this._navgroup = navgroup;24. }25.26.public event EventHandler Click;27.28.public void SetClientRectangle(Rectangle parentRect)29. {30.int i =2;31.int w = parentRect.Height;32.this._clientRectangle = new Rectangle(parentRect.Width - w + i,parentRect.Top + i, w - 2 * i, w - 2 * i);33. }34.public void Draw(Graphics g)35. {36. g.SmoothingMode = SmoothingMode.AntiAlias;37. g.FillEllipse(Brushes.White, this._clientRectangle);38. g.DrawEllipse(Pens.Gray, this._clientRectangle);39. Point centerpoint = new Point(this._clientRectangle.X + this._clientRectangle.Width / 2, this._clientRectangle.Y + this._clientRectangle.Hei ght / 2);40.int w = this._clientRectangle.Width / 4;41. Pen pen = new Pen(Color.Black, 1.6f);42.if (this._navgroup.GroupState == NavGroupState.collapse)43. {44. g.DrawLine(pen, centerpoint.X, centerpoint.Y, centerpoint.X- w, centerpoint.Y - w);45. g.DrawLine(pen, centerpoint.X, centerpoint.Y, centerpoint.X+ w, centerpoint.Y - w);46. g.DrawLine(pen, centerpoint.X, centerpoint.Y + 4, centerpoint.X - w, centerpoint.Y + w - 4);47. g.DrawLine(pen, centerpoint.X, centerpoint.Y + 4, centerpoint.X + w, centerpoint.Y + w - 4);48. }49.else50. {51. g.DrawLine(pen, centerpoint.X, centerpoint.Y, centerpoint.X- w, centerpoint.Y + w);52. g.DrawLine(pen, centerpoint.X, centerpoint.Y, centerpoint.X+ w, centerpoint.Y + w);53. g.DrawLine(pen, centerpoint.X, centerpoint.Y - 4, centerpoint.X - w, centerpoint.Y + w - 4);54. g.DrawLine(pen, centerpoint.X, centerpoint.Y - 4, centerpoint.X + w, centerpoint.Y + w - 4);55. }56. }57.public void DoClick()58. {59.if (this.Click != null)60. {61.this.Click(this, new EventArgs());62. }63. }64. }65.}NavGroupCollection.cs[csharp]view plaincopying System;ing System.Collections.Generic;ing System.Linq;ing System.Text;5.space WindowsApplication17.{8.public class NavGroupCollection :List<NavGroup>9. {10.private NavBar _ownerBar;11.public NavGroupCollection(NavBar ownerBar):base()12. {13.this._ownerBar = ownerBar;14. }15.public new void Add(NavGroup item)16. {17.this._ownerBar.SetLayOut(item);18.base.Add(item);19. item.GroupIndex = this.Count - 1;20. item.SmallImageList = this._ownerBar.SmallImageList;21. }22.public new void Add()23. {24. NavGroup item = new NavGroup(this._ownerBar);25.this.Add(item);26. }27.28. }29.}NavBarItemCollection.cs[csharp]view plaincopying System;ing System.Collections.Generic;ing System.Linq;ing System.Text;5.space WindowsApplication17.{8.public class NavBarItemCollection : List<NavBarItem>9. {10.private NavGroup _ownerGroup;11.12.public NavBarItemCollection(NavGroup ownerGroup):base()13. {14.this._ownerGroup = ownerGroup;15. }16.public new void Add(NavBarItem item)17. {18.this._ownerGroup.SetLayOut(item);19.base.Add(item);20. item.ItemIndex = this.Count - 1;21. }22.public new void Add()23. {24. NavBarItem item = new NavBarItem(this._ownerGroup);25.this.Add(item);26. }27. }28.}NavGroupState.cs[csharp]view plaincopying System;2.space WindowsApplication14.{5.public enum NavGroupState6. {7. expand,8. collapse9. }10.}使用,按钮点击时,写如下代码[csharp]view plaincopy1.NavBarItem item;2.navBar1.AddGroup().Title = "控制面板";3.item = navBar1[0].AddItem();4.item.ImageIndex = 0;5.item.Text = "区域选项";6.item = navBar1[0].AddItem();7.item.ImageIndex = 1;8.item.Text = "字体";9.item = navBar1[0].AddItem();10.item.ImageIndex = 2;11.item.Text = "添加硬件";12.navBar1.AddGroup().Title = "我的电脑";13.item = navBar1[1].AddItem();14.item.ImageIndex = 3;15.item.Text = "C 盘";16.navBar1.AddGroup().Title = "网上邻居";17.item = navBar1[2].AddItem();18.item.ImageIndex = 4;19.item.Text = "本地连接";20.item = navBar1[2].AddItem();21.item.ImageIndex = 5;22.item.Text = "VPN连接";23.navBar1.AddGroup().Title = "我的文档";24.item = navBar1[3].AddItem();25.item.ImageIndex = 6;26.item.Text = "文档 A";27.item = navBar1[3].AddItem();28.item.ImageIndex = 7;29.item.Text = "文档 B";30.item = navBar1[3].AddItem();31.item.ImageIndex = 8;32.item.Text = "文档 C";。
el-table树形表格某一行的展开与收起

el-table树形表格某一行的展开与收起在使用`el-table`(基于Element UI 的表格组件)时,如果需要实现树形表格某一行的展开与收起,可以使用`expand` 属性和`row-click` 事件。
以下是一个简单的例子:```html<template><div><el-table:data="tableData":tree-props="{children: 'children', hasChildren: 'hasChildren'}":expand="expandAll"@row-click="handleRowClick"><el-table-column label="ID" prop="id"></el-table-column><el-table-column label="Name" prop="name"></el-table-column><el-table-column label="Age" prop="age"></el-table-column><el-table-column label="Operation"><template slot-scope="scope"><el-button size="mini" type="text" @click="toggleExpand(scope.row)">{{ scope.row.expanded ? 'Collapse' : 'Expand' }}</el-button></template></el-table-column></el-table></div></template><script>export default {data() {return {expandAll: false, // 是否展开所有行tableData: [{id: 1,name: 'John Doe',age: 30,children: [{id: 2,name: 'Jane Doe',age: 25,hasChildren: false},{id: 3,name: 'Jim Doe',age: 28,children: [{id: 4,name: 'Jack Doe',age: 2,hasChildren: false}]}]},{id: 5,name: 'Bob Smith',age: 40,hasChildren: false}]};},methods: {handleRowClick(row, column, event) {// 处理行点击事件,如果点击的是Operation 列,不触发展开/收起if (column.property !== 'operation') {this.toggleExpand(row);}},toggleExpand(row) {// 切换展开/收起状态this.$set(row, 'expanded', !row.expanded);if (row.expanded) {// 如果展开,递归展开所有子节点this.expandAllChildren(row);} else {// 如果收起,递归收起所有子节点this.collapseAllChildren(row);}},expandAllChildren(row) {if (row.children) {row.children.forEach(child => {this.$set(child, 'expanded', true);this.expandAllChildren(child);});}},collapseAllChildren(row) {if (row.children) {row.children.forEach(child => {this.$set(child, 'expanded', false);this.collapseAllChildren(child);});}}}};</script>```在这个例子中,使用了`expand` 属性来控制表格的展开状态,通过`@row-click` 事件来监听行点击事件。
idea 方法中代码展开和收起款借鉴

idea 方法中代码展开和收起款借鉴在编程领域中,代码的展开和收起是一种常见的技术,它可以帮助开发者在阅读和理解大量代码时更加方便和高效。
以下是几种常见的方法,可以借鉴在你的IDEA中实现展开和收起代码的功能:1. 代码折叠功能:大多数集成开发环境(IDE)都提供了代码折叠功能,你可以使用该功能折叠或展开一段代码块。
通常,使用快捷键组合(例如Ctrl + "+"或Ctrl + "-")可以控制代码块的展开和收起。
你可以在IDE的设置中自定义这些快捷键,以使其更符合你的习惯。
2. 注释折叠:使用注释来折叠代码块也是一种常见的技巧。
在IDEA中,你可以在代码块的上下方添加注释,然后通过折叠注释来隐藏代码块。
例如,你可以在代码块上方添加`//region`注释,并在代码块下方添加`//endregion`注释,然后通过折叠这些注释实现代码块的折叠。
这种方法在IDEA中非常常见,很多开发者也习惯使用这种方式来组织和隐藏代码。
3. 自定义代码模板:IDEA允许你创建自定义代码模板,以实现更高级的代码展开和收起功能。
你可以创建一些常见的代码模板,并将其绑定到指定的快捷键上。
例如,你可以创建一个代码模板来生成一段特定的代码块,并将其绑定到快捷键上。
这样,当你按下快捷键时,IDEA会自动插入该代码块。
这种方法不仅可以帮助你更快速地编写代码,还可以合理地组织和展示代码。
4. 使用代码折叠插件:IDEA还提供了许多代码折叠插件,可以扩展和增强其默认的代码折叠功能。
你可以根据自己的需求选择合适的插件,例如"Code Folding+"等,来增强代码的折叠和展开功能。
这些插件通常可以在IDEA的插件市场中下载和安装。
总的来说,展开和收起代码的功能可以大大提高编程效率和代码阅读性。
在使用IDEA时,你可以根据自己的喜好和习惯,结合上述方法,定制和优化代码的展开和收起方式。
VSCode的代码折叠与展开功能介绍

VSCode的代码折叠与展开功能介绍代码编辑器是开发人员日常工作中必备的工具之一。
VSCode作为一款功能强大且广受欢迎的代码编辑器,提供了丰富的功能来提升开发效率。
其中,代码折叠与展开功能是VSCode的一项重要特性。
本文将介绍VSCode的代码折叠与展开功能,并探讨如何使用这一功能来提升代码阅读和编写的便利性。
一、代码折叠功能的介绍代码折叠功能是指将一段代码折叠成一个可点击的区域,从而在有限的空间内展示更多的代码。
通过折叠代码,可以减少屏幕上的代码行数,提高代码的可读性和整洁度。
VSCode提供了多种方式来进行代码折叠:1. 折叠整个方法或函数:通过点击代码左侧的“-”图标或按下特定快捷键(根据操作系统和用户设置的不同),可以折叠整个方法或函数。
这样,就可以将一大段代码折叠成一个简洁的区域,方便查看和编辑其他代码。
2. 折叠特定代码块:除了折叠整个方法或函数外,VSCode还支持折叠其他特定的代码块,如if语句、for循环等。
通过将光标放在代码块上并按下特定快捷键,或者点击代码左侧的三角形图标,即可折叠该代码块。
3. 折叠全部代码:如果你想一次性折叠所有代码,可以通过点击VSCode的侧边栏上的“折叠所有区域”按钮来实现。
这样可以迅速将整个文件的代码折叠起来,方便查看文件结构。
二、代码展开功能的介绍与代码折叠功能相反,代码展开功能用于显示已折叠的代码。
当代码折叠后,我们可以通过点击折叠区域或按下特定快捷键来展开被折叠的代码。
VSCode提供了以下几种代码展开的方式:1. 展开单个折叠区域:将光标放在折叠区域上并点击,或按下特定快捷键,即可展开被折叠的代码。
这种方式适用于只想展开某个特定的代码块的情况。
2. 展开全部折叠区域:如果你想一次性展开所有被折叠的代码,可以通过点击VSCode的侧边栏上的“展开所有区域”按钮来实现。
这样可以一次性展开整个文件的所有代码,方便全面查看文件内容。
三、如何使用代码折叠与展开功能代码折叠与展开功能的使用非常简单,你只需要记住相关的快捷键或点击相应的图标即可。
java折叠代码注释

在Java 中,代码注释用于提供代码的说明和解释,但它们不会影响代码的执行。
注释可以是单行的,也可以是多行的。
以下是几种常见的Java 注释类型:1. 单行注释:使用`//` 符号开始,直到行尾的所有内容都将被视为注释。
```java// 这是一个单行注释System.out.println("Hello, World!"); // 这也是一个单行注释```2. 多行注释:使用`/` 开始,使用`/` 结束,这种方式可以跨越多行。
```java/这是一个多行注释可以跨越多行/System.out.println("Hello, World!");```3. 文档注释:使用`/` 开始,使用`/` 结束,这种注释可以被工具如Javadoc 用来生成文档。
```java/这个是文档注释可以被Javadoc 工具用来生成文档/public class HelloWorld {/类的描述/public static void main(String[] args) {// 方法的描述System.out.println("Hello, World!");}}```至于"折叠代码注释",这通常是指在代码编辑器或IDE(集成开发环境)中的一种功能,允许开发者折叠或展开代码块。
这有助于提高代码的可读性和管理大型代码库。
在很多编辑器和IDE 中,你可以通过点击代码左侧的加号或减号按钮来折叠或展开代码块。
例如,在Eclipse 或IntelliJ IDEA 中,你可以折叠整个代码文件的方法或代码块,以减少屏幕上的混乱并专注于特定的代码部分。
这并不是Java 语言本身提供的功能,而是开发工具提供的便利。
如果你想在代码中实现某种形式的代码折叠,你通常需要使用预处理器指令或在代码中使用特定的标记来指示折叠的开始和结束。
MFCoffice2007风格设置左侧导航栏[转]
![MFCoffice2007风格设置左侧导航栏[转]](https://img.taocdn.com/s3/m/9e7dc56300f69e3143323968011ca300a6c3f6dd.png)
MFCoffice2007风格设置左侧导航栏[转]当基础的框架搭好以后,我想为其添加⼀个左侧导航栏,过程如下:在框架类的头⽂件添加⼀个导航栏参数:CMFCOutlookBar m_navigation;为了完善功能,在导航栏⾥⾯我添加了⼀个CTreeCtrl控件CTreeCtrl m_treectrl;并且创建⼀个函数创建导航栏,并关联CTreeCtrl控件,函数原型如下:bool CreateNavigationBar(CMFCOutlookBar& bar, UINT uiID, int nInitialWidth, CTreeCtrl& treectrl);uiID为CMFCOutlookB ar的ID,nInitialW idth为导航栏的宽度,函数的实现如下bool CBridgeWindow::CreateNavigationBar(CMFCOutlookBar& bar, UINT uiID, int nInitialWidth, CTreeCtrl& treectrl){//创建导航栏bar.Create("节点",this,CRect(0, 0, 250, 32000),uiID,WS_CHILD | WS_VISIBLE | CBRS_LEFT);CMFCOutlookBarTabCtrl* pOutlookBar = (CMFCOutlookBarTabCtrl*)m_navigation.GetUnderlyingWindow();if (pOutlookBar == NULL){ASSERT(FALSE);return FALSE;}//pOutlookBar->EnableInPlaceEdit(TRUE);//标签能够被编辑DWORD dwStyle = AFX_CBRS_FLOAT | AFX_CBRS_AUTOHIDE | AFX_CBRS_RESIZE;CRect rectDummy(0, 0, 0, 0);const DWORD dwTreeStyle = WS_CHILD | WS_VISIBLE | TVS_HASLINES | TVS_LINESATROOT | TVS_HASBUTTONS;treectrl.Create(dwTreeStyle,rectDummy,&bar,ID_TREELIST);TVINSERTSTRUCT tvInsert;tvInsert.hParent = NULL;tvInsert.hInsertAfter = NULL;tvInsert.item.mask = TVIF_TEXT;tvInsert.item.pszText = "河北";tvInsert.item.lParam=1;HTREEITEM hBridge = treectrl.InsertItem(&tvInsert);tvInsert.item.pszText = "⼭东";tvInsert.item.lParam=2;TVINSERTSTRUCT tNode;//tNode.hInsertAfter=hBridge;tNode.hParent=hBridge;tNode.item.mask=TVIF_TEXT;tNode.item.pszText="⽯家庄";tNode.item.lParam=1;treectrl.InsertItem(&tNode);hBridge=treectrl.InsertItem(&tvInsert);treectrl.InsertItem(TVIF_TEXT,"济南", 0, 0, 0, 0, 0, hBridge, NULL);pOutlookBar->AddControl(&treectrl, "节点列表", 2, TRUE, dwStyle);return false;}调⽤代码int CBridgeWindow::OnCreate(LPCREATESTRUCT lpCreateStruct)int CBridgeWindow::OnCreate(LPCREATESTRUCT lpCreateStruct){if (CFrameWndEx::OnCreate(lpCreateStruct) == -1)return -1;CMFCVisualManagerOffice2007::SetStyle(CMFCVisualManagerOffice2007::Office2007_LunaBlue);CMFCVisualManager::SetDefaultManager(RUNTIME_CLASS(CMFCVisualManagerOffice2007));CDockingManager::SetDockingMode(DT_SMART);m_wndRibbonBar.SetWindows7Look(false);RedrawWindow(NULL, NULL, RDW_ALLCHILDREN | RDW_INVALIDATE | RDW_UPDATENOW | RDW_FRAME | RDW_ERASE); m_wndRibbonBar.Create(this);m_wndRibbonBar.LoadFromResource(IDR_RIBBON);// 启⽤ Visual Studio 2005 样式停靠窗⼝⾏为// CDockingManager::SetDockingMode(DT_SMART);// 启⽤ Visual Studio 2005 样式停靠窗⼝⾃动隐藏⾏为// EnableAutoHidePanes(CBRS_ALIGN_ANY);// 导航窗格将创建在左侧,因此将暂时禁⽤左侧的停靠:// EnableDocking(CBRS_ALIGN_TOP | CBRS_ALIGN_BOTTOM | CBRS_ALIGN_RIGHT);//创建左侧导航栏CreateNavigationBar(m_navigation,ID_NAVIGATION,250,m_treectrl);return 0;}当然,要在resource.h中添加资源ID:ID_NAVIGATION,ID_TREELIST,编译运⾏即可。
vs code 全部折叠多行注释

vs code 全部折叠多行注释
在 VS Code 中,如果你想折叠(或展开)多行注释,你可以使用以下的步骤:
1. 打开你想要折叠的注释。
2. 在注释的上方,你会看到一个小的箭头,表示当前注释的折叠状态。
如果箭头朝下,表示注释是折叠的;如果箭头朝上,表示注释是展开的。
3. 点击这个箭头,你可以切换注释的折叠和展开状态。
如果你想在 VS Code 中默认折叠所有注释,你可能需要使用一个扩展。
例如,"Code Folding" 扩展可以帮助你折叠代码和注释。
此外,如果你想要自动折叠所有的代码块或注释,VS Code 目前并没有直接提供这样的功能。
但是,你可以使用一些快捷键来快速折叠或展开代码:
折叠所有:`Ctrl + K Ctrl + X` (Windows/Linux) 或 `Cmd + K Cmd + X` (macOS)
展开所有:`Ctrl + K Ctrl + Y` (Windows/Linux) 或 `Cmd + K Cmd + Y` (macOS)
请注意,这些快捷键可能会受到你所安装的扩展的影响,因此如果默认的快捷键不起作用,你可能需要查看你的扩展设置或文档来找到正确的快捷键。
vba折叠代码

vba折叠代码
在VBA(Visual Basic for Applications)中,折叠代码是一种组织和管理代码的方式,尤其在较长的程序中,它可以帮助提高代码的可读性和降低维护难度。
以下是如何在VBA中折叠代码的方法:
1. 首先,确保你的VBA编辑器中已开启“折叠”功能。
在VBA编辑器中,点击“工具”菜单,然后选择“选项”。
在“选项”对话框中,确保“编辑器”标签下的“启用折叠”复选框已被勾选。
2. 接下来,在代码中找到你希望折叠的部分。
这可以是函数、过程、循环等。
3. 在该部分的代码行左侧,点击鼠标右键,然后选择“折叠”。
这会将选定的代码部分折叠起来,使其在代码中不可见。
4. 如果你想展开折叠的代码,只需在代码行左侧再次点击鼠标右键,然后选择“展开”。
5. 你还可以使用快捷键来折叠和展开代码。
要折叠代码,请按Ctrl + Shift + F。
要展开代码,请按Ctrl + Shift + U。
通过以上步骤,你可以在VBA中轻松地折叠和展开代码,从而提高代码的可读性和管理效率。
在实际编写代码时,还可以结合其他编程技巧,如代码注释、命名规范等,以进一步提高代码质量。
(一)CSS3动画应用-CSS3实现侧边栏展开收起

(⼀)CSS3动画应⽤-CSS3实现侧边栏展开收起@keyframes规则⽤于创建动画。
@keyframes 中规定某项 CSS 样式,就能创建由当前样式逐渐改为新样式的动画效果@keyframes 中创建动画时,请把它捆绑到某个选择器,否则不会产⽣动画效果。
通过规定⾄少以下两项 CSS3 动画属性,即可将动画绑定到选择器:规定动画的名称规定动画的时长animationanimation 属性是⼀个简写属性,⽤于设置动画属性:animation-name:规定 @keyframes 动画的名称。
animation-duration:规定动画完成⼀个周期所花费的秒或毫秒。
默认是 0。
animation-timing-function:规定动画的速度曲线。
默认是 "ease"。
animation-delay:规定动画何时开始。
默认是 0animation-iteration-count:规定动画被播放的次数。
默认是 1。
animation-direction:规定动画是否在下⼀周期逆向地播放。
默认是 "normal"。
animation-fill-mode:规定对象动画时间之外的状态侧边栏实现1/* 动画定义 */2@-webkit-keyframes move_right {3 from {4 opacity: 0;5 }6 to {7 opacity: 1;8 -webkit-transform: translateX(120px);9 transform: translateX(120px);10 }11}12@keyframes move_right {13 from {14 opacity: 0;15 }16 to {17 opacity: 1;18 -webkit-transform: translateX(120px);19 transform: translateX(120px);20 }21}22@-webkit-keyframes move_left {23 from {24 opacity: 1;25 }26 to {27 opacity: 0;28 -webkit-transform: translateX(-120px);29 transform: translateX(-120px);30 }31}32@keyframes move_left {33 from {34 opacity: 1;35 }36 to {37 opacity: 0;38 -webkit-transform: translateX(-120px);39 transform: translateX(-120px);40 }41}42@-webkit-keyframes move_up {43 from {44 opacity: 0;45 }46 to {47 opacity: 1;48 -webkit-transform: translateY(-250px);49 transform: translateY(-250px);50 }51}52@keyframes move_up {53 from {54 opacity: 0;55 }56 to {57 opacity: 1;58 -webkit-transform: translateY(-250px);59 transform: translateY(-250px);60 }61}1/* 动画绑定 */2.move_right {3 -webkit-animation-name : move_right;4 animation-name : move_right;5 -webkit-animation-duration : 1s;6 animation-duration : 1s;7 -webkit-animation-iteration-count : 1;8 animation-iteration-count : 1;9 -webkit-animation-fill-mode : forwards;10 animation-fill-mode : forwards;11 }12.move_left {13 -webkit-animation-name : move_left;14 animation-name : move_left;15 -webkit-animation-duration : 1s;16 animation-duration : 1s;17 -webkit-animation-iteration-count : 1;18 animation-iteration-count : 1;19 -webkit-animation-fill-mode : forwards;20 animation-fill-mode : forwards;21 }22.move_up {23 -webkit-animation-name : move_up;24 animation-name : move_up;25 -webkit-animation-duration : 1s;26 animation-duration : 1s;27 -webkit-animation-iteration-count : 1;28 animation-iteration-count : 1;29 -webkit-animation-fill-mode : forwards;30 animation-fill-mode : forwards;31 }32.fadeIn {33 -webkit-transform : translateX(120px);34 transform : translateX(120px);35 opacity: 1;36 }37.fadeInUp {38 -webkit-transform : translateY(-250px);39 transform : translateY(-250px);40 opacity: 1;41 -webkit-transition :-webkit-transform .2s ease-out,opacity .2s ease-out;42 transition :transform .2s ease-out, opacity .2s ease-out;43 }44.fadeOutLeft {45 -webkit-transform : translateX(-120px);46 transform : translateX(-120px);47 opacity: 0.0;48 -webkit-transition :-webkit-transform .2s ease-out,opacity .2s ease-out;49 transition :transform .2s ease-out, opacity .2s ease-out;50 }html1<!doctype html>2<html lang="en" class="fullHeight">3<head>4<meta charset="UTF-8">5<title>demo</title>6<link rel="stylesheet" type="text/css" href="sidebar.css">7</head>8<body class="fullHeight">9<div class='sidebar fullHeight'>sidebar</div>10<div class="controller">11<div>12<button onclick="fadeIn()">淡进</button>13<button onclick="fadeOut()">淡出</button>14</div>15<div>16<button onclick="fadeInUp()">向上淡进</button>17<button onclick="fadeOutLeft()">向左淡出</button> 18</div>19</div>20<script src="sidebarEffects.js"></script>21</body>22</html>View Code加⼊JS1 <script>2var sidebarEl = document.querySelector(".sidebar");34function fadeIn (e) {5 sidebarEl.className = 'sidebar fullHeight';6 sidebarEl.style.top = '0px';7 sidebarEl.style.left = '0px';8 sidebarEl.classList.add('move_right');9 }10function fadeOut (e) {11 sidebarEl.className = 'sidebar fullHeight';12 sidebarEl.style.left = '120px';13 sidebarEl.classList.add('move_left');14 }15function fadeInUp(e) {16 sidebarEl.className = 'sidebar fullHeight';17 sidebarEl.style.top = '250px';18 sidebarEl.style.left = '120px';19 sidebarEl.classList.add('move_up');2021 }22function fadeOutLeft(e) {23 sidebarEl.className = 'sidebar fullHeight';24 sidebarEl.style.top = '0px';25 sidebarEl.style.left = '120px';26 sidebarEl.classList.add('move_left');2728 }29 </script>。
C#_winform 竖型 折叠式 菜单

using System;using System.Collections.Generic;using ponentModel;using System.Data;using System.Drawing;using System.Linq;using System.Text;using System.Windows.Forms;namespace testTree{public partial class Form1 : Form{public Form1(){InitializeComponent();}private void button1_Click(object sender, EventArgs e){Label aa = (Label)sender;String lname = ;FlowLayoutPanel flp = null;for (int i = 0; i < aa.Parent.Controls.Count; i++){if (aa.Parent.Controls[i].Name.Equals("f" + lname.Substring(1))) {flp = (FlowLayoutPanel)aa.Parent.Controls[i];break;}}if (flp.Visible){flp.Visible = false;aa.ImageIndex = 1;aa.ForeColor = Color.Black;}else{aa.ImageIndex = 0;aa.ForeColor = Color.White;flp.Visible = true;flp.Controls.Clear();for (int i = 0; i < 10; i++){Label test1 = new Label(); = "test" + i;test1.Text = "测试县";test1.Padding = new System.Windows.Forms.Padding(8);test1.AutoSize = true;flp.Controls.Add(test1);}}}private Label createdChanelLabel(string name, string text){Label test1 = new Label(); = name;test1.Text = text;test1.Padding = new System.Windows.Forms.Padding(8);test1.AutoSize = true;return test1;}private Label createdLabel(String name, String text){Label label = new Label();label.BackColor = System.Drawing.Color.FromArgb(((int)(((byte)(41)))),((int)(((byte)(41)))), ((int)(((byte)(41)))));label.Font = new System.Drawing.Font("宋体", 9F, System.Drawing.FontStyle.Bold, System.Drawing.GraphicsUnit.Point, ((byte)(134)));label.ForeColor = System.Drawing.Color.Black;label.ImageIndex = 1;label.ImageList = this.imageList1; = "l" + name;label.Size = new System.Drawing.Size(219, 31);label.TabIndex = 3;label.Margin = new System.Windows.Forms.Padding(0);label.Text = " " + text;label.TextAlign = System.Drawing.ContentAlignment.MiddleLeft;label.Click += new System.EventHandler(this.button1_Click);return label;}private FlowLayoutPanel createdFlowLayoutPanel(String name){FlowLayoutPanel flowPanel = new FlowLayoutPanel(); = "f" + name;flowPanel.AutoSize = true;flowPanel.BackColor = Color.White;flowPanel.Padding = new System.Windows.Forms.Padding(10, 0, 10, 10);flowPanel.Margin = new System.Windows.Forms.Padding(3, 0, 3, 3);flowPanel.BackgroundImageLayout = System.Windows.Forms.ImageLayout.Stretch;flowPanel.Visible = false;return flowPanel;}private FlowLayoutPanel createdPFlowLayoutPanel(String name){FlowLayoutPanel flowPanel = new FlowLayoutPanel(); = "p" + name;flowPanel.AutoSize = true;flowPanel.Paint += new System.Windows.Forms.PaintEventHandler(this.panel_Paint);return flowPanel;}private void button1_Click_1(object sender, EventArgs e){FlowLayoutPanel flowPanel = createdPFlowLayoutPanel("qhd");flowPanel.Controls.Add(createdLabel("qhd", "秦皇岛"));flowPanel.Controls.Add(createdFlowLayoutPanel("qhd"));this.flowLayoutPanel2.Controls.Add(flowPanel);}private void panel_Paint(object sender, PaintEventArgs e){Panel p = (Panel)sender;ControlPaint.DrawBorder(e.Graphics, p.ClientRectangle,Color.FromArgb(240, 240, 240), 1, ButtonBorderStyle.Solid,Color.FromArgb(240, 240, 240), 1, ButtonBorderStyle.Solid,Color.FromArgb(240, 240, 240), 1, ButtonBorderStyle.Solid,Color.FromArgb(240, 240, 240), 1, ButtonBorderStyle.Solid);}}}。
sqlserver 折叠代码

sqlserver 折叠代码SQL Server是一种常用的关系型数据库管理系统,它支持折叠代码的功能,方便开发人员在编写复杂的SQL语句时进行代码的组织和管理。
本文将介绍SQL Server折叠代码的功能以及如何使用它来提高SQL开发的效率和可维护性。
一、什么是折叠代码折叠代码是一种将多行代码折叠成一行或者几行的功能,通过折叠代码可以隐藏掉不需要关注的代码段,从而简化代码的阅读和编辑。
在SQL Server中,可以通过在代码行前面添加特定的注释来实现代码的折叠。
二、折叠代码的语法在SQL Server中,可以使用两种方式实现代码的折叠:使用特定的注释标记和使用特定的关键字。
1. 使用注释标记折叠代码折叠代码的注释标记分为两种:区域标记和行标记。
区域标记的语法为:/*region 折叠代码的标题*/行标记的语法为:--#region 折叠代码的标题代码的结束标记为:/*endregion*/或者--#endregion例如,要折叠一个名为“查询订单信息”的代码块,可以使用以下注释标记:/*region 查询订单信息*/--#region 查询订单信息代码.../*endregion*/--#endregion2. 使用关键字折叠代码除了使用注释标记,还可以使用特定的关键字来实现代码的折叠。
在SQL Server中,可以使用BEGIN和END关键字来折叠代码块。
折叠代码的语法为:BEGIN -- 折叠代码的标题代码...END -- 折叠代码的标题例如,要折叠一个名为“查询订单信息”的代码块,可以使用以下关键字:BEGIN -- 查询订单信息代码...END -- 查询订单信息三、折叠代码的作用折叠代码的主要作用是简化代码的阅读和编辑。
通过折叠不需要关注的代码段,可以使代码更加清晰、易于理解和维护。
特别是在处理复杂的SQL语句时,折叠代码可以帮助开发人员快速定位和编辑关键的代码部分。
折叠代码还可以提高开发人员的工作效率。
Vue中实现菜单下拉、收起的动画效果

Vue中实现菜单下拉、收起的动画效果菜单的下拉和收起动画,看起来好像⽐较简单,但是搞了半天。
最后可以使⽤的代码:<transitionname="default"v-on:enter="menuEnter"v-on:leave="menuLeave"enter-class="default-enter"leave-to-class="default-leave-to"><ul v-if="hasChildren(node, index)" class="menu-l2"><liv-for="(subnode, subIndex) in node.children":key="subnode.id"@click.prevent="handleChildNodeClick(subnode, subIndex)"class="node-l2":class="{ 'node-l2-active' : (subIndex == activeChildNodeIndex)}">{{ }}</li></ul></transition>js,这⾥是vue中的methods部分menuEnter: function(el, done) {//这⾏是关键el.offsetWidth;el.style.maxHeight = this.nodes[this.activeParentNodeIndex].children.length * 4 + "rem";el.style.transition = "all 0.3s ease-in";done();},menuLeave: function(el) {el.offsetWidth;el.style.maxHeight = 0;el.style.transition = "all 0.3s ease-out";}css://transitions.default-enter-active {transition: all 0.3s ease-in;}.default-leave-active {transition: all 0.3s ease-out;}.default-enter,.default-leave-to {max-height: 0;}说明这⾥结合了js和css,其实只⽤js也可以,但是稍微⿇烦。
codemirror折叠代码

codemirror折叠代码CodeMirror是一个基于JavaScript的代码编辑器,它支持多种编程语言,包括JavaScript、HTML、CSS、Python等。
CodeMirror的一个重要功能是折叠代码,这使得代码更易于阅读和管理。
CodeMirror的折叠代码功能可以通过使用foldGutter选项来启用。
该选项允许用户在编辑器的左侧显示一个折叠图标,以便折叠和展开代码块。
要启用foldGutter选项,可以使用以下代码:```var editor =CodeMirror.fromTextArea(document.getElementById("myTextAr ea"), {lineNumbers: true,foldGutter: true,gutters: ["CodeMirror-linenumbers", "CodeMirror-foldgutter"] });```在上面的代码中,foldGutter选项被设置为true,这将启用折叠代码功能。
gutters选项用于指定显示在编辑器左侧的图标,包括行号和折叠图标。
一旦启用了折叠代码功能,用户就可以使用鼠标单击折叠图标来折叠和展开代码块。
CodeMirror还提供了一些API方法,可以通过编程方式折叠和展开代码块。
例如,可以使用以下代码折叠第一行和第二行:```editor.foldCode({line: 0, ch: 0}, {line: 1});```在上面的代码中,foldCode方法用于折叠代码块。
第一个参数指定要折叠的第一行和第一个字符的位置,第二个参数指定要折叠的最后一行。
CodeMirror还提供了一些其他的折叠代码选项,包括折叠代码时是否隐藏折叠行、折叠代码时是否显示省略号等。
这些选项可以通过设置foldOptions选项来配置。
例如,可以使用以下代码设置折叠代码时隐藏折叠行:```var editor =CodeMirror.fromTextArea(document.getElementById("myTextArea"), {lineNumbers: true,foldGutter: true,gutters: ["CodeMirror-linenumbers", "CodeMirror-foldgutter"], foldOptions: {widget: "…",minFoldSize: 2,scanUp: true,clearOnEnter: false,hideOnBlur: true,rangeFinder: CodeMirror.fold.auto}});```在上面的代码中,foldOptions选项用于配置折叠代码的行为。
- 1、下载文档前请自行甄别文档内容的完整性,平台不提供额外的编辑、内容补充、找答案等附加服务。
- 2、"仅部分预览"的文档,不可在线预览部分如存在完整性等问题,可反馈申请退款(可完整预览的文档不适用该条件!)。
- 3、如文档侵犯您的权益,请联系客服反馈,我们会尽快为您处理(人工客服工作时间:9:00-18:30)。
<html>
<meta http-equiv=Content-Type content=text/html;charset=gb2312>
<title>收起左栏</title>
<!--这里的样式的重点是指当鼠标移到三角按钮时变成手掌-->
<style type="text/css">
.navPoint {COLOR: white; CURSOR: hand; FONT-FAMILY: Webdings; FONT-SIZE: 9pt}
.a2{BACKGROUND-COLOR: A4B6D7;}
</style>
<body style="MARGIN: 0px" scroll=no onResize=javascript:parent.carnoc.location.reload()>
<TABLE style="BORDER-COLLAPSE: collapse" cellSpacing=0 cellPadding=0 width="100%" border=0>
<TR>
<TD align=center width="100%" height=25 bgcolor="#B1C1E0" style="COLOR: #330099; font: 10.5pt"
><B>烈火网</B>
</TD>
</TR>
</TABLE>
<!--以下代码就是重点,屏幕切换点击后相应的向左或者向右展开-->
<script>
if(self!=top){top.location=self.location;}
function switchSysBar(){
if (switchPoint.innerText==3){
switchPoint.innerText=4
document.all("frmTitle").style.display="none"
}else{
switchPoint.innerText=3
document.all("frmTitle").style.display=""
}}
</script>
<!--以上代码就是重点,屏幕切换点击后相应的向左或者向右展开-->
<table border="0" cellPadding="0" cellSpacing="0" height="100%" width="100%">
<tr>
<td width="30" align="middle" vAlign="center" noWrap id="frmTitle"><!--注意这里的ID,它返回给上面那段javascript的-->
<!--以下是左边的FRAME,你只要做一个宽为180PX的页面嵌套进去就可以了。
当然你也可以修改这句里WIDTH的值为你叶子的宽度-->
<iframe frameBorder="0" id="carnoc" name="carnoc" scrolling=auto src="" style="HEIGHT: 100%; VISIBILITY: inherit; WIDTH: 180px; Z-INDEX: 2">
</iframe>
</td>
<!--同志们请注意下面这个TD,它的颜色就是中间跑来跑去分栏部分的颜色,你可以在这里将颜色改成与你页面融洽的颜色-->
<td width="46" bgcolor="#708EC7" style="WIDTH: 9pt">
<!--哈哈,看到了吧,中间的那个跑来跑去的栏实际上去一个TABLE哦!TABle的宽度就是那条栏的宽度-->
<table width="9" height="100%" border="0" cellpadding="0" cellspacing="0">
<tr>
<td width="200" style="HEIGHT: 100%" onClick="switchSysBar()"><!--这里调用上面的switchSysBar过程-->
<font style="FONT-SIZE: 9pt; CURSOR: default; COLOR: #ffffff">
<!--这里你可以把3改成1或者其他数字来看看就发现了是形状问题了-->
<span class="navPoint" id="switchPoint" title="关闭/打开左栏">3</span>屏幕切换</font></td>
</tr>
</table></td>
<td width="630" style="WIDTH: 100%"></td>
</tr>
</table>
</html>。
