DB2客户端SQuirreL使用
db2的使用
db2的使用DB2是IBM公司开发的关系型数据库管理系统,它可以运行在多个操作系统平台上,如Windows、Linux、Unix和IBM的主机操作系统等。
DB2的功能非常强大,可以用于各种企业级应用程序的开发和部署。
在本文中,我们将详细介绍DB2的使用,包括安装、配置、管理和编程等方面。
一、DB2的安装和配置1、先前准备(1)确定需要安装的DB2版本和操作系统平台,以及应用场景和需求;(2)确保计算机符合DB2的最低系统要求,包括硬件和软件配置等;(3)获取适用于操作系统的DB2安装介质,可以从IBM官网或授权渠道获取。
2、安装过程(1)下载安装介质并解压缩至指定位置;(2)运行安装程序,按照提示进行安装,可以根据需要选择安装路径和组件;(3)在安装向导中选择“完整安装”,可以安装DB2服务器、客户端、控制台和示例数据库等组件;(4)在安装向导中设置DB2实例的参数,如实例名称、端口、用户名和密码等,这些参数将决定DB2服务器的启动和运行方式;(5)完成安装后,可以通过命令行或控制台查看DB2实例状态,控制服务器的启停和配置。
3、基本配置(1)启动DB2服务器可以通过控制台或命令行方式启动DB2服务器,如下:Linux/Unix平台:db2startWindows平台:db2cmd,进入命令行模式,输入db2start启动服务器。
(2)连接DB2实例db2 connect to DATABASE user USERNAME using PASSWORDDATABASE为数据库名称,USERNAME为用户名,PASSWORD为密码。
(3)创建数据库db2 create database DATABASEDATABASE为数据库名称。
(4)设定权限和用户PRIVILEGE为权限名称,USER为用户名,OBJECT为对象名称。
二、DB2的管理1、数据库的备份和还原2、数据库的维护TABLENAME为表名称。
Db2的使用

torDb2的使用unix第一步:安装安装DB21。
/cdrom/db2setup,定制要选用控制中心2. 安装结束后,DB2的系统文件位于/usr/lpp/db2xxxx3、实例和数据存放位置只能跟在用户主目录后边,在/home/db2inst1Db27.2.0的版本使用java1.1.8(db2自动安装,用于控制中心使用)4、cd /etcvi services将两个实例的名称与对应的端口号添加进去。
注意两个实例的端口号一定不能相同,如50005,50007db2cdb2inst1 50000/tcp # Connection port for DB2 instance db2inst1db2idb2inst1 50001/tcp # Interrupt port for DB2 instance db2inst1此项自动添加5、在实例中创建测试用数据库,用于测试连通性在AIX上安装DB2, 包括管理实例DB2AS和实例DB2INST1二、启动db21、自动启动的文件在/etc/inittab 下有一行db:2:once:/etc/rc.db2 > /dev/console 2>&1 # Autostart DB2 Servicesdb2inst1 737368 835802 0 May 09 - 0:00 db2spmrmdb2inst1 745662 835802 0 May 09 - 0:00 db2gdsdb2inst1 753726 745662 0 May 09 - 0:00 db2resyndb2as 761880 811254 0 May 09 - 0:00 db2syscdb2inst1 770118 745662 0 May 09 - 0:00 db2spmlwdb2as 794856 761880 0 May 09 - 0:00 db2tcpdmdb2inst1 827626 745662 0 May 09 - 0:00 db2srvlstdb2inst1 835802 868586 0 May 09 - 0:00 db2syscdb2inst1 876778 835802 0 May 09 - 0:00 db2ipccmdb2as 901362 761880 0 May 09 - 0:00 db2tcpcmdb2as 966658 761880 0 May 09 - 0:00 db2gds三、启动实例在/home/db2inst1/sqllib/adm/ 目录下启动db2start四、启动控制中心以root用户登录,#xhost + //使所有的以其他用户名登录的用户可以使用图形化界面DISPLAY=你本机ip:0.0export DISPLAY以db2inst1用户登录,在/usr/lpp/db2_07_01/bin 目录下$./db2jstrt //JDBC 侦听器进程在/usr/lpp/db2_07_01/bin目录下$./db2cc //控制中心启动进程五、启动命令行#db2六、创建数据库必须在实例下面创建:命令行连接实例:db2>attach to db2inst1Db2>create database library(数据库名称)七、建立数据表1、使用脚本建立数据表DB2的脚本的扩展名也是.sql,然后在命令行下执行DB2脚本:db2 -svtf xxxx.sql其中:s 代表遇到错误时中止脚本运行v 代表输出结果到屏幕t 代表以分号作为每一行的分隔符f 代表后面需要跟脚本文件名db2 connect to reportdbdb2 -tvf reportdb.sqldb2 list tables //显示自己创建的表db2 list tables for all //显示所有的表空间附录:错误1、Q:无法启动控制中心db2inst2:/home/db2inst2>db2ccException in thread "main" ng.InternalError: Can't connect to X11 windowserver using ':0.0' as the value of the DISPLAY variable. 等等A:按照控制中心的方法重新启动一下。
解释工具db2expln的使用及实例分析

1、准备实验环境我们创建了一个模拟tpch(数据库工业标准测试)测试的数据库,库中一共有3张数据表,分别是:part 产品部件表supplier 供应商表partsupp 产品供应商关联表其中part表中含有200000条数据,partsupp表中含有800000条数据,suppl ier表中含有10000条数据1)我们为如上的3张表分别建立如下的索引:create index part_idx1 on tpcd.part(p_partkey,p_size);create index partsupp_idx1 on tpcd.partsupp(ps_partkey, ps_supplycost, ps_suppkey);create index supp_idx1 on tpcd.supplier(s_suppkey);2)建立索引后,我们收集一下相关的统计信息,在db2cmd中执行如下的命令:runstats on table tpcd.part with distribution and detailed indexes all;runstats on table tpcd.partsupp with distribution and detailed indexes all; runstats on table tpcd.supplier with distribution and detailed indexes all;分别对PART, PARTSUPP, SUPPLIER运行以下命令,确保runstats已经成功执行:db2 “select card,npages,stats_time from syscat.tables where tabname=’PART’”CARD NPAGES STATS_TIME-------------------- -------------------- -----------------------------------------------------------200000 7616 2008-08-21-17.20.22.828000其中,CARD为该表的记录数,NPAGES为该表所占有的存储空间(页数),S TATS_TIME为收集统计信息的时间。
IBM DB2 Web Query for i 5733WQX 2.2.0 安装说明说明书
IBM® DB2® Web Query for i™5733WQXInstall Instructions – Version 2.2.0(Updated 03/29/2017)This document provides the instructions for installation and setup of DB2 Web Query, 5733WQX, version 2.2.0. It is recommended that the steps be completed in the order listed. All steps should be performed under the sign-on of QSECOFR or a user with *SECADM and *ALLOBJ authority, unless stated otherwise.1. Install prerequisite products, options, and PTFsReview the 5733WQX prerequisite programs, options and PTFs listed in Info APAR II14818, and verify that all prerequisites are installed for your version of IBM i. The APAR is located athttps:///BdirFq.2. Restore the DB2 Web Query licensed programThe IBM i standard and keyed media set will include DB2 Web Query 2.2.0 when ordered afterApril 15, 2016. The 5733WQX base product and all options are included on one disc. If your Web Query discs are older than 2.2.0, order a new copy or download it from Entitled Software Support (ESS). Detailed steps for ESS can be found in the FAQ at http://ibm.co/db2wqfaq. The 2.2.0 disc is identified by the following label information.IBM iDB2 Web Query for i5733-WQX V2.2.0F_MULTI_NLVLCD8-1900-02To install the base product and optional features, use the Restore Licensed Program(RSTLICPGM) command. Minimally, you must install the base product, Express or StandardEdition, and Developer User options. Example commands are shown below. Substitute OPT01with your optical drive. For each restore command, read the license agreement and press F14 toaccept it.•RSTLICPGM LICPGM(5733WQX) DEV(OPT01) –Base product•RSTLICPGM LICPGM(5733WQX) DEV(OPT01) OPTION(1) –Express Edition•RSTLICPGM LICPGM(5733WQX) DEV(OPT01) OPTION(2) –Standard Edition•RSTLICPGM LICPGM(5733WQX) DEV(OPT01) OPTION(4) –Developer Users•RSTLICPGM LICPGM(5733WQX) DEV(OPT01) OPTION(5) –Developer Workbench Users•RSTLICPGM LICPGM(5733WQX) DEV(OPT01) OPTION(6) – Runtime Enablement Groups•RSTLICPGM LICPGM(5733WQX) DEV(OPT01) OPTION(7) –JD Edwards Adapter•RSTLICPGM LICPGM(5733WQX) DEV(OPT01) OPTION(8) –DataMigrator for i3. Set a password and CCSID for the QWQADMIN profileWhen the product is installed, it creates a user profile QWQADMIN with no password. Set apassword for the profile using the command CHGUSRPRF USRPRF(QWQADMIN)PASSWORD(<yourpwd>). Failure to do so will prevent DB2 Web Query from starting.The Web Query server’s code page should correspond to the CCSID of your data to reduce dataconversions. If one of the following conditions apply, set the CCSID in the QWQADMIN profile to override the default system CCSID for server jobs:- The default system CCSID is 65535.- The default system CCSID is different than the CCSID of the data accessed by your reports.To check the value of the default system CCSID, use the command DSPSYSVAL QCCSID.To set the CCSID in the QWQADMIN profile, use the CHGUSRPRF command. Here is anexample command for the English CCSID: CHGUSRPRF USRPRF(QWQADMIN) CCSID(37).4. Add license keysFor new installations, you have a 70-day trial period before you are required to enter license keys.Add license keys for the base product and each optional feature using the Add License KeyInformation (ADDLICKEY) command.5. Start DB2 Web QueryTo start DB2 Web Query, use option 1 of the Work with Web Query (WRKWEBQRY) tool.Alternatively, you can use the Start Web Query (STRWEBQRY) command.To end DB2 Web Query, use the WRKWEBQRY tool, the End Web Query (ENDWEBQRY)command, or the End Subsystem (ENDSBS) command for the Web Query subsystem. Whenending the subsystem, do not use the default DELAY(*NOLIMIT) parameter on the ENDSBScommand. Instead, specify a number of seconds to delay for a controlled end or specifyOPTION(*IMMED). Here is example syntax:ENDSBS SBS(QWEBQRY21) DELAY(60)ENDSBS SBS(QWEBQRY21) OPTION(*IMMED)6. Add licensed usersWhen DB2 Web Query is active, go to http://your_system:12331/webquery, where your_system is the name or IP address of the system with Web Query installed. Login using the administrativeprofile, QWQADMIN. Click Administration and then click Security Center.From the Security Center you can add licensed users and assign permissions. For moreinformation, refer to the Security Concepts section of the DB2 Web Query 2.1.0 New Featuresdocument at http://ibm.co/db2wqnewfeatures.7. Install the Developer Workbench client (optional)If you installed option 5, Developer Workbench Users, then the licensed users of this optionshould download and install the Developer Workbench client on their PCs. To install the client,follow these steps.A.Download the three files in binary from the IFS directory/qibm/ProdData/QWEBQRY/DeveloperWorkbench to a folder on the Windows PC. The filenames are:WQDevWork220.sfx.part1.exeWQDevWork220.sfx.part2.rarWQDevWork220.sfx.part3.rarB.Run WQDevWork220.sfx.part1.exe.The Dev Workbench Package Install dialog box displays, as shown in the following image.Note: Clicking Install will create a new WQDevWork220.exe file in the same folder whereyou are running WQDevWork220.sfx.part1.exe. Optionally, you can change the destinationfolder for the new file.C.Click Install. The WQDevWork220.exe file will be created in the Destination folder. TheWQDevWork220.exe will then automatically run, and the Developer Workbench installationwizard will start.The installation and setup of DB2 Web Query is now complete and you are ready to create and run reports. Details on configuring the product’s features can be found in the Product Manual at https:///Bd4vj6. You can also refer to the Web Query wiki at http://ibm.co/db2wqwiki for links to the user forum, videos, service levels, feature articles, and other getting started information.APPENDIX A: NLS ConfigurationFollow the instructions in this appendix if you wish to configure Web Query for any of these:•Language other than English•NLS settings such as1.Setting the default currency symbol2.Setting the default numeric formattingThe Web Query user interface currently supports the following languages:Arabic-2954Brazilian-Portuguese-2980Chinese-Simplified-2989Chinese-Traditional-2987Croatian-2912Czech-2975Danish-2926Dutch-2923Dutch-Belgium-2963English-2924English DBCS-2984English Uppercase DBCS-2938Finnish-2925French-2928French-Belgium-2966French-MNCS-2940French Canadian-2981German-2929German-MNCS-2939Hebrew-2961Hungarian-2976Italian-2932Italian-MNCS-2942Japanese-Upper/Lower-2930Japanese-DBCS-2962Korean-2986Norwegian-2933Polish-2978Portuguese-2922Portuguese-MNCS-2996Romanian-2992Russian-2979Slovakian-2994Spanish-2931Swedish-2937Turkish-2956Post installation steps for NLS configurationStep 1: Enable the languages for the drop-down listGo to URL http://sysname:12331/webquery. Login using the QWQADMIN user ID. Click on Administration, then Administration Console.Click on Configuration, and then Dynamic Language Switch. This switch enables the selection of languages that will appear on the Language drop down list on the login page. It is used for the DB2 Web Query user tools and GUI.In the Dynamic Language Switch window, the languages shipped with DB2 Web Query are displayed. By default, the Dynamic Language Switch and the language check boxes are unchecked. Click the Dynamic Language Switch check box to enable it. Doing so activates the Enable option check boxes for all languages. The default language (English) is automatically enabled. Click the check boxes for additional languages you want to appear in the Language drop-down list on logon pages.Once you select a language, only those that share the same character encoding will be available to be enabled. For example, Asian languages may only be enabled with English. European languages may be enabled with each other and English.Click on Save to apply the changes to the configuration. You must restart Web Query for the changes to take effect.Step 2: Set the default numeric formattingIf you wish to change the default numeric formatting, click on Custom Settings. By setting the value for Continental Decimal Notation (CDN), you can adjust the default behavior for numeric data.SET CDN= [ ON | OFF | SPACE | QUOTE | QUOTEP ]ON enables CDN. For example, the number 3,045,000.76 is represented as 3.045.000,76.OFF disables CDN. For example, the number 3,045,000.76 is represented as 3,045,000.76. OFF is the default value.SPACE separates groups of three significant digits with a space instead of a comma, and marks a decimal position with a comma instead of a period. For example, the number 3,045,000.76 is represented as 3 045 000,76.QUOTE separates groups of three significant digits with a single quotation mark instead of a comma, and marks a decimal position with a comma instead of a period. For example, the number 3,045,000.76 is represented as 3'045'000,76.QUOTEP separates groups of three significant digits with a single quotation mark instead of a comma, and marks a decimal position with a comma. For example, the number 3,045,000.76 is represented as 3'045'000.76.Example syntax:_site_profile=SET CDN = OFFNote that if the display format of a Web Query report is Excel 2000 or later, CDN is controlled by the settings on an end user’s computer. That is, numbers in report output are formatted according to the convention of the locale (location) set in regional or browser language options.Step 3: Set the default currencyIf you wish to change the default currency, edit the file/qibm/userdata/qwebqry/ibi/srv77/wfs/etc/nlscfg.err.The file is created when Web Query is started. Add the three letter code for the currency symbol you would like to use. The options are:EUR (Euro)USD (United States dollar)GBP (Pound sterling)JPY (Japanese yen)NIS (Israeli new shekel)For example, to specify the Euro, set CURRENCY = EUR.You must end DB2 Web Query and restart it for the change to take effect.Step 4: Enable visual data supportOnly perform this step if you are configuring Hebrew bi-directional language support. Enable Visual data support by editing the file/QIBM/userdata/qwebqry/base80/client/wfc/etc/cgivars.wfs. Change the WFTRANSINOUT setting to add the path com.srl.exits.WFExit. Note that it is case sensitive. Following is an example of how it should look:WFTRANSINOUT =com.srl.exits.WFExitSave and close the file.Step 5: Set the CCSID for QshellIf you are using the Arabic language and CCSID 420, the following steps are needed to specify an alternative CCSID for Web Query programs that run in Qshell, because Qshell does not support CCSID 420.1. Enter the command: wrklnk‘/qibm/userdata/qwebqry/WQLIB85/conf/i5OSStartup.properties'2. Select option 2=Edit.3. Edit the file to add this line: sid=4254. Press F3 to save the changed file.APPENDIX B: Code page mapping tableThe table below contains a mapping from the i CCSID to the Web Query Reporting Server codepage. By default, the client codepage is 65001 Unicode (UTF-8) for use with any server codepage.。
DB2 PureSacle安装手册
DB2 PureScale安装手册外围准备工作详细安装软硬件要求参见:/infocenter/db2luw/v9r8/topic/com.ibm.db2.luw.sd.doc/do c/r0054850.html1.1安装配置IB卡以及相关软件包InfiniBand 卡配置运行 DB2 pureScale 成员服务器或 CF,需要共享使用 Infiniband 卡,需要通过HMC 对 LPAR 的 HCA 资源进行配置:图 1. HCA 卡在 HMC 中的配置建议 GUID 号和分区号保持一致,同时对 HCA 使用容量进行正确的设置。
安装 InfiniBand 相关软件包Infiniband ifix 下载地址:ftp:///aix/efixes/iz90166/IZ90166.epkg.Z使用如下命令来安装 Infiniband ifix:#emgr -e IZ90166.epkg.ZPage 1 of 9配置 Infiniband Communication Manager在 4个节点上执行如下命令,创建 icm 设备:#mkdev -c management -s infiniband -t icm配置 Infiniband IP 地址在 4个节点上使用如下命令,并输入相关参数:#smit chinet图 2. Infiniband IP 配置需要注意的是,HCA Adapter 必须明确指定 Infiniband 适配器设备,如 iba0,否则服务器重启后 Infiniband 网卡 IP 将无法正常工作,另外Adapter ’ s port number 需要指定到连接了 Infiniband 线缆的端口(Infiniband 网卡为双口)。
配置域名解析在 4 个节点上编辑 /etc/hosts 文件,增加如下条目:172.16.24.121 db2m0172.16.24.122 db2m1172.16.24.123 db2cf0172.16.24.124 db2cf110.10.10.1 db2m0-ib010.10.10.2 db2m1-ib010.10.10.3 db2cf0-ib010.10.10.4 db2cf1-ib01.2其他系统配置共享磁盘赋予 PVID在 4个节点上分别对GPFS的Disk执行如下命令,赋予 PVID: #chdev -l hdisk6 -a pv="yes"配置 IOCP在 4 个节点上执行如下命令,配置 IOCP 设备:#mkdev -l iocp01.3验证DB2 Purescale安装环境1. 检查系统微码级别(firmware level)$ lsmcode –A2. 检查操作系统版本TL和SP,不低于AIX6.1.TL6 SP3$ oslevel -s3. 确认(uDAPL) 已经安装并且配置好。
db2客户端安装以及远程编目配置
9.1 安装DB2客户端操作说明执行此任务可以完成DB2数据库客户端的安装。
以下操作需要在service-cluster的主备节点(sersrv1、sersrv2)、mc-cluster的主备节点(mcsrv1、mcsrv2)、dmsserv、portal n(n从1开始累加)上分别进行安装。
操作步骤以在主机sersrv1上安装DB2数据库为例,介绍安装过程。
步骤 1以root用户登录主机sersrv1。
步骤 2将华为办事处下载的软件包C81AXML.tar FP12_U807381.tar存到主备机/home/db2soft/目录中,在C81AXML.tar解压目录中存在一个文件,需要在解压一次wsue.dbcs.tar这个包解压后目录中有db2setup。
步骤 3以root用户执行334_ESE_LNX26_32_NLV目录下的db2setup安装程序。
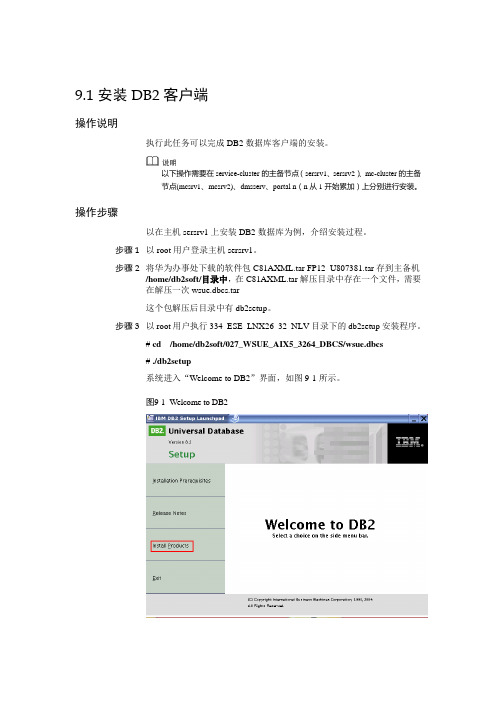
# cd /home/db2soft/027_WSUE_AIX5_3264_DBCS/wsue.dbcs# ./db2setup系统进入“Welcome to DB2”界面,如图9-1所示。
图9-1Welcome to DB2步骤 4单击“Install Products”选项,系统进入“Universal Datebase”界面。
选中“DB2 Application Development Client”单选按钮,如图9-2所示。
图9-2DB2 Application Development Client步骤 5单击“Next”,系统自动启动DB2安装向导。
步骤 6单击“Next”,选中“Accept”单选按钮,如图9-3所示。
图9-3Software License Agreement步骤 7单击“Next”,选中“Custom: 200 – 730 MB”单选按钮,如图9-4所示。
步骤 8单击“Next”,采用默认设置,如图9-5所示。
DB2数据库 CLI应用开发
DB2 9 应用开发CLI/ODBC 编程简介什么是CLI/ODBC?结构化查询语言(Structured Query Language,SQL)是用于操纵数据库对象和它们包含的数据的一种标准语言。
但是,由于SQL 没有过程语言的性质,因此,通常是将高级编程语言的决策和顺序控制与SQL 的数据存储、操纵和检索功能相结合来开发数据库应用程序。
有一些方法可以将SQL 与高级编程语言相结合,但最简单的方法是将SQL 语句直接嵌入到用于创建应用程序的高级编程语言源代码文件中。
这种技术被成为嵌入式SQL 编程。
嵌入式SQL 编程最大的缺点是所开发的应用程序缺乏互操作性。
用嵌入式SQL 为DB2 开发的应用程序如果要与其他关系数据库管理系统(RDBMS)交互,必须进行修改(在某些情况下,甚至要完全重写)。
由于不论为何种RDBMS 编写的嵌入式SQL 应用程序中都存在这样的限制,因此在20 世纪90 年代初,X/Open 公司和SQL Access Group(SAG,现在属于X/Open)就为可调用SQL 接口联合开发了一种标准的规范。
这种接口被称为X/Open CLI。
大部分X/Open CLI 规范后来都被接受为ISO CLI 国际标准的一部分。
X/Open CLI 的主要目的是通过允许数据库应用程序独立于任何一种数据库管理系统的编程接口,增加数据库应用程序的可移植性。
在 1992,Microsoft 为 Microsoft Windows 操作系统开发了一个名为 Open Database Connectivity (ODBC) 的可调用 SQL 接口。
ODBC 基于 X/Open CLI 标准规范,它提供了 X/Open CLI 没有提供的扩展功能和能力。
ODBC 位于一个操作环境之上,在此环境中,一个名为 ODBC Driver Manager 的组件在应用程序运行时动态地装载特定于数据源的 ODBC 驱动程序。
linux下db2的使用方法
Db2命令行安装:1、安装rpm包➢使用root用户登陆,把db2安装包拷贝到服务器的/opt下cd /opttar -zxvf v9.5fp3b_linuxx64_server.tar.gz (64位)tar –zxvf v9.5fp3b_linuxia32_server.tar.gz (32位)cd server./db2_install➢运行后出现输入窗口选择服务器产品ESE----------------------------------ESE2、安装完成后进行DB2服务器配置➢使用root用户创建用于DB2 安装的组和用户标识,要在Linux 上创建组groupadd -g 999 db2iadm1groupadd -g 998 db2fadm1groupadd -g 997 dasadm1(如果执行时出现无法创建可能由于卸载时没有删除相应组进入/etc/group删除相关DB2组)➢为每个组创建用户useradd -u 1004 -g db2iadm1 -m -d /home/db2inst1 db2inst1useradd -u 1003 -g db2fadm1 -m -d /home/db2fenc1 db2fenc1useradd -u 1002 -g dasadm1 -m -d /home/dasusr1 dasusr1(如果执行时出现错误,请重新执行卸载步骤)➢为每个用户修改密码passwd db2inst1 (输入密码)passwd db2fenc1 (输入密码)passwd dasusr1(输入密码)3、创建DB2 管理服务器(DAS)/opt/ibm/db2/V9.7/instance/dascrt -u dasusr1(如果执行时出现错误,请重新执行卸载步骤)4、使用db2icrt 创建实例/opt/ibm/db2/V9.7/instance/db2icrt -a server -u db2fenc1 db2inst15、配置DB2 实例的TCP/IP 通信su - db2inst1db2set DB2_SKIPINSERTED=ONdb2set DB2_EV ALUNCOMMITTED=ONdb2set DB2_SKIPDELETED=ONdb2set DB2_HASH_JOIN=YESdb2set DB2_RR_TO_RS=YESdb2set DB2CODEPAGE=1386db2set DB2COMM=TCPIPdb2set DB2_PARALLEL_IO=*db2 update dbm cfg using svcename 500006、更新产品许可证密钥➢进入\\10.10.1.11\质量检测部\测试资料\db2破解拷贝db2ese_t.lic文件到DB2服务器中/opt/ibm/db2/V9.5/adm/db2licm -a filenamefilename为db2ese_t.lic拷贝的路径➢选择语言#vi /home/db2inst1/.bash_profileexport LANG=en_US --把这个添加到这个文件的最后一行查看当前DB2许可证情况su db2inst1d2licm -ldb2卸载1、卸载实例➢使用Root用户登陆cd /opt/ibm/db2/V9.5/instance/./db2idrop db2inst1./dasdrop db2inst12、卸载db2➢进入安装目录,运行db2安装文件夹,执行db2_deinstall,卸载数据库。
db2递归结果作查询条件

db2递归结果作查询条件DB2递归结果作为查询条件的应用场景及方法概述:在DB2数据库中,递归查询是一种非常常见的需求。
通过使用递归查询,可以在一张表中查找与指定条件相关联的所有数据。
本文将介绍如何使用DB2中的递归结果作为查询条件,以及其应用场景。
一、递归查询的概念和原理递归查询是指在关系型数据库中,通过迭代地使用一个查询结果作为下一次查询的条件,从而达到查询多层级数据的目的。
在DB2中,可以使用WITH语句来实现递归查询。
二、递归查询的语法在DB2中,递归查询的语法如下:```WITH recursive cte (column_list) AS (-- Anchor memberSELECT column_list FROM table_name WHERE conditionUNION ALL-- Recursive memberSELECT column_list FROM table_name, cte WHERE condition)SELECT column_list FROM cte;```其中,cte是递归查询的名称,column_list是需要查询的列名,table_name是要查询的表名,condition是查询条件。
三、递归查询的应用场景1. 组织结构查询递归查询在组织结构查询中非常常见。
例如,可以使用递归查询来查找某个员工的所有下属,或者查找某个部门的所有员工。
通过将递归查询的结果作为查询条件,可以轻松地实现这些需求。
2. 层级结构查询递归查询也适用于查询具有层级结构的数据。
例如,在一个分类表中,每个分类都有一个父分类,可以使用递归查询来查找某个分类的所有子分类,或者查找某个分类的所有父分类。
3. 树状结构查询递归查询还可以用于查询树状结构的数据。
例如,在一个商品分类树中,每个分类都有一个父分类和多个子分类,可以使用递归查询来查找某个分类的所有子分类,或者查找某个分类的所有父分类。
Squirrel SQL 如何连接IBM db2
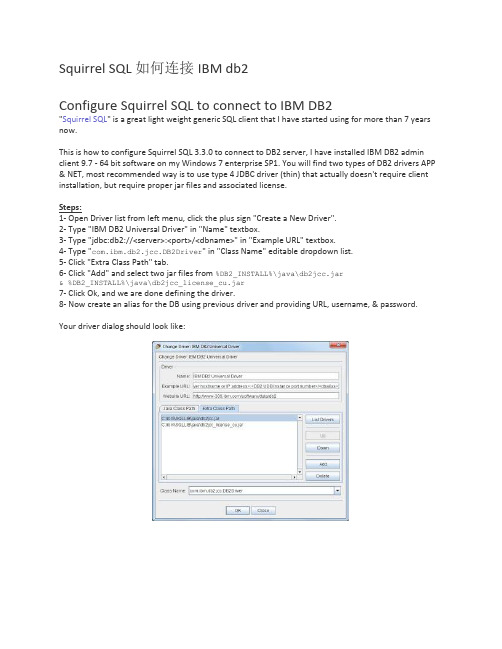
Squirrel SQL 如何连接IBM db2Configure Squirrel SQL to connect to IBM DB2"Squirrel SQL" is a great light weight generic SQL client that I have started using for more than 7 years now.This is how to configure Squirrel SQL 3.3.0 to connect to DB2 server, I have installed IBM DB2 admin client 9.7 - 64 bit software on my Windows 7 enterprise SP1. You will find two types of DB2 drivers APP & NET, most recommended way is to use type 4 JDBC driver (thin) that actually doesn't require client installation, but require proper jar files and associated license.Steps:1- Open Driver list from left menu, click the plus sign "Create a New Driver".2- Type "IBM DB2 Universal Driver" in "Name" textbox.3- Type "jdbc:db2://<server>:<port>/<dbname>" in "Example URL" textbox.4- Type "com.ibm.db2.jcc.DB2Driver" in "Class Name" editable dropdown list.5- Click "Extra Class Path" tab.6- Click "Add" and select two jar files from %DB2_INSTALL%\java\db2jcc.jar& %DB2_INSTALL%\java\db2jcc_license_cu.jar7- Click Ok, and we are done defining the driver.8- Now create an alias for the DB using previous driver and providing URL, username, & password. Your driver dialog should look like:。
在DB2服务器端配置TCP监听及加载和缷载数据
1.在DB2服务器端配置TCP监听2.在一个DB2的客户端(最好是linux/unix),创建一个客户的实例并配置远程访问DB2服务器3.使用export命令缷载数据4.使用import,load和ingest命令加载数据1.在DB2服务器端配置TCP监听[myinst@ye ~]$ db2 update dbm cfg using svcename 52000 #修改DB2端口DB20000I The UPDATE DATABASE MANAGER CONFIGURATION command completedsuccessfully.[myinst@ye db2dump]$ db2set db2comm=tcpip[myinst@ye db2dump]$ db2set -all[i] DB2COMM=TCPIP[myinst@ye db2dump]$ db2 terminate #断开连接以外,终止clp(命令行处理器)的后台进程DB20000I The TERMINATE command completed successfully.[myinst@ye db2dump]$ db2stop force;db2start07/27/2015 11:17:30 0 0 SQL1064N DB2STOP processing was successful.SQL1064N DB2STOP processing was successful.SQL8007W There are "77" day(s) left in the evaluation period for the product"DB2 Advanced Enterprise Server Edition". For evaluation license terms andconditions, refer to the License Agreement document located in the licensedirectory in the installation path of this product. If you have licensed thisproduct, ensure the license key is properly registered. You can register thelicense by using the db2licm command line utility. The license key can beobtained from your licensed product CD.07/27/2015 11:17:33 0 0 SQL5043N Support for one or more communications protocols specified in the DB2COMM environment variable failed to start successfully. However, core database manager functionality started successfully.SQL1063N DB2START processing was successful.tcp 0 0 0.0.0.0:52000 0.0.0.0:* LISTEN2.在一个DB2的客户端(最好是linux/unix),创建一个客户的实例并配置远程访问DB2服务器关闭SELINUXvi /etc/selinux/config#SELINUX=enforcing #注释掉#SELINUXTYPE=targeted #注释掉SELINUX=disabled #增加vi /boot/grub/menu.lstkernel那行加selinux=0[root@ye server_t]# yum -y install gcc make ncurses-devel libxml2-devel libtool-ltdl-devel gcc-c++ autoconf automake bison zlib-devel cmake[root@ye server_t]# yum -y install libstdc++.so.6 libstdc++.so.5 kernel-devel sg3_utils sg_persist libpam sg_persist sg3_utils[root@ye server_t]# yum -y install libpam.so* glibc* libstdc* pam*[root@ye server_t]# ./db2_install #在新的linux 机子上安装DB2 客户端软件Requirement not matched for DB2 database "Server" . Version: "10.5.0.5".DBT3514W The db2prereqcheck utility failed to find the following 32-bit library file: "/lib/libpam.so*". DBT3514W The db2prereqcheck utility failed to find the following 32-bit library file: "libstdc++.so.6". DBI1324W Support of the db2_install command is deprecated.Default directory for installation of products - /opt/ibm/db2/V10.5***********************************************************Install into default directory (/opt/ibm/db2/V10.5) ? [yes/no]noEnter the full path of the base installation directory: #输入安装路径------------------------------------------------/www/IBM/db2Specify one of the following keywords to install DB2 products.SERVERCONSVRTCLEnter "help" to redisplay product names.#选择CLIENTEnter "quit" to exit.***********************************************************CLIENTRequirement not matched for DB2 database "Server" . Version: "10.5.0.5".Summary of prerequisites that are not met on the current system:DBT3514W The db2prereqcheck utility failed to find the following 32-bit library file: "/lib/libpam.so*". DBT3514W The db2prereqcheck utility failed to find the following 32-bit library file: "libstdc++.so.6". DB2 installation is being initialized.Total number of tasks to be performed: 30Total estimated time for all tasks to be performed: 807 second(s)Task #1 startDescription: Checking license agreement acceptanceTask #2 startDescription: Base Client Support for installation with root privileges Estimated time 3 second(s)Task #2 endTask #3 startDescription: Product Messages - EnglishEstimated time 14 second(s)Task #3 endTask #4 startDescription: Base client supportEstimated time 307 second(s)Task #4 endTask #5 startDescription: Java Runtime SupportEstimated time 158 second(s)Task #5 endTask #6 startDescription: Java Help (HTML) - EnglishEstimated time 7 second(s)Task #6 endDescription: Java supportEstimated time 12 second(s)Task #7 endTask #8 startDescription: SQL proceduresEstimated time 3 second(s)Task #8 endTask #9 startDescription: Java Common filesEstimated time 18 second(s)Task #9 endTask #10 startDescription: Control Center Help (HTML) - English Estimated time 13 second(s)Task #10 endTask #11 startDescription: IBM Software Development Kit (SDK) for Java(TM) Estimated time 50 second(s)Task #11 endTask #12 startTask #12 endTask #13 startDescription: DB2 Instance Setup wizard Estimated time 20 second(s)Task #13 endTask #14 startDescription: Spatial Extender client Estimated time 3 second(s)Task #14 endTask #15 startDescription: Base application development tools Estimated time 35 second(s)Task #15 endTask #16 startDescription: DB2 Update ServiceEstimated time 4 second(s)Task #16 endTask #17 startDescription: Replication toolsEstimated time 53 second(s)Task #18 startDescription: Global Secure ToolKit Crypto Estimated time 27 second(s)Task #18 endTask #19 startDescription: itlmEstimated time 3 second(s)Task #19 endTask #20 startDescription: Command Line Processor Plus Estimated time 4 second(s)Task #20 endTask #21 startDescription: First StepsEstimated time 3 second(s)Task #21 endTask #22 startDescription: Product Signature for DB2 Client Estimated time 7 second(s)Task #22 endEstimated time 180 second(s)Task #23 endTask #24 startDescription: Executing control tasksEstimated time 20 second(s)Task #24 endTask #25 startDescription: Updating global registryEstimated time 20 second(s)Task #25 endTask #26 startDescription: Updating the db2ls and db2greg link Estimated time 1 second(s)Task #26 endTask #27 startDescription: Registering DB2 licensesEstimated time 5 second(s)Task #27 endTask #28 startDescription: Setting default global profile registry variablesTask #29 startDescription: Initializing instance listEstimated time 5 second(s)Task #29 endTask #30 startDescription: Registering DB2 Update ServiceEstimated time 30 second(s)Task #30 endTask #31 startDescription: Updating global profile registryEstimated time 3 second(s)Task #31 endThe execution completed successfully.For more information see the DB2 installation log at"/tmp/db2_install.log.7924".[root@ye instance]#vi /etc/hosts127.0.0.1 localhost localhost.localdomain localhost4 localhost4.localdomain4 ::1 localhost localhost.localdomain localhost6 localhost6.localdomain6改成127.0.0.1 localhost localhost4 localhost4.localdomain4 ::1 localhost localhost.localdomain localhost6 localhost6.localdomain6[root@ye instance]# groupadd grp[root@ye instance]# useradd inst1 -g grp[root@ye instance]# passwd inst1Changing password for user inst1.New password:BAD PASSWORD: it is based on a dictionary wordBAD PASSWORD: is too simpleRetype new password:Sorry, passwords do not match.New password:BAD PASSWORD: it is too shortBAD PASSWORD: is too simpleRetype new password:passwd: all authentication tokens updated successfully.[root@ye inst1]# chown inst1:grp /home/inst1[root@ye inst1]# cd /www/IBM/db2/instance[root@ye instance]# ./db2icrt -s client inst1 #创建一个客户的实例DBI1446I The db2icrt command is running.DB2 installation is being initialized.Total number of tasks to be performed: 4Total estimated time for all tasks to be performed: 309 second(s)Task #1 startDescription: Setting default global profile registry variables Estimated time 1 second(s)Task #1 endTask #2 startDescription: Initializing instance listEstimated time 5 second(s)Task #2 endTask #3 startDescription: Configuring DB2 instancesEstimated time 300 second(s)Task #3 endTask #4 startDescription: Updating global profile registryEstimated time 3 second(s)Task #4 endThe execution completed successfully.For more information see the DB2 installation log at "/tmp/db2icrt.log.38041".DBI1070I Program db2icrt completed successfully.[inst1@ye ~]$ db2 catalog tcpip node myinst remote 192.168.17.100 server 52000 #远程访问DB2服务器DB20000I The CATALOG TCPIP NODE command completed successfully.DB21056W Directory changes may not be effective until the directory cache isrefreshed.[inst1@ye ~]$ db2 list node directoryNode DirectoryNumber of entries in the directory = 1Node 1 entry:Node name = MYINSTComment =Directory entry type = LOCALProtocol = TCPIPHostname = 192.168.17.100Service name = 520003.使用export命令缷载数据#确保服务的数据库已连接数据库mydb3#先在服务端机子查看,查看emp 表数据记录,方便比对结果[myinst@ye ~]$ db2 "select * from emp"ID CNAME----------- --------------------1 a1 record(s) selected.在客户端机子:[inst1@ye ~]$ db2 catalog db mydb3 at node myinstDB20000I The CATALOG DATABASE command completed successfully.DB21056W Directory changes may not be effective until the directory cache is refreshed.[inst1@ye ~]$ db2 connect to mydb3 user myinst #用export命令缷载数据Enter current password for myinst:Database Connection InformationDatabase server = DB2/LINUXX8664 10.5.5SQL authorization ID = MYINSTLocal database alias = MYDB3[inst1@ye ~]$ db2 "export to emp.del of del select * from emp "SQL3104N The Export utility is beginning to export data to file "emp.del". SQL3105N The Export utility has finished exporting "1" rows.Number of rows exported: 1[inst1@ye ~]$ lsemp.del sqllib[inst1@ye ~]$ cat emp.del1,"a"[inst1@ye ~]$4.使用import,load和ingest命令加载数据[inst1@ye ~]$ db2 "import from emp.del of del insert into emp" #import命令加载数据SQL3109N The utility is beginning to load data from file "emp.del".SQL3110N The utility has completed processing. "1" rows were read from theinput file.SQL3221W ...Begin COMMIT WORK. Input Record Count = "1".SQL3222W MIT of any database changes was successful.SQL3149N "1" rows were processed from the input file. "1" rows were successfully inserted into the table. "0" rows were rejected.Number of rows read = 1Number of rows skipped = 0Number of rows inserted = 1Number of rows updated = 0Number of rows rejected = 0Number of rows committed = 1[inst1@ye ~]$ db2 "select * from emp" #查看结果ID CNAME----------- --------------------1 a1 a2 record(s) selected.[inst1@ye ~]$ db2 "load from emp.del of del replace into emp nonrecoverable" #load命令加载数据SQL3501W The table space(s) in which the table resides will not be placed inbackup pending state since forward recovery is disabled for the database.SQL3109N The utility is beginning to load data from file"/home/myinst/emp.del".SQL3500W The utility is beginning the "LOAD" phase at time "07/28/201515:44:45.794017".SQL3519W Begin Load Consistency Point. Input record count = "0".SQL3520W Load Consistency Point was successful.SQL3110N The utility has completed processing. "1" rows were read from theinput file.SQL3519W Begin Load Consistency Point. Input record count = "1".SQL3520W Load Consistency Point was successful.SQL3515W The utility has finished the "LOAD" phase at time "07/28/201515:44:45.903316".Number of rows read = 1Number of rows skipped = 0Number of rows loaded = 1Number of rows rejected = 0Number of rows deleted = 0Number of rows committed = 1[inst1@ye ~]$ db2 "select * from emp"ID CNAME----------- --------------------1 a1 record(s) selected.[myinst@ye ~]$ db2 "create table my_table (perkey integer not null,datetype DATE,chartype char(100))"DB20000I The SQL command completed successfully.[myinst@ye ~]$ vi my_file.txt[myinst@ye ~]$ cat my_file.txt64, 71621019,"O3DCZtnctxQj7%fZd9fwReviG60Uvt1G"-17, 23621119,"gge1C-wDEddunV8O2MZuKDctfz99-Cal"-1, 70121119,"+G5JJ+dkMTcn3a0vCzdfXwX__g+EH7TP"14, 11621119,"TqdBYEV2l5Cu1KNgVaRO6MauUtbnbyWK"-16, 75621119,"s70sQCmay0iZu_VUEAoKDZnNiVi02QG-"[myinst@ye ~]$ db2 "INGEST FROM FILE my_file.txt FORMAT DELIMITED restart off Insert INTO my_table" #INGEST命令加载数据SQL2979I The ingest utility is starting at "07/28/2015 16:17:52.835027".SQL2914I The ingest utility has started the following ingest job:"DB21005:20150728.161752.835027:00004:00005".Number of rows read = 5Number of rows inserted = 5Number of rows rejected = 0SQL2980I The ingest utility completed successfully at timestamp "07/28/201516:18:09.521366"[myinst@ye ~]$ db2 "select * from my_table"PERKEY DATETYPE CHARTYPE----------- ---------- ----------------------------------------------------------------------------------------------------64 10/19/7162 O3DCZtnctxQj7%fZd9fwReviG60Uvt1G-17 11/19/2362 gge1C-wDEddunV8O2MZuKDctfz99-Cal-1 11/19/7012 +G5JJ+dkMTcn3a0vCzdfXwX__g+EH7TP14 11/19/1162 TqdBYEV2l5Cu1KNgVaRO6MauUtbnbyWK-16 11/19/7562 s70sQCmay0iZu_VUEAoKDZnNiVi02QG-5 record(s) selected.。
db2expln使用说明
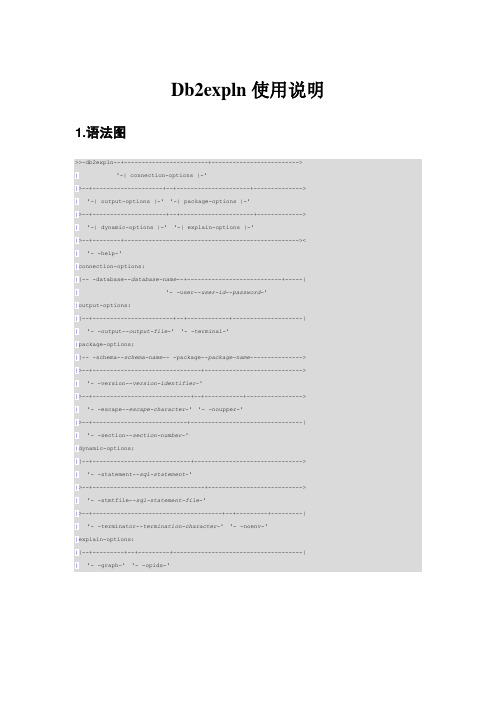
Db2expln使用说明1.语法图>>-db2expln--+------------------------+------------------------->| '-| connection-options |-'|>--+--------------------+--+---------------------+-------------->| '-| output-options |-' '-| package-options |-'|>--+---------------------+--+---------------------+------------->| '-| dynamic-options |-' '-| explain-options |-'|>--+--------+--------------------------------------------------><| '- -help-'|connection-options:||-- -database--database-name--+---------------------------+-----|| '- -user--user-id--password-'|output-options:||--+-----------------------+--+------------+--------------------|| '- -output--output-file-' '- -terminal-'|package-options:||-- -schema--schema-name-- -package--package-name--------------->|>--+-------------------------------+---------------------------->| '- -version--version-identifier-'|>--+----------------------------+--+-----------+---------------->| '- -escape--escape-character-' '- -noupper-'|>--+---------------------------+--------------------------------|| '- -section--section-number-'|dynamic-options:||--+----------------------------+------------------------------->| '- -statement--sql-statement-'|>--+--------------------------------+--------------------------->| '- -stmtfile--sql-statement-file-'|>--+-------------------------------------+--+---------+---------|| '- -terminator--termination-character-' '- -noenv-'|explain-options:||--+---------+--+---------+-------------------------------------|| '- -graph-' '- -opids-'1.1常用命令行1.分析程序包db2expln -d 数据库名-i -g -c 模式名-p程序包-s 0 -tdb2expln -d 数据库名-i -g -c 模式名-p程序包-s 0 -o文件名第一条命令行讲执行方案显示在屏幕上,第二条语句将方案输出到文件中2.分析sql 语句db2expln -d 数据库名-i -g -q sql语句-tdb2expln -d 数据库名-i -g -q sql语句-o 文件名3.输出简单说明在该输出中,每个程序包的说明信息显示在下列两个部分:∙程序包信息,如绑定日期和相关的绑定选项∙后跟要说明的SQL 语句的节信息,例如,节号。
linux中如何使用db2命令
linux中如何使用db2命令DB2数据库命令简介1.启动数据库db2start2.停止数据库db2stop3.连接数据库db2 connect to o_yd user db2 using pwd4.读数据库管理程序配置db2 get dbm cfg5.写数据库管理程序配置db2 update dbm cfg using 参数名参数值6.读数据库的配置db2 connect to o_yd user db2 using pwddb2 get db cfg for o_yd7.写数据库的配置db2 connect to o_yd user db2 using pwddb2 update db cfg for o_yd using 参数名参数值8.关闭所有应用连接db2 force application alldb2 force application ID1,ID2,,,Idn MODE ASYNC (db2 list application for db o_yd show detail) 9.备份数据库db2 force application alldb2 backup db o_yd to d:(db2 initialize tape on \\.\tape0)(db2 rewind tape on \\.\tape0)db2 backup db o_yd to \\.\tape010.恢复数据库db2 restore db o_yd from d: to d:db2 restore db o_yd from \\.\tape0 to d:11.绑定存储过程db2 connect to o_yd user db2 using pwddb2 bind c:\dfplus.bnd拷贝存储过程到服务器上的C:\sqllib\function目录中12.整理表db2 connect to o_yd user db2 using pwddb2 reorg table ydddb2 runstats on table ydd with distribution and indexes all 13.导出表数据db2 export to c:\dftz.txt of del select * from dftzdb2 export to c:\dftz.ixf of ixf select * from dftz14.导入表数据import from c:\123.txt of del insert into ylbx.czyxxdb2 import to c:\dftz.txt of del commitcount 5000 messages c:\dftz.msg insert into dftzdb2 import to c:\dftz.ixf of ixf commitcount 5000 messages c:\dftz.msg insert into dftz db2 import to c:\dftz.ixf of ixf commitcount 5000 insert into dftzdb2 import to c:\dftz.ixf of ixf commitcount 5000 insert_update into dftzdb2 import to c:\dftz.ixf of ixf commitcount 5000 replace into dftzdb2 import to c:\dftz.ixf of ixf commitcount 5000 create into dftz (仅IXF)db2 import to c:\dftz.ixf of ixf commitcount 5000 replace_create into dftz (仅IXF)15.执行一个批处理文件db2 -tf 批处理文件名(文件中每一条命令用;结束)16.自动生成批处理文件建文本文件:temp.sqlselect 'runstats on table DB2.' || tabname || 'with distribution and detailed indexes all;'from syscat.tables where tabschema='DB2' and type='T';db2 -tf temp.sql>runstats.sql17.自动生成建表(视图)语句在服务器上:C:\sqllib\misc目录中db2 connect to o_yd user db2 using pwddb2look -d o_yd -u db2 -e -p -c c:\o_yd.txt18.其他命令grant dbadm on database to user bb19select * from czyxx fetch first 1 rows only20db2look -d ylbx -u db2admin -w -asd -a -e -o a.txt21. 显示当前用户所有表list tables22.列出所有的系统表list tables for system23.查看表结构db2 describe select * from user.tables一、基础篇1、db2 connect to <数据库名> --连接到本地数据库名db2 connect to <数据库名> user <用户名> using <密码> --连接到远端数据库2、 db2 force application all --强迫所有应用断开数据库连接3、db2 backup db db2name<数据库名称> --备份整个数据库数据db2 restore db --还原数据库4、db2 list application --查看所有连接(需要连接到具体数据库才能查看)5、db2start --启动数据库db2stop --停止数据库6、create database <数据库名> using codeset utf-8 territory CN --创建数据库使用utf-8编码7、db2 catalog 命令db2 catalog tcpip node <接点名称> remote <远程数据库地址> server <端口号> --把远程数据库映射到本地接点一般为50000 db2 catalog db <远程数据库名称> as <接点名称> at nodePUB11 --远程数据库名称到本地接点db2 CONNECT TO <接点名称> user <用户名> using <密码> --连接本地接点访问远程数据库8、数据库导出db2look -d <数据库名> -u <用户> -e -o <脚本名称>.sql --导出数据库的表结构,其中用户空间一般为db2admin/db2inst1 db2look -d <数据库名> -u <用户> -t <表1> <表2> -e -o <脚本名称>.sql --导出数据库中表1和表2的表结构db2move <数据库名> export --导出数据库数据db2move <数据库名> export -tn <表1>,<表2> --导出数据库中表和表数据9、数据库导入db2 -tvf <脚本名称>.sql --把上述导出的表结构导入到数据库表结构db2move <数据库名> load -lo replace --把上述“db2move <数据库名> export “导出的数据导入到数据库中并把相同的数据替换掉在实际使用过程中,如果用到db2自增主键,需要使用by default,而不是always,功能是一样的,但这样在数据移植时候会很方便!10、db2 connect reset 或db2 terminate --断开与数据库的连接11、db2set db2codepage=1208 --修改页编码为120812、db2 describe table <表名> --查看表结构13、db2 list tables --查看数据库中所有表结构list tables for system --列出所有系统表14、db2 list tablespaces --列出表空间二、高级篇15、fetch first 10 rows only --列出表中前10条数据例如:select * from <表名> fetch first 10 rows only16、coalesce(字段名,转换后的值) --对是null的字段进行值转换例如:select coalesce(id,1) from <表名> --对表中id如果为null 转换成117、dayofweek(日期) --计算出日期中是周几(1是周日,2是周一.......7是周六)dayofweek_iso --计算出日期中是周几(1是周一.......7是周日)例如:dayofweek(date(2008-01-16)) --它会返回是4,代表星期三dayofweek_iso(date(2008-01-16)) --它会返回是3,代表星期三18、dayofyear(日期) --一年中的第几天,范围在1-366范围之内注意:参数中日期的格式是YYYY-MM-DD的形式,如果不是需要进行转换,否则函数不能使用例如:日期是20080116必须要进行转换dayofweek(concat(concat(concat(substr(openDate,1,4),'-'),concat(substr(openDa te,5,2),'-')),substr(openDate,7,2))) as week)这样格式正确的。
db2sql语句执行顺序.doc

★db2sql语句执行顺序DB2常用SQL语句集DB2常用SQL语句集1、查看表结构:describe table tablenamedescribe select * from tablename2、列出系统数据库目录的内容:list database directory3、查看数据库配置文件的内容:get database configuration for DBNAME4、启动数据库:restart database DBNAME5、关闭表的日志alter table TBLNAME active not logged inially6、重命名表rename TBLNAME1 to TBLNAME27、取当前时间select current time stamp from sysibm.sysdummy18、创建别名create alias ALIASNAME for PRONAME(table、viee)9、查询前几条记录select * from TBLNAME fetch first N ro TBLNAMEdb2 export to TBL.ixf of ixf select * from TBLNAME以指定分隔符‘|’下载数据:db2 export to cmmcode.txt of del modified by coldel| select * from cmmcode”14、导入表db2 import from TBL.txt of del insert into TBLNAMEdb2 import from TBL.txt of del mitcount 5000 insert into TBLNAMEdb2 import from TBL.ixf of ixf mitcount 5000 insert into TBLNAME db2 import from TBL.ixf of ixf mitcount 5000 insert_update intoTBLNAME db2 import from TBL.ixf of ixf mitcount 5000 replace into TBLNAMEdb2 import from TBL.ixf of ixf mitcount 5000 create into TBLNAME (仅IXF) db2 import from TBL.ixf of ixf mitcount 5000 replace_create into TBLNAME (仅IXF)以指定分隔符“|”加载:db2 import from btpoper.txt of del modified by coldel| insert into btpoper 15、显示当前用户所有表命令db2 “list tables”16、查看锁情况命令:db2 get snapshot for locks on DBNAMElist applications for db DBNAME shoonisor s TBNAME for update; for update不能和GROUP BY、DISTINCT、ORDER BY、FOR READ ONL Y及UNION, EXCEPT, or INTERSECT(但UNION ALL 除外)一起使用。
db2客户端安装以及远程编目配置

9.1 安装DB2客户端操作说明执行此任务可以完成DB2数据库客户端的安装。
以下操作需要在service-cluster的主备节点(sersrv1、sersrv2)、mc-cluster的主备节点(mcsrv1、mcsrv2)、dmsserv、portal n(n从1开始累加)上分别进行安装。
操作步骤以在主机sersrv1上安装DB2数据库为例,介绍安装过程。
步骤 1以root用户登录主机sersrv1。
步骤 2将华为办事处下载的软件包C81AXML.tar FP12_U807381.tar存到主备机/home/db2soft/目录中,在C81AXML.tar解压目录中存在一个文件,需要在解压一次wsue.dbcs.tar这个包解压后目录中有db2setup。
步骤 3以root用户执行334_ESE_LNX26_32_NLV目录下的db2setup安装程序。
# cd /home/db2soft/027_WSUE_AIX5_3264_DBCS/wsue.dbcs# ./db2setup系统进入“Welcome to DB2”界面,如图9-1所示。
图9-1Welcome to DB2步骤 4单击“Install Products”选项,系统进入“Universal Datebase”界面。
选中“DB2 Application Development Client”单选按钮,如图9-2所示。
图9-2DB2 Application Development Client步骤 5单击“Next”,系统自动启动DB2安装向导。
步骤 6单击“Next”,选中“Accept”单选按钮,如图9-3所示。
图9-3Software License Agreement步骤 7单击“Next”,选中“Custom: 200 – 730 MB”单选按钮,如图9-4所示。
步骤 8单击“Next”,采用默认设置,如图9-5所示。
DB2SQL存储过程语法
DB2SQL存储过程语法
1.简介
DB2SQL存储过程是一种可以把一系列SQL语句和DB2例程指令存储在数据库对象中,以便便于多次执行的一种程序。
这些存储过程的本质就是用SQL语言编写的程序,它们可以用于执行复杂的嵌套处理、访问数据库,以及控制DB2的活动,如创建表,修改行等等。
(1)DB2SQL存储过程语法的结构
•DECLARE:定义程序的参数,变量和游标。
•BEGIN:请求存储过程开始执行。
•DECLARE:以及定义的变量,参数的赋值等。
•SET:将一个变量的值设置为另一个变量或值。
•IF-THEN-ELSE:根据条件执行不同的操作。
•LOOP:满足条件时,循环执行SQL指令。
•OPEN:打开一个游标,以便DB2可以提取游标中的数据记录。
•FETCH:从指定的游标中提取记录。
•CLOSE:关闭游标。
•COMMIT:提交当前事务。
•ROLLBACK:回滚当前事务,以便可以撤消先前的操作。
•RETURN:返回一个值,该值可以由调用存储过程的程序来接收。
•END:告诉DB2,程序开发完成。
