Client-SideJavaScript-静宜大学资讯学院
安卓HttpClient+Jsoup+Httpwatch模拟登陆正方教务获取信息
安卓HttpClient+Jsoup+Httpwatch模拟登陆正方教务获取信息分类: android | 标签: 安卓,爬虫| 作者: u013082133 相关| 发布日期 : 2014-10-03 | 热度 : 1107°目录[+]之前想要写一下关于爬数据的文章的,发现时间有点急迫。
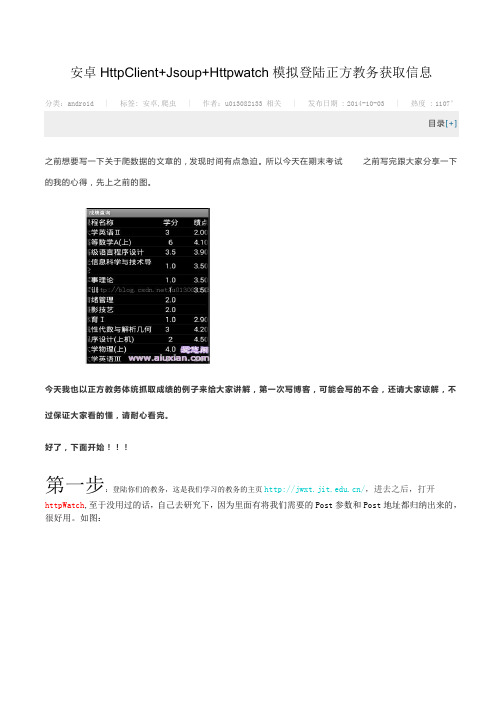
所以今天在期末考试之前写完跟大家分享一下的我的心得,先上之前的图。
今天我也以正方教务体统抓取成绩的例子来给大家讲解,第一次写博客,可能会写的不会,还请大家谅解,不过保证大家看的懂,请耐心看完。
好了,下面开始!!!第一步:登陆你们的教务,这是我们学习的教务的主页/,进去之后,打开httpWatch,至于没用过的话,自己去研究下,因为里面有将我们需要的Post参数和Post地址都归纳出来的,很好用。
如图:进去之后你会看见HttpWatch刷刷的,出来一大片数据,当然我们的从当中挑选出有用的数据。
如图,我们打开上栏中的第一列标签,就是横线的地方。
首先我们来观看下数据,请求方法:post,状态值:302,请求的URL:/default2.aspx。
然后,我们来观察下面大圈圈中的数据,这里是Post所带的参数,里面有__ViewStat(我也不知道是什么,不过一起带着Post就好了,这里有个情况,我等会在下面讲,先用绿色标记),Button的值(乱码),lbLanguage(不管,先记下),RadioButtonList1(单选按钮:学生...),TextBox1:账号,TextBox2:密码。
Ok.......下面我们来看一下Button和lbLanguage和RadioButtonList1具体的值,下面的标签打开Stream,如图:看,里面有一些不认识的参数的值。
Button="" ,lbLanguage="",RadioButtonList1="%D1%A7%C9%FA",哦了。
python 调用js的方法
python 调用js的方法
在Python中调用JavaScript的方法通常涉及使用一些特定的库或工具。
以下是一些常见的方法:
1. 使用PyV8或PyExecJS库,PyV8是一个Python与Google V8引擎的绑定,可以让你在Python中执行JavaScript代码。
PyExecJS是一个通用的Python库,可以在不同的JavaScript运行时环境中执行JavaScript代码,包括Node.js、PhantomJS等。
你可以使用这些库来调用JavaScript方法并获取返回结果。
2. 使用Selenium库,Selenium是一个用于自动化网页浏览器的工具,它可以与Python结合使用,通过调用浏览器执行JavaScript代码。
你可以使用Selenium来调用网页中的JavaScript方法,并获取执行结果。
3. 使用PyQt或PySide库,如果你需要在Python的GUI应用程序中执行JavaScript代码,可以使用PyQt或PySide库。
这些库提供了一个内置的Web浏览器组件,可以加载并执行JavaScript代码。
4. 使用Jupyter Notebook,如果你使用Jupyter Notebook进行数据分析和可视化,你可以使用IPython.display模块的Javascript函数来执行JavaScript代码。
总的来说,Python调用JavaScript的方法主要依赖于特定的库或工具,你可以根据具体的需求选择合适的方法来实现。
希望这些信息能够帮助你解决问题。
无法打开的js文件怎么办
无法打开的js文件怎么办无法打开的 JavaScript 文件怎么办JavaScript 是一种广泛应用于网页中的脚本语言,它能够为网页增加动态效果、交互性和功能性。
然而,在开发或使用 JavaScript 的过程中,我们有时可能会遇到无法打开 JavaScript 文件的情况,这可能会导致网页无法正常运行。
本文将探讨一些常见的无法打开 JavaScript 文件的原因,并提供相应的解决方案。
一、文件路径错误当浏览器无法打开 JavaScript 文件时,首先要检查文件的路径是否正确。
在编写 JavaScript 代码时,我们需要确保相对路径或绝对路径引用正确。
可以通过以下几种方式来检查路径是否正确:1. 确认文件是否位于正确的路径下,并且文件名的大小写是否正确。
文件路径应与代码中引用的路径完全匹配。
2. 如果是引用其他文件夹中的 JavaScript 文件,要使用正确的相对路径或绝对路径。
3. 如果使用了外部链接的 JavaScript 文件,确保链接地址正确,并且可以访问该链接。
二、网络问题有时无法打开 JavaScript 文件可能是由网络问题引起的。
以下是可能出现的网络问题及解决方案:1. 确保网络连接正常:检查网络连接是否正常,尝试访问其他网页或刷新当前页面,以确保网络连接没有问题。
2. 清除缓存:有时浏览器缓存可能导致 JavaScript 文件无法加载。
清除浏览器缓存可以解决这个问题。
具体操作可以在浏览器设置中找到清除缓存选项。
3. 防火墙或代理设置:如果有防火墙或代理设置,可能会阻止JavaScript 文件的加载。
确认防火墙或代理设置是否允许 JavaScript 文件的访问。
三、语法错误JavaScript 是一门编程语言,因此文件中可能存在语法错误。
当浏览器尝试加载包含语法错误的 JavaScript 文件时,会导致文件无法打开。
以下是一些常见的语法错误及解决方法:1. 括号不匹配:检查代码中的括号是否闭合正确,确保每个左括号都有与之对应的右括号。
前端开发实训案例使用FlutterWeb构建跨平台网页应用

前端开发实训案例使用FlutterWeb构建跨平台网页应用FlutterWeb是Google推出的一种开发工具,用于构建跨平台的网页应用。
在前端开发实训中,使用FlutterWeb可以实现快速开发、高效运行的跨平台网页应用。
本文将介绍如何使用FlutterWeb进行前端开发实训,并提供一个案例来展示其应用。
I. 引言在当前互联网时代,跨平台应用的需求日益增加。
而前端开发实训对于学生来说是一次锻炼实践的机会。
使用FlutterWeb来构建跨平台网页应用,不仅可以提高开发效率,还可以展示最新的前端技术。
本文将以一个案例来说明使用FlutterWeb进行前端开发实训的过程。
II. 案例背景某高校的信息技术学院计划开展一次学生信息管理系统的开发实训。
该系统需要具备跨平台的特性,能够在各种设备上运行,并且具备友好的用户界面。
为了满足这些要求,学院决定使用FlutterWeb来构建这个网页应用。
III. 开发流程1. 环境搭建首先,需要安装Flutter SDK,并将其配置到系统环境变量中。
接下来,使用命令行工具创建一个新的Flutter项目。
2. 项目结构在项目创建成功后,可以看到Flutter的标准项目结构。
其中,lib 文件夹用于存放业务逻辑代码,assets文件夹用于存放静态资源文件,test文件夹用于存放测试代码。
3. 开发界面使用FlutterWeb开发界面与使用Flutter移动端开发界面类似。
可以使用Flutter提供的丰富控件库来构建用户界面,并通过状态管理来实现页面响应。
4. API调用通过API调用与后端数据交互是开发实训中的一个重要模块。
在FlutterWeb中,可以使用Dio等HTTP库来发送网络请求,并处理返回的数据。
5. 适配不同设备由于跨平台的特性,FlutterWeb需要适配不同的设备,包括PC、手机、平板等。
可以通过媒体查询来实现界面的自适应,并采用响应式布局来适应不同尺寸的屏幕。
快速上手使用JavaScript编写交互性网页

快速上手使用JavaScript编写交互性网页Chapter 1: Introduction to JavaScriptJavaScript is a widely used scripting language that is primarily used for creating interactive web pages. It was created by Brendan Eich at Netscape Communications in 1995. With JavaScript, developers can add dynamic content, validate forms, create interactive elements, and enhance the user experience on websites.JavaScript can be embedded in HTML documents by using the script tag, which allows the code to be executed by the web browser. It is a client-side scripting language, which means that the code is executed on the user's computer rather than the server.Chapter 2: Basic Syntax and VariablesIn JavaScript, statements are executed in a top-down manner, and each statement ends with a semicolon. Variables are used to store and manipulate data. In JavaScript, variables do not need to be declared with a specific data type and can be assigned different values.For example, the following code snippet declares and assigns a value to a variable:```let message = "Hello, world!";```Chapter 3: Control Flow and FunctionsJavaScript includes control flow statements such as if-else, switch, and loops (for, while, and do-while) to control the execution of code based on certain conditions. These statements allow developers to make decisions and repeat code blocks as needed.Functions are reusable blocks of code that perform a specific task. They can be defined using the function keyword and can accept parameters and return values.Chapter 4: DOM ManipulationThe Document Object Model (DOM) is a programming interface that represents the structure of an HTML document as a tree-like structure. JavaScript can be used to manipulate the elements of a webpage by accessing and modifying the DOM.For example, the following code snippet changes the text content of an HTML element with the id "myElement":```let element = document.getElementById("myElement");element.textContent = "New content";```Chapter 5: Event HandlingJavaScript allows developers to add interactivity to web pages by handling user events, such as clicks, mouse movements, and keyboard input. Event handling involves attaching event listeners to HTML elements and specifying the code to be executed when the event occurs.For example, the following code snippet adds an event listener to a button element and calls a function when the button is clicked:```let button = document.getElementById("myButton");button.addEventListener("click", function() {console.log("Button clicked!");});```Chapter 6: Form ValidationJavaScript can be used to validate user input in web forms. By using event handlers and conditional statements, developers can check if the form inputs meet certain criteria, such as required fields, valid email addresses, or password strength.For example, the following code snippet validates a form field to ensure that it is not empty:```let input = document.getElementById("myInput");let value = input.value;if (value === "") {console.log("Input cannot be empty!");} else {console.log("Input is valid.");}```Chapter 7: AJAX and JSONAsynchronous JavaScript and XML (AJAX) is a technique that allows web pages to request and display data from a server without reloading the entire page. JavaScript can be used to send HTTP requests and handle responses asynchronously.JavaScript Object Notation (JSON) is a lightweight data format commonly used for transmitting data between a server and a web application. JavaScript provides methods for parsing and generating JSON data.Chapter 8: Libraries and FrameworksJavaScript has a vast ecosystem of libraries and frameworks that provide developers with pre-built solutions for common tasks.Examples include jQuery for simplified DOM manipulation, React for building user interfaces, and Node.js for server-side JavaScript development.These libraries and frameworks can greatly accelerate the development process and enhance the functionality of JavaScript-based web applications.Chapter 9: Best Practices and Performance OptimizationTo write efficient and maintainable JavaScript code, developers should follow best practices and optimize performance. This includes using meaningful variable and function names, avoiding unnecessary computations, minimizing DOM manipulation, and reducing HTTP requests.Other best practices include proper error handling, code commenting, and using tools such as linters and minifiers to improve code quality and reduce file size.ConclusionJavaScript is a powerful and versatile scripting language that allows developers to create interactive and dynamic web pages. By mastering the fundamental concepts and various techniques discussed in this article, aspiring web developers can quickly get started with writing JavaScript code for interactive web pages. With practice and continued learning, the possibilities of JavaScript are endless.。
如何在自动化测试中处理JavaScript弹窗
如何在自动化测试中处理JavaScript弹窗在网页自动化测试中,我们经常会遇到JavaScript弹窗,这给测试带来了困扰。
本文将从什么是JavaScript弹窗、JavaScript弹窗妨碍测试哪些方面出发,介绍如何在自动化测试中处理JavaScript弹窗。
一、什么是JavaScript弹窗?JavaScript弹窗是指当网页在不同操作中需要提示用户某些信息或需要用户输入特定数据时会出现的框,主要有alert、confirm和prompt三种类型。
其中alert消息框只有一个按钮,用于提供消息或警告;confirm消息框有两个按钮(确定和取消),用于获取用户确认或取消数字;prompt消息框有一个输入框和两个按钮,用于获取用户输入。
二、JavaScript弹窗妨碍测试的哪些方面?JavaScript弹窗不同于常规的网页元素,无法通过常规的方式定位和操作,可能会给测试带来以下问题:1.弹窗出现后停止测试执行。
如果测试代码在弹窗出现后停止执行,则需要手动关闭弹窗后再继续测试,这会浪费测试时间并增加测试人员的工作量。
2.无法定位弹窗。
弹窗的定位需要通过JavaScript进行操作,无法通过DOM元素属性或CSS属性进行定位。
如果定位错误,无法操作弹窗,会影响测试结果。
3.无法对弹窗进行操作。
由于弹窗是浏览器级别的,无法通过普通方式寻找和操作,需要特殊的方式进行处理。
如果测试代码无法正确操作弹窗,将导致测试结果不准确。
三、如何在自动化测试中处理JavaScript弹窗?在处理弹窗前,我们需要先了解浏览器窗口的机制。
在Selenium WebDriver测试自动化中,WebDriver并不会控制页面中出现的JavaScript弹窗,而是从WebDriver所连接的浏览器中接收警告框、确认框和提示框的信息。
因此,我们需要通过特殊方式来操作这些弹窗。
1.处理alert弹窗处理alert弹窗主要包括接受alert信息、关闭alert信息和获取alert信息三个方面。
sseclient使用样例 -回复
sseclient使用样例-回复标题:Sseclient使用样例:实时数据流传输的利器导言:在现如今大数据时代,实时数据分析和处理成为不可或缺的一部分。
然而,要实现实时数据处理,首先需要解决数据的实时传输问题。
Sseclient作为一种开源的Python库,提供了一种简单而高效的实时数据流传输解决方案。
本文将以中括号内的内容为主题,详细介绍Sseclient的使用样例,并逐步回答相关问题,帮助读者更好地理解和应用该工具。
第一部分:介绍Sseclient1.1 什么是Sseclient?Sseclient是一个Python库,全称是Server-Sent Events client,它提供了一种用于与服务器进行实时简单文本数据传输的机制。
1.2 Sseclient的特点是什么?- 简单易用:Sseclient提供了一个高级接口,使得与Server-Sent Events 服务器进行通信变得非常简单且易于使用。
- 协议支持:Sseclient支持常见的Server-Sent Events协议,如自动根据Content-Type解析事件流和处理重试。
- 实时传输:Sseclient通过HTTP长轮询(HTTP long-polling)实现实时数据传输,能够获取即时的更新。
第二部分:Sseclient使用样例2.1 安装Sseclient库首先,我们需要安装Sseclient库。
可以通过以下命令使用pip进行安装:pip install sseclient2.2 建立与Server-Sent Events服务器的连接在使用Sseclient之前,我们需要建立与Server-Sent Events服务器的连接。
以下是一个建立连接的示例代码:pythonfrom sseclient import SSEClienturl = ' # 服务器的事件流URLmessages = SSEClient(url)for msg in messages:print(msg.data)2.3 获取实时数据在建立连接后,我们可以使用Sseclient获取实时数据。
RPS API 2.2 说明书

1 IntroductionThe RPS API (Application Programming Interface) provides a RESTful interface for customers to integrate their applications with the configuration data stored in the RPS Database. This document describes how to install and configure RPS API in a MS Windows development environment.2 Feature OverviewThe main service provides the RESTful Web API to search for panel attributes by control panel GUID. The control panel GUID is a unique ID that identifies a panel.2.1 Panel, Area and Point attributesThe RPS API allows for secured READ ONLY access to select Panel, Area and Point attributes.Panel attributes include:•Panel GUID •Supported Languages • Panel LanguageArea attributes include:•Area Number •Area On property •Area Name Text •Exit Delay • Force Arm/Bypass MaxPoint attributes include:•Point Number •Area •Profile • TextPoint Profile attributes include:•Bypassable •Entry Delay •Point Type •Response •Circuit StyleApplication Note RPS-API V2.2 (build .27914)2.2 Panel Connection, 3rd Party Integration/Automation attributesThe RPS API allows for secured READ and WRITE access to select Panel Connection, 3rd PartyIntegration/Automation, and Panel User Assignments attributes.Panel Connection attributes include:•RPS Panel Data - View: Network IP details•RPS Panel Data - View: Cellular details•RPS Panel Data - View: Cloud ID details3rd Party Integration/Automation attributes include:•Automation Device•Automation PasscodeUser AssignmentsCreate, reset or delete users or individual User attributes include:•Passcode•Authority Level•User Name•User Group•Card Data•User Number3System requirements3.1Windows systemThe following are the minimum requirements for your environment:•Windows .NET 4.5 framework and higher•Windows 8, Windows 10•Windows Server 2012 R2 and higher• 4 GB RAM3.2RPS (Remote Programming Software)Install RPS API version 2.2.27914 on a machine that has RPS version 6.11 or higher installed. RPS API does not require the RPS client application after installation, but uses the configured connection to the RPS database.RPS minimum version supported for use with RPS API versions 2.2.27914 or higher:•RPS 6.11 or higher to support full API and panel operations, including TCP Panel connections.•RPS 6.04 to RPS 6.10 to support full API features with panel connections limited to and requiring UDP protocol.3.3Supported control panelsRPS-API supports the following control panels:•B9512G, B8512G•B6512, B5512, B4512, B3512•D9412GV4, D7412GV4•D9412GV3,D7412GV33.4Supported connectionsThe RPS-API Scheduler service supports the following RPS connections:•IP•Cellular•Cloud3.5Supported Network ProtocolsWhen opening a panel connection, RPS API version 2.1 (and higher) uses the System Configuration Settings saved in RPS. Using RPS version 6.07 (and higher), operators select one of three options:•UDP Only•TCP with fallback to UDP•TCP OnlyUsing RPS version 6.06 and earlier, RPS API will continue using the default UDP Only setting.Note: Using RPS version 6.10 and lower with RPS API 2.2.27914 and higher will result in failed TCP connections to panel systems and requires configuring either the UDP Only or TCP with fallback to UDP setting.3.6Required Security ProtocolRPS API version 2.2 and higher requires HTTPS.4InstallationIf your RPS API version is lower than version 2.2.27914, remove the previous version to enable HTTPS later.Note: Version 2.2.27914 and higher only supports HTTPS to secure communications.Perform the following steps to install RPS API:1.Unzip the Bosch_RPS_API_Setup_xxx.zip file.2.Copy the installer files (Bosch.RPS.APISetup.msi and setup.exe) to the same folder on a localcomputer that has RPS 6.04 or higher installed.3.Right-click setup.exe and select Run as administrator to start the Bosch RPS API Service install wizard.4.Click Next and follow the steps in the wizard to perform the installation.5.When the installation successfully completes, access the https://<hostname>:9000/swagger/ui/index URLin a browser to open the Swagger documentation web page and verify that the RPS-API is running. Notethat <hostname> is the computer name where the API is installed.4.1 HTTPS Configuration ToolThe RPS API 2.2.27914 installation provides an HTTPS configuration tool guide you through the HTTPS set up.1.In the configuration tool, edit these entries as needed:•Host Name - default value = 0.0.0.0. Change this entry when you want to have a specific domain name for RPS API, which relates to the DNS/Router settings. For more information, reference the netsh command inWindows. You can also use this command to manually set up HTTPS for RPS API. Avoid using localhost or127.0.0.1 for the host name as it makes RPS API inaccessible from another machine.•Port Number - default value = 9000. The entry port number for RPS API.•Select certificate from trust center - if you have a certificate for the Web server, use this entry to select an installed certificate from LocalMachine/Personal repository. Select More choices to select a certificatefrom a list. Once selected, the thumbprint is shown in the certificate field.2.Select Generate a self-signed certificate. Make sure that you enter the password for the certificate, as thepassword field cannot be empty.3.Click to process. The configuration tool generates a server certificate for the RPS API set up. Whenfinished, a success message displays. Click OK.If you already set up HTTPS for RPS API or if you want to manually set it up, click to exit theconfiguration tool.Self-signed certificate and untrusted CA warningWhen you install the RPS API version 2.2.27914 or higher and select to generate a self-signed certificate, the installation will install the certificate and set up RPS API using the HTTPS netsh command. On the client side, the self-signed certificate is not issued from a trusted authority, so browsers or your application will receive anuntrusted CA (Certificate Authority) warning.To fix the untrusted CA warning, install the self-signed certificate on the client machine and modify yourapplication to ignore the warning.4.2 Verify HTTPS is enabledWith administrator permission, open a Windows command prompt. Type and execute the commands:sh http show sslcertsh http show urlaclAfter the certificate is installed, you might need the certificate for your clients. Locate the generated certificates (if you selected the generate self-signed certificate option) in this path:%appdata%\Roaming\Bosch RPS APIFor example:c:\users\<name>\AppData\Roaming\Bosch RPS API)5Enable HTTPSRPS API version 2.2.27914 and higher only supports HTTPS to secure communications. During the installation, the HTTPS configuration tool will guide you through the set up of HTTPS. See section 4.1 HTTPS Configuration Tool for information.To enable HTTPS for RPS API, you must have an SSL certificate, and then install the certificate to the local machine.The following files are available for you to use:•Setup_HTTPS_RPSApi.ps1 (MS PowerShell)•Setup_HTTPS_RPSApi.bat (batch file)After you install the certificate, use the batch file (Setup_HTTPS_RPSApi.bat) to enable HTTPS for RPS API.1.Install the SSL certificate to LocalMachine\root.2.Stop the RPS API service.3.Change the EnableHTTPS configuration to 1 inHKEY_LOCAL_MACHINE\SOFTWARE\Wow6432Node\Bosch\RPSAPI\Setup.4.Copy the thumbprint of the certificate.5.Paste the thumbprint into $certHash=’’<thumbprint>’’ in either the Setup_HTTPS_RPSApi.ps1 orSetup_HTTPS_RPSApi.bat file.6.If RPS API is not running in port 9000, change the $port setting in either Setup_HTTPS_RPSApi.ps1 orSetup_HTTPS_RPSApi.bat file.7.Run Setup_HTTPS_RPSApi.ps1 or Setup_HTTPS_RPSApi.bat with administrator permission.8.Start the RPS API service.Note: If the certificate is not signed, the browser or Postman will block the connection. To verify the function,disable the HTTPS verify function in the browser or client application.6Test Sample CodeThe callback server and client sample code uses Visual Studio 2015 to build the source code.Configure the Callback server:1.Start the callback server.e /rpsapi/v1/subscriptions to set up the callback URL.For Example:{"url": "http://localhost:8083/api/callback", "headers": [{}],"eventType": "ALL"}3.The console receives a notification from RPS API as shown in the following graphic:Configure the Client:1.Open the RPS-API_Client project and modify the _webServiceBaseUrl in Program.cs for your PRS APIsetting on the machine.2.Modify _dirPath to change the location where JSON files are saved.3.Start the client to automatically get all panel information in your RPS DB. Also, combine theUsers/Areas/Points/Point Profile attributes in JSON files and statistics information.7Error logRPS API writes installation and run time information, warnings, and errors to the Windows Event Log (Bosch RPS RestAPI Log). Use the Windows Event Viewer to view this information.8Error status definitionsThe tables in this section contain HTTP and RPS error reference information.8.1HTTP error codesHTTP Status HTTP Methods Error Message(200) OK ALL SUCCESS – the entity body contains a representation ofthe requested resource.(400) BAD REQUEST ALL Client Error – the request cannot be fulfilled due to badsyntax(401) UNAUTHORIZED ALL Client Error – the request requires user authentication.(403) FORBIDDEN ALL Client Error – the user is not allowed to perform therequest.8.2 RPS API error codesError Code Error Message(0) SUCCESS Request successful.(20010) PANEL_NO_LOCK Panel is not locked.(20020) PANEL_PENDING Panel has pending updates.(20030) PANEL_PROCESSING Panel is synchronizing.(40110) UNAUTHORIZED_ACCESS Authorization has been denied for this request(40310) USER_HAS_NO_PERMISSION User does not have permission to operate, please check thesecurity level(40320) IP_ADDR_BLOCKING P Address is not allowed to access RPS API.(40050) NOT_SUPPORTED_SETTING RPS API Command is not supported by this panel model.(40051) SETTING_INVALID Setting is invalid and cannot be applied.(40052) SETTING_OUT_OF_RANGE Setting is out of range and cannot be applied.(40053) SETTING_CONFLICT Setting conflicts with another configured setting and cannot beapplied.(40054) ACTION_INVALID JSON format is invalid and cannot be parsed or applied.Error Code Error Message(40055) RPSAPI_START_SERVICE_FAILED Starting the RPS API service failed.(40056) RPSAPI_READ_REGISTRY_FAILED Reading the RPS API registry failed.(40057) RPSAPI_WRITE_ACTIVITY_FAILED Writing the RPS API activity log failed.(40058) FILE_NOT_FOUND Cannot find specific file.(40060) RPS_VERSION_NOT_SUPPORTED This version of RPS is not supported, please update. (40062) DB_OPERATE_FAILED Unable to connect to the database, please check theRPS settings.(40070) PANEL_DOES_NOT_EXIST Panel does not exist, please check panel GUID or name. (40071) PANEL_OFF_LINE Unable to connect to the panel.(40072) PANEL_READ_ONLY Panel is locked by another operator.(40073) PANEL_NOT_SUPPORT Panel is not supported, please check panel GUID or name. (40074) AREA_NOT_EXISTS Selected area does not exist in this control panel. (40075) POINT_NOT_EXISTS Selected point does not exist in this control panel. (40076) USER_NOT_EXISTS Selected user does not exist in this control panel. (40077) PANEL_INTERNAL_EXCEPTION Detected panel internal exception.(40078) PANEL_DATA_LOCKED Configuration data for panel is locked.(40079) POINTPROFILE_DOES_NOT_EXIST Selected point profile does not exist on this panel. (40080) DATA_TYPE_MISMATCH Requested data type does not match.(40081) DATA_NOT_FOUND Requested data is not found.(40082) DATA_ALREADY_EXISTS Data already exists.(40083) PANEL_BUSY Panel is updating, in use by another user or application. (40084) PANEL_CONNECT_RETRY Panel may not be able to connect, please retry. (40085) OPERATOR_NOT_EXISTS Operator setting was not found in database. (40086) PASSCODE_NOT_MATCH Requested passcode does not match.(40087) SERVICE_STOPPED Service is not running.(40088) SERVICE_BUSY Service is busy.(40099) UNKNOWN_ERROR Unknown Error, please check the event log.9 Troubleshooting9.1 RPS API is updating the old RPS DatabaseIf the RPS database is changed using the RPS system configuration utility, the API service(s) will require a reboot to connect to the new RPS database.9.2 Cannot Edit User0 AuthoritiesUser WRITE capabilities are restricted for User0 to ensure system access and authorities for this default user are maintained. For User0, Passcode, User Name, User Group and Language are available for edit.9.3 Deleting users fails when passcode is left blankWhen deleting a user, it is possible to include the user’s passcode for verification. If the passcode is not going to be used, the full “user: { }” block should be omitted and only the user “index” number should be included in the panelUserList array.For example, if deleting user 2, the body of the request should look like:9.4 RPS API is not connecting to panels using TCP as expectedIf Network Protocol details are changed using the RPS system configuration utility, the API service(s) will requirea restart to connect using the new RPS settings.Connections using TCP require control panel firmware 3.07 or higher and B465 communicator firmware 2.01 or higher. For environments that include lower firmware versions, connections will require the RPS NetworkProtocol set to TCP with fallback to UD or UDP only.9.5 RPS API requests to set Automation results in a "Value out of Range" errorSetting Automation requires that the target panel system support the configuration settings that are applied.Automation settings for GV3 panel systems are not available or supported.9.6 Client using HTTP to connect to RPS API 2.2.27914 version cannot reach serverIf the client used HTTP to connect to the RPS API version 2.2.27914, it will be unable to reach the server.RPS API version 2.2.27914 and higher requires HTTPS.9.7 Connections to panels fail with TCP authentication messageUpdate RPS to version 6.11 or higher or select the UDP only or TCP with fallback to UDP setting.9.8 Cloud panel not updatingIf a user cannot connect to the Cloud panel, then the Windows service is unable to connect to CBS via HTTPS. The user must have the proper permissions to use HTTPS or a specific account can be configured for the RPS API service. See Figure 1 and 2 on the next page for examples.•If the RPS API cannot update the Cloud panel, make sure that the Bosch RPS RestAPI Service has the proper permissions to use HTTPS.Figure 14.If the default Local System account does not have the correct permissions, you can configure the RPSAPI service to use a specific a ccount.Figure 29.9 Self-signed certificate storageRPS API self-signed certificates are stored in this folder location:C:\users\<name>\AppData\Roaming\Bosch RPS API9.10 Remove self-signed certificatesTo remove sslceret and urlacl binding to the RPS API, do 1 of these solutions:•Solution 1 - manually use netsh to configure the sslcert and urlacl.•Solution 2 - with administrator permission, access the Windows command prompt and run the HttsConfiguraiton.exe with the uninstall parameter:9.11 Delete certificates to downgrade RPS and RPS APIDowngrading RPS API/RPS is not typically recommended. If there is a reason to downgrade RPS to a version lower than 6.11 and RPS API version 2.2.27914, use the steps in this section to manually remove the control panel connection certificates.To remove certificates used for panel connection:1.Open Windows search and type Run.2.Type mmc and click OK.3.In the File menu of the Console window, select Add/Remove Snap-in.4.Select Certificates and click Add.5.Select Computer account.6.Click Finish and OK. The application will show the installed certificates.7.In the tree, right-click Certificates (Local computer), select Find Certificates.8.Search for *************.com in the Issued by field. There should be 2 certificates found.9.Right-click the certificates and select Delete to remove them.Note: New certificates will be installed with RPS version 6.11 or higher and RPS API version 2.2.x orhigher.9.12 Updated panel IP address is not being used during the panel connectionIf you change a panel IP address and then immediately connect to the panel, in some cases the API will continue to use the previous IP address of the panel. To correct this, restart the RPS API.Bosch Security Systems B.V. Torenallee 495617 BA EindhovenNetherlands© Bosch Security Systems B.V., 2021。
sseclient使用样例
sseclient使用样例sseclient是一个Python库,用于接收服务器发送的Server-Sent Events (SSE)流。
SSE是一种基于HTTP的技术,用于服务器向客户端推送持久连接的数据。
在本文中,我们将探讨如何使用sseclient库来接收和处理SSE流的数据,并提供一些示例代码和使用样例。
首先,我们需要安装sseclient库。
可以使用pip安装这个库,方法如下:pip install sseclient安装完成后,我们可以开始使用sseclient来接收SSE流。
首先,我们需要导入sseclient库并创建一个`SSEClient`对象。
这个对象用于连接到SSE 服务器并接收服务器发送的事件。
创建`SSEClient`对象的语法如下:pythonfrom sseclient import SSEClienturl = ' # SSE服务器的地址sse = SSEClient(url)在上面的代码中,`url`变量是SSE服务器的地址。
根据你的实际情况,需要将这个变量替换为你要连接的SSE服务器的实际URL。
创建`SSEClient`对象时,会自动向服务器发送一个GET请求,并等待服务器发送SSE流。
在创建`SSEClient`对象后,我们可以使用一个循环来接收和处理服务器发送的事件。
示例代码如下:pythonfor event in sse:if event.event == 'message':print('Received message:', event.data)elif event.event == 'notification':print('Received notification:', event.data)else:print('Received unknown event:', event.event)在这个示例代码中,我们使用一个循环来迭代`SSEClient`对象,从而接收服务器发送的SSE事件。
SortSite一键站点测试说明书
one-click site testing SortSite DesktopOne click site testing, compliance, and search engine optimizationSortSite is a standards-based testing tool that makes it quick and easy to check web sites for multiple issues including accessibility, usability, browser compatibility and search engine optimization (SEO).SortSite automates these checks and reduces web site testing to three simple actions:1.Type in the URL you want to test2.Click ‘Check’3.Review the test results on the dashboardFrom the dashboard you can drill down and see detailed problem descriptions and suggested resolutions. Benefits●Test entire sitesThe built-in web crawler follows everylink, applying over 450 quality checkpointsto each page.●Reduce consultancy costsSortSite reduces the amount spent onthird parties by enabling web site testingand search engine optimization to be donein-house.●Get more visitorsSortSite applies search engine guidelinesand SEO best-practice rules to ensureyour pages perform optimally.●Retain more visitorsBroken links, server error messages andusability problems drive visitors away.Find and fix these problems first. Checkpoints•Accessibility - check sites comply withW3C WCAG1, WCAG2 and Section 508 •Broken Links - check for broken links and images in HTML, CSS, PDF and Office docs •Spell Checking - check spelling in English and French•Compatibility - check for browser specific code, script and image formats•Privacy - check for compliance with EU and US law•Search Engine Optimization - checkGoogle, Yahoo and Bing content guidelines •Standards - validate HTML, XHTML and CSS •Usability - check against guidelinesone-click site testingPricingFor current pricing see/buyEditionsSortSite Desktop is a Mac and Windows application available in two editions:• Standard Edition aimed at web developers • Professional Edition aimed at enterprises and consultanciesAn OnDemand web application is also available that works on any web-enabled device (covered in a separate datasheet).SupportEmail and phone support is free of charge for 30 days after purchase. Optional 12/24 month support and maintenance contracts are available, giving priority support and free upgrades.System Requirements Windows 7 or laterMac OS X 10.10 or later 1 GB RAM20 MB free disk spacePowerMapper SoftwarePowerMapper Software is a UK-based softwarecompany specializing in web site analysis products. The company ’s first product, PowerMapper, was launched in 1997.PowerMapper Software products are used by more than 30% of the Fortune 100, and customers include Boeing, NASA, Bank of America, Dell and Microsoft.For More Information You can find out more at one-click site testing。
前端js调用fineui打开窗体方法
前端js调用fineui打开窗体方法
FineUI 是一个基于 jQuery 的 UI 框架,提供了丰富的 UI 组件和功能,其中包括窗体组件。
要在前端使用 JavaScript 调用 FineUI 打开窗体,你需要先确保 FineUI 库已经被正确引入到你的项目中,并且已经初始化了 FineUI 的窗体组件。
以下是一个简单的示例,展示如何使用 JavaScript 调用 FineUI 打开一个窗体:
1. 首先,确保你的 HTML 页面中已经引入了 FineUI 的相关文件。
你可以从FineUI 的官方网站下载或使用 CDN 来引入。
2. 在你的 JavaScript 代码中,你可以通过以下方式打开一个 FineUI 窗体:
```javascript
// 初始化 FineUI 窗体组件
var form = $.fineform("myForm");
// 打开窗体
();
```
在上面的代码中,`myForm` 是你要打开的窗体的 HTML 元素的 ID。
你需要将其替换为你实际使用的 ID。
注意:上述代码假设你已经正确引入了 FineUI 的相关文件,并且已经在你的 HTML 中创建了一个具有相应 ID 的元素来承载窗体。
确保在使用之前进行适当的验证和调试,以确保一切按预期工作。
webtestclient使用流程

webtestclient使用流程
使用WebTestClient的一般流程如下:
1. 导入相关依赖:在项目的构建文件中,添加WebFlux和WebTestClient的依赖。
2. 创建测试类:创建一个测试类,使用
`@RunWith(SpringRunner.class)`注解来指定使用SpringRunner 运行测试。
3. 注入WebTestClient:使用`@Autowired`注解,将WebTestClient注入到测试类中。
4. 编写测试方法:在测试方法中,使用WebTestClient对象来发送请求并验证响应。
- 发送请求:使用`client.method()`方法发送请求,其中
`method`可以是GET、POST、PUT、DELETE等。
- 设置请求头:使用`exchange.expectHeader().value()`方法,设置请求头的值。
- 设置请求体:使用
`exchange.body(BodyInserters.fromXXX())`方法,设置请求体的内容。
- 发送请求并获取响应:使用`exchange.exchange()`方法发送
请求,并使用`exchange.expectStatus().isOk()`方法验证响应状态码是否为200。
- 验证响应内容:使用`exchange.expectBody().xxx()`方法验证响应体的内容。
5. 运行测试:使用JUnit或其他测试运行器运行测试类。
以上就是使用WebTestClient进行测试的一般流程。
根据具体的测试需求,可以使用不同的方法来发送请求和验证响应。
DICTS插件使用
DICTS插件使用DICTS(Data Interface Client Tools Suite)是一种插件,用于帮助开发者更加方便地与数据接口进行交互和处理。
它提供了一系列的功能,可以帮助我们在项目开发中更加高效地操作和管理数据。
1.安装和配置:首先,我们需要安装DICTS插件并进行一些必要的配置。
安装可以通过IDE的插件中心进行,配置则包括设置一些全局变量,如接口请求的域名、端口、协议等。
2.创建接口类:在DICTS中,我们需要创建一个接口类来管理我们的接口请求。
接口类是一个面向对象的封装,包含了接口的各种属性和方法。
我们可以根据实际需要创建多个接口类,每个类对应一个具体的接口。
3.发起接口请求:通过接口类的方法,我们可以发起对接口的请求。
这些方法可以设置请求参数、请求头部信息,并根据接口的不同返回结果进行相应的处理。
DICTS插件提供了丰富的请求方法,如GET、POST、PUT、DELETE等。
4.数据处理和转换:在接口请求成功后,我们可以对返回的数据进行处理和转换。
DICTS插件提供了多种用于数据处理的方法,如数据分组、过滤、排序等。
我们可以根据实际需要选择和使用这些方法。
5.缓存和存储:DICTS插件支持接口数据的缓存和存储,可以通过配置将接口数据缓存到本地或服务器,并设置缓存的有效期。
这样在下次请求接口时,可以先从缓存中读取数据,提高数据的获取速度和效率。
6.错误处理和日志记录:在接口请求过程中,可能会遇到各种错误和异常情况。
DICTS插件提供了相应的错误处理机制,可以捕获和处理这些错误,并记录相应的日志信息。
这样可以方便我们对接口请求过程中的问题进行排查和修复。
使用DICTS插件的好处有很多:1.提高开发效率:DICTS插件提供了一系列的功能和方法,可以帮助我们更加方便地进行接口开发和调试。
通过封装和抽象,可以减少开发者工作量,提高开发效率。
2.提升代码质量:DICTS插件采用面向对象的开发方式,将接口请求过程进行了封装和模块化。
easyclick代理模式原理
easyclick代理模式原理
EasyClick代理模式是一种设计模式,用于在客户端和实际服务之间建立一个中间的代理对象,以控制对真实对象的访问。
代理模式包含三个主要角色:抽象主题角色、真实主题角色和代理主题角色。
- 抽象主题角色:定义客户端访问真实主题和代理主题的接口,是代理类和真实类的共同接口。
- 真实主题角色:实现抽象主题接口,是真实对象,即客户端所需访问的对象。
- 代理主题角色:实现抽象主题接口,持有对真实主题的引用,通过代理对象可以间接访问真实主题对象,可以在访问真实主题前后进行一些预处理操作。
EasyClick代理模式的原理如下:
1. 客户端通过访问代理对象的接口来间接访问真实对象。
2. 代理对象在接收到客户端的请求后,会在访问真实对象之前进行一些额外的处理,如权限控制、日志记录等。
3. 代理对象调用真实对象的方法,并将其结果返回给客户端。
4. 代理对象在访问真实对象之后,还可以进行一些后续处理操作,如结果缓存、异常处理等。
通过使用代理模式,可以实现对真实对象的访问控制,可以在不改变真实对象的
情况下进行一些额外操作,同时还可以对客户端进行封装,使得客户端在使用真实对象时更加方便。
JS之client
JS之client⼀、client 家族的组成1、clientWidth 和 clientHeight元素调⽤时:- clientWidth:获取元素的可见宽度(width + padding)。
- clientHeight:获取元素的可见⾼度(height + padding)。
body/html 调⽤时:- clientWidth:获取⽹页可视区域宽度。
- clientHeight:获取⽹页可视区域⾼度。
**声明**:- `clientWidth` 和 `clientHeight` 属性是只读的,不可修改。
- `clientWidth` 和 `clientHeight` 的值都是不带 px 的,返回的都是⼀个数字,可以直接进⾏计算。
2、clientX 和 clientYevent调⽤:- clientX:⿏标距离可视区域左侧距离。
- clientY:⿏标距离可视区域上侧距离。
3、clientTop 和 clientLeft- clientTop:盒⼦的上border。
- clientLeft:盒⼦的左border。
⼆、三⼤家族 offset/scroll/client 的区别区别1:宽⾼- offsetWidth = width + padding + border- offsetHeight = height + padding + border- scrollWidth = 内容宽度(不包含border)- scrollHeight = 内容⾼度(不包含border)- clientWidth = width + padding- clientHeight = height + padding区别2:上左offsetTop/offsetLeft:- 调⽤者:任意元素。
(盒⼦为主)- 作⽤:距离⽗系盒⼦中带有定位的距离。
scrollTop/scrollLeft:- 调⽤者:document.body.scrollTop(window调⽤)(盒⼦也可以调⽤,但必须有滚动条)- 作⽤:浏览器⽆法显⽰的部分(被卷去的部分)。
静宜大学汇总

Table row
Table data cell Table header cell
text level markup Physical Phrase Markup
B BIG I S SMALL SUB SUP TT U
Bold Increase font size Italics
Strike through
APPLET PARAM BASEFONT BGSOUND CENTER FRAMESET FRAME NOFRAME
Include an inline Java applet
Define a variable required by the applet
Set the base font Include an inline sound file Center contents horizontally Declare a FRAME document Content for a particular FRAME Markup for non FRAME browsers
- HTML, LaTex
標記(Tags)
HTML 標記必須寫在 <(小於符號)和 > (小於符號)之間。 譬如:<b>。
標記名稱中的字元,大小寫並無區別。譬如: <b> 和 <B> 相 同、<title> 和 <Title> 相同。
一個以 /(斜線符號)開頭的標記稱為結束標記。譬如:</b> 是 <b> 的結束標記。
們知道鄭成功的媽媽名叫失敗。
元件的屬性(Attributes of Elements)
有些元件可以設定屬性。屬性必須設定在起始標記 中,其格式如下:
Esri_Campus_Web_Scene_创建教程说明书
Tutorial 15: Publish web scenesTable of ContentsTutorial 15: Publish web scenes . . . . . . . . . . . . . . . . . . . . . . . . . . . . . . . . . . . . . . . 3Tutorial 15: Publish web scenesDownload items•Tutorial data•Tutorial PDFPart 1: Export CityEngine scene to Web Scene (.3ws)•Open scene Esri_Campus.cej•Generate modelsScene layersHave a look at the various layers in the scene:The layer setup is essential for the Web Scene we are going to create, as the layers will be shown in the Web Viewer like in the CityEngine scene.The scene contains five layers for the Dev HQ building: Exterior Walls, No Walls, and a floor plan layer for each of the three floors.The No Walls layer is basically empty; it will be used to enable the swipe view in the Web Scene later on.Campus Buildings and Buildings Environment contain the surrounding buildings as shells with no interior detail.Rocks, Trees, and Light Poles contain point data that load their respective 3D assets.Other scene detailsIn addition to the actual 3D content, other scene details are exported to a Web Scene.BookmarksThe view bookmarks of a CityEngine scene are exported directly to the Web Scene. All view bookmarks appear in the bookmarks menu of the Web Viewer (top left Star icon).Current viewThe camera view (camera position and view direction) that is current during export will be the initial view when the Web Scene is loaded in Web Viewer. It is therefore recommended to choose a good viewpoint before starting the Web Scene exporter.The following shadow settings are exported to the Web Scene:Shadow on/off:Sets the initial state for direct shadows.Ambient Occlusion on/off:Sets the initial state for diffuse shadows.Ambient occlusion settings:The four ambient occlusion settings found in the Scene Light settings in the Inspector are exported to the Web Scene and are used for the diffuse shadow settingsNote:The lights elevation and azimuth angle may be different in the Web Scene, as Web Viewerautomatically sets the lights depending on the world position and time information set in the sunlightpane.Export 3wsMake sure all layers are visible, and use drag-select to select all models in the scene.Steps:1.Start exporter File>Export Models2.Choose CityEngine WebScene.General export optionsMake sure to set the location to the models folder of the current project.For details about the other general export options, see the exporting models in the CityEngine help manual.Note:Pay special attention to the Simplify Terrain Meshes option. Enabling this option can help to reduce thesize of the .3ws file. For terrains with a resolution above 512x512, the simplification process can take awhile. In general, try to set a low terrain resolution and enable terrain simplification.The Object Interaction,Object Metadata, and Textures settings define the default behavior for all layers.Per layer export optionsCheck the first column to verify that all layers will be exported. If one check box is missing, no object of this layer has been selected for the export (or the layer is invisible).Group layersSet the layer Group Name to Dev HQ for the Exterior Walls and No Walls layers. This will enable swipe view in Web Viewer for these two layers.StateThe layer state of the Panorama and Terrain layers are automatically set to backdrop. This means they will always be visible and will not appear in the layer list. By setting No Walls to Hidden, we ensure that the initial visibility of the Dev HQ group will show the Exterior Walls layer.InteractionBackdrop layers cannot be selected and are automatically set to locked. Set all other layers to pickable to ensure all objects will be selectable in the Web Scene.MetadataWe only want to show metadata on the Campus buildings, therefore set No Metadata for all other layers.Texture qualityA JPG texture has been prepared specifically for the terrain and is set as Texture on the terrain layer. We can therefore use theTexture Quality option Original Textures for the terrain layer. Other layers use Scene Settings (set to Compact in the previous dialog box).Note:Only use texture quality Original on layers with specifically prepared textures. WebGL only supportsPNG and JPG textures; other image formats such as TIFF will appear black. When using non-preparedtextures, set the texture quality option to High, Medium, Low, Half-sized, or compact (recommended).Click Finish to start the export process. The exporter will create a Web Scene file (.3ws) in the chosen output directory.Part 2: Preview Web Scene locallyBefore publishing the Web Scene, it is recommended to preview it locally. This way you can ensure correct export and layer settings, and verify the Web Scene displays as expected.•Locate the exported Web Scene (the .3ws file) in the Navigator.•Double-click the .3ws file.This opens your web browser and loads the CityEngine Web Viewer with the new Web Scene. The preview will load in your systems default browser. If you want to preview in a different browser (in case your default browser does not support WebGL), you can change your systems default browser, or copy and paste the URL of the desired browser.By default, the Web Scene preview will load Web Viewer locally, but it accesses the Web Viewer application remotely from ArcGIS Online. Alternatively, you can start the Web Scene preview in offline mode as follows:•In the Navigator, right-click the Web Scene (the .3ws file).•In the context menu, choose Open With 3D Web Scene Viewer (offline).Note:Web Scenes can only be previewed within CityEngine Web Scenes from the CityEngine Navigator.Double-clicking a .3ws file in the systems file browser (for example, Windows Explorer) will not start theWeb Viewer preview.Part 3: CityEngine Web ViewerThe Web Scene as it shows in the preview Web Viewer:Check that the layers appear as desired. Note how the layer group Dev HQ is displayed as a radio group.•Hover over the group Dev HQ and start the swipe view by clicking the swipe iconSwipe view shows the exterior walls on the left, and no walls on the right.Ensure that bookmarks are displayed as expected in CityEngine Web Viewer. Hovering over the 3D viewport shows the bookmarks bar. Use the play button to play a tour through the bookmark views.Other actions:•Select one of the campus buildings, and find additional metadata in the information pane.•Turn direct and diffuse shadows on and off in the settings pane.•In the layer pane, hide floors 1 and 3 to see details of floor 2.•In the search pane, search for “restroom”.More details on CityEngine Web Viewer can be found in the ArcGIS Online help.Part 4: Publish to ArcGIS OnlineCityEngine Web Scenes can be uploaded to ArcGIS Online, where they can easily be shared with selected people or the public.Note:This feature requires an ArcGIS Online account. Create onehere.UploadSteps:1.Locate the .3ws file in the Navigator.2.Right-click Share as.This will display the CityEngine Web Scene Package wizard.3.Check Upload package to my ArcGIS Online account. the Web Scene, or use suggested Name.5.Choose the Item Description tab.6.Enter a summary for your Web Scene item.7.Choose or enter tags for your Web Scene item.8.Click Share.If you are not logged in yet, CityEngine will show the login dialog box for ArcGIS Online.9.Enter your credentials and sign in.CityEngine uploads your Web Scene to your ArcGIS Online account.Web Scene on ArcGIS OnlineOnce the upload is finished, the Web Scene appears as an item in your Portal-My Content in Navigator.Steps:1.Right -click the item, and choose Open in browser2.Click Edit, and set a thumbnail image (for example, from the projects images folder).3.Click Share to set access rights for selected groups or the public.4.Click View application to start Web Viewer with Esri Campus Web Scene on ArcGIS OnlineIf your item is public, you can use the share button in the header of CityEngine Web Viewer to share this Web Scene on Facebook, post on Twitter, send as email, share the link itself, or embed it in a web page.Tutorial 15: Publish web scenesCopyright © 1995-2015 Esri. All rights reserved.11。
vuepress侧边栏标题
vuepress侧边栏标题- Vuepress侧边栏标题是什么?- Vuepress是一款基于Vue.js的静态网站生成器,它可以帮助我们快速搭建一个静态网站。
而Vuepress侧边栏标题则是指在Vuepress生成的网站中,侧边栏所显示的标题。
- 如何设置Vuepress侧边栏标题?- 首先,在Vuepress的配置文件中,需要设置sidebar选项,这个选项是一个对象,里面包含了各个页面的侧边栏信息。
对于每个页面,我们可以设置它的侧边栏标题和对应的链接。
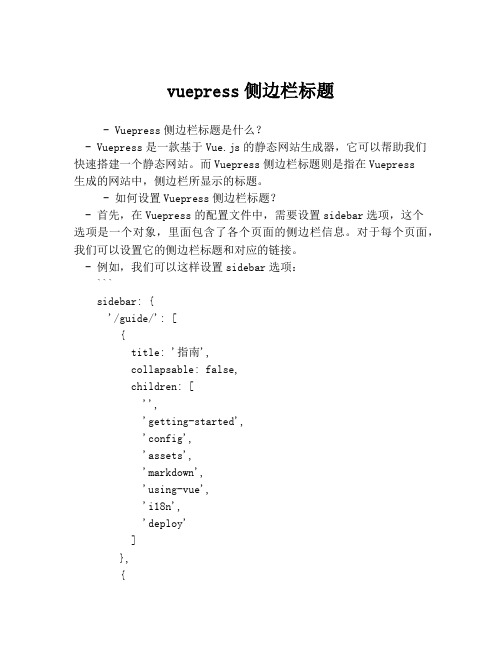
- 例如,我们可以这样设置sidebar选项:```sidebar: {'/guide/': [{title: '指南',collapsable: false,children: ['','getting-started','config','assets','markdown','using-vue','i18n','deploy']},{title: '深入',collapsable: false,children: ['frontmatter','permalinks','markdown-slot','global-computed']}]}```- 在上面的代码中,我们设置了/guide/目录下的侧边栏信息,其中每个对象代表一个侧边栏分组,title属性表示分组的标题,collapsable属性表示是否可以折叠,children属性表示分组下的链接列表,每个链接由一个字符串表示。
- 如何优化Vuepress侧边栏标题?- 在设置Vuepress侧边栏标题时,我们可以考虑以下几点来优化用户体验:- 标题要简洁明了,能够准确反映页面内容。
- 1、下载文档前请自行甄别文档内容的完整性,平台不提供额外的编辑、内容补充、找答案等附加服务。
- 2、"仅部分预览"的文档,不可在线预览部分如存在完整性等问题,可反馈申请退款(可完整预览的文档不适用该条件!)。
- 3、如文档侵犯您的权益,请联系客服反馈,我们会尽快为您处理(人工客服工作时间:9:00-18:30)。
IE 的事件模型
IE 4 以後的 IE 瀏覽器所採用事件模型
由於瀏覽器事件模型的差異性, 使用某個瀏覽器(如 IE )獨有的 事件進階功能常會造成其它瀏覽 器(如 Netsacpe)的錯誤。
Netscape 4 事件模型
Netscape 4 的事件模型 Netscape 6 仍支援其中部分的功能
事件驅動模式的程式
所有與瀏覽者互動的 JavaScript 程式都採用事件驅動(event driven)的架構。在這個架構下,瀏覽器會產生一些事件 (event)來反映某些有趣的狀況發生在網頁或網頁元件中; 譬如以下的狀況都會觸發瀏覽器產生相關的事件: • 網頁完全下載後、 • 瀏覽者的滑鼠遊標滑過超連結、
Abort Blur Change Click DblClick Error Focus KeyDown KeyPress
KeyUp Load MouseDown MouseMove MouseOut MouseOver MouseUp Move Reset
Resize Select Submit Unload
瀏覽器獨有的事件
Netscape
DragDrop
IE
ቤተ መጻሕፍቲ ባይዱ
BeforeCopy BeforeCut BeforePaste BeforePrint BeforeUnload Bounce ContextMenu Copy Cut Drag DragEnd
onmousedown='document.img1.src="down.jpg"'
onmouseout='document.img1.src="normal.jpg"' onmouseover='document.img1.src="over.jpg"'>
<img name="img1" src="normal.jpg" border=0>
DragEnter DragLeave DragOver DragStart Drop FilterChange Finish FocusIn FocusOut Help
MouseEnter
MouseLeave
MouseLeave MouseWheel MoveEnd
事件的差異
Netscape 4、 IE 和 DOM Level 2 各有若干特
殊的事件,我們必須注意這些不相容性。 Netscape 4 的事件通常只能用在特定的 HTML 元件。 IE 和 DOM Level 2 大部份的事件都適用於所有 的 HTML 元件。 三者的事件傳遞方式不同
瀏覽器均有的事件
HTML4, N6, IE4: 大部分元件 Netscape: a, area, img, button, document, link
範例 底下的滑鼠事件設定可製造出按鈕下壓的效果。不 過只適用於 IE,而不適用於 Netscape 4。
<a href=".tw"
MoveStart
Paste Scroll SelectStart
Start
事件的分類與說明
滑鼠事件 鍵盤事件 表單事件 文件事件 視窗事件 其它事件
滑鼠事件
Click 發生時機:使用者在網頁元件上點一下滑鼠左鍵。 適用元件:
N2, IE3: a, area, input N4: button, radio, checkbox, submit, reset, link HTML4, N6, IE4: 大部分元件
註:若處理碼傳回 false,則取消元件的預設行為(如
follow link, reset, submit 等)
DblClick
發生時機:使用者在網頁元件上快速點兩次滑鼠左鍵。
適用元件:
N4: document, link HTML4, N6, IE4: 大部分元件
MouseDown
發生時機:使用者在網頁元件上按住滑鼠左鍵。
Events & Event Handling
靜宜大學資管系 蔡奇偉 副教授
內容大綱
事件驅動模式的程式 事件的分類 四種事件模型 事件的差異 瀏覽器均有的事件 瀏覽器獨有的事件 事件的分類與說明 指定事件處理碼的方法 事件處理碼的傳回值 事件物件 事件的傳遞方式
• 瀏覽者按下表單中的傳送按鈕、…、等等。
若對處理某事件有興趣,你就必須在適當的元件中設定此事
件的處理碼(event handler)。當這事件發生時,瀏覽器
就會自動執行你所提供的事件處理碼。
事件的分類
我們可以把事件分為下列四類:
使用者操作引發的事件, 如:按下滑鼠鍵、改變文字欄
裏的內容、移動滑鼠游標通過超連結、…、等等 瀏覽器狀態改變所引發的事件,如:載入新網頁和離開網 頁 計時器(Timer)引發的事件
適用元件:
N4: button, document, link, a, area, img
HTML4, N6, IE4: 大部分元件
MouseMove
發生時機:使用者在網頁上移動滑鼠游標。
適用元件:
HTML4, N6, IE4: 大部分元件
MouseOut
發生時機:使用者把滑鼠游標移出網頁元件。 適用元件:
HTML4, N6, IE4: 大部分元件 N4: layer, link
MouseOver 發生時機:使用者把滑鼠游標移到網頁元件的上方。 適用元件:
HTML4, N6, IE4: 大部分元件
註:在超連結元件中,處理碼傳回 true 可制止超連結 的 URL 出現在狀態行中。 MouseUp 發生時機:使用者放開滑鼠的左鍵。 適用元件:
錯誤( Error )引發的事件
四種事件模型
原始的事件模型
源自於 Netscape 4 規格的一個簡單事件模型 又稱為 DOM Level 0 的事件模型 所有具有 JavaScript 功能的瀏覽器都支援此事件模型
標準的事件模型
DOM Level 2 所定義的事件模型 Netscape 6 和 Mozilla 瀏覽器支援