Proflex PCR System使用说明书
ProFlex 3x32PCR仪

ABI ProFlex 3x32型核酸扩增仪3位不同的用户,3个不同的实验,3个不同的时间。
它们均与一台适用于当今PCR实验室、
灵活且高性能的仪器建立了远程连接。
1.技术指标:
1.1.*Block形式:3 x 32孔0.2ml(可独立运行);
1.2.*Block最高升降温速率:6.00 °C/秒
1.3.*样品最大变温速率:4.40 °C/秒
1.4.样品通量及体积:1-96个/10-80ul
1.5.*梯度功能:每个32孔模块可以设置两个退火温度用于实验条件的摸索,
1.6.梯度温控范围:最高为99.9℃
1.7.*最小温度梯度和最大温度梯度:每2列区域间温差为0.1℃;每2列区域间温差为5℃;
1.8.特异性扩增:实验开始先升热盖温度,热盖温度上升到设定温度前,模块一直保持在任何温度,防止样品蒸发和提高反应特异性;
1.9.温度精确性:±0.25 °C(35-99.9 °C)
1.10.温度均一性:<0.5°C(达到95°C后20sec)
1.11.*显示屏:8.4英寸彩色TFT LCD,更加清晰的操作显示屏,更直观;
1.1
2.*具有市面上多种PCR仪的控温模式:可以可以直接在该机器上使用原有程序,无需再进行优化,大大节省您的时间;
1.13.操控:可以进行PC控制
1.14.存储能力:在主机上可存储800个protocol,若使用U盘存储则无限制
1.15.*具有WiFi功能,可以远程监控实验以及机器的运转情况;。
宝生物荧光定量PCR使用说明

① 按下列组份配制 PCR 反应液(反应液配制请在冰上进行)。
试剂 SYBR® Premix Ex TaqTM(2×) PCR Forward Primer(10 µM) PCR Reverse Primer(10 µM) DNA 模板 dH2O(灭菌蒸馏水) Total
司独自开发的Buffer系统相结合,具有高扩增效率,高扩增灵敏度,高扩增特异性之特点。
●操作注意 以下为使用本试剂盒时的注意事项,使用前一定认真阅读。
1. 本制品请于 4℃避光保存,避免冻结制品。实验证明,4℃保存一年半制品性能稳定,反复冻融制品性 能可能下降。
2. 使用时请上下颠倒轻轻均匀混合,避免起泡,并经轻微离心后使用。 3. 本制品中含有荧光染料SYBR® Green I,保存制品或配制PCR反应液时应避免强光照射。 4. 反应液的配制、分装请一定使用新的(无污染的)枪头、Microtube 等,尽量避免污染。
1.热变性
Primer
荧光物质
2.引物退火
Polymerase
3.延伸反应
●试剂盒特长
1. 适用于 Real Time PCR 反应,可以快速、准确地对目的基因进行检测、定量。 2. 在 2×浓度的Premix中,预先混有SYBR® Green I,PCR反应液配制时,只需加入模板、引物、灭菌
蒸馏水便可进行Real Time PCR反应,操作简单方便。 3. DNA聚合酶使用了改良后的TaKaRa Ex TaqTM HS,可以进行Hot Start法PCR反应,再与TaKaRa公
*3 建议反应液体积为 25 ~ 50 µl。
pcr仪使用说明

一. 开机打开 PCR 仪的电源,需等待一小段时间,大概几十秒,仪器程序开始初始化。
初始化完成后,显示主菜单,二. 建立新方法1. 点击“N ew Methods ”,进入以下界面,点击“open template ”进入创建程序界面,可以通过已存在的模板创建程序,如果没有使用其中的模板,请选择“Blank Template ”,在选择“General PCR ”进入下边第三幅图界面。
2. 温度,时间,循环等体积等的设置:点击”Edit ”进入如下“edit ”界面,可以通过点击页面上的步骤温度、时间、热盖温度、反应体积和循环数,来设定每个步骤时间和温度;点击“Save ”保存当前程序,可以设定程序名称,保存位置。
程序保存后选择模块,直接运行程序。
3. 添加步骤和阶段。
点击“Manage Stages ”进入如下界面,点击“Add Stage ”出现“+”,点击“+”则在该Stage 之前添加一个相同的Stage ,点击“Remove Stage ”在程序界面上出现“-”,点击“-”则移除当前Stage ;点击“add step ”出现“+”,点击“+”则在该Step 之前添加一个相同的Step ,点击“Remove Step ”在程序界面上出现“-”,点击“-”则移除当前Step ;4. 高级设置。
点击“Advanced Options ”进入高等设置界面,如下图:点击“Simulation Mode ”进入模拟界面,可以选择需要模拟的机器。
当选择模拟机器时,仪器的变温速率是不可以调整的。
通过“VeriFlex ”设定仪器的梯度,点击,设置梯度,两个梯度范围间隔最小0.1℃,最大5℃三、运行已有的程序点击“Open method ”,进入“Select Method ”菜单项,选择左侧的文件夹,查看文件夹中的程序,选择要运行的程序直接点击,进入程序界面,在此界面下也可以对程序进行编辑,如果无需编辑选择要使用的模块,直接点击“Start RUN ”,运行当前程序。
PCR仪比较ProFlex96孔PCR系统具有稳定且可靠的性能

应用说明2ProFlex 96孔PCR系统PCR仪比较:ProFlex 96孔PCR系统具有稳定且可靠的性能简介:GeneAmp™ PCR系统9700于1997年问世,曾被大量文献引用过(~3,000篇文献),享有极高的声誉,是一款精确且可靠的PCR仪。
本研究将几款PCR仪与GeneAmp PCR系统9700相比较,包括:•ProFlex™ 96孔PCR系统•Bio-Rad® C1000 Touch™ 96孔PCR仪•MJ Research PTC-200 96孔PCR仪•Eppendorf® Mastercycler™ Pro S材料与方法采用图1和图2所示的试剂和扩增程序检测两种PCR 模板 (0.9 kb 和3 kb)。
使用含SYBR Safe DNA 凝胶染料的E-Gel 琼脂糖凝胶套装,1.2% (货号:G620601)和TrackIt™ 1 Kb Plus DNA 分子量标准(货号:10488085)用于PCR 产物电泳。
为说明加热模块中的差异,按图3所示放置PCR反应管,H11位置为阴性对照孔。
95˚C 01:0000:3001:0010:0094˚C 72˚C 00:30x30 cycles55˚C 72˚C ∞4˚C95˚C 01:0000:3003:0010:0094˚C 68˚C 00:30x30 cycles55˚C 68˚C ∞4˚C图1. 用于0.9 kb 模板的PCR 反应组分和循环条件。
图2. 用于3 kb 模板的PCR 反应组分和循环条件。
Platinum PCR SuperMix 46.011306016正向引物 (100 pmol/μL)0.5A15612反向引物 (100 pmol/μL)0.5A15612DNA 模板 (50 ng 质粒)1.0NA UltraPure 无DNA 酶/无RNA 酶蒸馏水2.010977015Platinum 高保真PCR SuperMix 46.012532016正向引物 (100 pmol/μL)0.5A15612反向引物 (100 pmol/μL)0.5A15612DNA 模板 (50 ng 质粒)1.0NA UltraPure 无DNA 酶/无RNA 酶蒸馏水2.010977015图3. 加热模块中的PCR 反应位置。
伯乐数字pcr 技术规格
伯乐数字pcr 技术规格
伯乐数字PCR(Polymerase Chain Reaction)技术是一种用于扩增DNA片段的方法,常被应用于分子生物学和基因工程领域。
以下是伯乐数字PCR技术的一些常见规格:
1. 温控系统:伯乐数字PCR设备通常配备了精确的温度控制系统,可在不同温度下进行PCR反应的各个阶段,包括变性、退火和延伸。
2. 热循环数:伯乐数字PCR设备可以执行多个热循环,每个循环由特定的时间和温度组成。
这使得用户可以根据需要进行多轮PCR反应。
3. 反应体积:通常,伯乐数字PCR设备支持小体积PCR反应,其反应体积可以为10微升至100微升。
这有助于减少试剂消耗和降低成本。
4. 检测模式:伯乐数字PCR设备通常可以提供多种检测模式,包括实时荧光检测、终点荧光检测和光学密度测量等。
这些模式可以帮助用户实时监测PCR反应的进展和结果。
5. 数据分析软件:伯乐数字PCR设备通常配备了专门的数据分析软件,用于解析和处理PCR反应的数据。
这些软件通常提供数据可视化、扩增曲线分析、定量分析等功能。
请注意,伯乐数字PCR技术的具体规格可能因设备型号和制造商而有所不同。
因此,在购买或使用伯乐数字PCR设备时,建议参考相应的产品说明书和用户手册以获取准确的技术规格信息。
PCR仪使用说明书

PCR 仪使用说明书步骤:1、开机:打开开关,视窗上显示“SELF TEST ”,显示10秒中后,显示RUN-ENTER准备执行程序。
2、放入样本管,关紧盖子。
3、如果要运行已经编好的程序,则直接按《Proceed 》,用箭头键选择已储存的程序,按《Proceed 》,则屏幕显示:按《Proceed 》选择ENABLE ,则开始执行4、如果要输入新的程序,则在RUN-ENTER 菜单上用箭头键选择ENTER PROGRAM,按《Proceed 》,屏幕显示按《Proceed 》,1)选择NEW,按《Proceed 》确认(如何输入字母、数字2)输入程序步骤:名字输入后,显示 按《Proceed 》则可以输入温度(0~100℃),按《Proceed 》确认后,则可以输入孵育时间,用《Select 》键移动光标,输入数字,完成后按《Proceed 》确认,跳到下一步,输入方式同上。
3)选择GOTO ,输入循环步骤时链接到第几步(循环数最多可达9999次)(为实际循环数-1)。
4) 选择option,显示 再选择increment,按《Proceed 》Proceed 》确认,然后输入每个循环增加或减少的温度,增加用正值,减少用负值(-0.1℃~6℃),按《Proceed》确认。
选择extend, 按《Proceed》确认,输入每个循环增加或减少的时间(-60~60秒),按《Proceed》确认。
选择slop(指温度上升或下降的速率),输入温度的改变值(-0.1~1.5℃)按《Proceed》确认,然后输入加热或致冷的速度,按《Proceed》确认。
4)选择End,输入结束步骤。
5、输入完成的程序后,到RUN-ENTER菜单,选择新程序,开始运行。
6、其它:用《pause》可以暂停一个运行的程序,再按一次继续程序。
用《stop》或《Cancel》可停止运行的程序。
编辑程序:1、可以用《Cancel》键删除输错的值,输入新的值后按《Proceed》确认。
荧光定量PCR仪操作指南设计eppendorf
目录:1 安全预防法2 安装2.1 交货包装2.2 仪器的安装2.3 功能性单元2.3.1 Mastercycler ep realplex2.4 启动2.4.1 realplex模块与热模块之间的连接2.4.2 Mastercycler ep realplex 与计算机之间的连接2.4.3 与其它部件的连接2.4.4 realplex软件的安装2.4.4.1 安装主程序2.4.4.2 数据恢复2.4.4.3 开始realplex软件的运行3. 操作3.1 管理者登陆3.2 登陆3.3 用户变更3.4 系统配置3.4.1 对使用者的管理3.4.1.1 新用户建立3.4.1.2 编辑用户3.4.1.3删除用户3.4.2 用户层3.4.3 循环仪3.4.4 realplex 模块3.4.5 系统层3.4.5.1 特性3.4.5.2 登陆出错信息3.4.5.3 用户登陆3.4.5.4 软件更新3.5 检测项目管理3.5.1 建立检测项目3.5.2 打开检测项目3.5.3 保存检测项目3.5.4 保存模板文件3.5.5 模板文件的使用3.5.6 复制检测项目3.5.7 检测项目的输出3.5.8 检测项目的输入3.5.9 建立文件夹3.5.10 删除检测项目和文件夹3.6 探针管理3.7 染料管理3.8 校准3.8.1 背景校准3.8.2 颜色校准3.8.2.1 使用商业的校准工具包进行的颜色校准3.8.2.2 客户特有的染料的校准3.9 数据库管理3.9.1 当前数据库的自动保存3.9.2 当前数据库的保存3.9.3 输入数据库3.9.4 数据库的归档4 编程(检测项目的建立)4.1 建立一个新的检测项目4.2 建立板布局4.2.1 染料的确定4.2.2 参考染料的选择4.2.3 样本容积输入4.2.4 探针类型的确定4.2.5 背景的确定4.2.6 样品类型的定义4.2.6.1 标准4.2.6.2 阳性对照4.2.6.3 阴性对照4.2.6.4 未知样品4.2.7 复制和标准系列的自动建立4.2.8 定量的样品类型4.2.9 相对定量的样品类型4.2.9.1 多plex分析例子4.2.9.2 单plex分析的例子4.2.10 熔点分析中的样品类型4.2.11 终点测定中的样品类型4.2.12 +/-检测项目中的样品类型4.2.13 基因辨识中的样品类型4.2.12 样品的复制与剪切4.2.15 删除样品4.2.16 几个样品的归组4.2.17 子检测项目的测定4.2.18 板布局的删除4.2.19 完整检测项目的板布局编辑4.3 pcr程序的建立4.3.1 用模板程序建立一个pcr程序4.3.2 不用模板程序建立pcr程序4.3.3 程序步的插入和编辑4.3.3.1 温度4.3.3.2 循环(1-5步循环)4.3.3.3 保温4.3.3.4 暂停4.3.3.5 声音4.3.3.6 熔解曲线4.3.3.7 终点4.3.4 程序的复制4.3.5 程序的删除4.3.6 测量点的确定4.3.7 热盖设置5 操作(监测)5.1 样品的加载5.2 模块温度控制5.3 样品体积5.4 启动检测项目5.5 单个样品的选择5.6 单个样品类型的选择5.7 循环仪状态5.8 当前运行检测项目的中断5.9 继续运行检测项目5.10 终止检测项目5.11 mastercycler ep realplex 作为pcr的使用5.12 mastercycler ep realplex 作为荧光计的使用5.13 关闭6 分析6.1 概要6.1.1 打开检测项目6.1.1.1 打开在运行的检测项目6.1.1.2 打开子检测项目6.1.2 单一检测项目的选择6.1.3 使样品处于不活动状态6.1.4 样品类型的选择6.1.5 分析模式的选择6.1.6 图标缩放6.1.7 存储默认设置6.1.8 图表的保存和复制6.1.9 样品数据的保存和复制6.1.10 编辑报告6.1.10.1 模板报告的应用6.1.11 分析的保存6.1.12 调用分析6.2 定量6.2.1 阈值确定6.2.2 基准线测定6.2.3 标准曲线6.2.4 分析6.2.5 multiplex 分析6.3 相对定量6.3.1 阈值的测定6.3.2 多plex 分析的估算6.3.3 单plex分析的估算6.4 熔解曲线分析6.4.1 阈值的测定6.4.2 分析6.5 终点测量6.5.1标准曲线6.5.2 分析6.6 +/-检测项目6.6.1 将终点测定作为数据源的+/-检测项目分析模式6.6.1.1 阈值的测定6.6.2 pcr数据作为数据源的+/-assay6.6.2.1 阈值测定6.6.3 分析6.6.4 多plex分析6.7 基因测定6.7.1 阈值测定6.7.2 分析7 维护7.1 清洁仪器的一般方法7.2 热模块的清洁7.3 热模块的验证与校准8 故障查找8.1 一般故障8.2 在sybr绿色分析中发生的错误8.3 qrt-pcr过程中发生的错误9.1 登陆9.2 新用户的建立9.3 创建一个检测项目9.4 检测项目的保存9.5 执行检测项目9.5.1 概述9.5.2 板布局9.5.3 pcr程序9.5.4 开始检测项目9.5.5 当前运行检测项目的中断9.5.6 继续运行检测项目9.5.7 退出检测项目9.5.8 分析10 技术数据2.3 功能性单元2.3.1 Mastercycler ep realplex图1:关闭的realplex模块前面观1 realplex模块2 状态显示3 密封压板(锁住状态)4 控制面板的挂钩(Mastercycler ep realplex不需要)5 热模块图2:打开的realplex模块前面观1 密封压板(开启状态)2 realplex模块3 热模块放入试验样本后,向前拉动realplex模块,覆盖住插入的试管。
PCR 仪操作手册
Mastercycler PersonalPCR 仪操作手册1 简介Eppendorf 的Mastercycler Personal 是适用于所有分子生物学和生化实验室研究的PCR仪。
样品温度在4-90 度间快速可调(最大速度每秒3 度)。
设计有特殊的¡离心管控制¡模式,从而对装有不同体积溶液的不同离心管中的样本进行温度控制。
加热槽为一通用模块,可适用5X5 的微孔板、25 个0.2ml 的Eppendorf PCR 管、16 个0.5ml 薄壁的Eppendorf PCR 管或其他相应的试管,而无须更换模块。
为避免样本蒸发浓缩,本仪器设计有可适应各种试管高度的热盖。
本仪器易于操作,有完整的八线显示,并可连接打印机。
Mastercycler Personal 是Perkin-Elmer 公司授权许可生产的PCR 仪。
2 安全警告3 安装3.1 包装一个包装内应含有以下物品:1 台小型PCR 仪1 条主电源线1 本操作指南1 张个人存储卡1 包0.2mlPCR 管(100 个)3.2 装机安装时请确保通气孔通畅,四周有足够的空间散热;并请确保仪器下部无其他异物。
搬动仪器时无须其他装置,可抓住仪器两侧将其提起。
所需空间:宽18cm深:35cm高:25cm电源连接:1 个防电击插座。
如需连接打印机,则需用另一电源连接。
3.3 启动仪器拆除热盖上的胶条并取出热盖下的泡沫塑料。
连接电源线。
启动仪器前请核对用户电源是否与铭牌要求相符。
连接和启动打印机的步骤见第9 部分。
4 技术说明4.1 仪器结构图1:前面观1 热盖2 热盖锁3 显示与控制面板4 个人存储卡读取器图2:侧面观图3:背面观1 热盖2 加热槽(此图中未显示)3 通气孔4 PC 连接插孔5 打印机连接插孔1 通气孔2 主电源开关3 保险丝4 主电源插孔5 铭牌图4:显示与控制面板1 编辑键2 光标键3 控制键4 小数点和顺序颠倒标志键5 显示屏4.2 按键1、编辑键Opt ¡在运行过程中按opt 键可显示程序运行的剩余时间¡编程时选择温度指令(ramp、梯度、增量)Del ¡删除程序条,数据字母或重新设定参数:按住此键可删除整条信息Sel ¡选择程序指令¡选择菜单信息¡可选择字母(用¡键决定正逆序)Ins ¡在程序编辑中插入程序条2、光标键▲►▼◄用于移动光标,显示为黑色方块。
PCR仪使用说明书

PCR仪使⽤说明书PCR 仪使⽤说明书步骤:1、开机:打开开关,视窗上显⽰“SELF TEST ”,显⽰10秒中后,显⽰RUN-ENTER准备执⾏程序。
2、放⼊样本管,关紧盖⼦。
3、如果要运⾏已经编好的程序,则直接按《Proceed 》,⽤箭头键选择已储存的程序,按《Proceed 》,则屏幕显⽰:按《Proceed 》选择ENABLE ,则开始执⾏4、如果要输⼊新的程序,则在RUN-ENTER 菜单上⽤箭头键选择ENTER PROGRAM,按《Proceed 》,屏幕显⽰按《Proceed 》,1)选择NEW,按《Proceed 》确认(如何输⼊字母、数字2)输⼊程序步骤:名字输⼊后,显⽰按《Proceed 》则可以输⼊温度(0~100℃),按《Proceed 》确认后,则可以输⼊孵育时间,⽤《Select 》键移动光标,输⼊数字,完成后按《Proceed 》确认,跳到下⼀步,输⼊⽅式同上。
3)选择GOTO ,输⼊循环步骤时链接到第⼏步(循环数最多可达9999次)(为实际循环数-1)。
4) 选择option,显⽰再选择increment,按《Proceed 》Proceed 》确认,然后输⼊每个循环增加或减少的温度,增加⽤正值,减少⽤负值(-0.1℃~6℃),按《Proceed》确认。
选择extend, 按《Proceed》确认,输⼊每个循环增加或减少的时间(-60~60秒),按《Proceed》确认。
选择slop(指温度上升或下降的速率),输⼊温度的改变值(-0.1~1.5℃)按《Proceed》确认,然后输⼊加热或致冷的速度,按《Proceed》确认。
4)选择End,输⼊结束步骤。
5、输⼊完成的程序后,到RUN-ENTER菜单,选择新程序,开始运⾏。
6、其它:⽤《pause》可以暂停⼀个运⾏的程序,再按⼀次继续程序。
⽤《stop》或《Cancel》可停⽌运⾏的程序。
编辑程序:1、可以⽤《Cancel》键删除输错的值,输⼊新的值后按《Proceed》确认。
全自动酶免操作说明压塑

爱康全自动酶免分析仪简易操作流程1实验准备工作1.1准备试剂,检查各种试剂的量是否足够。
检查阴阳对照和质控的量是否足够,同时确保瓶中没有气泡,之后将阴阳质控QC根据位置表放到指定的位置。
1.2检查洗液是否足够,将要做实验的项目的洗液配足倒入指定的洗液瓶中。
检查洗液桶通道是否接好。
1.3检查盖子是否摆放到位。
1.4将微板、标本摆放到位(如贴条码时标本放入试管架时有条码的一侧正对扫描头)。
2 开始实验2.1先开启设备电源,后运行软件。
注意先开设备再开电脑,关机的时候先关电脑再关机器。
2.2在如下方左图的弹出栏点开始,执行实验前维护。
2.3维护结束后在桌面弹出的对话框中输入“用户名”及“密码”;点击“确认”。
2.4进入软件后,点击,在弹出的窗口(上方右图)中选择要做的实验组,输入标本个数、复查标本个数,修改微板条码,按照微板放置提示放置微板。
然后按照向导完成标本扫描和复查标本的孔位选择,最后点击,运行实验。
2.5在实验当中,如果想要插入新的项目,步骤同2.4。
3 实验中3.1实验过程中,要有人进行看守,以免出现标本或者试剂漏加的情况。
当一架标本加完之后可以将该微板拿出来观察是否有漏加的情况,注意机械臂的移动,以免撞到。
3.2没有取到针的对话框如右图。
其中:Init+Retry为初始化加样臂然后重试,当因为加样臂失位而没有取到针的时候用。
Retry:重试,当确实没有取到针的时候,点重试。
Ignore:忽略,当取到了针但由于取得太紧或者太松而误报的时候用。
Abort:终止,终止实验,尽量别点。
3.3实验中出现洗板机堵针等情况,首先暂停实验,进入洗板机模块,点暂停洗板机,待问题解决后点(继续)运行洗板机,并继续实验。
3.4右图为实验中报警提示没有液体。
因为设备吸液体不会象手工吸液体一样那么干净,所以要有一定的液量液体垫底,所以尽量保证液体足够,当报没有液体的时候会出现上面的对话框。
Retry:重试,确实没有液体,将液体加足够之后点重试。
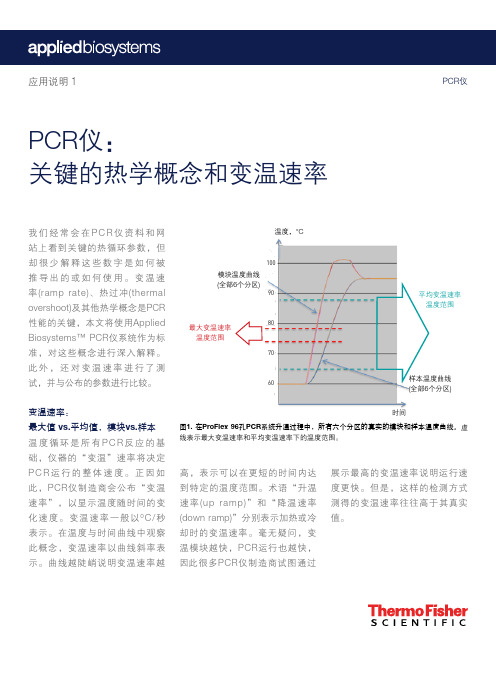
PCR仪关键的热学概念和变温速率-ThermoFisherScientific
温度设置点
温度,°C
形成模块热能过冲 (绿色区域),能量转移至样本。
模块温度 (样本导向的算法) 样本温度
时间 (秒) 图2. 模块热过冲。在加热阶段,反应模块(蓝色)和样本(红色)温度曲线及相关的模块热能过冲(绿色)控制得很理想。虚线表示该阶段的设置 温度。
必须指出,当模块超过设置点时,样本可完美地达到 设置点,不会出现过冲现象。此外,直到样本达到设 置点时,仪器方开始对该步骤进行倒计时。这可确保 样本能够在您设置的特定温度保持一定的时间。
但仅仅是模块达到了目标温度或“设置点”,并 不意味着样本也达到了同样的设置点。Applied Biosystems仪器采用的专利温度控制算法将样本体积 考虑在内,可确保快速且准确地达到温度设置点。该 算法的实际模块温度高于设置点,从而使样本能够更 快地达到设置点。这又称为模块热过冲,如图2中以 绿色表示。
时间
图1. 在ProFlex 96孔PCR系统升温过程中,所有六个分区的真实的模块和样本温度曲线。虚 线表示最大变温速率和平均变温速率下的温度范围。
高,表示可以在更短的时间内达 到特定的温度范围。术语“升温 速率(up ramp)”和“降温速率 (down ramp)”分别表示加热或冷 却时的变温速率。毫无疑问,变 温模块越快,PCR运行也越快, 因此 很 多 P C R 仪 制 造 商 试 图 通 过
荧光定量PCR仪操作指南

荧光定量P C R仪操作指南e p p e n d o r f(总97页)本页仅作为文档封面,使用时可以删除This document is for reference only-rar21year.March目录:1 安全预防法2 安装交货包装仪器的安装功能性单元Mastercycler ep realplex启动realplex模块与热模块之间的连接Mastercycler ep realplex 与计算机之间的连接与其它部件的连接realplex软件的安装安装主程序数据恢复开始realplex软件的运行3. 操作管理者登陆登陆用户变更系统配置对使用者的管理新用户建立编辑用户删除用户用户层循环仪realplex 模块系统层特性登陆出错信息用户登陆软件更新检测项目管理建立检测项目打开检测项目保存检测项目保存模板文件模板文件的使用复制检测项目检测项目的输出检测项目的输入建立文件夹删除检测项目和文件夹探针管理染料管理校准背景校准颜色校准使用商业的校准工具包进行的颜色校准客户特有的染料的校准数据库管理当前数据库的自动保存当前数据库的保存输入数据库数据库的归档4 编程(检测项目的建立)建立一个新的检测项目建立板布局染料的确定参考染料的选择样本容积输入探针类型的确定背景的确定样品类型的定义标准阳性对照阴性对照未知样品复制和标准系列的自动建立定量的样品类型相对定量的样品类型多plex分析例子单plex分析的例子熔点分析中的样品类型终点测定中的样品类型+/-检测项目中的样品类型基因辨识中的样品类型样品的复制与剪切删除样品几个样品的归组子检测项目的测定板布局的删除完整检测项目的板布局编辑pcr程序的建立用模板程序建立一个pcr程序不用模板程序建立pcr程序程序步的插入和编辑温度循环(1-5步循环)保温暂停声音熔解曲线终点程序的复制程序的删除测量点的确定热盖设置5 操作(监测)样品的加载模块温度控制样品体积启动检测项目单个样品的选择单个样品类型的选择循环仪状态当前运行检测项目的中断继续运行检测项目终止检测项目mastercycler ep realplex 作为pcr的使用 mastercycler ep realplex 作为荧光计的使用关闭6 分析概要打开检测项目打开在运行的检测项目打开子检测项目单一检测项目的选择使样品处于不活动状态样品类型的选择分析模式的选择图标缩放存储默认设置图表的保存和复制样品数据的保存和复制编辑报告模板报告的应用分析的保存调用分析定量阈值确定基准线测定标准曲线分析multiplex 分析相对定量阈值的测定多plex 分析的估算单plex分析的估算熔解曲线分析阈值的测定分析终点测量标准曲线分析+/-检测项目将终点测定作为数据源的+/-检测项目分析模式阈值的测定pcr数据作为数据源的+/-assay阈值测定分析多plex分析基因测定阈值测定分析7 维护清洁仪器的一般方法热模块的清洁热模块的验证与校准8 故障查找一般故障在sybr绿色分析中发生的错误qrt-pcr过程中发生的错误登陆新用户的建立创建一个检测项目检测项目的保存执行检测项目概述板布局pcr程序开始检测项目当前运行检测项目的中断继续运行检测项目退出检测项目分析10 技术数据功能性单元Mastercycler ep realplex图1:关闭的realplex模块前面观1 realplex模块2 状态显示3 密封压板(锁住状态)4 控制面板的挂钩(Mastercycler ep realplex不需要)5 热模块图2:打开的realplex模块前面观1 密封压板(开启状态)2 realplex模块3 热模块放入试验样本后,向前拉动realplex模块,覆盖住插入的试管。
PCR仪使用说明及注意事项报告.doc

PCR仪使用说明及注意事项开机:PCR仪的开关在仪器的背面将开关打开后仪器显示如下界面F1(Run)选择一个程序并开始运行;F2(Create)F3(Edit)建立一个新程序或修改已有程序;F4(Util) 查看仪器最后运行的程序;F5(User)建立、编辑或删除新用户。
建立新用户:选择F5选择F2用户名可以用字母、数字或它们的组合命名,通过方向键选择字母、通过数字键选择数字。
命名完成后选择F1,用户名建立完成。
程序设置:1、新建程序选择用户名后,选择F2通过光标移动及数字键设定程序的各个参数(包括各反应阶段的事件、温度及循环数),完成后选择F2储存程序,出现以下界面,选择F3为程序命名选择F1保存。
2、编辑程序:在主菜单的界面下选择F2,选择需要编辑的程序选择F1编辑编辑完成后,选择F2保存程序信息。
运行程序:在主菜单下选择F1,然后选择运行的程序选择F1在此界面下需确定样品的体积,选择F1开始运行。
程序运行结束后出现以下界面退出到主菜单,取出样品并关闭电源。
注意事项:1、使用PCR仪需提前预订,预订的程序要标明退火温度和延伸时间:如果不用要及时取消或通知接下来要做的人。
2、不得无故拖延反应开始的时间,如无故拖延超过半小时,该时间段即刻取消,其他同学可协商使用。
3、PCR反应结束后请及时收取PCR产物,或交代同学及时帮忙收取。
若后续反应不能及时跟上,请务必关机!因为开机状态下,热盖将持续工作,长此以往,热盖容易损坏。
4、PCR反应最后一步请务必设置为:16℃,2 min。
(切忌4℃,∞,避免压缩机过度耗损!)5、PCR仪不能同一温度设置较长时间,16℃3小时。
6、PCR仪不能开机运行过夜。
大龙pcr扩增仪说明书
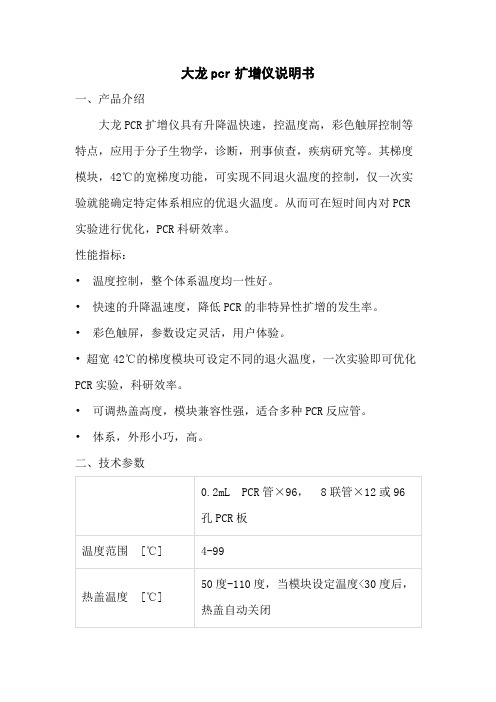
温度范围 [℃]
4-99
热盖温度 [℃]
50度-110度,当模块设定温度<30度后,热盖自动关闭
显示精度[℃]
0.1
温度准确性[℃@55℃]
±0.1
温度均一性[℃@55℃ ]
< 0.3
大变温速率[℃/s]
4
温度梯度[℃]
有
梯度范围[℃]
30-99
• 温度控制,整个体系温度均一性好。
• 快速的升降温速度,降低PCR的非特异性扩增的发生率。
• 彩色触屏,参数设定灵活,用户体验。
• 超宽42℃的梯度模块可设定不同的退火温度,一次实验即可优化PCR实验,科研效率。
• 可调热盖高度,模块兼容性强,适合多种PCR反应管。
• 体系,外形小巧,高。
二、技术参数
大龙pcr扩增仪说明书
一、产品介绍
大龙PCR扩增仪具有升降温快速,控温度高,彩色触屏控制等特点,应用于分子生物学,诊断,刑事侦查,疾病研究等。其梯度模块,42℃的宽梯度功能,可实现不同退火温度的控制,仅一次实验就能确定特定体系相应的优退火温度。从而可在短时间内对PCR实验进行优化,PCR科研效率。
性能指标:
梯度跨度[℃]
1-42
屏幕大小
7英寸800*480
触模屏操作
有
断电保护
有(无时间限制)
输入电压
A
PCR扩增仪操作手册

博日小精灵PCR说明书
注意:本文件中所包含的信息若有修改,恕不另行通知。
本文件包含有受版权保护的专利资料。
版权所有,未经杭州博日科技有限公司事先书面同意,不允许对文件中的任何部分进行复印、重新制作或翻译成其它语言。
首次使用本仪器时,请务必先仔细阅读使用说明书!产品专利号:ZL 98 2 44367.6产品标准号:YZB/浙0189-2007本产品仅是用于科研文件编号:BYQ605300000000SM文件版本:2008年5月 2.3版重要说明1惯例注意:注意项目中包含特别重要的信息,请您应仔细阅读。
如果不注意按提示去做,有可能造成设备损坏或无法正常工作。
警告!警告信息要求您特别小心做某一操作步骤或方法。
如果没有正确地按照要求去做,有可能导致严重的人身伤害。
2安全在操作、维护和修理本仪器的所有阶段,都必须遵守下面的基本安全措施。
如果不遵守这些措施或本说明书其它地方指出的警告,便可能影响到仪器提供的保护。
同时,这也会破坏设计和制造的安全标准以及仪器的预期使用范围。
杭州博日科技有限公司对用户不遵守下述要求所造成的一切后果,概不承担任何责任。
注意:本仪器是符合GB4793.1标准的Ⅱ类设备,防护等级IP20。
本仪器是室内使用的产品。
a)仪器接地为了避免触电事故,仪器的输入电源线必须可靠接地。
本仪器使用的是三芯接地插头,这种插头带有一个第3(接地)脚,只能配合接地型电源插座使用,这是一种安全装置。
如果插头无法插入插座内,则应请电工安装正确的插座,不要使接地插头失去安全作用。
b)远离带电电路操作人员不得擅自打开仪器。
更换元件或进行机内调节必须由持证的专业维护人员完成。
不要在连接上电源线的情况下更换元件。
c)注意使用电源在连接交流电源之前,要确保电源的电压与仪器所要求的电压一致(允许±10%的偏差)。
并确保电源插座的额定负载不小于仪器的要求。
d)注意电源线本仪器通常应使用随机附带的电源线。
如果电源线破损,必须更换不许修理。
DRR390A

中含有的靶基因的拷贝数不同,必要时可进行梯度稀释,确定最佳的 DNA 模板添加量。 如果欲使用本制品进行 2 Step RT-PCR 反应的第二步 PCR 扩增反应,第一步的 RT 反应 液作为 DNA 模板时的添加量不要超过 PCR 反应液总体积的 10%。
2) 进行 Real Time PCR 反应。 建议采用下列图表显示的两步法 PCR 反应程序。退火/延伸时间可在 20~30 秒范围内进行调整,推荐 使用 30 秒的条件。有关 PCR 的具体反应条件请参照「PCR 反应条件说明」。
使用量 10.0 μl 0.4 μl 0.4 μl 0.8 μl 0.4 μl 2.0 μl 6.0 μl 20.0 μl
使用量 25.0 μl 1.0 μl 1.0 μl 2.0 μl 1.0 μl 4.0 μl 16.0 μl 50.0 μl
终浓度 1×
0.2 μM*1 0.2 μM*1
*2 1× *3
● 操作方法
◆ 应用Thermal Cycler Dice® Real Time System扩增仪的操作方法
请按照Thermal Cycler Dice® Real Time System(Takara Code:TP800)的使用说明书要求进行实验操 作。
-2-
1) 按下列组份配制 PCR 反应液(反应液配制请在冰上进行)。
● 制品内容(50 μl 反应×200 次)
Premix Ex TaqTM(Probe qPCR)(2×Conc.)*1 ROX Reference Dye(50×Conc.)*2 ROX Reference Dye II(50×Conc.)*2
1.0 ml×5 支 200 μl ×1 支 200 μl ×1 支
宏石96P Realtime PCR system 标准操作规程
目的:建立宏石96P Realtime PCR system 标准操作规程,指导操作人员的正常使用和维护保养。
范围:适用于研发部、技术部实验全过程。
责任人:实验室负责人执行:研发部所有人员、技术部所有人员监督管理:研发部负责人、技术部负责人一、使用环境要求1.不要将SLAN主机安装在强电磁干扰或有高感应系数的仪器旁边,例如:电冰箱、高速离心机、振荡器等;2.SLAN主机通过风扇散热,主机放置位置离周围物体或墙壁至少要有15cm距离,以便通风;仪器上不许覆盖任何东西。
3.仪器必须放在稳固、水平的平面上,避免阳光直射,避免靠近加热设备;4.仪器在环境温度10~30℃,相对湿度20~80%的室内使用;5.为了防止电击危害,SLAN主机必须接在符合安规标准的三芯接地插座上,电压为~220V(50Hz);6.SLAN系统的用户必须经过制造商或经销商的专业技术人员培训后,才能安装及使用本系统。
二、系统操作简易流程1.新建一文件后,选择对应的模块。
2.进行反应孔的模板编辑,选择每个反应孔的样品类型,完成每个孔的信息输入。
3.轻轻推开蓝色滑板,按模板设置的顺序将反应试管正确放置在模块中(48孔),并关上滑板。
4.新建或打开一个PCR程序,编辑PCR反应的升降温步骤,选择合适的探针。
5.确认无误后,在程序编辑页面点击“开始”进行实验。
6.反应结束后,实验结果自动保存在E盘“PCR结果”文件夹中。
7.点击工具栏中的“数据分析”图标,对结果进行分析;8.点击“实验结果”选项卡,用户可观察实验结果:浓度值、Ct值、曲线等。
有经验的用户可根据自己的判断,适当地调整分析参数,来优化实验结果;9.打印所需的实验报告;10.点击工具栏中的“打开热盖”图标,将锁紧的热盖打开。
然后轻轻推开蓝色滑板,取出试管,再将蓝色滑板轻轻推回盖好;11.为了防止实验室污染,废弃物应按相关规定及时处理。
12.保存实验结果,关闭SLAN软件,关闭SLAN主机电源,并盖上防尘罩。
- 1、下载文档前请自行甄别文档内容的完整性,平台不提供额外的编辑、内容补充、找答案等附加服务。
- 2、"仅部分预览"的文档,不可在线预览部分如存在完整性等问题,可反馈申请退款(可完整预览的文档不适用该条件!)。
- 3、如文档侵犯您的权益,请联系客服反馈,我们会尽快为您处理(人工客服工作时间:9:00-18:30)。
USER GUIDEFor Research Use Only. Not for use in diagnostic procedures.ProFlex ™PCR System User GuideInstallation, Use, and Maintenancefor use with: PCR reagents from Invitrogen ™ and Applied Biosystems ®Catalog Number 4483636, 4483637, 4483638, 4484071, 4484073, 4484074, 4484075, 4484076, 4484078,4484072, and 4484077Publication Number MAN0007697RevisionA.0For Research Use Only. Not for use in diagnostic procedures.The information in this guide is subject to change without notice.DISCLAIMERLIFE TECHNOLOGIES CORPORATION AND/OR ITS AFFILIATE(S) DISCLAIM ALL WARRANTIES WITH RESPECT TO THIS DOCUMENT, EXPRESSED OR IMPLIED, INCLUDING BUT NOT LIMITED TO THOSE OF MERCHANTABILITY, FITNESS FOR A PARTICULAR PURPOSE, OR NON-INFRINGEMENT. TO THE EXTENT ALLOWED BY LAW, IN NO EVENT SHALL LIFE TECHNOLOGIES AND/OR ITS AFFILIATE(S) BE LIABLE, WHETHER IN CONTRACT, TORT, WARRANTY, OR UNDER ANY STATUTE OR ON ANY OTHER BASIS FOR SPECIAL, INCIDENTAL, INDIRECT, PUNITIVE, MULTIPLE OR CONSEQUENTIAL DAMAGES IN CONNECTION WITH OR ARISING FROM THIS DOCUMENT, INCLUDING BUT NOT LIMITED TO THE USE THEREOF.Important Licensing InformationThis product may be covered by one or more Limited Use Label Licenses. By use of this product, you accept the terms and conditions of all applicable Limited Use Label Licenses.TrademarksAll trademarks are the property of Thermo Fisher Scientific and its subsidiaries unless otherwise specified. AmpliTaq and AmpliTaq Gold are registered trademarks of Roche Molecular Systems, Inc. Clorox is a registered trademark of The Clorox Company, Bio-Rad, MyCycler, and C1000 Touch are trademarks of Bio-Rad Laboratories, Inc. Eppendorf, Mastercycler, and MJ Research are trademarks of Eppendorf AG.©2014 Thermo Fisher Scientific Inc. All rights reserved.ContentsAbout this Guide (6)Revision History (6)Purpose (6)■CHAPTER 1 About the System (7)About the system (7)Use the Touchscreen (8)Enter text (9)Enter numerals (10)Touchscreen menu overview (11)■CHAPTER 2 Initial Set-up (14)Site requirements (14)Environmental requirements (14)Temperature and humidity requirements (14)Pollution (14)Altitude (14)Materials (15)Required materials (15)Optional protective hardware (15)Unpack the product (15)Set up the system (16)Set up the wired connection (18)Set up the wireless connection (20)Recommended instrument settings (21)Change sample blocks (30)■CHAPTER 3 Operating the ProFlex™ PCR System (31)Load samples into the instrument (31)Load samples (31)Load samples in the ProFlex™ 3x32-Well PCR System (33)Create a new run method (34)Edit a run method (36)ProFlex™ PCR System User Guide 3 For Research Use Only. Not for use in diagnostic procedures.ContentsManage methods and folders (41)Perform a run (43)Perform a run on multiple instruments (45)Connect the instruments (45)Perform a run on multiple instruments (45)Monitor a run (46)Monitor via the Home screen (46)Monitor via the run monitor screen (46)If the power fails (48)View and export the run report (48)Remove the samples from the instrument (48)■CHAPTER 4 Routine Maintenance (49)As-needed maintenance (49)Clean the instrument (49)Replace the fuses (51)Upgrade the system firmware (51)Self Verification test (53)Order kits and replacement parts (54)■APPENDIX A Ordering Information (55)Instrument part numbers (55)Consumables (55)■APPENDIX B Troubleshooting (59)Troubleshoot problems (59)Return an instrument for service (60)■APPENDIX C Instrument specifications (62)Technical specifications (62)System specifications (64)Location of power point and ports on the instrument (65)■APPENDIX D Predefined Run Methods (66)■APPENDIX E Safety (81)Symbols on this instrument (81)Safety alerts on this instrument (82)Location of safety labels on this instrument (83)Safety information for instruments not manufactured by Thermo Fisher Scientific (85)4ProFlex™ PCR System User GuideFor Research Use Only. Not for use in diagnostic procedures.Contents Instrument safety (86)General (86)Physical injury (86)Electrical (86)Cleaning and decontamination (86)Laser (87)Safety and electromagnetic compatibility (EMC) standards (87)Safety (87)EMC (87)Environmental design (88)Chemical safety (88)Biological hazard safety (89)Documentation and support (90)Related documentation (90)Obtaining SDSs (90)Obtaining support (91)Limited product warranty (91)ProFlex™ PCR System User Guide 5 For Research Use Only. Not for use in diagnostic procedures.About this Guide Revision HistoryPurposeThe ProFlex™ PCR System User Guide provides information about installing, using,and maintaining the ProFlex™ PCR System.6ProFlex™ PCR System User GuideFor Research Use Only. Not for use in diagnostic procedures.1About the SystemThe ProFlex™ PCR System is an end-point thermal cycler, specifically designed for theamplification of nucleic acids using the Polymerase Chain Reaction (PCR) process.The user interface consists of a touchscreen with a graphical display that shows thetime, status, and temperature for each run. A touchscreen keypad allows you to enterinformation into fields on the display screen.About the systemThere are five models of the ProFlex™ PCR System:Five interchangeable ProFlex™ Sample Blocks are available:The ProFlex™ PCR System allows you to:•Run three experiments at a time with the 3x32-well, 0.2-mL block•Interchange the blocks (e.g. exchange the ProFlex™ 3x32-Well Sample Block withthe ProFlex™ 96-Well Sample Block, the ProFlex™ Dual 96-Well Sample Block, theProFlex™ Dual Flat Sample Block, the ProFlex™ Dual 384-Well Sample Block, andvice-versa)•Access the system remotely through a mobile application•Program the instrument from the touchscreen interface•Simulate other PCR instruments with Thermal Simulation modesProFlex™ PCR System User Guide 7 For Research Use Only. Not for use in diagnostic procedures.•Optimize your PCR with the help of the Veriflex ™blocksFigure 1 ProFlex ™3x32-Well PCR SystemFigure 2 ProFlex ™ 96-Well PCR SystemThis user guide provides information on how to maximize the capabilities of your ProFlex ™ PCR System. This user guide provides unique instructions for the different ProFlex ™ block types at the beginning of each section.Detailed specifications for the ProFlex ™ PCR System are found in Appendix C,“Instrument specifications“.Use the TouchscreenYou interact with the instrument using a touchscreen. Table 1 describes the several buttons common to many of the screens in the ProFlex ™ System.Table 1 Buttons in the touchscreenChapter 1 About the System Use the Touchscreen18ProFlex ™ PCR System User Guide For Research Use Only. Not for use in diagnostic procedures.and buttons.When you touch a field that requires the input of text, the text editor, as seen in the following figure, opens. Table 2 displays the buttons to touch to enter different information types.Table 2 Buttons to enter different informationEnter text Chapter 1 About the System Use the Touchscreen 1ProFlex ™ PCR System User Guide 9For Research Use Only. Not for use in diagnostic procedures., then the symbol(s). When you are done, touch again. to accept the entry and close the editor.When you touch a field that requires a numerical input, the numeric editor, as seen in the following figure, opens. Table 3 displays the buttons to touch to perform different functions while entering numbers.Table 3 Functions performed by entering numbersEnter numerals Chapter 1 About the System Use the Touchscreen110ProFlex ™ PCR System User Guide For Research Use Only. Not for use in diagnostic procedures.Touchscreen menu overviewOn powering on the instrument, you will first see the following Splash screen.Figure 3 ProFlex ™ PCR System Splash screenAfter the Splash screen, the Home screen appears.The instrument has interchangeable blocks, and detects which module is present on the system automatically. After the block completes initializing, depending on the block in use, the Home screen displays status dials; three for the ProFlex ™ 3x32-Well Sample Block and one for the ProFlex ™ 1x96-Well Sample Block, the ProFlex ™ Dual 96-Well Sample Block, the ProFlex ™ Dual Flat Sample Block, and the ProFlex ™ Dual384-Well Sample Block.Figure 4 Home screenThe Home screen includes the following features:1.Status dial : The number of dials appearing on the Home screen varies with the block module in use. While the instrument is in use, the status dial displays the current temperature of the block, the time elapsed for a run, and the run status.When the instrument is not in use, the status dial/s will show the 'Set Up Run'display. You can start a run by touching the status dial where it says Set Up Run.For instructions on starting a run by this method, see “ Perform a run“ on page 43.Chapter 1 About the System Touchscreen menu overview 12.Sign In : Touch Sign In to create an account or to enter information to sign in to your account.•To create a new account:a.In the Sign In screen, touch Sign Up .b.In the Create An Account screen, enter your personal information,create a user name and password, and enter a name for the defaultfolder that will contain the account information.c.TouchCreate Account•To sign-in to an existing account:1.Enter your user name and password.Note: To sign-in to an existing account as an administrator, enter youruser name as "Administrator" and password as "password".2.Touch Sign In .Chapter 1 About the System Touchscreen menu overview1Note: Once you have signed into your account, the Sign In button on the Home screen turns to My Account. The user name (custom or administrator) appears inthe bottom-left of the Home screen.3.New Method : Touch New Method to create a new run method with the help of the default templates that are pre-loaded with the instrument. Touching New Method takes you to the Setup Run screen that allows you to create a new run method by using the default templates or existing methods. You can also create a run method for incubation from the Setup Run screen.4.Open Method : Touch Open Method to select an existing run method to start a run. Touching Open Method takes you to the Select Method screen that displays the existing run methods. The run methods are sorted and stored in various folders. Select a folder to display the run methods within the folder. Touch a run method under the Method name to edit that run method in the edit mode.5.Incubate : Touch Incubate to use the instrument as a precise incubator for non-PCR workflows.6.Settings : Touch Settings to configure the instrument.Chapter 1 About the System Touchscreen menu overview 1Initial Set-up This chapter includes the procedures for installing the ProFlex ™PCR System.Site requirements The ProFlex ™ PCR System is for indoor use. Ensure that the installation site:•Meets the spatial and weight requirements (see “System specifications“ on page 64)•Meets environmental requirements (see “Environmental requirements“ on page 14)•Is within 1 m (3 ft.) of an AC power source receptacle•Is away from waterEnvironmental requirementsEnsure that the installation site is maintained under the following conditions:Table 4 Temperature and humidity requirementsAvoid placing the instrument adjacent to heaters, cooling ducts, or in direct sunlight.Fluctuations between day and night temperatures can cause system instability. Place away from any equipment that vibrates, such as a refrigerator or centrifuge.The ProFlex ™ PCR System has a Pollution Degree rating of 2. It may be installed in an environment that has non-conductive pollutants only, such as dust particles or wood chips. Typical environments with a Pollution Degree II rating are laboratories and sales and commercial areas.The safety of ProFlex ™ PCR System use was tested for altitudes up to 6000 ft.2Temperature and humidity requirements Pollution AltitudeMaterials•Scissors, pocket knife, or box cutter •Compressed air •Protective hardware, as appropriate (see below)Life Technologies supports the use of the following devices to protect the ProFlex ™PCR System from damage resulting from electrical hazards and the resultant loss of data. Before installing the system, decide what additional hardware (if any) you want to install.•Power line regulator (1.5-kVA)•Surge protector/line conditioner (10-kVA)•Uninterruptible power supply (1.5-kVA)Unpack the productIMPORTANT! Save the packing materials and box in case you need to ship the instrument to Life Technologies for service.1.To unpack the ProFlex ™ System:a.Cut the straps securing the instrument box.b.Cut the tape securing the top flaps of the instrument crate, then open the flaps.c.Remove the ProFlex ™ System Accessories from the instrument and set them aside.d.Lift and remove the cover from the instrument crate.e.Remove the packing material from the ProFlex ™ System, then inspect the instrument for shipping damage.IMPORTANT! If the ProFlex ™ System is damaged, note the location and appearance of the damage, then contact Life Technologies Technical Support or your service representative (see “Obtaining support“ on page 91).2.Move the ProFlex ™ System to the desired installation site. Follow these guidelines for lifting and moving:•Make sure that you have a secure, comfortable grip.•Keep your spine in a neutral position.•Bend at the knees and lift with your legs.•Do not lift and twist your torso at the same time.Required materialsOptional protective hardware Chapter 2 Initial Set-up Materials 23.Verify that the package containing the ProFlex ™ System Accessories includes the ProFlex ™ System Starter Kit :•Power cord cable•ProFlex ™ System Starter Kit•USB-enabled Wi-Fi Card (Part no. 4483658)Set up the system1.Remove the packing material:a.Open the ProFlex ™ System heated cover.b.Remove the packing material from the ProFlex ™ sample block(s) (ProFlex ™96-Well Sample Block, ProFlex ™ 3x32-Well Sample Block, ProFlex ™ Dual 96-Well Sample Block, ProFlex ™ Dual Flat Sample Block, or ProFlex ™ Dual 384-Well Sample Block) .ing a can of compressed air, deliver a blast of air into each well of the sample block(s) to remove any particles that may have collected during transportation.2.Install the sample block. To place the sample block into the instrument base:a.Facing the ProFlex ™ Base unit away from you, pull the lever all the way tothe right hand side.Figure 5 ProFlex ™ System Base unit and the ProFlex ™ 3x32-Well Sample Block)b.Place the sample block onto the ProFlex ™ Base with the latching mechanismto the right.Figure 6 ProFlex ™ System Base unit with the latching mechanism to the rightChapter 2 Initial Set-up Set up the system2c.Push the latching mechanism all the way to the left to secure the block ontothe base.Figure 7 ProFlex ™ System Base unit with the latching mechanism to the left Note: If the sample block module is not seated in place correctly, the instrument will not be able to detect the block type.Note: To change the sample block from one type to the other, see Change sample blocks.3.Close the heated cover.4.Connect the power cable to the ProFlex ™System.Figure 8 Power cable inlet in the ProFlex ™ System5.(Optional) Install any of the recommended protective devices (see “Optional protective hardware“ on page 15).6.Connect the power cable to the AC power source receptacle.7.Connect the instrument to the network by inserting the ethernet cable into the ethernet port at the back of the ProFlex ™ System. For instructions on setting up the wired connection, see “Set up the wired connection“ on page 18.In the absence of the ethernet cable or the ethernet port, you can connect the instrument to the network via the USB-enabled Wi-Fi Card (Cat. no. 4483658) as shown in the following graphic.Insert the Wi-Fi Card into the USB port at the back of ProFlex ™ System. For instructions on setting up the wireless connection, see “Set up the wireless connection“ on page 20Chapter 2 Initial Set-up Set up the system 2Figure 9 USB port in the ProFlex ™ System unit 8.Toggle the power switch, then wait for the instrument to start up. The touchscreen displays the Main Menu, indicating that the ProFlex ™ System startup is complete. When you power on the instrument, the instrument may require about 45 seconds to start up.Note: First time users will be prompted with the End User License Agreement (EULA) screen. See “Recommended instrument settings“ on page 21 for moreinformation on the EULA.Figure 10 ProFlex ™ System Touchscreen Home See “Set up the system“ on page 16for instructions on connecting the ProFlex ™ System to the network. To set up the wired connection:1.On the Home screen, touch Settings.Figure 11 ProFlex ™ PCR System Settings screen Set up the wired connectionChapter 2 Initial Set-up Set up the system22.In the Settings screen, touch Instrument Settings.Figure 12 ProFlex ™ PCR System Instrument Settings screen3.In the Instrument Settings screen, touch Network Connection.Figure 13 ProFlex ™ PCR System Network Connection screen4.In the Network Connection screen, touch Wired .The Network Configuration screen opens up.Figure 14 ProFlex ™ PCR System Network Configuration screenIn the Network Configuration screen, you can choose to connect to the network by obtaining the IP address either automatically (using DHCP) or manually. If your instrument is not on a network, you do not need to set the IP address.Chapter 2 Initial Set-up Set up the system 2Note: Ask your system administrator if the IP address is assigned statically or dynamically. For static addresses, you need to know the IP address for the instrument, the subnet mask, and the default gateway.•Automatically:Touch Obtain an IP address automatically (using DHCP). A check mark appears when DHCP is selected.or •Manually:Touch Use the following IP Address , then enter the appropriate IP addresses for the instrument, the Subnet Mask, and, optionally, the Default Gateway, the Primary DNS Server, and the Secondary DNS Server using the numeric editor. Addresses are in the form of X.X.X.X, where each X is a 3-digit number, from 001 to 255.5.Touch OK to save the changes and go back to the Network Connection screen.Touch Cancel to exit the screen without saving the changes.See “Set up the system“ on page 16on connecting the USB-enabled Wi-Fi Card into the ProFlex ™ System. To set up the wireless connection:1.Refer to “Set up the wired connection“ on page 18 through step 3 to arrive at the Network Connection screen.2.In the Network Connection Type screen, touch Wireless.Figure 15 ProFlex ™ PCR System Network Connection screen The Choose Network screen will come up and the wireless symbol will appear active. Touch Cancel to exit the screen.Note: During initial setup, if you selected the Wired option in the Network Connection Type screen, you will be required to enter your IP address if you selected the Static IP wired option. If you selected the Dynamic IP wired option,the IP address is automatically populated.3.Once a wireless connection has been detected, a list of the available networks will be displayed in the Choose Network screen. Touch the network name of your choice or touch Join Other Network .If you choose Join Other Network, the Configure and Join Network screen opens.Set up the wireless connectionChapter 2 Initial Set-up Set up the system 24.In the Configure and Join Network screen, enter the name and security type of the network.Note: When you touch in the Network Name field, a keypad will come up to facilitate making the entry.5.From the Security type drop-down menu, touch to select the security type and enter the relevant information in the screen.Note: Contact your IT Systems Administrator for information on security type.You can select from the following options:•Open•WEP•WPA Personal•WPA2 Personal•WPA Enterprise•WPA2 EnterpriseNote: The above options are available only if you selected Join Other Network in step 3. You cannot change the security type if you selected an existing network.6.Touch Join to continue or Cancel to exit from the Find and Join a Network screen.7.Depending on the security type you have selected, enter the appropriate passwords and touch Join .If you entered the correct information, the Network Connection Complete screen will appear. Touch OK to continue. If you entered incorrect information, the Network Connection Failed screen will come up and you will require to go back to security type screen to resolve the issue. Touch OK to continue.You can configure the following instrument settings by touching Settings on theHome screen:Note: The Manage Users button is visible only when you sign in as an administrator.•Instrument Settings : Touch Instrument Settings to set various additional parameters:Set the following in the Instrument Settings screen:Recommended instrument settings Chapter 2 Initial Set-up Set up the system 2Note: The Backup/Restore and Restore Factory Settings are available only when you sign in as an administrator.–Instrument Name : Touch the Instrument Name field and, using the text editor, enter up to 25 alphanumeric characters to identify the instrument.Note: The instrument name cannot have spaces. Separate consecutive characters with a hyphen or underscore; for example, MyInstrument.–Date/ Time : Touch Date/ Time to set the date and time for a run.1.Enter the date and time in the Date/Time field using the numerical editor that comes up when you place the cursor in the respective fields.You can toggle between AM and PM by touching in the field directly.2.Touch OK to save the date and time changes or Cancelto exit.–Sleep Mode : In the Sleep Mode screen, touch the Off and On toggle button to disable or enable, respectively, the sleep mode.Chapter 2 Initial Set-up Set up the system 2In the 'On' mode, you can edit the time (in minutes) after which theinstrument will go from the idling state into standby mode.–Network Connection : Touch Network Connection to select the type of network connection. You can select from the Wireless and Ethernet options.For details on using the Wireless and Ethernet options, see “Set up the wired connection“ on page 18 and “Set up the wireless connection“ on page 20,respectively.–Heated Cover :1.In the Heated Cover screen, touch the On and Off toggle button to enable or disable, respectively, the heated cover idling temperature.2.Edit the idling temperature if the button is in the 'On' mode.Note: The temperature for the heated cover must be between 30°C and 110°C.3.Click OK to save the changes or Cancelto exit the screen.Chapter 2 Initial Set-up Set up the system 2–Remote Service : In the Remote Service screen, use the On and Off toggle button to enable or disable, respectively, remote service. The feature allows the instrument to upload data, periodically, to a remote server. For more information on remote services, visit /proflex .Note: To connect to the ProFlex ™ PCR System with your mobile device,Remote Services must be switched on.Note: Ensure that you are connected to a network if you want to enable the Remote Service feature.After you have set the toggle button, touch OK to save the change or Cancelto exit the screen.–Printer Configuration : In the Printer Configuration screen, enter the IP address of the printer in the Remote Printer IP Address After you have entered the IP address, touch OK to save the change or Cancelto exit the screen.–Multi-Instrument Setup : Use this feature to allow multi-instrument runs on visible instruments. In the Multi-Instrument Setup screen, touch:1.The Off and On toggle button to make the instrument on which you are running an experiment invisible or visible, respectively, to other instruments on the network.2.The second set of Off and On toggle buttons to ignore or find,respectively, other instruments on the network.Chapter 2 Initial Set-up Set up the system 2–Backup/Restore (for Admin only): In the Backup/ Restore screen, touch:–Backup Instrument to back up the instrument settings, user accounts,and methods on the instrument you are working to a USB drive.–Restore a Backup to view the files that you have backed up on a USBdrive.This feature can be useful in event of a hardware failure or while setting up multiple instrument runs.–Restore Factory Settings (for Admin only): Touch Restore Factory Settings to remove all the data and customized settings and revert to factory settings.Touch Yes to confirm if you want to restore factory settings or Cancel to exit the screen.At the end of the restoration process, the message, "Your instrument has been restored." will be displayed and the instrument will automatically reboot after 30 seconds.Note:All data and settings will be erased once factory settings are restored.Chapter 2 Initial Set-up Set up the system 2•About Instrument : Touching About Instrument will take you to the About Instrument screen where you can find out more information about the instrument as well as view the End User License Agreement (EULA).–Touch About Instrument to find out more about the ProFlex ™ PCR System.In the About Instrument screen, you can view information like firmware version and instrument statistics.–Touch EULA to view the End User License Agreement. You can also save theEULA document to a USB drive.•Run History : The Run History screen displays the entire list of runs performed using a particular ProFlex ™ PCR System.a.In the Run History screen, touch a particular Run ID to view the details of that run.b.Touch Export to save the run details to a USB device or Print to print the rundetails.Chapter 2 Initial Set-up Set up the system2Note: If you sign in as an Administrator, you can manage the Run History. Forexample, deleting a run history.•Maintenance & Services : You can perform the following in the Maintenance &Services screen:–Software Update : Touch Software Updates to update the System firmware.See “ Upgrade the system firmware“ on page 51 for instructions on updating the firmware.–Service Reminders : Touch Service Reminders to set the time interval for the service reminder. Use the Off and On toggle button to turn off and on,respectively, the service reminder. If you select On, the time interval field becomes visible. Touch the time interval field to choose from 12 Months, 9Months, 6 Months, 3 months, and 1 Month. Touch OK to save the change or Cancel to exit the screen.–Self Verification Test : Touch Self Verification Test for the instrument to conduct a check on the instrument hardware. The check includes testing the block, heated cover, and other components. See Chapter 4, “ Routine Maintenance“ for instructions on conducting the self-verification test.–Export Instrument Log : Touch Export Instrument Log to export the instrument logs to a USB. Insert the USB into the USB drive before using this feature.–Block Verification Test : Touch Block Verification Test to perform a block verification test. Ensure that you have the Temperature Verification Kit (TVK) (Cat. no. 4377669) (need corresponding TVK for ProFlex) before performing this test. The TVK kit is available at /temperatureverificationkits . Touch:–Verify Block Temperature to carry out the block temperature test.1.Choose the test type from:–Heated Cover–Temperature Verification–Temperature Non-Uniformity2.Touch Next .Connect the TVK and depending on the test type perform insert the TVK probe into a specific zone.3.Touch Start Test .–Verify Cycle Performance to check the cycle performance of the instrument.Chapter 2 Initial Set-up Set up the system 2。
