松下FHD351_03维修手册
维护保养-松下机器人点检指南
2
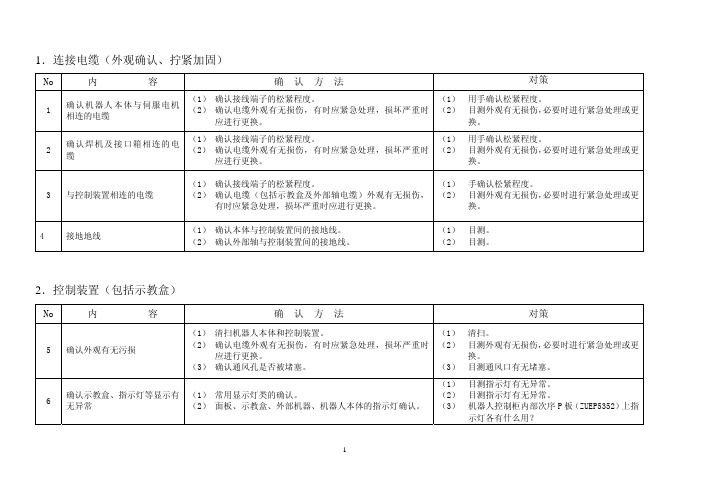
3.焊枪(焊枪本体)部
No
内
容
19 确认有无飞溅及灰尘附着
20 确认外观有无损伤
21 确认并清扫绝缘处 22 松紧的确认、紧固
确认方法
对策
(1) 清扫。
(1) 清扫。
(1) 确认焊枪、焊枪本体外观有无损伤,有时要应急处理, (1) 目测外观有无损伤,进行紧急处理,必要时
严重时要更换零件。
进行更换。
有时应紧急处理,损坏严重时应进行更换。
换。
4 接地地线
(1) 确认本体与控制装置间的接地线。 (2) 确认外部轴与控制装置间的接地线。
(1) 目测。 (2) 目测。
2.控制装置(包括示教盒)
No
内
容
确认方法
对策
5 确认外观有无污损
(1) 清扫机器人本体和控制装置。 (2) 确认电缆外观有无损伤,有时应紧急处理,损坏严重时
(1) 确认接线端子的松紧程度。 (2) 确认电缆外观有无损伤,有时应紧急处理,损坏严重时
应进行更换。
(1) (2)
用手确认松紧程度。 目测外观有无损伤,必要时进行紧急处理或更 换。
3 与控制装置相连的电缆
(1) 确认接线端子的松紧程度。
(1) 手确认松紧程度。
(2) 确认电缆(包括示教盒及外部轴电缆)外观有无损伤, (2) 目测外观有无损伤,必要时进行紧急处理或更
(1) 确认并清扫绝缘件与焊枪、焊枪本体的安装部位及绝缘 (1) 清扫各部位,目测绝缘件是否损坏,必要时
件与送丝电机安装部位。
进行更换。
(1) 紧固焊枪安装螺钉及 CC 零件、母材线、地线部位。
(1) 紧固各部位。
4.机器人本体
No
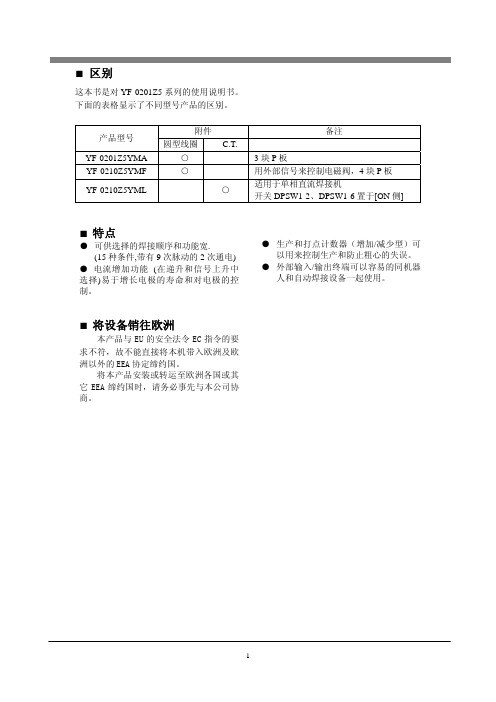
panasonic操作手册

i
目录
使用前注意事项............................................... v 菜单选项一览.................................................. vi
3.2 基本的按键操作........................................................36
4.7 设定检查区域和条件(检查设定).........................91 4.7.1 检查设定的种类和概述.......................................91 4.7.2 作成检查设定......................................................94
4.4.3 在“分支执行”模式中检测...............................71 4.4.4 在“指定执行”模式中检测...............................73
4.5 拍摄图像....................................................................74
4.6 图像预处理(2 值化/预处理).................................75 4.6.1 对灰度图像执行预处理(2 值化层级・灰度预处
4.6.2 4.6.3
理).....................................................................76 对图像执行 2 值化(2 值化层级)........................76 设定灰度变换......................................................77
松下风管机维修资料

松下风管机维修资料
1.风管机显示E3故障代码意思是压缩机低压保护。
维修方法如下:(1)首先确定环境温度是否太低,然后排除故障。
(2)接着将风管机主控板上的LPP插头以及主板上的零线N短接起来,假如风管机内机运行正常,此时可以说明室显示板或者室内机主板没问题可以排除故障,而说明了故障出现在室外机低压开关或者外机以及室内机的连接线、插接头上。
(3)最后检修风管机外机连接线和插头,将万用表调好在欧姆挡上,将一个表笔接在主板上拔掉的LPP保护线上,另一个表笔接在零线N上,假如阻值为0,说明故障在低压开关上,反之是线路问题。
第四步通过压力表来判断是系统漏氟,还是堵塞。
2.风管机其中一台内机坏了维修方法:
假如风管机其中一台内机有故障应该检查通讯是否良好、内机是否通电、控制板是否故障、风机是否转动。
风管机风管机美观、大气,功能方面,制冷效果很不错。
同样是3P 的空调,风管机的出风口在高处,而冷空气是向下沉得,风管机制冷的时候,冷风既不直接吹到你头上(直接吹容易生病),又能很快很有效的到达身体周围。
风管机噪声小,这是非常明显的优点,风管机性能非常稳定,
使用寿命长,使用寿命是非常重要的因素;大型金风管机体薄,安装在天花板上,这对美容空间没有影响,也能提高装修质量。
松下焊机说明书

IC控制器控制 YR系列交流电阻焊机 维修指南 唐山松下产业机器有限公司焊接学校前 言 唐山松下产业机器有限公司自成立至今已销售了几万台各种类型的焊机,深受广大用户的好评。
为了便于广大用户更好地掌握唐山松下产品的正确使用、维护及修理,我们编写了这本教材,其中的内容着重为操作和维修人员提供帮助,所以没有过多的理论陈述,而是以操作时的控制程序为基础,主要介绍了电路结构及故障检测。
同时,根据敝公司技术服务人员的工作实践和焊接学校教师的授课经验,介绍了故障原因的分析方法和相关注意事项,相信对读者会有所帮助。
本教材所提供的检测方法仅供参考,具体故障请结合实际情况仔细检查。
由于时间及水平所限,对其中不足之处,敬请读者批评指正。
唐山松下产业机器有限公司焊接学校2003年8月目 录 1.概述 (4)2.电阻焊基本原理 (5)3.松下工频YR系列阻焊机额定规格 (11)4.YF-0701D型控制器的操作及功能 (12)5.YF-0701D型标准IC控制电阻焊机电路方框图 (13)6.电阻焊机常用检修方法 (14)7.检修程序及注意事项 (15)8.更换YF-0701D控制器时的调试方法 (17)9.晶闸管的检修方法 (17)10.YF-0701D阻焊控制器主P板故障检测流程图 (18)11.YF-0701D阻焊控制器故障检测流程图 (21)12.阻焊机一般养护流程图 (23)13.YF-0701D控制电阻焊机主电路图 (24)14.部品明细表 (25). 概 述: 1.1电阻焊定义: 电阻焊是将被焊工件压紧于两电极之间,并通以电流,利用电流流经工件接触面及邻近区域产生的电阻热将其加热到熔化或塑性状态,使之形成金属结合的一种方法。
电阻焊方法主要有四种,即点焊、缝焊、凸焊、对焊。
点焊时,工件只在有限的接触面上,即所谓“点”上被焊接起来,并形成扁球形的熔核。
点焊又可分为单点焊和多点焊。
多点焊时,使用两对以上的电极,在同一工序内形成多个熔核。
松下门机手册
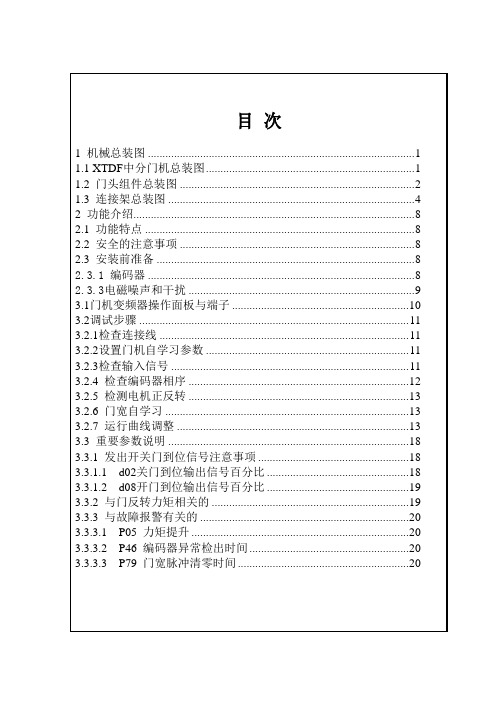
1 机械总装图
1.1 XTDF中分门机总装图,见图
1.2 门头组件总装图,见图
1.3 连接架总装图,见图
2 功能介绍2.1 功能特点
额定电压:1*(230输出电压:3*(0~230
3.1门机变频器操作面板与端子
3.2调试步骤3.2.1检查连接线
3.2.5 检测电机正反转
P 菜单
No. 参数名称
No. 参数名称
d 菜单
NO 参数名称
3.3.1.2 d08开门到位输出信号百分比
3.3.3 与故障报警有关的:3.3.3.1 P05 力矩提升
表
名称
异常面板显示
八、使用过程中应注意的问题:
1.不要将交流电源接到输出端子(U,V,W)上。
2.输入电压为200~230V AC,且应是稳定的电压,以免由于电压过高烧坏控制器。
3.请确认输入电源处于断开状态之后再接线,接线作业时,请在充电指示灯完
全熄灭后在进行。
4.控制器及电动机应可靠接地,以免发生触电危险。
5.电源接通后,请不要用手触摸散热片及带电端子,以免发生危险。
6.不要让金属异物落入控制器内,以免因短路造成危险。
松下FHD351_03维修手册
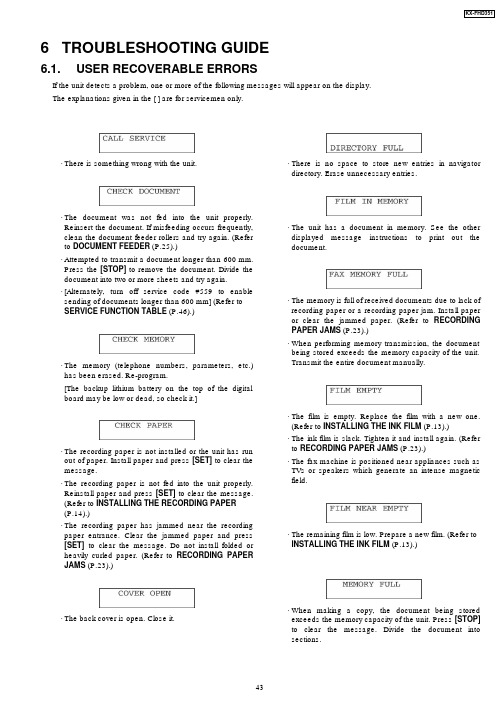
KX-FHD3516TROUBLESHOOTING GUIDEER RECOVERABLE ERRORSIf the unit detects a problem, one or more of the following messages will appear on the display.The explanations given in the [ ] are for servicemen only.·There is something wrong with the unit.·The document was not fed into the unit properly.Reinsert the document. If misfeeding occurs frequently,clean the document feeder rollers and try again. (Referto DOCUMENT FEEDER (P.25).)·Attempted to transmit a document longer than 600 mm.Press the [STOP] to remove the document. Divide thedocument into two or more sheets and try again.·[Alternately, turn off service code #559 to enablesending of documents longer than 600 mm] (Refer toSERVICE FUNCTION TABLE (P.46).)·The memory (telephone numbers, parameters, etc.)has been erased. Re-program.[The backup lithium battery on the top of the digitalboard may be low or dead, so check it.]·The recording paper is not installed or the unit has runout of paper. Install paper and press [SET] to clear themessage.·The recording paper is not fed into the unit properly.Reinstall paper and press [SET] to clear the message.(Refer to INSTALLING THE RECORDING PAPER(P.14).)·The recording paper has jammed near the recordingpaper entrance. Clear the jammed paper and press[SET] to clear the message. Do not install folded orheavily curled paper. (Refer to RECORDING PAPERJAMS (P.23).)·The back cover is open. Close it.·There is no space to store new entries in navigatordirectory. Erase unnecessary entries.·The unit has a document in memory. See the otherdisplayed message instructions to print out thedocument.·The memory is full of received documents due to lack ofrecording paper or a recording paper jam. Install paperor clear the jammed paper. (Refer to RECORDINGPAPER JAMS (P.23).)·When performing memory transmission, the documentbeing stored exceeds the memory capacity of the unit.Transmit the entire document manually.·The film is empty. Replace the film with a new one.(Refer to INSTALLING THE INK FILM (P.13).)·The ink film is slack. Tighten it and install again. (Referto RECORDING PAPER JAMS (P.23).)·The fax machine is positioned near appliances such asTVs or speakers which generate an intense magneticfield.·The remaining film is low. Prepare a new film. (Refer toINSTALLING THE INK FILM (P.13).)·When making a copy, the document being storedexceeds the memory capacity of the unit. Press [STOP]to clear the message. Divide the document intosections.KX-FHD351·There is no room left in memory to record a voicemessage. Erase unnecessary messages.·There is something wrong with the modem circuit.·The other party´s fax machine isbusy or has run out ofrecording paper. Try again.·The ink film is empty. Replace the ink film with a newone.·The ink film is not installed. Install it.Refer to INSTALLING THE INK FILM (P.13).·The ink film is slack. Tighten it.·The fax machine is positioned near appliances such asTVs or speakers which generate an intense magneticfield.·A recording paper jam occurred. Clear the jammedpaper.[If the printout jams, please refer to RECORDINGPAPER JAMS (P.23).]·The unit is checking that there is no slack on the inkfilm. Wait for a moment while the check completes.·The other party´s fax machine isbusy or has run out ofrecording paper. Try again.·The document is jammed. Remove the jammeddocument. (Refer to DOCUMENT JAMS - SENDING(P.24).)·A transmission error occurred. Try again.·The unit is too hot. Let the unit cool down.KX-FHD3516.2.PROGRAMMING AND LISTSThe programming functions are used to program the various features and functions of the machine, and to test the machine.This facilitates communication between the user and the service man while programming the unit.6.2.1.OPERATIONThere are 2 basic categories of programming functions, the User Mode and the Service Mode. The Service Mode is further broken down into the normal and special programs. The normal programs are those listed in the Operating Instructions and are available to the user. The special programs are only those listed here and not displayed to the user. In both the User and Service Modes, there are Set Functions and Test Functions. The Set Functions are used to program various features and functions, and the Test Functions are used to test the various functions. The Set Functions are accessed by entering their code, changing the appropriate value, then pressing the SET key. The Test Functions are accessed by entering their code and pressing the key listed on the menu. While programming, to cancel any entry, press the STOP key.6.2.2.OPERATION FLOWKX-FHD3516.2.3.SERVICE FUNCTION TABLECode Function Set Value Effective Default RemarksRange501 Pause time set X 100 msec 001~600 30 ----------502 Flash time X 10 ms 01~99 70 ----------503 Dial speed select 1: 10 pps 1, 2 1 ----------2: 20 pps510 VOX time 1:6 sec 2:4sec 1, 2 1 ----------511 VOX sense 1:High 2:Low 1, 2 1 When the TAM (or EXT TAM) does not stoprecording the ICM because noise is detected onthe telephone line, change this setting to "LOW".520 CED frequency select 1:2100 Hz 1, 2 1 See Symptom/Countermeasure Table for long2:1100 Hz distance and international calls in THE UNIT CANCOPY, BUT CANNOT EITHERTRANSMIT/RECEIVE LONG DISTANCE ORINTERNATIONL COMMUNICATIONS (P.77).521 International mode select 1:ON 2:OFF 1, 2 1 See Symptom/Countermeasure Table for longdistance and international calls in THE UNIT CANCOPY, BUT CANNOT EITHERTRANSMIT/RECEIVE LONG DISTANCE ORINTERNATIONL COMMUNICATIONS (P.77).522 Auto standby select 1:ON 2:OFF 1, 2 1 The resolution reverts to the default whentransmission is complete.523 Receive equalizer select 1: 0 km 1~4 1 When the telephone station is far from the unit or2: 1.8 km reception cannot be performed correctly, adjust3: 3.6 km accordingly.4: 7.2 km524 Transmission equalizer select 1: 0 km 1~4 1 When the telephone station is far from the unit or2: 1.8 km transmission cannot be performed correctly, adjust3: 3.6 km accordingly.4: 7.2 km550 Memory clear See TEST FUNCTIONS (P.48).533 Setting the number of times that 00~99 00~99 03 Selects the number of times that message massage transfer is redialed. transfer is redialed (not including the first dialing).534 Setting the massage transfer/pager 001~999 sec 001~999 065 Sets the interval of message transfer/pager call call redial interval redial.551 ROM check See TEST FUNCTIONS (P.48).552 DTMF single tone test 1:ON 2:OFF 1, 2 2 See TEST FUNCTIONS (P.48).553 Monitor on FAX communication 1:OFF 1~3 1 Sets whether to monitor the line signal with the select 2:PHASE B unit´s speaker during FAX communication or not.3:ALL554 Modem test See TEST FUNCTIONS (P.48).555 Scan check See TEST FUNCTIONS (P.48).556 Motor test 0 See TEST FUNCTIONS (P.48).557 LED test See TEST FUNCTIONS (P.48).558 LCD test See TEST FUNCTIONS (P.48).559 Document jam detection select 1:ON 2:OFF 1, 2 1 See DOCUMENT JAMS - SENDING (P.24).561 KEY test See TEST FUNCTIONS (P.48).570 BREAK % select 1:61% 2:67% 1, 2 1 Sets the % break of pulse dialing according PBX.571 ITS auto redial time set X number of 00~99 00 Selects the number of times that ITS is redialedtimes (not including the first dial).572 ITS auto redial line disconnection X second 001~999 065 Sets the interval of ITS redialing.time set573 Remote turn-on ring number set X number of 01~99 10 Sets the number of rings before the unit starts torings receive a document in the TEL mode.580 TAM continuous tone detection 1:ON 2:OFF 1, 2 1 ON : Stops TAM operation when Dial tone, etc.are detected.590 FAX auto redial time set X number of 00~99 2 Selects the number of redial times during FAXtimes communication (not including the first dial).591 FAX auto redial time disconnection X second 001~999 065 Sets the FAX redial interval during FAX time set communication.592 CNG transmit select 1:OFF 1~3 2 Lets you select the CNG output during FAX2:ALL transmission. ALL: CNG is output at phase A.3:AUTO AUTO: CNG id output only when automatic dialingis performed. OFF: CNG id not output at phase A.Refer to SOMETIME THERE IS A TRANSMITPROBLEM (P.75).KX-FHD351 Code Function Set Value Effective Default RemarksRange593 Time between CED and 300bps 1:75 msec 1~3 1 See Symptom/Countermeasure Table for long2:500 msec distance and international calls in THE UNIT CAN3:1 sec COPY, BUT CANNOT EITHERTRANSMIT/RECEIVE LONG DISTANCE ORINTERNATIONL COMMUNICATIONS (P.77).Refer to RECEIVE PROBLEM (P.76) and THEUNIT CAN COPY, BUT CANNOT EITHERTRANSMIT/RECEIVE LONG DISTANCE ORINTERNATIONL COMMUNICATIONS (P.77).594 Overseas DIS detection select 1:detects at 1, 2 1 See Symptom/Countermeasure Table for longthe 1st time distance and international calls in THE UNIT CANCOPY, BUT CANNOT EITHER2:detects at TRANSMIT/RECEIVE LONG DISTANCE ORthe 2st time INTERNATIONL COMMUNICATIONS (P.77).Refer to SOMETIME THERE IS A TRANSMITPROBLEM (P.75) and THE UNIT CAN COPY,BUT CANNOT EITHER TRANSMIT/RECEIVELONG DISTANCE OR INTERNATIONLCOMMUNICATIONS (P.77).595 Receive error limit value set X Number of 001~999 100 Sets the number of acceptable error lines whentimes the FAX reconstructs the received data. Refer toRECEIVE PROBLEM (P.76).596 Transmit level set X dBm - 15~00 10 Selects the FAX transmission level. Refer toSOMETIME THERE IS A TRANSMIT PROBLEM(P.75)and RECEIVE PROBLEM (P.76).598 Receiving sensitivity 43= -43 dBm 20~48 40 Used when there is an error problem. Refer toTHE UNIT CAN COPY, BUT CANNOT EITHERTRANSMIT/RECEIVE LONG DISTANCE ORINTERNATIONL COMMUNICATIONS (P.77).717 Transmit speed selection 1:14400BPS 1~6 1 Adjusts the speed to start training during FAX2:12000BPS transmission. Refer to SOMETIME THERE IS A3:9600BPS TRANSMIT PROBLEM (P.75) and THE UNIT4:7200BPS CAN COPY, BUT THE TRANSMISSION AND5:4800BPS RECEPTION IMAGE ARE INCORRECT (P.80).6:2400BPS718 Receive speed selection 1:14400BPS 1~6 1 Adjusts the speed to start training during FAX2:12000BPS reception. Refer to RECEIVE PROBLEM (P.76)3:9600BPS and THE UNIT CAN COPY, BUT THE4:7200BPS TRANSMISSION AND RECEPTION IMAGE ARE5:4800BPS INCORRECT (P.80).6:2400BPS722 Redial tone detect 1:ON 2:OFF 1, 2 2 Sets the tone detection mode after redialing.731 CPC mode 1:A 2:B 3:OFF 1~3 1 Sets the CPC signal detection mode from theconverter.732 AUTO disconnect cancel time 1:350 ms 1~3 1 “Set to “2” when the auto disconnect circuit2:1.8 sec operates and cuts the line.”3:OFF745 Power ON film feed 1:ON 2:OFF 1, 2 1 When the power is turned on, the film is wound totake up any slack.763 CNG detect time for friendly 1:10 sec 1~3 3 Selects the CNG detection tone of friendly reception 2:20 sec reception.3:30 sec771 T1 timer 1:35 sec 1, 2 1 Sets a higher value when the response from the2:60 sec other party needs more time during FAXtransmission.774 T4 timer X 100 msec 00~99 0 Use this function when delay occurs in the lineand communication (ex. Mobile comm) does notwork well.775 Monitoring of message transfer 1:ON 2:OFF 1, 2 2 If set to ON a message can be monitored fromthis unit´s SP-PHONE when transferring amessage.784 Voice prompt test You can hear the voice prompt from speaker afterpressing “START” key.815 Sensor & Vox check See TEST FUNCTIONS (P.48).841 Digital SP-phone check See DIGITAL SPEAKERPHONE (P.105).844 Original setting 1:NORMAL 1~3 1 Use this feature when you need to transmit and2:LIGHT copy a document with very faint writing or very dark3:DARKER writing.NORMAL: Used for normal writing.LIGHT: Used for faint writing.DARKER: Used for dark writing.This feature will return to the normal mode aftertransmission or copying.852 Print test pattern See TEST FUNCTIONS (P.48).853 Top margin 1~9 5 ----------KX-FHD351Code Function Set Value Effective Default RemarksRange880 History list See HISTORY (P.56).881 Journal 2 list See PRINTOUT EXAMPLE (P.93).882 Journal 3 list See PRINTOUT EXAMPLE (P.93).6.3.TEST FUNCTIONSThe codes listed below can be used to perform simple checks of some of the unit’s functions. When complaints are received from customers, they provide an effective tool for identifying the locations and causes of malfunctions. To do this, you set the Service Mode (Refer to OPERATION (P.45)) first, then operate the below test items.Test Mode Type of Mode Code FunctionOperation after codeinputMOTOR TEST Service Mode “5” “5” “6”Rotates the transmission and reception motor to check the operation of theSTART motor.12: Document feed24: Recording paper is fedPress [STOP] button to quit.MODEM TEST Service Mode “5” “5” “4”Telephone line circuit is connected automatically, output the following signals onSTART the circuit line.1)OFF 2)14400bps 3)12000bps 4)9600bps (V17) 5)7200bps(V17)6)9600bps 7)7200bps 8)4800bps 9)2400bps 10)300bps 11)2100Hz12)1100HzROM CHECK Service Mode “5” “5” “1”Indicates the version and checks the sum of the ROM.STARTSCAN CHECK Service Mode “5” “5” “5”Turns on the LEDs of the CIS and operates the read systems.STARTLCD CHECK Service Mode “5” “5” “8”Checks the LCD indication.START Illuminates all the dots to check if they are normal.DTMF SINGLE TEST Service Mode “5” “5” “2”Outputs the DTMF as single tones. Used to check the frequencies of the1....ON individual DTMF tones. Refer to DTMF SINGLE TONE TRANSMIT SELECTION2....OFF (P.49).KEY CHECK Service Mode “5” “6” “1”Checks the button operation.START (any key) Indicates the button code on the LCD while the button is pressed. Refer toBUTTON CODE TABLE (P.49).MEMORY CLEAR Service Mode “5” “5” “0”To reset the value to the default one, except the top margin (#853), time/daySTART (#001), logo (#002), Fax ID, History, Directory and CALLER IQ data.Please restart a power supply after clearing a memory.LED CHECK Service Mode “5” “5” “7”All LEDs above the operation panel board flash on and off, or are illuminated.STARTDIGITAL Service Mode “8” “4” “1”Please refer to DIGITAL SPEAKERPHONE (P.105).SPEAKERPHONE SPEAKERPHONERX & TX CHECKPRINT TEST Service Mode “8” “5” “2”Prints out the test pattern.PATTERN START Used mainly at the factory to test the print quality.You can select 1~4. (See PRINT TEST PATTERN (P.50))KX-FHD351 Test Mode Type of Mode Code FunctionOperation after codeinputSENSOR CHECK & Service Mode “8” “1” “5”If you enter this mode and operate sensor levers with your hands, the LCDVOX CHECK START display of the related sensor (or switch) turns ON / OFF. Also, when copying adocument, the related sensor will turn ON / OFF. ( Do, Sn, Co, Pt, Vx)For each sensor’s operation, refer to SENSORS AND SWITCHES(P.134).Do Sn Co Pt Vx : LCD DISPLAYDo: Document set sensor:Paper inserted. Turns on when a document is inserted.Sn: Read position sensor.:At the read position, turns on when the front cover is opened and thesensor lever is pressed directory.Co: Cover open sensor / Film end sensor:Cover open of don’t set the film. Turns on and off when the front cover isopened and closed.Pt: Paper top sensor:Sensor on Turns on when the front cover is opened and the sensor leveris pressed directly.Vx: Vox signal:Detection signal for the tone on the line. Turns on when there is a tonesignal on the line.Note:The numbers in the boxes (XXX) indicate the keys to be input for the various test modes.6.3.1.DTMF SINGLE TONE TRANSMIT SELECTIONWhen set to ON (=1), the 12 keys and transmission When set to OFF (=2), the 12 keys and transmission frequencies are as shown.frequencies are as shown.key High Frequency (Hz) key Low Frequency (Hz) “1”697 “5”1209“2”770 “6”1336“3”852 “7”1477“4”941 “8”1633High (Hz) 1209 1336 1477 Low (Hz)697 “1”“2”“3”770 “4”“5”“6”852 “7”“8”“9”941 “ ”“0”“#”Note:After performing this check, do not forget to turn the setting off.Otherwise, dialing in DTMF signal will not work.6.3.2.BUTTON CODE TABLECode Button Name Code Button Name Code Button Name Code Button Name04 FAX /START / SET 31 1 3C # 64 STATION 105 LOWER 32 2 3D REDIAL PAUSE 65 STATION 206 COPY 33 3 3E FLASH 66 STATION 308 DIGITAL SP-PHONE 34 4 47 CALLER ID 67 STATION 40A MUTE 35 5 4E CALLRE IQ 68 STATION 50C AUTO ANSWER 36 6 1E NEXT14 RECORD 37 7 1F PREV16 ERASE 38 818 PLAY MESSAGE 39 9 00 NO INPUT20 MENU 3A 0 01 STOP22 HELP25 [+] VOLUME26 [-] VOLUMEKX-FHD3516.3.3.PRINT TEST PATTERN1. Platen roller 3. Thermal head 1 dot2. Left margin / Top margin 4. Use this test pattern to confirm the torque limiter for inkfilm and platen roller timingKX-FHD3516.4.REMOTE PROGRAMMINGIf, after the call is connected, the customer describes the situation and it is determined that the problem can be corrected by making parameter changes, this function makes it possible to change parameters such as the user code and service code from another fax (using DTMF tones). Therefore, travel to the customer´s location is not required. However, it is not possible to change all the parameters remotely (PROGRAM MODE TABLE(P.52)). The function used to accomplish this is remote programming.First, in order to check the current status of the service code parameter, print out the setup list (code: 991) and the service list (code: 999) from the customer´s fax machine.Based on this, the parameters for the desired codes can be changed.The procedure for changing and listing parameters is described on ENTERING THE REMOTE PROGRAMMING MODE AND CHANGING SERVICE CODES (P.51). Also, before exiting the remote programming mode, it is advisable to obtain a new list to confirm that the changes were made correctly.Hint:Since the connected telephone is in use during the remote programming mode, it may be helpful to ask the customer to switch to the speakerphone. This frees the customer from the need to remain right next to the fax while you are making parameter settings. When finished, inform the customer. Also note that in very noisy locations where the DTMF tones are not audible, the remote programming function will not work.6.4.1.ENTERING THE REMOTE PROGRAMMING MODE AND CHANGING SERVICECODESCROSS REFERENCE:PROGRAM MODE TABLE (P.52)KX-FHD3516.4.2.PROGRAM MODE TABLECode Function Set Value Default RemoteSetting 001 Set date and time mm/dd/yy hh:mm Jan/01/2002 NG 002 Your logo --------- None NG 003 Your FAX number --------- None NG 004 Print sending mode 1:ERROR/ 2:ON / 3:OFF ERROR OK 006 FAX ring count 1~4 3 OK TAD/FAX ring count 1:1~4 / 2:TOLL SAVER / 3: RINGER 2 OKOFF010 Recording time 1:VOX / 2:MIN VOX OK 011 Remote TAD ID --------- ID=111 NG 013 Dialing mode 1:PULSE / 2:TONE TONE OK 017 Ringer Pattern 1:A / 2:B / 3:C A OK 022 Journal auto print 1:ON / 2:OFF ON OK 023 Overseas mode 1:NEXT FAX / 2:ERROR / 3:OFF ERROR OK 025 Delayed transmission 1:ON / 2:OFF OFF NG 026 Auto caller ID list 1:ON / 2:OFF ON OK 031 Ring detection 1:ON / 2:OFF OFF OK 032 Fax ring pattern 1:B-D / 2:A / 3:B / 4:C / 5:D B-D OK 034 Quick scan 1:ON / 2:OFF OFF OK 036 RCV reduction 1:72% / 2:86% / 3:92% / 4:OFF 92% OK 039 LCD contrast 1:NORMAL / 2:DARKER NORMAL OK 041 FAX activation code 1:ON / 2:OFF ON ID=*#9 OK 042 Message alert 1:ON / 2:OFF OFF OK 043 REC. time alert 1:ON / 2:OFF OFF OK 044 Memory receive alert 1:ON / 2:OFF ON OK 046 Friendly receive 1:ON / 2:OFF ON OK 047 FAX voice guidance 1:ERROR/2:ON/3:OFF ON OK 051 Mailbox 1 Password --------- --------- NG 052 Mailbox 2 Password --------- --------- NG 054 Greeting MSG. REC. time 1:16s / 2:60s 16s OK 055 Mailbox 1 Greeting 1:CHECK / 2:RECORD / 3:ERASE CHECK NG 056 Mailbox 2 Greeting 1:CHECK / 2:RECORD / 3:ERASE CHECK NG 060 Message transfer 1:ON / 2:OFF OFF NG 061 Transfer greeting 1:CHECK / 2:RECORD / 3:ERASE CHECK NG 067 ICM monitor 1:ON / 2:OFF ON OK 070 Pager call 1:ON / 2:OFF OFF NG 076 Connecting tone 1:ON / 2:OFF ON OK 077 Auto answer mode 1:TAD/FAX 2: FAX Only TAD/FAX OK 080 Set default 1:YES / 2:NO NO NG 501 Pause time set 001~600 x 100msec 030msec OK 502 Flash time 01~99 x 10ms 70ms OK 503 Dial speed 1:10pps / 2:20 pps 10pps OK 510 Vox time 1:6sec / 2:4sec 6sec OK 511 Vox sense 1:High / 2:Low High OK 520 CED frequency select 1:2100Hz / 2:1100Hz 2100Hz OK 521 International mode select 1:ON / 2:OFF ON OK 522 Auto standby select 1:ON / 2:OFF ON OK 523 Receive equalizer select 1:0km / 2:1.8km / 3:3.6km / 4:7.2km 0km OK 524 Transmission equalizer select 1:0km / 2:1.8km / 3:3.6km / 4:7.2km 0km OK 533 Setting the number of times that message transfer is 00~99 03 OK redialed.534 Setting of the message transfer/pager call redial 001~999 065 OK interval550 Memory clear --------- --------- NG 551 ROM check --------- --------- NG 552 DTMF signal tone test 1:ON / 2:OFF OFF OK 553 Monitor on FAX communication 1:OFF / 2:Phase B / 3:ALL OFF OK 554 Modem test --------- --------- NG 555 Scanner test --------- --------- NG 556 Motor test --------- --------- NG 557 LED test --------- --------- NG 558 LCD test --------- --------- NG 559 Document jam detection 1:ON / 2:OFF ON OK 561 Key test --------- --------- NG 570 Break % select 1:61% / 2:67% 61% OK 571 ITS auto redial time set 00~99 00 OKKX-FHD351 Code Function Set Value Default RemoteSetting 572 ITS auto redial line disconnection time set 001~999sec 065sec OK 573 Remote turn-on ring number 01~99 10 OK 580 TAM continuous tone detection 1:ON / 2:OFF ON OK 590 FAX auto redial time set 00~99 02 OK 591 FAX auto redial line disconnection time set 001~999sec 065sec OK 592 CNG transmit select 1:OFF / 2:ALL / 3:AUTO ALL OK 593 Time between CED and 300 bps 1:75ms / 2:500ms / 3:1sec 75ms OK 594 Overseas DIS detection 1:1st / 2:2nd 1st OK 595 Receive error limit value 001~999 100 OK 596 Transmit level set -15~00dBm -10dBm OK 598 Receiving Sensitivity 20~48 40 OK 717 Transmit speed select 1:14400 / 2:12000 / 3:9600/ 4:7200/ 14400bps OK5:4800/ 6:2400718 Receive speed select 1:14400 / 2:12000 / 3:9600/ 4:7200/ 14400bps OK5:4800/ 6:2400722 Redial tone detect 1:ON / 2:OFF OFF OK 731 CPC mode 1:A / 2:B / 3:OFF A OK 732 Auto disconnect 1:350ms / 2:1800ms / 3:OFF 350msec OK 745 Power on film feed 1:ON / 2:OFF ON OK 763 CNG detect time for friendly reception 1:10s / 2:20s / 3:30s 30s OK 771 T1 timer 1:35s / 2:60s 35s OK 774 T4 timer 00~99 × 100ms 00ms OK 775 Monitoring of message transfer 1:ON / 2:OFF OFF OK 784 Voice prompt 1:Start --------- NG 815 Sensor & VOX test --------- --------- NG 844 Original setting 1:Normal / 2:Light / 3:Darker Normal NG 852 Print test pattern --------- --------- NG 853 Top margin 1~9 5 OK 880 History list 1:Start --------- NG 881 Journal 2 --------- --------- NG 882 Journal 3 --------- --------- NG 991 Setup list 1:Start --------- OK 994 Journal list 1:Start --------- OK 995 Journal 2 list 1:Start --------- OK 996 Journal 3 list 1:Start --------- OK 998 History list 1:Start --------- OK 999 Service list 1:Start --------- OKOK means "can set".NG means "can not set".Note:Refer to SERVICE FUNCTION TABLE (P.46) for descriptions of the individual codes.Example:If you want to set value in the "004 Transmission report mode", press the dial key number 1,2 or 3 corresponding to the Set Value you want to select. (1:ERROR/2:ON/3:OFF)KX-FHD3516.5.THE EXAMPLE OF THE PRINTED LISTER MODENote:The above values are the default values.KX-FHD351 6.5.2.SREVICE MODE SETTINGSNote:The above values are the default values.KX-FHD3516.5.3.HISTORYNote:See the following descriptions of this report. Item No. (1) ~ (44) are corresponding to the listed items in DESCRIPTIONS OF THE HISTORY REPORT (P.57).KX-FHD351 6.5.3.1.DESCRIPTIONS OF THE HISTORY REPORT(1)ROM VERSIONFLASH ROM version(2)SUMFLASH ROM internal data calculation.(3) YOUR LOGOThe user logo recorded in the unit. If it is not recorded, NONE will be displayed.(4) YOUR TELEPHONE NUMBERThe user telephone number recorded in the unit. If it is not recorded, NONE will be displayed.(5) FAX PAGER NUMBERIf you program a pager number into the unit, the pager number will be displayed here.(6) FACTORY - CUSTOMERThis shows how many days from factory production until the user turns ON the unit.(7) MONTHThe shows the very first month, date, year and time set by the user after they purchased the unit.(8) DAYThe shows the very first month, date, year and time set by the user after they purchased the unit.(9) YEARThe shows the very first month, date, year and time set by the user after they purchased the unit.(10) TIMEThe shows the very first month, date, year and time set by the user after they purchased the unit.(11) USAGE TIMEThe amount of time the unit has been powered ON.(12) FACTORY - NOWThis shows how many days from factory production until the user prints out this history list.(13) TEL MODEThe amount of time the TEL mode setting was used.(14) FAX MODEThe amount of time the FAX mode setting was used.(15)Not Used(16)ANS/FAX MODEThe amount of time the ANS/FAX mode setting was used. (17) FINAL RECEIVE MODEThe last set receiving mode by the user.(18) TONE/PULSE SELECTIONThe most recently used setting used, either TONE or PULSE.(19) RECEIVE REDUCTIONThe compression rate when receiving.(20)SETTING NO. OF DIRECTORYThe recorded directory stations.(21)NUMBER OF COPYThe number of pages copied.(22) NUMBER OF RECEIVE The number of pages received.(23)NUMBER OF SENDINGThe number of pages sent.(24)NUMBER OF CALLER IDThe number of times Caller ID was received.(25) NUMBER OF RECORDING MESSAGEThe number of messages recorded in TAM.(26)~(29) Not Used(30)NUMBER OF PRINTING WARNING LISTThe number of warning lists printed until now.(31)NUMBER OF PRINTING HELPThe number of help lists printed until now.(32) NUMBER OF DIVIDED PRINTING IN FAX RECEPTION The number of faxes received that were divided into more than one sheet since the unit was purchased.(33)Not Used(34)FAX MODEMeans the unit received a fax message in the FAX mode. (35) MAN RCVMeans the unit received a fax message by manual operation.(36) FRN RCVMeans the unit received a fax message by friendly signal detection.(37) VOXMeans the unit detected silence or no voice.(38) RMT DTMFMeans the unit detected DTMF (Remote Fax activation code) entered remotely.(39) PAL DTMFMeans the unit detected DTMF (Remote Fax activation code) entered by a parallel connected telephone.(40) TURN-ONMeans the unit started to receive after 10 rings. (Remote Turn On: Service Code #573)(41) TIME OUTMeans the unit started to receive after Ring Time Out in the EXT-TAM or TEL/FAX mode.(42) IDENTMeans the unit detected Ring Detection.(43) CNG OGMMeans the unit detected the CNG while it was sending the Dummy Ring Back Tone in the TEL/FAX mode, or while answering a call in the EXT-TAM mode. Or means the unit detected the CNG while it was sending the OGM in the ANS/FAX mode.(44) CNG ICMMeans the unit detected the CNG while it was recording the ICM in the ANS/FAX mode.。
松下电阻焊控制器中文手册
6
名称和功能 3. 名称和功能
3.1 指示灯
()
Panasonic
a. 条件选择指示灯 选择这个模式时亮灯
b. 启动指示灯 条件选择模式下选择启动程序时亮灯
c. 启动序号显示器 表示启动序号(1~4)
d. 焊接条件指示灯 条件选定及程序模式下,选择焊接条件
序号时亮灯 e. 焊接条件序号显示器
表示焊接条件序号(1~9 或者 A~F) f. SOL 指示灯
“严重的人身伤害”指的是失明,烫伤(高 和低度烫伤),电击,骨折和中毒,需要住 院治疗和必要的药物治疗。“轻度的人身伤
害”指烫伤电击等伤害不需要长期的住院治 疗和必要的药物治疗。“财产损失”指对周 围环境和设备的损失。
1.2 必须阅读的安全说明
危险
焊接电源
遵守说明规定防止冒险行事
⑴ 不要将焊接电源用于其它用途。(例如: 管道解冻。) ⑵ 阅读这些说明,安全警告,提醒等非常 重要,否则可能引起重大伤亡事故。 ⑶ 对于驱动电源的输入,要选择好工作位 置,处理方法,储存和接通高压气体,保管 好成品,按照操作说明以及工厂的规定处理 好废品。 ⑷ 防止未经允许的人员进入和在工作区域 周围徘徊。
程序模式下,选择 SOL 序号时亮灯 g. SOL 序号显示
表示 SOL 序号(1 或 2) h. 程序指示灯
选择程序模式下亮灯 i. 数据显示器 A
显示运转时的数据(通电周波、通电角、 打点数及故障序号)及程序监视模式的各 种数据 j. 数据显示器 B 显示运转时的数据(焊接电流、生产数) 及运转时的模式显示、程序监视模式等的 各种数据 k. 监视指示灯 选择监视模式时亮灯 l. 全负载引弧指示 焊接电流已临近界限,不能在上升时亮灯 m. 准备焊接指示灯 当控制器与焊接电源接通时,机器进入运 行状态时亮灯 n.焊接电源指示灯 焊接电源接通时亮灯
松下g3说明书

松下g3说明书篇一:松下操作说明书收到机子首次使用要先充电12个小时以上底座接上电源无绳里面放上电池无绳放到底座上就可以进行充电了发货前我们都是设置好的您收到机子充好电就可以使用了不需要进行对码操作有问题可以在线咨询或来电咨询谢谢支持1. 接听电话:当有电话来的时候按通话键或者免提键即可进行通话通话完毕后按挂机键退出2. 拨打电话:先按通话键或者免提键听筒有拨号音之后然后再拨您要拨打的电话号码通话完毕后按挂机键退出还可以先拨您要拨打的电话号码然后再按通话键或者免提键3. 重播键:先按一下重播键然后按上翻或者下翻找到要播出的号码然后按通话键或者免提键即可播出4. 对讲操作:在待机的状态下无绳屏幕都会自动分出1 和 2 按一下对讲键然后再按数字键要对讲的无绳号另一个无绳的就会响铃按通话键即可通话5. 电话本储存号码操作:在待机的状态下按一下确认键然后再按一下退出键然后按数字键输入要储存的姓名(只能拼音或者英文)输入完毕之后再按确认键进入输入要存储的电话号码输入完毕之后再按2次确认键确认6. 删除电话本里面的电话号码:在待机的状态下按一下确认键然后再按上翻或者下翻找到您要删除的号码然后按退出键再按确认键即可删除7. 进入菜单操作(以下操作都是在待机的状态下操作)(1) Ringer setting 铃声设定:按一次菜单键然后按4次下翻屏幕显示Ringer srtting 时按一次确认键然后再按1次下翻屏幕显示Ringer tone时再按1次确认然后再按上翻或者下翻就可以选择铃声了按确认键确认(2) Ringer volume 铃声音量:按一下菜单键然后按4次下翻键然后按2次确认键按上翻或者下翻选择铃声音量大小 OFF为关闭铃音按确认键确认(3) Set date & time 设置日期时间:按一下菜单键然后按5次下翻键然后按2次确认键进入设置如期时间直接按数字键输入按退出键可以选择上午和下午 AM为上网 PM为下午按确认键确认(4) Alarm 闹钟:按一下菜单键然后按5次下翻键然后按1次确认键然后再按1次下翻键再按确认键进入按上翻或者下翻选择(OFF 为关闭 ONCE为一次 Daily/每日)再按1次确认键进入闹钟时间设置按退出键选择上午或者下午(AM为上午 PM为下午)再按2次确认键进入闹钟铃声选择按确认键确认(5) Night mode 休息模式/外来电话铃声静音状态:按一下菜单键然后按3次下翻键在按2次确认键然后再按上翻或者下翻现在 ON为开启静音模式 OFF为关闭静音模式按确认键确认(6) LCD contrast 液晶显示对比度设置:按一次菜单键然后按8次下翻键然后再按一次确认键再按3次下翻键然后再按确认键进入按上翻或者下翻选择按确认键确认(7) Set dial mode/拨号方式音频和脉冲设置:按一次菜单键然后按8次下翻键再按1次确认键然后再按7次下翻键再按2次确认键然后按上翻或者下翻选择 Tone/音频 Pulse/脉冲按确认键确认(8)按键音开关设置:按一次菜单键然后按8次下翻键再按1次确认键然后按4次下翻键再按1次确认键进入选择 ON为开启 OFF为关闭按确认键确认(9)子机听留言:按一下菜单键然后按确认键即可听取按导航键的右箭头可以听取下一条按导航键的左箭头可以重复听取(10)设置自动应答响铃次数:按一次菜单键然后按8次下翻键再按3次确认键然后按上翻或者下翻选择2-7次按确认键确认(11)语音报号开关设置:按1次菜单键然后按下翻键至屏幕显示Talking Caller ID时再按确认键进入然后按上翻或者下翻选择ON或者OFF ON为开 OFF为关闭按确认键确认8. 底座留言操作:(1)主人留言:按2次REC主人留言键听见“滴”声后开始录制录制完之后再按一下REC主人留言键即可完成。
松下焊机维修资料

波形控制交直流脉冲TIG焊机YC-300WX4HGE维修指南唐山松下产业机器有限公司焊接学校目录程序P板ZUEP1313 或ZUEP1330的检测电压 (3)故障检查及修理 (8)报警指示灯亮时的对策 (11)电路介绍 (12)IGBT 的检测方法 (13)如何检测驱动信号 (14)1-2 次级逆变 (15)次级晶体管的检测 (16)如何检测驱动信号 (17)2-1.时序图(程序板ZEUP1313) (18)2-2. 时序图(无收弧) (19)2-3. 时序图3 (有收弧) (20)2-4. 时序图4 (有收弧) (21)2-5. 焊炬开关电路 (22)2-6. 输出电流电位器选择电路 (23)2-7. 电防电路 (24)2-8. 脉冲电路 (25)2-9. 电源电路,输入过压检测电路 (26)2-10. 电流检测电路 (26)2-11. 收弧(点焊电路) (27)2-12. 提前送气,滞后停气 (28)2-13. 气阀 (28)2-14. 高频继电器,脉冲继电器,起始信号 (28)2-15. 全波整流电路,电流检测电路,电流表补偿电路 (29)2-16. 波形控制电路,误差放大电路 (30)2-17. 清洁电路 (31)2-18. 输出极性转换电路 (32)2-19. 输入过流检测电路,输出过压检测电路 (32)2-20. PWM控制电路 (33)2-21. 焊接方法选择电路 (34)2-22. 灭弧恢复电路 (34)2-23. ROM电路 (1)2-24. 波形读取时钟图 (2)2-25. 一次侧IGBT驱动电路(ZUEP1220) (1)2-26. 次级晶体管驱动电路(ZUEP1119) (2)2-27. 高频PCB(ZUEP0683) (3)2-28. 堆栈电路 (4)程序P板ZUEP1313 或ZUEP1330的检测电压:检测条件:1.以下各点电压值是在直流TIG,无收弧,无脉冲时将焊接电流旋钮从最小旋到最大过程中测得的。
松下电焊机维修指南
1. 故障检修的程序: 第一步:调整送丝机遥控盒上的两个电位器,观察焊机的空载电压和送丝机的转速, 根据焊机的空载电压和送丝机的转速是否受调确认故障现象。 第二步:根据故障现象推断故障所在的范围。 第三步:通过分析、检查、测试等手段找出故障点。 第四步:用合格的部品更换损坏品或用其它手段排除故障。
第一章 KR 系列 CO2 气保焊机典型故障及排除方法
三. 典型故障及排除方法:
1. 故障现象:按焊枪开关,无空载电压,送丝机不转。 故障原因: (1) 外电不正常。 (2) 焊枪开关断线或接触不良。 (3) 控制变压器有故障。 (4) 交流接触器未吸合。 (5) P 板有故障。 排除方法: (1) 在焊机的后面板输入端子处,用万用表测量三相输入电压,确认三相电压是否正 常(正常值为 380V±10%)。 (2) 用万用表检查 6 芯控制电缆插头的 3#和 5#插孔,按下焊枪开关,观察其有无约 220Ω左右的电阻,若为∞,说明焊枪开关回路断路。此时可将焊枪开关插头从 送丝机插座上拔下,按下焊枪开关 ,测量该插头的两根插针,电阻值应近似为 零,若阻值很大或为∞,说明焊枪电缆内的控制线断或开关故障。若近似为零Ω, 说明故障发生在 6 芯电缆,应继续查找故障点,检查出故障原因后,重新接线。 (3) 用万用表检查控变输入、输出电压,确认是否正常,一次电压正常值为 380V± 10%,二次电压分别为 200V 和 20V(2 组),若输入电压正常,输出电压不正常, 此时应断开控变的负载重新测量,若还不正常说明控变有故障,应予以更换。 (4) 检查交流接触器线圈阻值,100Ω以下、500Ω以上为不正常,需要更换。 (5) 用万用表电压档测量 P 板 38-8 点,按焊枪开关,此两点间的电压应为零,否则 P 板有故障,可更换 P 板。 (6) 电焊机面板上的 5A 保险烧损,更换。
松下复印机维修代码区(完整版)

松下复印机维修代码区(完整版)松下复印机维修代码区(完整版)7713、7715机子进入维修模式:依次按住―纸盒选择键‖、―DOWN"、‖1―退出:依次按住―纸盒选择键‖、‖清除\停止"松下 EP—7715 自疹代码E101 光学部传感器光学部驱动板故障 E121 光学传感器.马达.光学驱动板故障E122 反射镜传感器.反射镜驱动马达故障.E132 色度检测板故障E140 光学冷却风扇A故障 E141 光学冷却风扇B故障E220 手送纸传感器故障 E303 碳粉密度传感器故障E310 高压漏电 E320 主马达故障E322 防黑胶片异常 E330清洁灯故障E401 定影器故障 E410 定影器排风扇故障E501 24V低压电源故障 E504 10V低压电源板.CPU板故障E535 主控板信号故障 E542 计数器故障U13 碳粉不足 U16 载体槽不良服务开关模式同时按下纸盒键和倍率下键,显示C00用数字键输入代码按复印键操作开始输出检查确认左侧安全开关在ON位置20 定影器排风扇 21 光学冷却风扇22 全速电磁阀 23 半速电磁阀24 自动板电磁阀 25 暴光灯26 主马达.除电灯.磁辊偏压 27 24V ON28 送纸离合器 29 手送纸离合器30 同步离合器 31 计数器先进入F5状态按复印键,显示C00用数字键输入代码按复印键输入新数据按复印键存储,按停止/清除键两次返回到F5状态00 国家版标准=0 0=国内 1=北欧 2=欧洲01 电源濒率设定标准=1 0=50HZ 1=60HZ02 自动还原时间标准=1 0=不自动 1=30秒 2=1分 3=2分03 节电标准=0 0=无 1=2分 2=4分09 加热灯控制方式标准=0 0=零伏检测 1=项位控制10 光学散热标准=1 0=复印转 1=标准13 省电模式时间调整标准=0 0=无 1=5分 2=10分 3=30分 4=60分14 省电模式选择标准=0 0=模式1 1=模式224 亮度检测标准=1 0=不检测 1=AE检测34 鼓低色修正功能标准=2 0=无 1=1600修正张 2=2000修正张 3=2400修正张50 浓淡度模式设定标准=2 0=无自动 1=自动优先 2=手动优先59 无粉后复印标准=0 0=停止 1=可以复印63 补粉后U13消除标准=0 0=按任意键 1=按纸盒+数字键70 维修符号周期设定标准=5 0=不设定 1=1千张 2=2千张 3=4千张4=1.6万张 5=3万张83 纸盒尺寸设定标准=0 0=依实际尺寸 1=依前一张时序来设定2=A3 3=A4L 5=A4R 6=B5 7=B5R先进入F6状态按复印键,显示C00用数字键输入代码按复印键用数字键输入新数据,按复印键储存,按两次停止/清除键返回到F6状态〈按淡键为负,按浓键为正〉00 等倍率调整范围=99.1%—100.9% 每格差0.1%,〈-9—+9〉01等倍率〈与送纸方向水平〉改变扫描速度每格差0.1%,〈-9—+9〉02等倍焦距调整焦距〈-50— +50〉03等倍率〈与送纸方向垂直〉〈-20— +20〉04 原稿扫描同步执行F8—02本项自动调整每格差0.2MM〈-20—+20〉05 纸张同步执行F8—02本项自动调整每格差0.5MM〈-18—+18〉07 前端空白每格差0.5MM〈-18—+18〉08 尾端转印每格差0.5MM〈-18—+18〉10 防黑胶卷定位每格差0.56MM〈-99—+99〉11 暴光灯亮度标准=62V 每格差0.2V 〈-99—+99〉12 照片暴光灯亮度标准=-8.2V 每格差0.4V 〈-9—+9〉13 缩小时暴光灯亮度65% 标准=+47V 每格差0.22V 〈-9—+9〉14 放大时暴光灯亮度141% 标准=+5.4% 每格差0.16V 〈-9—+9〉15 亮度标准设定执行F8—03本项自动修正每格差0.2V〈-99—+99〉17 栅极电压标准=820V 每格差0.2V〈-44—+16〉18 照片栅极电压标准=520V 每格差-8.3V〈-8—+52〉31 定影温度调整每格差0.7度〈-15—+15〉先进入F7状态按复印键,显示C00用数字键输入代码按复印键,显示计数器张数,按两次停止/清除键返回F7状态21总计数器记录所有复印张数22 周期保养计数供F5-70项使用扳手出现时本记录归零23 黑色铁粉总计数 F8—09后本项归零43 感光鼓计数器执行F6—61时本项归零99 清除所有电子计数所有计数归零按复印键两次先进入F8状态按复印键显示C00用数字键输入代码按复印键,操作开始00 暴光灯更换按复印键暴光灯移位,按停止/清除回位03 暴光灯亮度标准值设定按复印键自动修正08 锁定半速/全速反射镜按复印键,板面显示009 铁粉补给控制自动调整按复印键,自动调整约两分钟松下 EP—7715 自疹代码E101 光学部传感器光学部驱动板故障 E121 光学传感器.马达.光学驱动板故障E122 反射镜传感器.反射镜驱动马达故障.E132 色度检测板故障E140 光学冷却风扇A故障 E141 光学冷却风扇B故障E220 手送纸传感器故障 E303 碳粉密度传感器故障E310 高压漏电 E320 主马达故障E322 防黑胶片异常 E330清洁灯故障E401 定影器故障 E410 定影器排风扇故障E501 24V低压电源故障 E504 10V低压电源板.CPU板故障E535 主控板信号故障 E542 计数器故障U13 碳粉不足 U16 载体槽不良服务开关模式同时按下纸盒键和倍率下键,显示C00用数字键输入代码按复印键操作开始输出检查确认左侧安全开关在ON位置20 定影器排风扇 21 光学冷却风扇22 全速电磁阀 23 半速电磁阀24 自动板电磁阀 25 暴光灯26 主马达.除电灯.磁辊偏压 27 24V ON28 送纸离合器 29 手送纸离合器30 同步离合器 31 计数器先进入F5状态按复印键,显示C00用数字键输入代码按复印键输入新数据按复印键存储,按停止/清除键两次返回到F5状态00 国家版标准=0 0=国内 1=北欧 2=欧洲01 电源濒率设定标准=1 0=50HZ 1=60HZ02 自动还原时间标准=1 0=不自动 1=30秒 2=1分 3=2分03 节电标准=0 0=无 1=2分 2=4分09 加热灯控制方式标准=0 0=零伏检测 1=项位控制10 光学散热标准=1 0=复印转 1=标准13 省电模式时间调整标准=0 0=无 1=5分 2=10分 3=30分 4=60分14 省电模式选择标准=0 0=模式1 1=模式224 亮度检测标准=1 0=不检测 1=AE检测34 鼓低色修正功能标准=2 0=无 1=1600修正张 2=2000修正张 3=2400修正张50 浓淡度模式设定标准=2 0=无自动 1=自动优先 2=手动优先59 无粉后复印标准=0 0=停止 1=可以复印63 补粉后U13消除标准=0 0=按任意键 1=按纸盒+数字键70 维修符号周期设定标准=5 0=不设定 1=1千张 2=2千张 3=4千张4=1.6万张 5=3万张83 纸盒尺寸设定标准=0 0=依实际尺寸 1=依前一张时序来设定2=A3 3=A4L 5=A4R 6=B5 7=B5R先进入F6状态按复印键,显示C00用数字键输入代码按复印键用数字键输入新数据,按复印键储存,按两次停止/清除键返回到F6状态〈按淡键为负,按浓键为正〉00 等倍率调整范围=99.1%—100.9% 每格差0.1%,〈-9—+9〉01等倍率〈与送纸方向水平〉改变扫描速度每格差0.1%,〈-9—+9〉02等倍焦距调整焦距〈-50— +50〉03等倍率〈与送纸方向垂直〉〈-20— +20〉04 原稿扫描同步执行F8—02本项自动调整每格差0.2MM〈-20—+20〉05 纸张同步执行F8—02本项自动调整每格差0.5MM〈-18—+18〉07 前端空白每格差0.5MM〈-18—+18〉08 尾端转印每格差0.5MM〈-18—+18〉10 防黑胶卷定位每格差0.56MM〈-99—+99〉11 暴光灯亮度标准=62V 每格差0.2V 〈-99—+99〉12 照片暴光灯亮度标准=-8.2V 每格差0.4V 〈-9—+9〉13 缩小时暴光灯亮度65% 标准=+47V 每格差0.22V 〈-9—+9〉14 放大时暴光灯亮度141% 标准=+5.4% 每格差0.16V 〈-9—+9〉15 亮度标准设定执行F8—03本项自动修正每格差0.2V〈-99—+99〉17 栅极电压标准=820V 每格差0.2V〈-44—+16〉18 照片栅极电压标准=520V 每格差-8.3V〈-8—+52〉31 定影温度调整每格差0.7度〈-15—+15〉先进入F7状态按复印键,显示C00用数字键输入代码按复印键,显示计数器张数,按两次停止/清除键返回F7状态21总计数器记录所有复印张数22 周期保养计数供F5-70项使用扳手出现时本记录归零23 黑色铁粉总计数 F8—09后本项归零43 感光鼓计数器执行F6—61时本项归零99 清除所有电子计数所有计数归零按复印键两次先进入F8状态按复印键显示C00用数字键输入代码按复印键,操作开始00 暴光灯更换按复印键暴光灯移位,按停止/清除回位03 暴光灯亮度标准值设定按复印键自动修正08 锁定半速/全速反射镜按复印键,板面显示009 铁粉补给控制自动调整按复印键,自动调整约两分钟松下FP-7718,FP7722 自疹代码E1—01 光学扫描故障 E1—20 镜头倍率驱动故障E1—21 反射镜驱动故障 E1—23 F8-02测试输入E1—32 自动浓度原稿检测 E1—40 光学风扇马达1故障E1—41 光学风扇马达2故障 E1—43 光学风扇马达4故障E2—01 上升托盘提升马达 E2—01下层托盘提升马达E3—01 补粉马达故障 E3—03 碳粉浓度传感器故障E3—10 高压电源漏电 E3—11 高压电源漏电E3—20 主马达故障 E3—21 吸尘扇马达故障E3—22 抽风扇马达故障 E3—23吸入风扇马达故障E3—30 消电灯故障 E3—40 复印浓度传感器输出检测E3—50 转印清洁器E4—01 定影器预热故障 E4—10 抽风扇马达1E4—11抽风扇马达2 E4—12抽风扇马达3E5—01 +24V直流电源 E5—04 +10V直流电源E5—10 +5V直流电源 E5—23 控制面板通讯故障E5—41 对位定时控制电路故障 E5—42 总计数器E5—50 通讯错误 E7—XX ADF故障用户代码U0 键计数器失灵或操作代码没有输入 U1 前门没关好U4 关闭分页器 U5 关闭双面单元U6关闭右侧门 U10 关闭ADFU11 清除分页器存储斗 U13 加碳粉U14 废粉满 U16 显影器没装好U18 复印机寿命上限进入维修方式同时按下用户〈USER〉键,数字3键和原稿尺寸A3键,机器进入F1状态,用数字键选择F1—F 9按复印键显示C00,输入功能代码按复印键,同时按下用户〈USER〉和消除/停止键退出F模式F1 显示器全亮 F2 单页复印操作F3 双面复印操作 F4输入/输出检查F5 改变复印机功能 F6 调整和编程F7 电子计数器 F8 复印机操作调整F9 电话号码编程F4 输出检查26 定位轮离合器 27 手送纸进纸离合器28 手送纸进纸离合器 29 主马达30 对位轮离合器 31主定影灯32 副定影灯 33 暴光灯34 臭氧/吸尘/冷却风扇 35 循环离合器36 出纸选择离合器 37 抽风马达138抽风马达2 39 光学风扇1和440 光学风扇2和3 41 进纸离合器42 总计数器 43 键计数器45 +24V输出F5功能编程0 国家版本标准=1 0=日本 1=美国 2=欧洲1 频率 0=50HZ 1=60HZ2 自动复位时间标准=2 0=无 1=1.45S 2=2:1M 3=3:3M3 节能时间标准=7 0=15M 1=30M 2=60M 3=1.5H 4=2H 5=3H 6=4H 7=无7 语言变更标准=0 0=日语 1=英语 2=德语9 定影灯项位控制标准=0交叉控制 1=项位控制10 光学冷却风扇控制标准=1控制方式 0=正常动作11 复印保留功能标准=1检测 0=不检测13 自动关闭时间标准=0=无 1=30M 2=60M 3=1.5HR 4=3HR 5=4HR14 上纸盒复印纸尺寸设定标准=0=无 1=3A 2=B4 3=A4 4=A4R 5=A515 下纸盒复印纸尺寸设定同上25 复印浓度感应器标准=1=检测 0=不检测58 U14废粉满标准=0=停止复印 1=可以复印59 U13无碳粉标准=0=停止复印 1=可以复印60 纸盘选择 0=手动 1=自动70 预防维护标准=0 0=无 1=1.5K 2=2.5K 3=3.5K 4=10K 5=15K6=20K 10=80K 11=90K 工厂设定=10=8万71 预防维护 0=不标识 1=标识72 定影器清洁辊计数 0=继续复印 1=停止复印《标准=1》73 清洁辊计数器选择 0=120K 1=80K80 纸张尺寸优先选择标准=A4 0=A4R 1=B4 3=A3 4=B5R 5=B590 风鸣器标准=1=有 0=无F6 调整编程0 100%垂直和水平倍率标准=100% 范围= -9—+9 +放大–缩小1 100%水平倍率标准=100% 范围= -9—+92 100%距焦范围= -50—+503 100%垂直倍率范围= -50—+50 +放大键 -缩小键4 原稿对位检测时间范围= -30—+3011暴光标准范围= -99—+9912图片暴光电压范围= -99—+9913 缩小暴光14 放大暴光17 栅极电压标准标准=810V19 偏压标准电压标准= -200V21 碳粉浓度传感器增益电压标准= -6.5V99 F5 F6初始化回到工厂初始值F7 计数器22 预防维护总计数器维护呼叫指示器ON,PM计数器被消零35 手送纸计数器36 下层纸盘计数器37 上层纸盘计数器F8 操作调整00 更换暴光灯灯架前移450MM,按清除/停止键返回08 反射镜和镜头锁定操作按复印键09 碳粉浓度感应器自动调整更换载体时按复印键,调整约两分钟10 鼓充电电压检查F9 电话号码输入按复印键,输入电话号码,〈—〉复位键,空格=图片/自动键,。
松下微波炉维修手册(K583_K573_S563_S553)概要

6.3.当必须进行零部件更换时,从电源插座上拨下插头。
6.4.
当短路开关作业造成10A 250V保险丝烧断时:
6.5.
作业时,切忌将钉子、导线等穿入装置的任何孔中。
千万不要把导线、钉子或金属物插入炉镗的灯孔或其它孔或缝中,因为这些物质可能会起到天线的作用,造成微波泄漏。
6.6.检修后的确认
注意
进行磁控管更换时,须保证天线的密封垫安放正确。
注意
此型号所用的磁控管是专为变频器电源供应系统而设计的,更换
时必须确定是否零件表所列之型号。
7.4.风扇电机
1.从风扇电机接线端上拆除2根导线。
2.旋除将上风扇支架固定于腔体上的1颗螺丝。
3.移去上风扇支架。
4.旋除固定风扇电机组件和腔体排气孔的2颗螺丝,以拆除风
注意微波辐射
技术人员不应暴露于微波中,微波可能从磁控管或其它微波发生装置中逃逸出来。
重要提示
1.微波炉工作时下述零件电压高达2000伏以上: V磁控管
V散热器(变频器(U V高压变压器(变频器(U V高压二极管(变频器(U V高压电容器(变频器(U对这些部件要特别小心。
2.微波炉工作时,若炉门铰链或磁控管安置不当,微波炉泄漏量可达5mw/cm 2以上,故在维修或置换零部件后,必须检查磁控管和炉门铰链是否安装合适。
2.当显示窗上的烹调时间一到,数据程序电路即发出一个控制信号,使微波炉自动关机。
注:当自动再加热结束后,风扇仍将工作1分钟以便冷却炉体和电子元件。
巧速解冻
自动食谱(冷冻食品
自动再加热(热饭
5.3.感应烹调(自动感应烹调
自动感应烹调是微波炉烹调的一项革命性烹调方法,烹调时毋须输入功率及时间,只要在烹调前选择自动感应程序。了解自动感应烹调
松下空调校准点及维修流程

松下空调校准点及维修流程下载温馨提示:该文档是我店铺精心编制而成,希望大家下载以后,能够帮助大家解决实际的问题。
文档下载后可定制随意修改,请根据实际需要进行相应的调整和使用,谢谢!并且,本店铺为大家提供各种各样类型的实用资料,如教育随笔、日记赏析、句子摘抄、古诗大全、经典美文、话题作文、工作总结、词语解析、文案摘录、其他资料等等,如想了解不同资料格式和写法,敬请关注!Download tips: This document is carefully compiled by theeditor. I hope that after you download them,they can help yousolve practical problems. The document can be customized andmodified after downloading,please adjust and use it according toactual needs, thank you!In addition, our shop provides you with various types ofpractical materials,such as educational essays, diaryappreciation,sentence excerpts,ancient poems,classic articles,topic composition,work summary,word parsing,copy excerpts,other materials and so on,want to know different data formats andwriting methods,please pay attention!松下空调校准点及维修流程一、准备工作阶段在进行松下空调的校准点及维修之前,需要进行一系列准备工作。
业余修家用电器工作手册.精讲
电器检修中的注意事项及安全•注意人身安全•注意危险触点•注意烙铁放置•保管好拆下来的螺丝•操作中勿乱碰元件电器检修的基本原则•先调查后熟悉询问故障出现前后的情况再对电路进行研究,熟悉其电路原理•先机外后机内先检查机外引线有无断路短路现象,再对机器内部进行检查•先机械后电气先确定各部位的转动机构无故障时,再进行电气检查,对风扇特别适用.•先静态后动态所谓静态,即未通电之前进行的检查,再通电进行动态检查,检查过程中若发现冒烟现象,应立即关机,避免不必要的损坏.•先清洁后检修检查机器内部时,应着重检查机内是否清洁,引线,走线之间是否有尘土,污垢等异物,应先加以清除,再进行检查.有些故障是由于脏污引起的,一经清洁,故障往往会自动消失.•先电源后机器电源如果不正常,也就无从检查别的故障.而且电源的故障率也是最高的.检个时应引起重视.•先通病后特殊根据机器的共同特点,先排除普遍性的故障,再去检查特殊的电路,以便逐步缩小故障范围.•先外围后内部检查集成电路时,应先检查其外围电路,确认外围电路正常时再对集成电路进行检查,根据维修实践,外围电路故障率要比集成块内部电路高得多.•先直流后交流这时主要是指功放电路.直流是指它的静态工作点,交流则是输入的信号.•先检查故障后进行调试电风扇故障现象:风扇电机不转•电机不转,根据我们以往的维修经验,一般是电机的阻力过大,使电机无法转动.在维修时先轻轻转一下风扇叶,如果感觉阻力很大,多数情况下是电机缺油引起的的.这时只要打开电机(不要轻易拆开电动马达),往里面加入适量的润滑油就可以解决问题.•如果转动风扇叶时很容易转动,所谓容易转动,就是你转它一下,它接着转几圈才停下,那么这种情况多数是电源供电出了问题.而且多数是定时器(一般将其短路)和防跌倒开关出问题.故障现象:电机转动无力•风扇转动无力,一种情况是电机转动阻力太大,同样是转轴缺少润滑油引起.•另一种情况则是启动电容的故障,这时可以对电容进行检查.对于怀疑是电容故障的,可以用替换法来检验,就是把原来的拆下来,拿一个好的电容接上去通电试验,如果这时电机转动恢复正常,那么就说明是电容的故障,更换解决.故障现象:低档不能启动•对于这种情况,往往不是一开始就有的,更多是原来不能转的,我们修好后能转了,但是却出现低档不能转动,或者要用手给它加点力才能转起来.•首先要检查的同样是它的电机是否阻力过大,低档接线处有没有氧化现象,一般常见的是在电机装回去时没有对准.这时要重新拆开电机,对准后再把螺丝拧回去.故障现象:噪声过大•噪声过大,主要检查风扇叶有没有变形,有没有与防护罩相碰,转子有没与其他零件相碰.这种情况细心点检查就可以找出问题所在,然后再进行相应的处理.故障现象:电机时转时不转•(琴键)开关、防跌倒开关触点接触不良(虚焊)•定时器触点接触不良•电动机、电容器焊点松动或虚焊电吹风故障现象:电机不转•电机不转,首先检查电源供电有没正常。
- 1、下载文档前请自行甄别文档内容的完整性,平台不提供额外的编辑、内容补充、找答案等附加服务。
- 2、"仅部分预览"的文档,不可在线预览部分如存在完整性等问题,可反馈申请退款(可完整预览的文档不适用该条件!)。
- 3、如文档侵犯您的权益,请联系客服反馈,我们会尽快为您处理(人工客服工作时间:9:00-18:30)。
·There is something wrong with theunit.·The document was not fed into the unit properly. Reinsert the document.If misfeeding occurs frequently, clean the document feeder rollers and try again.(Refer to DOCUMENT FEEDER(P.25).)·Attempted to transmit a document longer than600mm. Press the[STOP]to remove the document.Divide the document into two or more sheets and try again.·[Alternately,turn off service code#559to enable sending of documents longer than600mm](Refer to SERVICE FUNCTION TABLE(P.46).)·The memory(telephone numbers,parameters,etc.)has been erased.Re-program.[The backup lithium battery on the top of the digital board may be low or dead,so checkit.]·The recording paper is not installed or the unit has run out of paper.Install paper and press[SET]to clear the message.·The recording paper is not fed into the unit properly. Reinstall paper and press[SET]to clear the message. (Refer to INSTALLING THE RECORDING PAPER (P.14).)·The recording paper has jammed near the recording paper entrance.Clear the jammed paper and press [SET]to clear the message.Do not install folded or heavily curled paper.(Refer to RECORDING PAPER JAMS(P.23).)·The back cover is open.Closeit.·There is no space to store new entries in navigator directory.Erase unnecessaryentries.·The unit has a document in memory.See the other displayed message instructions to print out thedocument.·The memory is full of received documents due to lack of recording paper or a recording paper jam.Install paper or clear the jammed paper.(Refer to RECORDING PAPER JAMS(P.23).)·When performing memory transmission,the document being stored exceeds the memory capacity of the unit. Transmit the entire documentmanually.·The film is empty.Replace the film with a new one. (Refer to INSTALLING THE INK FILM(P.13).)·The ink film is slack.Tighten it and install again.(Refer to RECORDING PAPER JAMS(P.23).)·The fax machine is positioned near appliances such as TVs or speakers which generate an intense magneticfield.·The remaining film is low.Prepare a new film.(Refer to INSTALLING THE INK FILM(P.13).)·When making a copy,the document being stored exceeds the memory capacity of the unit.Press[STOP] to clear the message.Divide the document into sections.6 TROUBLESHOOTING GUIDE6.1. USER RECOVERABLE ERRORSIf the unit detects a problem,one or more of the following messages will appear on the display.The explanations given in the[]are for servicemen only.43·There is no room left in memory to record a voice message.Erase unnecessarymessages.·There is something wrong with the modemcircuit.·The other party´s fax machine is busy or has run out of recording paper.Tryagain.·The ink film is empty.Replace the ink film with a new one.·The ink film is not installed.Install it.Refer to INSTALLING THE INK FILM(P.13).·The ink film is slack.Tighten it.·The fax machine is positioned near appliances such as TVs or speakers which generate an intense magneticfield.·A recording paper jam occurred.Clear the jammed paper.[If the printout jams,please refer to RECORDING PAPER JAMS(P.23).]·The unit is checking that there is no slack on the ink film. Wait for a moment while the checkcompletes.·The other party´s fax machine is busy or has run out ofrecording paper.Tryagain.·The document is jammed.Remove the jammeddocument.(Refer to DOCUMENT JAMS-SENDING(P.24).)·A transmission error occurred.Tryagain.·The unit is too hot.Let the unit cool down.446.2. PROGRAMMING AND LISTSThe programming functions are used to program the various features and functions of the machine,and to test the machine.This facilitates communication between the user and the service man while programming the unit.6.2.1. OPERATIONThere are2basic categories of programming functions,the User Mode and the Service Mode.The Service Mode is further broken down into the normal and special programs.The normal programs are those listed in the Operating Instructions and are available to the user.The special programs are only those listed here and not displayed to the user.In both the User and Service Modes,there are Set Functions and Test Functions.The Set Functions are used to program various features and functions,and the Test Functions are used to test the various functions.The Set Functions are accessed by entering their code, changing the appropriate value,then pressing the SET key.The Test Functions are accessed by entering their code and pressing the key listed on the menu.While programming,to cancel any entry,press the STOP key.FLOW6.2.2. OPERATION Array456.2.3. SERVICE FUNCTION TABLE46476.3. TEST FUNCTIONSThe codes listed below can be used to perform simple checks of some of the unit’s functions.When complaints are received from customers,they provide an effective tool for identifying the locations and causes of malfunctions.To do this,you set the Service Mode(Refer to OPERATION(P.45))first,then operate the below test items.48When set to ON (=1),the 12keys and transmission frequencies are as shown.When set to OFF (=2),the 12keys and transmission frequencies are as shown.High (Hz)120913361477Low (Hz)697“1”“2”“3”770“4”“5”“6”852“7”“8”“9”941“NEXT14RECORD3771F1.Platenroller2.Left margin /Topmargin3.Thermal head 1dote this test pattern to confirm the torque limiter for ink film and platen rollertiming6.3.3. PRINT TEST PATTERN506.4. REMOTE PROGRAMMINGIf,after the call is connected,the customer describes the situation and it is determined that the problem can be corrected by making parameter changes,this function makes it possible to change parameters such as the user code and service code from another fax(using DTMF tones).Therefore,travel to the customer´s location is not required.However,it is not possible to change all the parameters remotely(PROGRAM MODE TABLE(P.52)).The function used to accomplish this is remote programming.First,in order to check the current status of the service code parameter,print out the setup list(code:991)and the service list (code:999)from the customer´s fax machine.Based on this,the parameters for the desired codes can be changed.The procedure for changing and listing parameters is described on ENTERING THE REMOTE PROGRAMMING MODE AND CHANGING SERVICE CODES(P.51).Also,before exiting the remote programming mode,it is advisable to obtain a new list to confirm that the changes were made correctly.Hint:Since the connected telephone is in use during the remote programming mode,it may be helpful to ask the customer to switch to the speakerphone.This frees the customer from the need to remain right next to the fax while you are making parameter settings.When finished,inform the customer.Also note that in very noisy locations where the DTMF tones are not audible,the remote programming function will not work.6.4.1. ENTERING THE REMOTE PROGRAMMING MODE AND CHANGING SERVICECODESCROSS REFERENCE:PROGRAM MODE TABLE(P.52)516.4.2. PROGRAM MODE TABLE52OK means"can set".NG means"can not set".Note:Refer to SERVICE FUNCTION TABLE(P.46)for descriptions of the individual codes.Example:If you want to set value in the"004Transmission report mode",press the dial key number1,2or3corresponding to the Set Value you want to select.(1:ERROR/2:ON/3:OFF)6.5. THE EXAMPLE OF THE PRINTED LISTMODE6.5.1. USER Array Note:The above values are the default values.6.5.2. SREVICE MODESETTINGS Array Note:The above values are the default values.6.5.3. HISTORYNote:See the following descriptions of this report.Item No.(1)~(44)are corresponding to the listed items in DESCRIPTIONS OF THE HISTORY REPORT(P.57).(1)ROM VERSIONFLASH ROM version(2)SUMFLASH ROM internal data calculation.(3)YOUR LOGOThe user logo recorded in the unit.If it is not recorded,NONE will be displayed.(4)YOUR TELEPHONE NUMBERThe user telephone number recorded in the unit.If it is not recorded,NONE will be displayed.(5)FAX PAGER NUMBERIf you program a pager number into the unit,the pager number will be displayed here.(6)FACTORY-CUSTOMERThis shows how many days from factory production until the user turns ON the unit.(7)MONTHThe shows the very first month,date,year and time set by the user after they purchased the unit.(8)DAYThe shows the very first month,date,year and time set by the user after they purchased the unit.(9)YEARThe shows the very first month,date,year and time set by the user after they purchased the unit.(10)TIMEThe shows the very first month,date,year and time set by the user after they purchased the unit.(11)USAGE TIMEThe amount of time the unit has been powered ON.(12)FACTORY-NOWThis shows how many days from factory production until the user prints out this history list.(13)TEL MODEThe amount of time the TEL mode setting was used.(14)FAX MODEThe amount of time the FAX mode setting was used.(15)Not Used(16)ANS/FAX MODEThe amount of time the ANS/FAX mode setting was used.(17)FINAL RECEIVE MODEThe last set receiving mode by the user.(18)TONE/PULSE SELECTIONThe most recently used setting used,either TONE or PULSE.(19)RECEIVE REDUCTIONThe compression rate when receiving.(20)SETTING NO.OF DIRECTORYThe recorded directory stations.(21)NUMBER OF COPYThe number of pages copied.(22)NUMBER OF RECEIVE The number of pages received.(23)NUMBER OF SENDINGThe number of pages sent.(24)NUMBER OF CALLER IDThe number of times Caller ID was received.(25)NUMBER OF RECORDING MESSAGEThe number of messages recorded in TAM.(26)~(29)Not Used(30)NUMBER OF PRINTING WARNING LISTThe number of warning lists printed until now.(31)NUMBER OF PRINTING HELPThe number of help lists printed until now.(32)NUMBER OF DIVIDED PRINTING IN FAX RECEPTIONThe number of faxes received that were divided into more than one sheet since the unit was purchased.(33)Not Used(34)FAX MODEMeans the unit received a fax message in the FAX mode. (35)MAN RCVMeans the unit received a fax message by manual operation.(36)FRN RCVMeans the unit received a fax message by friendly signal detection.(37)VOXMeans the unit detected silence or no voice.(38)RMT DTMFMeans the unit detected DTMF(Remote Fax activation code) entered remotely.(39)PAL DTMFMeans the unit detected DTMF(Remote Fax activation code) entered by a parallel connected telephone.(40)TURN-ONMeans the unit started to receive after10rings.(Remote Turn On:Service Code#573)(41)TIME OUTMeans the unit started to receive after Ring Time Out in the EXT-TAM or TEL/FAX mode.(42)IDENTMeans the unit detected Ring Detection.(43)CNG OGMMeans the unit detected the CNG while it was sending the Dummy Ring Back Tone in the TEL/FAX mode,or while answering a call in the EXT-TAM mode.Or means the unit detected the CNG while it was sending the OGM in the ANS/FAX mode.(44)CNG ICMMeans the unit detected the CNG while it was recording the ICM in the ANS/FAX mode.6.5.3.1. DESCRIPTIONS OF THE HISTORY REPORT6.6. TROUBLESHOOTING DETAILS6.6.1. OUTLINETroubleshooting is for recovering quality and reliability by determining the broken component and replacing,adjusting or cleaning it as required.First,determine the problem then decide the troubleshooting method.If you have difficulty finding the broken part,determine which board is broken.(For example:the Digital PCB,Analog PCB,etc.)The claim tag from a customer or dealer may use different expressions for the same problem,as they are not a technician or ing your experience, test the problem area corresponding to the claim.Also,returns from a customer or dealer often have a claim tag.For these cases as well,you need to determine the problem.Test the unit using the simple check list on SIMPLE CHECK LIST(P.59).Difficult problems may be hard to determine,so repeated testing is necessary.6.6.2. STARTING TROUBLESHOOTINGDetermine the symptom and the troubleshootingmethod. Array CROSS REFERENCE:USER RECOVERABLE ERRORS(P.43)SIMPLE CHECK LIST(P.59)DIGITAL BOARD SECTION(P.95)POWER SUPPLY BOARD SECTION(P.107)6.6.3. TROUBLESHOOTING ITEMS TABLE6.6.3.1. SIMPLE CHECK LISTCROSS REFERENCE:TEST FUNCTIONS (P.48)DIGITAL BOARD SECTION (P.95)POWER SUPPLY BOARD SECTION (P.107)SENSOR SECTION (P.111)STEPPING MOTOR DRIVE CIRCUIT (TX)(P.132)HOW TO REMOVE THE MOTOR BLOCK ANDSEPARATION ROLLER (P.40)HOW TO REMOVE THE GEARS OF MOTOR BLOCK (P.41)6.6.4. ADF (Auto Document Feed)SECTION 6.6.4.1. NO DOCUMENTFEEDJAM6.6.4.2. DOCUMENT ArrayCROSS REFERENCE:TEST FUNCTIONS(P.48)SENSOR SECTION(P.111)DISASSEMBLY INSTRUCTIONS(P.28)6.6.4.3. MULTIPLE FEED·When using thick paper etc.,sometimes the document will not befed.CROSS REFERENCE:DOCUMENT FEEDER(P.25)DISASSEMBLY INSTRUCTIONS(P.28)HOW TO REMOVE THE MOTOR BLOCK AND SEPARATION ROLLER(P.40)Note:When confirming if the characters are extended or distorted,or if the feed problem is occurred,use this test chart format(Fig.B).6.6.4.4. SKEW*We recommend making a copy of the Fig.B document in MULTIPLE FEED(P.62)and using it.CROSS REFERENCE:COMPONENT LOCATIONS(P.19)DISASSEMBLY INSTRUCTIONS(P.28)CROSS REFERENCE:INSTALLING THE RECORDING PAPER(P.14)TEST FUNCTIONS(P.48)HOW TO REMOVE THE PICKUP ROLLER(P.36)HOW TO REMOVE THE GEARS OF MOTOR BLOCK (P.41)DIGITAL BOARD SECTION(P.95)POWER SUPPLY BOARD SECTION(P.107) SENSOR SECTION(P.111)OPERATION PANEL SECTION(P.168)6.6.4.5. THE RECORDING PAPER DOES NOTFEED*We recommend making a copy of the Fig.B document in MULTIPLE FEED(P.62)and using it.6.6.4.6. PAPER JAMCROSS REFERENCE:DISASSEMBLY INSTRUCTIONS(P.28)HOW TO REMOVE THE PICKUP ROLLER(P.36) TEST FUNCTIONS(P.48)SENSOR SECTION(P.111)SENSORS AND SWITCHES(P.134)6.6.4.7. MULTIPLE FEED AND SKEWCROSS REFERENCE:HOW TO REMOVE THE PICKUP ROLLER(P.36)OPERATION PANEL SECTION(P.168)6.6.4.8. THE SENT FAX DATA IS SKEWED*We recommend making a copy of the Fig.B document in MULTIPLE FEED(P.62)and using it. CROSS REFERENCE:SKEW(P.63)6.6.4.9. THE RECEIVED FAX DATA IS SKEWED*We recommend making a copy of the Fig.B document in MULTIPLE FEED(P.62)and using it.CROSS REFERENCE:MULTIPLE FEED AND SKEW(P.66)6.6.4.10. RECEIVED OR COPIED DATA IS EXPANDED*We recommend making a copy of the Fig.B document in MULTIPLE FEED(P.62)and using it.CROSS REFERENCE:DOCUMENT FEEDER(P.25)HOW TO REMOVE THE MOTOR BLOCK AND SEPARATION ROLLER(P.40)6.6.4.11. A BLANK PAGE IS COPIED*We recommend making a copy of the Fig.B document in MULTIPLE FEED(P.62)and using it. CROSS REFERENCE:HOW TO REMOVE THE THERMAL HEAD(P.34)TEST FUNCTIONS(P.48)A BLANK PAGE IS RECEIVED(P.70)THERMAL HEAD(P.128)6.6.4.12. A BLANK PAGE IS RECEIVEDCROSS REFERENCE:TEST FUNCTIONS(P.48)A BLANK PAGE IS COPIED(P.68)ANALOG BOARD SECTION(P.103)6.6.4.13. BLACK OR WHITE VERTICAL LINE*We recommend making a copy of the Fig.B document in MULTIPLE FEED(P.62)and using it.CROSS REFERENCE:THERMAL HEAD(P.26)HOW TO REMOVE THE THERMAL HEAD(P.34)6.6.4.14. BLACK OR WHITE LATERAL LINE ON PRINT OUT*We recommend making a copy of the Fig.B document in MULTIPLE FEED(P.62)and using it.CROSS REFERENCE:DISASSEMBLY INSTRUCTIONS(P.28)TEST FUNCTIONS(P.48)A BLANK PAGE IS COPIED(P.68)DIGITAL BOARD SECTION(P.95)6.6.4.15. AN ABNORMAL IMAGE IS PRINTED*We recommend making a copy of the Fig.B document in MULTIPLE FEED(P.62)and using it.CROSS REFERENCE:HOW TO REMOVE THE THERMAL HEAD(P.34)TEST FUNCTIONS(P.48)ANALOG BOARD SECTION(P.103)6.6.5. COMMUNICATION SECTIONFind the problem in the table shown below,and refer to the corresponding troubleshooting procedure in DEFECTIVE FACSIMILE SECTION(P.74).6.6.5.1. DEFECTIVE FACSIMILE SECTION6.6.5.1.1. TRANSMIT PROBLEMCROSS REFERENCE:DOCUMENT FEEDER(P.25)HOW TO REMOVE THE MOTOR BLOCK AND SEPARATION ROLLER(P.40) ADF(Auto Document Feed)SECTION(P.60)OPERATION PANEL SECTION(P.110)6.6.5.1.2. SOMETIME THERE IS A TRANSMIT PROBLEMNote:"596:Transmit level set"represents a service code.(Refer to SERVICE FUNCTION TABLE(P.46).)6.6.5.1.3. RECEIVE PROBLEMFirst confirm whether the recording paper is installed properly or not before starting troubleshooting.(Refer to"Remarks".)Note:"596:Transmit level set"represents a service code.(Refer to SERVICE FUNCTION TABLE(P.46).)Remarks:Regarding the reception problem,we have investigated the conceivable causes in the flow chart except for the software-related errors.However,some troubles may occur due to the software-related problems such as"OUT OF PAPER"when the fax switches to the memory receiving mode and the memory capacity becomes full of the unprintable data.In this case,error messages[MEMORY FULL]and its main cause,for example"CHECK PAPER"are displayed on the LCD.Once you solve the main problem,[MEMORY FULL]will be cancelled and the reception problem will be resolved.LCD display messages indicating the error causes are shown below.CHECK PAPERCOVER OPENUNIT OVERHEATED(COVER OPEN,etc.)...Reset the unit.PAPER JAMMEDCHECK FILMPlease refer to USER RECOVERABLE ERRORS(P.43)for the above items.If it turns out to be a hardware deformity,please check each sensor.(Refer to TEST FUNCTIONS(P.48).)The following two causes can be considered for this symptom.6.6.5.1.4. THE UNIT CAN COPY,BUT CANNOTTRANSMIT/RECEIVECROSS REFERENCE:TEST FUNCTIONS (P.48)ANALOG BOARD SECTION (P.103)6.6.5.1.5. THE UNIT CAN COPY,BUT CANNOT EITHER TRANSMIT/RECEIVE LONGDISTANCE OR INTERNATIONL COMMUNICATIONSCause 1:The other party is executing automatic dialing,the call has been received by this unit,and the CED or DIS signal response time is too long.(In most cases,this unit detects the CNG signal and can respond to CED or DIS.)(According to the ITU-T standard,the communication procedure is cancelled when there is no response from the other party within 35sec,so that the other party releases theline.)(Cause and Countermeasure)As shown in the chart above,the total handshaking time must be reduced,but because of the long distance connection and linking of several stations,the line connection time cannot be reduced.Accordingly,the following countermeasures should be tried.(A)...As the35sec.count is started directly after dialing or directly after the START button has been pressed for models witha START button,the other party should be called manually,if possible.Another possibility is entering two pauses at the end ofthe auto dial number on the transmission side.Then the count start time can be delayed for2pauses(about10sec.). Cause2:Erroneous detection because of an echo or an echo canceler.(Echo/Echo Canceler)The signal from FAX1reaches FAX2via stations1and2,but the reflection signal at station2also returns via station1(echo).As the distance between station1and station2is far,the echo returns to FAX1at a max of600msec after transmission.There is a possibility that this signal is detected erroneously as the signal from FAX2.For a normal call,there is also a possibility that the echo of their own voice will make the call difficult to understand.For this reason,each station(station1and station2) attaches echo cancelers(S1and S2)for international lines or long distance lines.For the echo canceler,the level of the transmission signal from FAX1is compared with the level of the reception signal from FAX2.When the transmission signal is larger,S1is closed while S2is opened when it is smaller.In other words,for transmission from FAX1,S1is closed and S2is open,so that the echo does not return to FAX1.(Causes andCountermeasures)Fig.a(Overlapping the Echo of the DIS signal and DCSsignal)Fig.b(Countermeasure by Changing the CED Frequency)Fig.c(Countermeasure by Changing the Interval Between CEDand DIS)Fig.d(Countemeasure by Ignoring the1st DIS)(Fig.e)6.6.5.1.6. THE UNIT CAN COPY,BUT THE TRANSMISSION AND RECEPTION IMAGE AREINCORRECT(Long distance or international communication operation)This symptom highly depends on the transmission and reception capability of the other FAX unit and the line conditions.The countermeasures for this unit are shown below.Transmission Operation:Set the transmitting speed to4800BPS(service mode:code No.717)or select the overseas mode.Reception Operation:If80%or more of the reception is incorrect,set the receiving speed to4800BPS.(Service mode:code No.718)·Refer to SERVICE FUNCTION TABLE(P.46).1.Equipment· 1jig· 1PC (with LINE IN)· 1audio cord (mini jack supported) · 2tel cords6.6.5.1.7. HOW TO RECORD FAX SIGNAL BY USING PCRecording FAX signal is one of the useful analysis measures to solve communication problems.The way of recording easily by using PC is shown as follows.2.Setting upFAX SIGNAL RECORDING JIG3.Connecting PC and JIG4.PC setting and recording1. Set LINE IN to be valid in the volume control setting.Refer to the PC instruction book.2. Start up the PC software “SOUND RECORDER”.(Thissoftware is bundled to Windows OS,which can create WAV file.)Set the audio format “PCM 22.050kHz,8bit,mono”.3. Click the record button and start recording after acquisition the signal.Note:· Not to be wind wave patterns on the wave monitor.· Please compress the recording data when you send attaching to E-Mail because the data size will be so heavy. · Any software which can create WAV files is available.6.6.5.1.8. HOW TO OUTPUT THE JOURNAL REPORT1. Press[MENU]button.2. Press[#],then[8]and[4].3. Press[SET]button.4. The report is printed out.Error code table:SND=TRANSMISSION RCV=RECEPTIONMost fax communication problems can be resolved by the following steps.1. Change the transmit level.(Service code:596,refer to SERVICE FUNCTION TABLE(P.46).)2. Change the TX speed/RX speed.(Service code:717/718,refer to SERVICE FUNCTION TABLE(P.46).) Note*:If the problem remains,see the following"Countermeasure"flow chart.CROSS REFERENCE:TEST FUNCTIONS(P.48)CROSS REFERENCE:TEST FUNCTIONS(P.48)CROSS REFERENCE:TEST FUNCTIONS(P.48)CROSS REFERENCE:TEST FUNCTIONS(P.48)CROSS REFERENCE:TEST FUNCTIONS(P.48)6.6.6. SPECIAL SERVICE JOURNAL REPORTSJournal2and Journal3shown below,which are special journals giving the additional detailed information about the latest35 communications,can be printed by Service Code881or882.Remote printing function for the journal reports(JOURNAL, JOURNAL2and JOURNAL3)is also available for service technicians.(Refer to REMOTE PROGRAMMING(P.51).)The JOURNAL report only gives you basic information about a communication,but the other two journal reports provide different information on the same item(communication).HOW TO READ JOURNAL REPORTS:Example:1. Look at NO.01in the JOURNAL.If you want to know about the details about that item,see NO.01in the JOURNAL2andthe JOURNAL3.You can get the following information.*MODE:Fax transmission*RCV.MODE:TEL*TX SPEED:9.6kbps*RESOLUTION:standard*ENCODE:MH*MAKER CODE:792. Look at NO.04in the G(0003)indicates that the CNG signal has been received three times since thepurchase date.For further details,see JOURNAL2(P.92)and JOURNAL3(P.93).6.6.6.1. JOURNAL2Refer to JOURNAL2in PRINTOUT EXAMPLE(P.93).Journal2displays the additional detailed information about the last35communications.Descriptions:(1)RCV.MODEIndicates which receive mode the unit was in when the unit received a fax message.This information is also displayed when the unit transmitted a fax message.(2)SPEEDIndicates the speed of the communication.If multiple pages are transmitted or received,it indicates the last page’s communication speed.If there is a communication error,"?"is displayed.(3)RESOLUTIONIndicates the resolution of the communication.If multiple pages are transmitted or received,it indicates the last page’s resolution. If there is a communication error,"?"is displayed.(4)RCV-TRIG.(CNT.)Indicates the trigger that causes the unit to switch to the fax receive mode.The available options are listed in JOURNAL2in PRINTOUT EXAMPLE(P.93).The values in parentheses indicate how many times the trigger has been used.(For example,"0003" means three times.)(5)ERROR→MEMORYIndicates the reason why the unit received a fax message in memory.If you look at No.11in the JOURNAL2in PRINTOUT EXAMPLE(P.93),it shows the fax message was received in memory due to "PAPER OUT"error.NO RESPONSE DISAPPEARED ON JOURNALThe"NO RESPONSE DISAPPEARED ON JOURNAL"displays the information about the last10communications terminated by "No Response".(Some of the communications terminated by"No Response"were not displayed in the JOURNAL.)When a fax transmission cannot be performed because the other party’s unit is set to the TEL mode,"No response"will be printed.。