xenapp65 securegateway sg presentation server v2
xenapp安装指南笔记十(pass

xenapp安装指南笔记十(passCitrix recommends enabling passthrough client authentication. When the user connects to applications published on different servers, passthrough client authentication enables XenApp to automatically pass a user’s credentials from the initial server to the server hosting the next application. This prevents the user from having to re-authenticate when opening applications on different servers.Citrix建议启用passthrough client authentication功能。
当用户与“在不同服务器上发布的应用”建立连接的时候,passhrough client authentication 功能会让xenapp自动把认证信息从第一台服务器传递到另一台托管其他用用的服务器。
这样可以避免用户在不同服务器上打开应用程序需要再次认证的“尴尬”。
这张插图示意认证传递过程If the pass-through authentication feature is not enabled before deploying the clients to end users, users must reinstall the clients with this feature enabled before pass-through authentication will work. T o configure pass-through client authentication functionality on the server, install any Citrix XenApp Plugin for Hosted Apps — Program Neighborhood, the Citrix XenApp plugin, or the Citrix XenApp Web Plugin — on each XenApp server before Setup. If you are deploying the XenApp plugin as the client for users, install the XenApp plugin on your server as the pass-through client. Then, configure these pages during Setup:Passthrough Authentication for the Passthrough Client. Select Yes to enable pass-through client authentication.Server Address for the Passthrough Client. If you installed the Citrix XenApp plugin as the pass-through client, specify the URL for your XenApp Services site. For example, http://yourservername/Citrix/PNAgent.如果没有在为用户部署客户端之前启用passthrough authentiction 功能,用户必须重新安装客户端,来启用passthrough authentication功能。
XenApp技术特性地要求地要求规范

用户可访问客户端打印机的打印机设备设置。可让用户管理打印机属性,而无需将所有权限赋予用户。
基于XPS的通用
打印
为Microsoft XML Paper Specification(XPS)协议提供客户端打印支持,无需在服务器上安装打印机驱动。
基于EMF的通用打印
可以利用增强型元文件(EMF)打印格式为客户端打印提供支持,无需在服务器上安装打印机驱动。
自助密码重置
用户可以通过PC或Web浏览器安全重置域密码或解锁Windows帐户,降低因密码重置带来的Help Desk成本。
仅指铂金版
企业单点登录
只要求用户使用网络凭证登录一次,然后将自动化随后的应用登录,用户可经由Web浏览器、Windows客户端或终端设备访问这些应用。规定强密码特征,如对单个应用的长度、字符重复和字母顺序的要求——适用于手动和自动密码修改。
一般通用打印驱动
在可指定任何客户端打印机的会话中创建一个通用打印机,以减少打印机创建开销。
自动驱动安装
在需要时自动安装打包打印机驱动。
打印机驱动映射
管理员可为指定客户端打印机定义服务器打印机驱动映射。
打印机驱动回滚
提供“最后的打印机驱动”功能,确保在服务器上没有匹配驱动时,以及没有通用打印驱动时,打印机可获得基本的打印功能。
仅指企业版
/铂金版
集中化资源监测
可实现对服务器性能的监控和评估。可以根据自定义阈值进行提醒或生成报告,以增强管理,以及让管理员优化后台服务群集。
仅指企业版
/铂金版
应用性能监控
IT可以识别性能不佳的应用,管理系统资源,以消除瓶颈,并生成应用利用率报告。让管理员可以清楚了解用户的应用性能,从而由被动管理转为主动管理。提供模拟客户端负载的功能,管理员可以确保性能数据达到客户要求的服务级别。
应用发布接入Xenapp解决方案

应用发布接入Xenapp解决方案总体方案构架通过Citrix XenApp集中部署和发布应用客户端软件,整个的后台应用服务器架构没有变化,客户端可以通过XenApp来访问集中发布的各种在线培训应用程序和某些测试环境。
其整体构架如下图所示:客户端软件安装在Citrix服务器(XenApp)上,而所有访问用户使用终端设备均无需事先安装应用客户端软件。
客户端设备只需通过IE就可以运行应用系统(第一次访问时会自动提示下载安装一个几兆大小的Citrix ICA插件),多用户同时访问时,由XenApp管理和运行应用客户端软件的多进程访问,并控制向不同用户发布的权限。
客户端可以直接连接WebInterface和XenApp服务器。
或者可以通过在防火墙打开相应的HTTP和ICA协议端口来访问XenApp服务器。
同时外网远程接入所有客户端经过安全网关Access Gateway(可选)或者第三方VPN接入。
使用Access Gateway可以实现SSL加密,对传输的数据进行加密保护,并且配合XenApp的智能访问,可以实现用户的访问场景识别,能够更加严格地限制用户对后台资源的访问,保护客户的数据安全。
XenApp可整合现有的活动目录中的用户账户来进行用户身份认证。
图中的文件服务器,提供了用户的个人数据存储功能。
通过使用Windows的目录权限控制,及文件夹重定向功能,可以做到用户数据的安全保存及漫游访问。
通过Citrix服务器(XenApp)的SmartAudit功能,客户端的操作不仅可以被管理员实时监控,还可以进行屏幕录像并长期保存,以实现行为审计。
实现集中管理Citrix的集中部署模式只将应用部署在数据中心,用户可以通过任意终端和任意网络进行访问数据中心,非常方便;而只需对服务器端的数据中心进行管理,实现了管理维护的简化。
应用软件的安装及配置变化,均可以在服务器端集中进行,大大简化了开发环境的配置和部署。
应用发布XenApp为用户提供了基于服务器的计算模式(Server-based Computing),实现了虚拟化应用发布。
Citrix系列三 XenApp6.5安装文档
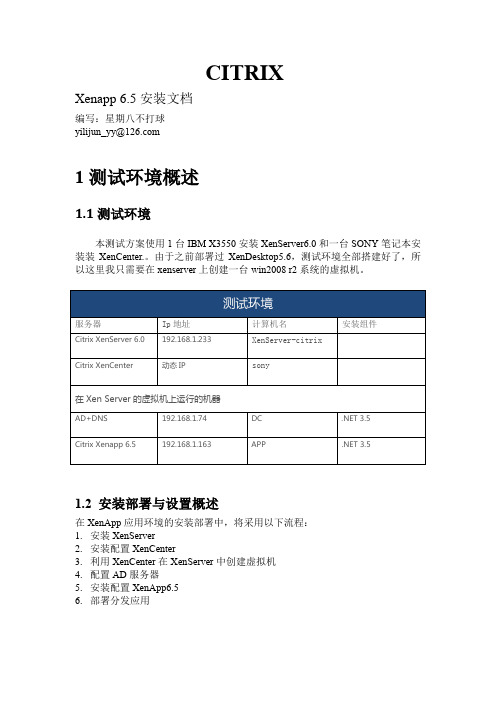
CITRIXXenapp6.5安装文档编写:星期八不打球yilijun_yy@1测试环境概述1.1测试环境本测试方案使用1台IBM X3550安装XenServer6.0和一台SONY笔记本安装装XenCenter.。
由于之前部署过XenDesktop5.6,测试环境全部搭建好了,所以这里我只需要在xenserver上创建一台win2008 r2系统的虚拟机。
1.2 安装部署与设置概述在XenApp应用环境的安装部署中,将采用以下流程:1.安装XenServer2.安装配置XenCenter3.利用XenCenter在XenServer中创建虚拟机4.配置AD服务器5.安装配置XenApp6.56.部署分发应用2安装XenServer3 安装XenCenter4 在XenServer中创建虚拟机这里就不多做介绍了,域服务器用的是之前做XenDesktop环境时建好的,5 配置AD域控制器AD域配置在这里就不详细描述了。
之前做系二XenDesktop的测试实验有简单的介绍,不懂的朋友可以去下载看看。
6 安装配置Xenapp 6.56.1配置安装环境在之前虚拟机中安装好的Windows 2008 r2操作系统,修改计算机名APP,配置DNS,并加入域。
安装.NET 3.5组件6.2 安装Xenapp 6.51 加载XenApp6.5安装盘或ISO并运行安装程序,点击安装Xenapp服务器:2 点击添加服务器角色3 这里我安装Platinum版4 点击接受,下一步5 选择xenapp和web interface,点击下一步6 直接下一步7 点击安装8 点击完成9 点击重新引导10 点击继续安装11 安装12 安装完后,配置web interface13 右击xenapp web站点,点击创建站点,选择设置为ISS站点的默认页面14 默认直接下一步15 下一步16 直接下一步17 点击添加,输入app服务器的IP地址,修改XML服务端口为808019 默认下一步,这里也可以设置域限制,以后访问应用输入用户名和密码时不用再输入域。
XenApp6.5 外网访问配置教程
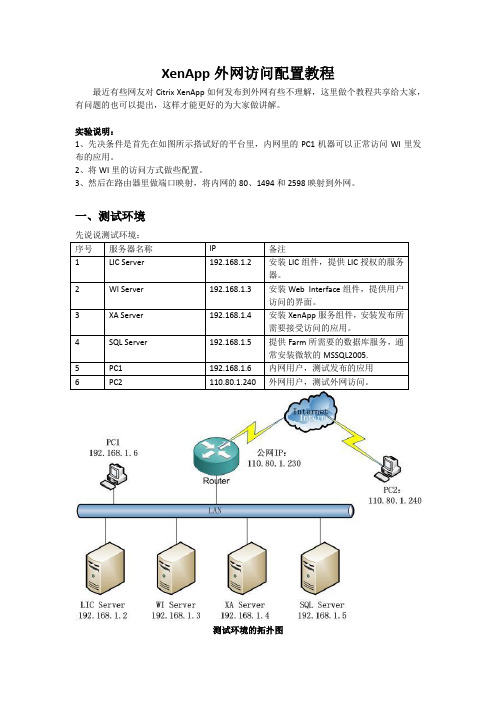
XenApp外网访问配置教程最近有些网友对Citrix XenApp如何发布到外网有些不理解,这里做个教程共享给大家,有问题的也可以提出,这样才能更好的为大家做讲解。
实验说明:1、先决条件是首先在如图所示搭试好的平台里,内网里的PC1机器可以正常访问WI里发布的应用。
2、将WI里的访问方式做些配置。
3、然后在路由器里做端口映射,将内网的80、1494和2598映射到外网。
一、测试环境先说说测试环境:测试环境的拓扑图二、WI里的配置2.1 右键点击已发布的站点链接,选择“安全访问”2.2 将“默认”的访问方法改为“已转换”2.3 为了保证我们的内网网段不被转换为外网IP而导至内网用户无法正常访问,我们需要添加一个访问规则,让内网用户的访问方法为“直接”,如下图,我们将192.168.1.0的网段添加到列表。
2.4 完成后效果如下图,点击“下一步”继续:点击添加输入内网网段完成确定选择直接2.5 到此步,我们需要添加一些转换规则,也就是指定要如何转换。
点击添加2.6 将内部XA Server的IP地址的1494端口映射到公网地址的1494端口:2.7 如上一步同样的方式将2598也添加进来2.8 都添加好后点击“完成”即可。
三、路由器里的配置工作路由器需要做的就是将内网192.168.1.4的IP地址的1494和2598端口映射到公网地址的1494和2598地址,还有WI服务器192.168.1.3的80端口映射到外网的8088端口。
1494端口:Citrix的ICA协议端口2598端口:保证会话可靠性的端口,如果此端口没映射,发布的XenApp也同样可以访问,但连接速度会非常慢。
80端口:不发布就没法打开网页了。
四、测试工作。
在PC2上Telnet 公网IP:110.80.1.230的1494,2598,8088端口是否可以正常连接。
可以正常连接通常就可以在外网PC2上正常访问内网发布的应用了。
CitrixXenapp使用手册

Citrix Xenapp使用手册()一、Citrix Xenapp功能阐明Citrix Xenapp是思杰公司旳一种提供远程虚拟应用旳产品,它可以实现应用程序旳远程虚拟访问,顾客所使用旳应用程序在服务器端运营,本地计算机只是显示一种执行界面。
通过这种应用虚拟技术,可以有效地减少系统通讯旳数据量,提高系统响应速度,同步可以实现相应用程序集中管理和发布。
分公司于近期安装部署了Citrix Xenapp服务器,该服务器重要用于如下两个目旳:1、自营油气田生产现场员工访问Maximo系统和SAP系统。
2、分公司员工使用非原则配备软件,如Microsoft Visio、Microsoft Project、AdobeProfessional等。
二、客户端软件安装在使用Citrix Xenapp服务器前,顾客必须安装Citrix 客户端软件,分公司员工可以通过如下措施安装该客户端软件。
1、自营油气田生产现场员工可以拷贝O:\citrix\icaClientInstall.exe到本地,然后运营该文献。
2、分公司机关员工可以拷贝x:\公共文献夹\Citrix\icaClientInstall.exe 到本地,然后运营该文献。
3、除上述两种方式外,顾客第一次登录系统时,系统会提示下载和安装客户端软件。
由于软件较大,海上顾客下载旳速度会很慢。
三、系统登录和使用分公司Citrix Xenapp服务器旳地址为:10.138.1.11,顾客可以在IE浏览器中直接输入该地址,访问该服务器。
如果客户端软件已经正常安装,系统会浮现如下登录界面,顾客输入各自旳域账号和密码登录系统。
登录后,系统浮现下面旳界面,顾客根据需要点击需要运营旳应用程序。
第一次登录时,系统会弹出下面旳窗口,由顾客确认对本地资源旳使用状况,按下图中旳选项进行确认。
每次登录后,第一次打开应用程序时,系统会弹出下面旳提示窗口,关闭此窗口。
应用程序运营后,顾客按照本机操作旳措施进行使用。
Citrix XenApp 6.5 安装配置

Citrix XenApp 6.5 安装-配置-发布应用-客户端访问本篇分为:1.Citrix License服务器配置以及License申请2.Citrix Xenapp安装3.配置Webinterface4.配置Webinterface客户端部署5.发布应用6.测试访问测试环境:服务器两台PDCDCCitrix License服务器XenApp服务器软件:操作系统为Windows Server 2008 R2 Sp1,Citrix XenApp 6.5SQL 2008Express操作步骤:一.Citrix License服务器配置以及License申请(在PDC上操作)1.配置DC,XenApp加入域(略)2.在PDC上安装Citrix License组件3.许可证服务器配置4.申请评估License(里面的Host name of your Citrix License Server,须与机器相同,即PDC)5.下载License 文件6.通过许可管理控制台导入license(提示必须重启供应商守护程序)7.重启一下服务8.检查一下Windows 日志是否有错误警告二.Citrix XenApp6.5 安装10.安装XenApp服务器(几次重启)11.配置License,指向PDC12.配置XenApp,创建新的服务器场(完成后重启)13.添加IIS管理控制台三.配置Webinterface14.配置Webinterface15.配置身份验证16.验证访问(域名预填写)四.配置Webinterface支持客户端部署17.从Citrix 官方站点下载最新Clients,复制目录18.配置客户端部署19.修改Webinterface.conf去掉注释20.测试客户端安装Plugin组件五.配置XenApp,发布应用21.配置Citrix AppCenter22.发布应用。
xenapp安装指南笔记十一(ConfiguringtheCitrixXMLSe...
xenapp安装指南笔记十一(ConfiguringtheCitrixXMLSe...Configuring the Citrix XML Service Port配置citrix xml 服务端口XenApp uses the Citrix XML Service to supply the Web Interface server, and its connecting clients, with the names of applications available in a farm. By default, Setup configures the Citrix XML Service to share the default TCP/IP communication port (port 80) with Microsoft Internet Information Services (IIS).xenapp用 citrix xml service连接web interface 服务器与farm 中应用程序间通信,并为客户端连接提供连接支持。
默认情况下,安装程序会配置citrix xml service 与iis共享tcp/ip默认通信端口(80)。
If you intend to send data to the Web Interface over a secure HTTP connection using SSL, be sure that the Citrix XML Service is set to share its port with IIS and that IIS is configured to support HTTPS. If you intend to install the Web Interface on the same server as the XML service, select the port sharing option.如果你打算使用ssl建立安全http连接传输数据到web interface,确认citrix xml service 与iis使用共享端口,并且iis已经被配置支持https连接。
Citrix_Xenapp6.5安装图文教程_虚拟化之旅

Citrix虚拟化之旅二(Xenapp6.5安装V2.1)By:Citrix阳光2011-10-08Citrix安装过程中需注意的事项1.Citrix安装时对服务器的配置要求较高,最低版本为Windows server 2008R2。
2.服务器的计算机名字最好改为CITRIX,工作组改为WORKGRUOP3.由于Citrix和u8在安装过程中都会对IIS服务进行配置,如果先装Citrix后装u8会导致客户端连接服务器不成功,请选择先装U8后装Citrix。
4.使用客户端连接服务器时,请先安装Citrix文件夹中的receiver目录下的CitrixReceiver.exe应用程序,再使用浏览器进行连接,地址为:Http://20.1.41.36(这个为服务器的IP)。
安装前的准备:Windows2008R2操作系统,XenApp 6.5资源盘,有效的LIC授权。
6.5安装前会强制自动安装“桌面体验”组件,安装过程中也需要重启,我们也可以提前安装好。
第一步:安装系统,没什么窍门,注意的地方是:XenApp 6一定要Windows2008R2(只有64位的版本)的操作,安装LIC组件所在的那台计算机名一定需要与LIC上显示的计算机名称相同,而且区分大小写(如下图所示),hostname后面的名称。
我们这里测试环境,将LIC 与Xenapp装在同一台服务器上。
计算机名第二步:准备工作:设置IP地址,更改计算机名为LIC的名称:xm(如下图所示),激活操作系统,附上一个Windows2008R2 180 Day的测试KEY:7PJBC-63K3J-62TTK-XF46D-W3WMD(其实连接网络的情况下,点击更改产品密钥时,不要在需要输入KEY的栏目里输入任何东西,直接下一步即可激180天的免费测试时间),如果需要在域环境请在这一步就加入,这里实验不加域。
第三步:安装组件,看图,我就不多打字了。
3.1:右键我的电脑>属性>角色>添加角色(如下图)12 3.2:如下图13.3:三个钩,记住1234112311121 2311 11211211重启后的界面如下,点关闭1 放入Xenapp6的光盘后点击“autorun.exe”文件111 1我们这里测试环境,将三个角色都安装在同一台服务器里,正试生产环境建议分开安装。
xenapp解决方案
xenapp解决方案
《XenApp解决方案》
XenApp是一款用于虚拟化应用程序的软件解决方案,它可以帮助企业轻松管理和提供应用程序,同时提高员工的工作效率和生产力。
这款解决方案不仅可以节省成本,还可以提供更好的用户体验和安全性。
XenApp解决方案主要有以下几个特点:
1. 应用集中管理:XenApp可以帮助企业集中管理所有的应用程序,无论是Windows、移动设备还是云端应用。
这意味着管理员可以更加轻松地管理和分发应用程序,而用户可以方便地访问所需的应用程序。
2. 弹性扩展:XenApp可以根据企业实际需求进行弹性扩展,无论是增加用户数量还是扩展到不同的地理位置。
这使得企业可以更加灵活地应对业务的增长和变化。
3. 安全性:XenApp提供了丰富的安全功能,包括数据加密、访问控制和多因素认证等。
这些功能可以帮助企业保护敏感数据和防止安全威胁。
4. 用户体验:XenApp可以提供一致的用户体验,无论是在移动设备上还是在桌面上。
这意味着用户可以方便地访问应用程序,而不必担心设备的兼容性和性能问题。
5. 成本效益:XenApp可以帮助企业节省成本,包括硬件成本、软件许可成本和管理成本。
同时,它还可以提供更高的IT资
源利用率和更好的资源共享。
总之,XenApp是一款功能强大的解决方案,可以帮助企业更
好地管理和提供应用程序,并提高员工的工作效率和生产力。
无论是小型企业还是大型企业,都可以从XenApp解决方案中
获益。
Citrix XenApp6.5安装教程(二)
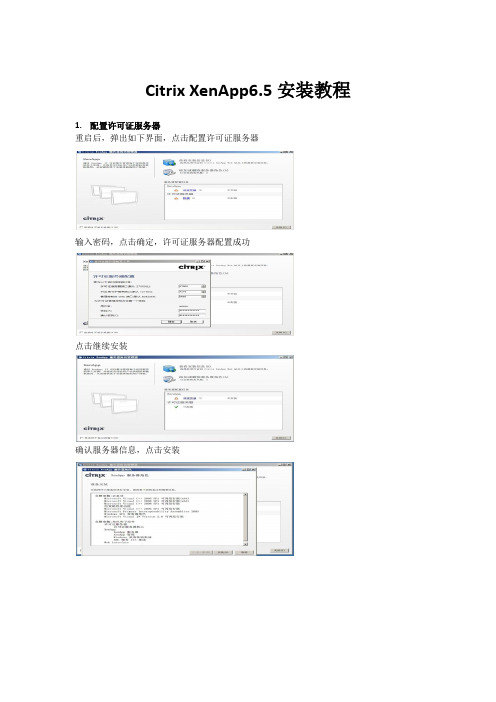
Citrix XenApp6.5安装教程1.配置许可证服务器重启后,弹出如下界面,点击配置许可证服务器输入密码,点击确定,许可证服务器配置成功点击继续安装确认服务器信息,点击安装安装完成,点击完成按钮输入许可证服务器名称,点击测试连接会提示成功连接到许可服务器,点击下一步默认,点击应用License文件指定正确后,点击配置输入新XenApp服务器场名称,点击下一步默认,点击下一步输入用户名和密码,点击确定默认,点击下一步默认,点击下一步默认,下一步确认XenApp服务器信息,点击应用安装完成,点击完成点击重新启动2.Web Interface配置点击配置Web Interface创建站点勾选设置为IIS站点的默认页面,点击下一步默认,点击下一步确认新站点设置信息,点击下一步创建站点成功,点击下一步点击添加按钮,添加服务器完成,点击下一步默认,点击下一步默认,点击下一步默认,点击下一步默认,点击下一步确认设置信息,点击完成XenApp Web新站点创建成功web站点建好后,在右边点”身份验证方法”把域添加到登陆页上去点击右边的属性按钮选择身份验证类型,点击设置在域列表中选择“预填写”,添加服务器,点击确定创建XenApp Services站点默认,点击下一步确认新站点信息,点击下一步创建完成,点击下一步添加服务器成功后,点击下一步默认,点击下一步确认XenApp Services站点信息,点击完成XenApp Services信息创建成功Citrix App Center为了加快Citrix交付服务控制台启动速度,选择禁用验证码签名检查提高启动性能默认,点击下一步去掉Single Sign-on前面的勾,点击下一步添加服务器,点击下一步默认,点击下一步检测完成,点击下一步。
xenapp65 securegateway sg installing configuring wrapper v2

Installing and Configuring the Secure Gateway and Secure Gateway Proxy2013-11-16 06:28:44 UTC© 2013 Citrix Systems, Inc. All rights reserved. Terms of Use | Trademarks | Privacy StatementContentsInstalling and Configuring the Secure Gateway and Secure Gateway Proxy (3)Upgrading Secure Gateway or Secure Gateway Proxy (4)Using Firewall Software with the Secure Gateway or Secure Gateway Proxy (5)Installing the Secure Gateway or Secure Gateway Proxy (6)To install the Secure Gateway or Secure Gateway Proxy (7)Configuring the Secure Gateway or Secure Gateway Proxy (8)To start the configuration wizard manually (9)To select a configuration level (Secure Gateway) (10)To select a configuration level (Secure Gateway Proxy) (11)Task Summary for Secure Gateway, Advanced or Standard Configuration (12)Task Summary for Secure Gateway Proxy, Advanced or Standard Configuration.13To select a server certificate (14)To configure secure protocol settings (15)To configure inbound client connections (16)To configure outbound connections (17)To configure an access control list for outbound connections (18)To configure servers running the Secure Gateway Proxy (20)To add the Secure Ticket Authority details (21)To configure connection parameters (22)To configure logging exclusions (23)To add the Web Interface server details (24)To configure the logging parameters (25)To complete the configuration (26)To stop the Secure Gateway/Secure Gateway Proxy service (27)To uninstall the Secure Gateway (28)Installing and Configuring the Secure Gateway and Secure Gateway Proxy In addition to describing the Secure Gateway and Secure Gateway Proxy installation andconfiguration processes, this section also explains how to move to the current version ofSecure Gateway from an installed earlier version. It also presents how to use a firewall withSecure Gateway and Secure Gateway Proxy.When Secure Gateway or Secure Gateway Proxy is installed on a supported 64-bit Windowsoperating systems, it installs in the 32-bit application location by default.Note: If Secure Gateway or Secure Gateway Proxy is already installed, disconnected allactive sessions before reinstalling or reconfiguring it. Otherwise, the Secure Gatewayservice might fail to restart.Upgrading Secure Gateway or Secure Gateway ProxyYou can upgrade from these versions of Secure Gateway or Secure Gateway Proxy:•Secure Gateway or Secure Gateway Proxy 3.2•Secure Gateway or Secure Gateway Proxy 3.1.4•Secure Gateway or Secure Gateway Proxy 3.1.3Perform a fresh installation to migrate from these versions of Secure Gateway or SecureGateway Proxy; upgrading is not supported:•Secure Gateway or Secure Gateway Proxy 3.1•Secure Gateway or Secure Gateway Proxy 3.0.x•Secure Gateway or Secure Gateway Proxy 3.0To perform a fresh installation:1.Remove any installed Secure Gateway hotfix software packages.2.Remove the Secure Gateway or Secure Gateway Proxy software.3.Install Secure Gateway or Secure Gateway Proxy.Using Firewall Software with the Secure Gateway or Secure Gateway ProxyThe firewall software included in your Microsoft Windows server operating system (such asWindows Firewall with Advanced Security) where the Secure Gateway or Secure GatewayProxy is used might not automatically allow access to required ports. Non-Microsoft firewallsoftware might also disallow port access by default.Also, the Secure Gateway or Secure Gateway Proxy does not automatically create anexception to allow access to the default SSL port 443, the default Secure Gateway Proxyport 1080, or any port number you select when configuring the software.Manually add or allow access to these ports to any firewall software you are using in yourenvironment.Gateway ProxyThe Secure Gateway installer installs the Secure Gateway or the Secure Gateway Proxy.When installation is complete, the Secure Gateway Configuration wizard automaticallystarts so you can configure Secure Gateway.The following steps outline the installation sequence of the Secure Gateway:•Install Citrix XenApp.•Install root and server certificates on the appropriate computers.•If using a double-hop DMZ, install the Secure Gateway Proxy in the second DMZ.•If you are securing communications between the Secure Gateway and the Secure Gateway Proxy, ensure you install a server certificate on the server running the SecureGateway Proxy.•Install the Secure Gateway in the first, or only, DMZ.The installation sequence must be in this order:1.Always install components within the secure network first.2.Optional. If your network contains a double-hop DMZ, install components in the secondDMZ segment next.3.Install components in the first DMZ segment last.Gateway Proxy1.On the installation media, click autorun.exe. The Autorun menu launches..2.Select Manually install components > Server Components > Secure Gateway.3.On the Welcome screen, click Next.4.Read and accept the license agreement, and then click Next.5.In Installation Mode, select Secure Gateway or Secure Gateway Proxy.6.To install the Secure Gateway components in the default destination path, click Next.To install these components in a different location, click Browse and then navigate tothe folder you want to use.7.In Service Account, select the user account to determine credentials and privileges.Citrix recommends that you select an account that restricts privileges.8.Click Next and follow the instructions in the wizard to complete installation.9.After installing the Secure Gateway, configure it as described in Configuring the SecureGateway or Secure Gateway Proxy.Configuring the Secure Gateway or Secure Gateway ProxyThe Secure Gateway Configuration or Secure Gateway Proxy Configuration wizardautomatically starts when the installation is complete. The wizard guides you throughconfiguration tasks and provides context-sensitive help describing the procedures andinformation you need to enter.Configuring the Secure Gateway for use with Citrix XenApp requires the followinginformation:•The FQDN and path of the server running the STA•The FQDN and path of the server running the Web InterfaceTo start the wizard manually, see To start the configuration wizard manually. See alsoUsing Firewall Software with the Secure Gateway or Secure Gateway Proxy.To start the configuration wizard manually If you need to start the configuration wizard manually (for instance, to change theconfiguration at any time after initial installation and configuration), perform the followingsteps.1.Log on as an administrator to the computer running the Secure Gateway.2.Open the wizard by clicking Start and locating the Secure Gateway ManagementConsole.3.In the Secure Gateway Management Console menu, click Action > All Tasks and selectStop to stop the Secure Gateway Service.4.From the Start button, locate and click Secure Gateway Configuration Wizard orSecure Gateway Proxy Configuration Wizard.5.Click OK.To select a configuration level (Secure Gateway)Task Summary for Secure Gateway, Advanced or Standard Configuration describes the tasksummary depending on the configuration level you select.1.Select one of the following to access the parameters available for modification duringthe configuration process:•StandardIncludes only the minimum set of parameters required to configure the SecureGateway. The Secure Gateway Configuration wizard sets all remaining parametersto their default values, respectively.•AdvancedIncludes all of the Secure Gateway’s configurable parameters, for example,supported secure protocols and logging exclusions.To select a configuration level (Secure Gateway Proxy)Task Summary for Secure Gateway Proxy, Advanced or Standard Configuration describes thetask summary depending on the configuration level you select.1.Select one of the following to access the parameters available for modification duringthe configuration process:•StandardIncludes only the minimum set of parameters required to configure the SecureGateway Proxy. The Secure Gateway Proxy Configuration wizard sets all remainingparameters to their default values, respectively.•AdvancedIncludes all of the Secure Gateway Proxy’s configurable parameters, for example,supported secure protocols and logging exclusions.2.Select the Secure traffic between the Secure Gateway and Secure Gateway Proxyoption to secure communications between the Secure Gateway and the Secure GatewayProxy servers using SSL or TLS. When this option is not selected, the connectionbetween the Secure Gateway and Secure Gateway Proxy is not secured. To securetraffic between the Secure Gateway and Secure Gateway Proxy you must also:•Install a server certificate on the server running the Secure Gateway Proxy•Install a client certificate on the Secure GatewayAdvanced or Standard Configuration The task summary when selecting the advanced or standard configuration type is as follows:Tasks AdvancedConfigurationSelected Standard Configuration SelectedTo select a server certificate X XTo configure secure protocol settings X Not available To configure inbound client connections X XTo configure outbound connections X XTo add the Secure Ticket Authority details X XTo configure connection parameters X Not available To configure logging exclusions X Not available To add the Web Interface server details X XTo configure the logging parameters X XProxy, Advanced or Standard ConfigurationThe task summary when selecting the advanced or standard configuration type is as follows:Tasks AdvancedConfigurationSelected Standard Configuration SelectedTo select a server certificate X XTo configure secure protocol settings X Not available To configure inbound client connections X XTo configure outbound connections X XTo add the Secure Ticket Authority details Not available Not available To configure connection parameters X Not available To configure logging exclusions X Not available To configure the logging parameters X XTo select a server certificateServer certificates enable user devices to verify the identity of the server running theSecure Gateway.Note: This option is not displayed when you are installing the Secure Gateway Proxy andyou select the Secure traffic between the Secure Gateway and Secure Gateway Proxyoption as described in To select a configuration level (Secure Gateway Proxy).1.Select a valid server certificate installed on the computer running Secure Gateway orSecure Gateway Proxy from the Certificates Found menu.2.Click View to display the details of the selected certificate.To configure secure protocol settings This configuration dialog appears if you selected Advanced for the Secure Gateway’sconfiguration level. Select the secure protocol and cipher suite used to secure the datatransmitted between the Secure Gateway and the user device or Secure Gateway Proxy.Note: When deployed in proxy mode, the Secure Gateway Proxy’s client is the SecureGateway. However, when deployed in relay mode, the Secure Gateway Proxy’s client isCitrix Receiver for Windows or the Citrix online plug-in.1.Select a secure protocol:•Transport Layer Security (TLSv1)Configure the Secure Gateway to use only TLS as its secure protocol. If you selectthis option, verify that all user devices support and are configured to use TLS aswell.•Secure Sockets Layer (SSLv3) and TLSv1Configure the Secure Gateway and Secure Gateway Proxy to use SSL and TLS as itssecure protocols. This option is useful when deploying the Secure Gateway orSecure Gateway Proxy in an environment in which some clients support only SSL.Note: If a user device supports both the SSL and TLS protocols, TLS is used tosecure the data transmitted between the Secure Gateway/Secure Gateway Proxyand the client.2.Select a cipher suite:•GOVYou can configure the Secure Gateway/Secure Gateway Proxy to use the followinggovernment strength cipher suite: RSA_WITH_3DES_EDE_CBC_SHA or {0x00,0x0A}•COMYou can configure the Secure Gateway/Secure Gateway Proxy to use the followingcommercial strength cipher suites: RSA_WITH_RC4_128_MD5 or {0x00,0x04},RSA_WITH_RC4_128_SHA or {0x00,0x05}•ALLYou can configure the Secure Gateway/Secure Gateway Proxy to use both thecommercial and government strength cipher suites. This option is useful whendeploying the Secure Gateway/Secure Gateway Proxy in an environment wheresome user devices support only COM while others support only GOV.Note: When the Secure Gateway and a user device support both COM and GOVcipher suites, the Secure Gateway uses the COM cipher suite.3.Click Next to proceed.To configure inbound client connections Specify the IP addresses and TCP ports that you want the Secure Gateway/Secure GatewayProxy to monitor for incoming connections. See also Using Firewall Software with theSecure Gateway or Secure Gateway Proxy.1.Select each Monitor all IP addresses check box to configure the Secure Gateway tolisten for connections on all available IPv4 or IPv6 addresses. This option is useful whenconfiguring the Secure Gateway/Secure Gateway Proxy on a server using multiplenetwork interface cards (NICs). When configured in proxy mode, the Secure GatewayProxy listens on all available IP addresses for Secure Gateway connections. Whenconfigured for relay mode, the Secure Gateway Proxy listens on all available IPaddresses for client connections.2.Type a listener TCP port number in the TCP Port field. This option is available onlywhen the Monitor all IP addresses option is selected. The Secure Gateway/SecureGateway Proxy listens for Secure Gateway or client connections on all available IPaddresses using the port specified on the server. The default TCP port is 443.3.Clear the Monitor all IP addresses check boxes to configure the Secure Gateway/SecureGateway Proxy to listen on one or more specific IP addresses. Then click Add to addone or more IP addresses and related TCP port address.Typically, you would exclude dynamic IP addresses. When a dynamic IP address changes,new connections are not accepted on that address and the service can fail to start whenthe server is restarted.To configure outbound connectionsSelect the servers to which the Secure Gateway can connect:Options DescriptionNo outbound traffic restrictions Select this option to enable the Secure Gateway/Secure Gateway Proxy to establish connections to any server within the DMZ or secure network. Click Next to continue.Use the Secure Gateway Proxy This option is not available when configuring the Secure Gateway Proxy. Select this option when configuring the Secure Gateway in a double-hop environment. See To configure servers running the Secure Gateway Proxy. Select the Secure traffic between the Secure Gateway and the Secure Gateway Proxy check box to use HTTPS to secure communications between them.Use an Access Control List (ACL)Select this option to create an access control list for the Secure Gateway/Secure Gateway Proxy. An access control list restricts the Secure Gateway/Secure Gateway Proxy to establishing connections to servers specified in the list. Click Configure to specify the start and end IP address range for allowed connections. See To configure an access control list for outbound connections.Note: In a double-hop DMZ, configure outbound access control lists on the Secure Gateway Proxy server only.To configure an access control list for outbound connectionsYou do not need to include servers running the Secure Ticket Authority because these areconfigured elsewhere in the wizard.1.Select the Use an Access Control List (ACL) button, click Configure, and then clickAdd.2.If you select the IP Address Range option, type or select the following information:Option DescriptionStart address Enter the IP address of a server that you want to add to theoutbound access control list. When specifying an IP addressrange, enter the range’s start IP address. If you use an IPaddress range for multiple servers running XenApp, be surethat the servers you specify offer the full range ofapplications that you want to be available.End address Leave this field blank if you are creating an entry for asingle server. Otherwise, enter the end address of therange.TCP port Enter the TCP port used by the server(s). To allowconnections to any port on a server you can use the wildcard asterisk character (*) in the TCP port field. You can usethis wild card to allow one ACL entry for a range of IPaddresses to permit connections using the ICA and CommonGateway Protocol (CGP) protocols.Use default port Select this option to use the default port used by the serverfor the protocol selected.ICA Select this option to allow ICA/SOCKS connections to theselected servers. Typically, you would use ICA for serversrunning Citrix XenApp that accept ICA/SOCKS connections.This option is not available to the Secure Gateway Proxy.CGP Select this option to allow CGP connections to the selectedservers. Typically, you would use CGP for servers runningCitrix XenApp that accept CGP connections. CGP can providesession reliability if you enable session reliability on theselected servers. To allow CGP as well as ICA/SOCKSconnections to the same servers, add a separate entry foreach protocol. This option is not available to the SecureGateway Proxy.3.If you select the Server FQDN option, type or select the following information:Options DescriptionFQDN Enter the fully qualified domain name of the server towhich the Secure Gateway Proxy allows access.TCP port Enter the TCP port used by the server. To allowconnections to any port on a server, you can use thewild card asterisk character (*) in the TCP port field.Secure traffic between the server and the Secure Gateway Proxy Select this option to secure communications between the server and the Secure Gateway Proxy servers using SSL or TLS. When this option is not selected, the connection is not secured.4.Click OK, then click Add to add another connection, or click OK to close the dialog box. To configure an access control list for outbound connectionsTo configure servers running the Secure Gateway Proxy1.From the Configure outbound connections dialog window, select Use the SecureGateway Proxy radio button and click Configure.2.Click Add.3.Type the fully qualified domain name (FQDN) or IP addresses and TCP port of the SecureGateway Proxy servers to which you want the Secure Gateway server to connect. Thedefault TCP port for unsecured communications between the Secure Gateway and theSecure Gateway Proxy is 1080. The default TCP port for secure communicationsbetween the Secure Gateway and Secure Gateway Proxy is 443.4.Click OK.5.Select the Secure traffic between the Secure Gateway and Secure Gateway Proxyoption to secure communications between the Secure Gateway and the Secure GatewayProxy servers using SSL or TLS. When this option is not selected, the connectionbetween the Secure Gateway and Secure Gateway Proxy is not secured. To securetraffic between the Secure Gateway and Secure Gateway Proxy you must also:•Install a server certificate on the server running the Secure Gateway Proxy•Install a client certificate on the Secure Gateway6.Click OK.To add the Secure Ticket Authority details You can configure the Secure Gateway to contact multiple STAs for failover protection. Ifyou specify multiple STAs, be sure that this list matches the list of STAs that the WebInterface is configured to contact.1.Type or select the following information:Option DescriptionFQDN Enter the fully qualified domain name of the server runningthe STA.Path This field is populated automatically with the default virtualdirectory path, /Scripts/CtxSTA.dll orCitrixAuthService/AuthService.asmx. If you changed thedefault path when you configured the Citrix XML Service toshare a port with Internet Information Services on the serverrunning Citrix XenApp, enter the correct path.ID This field is populated automatically by the Secure Gatewaywhen it resolves the specified FQDN and reads the ID stringfrom the server running the STA. If the Secure Gateway isunable to resolve the address specified you are prompted toenter the ID for the STA. The ID for the STA is a randomlygenerated string. You can view STA IDs by running theSecure Gateway diagnostic tool.Secure traffic between the STA and the Secure Gateway Select this option to secure communications between the Secure Gateway and the STA by using SSL or TLS. To enable this security feature, the FQDN of the STA must match the FQDN specified by its server certificate.TCP port Enter a network port number used by the Secure Gateway tocontact the STA.Use default Select this option to use the default port assignment for theSTA. The default TCP port for unsecured communicationsbetween the Secure Gateway and the STA is 80. The defaultTCP port for secure communications between the SecureGateway and STA is 443.To configure connection parametersYou can configure how connection requests time out. Preventing requests from timing outmay be useful if your network has periods of high latency. However, uncompletedconnection requests that do not time out, or time out slowly, can preempt additionalconnections through the Secure Gateway. The number of connections the Secure Gatewayserver can support depends on the server processor, usage, and limits set in the ConcurrentConnection Limits section.Select one of the following options:Option DescriptionNo connection timeout Select this option if you do not want to limit the time inwhich Secure Gateway must complete a connection request.Do not select this option if typical usage behavior can resultin so many uncompleted connection requests that the serverstops accepting connection requests.Connection timeout (seconds)Set the interval of time in which the Secure Gateway can complete a connection request. If the connection is not established by the time the specified value elapses, then the connection times out. By default, the connection timeout value is configured for 100 seconds.Concurrent Connection Limits This option is not available for the Secure Gateway Proxy. Set the following values using numbers suitable to your environment. Consider processor type and processor speed as well as typical usage behavior. Failure to do so may overload the processor and result in a poor quality of service for your end users.•Unlimited. Select this option to configure the Secure Gateway to support up to 1,920 concurrent clientconnections (250 connections are allocated to HTTP/S by default, leaving 1,670 ICA/CGP connections, includingMAPI over CGP connections). The Secure Gateway stopsaccepting new connection requests if the number ofconcurrent client connections reaches 1,920. This setting overrides the value entered in Maximum connections.•Maximum Connections. Specify the maximum number of concurrent ICA/CGP connections supported by the Secure Gateway. The Secure Gateway stops accepting newICA/CGP connection requests when the number ofconcurrent connections equals the value entered in this field.To configure logging exclusionsTypically, third-party network devices such as load balancers generate extraneous SecureGateway log information. For example, load balancers might poll the Secure Gatewayrepeatedly to ensure that the server is active. Each poll is recorded by the Secure Gatewayas a connection, resulting in the event log containing several unnecessary entries.The Secure Gateway and the Secure Gateway Proxy generate their own log files. Therefore,if you deployed the Secure Gateway in proxy mode, you must configure each component’slogging exclusions separately.1.Click Add to enter the IP address of a network device that you want the SecureGateway to exclude from its logging operations.2.After typing the IP address, click OK.To add the Web Interface server details The Web Interface works with the Secure Gateway to provide a logon interface, andfacilitates the authentication and authorization of connection requests to server farms.Running the Secure Gateway and the Web Interface on a single server is supported only in asingle-hop DMZ environment.1.Select one of the following access options:•IndirectTo access the Web Interface, users enter the URL of the Secure Gateway. Usersconnect to the Secure Gateway, which routes the request to the Web Interface. Ifthe Web Interface is installed on the same computer as the Secure Gateway, selectthe Installed on this computer check box (this option is not available in adouble-hop environment).If you configure your firewall to permit connections to the Secure Gateway only,the Web Interface is not exposed to the Internet, which is preferable in someenterprises. Configuring indirect access can be economical if you deploy the WebInterface on the Secure Gateway server. In that case, all that is required is one SSLcertificate, one public IP address, and one server.•DirectIf you configure your firewall to permit connections to the Secure Gateway only,the Web Interface is not exposed to the Internet, which is preferable in someenterprises. Configuring indirect access can be economical if you deploy the WebInterface on the Secure Gateway server. In that case, all that is required is one SSLcertificate, one public IP address, and one server.2.If you do not select the Installed on this computer check box, type or select thefollowing information in the Details area:•FQDNEnter the fully qualified domain name of the server running the Web Interface. Ifyou selected Installed on this computer, this field is automatically populated withthe value localhost.•TCP portEnter the port number the Secure Gateway should use when communicating withthe Web Interface.3.Select the Secure traffic between the Web Interface check box to configure theSecure Gateway to use HTTPS when communicating with the Web Interface.To configure the logging parameters1.Specify the type of errors and events that the Secure Gateway/Secure Gateway Proxywrites to the event log and Event Viewer. The logging levels available include thefollowing:•Fatal Events OnlyFatal error messages are logged when an operational failure prevents the SecureGateway Proxy from starting. Select this option to log only fatal events.•Error and Fatal EventsError messages are logged when a partial failure, such as the Secure Gateway Proxybeing out of memory, occurs. Select this option to log errors and fatal events.•Warning, error, and fatal eventsWarning messages are logged when tickets time out, data packets are corrupted,and similar events occur. Select this option to log warnings, errors, and fatalevents.•All events including informationalAll events are logged, including informational messages resulting from clientconnections. Select this option to log all events and errors. Selecting this optionwill result in the Event Viewer window and event log filling up rapidly.2.Click Next.。
Citrix应用虚拟化XenApp 6.5部署教程

Citrix应用虚拟化XenApp 6.5部署教程应用虚拟化实现环境域服务器、SQL数据库服务器、Xenapp License服务器、Xenapp服务器、系统环境均为WINDOWS2008 64位R2。
安装事项:我们安装Xenapp服务器使用外部已创建好的数据库SQL 2008 开发版。
CITRIX应用虚拟化产品基本的三个服务器组件Xenapp License、Xenapp、Xenapp WebInterface,我们将Xenapp License服务器单独安装,Xenapp与Xenapp WebInterface合二为一安装到一台服务器。
我们安装演示使用License号为网络上较火的20人授权的Lic,注意做为Xenapp License服务器的主机其计算名要与序列号文件LIC上显示的计算机名称相同才可以。
进入安装演示模式1. Xenapp服务器配置首先我们将Xenapp License服务器计算机改名为Hydrogen与其lIC序列号文件指定的计算机同名,然后加入域。
同样我们将Xenapp服务器也加入域。
由于操作较为简单,故不上图演示。
2. Xenapp License服务器安装启动XENAPP安装光盘选择手动安装组件选择常见组件选择安装citrix Licensing组件同意安装条款选择安装目录安装ing…等待安装完成安装完成后,我们为访问许可证控制台输入管理员密码,然后确定。
从开始菜单选择进入citrix许可证管理控制台,在弹出的IE窗口中,我们点击右边的管理,输入刚才设定好的账号与密码并点击提交,进行登录。
我们点击最下面的供应商守护程序配置然后选择导入许可证导入许可证,许可证扩展名为LIC的文件重启Citrix Licensing服务可使导入的许可证生效重新登录许可证管理控制台进入控制板可看到授权信息。
至此XENAPP licese服务器安装完成。
3. Xenapp与Web Interface服务安装安装Xenapp需要有.NET Framework3.5的支持,我们在windows2008的功能列表里面进行添加安装。
xenapp安装指南笔记六(DesigningTerminalServicesUs...

xenapp安装指南笔记六(DesigningTerminalServicesUs...Designing Terminal Services User Profiles终端服务用户配置文件设计这部分内容比较重要,就是安排各个用户资料存储问题,是采用本地存储,还是漫游用户配置文件,还是强制性配置文件,还是采用多类型结合配置?Terminal Services user profiles define the user-specific Windows Server 2008 environment and preference settings, including desktop appearance and color options. Citrix recommends setting Terminal Services profiles for all users to avoid inconsistencies. Terminal Services user profiles are distinct from Windows user profiles.终端服务用户配置文件定义了用户特定的Windows Server2008环境和偏好设置,包括桌面的外观和颜色选择。
Citrix建议为避免不一致,为所有用户终端服务配置文件进行设置。
终端服务用户配置文件有别于Windows用户配置文件。
Effectively designing Terminal Services user profiles can significantly improve the performance and manageability of a XenApp environment. Issues such as slow logons, loss of user settings, profile corruption, and excessive administration effort can result from suboptimal user profile designs.有效地设计终端服务用户配置文件,可以显着提高了XenApp环境的性能和可管理性。
XenApp_6.5体验SmartAuditor_Player不能播放及播放界面黑屏问题
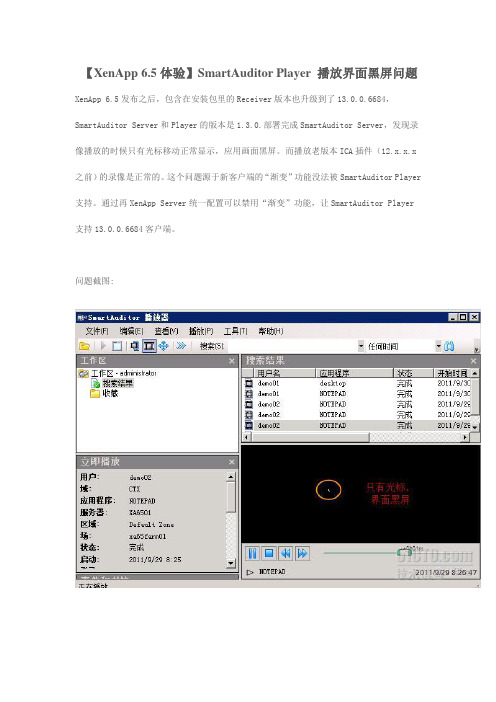
【XenApp 6.5体验】SmartAuditor Player 播放界面黑屏问题XenApp 6.5发布之后,包含在安装包里的Receiver版本也升级到了13.0.0.6684,SmartAuditor Server和Player的版本是1.3.0.部署完成SmartAuditor Server,发现录像播放的时候只有光标移动正常显示,应用画面黑屏。
而播放老版本ICA插件(12.x.x.x 之前)的录像是正常的。
这个问题源于新客户端的“渐变”功能没法被SmartAuditor Player 支持。
通过再XenApp Server统一配置可以禁用“渐变”功能,让SmartAuditor Player 支持13.0.0.6684客户端。
问题截图:解决方法:在xenapp server上使用注册表编辑器,增加DWORD键值HKLM\SOFTWARE\Citrix\Ica\Thin wire\DisableGdiPlusSupport 为 1,以禁用“渐变”效果。
改完之后Reboot XenApp Server,新的ICA会话可以被SmartAuditor Player正常回放。
新装完的SmartAuditor Player 1.3默认只支持12.0的客户端,所以在播放13.0客户端产生的录像文件时候会提示smartadutior player不支持13.0.0.6684客户端,需要升级player.这个小问题实际上早就有了,因为客户端经常更新,而Player的配置文件限定了能够播放的客户端的最高版本,解决办法也很简单,修改smartauditor player的配置文件即可。
配置文件位于SmartAuditor Player的安装目录下面,如C:\Program Files (x86)\Citrix\SmartAuditor\Player\Bin\SmAudPlayer.exe.config用记事本可以打开直接编辑,把value从12.x.x.x修改为13.0.0.9999,即版本号高于Receiver的版本号即可。
- 1、下载文档前请自行甄别文档内容的完整性,平台不提供额外的编辑、内容补充、找答案等附加服务。
- 2、"仅部分预览"的文档,不可在线预览部分如存在完整性等问题,可反馈申请退款(可完整预览的文档不适用该条件!)。
- 3、如文档侵犯您的权益,请联系客服反馈,我们会尽快为您处理(人工客服工作时间:9:00-18:30)。
Citrix XenApp Components That Work with Secure Gateway2013-11-16 06:14:06 UTC© 2013 Citrix Systems, Inc. All rights reserved. Terms of Use | Trademarks | Privacy StatementContentsCitrix XenApp Components That Work with Secure Gateway (3)Secure Gateway Features (4)Citrix XenApp Components That Work with Secure GatewayYour enterprise network can contain one or more servers running Citrix XenApp. A serverfarm is used for hosting published resources that users can access over the network.The Secure Gateway works with the following components of Citrix XenApp for logon andauthentication:Citrix Web InterfaceProvides user access to published resources in a server farm from a Web browser. TheWeb Interface works with the Secure Gateway to provide a logon interface, andfacilitates authentication and authorization of connection requests to the server farm.Secure Ticket Authority (STA)The STA is responsible for issuing session tickets in response to connection requests forpublished resources on Citrix XenApp. These session tickets form the basis ofauthentication and authorization for access to published resources. During installation ofCitrix XenApp, the STA is installed automatically. It is no longer necessary to reserve aseparate server for the STA.Citrix XML ServiceWhen the Secure Gateway provides secure access to published resources available in aserver farm, the Citrix XML Service is contacted for published resources availability andlocation. The Citrix XML Service is the point of contact for a server farm and provides anHTTP interface to the user device. It uses the TCP protocol instead of UDP, which allowsconnections to work across most firewalls. The default port for the Citrix XML Service is80. Ensure that this port is configured, functioning correctly, and is accessible throughthe firewall in front of the secure network.Citrix Receiver WebYou can use Citrix Receiver web to access resources available from the Web Interfaceand for access to resources published with traditional Application Launching andEmbedding (ALE).Secure Gateway FeaturesDesigned-in securityThe Secure Gateway provides authentication, authorization, and cryptographyfunctionality that is consistent with Microsoft’s best practices for secure software.Network protocol supportThe Secure Gateway supports the TCP/IP protocols, such as FTP, HTTP, and Telnet.IPv4 and IPv6 protocol supportThe Secure Gateway can be configured to accept inbound connections from clients usingIPv4 and IPv6 addresses.Secure Socket Layer supportThe Secure Gateway provides SSL support to secure communication between the clientand the Secure Gateway components.Simple deploymentCitrix XenApp includes the Secure Ticket Authority (STA) and is merged into a singleWindows Installer package resulting in a more efficient deployment. The STA is deployedautomatically on the same computer as Citrix XenApp, resulting in a reduction of thenumber of computers required for basic deployment Internet Information Server is nolonger a requirement for installing the STA Internet Information Server deployment is asupported option during installation of Citrix XenApp.Certificate managementThe Secure Gateway Configuration wizard prevents the selection of a certificate thatdoes not have a private key and verifies that the appropriate certificate is installed inthe local computer certificate store. Wildcard certificate support. Wildcard certificatescan be deployed on the Secure Gateway, the Secure Gateway Proxy, and on thecomputer where Citrix XenApp is hosting the STA.Load balancingThe Secure Gateway provides load balancing for the Secure Gateway Proxy. IP addressesare retrieved from the DNS using a domain name or listed individually.LoggingThe Secure Gateway uses the Apache standard access log files and supports log rotationfunctionality for the access log files. The access log files provide connection informationto the Secure Gateway or the Secure Gateway Proxy.InstrumentationThe Secure Gateway includes a new set of performance counters to analyze the usage and load on the Secure Gateway server.Based on Apache TechnologyThe software code based on Apache technology is used as a foundation for building the Secure Gateway.Section 508 complianceSecure Gateway is compliant with Section 508 of the United States WorkforceRehabilitation Act of 1973.Session reliabilityImprovements in session reliability benefit both mobile and local users by having their work items remain open when network connectivity is lost, and then seamlessly resumed when connectivity is restored. This feature is especially useful for mobile users with wireless connections that are interrupted or dropped. When a session connection is interrupted, all open windows to published resources remain visible while reconnection is attempted automatically in the background.Relay modeSecure Gateway can be installed in relay mode for internal secure communications.Relay mode can be used in secure corporate environments such as intranets, LANs, and WANs. Relay mode is not recommended for external connections from the Internet to a server farm or server access farm.Supports single-hop or double-hop DMZ deploymentThe Secure Gateway can be installed to span a single-hop or a double-hop DMZ. If your DMZ is divided into two stages, install the appropriate Secure Gateway component in each DMZ segment to securely transport HTTP/S and ICA traffic to and from the secure network.Supports secure communication between the Secure Gateway components The Secure Gateway components support the use of digital certificates and the task of securing links by using SSL/TLS between components.Configuration, management, and diagnostic toolsThe Secure Gateway Management Console is a Microsoft Management Console (MMC) snap-in you can use to manage, analyze, and troubleshoot a Secure Gatewaydeployment. The Secure Gateway Diagnostics tool, available from the Secure Gateway Management Console, reports configuration values, certificate details, and the state of each configured component.Minimal client configurationUser devices require no preinstalled software for security. Remote, secure access is easy to support, requiring little effort from IT staff.Certificate–based securityThe Secure Gateway uses standard Public Key Infrastructure (PKI) technology to provide the framework and trust infrastructure for authentication and authorization.Standard encryption protocolsThe Secure Gateway uses industry-standard SSL or TLS encryption technology to secure Web and application traffic between the client and server. Connections between clients and the Secure Gateway are encrypted using SSL or TLS protocols. You can furtherenhance security by forcing the Secure Gateway to restrict its use of ciphersuites to commercial or government ciphersuites certified for Federal Information Processing Standard (FIPS) 140 requirements.Authentication and authorizationThe Secure Gateway works with the Web Interface to facilitate authentication of users attempting to establish connections to a server farm. Authorization occurs when the Secure Gateway confirms that the user is authenticated by the enterprise network. The authorization process is entirely transparent to the user.Single point of entryThe need to publish the address of every Citrix XenApp server is eliminated and server certificate management is simplified. The Secure Gateway allows a single point ofencryption and access to computers running Citrix XenApp.Firewall traversalConnections from clients are secured with standard protocols using ports typically open on corporate firewalls. This allows easy traversal of firewalls without customconfiguration.Ease of installation and managementAdding the Secure Gateway to an existing server farm is relatively quick and simple, and requires minimal configuration, significantly reducing time and management costs. Reliability and fault toleranceThe solution allows implementation of duplicate components to enable a redundant system. Large arrays can be built using industry-standard SSL load balancing systems for scalability. Even if hardware fails, the server farm remains protected.Scalable and extensible solutionA single server running the Secure Gateway can support a small corporate site consistingof hundreds of users. You can support medium to large sites catering to thousands of users connecting to an array of load balanced servers running the Secure Gateway. The Secure Gateway components do not require special hardware devices or networkequipment upgrades.Event and audit loggingCritical and fatal system events are logged to the Secure Gateway application log,enabling administrators to help diagnose system problems. Logging levels areconfigurable and can be set from the user interface. Depending on the configured logging level, you can retrieve a complete record of network connection attempts to the SecureGateway. You can also configure the Secure Gateway to omit log entries for polls from network equipment such as load balancers.。
