GridView鼠标停留变色,行单击事件处理
C#DataGrid控件的整行选取和单击响应
//string newImage = this.CreateImage(imageURL, aid);
private void dataGridView1_CellContentClick(object sender, DataGridViewCellEventArgs e)
{
int iRow = e.RowIndex;
int iCol = e.ColumnIndex;
C#DataGrid控件的单击响应和整行选取
(1)整行选取
先将DataGridview控件中SelectionMode属性设置一下,改为fullrowselection
(2) 单击响应
使用CellContentClick 和CellClick事件
在判断某一行的时候,使用e.RowIndex属性
string aid = this.dataGridView1.Rows[e.RowIndex].Cells[0].Value.ToString();
//Regex reg = new Regex("&re=(.+?)&");
//string re = this.RegStr(reg, url);
//this.dataGridView1.Rows[e.RowIndex].Cells[7].Value = System.Drawing.Image.FromFile(newImage);
}
if (buttonText == "ss")
gridview设置隔行换色
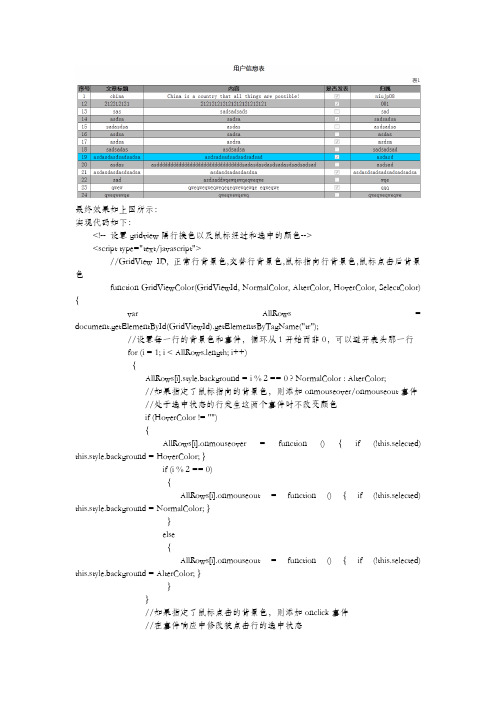
最终效果如上图所示:实现代码如下:<!-- 设置gridview隔行换色以及鼠标经过和选中的颜色--><script type="text/javascript">//GridView ID, 正常行背景色,交替行背景色,鼠标指向行背景色,鼠标点击后背景色function GridViewColor(GridViewId, NormalColor, AlterColor, HoverColor, SelectColor) {var AllRows = document.getElementById(GridViewId).getElementsByTagName("tr");//设置每一行的背景色和事件,循环从1开始而非0,可以避开表头那一行for (i = 1; i < AllRows.length; i++){AllRows[i].style.background = i % 2 == 0 ? NormalColor : AlterColor;//如果指定了鼠标指向的背景色,则添加onmouseover/onmouseout事件//处于选中状态的行发生这两个事件时不改变颜色if (HoverColor != ""){AllRows[i].onmouseover = function () { if (!this.selected) this.style.background = HoverColor; }if (i % 2 == 0){AllRows[i].onmouseout = function () { if (!this.selected) this.style.background = NormalColor; }}else{AllRows[i].onmouseout = function () { if (!this.selected) this.style.background = AlterColor; }}}//如果指定了鼠标点击的背景色,则添加onclick事件//在事件响应中修改被点击行的选中状态if (SelectColor != ""){AllRows[i].onclick = function (){this.style.background = this.style.background == SelectColor ? HoverColor : SelectColor;this.selected = !this.selected;}}}}</script>在body中引用如下:<body onload='GridViewColor("GridView1","#bbb","#fff","#0CF","#0CF")'>。
史上最全GridView使用方法
史上最全GridView使用方法快速预览:GridView无代码分页排序GridView选中,编辑,取消,删除GridView正反双向排序GridView和下拉菜单DropDownList结合GridView和CheckBox结合鼠标移到GridView某一行时改变该行的背景色方法一鼠标移到GridView某一行时改变该行的背景色方法二GridView实现删除时弹出确认对话框GridView实现自动编号GridView实现自定义时间货币等字符串格式GridView实现用“...”代替超长字符串GridView一般换行与强制换行GridView显示隐藏某一列GridView弹出新页面/弹出新窗口GridView固定表头(不用javascript只用CSS,2行代码,很好用) GridView合并表头多重表头无错完美版〔以合并3列3行举例〕GridView突出显示某一单元格〔例如金额低于多少,分数不及格等〕GridView加入自动求和求平均值小计GridView数据导入Excel/Excel数据读入GridView在对GridView编辑的时候实现自动计算实现类似winform的点击行选中功能GridView在编辑的时候控制编辑框的列宽。
给Gridview加入Tooltip的功能:效果图:1.AllowSorting设为True,aspx代码中是AllowSorting="True";2.默认1页10条,如果要修改每页条数,修改PageSize即可,在aspx代码中是PageSize="12"。
3.默认的是单向排序的,右击GridView弹出“属性”,选择AllowSorting为True即可。
2.GridView选中,编辑,取消,删除:效果图:后台代码:你可以使用sqlhelper,本文没用。
代码如下:using System;using System.Data;using System.Configuration;using System.Web;using System.Web.Security;using System.Web.UI;using System.Web.UI.WebControls;using System.Web.UI.WebControls.WebParts;using System.Web.UI.HtmlControls;using System.Data.SqlClient;public partial class _Default : System.Web.UI.Page{//清清月儿SqlConnection sqlcon;SqlCommand sqlcom;string strCon = "Data Source=(local);Database=数据库名;Uid=帐号;Pwd=密码";protected void Page_Load(object sender, EventArgs e){if (!IsPostBack){bind();}}protected void GridView1_RowEditing(object sender, GridViewEditEventArgs e) {GridView1.EditIndex = e.NewEditIndex;bind();}//删除protected void GridView1_RowDeleting(object sender, GridViewDeleteEventArgs e) {string sqlstr = "delete from 表where id='" +GridView1.DataKeys[e.RowIndex].Value.ToString() + "'";sqlcon = new SqlConnection(strCon);sqlcom = new SqlCommand(sqlstr,sqlcon);sqlcon.Open();sqlcom.ExecuteNonQuery();sqlcon.Close();bind();}//更新protected void GridView1_RowUpdating(object sender, GridViewUpdateEventArgs e) {sqlcon = new SqlConnection(strCon);string sqlstr = "update 表set 字段1='"+((TextBox)(GridView1.Rows[e.RowIndex].Cells[1].Controls[0])).Text.ToString().Trim() + "',字段2='"+((TextBox)(GridView1.Rows[e.RowIndex].Cells[2].Controls[0])).Text.ToString().Trim() + "',字段3='"+((TextBox)(GridView1.Rows[e.RowIndex].Cells[3].Controls[0])).Text.ToString().Trim() + "' where id='"+ GridView1.DataKeys[e.RowIndex].Value.ToString() + "'";sqlcom=new SqlCommand(sqlstr,sqlcon);sqlcon.Open();sqlcom.ExecuteNonQuery();sqlcon.Close();GridView1.EditIndex = -1;bind();}//取消protected void GridView1_RowCancelingEdit(object sender, GridViewCancelEditEventArgs e){GridView1.EditIndex = -1;bind();}//绑定public void bind(){string sqlstr = "select * from 表";sqlcon = new SqlConnection(strCon);SqlDataAdapter myda = new SqlDataAdapter(sqlstr, sqlcon);DataSet myds = new DataSet();sqlcon.Open();myda.Fill(myds, "表");GridView1.DataSource = myds;GridView1.DataKeyNames = new string[] { "id" };//主键GridView1.DataBind();sqlcon.Close();}}前台主要代码:... ...<asp:GridView ID="GridView1" runat="server" AutoGenerateColumns="False" CellPadding="4"ForeColor="#333333" GridLines="None"OnRowDeleting="GridView1_RowDeleting" OnRowEditing="GridView1_RowEditing"OnRowUpdating="GridView1_RowUpdating"OnRowCancelingEdit="GridView1_RowCancelingEdit"><FooterStyle BackColor="#990000" Font-Bold="True" ForeColor="White" /><Columns><asp:BoundField DataField="身份证号码" HeaderText="用户ID" ReadOnly="True" /><asp:BoundField DataField="" HeaderText="用户" /><asp:BoundField DataField="职工性别" HeaderText="性别" /><asp:BoundField DataField="家庭住址" HeaderText="家庭住址" /><asp:CommandField HeaderText="选择" ShowSelectButton="True" /><asp:CommandField HeaderText="编辑" ShowEditButton="True" /><asp:CommandField HeaderText="删除" ShowDeleteButton="True" /> </Columns><RowStyle ForeColor="#000066" /><SelectedRowStyle BackColor="#669999" Font-Bold="True"ForeColor="White" /><PagerStyle BackColor="White" ForeColor="#000066"HorizontalAlign="Left" /><HeaderStyle BackColor="#006699" Font-Bold="True" ForeColor="White" /></asp:GridView>3.GridView正反双向排序:〔用到数据库视图DATAVIEW及GRIDVIEW的VIEWSTAT 类〕效果图:点各2次的排序,点其他也一样可以。
gridcontrol click事件用法

一、简介在软件开发中,GridControl 是一种常见的控件,用于在界面上显示由行和列组成的表格数据。
在 GridControl 中,click 事件是一种常用的事件类型,用于响应用户在表格中点击的操作。
二、点击事件的作用1. 响应用户点击操作当用户在 GridControl 中点击某一行或者某一列时,click 事件会被触发,开发人员可以通过捕获该事件来进行相应的处理,例如根据用户的点击操作展开详细信息、修改数据或者执行其他相关操作。
2. 提高用户交互性通过使用 click 事件,可以使用户与表格进行更直观、更方便的交互。
用户可以通过点击来选择感兴趣的数据,进而进行后续的操作,提高了用户的体验和操作效率。
三、 click 事件的使用方法1. 绑定事件处理器在使用 GridControl 控件时,首先需要在代码中绑定 click 事件的处理器。
一般可以通过以下方式来实现:gridControl1.Click += newEventHandler(gridControl1_Click);其中 gridControl1 是指实际使用的 GridControl 控件,gridControl1_Click 则是对应的事件处理函数。
2. 编写事件处理函数在上一步中,我们已经进行了事件处理器的绑定,接下来就需要在代码中编写对应的事件处理函数 gridControl1_Click。
在该函数中,可以实现需要的业务逻辑,例如根据用户点击的位置进行数据处理、展示详细信息等。
3. 使用事件参数在事件处理函数中,可以通过事件参数e 来获取用户点击的位置信息。
通过 e 参数,我们可以获取到用户点击的行、列等具体的位置信息,从而实现对应的操作。
四、实例下面通过一个简单的实例来演示如何使用 click 事件来实现具体的交互功能。
假设我们有一个 GridControl 控件用于显示学生的成绩信息,我们希望实现当用户点击某一行时,可以在界面上弹出该学生的详细成绩信息。
asp.netDataGridGridView表格之选中行与获取选中行数据

DataGridGridView表格之选中⾏与获取选中⾏数据⼀、GridView 表格之选中⾏选中⾏的功能最初以为只能通过属性中AllowGenerateSelectButton(运⾏时是否⾃动⽣成选择按钮)来实现,需要点击⽣成的选择按钮来操作,但这样使⽤并是很⽅便。
经寻找找到了改进办法如下效果⿏标经过时背景⾊会改变,选中后可获取响应⾏的数据实现⽅法如下:⾸先前台设计属性框中事件绑定RowDataBound(在对时局进⾏了绑定后激发)事件后台代码如下:///<summary>///在对数据进⾏了绑定后激发///主要实现⿏标点击时选中该⾏///</summary>///<param name="sender"></param>///<param name="e"></param>protected void GridView1_RowDataBound(object sender, GridViewRowEventArgs e){#region⽅法0 存在bug 暂未改进供参考//e.Row.Attributes["style"] = "cursor:hand";//PostBackOptions myPostBackOptions = new PostBackOptions(this);//myPostBackOptions.AutoPostBack = false;//myPostBackOptions.PerformValidation = false;//myPostBackOptions.RequiresJavaScriptProtocol = true; //加⼊javascript:头//String evt = Page.ClientScript.GetPostBackClientHyperlink(sender as GridView, "Select$" + e.Row.RowIndex.ToString());//e.Row.Attributes.Add("onclick", evt);#endregion#region⽅法1//if (e.Row.RowType == DataControlRowType.DataRow)//{// e.Row.Attributes.Add("onClick", "__doPostBack('" + GridView1.UniqueID + "','Select$" + e.Row.RowIndex + "');");//此处为两个“_” //}#endregion#region⽅法2int i;for (i = 0; i <= GridView1.Rows.Count; i++){//⾸先判断是否是数据⾏if (e.Row.RowType == DataControlRowType.DataRow){//当⿏标停留时更改背景⾊e.Row.Attributes.Add("onmouseover", "c=this.style.backgroundColor;this.style.backgroundColor='#00A9FF'");//当⿏标移开时还原背景⾊e.Row.Attributes.Add("onmouseout", "this.style.backgroundColor=c");//单击⾏的任意列会⾃动选中此⾏e.Row.Attributes.Add("onclick", "__doPostBack('GridView1','Select$" + e.Row.RowIndex + "')");}}#endregion⼆、获取选中⾏数据选中某⾏后获取数据在属性框中事件选项中选择设置SelectedIndexChanged(在GridView中选择⾏时,在该⾏选择完成后激发)事件选项后台代码如下///<summary>///选择某⾏时在最左侧更新显⽰数据详细///在DataGriew选择⾏时,在该选择操作完成后激发///</summary>///<param name="sender"></param>///<param name="e"></param>protected void GridView1_SelectedIndexChanged(object sender, EventArgs e){if (GridView1.SelectedIndex >= 0){ClearTreeNodeChecked(TreeView1.Nodes);txtName.Text = GridView1.SelectedRow.Cells[0].Text;txtPhone.Text = GridView1.SelectedRow.Cells[1].Text;txtSendTime.Text = GridView1.SelectedRow.Cells[2].Text;GetUserNodes();}}如果单独设置了修改或删除按钮,选中某⾏后,点击这些按钮来处理数据,可通过定义⼀些页⾯属性来保存当前⾏选中的列数据,在每次选中⾏改变SelectedIndexChanged事件中更改这些定义的表⽰⾏列数据的属性,然后利⽤这些列数据进⾏操作⾸先定义页⾯属性///<summary>///选中⾏的代码列///</summary>private static string Code = "";///<summary>///选中⾏的名字列///</summary>private static string Name = "";///<summary>///选中⾏的描述列///</summary>private static string Descripe = "";在每次选中⾏触发SelectedIndexChanged事件时更改这些属性的值///<summary>///⾏选择操作完成后激发///</summary>///<param name="sender"></param>///<param name="e"></param>protected void grdQualityDoorAndParts_SelectedIndexChanged(object sender, EventArgs e){//当选中⾏时if (grdQualityDoorAndParts.SelectedIndex >= 0){btnEdit.Enabled = true;//启⽤编辑按钮btnDelete.Enabled = true;//启⽤删除按钮Code = grdQualityDoorAndParts.SelectedRow.Cells[0].Text.Trim().ToString() == " " ? "" : grdQualityDoorAndParts.SelectedRow.Cells[0].Text.Trim().ToString();Name = grdQualityDoorAndParts.SelectedRow.Cells[1].Text.Trim().ToString() == " " ? "" : grdQualityDoorAndParts.SelectedRow.Cells[1].Text.Trim().ToString(); Descripe = grdQualityDoorAndParts.SelectedRow.Cells[2].Text.Trim().ToString() == " " ? "" : grdQualityDoorAndParts.SelectedRow.Cells[2].Text.Trim().ToString();//给编辑按钮添加点击事件,跳转到编辑页⾯,并传值过去(在这⾥将名称列的值传给编辑界⾯)string url1 = "Edit.aspx/?Name=" + Name;btnEdit.Attributes.Add("onclick", "window.showModalDialog('" + url1 + "',window,'dialogHeight:550px;dialogWidth:800px'); return false;");}else{btnEdit.Enabled = false;//启⽤编辑按钮btnDelete.Enabled = false;//启⽤删除按钮}}。
[翻译]在GridView中针对鼠标单击的某一独立单元格进行编辑
![[翻译]在GridView中针对鼠标单击的某一独立单元格进行编辑](https://img.taocdn.com/s3/m/43ef8f0154270722192e453610661ed9ac515551.png)
[翻译]在GridView中针对鼠标单击的某一独立单元格进行编辑原文发布日期:2007.04.07作者:Declan Bright翻译:webabcd介绍的GridView控件允许你通过设置它的EditIndex属性来编辑数据行,此时整个数据行都处于编辑模式。
如果你在EditItemTemplate的一些列中使用了DropDownList控件,那么你也许不希望整个数据行都处于编辑模式。
因为,如果每一个DropDownList控件都有很多选项的话,那么一次加载所有DropDownList控件的所有选项就会导致页面执行缓慢。
另外,如果你的数据行的编辑模式需要占用更多的空间的话,那么针对每一个独立的单元格进行编辑要优于针对整个数据行进行编辑。
这里,我将示范如何实现这样的功能,又如何去处理事件验证(event validation)。
背景本文基于我之前写的一篇文章:GridView和DataList响应单击数据行和双击数据行事件。
如果你不知道如何让GridView响应单击数据行事件,那么你可以在阅读本文之前先看看这篇文章。
编辑某一个独立的GridView单元格。
我所演示的这个GridView有一个不可见的asp:ButtonField控件,它处于GridView的第一列,名为“SingleClick”。
它用于给GridV iew的数据行增加单击事件。
<Columns><asp:ButtonField Text="SingleClick" CommandName="SingleClick" V isible="False"/></Columns>其它每一列的ItemTemplate中有一个可见的Label控件和一个不可见的TextBox或DropDownList控件。
为了方便,我们称Label为显示控件,TextBox或DropDownList为编辑控件。
扩展GRIDVIEW实现多选(全选)、点击行任意位置选择行、选中变色、添加双击事件等

public class WebBarGridView : GridView
什么?你说为什么要继续GridView。因为我们要扩展它,添加我们自己想要的新功能。当然你也可以直接继承Control。
接下来为类定义几个公开属性和几个私有变量,代码如下:
扩展GridView实现多选(全选)、点击行任意位置选
择行、选中变色、添加双击事件等
本文适合初学者阅读,高手达人可以无视。
主要功能:
a.隔行色(颜色可自定义)
b.点击行任意位置选择行
c.点击已选中行任意位置取消选择
d.选中行变色(颜色可自定义)
e.多选全选功能
f.添加双击响应事件
[Description("隔行背景色(单号行的背景)")]
public Color SingleBackGroundColor
{
get
{
return ViewState["SingleBackGroundColor"] != null ? (Color)ViewState["SingleBackGroundColor"] : Color.Empty;
private HtmlInputCheckBoxcb; //各行前面的多选框
private Button HideButton = new Button();//隐藏按钮用于引发事件,后面会说到
[Browsable(true)]
[Category(ቤተ መጻሕፍቲ ባይዱquot;Appearance")]
GridViewDataGrid行单击和双击事件实现代码_.Net教程

GridViewDataGrid⾏单击和双击事件实现代码_.Net教程功能:单击选中⾏,双击打开详细页⾯说明:单击事件(onclick)使⽤了 setTimeout 延迟,根据实际需要修改延迟时间 ;当双击时,通过全局变量 dbl_click 来取消单击事件的响应常见处理⾏⽅式会选择在 RowDataBound/ItemDataBound 中处理,这⾥我选择 Page.Render 中处理,⾄少基于以下考虑1、RowDataBound 仅仅在调⽤ DataBind 之后才会触发,回发通过 ViewState 创建空件不触发假如需要更多的处理,你需要分开部分逻辑到 RowCreated 等事件中2、并且我们希望使⽤ ClientScript.GetPostBackEventReference 和 ClientScript.RegisterForEventValidation ⽅法进⾏安全脚本的注册,⽽后者需要在页的 Render 阶段中才能处理 .aspx(直接运⾏)<%@ Page Language="C#" %><%@ Import Namespace="System.Data" %><%--/Expert/TopicView3.asp?id=5767096--%><!DOCTYPE html PUBLIC "-//W3C//DTD XHTML 1.0 Transitional//EN" "/TR/xhtml1/DTD/xhtml1-transitional.dtd"><script runat="server">protected void Page_Load(object sender, EventArgs e){if (!IsPostBack) {LoadGridViewProductData();LoadDataGridProductData();}}protected void GridView1_RowDataBound(object sender, GridViewRowEventArgs e){/*当然可以在这⾥进⾏客户端脚本绑定,但是,我选择在重载页的 Render ⽅法中处理,因为1. RowDataBound 仅仅在调⽤ DataBind 之后才会触发,回发通过 ViewState 创建空件不触发假如需要更多的处理,你需要分开部分逻辑到 RowCreated 等事件中2. 并且我们希望使⽤ClientScript.GetPostBackEventReference 和 ClientScript.RegisterForEventValidation ⽅法进⾏安全脚本的注册,⽽后者需要在页的 Render 阶段中才能处理*/}protected void DataGrid1_ItemDataBound(object sender, DataGridItemEventArgs e){// 隐藏辅助按钮列int cellIndex = 0;e.Item.Cells[cellIndex].Attributes["style"] = "display:none";}void LoadGridViewProductData(){DataTable dt = CreateSampleProductData();GridView1.DataSource = dt;GridView1.DataBind();}void LoadDataGridProductData(){DataTable dt = CreateSampleProductData();DataGrid1.DataSource = dt;DataGrid1.DataBind();}#region sample datastatic DataTable CreateSampleProductData(){DataTable tbl = new DataTable("Products");tbl.Columns.Add("ProductID", typeof(int));tbl.Columns.Add("ProductName", typeof(string));tbl.Columns.Add("UnitPrice", typeof(decimal));tbl.Columns.Add("CategoryID", typeof(int));tbl.Rows.Add(1, "Chai", 18, 1);tbl.Rows.Add(2, "Chang", 19, 1);tbl.Rows.Add(3, "Aniseed Syrup", 10, 2);tbl.Rows.Add(4, "Chef Anton’s Cajun Seasoning", 22, 2);tbl.Rows.Add(5, "Chef Anton’s Gumbo Mix", 21.35, 2);tbl.Rows.Add(47, "Zaanse koeken", 9.5, 3);tbl.Rows.Add(48, "Chocolade", 12.75, 3);tbl.Rows.Add(49, "Maxilaku", 20, 3);return tbl;}#endregionprotected override void Render(HtmlTextWriter writer){// GridViewforeach (GridViewRow row in GridView1.Rows) {if (row.RowState == DataControlRowState.Edit) { // 编辑状态row.Attributes.Remove("onclick");row.Attributes.Remove("ondblclick");row.Attributes.Remove("style");row.Attributes["title"] = "编辑⾏";continue;}if (row.RowType == DataControlRowType.DataRow) {// 单击事件,为了响应双击事件,需要延迟单击响应,根据需要可能需要增加延迟// 获取内置回发脚本函数,返回 __doPostBack(<<EventTarget>>, <<EventArgument>>)// 可直接硬编码写⼊脚本,不推荐row.Attributes["onclick"] = String.Format("javascript:setTimeout(\"if(dbl_click){{dbl_click=false;}}else{{{0}}};\", 1000*0.3);", ClientScript.GetPostBackEventReference(GridView1, "Select$" + row.RowIndex.ToString(), true)); // 双击,设置 dbl_click=true,以取消单击响应row.Attributes["ondblclick"] = String.Format("javascript:dbl_click=true;window.open(’DummyProductDetail.aspx?productid={0}’);", GridView1.DataKeys[row.RowIndex].Value.ToString());//row.Attributes["style"] = "cursor:pointer";row.Attributes["title"] = "单击选择⾏,双击打开详细页⾯";}}// DataGridforeach (DataGridItem item in DataGrid1.Items) {if (item.ItemType == ListItemType.EditItem) {item.Attributes.Remove("onclick");item.Attributes.Remove("ondblclick");item.Attributes.Remove("style");item.Attributes["title"] = "编辑⾏";continue;}if (item.ItemType == ListItemType.Item || item.ItemType == ListItemType.AlternatingItem) {//单击事件,为了响应双击事件,延迟 1 s,根据需要可能需要增加延迟// 获取辅助的⽀持回发按钮// 相对⽽⾔, GridView ⽀持直接将 CommandName 作为 <<EventArgument>> 故不需要辅助按钮Button btnHiddenPostButton = item.FindControl("btnHiddenPostButton") as Button;item.Attributes["onclick"] = String.Format("javascript:setTimeout(\"if(dbl_click){{dbl_click=false;}}else{{{0}}};\", 1000*0.3);", ClientScript.GetPostBackEventReference(btnHiddenPostButton, null)); // 双击// 双击,设置 dbl_click=true,以取消单击响应item.Attributes["ondblclick"] = String.Format("javascript:dbl_click=true;window.open(’DummyProductDetail.aspx?productid={0}’);", DataGrid1.DataKeys[item.ItemIndex].ToString());//item.Attributes["style"] = "cursor:pointer";item.Attributes["title"] = "单击选择⾏,双击打开详细页⾯";}}base.Render(writer);}</script><html xmlns="/1999/xhtml" ><head id="Head1" runat="server"><title> DEMO15: GridView ⾏单击与双击事件2</title><script>// 辅助全局变量,指⽰是否双击var dbl_click = false;</script></head><body><form id="form1" runat="server"><div><h3>功能:</h3><li>单击选中⾏</li><li>双击打开详细页⾯</li><h3>说明:</h3><ul><li>这是<a href="GridView/DataGrid /Jinglecat/archive/2007/09/20/900645.html"> DEMO 15: 同时⽀持⾏单击和双击事件</a>的改进版本</li><li>单击事件(onclick)使⽤了 setTimeout 延迟,根据实际需要修改延迟时间</li><li>当双击时,通过全局变量 dbl_click 来取消单击事件的响应</li><li>常见处理⾏⽅式会选择在 RowDataBound/ItemDataBound 中处理,这⾥我选择 Page.Render 中处理,⾄少基于以下考虑<li style="padding-left:20px; list-style-type:square">RowDataBound 仅仅在调⽤ DataBind 之后才会触发,回发通过 ViewState 创建空件不触发假如需要更多的处理,你需要分开部分逻辑到 RowCreated 等事件中</li><li style="padding-left:20px; list-style-type:square">并且我们希望使⽤ClientScript.GetPostBackEventReference 和 ClientScript.RegisterForEventValidation ⽅法进⾏安全脚本的注册,⽽后者需要在页的 Render 阶段中才能处理</li></li><li>关于“DataGrid中采取的辅助按钮⽀持回发”见<a href="/Jinglecat/archive/2007/07/15/818394.html"> DEMO8: 为 GridView 每⾏添加服务器事件</a></ul><br /><input type="button" id="Button1" value="Rebind" onclick="location.href=location.href;" /><div style="float:left"><h3>GridView Version</h3><asp:GridView ID="GridView1" DataKeyNames="ProductID" runat="server" AutoGenerateColumns="False" OnRowDataBound="GridView1_RowDataBound"><SelectedRowStyle BackColor="CadetBlue" /><Columns><asp:TemplateField HeaderText="ProductName" ><ItemTemplate><%# Eval("ProductName") %></ItemTemplate><EditItemTemplate><asp:TextBox ID="txtProductName" runat="server" Text=’<%# Bind("ProductName") %>’ /></EditItemTemplate></asp:TemplateField><asp:BoundField DataField="UnitPrice" HeaderText="UnitPrice" /></Columns></asp:GridView></div><div style="float:left;padding-left:100px;"><h3>DataGrid Version</h3><asp:DataGrid ID="DataGrid1" DataKeyField="ProductID" runat="server" AutoGenerateColumns="False" OnItemDataBound="DataGrid1_ItemDataBound"><SelectedItemStyle BackColor="CadetBlue" /><Columns><asp:TemplateColumn><ItemTemplate><asp:Button ID="btnHiddenPostButton" CommandName="Select" runat="server" Text="HiddenPostButton" style="display:none" /></ItemTemplate></asp:TemplateColumn><asp:BoundColumn DataField="ProductName" HeaderText="ProductName" /><asp:BoundColumn DataField="UnitPrice" HeaderText="UnitPrice" /></Columns></asp:DataGrid></div></li></div></form></body></html>。
添加GridViewDataGrid单击一行服务器事件
添加GridViewDataGrid单击一行服务器事件GridViewDataGrid是一个常用于显示数据的控件,它类似于表格,可以按行和列的形式展示数据。
在实际开发中,我们经常需要为GridViewDataGrid的每一行添加点击事件,以实现一些特定的功能。
本文将介绍如何添加GridViewDataGrid单击一行的服务器事件,并给出一些示例代码。
首先,我们需要在前端页面中定义一个GridViewDataGrid,并设置相应的属性和事件。
在这个例子中,我们将使用来实现。
```html<asp:GridView ID="GridView1" runat="server" AutoGenerateColumns="False"OnRowCommand="GridView1_RowCommand"><Columns><asp:BoundField DataField="Name" HeaderText="姓名" /><asp:BoundField DataField="Age" HeaderText="年龄" /><asp:BoundField DataField="Gender" HeaderText="性别" /><asp:TemplateField><ItemTemplate><asp:Button ID="btnViewDetails" runat="server" Text="查看详情" CommandName="ViewDetails" CommandArgument="<%# Container.DataItemIndex %>" /></ItemTemplate></asp:TemplateField></Columns></asp:GridView>```在上面的代码中,我们创建了一个GridViewDataGrid,包含了姓名、年龄和性别三个列,以及一个“查看详情”按钮。
当鼠标移动到ListView行时,背景变色

当鼠标移动到ListView行时,背景变色用ListView展示数据时,当鼠标移到每行时,行的背景变色。
1.在ItemTemplate模板中给tr添加一个Id,如果有AlternatingItemT emplate模板也添加一个同样的Id(注意这是给模板添加Id,Id是可以重复的),如下:<ItemTemplate><tr runat="server" id="trRow"><td></td></tr></ItemTemplate>2.在Listview的ItemDataBound事件中添加如下代码:protected void ListView1_ItemDataBound(object sender, ListViewItemEventArgs e){if (e.Item.ItemType == ListViewItemType.DataItem)//只处理数据行{HtmlTableRow trRow = (HtmlTableRow)e.Item.FindControl("trRow");trRow.Attributes.Add("onmouseover","this.style.backgroundColor='#CCCCCC';");trRow.Attributes.Add("onmouseout","this.style.backgroundColor='';");}}上面的红色代码为鼠标移到每行时变色代码,其中'#CCCCCC'可以自定义。
Ext鼠标悬停grid的一行显示该行信息
Ext鼠标悬停grid的一行显示该行信息<html><head><title>Debug Console</title><link rel="stylesheet" type="text/css" href="../../resources/css/ext-all.css" /><link rel="stylesheet" type="text/css" href="debug.css" /><!-- GC --><!-- LIBS --><script type="text/javascript" src="../../adapter/ext/ext-base.js"></script><!-- ENDLIBS --><script type="text/javascript" src="../../ext-all.js"></script> <script type="text/javascript">Ext.onReady(function(){var cm = new Ext.grid.ColumnModel([{header:'编号',dataIndex:'id',width:35},{header:'名称',dataIndex:'name',width:80},{header:'描述',dataIndex:'descn',width:120}]);var data = [['1','name1','descn1'],['2','name2','descn2'],['3','name3','descn3'],['4','name4','descn4'],['5','name5','descn5']];var store = new Ext.data.Store({proxy: new Ext.data.MemoryProxy(data),reader: new Ext.data.ArrayReader({}, [{name: 'id'},{name: 'name'},{name: 'descn'}])});store.load();var grid = new Ext.grid.GridPanel({autoHeight: true,renderTo: 'grid',store: store,cm: cm,viewConfig: {forceFit: true}});grid.on('mouseover',function(e){//添加mouseover事件var index = grid.getView().findRowIndex(e.getTarget());//根据mouse所在的target可以取到列的位置if(index!==false){//当取到了正确的列时,(因为如果传入的target列没有取到的时候会返回false)var record = store.getAt(index);//把这列的record取出来var str = Ext.encode(record.data);//组装一个字符串,这个需要你自己来完成,这儿我把他序列化var rowEl = Ext.get(e.getTarget());//把target转换成Ext.Element对象rowEl.set({'ext:qtip':str //设置它的tip属性},false);}});var win = new Ext.Window({id:'window',el:'window-win',layout:'fit',width:500,height:270,closeAction:'hide',items: [grid]});win.show();Ext.QuickTips.init();//注意,提示初始化必须要有});</script></head><body><div id="window-win"><div id="grid"></div></body></html>。
【IT专家】利用Jquery实现GridView隔行换色,全选,鼠标滑过当前行效果

本文由我司收集整编,推荐下载,如有疑问,请与我司联系利用Jquery实现GridView隔行换色,全选,鼠标滑过当前行效果2012/08/28 2413 //first $(gridviewId + “ tbody tr:first”).removeClass(“NormalColor”).addClass(“HeadColor”); //odd $(gridviewId + “ tbody tr:odd”).addClass(“AlterColor”); //move and click $(gridviewId + “ tbody tr”).slice(1).hover(function () { $(this).addClass(“HoverColor”); }, function () { $(this).removeClass(“HoverColor”); //all check $(“#chkAll”).click(function () { $(gridviewId + ‘ tbody tr td input:checkbox’).attr(‘checked’, this.checked); //check status $(gridviewId + ‘ tbody tr td input:checkbox’).click(function () { var expr1 = gridviewId + ‘ tbody tr td input:checkbox:checked’; var expr2 = gridviewId + ‘ tbody tr td input:checkbox’; var selectAll = $(expr1).length == $(expr2).length; $(‘#chkAll’).attr(‘checked’, selectAll);} asp:GridView ID=“GridView1” runat=“server” ClientIDMode=“Static” Width=“100%” Css Columns asp:TemplateField HeaderTemplate input type=“checkbox” id=“chkAll” name=“chkAll” / /HeaderTemplate ItemTemplate input type=“checkbox” id=“chkItem” name=“chkItem” value=‘ %# Eval(“ID”) % ‘ / /ItemTemplate /asp:TemplateField /asp:GridView .HeadColor{background-color: #E0ECFF; color:#333;line-height:25px;}.AlterColor{background-color: #edf1f8; line-height:20px;}.NormalColor{background-color: #f7f6f3; line-height:20px;}.HoverColor{background: #89A5D1; line-height:20px;}.SelectColor{background-color: #ACBFDF; line-height:20px;}tips:感谢大家的阅读,本文由我司收集整编。
为GridView添加鼠标事件

在GridView的RowDataBound事件中,可以为行绑定如下的一些属性。
protected void GridView1_RowDataBound(object sender, GridViewRowEventArgs e){……}1、添加onmouseover和onmouseout事件:if (e.Row.RowType == DataControlRowType.DataRow){e.Row.Attributes.Add("onmouseover", "mouseOver(this);");//当鼠标停留时更改背景色e.Row.Attributes.Add("onmouseout", "mouseOut(this);");//当鼠标移开时还原背景色}效果描述:当鼠标指向某一行时,改变这一行的背景色。
鼠标离开后,这一行恢复以前的背景色。
protected void gvUserList_RowDataBound(object sender, GridViewRowEventArgs e) {//判断是否是DataRow,以防止鼠标经过Header也有效果if (e.Row.RowType == DataControlRowType.DataRow){e.Row.Attributes.Add("onmouseover", "e=this.style.backgroundColor; this.style.backgroundColor='#c8dafa'");e.Row.Attributes.Add("onmouseout", "this.style.backgroundColor=e");}}前台页面的js:var oldColor1='#ffffff',oldColor2='#ffffff';var rowid;function mouseOver(row){var bgColor=row.style.backgroundColor;if(bgColor!='#ffff00'){oldColor1=bgColor;row.style.backgroundColor='#C7E4FC';row.style.cursor='hand';}}function mouseOut(row){var bgColor=row.style.backgroundColor;if(bgColor!='#ffff00'){row.style.backgroundColor=oldColor1;}}显示效果如下:如图所示:每行原来的背景色是白色;当鼠标移到其上时,背景色变成浅蓝;当鼠标移开某行时,背景色恢复白色;当单击某行时,背景色变为黄色,顶部显示“第*行”中的数字被随之更改;当点击其它行时,原来被点击的行恢复白色背景,行号也会一起更改。
在DataGridView当鼠标移到某行时,该行改变颜色

在datagridview当鼠标移到某行时,该行改变颜色Winform:DataGridView属性中有个SelectMode之类的属性,可以设定是选择单元格还是选择行。
在DataGirdView属性中还有DefaultCellStyle之类的属性,可以设定选中时的背景色、字体颜色等。
private void dataGridView1_CellMouseEnter(object sender, DataGridViewCellEventArgs e)//鼠标移动到某行时更改背景色{if (e.RowIndex >=0){dataGridView1.Rows[e.RowIndex].DefaultCellStyle.BackColor = Color.LightBlue;}}private void dataGridView1_CellMouseLeave(object sender, DataGridViewCellEventArgs e) //鼠标移开时还原背景色{if (e.RowIndex >=0){dataGridView1.Rows[e.RowIndex].DefaultCellStyle.BackColor = Color.White;}}///<summary>///鼠标移动事件处理///</summary>///<paramname= "sender "> </param>///<paramname= "e "> </param>private void dataGridView1_MouseMove(object sender,MouseEventArgse){DataGridView.HitTestInfo hti =this.dataGridView1.HitTest(e.X,e.Y);//如果坐标在xx内if (hti.Type==DataGridViewHitTestType.Cell){//取消选择所有的选定单元格this.dataGridView1.ClearSelection();//设置控件内所有行的颜色for (inti =0;i<this.dataGridView1.Rows.Count;i++){this.dataGridView1.Rows[i].DefaultCellStyle.Ba ckColor =Color.White;if (i%2==0){this.dataGridView1.Rows[i].DefaultCellStyle.BackColor=Color.FromArgb(224,224,224);}else {this.dataGridView1.Rows[i].DefaultCellStyle.BackColor=Color.FromArgb(192,192,192);}if (this.dataGridView1.RowCount>hti.RowIndex){//设置控件内鼠标移动到的颜色this.dataGridView1.Rows[hti.RowIndex].DefaultCellStyle.BackColor =Color.FromArgb(255,}}}}private void Form1_Load(object sender, EventArgs e){//设置奇偶行颜色dataGridView1.RowsDefaultCellStyle.BackColor = Color.White;dataGridView1.AlternatingRowsDefaultCellStyle.BackColor = Color.Beige;//设置奇偶行选中的颜色dataGridView1.DefaultCellStyle.SelectionBackColor = Color.White ;protected void GridView1_RowDataBound(object sender, GridViewRowEventArgs e){int i;//执行循环,保证每条数据都可以更新for (i = 0; i < GridView1.Rows.Count; i++){//首先判断是否是数据行if (e.Row.RowType == DataControlRowType.DataRow){//当鼠标停留时更改背景色e.Row.Attributes.Add("onmouseover","c=this.style.backgroundColor;this.style.backgroundColor='#00A9FF'"); //当鼠标移开时还原背景色e.Row.Attributes.Add("onmouseout", "this.style.backgroundColor=c");}} }255,192)。
ooalv自定义按钮、单击、双击、列编辑切换的事件资料

1、需新建屏幕1001 并画container:'CONT1'2、需新建屏幕1002 并画container:'CONT2'3、定义屏幕1001、1002的ok_code和逻辑流4、定义工具栏程序代码:1.TABLES t001w.2.3.TYPES:BEGIN OF typ_t001w ,4.werks TYPE t001w-werks,1TYPE t001w-name1,6.werks2 TYPE t001w-werks,7.rowcolor TYPE char10,8.zcheckbox TYPE c, "LAYOUT-CHECBOX='ZCHECKBOX'.9.*zflag TYPE c,"LAYOUT-BOX_FNAME = 'ZFLAG'.10.zicon TYPE char10, "LAYOUT-ICON= 'ZICON'图标需要显示的11.END OF typ_t001w.12.13.TYPES:BEGIN OF typ_smf ,14.werks TYPE t001w-werks,1TYPE t001w-name1,16.END OF typ_smf.17.18.DATA:i_t001w TYPE TABLE OF typ_t001w,"""""第一次alv内表19.i_detail TYPE TABLE OF typ_smf, """""单击ALV内表列ZICON显示的明细ALV内表20.i_smf TYPE TABLE OF typ_smf.""""SF内表21.22.DATA:fieldcat TYPE lvc_t_fcat,23.grid TYPE REF TO cl_gui_alv_grid,"alv控件名24.grid2 TYPE REF TO cl_gui_alv_grid,"alv控件名25.g_container TYPE scrfname VALUE 'CONT1',"重新定义本地容器对象名26.g_container2 TYPE scrfname VALUE 'CONT2',"重新定义本地容器对象名27.is_layout TYPE lvc_s_layo,28.ps_layout TYPE lvc_s_layo,29.g_custom_container TYPE REF TO cl_gui_custom_container,30.g_custom_container2 TYPE REF TO cl_gui_custom_container.31.32.DATA: ui_functions TYPE ui_functions. "隐藏按钮的内表33.*********ALV上事件捕捉类34.DATA:gs_toolbar TYPE stb_button. "按钮35.CLASS alv_event_receiver DEFINITION DEFERRED. "声明类对象36.*----------------------------------------------------------------------*37.* CLASS alv_event_receiver DEFINITION38.*----------------------------------------------------------------------*39.*40.*----------------------------------------------------------------------*41.CLASS alv_event_receiver DEFINITION."声明类成员可见性42.PUBLIC SECTION."定义相关类成员可以被程序中的所有对象调用43. CLASS-METHODS: "静态方法44.handle_toolbar"初始化工具栏对象事件,如增加按钮并设定其属性45.FOR EVENT toolbar OF cl_gui_alv_grid46. IMPORTING e_object e_interactive,47.48. handle_menu_button"用于在下拉菜单中增加选项49.FOR EVENT menu_button OF cl_gui_alv_grid50. IMPORTING e_object e_ucomm,51.52. handle_user_command"工具栏中的按钮的单击事件53. FOR EVENT user_command OF cl_gui_alv_grid54.IMPORTING e_ucomm,55.56. handle_hotspot_click57. FOR EVENT hotspot_click OF cl_gui_alv_grid "屏幕中的单击事件,可以具体到某行某列,需要设置热点58.IMPORTING e_row_id e_column_id es_row_no,59.60. handle_double_click61. FOR EVENT double_click OF cl_gui_alv_grid"屏幕中的双击事件,可以具体到某行某列,即使设置热点也必须双击62.IMPORTING e_row e_column es_row_no.63.ENDCLASS."alv_event_receiver DEFINITION64.*&---------------------------------------------------------------------*65.*& Class (Implementation)alv_event_receiver66.*&---------------------------------------------------------------------*67.*Text68.*----------------------------------------------------------------------*69.CLASS alv_event_receiver IMPLEMENTATION."实现类方法70.METHOD handle_toolbar.71. gs_toolbar-function ='B_SUM'. "为按钮分配功能码72. gs_toolbar-icon=icon_display."为按钮分配图标73. gs_toolbar-text='总行数'."为按钮分配文本74. gs_toolbar-butn_type = '0'."定义按钮类型,不填时默认为075. APPEND gs_toolbar TO e_object->mt_toolbar. "添加按钮到工具栏76.77. gs_toolbar-function ='B_PRINT'. "为按钮分配功能码78. gs_toolbar-icon=icon_import."为按钮分配图标79. gs_toolbar-text='转储订单打印'."为按钮分配文本80. gs_toolbar-checked= 'X'.81. gs_toolbar-butn_type = '0'."定义按钮类型,不填时默认为082. APPEND gs_toolbar TO e_object->mt_toolbar. "添加按钮到工具栏83.84. gs_toolbar-function ='B_LIST'."为按钮分配功能码85. gs_toolbar-quickinfo = '自定义下拉菜单'.86. gs_toolbar-icon=icon_biw_report_view."为按钮分配图标87. gs_toolbar-text='下拉菜单'."为按钮分配文本88. gs_toolbar-butn_type = '1'."定义按钮类型89. APPEND gs_toolbar TO e_object->mt_toolbar. "添加按钮到工具栏90.91. gs_toolbar-function ='B_EDIT'. "为按钮分配功能码92. gs_toolbar-icon=icon_change."为按钮分配图标93. gs_toolbar-text='切换编辑状态'."为按钮分配文本94. gs_toolbar-checked= 'X'.95. gs_toolbar-butn_type = '0'."定义按钮类型,不填时默认为096. APPEND gs_toolbar TO e_object->mt_toolbar. "添加按钮到工具栏97.ENDMETHOD."handle_toolbar98.METHOD handle_menu_button.99. IF e_ucomm = 'B_LIST'.100.CALL METHOD e_object->add_function101.EXPORTING102. icon= icon_display103. fcode = 'B_SUM'104. text= '显示ALV总数'.105. ENDIF.106.ENDMETHOD."handle_menu_button107.METHOD handle_user_command.108. DATA sum TYPE i.109. DATA text TYPE string.110. DATA: lwa_t001w LIKE LINE OF i_t001w.111. DATA: lwa_smf LIKE LINE OF i_smf.112.113. CASE e_ucomm.114.WHEN'B_SUM'.115.DESCRIBE TABLE i_t001w[] LINES sum.116.text = sum.117.CONCATENATE'当前表格中数据的总行数:' text INTO text.118.MESSAGE text TYPE 'I'. "为何消息类型为 E 时运行时显示A类型,异常终止到初始界面119.WHEN 'B_PRINT'.120.LOOP AT i_t001w INTO lwa_t001w WHERE zcheckbox = 'X'.121. lwa_smf-werks = lwa_t001w-werks.122. lwa_smf-name1 = lwa_t001w-name1.123. APPEND lwa_smf TO i_smf.124. CLEAR :lwa_t001w,lwa_smf.125.ENDLOOP.126.IF i_smf[] IS INITIAL.127. MESSAGE '请至少选择一行数据区打印!' TYPE 'E'. "E类型消息会转化为A类型,很蛋疼,求破!128.ELSE.129. PERFORM frm_print_data."这个没具体写。
C#winformdatagridview单元格的单击处理

C#winformdatagridview单元格的单击处理⾸先看看效果图:需求:要求是的在datagridview⾥⾯绑定数据后,可以任意点击想要点击的某列的单元格进⾏改变数据。
需要在datagridview⾥⾯写3个事件1.RowPrePaint事件:主要设置要点击的某单元对应的某列显⽰的颜⾊private void dgv_Data_RowPrePaint(object sender, DataGridViewRowPrePaintEventArgs e){try{FontStyle newStyle = this.dgv_Data.DefaultCellStyle.Font.Style;newStyle |= FontStyle.Underline;Font font = new Font(this.dgv_Data.DefaultCellStyle.Font, newStyle);foreach (DataGridViewRow dr in this.dgv_Data.Rows){if (dr.Cells["ID"].Value.ToString() == "0"){dr.DefaultCellStyle.ForeColor = Color.Red;}dr.Cells["馆藏重复"].Style.Font = font;dr.Cells["馆藏重复"].Style.ForeColor = Color.Blue;dr.Cells["是否采购"].Style.Font = font;dr.Cells["是否采购"].Style.ForeColor = Color.Blue;}}catch (Exception ex){MessageBox.Show(ex.Message, "", MessageBoxButtons.OK, MessageBoxIcon.Error);}}2.CellMouseMove事件:主要是⿏标指针移动到单元格时候的样式private void dgv_Data_CellMouseMove(object sender, DataGridViewCellMouseEventArgs e){if (e.ColumnIndex == -1 || e.RowIndex == -1){return;}DataGridViewCell cell = this.dgv_Data.Rows[e.RowIndex].Cells[e.ColumnIndex];if (cell == null || cell.Value.ToString() == "" || cell.Value.ToString() == "0"){return;}string headText = this.dgv_Data.Columns[e.ColumnIndex].HeaderText;if (headText == "馆藏重复" || headText == "是否采购"){this.Cursor = Cursors.Hand;}else{this.Cursor = Cursors.Default;}}3.CellClick事件:主要是对单元格进⾏单击的数据库操作private void dgv_Data_CellClick(object sender, DataGridViewCellEventArgs e){try{if (e.ColumnIndex == -1 || e.RowIndex == -1){return;}DataGridViewCell cell = this.dgv_Data.Rows[e.RowIndex].Cells[e.ColumnIndex];if (cell == null || cell.Value.ToString() == "" || cell.Value.ToString() == "0"){return;}Stay_PurchaseData bll = new Stay_PurchaseData();string headText = this.dgv_Data.Columns[e.ColumnIndex].HeaderText;switch (headText){case"馆藏重复":if (cell.Value.ToString().Trim() == "是"){bll.ChangeGCCF(dgv_Data.Rows[e.RowIndex].Cells["ID"].Value.ToString(), true); }else{bll.ChangeGCCF(dgv_Data.Rows[e.RowIndex].Cells["ID"].Value.ToString(), false); }break;case"是否采购":if (cell.Value.ToString().Trim() == "是"){bll.ChangeSFCG(dgv_Data.Rows[e.RowIndex].Cells["ID"].Value.ToString(), true); }else{bll.ChangeSFCG(dgv_Data.Rows[e.RowIndex].Cells["ID"].Value.ToString(), false); }break;}//刷新btn_Query_Click(sender, e);}catch (Exception ex){MessageBox.Show(ex.Message, "", MessageBoxButtons.OK, MessageBoxIcon.Error); }}。
GridView的RowDeleting、RowUpdating和RowCommand事件...
GridView的RowDeleting、RowUpdating和RowCommand事件...1. RowCommand:行命令事件何时触发:任何在GridView中设定了CommandName的控件都可以触发该事件。
代码案例:<asp:LinkButton runat="server"ID="lbtnDelete"Text="删除"CommandArgument='<%#Eval("StudentNo") %>' CommandName="Del"/>说明:需要在GridView中执行某个命令时能够自定义行为,而不是有GridView自动来完成,可使用该事件。
比如执行自定义的删除和修改功能。
该事件可同时处理一个GridView发出的不同的操作指令,如删除和修改,如何判断某一时刻做什么操作就成为了关键。
我们可以通过CommandName来区分每个不同的指令。
如if(commandName=="Del"){//执行删除操作....}else if(commandName=="Update"){//执行修改操作....}2. RowDeleting:行正在删除事件何时触发:1.如果GridView是通过设置DataSourceID="odsStudent"来指定数据源的,则在执行删除时总会调用该事件2.只要引发事件的CommandName是“Delete”就会自动引发RowDeleting事件。
代码案例:1.<asp:CommandField ShowDeleteButton="True" ShowEditButton="True"/>2.<asp:LinkButton runat="server"ID="lbtnDelete"Text="删除"CommandName="Delete"/>说明:如果GridView的数据源是通过设置DataSourceID="odsStudent"来指定,则必须为ObjectDataSource 指定DeleteMenthod方法,因为GridView此时某自动寻找DeleteMenthod属性指定的删除方法,如果没有指定的方法,则会报错,如下图所示:当然此时也会触发RowCommand事件,我们可以在RowCommand事件中手动调用删除方法来执行删除功能,但必须在RowDeleting事件处理方法中写上 "e.Cancel = true;",取消该事件的默认行为。
- 1、下载文档前请自行甄别文档内容的完整性,平台不提供额外的编辑、内容补充、找答案等附加服务。
- 2、"仅部分预览"的文档,不可在线预览部分如存在完整性等问题,可反馈申请退款(可完整预览的文档不适用该条件!)。
- 3、如文档侵犯您的权益,请联系客服反馈,我们会尽快为您处理(人工客服工作时间:9:00-18:30)。
GridView鼠标停留变色,行单击事件处理
在使用C#写CRM时遇到一个问题,GridView绑定了了数据后,我想在鼠标停留到GridView数据行时,行变色突出显示该行,并且鼠标点击该行时,将该条目的数据显示在GridView下面的控件自动将该行对应的数据显示出来。
我的实现步骤是:
1.增加GridView的GVSelect_RowDataBound事件
protected void GVSelect_RowDataBound(object sender, GridViewRowEventArgs e) {
if(e.Row.RowType == DataControlRowType.DataRow)
{
//当鼠标停留时更改背景色
e.Row.Attributes.Add("onmouseover", "c=this.style.backgroundColor;this.sty le.backgroundColor='#8EC26F'");
//当鼠标移开时还原背景色
e.Row.Attributes.Add("onmouseout", "this.style.backgroundColor=c");
//设置悬浮鼠标指针形状为"小手"
e.Row.Attributes["style"] = "Cursor:hand";
//单击/双击事件
e.Row.Attributes.Add("OnClick", "ClickEvent('" + e.Row.Cells[10].FindContro l("btnDetial").ClientID + "')");
//注:OnClick参数是指明为鼠标单击时间,后个是调用javascript的ClickEvent函数
}
}
2.在页面的HTML里添加javascript函数,用来响应鼠标点击事件,因为ASP客户端不能主动调用服务端的函数,我在这里在Gridview添加一个辅助Button列,然后在ClickEvent(cId)函数中,调用这个Button的单击事件。
<script language="javascript">
function ClickEvent(cId)
{
//调用LinkButton的单击事件,btnBindData是LinkButton的ID
document.getElementById(cId).click();
}
</script>
3.响应事件
protected void gdvTaskList_RowCommand(object sender, GridViewCommandEven tArgs e)
{
if (mandName == "Detail")
{
//在这里对你需要的数据信息进行输出
SetClientInfo();//我的处理函数
}
}
GridView鼠标停留变色和单击处理事件,当鼠标在GridView的行上停留时,将该行变色,当单击该行时,做相应处理,记得要在<gridview ></gridview> 之间加上RowDataBound=GV Select_RowDataBound 属性
注释:
添加辅助列方法
<asp:TemplateField ItemStyle-CssClass="showcell" HeaderStyle-CssClass="showcell ">
<ItemTemplate>
<asp:LinkButton runat="server" ID="btnDetial" CommandName="Detail " CommandArgument='<%# Eval("ID") %>'>辅助列</asp:LinkButton>
</ItemTemplate>
</asp:TemplateField>
样式:
.showcell{
DISPLAY:none;
}
单击行后改变行样式,需在页面增加
<script language="javascript">
var prevselitem=null;
function selectx(row)
{
if(prevselitem!=null)
{
prevselitem.style.backgroundColor='#ffffff';
}
row.style.backgroundColor='#8EC26F';
prevselitem=row;
}
</script>。
