Ample Guitar 基本手册
Ample Guitar RB主面板用户手册说明书

Main Panel Manual Ample Guitar RBCONTENTS1INSTRUMENT PANEL (1)1.1O VERVIEW OF I NSTRUMENT P ANEL (1)1.2S AVE/L OAD P RESET (1)1.3A LTERNATE T UNER (2)2MAIN PANEL (2)2.1O VERVIEW OF M AIN P ANEL (2)2.2A RTICULATIONS &P OLY L EGATO (3)2.2.1Articulation List (3)2.2.2Sustain & Pop (4)2.2.3Natural Harmonic (4)2.2.4Palm Mute (4)2.2.5Slide In from below & Slide Out downwards (4)2.2.6Legato Slide (Poly Legato) (5)2.2.7Hammer-On & Pull-Off (Poly Legato) (9)2.2.8Mordent (11)2.2.9Doubled Keyswitches (11)2.3S OUND M ODE (11)2.4D OUBLED I NSTRUMENTS (12)2.5R ICH F RET S OUND (12)2.6C APO (12)2.7C APO L OGIC M ODE (12)2.8O PEN S TRING F IRST (12)2.9P LAY M ODE S WITCH (13)2.10A UTO L EGATO M ODE S WITCH (13)2.11S TROKE N OISE (13)2.12V IBRATO W HEEL (13)2.13S TRING F ORCE &C APO F ORCE (13)2.13.1String Force (13)2.13.2Capo Force (14)2.14FX S OUND G ROUP (14)2.15P OLY R EPEATER (15)2.16H OLD P EDAL T OGGLE (15)1 Instrument Panel1.1Overview of Instrument Panel1.2 Save/Load PresetPreset button displays current preset in use. The “Default” preset is loaded automatically when the plugin starts. Preset name is shown as “Preset” if the “Default” preset is not found. To load a preset, click preset name to open the file chooser window. Left and right arrow can also be used to quickly change preset. To save current preset, click the down arrow to open the preset save window.1.3Alternate TunerTuning of all strings can be altered altogether with one tuner, 2 semitones down at most. Tuning is fully compatible with Strummer, Tab and all articulations.2Main Panel2.1Overview of Main Panel2.2Articulations & Poly Legato 2.2.1Articulation List2.2.2Sustain & PopKeyswitch is C0. Notes of velocity less than 127 will be Sustain. notes of velocity 127 will be Pop.2.2.3Natural HarmonicKeyswitch is C#0.2.2.4Palm MuteKeyswitch is D0. Lower the velocity, greater the mute depth. If you press C0 and D0 at the same time, subsequent notes of high velocity will be Sustain and notes of low velocity will be Palm Mute.2.2.5Slide In from below & Slide Out downwardsKeyswitch is D#0. When D#0 is before a note, subsequent note will be Slide In. When D#0 is during a note, Slide Out is triggered whose velocity is determined by D#0. Articulation will return to Sustain when note ends. You can also stay on this articulation by holding the keyswitch. Articulation will not return to Sustain while this keyswitch is held.2.2.6Legato Slide (Poly Legato)Keyswitch is E0. Slides of all possible intervals on the fretboard are supported, whose speed is controlled with the destination note’s velocity. Slide triggered by E0 with high velocity will change fret position. Low velocity will not.The articulation will return to previous one when the destination note ends. You can also stay on this articulation by holding the keyswitch. Articulation will not return while this keyswitch is held.* The two notes must overlap in time.* E0 must be ahead of the start note.* The two notes must be on the same string.Poly Legato: Press the highest note of destination to slide upwards; Press the lowest note of destination to slide downwards.Slides on different strings with different intervals: Use the String Force keyswitch before each note to notify the intended strings (note on at least 1 tick before). Then the start notes will only slide to other notes (with String Force keyswitches) on the same string.Slide Smoother: The speed of long legato slide (slide more than 2 frets) is determined by the velocity of destination note. Higher the velocity, faster the speed.Auto Slide requires:1.Auto legato mode is Auto Legato Slide.2.The two notes must overlap in time.3.The two notes must be on the same string.4.Instrument Mode.2.2.7Hammer-On & Pull-Off (Poly Legato)Keyswitch is F0. HP triggered by F0 of high velocity will change fret position if it goes beyond current position. Low velocity will not.Articulation will return to previous one when the destination note ends. You can also stay on this articulation by holding the keyswitch. Articulation will not return while this keyswitch is held.* The two notes must overlap in time.* F0 must be ahead of the start note.* The two notes must be on the same string.Poly Legato: Press the highest note of destination to Hammer On; Press the lowest note of destination to Pull Off.HP on different strings with different intervals:Same as slides, use the String Force keyswitch before each note to notify the intended strings (note on at least 1 tick before). Then the start notes will only HP to other notes (with String Force keyswitches) on the same string.Auto HP requires:1.Auto legato mode is Auto Legato HP.2.The two notes must overlap in time.3.The two notes must be on the same string.4.Instrument Mode2.2.8MordentKeyswitch is F#0. The mordent interval is major second. Playing this keyswitch when a note is sounding will play legato to Mordent. Articulation will return to Sustain when the note ends. You can also stay on this articulation by holding the keyswitch. Articulation will not return while this keyswitch is held.2.2.9Doubled KeyswitchesPress 2 Keyswitches at the same time to get two articulations to switch via velocity layer.2.3Sound ModeMono and Stereo modes are available. You can adjust the volume of different microphones to get more sound.1. Stereo2. DI2.4Doubled InstrumentsToggle on to achieve an authentic doubling effect with only one instrument.2.5Rich Fret SoundIn real performance, a lot of playing noises are generated. Virtual instrument would sound unnatural without those noises. Ample Sound Engine can generate rich Fret Noise automatically.FR:Fingering Release Sound Gain2.6CapoIt simulates the real capo. It can transpose the pitch without changing the fingering.2.7Capo Logic Mode2 kind of Capo Logic modes:1.Melody Mode:Melody Mode, the range is 3 octaves. Triggered bypressing B6 with high velocity.2.Chord Mode:The range is 5 frets. Triggered by pressing B6 with lowvelocity.2.8Open String FirstE1 A1 D2 G2 B2 and E3 5 notes will be played on open strings.It can be toggled on with note G#6, High velocity toggles on, Low velocity toggles off.2.9Play Mode SwitchInstrument Mode:It is limited by the real playing rules of the instrument, such as two notes on the same string cannot ring simultaneously.Keyboard Mode:When Keyboard Mode is on, multiple notes can be played on same string simultaneously.Solo Mode :Only a single note can be played simultaneously.* Both Keyboard Mode and Solo Mode will disable Automatic Legato.2.10Auto Legato Mode SwitchThere are 3 modes: Automatic Slide; Automatic Hammer On and Pull Off; Off.Note D#6 with high velocity sets the mode to Automatic Slide, and low velocity sets the mode to Automatic Hammer On and Pull Off.2.11Stroke NoiseA strummed noise will be generated automatically for polyphonic notes.2.12Vibrato WheelPlease refer to the “Banjo Settings and CPC Manual”.To vibrate automatically, open Settings Panel and toggle on Auto Mod.2.13String Force & Capo Force2.13.1String ForceSpecify a string to be played. G0-C1 correspond to 6th string-1st string. High velocity String Force will affect fret position,while low velocity will not.2.13.2Capo ForceSwitch to a fret position manually. A yellow line will be displayed after pressing C#1, Press E1-A#2 to switch to position 0-18 respectively.2.14FX Sound Group2.15Poly RepeaterPress D6 to repeat notes being played. Polyphonic notes are supported. 2.16Hold Pedal ToggleWebsite: Free Version Download: /en/download.aspOnline Service: /AmpleSoundTechTech-Born MusicProduced and Copyright provided by Beijing Ample Sound Technology Co. Ltd。
Ample Guitar 6 in 1 使用手册说明书

Ample Guitar (6 in 1) Manual Beijing Ample Sound Technology Co. LtdContents1INSTALLATION AND ACTIVATION (7)1.1I NSTALLATION ON M AC (7)1.2I NSTALLATION ON W INDOWS (9)1.3F ULL F EATURES T RIAL &A CTIVATION (14)2PARAMETERS SETTING (17)2.1O VERVIEW OF S ETTINGS P ANEL (17)2.2S AVE/L OAD P RESET (18)2.3I NSTRUMENT P ATH S ETTING (18)2.4M ASTER T UNE (18)2.5MIDI O UT (18)2.6M AX V OICES (19)2.7V ELOCITY L AYERS (19)2.8P OLY B ENDER (20)2.9MIDI G UITAR M ODE (20)2.10C USTOMIZED P ARAMETERS C ONTROL (20)2.10.1MIDI Controller (20)2.10.2Automation (21)3INSTRUMENT PANEL (22)3.1O VERVIEW OF I NSTRUMENT P ANEL (22)3.2S AMPLE L IBRARY (22)3.3S OUND M ODE(A COUSTIC ONLY) (23)3.4O PEN S TRING F IRST (24)3.5P LAY M ODE (24)3.6A UTO L EGATO M ODE (24)3.7T UNER (25)4MAIN PANEL (26)4.1O VERVIEW OF M AIN P ANEL (26)4.2A RTICULATIONS AND P OLY L EGATO (27)4.2.1Sustain & Pop (28)4.2.2Natural Harmonic & Artificial Harmonic (29)4.2.3Palm Mute (30)4.2.4Slide In from below & Slide Out downwards (Original) (31)4.2.5Legato Slide (Poly Legato) (32)4.2.6Hammer-On & Pull-Off (Poly Legato) (34)4.2.7Slide Guitar (35)4.3D OUBLING (36)4.4C ONTROLLABLE R ESONANCE (36)4.5F RET S OUND (36)4.6G LOBAL S AMPLE S TART T IME (37)4.6.1Start Time Setting (38)4.7C APO (39)4.8M ANUAL V IBRATO W HEEL (O RIGINAL) (39)4.9S TR M AN AND C APO M AN (40)4.9.1StrMan (40)4.9.2CapoMan (40)4.10FX S OUND G ROUP (41)4.11P OLY R EPEATER (O RIGINAL) (41)5STRUMMER PANEL (42)5.1O VERVIEW OF S TRUMMER P ANEL (42)5.2S TRUM T IME AND M ODE (43)5.3B ODY R ESONANCE AND M UTE D EPTH (43)5.4S TRUMMER H UMANIZATIONS (44)5.4.1Humanization (All) (44)5.4.2Humanization (Each) (44)5.4.3Humanization (Velocity) (44)5.4.4SEQ Swing (44)5.5C HORD S ETTING AND S WITCH (I MPORTANT) (44)5.5.1Select Mode (44)5.5.2Detect Mode (46)5.6C HORD P LAY AND SEQ S ETTING (I MPORTANT) (48)5.6.114 Strum Notes + 28 Ways to Play (Original) (48)5.6.2SEQ Edit (48)5.6.3Save/Load Pattern (49)5.6.5SEQ Export (50)5.7S TRUM WITH A RTICULATIONS (O RIGINAL) (50)5.7.1Strum Legato - Legato Slide (50)5.7.2Strum Legato - Hammer On & Pull Off (51)5.7.3Slide In Strum (52)5.7.4Harmonic Strum (53)5.8S TRUMMER K EYS (I MPORTANT) (53)6TAB PANEL (54)6.1O VERVIEW OF T AB P ANEL (54)6.2T AB L OAD (54)6.3T AB P LAY (55)6.4V ELOCITY P ROPORTION AND H UMANIZATION (55)6.5T AB S WING (55)6.6S TRUM T IME P ROPORTION (55)7FX PANEL (56)7.1O VERVIEW OF FX P ANEL (56)7.2C OMPRESSION (56)7.3O VERDRIVE (57)7.45-B AND-EQ (57)7.5W AH (57)7.6C HORUS (58)7.8D ELAY (58)7.9R EVERB (58)8EDIT PANEL (59)1Installation and Activation 1.1Installation on Mac1.Continue to install.2. Read and accept the license agreement.3.Select plugin formats to install. Change Location if you want to install sample library in a different place.4. Close to exit.1.2Installation on Windows1.Continue to install.2.Read and accept the license agreement.3.Specify location to install standalone.4.Specify location to install 64bit VST.5.Specify location to install 32bit VST.6.Specify location to install sample library.7.Select plugin formats to install.8.Choose if to create a Start Menu folder.9.Finish to exit.*Please install Microsoft Visual C++ 2013 Redistributable if program cannot run. Microsoft official download page*If encountered with error shown above, please close and simply ignore it.1.3Full Features Trial & Activation1. 7-days trial with full features is offered.2. Trial requires an internet connection.3. Activation: open Activation Manager to activate products.4. Online Activation: fill in User ID and password and click "Activate" to complete activation. Click "Forgot" if you want to inquire User ID and reset password.5.Offline Activation: please send Challenge Code and User ID to ********************** . Our customer service will send you Key Code within 24 hours. Fill in User ID and Key Code and click "Activate" to complete activation. Keep your User ID and Key Code in case of reinstallation.6.After activation succeeds, please close Activation Manager and restart program.2Parameters Setting2.1Overview of Settings Panel2.2Save/Load PresetYou can save your current parameters setting as local file for later use with other projects or DAWs.2.3Instrument Path SettingYou can move sample library folder indicated by original path to anywhere you want, and set path to new location.2.4Master TuneDefault tune is in 440Hz. You can set tune to any non-standard between 430 and 450Hz.2.5MIDI OutToggle on MIDI Out, add a MIDI track in project and set the input to MIDI Out of Ample Guitar. Then any note being played will be converted to MIDI, including those by strum and tab.2.6Max VoicesDefines the maximum number of voices which can be played simultaneously. Voices will be forced stop if the number goes beyond maximum.2.7Velocity LayersEach Cycle: Separate sample cycle for each note and each velocity layer, greatly improving humanization.Rhombic Sampling Structure: Greatly improves sample utilization proficiency.Sliders control velocity thresholds of corresponding layers. Adjust them according to your play style.2.8Poly BenderWhen toggled on, open string and multiple notes can be bended.2.9MIDI Guitar ModeToggle on when you use midi guitar as input. Make sure the input channel of midi track is set to all.2.10Customized Parameters Control2.10.1MIDI ControllerAll buttons, knobs and sliders on GUI can be controlled by MIDI Controllers. Alt + click orright-click a control to open the dialog below and assign a controller.2.10.2AutomationYou can also use automation to control parameters.3Instrument Panel3.1Overview of Instrument Panel3.2Sample LibraryAcoustics have three distinct sample libraries: Finger, Pick and Strum. Strum library includes real strum samples customizable for any chord and rhythm without loss of quality.Electrics have sample libraries of three pickup options: Neck, Both and Bridge.*Sample Library cannot be switched during play.3.3Sound Mode(Acoustic only)Two mono and stereo modes are available. In addition, you can adjust mic volumes, pan and width to meet your need.3.4Open String FirstUsed for high position arpeggios with open strings. When toggled on, notes will be played priorly on open strings regardless of Capo Logic. Note G#6 can toggle it on with high velocity and off with low velocity.3.5Play ModeWhen Keyboard Mode is on, multiple notes can be played on same string simultaneously. When Solo Mode is on, only single note can be played. Both Keyboard Mode and Solo Mode will mute Auto Legato.3.6Auto Legato ModeWhen two notes on same string overlap and Keyboard/Solo Mode is off, a legato will be automatically made. Note D#6 can switch auto legato mode, high velocity for Auto LS and low velocity for Auto HP.3.7TunerYou can tune every string by turning its corresponding tuner, 2 semitones down at most. Tuning is fully compatible with strummer, tab and all articulations.4Main Panel4.1Overview of Main Panel4.2Articulations and Poly Legato4.2.1Sustain & PopKeyswitch is C0. Notes of velocity less than 127 will be Sustain. For acoustics, notes of velocity 127 will be Pop. For electrics, notes of velocity 127 will be either Artificial Harmonic or Pop depending on Accentuate Mode.4.2.2Natural Harmonic & Artificial HarmonicKeyswitch is C#0. For electrics, notes of velocity less than 127 will be Natural Harmonic. Notes of velocity 127 will be Artificial Harmonic.4.2.3Palm MuteKeyswitch is D0. Lower the velocity, greater the mute depth. If you press C0 and D0 at the same time, subsequent notes of high velocity will be Sustain and notes of low velocity will be Palm Mute.4.2.4Slide In from below & Slide Out downwards (Original) Keyswitch is D#0. When D#0 is before a note, subsequent note will be Slide In. When D#0 is during a note, Slide Out is triggered whose velocity is determined by D#0. Articulation will revert to Sustain when note ends.4.2.5Legato Slide (Poly Legato)Keyswitch is E0. The two notes must overlap and E0 must be ahead of the start note. Articulation will revert to previous one when destination note ends. Slide triggered by E0 of high velocity will change fret position. Low velocity will not.Poly Slide (Original): Press the highest note of destination set to slide upwards; Press the lowest note of destination set to slide downwards.Slide Smoother: The speed of long legato slide (slide more than 2 frets) is determined by the velocity of destination note. Higher the velocity, faster the speed.Auto LS: When keyboard/solo mode is off and auto legato mode is Auto LS, two overlapped note on same string will make a slide automatically without keyswitch.4.2.6Hammer-On & Pull-Off (Poly Legato)Keyswitch is F0. The two notes must overlap and F0 must be ahead of the start note. Articulation will return to previous one when destination note ends. HP triggered by F0 of high velocity will change fret position if it goes beyond. Low velocity will not.Auto HP: When keyboard/solo mode is off and auto legato mode is Auto HP, two overlapped note on same string will make a HP automatically without keyswitch.Poly Legato (Original): Press the highest note of destination set to Hammer-On. Press the lowest note of destination set to Pull-Off.4.2.7Slide GuitarKeyswitch is F#0.4.3DoublingToggle on to achieve an authentic doubling effect with only one Ample Guitar.4.4Controllable ResonanceIn real performance, guitarist can control resonance volume and time. Ample Guitar simulates these controls.Silent Press(G5), Silent Stroke(G#5) and releasing Hold Pedal can mute ringing resonance. 4.5Fret SoundIn real performance, hand is constantly moving and touching fretboard. Without fret sound virtual instruments would sound artificially "clean".4.6Global Sample Start TimeAfter pick strokes string, it takes around 50ms to get the string really vibrating. Ample Guitar preserves the moment of the stroke, otherwise it will sound like piano.4.6.1Start Time SettingSet Start Time to 50ms and Track Delay of DAWs to 0ms as shown in the figure above on the left for real-time playing.Set Start Time to 0ms and Track Delay of DAWs to -50ms as shown in the figure above on the right for playback or export.If your DAW doesn't support Track delay, you will need to drag tracks a few ms (according to start time) forward manually, or use the formula of Time to BPM: Track Delay(beat) = Time(s) * Tempo / 60, e.g. for 50ms, you need to drag tracks 0.1 beat or 48 ticks forward when Tempo = 120.You need to export audio one bar earlier after Track Delay is set as shown in the figure below.4.7CapoShifts all incoming notes without need to change original.4.8Manual Vibrato Wheel (Original)Vibrato can be controlled by hand like a real guitarist does. If you want to vibrate automatically, open Settings Panel to toggle on Auto Mod.4.9StrMan and CapoMan4.9.1StrManSpecify a string to be played manually. G0-C1 correspond to 6th string-1st string. High velocity StrMan will affect fret position while low velocity will not.4.9.2CapoManSwitch to a fret position manually. Press C#1 and the CapoMan line (yellow) will appear. Then press E1-C3 to switch to position 0-20 respectively.4.10FX Sound Group4.11Poly Repeater (Original)As a simulation of repetitive downstroke and upstroke, you can press D6 and E6 to repeat notes being played or last ended note. Multiple notes are supported.5Strummer Panel5.1Overview of Strummer Panel5.2Strum Time and ModeStrum Time controls how fast pick cross strings. When Strum Time is 1000ms, in Each Mode every interval between chord notes is 1000ms while in All Mode intervals are altogether 1000ms.Note C#5 can control Strum Time. Higher the velocity, shorter the time.5.3Body Resonance and Mute DepthThere are two ADSRs in strum mode, Body Resonance and Mute Depth. Body Resonance simulates open strum, higher the value longer the ringing time. Mute Depth simulates mute strum, lower the value greater the depth.5.4Strummer Humanizations5.4.1Humanization (All)Applies random change to total strum time.5.4.2Humanization (Each)Alters the timing of chord notes without affecting total strum time.5.4.3Humanization (Velocity)Applies random change to strum velocity.5.4.4SEQ SwingRandomly flexes the timing grids of SEQ to avoid mechanical performance.5.5Chord Setting and Switch (Important)There are two chord modes available, select mode and detect mode. Note D5 can switch chord mode, high velocity for detect mode and low velocity for select mode.5.5.1Select ModeSelect Mode provides 24 chord slots. Every chord slot can be customized by setting root note, type and position, altogether 540 variations available. You can also customize by clicking on the fretboard.Press C1-B2 to switch to chord slot 1-24 respectively. Chord switch with high velocity will mute the ringing of previous chord.Click Transpose button will transpose 24 chord slots altogether.Click Load button to browse and load whole chord bank. Click Scan Folder to change folder.Click Save button to save whole chord bank.5.5.2Detect ModeDetect Mode can detect chord pressed by users within C1-B2 and directly switch to corresponding preset. Root note must be within C1-B1.Chord Inversion is supported. Different inversions will be mapped to different positions.Pressing C1-B1 or C2-B2 solely can make a slash chord based on current.5.6Chord Play and SEQ Setting (Important)5.6.114 Strum Notes + 28 Ways to Play (Original)Strummer system provides 14 strum notes, and 28 ways to play when combined with different velocity, giving great variety for chord play, even with only one chord.28 ways to play have been designed and arranged for convenience concern after countless hours of testing. Without need for remembering them, you can play naturally on keyboard to achieve realistic strum.Figure below shows 28 ways to play with Em chord (6 Notes).5.6.2SEQ EditClick 8 SEQ buttons to browse and edit SEQs.The icons on the left of editor are 14 strum notes.Click to clear current SEQ notes. Click to copy another SEQ to current. Click toselect default velocity of SEQ note.The color of SEQ note indicates velocity. Dragging mouse up/down or left/right will change the velocity and/or duration. Single clicking will enter a note. Double clicking on an existing note will remove it.5.6.3 Save/Load PatternClick Load button to browse and load pattern. Click Scan Folder to change folder. Select Category, Time Signature or type to filter patterns.Click Save button to save pattern.5.6.4SEQ PlayPress C3 C#3 D#3 F#3 G#3 A#3 C#4 D#4 to play SEQ 1-8 respectively.5.6.5SEQ ExportDrag export button to export current SEQ to host.5.7Strum with Articulations (Original)By combining articulation keyswitches and chord switch keys, you can play Natural Harmonic, Palm Mute, Slide In & Out, Legato Slide, Hammer-On & Pull-Off and Pop while strumming.5.7.1Strum Legato - Legato SlidePress E0 and switch to another chord during a strum note, a slide will be made by notes of previous chord and current chord which are on same string but different frets.。
GUITAR RIG 5 中文模块使用手册
1介绍这本手册会对Guitar Rig5中的每个效果模块进行更加深入地介绍,会帮助您更好地对声音进行塑形,以及当作是对每个模块每个旋钮参数的工具手册,在以下章节中,将对Guitar Rig 5中的所有放大器、效果器、以及工具模块进行介绍,顺序与在Guitar Rig5的模块浏览器中的顺序是相同的。
要学习Guitar Rig5的基础操作,我们推荐您先从Getting Started(快速开始)手册开始,然后可以阅读Application Reference(软件使用手册)来对Guitar Rig本身的操作功能有更深入地了解。
您可以通过Guitar Rig软件界面的Help(帮助)>Open Manual(打开手册)命令来打开各个英文使用手册。
2Amplifiers(放大器)除了乐器本身以外,对吉他和贝斯的音色调节通常都是从放大器开始(俗称箱头)。
Guitar Rig 5精挑细选了一些1950年到现在的经典放大器模块。
就像真实的放大器一样,不同的放大器和参数设置会直接影响到其他模块处理后的声音,所以使用放大器来作为探索声音效果的最开始是非常必要的,另外,在每个放大器模块中都有一部分额外的扩展参数,这些参数可以模拟真实世界的各种因素对音色的影响,这些额外的参数在几乎所有的放大器上都是相同的,下一章节会先对这些额外的控制功能进行介绍。
2.1额外控制功能点击模块界面右上角的三角标志按钮可以展开额外控制面板,这里提供了绝大多数放大器都具有的相同控制功能:·POWER SUPPLY(电源设置)可以将放大器的电源在50Hz和60Hz之间进行切换,用于对放大器电源内部的DC电压进行校正,不正确的电压可以对声音产生一点微妙的调制效果。
·VARIAC(变压器)会尽力模拟一种AC电源中的可调变压器效果,从而实现可变电压的特点(著名的‘brown sound’效果),或者是超过正常电压值(可以让声音显得更加‘凶猛’)。
Ample China 大笛主面板用户手册说明书

龙吟大笛主面板用户手册Ample China Dongxiao北京博声音元科技有限公司目录1乐器 (1)1.1乐器概述 (1)1.2预制文件读取/保存 (1)1.3语言选择(英文/中文) (1)2主面板 (2)2.1主面板概述 (2)2.2演奏法 (3)2.2.1演奏法分类 (3)2.2.2演奏法使用 (3)2.2.3音头组演奏法 (4)2.2.4音体组演奏法 (4)2.2.5特技组演奏法 (5)2.2.6长音 (5)2.2.7连吐音 (5)2.2.8上倚音 (5)2.2.9下倚音 (5)2.2.10上五声 (5)2.2.11下五声 (6)2.2.12波音 (6)2.2.13前颤音 (6)2.2.14气冲音 (6)2.2.15上历音 (6)2.2.16下历音 (6)2.2.17中啸音 (6)2.2.18气变音 (7)2.2.19气震音 (7)2.2.20颤音 (7)2.2.21花舌 (7)2.2.22打音 (7)2.2.23叠音 (7)2.2.24上滑音 (8)2.2.25下滑音 (8)2.2.26强弱强 (8)2.2.27狼音 (8)2.2.28尾滑音 (8)2.2.29尾冲音 (8)2.2.30乐句 (8)2.2.31气啸音 (9)2.2.32镜像 (9)2.3话筒模式 (9)2.4表情 (9)2.5调 (9)2.6口风 (9)2.7演奏模式 (10)2.8随机音头 (10)2.9连奏模式 (10)2.9.1连奏 (10)2.9.2滑音连奏 (10)2.9.3连奏平滑度 (11)2.10采样循环 (11)2.11弯音 (11)2.12颤音 (11)2.13效果音组 (11)2.14延音踏板开关 (12)1乐器采样乐器:龙吟凤鸣系列C D E F G调五支低音大笛(董雪华手工制);龙吟的乐器面板会显示G调大笛的指法,蓝色点表示当前采样属于G调大笛,绿色点表示采样自其他大笛。
1.1乐器概述1.2预制文件读取/保存点击预置名读取预置,左右箭头快速切换预置。
Sigma Guitars吉他产品手册2022说明书

在20世纪60年代下半叶,美国本土吉他生产商开始面临一个难题:日本开始生产出与美国吉他外观十分相似的吉他产品,迅速以低价打入市场。
这类吉他严重威胁美国产吉他在市场中的主导地位,一些美国生产商对此作出了明智的反应:他们并没有忍气吞声,而是迅速有效地作出了反应,1970年,Sigma Guitars作为一个美国知名品牌的子品牌便诞生在这个微妙的时代。
第一批日产Sigma吉他在以后的年头中都达到其他国家乐器产品可望而不可及的高度。
几年后,Sigma开始转到韩国生产,并适时地推出了新型号和新商标。
Sigma吉他进入市场后,迅速稳固了自己的市场地位,彰显出它的传奇色彩。
其中一些型号被誉为构造与音质并存的极品吉他。
这也是为什么人们对于很难在市场上买到的二手Sigma吉他感到惊叹、却并不意外。
大多数乐手都很爱惜自己的乐器,一旦选定了自己的伙伴、便不会丢弃它。
在世界的各个角落都存在着Sigma爱好者、Sigma社区、Sigma网站,甚至有一些人专门收藏Sigma的各种吉他。
进入21世纪,Sigma Guitars新系列新型号的诞生,表明了这个传奇品牌的重生。
更贴近大众的消费水平,更完整的产品线,更出色的设计,让Sigma Guitars迅速占领了市场。
作为一个负责任的品牌,Sigma Guitars积极响应CITES华盛顿公约内容, 2017年采用米卡塔(米卡塔)作为指板琴桥材料,类似乌木的外观,手感和音色表现,免于日常维护的优点,为Sigma Guitars的产品增添光彩。
SDM-10E / S000M-10E D型或000型全单云杉面板桃花芯背侧板桃花芯木琴颈哑光油漆LR Baggs EAS-VTC拾音器SDP-10E / S000P-10E D型或000型全单云杉面板玻利维亚玫瑰木背侧板桃花芯木琴颈黑色包边哑光油漆LR Baggs EAS-VTC拾音器全单配置,简约实用,该系列型号提供经典的D型、000型以及GrandOM型,但拥有更时尚的外观。
Ample Guitar LP 主面板用户手册说明书

主面板用户手册Ample Guitar LP北京博声音元科技有限公司目录1乐器面板 (4)1.1乐器面板概述(O VERVIEW OF I NSTRUMENT P ANEL) (4)1.2采样库切换(S AMPLE L IBRARY S WIT CH) (4)1.3预制文件读取/保存(S AVE/L OAD P RESET) (4)1.4卷弦器(A LT ERNAT E T UNER) (5)2主面板 (6)2.1主面板概述(O VERVIEW OF M AIN P ANEL) (6)2.2吉他技巧与复音连奏(A RTICULATIONS&P OLY L EGAT O) (7)2.2.1技巧列表(Articulation List) (7)2.2.2标准音与重勾弦-Sustain&Pop (7)2.2.3自然泛音(Natural Harmonic) (7)2.2.4手掌闷音(Palm Mute) (8)2.2.5无头滑音与无尾滑音(Slide In from below&Slide Out downwards) (8)2.2.6连奏滑音(复音连奏)-Legato Slide(Poly Legato) (9)2.2.7击钩弦(复音连奏)-Hammer-On&Pull-Off(Poly Legato) (12)2.2.8双演奏法功能(Doubled Keyswitches) (14)2.3声音模式(S OUND M ODE) (14)2.4双吉他模式(D OUBLED G UIT ARS) (14)2.5丰富的左手演奏噪音(R ICH F RET S OUND) (14)2.6变调夹(C APO) (15)2.7指法逻辑切换(C APO L OGIC M ODE) (15)2.8空弦优先(O PEN S TRING F IRST) (15)2.9演奏模式切换(P LAY M ODE S WIT CH) (15)2.10自动连奏模式切换(A UT O L EGAT O M ODE S WIT CH) (16)2.11自动扫弦噪音(S TROKE N OISE) (16)2.12颤音(V IBRAT O W HEEL) (16)2.13弦指定与把位指定(S TRING F ORCE&C APO F ORCE) (16)2.13.1弦指定(String Force) (16)2.13.2把位指定(Capo Force) (17)2.14效果音组(FX S OUND G ROUP) (17)2.15复音重复键(P OLY R EPEAT ER) (18)2.16延音踏板开关(H OLD P EDAL T OGGLE) (18)1乐器面板1.1乐器面板概述(Overview of Instrument Panel)1.采样库切换(Sample Library Switch)2.预制文件读取/保存(Save/Load Preset)3.卷弦器(Alternate Tuner)4.把位显示(Capo Force Display)5.弦指定显示(String Force Display)1.2采样库切换(Sample Library Switch)AGLP有Neck、Both、Bridge三档采样库。
Crave FlexWave15R 电子吉他放大器用户手册说明书

Guitar AmplifierOwner’s ManualCongratulations and thank you for choosing the Crate FlexWave15R Guitar Amplifier. Thisrugged amplifier combines outstanding features with serious clean and distorted sounds. The built-in spring reverb provides that classic reverb sound for added depth and greater flexibility. A stereo mini-jack input allows connection of a CD or tape player for playing along with your favorite music, and the headphones jack lets you practice in private.In order to get the most out of your new amplifier, we strongly urge you to read this manual before you begin playing.Here are some of the features packed into your new FlexWave15R Combo Amplifier:• 15 watts rms power output • 1 x 12" speaker • Two-Channel Operation —Clean Channel —Overdrive Channel • 3-band EQ• Spring reverb with Level control • CD Input• Headphone Out • External Speaker jackThis device complies with part 15 of the FCC Rules, ICES-003, EN55022 and EN55024. Operation is subject to the following two conditions: (1) This device may not cause harmful interference, and (2) This device must accept any interference received, including interference that may cause undesired operation.1. INPUT: Use this jack to connect your guitar to the amplifier by means of a shield-ed instrument cable.OVERDRIVE CHANNEL: A high gain channel giving you sounds from a slight edge to seri-ous overdrive.2. GAIN: Use this control to adjust the amount of distortion for the Overdrive channel.3. LEVEL: Use this control to adjust the out-put level of the Overdrive channel.4. OVERDRIVE/CLEAN: Use this switchto select the Overdrive or Clean channel. With the switch in the out position, the Clean channel is selected. When the switch is depressed, the Overdrive channel is selected. CLEAN CHANNEL: A normal gain channel designed to give you crystal clear sounds to medium distortion.5. VOL: Use this control to adjust the out-put level of the Clean channel.6. LOW: This adjusts the bass frequencies. Use this control to get the best sounding bass response for your instrument.7. MID: This adjusts the midrange frequen-cies. Use this control to get the best projec-tion and midrange tones for your instrument.8. HIGH: This adjusts the treble frequen-cies. Use this control to attain a bright and lively sound for your instrument.9. REV LEVEL: Use this control to adjust the level of the spring reverb effect.10. CD INPUT: Use this 1/8" stereo mini jack to connect the output from a CD player, MP3 player, laptop, etc., to the amplifier. The signal at this jack is summed into a mono signal, which is sent to the internal power amp circuit. Use the output level con-trol for the signal source to adjust the signal for the proper mix with your guitar.Note: Depending on your CD player or other signal source device, you may need to use an adapter (i.e., two phono jacks to 1/8" stereo plug), available at most electronic outlets. 11. HEADPHONES: Use this 1/8" stereo jack to connect headphones to the amplifier. The internal speaker is disconnected when headphones are used.Note: Depending on your headphones, you may need to use a stereo 1/8" plug to 1/4" jack headphone adapter, available at most electronic outlets.CAUTION: To avoid possible damage to yourhearing, do not use headphones for extend-ed periods of time at extremely loud levels. 12. SPEAKER: Use this jack to connectthe amplifier to an external speaker. The internal speaker is disconnected when this jack is used. The impedance of the external speaker must be 4 ohms or greater.WARNING: Do not attempt to use head-phones in the Speaker jack! Permanenthearing damage could result!13. POWER: Use this switch to turn the ampli-f ier on (top of the switch depressed) and off (bottom of the switch depressed). The switch illuminates when the amplifier is turned on. 14. POWER CORD (rear panel, not shown): The grounded power cord should only be plugged into a grounded power out-let that meets all applicable electrical codes and is compatible with the voltage, power, and frequency requirements stated on the rear panel. Do not attempt to defeat the safety ground connection.The Front Panel:FlexWave15R TECHNICAL SPECIFICATIONS:Output Power Rating15W rms @ 5% THD, 4Ω, 120 VAC Gain Overdrive Ch86 dB ±6 dB @ 1 kHz Clean Ch 46 dB ±6 dB @ 1 kHzCD Input26 dB ±2 dBMaximum Input Signal Accepted2.2 volts rms @ 400 Hz Tone Controls Low 25 dB range @ 80 Hz Mid 19 dB range @ 900 HzHigh23 dB range @ 5 kHz Signal To Noise Ratio Overdrive Ch>50 dBClean Ch>65 dBSpeaker Size and Rating12" Crate Custom Design 4 ohm Power Requirements 120 VAC, 60 Hz, 30 VA100/115 VAC, 50/60 Hz, 30 VA230/240 VAC, 50/60 Hz, 30 VASize (H x W x D) 17.25 in/43.82 cm x 17.50 in/44.45 cm x 10.75 in/37.31 cm Weight22.5 lb/10.2 kgThe FlexWave15R is covered with a durable Tolex material. Wipe it clean with a lint-free cloth.Never spray cleaning agents onto the cabinet. Avoid abrasive cleansers that could damage the finish.Crate continually develops new products, as well as improves existing ones. For this reason, the specificationsand information in this manual are subject to change without notice.“Crate” is a registered trademark of LOUD Technologies Inc. All other brand names mentioned are trademarks orregistered trademarks of their respective holders, and are hereby acknowledged.Service Information:If you are having a problem with your FlexWave15R, you can go to our website() and click on Support for service information, or call 1-800-898-3211 during busi ness hours (7 am to 5 pm PST , Monday-Friday). If you are outside of the U.S., contact your local distributor for technical support and service.©2007 LOUD Technologies Inc.Part No. 0022723 Rev. B 01/07Declaration Of ConformityManufacturer: LOUD Technologies Inc. 16220 Wood-Red Rd. NE Woodinville, WA 98072, USAProduct Name: Crate FlexWave15RProduct Type: Audio Amplifier Complies with Standards: LVD: 92/31/EEC, 93/68/EEC, & 73/23/EWG Safety: EN60065 EMC: EN55013, EN55020, EN55022, EN55103, EN61000-3-2, & EN61000-3-3The official Declaration of Conformity for this product is kept on file at:LOUD Technologies Inc., 16220 Wood-Red Road NE, Woodinville, WA 98072 • Tel: 1-866-858-5832。
Ample Guitar 吉他安装方法
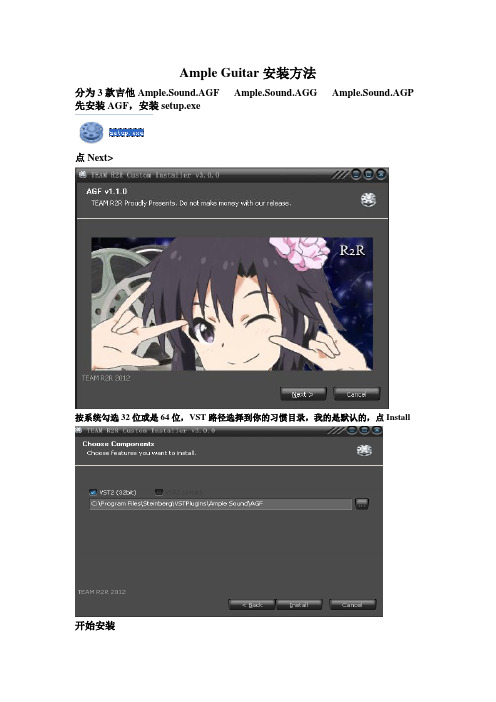
Ample Guitar安装方法分为3款吉他Ample.Sound.AGF Ample.Sound.AGG Ample.Sound.AGP 先安装AGF,安装setup.exe点Next>按系统勾选32位或是64位,VST路径选择到你的习惯目录,我的是默认的,点Install开始安装点Next>点Close安装完成现在在安装采样库,先在自己存放音色的盘符中建立一个Ample Guitar文件夹(位置随意),一会要放3把吉他的库文件,这样方便管理。
如:D:\Ample Guitar用虚拟光驱加载AGF.Library.iso库镜像文件,进入虚拟光驱复制AGF文件夹到刚建立的Ample Guitar文件夹中复制完成后,用缩主软件加载或者桌面的主程序都是一样,为了方便我选择桌面的主程序打开会弹出loading samples failed《加载样品不合格》点确定出现吉他界面点Activation《激活》来注册注册页面打开注册机Ample_Sound_Keygen.exe,复制注册页面Challenge code框中的代码到注册机的Challenge框中,点注册机GENERATE生成注册码复制注册机UserID UserID 框中 复制注册机KeyCode 框中的注册码到注册页面的KeyCode 框中 点注册页面的Activate 激活按键点AMPLE OUND会弹出这个页面点instrumens path:右边的框,会弹出要你选择路径的页面找到你刚才复制的AGF文件夹,选择AGF文件夹,不可再往里面了,就AGF 文件夹,点确定OK 路径已经按自己的选择改变了点AMPLE OUND收起路径页面这时你再点白色的虚拟键盘看看,已经有声音了,恭喜你,安装破解成功============================================================ 接下来我们安装AGG AGP安装发现,他们的安装注册与加载采样库的方法是一样的,在这里就不重复截图了,唯一要注意的事是,注册时要在注册机的PRODUCT框中选择对应的吉他Ample Guitar F 为AGFAmple Guitar G为AGGAmple Guitar P为AGP还有加载采样库时选择对应的库文件夹OK到这里安装注册加载库就全部完成,祝愿所有的音乐人士好运。
Ashdown Engineering Bass Guitar Amplifier用户手册说明书

THANK YOUThank you for purchasing your Ashdown Engineering Amplifier and welcome to the family! We really think you’ve made the right choice and know that this amplifier will give you years of great tone and service. It is a machine though and needs to be looked after, please read through this user manual which will help you get the most out of your new Amp and keep it running as long as some of our happiest and very famouscustomers.Before operating this bass guitar amplifier please read the enclosed safety information document. Please register this product online or by post so we can make sure we give you years of customer supportthrough our friendly in-house service centre.REGISTER ONLINEHere is where you need to visit to register your product:/registerINPUT - There is a single instrument input provided linked to a PASSIVE/ACTIVE selector switch. The Passive input (switch out) is high sensitivity and also high impedance to suit the output from PASSIVE basses. The Active input (switch in) is low sensitivity and lower impedance to suit the output from ACTIVE basses.INPUT CONTROL - The INPUT control sets the signal levelthrough the preamp in conjunction with the INPUT LEVEL VU Meter. This is adjusted to give a reading of 0VU on the meter for average playing dynamics with occasional peaks into the red region. Please note that the setting of this may have to be re-adjusted after modification of the EQ controls.PUSH FLAT / SHAPE - With this button in its OUT position a fixed E.Q. is superimposed on the preamp to give a bright but punchy character to the sound. Pushing this button IN returns the preamp to a Flat frequency response. This function mayalso be controlled from a footswitch. For the footswitch to operate this button must be in its OUT position.DOOM - This routes the signal either through a clean Solid State amplification section (control on zero) or through a Dual Triode Tube amplification/overdrive section in order to add either tonal character i.e. warmth with the control set at 9 o’clock, a slight edge in the sound at 12 0’clock through to an increasing degree of Tube distortion/over-drive as the control is advanced to maximum.A Mix of these two amplification sections can be achieved with this control.N.B. The degree of tube distortion provided by this control will also depend on the setting of the INPUT control.DOOM IN/OUT - This push button switches the valve drivesection IN or OUT. This function may also be controlled from the Ashdown 4 way footswitch. For the footswitch to operate this button must be in its OUT position.E.Q. IN / OUT - This push button switches the Equalisation section IN or OUT i.e. the Bass, Middle and Treble controls plus the two sets of sliders placed between each of these. HEAD OF DOOM USER GUIDE:This function may also be controlled from the Ashdown 4 way footswitch. For the footswitch to operate this button must be in its OUT position.9 BAND EQUALISATION - This consists of BASS, MIDDLE and TREBLE controls with three sliders placed between each control. This can be used in a number of ways:Firstly as a very simple Bass, Middle and Treble tone control section as found on older traditional amplifiers. This is done by leaving The two sets of sliders interposed between these controls set in their centre positions and using only the BASS, MIDDLE and TREBLE controls to alter the overall tone.Secondly, if more control is required then the sliders can also be used to tailor the E.Q. In the regions between the main tone controls. This provides a very versatile Equali-sation section, it is simple to understand and operate, yet provides a wide degree of variation. It retains the simplicity of a three- control tone section but provides the flexibility of a graphic equaliser.SUB HARMONICS - This section produces Sub Harmonics an octave below the notes being played. The level of these Sub Harmonics relative to the straight bass sound can be adjusted using the LEVEL control.This is very effective in thickening the sound and you will find in use that only a small degree of this lower octave is required to really fill out the sound and provide a character that is not possible by any other means.The degree of Sub Harmonics is also dependant on the setting of the BASS control.DIRECT INJECT (D.I.) - A balanced D.I. Is provided on a latching XLR socket. This has a push button placed below it that allows the user to choose either a Pre E.Q. Signal (button pushed IN) or a Post E.Q. Post Sub and effects signal (button OUT).The output signal from this XLR socket is set to a level and impedance suitable for connecting directly into the Microphone input of a mixing desk for either Direct Injection into the PA system or for recording. This must ONLY be used into a Balanced Microphone input, it is not intended for any other type of connection.This has a floating ground that is referenced to the mixing console it is plugged into and should not need ground lifting. It is also unaffected by Phantom Powering on the Microphone input. Make sure your XLR plug does not have the shell of the plug internally connected to signal ground or this will connect the system to chassis ground of the ABM and may cause problems with hum.PUSH TO MUTE - When pushed IN this button mutes the output from the preamp to the power amp, mutes the output from the D.I. Socket and mutes the output from the LINE Out socket as well. This leaves the output from the TUNER socket still available to allow muted tuning. A purple LED is provided next to this switch to indicate when the amplifier is muted. This function operates only from the front panel MUTE push switch. i.e. pressing this button mutes all sound from the amplifier and allows a tuner connected to the TUNER socket to operate for silent tuning. Release the button and you are back in action again.TUNER OUT - This output socket provides a line level signal that can be used for a permanent connection to a tuner.The signal from this socket remains when all other outputsfrom the amplifier are Muted allowing all sound from the amplifier to be silenced while tuning is in progress.LINE OUT -This output socket provides a line level/postOutput Level control signal for connection to an external power amplifier driving additional speaker cabinets.OUTPUT LEVEL - The OUTPUT control adjusts the overall level of the amplifier. Adjust this for your preferred overall stage playing volume in conjunction with the OUTPUT LEVEL VU Meter.LINE INPUT - The rear panel has a Line Input socket for connection of other signal sources into the system. This can be used for plugging a CD, Tape or MP3 player into theamplifier for practising, rehearsing or for connection of a second pre-amp into the system.EFFECTS SEND / RETURN - A serial effects loop is provided at a level of 0dB. The EFFECTS SEND socket can also be used as a Line Out socket if required as the signal path throughthe preamp is only broken when a jack plug is inserted intothe EFFECTS RETURN socket. The EFFECTS SEND is situated after the EQ, the Valve section the Compression and the SubBass Processor.4-WAY FOOTSWITCH SOCKET - For the 4 way footswitch to operate it is essential that the corresponding front panelpush buttons be in the OUT position.This is a mono jack socket for connection of the Ashdown 4 way footswitch (sold separately) only. Always connectthis prior to turning on the power to the amplifier as thefootswitch derives its power from the amplifier and sends a serial data stream to the amplifier in order to operate the various functions.Each of the 4 facilities available for selection is indicatedby an LED (on the FS4) that will light when that facility is selected from the footswitch.SPEAKER OUTPUT - The Speaker Output sockets are also situated on the rear panel of the unit. The HOD has onepower section rated at 666 Watts RMS with two Neutrikcombi speakon out-puts. The Power section has a minimum load of 4 ohms. SLAVE INPUT - There is a slave input on the rear of the head this has been designed to be fed by the transformer isolated outputs if running multiple heads from one input source... ISOLATED INSTRUMENT OUTPUTS - On the rear of the head are 3 transformer isolated outlets labelled A, B and C. These are designed to either feed the slave inputs of multiple heads, if you wish to just use one head as a master.Alternatively if you wish to be able to shape each individual amplifier simply plug your instrument into your master amp and connect slave outputs A, B or C to the instrument input on the front of your other amp.Please see the diagram over page for a few scenarios... SPECIFICATIONS:INPUTS High Input Impedance 3.9M Ohms Input range 50mV to 15V p-p Low Input Impedance 10K Ohms Input range 300mV to 30V p-p Slave Input Impedance 10K Ohms Input range 0dBu nominal Line Input Impedance 22K Ohms Input level 0dBu nominal Effects Return Impedance 22K Ohms Input level 0dBu nominal OUTPUTS Tuner Output Impedance 1K Ohms Level 0dBu nominal Line Output Impedance 10K Ohms Level 0dBu nominal Effects SendImpedance 22K Ohms Level 0dBu nominal D.I. Output600 Ohms balanced Level -20dBu nominal Isolated Instrument Outputs A, B & C 2400 Ohms balanced Level 0dBu nominal EQUALISATION Shape (Push Flat) +8dB @ 50Hz & 4kHz, -8dB @ 400Hz, filter slope - 6dB/octave Bass +/-15dB @ 45Hz Middle +/-15dB @ 660Hz Treble +/-15dB @ 7kHz shelving Slider1 +/-15dB @ 100Hz Slider 2 +/-15dB @ 180Hz Slider 3 +/-15dB @ 340Hz Slider 4 +/************Slider 5 +/************Slider 6 +/-15dB @ 5kHz Frequency Response -3dB at 17Hz and 22KHzSpeaker Outputs Minimum impedance 4 Ohms Output Power 600watts RMS into 4 ohms.NOTES:。
吉他效果器说明书
效果器常用英文单词一览AMPLIFIER(AMP)放大器、扩音机 CHORUS 合唱效果器ANALOG DELAY 模拟延时器 CLEAN 清彻音ATTACK 打进声 CONTROL 控制AUTO 自动 CRUNCH 嘎吱音BALANCINC 平衡 DECAY 衰减BAND 波段 DELAY 延时效果器BANK 组合 DEPTH 深度BEAT 拍、拍子 DIGITAL 数字、数字式BLEND 混合 DISPLAY 显示BOOST 提升 DISTORTION(DIST)失真效果器BRIGHT 明亮 DIRECT OUT 直接信号输出BUTTONS 按钮 DRIVE 驱动CALIBRATION 校音器 ECHO 回声CANCEL 消除 EDIT 编辑CENT 音分 EFFECTORS 效果器COLOR 色彩 EFFECT 效果COMPARE 比较 ELEC.CUTTAR 电吉他COMPRESSOR 压缩效果器 EQUALIZER(EQ)均衡器CHANNEL 通道 FRET 音品CHECK INDICATOR 核对指示灯 FEEDBACK 反馈 CHORD 和弦 FLANGER 弗兰格效果器FOOT SW 脚踏开关 PLAY 弹(放)FOOT VOLUNE 脚踏音量控制器 POWER 电源、功率FREQUENCY 频率 POLARITY 极性(指电源)GAIN 增益 PULL 开关HARD 硬(指声音) PROGRAM 程序HIGH 高(指声音的高调) RATE 比率HEAVY METAL 硬摇滚、重金属乐 RECALL 恢复INPUT 输入插孔 RECORD 录、录音INSTRUMENT 乐器(插孔) REECHO 回响JACK 插梢(或指插孔) REPEAT 反复KNOB 旋钮 RESET 重放LAMP 指示灯 REVERB 混响(效果器)LEAD 超载音 RELEASER 解除、释放LIGHT 指示灯 PHYTHM 节奏LEFT 左(声道) RIGHT 右(声道)LEVEL 电平 SEND 发送LOW 低(指音量) SELECTOR 选择钮LONG 长(指持续音) LENSITIVITY 灵敏度LINE OUT 线路输出 STRING 弦线MASTER VOL 总音量 SHORT 短(指持续音)MIDDLE 中音 SHARP 尖锐(指声音)NOISE GATE 噪声闸(效果器的一种)SIGNAL 信号NUT 琴马 SOUND 音响OVER DRIVE 驱动器(效果器的一种)SOFT 柔和(指声音)OUTPUT 输出插孔 SPEED 速度PARAMETRIC EQ 参数均衡器 SPEAKERS 扬声器PHASER 移相(效果器) STAGE TUNER 弦乐校音仪PHONES 耳机 START 启动PICKUPS 拾音器 STOP 停止PITCH 音准 SUSTAIN 持续音(延音)TIME 时间 SWITCH(SW)开关TIMITER 限幅器 SYNTHESIZER 合成器TONE 音调 TEMPO 拍子速度BOOSTER 提升 VOICES 声音TREBLE 高音 VOLUME 音量TUNER 校音 VOLUME PEDAL音量踏板TUBE MANIA 管爆(失真器果的一种)WAW 哇音WRITE 存储(写入)BOSSGT-5 中文说明书第一章:入门一、构造(以GT-3为例,从左到右、由上而下顺序说明)上面板:1、液晶显示屏2、 *** 118;alues调节旋钮(数值轮)3、BANK踏板:GT-3有两个,GT-5一个,用来变换音色组4、脚踏(大踏板、表情踏板、音量踏板)5、设置按钮(多个)6、小踏板:GT-3有4个、GT-5有5个变换小踏板,用来变换某组内的音色号,最右边为1个控制踏板(C踏板)背面板:1、INPUT:输入插孔,接电吉他2、LEVEL:输出音量(电平)调节旋钮3、OUTPUT R:右声道输出插孔,接音箱等设备4、OUTPUT L(MONO):左声道输出插孔,若非立体声输出,使用此插孔接音箱等设备5、PHONES:耳机插孔,此插孔为3.5mm立体声输出小插孔,也可以利用此插孔接调音台6、SEND:外部效果器(效果设备)输出插孔,接外部效果器(效果设备)的输入插孔7、RETURN:外部效果器(效果设备)输入插孔,接外部效果器(效果设备)的输出插孔8、SUB EXP PEDAL:外部表情踏板接入插孔9、MIDI IN:MIDI输入插孔10、MIDI OUT:MIDI输出插孔11、POWER:GT电源开关按钮12、AC IN 14V:14V直流变压器电源输入插孔=====================================================================二、连接将GT与吉他、音箱等设备连接好后,接通电源。
雷霆50电钢吉他电震器操作手册说明书

Thunder 50 Guitar-Amplifier Operator´s Manual Please, first read this manual carefully!Front: Thunder 50 Reverb, T ype E320Front: Thunder 50, T ype E322 & E3251 Input Input ¼" unbalanced input. Plug your guitar cord in here.2 Gain Controls input sensitivity. Use this knob and the Master (10) control to adjust the volume of the Clean channel. For the Crunch and Lead channels, Channel selector pushbutton for Crunch and Lead modes in the Lead channel. This function can also be activated via a footswitch (jack 15). Once a footpedal is connected, the channel selector pushbutton is deactivated.CAUTION: Extremely high gain and volume levels in the Lead mode can produce strong feedback. Avoid feedback squeals, they lead to hearing loss and damaged speakers!4 Bass Bottom end voicing control.5 Middle Mid-range voicing control. 6 Treble Upper range voicing control.Thunder 50 - is an all-tube guitar amp, fully loaded with all key features. Next to its sonic. With its uncluttered, sensibly arrayed control features, the Thunder comes complete with everything you need to dial in first-class sound. Handling couldn't be easier. With the Thunder, what you see is truly what you get-great looks, great sound. The latest in a line of classy amps, the Thunder delivers that unmistakable ENGL sound-warm, creamy and extremely dynamic tube tone. This operating manual covers three different versions of the amp, the Thunder 50 Combo (model E322), the Thunder 50 Head (model E325) and the Thunder 50 Reverb (model E320), a Combo version equipped with a spring reverb. Quality components, excellent workmanship and strict quality control ensure this amp retains its value. You'll find guidelines on care and maintenance of tube amps on the last page of the manual. Please read and heed these before operating your amp. You'll also come across boxes shaded grey throughout the manual. These are located between the descriptions of the amp's functions and contain handy tips on the preceding function. All critical information pertaining to the operation of this amp is preceded by "NOTE" or "CAU TION." Please pay particular attention to these safety tips. The team wishes you all the best —Volume control for the Crunch channel. Use this knob to adjust the balance of levels between the Crunch and Clean and Lead channels. Note: In the signal chain, this knob is located before the effects loop, meaning that it influences the send signal of the effects loop.7*Reverb (Thunder 50 Reverb, Combo model E320 only) This knob controls the amount of reverb. As you rotate the knob clockwise, the intensity of the reverb effect increases.8 Lead Volume Volume control for the Lead channel (and the Crunch channel at model E320). Use this knob to dial in the desired balance of levels between the Lead (& Crunch at model E320) and Clean channels. Note: In the signal chain, this knob is located before the effects loop, meaning that it influences the send signal of the effects loop.9 Clean / Lead Channel selector pushbutton for Clean and Lead channels, red LED indicate Lead mode; This function can also be activated via a footswitch (jack 15). Once a footpedal is connected, the channel selector pushbutton is deactivated.10 Master Master volume control for power amp output.11 Stand By Power amp standby switch: Use this switch to silence (0 position) the amp when you take a lengthier break. The amp's tubes stay warm, which means that it is ready to roll immediately when you switch it back to full power. The standby switch is also well-suited for muting the amp for brief breaks, for instance when you're switching guitars.12 Power AC power on/off.Suggested Gain settings for the Crunch channel:Remarks and Tips: With the settings we've called "Light Crunch" and "Deep Crunch", you can exploit the entire spectrum of the amp's different channels. "Soft Lead" will roughen up the edges of the Clean channel sound by slightly saturating the preamp. When you activate it for the Lead channel, it generates what we've called "Ultra-Heavy Lead." We recommend that you avoid using this option when you're playing through the Lead channel at fairly high volumes. The noise level (hissing and humming) increases dramatically , as does the likelihood of feedback being generated by your guitar's pick-ups, loudspeaker and preamp. The "Soft Lead" option is only advisable if you generally don't require a heavy lead sound in the Lead channel. It's also helpful if you are accustomed to using your guitar's volume knob-along with the channel switches-to keep the sound of the Clean channel squeaky clean and control the amount of distortion in the Crunch channel. With this configuration, the power amp tends to distort even at low Master volume levels. This is an additional sound sculpting tool that distinguishes the Thunder. We highly recommend the "Light Crunch" setting if you have a serious joyness for classy vintage sounds. In this case, you'll have to turn up the Master knob to bring up the level of the Clean channel. Then use the Crunch channel Volume knob (types E322 and E325 only) and Lead channel volume knob to dial in the desired balance of levels between the Clean sound and Crunch and Lead sounds.from ->to ->Humbucker pickup Single Coil pickup Humbucker pickup Single Coil pickup Gain Gain GainGain Soft Lead Humbucker pickup Soft Lead Single Coil pickupGain GainRear Panel13 AC Socket:Connect AC cord here.CAUTION: Ensure you use an intact AC cord with an insulated plug only!Before you power the amp up, ensure the voltage value printed beside theAC socket corresponds to the available current.14 AC Fuse Box:Contains mains fuse (rear chamber) and spare fuse (front chamber).NOTE: Ensure replacement fuses bear identical ratings (refer to the table)!15 Footswitch: Clean / Lead; Crunch / Lead1/4" stereo jack for double footswitches, executes the following functions:1. Channel switching Clean/Lead (mono terminal)2. Channel switching Crunch/Lead (stereo terminal).Impotant Note: You can use standard two-way footswitches that connect the mono or stereo contact of the ¼" jack and its ground. An LED that serves as a status indicator can also be connected in series (power requirements approx. 10 - 20 milliamperes, depending on function). In practicethough we've found that not every footswitch by every manufacturer under the sun is compatible. If you choose to use the ENGL Z-3 (basic plastic version without LED display) or ENGL Z-4 (rugged metal version with LED display) footswitches, you won't encounter any compatibility problems.16 FX Loop: SendSignal output for the Effects loop. Connect this output to a signal processor’sinput/return jack via a shielded cable with 1/4" plugs.17 FX Loop: ReturnSignal input for the Effects loop. Connect this input to a signal processor’soutput/send jack via a shielded cable with 1/4" plugs.18 Balance:FX mix control for the Effects loop: Rotate the knob to the Dry position for the pureamp signal, i.e. no effect on the signal. Turn clockwise to blend in an effect connected to the loop to the dry signal (parallel/passive). At the Effect position, only the wet signal, i.e. the signalsent from the FX device is fed to the power amp (serial/passive).NOTE:If no effects processor is connected to this loop, leave this control in position Dry! 19, 20 Poweramp Output: 8 Ohms, parallelParallel 8-ohm speaker outs, connected internally in parallel. Connect an 8-ohm cabinet or,in the case of the Combo E320 and E322, its internal speaker here. Alternatively, two 16-ohmcabinets can also be connected to these two outputs.21 Poweramp Output: 16 Ohms, serial16-ohm speaker out, connected internally in series with Jack 22. Connect a 16-ohm cabinet here. Two 8-ohm speakers are connected to Jacks 21 and 22, for example a combination of the internal 8-ohm speaker of the Combo E320 (E322) and an external 8-ohm cabinet,e.g. the ENGL models E112 or E412.C AUTION: If you intend to use a 16-ohm cabinet only, make absolutely certain youconnect it to Jack 21! Jack 22 is only enabled when a speaker is connected to jack 21.22 Poweramp Output: 16 Ohms, serial16 ohms serial. This is an auxiliary output connected in series with Jack 21. This jack is designedfor one application for only—when you are driving a combination of two 8-ohm cabinets/speakers. This output may only be used when an 8-ohm speaker is connected to Jack 21.(See the example for Item 21)NOTE: Never operate the amplifier without a sufficient load, otherwise you may damageor destroy the power amp! Ensure your cabinet’s specifications match the respectiveoutput’s specs.Possible speaker co mbinations:1 x 8 ohms or2 x 16 ohms (Jacks 19 and 20) or1 x 16 ohms (Jack 21!) or2 x 8 ohms (Jacks 21 and 22).Technical Data:Rated power: approx. 50 watts at 8 or 16 ohms; Tubes: V1 (input-tube): ECC 83 / 12AX7, FQ Grade; V2, V3: ECC 83 / 12AX7 selected; V4: ECC 83 / 12AX7, standard; V7, V8: 5881 (6L6GC) matched set.Fuses: external: 1,25 AM (medium) at 230 Volts; 2,5 AM (medium) in the 100 and 120 Volts models. internal: 1,6 AT (slow) at 230 Volts; 3,15AT (slow) in the 100 and 120 Volts models. Important: Replace fuses only against same type and rating!Dimensions: Combo E320 approx. 52,5 x 45 x 25 cm, (20,7 W x 17,7 H x 9,8 T) Head E325 approx. 52,5 x 25 x 25 cm, (20,7 W x 9,8 H x 9,8 T) Weight: Combo: approx. 22 kg (48,4 lbs); Head: approx. 14 kg (30,8 lbs);Tube array:The different options for controlling the Thunder 50 amp remotely:1. T wo-way footswitch (e.g. ENGL Z-4): Connect it to the amp (to jack 15) via a stereo ¼" cord. Functions: Clean/Lead, Crunch/Lead. With this solution, you can't activate the channels Clean, Crunch and Lead directly, i.e. this requires an intermediate switching operation.2. MIDI-Switcher (e.g. ENGL Z-11): Connect the unit to the amp via two stereo ¼" cords. The buttons on the Switcher control Clean/Lead and Crunch/Lead. If you program the diverse channels to different MIDI program locations, you can activate all three channels directly via a MIDI board (e.g. ENGL Z-12). This type of control option is extremely versatile, we recommend it highly if you intend to use the amp in conjunction with a MIDI system (e.g. MIDI effects devices).Handling and CareProtect the amp from mechanical knocks (tubes!).Let the amp cool down before you transport it (approx. 10 minutes).Tubes need about 20 seconds to warm up after you switch the power on, and furtheron a few minutes before they reach their full power capability .Avoid storing the amp in damp or dusty rooms, they are hard on jacks, switches and potentiometers.Make sure air can circulate at the rear and top of the ampto allow for adequate cooling (increases component life).microfonic properties, undesireable noise and unbalanced performance.We reserve the right to make unannounced technical upgrades!ENGL Ger ätebau GmbH, GermanyInternet: Text, design, grafics and layout by Horst Langer。
吉他am技巧
吉他am技巧
电子吉他AM是指使用数字式媒体技术来演奏吉他的一种技术。
它提供了一系列更加准确和完美的吉他声音,使吉他的表现得到更大
的提升。
使用AM的技术,吉他手可以轻松自如地在各种场合展现出自
己的技艺。
首先,熟悉吉他AM的基本理念,例如调整声音的技巧,选择合
适的扬声器,会使进一步提升效果明显。
掌握一些调教重要参数的知识,在实际操作中,利用高低音调、音量、延迟等调整参数,能使得
演奏者成品音更加清晰,效果更好。
此外,在训练吉他AM时,要熟练掌握古典吉他的基础知识,例
如和弦,和弦的变换,手指力度的控制,这些都能在学习吉他AM时起
到重要作用。
另外,还要加强创新练习,研究和探索吉他AM呈现出来
的各种声音,通过实践来拓展自己的演奏技巧。
最后,要注意经常性的练习,加强熟悉AM技巧,以及熟练掌握
与古典吉他技巧相结合的吉他技巧。
只有以上内容都掌握得非常自如,才能真正充分发挥吉他AM技巧的威力,真正地把。
65amps Ventura Guitar Amplifier用户手册说明书

The Ventura Guitar Amplifier Congratulations on your purchase of the Producer!The Ventura, of our “Working Pro” Red Line is a response to the over-saturation of “Lunch Box” amps in the market that are found lacking in quality for professional players. The Ventura illustrates that a compact, portable amp CAN be combined with high-level, professional functionality. The Ventura is made in 65amps’ factory in North Hollywood utilizing the same high-level materials and engineering experience as always. The Ventura uses a 2-6V6 power section and front end utilizing 65amps’ most popular circuits, The Color channel of the London and the Bump Circuit of the SoHo. This allows the Ventura to create a rich palette of American and British tones all with the signature flair that has made 65amps a major presence on top-level tours and recording studios around the world.***READ BEFORE USING AMP FOR THE FIRST TIME***CAUTION - FOR U.S. OPERATION, SET AC VOLTAGE SELECTOR FOR 120 VOLTS ONLY!Tubes:The Producer tube complement consists of two 6v6 tubes.Channels:The Producer has two channels, The Color Channel and the Bump circuit, totaling to four voices that are all accessible through a standard 2-button foot-switch. Master VoltageOur master voltage emulates the tonal response of a big amp only at low volumes. The “Master Voltage”™ knob reduces the B+ voltage and output in the amp in a unique way that keeps the internal tube relationships perfect while keeping the filament voltage up. After seeing all other power schemes’ shortcomings, we’ve come at this from a different angle and we’re very pleased with the results. Y ou can dial this amp down to 3 watts output WITHOUT losing tone, feel, vocabulary, authority, etc.FX Loop - The passive effects loop comes out on a pair of jacks, allowing the user’s own effects to be added after the preamp stage.Bump ControlThe Bump™ control is a much more effective alterna-tive to traditional channel switching. The Bump™ al-lows the user gain-up and re-slope the amp’s tone stack allowing much more midrange to flow through the circuit; thereby gaining up the entire amp naturally and not inducing false preamp gain that creates fizz and buzz. The end result is the effect of having two amps in one.Tone controls:The Tone control for the channel is passive cut-style. We recommend starting at “10” and backing off. With brighter single-coil guitars, the mid’s will focus really well with the TONE set back around “5 to 8”. ON/Standby - Best to turn the POWER switch on first before the Standby and wait about 10 seconds before turning Standby on. This will prolong tube life. When turning the amp off, turn POWER switch off first. This allows the power to drain out of the amp circuit. Y ou can turn off the Standby switch laterbefore turning the amp back on.CHANNEL FTSW - This is allows you to change channels.SPEAKER OUTPUTS - Two speaker outputs in parallel.IMPEDANCE - All 65 212-Combos and Extension Cabinets are wired for 16-ohms (two 8-ohm speak-ers in series). If using two 16-ohm cabinets, set IMPEDANCE to 8-ohms. Always be sure to match the impedance of this amplifier with the impedance of the speaker cabinet you are using.H.T. (High Tension) FUSE - (500mA Slo-Blo) This fuse is in line with the DC voltage in the amp. When the H.T. FUSE blows, it is typically a sign of a bad power tube.A.C. FUSE - (2A/250V Slo Blo) This fuse is connect-ed to the AC primary side of the Power Transformer. CAUTION - Never use a fuse with a higher amper-age rating.Specifications:Specifications:2x 6V6 power section20 WattsHybrid London Color channel and SoHo gain stage front end. 12AT7 Phase inverterBump that works on both channels = 4 VoicesPassive FX LoopMaster VoltageKnobs = Volume, Tone, Master VoltageSwitches = Manual Channel Switch & Manual Bump Switch Footswitch = Dual button that controls channel and bump Pair with cabinet:IMPORTANT: We recommend a qualified technician for retubing. All tubes use the same size socket, but have very different wiring configurations and volt-ages. Placing the wrong tube in the wrong socket can cause damageto the amplifier and tube.PLEASE READ THE FOLLOWING WARNINGS AND USER ADVICE!• Always make sure the AC Voltage Selector is set for the proper voltage (120 volts in the U.S.) before turn-ing on the amplifier!• Always make sure the amplifier is grounded!(3-prong connector - no ground lifts).• Use only a high quality grounded 3-prong AC power cable with this unit. Always look for breaks or exposed wire and replace if defective.• Never remove the chassis from the cabinet! The amplifier will store high voltages long after the amp has been turned off and disconnected from the AC. Changing tubes does not require any internal adjust-ments. Refer all service to a qualified technician.• Do not expose to excessive humidity, direct sun-light or extreme high or low temperatures. Be certain there is adequate ventilation around the amplifier. Never expose to liquids or excessive dust.More info at 。
Guitar Pro 6中文用户操作手册
新建一个乐谱.................................................................................................................................................17
添加音轨 ........................................................................................................................................................ 18
安装.................................................................................................................................................................. 5
增加行为 Inserting Events ...........................................................................................................................21
添加符号 Adding Symbols ..........................................................................................................................22
吉他乐理基础知识

吉他演奏的心态与姿态
保持放松和自然的心态
保持正确的演奏姿态
• 演奏时要保持心情愉悦,避免紧张和焦虑
• 坐姿要舒适,保持身体平衡
• 通过深呼吸和放松练习,调整心态
• 吉他放置位置要适中,便于演奏
• 手指和手腕要自然放松,避免僵硬和紧张
吉他表演的技巧与台风
吉他表演的技巧
吉他表演的台风
• 通过调整练习方法和节奏,克服困难
• 通过学习不同风格的音乐,提高指法的适应性和表现力
• 寻求专业指导和建议,提高练习效果
04
吉他编曲与创作技巧
编曲的基本概念与原
则
• 编曲是将音乐元素进行组织和安排的过程
-编曲包括和弦进行、
节奏安排、声部编写等
•
-编曲的目的是为了让音乐更加丰富、多样和完整
• 编曲的基本原则
音阶与和弦的关系与应用
音阶与和弦的关系
音阶与和弦的应用
• 音阶是构成和弦的基础
• 在编曲和创作中,可以根据音阶选择合适的和弦
• 不同音阶可以构成不同的和弦
• 通过音阶与和弦的组合,可以创造出丰富多样的音乐效
果
03
吉他指法与弹奏技巧
吉他的基本指法介绍
吉他的基本指法包括拨弦、扫弦、指弹等
学习吉他指法需要时间和练习
器
调整音箱和效果器
学习和掌握各种演奏技巧
• 音箱和效果器可以改变音色和音量
• 不同的演奏技巧可以产生不同的音色
• 根据演奏者的需求和风格调整音箱和效果
• 学习和掌握各种演奏技巧,丰富音色表现
器
02
音阶与和弦的构成
音阶的基本概念与种类
音阶是音乐中的基本元素,
Eagletone Aero 8 V2 电子吉他放大器用户手册说明书
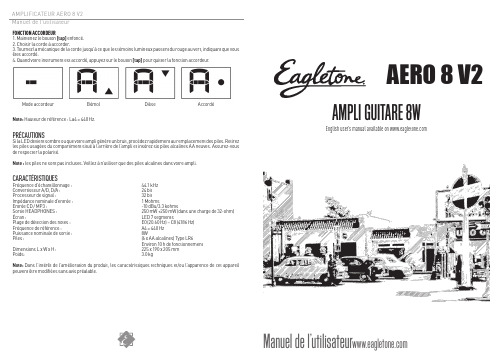
AMPLIFICATEUR AERO 8 V2 Manuel de l’utilisateur AMPLIFICATEUR AERO 8 V2 Manuel de l’utilisateurATTENTION : CONSIGNES IMPORTANTES DE SÉCURITÉÀ LIRE AVANT D’UTILISER CET APPAREIL Veuillez respecter les précautions et conseils de sécurité suivants pour vous assurer d’utiliser l’AERO 8 V2 en toute sécurité.Alimentation électriqueÉtant donné la consommation électrique assez conséquente de cet appareil, nous vous recommandons d’utiliser un adaptateur CA à chaque fois que cela est possible. Lorsque l’alimentation de l’amplificateur se fait par piles, utilisez exclusivement des piles alcalines. Alimentation par adaptateur CAVeillez à utiliser l’adaptateur CA fourni (9 V, 1 A et muni d’une fiche avec le moins au centre).L’emploi d’un adaptateur CA d’un type autre que celui spécifié peut endommager l’appareil et présenter un danger pour votre sécurité.Alimentation par pilesL’AERO 8 V2 fonctionne au moyen de six piles IEC R6 alcalines conventionnelles (format AA).L’ampli ne peut pas faire office de chargeur de batterie. Lisez attentivement l’étiquetage des piles pour vous assurer d’avoir choisi le type approprié.En cas de longue période d’inutilisation, retirez les piles de l’appareil.En cas de fuite du liquide des piles à l’intérieur de l’appareil, nettoyez soigneusement le compartiment à piles et les bornes pour enlever les résidus de liquide. Lorsque l’appareil est en cours d’utilisation, le compartiment à piles doit être fermé. EnvironnementPour éviter tout risque d’incendie, d’électrocution ou de panne, veillez à ne pas utiliser votre MIGHTY8 dans des endroits où il serait exposé à l’une des conditions suivantes :•Températures extrêmes•Sources de chaleur intense, tels que radiateurs ou poêles •Forte humidité•Poussière excessive ou sable•Vibrations excessives ou chocsManipulationNe laissez aucun liquide (eau, jus de fruits, sodas, etc.) pénétrer dans l’appareil.Ne placez jamais d’objets contenant des liquides, tels que des vases ou des verres sur l’AERO8 V2, cela peut provoquer un choc électrique ou une électrocution.Ne placez jamais de flammes nues telles que des bougies allumées sur l’AERO 8 V2, cela présente un risque d’incendie.L’AERO 8 V2 est un instrument de précision. N’exercez aucune pression excessive sur les touches et autres contrôles. Prenez également soin de ne pas faire chuter l’appareil et évitez de lui faire subir des chocs ou toutepression excessive.Veillez qu’aucun objet étranger (pièce de monnaie,épingles, etc.) ou liquide ne pénètre dans l’appareil.Lorsque la prise secteur ou qu’une prise de courantfemelle fait office de moyen de déconnexion, celle-ci doitrester en permanence accessible.ModificationsN’ouvrez jamais l’enceinte de l’AERO 8 V2 et n’essayez pasde modifier le produit de quelque manière que ce soit, celarisque d’endommager l’appareil et d’annuler la garantie.RESPECTEZ TOUTES LES CONSIGNES ET TENEZ COMPTEDE TOUS LES AVERTISSEMENTSCONSERVEZ CES CONSIGNES !PRESENTATIONNous sommes heureux que vous ayez choisi notre minicombo guitare de 8 W de la série l’AERO.L’AERO 8 V2 utilise la technologie Integral Tube Simulation(ITS) conçue pour simuler avec précision la manière dontun ampli tout lampes interagit avec un haut-parleur. Grâceà son DSP 32 bit et son taux d’échantillonnage de 44,1 kHz(qualité CD), l’AERO8 V2 vous donnera un son comparableà celui d’un ampli à lampes jusqu’ici impossible à obtenirdans un mini ampli aussi polyvalent qu’attractif au niveaudu prix.Un commutateur vous permet de passer du canal CLEANau canal LEAD (saturation). En passant par un puissantDSP 32 bit, les canaux CLEAN et LEAD vous offrent untotal de sept simulations de préamplis, CLEAN, BLUES,OVERDRIVE, CRUNCH, CLASSIC, SUPERLEAD et HEAVYMETAL au lieu d’un seul et unique son de distorsion !L’ampli de 4 Watt associé à un haut-parleur de 6,5 poucesfait de l’AERO 8 V2 un combo à la puissance plus quesuffisante, que ce soit en tournée ou dans votre salon.L’AERO8 V2 possède un égaliseur 3 bandes (BASS, MID etTREBLE) simple d’utilisation.Il possède également 6 effets numériques intégrés :Chorus, Flanger, Phaser, Tremolo, Delay et Reverb. LeDelay et la Reverb possèdent leur propre potentiomètreindépendant de celui commandant les effets demodulation.L’AERO 8 V2 possède aussi une fonction Accordeur. Pourl’activer, appuyez pendant 2 secondes sur le bouton Tuner/Select.L’AERO 8 V2 est équipé d’une sortie “MIXER/PHONES”(Table de mixage / Casque) dans laquelle vous pouvezbrancher un casque ou un appareil d’enregistrement.L’AERO 8 V2 possède également deux entrées jack CD/MP3 et LINE IN très pratiques en répétition. Vous pouvezjouer avec une boîte à rythmes, un lecteur CD ou MP3, etc.En fonctionnement sur batterie, six piles alcalines AApermettent de jouer environ dix heures d’affilée.AERO 8 V2 FACE AVANTINPUT (entrée)Branchez votre guitare dans cette prise jack.AMP• CleanModélisé à partir du son très propre des amplis àtransistors.• BluesModélisé à partir du son Blues américain classique.Simule un baffle 4x10 pouces, produisant desfréquences hauts-médiums claires et des gravesgénéreuses. Son « crunch » en fait un incontournablepour les guitaristes blues-rock.• CrunchModélisé à partir de l’ampli combo de classe Abritannique qui a créé le son de Liverpool des années60. Célèbre pour ses fréquences bas-médiums claireset ses graves fermes.• BritishModélise à partir du célèbre combo anglais desannées 60. Cet ampli de type classe A, a permis à desgénérations de fans de danser sur les tubes du plusgrand groupe de Liverpool ! Basses fermes et bas-médiums très bien définis.• ClassicModélisé à partir de l’ampli High Gain anglais desannées 70, c’est l’ampli parfait pour le Classic et leHard Rock.• SoloModélisé à partir de l’ampli américain « Modern HighGain ». Cet ampli à gain super élevé est l’ampli parexcellence pour les soli ou le Métal années 80.• MétalModélisé à partir d’une célèbre pédale Métal crééedans les années 90. Il produit des tonnes de grave etdes hauts-mediums fracassants.• FlatConnectez un micro ou un autre instrument. Son trèspropre et réponse en fréquence plate.GAINCe potentiomètre permet de régler le gain du préampli enfonction du type d’ampli choisi.VOLUMECe bouton permet de régler le volume pour chaque typed’ampli.SECTION EQLes potentiomètres [bass], [mid] et [high] permettent derégler respectivement la réponse dans les fréquencesgraves, médiums et hautes pour les deux canaux.EFXTournez ce potentiomètre pour choisir soit le chorus,le flanger, le phaser ou le tremolo et pour régler sonintensité.DELAY/REVERBTournez ce bouton sur [delay] ou [reverb] afin d’activerl’un de ces effets et d’en ajuster le niveau.TAPAppuyez sur ce bouton afin de définir le temps de délai.Maintenez le bouton enfoncé pour obtenir la fonctionaccordeur.PHONESCette sortie jack mono 6,35 mm vous permet de brancherun casque d’écoute.AUX INVous pouvez connecter un lecteur de CD, un lecteur MP3ou tout autre appareil à cette prise jack 6,35 mm pour êtreaccompagné en musique.AERO 8 V2 FACE ARRIÈREDC 12VBranchez l’adaptateur CA fourni dans cette embase.Assurez-vous que la tension de votre alimentation secteurcorrespond à celle spécifiée sur l’adaptateur avant debrancher le cordon dans votre prise murale.POWERInterrupteur POWER : Met sous et hors tensionl’amplificateur.。