明阳风机安装手册印刷版
风力发电机组安装说明书
风力发电机组安装说明书一、前言感谢您购买我们的风力发电机组。
为了确保您的安全和顺利安装,我们提供以下安装说明。
请仔细阅读本文并按照指导进行操作。
二、安装前准备在开始安装之前,请确保您已经具备以下设备和物料:1. 手持工具:螺丝刀、扳手等;2. 安全装备:手套、护目镜等;3. 安装材料:螺栓、螺母、封胶等;4. 安全设备:梯子、安全带等;5. 安装位置:在地面或其他平坦稳固的地方。
三、安装步骤1. 安装基础:根据风力发电机组的尺寸和重量,选择合适的基础材料,并确保基础牢固。
将基础固定在地面或其他平坦稳固的地方。
2. 安装塔筒:将塔筒部分通过螺栓连接在基础上。
使用螺栓和螺母进行紧固,并使用扳手进行适当的力度控制。
3. 安装发电机组:将风力发电机组安装在塔筒上方。
确保连接牢固,使用螺栓和螺母进行紧固,并使用扳手进行适当的力度控制。
4. 连接电缆:根据风力发电机组的电缆接口,将电缆正确连接到适当的接口上。
确保电缆连接准确无误。
5. 风向调整:根据风力发电机组的设计要求,调整风向。
确保风力发电机组能够最大程度地利用风能。
6. 系统测试:在安装完毕后,进行系统测试,确保各项功能正常运作。
如有异常情况,请及时联系相关技术人员进行排查。
四、注意事项1. 安全第一:在安装过程中,务必佩戴好安全装备。
注意避免高空坠落和其他安全事故的发生。
2. 操作规范:按照操作规范进行安装,确保安装质量和效果。
3. 维护保养:定期检查和维护风力发电机组,以确保其正常运行和延长使用寿命。
4. 风力条件:选择适当的安装位置,确保风力条件符合风力发电机组的要求。
5. 防雷措施:在安装过程中,应考虑防雷措施,以保护风力发电机组及相关设备。
6. 电源接入:在接入电源之前,确保电源符合相关标准,并由专业电工进行接线操作。
五、结语感谢您选择我们的风力发电机组。
如您在安装过程中遇到任何问题,请随时与我们联系,我们将竭诚为您提供技术支持和帮助。
希望我们的产品能够为您带来满意的使用体验和可靠的发电效果。
1 明阳1.5MW风电机组 产品说明-12
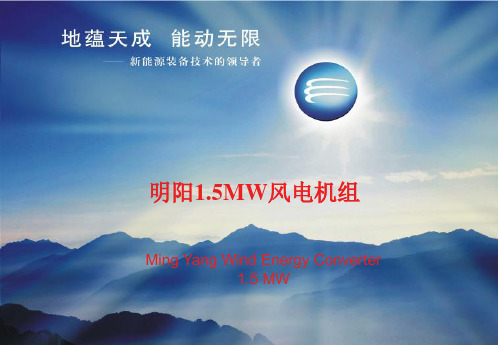
1500 1400 1300 1200 1100 1000
. .............. . . . . . . . 3
4Leabharlann 电功率(kW)900 800 700 600 500 400 300 200 100 0 0 1 2
.
5 6 7 8 9 10 11 12 13 14 15 16 17 18 19 20 21 22 23 24 25 风速(m/s)
年平均风速 (m/s)
技术指标
年发电量 (MWh) 等效年利用小 时(h)
5 6
2038 3317
1359 2211
– 生存温度范围 -20°C - +50 °C – 运行温度范围 -10 °C - +40 °C
7
8
5199
5897
3099
3931
MY1.5Sh 产品说明
• 技术特点:
– 1510kW额定发电功率; – 为南方沿海有台风地区设计; – IEC TC2A+ 设计
1800 1600 1400 P.el(kW)
1200
1000 800 600 400 200 0 0 5 10 15 20 25
Vwind(m/s)
MY1.5MW产品说明
功率曲线 • 82.76 米大叶片风轮:
功率曲线 1600
– – – – – – –
风轮转速范围 9.7 – 19.5 rpm; 风轮额定转速 17.4 rpm 扫风面积:5320 m2 额定风速 10.5 m/s; 切入风速 3 m/s 切出风速 25 m/s 设计寿命 20 年
明阳1.5MW风电机组
Ming Yang Wind Energy Converter 1.5 MW
风机安装指导说明书:
风机安装调试使用说明指导书西安巨龙风机有限公司一、风机的安装(一)安装前的施工准备:1)在安装前首先应准备好安装用材料及工具,并对风机各部件进行全面检查,机件是否完整、叶轮与标示的旋转方向是否一致、各部件联接是否紧固;根据文件核对叶轮、机壳和其它部件的主要安装尺寸是否符合设计要求等。
2)基础的验收和放线:首先,检查地基的外形尺寸;基础划线,以主厂房建筑基点或设备纵横中心线为基准,测得基础纵横主中心线偏差,中心线距离偏差,;基层表面不得有空腔、疏松、夹层和脏杂物;采用拉钢丝挂线锤法对基础进行检验和放线。
3)垫铁的安装:凿平地基,放置地脚螺栓、布置垫铁,厚的放下面,斜垫铁应成对使用;找正后应焊牢、不许松动;平垫铁采用座法安装。
4)风机的准备:清理干净各组件,注意检查机壳,壳内不应掉入和遗留工具和杂在一些结合面上为了防止生锈减少拆卸困难,将半联轴器在电机上。
(二)风机的就位与找正:1)、机壳下半部粗定位:将风机壳体下半部分放在基础上,同时预紧还应校正机壳横向水平度,符合要求后初步固定地脚螺栓.注意安装标记,就位前注意区分与进出口风管的关系、叶轮旋向等.2)、安装进气室,将下半部分螺栓预紧后,拆掉上半部分;安装密封元件,将轴封的下半部分与壳体连接,其端面应与机壳帖合良好。
3)、轴承下瓦安装:下轴瓦、轴承座、轴承盖安装时应使轴瓦背与轴承座孔接触良好,并且要求接触面积均匀,不允许下瓦底部与两侧出现间隙,一旦下瓦两侧有间隙,使轴瓦承受到压强增大,就导致很快磨损。
4)、转子安装:将进风口口环部分认准方向套进叶轮中,把转子吊平后徐徐放下,避免与其它部件碰闯,使转子吊入预定位置。
5)、风机转子找平、找正:转子重要部位的跳动检查:转子的中部和两端、叶轮的进口圈和联轴器等部位的径向跳动,轴径推力盘和联轴器端面等部位的轴向跳动,作记录(应有角度和数值两项内容)转子在位置确定后,应把转子相对于轴承座的位置值(径向和轴向)记录下来,以供检修时参考。
最新明阳维护手册

广东明阳风电技术有限公司明阳1.5MW风力发电机维修与维护手册编写:校对:审核:批准:发布日期:2008年8月工程服务部编写目录前言 (16)第一章 MY1.5s风机简介 (18)1.1 MY1.5S风力发电机的组成 (18)1.2 MY1.5S系列风力发电机的特点 (20)第二章叶片 (22)2.1 简介 (22)2.2 检查与维护 (22)2.2.1 外观检查 (23)2.2.2 叶片螺栓的维护和检查 (26)2.2.3 叶片的安装及拆卸 (28)2.3 工具 (31)2.3.1 工具清单 (31)2.3.2 修复材料及工具清单 (31)第三章轮毂与变桨系统 (33)3.1 变桨系统概述 (33)3.2 变桨系统构成主要部件 (33)3.3 注意事项 (34)3.4 变桨轴承检修 (34)3.4.1 变桨轴承结构图 (35)3.4.2 变桨轴承检查 (35)3.4.3 变桨轴承螺栓检查 (36)3.4.4 变桨轴承润滑 (38)3.5 变桨电机检修 (38)3.5.1 技术参数 (38)3.5.2 变桨电机检查 (38)工程服务部编写3.5.3 检查变桨电机与旋转编码器连接螺栓 (39)3.6 变桨齿轮箱 (40)3.6.1 技术参数 (41)3.6.2 变桨齿轮箱与变桨小齿轮检查 (41)3.6.3 变桨齿轮箱螺栓检测 (42)3.6.4 加润滑油 (42)3.7 变桨控制 (43)3.7.1 变桨控制检查 (43)3.7.2 变桨控制柜螺栓紧固 (43)3.7.3 检查备用电池 (44)3.7.4 限位开关 (44)3.7.5 检查轮毂转速传感器 (44)3.8 轮毂 (45)3.8.1 轮毂外表检查与维护 (45)3.8.2 轮毂与齿轮箱连接螺栓紧固 (45)3.9 滑环 (46)3.10 轮毂装配中所用紧固件分部件统计变桨系统各部件明细 (46)第四章齿轮箱 (48)4.1 简介 (48)4.1.1 功能 (48)4.1.2 原理 (48)4.1.3 技术参数 (48)4.1.4 齿轮箱外型图 (50)4.1.5 冷启动程序 (50)4.1.6 控制器资料摘要 (51)4.2 维护与维修 (52)工程服务部编写4.2.1 齿轮箱外表检查与维护 (54)4.2.2 齿轮箱中所有紧固件维护与维修 (54)4.2.3 齿轮箱中润滑油维护与维修 (56)4.2.4 检查齿轮箱噪音 (57)4.2.5 检查齿轮箱振动情况 (57)4.2.6 检查轮齿啮合及齿表面情况 (57)4.2.7 检测传感器 (58)4.2.8 检测减震支撑 (58)4.2.9 检查加热器 (58)4.2.10 检查润滑泵及冷却润滑 (58)4.2.11 检查避雷板 (58)4.3 齿轮箱拆卸及更换 (58)4.3.1 齿轮箱及内部件拆卸及更换 (58)4.3.2 润滑滤清器拆卸及更换 (58)4.3.3 加热器拆卸及更换 (59)4.3.4 减噪板弹簧拆卸及更换 (59)4.3.5 温度传感器拆卸及更换 (59)4.3.6 雷电电缆拆卸及更换 (59)4.3.7 更换齿轮箱润滑油 (59)4.4 齿轮箱的更换 (60)4.4.1 条件 (60)4.4.2 安全 (60)4.4.2.1 综述 (62)4.4.2.2 安全设施 (62)4.4.2.3 吊车操作 (64)4.4.2.3.1 综述 (64)工程服务部编写4.4.2.3.2 吊车指挥 (65)4.4.2.3.3 吊车挂钩 (65)4.4.2.4 电动工具工作 (65)4.4.2.4.1 综述 (66)4.4.2.4.2 措施 (66)4.4.2.4.3 风机控制系统 (66)4.4.2.5 施工场地的准备 (66)4.4.2.5.1 综述 (66)4.4.2.6 事故处理 (66)4.4.3 叶轮拆卸 (66)4.4.4 机舱罩的拆卸 (69)4.4.5 主轴齿轮箱从机架拆卸 (72)4.4.5.1 主吊升起挂好吊具,固定引导绳,然后开始拆卸螺栓 (72)4.4.5.2.主轴齿轮箱与机架电气连机拆卸 (74)4.4.5.3. 主轴齿轮箱从机架卸下 (74)4.4.5.4. 主轴总成与齿轮箱连接 (74)4.4.5.5 齿轮箱弹性支撑螺栓更换 (77)4.4.6 主轴齿与轮箱吊装到机架 (78)4.4.7 机舱罩的吊装 (82)4.4.8 叶轮的吊装 (82)4.4.9 电气连线 (84)第五章齿轮箱油冷却与润滑系统 (85)5.1 简介 (85)5.1.1 功能 (85)5.2 冷却过程说明 (86)5.3 维护与维修 (89)工程服务部编写5.3.1 检修与维护要求 (89)5.3.2 检查管路连接情况 (89)5.3.3 检查热交换器 (90)5.3.4 检查过滤器 (90)5.3.5 检查润滑泵 (90)5.3.6 检查系统各部件 (90)5.3.7 紧固件检查 (91)5.4 冷却系统拆卸及更换 (91)5.4.1 冷却润滑泵拆卸及更换 (91)5.4.2 过滤网拆卸及更换 (91)5.4.3 油位指示器拆卸及更换 (91)5.5 油位指示器拆卸及更换 (91)第六章联轴器 (92)6.1 简介 (92)6.1.1作用 (92)6.1.2原理图 (92)6.2 检查与维护 (93)6.2.1联轴器外表检查与维护 (93)6.2.2螺栓检测 (94)6.2.3同轴度检测 (94)6.3 设备拆卸及更换 (95)6.3.1联轴器拆卸 (95)6.3.2制动盘拆卸 (95)6.3.3联轴器安装尺寸 (96)6.4 清单 (97)6.4.1螺栓清单 (97)工程服务部编写6.4.2工具清单 (97)第七章液压系统 (98)7.1 简介 (98)7.1.1液压系统外观及参 (98)7.1.2作用与原理 (98)7.1.3系统开机前注意事项 (100)7.2 液压系统检查与维护 (104)7.2.1系统液压油 (105)第八章制动器 (111)8.1 简介 (111)8.2 高速制动器的作用与原理 (111)8.2.1检查与维护 (112)8.2.2螺栓检测(以下涉及到的螺栓编号均为下图的编号,非图纸中的件号) (112)8.2.3检测间隙 (115)8.2.4检测闸瓦 (115)8.2.5检测压力油 (115)8.2.6检测弹簧包 (116)8.2.7检测制动盘 (116)8.2.8检查过滤器 (116)8.2.9传感器检测 (116)8.3 设备拆卸及更换 (116)8.3.1制动器的更换 (116)8.3.2制动器过滤器滤网的更换 (117)8.3.3制动器弹簧包的更换 (118)8.3.4制动器液压油的更换 (118)工程服务部编写8.3.5制动器闸垫的更换 (118)8.3.6制动盘的更换 (119)第九章发电机 (121)9.1 发电机概 (121)9.2 安全规范 (122)9.2.1 注意 (122)9.2.2 定义、警告 (122)9.2.3 安全和应用规范 (124)9.2.4 处理方法 (125)9.3 描述、技术数据 (126)9.3.1 用途 (126)9.3.2 解释 (126)9.3.3 定子 (126)9.3.4 转子 (127)9.3.5 静态加热器 (127)9.3.6 减磨滚柱轴承 (127)9.3.7 冷却和通风 (128)9.3.8 监控设备 (128)9.3.9 滑环室 (129)9.3.10 电气连接 (129)9.3.10.1 定子连接 (129)9.3.10.2 滑环室的连接 (129)9.3.10.3 保护和接地电缆的连接 (129)9.3.10.4 静态加热器的连接 (129)9.3.10.5 通风设备的连接 (129)9.3.10.6 监控设备的连接 (129)工程服务部编写9.3.10.7 技术数据 (129)9.4 相关图纸 (131)9.5 安装、装配 (139)9.5.1 运输、存储 (139)9.5.2 运输后的检查 (139)9.5.3 存储防范 (140)9.5.4 呆装 (140)9.5.5 固定 (141)9.5.6 连接 (141)9.5.7 基础配置 (142)9.5.8 装配连轴器 (142)9.5.9 粗略连接 (142)9.5.10 精细连接 (143)9.6 定子绕阻连接 (144)9.7 接地电缆连接 (145)9.8 辅助电路连接 (145)9.9 收尾工作 (146)9.10 螺栓连接的扳紧力矩 (146)9.11 长时间停机或存储之后检查轴承润滑 (148)9.12 试车 (148)9.12.1 准备 (148)9.12.2 检查绝缘电阻 (148)9.12.2.1 绝缘绕阻烘干 (150)9.12.3 收尾工作 (151)9.12.4 接通 (152)9.13 参数 (152)工程服务部编写9.13.1 极限温度 (152)9.14 运行 (153)9.14.1 接通 (153)9.14.2 停机期间 (153)9.15 维护 (154)9.15.1 维护时间表 (155)9.15.2 常规清理和维护检查 (156)9.15.3 维护检磨轴承 (156)9.15.4 重新添加油脂 (156)9.15.5 更换油脂 (158)9.15.6 维护电刷 (158)9.15.6.1 检查周期为运行一周以后每六个月一次 (158)9.15.6.2 一年之后的检查 (159)9.15.6.3 每年复位电刷 (159)9.15.6.4 关于接地炭刷的特殊信息 (160)9.15.6.5 检查电刷固定器 (161)9.15.6.6 维护滑环 (161)91.5.6.7 清洁滑环室 (162)9.16 一般说明 (162)9.16.1 器件清单 (163)9.17 发电机所需紧固件维护 (164)9.17.1 发电机安装用螺栓1 (164)9.17.2 电机减震器安装用螺栓2 (164)9.17.3 电机减震器安装用螺栓3 (164)9.18 发电机常见故障 (165)9.19 工具 (166)工程服务部编写9.20 发电机的基本维护 (167)9.20.1 概述 (167)9.20.2 发电机的安装 (167)9.20.3 电气连接及空载运转 (167)9.20.4 绝缘电阻 (168)9.20.5 电机拆装 (168)9.20.6 轴承 (169)9.20.7 电机的通风、冷却 (169)9.20.8 发电机与齿轮箱主轴对心 (169)第十章水冷系统检修维护 (171)10.1 使用范围 (171)10.2 设计、制造标准 (171)10.3 工作环境条件 (171)10.4 系统参数 (171)10.5 功能说明 (172)10.6 设备组成 (172)10.6.1 水泵装置 (172)10.6.2 水冷却装置 (173)10.7 设备安装 (174)10.7.1 水泵安装 (174)10.7.2 水冷器安装 (174)10.7.3 管路连接 (174)10.8 系统开机运行 (174)10.8.1 水冷却系统开机调试前检查确认设备安装已完成,管路连接正确,电气接线及供电 (174)10.8.2 系统预充液 (174)工程服务部编写10.8.3 确认电机转向 (174)10.9 系统检修维护 (175)10.10 故障/原因和解决办法 (175)10.11 附图 (177)10.11.1 原理图 (177)10.11.2 水泵装置 (179)10.11.3 水冷装置 (180)10.11.4 PT100图纸 (181)10.11.5 压力开关 (182)10.12. 检查维护 (183)10.12.1 检验要点 (183)10.12.2 防冻剂 (184)10.12.3 密封性检查 (185)10.12.4 紧固件检查 (185)10.12.5 装配步骤 (186)10.12.6 拆卸步骤 (186)10.12.6.1 工具清单 (186)第十一章主机架检修维护 (188)11.1简介 (188)11.1.1 基本参数 (188)11.1.2 环境参数 (188)11.2维护检修 (189)11.2.1 表面清洁 (190)11.2.2 目检防腐 (190)11.2.3 焊缝的检修维护 (190)11.2.4 非紧固件的检修维护 (190)工程服务部编写第十二章偏航部分维护 (190)12.1简介 (190)12.1.1 偏航维护 (190)12.1.1.1功能 (190)12.1.1.2偏航系统的组成 (190)12.1.1.3偏航轴承 (191)12.1.1.4偏航驱动器 (191)12.1.1.5偏航电机 (192)12.1.1.6 偏航制动器 (193)12.1.1.7 偏航润滑泵 (193)12.1.1.8 偏航系统零部件清单 (193)12.2检查与维护 (194)12.2.1 表面检查与维护 (195)12.2.1.1安装后的检查 (195)12.2.1.2轴承的在润滑 (195)12.2.1.2.1 滚道的在润滑 (195)12.2.1.3 齿的再润滑 (195)12.2.1.4 润滑周期填充量 (195)12.2.1.5 密封系统检查 (196)12.2 检查与维护 (197)12.2. 2 紧固件检查与维护 (197)12.2.2.1 偏航轴承装配到上塔筒上用的螺栓 (197)12.2.2.2 将主机架装配到偏航轴承上用的螺栓 (197)12.2.2.3 安装偏航驱动器用螺栓 (197)12.2.2.4 检测安装到偏航刹车夹螺栓 (197)12.2.2.5 检测安装到偏航驱动装置中电机的紧固螺栓 (198)工程服务部编写12.2.3非紧固件检查与维护(用手动扳手打紧) (198)第十三章塔架的检修维护 (175)13.1 简介 (175)13.1.1 工作环境 (175)13.1.2 技术参数 (176)13.1.3 结构 (177)13.2 检查维护 (182)13.2.1 非紧固件的检查维护 (182)13.2.1.1 塔门闭锁机构的核查 (183)13.2.1.2 检查塔的防腐情况 (183)13.2.1.2.1 内部维护 (183)13.2.1.2.2 外部维护 (183)13.2.1.3 检查内部照明和紧急照明 (184)13.2.1.4 检查登高保护系统 (184)12.2.1.5 目检灭火器 (184)13.2.1.6 核检第一救助箱的完整性 (184)13.2.1.7 检查塔门的过滤器 (184)13.2.1.8 检查梯子 (184)13.2.1.9 检查平台 (184)13.2.2 焊缝检查 (184)13.2.3 紧固件检查 (184)13.2.3.1 检查周期 (185)13.2.3.2 检查法兰连接螺栓 (185)13.2.3.3 塔筒附件螺栓 (187)13.2.3.3.1 门外梯子平台、塔筒门紧固件清单 (187)12.2.3.3.2 梯子紧固件 (188)13.3 拆卸与更换 (190)工程服务部编写13.3.1 注意事项 (190)13.3.2 工具及消耗品清单 (190)第十四章罩体维护及检验 (192)14.1 简介 (192)14.2 检查与维护 (193)14.2.1 外表检查与维护 (194)14.2.2 螺栓检验 (195)14.2.2.1 机架悬臂上的弹性轴承与机舱罩联结用螺栓 (195)14.2.2.2 机舱罩弹性支撑与机架固定用螺栓 (195)14.2.3 检查机舱罩各组成部分之间联结用螺栓 (196)14.2.4 航空灯的检查维护 (197)14.2.5 风速风向仪检查维护 (197)14.3 修复 (197)14.3.1 前提要求 (197)14.3.2 工艺准备 (197)14.3.3 操作 (198)14.3.4 固化 (199)14.4 所用工具 (200)工程服务部编写前言本手册包含了MY1.5S型风力发电机的维护与维修信息,是风力发电机维修人员的技术依据。
风机安装的基本手册范本

风机的安装手册第一条为保证风机稳定可靠的运行,风机应牢固的安装在基础之上。
基础应有足够的重量,并有适当大的尺寸,风机基础的大小应比风机底座宽出200-250mm,风机安装前应在基础表面铲出垫铁位置和麻面,预留地脚螺栓孔清理干净使二次灌浆能与基础紧密结合,风机安装的基础应符合有关设计图的要求。
第二条风机的开箱检查应符合下列要求:1、根据设备装箱清单,核对叶轮、机壳和其他部位(如地脚孔中心距、进、排气口法兰孔径和方位及中心距、轴的中心标高等)的主要安装尺寸是否与设计相符;2、叶轮旋转方向应符合设备技术文件的规定;3、进、排气口应有盖板严密遮盖,防止尘土和杂物进入;4、检查风机外露部分各加工面的防锈情况,和转子是否发生明显的变形或严重锈蚀、碰伤等,如有上述情况应会同有关单位研究处理。
第三条风机的搬运和吊装应符合下列要求:1、现场组装的风机,绳索的捆缚不得损伤机件表面和转子与齿轮轴两端中心孔、轴瓦的推力面和推力盘的端面机壳水平中分面的连接螺栓孔、转子轴颈和轴封处均不应作为捆缚部位;2、输送特殊介质的风机转子和机壳内涂有保护层,应严加保护,不得损伤;3、不应将转子和齿轮轴直接放在地上滚动或移动。
第四条风机的润滑、油冷却和密封系统的管路除应清洗干净和畅通外(其受压部分均应作强度试验,试验压力如设备技术文件无规定时,用水压试验时试验压力应为最高工作压力的 1.25~1.5倍,用气压试验时试验压力应为工作压力的1.05倍)现场配制的润滑、密封管路应进行除锈、清洗处理。
第五条风机的进气管、排气管、阀件调节装置和气体加热成冷却装置油路系统管路等均应有单独的支撑并与基础或其他建筑物连接牢固;各管路与风机连接时法兰面应对中贴平,不应硬拉和别劲,风机机壳不应承受其他机件的重量,防止机壳变形。
管路安装完毕后,应复测机组的不同轴度是否符合要求。
第六条风机连接的管路需要切割或焊接时,不应使机壳发生变形,一般宜在管路与机壳脱开后进行。
明阳2.0型风力发电机组用户手册(电气)
航对风。
风机机舱罩由玻璃钢制成,它可保护机舱内部各组件免受雨、雪、灰尘、太阳辐射等的破坏。从
塔架内通过爬梯可以到达机舱,爬梯上配备有助爬器(可选)。
机舱内部包含有一台维护吊机,额定起重重量为 250kg。
塔架外形为锥形,塔架采用特殊的防腐蚀保护工艺,保证风场当地环境生存期的防腐要求。
风力发电机组的所有功能由控制系统启动并管理,并具有先进的控制策略。
II
MY2.0 型风力发电机组 文件号:MF.W16.410.006
电气用户手册
版 本:V1.0
1 前言
1.1 概述
为了保证安全操作风力发电机组,相关人员须认真阅读并遵守本手册的安全操作指南,任何错误 操作和违章行为都可能导致机组严重损坏或危及来访人员。本手册内容包括:安全操作指南、机组的 基本技术参数、机组零部件说明以及操作系统说明。
I
MY2.0 型风力发电机组 电气用户手册
文件号:MF.W16.410.006 版 本:V1.0
5.3 操作、监视界面 .................................................................... 24 5.3.1 系统总览界面 .................................................................. 24 5.3.2 用户登录界面 .................................................................. 25 5.3.3 机组浏览器界面 ................................................................ 25 5.3.4 系统综览趋势图界面 ............................................................ 26 5.3.5 手动控制系统界面 .............................................................. 27 5.3.6 温度界面 ...................................................................... 28
明阳1[1].5MW风电机组安装说明091120
![明阳1[1].5MW风电机组安装说明091120](https://img.taocdn.com/s3/m/bcc4fc0be87101f69e319588.png)
塔筒
• 叶轮部分将分成轮毂、ang 1.5 MW / Loop 1 Development / December 2006
运输及卸车
MY1500型风机的安装和设备组装需要下列必要的运输条件 三辆卡车用于运输塔筒,一节塔筒需要一辆卡车
Ming Yang 1.5 MW / Loop 1 Development / December 2006
机舱吊装1
挂好机舱专用吊具拆掉运输支架; 机舱吊装用吊带30吨4根(8.4米、10米各两根),30吨卸扣4副;装上2 根150M 的风 绳用引导机舱的方向;启动大吊车,提升机舱;将机舱提升超过上塔筒的上法兰后, 按照塔上
Ming Yang 1.5 MW / Loop 1 Development / December 2006
机舱吊装注意事项
注释:
当平均风速超过 10m/s或阵风超过 12m/s时,切勿安装塔 架。咨询当地气象预报 部门和起重机风速仪。 第三节塔筒吊装完毕, 应立即吊装机舱,风速 过大不能起吊机舱时应 把第三节塔筒吊下。
Ming Yang 1.5 MW / Loop 1 Development / December 2006
草原上满发中的MY1.5se 风机(82.6米风轮) 达茂旗巴音敖包草原
Ming Yang 1.5 MW / Loop 1 Development / December 2006
MY1.5se 风机 运行状况 大风中稳定满发的 达茂旗巴音敖包草原
Ming Yang 1.5 MW / Loop 1 Development / December 2006
主机
Ming Yang 1.5 MW / Loop 1 Development / December 2006
NEMO500 风力发电机安装手册说明书

Instruction Manual NEMO500Version1.1 TM1. I ntroduction:This manual contains installation and safety information for the Nemo500 Wind turbine. The information in this manual is believed to be accurate and reliable; however,The Distributor assumes no responsibility for inaccuracies or omissions. Our company reserves the right to make changes to this product specification, or its manual, without prior notice. Therefore, check the Shoot Power Website for updates as necessary.The wind turbine, like other sources of electrical power, must be installed following the guidelines established by state and local regulations. Consult a local electrician or local planning and zoning offices for detailed information about your area.For your ease write the serial number of your wind turbine on the front of this manual. Store your manual and receipt together. You will need this information in the event of a warranty claim.CONGRATULATIONS!You will find your new wind turbine easy to install. However, it is important that you read this manual thoroughly prior to installation to assure proper performance and safety.If you have any questions after reading the manual, please contact the Distributor.2TABLE OF CONTENTS3. WIRING AND INSTALLATION PROCEDURES3.1 System wiring diagrams4.LOCATION SELECTION5. TOWER6.1 SINGLE WIND GENERATOR6.2CONTROLLER WIRING6.3 INSTALLATION OPERATION6.4 ATTACHING TO POLE6.5 STEP-BY-STEP INSTRUCTION7. WARRANTY POLICY7.1 ELEVATION8. SPECIFICATIONS 4 4 4 456 6789 10 1111 12 15 15 161. PRECAUTIONSThe wind turbine has been designed with your safety in mind. However,there are inherent dangers involved with any electrical and/or mechanicalequipment. Safety must be your primary concern as you plan the location,installation and operation of the turbine. At all times be aware of electrical,mechanical and rotor blade hazards.1.1 MECHANICAL HAZARDRotating blades present the most serious hazard. The rotor blades are made of very strong thermoplastic. At the tip, the blades may be moving at velocities over 275 miles per hour (440 km/hr). At this speed, the tip of a blade is nearly invisible and can cause serious injury. Under no circumstances should you install the turbine where a person could come in contact with moving rotor blades. DO NOT INSTALL THE TURBINEWHERE ANYONE CAN APPROACH THE PATH OF THE BLADES.1.2 ELECTRICAL HAZARDS*Observe all manufacturers' safety procedures when working around batteries andother electrical equipment.The wind turbine is equipped with sophisticated electronics designed to provide protection from high surge electrical dangers. The internal electronics of the wind turbine prevents open circuit voltages from rising above 20 volts for 12-volt systems. Please note that the inherent personal dangers from electrical current still exist, therefore caution should always be used when connecting this and other electrical devices.Heat in wiring systems is often a result of too much current flowing through anundersized wire or through a bad connection.Batteries can deliver a dangerous amount of current. If a short occurs in the wiringfrom the batteries, a fire can result. In order to avoid this threat, a properly sized fuseor circuit breaker is required in the lines connecting to the battery.1.3 INSTALLATION PRECAUTIONS:Installation procedures should be performed at ground level.Make sure that all batteries are disconnected throughout the installation process.Never install the AWS Wind Turbine upside down.Choose a day when the wind is calm.Connect the 2 wires coming from the Wind Turbine to the control switch panel. Then, connect control panel output wires to the battery bank.From Wind turbine and swtich panel has two wires(Black = Negative (-)Red = positive (+)) ensuring they do not made a mistake.1.4 OPERATION PRECAUTIONSCheck support structures, blades, and electrical systems regularly. The rotor blades are very strong; however, if they come in contact with a solid object, they can break. When performing periodic inspections, or if you must approach the path of the blades, disconnect the power leads from the battery and tie the wind turbine output leadstogether to stop /slow down the blades from rotating.Note: There is a short break-in period with new wind turbines. The bearings in both theturbine yaw and the turbine rotor will require approximately 60-100 hours of operation in normal wind speeds (approximately 18 – 20 mph, 8 – 9 m/s) before they are running at peak efficiency. During this break-in period, the turbine operation might appear sluggish.2. PACKAGE CONTENTSROTOR BLADES ARE SHARP. PLEASE HANDLE WITH CARE. USE CHART BELOW TO COMPARE PARTS.1. N ose Cone2. S crew Socket Head3. N ut-Jam-SAE 5/8-184. B lade5. H UB6. N ut-Nylock-SAE 6-327. S crew Socket head 10-24 x 1-1/2”8. F ace Assembly 10. Rotor11. O-Ring12. Body Assembly13. Snap Ring- 32 MM External 14. Yaw Shaft Assembly15. Internal MPPT Controller 16. Power Meter box63. WIRING AND INSTALLATION PROCEDURESYour Wind Turbine is shipped partially assembled. Please completely readall procedures before beginning installation. NOTE: Do not install the blade/hub until the turbine is mounted on the tower4mm hex key wrench (included)5mm hex key wrench (included)8mm hex key wrench (included)Power cables (not included):#12 AWG (American Wire Gage) stranded.Batteries (not included)Steel Pipe: 1 1/2", Schedule 40 steel pipe (Actual OD 1.875 inches, 48mm) (not included)Torque wrench with 4mm, 5mm, and 8mm hex drives (not included)Soldering iron or propane torch (not included)Rosin core solder (not included)Electrical tape or 1/4” (6-7mm) heat shrink (not included)Wire strippers (not included)Wire crimpers (not included)NOTE: Do not connect to the battery.Precheckand negative wires. With the wiresmore difficult to rotate. With the wires disconnected, it should spin freely.Every time connect the DCOUTPUT's wires (RED= Positive, BLACK = Negative)directly to the set of posts of thelighten to indicate that the controller is running properly.EVEN A SECOND, OR ELSE WILL DAMAGE THE WIND GENERATOR'S CONTROLLER AND VOID YOUR WARRANTY.4. LOCATION SELECTIONTo ensure good performance from the Wind Generator, it is important thatcare is taken in the site of the machine. Buildings, trees and rocky outcrops etc. disrupt the smooth flow of wind creating a “Wind Shear” with the wind velocity nearer the ground being slower than that higher up. Turbulence isalso created by these obstructions. Turbulence is detrimental as the swirlingair causes the Wind Generator to yaw continually thus stressing the mechanical parts and greatly increasing wear and tear.Sharp edgesCreate turbulence2H20HTurbulent airflow created by obstructions (Ad. P. Gipe, 93) Therefore, as a general rule the Wind Generator should be mounted twice as high as any such obstructions. The power obtained from the wind is proportional the cube of the wind speed, and the wind speed increases with height from the ground. A 26% increase in wind speed from a higher tower will yield a 100% increase in power from the wind generator. A little more money spent on a higher tower will harvest the same power as 2 machines! Preference should be given to the prevailing wind direction, but it should be noted that tall features behind the Wind Generator can also slow down the wind flow through the Wind Generator.7The Wind Generator should be mounted on a tower a minimum of 25'(8 meters) above any surrounding objects within a 500' (150m) radius.If this is not possible, then place it as high as you can. If this is a rooftop installation, it is important there are no objects around the structure that may block the wind.5. TOWERGreat care should be taken in the selection and preparation of the wind generator's tower, as this is the most difficult and crucial aspect of the entire installation. If you select a tower from another source or build your own, you are responsible for assuring the tower is suitable. As with all towers, you must first evaluate your site to determine the appropriate tower height, available space and reasonable cost.The following list considerations must be consulted:Number of Wind GeneratorsBudgetType: guyed, freestanding or rooftopSite: hills, trees, buildingsEase of useNote: Guyed And Freestanding Towers Are The Most Common Way To Install A Wind Generator. These Towers Are Available In All Shapes, Sizes And Costs. Caution: Do Not Install The Wind Generator Where The Path Of TheBlades Can Be Reached During Normal Operation! Never ApproachThe Wind Generator During Operation!Usually, the higher tower is erected, the greater the output, but also the greater cost and effort of the installation. If purchasing a taller tower will provide significantly more power it might offset the additional cost and effort. It's very important to mount the wind generator in the best winds while being balanced by the cost and effort of the installation.This Wind Generator is designed to use steel pipe 1.875 inch (48mm) outside diameter, equivalent to 1 ½ inch SCH 40 pipe, which can be usedin some tower applications. If larger pipe is used for your tower, makesure that the 1.875 inch pipe is at least 22 inch long or will damage the blades. Refer to SPHERE OF OPERATION (Minimum Safe Pole Length Above Obstructions).CAUTION: SAFETY, ENGINEERING AND LOCAL CODES MUST BE ADDRESSED BEFORE ATTEMPTING ANY INSTALLATION.NOTE: The yaw wires can support loads up to a total of 155 lbs. (70kg). If the wire weight is higher, you must install a strain relief to minimize the stress put on the hanging wires.NOTE: Towers must be capable of withstanding 155 lb. (70kg) of load in the horizontal direction at the Wind Generator.86.1. Single wind generatorGenerator Mode Lamp Status CauseNormal mode Stop mode Solid GreenFlashing redCharging wind speed3.13m/s to 9m/sRotor ro ta ting at lowspin or stopRotor ro ta ting at lowspin or stopFlashing red andgreen lightalternativelyThe alternatortemperatureexceeded 90C ortemperature sensordamageRotor rotating at0-1000rpmNormal mode Flashing green Charging windspeed to 9m/s to16m/sRotor rotating at1000rpm to 1500rpmSystem returns tonormal mode if thebattery voltagedrops below 13.1V,24V system 26.2VNormal ModeBattery fully charged(voltage exceeds 14.1V)or 24V system 28.2VNormallyNormallyOperationSystem returns to normal mode if the control temperature drops below 60CStop mode Solid red Rotor ro ta ting at lowspin or stopThe output is reach peakpower.It will stop 30minsand restart again9106.2 CONTROLLER WIRINGDo not make a wrong positive and negative connections to the power meter box or the battery bank.The wrong positive and negative connection or positive and negative in short circuit condition will damage the power meter box or wind turbine controller, the warranty will not cover.Black is for negative.When the green light is on or flashing, it is normal charging.Please connect with power meter box in any time, without power meter box positive and negative direct short circuit easily damaged internal controller in wind condition, the warranty will not covered.The power meter box main function is display and break the wind turbine, theMPPT controller in the wind turbine body.B”+” is battery”+”B”-” is battery”-”Wind”+” is Wind turbine”+” ; Wind”-” is Wind turbine”-” ;ImportantUse bolt driver to remove the 4pcs screws on the backside of the meter box and open it, then install the cables from the wind turbine and battery to the power meter box board as the following photo:For more information about some very economical tower kits for thewind generator, please refer or purchase them from your dealer or distributor.6.3 INSTALLATION OPERATIONChoose a calm day and have someone available to help during the installation process.NOTE: THE BLADE EDGES ARE SHARP. PLEASE HANDLE IT CAREFULLY. NOTE: DO NOT install the blade assembly until the body is mounted onthe tower.CAUTION: ALL BATTERIES MUST DISCONNECTED THROUGHOUTTHE INSTALLATION PROCESS!CAUTION: DO NOT INSTALL THE WIND GENERATOR WHERE THEPATH OF THE BLADES CAN BE REACHED DURING NORMAL OPERATION! NEVER APPROACH THE WIND GENERATOR DURING OPERATION!USE COMMON SENSE AND PLEASE BE CAREFUL!6.4 Attaching to poleRight Right WrongFigure 3 Proper Blade-to-Tower Clearances6.5 Step-by-step instructionsoutline of the Marine grade Nemo500 wind turbine installation process. This consolidated reference should only be used as an outline during installation. Refer to the appropriate sections for further details.1).Ensure the voltage systems of the wind generator and the battery bank are the same. Prepare the appropriate wires.2).Run the wire through the pipe and drag the wires near to the batteries(Do not connect to the battery), strip the insulation back from each set of wires.b a t t e r y3).Connect the Wind Generator to the wires and insulate the connections using either heat shrink tubing or a quality electrical tape.4).Once the yaw shaft is on the tower, firmly tighten the yaw clamp screws with the 4mm hex key to 3-5 foot pounds(4.0-6.5Nm). Be sure that it is securely attached to the mounts.Slide the yaw shaft all the way down over the end of pole being careful not to pinch the yaw wires. Be sure to leave enough slack in the wires so that if necessary, the Wind Generator can be removed.5) Prepare a grounding cable from yaw shaft screw, secure the grounding cable against the pipe with insulation tape for grounding the windgenerator by the pipe.6).Place one of the blades on the hub socket and insert one of the M6-15socket head cap screws. Place a plastic disk on the end of the screw, then place self-locking nut (M6) and tighten it with the 5mm hex key to 8-107). Remove the M16 nut from the rotor shaft. Slide the blades assembly ontothe blades assembly. Holding the blades assembly and tightening the M16nut lightly with the 8mm hex key. Finally, spin the blades slowly to be sure they turn freely.8mm Hex KeyCAUTION: DO NOT SCREW M16 NUT TOO TIGHTLY, OTHERWISE THE FACE BEARING WILL BE STUCK AND THE BLADES ROTATE DIFFICULTLY!9) Place the nose cone over the center line of the blades assembly and snap the nose cone into place. Carefully check it is secure by firmly pulling on and be sure all three edges are catch. Don't worry if the nose cone missing, it will not affect the performance of the wind generator.Nose Cone9)Before attaching the wiring to the battery, make sure that:a.All wires connect to the control box and battery ok.b.The stop switch is in the "Stop"position.Note: GroundingFor long-term operation and protecting the electronics, properly grounding is very important. Grounding procedures must be followed along with any local electrical codes.The negative wire of your system should be connected to a ground. This is usually done by connecting a wire from the negative battery terminal to a nearby ground rod. Wires with the same ratings as the positive andnegative wires must connect all system grounds.A ground electrode can be made for systems without an existing systemground from an 8 ft. (2.4 m) section of 3/4" (19 mm) galvanized pipe orconduit, or an 8 ft. (2.4 m) section of 5/8" (16 mm) iron or steel rod. Thisground electrode must be buried completely beneath the soil, at no more than 45 degrees from vertical, or horizontally at least 2 1/2 ft. (75 cm)beneath the surface. It is recommended that the ground electrode beinstalled as close as possible to the batteries for maximum lightningprotection. The base of the tower is also a good location for anappropriate surge arrestor.Caution: Improper Grounding Will Damage Your Wind GeneratorAnd Void Your Warranty.10)Carefully raise the tower and secure base and/or guy cables.Caution: Ensure That The Tower Is Vertical So That The WindGenerator Can Yaw (turn Into The Wind) Properly.CONGRATULATIONS! You have completed the installation process now.FEET1-500ftMETER 0-150m OUTPUT POWER 100%500-1,000ft1,000-2,000ft2,000-3,000ft3,000-4,000ft4,000-5,000ft 5,000-6,000ft6,000-7,000ft7,000-8,000ft8,000-9,000ft9,000-10,000ft 150-300m 300-600m 600-900m 900-1,200m 1,200-1,500m 1,500-1,800m 1,800-2,100m 2,100-2,400m 2,400-2,700m 2,700-3,000m 97%94%91%88%85%82%79%76%73%70%7.1 ELEVATIONAn important fact to keep in mind is elevation. The higher a Wind Generator is from sea level, the lower the air density. Air density is directlyproportional to the output of your Wind Generator. Here are somegeneral numbers to keep in mind when determine the maximum output that can be expected from a Wind Generator.7. Warranty policy proof of purchase is required(Receipt)Our company wind turbineour companyother obligations in connection to our company and it products. Any impliedOur company8. SPECIFICATIONSTMShoot Power Equipment Co., LtdMade In China。
风机现场安装作业指导手册100512

明阳2.0型风力发电机组用户手册(电气)

航对风。
风机机舱罩由玻璃钢制成,它可保护机舱内部各组件免受雨、雪、灰尘、太阳辐射等的破坏。从
塔架内通过爬梯可以到达机舱,爬梯上配备有助爬器(可选)。
机舱内部包含有一台维护吊机,额定起重重量为 250kg。
塔架外形为锥形,塔架采用特殊的防腐蚀保护工艺,保证风场当地环境生存期的防腐要求。
风力发电机组的所有功能由控制系统启动并管理,并具有先进的控制策略。
2.2 安全系统
2.2.1 人身安全
风力发电机组是根据标准的工程技术规定设计和制造的,所以根据规程进行操作对工作人员的安 全和健康没有任何危险。
各控制元件都设置在容易操作的地方,且保证操作安全,有明确标志加以保护,以防止无意启动。 注意:未经授权而拆卸或连接(旁路)安全设备,如果造成伤害,任何责任索赔无效。 所有危险部位和危险驱动部件都有防护设备,这些设备只有在专业人员在进行维修和保养时,才 允许被打开或拆卸。 必须穿戴和使用安全防护用品,以避免工作中发生事故和对个人身体健康产生危害。 在存在一定安全风险的部件上工作之前,必须通过机舱控制柜或塔基控制柜面板上的开关将机组 切换到“维护状态”。同时,要在开关上应悬挂明显的警告标志,以避免其他人无意的操作。 机组切换到“维护状态”时,机组无法启动,但允许部分手动控制(正常运行时是不允许的)。 在轮毂中进行维护工作时,不允许变桨系统进行变桨动作,除非在特殊情况下,并且采取了特殊 的防范措施。每个叶片有一个锁紧装置,当检修叶片变桨驱动时必须启用该锁紧装置。 在轮毂或在传动链部件上工作时必须启用风轮锁定装置。 在系统检修时,同一时间内可以关闭一个偏航驱动,其他的驱动可以承受偏航所需的负载。 1)工作服 服装必须与所从事的工作性质相适应。禁止穿着松散宽大的罩衫,宽松衣袖的外衣和宽大裤腿的 裤子。在机器附近工作时,不得穿戴长围巾或穿着有长带子的服装。袖口应当扎紧。
风电安装手册

风力发电机安全手册编号:FT000320-IT R00目录1.责任与义务2.安全和防护设备2.1 必备设备2.2 用于特殊操作的设备2.2.1 用于紧急下降的设备2.2.2 其它特殊操作3.基本安装注意事项3.1 概述3.2 对风力发电机的操作3.3 在风力发电机附近逗留及活动3.4 访问控制单元和面板3.5 访问变压器平台4.安全设备4.1 紧急停止4.2 与电网断开4.3 过速保护设备(VOG)4.4 机械安全设备4.4.1 啮合锁4.4.2 活动元件的保护罩4.4.3 机舱顶的栏杆4.4.4 机舱后门的栏杆5.在风力发电机内部检查或工作6.对风力发电机的设备的操作6.1 使用绞盘6.2 使用紧急下降器7.风力发电机的固定8.急救9.应急计划10.发生火灾时的应急措施11.发生事故时的措施1.责任与义务Gamesa Eólica将安全与健康方向的考虑放在首位并一以贯之,因此在我们生产的风力发电机的设计中体现了防护的需要。
设计是在决不损害人、动物或者财产的前提下进行的。
因此,只要风力发电机的安装、维护和使用遵照Gamesa Eólica的设计,就不会出现这方向的问题。
经批准接触或使用风力发电机的人员在《工作场所安全与健康》方面有权得到有效保护。
同样,经批准在风力发电机中进行有关工作的人员必须遵守《工作场所的安全与健康以防工作场所事故》的有关法律及法规,在执行任务时必须正确地使用工作设备和所有防护性设备,在可能遇到的危险情况的出现必须及时报告。
经批准执行安装任务的人员必须已经接收了足够且合适的理论与实践方面的训练以正确执行任务。
本文档介绍基本的预防,在接触风力发电机时在安全方面必须遵守的义务及程序。
不同维护工作的具体安全措施将在有关这些操作的具体文档中介绍。
2.安全及防护设备2.1必备设备在对风力发电机进行任何检查或者维护工作之前,每个人至少应该理解如下设备的使用说明:●安全设备●可调的系索●系索(1m和2m)●安全头盔●安全手套●防护服除了上面指出的设备外,每个维护或者检查小组必须具有如下物件:●紧急下降设备●灭火器(在运输工具中有)●移动电话在任何时候,不管是在风力发电机内部还是在其外部,都应该使用安全头盔。
风机运输手册标准版
中山市明阳电器有限公司
一辆车用于主机运输
注:车板有效装车长度需在18米左右,车板后端装有轮毂,导流罩,大电缆等物品,需占
注:车板有效装车长度需在16-18米左右,车板后端装有轮毂,变频器,备品备件等物品,
文件编号:MF/GC-001 A版本标记 A
中山市明阳电器有限公司
1.5MW风机运输指导手册第4 页共16 页
1. 塔筒尺寸
75 米塔筒
尺寸重量长度底部尺寸上部尺寸第一节61T 17045mm 4200mm 3853mm.
第二节61T 26723mm 3853mm 3309mm
第三节42T 28062mm 3309mm 2737mm
65 米塔筒
尺寸重量长度底部尺寸上部尺寸第一节23T 7050mm 4200mm 3853mm.
第二节40T 26723mm 3853mm 3309mm
第三节27T 28062mm 3309mm 2737mm
机舱外部尺寸
叶片
型号重量长度南方型 6 T 37.5m
图A
图A 机舱卸车(图C)
文件编号:MF/GC-001 A版本标记 A
中山市明阳电器有限公司。
风机电气安装手册

远景能源科技有限公司EN15风机现场电气安装手册EP15.X-1-11.1版本历史:目录:1。
动力电缆敷设与连接 (3)2.控制、动力和通讯电缆的敷设与接线 (6)3.风速仪,风标及航空灯的安装与接线 (8)4.轮毂内变桨柜接线 (10)5.塔筒内照明与插座电缆敷设与连接 ................................................................................................................................................................................................................................................................................................... 错误!未定义书签。
6.机舱内照明的连接.............................................................................................................................................................................................................................................................................................................................. 错误!未定义书签。
7.电葫芦供电电缆的敷设与连接 ........................................................................................................................................................................................................................................................................................................... 错误!未定义书签。
- 1、下载文档前请自行甄别文档内容的完整性,平台不提供额外的编辑、内容补充、找答案等附加服务。
- 2、"仅部分预览"的文档,不可在线预览部分如存在完整性等问题,可反馈申请退款(可完整预览的文档不适用该条件!)。
- 3、如文档侵犯您的权益,请联系客服反馈,我们会尽快为您处理(人工客服工作时间:9:00-18:30)。
第 2 页 共 121 页
※ 版权所有 不得复制
MY1.5 风力发电机组安装手册(2010 版)
6.2.3 塔筒卸车吊具的安装..................................................................................................... 18 6.2.4 塔筒卸车......................................................................................................................... 18 6.2.5 塔筒的储存..................................................................................................................... 18
4.5 风机进场道路的要求............................................................................................................. 14
4.6 吊机的准备............................................................................................................................. 15
4 接收条件........................................................................................................................................... 9
4.1 人员的安排.......................................................................................................................................................................................................................... 10 4.1.2 主机厂人员组织结构..................................................................................................... 10 4.1.3 业主人员组织结构......................................................................................................... 11
第一部分 安装准备........................................................................................................................... 9
1 目的................................................................................................................................................... 9
5.2 检查运输物料程序................................................................................................................. 15
5.3 货物的检查............................................................................................................................. 16 5.3.1 塔筒的检查..................................................................................................................... 16 5.3.2 主机的检查..................................................................................................................... 16 5.3.3 轮毂系统的检查............................................................................................................. 16 5.3.4 叶片的检查..................................................................................................................... 16 5.3.5 塔基柜、变频柜、变压器的检查................................................................................. 16
• 2010 版
MY1.5 风力发电机组
MY1.5 风力发电机组安装手册(2010 版)
目录
前 言................................................................................................................................................... 8
2 适用范围........................................................................................................................................... 9
3 作业安全........................................................................................................................................... 9
5 货物接收与验收............................................................................................................................. 15
5.1 货物接收的简要流程............................................................................................................. 15
4.3 基础的准备............................................................................................................................. 12
4.4 资料的准备............................................................................................................................. 13
