netflow安装过程
NETFLOW配置及软件
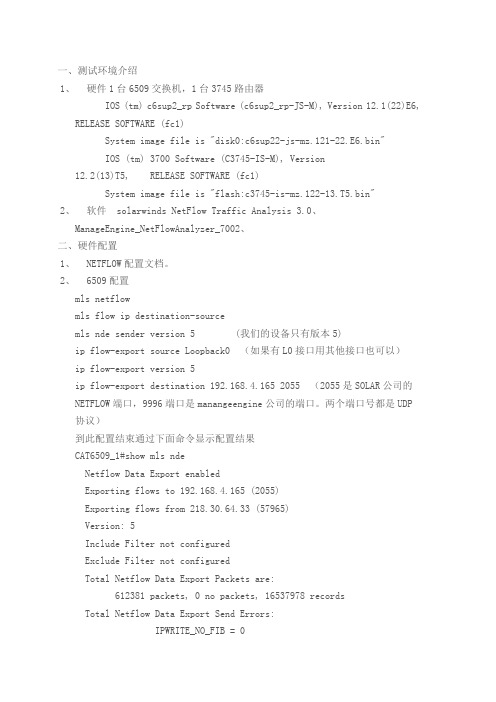
一、测试环境介绍1、硬件1台6509交换机,1台3745路由器IOS (tm) c6sup2_rp Software (c6sup2_rp-JS-M), Version 12.1(22)E6, RELEASE SOFTWARE (fc1)System image file is "disk0:c6sup22-js-mz.121-22.E6.bin"IOS (tm) 3700 Software (C3745-IS-M), Version12.2(13)T5, RELEASE SOFTWARE (fc1)System image file is "flash:c3745-is-mz.122-13.T5.bin"2、软件solarwinds NetFlow Traffic Analysis 3.0、ManageEngine_NetFlowAnalyzer_7002、二、硬件配置1、NETFLOW配置文档。
2、6509配置mls netflowmls flow ip destination-sourcemls nde sender version 5 (我们的设备只有版本5)ip flow-export source Loopback0 (如果有L0接口用其他接口也可以)ip flow-export version 5ip flow-export destination 192.168.4.165 2055 (2055是SOLAR公司的NETFLOW端口,9996端口是manangeengine公司的端口。
两个端口号都是UDP 协议)到此配置结束通过下面命令显示配置结果CAT6509_1#show mls ndeNetflow Data Export enabledExporting flows to 192.168.4.165 (2055)Exporting flows from 218.30.64.33 (57965)Version: 5Include Filter not configuredExclude Filter not configuredTotal Netflow Data Export Packets are:612381 packets, 0 no packets, 16537978 recordsTotal Netflow Data Export Send Errors:IPWRITE_NO_FIB = 0IPWRITE_ADJ_FAILED = 0IPWRITE_PROCESS = 0IPWRITE_ENQUEUE_FAILED = 0IPWRITE_IPC_FAILED = 0IPWRITE_MTU_FAILED = 0IPWRITE_ENCAPFIX_FAILED = 0配置需要分析的端口。
6-IPFIX和NetFlow
Address
Source AS Number Source Subnet Mask
Interface Application
Input physical interface Source TCP/UDP port Packet count Byte count
Statistics
Start timestamp End timestamp
因特网是全球性的工具 因特网有统一的基本规则、协议、流程 谁来制订这些统一的标准? 主要组织:IETF
– – –
3
Internet Engineering Task Force 通过发布RFC的形式制订标准
l
l l
4
IPFIX-网络流量监测系统参考模型
详见RFC5470
5
监测系统各个组件
• Observation Points:探针,连接到网络接口,获取流量。 • Metering Process:测量程序,将网络流量转化为流记录。 • Exporter:上报设备,运行一个或多个上报程序 • Exporting Process:上报程序,发送流记录到一个或多个采集程 序,流记录由一个或多个测量程序产生。
–
仅有HP、Foundry和Extreme Networks等厂商的部分型号 的交换机支持sFlow。
主流的流技术
l
J-Flow
–
Juniper开发的网络监测技术,类似于cisco的 Netflow。 目前有版本v5,v8,其中v5最常用。 华为制订的私有技术协议,类似于Cisco公司的 Netflow。 应用于华为、华为3com的部分型号网络设备。
H3C WT1010无线终结者 安装指导-5W100-整本手册

#
由“#”号开始的行表示为注释行。
2. 图形界面格式约定
格式
意义
<>
带尖括号“< >”表示按钮名,如“单击<确定>按钮”。
格式 [] /
意义
带方括号“[ ]”表示窗口名、菜单名和数据表,如“弹出[新建用户]窗口”。
多级菜单用“/”隔开。如[文件/新建/文件夹]多级菜单表示[文件]菜单下的[新建]子菜单下 的[文件夹]菜单项。
H3C、
、H3CS、H3CIE、H3CNE、Aolynk、
、H3Care、
、IRF、NetPilot、
Netflow、SecEngine、SecPath、SecCenter、SecBlade、Comware、ITCMM、HUASAN、华三 均为杭州华三通信技术有限公司的商标。对于本手册中出现的其它公司的商标、产品标识及商品名
称,由各自权利人拥有。
由于产品版本升级或其他原因,本手册内容有可能变更。H3C 保留在没有任何通知或者提示的情况 下对本手册的内容进行修改的权利。本手册仅作为使用指导,H3C 尽全力在本手册中提供准确的信 息,但是 H3C 并不确保手册内容完全没有错误,本手册中的所有陈述、信息和建议也不构成任何 明示或暗示的担保。
该图标及其相关描述文字代表无线接入点设备。
T
该图标及其相关线终结者。
该图标及其相关描述文字代表无线Mesh设备。
该图标代表发散的无线射频信号。 该图标代表点到点的无线射频信号。
该图标及其相关描述文字代表防火墙、UTM、多业务安全网关、负载均衡等安全设备。
该图标及其相关描述文字代表防火墙插卡、负载均衡插卡、NetStream插卡、SSL VPN插 卡、IPS插卡、ACG插卡等安全插卡。
netflow协议的原理

netflow协议的原理宝子!今天咱来好好聊聊Netflow协议这个挺有趣的玩意儿。
Netflow协议啊,就像是网络世界里的一个小侦探呢。
你想啊,在一个超级复杂的网络环境里,就像一个超级大的迷宫,里面有各种各样的数据跑来跑去。
Netflow 协议呢,它的任务就是要搞清楚这些数据是从哪儿来的,要到哪儿去,就像是追踪小怪兽的踪迹一样。
那它是怎么做到的呢?这就很神奇啦。
当网络设备,比如说路由器或者交换机,在处理数据流量的时候,Netflow协议就开始发挥作用了。
它会悄悄地在旁边看着这些数据流动,然后把一些关键的信息给记下来。
比如说,它会记录这个数据流量是哪个源IP地址发出来的,就像是知道是哪个小房子里的人发出了信号一样。
还有目的IP地址,这就好比是这个信号要到达的另外一个小房子。
而且啊,它还会记下这个流量用的是什么端口,这就像知道是从哪个小窗户发出去或者要进入哪个小窗户似的。
这个协议啊,还有个很贴心的地方呢。
它不仅仅是简单地记录这些信息,还会把这些信息按照一定的规则给整理好。
就像把你那些乱七八糟的小物件都分类放在不同的小盒子里一样。
它会把相似的流量信息归为一组,比如说,从同一个源IP地址到同一个目的IP地址,而且端口也相同的流量,就把它们放在一起。
这样做有啥好处呢?这就方便网络管理员去查看和分析啦。
你可以想象一下,如果没有Netflow协议,网络管理员就像是在一个黑暗的房间里找东西,完全不知道数据的流动情况。
但是有了Netflow协议呢,就好像有人给他开了一盏小灯,他可以清楚地看到数据的走向。
比如说,要是发现某个源IP地址总是向一个不正常的目的IP地址发送大量的数据,那管理员就可以怀疑是不是有什么安全问题啦,是不是有小坏蛋在偷偷搞事情呢。
而且啊,Netflow协议还能帮助网络管理员来管理网络的带宽呢。
就像你家里的水管子一样,如果不知道哪里用水多,哪里用水少,可能就会造成一些地方水不够用,一些地方又浪费水。
流媒体服务器安装步骤
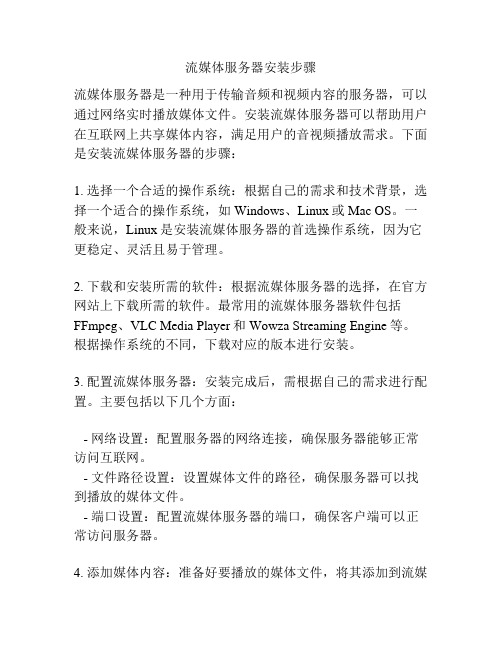
流媒体服务器安装步骤流媒体服务器是一种用于传输音频和视频内容的服务器,可以通过网络实时播放媒体文件。
安装流媒体服务器可以帮助用户在互联网上共享媒体内容,满足用户的音视频播放需求。
下面是安装流媒体服务器的步骤:1. 选择一个合适的操作系统:根据自己的需求和技术背景,选择一个适合的操作系统,如Windows、Linux或Mac OS。
一般来说,Linux是安装流媒体服务器的首选操作系统,因为它更稳定、灵活且易于管理。
2. 下载和安装所需的软件:根据流媒体服务器的选择,在官方网站上下载所需的软件。
最常用的流媒体服务器软件包括FFmpeg、VLC Media Player和Wowza Streaming Engine等。
根据操作系统的不同,下载对应的版本进行安装。
3. 配置流媒体服务器:安装完成后,需根据自己的需求进行配置。
主要包括以下几个方面:- 网络设置:配置服务器的网络连接,确保服务器能够正常访问互联网。
- 文件路径设置:设置媒体文件的路径,确保服务器可以找到播放的媒体文件。
- 端口设置:配置流媒体服务器的端口,确保客户端可以正常访问服务器。
4. 添加媒体内容:准备好要播放的媒体文件,将其添加到流媒体服务器中。
具体操作可以参考相关的文档或手册。
一般来说,可以通过命令行或图形界面的方式添加媒体内容。
5. 启动服务器:在完成配置和添加媒体内容后,启动流媒体服务器。
根据不同的软件,有不同的启动方式。
一般来说,可以通过命令行输入相应的指令或者在图形界面上点击启动按钮来启动服务器。
6. 测试服务器:在服务器启动后,可以使用浏览器或媒体播放器进行测试。
尝试访问流媒体服务器的URL,在播放器中输入相应的链接地址,验证服务器是否正常工作。
以上就是安装流媒体服务器的基本步骤。
在具体操作过程中,还需要根据软件的不同进行相应的配置和调试。
安装流媒体服务器需要一定的技术实力,如果遇到问题,可以参考相应的技术文档或寻求技术支持。
【CCIE】NetFlow配置案例
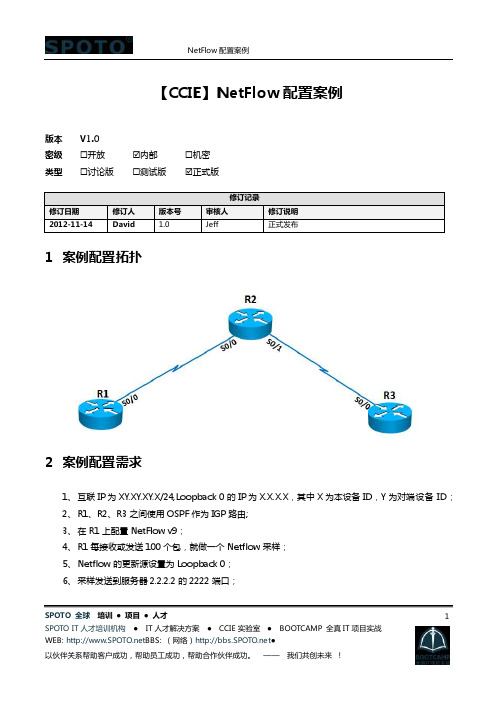
SPOTO 全球 培训 ● 项目 ● 人才 SPOTO IT 人才培训机构 ● IT 人才解决方案 ● CCIE 实验室 ● BOOTCAMP 全真IT 项目实战1 【CCIE 】NetFlow 配置案例版本V1.0 密级☐开放 ☑内部 ☐机密 类型☐讨论版 ☐测试版 ☑正式版1 案例配置拓扑2 案例配置需求1、 互联IP 为XY.XY.XY.X/24,Loopback 0的IP 为X.X.X.X ,其中X 为本设备ID ,Y 为对端设备ID ;2、 R1、R2、R3之间使用OSPF 作为IGP 路由;3、 在R1上配置NetFlow v9;4、 R1每接收或发送100个包,就做一个Netflow 采样;5、 Netflow 的更新源设置为Loopback 0;6、 采样发送到服务器2.2.2.2的2222端口;SPOTO 全球 培训 ● 项目 ● 人才 SPOTO IT 人才培训机构 ● IT 人才解决方案 ● CCIE 实验室 ● BOOTCAMP 全真IT 项目实战2 3 案例配置思路1、 在3台路由器上配置IP :2、 在3台路由器上运行OSPF ;3、 在R1上配置Netflow :Ip cefflow-sampler-map SPOTO/创建Netflow 例图/ mode random one-out-of 100/设置例图模式为100个包随机取1个/ ip flow-export source Loopback0/设置Netflow 更新源/ ip flow-export version 9 /设置Netflow 版本号/ ip flow-export destination 2.2.2.2 2222 /设置Netflow 发送的目的/interface Serial0/0flow-sampler SPOTO /接口进流量应用例图采样/ flow-sampler SPOTO egress/接口出流量应用例图采样/ 4 案例检验结果1、 配置完成后,在R3 ping R1 1100个包后,在R1上查看Netflow 例图:R1#show flow-samplerSampler : SPOTO, id : 1, packets matched : 11, mode : random sampling modesampling interval is : 100R1#2、 配置完成后,在R1上查看SNMPv3的用户信息:R1#show ip flow exportFlow export v9 is enabled for main cacheExporting flows to 2.2.2.2 (2222)Exporting using source interface Loopback0Version 9 flow recordsSPOTO 全球 培训 ● 项目 ● 人才 SPOTO IT 人才培训机构 ● IT 人才解决方案 ●CCIE 实验室 ● BOOTCAMP 全真IT 项目实战3 50 flows exported in 34 udp datagrams0 flows failed due to lack of export packet0 export packets were sent up to process level0 export packets were dropped due to no fib0 export packets were dropped due to adjacency issues0 export packets were dropped due to fragmentation failures0 export packets were dropped due to encapsulation fixup failuresR1#5 案例配置文件6 案例总结及其它1、 Netflow 协议为设备进行流量采样汇总功能;2、 默认情况下,配置了Netflow 的接口,在接收或者发送出一个数据包时,产生一个采样包;3、 采样包包含设备(源IP )、接口ID 、收发定义等信息,被发送到Netflow 服务器上识别、记录;4、 可以使用Netflow 采样视图,设置对多个包随机产生一个采样包;。
(NTA)如何在网络设备上配置Netflow
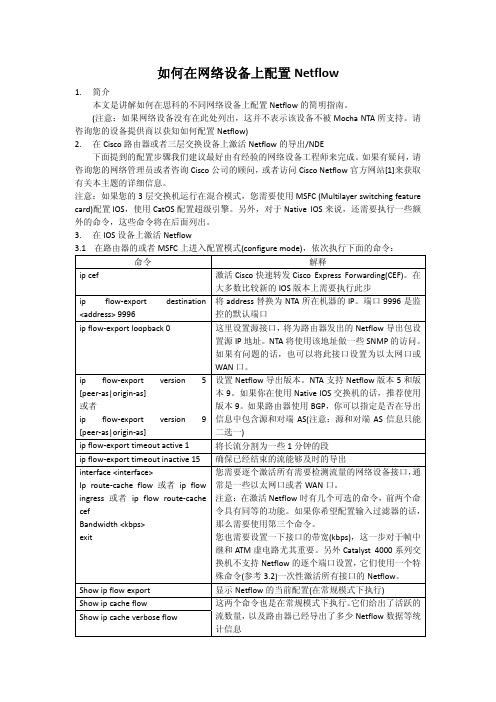
如何在网络设备上配置Netflow1.简介本文是讲解如何在思科的不同网络设备上配置Netflow的简明指南。
(注意:如果网络设备没有在此处列出,这并不表示该设备不被Mocha NTA所支持。
请咨询您的设备提供商以获知如何配置Netflow)2.在Cisco路由器或者三层交换设备上激活Netflow的导出/NDE下面提到的配置步骤我们建议最好由有经验的网络设备工程师来完成。
如果有疑问,请咨询您的网络管理员或者咨询Cisco公司的顾问,或者访问Cisco Netflow官方网站[1]来获取有关本主题的详细信息。
注意:如果您的3层交换机运行在混合模式,您需要使用MSFC (Multilayer switching feature card)配置IOS,使用CatOS配置超级引擎。
另外,对于Native IOS来说,还需要执行一些额外的命令,这些命令将在后面列出。
3.在IOS设备上激活Netflow3.1 在路由器的或者MSFC上进入配置模式(configure mode),依次执行下面的命令:命令 解释ip cef 激活Cisco快速转发Cisco Express Forwarding(CEF)。
在大多数比较新的IOS版本上需要执行此步ip flow‐export destination <address> 9996 将address替换为NTA所在机器的IP。
端口9996是监控的默认端口ip flow‐export loopback 0 这里设置源接口,将为路由器发出的Netflow导出包设置源IP地址。
NTA将使用该地址做一些SNMP的访问。
如果有问题的话,也可以将此接口设置为以太网口或WAN口。
ip flow‐export version 5 [peer‐as|origin‐as]或者ip flow‐export version 9 [peer‐as|origin‐as] 设置Netflow导出版本。
RG-NetFlowAnalyzer流量分析系统7.0版本安装手册.pdf

单击:快速按下并释放鼠标的左键。 双击:连续两次快速按下并释放鼠标的左键。 右击:快速按下并释放鼠标的右键。 拖动:按住鼠标左键不动,移动鼠标。
目录
目录
1 安装准备 ........................................................................................................................................................... 2 1.1 硬件要求 ............................................................................................................................................... 2 1.2 软件要求 ............................................................................................................................................... 2 1.3 端口要求 ............................................................................................................................................... 3 1.4 推荐的系统设置 ................................................................................................................................... 3 1.5 更改MySQL缺省端口 .......................................................................................................................... 3
netflow配置V9版本
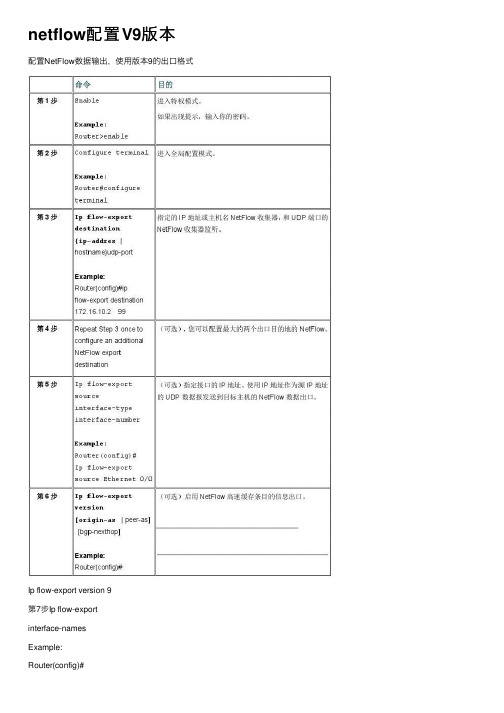
netflow配置V9版本配置NetFlow数据输出,使⽤版本9的出⼝格式Ip flow-export version 9第7步Ip flow-exportinterface-namesExample:Router(config)#Ip flow-exportinterface-names 配置NetFlow数据出⼝到包括从流出⼝到⽬的地系统NetFlow⾼速缓存条⽬时,它的接⼝名。
第8步Ip flow-exporttemplaterefresh-ratepacketsExample:Router(config)#Ip flow-exporttemplaterefresh-rate 15(可选)启⽤NetFlow⾼速缓存条⽬的信息出⼝。
刷新率包关键字参数对指定出⼝前的模板重新发送的数据包数量。
您可以指定从1到600的数据包。
缺省值是20。
第9步Ip flow-exporttemplatetimeout-rateminutesExample:Router(config)#Ip flow-exporttemplatetimeout-rate 90 (可选)启⽤NetFlow⾼速缓存条⽬的信息出⼝。
超时率分钟关键字参数对指定时间前的模板重新发送。
您可以指定从1到3600分钟。
默认值是30。
第10步Ip flow-exporttemplate optionsexport statsExample:Router(config)#Ip flow-exporttemplate optionsexport-stats (可选)启⽤NetFlow⾼速缓存条⽬的信息出⼝。
出⼝统计关键字指定的出⼝统计数据,包括出⼝流量的总数和出⼝的数据包的总数。
第11步Ip flow-exporttemplate optionsrefresh-ratepackets (可选)启⽤NetFlow⾼速缓存条⽬的信息出⼝。
刷新率包关键字参数对指定出⼝前的模板重新发送的数据包数量。
H3C S6800系列以太网交换机安装指导

杭州华三通信技术有限公司 资料版本:6W100-20131128
Copyright © 2013 杭州华三通信技术有限公司及其许可者 版权所有,保留一切权利。 未经本公司书面许可,任何单位和个人不得擅自摘抄、复制本书内容的部分或全部,并不得以任何 形式传播。
电源手册 配置指导 命令参考
帮助您了解产品支持的可插拔电源模块的外观、功能、规格、安装及 拆卸方法
帮助您掌握设备软件功能的配置方法及配置步骤
详细介绍设备的命令,相当于命令字典,方便您查阅各个命令的功能
资料获取方式
您可以通过H3C网站()获取最新的产品资料: H3C 网站与产品资料相关的主要栏目介绍如下: • [服务支持/文档中心]:可以获取硬件安装类、软件升级类、配置类或维护类等产品资料。 • [产品技术]:可以获取产品介绍和技术介绍的文档,包括产品相关介绍、技术介绍、技术白皮
读者对象
本手册主要适用于如下工程师: • 网络规划人员 • 现场技术支持与维护人员 • 负责网络配置和维护的网络管理员
本书约定
1. 图形界面格式约定
格式
意义
<>
带尖括号“< >”表示按钮名,如“单击<确定>按钮”。
[]
带方括号“[ ]”表示窗口名、菜单名和数据表,如“弹出[新建用户]窗口”。
/
多级菜单用“/”隔开。如[文件/新建/文件夹]多级菜单表示[文件]菜单下的[新建]子菜单下 的[文件夹]菜单项。
书等。 • [解决方案]:可以获取解决方案类资料。 • [服务支持/软件下载]:可以获取与软件版本配套的资料。
技术支持
用户支持邮箱:service@ 技术支持热线电话:400-810-0504(手机、固话均可拨打)
netflow_实验指导书

netflow
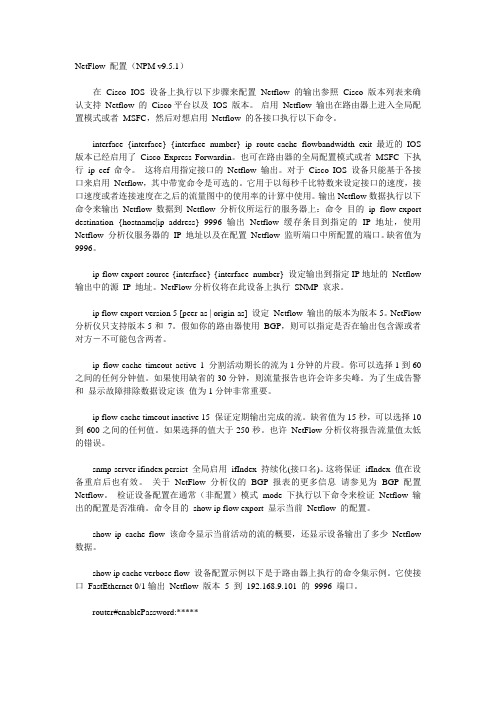
NetFlow 配置(NPM v9.5.1)在Cisco IOS 设备上执行以下步骤来配置Netflow 的输出参照Cisco 版本列表来确认支持Netflow 的Cisco平台以及IOS 版本。
启用Netflow 输出在路由器上进入全局配置模式或者MSFC,然后对想启用Netflow 的各接口执行以下命令。
interface {interface} {interface_number} ip route-cache flowbandwidth exit 最近的IOS 版本已经启用了Cisco Express Forwardin。
也可在路由器的全局配置模式或者MSFC 下执行ip cef 命令。
这将启用指定接口的Netflow 输出。
对于Cisco IOS 设备只能基于各接口来启用Netflow,其中带宽命令是可选的。
它用于以每秒千比特数来设定接口的速度,接口速度或者连接速度在之后的流量图中的使用率的计算中使用。
输出Netflow数据执行以下命令来输出Netflow 数据到Netflow 分析仪所运行的服务器上:命令目的ip flow-export destination {hostname|ip_address} 9996 输出Netflow 缓存条目到指定的IP 地址,使用Netflow 分析仪服务器的IP 地址以及在配置Netflow 监听端口中所配置的端口。
缺省值为9996。
ip flow-export source {interface} {interface_number} 设定输出到指定IP地址的Netflow 输出中的源IP 地址。
NetFlow分析仪将在此设备上执行SNMP 哀求。
ip flow-export version 5 [peer-as | origin-as] 设定Netflow 输出的版本为版本5。
NetFlow 分析仪只支持版本5和7。
假如你的路由器使用BGP,则可以指定是否在输出包含源或者对方-不可能包含两者。
H3C S7000 系列交换机快速安装指南说明书

H3C S7000 系列交换机快速安装指南杭州华三通信技术有限公司资料版本:APW100-20131018Copyright © 2013 杭州华三通信技术有限公司及其许可者 版权所有,保留一切权利。
未经本公司书面许可,任何单位和个人不得擅自摘抄、复制本书内容的部分或全部,并不得以任何形式传播。
H3C 、、H3CS 、H3CIE 、H3CNE 、Aolynk 、、H 3Care 、、IRF 、NetPilot 、Netflow 、SecEngine 、SecPath 、SecCenter 、SecBlade 、Comware 、ITCMM 、HUASAN 、华三均为杭州华三通信技术有限公司的商标。
对于本手册中出现的其它公司的商标、产品标识及商品名称,由各自权利人拥有。
由于产品版本升级或其他原因,本手册内容有可能变更。
H3C 保留在没有任何通知或者提示的情况下对本手册的内容进行修改的权利。
本手册仅作为使用指导,H3C 尽全力在本手册中提供准确的信息,但是H3C 并不确保手册内容完全没有错误,本手册中的所有陈述、信息和建议也不构成任何明示或暗示的担保。
安全声明重要!在产品上电启动之前,请阅读本产品的安全与兼容性信息。
IMPORTANT! See Compliance and Safety information for the product before connecting to the supply.您可以通过以下步骤获取本产品的安全与兼容性信息:To obtain Compliance and Safety information, follow these steps: (1) 请访问网址:/Technical_Documents ;Go to /Technical_Documents . (2) 选择产品类型以及产品型号;Choose the desired product category and model.(3) 您可以从安全与兼容性手册或安装手册中获取安全与兼容性信息。
NETFLOW教程

NetFlow教程1NetFlow介绍1.1 NetFlow的产生原因●由网络设备进行原始统计信息的汇聚可以大大减少网络设备输出的数据量,降低对上层管理服务器的配置要求,提高上层管理系统的扩展性和工作效率。
●虽然SNMP有助于容量规划,但无法提取流量特征,而只有了解了特征,才能保证业务连续性,确定是否需要增加容量才能提高利用率保证,以及评估QoS参数是否符合目标服务水平要求等●流量特征提取遇到的另一个困难是,许多新应用每次使用的端口都不相同,它们每次都动态选择新端口使用。
1.2 NetFlow技术的起源NetFlow技术最早是于1996年由思科公司的Darren Kerr和Barry Bruins发明的,并于同年5月注册为美国专利,专利号为6,243,667。
NetFlow技术首先被用于网络设备对数据交换进行加速,并可同步实现对高速转发的IP数据流(Flow)进行测量和统计。
经过多年的技术演进,NetFlow原来用于数据交换加速的功能已经逐步由网络设备中的专用ASIC芯片实现,而对流经网络设备的IP数据流进行特征分析和测量的功能也已更加成熟,成为了当今互联网领域公认的最主要的IP/MPLS流量分析和计量行业标准,同时也被广泛用于网络安全管理。
利用NetFlow技术能对IP/MPLS网络的通信流量进行详细的行为模式分析和计量,并提供网络运行的准确统计数据,这些功能都是运营商在进行网络安全管理时实现异常通信流量检测和参数定性分析所必需的。
1.3 什么是NetFlow●通过分析网络中不同Flow间的差别,可以发现判断任何两个IP数据包是否属于同一个Flow。
实际上可以通过分析IP数据包的以下7个属性来实现:➢源IP地址(Source IP address)➢目的IP地址(Destination IP address)➢源端口号(Source port number)➢目的端口号(Destination port number)➢协议类型(Protocol type)➢服务类型(Type of service)➢输入/输出接口(Input/Output interface)将路由器的所有数据包分成很多有以上信息的7字段值的单向IP 数据流,称为网流(NetFlow)。
NetFlowTracker.快速安装指南
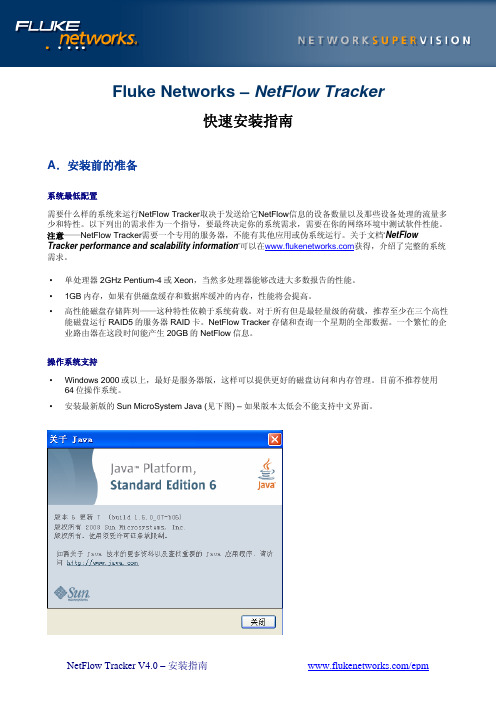
Fluke Networks – NetFlow Tracker快速安装指南A.安装前的准备系统最低配置需要什么样的系统来运行NetFlow Tracker取决于发送给它NetFlow信息的设备数量以及那些设备处理的流量多少和特性。
以下列出的需求作为一个指导,要最终决定你的系统需求,需要在你的网络环境中测试软件性能。
注意——NetFlow Tracker需要一个专用的服务器,不能有其他应用或伪系统运行。
关于文档‘NetFlow Tracker performance and scalability information’可以在获得,介绍了完整的系统需求。
• 单处理器2GHz Pentium-4或Xeon,当然多处理器能够改进大多数报告的性能。
• 1GB内存,如果有供磁盘缓存和数据库缓冲的内存,性能将会提高。
• 高性能磁盘存储阵列——这种特性依赖于系统荷载。
对于所有但是最轻量级的荷载,推荐至少在三个高性能磁盘运行RAID5的服务器RAID卡。
NetFlow Tracker存储和查询一个星期的全部数据。
一个繁忙的企业路由器在这段时间能产生20GB的NetFlow信息。
操作系统支持2000或以上,最好是服务器版,这样可以提供更好的磁盘访问和内存管理。
目前不推荐使用• Windows64位操作系统。
• 安装最新版的Sun MicroSystem Java (见下图) – 如果版本太低会不能支持中文界面。
B.软件安装在Windows系统上的安装按提示进行安装,很快就可以完成。
如果你收到的是NetFlow Tracker的CD,安装程序可以自动运行。
若没有,只要打开我的电脑里的CD驱动器,双击“setup.exe”即可。
如果你是下载了该软件,只需双击下载的文件。
安装包括几个步骤。
在每一步,你可以点击”Next>”按钮接受缺省选项到下一步。
Java运行环境安装如果服务器还没有安装所需的Java运行环境,将会有提示进行安装,按OK即可安装。
netflow exporter原理

netflow exporter原理下载温馨提示:该文档是我店铺精心编制而成,希望大家下载以后,能够帮助大家解决实际的问题。
文档下载后可定制随意修改,请根据实际需要进行相应的调整和使用,谢谢!并且,本店铺为大家提供各种各样类型的实用资料,如教育随笔、日记赏析、句子摘抄、古诗大全、经典美文、话题作文、工作总结、词语解析、文案摘录、其他资料等等,如想了解不同资料格式和写法,敬请关注!Download tips: This document is carefully compiled by the editor. I hope that after you download them, they can help you solve practical problems. The document can be customized and modified after downloading, please adjust and use it according to actual needs, thank you!In addition, our shop provides you with various types of practical materials, such as educational essays, diary appreciation, sentence excerpts, ancient poems, classic articles, topic composition, work summary, word parsing, copy excerpts, other materials and so on, want to know different data formats and writing methods, please pay attention!Netflow exporter原理Netflow exporter是一种用于收集网络流量信息并将其导出到外部系统的工具。
NVIDIA DOCA NetFlow Exporter 应用指南说明书

Reference Application GuideTable of ContentsChapter 1. Introduction (1)Chapter 2. System Design (2)Chapter 3. Application Architecture (3)Chapter 4. Configuration Flow (5)Chapter 5. Running Application on BlueField (6)Chapter 6. References (7)Chapter 1.IntroductionNetFlow is a protocol used for exporting device network flows information to a NetFlow collector. A flow refers to any connection or connection-like communication channel between two communication nodes.The most common definition of a flow is by a standard 5-tuple.Using NetFlow requires three network nodes:‣NetFlow exporter – a network device in charge of collecting flow information and exporting it to a flow collector‣NetFlow collector – a server that receives exported flow information‣NetFlow analyzer – an application which runs on the collector and analyzes flow information collected by the flow collectorUsing a NetFlow monitoring solution allows monitoring and analyzing these flow records more efficiently and effectively for traffic within the network.Main NetFlow use cases:‣Bandwidth utilization and network resource allocation (QoS)NetFlow data allows network administrators to view a complete report on traffic which allows them to understand bandwidth consumption, network resource utilization, etc.‣Anomaly-based attack detectionFlow-based analysis relies on algorithms and behavior rather than signature matching.This gives the flow analyzer the ability to detect attacks before a signature is available.‣Network visibilityNetFlow provides the ability to drill down into network traffic to see source and destination address and ports, protocol, and more. With this information, it is possible to identify traffic patterns throughout the entire network. Full view of traffic flow allows network operation and security operation teams to monitor when and how often users access applications in the network.Chapter 2.System Design The following diagram illustrates NetFlow architecture and nodes:Chapter 3.Application Architecture1.Define record struct and template.The application must define a TLV NetFlow v9 template. This is done by usingdoca_netflow_types.h defined macros. The order has no significance for the collector but must be maintained for the record struct. The struct should be in packed formatwithout pointers. The app can use the default record struct and template by using structs doca_netflow_default_record and doca_netflow_template_default_get().2.Initiate NetFlow Exporter.Call doca_netflow_exporter_init() to initiate the exporter. Pass the configuration file or pass NULL for the default path.The configuration file is located by default at /etc/doca-netflow.conf. The configuration file should contain:‣Title – [doca_netflow_conf]‣Target – the IP and port of the collector (to send the NetFlow records)‣Source ID – the source ID of the NetFlow exporter (defined by the user) to send alongside the NetFlow records to identify the source of the record‣Version – 9 (for future development)For example:3.Update record information.The app should update the flow information with information that extracted from thepackets. For information on this process, please refer to the NVIDIA DOCA Application Recognition Reference Guide.This part should be periodically updated before sending the records.4.Send records.Call doca_netflow_exporter_send() to send the records to the collector.Application ArchitectureThis function should be periodically called, and must contain all the current active flows or flow-sampled records in that period of time.5.Destroy.Call doca_netflow_exporter_destroy() to close the exporter before exiting theapplication.The NetFlow example source file shows how to set up the exporter and send an array of record flows to a collector. It contains 2 functions:‣default_template_example() – this example uses the default template with the default struct‣custom_template_example() – this example creates a custom template that can be altered to meet the application's needsFor simplicity and generalization, the example sends a static dummy record duplicated over an array of records. This is the part the app that includes the NetFlow lib shouldsupply.Chapter 4.Configuration Flow1.Create a new record with a default template.Note: It is possible to configure a custom record.struct doca_netflow_default_record record = {.src_addr_v4,/* Source IP Address */.dst_addr_v4,/* Destination IP Address */.next_hop,/* Next hop router's IP Address */.input,/* Input interface index */.output,/* Output interface index */.src_port,/* TCP/UDP source port number or equivalent */.dst_port,/* TCP/UDP destination port number or equivalent */.tcp_flags,/* Cumulative OR of tcp flags */.protocol,/* IP protocol type (for example, TCP = 6, UDP = 17) */.tos,/* IP Type-of-Service */.src_as,/* originating AS of source address */.dst_as,/* originating AS of destination address */.src_mask,/* source address prefix mask bits */.dst_mask,/* destination address prefix mask bits */.d_pkts,/* Packets sent in Duration */.d_octets,/* Octets sent in Duration. */.first,/* SysUptime at start of flow */.last,/* and of last packet of flow */.flow_id,/* This identifies a transaction within a connection */.application_name /* Name associated with a classification */};2.Initialize NetFlow exporter. Run:doca_netflow_exporter_init(file_path);3.Send NetFlow records. Run:doca_netflow_exporter_send(&template, (const void **)(records), records_length, &err)Chapter 5.Running Application onBlueField1.Please refer to the DOCA Installation Guide for details on how to install BlueField relatedsoftware.2.To build the application:a).Modify the code. Change the "netflow.c" example, the configuration file location, therecord to send, the template, etc.b).Prepare the configuration file which may be found by default at /etc/doca_netflow.conf.c).Compile the example. Run:cd /opt/mellanox/doca/examples/netflow/srcmeson /tmp/buildninja -C /tmp/build3.To run the application, simply run doca_netflow.Chapter 6.References‣/opt/mellanox/doca/examples/netflow/src/netflow.cNoticeThis document is provided for information purposes only and shall not be regarded as a warranty of a certain functionality, condition, or quality of a product. NVIDIA Corporation nor any of its direct or indirect subsidiaries and affiliates (collectively: “NVIDIA”) make no representations or warranties, expressed or implied, as to the accuracy or completeness of the information contained in this document and assume no responsibility for any errors contained herein. NVIDIA shall have no liability for the consequences or use of such information or for any infringement of patents or other rights of third parties that may result from its use. This document is not a commitment to develop, release, or deliver any Material (defined below), code, or functionality.NVIDIA reserves the right to make corrections, modifications, enhancements, improvements, and any other changes to this document, at any time without notice. Customer should obtain the latest relevant information before placing orders and should verify that such information is current and complete.NVIDIA products are sold subject to the NVIDIA standard terms and conditions of sale supplied at the time of order acknowledgement, unless otherwise agreed in an individual sales agreement signed by authorized representatives of NVIDIA and customer (“Terms of Sale”). NVIDIA hereby expressly objects to applying any customer general terms and conditions with regards to the purchase of the NVIDIA product referenced in this document. No contractual obligations are formed either directly or indirectly by this document.NVIDIA products are not designed, authorized, or warranted to be suitable for use in medical, military, aircraft, space, or life support equipment, nor in applications where failure or malfunction of the NVIDIA product can reasonably be expected to result in personal injury, death, or property or environmental damage. NVIDIA accepts no liability for inclusion and/or use of NVIDIA products in such equipment or applications and therefore such inclusion and/or use is at customer’s own risk. NVIDIA makes no representation or warranty that products based on this document will be suitable for any specified use. Testing of all parameters of each product is not necessarily performed by NVIDIA. It is customer’s sole responsibility to evaluate and determine the applicability of any information contained in this document, ensure the product is suitable and fit for the application planned by customer, and perform the necessary testing for the application in order to avoid a default of the application or the product. Weaknesses in customer’s product designs may affect the quality and reliability of the NVIDIA product and may result in additional or different conditions and/or requirements beyond those contained in this document. NVIDIA accepts no liability related to any default, damage, costs, or problem which may be based on or attributable to: (i) the use of the NVIDIA product in any manner that is contrary to this document or (ii) customer product designs.No license, either expressed or implied, is granted under any NVIDIA patent right, copyright, or other NVIDIA intellectual property right under this document. Information published by NVIDIA regarding third-party products or services does not constitute a license from NVIDIA to use such products or services or a warranty or endorsement thereof. Use of such information may require a license from a third party under the patents or other intellectual property rights of the third party, or a license from NVIDIA under the patents or other intellectual property rights of NVIDIA.Reproduction of information in this document is permissible only if approved in advance by NVIDIA in writing, reproduced without alteration and in full compliance with all applicable export laws and regulations, and accompanied by all associated conditions, limitations, and notices.THIS DOCUMENT AND ALL NVIDIA DESIGN SPECIFICATIONS, REFERENCE BOARDS, FILES, DRAWINGS, DIAGNOSTICS, LISTS, AND OTHER DOCUMENTS (TOGETHER AND SEPARATELY, “MATERIALS”) ARE BEING PROVIDED “AS IS.” NVIDIA MAKES NO WARRANTIES, EXPRESSED, IMPLIED, STATUTORY, OR OTHERWISE WITH RESPECT TO THE MATERIALS, AND EXPRESSLY DISCLAIMS ALL IMPLIED WARRANTIES OF NONINFRINGEMENT, MERCHANTABILITY, AND FITNESS FOR A PARTICULAR PURPOSE. TO THE EXTENT NOT PROHIBITED BY LAW, IN NO EVENT WILL NVIDIA BE LIABLE FOR ANY DAMAGES, INCLUDING WITHOUT LIMITATION ANY DIRECT, INDIRECT, SPECIAL, INCIDENTAL, PUNITIVE, OR CONSEQUENTIAL DAMAGES, HOWEVER CAUSED AND REGARDLESS OF THE THEORY OF LIABILITY, ARISING OUT OF ANY USE OF THIS DOCUMENT, EVEN IF NVIDIA HAS BEEN ADVISED OF THE POSSIBILITY OF SUCH DAMAGES. Notwithstanding any damages that customer might incur for any reason whatsoever, NVIDIA’s aggregate and cumulative liability towards customer for the products described herein shall be limited in accordance with the Terms of Sale for the product.TrademarksNVIDIA, the NVIDIA logo, and Mellanox are trademarks and/or registered trademarks of Mellanox Technologies Ltd. and/or NVIDIA Corporation in the U.S. and in other countries. The registered trademark Linux® is used pursuant to a sublicense from the Linux Foundation, the exclusive licensee of Linus Torvalds, owner of the mark on a world¬wide basis. Other company and product names may be trademarks of the respective companies with which they are associated.Copyright© 2022 NVIDIA Corporation & affiliates. All rights reserved.NVIDIA Corporation | 2788 San Tomas Expressway, Santa Clara, CA 95051。
Juniper SRX Netflow配置举例
Dump File Pa ath
指定 指定捕获的数据 数据包存放的路 路径,默认即 即可,直接点 点 set
返回顶部 部菜单”plugi ins””netflo ow””active” ”,激活此插件 件。
图 4 最后一点 点,在顶菜单 单的“admin n”下点"swit tch NIC"然后选择刚创建的 netflow de evice。
二、收 收集设 设备的安 安装及 及配置
本例中使用 用 Linux 下的 下 NTOP 作为 作 netflow w 收集分析 析器,也可以 以使用 Wind dows 下的 SolarWinds s Free Real‐T Time NetFlo ow Analyzer r
1、安装 装 NTOP
到此 NTOP 配 配置完成,可 可以查看流量 量情况了。
Author:Mark k_wang@cn.syn nnex‐ 第 3 页
Author:Mark k_wang@cn.syn nnex‐ 第 1 页
1.1、下载 yu um 安装源 wget http://d dag.wieers.co om/rpm/pack kages/rpmfor rge‐release/rpmforge‐rele ease‐0.3.6‐1.e el5.rf.i386.rpm rpm ‐Uvh rpm mforge‐releas se‐0.3.6‐1.el5 5.rf.i386.rpm 1.2、安装 nt top yum install ntop (NTOP 安装要求先安 安 安装 rrdtool, 此命令会自动安装依赖的 rrdtool)
2、配置 置 NTOP
2.1 启用 NT TOP 进程 ‐i none ‐d ‐w 3000 ntop ‐u root ‐ 语法解释: 进程执行的宿 宿主为 root 用户 用 ‐u root:表示进 ‐i none:表示不在任何接口上监听,否 否则默认是 e eth0 后台进程方式 式运行 ‐d :表示以后 ‐w 3000:表示 示 web 服务端 端口为 3000(此为 WEB 配置 NTOP 的入口) 2.2 WEB 配置 置 NTOP 的 Netflow N 打开浏览 览器输入 htt tp://[ntop 服务器 服 IP]:300 00 在顶部菜 菜单的 “plug gins” ‐‐>"netfl low"‐‐>"view w/configure"然后在出现的 然 的界面选择添 添加 “add netf flow device” 。
- 1、下载文档前请自行甄别文档内容的完整性,平台不提供额外的编辑、内容补充、找答案等附加服务。
- 2、"仅部分预览"的文档,不可在线预览部分如存在完整性等问题,可反馈申请退款(可完整预览的文档不适用该条件!)。
- 3、如文档侵犯您的权益,请联系客服反馈,我们会尽快为您处理(人工客服工作时间:9:00-18:30)。
Netflow安装步骤
一、安装linux 操作系统,安装是要把apche(www服务器)组件和development tools(编译安装工具)选上
二、部署flow-statcgi
Flow-statcgi是一个基于flow-tools的browse/server结构(cgi)的NetFlow数据分析工具。
2.1cisco设备的设置
cisco设备的NetFlow支持,首先要培植cisco设备,使之产生NetFlow数据,输出到服务器的2055端口上。
2.2安装flow-tools 0.56
使用flow-tools来接收NetFlow数据,并保存成文件。
为了顺利编译flow-statcgi,要将flow-tools的源文件解压缩到/root下:
1.将flow-tools-0.56.tar.gz复制到服务器的/root目录下。
2.cd /root ; tar zxvf flow-tools-0.56.tar.gz ; cd flow-tools-0.56(这是三个命令用一行执行) 3../configure
4.make
5.make install
2.3安装apache server
使用apache server来做http服务器。
由于各apache server的配置不一样,在flow-statcgi中假设cgi-bin目录为/var/www/cgi-bin,www目录为/var/www/html。
如果有变动,需要修改flow-statcgi.c中的“DEBUGFILENAME”、make_flow_cgi.sh中的“/var/www/cgi-bin/”
三、编译和安装flow-statcgi
3.1预处理
1.将flow-statcgi.c复制到/root/flow-tool-0.56/src/,将flow-statcgi.temple.html复制到/var/www/cgi-bin/(cgi所在目录),将flow-statcgi.log.html复制到
/var/www/html/(html所在目录),注意要在这里把flow-statcgi.log.html的属性
加个可写属性。
2.修改flow-statcgi.c中的“DEBUGFILENAME”(要改成html文件所在的位置)、“DataDir”(要改成flow-tool数据所在目录)
3.修改flow-statcgi.c中的“isip”部分,同时修改“ISIPCOUNT ”、“isipdesc”,“isip”。
详细说明见《Flow-statcgi使用说明》中的“预定义条件”。
3.2编译、安装
把make_flow_cgi.sh这个文件拷贝到/root目录下,修改make_flow_cgi.sh中的“/var/www/cgi-bin”为cgi所在目录。
执行一下命令进行编译、安装“sh make_flow_cgi.sh flow-statcgi”,这样会在cgi目录下面生成一个flow-statcgi的cgi文件。
其中编译之后会出现警告信息,可以忽略不管。
四、运行flow-tools
1.把startflowreceive.sh和starflowcapture.sh这两个shell命令文件拷到/root目录下2.执行“sh startflowreceive.sh”命令
3.执行“sh startflowcapture.sh”命令
4.如果还有其他的软件来分析NetFlow数据,可以在第一步之前或之后用“flow-fanout”将NetFlow数据复制一份。
要注意修改两个.sh文件中的端口。
Flow-fanout的使用可以参考flow-fanout的man page(“man –M
/usr/local/NetFlow/man flow-fanout”)。
五、运行flow-statcgi
使用浏览器浏览“http://机器ip/cgi-bin/flow-statcgi”,即可
flow-statcgi的使用说明见《Flow-statcgi使用说明》。