磁带转电脑
SONY 高清晰度数字磁带录像机 HDW-2000 HDW-M2000 HDW-M2000P 说明书
美国用户须知
本设备经检测符合 FCC(美国通信委员会)规范第 15 部分中规定 的 A 级数字设备的限制参数。 当本设备商用时, 上述限制参数设计 用于防止设备受到有害干扰。 本设备产生、 使用并能够辐射出高频 能量, 如果不按照本操作手册的要求安装与使用, 可能会对无线电 通信设备造成有害干扰。在居民区使用本设备,会产生有害干扰, 需要用户自行消除。 注意, 进行本操作手册中任何未明确批准的变更或改动会, 可能会 无法使用本设备。 本操作手册中推荐的接口屏蔽电缆, 必须与本设备配套使用, 才能 使其符合 FCC(美国通信委员会)规范第 15 部分 B 节中规定的 A 级数字设备的限制参数。
3-1-1 与数字设备的连接 ...................................................................................... 3-1
3-2 基准同步信号 ............................................................................................. 3-2
第4章 录制与重放
4-1 录制 ............................................................................................................. 4-1
4-1-1 录制准备工作 .............................................................................................4-1 4-1-2 录制时间码与用户比特 ............................................................................... 4-2 4-1-3 录制步骤 .................................................................................................... 4-4
戴尔PowerVault DL2000磁带机数据迁移指南说明书
MEDIA MIGRATIONDELL POWERVAULT DL 2000 POWERED BY SYMANTECEXECUTIVE SUMMARYDuring the operation of the Dell™ PowerVault™ DL2000 Backup to Disk Appliance Powered by Symantec Backup Exec™, it may become necessary to migrate or copy backup data from one appliance to another. Depending on the appliance configuration, this data may reside on disk, tape, or both. This guide provides instructions for migrating the data from one appliance to an-other for the following items:• Disk Group(s)• Tape Media• Tape Library/Libraries• Data Set(s)• Disk Group(s) not associated with a PowerVault DL Backup to Disk ApplianceAn entire Disk Group (the physical drives making up the virtual disks on the PowerVault DL Backup to Disk Appliance) must be migrated together from one PowerVault DL Backup to Disk Appliance to another. Migrating single drives or partial drives in a Disk Group will result in data loss for the entire Disk Group.Perform the following steps to migrate a Disk Group from one appliance to another:1. Determine the Disk Group for migration.Note : Although Disk Groups in a standard configuration state (as defined in the DellPowerVault™ DL Backup to Disk Appliance Powered by Symantec Backup Exec Quick Start Guide ) are typically contained in Slots 1-7 or Slots 8-14 on each PowerVault MD1000Storage Enclosure, there are cases where the slot locations may be different or havechanged. Using the following procedure ensures the correct drives are migrated in all cases.a. From Symantec’s Backup Exec Management Console , select the Devices taband then determine the “Hardware name” of the resource of the Storage Array tobe migrated.In the example found in Figure 1, “VIRTDISK 8” in “ARRAY 1” is going to bemigrated, and its associated hardware name is “VDS_CREATED_001”.MIGRATING AN ENTIRE DISK GROUPFigure 1: Example selection of a storage resource to be migratedb. From the DL Backup to Disk Appliance Console, launch Dell’s OpenManage ServerAdministrator (OMSA). Select Virtual Disks from the appropriate PERC 6/e Adapter as seen in Figure 2 and locate the hardware name of the resource to be migrated as deter-mined in step 1.a.c. Determine and make note of which physical disks the Disk Group is comprised of byeither 1) using the Blink task (see Figure 3) and then manually viewing the physicaldrives (now blinking) associated with the resource on the MD1000 Storage Enclosure;or 2) by viewing the details of the virtual disk as shown in Figure 4.Figure 2: OMSA view of storage resource to be migratedFigure 3: Selection of the Blink task in OMSA2. Power down the PowerVault DL Backup to Disk Appliance, including the server and all at-tached MD1000 Storage Enclosures.3. Remove the physical disks for the Disk Group to be migrated as determined in Step 1.c.4. On the target PowerVault DL Backup to Disk appliance, set the Disk Configuration Policyto Manual via the Appliance Management Console .5. Install the physical disks of the migrated Disk Group in to the MD1000 Storage Enclosureconnected to the target PowerVault DL Backup to Disk Appliance.Note : If the goal is to keep the Disk Configuration State as Standard , the migrated Disk Group must occupy Slots 1-7 or Slots 8-14 in the new MD1000 Storage Enclosure. The optional hot spare should be installed in Slot 0.6. From the target PowerVault DL Backup to Disk Appliance Console, launch Dell’s OpenMan-age Server Administrator (OMSA) tool. Import the migrated Disk Group(s) using OMSA. Refer to the Dell OpenManage Server Administrator (OMSA) User Guide for specific steps.Note : Use the OMSA procedure for importing foreign configurations.7. On the target PowerVault DL Backup to Disk appliance, reset the Disk Configuration Policyto one of the Automatic settings via the Appliance Management Console.8. Launch Symantec Backup Exec once the Disk Group has been imported. Backup Exec willautomatically discover and detect the imported Disk Group (listed as an Array in the De-vices tab), including its virtual disks. The contents of the migrated Disk Group / array must be inventoried and cataloged before they are available for use.9. Select the Devices tab from within the Backup Exec management console. Right-click theimported virtual disk and select Inventory from the pop-up menu. Repeat this step for each imported virtual disk. Once all virtual disks have been inventoried, their contents must becataloged.Figure 4: Physical disks associated with the resource to be migratedCATALOGING THE MIGRATED DISK GROUPThe virtual disks contained in the migrated Disk Group must be cataloged in Backup Exec once the virtual disks have been imported and inventoried on the new PowerVault DL Backup to Disk Appliance. Cataloging the virtual disks allows Backup Exec to read and store the information contained in the virtual disks which includes:• Media number/label/name (something to identify that media from all others)• Date and time of the backup• Type of backup• What directories/files were backed upFrom the Backup Exec Management Console, perform the following steps to catalog the imported virtual disks:1. From the Devices tab, select the first virtual disk that was imported. Refer to Figure 1 foran example location.2. Select all of the media on the right.3. Right-click all of the media and select Catalog Media from the pop-up menu. Specifythe following (if necessary) on the Catalog Job Properties dialogue:• Under Device, specify a password if the media is password protected• Under General, specify a job name and priority• Under Schedule, select Run Now to start the Inventory Operation4. Continue to specify the settings for each media in the catalog operation.Backup Exec will catalog the media and it will be available for use.MIGRATING TAPE MEDIAIt may be necessary to migrate backup sets stored on tape media from one PowerVault DL Backup to Disk Appliance to another. In order to migrate tape media from one appliance to another, the tape media must be exported from the tape library attached to the original appliance. Exporting Tape MediaAn export job must be created to export tape media so that the Backup Exec database is updated. The Backup Exec export media job fully supports robotic libraries with portals. When this job is run on one or more robotic library slots, the exported media is placed in the portals. If you select more media than there are portals, the robotic library will fill as many slots as possible, and then you are prompted to remove the media from the portal. This process continues until all of the selected media has been removed from the robotic library.1. Open the Symantec Backup Exec Management Console.2. Click Devices on the navigation bar.3. Select the robotic library containing the tape media.4. Click Slots.5. On the Results pane, select the slots you want to export tape media from.6. Under Media Tasks in the Task pane, select Export media.7. Complete the appropriate options as follows:• Job Name• Job Priority8. Select Run Now to have the import media operation run.Importing Tape MediaOn the PowerVault DL Backup to Disk Appliance that you wish to import the tape media into, you must create an import media job to insert media into your robotic library so that the Backup Exec database is updated. The Backup Exec import media job fully supports robotic libraries with portals. When this job is run, the slots you selected are checked for media. If media is found, it is exported to the portals. After all the media has been exported, you are prompted to insert new media into the portal so it can be imported. This process continues until all of the requested media has been imported into the robotic library.Before you create an import media job, note the following:• If the media does not have a bar code, when you create the import job, you must select the option Auto-inventory after import is completed.• If your robotic library uses a media magazine, make sure no jobs are currently running and that all media are ejected from the drive and are back in the magazine slots beforeswapping the magazine.You can select any number of slots to import.You can monitor this job on the Job Monitor.To import media to a robotic library:1. On the navigation bar, click Devices.2. Select the robotic library.3. Click Slots.4. On the Results pane, select the slots you want to import media to.5. Under Media Tasks in the Task pane, select Import media.6. Complete the appropriate options as follows:• Job Name• Job Priority7. Backup Exec must inventory the media after it has been placed in the library. In orderfor Backup Exec to automatically create an inventory job to run after the import jobcompletes, under Settings, click Options, and then select Auto-inventory after importis completed.8. Select Run Now to have the import media operation run.CATALOGING MIGRATED TAPE MEDIAThe tape media must be cataloged once the tape media has been imported and inventoried on the new PowerVault DL Backup to Disk Appliance. Cataloging the tape media allows Backup Exec to read and store the information contained in the tape media catalog which includes: • Tape number/label/name (something to identify that tape from all others, which is typically the barcode for tape media)• Date and time of the backup• Type of backup• What directories/files were backed upPerform the following steps to catalog the imported tape media:1. Click the tape drive/robotic library.2. Select the slots containing the tape media that was just imported.3. Right-click the tapes/slots and select Catalog.Perform the following steps to move a tape library from one PowerVault DL Backup to Disk Appli-ance to another PowerVault DL Backup to Disk Appliance.Note: The correct number of Backup Exec Library Expansion Option licenses must be in-stalled on the new appliance to support your PowerVault Tape Library.1. Power down the PowerVault DL Backup to Disk Appliance including the server and at-tached tape library.2. Perform the necessary steps to disconnect the PowerVault Tape Library from the originalappliance and connect the PowerVault Tape Library to the new appliance. Refer to your PowerVault Tape Library documentation for more information on cabling your Power-Vault Tape Library.3. Power on the new PowerVault DL Backup to Disk Appliance and complete the appliancelog in process.4. Launch Backup Exec 12.5 and install the correct number of Library Expansion Optionlicenses to support the PowerVault Tape Library.5. On the navigation bar, click Devices .6. Select the robotic library.7. Click Inventory. The tape library will inventory each cartridge within the library. Thisprocess could take several minutes depending on the number of cartridges in the library.Cataloging Media from a Migrated Tape LibraryThe tape media must be cataloged once the PowerVault Tape library has completed the inventory process. Cataloging the tape media allows Backup Exec to read and store the information con-tained in the tape media catalog which includes:• Tape number/label/name (something to identify that tape from all others)• Date and time of the backup• Type of backup• What directories/files were backed upPerform the following steps to catalog the tape media in the library:1. Click the tape drive/robotic library.2. Select the slots containing the tape media that was just imported.3. Right-click the tapes/slots and select Catalog.MIGRATING A TAPE LIBRARYCOPYING DATA SETSCopying Data SetsSpecific media sets can be copied from one PowerVault DL Backup to Disk Appliance to another. Copying sets involves the duplicate operation to copy media sets from one appliance to another. Perform the following steps to copy media sets from one appliance to another:1. On the source appliance, create a backup-to-disk folder where the data will reside on thetarget appliance.a. Select Tools→Wizards →Backup-to-Disk.b. Click Next to continue the wizard.c. Select Create a new backup to disk folder.d. Select Backup-to-disk folder.e. Name the backup-to-disk folder.f. Select a path to store the backup-to-disk folder. This path should be located on theappliance where the media sets are being copied.g. Set the size for the backup-to-disk files.h. Set the maximum file size.i. Set the number of backup sets per file.j. Set the maximum number of concurrent jobs.k. Set the low disk space thresholds.thewizard.l. Complete2. On the Job Setup tab, select New Job to Duplicate Backup Sets.3. Select Duplicate Existing Backup Sets.4. Select the backup sets that are to be copied to the new appliance.5. Select the backup-to-disk folder on the new appliance (specified in step 1) as thedestination for the duplicate operation from the Device and Media tab.6. Complete other settings for the wizard and select Run Now to run the duplicateoperation.7. Once the duplicate operation has completed, go to the new appliance.8. On the new appliance, create a backup-to-disk folder following step 1. Specify the pathfor the backup-to-disk folders as the local path on the appliance set in Step 1. Completethe wizard.9. Select the Devices tab from Backup Exec. Right-click the backup-to-disk folder createdin the previous step and select Inventory from the pop-up menu. Once the backup-to-disk folder has been inventoried, the contents must be cataloged.CATALOGING COPIED DATA SETSThe media in the backup-to-disk folder must be cataloged once the backup-to-disk folder has been inventoried on the new PowerVault DL Backup to Disk Appliance. Cataloging the backup-to -disk folder allows Backup Exec to read and store the information contained in the folders which includes:• Media number/label/name (something to identify that media from all others)• Date and time of the backup• Type of backup• What directories/files were backed upPerform the following steps to catalog the imported virtual disks:1. From the Devices tab, select the backup-to-disk folder that was imported.2. Select all of the media on the right.3. Right-click all of the media and select Catalog Media from the pop-up menu. Specifythe following (if necessary) on the Catalog Job Properties dialogue:• Under Device, specify a password if the media is password protected• Under General, specify a job name and priority• Under Schedule, select Run Now to start the Inventory Operation4. Continue to specify the settings for each media in the catalog operation.Backup Exec will catalog the media and it will be available for use.Disk Group(s) from other systems (e.g., another Dell PowerEdge Server with attached storage enclosures) may be migrated to a PowerVault DL Backup to Disk Appliance.Perform the following steps to migrate a Disk Group from one system to a targeted PowerVault DL Backup to Disk Appliance:1. Determine the Disk Group for migration.2. Power down the system that owns the Disk Group, including the server and all attachedMD1000 Storage Enclosures.3. Remove the physical disks for the Disk Group to be migrated .4. On the target PowerVault DL Backup to Disk appliance, set the Disk ConfigurationPolicy to Manual via the Appliance Management Console .5. Install the physical disks of the migrated Disk Group in to the MD1000 Storage Enclosureconnected to the target PowerVault DL Backup to Disk Appliance.Note : If the goal is to keep the Disk Configuration State as Standard , the migrated DiskGroup must occupy Slots 1-7 or Slots 8-14 in the new MD1000 Storage Enclosure. Theoptional hot spare should be installed in Slot 0.6. From the target PowerVault DL Backup to Disk Appliance Console, launch Dell’sOpenManage Server Administrator (OMSA) tool. Import the migrated Disk Group(s)using OMSA. Refer to the Dell OpenManage Server Administrator (OMSA) User Guidefor specific steps.Note : Use the OMSA procedure for importing foreign configurations. If importing the foreign configurations fails, issue the Clear command for the migrated Disk Group.7. Using OMSA, perform a Fast Initialization on each of the imported virtual disks andthen delete any imported virtual disks.8. On the target PowerVault DL Backup to Disk appliance, reset the Disk ConfigurationPolicy to one of the Automatic settings via the Appliance Management Console .Backup Exec will then configure the imported Disk Group(s) as one or more virtual disksand make them available for use by the PowerVault DL Backup to Disk appliance.MIGRATING AN UNASSOCIATED DISK GROUPSUMMARYThe need to migrate or copy backup data from one Dell PowerVault DL Backup-to-Disk Appliance to another is handled via straightforward processes and procedures. Depending on the appliance configuration, this data may reside on disk, tape, or both. The procedures contained herein pro-vide a direct methodology to accomplish the aforementioned tasks.THIS WHITE PAPER IS FOR INFORMATIONAL PURPOSES ONLY, AND MAY CONTAIN TYPOGRAPHICAL ERRORS AND TECHNICAL INACCURACIES. THE CONTENT IS PROVIDED AS IS, WITHOUT EXPRESS OR IMPLIED WARRANTIES OF ANY KIND.。
磁带音频转录到电脑的方法
磁带音频转录到电脑的方法
一、硬件
1、电脑一台
2、单放机一台
3、音频连接线一根
二、软件
GoldWave
三、连接方式
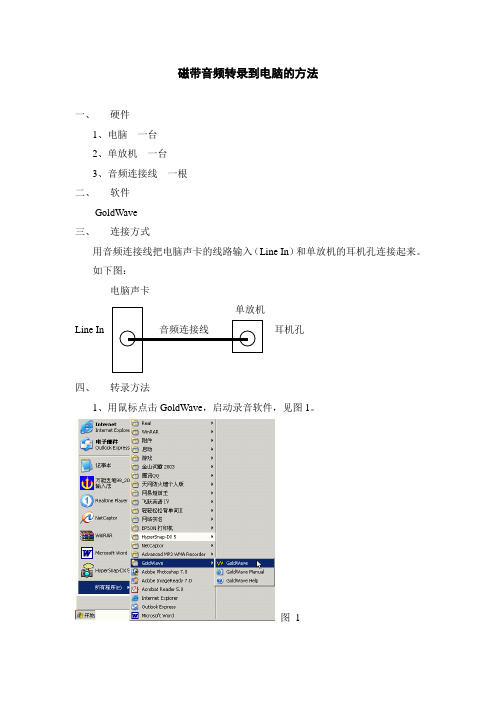
用音频连接线把电脑声卡的线路输入(Line In)和单放机的耳机孔连接起来。
如下图:
电脑声卡
Line In 耳机孔
四、转录方法
1、用鼠标点击GoldWave,启动录音软件,见图1。
图1
2、用鼠标点击New,出现New Sound窗口,再点击V oice,修改Length为
30分钟(注意格式为30:00),接着再点击OK,见图2、图3。
图2
图3
3、调节单放机的音量旋钮,使其处于适中位置,同时调节电脑的线路输入,
使其处于适中位置,见图4。
图4
4、把磁带倒到头,然后按下单放机的放音按钮,当出现声音时,按住Ctrl
键,同时用鼠标左键点图3的红色录音按钮,此时就进入录音状态,观察图3红色录音按钮下的两条闪动的彩色条纹,闪动条纹的峰值应该占整个条纹的60%~70%(这是显示声音的强度,太大或太小录音的效果都不好),如果太大或太小,可适当调节单放机音量旋钮或线路输入。
5、录完一面后选File—Save,然后输入相应文件名即可,接着重复2、3、4
录另一面。
录像带转存电脑的方法
录像带转存电脑的⽅法家有珍存录像带,⼗多年了。
某⽇看新闻知录像带⼀般寿命为3-5年,时间再长就容易胶带变质。
于是有了标题内容的想法,通过⼀番研究,和实际操作得出了通⽤⽅法如下:1、需要⼀块电视卡,⼀般家⽤品牌机都有,就是买新的也不过五六⼗元⽽已。
也不⽤买新的,看看谁的是品牌机就给他卸下来⽤⽤。
(辨认是不是电视卡很⽅便,上⾯有四个孔,分别写着ad什么来就是声⾳那个单词⼀个av⼀个tv⼀个那种⽼式的插电视机线的头)需要⼀条三头对三头的AV线,这上⾯就是⽤它的黄线也就是视频传送。
需要⼀条两头对⼀头的⾳频线,这⾥需要把录像带上的声⾳输出到电脑⾥。
需要会声会影⼀类的计算机软件作为总体操控。
需要⼀副⽿机2、把电视卡插⼊计算机,安装好驱动程序。
把录像机的video out (视频输出,黄⾊的)插上av线的黄头,把另⼀端的黄头插⼊电视卡的av接⼝(也是黄⾊的)把⾳频线两头的⼀端的⽩头(就是输出头)插⼊录像机的ad out,把另⼀端单头的插⼊计算机声卡的麦克风头(红⾊的这⾥表⽰声⾳从这⾥输⼊计算机)按正常⽅式插好⽿机上⾯的⼯作就是第三个容易乱。
插录像机的是⽩线表⽰声⾳从录像机⾥出来,插声卡的是另⼀端的单线头,不过是插在红⼝⾥,这⾥表⽰把从录像机⾥读出来的声⾳像⼈说话⼀样投⼊的计算机⾥然后打开会声会影,放⼊录像带开始运⾏录像机。
如果屏幕没有出现录像机⾥⾯的内容,不要着急,把视频输⼊模式定为视频混合,pal即可如果⽿机听不到声⾳,把⾳频输⼊定为⾃⼰的声卡,麦克风即可如果还是听不到声⾳,打开声卡管理模式,显⽰麦克风,很多ghost版本把麦克风⼀项设为了静⾳,去掉他即可这时候应该能看到图像,并听见声⾳了。
在这之前不要忙着录。
先调试是关键。
可以先录⼀段,然后保存,⽤暴风影⾳等东西打开⾃⼰录得看看效果。
好了,这⾥重点就是线路接法,都接好了,就不要怀疑物理上链接的问题了。
需要看看软件的事情,1、声卡管理把麦克风输⼊关闭了,这个需要改2、应⽤软件,⽐如会声会影会对很多细节⽅⾯有调整,多试试,不忙录,务必追求最好。
摄像机磁带中的视频怎么转存到电脑中?minidv使用说明
磁带摄像机与电脑的连接方法前言。
目前,市场上常见的DV摄像机大致有以下几种记录介质:DV磁带、HDD硬盘、光盘、存储卡。
磁带DV的采集。
磁带拍摄的DV素材导入到电脑里面的术语叫做“采集”,一般通过IEEE1394接口或USB接口进行数据传输。
那么,没办法,你就去市场买一块PCMCIA接口的1394卡吧,直接插在笔记本的PCMCIA接口就可以。
和DV的1394接口相连接,不同DV的接口不同,自己慢慢找吧。
事实上,非线性编辑系统是一个扩展的计算机系统,它的一切操作都符合计算机的操作规范,非线性编辑系统进行工作时首先要将所有需要编辑的素材(包括带上的视频信号、线上传输的视频信号)经过数字化采集后转换成图象文件的形式,只不过这个图象文件不同于以往常见的计算机单帧固定画面图象文件,它的文件内容是活动图像,画面的内容随时间的变化而变化,也就是说这是一个有时间长度的图像文件,我们且称它们为视频文件。
1394好像很神秘,这种接口在很多的笔记本电脑上都是标配,但最新的笔记本电脑标配接口又开始省略?掉1394接口。
自从有了DV,也就是真正的数字记录格式摄像机即使用DV磁带和部分索尼D8(使用8mm磁带)出世后,1394接口也随即成为数码摄像机的标配接口。
我们可以看到,不管是哪个品牌和型号,只要是用DV 磁带的机型,绝大多数都有1394接口,索尼还给这个接口另起了一个名子叫i-link。
我们知道,摄像机所拍摄到的影像,其实是通过光所产生出来的,而光是由红、绿、蓝三原色所构成的,常见的CCD数码摄像机采用1个CCD处理,通过摄像机将光线还原为三原色,而3CCD数码摄像机是通过特有的三棱镜将光线分解并使用三个的CCD进行处理,既避免了1CCD数码摄像机还原时的色彩误差,又能够确保达到高分辨率以及精确的重现色彩效果,拍摄的影像将更为鲜明、有层次感,因此,专业级的数码摄像机基本都已采用了3CCD模式。
DVD介质是目前所有的介质数码摄像机中安全性、稳定性最高的,既不像磁带DV那样容易损耗,也不像硬盘式DV那样对防震有非常苛刻的要求。
磁带翻录教程

翻录时音量大小的控制: 六.翻录时音量大小的控制:
首先,在电脑上将线路输入音量调到最大,或者麦克风音量调到最大。为保 证录制时音量大小合适,此时控制音量大小完全要由随身听内置音量旋钮。这样 是为了将磁带在播放时随身听电机转动产生的电流声降到最低。也就是说随身听 出多大声音,电脑则会采集多大声音。那么,究竟多大声音才够合适?录音软件 在录制时,采集到的声音波形峰值不能超出两边的边界线。如下图:
2、A、B面声音大小不一。从波形上可以看出,前后两段波形大小明显不一, 面声音大小不一。 如果连接后,声音突然变小,听着很不自然。这时就需要将两段音频声音大 小调节统一,尽量让练级出自然过渡。
友情提示: 友情提示:由于录制时录音软件所采集声音来源于 线路输入,所以电脑中播放的声音声音或者电脑系 统提示音等都不会被录入,此时你可以一边欣赏磁 带播放的音乐,一边浏览网页,轻松愉快的进行录 制。值得一提的是不能将手机放在电脑旁,否则来 电时的电波干扰音会被录入。
后期处理: 八.后期处理:
关于后期处理,主要是降噪,接下来会详细介绍降噪处理。降噪完后就是对音频 音量进行调整统一,最后就是将A面和B面连接。 A .降噪 首先,在这里说说降噪的原理。降噪的原理就是提取一段噪音,然后利用软件进 行采样计算出该段噪音频率,降噪时软件会认为小于采集到噪音频率以下的声音为 噪音,然后将这个频率范围内的声音进行消除。 再次,关于磁带播放时所产生的噪音。一个是来自随身听转动电机的电流声,一 个是来自磁带和磁头摩擦所产生的声音,有些磁带由于使用多次,带面有赃物,还 有磁头因氧化表面所产生的氧化膜以及赃物,这样噪音就会偏大。 最后,大家看看降噪的步骤: ①查看噪音波形:将波形放大,可以明 显看到噪音波形很有规律且大小基本统 一。若播放时,就会听到“嗤嗤”的连 续声,这就是噪音。
硬盘工作原理
本文中,我们将拆解一个硬盘驱动器以了解其内部构造,并讨论它们是如何将成吉字节的信息组织到文件之中的。
硬盘发明于20世纪50年代。
最初这些直径达20英寸的宽大磁盘只能保存几兆的数据。
它们先是被称为“固定磁盘”或“温彻斯特盘”(IBM 公司一种流行产品的代号),后来又被称为“硬盘”以区别于“软盘”。
硬盘使用附有磁性介质的硬质盘片,而磁带和软盘使用的是柔软的塑料薄片。
在最为基本的层面上看,硬盘与卡式磁带并无太大不同。
它们都使用磁带录音机工作原理一文中介绍的磁记录技术。
硬盘与卡式磁带共享磁存储带来的最大好处在于:磁介质很容易被擦除和重写,并可将存于其上的磁通模式“记忆”许多年。
下一节我们要谈谈卡式磁带和硬盘的主要差异。
下面让我们看看卡式磁带与硬盘的主要区别:对于卡式磁带,磁记录材料被涂于塑料薄带之上;对于硬盘,磁记录材料先被层积在高精度的铝制或玻璃基片上,然后再将盘片打磨成如镜面一样平滑。
对于磁带,要跳到特定位置需快进或快退,若磁带很长则可能花费数分钟的时间;对于硬盘,可几乎立刻移至磁盘表面的任一点。
卡带仓中的读写头直接接触磁带。
而硬盘的读写头“悬浮”在磁盘上,从不会有真正的接触。
卡带仓中的磁带以每秒约5厘米的速度移过磁头。
而硬盘的盘体在磁头下的旋转速度可达每秒76米(约为每小时272公里)! 与卡式磁带相比,硬盘信息被存储于极小的磁畴中。
盘片的精度和介质的速度使这样小的磁畴成为可能。
由于以上的差异,一个硬盘驱动器可以在很小的空间中存储数量惊人的信息,并能在一眨眼的时间里访问信息的任何部分。
典型台式电脑的硬盘容量在10-40G 之间。
数据以文件的形式保存在磁盘上。
一个文件不过是一组命名的字节。
这些字节可能是某个文本文件中字符的ASCII 码,也可能是供计算机执行的某个应用软件的指令,或者是某个数据库的记录,还可能是某个GIF 图像的像素颜色。
无论文件包含了什么内容,它只是一个字节流罢了。
当在计算机上运行的程序请求使用某个文件时,硬盘将取得文件的字节并依次发送给CPU 。
惠普DAT存储(usb)磁带机使用手册
准备装配托架 .......................................................................... 23 连接装配件 ............................................................................ 24 安装磁带机 ............................................................................ 24 将 USB 电缆连接到服务器 ................................................................ 25
升级备份软件 ........................................................................... 20 启用加密(仅 DAT 320) ............................................................. 21
2 驱动程序和备份软件 ............................................ 19
安装驱动程序 ........................................................................... 19 在 Windows 上安装 .................................................................. 19 安装过程 ....................................................................... 19 在 Linux 上安装 .................................................................... 20
用DV机备份电脑文件
用DV机备份电脑文件在当今社会,信息的高速发展,造成了人们对存储空间的急迫需求,大家都希望有一种可以存储大量数据,又很廉价的存储方式,这就是我这里为大家介绍的采用DV磁带+DVStreamerPRO2软件备份数据的新方式,DVStreamerPRO2是一个来自硅谷的小公司的产品,他们试图对磁带技术展开一次废物利用式的尝试。
DV Streamer的总工程师在介绍自己的理念时说道:“目前摄像机使用的DV 带和超八毫米磁带都是最廉价的资源,不到3美元的一盘DV磁带存储容量可以顶一个价值50美元的15GB计算机硬盘”。
我们把摄像机当作数据磁带机来使用,其工作方式是通过FireWire (IEEE1394)将摄像机连接到PC或笔记本电脑。
软件会控制DV摄像机录制(备份)与播放(复原),这与传统的视频编辑程序无异。
由于录像带上可以写入不限数量的文件与目录,因此DV影片格式充其量只是一种容器。
光从技术的观点来看,DV录像带上可以写入各种类型的数据。
在储存时,DV Streamer PRO会在录像带上写入特殊的标题,包括数据大小、起止时间与目录结构。
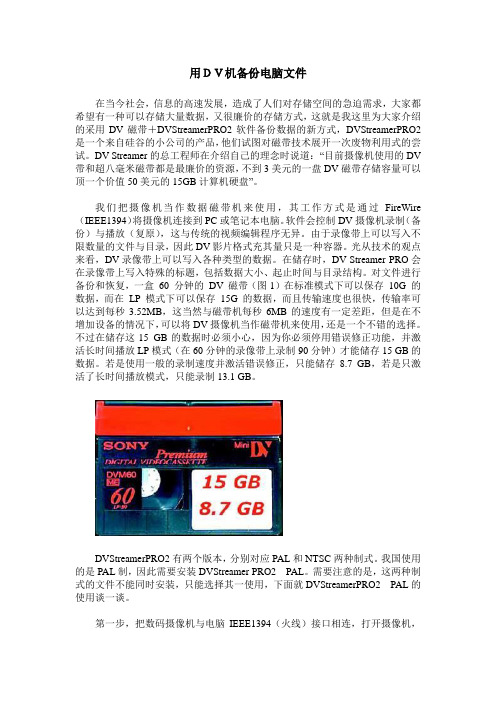
对文件进行备份和恢复,一盒60 分钟的DV 磁带(图1)在标准模式下可以保存10G 的数据,而在LP 模式下可以保存15G 的数据,而且传输速度也很快,传输率可以达到每秒3.52MB,这当然与磁带机每秒6MB的速度有一定差距,但是在不增加设备的情况下,可以将DV摄像机当作磁带机来使用,还是一个不错的选择。
不过在储存这15 GB的数据时必须小心,因为你必须停用错误修正功能,并激活长时间播放LP模式(在60分钟的录像带上录制90分钟)才能储存15 GB的数据。
若是使用一般的录制速度并激活错误修正,只能储存8.7 GB,若是只激活了长时间播放模式,只能录制13.1 GB。
DVStreamerPRO2有两个版本,分别对应PAL和NTSC两种制式。
我国使用的是PAL制,因此需要安装DVStreamer PRO2 PAL。
如何将磁带上的声音录制到电脑上
把磁带机的耳机插孔与电脑声卡的line-in用双头音频线连接起来播放磁带电脑里则用录音机软件进行录音不过效果不怎么好以下有详细资料,希望能对你有帮助将磁带转录成MP3是一个简单的过程,也是一个复杂的过程。
说简单,拿一台录音机线路输出和声卡的线路输入一对,找个合适的软件录制再压缩就完成了;说复杂,就是再录制过程中有很多要注意的地方,如果某一步出了差错都会影响到录音质量。
虽然我转录完成了上百盘磁带,细细听来感觉满意的寥寥无几。
现在应朋友们的要求,我将自己的做法和体会写一下,欢迎大家批评指教。
第一部分:硬件的准备硬件包括计算机和录音机,以及必要的连接线(一般是一条3.5/3.5转录线)。
【计算机】1.推荐选择主频在300MHZ以上的PC。
过低的主频会增加处理的难度和降低处理速度。
我想谁都不想为一首歌降噪整整一个晚上吧!2.声卡最好是独立的而不是主板整合声卡(当然某些主板整合声卡性能并不差,录制效果也不比分立声卡差),例如创新、启哼、帝盟、8738等。
其中8738最好是用公版的驱动,有的杂音较大,甚至不如板载声霸卡。
3.声卡最好不要紧紧的贴在显示卡附近,也不要紧紧靠着机箱的一侧。
如果你的主板有三个以上的PCI插槽(我的是5个),我建议将声卡装在第二个插槽上(从机箱底板算起)这样和AGP显卡间隔3个PCI槽,录制效果是最好的。
如果靠显卡太近了,而且显卡又是杂牌货,有可能造成丝声干扰,增加处理难度。
4.将除了声卡以外的网卡、猫、采集卡等暂时拿掉。
当然这些设备的影响也许没有,也许非常小,但也有可能造成的影响消除是非常麻烦的。
5.最后你应将光驱到声卡的音频线拔下来。
如果你是一位电脑高手,建议你作以上步骤,毕竟几分钟就能完成任务;如果你对电脑硬件不是很熟悉,那就免了吧!别再开箱了,否则有什么问题我可负不起这个责任啊!~我现在的设备是K7-900,创新SBlive 。
【录音机】录音机有几种可以供选择:一般来说最优先选择的是录放卡座和监听卡座,其次是台式机,最后是随身听。
录音棚使用指南
录音棚使用指南一、开机、关机:开机顺序为总电源→声卡→调音台→电脑→音箱,关机顺序则相反。
二、录音(话筒录音):开机完成后视工作目的,如需录音,则先架好装好话筒(见话筒架设),打开话放,然后按调音台用户区(USER DEFINE KEYS)1键召回调音台预设的录音状态(RECORD),完成录音硬件准备;打开程序SAMPLITUDE 2496,再视工作目的分为两种情况:新建工程、打开未完成工程或补录。
(1)新建工程:STEP 1:在打开程序SAMPLITUDE 2496后,按键盘“E”键,弹出对话框后确认轨数(一般选4轨)、采样频率(一般选44100)及时间长度(一般选60MIN),然后确定。
进入工程文件后,选择要录音的轨道,对着其左方工作区的一长方条(内有S:1,S:2,S:3等字样)点出对话框后选择输入输出通道。
一般情况下,输出OUTPUT选择ADAT2(7+8),输入INPUT选择ADAT1(1+2),录音模式选择单声道(MONO)再点击OK。
之后,将3轨左方的MUTE静音灯点亮,以便留下待选素材。
STEP 2:准备工作完成后,按CTRL+S键呼出保存对话框,选择需要的路径:对NEW下拉菜单选择盘符,进入后选择文件夹或新建文件夹,进入文件夹后,将“文件名”一栏中“NEW .VIP”改为需要的文件名,单击“OK”完成工程文件的保存。
STEP 3:完成工程文件的保存后,按键盘“I”键,呼出对话框,在“LOCK RECORDING OBJECT”前的方框内打上“√”,按“OK”确认。
STEP 4:此时按“R”键呼出菜单,对着对话框中仅有的文件夹图案点左键查看路径,再确认一下录音路径是否正确,这点非常重要。
STEP 5:将鼠标光标放在工程文件最左方,将文件放长(按住CTRL再按小键盘“→”键为放大长度,“←”为缩短长度,“↑”为放大波形,“↓”为缩小波形,以上均为可视变化,不对工程文件及波形文件产生影响),再按住“SHIFT+1”,在工程文件头部打一个点(MAKER)作为标记,以后只要按“1”键就可返回此处。
如何将磁带上的录音转录到电脑上并制作成MP3?
如何将磁带上的录音转录到电脑上并制作成MP3?一、需要的材料一台录音机、要录制的听力磁带、一根音频线(两端都有接口的)、软件(Total Recorder 4.5标准版)二、录制的步骤-前期录音(磁带→电脑)1.将要转录的磁带放入录音机,用音频线把录音机的电脑连起来,一端插在录音机的Headphone插口(放音),一端插在电脑的Micphone插口(录音);2.启动软件Total Recorder(我用的是标准版4.5),点击“录音源及其参数设置”,录音源选择“声卡(N)”,在“使用下列设置(L)”下选择“麦克风”;然后在录音参数下点击“更改”,设置录音的格式及属性,在格式的下拉框中选择“MPEG Layer-3”,在属性的下拉框中选择“56kBit/s,24,000Hz,Stereo”,点击确定返回软件主界面;3.按下录音机的放音键,同时单击软件界面中的红色按钮,开始录音。
4.前期录制工作结束。
这样下来,25分钟的录音大概有10M大小。
如果你觉得还是太大了点,可以更改第二个步骤中的“录音属性”,比如将“56kBits,24,000,Stereo”更改为“32kBits,16,000,Stereo”等。
三、录制的步骤-后期录音(软件录音)以上是将整盒一面的录音带录制下来,如果各个课时、部分要分开,还要以下步骤:1.用Windows Media Player播放刚才录制好的文件,选择要录制的部分;2.启动软件Total Recorder 4.5标准版,点击“录音源及其参数设置”,录音源选择“软件(W)”,选择下面的“在底部的‘录音参数’选项中更改设置(C)”;然后在录音参数下点击“更改”,设置录音的格式及属性,在格式的下拉框中选择“MPEG Layer-3”,在属性的下拉框中选择“24kBit/s,12,000Hz,Stereo”(这样选择的音质已经很不错了,而且文件较小),点击确定返回软件主界面;3.按下Windows Media Player的放音键,同时单击Total Recorder4.5标准版软件界面中的红色按钮,开始录音。
如何将磁带转录成MP3
如何将磁带转录成MP3
将磁带转录成MP3是一个简单的过程,也是一个复杂的过程。说简单,拿一台录音机线路输出和声卡的线路输入一对,找个合适的软件录制再压缩就完成了;说复杂,就是再录制
过程中有很多要注意的地方,如果某一步出了差错都会影响到录音质量。虽然我转录完成了上百盘磁带,细细听来感觉满意的寥寥无几。现在应朋友们的要求,我将自己的做法和
的运转情况,如果有必要需要用手尝试堵转,发现卷带轮扭力过大需要修理(否则过力矩抖晃严重),如果卷带轮扭力过小也需要修理(否则易卡带)。一般以用手捏
不易被捏住为合适。
6.磁带准备:在准备转录前应该对磁带节目比较熟悉,至少听1遍,掌握一下内容:主要包括(1)磁带时间长度(2)磁带真个音量是否均衡(3)磁带动态是否均衡(4)磁带是否有比较严重的瑕疵,如铰带、磁纷脱落(5)确定磁带采样的基准。如果在试听时发现抖晃或者前后变调,要及时查找原因,在排除放音机的原因后,一般可以判断为磁带内部阻力大或者阻力不均,通过快速倒带1~2次即可解决问题,如果还是不行,则时由于在存放过程中磁带变形或者其中的带轮等部件变形,建议找一高质量的磁带,将其中的磁带部分导出到另外的带机上,将准备录制的磁带导入高质量磁带带盒即可。我用的是一盒1998年出的正版SONY60min磁带,根据经验,SONY和TDK是比较好的选择。
把磁带机的耳机插孔与电脑声卡的line
把磁带机的耳机插孔与电脑声卡的line-in用双头音频线连接起来播放磁带电脑里则用录音机软件进行录音不过效果不怎么好以下有详细资料,希望能对你有帮助将磁带转录成MP3是一个简单的过程,也是一个复杂的过程。
说简单,拿一台录音机线路输出和声卡的线路输入一对,找个合适的软件录制再压缩就完成了;说复杂,就是再录制过程中有很多要注意的地方,如果某一步出了差错都会影响到录音质量。
虽然我转录完成了上百盘磁带,细细听来感觉满意的寥寥无几。
现在应朋友们的要求,我将自己的做法和体会写一下,欢迎大家批评指教。
第一部分:硬件的准备硬件包括计算机和录音机,以及必要的连接线(一般是一条3.5/3.5转录线)。
【计算机】1.推荐选择主频在300MHZ以上的PC。
过低的主频会增加处理的难度和降低处理速度。
我想谁都不想为一首歌降噪整整一个晚上吧!2.声卡最好是独立的而不是主板整合声卡(当然某些主板整合声卡性能并不差,录制效果也不比分立声卡差),例如创新、启哼、帝盟、8738等。
其中8738最好是用公版的驱动,有的杂音较大,甚至不如板载声霸卡。
3.声卡最好不要紧紧的贴在显示卡附近,也不要紧紧靠着机箱的一侧。
如果你的主板有三个以上的PCI插槽(我的是5个),我建议将声卡装在第二个插槽上(从机箱底板算起)这样和AGP显卡间隔3个PCI槽,录制效果是最好的。
如果靠显卡太近了,而且显卡又是杂牌货,有可能造成丝声干扰,增加处理难度。
4.将除了声卡以外的网卡、猫、采集卡等暂时拿掉。
当然这些设备的影响也许没有,也许非常小,但也有可能造成的影响消除是非常麻烦的。
5.最后你应将光驱到声卡的音频线拔下来。
如果你是一位电脑高手,建议你作以上步骤,毕竟几分钟就能完成任务;如果你对电脑硬件不是很熟悉,那就免了吧!别再开箱了,否则有什么问题我可负不起这个责任啊!~我现在的设备是K7-900,创新SBlive 。
【录音机】录音机有几种可以供选择:一般来说最优先选择的是录放卡座和监听卡座,其次是台式机,最后是随身听。
将录音带上的内容转至MP3播放器方法两则
将录音带上的内容转至MP3播放器方法两则摘要:随着科技的不断发展,音频媒体的载体越来越多,本文介绍了两种方法来完成这一任务,即用WINDOWS系统中自带的录音机录音和用WINDOWS自带的Windows Movie Maker 2.0完成。
关键词:WINDOWS系统;录音;Windows Movie Maker 2.0随着科技的不断发展,音频媒体的载体越来越多,磁带录音机的使用也越来越少了,但是有不少人由于各种原因还用录音磁带,录制自己所需要的语音或者音乐。
由于磁带录音机体积较大,携带不方便,因此,将录音磁带上的内容转到MP3播放器上就显得很有必要。
下面我介绍两种方法来完成这一任务。
这两种方法都需要一根音频连接线,两端带音频插头,一端插在电脑的线路输入插孔(与耳机插孔,话筒插孔并排),一端插在录音机的输出插孔上,这样一来,磁带录音机所播放的内容就可以传到电脑中了,剩下的问题是我们怎么来获取这些声音。
一、用WINDOWS系统中自带的录音机录音Windows自带一个录音机,可用于录音。
但遗憾的是每次只能录一分钟。
再往下录时又得单击一下录音键,很不方便。
其实我们可以利用Windows的录音机来录制超过1分钟的声音文件。
操作步骤如下:1、录制一个备用的声音文件:先用录制1分钟后单击一次录音键的方法录制一个声音文件(声音文件的扩展名为.wav),存入磁盘。
2、获得合适的录音时间:要录制一段声音前先估计一下大概需要几分钟,然后单击录音机“编辑”菜单下的“插入文件…”命令,弹出对话框后选择你以前存盘的那个文件,再单击“打开”按钮即可将文件插入进来,这时在“录音机”右边的“长度”框里显示了当前可保存的录音文件的长度(以秒数计算),如果不够就再如法插入若干次,直到超过你需要录音的时间为止。
值得提醒的是:最好在“插入文件…”前先关闭其他应用程序,以免内存不够,当然最好是开机后在没有打开任何应用程序的情况下直接录音。
磁盘驱动器和磁带机既可以看作输入设备 又可以看作输出设备

计算机指令和程序设计语言
1、计算机指令
指令就是给计算机下达的一道命令。 一条指令必须包括操作码和操作数两部分。
2、程序
所谓程序就是用程序设计语言描述的、用于控制计 算机完成某一特定任务的程序设计语言语句的集 合。
3、程序设计语言
机器语言、汇编语言、高级语言
返回
计算机软件系统
• 软件是指使计算机运行所需的程序和有关的文档。计 算机执行某种操作的命令,称为指令。
返回
字符的编码
目前采用的字符编码,主要是ASCII码,它是American Standard Code for Information Interchange (美国标准信息交换码)的缩 写。
ASCII码是一种西文机内码,有7位ASCII码和8位ASCII码两种,7 位ASCII码称为标准ASCII码,8位ASCII码称为扩展ASCII码。
新的生产力并使之造福于社会的历史过程。 2、信息高速公路 “信息高速公路”是一个交互式的多媒体通信
网络,它以光纤为“路”,以 、电脑、电视、 的多媒体终端为“车”,既能传输语言和文字, 又能传输数据和图像,使信息的高速传递、共 享和增值成为可能。
信息化建设
3、我国的信息化建设
三金工程: 金桥、金关、金卡 四大互联网:中国互联网(Chinanet)
计算机文化最早出现在20世纪80年代初。
返回
1.2 计算机概述
1.2.1 1.2.2 1.2.3 1.2.4 1.2.5
计算机的发展历程 计算机的特点 计算机的分类 计算机的应用 计算机的新技术与发展趋势
返回
计算机的发展历程
1946年2月,世界上第一台电子计算机 ENIAC在美国宾西法尼亚大学研制成功。
- 1、下载文档前请自行甄别文档内容的完整性,平台不提供额外的编辑、内容补充、找答案等附加服务。
- 2、"仅部分预览"的文档,不可在线预览部分如存在完整性等问题,可反馈申请退款(可完整预览的文档不适用该条件!)。
- 3、如文档侵犯您的权益,请联系客服反馈,我们会尽快为您处理(人工客服工作时间:9:00-18:30)。
趁着一些老磁带还能听,还是很有必要转成数字格式存到电脑里的,有很多是找不到的稀有音乐。
第一部分:准备器材
1.准备一条双头音频线(两端都是立体声耳机3.5MM那样的插头),一般的音响元件店或卖光碟的地方都有出售,实在没有也可以自己制作:找两根报废的单放机耳机(普通三芯插头),去掉耳塞头,并将左右音频线对接,对接时要看准颜色,不要接错。
2.找个带
3.5MM耳机输出插口的好录音机,最好是卡座,就是像VCD机那样的磁带机。
如果没有,台式录放机,或普通单放机、磁带随身听、磁带复读机也可以。
为了保证转换的质量,最好用酒精棉签擦洗一下磁带放音机的磁头,有条件的话还可以给磁头消消磁,使放音更清晰。
3.要找一个好的电脑声卡,最好是独立的而不是主板整合声卡,驱动最好是公板驱动,声卡最好不要紧紧的贴在显示卡附近,也不要紧紧靠着机箱的一侧。
就是说如果你的主板有三个以上的PCI插槽,建议将声卡装在第二个插槽上。
4.如果有条件,最好将电脑上除了声卡以外的网卡、猫等暂时拿掉。
第二部分:软件-
过去一般都用CoolEDIT Pro,现在有了更省事的软件—MP3 Sound Recorder,网上有下载的,最好能找到注册码,版本低些也可以。
第三部分:操作
1.安装MP3 Sound Recorder,最好用注册版。
2.把双头音频线的一端接入录音机的“Line Out”输出插口(即耳机差孔),另一端插入计算机声卡的“Line In”输入接口。
3.如果有可能,尽量使录音机和计算机不用一个插座供电。
4.运行MP3 Sound Recorder,会出现一个录音机样的界面,
上图中画面下方共有6个按钮,分别是。
(1)文件保存目录设置
(2)开始录音
(3)开始录音并暂停•
(4)录音控制设置
(5)显示队列
(6)参数设置
首先,点击(4)录音控制设置,会打开一个录音控制窗口,选择“线路输入”项。
第二、点击最右边的按钮设置参数,一般说来,默认即可。
对于品相较好的原版磁带可以选择160,最好选择192。
第三、将磁带放入录放机中,并按播放键。
第四、点击(2)开始录音。
此时出现下图所示画面,表示录音开始。
这时,如果电脑音箱打开,可以听到所转录的内容。
1、要录音的时候先启动软件,再启动录音机播放磁带,播放磁带最好先按下暂停键,然后按播放键,再关闭暂停键即可播放,这样可减小启动杂声,关闭时也先用暂停键。
2、录音机的输出音量要合适,不可太大或太小,以保持图中时间栏下方电平指示条为绿、黄色,不出现红色为宜。
可以通过更改放音机的音量,以选择合适的录音电平。
但在正式录音过程中,绝对不要更改录音机的音量和计算机上录音调音台的音量,从始至终保持所有音量输出和接收一致。
第五、录音过程中,点击上图中左边第一个按钮暂停录音,左边最后一个按钮停止录音。
在磁带首尾的空白区段可以多录制一些,一般1~2min。
还有,在录放机开启后一直到录音结束,要保持距离录音机1m以外,更不要靠近录音机去按键,否则容易感应交流声。
如果确定不准,可以多录两次,然后选择最好的一次。
还有一种简单的转换方法,就是利用现有的MP3机[带CD直录的那种],直接录入磁带或其他媒介音频,一般会自动保存为W A V格式,然后用解霸或千千静听之类的播放器转换为MP3。
但是效果不是很好,要做一些降噪处理。
