XIV日常监控手册
云池 云安全管理平台 部署手册说明书

Version v1.2Copyright2021Hillstone Networks.All rights reserved.Information in this document is subject to change without notice.The software described in this doc-ument is furnished under a license agreement or nondisclosure agreement.The software may be used or copied only in accordance with the terms of those agreements.No part of this publication may be reproduced,stored in a retrieval system,or transmitted in any form or any means electronic or mechanical,including photocopying and recording for any purpose other than the purchaser's per-sonal use without the written permission of Hillstone Networks.Hillstone Networks本文档禁止用于任何商业用途。
联系信息北京苏州地址:北京市海淀区宝盛南路1号院20号楼5层地址:苏州市高新区科技景润路181号邮编:100192邮编:215000联系我们:https:///about/contact_Hillstone.html关于本手册本手册介绍山石网科的云·池云安全管理平台系统的使用方法。
获得更多的文档资料,请访问:https://针对本文档的反馈,请发送邮件到:***********************山石网科https://TWNO:TW-WUG-UNI-A-1.2-CN-v1.2-11/5/2021目录目录i 第1章介绍iii 功能介绍iii 在OpenStack上部署云·池vi环境要求vi部署原理vii准备工作ix部署步骤x步骤一:创建映像文件x步骤二:创建实例类型xii步骤三:创建网络xiv步骤四:启动云主机实例xv步骤五:登录云·池,通过配置向导部署方案xvi 第2章在HStack上部署云·池xvi环境要求xvi准备工作xvii部署步骤xviii步骤一:创建镜像文件xviii步骤二:创建网络xix步骤三:创建安全组xxi步骤四:创建云主机类型xxiii 步骤五:创建云主机实例xxiv 步骤六:登录云·池,通过配置向导部署方案xxvi 配置向导xxvii 通过配置向导部署云·池xxvii 准备工作xxvii 部署步骤xxvii 第一步:方案选择xxvii 第二步:云平台配置xxviii 第三步:配置vLMS xxx 配置恢复xxxi第1章介绍云·池云安全管理平台(CloudPool SecaaS)(以下简称云·池)是基于软件定义安全技术的云安全管理平台,向用户提供丰富的安全资源,且与云平台解耦,广泛应用于新建、已建、扩建的云场景及传统数据中心安全建设。
ThinkVo交流伺服简易用户手册v1.05

THINKVO高性能交流伺服系统
Version 1.05
南京天辕科技有限公司 Nanjing Tianyuan Technology CO.,Ltd
1
——目 录——
第一章 安装与尺寸.......................................................................................................................................... 3 1.1 伺服驱动器安装环境要求 .................................................................................................. 3 1.2 伺服驱动器安装........................................................................................................................................ 3 1.2.1 方向性 ............................................................................................................................................ 3 1.2.2 安装标准......................................................................................................................................... 4 1.3 外形图(基座型) .................................................................................................................................... 4
视频监控代维处理指导手册(千里眼)

视频监控代维处理指导手册编写日期:2011年3月7日目录序、代维处理故障总流程 .................................................................................................................... 2一、视频监控业务Web无法控制类故障处理流程及步骤....................................................... 31、图像不能控制 .................................................................................................................................... 3二、视频监控业务使用不正常类故障处理流程和步骤............................................................. 41、业务中断....................................................................................................................................... 42、图像黑屏....................................................................................................................................... 63、图像不流畅.................................................................................................................................. 7三、常见案例 ........................................................................................................................................... 8案例一、ACE和搜狗输入法冲突 ..................................................................................................... 8案例二、文件能查询不能回放........................................................................................................... 8案例三、5000/6000文件在线回放有码流看不到图像 ............................................................... 9案例四、一机双屏副屏上有码流无法播放.................................................................................... 9案例五、摄像头能看不能控................................................................................................................ 9案例六、客户端查询日志无法查询到登陆日志,其他操作日志可以查......................... 11案例七、无法浏览视频的常见原因.............................................................................................. 11案例八、客户端视频不流畅............................................................................................................ 11案例九、输入法问题 ......................................................................................................................... 11案例十、本地联动设置不上的问题.............................................................................................. 12案例十一、存储录像停不掉............................................................................................................ 12序、代维处理故障总流程代维故障工单处理总流程说明:代维人员接单后的,处理步骤流程注:代维有线宽带故障处理必须操作步骤:预约客户处理时间、测试宽带恢复情况。
VISIO使用手册

Microsoft® Office Visio®2003 用户指南Microsoft Office 商业和技术绘图解决方案本文档中的信息(包括URL和其他Internet网站参考资料)如有更改,恕不另行通知。
除非另行说明,本文档范例中涉及的公司、组织、产品、人物或事件均属虚构,并无意联系或暗示任何真实的公司、组织、产品、人物或事件。
遵守任何适用的著作权法是用户的责任。
在不限制著作权权利的前提下,未经Microsoft Corporation的明确书面许可,无论出于何种目的,均不得以任何形式或借助任何手段(电子、机械、影印、录音或其他手段)复制或传播本文中的任何部分,或将其存储于或引入检索系统。
Microsoft可能对本文档下标的拥有专利、专利申请、商标、著作权或其他知识产权。
除了在任何Microsoft授权许可协议中明确书面许可,对本文档并不赋予您有关这些专利、商标、版权或其他知识产权的任何许可。
Microsoft、Active Directory、ActiveX、FoxPro、FrontPage、MS-DOS、Outlook、PowerPoint、ShapeSheet、SmartShapes、Visual Basic、Visual C++、Visual FoxPro Visual J++、Visual SourceSafe、Visual Studio、Visio、Win32、Windows和Windows NT是Microsoft Corporation在美国和/或其他国家(地区)的注册商标或商标。
版权所有© Microsoft Corporation 1991-2003。
保留所有权利。
部分版权所有©1996, 1998 Novell, Inc. 保留所有权利。
Novell, Inc. 允许使用、复制和分发。
Novell是Novell, Inc.在美国和其他国家(地区)的注册商标。
IBM XIV系列存储快速维护手册
IBM XIV系列存储快速维护手册目录一、XIV的基本架构和组成: (3)二、XIV的基本管理: (5)三、XIV的安装环境要求: (6)四、XIV安装上电 (8)五、如何升级XIV的微码 (11)六、如何收集XIV的System Data(XRAY) (11)七、如何通过GUI更换单个的DDM (15)八、如何通过GUI更换一个模块(Interface Module 或Data Module) (20)附录A:参考文档: (25)一、XIV的基本架构和组成:IBM的XIV系统存储2810-A14,提供了高性能、可扩展性、易于管理功能。
同时采用了SATA磁盘,更加降低了单位容量的成本。
XIV存储主要包括以下组成部分:1.6个主机系统接口模块(Interface Module),它提供FC以及iSCSI接口,同时每个模块包括了12块1TB的SATA硬盘。
2.9个数据模块(Data Module),每个模块包括了12块1TB的SATA硬盘。
3.3组不间断电源模块(UPS),提供掉电保护功能。
4.2个以太网交换机,提供模块间的数据交换功能。
5.一个维护模块(Maintenance Module)6.一个自动电源分配管理模块(ATS),管理外部输入电源的冗余。
7.一个Modem,连接到维护模块,提供CallHome和远程维护。
除此之外,为了方便和外部系统相连接,XIV将所有要和外部相连接的端口都集中到了一个叫Patch Panel的模块。
Patch Panel位于机柜后面右上角。
具体的端口定义如下图。
二、XIV的基本管理:XIV主要是通过XIV Storage Manager GUI进行管理的。
通过GUI完成以下的管理功能:1.XIV硬件的维护和备件的更换2.XIV存储容量的逻辑划分3.XIV和主机系统连接的配置管理4.系统性能的检测5.系统快照、拷贝、远程拷贝、数据迁移功能的管理除此之外XIV还提供了命令行方式的管理XCLI,所有能在GUI中完成的功能也都够通过XCLI完成。
燃烧器操作手册
燃烧器操作说明一、 初次使用,检查程序:遵循锅炉制造商的使用说明确认系统有足够多的水,油箱满油确认燃烧系统电控柜接线正确检查燃烧器电机转向检查温度、压力等传感器设定油路排气确保无空气检查油箱、油管、油泵充满油,喷嘴选择正确检查油路是否有泄露燃烧器处于开启位置,风门处于关闭位置程控器闭合,程控器处于启动位置二、 油路系统检查断开油路卸下电磁阀和喷嘴间连接启动燃烧器检查是否安程序控制器既定程序运行1、鼓风机气动2、风门伺服电机运行到最大位置3、风压监测正常4、风门伺服电机返回到点火位置5、点火6、油电磁阀打开7、安全时间后报警重新装好连接件三、 比例调节器回油与空气流量调节卸下风门伺服电机与比例调节器上的连接,启动燃烧器,点火后手动设定燃烧器负荷在最小位置,检查燃油和风量配合效果。
顺时针转动= 增加风量逆时针转动= 降低风量注意:燃烧器启动后调节风压开关,如果设定值过高,风压开关会自动保护,设定风压保护值一定要合理。
测量点火位置油消耗量1、通过流量表2、根据供油压力和喷嘴型号按照曲线图测算调节点火位置油量1、若喷油量过低,将伺服电机逐步增大到规定值2、若喷油量过高,现将最低油量限位开关调低,再逐步降低风门伺服电机,直至达到规定值。
调整过程中注意燃烧器的燃烧情况,如有必要从新调整。
调整满负荷耗油量逐步增大风门伺服电机的位置直至满负荷,调整过程中观察火焰燃烧情况,如有必要从新进行调整。
测量满负荷位置油消耗量1、通过流量表2、根据供油压力和喷嘴型号按照曲线图测算调节满负荷油流量若满负荷油量过多,减小风门伺服电机开度,直至达到规定值注意:不允许通过调节连杆降低油流量,以免影响低负荷燃烧状况。
若满负荷油量过低,首先增大限位开关的位置,然后调节伺服电机的开度,直至达到规定值,调节过程中注意观察火焰燃烧情况,如有必要从新进行调整。
风量调节风门伺服电机出厂设定值为:满负荷时全开,低负荷时全关,未达到最佳的燃烧效果,应从低负荷位置逐步调整燃油与风量的配比。
理光MT-C1、C2、C3系列复印机中文维修手册(上册)(可编辑)
理光MT-C1、C2、C3系列复印机中文维修手册(上册)MT-C1B064/B065MT-C2B140/B141/B163/B142/B143/B228MT-C3B246/B248/B250/B252/B25312345. Start Start612312. NVRAMNVRAM NVRAMNVRAMNVRAM1234100CRDHB064/B065/B246B064 B064/B065B140/B141/B142/B143/B163/B228B140B246/B248/B249/B250B/252/B253B246ECShort Edge Feed SEF Long Edge Feed LEF SEF LEF11-1 1.11-11.1.1.1-11.1.21-21.1.31-31.1.4.1-4B064..1-4B140..1-5B246..1-61.1.5 /..1-71.1.6..1-101.2 B064 / B140 /B246 .1-111.2.1..1-111.2.2..1-12..1-12ADF.1-14..1-151-17B064 1-18B140 /B246 .1-191-20..1-22/..1-22SP.1-221.3 A3/DLT B475..1-231.3.1..1-231-241.4 LCT B4731-261.4.2..1-271-27..1-28LCT..1-281.5 LG/B4 B474.1-301.5.1..1-301.5.2..1-311.6 3000 B468/B469/B674..1-34 1.6.1..1-341.6.2..1-35..1-35.1-37.1-40.1-40 1.7 B3771-411.7.1..1-41i1.7.2. 1-421.8 B470. 1-441.8.1 1-441.8.2. 1-45 1-45 1-46. 1-47B478/B7061-48B478/B706 1-48B478/B706 1-491-501.9 9 B471. 1-521.9.1 1-521.9.2. 1-53. 1-531-531.10 3000 B478/B7061-551.10.2 1-561.10.3. 1-581.11 B531/B812 1-591.11.11-591.11.2 1-601.12 B5131-641.12.1. 1-641.12.2 1-651.13 Z- B660 1-661.13.1. 1-661.13.21-67. 1-671-68. 1-691-721.14 2000/3000 B700/B7011-741.14.1 1-741.14.21-75. 1-751-78 1-81 1-82. 1-83 B7001-83. 1-841.15 B702 1-861.15.1. 1-861.15.21-871.16 B704 1-901.16.1 1-901.16.21-91ii.1-91B700/B701/B7061-92B706..1-93B706.1-94B706..1-95B700/B701.1-96B700/B701/ B706..1-97B706.1-98B700/B701/B706..1-100 1.17 B703.1-1021.17.1.1-1021.17.21-1031.18 B762..1-1051.18.11-1051.18.21-1061.19 B756..1-1091.19.1.1-1091.19.2. 1-1101.20 B498, B4521-1131.20.1 B498 1-1131.20.2 B4521-1141.20.3. 1-1151-115 1-1161.21.1 B064 B525-10 -12. 1-118. 1-1191-120..1-121 1.21.2 B140 B328-031-125.1-125..1-1261-1271.21.3 B246 B842..1-1301-1301-1311-1321.22 MFP B0641-1351.22.1 / KIT G338, G339.1-135..1-1351.22.21-136DIMM.1-136..1-1371.22.3 PS3 B525 - 08.1-1391.22.4 USB 2.0 B525-01..1-140.1-140..1-140USB SP.1-1411.22.5 IEEE1394 G561.1-142iii 1-1421-143IEEE1394 UP. 1-144IEEE1394 SP1-1451.22.6 802.11B G628..1-146. 1-1461-147UP 1-148802.11B SP1-1501.22.7 MLB B519.1-151. 1-1521-1521-1521-1531.23 MFP : B140/B2461-1541.23.1 SD 1-154 1-154. 1-1551-156SD 1-1571.23.3 / B659. 1-1591-159 1-1601.23.4 PS3 B525-15 1-163. 1-163 1-1631.23.5 USB2.0 B596-011-164. 1-164 1-1641.23.6 IEEE 1394 B581-011-165. 1-165 1-1651.23.7 IEEE 802.11B B582-01, -02..1-166. 1-166 1-166 1.23.8 G3771-168. 1-168 1-1681.23.9 B6091-169. 1-169 1-1691.23.10 B7351-170. 1-170. 1-1701-1711-1721.24 MFP B2461-1751.24.1. 1-175iv1.24.2.1-176SD1-176SD1-1761.24.3 B841.1-177.1-177..1-1781.24.4 PostScript3 B525.1-181..1-181..1-1811.24.5 IEEE1394 B581.1-182..1-182..1-1821.24.6 G813 802.11b..1-183..1-183..1-1831.24.7 C B826..1-184..1-184..1-1841.24.8 C B609.1-185.1-185..1-1851.24.9 C B735..1-186.1-186…1-186..1-187.1-1881.24.10 CM1 B818.1-191..1-191..1-1911.24.11 A USB B825.1-194.1-194..1-194 1.24.12 B B828..1-195..1-195..1-1951.24.13 C B8291-196..1-196..1-196B246 : IPU.1-1961.24.14 VM B861.1-198..1-198..1-1981.24.15 IEEE1284 B6791-199..1-199..1-199 1.24.16 G381..1-200..1-200..1-200v22-12.1 PM. 2-12.1.1. 2-12.1.2 ADF2-52.1.3. 2-5LCT B473. 2-5B4702-550 B468/B469/674 30002-63000- B478/B7062-6Z- 2105 B660 2-62000/3000- B700/B701. 2-7B7022-72.2 SP. 2-73. 3-13.1. 3-13.1.13-13.1.2. 3-1 3.1.3 3-23.1.4 3-23.1.5 3-23.1.6 3-33.1.7. 3-3 3.1.8. 3-4 3.1.9 3-43.1.103-43.1.11 3-43-5 3.23.2.1 3-53.2.2. 3-5 3.33-63.3.1 3-63.3.2. 3-6 3.3.3. 3-7 3.3.4. 3-8 3.3.5. 3-9 3.4 3-103.4.1 ADF 3-10ADF3-103-113.4.2. 3-123.4.3 3-133.4.4. 3-143.4.5. 3-153.4.6. 3-163.4.7 SDRB3-173.4.8. 3-18vi3.4.9..3-193.4.103-20..3-20..3-21..3-223-23 3.4.11.3-253.53-263.5.1.3-263.5.2 LD3-273.5.3.3-293.5.4..3-303.6.3-323.6.1..3-32..3-32.3-33..3-333.6.23-343.6.3..3-353.6.4..3-363.6.5 OPC..3-37..3-38 3.6.6 PTL B140 3-39 3.6.7..3-403.6.83-403.6.9.3-413.6.10..3-413.6.11..3-423.6.123-433.6.13 ID..3-433.6.143-443.6.15..3-453.6.16.3-453.6.17..3-463.6.183-463.6.193-463.73-473.7.13-473.7.2.3-493.7.3..3-503.7.4 TD3-513.7.5..3-513.7.6.3-523.7.7.3-533.8..3-543.8.1.3-543.8.2..3-553.8.3..3-573.8.4..3-58vii3.8.5 3-593.9 3-603.9.1. 3-603.9.2 B140 . 3-62 3.9.3 B140 3-63 3.9.43-64B0643-65B1403-65B246. 3-653.9.5 3-673-673-68 3.9.63-693.9.73-70B0643-70B1403-713.9.8. 3-72B0643-72B1403-73B064 . 3-783.9.93-793.9.103-80B0643-80B1403-813.9.11 3-823.9.123-833.9.13 /3-843.9.14. 3-853.10. 3-863.10.1 3-863.10.23-873.10.33-873.10.43-883-88 3-89 3.10.5 / 3-903.10.6 3-913.10.7 3 3-923.10.8 1 2. 3-93 3.10.9. 3-943.113-953.11.13-953.11.2. 3-973.11.3. 3-983.11.4 3-993.11.5 3-1003.11.6 3-1023.11.7. 3-1053.11.8 3-106viii3.11.9. 3-108 3.11.10. 3-1093.11.113-1103.11.12..3-1113.11.13. 3-1123.11.14. 3-1133.11.15. 3-1143.12 PCBS HDD3-116 3.12.1 BCU 3-116 3.12.2. 3-118B0643-118B140. 3-119B246 :. 3-1203.12.3 IPU3-121B0643-121B140. 3-122B246 : IPU 3-125B2463-1263.12.43-1283.12.5 PSU PFC3-129 B064. 3-129B140 PSU. 3-129B246 PSU..3-1303.12.6 HDD. 3-131B064 3-131B140 3-132B246 HDD3-1333.12.7 NVRAM3-134 NVRAM B064 B140 3-134 NVRAM: B246 3-1363.12.8 DIMMS 3-138 3.13 ADF 3-1393.13.1 ADF 3-1393.13.2 3-1403.13.3. 3-1413.13.4. 3-1423.13.5 3-1433.13.6 ADF3-1443.13.73-1453.13.8. 3-1463.13.9 DF APS 3-1473.13.10 ADF. 3-1483.13.11 3-1493.13.12. 3-1493.13.13. 3-1503.13.14 3-151ix3.13.15 CIS CIS. 3-152 3.13.16 ADF3-1533.14 /3-1543.14.1. 3-154/3-154. 3-155 3-155 3.14.2. 3-156 3-156 3-156 3.14.3 ADF. 3-157. 3-157 DIP ADF 3-157ADF 3-1573.15. 3-15944-14.1 4-14.1.1 4-24.1.2 SP4-24.1.34-34.1.4 4-64-64.1.5 4-7. 4-7. 4-8 4-9 4.1.6. 4-104.2 B0644-114.2.1 B0644-114.4.2 B064 SC4-12SC100. 4-12SC300 1..4-15SC400 2..4-20SC5004-21SC600. 4-24SC700. 4-26SC8004-29SC9004-324.2.3 SMC SC 4-344.3 B140/B246. 4-374.3.1 / 4-374.3.2 B140/B246. 4-38 4.3 3 B140/B246. 4-39 SC100. 4-40SC200: 4-43SC300 1..4-44SC400 2..4-49SC5004-50xSC600..4-55SC700..4-57SC800..4-66SC9004-724.3.4.4-76..4-76B4694-77B468/B6744-77B478/B706.4-78B471..4-78B470..4-78Z- B6604-794.3.5 SMC SC.4-804.4 B064/B140/B246 ..4-83 4.4.1..4-834.4.2.4-834.4.3.4-8455-15.1.5-1/..5-1SP.5-2Super SP.5-2.5-2SP5-3SP..5-4SP SMC .5-55.25-65.2.1 SP58015-65.2.2.5-10.5-10.5-10/.5-10..5-105.35-115.3.1 SP2902-003. 5-115-125.3.2 IPU / SP2902 001 002.5-135-14 5.3.3 IPU SP2902-0045-155.45-165.4.1 B140 / B246.5-16LCDC5-215-21NVRAM /..5-225.4.2 B064..5-23GW / BCU..5-24.5-25xi5-25. 5-26 5-27Netfile5-27NVRAM 5-28. 5-28. 5-305.5. 5-295.5.1 5-295.5.2 5-30SP1xxx. 5-30SP2xxx5-35SP3xxx. 5-53SP4xxx 5-56SP5xxx. 5-67SP6xxx. 5-119SP7xxx. 5-130SP8 xxx 2 5-1475.5.3. 5-1765.5.4. 5-1775.6 /. 5-1895.6.1 SP5803. 5-1895.6.2 SP5804. 5-1955.6.3 ADF SP6007. 5-1975.6.4 ADF SP6008. 5-1985.6.5 SP6117 B478/B704. 5-1995.6.6 SP6118 5-2015.6.7 1 : 61215-2026.6.8 1 : 61245-203 6.6.9 2 : 61225-204 6.6.10 2 : 6125 5-205 5.7 B140/B246 5-206 5.7.15-2065.7.2 5-2095.7.3. 5-2105.7.4. 5-211SP5857-015 SD SD5-211 SP5857-0165-211SP5857-017 SD. 5-211 5.8. 5-2125.8.1. 5-2125.8.2 5-213B064 5-213B140 5-2155.8.3 / 5-2185.8.4 5-2225.8.55-2225.9 DIP 5-2235.9.1 BCU . 5-223 xii5.9.25-22366-16.1.6-16.1.1 ..6-36.1.2 9 6-46.1.3.6-56.26-66.2.1..6-66.2.2.6-7BCU 6-7..6-7MB ..6-7IPU ..6-7SBU .6-8PFC ..6-8SDRB .6-8VIB 6-8DRB 6-8CNB 6-8..6-96.3..6-106.4 ADF..6-126.4.16-126.4.2 ADF.6-136.4.3.6-146.4.4..6-156.4.5..6-16..6-176.4.66.4.7.6-186.4.86-206.4.9 ADF..6-236.4.106-246.5..6-256.5.16-256.5.2..6-266.5.36-276-276-286.5.4..6-296-296.5.5 ADS6-30CCD ADS.6-30 CIS ADS..6-306.6.6-316.6.16-316.6.2.6-326.6.3.6-336.6.4 SP6-34xiii 6-34. 6-36. 6-38 6-39 6.6.5 SP UP6-406.6.66-426-42 6-42 6-43/ 6-44 6-446.7 6-456.7.16-456.7.2. 6-466.7.3 6-476.7.4. 6-486.7.5 LD6-496.8 6-516.8.16-516.8.2 OPC. 6-526.8.36-526.8.46-536.8.56-546.8.6 6-556.8.76-566.8.8. 6-576.8.9. 6-586.8.106-59 6-596-596.8.116-60 6-606-61LD6-62ID Vsg 6-64TD Vref. 6-646.96-656.9.16-656-65 6-66. 6-67 6.9.26.9.3 / . 6-686.9.4. 6-696.9.56-706.9.6. 6-716.9.76-726.9.8. 6-72xiv6.9.9.6-736.9.10..6-74..6-74..6-75 TD6-76Vref6-76ID TD6-77TD.6-77ID6-776-786-786.10..6-796.10.16-796.10.2.6-80..6-80..6-816.10.46-836.10.5.6-846.10.6..6-856.10.7.6-866.10.8.6-876.11..6-886.11.1.6-88.6-896-896-89..6-896-89 6.11.2.6-906.11.3 - 2 36-91.6-916-926.11.4.6-93..6-936-94..6-956.11.5 - 2 3.6-966.11.6.6-971.6-972 3..6-976.11.7.6-986.11.8 - 1..6-99..6-99..6-100 /.6-101.6-103.6-1046-105xv6.11.9 - 1 3 6-1066.11.10. 6-107. 6-1076-1086-109 6.11.116-110 6-110..6-1116-1126.12 6-113B064 6-113B140 6-114. 6-1146.12.2 6-115B064 6-115B140 6-1166.12.3. 6-117B064 6-117B140 6-1186.12.46-119 6-1196-120. 6-1206-120 6.12.5 6-1216.12.6. 6-1226.12.7 CPU. 6-123B140 6-1236.12.8. 6-1246.12.9. 6-1266.12.10 6-1276.136-1286.13.1. 6-1286.13.2 6-1296.13.36-1306-130. 6-1316.13.4. 6-1326.146-1356.14.1. 6-1356.14.2 6-136. 6-136. 6-136 6-136 6.14.3 6-137. 6-137. 6-137xvi..6-1376.14.4..6-1386-1386-1386-1386-138 6.14.56-139.6-139.6-1396-139-11 -11.1-11.2 ADF -21.3-32-53-63.1 A3/DLT B475. -63.2 LCT B473-63.3 50 3000B468 -7. -7-7-7-7. -8-83.4 50 3000 B469. -9. -9-9-9. -9 3.5 50 3000B674-10-10 -10 -11-11-12 -123.6 B377. -133.7 B470 -143.8 3000 B478/B706 -153.9 B531-163.10 A812 -173.11 B513. -183.12 9- B471 -183.13 LG/B4 B474 -18xvii3.14 Z- B660-183.15 3000- B701. -193.16 2000- B700-213.17 B702-233.18 9- B762 -23xviii1. 安装程序1.1 安装要求1.1.1 操作环境1. 温度范围:建议:15 °C ~ 25 °C 59 °F ~ 77 °F可能:10 °C ~ 32 °C 50 °F ~ 90 °F2. 湿度范围: 15% ~ 80% RH 27 °C 80%,32 °C 54%3. 室内照明:小于 1500 lux 勿直接暴露在阳光或强光下。
AWG70001A和AWG70002A任意波形发生器安全和安装手册说明书

主要功能 ..................................................................................................................................... xiii 文档 ............................................................................................................................................. xiv 本手册中使用的约定 ................................................................................................................. xiv
为获得本保修所承诺的服务,客户必须在保修期内向 Tektronix 通报缺陷,并为服务的履行做出适当安排。 客户应负责包装缺陷产品并托运到 Tektronix 指定的维修中心,同时预付运费。如果产品要运送到 Tektronix 维修中心所在国内的地点,Tektronix 应支付向客户送返产品的费用。如果产品送返到任何其他 地点,客户应负责支付所有的运费、关税、税金及任何其他费用。
solarwinds性能监控平台安装及使用手册

Solarwinds监控平台安装及使用手册2013年3月目录一安装环境 (3)二windows 2003企业版SP2安装过程 (4)2.1 准备工作 (4)2.2 硬件要求 (5)2.3安装过程 (6)2.4打补丁 (25)2.5安装IIS及.NET (25)三安装SQL Server 2005 SP2 (28)3.1 安装SQL Server 2005 (28)3.2 安装SQL Server 2005 SP2补丁包 (44)四安装solarwinds监控平台 (45)4.1 安装solarwinds软件 (45)4.2 solarwinds 数据库的安装 (51)五添加节点及配置告警 (56)5.1 添加告警设备 (56)5.2 告警配置 (58)六拓扑制作与权限设置 (64)6.1制作拓扑图 (64)6.2帐号权限和视图管理 (68)6.2.1 账号权限 (68)6.2.2 视图管理 (70)一安装环境➢环境:Windows Server 2003✧WindowsServer2003-KB914961-SP2-x86-CHS✧WindowsServer2003-KB2621440-x86-CHS✧WindowsServer2003-MMC3.0_X86➢安装SolarWinds之前需要安装:✧安装SNMP 和IIS✧安装.NET Framework 3.5 or later✧安装SQL Server 2008 Express, Standard, or Enterprise. Or SQLServer 2005 SP1 Express, Standard, or Enterprise ➢SolarWinds文件:✧work.Performance.Monitor.SLX.Edition.v9.5✧Keygen.exe (solarwinds破解工具)二windows 2003企业版SP2安装过程2.1 准备工作➢准备好windows 2003企业版SP2简体中文标准版版安装光盘。
INFORMIX数据库系统日常监控操作技术手册
IBM Informix数据库系统日常监控操作技术手册1.监控数据库系统软件的逻辑日志文件是否正常被备份,防止出现当逻辑日志文件满了而没备份导致数据库停机;使用onstat –l 命令监控逻辑日志的使用,监控输出中的Flag标志字段,注意第位,如果是‘-’,则表明此逻辑日志没有备份。
该标识位的详细描述如下:Describes the status of the Logical Log using the following coded values:Position 1: A Newly addedF Free logU Used logPosition 3:B Backed upPosition 5: C Currently active logPosition 7:L Contains last checkpoint record如果数据库系统采用Onbar进行系统的备份和恢复,也可以直接监控$INFORMIXDIR/etc/ixbar.servernum日志文件,观察目前备份的状态。
2.监控数据库的数据库磁盘空间;IBM Informix数据库系统的数据存储空间成为dbspace,每个dbspace可以包括多个chunks。
使用如下命令可以监控到某个dbspacece中chunk的空间使用情况:oncheck –pe dbspace_name输出入下:DBspace Usage Report: dataspace Owner: informix Created: 09/29/2005Chunk Pathname Size Used Free8 /home/informix/IDS940/datachk1 500 53 447Description Offset Size------------------------------------------------------------- -------- ------------------------------------------------RESERVED PAGES 0 2CHUNK FREELIST PAGE 2 1testzeng:'informix'.TBLSpace 3 50FREE 53 447Total Used: 53Total Free: 447Chunk Pathname Size Used Free10 /home/informix/IDS940/datachk2 5000 3 4997Description Offset Size------------------------------------------------------------- -------- ------------------------------------------------------RESERVED PAGES 0 2CHUNK FREELIST PAGE 2 1FREE 3 4997Total Used: 3Total Free: 4997通过监控dbspace中每个chunk的Total Used和Total Free,可以知道目前数据库系统实际对磁盘空间的占用情况。
维护手册-编制规范

文档编号:内部资料注意保密系统维护手册编制规范XX 公司XX 部门文档信息版本号起草 /修改人审核人批准人日期变更内容Ver 0.1关于版本号的说明:1. 初稿版本号由0.1 开始,每审核一次,版本号在递加0.1 ,未正式发布的文档版本号<1 ;2.首次发布的文档版本号为 1.0 ;3.文档发布后,对文档进行的微小调整,在原版本号的基础上依次递加 0.1 ,并在上表中说明变更内容;4.每次发布对文档的重大调整,在 1.0 版本的基础依次以 1 为单位进行递加,重大调整应重新发布。
前言维护手册编制说明:一、维护手册编制目的:结合部门 09 年度服务支撑工作的要求--形成各系统的维护手册,使维护人员更加清晰的了解系统维护支撑工作的整体架构,掌握系统维护的基本操作方法及突发事件的应对策略,深入了解各项配置信息及参数,为系统及网络的稳定运行打下坚实的基础,特制定本规范。
二、维护手册的主要内容维护手册共分三个分册:(一)维护基础信息分册1.系统的基本信息,包括系统实现的业务功能,系统基本构成及环境描述;2.维护支撑工作的内容及要求,包括管理部门的考核指标;3.系统的维护支撑体系。
(二)维护操作手册(分册)维护操作手册的内容应确保对操作人员具有指导性,维护操作手册的内容包括以下几个方面:1.值班监控手册2.日常维护手册3.应急处置手册其中:日常维护手册应依据系统的维护角色定制,可以包括主机及操作系统分册,数据库及中间件分册,应用软件分册,业务手册等,各手册的内容应包括日常检查,备份及安全管理等内容。
应急处置手册可结合系统应急预案制定,确保维护人员对故障的迅速定位及排除。
(三)技术支撑文档(分册)详细说明系统的配置信息,配置参数,并详细的列出相关技术支撑文档信息,以便维护人员进行相关技术数据的查询。
三、维护手册的编制要求(一)以系统为单位进行编写;(二)可根据手册应用的迫切性,有重点,分阶段的完成。
目录系统基本信息分册 .............................................................................................................................................- 1 -1系统概述 .....................................................................................................................................................- 1 -1.1系统基本信息 ......................................................................................................................................- 1 -1.2业务功能描述 ......................................................................................................................................- 1 -1.3系统构成及环境 ..................................................................................................................................- 1 -2维护支撑工作范围 .....................................................................................................................................- 2 -2.1系统平台运行支持与保障..................................................................................................................- 2 -2.2应用系统支持与保障..........................................................................................................................- 3 -2.3业务运营支持服务 * ............................................................................................................................- 3 -3系统维护支撑组织架构 .............................................................................................................................- 3 -3.1运维管理 /服务支撑组织体系: .........................................................................................................- 3 -3.2职责与分工界面 ..................................................................................................................................- 4 -3.3干系人表 ..............................................................................................................................................- 4 -3.4集中系统省级支撑架构* ....................................................................................................................- 5 -4系统维护指标: .........................................................................................................................................- 6 -4.1维护指标 ..............................................................................................................................................- 6 -4.2运行指标 ..............................................................................................................................................- 6 -维护操作手册 .....................................................................................................................................................- 1 -1系统监控手册 .............................................................................................................................................- 1 -2系统维护手册 .............................................................................................................................................- 1 -2.1系统巡检要求 ......................................................................................................................................- 1 -2.2系统备份管理 ......................................................................................................................................- 1 -2.3安全管理 ..............................................................................................................................................- 2 -3应急处置 .....................................................................................................................................................- 2 -3.1故障级别定义 ......................................................................................................................................- 2 -3.2应急处置流程 ......................................................................................................................................- 2 -3.3常见问题及故障的处理......................................................................................................................- 3 -主机及操作系统类 .....................................................................................................................................- 3 -数据库类 .....................................................................................................................................................- 3 -应用类 .........................................................................................................................................................- 3 -网络类 .........................................................................................................................................................- 3 -关联系统类 * ...............................................................................................................................................- 4 -4系统操作指导 .............................................................................................................................................- 4 -4.1启停步骤及流程 ..................................................................................................................................- 4 -4.2系统常用仪器仪表使用说明..............................................................................................................- 4 -4.3系统安装及配置流程* ........................................................................................................................- 5 -技术支撑文档 .....................................................................................................................................................- 1 -1物理拓扑图 .................................................................................................................................................- 1 -1.1网络环境描述: ..................................................................................................................................- 1 -1.2内部连接信息 ......................................................................................................................................- 1 -2系统连接图 .................................................................................................................................................- 2 -3机房布局图 .................................................................................................................................................- 2 -4配线及线缆 .................................................................................................................................................- 2 -5设备配电信息 .............................................................................................................................................- 2 -6业务功能说明 .............................................................................................................................................- 3 -7系统设备说明 .............................................................................................................................................- 3 -7.1业务引擎区 ..........................................................................................................................................- 3 -7.2平台用户访问区 ..................................................................................................................................- 4 -7.3平台数据区 ..........................................................................................................................................- 5 -7.4平台应用区 ..........................................................................................................................................- 6 -8系统软件及补丁说明 .................................................................................................................................- 6 -8.1操作系统 ..............................................................................................................................................- 6 -8.2数据库及中间件 ..................................................................................................................................- 6 -8.3应用软件 ..............................................................................................................................................- 7 -8.4业务应用系统 ........................................................................................................错误!未定义书签。
nagios监控系统手册详细操作
nagios网络监控Nagios是什么:Nagios是一款开源的免费网络监视工具,能有效监控Windows、Linux和Unix的主机状态,交换机路由器等网络设置,打印机等。
在系统或服务状态异常时发出邮件或短信报警第一时间通知网站运维人员,在状态恢复后发出正常的邮件或短信通知。
nagios是功能强大的监控软件,主要用来监控网络设备的状态(比如:主机的资源状态);适合于:对大量的服务器进行监控,判断其负载或服务是否正常,发生异常能通过邮件、短信报警。
特别注意:流量监控不是他的强项,流量监控建议使用cacti.可以绘制非常直观的图形nagios能监视什么:nagios可以监控:1、主机是否宕机(通过ping命令,如果ping不通会认为主机属于宕机状态,但不影响所监控的其他服务);2、服务器资源(cpu使用率、硬盘剩余空间等);3、网络服务(smtp\pop3\http\);4、监控网络设备(路由器、交换机等。
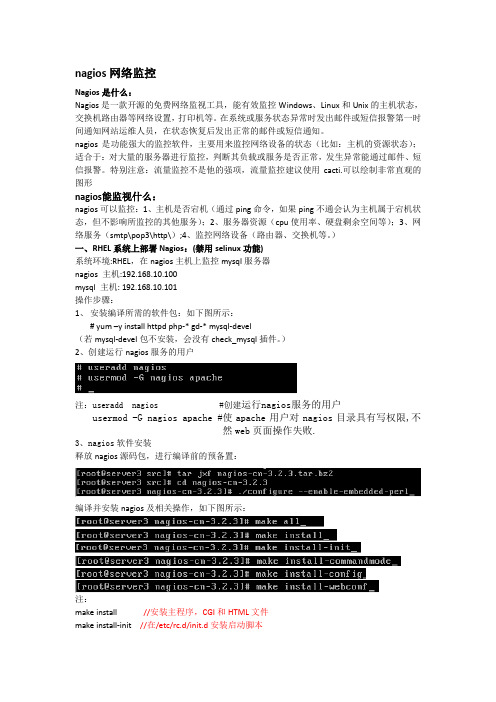
)一、RHEL系统上部署Nagios:(禁用selinux功能)系统环境:RHEL,在nagios主机上监控mysql服务器nagios 主机:192.168.10.100mysql 主机: 192.168.10.101操作步骤:1、安装编译所需的软件包:如下图所示:# yum –y install httpd php-* gd-* mysql-devel(若mysql-devel包不安装,会没有check_mysql插件。
)2、创建运行nagios服务的用户注:useradd nagios #创建运行nagios服务的用户usermod -G nagios apache #使apache用户对nagios目录具有写权限,不然web页面操作失败.3、nagios软件安装释放nagios源码包,进行编译前的预备置:编译并安装nagios及相关操作,如下图所示:注:make install //安装主程序,CGI和HTML文件make install-init //在/etc/rc.d/init.d安装启动脚本make install-commandmode //配置目录权限make install-config //安装示例配置文件make install-webconf //安装nagios的web接口,会在/etc/httpd/conf.d目录中创建nagios.conf文件。
EPSON RC+7.0 机器人安全与设置手册说明书

机器人控制器 控制单元 RC700RC700-A驱动单元 RC700DURC700DU-A编程软件 EPSON RC+7.0机器人 G1 G3 G6 G10 G20 系列RS 系列C4 C8 C12 系列N2 N6 系列X5 系列机器人系统安全与设置(RC700/EPSON RC+7.0)Rev.24机器人系统安全与设置(RC700 / EPSON RC+ 7.0)Rev.24Copyright 2012-2020 SEIKO EPSON CORPORATION. All rights reserved. 安全与设置(RC700 / EPSON RC+ 7.0) Rev.24 i前言感谢您购买本公司的机器人系统。
本手册记载了正确使用示教器所需的事项。
使用系统之前,请阅读本手册与相关手册,正确地进行使用。
阅读之后,请妥善保管,以便随时取阅。
保修本机及其选装部件是经过本公司严格的质量控制、测试和检查,并在确认性能满足本公司标准之后出厂交付的。
在交付产品的保修期内,本公司仅对正常使用时发生的故障进行免费修理。
(有关保修期方面的信息,请与当地销售商联系。
)但在以下情况下,将对客户收取修理费用(即使发生在保修期内):1. 因不同于使用说明书内容的错误使用以及使用不当而导致的故障与损伤。
2. 客户擅自改造或拆卸造成的故障。
3. 因调整不当/擅自修理而导致的损坏。
4. 因地震、洪水等自然灾害导致的损坏警告、注意、使用:1. 如果机器人或相关设备的使用超出本手册所述的使用条件及产品规格,将导致保修无效。
2. 本公司对因未遵守本手册记载的“警告”与“注意”而导致的任何故障或事故,甚至是人身伤害或死亡均不承担任何责任,敬请谅解。
3. 本公司不可能完全预见危险与故障发生的所有状况,此可预见性存在局限性。
因此,本手册不能警告用户所有可能的危险。
ii 安全与设置(RC700 / EPSON RC+ 7.0) Rev.24商标Microsoft、Windows及Windows标识为美国Microsoft Corporation在美国及其它国家的注册商标或商标。
TranSync 合规监控手册说明书

TranSync™ ComplianceMonitoring Manual Homecare Provider/Authorized MonitorsAbout this user manualNote: This user manual is designed to be duplex-printed (printed on both sides of each sheet). If not printed in this manner, you will find blank pages in your printout.Note: For purposes of this manual, some software screen images may differ from the actual screen display. This is only for clear printing and on-screen display of this manual. ContentsTranSync Introduction (3)Indications for Use (3)Components of the TranSync System (3)TranSync Website† (3)Registering Devices† (3)Creating New Patients† (4)Assign a Device to a Patient† (5)Add a Note to a Patient Record† (6)Managing Replacement Reminders† (7)Reviewing Compliance Reports‡ (9)Reviewing a 30-day Compliance Window Report‡ (11)Reviewing Group Compliance Reports‡ (12)Creating New User Profiles for your Homecare Account† (13)Creating Sub-Accounts† (13)Transferring a Patient to Another Account† (14)Transferring a Device to Another Account or Patient† (15)Sharing Patients with an Authorized Monitor† (17)Deactivating a Patient† (18)Deactivating a Device† (18)Managing Care Monitors† (19)Managing Insurance Providers† (20)Managing Mask Types† (21)Appendix: Limited Warranty (22)†Denotes Homecare Provider Function‡Denotes Homecare Provider and Monitor FunctionTranSync IntroductionThe TranSync™ System provides homecare providers and monitors the ability to track patient compliance data through a secure web portal. Patients using the system can view and transmit their compliance data to their homecare providers and monitors. The system is comprised of a cloud-based website and patient desktop software.Indications for UseThe TranSync system is intended for use by patients, homecare providers and monitors in conjunction with the Transcend miniCPAP devices for the purpose of managing patient compliance and viewing or sending compliance data.Components of the TranSync System TranSync WebsiteThe TranSync website () allows homecare providers and monitors to view compliance information and manage patients under care. Please see “Using the TranSync Website” for more information.Registering Devices1.To register a device, select “Devices” and then “Register Device”.2.Enter the serial number of the Transcend device and select “submit” to registerthe device.Note: The serial number label is located underneath the Transcend PAP. Refer to the Transcend User Manual for more information.3.Select “Devices” and then choose “List” to see a list of registered devices. Note: The device may already be registered to a patient account. In this case, continue with sending the patient a confirmation email. The patient must approve compliance monitoring of their device before you may view their compliance data.Creating New Patients1.Select “Patients” near the top of the page, then select “Create New.”2.Fill out the required information (indicated by a *).Note: Additional fields are optional.3.Select “Create Patient”at the bottom of the screen to confirm.Note: The patient will receive a confirmation email. They must approve compliance monitoring of their device before you may view their compliance data.4.Select “Patients” and then select “List” to see a list of created and connectedpatients.Assign a Device to a PatientYou may assign a Transcend device when creating a patient account (see“Creating New Patients”) or you can use the method described below.1.From the patient list, choose a patient by selecting “Name or ID.”2.In the add device section, select the + symbol.3.Select the device you wish to add to the patient.4.Select “Add Device”.Note: Only registered devices will be available for assignment. Add a Note to a Patient Record1.From the patient list, choose a patient by selecting “Name or ID.”2.In the add note section, select the + symbol.3.Type the note in the field and select “Create.”Managing Replacement RemindersThe replacement schedule acts as a reminder for when a patient is due for new equipment, such as masks and tubing. The replacement schedule is initiated from the date of device assignment and will alert the homecare provider and patient on periodic replacements. Follow these steps to adjust reminder settings:1.To manage replacement reminders, select the “Manage Insurance Providers /Replacement Schedule” under the “Settings”tab.2.Select “Manage Replacement Schedule” corresponding to the insuranceprovider of your choice.3.Adjust the replacement schedule.4.Adjust the Pre-reminder and Post-reminder.5.Check the “Reminder s On?” box to turn on the feature in your account.6.Check the “Patient Email Reminders On?” box if you wish to remind patientsabout replacement equipment.7.Select “Update.” All patients subscribed to that insurance provider will beupdated with these settings.8.To view upcoming replacement reminders for patients, select “Settings” then“Replacement Reminders.”Reviewing Compliance ReportsFollow these steps to view a full compliance report:1.Under the “Patients” tab, select “List.”2.On the Patient List screen, select the button in the “Report” column toopen a patient’s compliance report.3.You will be directed to the compliance overview screen, on which you will findinformation including: Compliance Summary, Patient Therapy Settings,Therapy Pressure Summary, AHI – Events Per Hour of Use, and LeakSummary.To view the compliance information in more detail, select “View Compliance Detail”. This screen will display details of each night of use, as well as graphs displaying AHI events. To print this report, select “Print to PDF”. Once the PDF version of the report has successfully downloaded, you may print the report to hard copy.4.To change the report time period, simply change the dates at the top of thepage and select “Submit”.Reviewing a 30-day Compliance Window ReportThe 30-day compliance window is designed based on the Medicare standard for compliance. The feature searches for a 30-day consecutive window of use within the last 90 days. At least 70% of those nights must have four or more hours of therapy. Follow these steps to view the 30-day Compliance Window.1.Select the patient from the Patient List.2.Under the “Patient Functions” tab, select “View 30-day Compliance Window”.3.If the patient is compliant, the search will display “30-day ComplianceWindow found”. However, if the patient is not compliant, the search willdisplay “No 30-day Compliance Window Found.”Reviewing Group Compliance ReportsYou have the ability to view a compliance summary for multiple patients,simultaneously. Compliance is based on 70% of total days containing four hours of therapy at a minimum. To review compliance over a specific time period, followthese steps:1.Under the “Patients” tab, select “List.”2.Filter patients by choosing criteria from the drop-down menu, then select the+ symbol to add it to the search, and finish by selecting “search”.3.Under the “Patient Group Reports” drop-down, select “Past 24 Hours”,“Past 7days”,“Past 30 days”, or “Past 90 Days” to view patients in the search criteria.4.In the Compliant column, patients that are compliant with therapy will belabeled “Yes” and patients who do not meet the requirements will be labeled“No”. Additional information over the selected time period includes columns corresponding to: Total Days of Use, Total Therapy Hours, Number of 4+ Hour Sessions, AHI, and % Compliant.Creating New User Profiles for your Homecare AccountNew accounts can be set up for individual users within your organization. The type of user access varies by the following definitions:•IT Administrator- User has Full Access rights, including the additional ability to create/delete Sub Accounts and New User profiles within theorganization.•Full Access User- User is able to register CPAP devices and create/delete patient profiles. User is also able to manage care monitors, insuranceproviders, replacement schedules, and mask types.•Read-Only User- User is able to view device list, view patient list, and track patient compliance.To create a new user account, under the “User s” tab, select “Create New”. Fill out the required information and select their role for access as described above. The new user will receive an email asking them to confirm their account and create a new password.Creating Sub-AccountsA Sub-Account can be created for a second location or partnering care provider. Sub-Accounts have full read-write access for the shared patients. The administrator of the Sub-Account will have IT Administrator access for that account, which allows them to set up new user accounts within their organization. While you will maintain control over the Sub-Account actions, these accounts will have the ability to add new patients to your patient list. Under the Sub-Accounts tab, select “Create New.”1.Fill out the required information for the Sub-Account. Once you have reviewedthe Terms of Use, check the corresponding box and select “Create Sub-Account.”2.The Sub-Account contact will receive an email confirmation. The contact mustaccept the invitation in order to use the system.Transferring a Patient to Another AccountUse this feature to transfer a patient to a Sub-Account or another homecare provider.1.To transfer a patient to another account, select a patient from the Patient ListScreen.2.Under the “Patient Functions” tab, select “Transfer Patient.”3.Type in the name of the account to which you wish to transfer the patient,then select “Search.”4.Select the desired account from the search results.5.Accept the terms of use and select “Confirm.”6.The new account will receive an email with information about the patienttransfer.Note: If transferring to a Sub-Account, you will still maintain control of the patient. If transferring to another homecare provider, you will lose all rights and records of that patient.Transferring a Device to Another Account or PatientUse this feature to transfer a device to a sub-account or another homecare provider or to another patient.1.To transfer a device to another account, select a device from the Device Listscreen.2.If more than one Institution is set up, a dropdown will appear. Select anInstitution from the Account dropdown list and then click “Update” to transfer the device to another account.3.Under the “Patient” drop-down, choose a patient, then select “Update” totransfer the device to the intended patient.Sharing Patients with an Authorized MonitorFollow these steps to share patients with authorized monitors. Authorized monitors are only allowed to view patient data and compliance.Note: Authorized monitors must be registered in the TranSync system. Have your partners register by visiting and registering for an Authorized Monitoring Account.1.From the patient list, choose a patient by selecting “Name or ID.”2.In the Authorized Monitors section, select the + symbol.3.Search for a monitor using any of the fields provided.4.Once you find your monitor from the results list, choose “Select.”5.Confirm the selection and choose “Confirm”Deactivating a Patient1.To deactivate a patient, select the patient from the patient list.2.Select “Patient Functions”, then select “Deactivate Patient”.3.Confirm the deactivation.Deactivating a Device1.To deactivate a device, select the device from the device list.2.Select “Device Functions”, then select “Deactivate Device”.3.Confirm the deactivation.Managing Care MonitorsYou may set up Care Monitors to track who is involved in managing your patients’care. Each patient can have up to three Care Monitors. These Care Monitors do not have rights to view patient data unless they specifically register for an Authorized Monitor account.1.Under the “Settings” tab, select “Manage Care Monitors”.2.To add a new monitor, type in the name and institution, then select “Create.”3.To update an existing monitor, edit the fields, then select “Update.”Managing Insurance ProvidersFollow these steps to add or update new insurance providers.1.Under the “Settings” tab, select “Manage Insurance Providers”.2.To add a new insurance provider, type in the name and select “Create.”3.To update an existing insurance type, edit the field, then select “Update.”Managing Mask TypesFollow these steps to add or edit mask types:4.Under the “Settings” tab, select “Manage Mask Types.”5.To add a new mask, type in the information, then select “Create.”6.To update an existing mask, edit the field, then select “Update.”Appendix: Limited warrantySomnetics warrants its products to be free of defects in materials and workmanship and will perform in accordance with the product specifications for a period specified in the following table:If the product fails to perform in accordance with the product specifications, Somnetics will repair or replace, at its option, any materials or parts of the product, which upon Somnetics’ examination appear defective. This warranty does not cover damages caused by accident, misuse, abuse, alteration, and other defects not related to material or workmanship. Somnetics will pay customary freight charges from Somnetics to dealer location only.Somnetics disclaims all liability for economic loss, loss of profits, overhead, or consequential damages which may be claimed to arise from any sale or use of its products. Some states do not allow the exclusion or limitation of incidental or consequential damages, so the above limitation or exclusion may not apply to you. This warranty is given in lieu of all other express warranties. In addition, any implied warranties, including warranty of merchantability or fitness for the particular purpose are limited to the period noted in the table above for the individual product. Some states do not allow the exclusion or limitation of incidental or consequential damages, so the above limitation or exclusion may not apply to you. This warranty gives you specific legal rights, and you may also have rights which vary from state to state.To qualify for repair, replacement, or refund, the defective device must bereturned to Somnetics within 30 days after the discovery of the defect. Proof of purchase, including proof of the date of purchase, is required. Any repair,replacement, or refund obligation would not apply if the device has been repaired or otherwise altered in a facility not authorized in writing by Somnetics. Toexercise your rights under this warranty, contact your local, authorized Somnetics dealer or Somnetics at 103 Osborne Road, Fridley, Minnesota 55432 USA, 1.877.621.9626 or 1.651.621.1800.Somnetics International, Inc. 103 Osborne Road NEFridley, Minnesota 55432 USA / Email: ****************** Phone: 651.621.1800 Toll-free: 877.621.9626 Fax:651.204.0064Somnetics ® and TranSync are registered trademarks of Somnetics International, Inc.; all rights reserved.© Copyright 2021 Somnetics International, Inc.; all rights reserved.103516 Rev D2021-05。
Syride SYS'GPS 用户手册 (中文)说明书
syride®CNSYS’GPSGuide d’utilisation : p1用户指南 : p21Manual de usuario : p43前言欢迎来到Syriders!SYS'GPS是一部拥有最新技术的超轻仪器,将指导你去改进,使你能更好提升自己的飞行水平。
你也将能够建立一个属于你自己的和非常详细的在线飞行手册。
SYS'GPS将带你进入一个新的滑翔伞飞行高度作为集体的一员,你将成为一个关键的飞行员,在改进中不断的进步,包括在SYS'GPS中的创新传感器的范围也在不断改进。
为了让你更满意我们鼓励你分享你的建议。
飞行Syride祝愿你有愉快的22ContentsI.设置SYS PC工具 (24)CN II.放置仪器 (25)III.给电池充电 (26)IV.设定你的设备 (27)V.高级设定 (29)VI.自定义屏幕和高度表声音 (29)VII.地面高度 (31)VIII.飞行屏幕............................................................................ (32)IX.GPS状态信息 (33)X.显示和删除飞行记录 (34)XI.警告和重置 ............................................................................. (35)XII.转移你的飞行记录 (36)XIII.参数 (39)XIV.使用建议. (40)23I. 设置SYS PC工具1.复制以下链接, 下载最新版本的sys PC工具:/en/software2.按照提示操作将其安装到计算机上。
3.安装后,图标会显示在任务栏中。
检测你的仪器是否连接。
4.当你开始操作系统将自动启动软件。
2425II.放置仪器1.Syride 建议你把仪器放在主带的位置,你可以利用2个魔术贴放置在任何现有的主带上。
XIV-1 代码手册说明书

CODE MANUALThis page is purposely blank for duplex printing62 XX – LIFT STATIONSUse these codes for all work done on lift stationsExplanationThe first four numbers represent the location where work was performed. A list of these locations is shown below.The last two numbers indicate the type of work performed. The work codes are listed at the end of this section.Location Code63 XX TREATMENT PLANTSUse these codes for all work done at treatment facilitiesExplanationThe first four numbers represent the location where work was performed. A list of these locations is shown below.The last two numbers indicate the type of work performed. The work codes are listed at the end of this section.Location Code65 XX – COLLECTION SYSTEMSUse these codes for all work done on the collection / transmission systemsExplanationThe first four numbers represent the location where work was performed. A list of these locations is shown below.The last two numbers indicate the type of work performed. The work codes are listed at the end of this section.Location CodeWORK CODESWORK CODESPay codes Description001 Regular time007 Leave without pay011 Summer Help014 Extra Help022 Straight Overtime023 Overtime024 Double time050 Leave without Pay FMLA093 Call Back Worked at 1.5292 Call Back Worked 2X293 Call Back Not Worked119 Call Back Phone call response 1.5109 Call Back Phone call response 2X605 Call back comp earned at 1.5606 Call back comp earned at 2X615 Comp Time616 Comp double time617 Comp Straight time620 Comp Time used095 Floating Holiday096 Holiday worked at 1.5097 Paid Holiday098 Holiday worked straight time094 Bereavement Leave826 Bereavement Leave extra days for out of town 048 Jury Duty049 Military Leave720 Annual Leave721 Annual Leave FMLA723 Time Loss Annual Leave808 WA Family Care Medical Act Leave820 Sick Leave821 Sick Leave FMLA823 Time Loss Sick Leave。
XIV日常监控手册
XIV日常监控(jiān kònɡ)手册1.XIV开机(kāi jī)步骤a)打开(dǎ kāi)客户UPS上给XIV供电(ɡònɡ diàn)的开关。
b)检查并确保(quèbǎo)机柜后面ATS左侧的四个开关都是处于ON(向上)的位置。
c)检查并确认ATS上J1与J2的Input Power LED都是绿灯。
d)检查并确保三个UPS后面左侧的开关都是出于ON(向上)的位置。
e)检查(jiǎnchá)并确认三个UPS前面的风扇已经开始(kāishǐ)工作。
f)同时(tóngshí)按下三个UPS前面(qián mian)的Test按钮g)约15分钟后,使用(shǐyòng)XCLI命令state_list命令检查系统状态,正常状态值如下:2.XIV关机(ɡuān jī)步骤a)使用(shǐyòng)XIVGUI连上需要(xūyào)关机的XIV。
b)在菜单(cài dān)上选择File->Shutdown3.XIV状态(zhuàngtài)灯检查a)UPS正常状态下除了Load与Battery Charge部分外,只有这个灯显示为绿灯b)ATS上J1与J2的Input Power LED都是绿灯。
c)ATS侧面(cèmiàn)Power Output LED显示(xiǎnshì)为绿灯。
灯熄灭(xīmiè)。
PowerAttentionIDe)每个Module背后(bèihòu),两个PSU LED应该(yīnggāi)绿灯常亮,Status LED应该(yīnggāi)绿灯常亮。
PSU LEDs Motherboard LEDsf)两台(liǎnɡtái)Ethernet Switch后面(hòu mian),MASTER、1/7、DIAG、RPS、PWR、FAN与TEMP应该绿灯常亮。
(完整word版)NBU6.5日常监控及管理手册
VERITAS NetBackup TM 6.5 日常监控及管理手册VERITAS NetBackup TM6.5日常监控及管理手册 (1)管理维护手册 (1)VERITAS NETBACKUP (NBU) 简介 (3)NBU基本概念 (5)管理界面 (7)存储单元管理 (8)创建新的存储单元 (8)修改已有存储单元的属性 (13)删除已有的存储单元 (14)存储单元属性 (15)策略管理 (17)创建备份策略 (17)修改备份策略 (24)修改计划 (25)修改客户端设置 (27)手工备份 (28)目录管理 (30)察看报告 (30)状态监控 (32)拓扑监控 (33)作业监控 (34)服务监控 (36)进程监控 (36)驱动器监控 (37)恢复 (37)文件系统恢复:........................................................................ 错误!未定义书签。
SQL数据库恢复: (37)ORACLE数据库恢复: (38)DB2数据库恢复 (40)VERITAS NETBACKUP (NBU) 简介NBU是Veritas 公司提供的企业级备份管理软件,它支持多种操作系统,包括UNIX、Microsoft Windows、OS/2以及Macintosh等。
目前,NBU是国际上使用最广的备份管理软件。
NBU采用全图形的管理方式,同时提供命令行接口,适应不同的用户需求。
它提供了众多的性能调整能力,从管理角度看,其高性能特征十分明显。
如提供多作业共享磁带机、大作业并行数据流备份、完善的监控报警、动态备份速度调整等能力,为用户的集中式存储管理提供了灵活和卓有成效的手段。
通过管理界面,管理员可以设置网络自动备份策略,这些备份可以是完全备份,也可以是增量备份。
管理员也可以手动备份客户端数据。
客户端用户可以从客户端备份(Backup)/恢复(Restore)/归档(Archive)自己的数据。
2、联众智达-诺贝尔—杭州协和公司终端督导与日常检核手册

杭州协和陶瓷公司终端督导与日常检核手册(供诺贝尔各片区经理、业务员及各终端导购人员参阅)目录前言----- --------------------------------------------------------3保密约定----------------------------------------------------------31.终端督导在组织架构中的位置-----------------------------------------42.终端督导的工作能力要求--------------------------------------------43. 终端督导的主要工作职责-----------------------------------------44. 终端督导工作流程-----------------------------------------------55. 终端督导工作内容框架-------------------------------------------66. 对终端业务员的检核---------------------------------------------6对终端现场管理的检核-------------------------------------------7对终端店员的工作检查-------------------------------------------9对终端价格的检查-----------------------------------------------10终端产品的检查-------------------------------------------------1111.对促销执行的检查-----------------------------------------------1112. 对终端的财务检查----------------------------------------------1213.对终端服务的检查----------------------------------------------1214. 对终端信息收集的调查------------------------------------------1315. 对顾客投诉的检------------------------------------------------1316. 对被检查人的考评----------------------------------------------1417. 督导人员对终端整改意见的提出----------------------------------1418. 常用督导表格--------------------------------------------------14前言诺贝尔终端的定位是“专业、温馨”的诺贝尔,这一定位将体现在诺贝尔终端一切经营行为当中。
- 1、下载文档前请自行甄别文档内容的完整性,平台不提供额外的编辑、内容补充、找答案等附加服务。
- 2、"仅部分预览"的文档,不可在线预览部分如存在完整性等问题,可反馈申请退款(可完整预览的文档不适用该条件!)。
- 3、如文档侵犯您的权益,请联系客服反馈,我们会尽快为您处理(人工客服工作时间:9:00-18:30)。
XIV日常监控手册
1.XIV开机步骤
a)打开客户UPS上给XIV供电的开关。
b)检查并确保机柜后面ATS左侧的四个开关都是处于ON(向上)的位置。
c)检查并确认ATS上J1与J2的Input Power LED都是绿灯。
d)检查并确保三个UPS后面左侧的开关都是出于ON(向上)的位置。
e)检查并确认三个UPS前面的风扇已经开始工作。
f)同时按下三个UPS前面的Test按钮
g)约15分钟后,使用XCLI命令state_list命令检查系统状态,正常状态值如下:
2.XIV关机步骤
a)使用XIVGUI连上需要关机的XIV。
b)在菜单上选择File->Shutdown
3.XIV状态灯检查
a)UPS正常状态下除了Load与Battery Charge部分外,只有这个灯显示为绿灯
b)ATS上J1与J2的Input Power LED都是绿灯。
c)ATS侧面Power Output LED显示为绿灯。
d)每个Module前面只有Power LED是绿灯常亮,Attention与ID灯熄灭。
Power
Attention
ID
e)每个Module背后,两个PSU LED应该绿灯常亮,Status LED应该绿灯常亮。
PSU LEDs Motherboard LEDs
f)两台Ethernet Switch后面,MASTER、1/7、DIAG、RPS、PWR、FAN与TEMP应该绿
灯常亮。
其余灯应该熄灭。
g)Redundant Power Supply(RPS)前面,RPS1与2绿灯常亮,3与4绿灯闪烁。
4.如何使用XIVGUI检查XIV状态
a)用XIVGUI连接至需要管理的XIV。
b)检查右下角是否显示Full Redundancy。
c)检查Events里是否有异常。
特别注意显示为红叉的Critical事件。
d)检查Stroage Pools的使用率。
5.如何使用XCLI打开VPN
a)打开VPN Connection。
support_center_connect
b)检查连接状态
support_center_status
c)关闭VPN Connection。
support_center_disconnect。
