GEM3D_v7.1.0培训手册
三维数控仿真教学软件使用说明及实验讲解

第一章三维数控仿真教学软件1.1 软件概述本章介绍的软件(三维数控仿真教学系统)是由浙江天煌科技实业有限公司最新开发的,专门针对数控系统教学与培训的软件。
本软件以普通的PC机器为平台,构建逼真的、生动的和专业的数控(铣床)培训环境。
§1.1.1软件简介三维数控仿真教学系统是基于虚拟现实的仿真软件,为了满足企业对数控加工的培训和教育部门数控技术教学的需要,该软件主要参考国内最常用的SIEMENS等数控系统,实现对数控铣床加工的全过程仿真,它由以下几部分组成:(1) 熟悉机床模块(2) 数控编程学习模块(3) CNC仿真模块§1.1.2适用对象本软件的使用者主要有两类:(1) 各大中专院校及各类职业学校数控专业的老师和同学(2) 数控机床的培训者因此,该软件基本上可以用于两种场合:即各大中专和职业学校及企业(机床厂或最终用户)的培训中心。
§1.1.3操作面板说明如图所示为三维数控仿真教学系统的操作面板 (图1)及加工仿真面板(图2),其各键使用功能见(表1-1)说明:图1 三维数控仿真教学系统操作面板图图2 三维数控仿真教学系统加工仿真面板图表1-1 三维数控仿真教学系统各按钮功能说明按扭功能说明按扭功能说明数字键(上档键转换对应字符)字母键(上档键转换对应字符)增量选择键点动键加工显示键手动数据键回参考点键快速运行叠加菜单扩展键单段运行键删除退格键报警应答键空格键垂直菜单键上档键区域转换键回车键数控停止键主轴停止键复位键主轴左转数控启动键主轴右转选择转换键软键(进入相应的显示界面)手动方向键进入仿真界面光标方向键返回键§1.1.4 屏幕划分其显示屏幕区域划分如图3所示,屏幕中的缩略符号及其含义见(表1.2)所示:图3 显示屏幕区域划分1.2 软件的安装与卸载§1.2.1系统要求由于该软件包的运行平台为普通的 PC机,因此,其系统要求应包括硬件和软件两方面:(1) 硬件要求:● CPU:P-III 800 Mhz 以上●内存:256 MB 及以上●硬盘容量:2G 以上●显示卡:3D支持(2) 软件要求:●操作系统:Windows 98/ME/2000/XP●屏幕分辨率:1024*768§1.2.2 软件安装软件安装过程如下:1.双击安装图标,系统进入安装界面,如下图所示:2.点击“下一步”按钮,进入许可协议对话框,如下图所示。
Gager3d 7.0使用手册201002
欢迎使用本手册!感谢使用本公司的影像测量系统,本手册是作为影像测量系统的一部分,为了用户能够更快更好的掌握软件使用而制订的。
手册采用图文结合的方式来介绍软件的菜单和使用方法,易读易懂。
本手册包括以下内容:第一章:简介------------------------------------------------------------------------1●介绍●用户接口第二章:命令及控制---------------------------------------------------------------22-1运行测量软件-----------------------------------------------------------------22-2命令及菜单--------------------------------------------------------------------2●下拉式菜单●快捷菜单●数据显示窗口●坐标显示●图像调节●单位选项●历程树●坐标显示及信息窗口第三章:测量及操作---------------------------------------------------------------103-1 图像初始化------------------------------------------------------------------103-2 测量前参数的校正---------------------------------------------------------103-3 测量机系统回零------------------------------------------------------------143-4 测量图片保存---------------------------------------------------------------143-5 基本元素测量---------------------------------------------------------------14●点测量●直线测量●圆测量●圆弧测量●圆环测量3-6十字线测量------------------------------------------------------------------------253-7编辑工具------------------------------------------------------------------------263-8图形标注-----------------------------------------------------------------------333-9测量结果显示及处理--------------------------------------------------------35 3-10 删除记录--------------------------------------------------------------------36 第四章:探头测量-------------------------------------------36 第五章:其它辅助功能---------------------------------------37 5-1 建立零点坐标系5-2 图纸对刻5-3 对齐5-4 轮廓及轮廓点提取5-5 公差设定5-6 spc功能第六章:系统及参数设置功能---------------------------------43 6-1 软件登陆6-2 软件版本及注册6-3测量参数设置6-4检测报告设置6-5 参数设置●系统参数●光栅通道设置附录一:影像测量机软件及板卡安装手册------------------------------------48附录二:影像测量机硬件手册---------------------------------------------------58附录三:常见问题故障及报修---------------------------------------------------59第一章简介1.1介绍:Gager3D影像测量软件系统是基于计算机平台建立的一种综合的数据采集及处理工具,使您可在非接触情况下通过影像测量系统准确、快速、有效的完成测量工作,并同时可切换至探头测量系统下完成测量工作,软件采用windows风格,运用下拉式菜单及鼠标操作、接口友好、操作简单。
GEM3D_v7.0.0培训手册

执行后 的视图
Tutorial 1:消音器建模
1.23 在新建的壳体上添加丝绵
先选择新建的壳体,然后在菜单选择“Builder/Add Feature/Wool”,按 下图所示添加丝绵:
执 行 后 的 视 图
Tutorial 1:消音器建模
1.24 在消音器壳体内添加挡板
先选择壳体,然后在菜单选择“Builder/Add Feature/Baffle”,按下图所 示添加挡板:
Tutorial 1:消音器建模
先选择锥形弯管(“outlet1”),然后在菜单选择“Builder/Add Feature/Perforate Section”,按下图所示设定添加穿孔:
执行后 的视图
Tutorial 1:消音器建模
1.16 建立包覆有套筒的直管
点击工具栏的 按钮,或选择“Builder/Add Component/Straight Pipe”, 按如下设定建立直管。并建立其与锥形弯管的连接:
执行后 的视图
Tutorial 1:消音器建模
选择“Connection/Flow Connection”,建立弯管与直管的连接。然后选择 “Builder/Transformations/Component Rotation”,将弯管旋转145度:
Tutorial 1:消音器建模
1.20 建立连接上面弯管的直管
切割平面位置确定后鼠标点击选择要被切割的几何然后点击工具栏的按钮或在菜单栏选择切割平面位置确定后鼠标点击选择要被切割的几何然后点击工具栏的按钮或在菜单栏选择slicerclip或点击cuttingplanecontrol窗口的clip按钮执行切割操作
GEM3D v7.0.0 培训教程
MA3D中文说明书
MA3D中文说明书GrandMA 3D中文说明书内容1引言52系统要求3安装63.1奶奶办公桌或奶奶onPC版本 3.2的IP 73.3连接奶奶办公桌3.4 1姥姥或奶奶2模式4数据94.1主/从94.2坐标系统5个快速启动6计划表面6.1菜单栏6.2工具栏6.3(第一阶段视图,三维对象视图)主要的Windows 6.3.1第一阶段检视6.3.2鼠标+键盘操作6.3.3安排(对齐对象)的对象6.3.4复制(复制的三维物体)6.3.5三维对象6.4资产(信息窗)6.5属性6.6媒体数据库6.7材料6.8移动Pathes6.9会议6.10状态栏7灯具类型8三维建模和导入8.1三维模型8.2参数8.2.1轴8.2.2旋转轴8.2.3线性轴8.2.4束光.8.3自动导入8.4分配模型夹具类型8.5三维建模清单8.6创立一个三维模型9视频创立10常见问题11个键盘快捷键12指数马照明科技有限公司Dachdeckerstr。
16 D - 97297Waldbüttelbrunn.de1引言:奶奶3D是一个独特的新的用户界面,三维可视化创立利用与奶奶产品范围结合的阶段布局。
系列I和系列第二站的支持。
该软件被设计成一个灯光设计师的预编程工具。
它简化了创立显示,以节省时间和金钱的过程。
奶奶3D包括一个基本图形元素库。
使用多个窗口前/侧/顶视图能够在同一时间打开和更新。
所有的舞台元素被定位在X / Y / Z方向,也可能是周围的各种轴旋转。
习俗这些元素的表面纹理,能够导入位图格式,或可能选择从一个图书馆。
灯笼,灯具或移动灯的设置,能够简单地检索到的奶奶控制台或电子转帐的奶奶onPC每放映文件。
有没有需要设置的DMX线,DMX地址或单个装置的操作模式,因为这些细节,都已经预先调整中的奶奶。
当切换到3D渲染模式,奶奶3D软件变得极其强大的可视化实时渲染设施。
所有绘图元素,装置及灯笼与表面纹理,作为一种虚拟现实。
3DMOVE培训手册
3Dmove基本操作3Dmove软件简介:3Dmove:是一个全交互式的可视化软件,它可以为从事勘探和开发的研究人员提供适用于所有构造类型的模拟和恢复的软件包。
这个软件包可进行实地构造恢复以及正演模拟。
主要提供在模型数据体及真实数据体上进行的三维回剥、断弯褶皱演化、地层展平、平面复原绘制和任意形态形变演化分析。
快速的可视性效果与先进工具的结合使得这个软件包适用于解释工作的各个阶段,并且模拟出全过程。
它的另一个特点就是可以同时在地震勘探工区坐标和地理坐标系统里直接进行可视化操作,用游标在地震解释数据体中直接拾取已解释出的界面。
用户进行交互式操作解释,检查断层和层位的地质合理性,即拾取解释的断层和层位进行反演模拟以检查其在构造地质上是否合理,同时将修改的理想初始值带入正演模型得到的理想的解释结果反馈到地震解释上。
反复进行上述过程,从而得到最佳的解释结果。
以这种方式来发现在原先解释过程中所存在的构造地质问题并且加以解决,从而使地震及钻井资料得到最佳的利用以减少勘探风险。
进入3DMove用户,启动3Dmove3Dmove主菜单窗口:见图一图一主菜单一、生成一个新工区1.在主菜单下点击File选项2.再按New选项,弹出一个坐标系x、y、z3.按save选项,存一个新工区名(包括路径)二、选择一个工区1.如果要选择一个已存在的工区,在主菜单下点击File选项2.再按Load选项,弹出一个对话框,点击你需要的工区三、数据输入建立三维构造模型的数据可以来源于二维资料或三维资料。
3Dmove软件支持Landmark,Geoquest,Charisma和Zmap+和CPS3等软件的接口。
同时所提供的ASCII格式的数据也使之可与更多的界面相连。
1.在主菜单下点击File选项2.再按Import选项,弹出一个对话框,选择所输入的类型,包括Landmark ASCII文件、Geoquest ASCII文件、Attribute资料都可输入3.点击OK,弹出下一个对话框,选择文件所在路径和文件名,点击后输入到右窗口中(1)选件column specification 按列数输入(2)选件field specification 按域数输入(3)选件edit可进行编辑(4)选件depth按深度输入,不带负号(5)选件elevation按高程输入,带负号(6)层面按data /cloud输入(7)断层以lines选件输入4.点击输入文件四、模型建立的工作流程建构造模型的工作流程见图二图二工作流程五、显示和目标的选取显示功能可以用来显示整个模型和所选取的模型的局部。
MA3D中文说明书

MA3D中文说明书GrandMA 3D中文说明书内容1引言52系统要求3安装63.1奶奶办公桌或奶奶onPC版本3.2的IP 73.3连接奶奶办公桌3.4 1姥姥或奶奶2模式4数据94.1主/从9奶奶3D包括一个基本图形元素库。
使用多个窗口前/侧/顶视图可以在同一时间打开和更新。
所有的舞台元素被定位在X / Y / Z方向,也可能是周围的各种轴旋转。
习俗这些元素的表面纹理,可以导入位图格式,或可能选择从一个图书馆。
灯笼,灯具或移动灯的设置,可以简单地检索到的奶奶控制台或电子转帐的奶奶onPC每放映文件。
有没有需要设置的DMX线,DMX地址或单个装置的操作模式,因为这些细节,都已经预先调整中的奶奶。
当切换到3D渲染模式,奶奶3D软件变得极其强大的可视化实时渲染设施。
所有绘图元素,装置及灯笼与表面纹理,作为一种虚拟现实。
的所有功能。
安装路灯远程控制连接的奶奶办公桌和onPC逼真的动作,颜色和图像显示。
同时视角可以改变的只是完全控制缩放,位置移动虚拟摄像头周围和旋转。
或者只是切换到另一个预定义的摄像机的位置,并开始一个新的从那里运动。
几家眼镜夹具参数,如束角,颜色(颜色均匀混合)和图案可以被显示出来。
可以插入简单地分配一个颜色位图文件到自定义图案图案的相关夹具的位置。
以后可以收到所有的数据显示,从奶奶的办公桌或onPC“在线”显示在实时渲染。
它也可以录制现场,并转换成一个标准的视频压缩格式。
这些文件可以很容易地查看任何个人甚至有可能与标准的媒体播放器软件的计算机或MAC和通过电子邮件发送。
2系统需求的IBM®兼容PC或笔记本2GHz处理器,至少1 GB的RAM以太网卡高速硬件加速3D图形卡:- 至少512 MB的视频内存,例如NVIDEA9800 GTX- > = 3.0顶点着色器- 像素着色> = 3.01024×768像素或更高分辨率500 MB硬盘上的可用磁盘空间微软Windows®XP(推荐)或Windows Vista®作业系统最新的service pack微软DirectX®版本9或以上奶奶控制台或奶奶onPC(系列1或2支持)3安装实际应用程序的版本可以从MA照明技术支持网站下载:TUwww.malighting.deUTH请下载的文件解压到一个临时文件夹,并运行“安装”(gMAvideo_xxx.exe)计划。
3Ds Max培训课程大纲
课程1 3dsmax快速入门∙如何打开场景∙如何建立对象的模型和应用具有真实感的材质∙如何导航3ds max的视口和界面∙如何移动对象和设置对象的动画∙如何渲染∙使用层管理器建造太空场景的模型∙创建基本体对象∙在场景中移动对象∙使用修改器改变对象的形状∙课程2 基础建模1将2D 徽标转换为3D∙添加视口背景。
∙绘制样条线。
∙对顶点进行圆角处理。
∙挤出图形对象。
∙将元素分离到对象中。
∙对齐轴点。
∙添加材质。
∙为对象生成动画。
∙将动画渲染为影片格式。
课程3 基础建模2建造国际象棋的模型∙创建并编辑样条线对象。
∙使用“车削”修改器创建 3D 对象。
∙使用“面”挤出创建几何体。
∙使用“布尔”复合对象。
∙使用视口背景图像。
∙使用“曲面”修改器。
课程4 基础建模3创建具有真实感的沙漏∙使用“锥化”和“FFD”修改器塑造沙漏外形。
∙使用设置了动画的“切片”修改器在沙漏的上部球中创建移动的沙子表面。
∙使用粒子系统在沙漏的下部球中创建下落的沙子。
∙使用一个设置了动画的半球创建沙子堆起效果。
课程5 多边形建模建造飞机模型∙设置带有背景图像的视口以帮助建模。
∙使用基本体对象作为每个飞机部件的基础。
∙在子对象层级编辑模型。
∙调整模型的轴点和层次,为使用游戏引擎做准备。
∙使用“顶点焊接”修改器焊接顶点。
∙“可编辑多边形”中的功能。
∙使用软选择的方式。
∙HSDS 修改器中的功能。
∙如何使用“编辑法线”修改器。
课程6 基础动画1∙自动关键点动画∙重影∙虚拟对象和动画∙轨迹视图 - 摄影表∙循环动画∙加权列表控制器∙使用“柔体”修改器创建挤压和拉伸∙设置关键点动画∙变形动画∙路径约束和路径变形动画方法∙在轨迹栏中复制关键点。
∙使用重影来显现中间帧。
∙使用“功能曲线编辑器”中的切线控制柄控制中间帧。
∙使用参数超出范围类型创建循环动画。
∙使用虚拟对象设置动画。
∙使用“布局”模式。
∙应用增强曲线。
∙使用“摄影表编辑器”加速动画和反转时间。
04.3维GEM3D处理(GT前处理)

GT-SUITE三维前处理工具CDAJ-China技术部宋波CAE -成本节约和技术革新的关键技术内容:GEM3D-管路系统三维处理工具l价值l能导入“完整”的三维数模(STL),解决了三维数模转为GT模型的困难l能自动导入管路的详细特征(变截面管路)l建模时允许输入参数,灵活性大增COOL3D-发动机机舱准三维处理工具l价值l应用特点GEM3D (3D管路前处理工具)价值:l整合设计工程师工作Ø实现不同部门的数据传递l提高工作效率(自动化程度提提高)Ø缩短管路系统的建模时间Ø也可以单独完成三维管路系统l提高管路系统建模的准确性GEM3D (3D管路前处理工具)导入“完整”的STL文件(不仅仅是壳体)GEM3D (3D管路前处理工具)把“三维离散”功能整合到了GEM中了GEM3D (3D管路前处理工具)•处理结果: 根据CAD文件,产生一维的管路和三维的壳体文件GEM3D (3D管路前处理工具)•GEM3D前处理中允许参数输入•自动产生GTM的子文件系统position?# holes?•以隔板位置和孔的数目为变量GEM3D (3D管路前处理工具)导入CAD管路GEM3D (3D管路前处理工具)导入管路CAD时的自动划分l利用“曲线分割法”, 可以自动在截面变化的地方对管路进行划分。
GEM3D (3D管路前处理工具)整个管路截面的转化GEM3D (3D管路前处理工具) 三维建模功能-11-v7.0版本GEM3D的新特性 • GEM的前处理工具允许直接导入 .stl格式的CAD文件 • 如:润滑系统回路 半自动1D模型的生成3D-CAD文件GEM前处理工具GT-SUITE-12-v7.0版本GEM3D的新特性CAD整合功能: 直接导入水套几何-13-内容:GEM3D-管路系统三维处理工具l 价值 l 能导入“完整”的三维数模(STL),解决了三维数模转为GT模型的 困难 l 能自动导入管路的详细特征(变截面管路) l 建模时允许输入参数,灵活性大增COOL3D-机舱热管理准三维处理工具l 价值 l 应用特点-14-COOL3D-机舱热管理准三维处理工具价值:l l l l l 考虑机舱的各主要部件的布置,并进行相互安装位置优化 应用于概念设计阶段,处理快速、高效 多个冷却回路的相互影响 考虑了单个热管理系统到整车级热管理的提升 考虑了多个方面流体的流动(准三维)传统一维-15-COOL-3DCOOL3D-机舱热管理准三维处理工具 建模方便、直观、高效-16-COOL-3D机舱热管理准三维前处理工具 • 自动离散机舱内的热交换器、风扇和阻碍物(V6.2.0功能)-17-COOL3D-机舱热管理准三维处理工具 相互位置影响:10 mmAir Velocity profile through Hx Air Velocity profile through Hx200 mm50 mm300 mmFan to HX Distance -18-Fan to HX DistanceNote: Effect of inlet grill showing through!COOL-3D: V7.0新设计的输出功能 • • • • •V6.2 V7.0更好的直观性 模型打开更快捷 方便模型的拷贝/粘贴 执行器用起来更方便 图形输出更方便-19-COOL-3D: 开路循环系统的散热器按比例缩放功能带有31根管的基本型散热器 按比例缩放后带21根管的散热器Tout = 360.3 K& Q = 31.10 kW& m = 1.84 kg/sTout = 361.7 K& Q = 26.89 kW& m = 1.23 kg/s*外换热条件保持一致: 车速和温度 *内部边界条件保持一致 : 质量流率和温度-20-COOL3D的先进特性•COOL3D前处理中允许参数输入•可以直接进行对比计算•方便实现优化功能•自动产生GTM的多个子文件系统-21-谢谢!CAE -成本节约和技术革新的关键技术。
Demo3D 短期入门培训教程
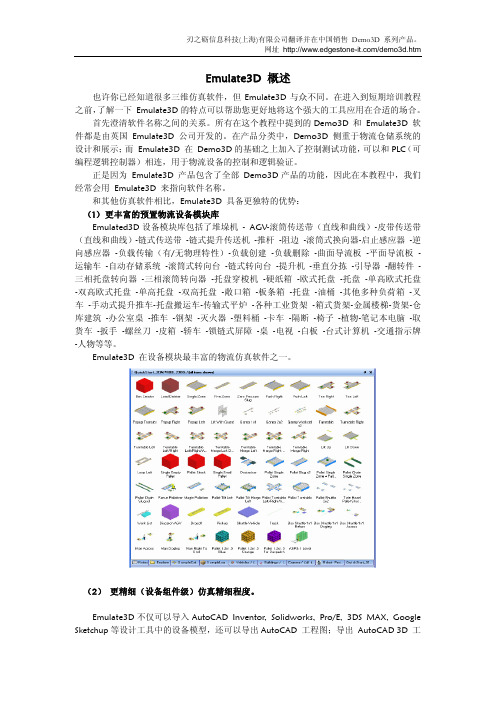
在你开始学习之前,有一个细节需要说一下—Emulate3D 有限公司开发了 Emulate3D Controls Testing(ECT)版本用于控制测试,还开发了 Demo3D 版本用于售前展示和自动 化物料搬运系统原型建模。ECT 和 Demo3D 使用的是相同的建模环境,并且你会经常看到 Demo3D 和 Emulate3D 互换使用。 2.欢迎来到 Demo3D
正是因为 Emulate3D 产品包含了全部 Demo3D 产品的功能,因此在本教程中,我们 经常会用 Emulate3D 来指向软件名称。
和其他仿真软件相比,Emulate3D 具备更独特的优势: (1) 更丰富的预置物流设备模块库
Emulated3D 设备模块库包括了堆垛机 - AGV-滚筒传送带(直线和曲线)-皮带传送带 (直线和曲线)-链式传送带 -链式提升传送机 -推杆 -阻边 -滚筒式换向器-启止感应器 -逆 向感应器 -负载传输(有/无物理特性)-负载创建 -负载删除 -曲面导流板 -平面导流板 运输车 -自动存储系统 -滚筒式转向台 -链式转向台 -提升机 -垂直分拣 -引导器 -翻转件 三相托盘转向器 -三相滚筒转向器 -托盘穿梭机 -硬纸箱 -欧式托盘 -托盘 -单高欧式托盘 -双高欧式托盘 -单高托盘 -双高托盘 -敞口箱 -板条箱 -托盘 -油桶 -其他多种负荷箱 -叉 车 -手动式提升推车-托盘搬运车-传输式平炉 -各种工业货架 -箱式货架-金属楼梯-货架-仓 库建筑 -办公室桌 -推车 -钢架 -灭火器 -塑料桶 -卡车 -隔断 -椅子 -植物-笔记本电脑 -取 货车 -扳手 -螺丝刀 -皮箱 -轿车 -锁链式屏障 -桌 -电视 -白板 -台式计算机 -交通指示牌 -人物等等。
胰腺癌的治疗
Gemcitabine为基础联合化疗治疗晚期胰腺癌 Meta分析
20个临床试验Meta分析结果
PFS而不是RR是GEM为基础联合化疗临床 试验代替OS的可靠研究终点
PFS只在plat-Gem vs. Gem的临床试验中有 显著意义
美国临床肿瘤协会资料
平均患病年龄为63岁,30岁以前很少发病。 世界人口老龄化,60以上人口数量迅速增长与胰腺癌相关肥胖、糖尿病,
甚至缺乏运动等均可能导致胰腺癌发病率逐年上升。
胰腺癌高危人群
年龄大于40岁,有上腹部非特异性不适; 有胰腺癌家族史; 突发不典型糖尿病,缺乏家族史,很快胰岛素抗 者。40%的胰腺癌患者在确诊时伴有糖尿病; 慢性胰腺炎是一个重要的癌前病变,特别是慢性 家性胰腺炎和慢性钙化性胰腺炎; 导管内乳头状黏液瘤亦属癌前病变; 患有家族性腺瘤息肉病者; 胰腺癌的高危因素有长期吸烟、大量饮酒,以长 期接触有害化学物质等。
诊断
(一) 病史和体格检查
家族史、饮食史,慢性胰腺炎、糖尿病史等;腹部不适、腰 背部隐痛;食欲下降及体重减轻;梗阻性黄疸;自发性的胰 腺炎发作;晚期出现上腹部肿块、腹水、肝、骨转移、伴发 糖尿病、恶液质等,侵犯十二指肠可出现上消化道梗阻症。
(二)肿瘤标记物
CEA、CA19-9、CA242等 (三)影像学
20个临床试验Meta分析
Schedule
Pts (n)
PG vs. G
1,354
FG vs. G
1,659
XG vs. G
1,404
NG vs. G
1,879
P: Platin F: Fluoropyrimidine X: Other cytotoxic N: New drug
3D数字技术应用分析:电力网格培训说明书
Application Analysis of 3D Digital Technology in Power Grid TrainingHao TengfeiT raining and Evaluation Center of GPGC510520, Guangzhou Guangdong, 510520, China E-mail:****************Guo JianlongTraining and Evaluation Center of GPGC510520, Guangzhou Guangdong, 510520, ChinaLiu XiaoTraining and Evaluation Center of GPGC510520, Guangzhou Guangdong, 510520, ChinaXiong ShanTraining and Evaluation Center of GPGC510520, Guangzhou Guangdong, 510520, ChinaAbstract —With the improvement of computer technology, 3D virtualization technology whose application can achieve a comprehensive sensory simulation to simulate realistic environment has penetrated into various industry fields, and for the development and application of various electrical equipment in power industry equipment information construction, professional technical training and operation are required. Moreover, It is known that using 3D visual virtual reality to realize the training environment can improve the technical level and operational specifications of professionals. Based on the three-dimensional visual virtual reality technology applied in the maintenance and evaluation environment of substation whip and circuit breaker, multi-role interaction technology combined with virtual scene is realized in this paper, which improves the training accuracy and reduces the possibility of operational errors.Keywords-3D Digitization; Grid Training; Technical ApplicationI. I NTRODUCTIONNowadays, two-dimensional visualization technology is widely used in non-physical maintenance training of power systems. Due to the variety of power equipment and complex equipment structure, two-dimensional image lacks three-dimensionality, which leads to the gap between students' understanding and actual situation on equipment structure[1].The digitization of equipment information model is the key to realizing three-dimensional simulation, which can reflect the information changes of real equipment to the equipment model in the virtual environment. What ’ s more,virtual environment simulation mainly realizes sensory cognition such as vision, auditory sense, which is similar to that in real environment under virtual scene, and image information is combined with the characters and devices in the virtual scene through transmission, recognition, transformation and processing[2].Models and algorithms used in 3D visualization technology are analyzed in this paper, and substation panoramic simulation that is based on substation equipment maintenance and training system (hereinafter referred to as "system") where the three-dimensional simulation of the state evaluation and maintenance process of transformers and circuit breakers are achieved and supporting 3D evaluation module is included as well is developed, which can enhance apprentices' ability to accept the training content and reduce the error rate of the apprentices in actual environment so that apprentices will have a more intuitive understanding and obtain better learning results.II. S YSTEM A RCHITECTUREA. VRML-based Virtual Reality Visualization SystemBased on Windows operating system, development environment is built, and with the help of multi-tasking processing, network communication management and support for graphical development tools in Windows Server 2010, 3DStudioMax is selected as a modeling tool. Besides it, virtual reality modeling language is adopted to establish the connection between virtual models and real entities. The structure of virtual reality visualization system based on VRML is shown in Figure 1[3-4].Figure 1. VRML-based Virtual Reality Visualization SystemInternational Conference on Precision Machining, Non-Traditional Machining and Intelligent Manufacturing (PNTIM 2019)B. Hierarchical Virtual Scene ModelAccording to the structural characteristics of the substation, hierarchical modeling method is used in this paper to decompose a complex scene into multiple sub-scenes, each of which is composed of basic three-dimensional entities. What ’s more, 3DStu ⁃dioMax is first used to establish basic 3D solid model such as 3D model with basic components of device, and 3db format file is generated, which is converted into a 3D data file of the virtual model by a format conversion tool, including points, faces, normal vectors, and relative position matrices among models. In 3D space, the most important step is to select the appropriate interpolation algorithm to transform the data of the 3D solid foundation component into the model data in the 3D spatial virtual scene. For example, four vertices have been defined on the plane shown in Figure 2, and v1, v2, v3 and v4 are the four data corresponding to the three-dimensional physical components of the four vertices, where a suitable interpolation algorithm is needed to calculate the fixed point p on the plane twhich correspondsto component model in virtual reality system[5-6].Figure 2. Example of Spatial Interpolation AlgorithmThe task of the spatial interpolation algorithm is to calculate the position vp of the point p. The common calculation method is the square inverse ratio algorithm of distance. The formula is as follows.∑∑===ni pini piid dv 1212p 1v (1)In formula (1) n is the number of known data points, and dpi refers to the distance from the data point i (i = 1, 2, ..., N) to p.The virtual reality model data file corresponding to the 3D solid component data is calculated according to interpolation algorithm. Then 3D data is recombined with the help of Unity3D graphics processing function to create a 3D frame model and obtain realistic 3D image through illumination and texture mapping. Finally, super-connectedAnchor node and the inline node are adopted to combine the sub-scene to generate the required simulation scene. C. Control of Interaction BehaviorEvents are treated as the trigger mechanism of state or action, and VRML and C# are adopted as development language of human-computer interaction in this paper. In VRML, a node that consists of a domain and an event which includes an eventin (EventIn) and an eventout (EventOut) and provides the node with the ability to accept external messages and send messages to the outside world is a basic unit that constitutes a virtual scene, and the value of the domain determines the value of the node so that the current state of the virtual state is determined. In addition, events can dynamically change the state of the virtual state. Since most of the nodes in the VRML technical specification have special data specifications, they are difficult to expand. However, the script node has an independent uniform resource location field (url), which can be mixed with other languages to realize the interaction between the VRML space and the external information source[7].C# can realize the interaction among VRML node objects and the ability to process messages, and specific C# class will generate a series of actions when the corresponding Script node accepts the event. Meanwhile, it can modify the domain value of the node to realize human-computer interaction and complete the operation of moving, opening, closing, disassembling, etc. In virtual scene, when a sensor node generates an initial event (InitialEvent), the event will be propagated from the event logic output (EventOut) to event logic inputs (EventIn) of other node along the route defined by the route keyword. Meanwhile, other nodes may receive, generate, and execute other events until the end of all events, which is shown in Figure 3.Figure 3. C# and VRML Combined DiagramIII. R ECONSTRUCTION OF R EAL S CENE M ODELA. 3D Modeling RequirementsThe 3D modeling of the switchgear for substation training is required to meet the function such as equipment cognition, structural analysis, secondary loop identification, mechanical action and so on. Taking the secondary circuit as an example, the direction of the cable and the individual arrangement of the terminal block are exactly the same as the scene in real-life model so that through the training of thereal-life model, the maintenance personnel can not only be familiar with the common features of the switchgear, but also the personality characteristics of the specific switchgear. Based on the accurate 3D point cloud data, the reconstruction of 3D model in switch cabinet is implemented in this paper according to the following process[8-10].1)Characteristic analysis and structure division of the switchgear are performed.2)In 3D modeling software, complete components and structural models of the switchgear are constructed based on the point cloud.3)Model splicing is performed to obtain a three-dimensional black and white model of switchgear.4)The texture color collected in the scene is assigned to three-dimensional model to realize three-dimensional real-time visualization of switchgear model.5)According to the first and second equipment schematic of the switchgear as well as the layout drawing of the terminal block and other related drawings, the model is named to realize the complete coding of the components.6)Based on the training needs, the components are stratified and grouped reasonably.B.Model Release and Application StrategyThe three-dimensional model constructed by the above process has plenty of functions. For example, it can be rotated and disassembled arbitrarily, and it can be observed at 360 degrees without dead angle. In addition, it can be displayed hierarchically. In addition, the realized 3D real-life model also has six features such as complete components, real-life restoration, rich details, accurate model coding, multi-format publishing, and multi-terminal support. In order to provide convenience for training personnel, the model can be released both in professional 3D format and the most popular PDF format, and it supports various platforms such as computers, smart phones, and tablets.IV.S YSTEM F UNCTION I NTRODUCTION Based on the three-dimensional visualization technology, the internal structure and operation principle of the equipment, the state maintenance process of the substation equipment, the status evaluation guide of the substation equipment, the typical fault handling of the substation equipment, and the theoretical assessment are used to develop the simulation training function under the virtual scene in this paper.A.Equipment Internal Structure and Principle SimulationAccording to the actual structure of substation equipment, a three-dimensional simulation model of equipment is established, and the actual operation of the equipment is simulated through dynamic interactive language so that the apprentices can intuitively understand the internal structure and operation principle of the equipment. Taking the circuit breaker operating structure as an example, three-dimensional simulations of the main components such as the energy storage motor and the spring are performed to reproduce the internal structure of the circuit breaker. What’s more, apprentices can clearly see the composition and working principle of the circuit breaker transmission mechanism through simulating the opening and closing operation of circuit breaker. When the opening and closing operation fails, apprentices analyze and judge malfunction according to the abnormal situation of the site to determine the cause of the fault and select the treatment measures. The three-dimensional simulation diagram of the circuit breaker operating mechanism is shown in Fig. 4.Figure 4.3D Simulation Diagram of the Circuit Breaker OperatingMechanismB.Virtual Scene RoamingThe system refers to the real substation and builds a 220kV three-dimensional analog substation, which covers different types of equipment in line spacing, bus spacing, and main transformer interval. Moreover, in combination with the substation equipment model, the model is associated with the actual configuration, technical parameters, and functional location relationships of the device, and the device information can be viewed in real time under virtual scenario. Therefore, apprentices can roam in the virtual scene from the perspective of the first person, and get familiar with the electrical equipment and connection principle of substation from different angles.C.Maintenance Procedures TrainingAccording to the maintenance rules of transformers and circuit breakers, the equipment maintenance process in the virtual scene and the maintenance operation under each process (including the bushing of the transformer and circuit breaker, the appearance inspection of the fuel tank, the appearance of the fuel tank, etc.) are constructed. Maintenance training includes two modes teaching and practice. In teaching mode, instructor performs various maintenance operations on the basis of maintenance process in the virtual scene, and according to system prompt, controls the virtual character is controled to reach the specified position in the process, and the correct maintenance tool is selected, and corresponding maintenance operation is performed as well. Moreover, in practice mode, apprentices control the avatar without system prompt and relatedoperations are performed in the maintenance procedure.D.State Evaluation Guide TrainingThe guideline for state evaluation of substation equipment is the main basis for achieving state maintenance where various aspects such as equipment operation, test and online monitoring are involved. Through status evaluation, health status of the equipment is objectively evaluated, which is the basis for maintenance. In order to allow the trainees to fully grasp the guidelines for the evaluation of the status in substation equipment, the system transforms the state evaluation guide training for transformers and circuit breakers from traditional two-dimensional picture to three-dimensional scene where the deduction item is associated with the actual part in the equipment to realize the visualization of the deduction item and unification between theory and object. In addition, through the simulation of deduction points, the status of the device is dynamically displayed, and the understanding of the device status evaluation guidelines is deepened.E.Multi-role Interaction Fault SimulationWhen socket-based multi-role communication server is processed, it needs apprentices to open the training system through a web browser, and register the local virtual client to the server, then the plurality of registered apprentices can collaborate in the same virtual scenario through the server. Besides it, based on the experience of Guangxi power grid equipment fault handling, a typical fault is selecyed as a case in the system where multi-role operation scenario such as fault handling on breaker SF6 with gas pressure shortage and transformer fire. Therefore, participants who participate in the training can understand the troubleshooting process more clearly through multi-person collaboration, and apprentices’ability to solve problems on the spot and coordinate with each other in the actual work can be improved through learning the experience of past troubleshooting.F.Training AssessmentDuring the three-dimensional virtual assessment in system, apprentices enter equipment maintenance or status evaluation guide to train the virtual scene through the virtual client, and test questions created by the web browser can be invoked according to the process steps. What’s more, answers and submissions can be completed in the virtual scene. After the assessment is completed, the assessment results can be viewed in the virtual scene. Instructors can start, suspend, and stop the training and assessment process through task management. Besides it, training and assessment process of a certain apprentice can be allowed or suspended, and the operation process of the apprentices can be recorded and reproduced, which is convenient for instructors and apprentices to judge and study on their own. When it comes to assessment in 3D virtual scene, apprentices can enter the process that needs to be evaluated through the virtual client, and each step in the virtual scenario will invoke the test questions created by the Web browser, so after completing the test questions for each step, apprentices can submit the test paper.V.A PPLICATION E FFECT A NALYSIS In order to apply the entire training assessment system into actual grid so that state evaluation and maintenance training can be assited, No. 1 main transformer casing is selected as maintenance assessment project by management personnel during the apprentices training. After setting up the assessment project and the assessment time in system, the designated student A will conduct the whole process assessment (including the actual operation and the theoretical examination). When formal assessment begins, apprentices A is first required to patrol the entire substation after entering the substation, and follow the prompts to reach the No. 1 main transformer within the specified time. Then, according to the existing state and evaluation guidelines of the equipment, the equipment evaluation of the main transformer is carried out, and it will be found that the casing has accumulated dirt and slight oil leakage. Finally, based on the evaluation results, it will be decided to carry out maintenance of casing leakage oil. In addition, another apprentice logs into the server and enters the system, and according to the rules, one person monitors one person to wipe the casing. After the actual operation, the theoretical test is carried out, and system administrator issues the test questions according to apprentices’s grades and assessment content. Then, apprentices conduct the online test. After the test is over, the system automatically scores and judges whether it is qualified.VI.C ONCLUSION3D modeling technology is used to establish the virtual scene of the substation equipment maintenance in this paper, and dynamic simulation of the equipment status is realized by the data driven model. Meanwhile, VRML is used to realize the virtual interaction between personnel and equipment, and build a virtual environment for equipment maintenance operations for the participants in the training. Combining the multi-role interaction technology in the virtual scene, the collaboration among instructors and apprentices is realized, where practical operation ability, teamwork spirit and participation enthusiasm of apprentices are greatly improved.Combined with virtual reality technology such as 3D panoramic camera rapid modeling and somatosensory technology, 3D visualization training method can not only reduce the material and labor costs required for training, but also enhance practical skills. In the future, 3D visualization will be applied to more occasions in power systems, such as equipment test simulation, line disaster warning simulation, power equipment life assessment simulation, and power engineering construction simulation.R EFERENCES[1]Liu Sha, Zhang Zhihua, Feng Shangchao. Accuracy Analysis of3DMAX 3D Modeling[J]. Beijing Surveying and Mapping. 2019(01).[2]Wei Yukun. Design and Implementation of Virtual Reality InteractionSystem Based on Unity3D[J]. Electronic Technology & Software Engineering. 2018(14).[3]Ding Xiao. Research on Power Skill Training System Based on VirtualReality Technology [J]. Power Supply. 2016(11).[4]Yang Siyao, Ning Baokuan, Lu Haiyan, Wang Shouping. HomeDecoration Design System Based on Unity3d [J]. Architectural Design Management. 2018(02).[5]Wu Tong, Wang Xiaoyu. Research on collision detection problem inUnity3D [J]. Electronic Test. 2018(01).[6]Yang Zhongya, Zhao Yong, Liu Juanpeng, Huang Ying, YangChengshun. Design and Implementation of Transmission Line Patrol Simulation Training System Based on Virtual Reality[J]. Electronic Measurement Technology. 2015(04). [7]Feng Bo, Liu Peng. Design and Development of VR Application Basedon Unity3D[J]. Digital Technology & Applications. 2017(11).[8][8] Ma Yufeng, Yuan Ye. Development of Wellbore TrajectoryPrediction and 3D Visualization System of Wellbore Trajectory[J].Microcomputer Applications. 2017(08).[9]Jiang Bizhen, Cong Lin. Research on 3D Visualization of WellLogging Information Based on QT and OpenGL[J]. Foreign Well Logging Technology. 2017(03).[10]W ang Rende, Du Yong, Shen Xiaojun. Current Status and Prospect of3D Modeling Method in Substation[J]. North China Electric Power Technology. 2015(02).。
3DMOVE培训手册

3Dmove基本操作3Dmove软件简介:3Dmove:是一个全交互式的可视化软件,它可以为从事勘探和开发的研究人员提供适用于所有构造类型的模拟和恢复的软件包。
这个软件包可进行实地构造恢复以及正演模拟。
主要提供在模型数据体及真实数据体上进行的三维回剥、断弯褶皱演化、地层展平、平面复原绘制和任意形态形变演化分析。
快速的可视性效果与先进工具的结合使得这个软件包适用于解释工作的各个阶段,并且模拟出全过程。
它的另一个特点就是可以同时在地震勘探工区坐标和地理坐标系统里直接进行可视化操作,用游标在地震解释数据体中直接拾取已解释出的界面。
用户进行交互式操作解释,检查断层和层位的地质合理性,即拾取解释的断层和层位进行反演模拟以检查其在构造地质上是否合理,同时将修改的理想初始值带入正演模型得到的理想的解释结果反馈到地震解释上。
反复进行上述过程,从而得到最佳的解释结果。
以这种方式来发现在原先解释过程中所存在的构造地质问题并且加以解决,从而使地震及钻井资料得到最佳的利用以减少勘探风险。
进入3DMove用户,启动3Dmove3Dmove主菜单窗口:见图一图一主菜单一、生成一个新工区1.在主菜单下点击File选项2.再按New选项,弹出一个坐标系x、y、z3.按save选项,存一个新工区名(包括路径)二、选择一个工区1.如果要选择一个已存在的工区,在主菜单下点击File选项2.再按Load选项,弹出一个对话框,点击你需要的工区三、数据输入建立三维构造模型的数据可以来源于二维资料或三维资料。
3Dmove软件支持Landmark,Geoquest,Charisma和Zmap+和CPS3等软件的接口。
同时所提供的ASCII格式的数据也使之可与更多的界面相连。
1.在主菜单下点击File选项2.再按Import选项,弹出一个对话框,选择所输入的类型,包括Landmark ASCII文件、Geoquest ASCII文件、Attribute资料都可输入3.点击OK,弹出下一个对话框,选择文件所在路径和文件名,点击后输入到右窗口中(1)选件column specification 按列数输入(2)选件field specification 按域数输入(3)选件edit可进行编辑(4)选件depth按深度输入,不带负号(5)选件elevation按高程输入,带负号(6)层面按data /cloud输入(7)断层以lines选件输入4.点击输入文件四、模型建立的工作流程建构造模型的工作流程见图二图二工作流程五、显示和目标的选取显示功能可以用来显示整个模型和所选取的模型的局部。
三坐标测量仪培训手册
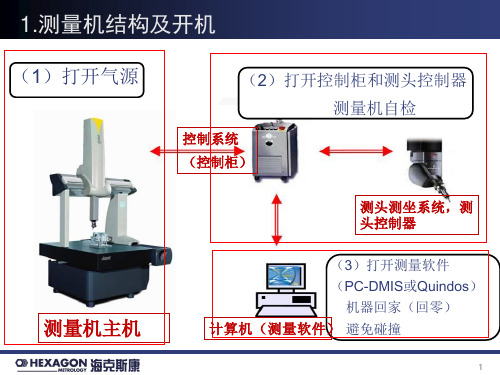
三坐标讲义第一节课学前知识一.三坐标概况1.三坐标组成三坐标主要由以下几部分组成:测量机主机,控制系统,计算机(测量软件),测座、测头系统。
2.测量机主机这是测量机的基本硬件,有多种结构形式:移动桥式:活动桥式测量机是使用最为广泛的一种机构形式。
特点是开敞性比较好,视野开阔,上下零件方便.运动速度快,精度比较高。
有小型、中型、大型几种形式。
固定桥式:固定桥式测量机由于桥架固定,刚性好,动台中心驱动、中心光栅阿贝误差小,以上特点使这种结构的测量机精度非常高,是高精度和超高精度的测量机的首选结构.高架桥式:高架桥式测量机适合于大型和超大型测量机,适合于航空、航天、造船行业的大型零件或大型模具的测量。
一般都采用双光栅、双驱动等技术,提高精度。
水平臂式: 水平臂式测量机开敞性好,测量范围大,可以由两台机器共同组成双臂测量机,尤其适合汽车工业钣金件的测量。
关节臂式:关节臂式测量机具有非常好的灵活性,适合携带到现场进行测量,对环境条件要求比较低。
各种结构三坐标“图”以活动桥式测量机为例,介绍三坐标主要组成及功能:工作台(一般采用花岗石),用于摆放零件支撑桥架; 工作台放置零件时,一般要根据零件的形状和检测要求,选择适合的夹具或支撑。
要求零件固定要可靠,不使零件受外力变形或其位置发生变化。
大零件可在工作台上垫等高块,小零件可以放在固定在工作台上的方箱上固定后测量。
桥架,支撑 Z 滑架,形成互相垂直的三轴; 桥架是测量机的重要组成部分,由主、附腿和横梁、滑架等组成。
桥架的驱动部分和光栅基本都在主腿一侧,附腿主要起辅助支撑的作用。
由于这个原因,一般桥式测量机的横梁长度不超过 2。
5 米,超过这个长度就要使用双光栅等措施对附腿滞后的误差进行补偿,或采用其他机构形式。
滑架,使横梁与有平衡装置的 Z 轴连接;滑架连接横梁和 Z 轴,其上有两轴的全部气浮块和光栅的读数头、分气座。
气浮块和读数头的调整比较复杂,直接影响测量机精度,不允许调整。
FRANC3D-V7-Training-Part-4
Anchor at Node
Set crack position and orientation.
Set crack-front template mesh parameters.
Part IV 6
Crack Insertion Wizard – Library Shapes
Part IV
2
Workshop Agenda
• • • • • • Part I: Introduction to Fracture Mechanics Analysis Part II: Introduction to FRANC3D Part III: FRANC3D FE model import - demo & hands-on Part IV: Crack Insertion Process – demo & hands-on Part V: Crack Growth and Fatigue Life – Theory, Rules & Models Part VI: FRANC3D crack growth, SIF history & fatigue life - demo & hands-on • Part VII: FRANC3D Session Log, Playback, Command Line & Python • Part VIII: Known issues & what to do if something goes wrong • Part IX: Capabilities coming soon
quarter-point singular wedge crack-front elements tetrahedral elements used for most of volume mesh
地质建模型培训步骤(精)
地质建模型培训步骤GEMCOM 国际软件公司 SURPAC 中国办事处I目录第 1章地质数据库结构 ............................................................................................................................ 1 1.1 分析实例地质数据 ....................................................................................................................... 1 第 2章创建一个 Surpac 地质数据库 ....................................................................................................... 5 2.1 创建数据库结构 ........................................................................................................................... 5 2.2 编辑转换表 (8)2.3 导入数据 (9)第 3章三维空间显示钻孔 ...................................................................................................................... 13 3.1 设置钻孔显示风格 .....................................................................................................................13 3.2 显示钻孔 (16)第 4章地质解译和剖面品位计算 .......................................................................................................... 20 4.1 创建剖面 (20)4.2 地质解译(圈定矿体 ............................................................................................................. 24 4.3 计算线段品位 ............................................................................................................................. 31 第5章形成实体模型 .............................................................................................................................. 33 5.1 建立实体模型 ............................................................................................................................. 33 第 6章数据提取 (38)6.1 提取钻孔平面图 /剖面图 . ........................................................................................................... 38 6.2 提取样品表中数据,获得取样长度 ......................................................................................... 41 6.3统计样长,确定组合样长 ......................................................................................................... 43 第 7章组合 ........................................................................................................................................... ... 46 7.1 样品组合原理 ............................................................................................................................. 47 7.2 根据勘探工程组合 ..................................................................................................................... 47 第 8章基本统计与分析 .......................................................................................................................... 54 8.1 基本统计 (54)8.2 处理特高品位 ............................................................................................................................. 59 第 9章创建块体模型 .............................................................................................................................. 62 9.1 创建块模型 (63)9.2 增加属性及背景值 ..................................................................................................................... 66 9.3 约束 ........................................................................................................................................... .. 68 9.4 块体模型的显示 ......................................................................................................................... 70 第 10章块体模型赋值 ............................................................................................................................ 74 10.1 直接赋值法 (74)10.2 距离幂次反比法 ....................................................................................................................... 78 10.3 根据属性为模型着色 ...............................................................................................................85 10.4 第二次估值 ............................................................................................................................... 87 第11章资源储量报告 ............................................................................................................................ 95 11.1 块模型的报告 (95)II第 1章地质数据库结构1.1 分析实例地质数据该实例为一套培训数据,作为初学者学习所用,此例为仅有钻孔数据的金矿床。
FRANC3D_V7.0新版本功能介绍
6
Sub-Model Generation Tool
7
Sub-Model Generation Tool
8
Sub-Model Generation Tool
9
ABAQUS/ANSYS Emulation
FRANC3D can be run in emulation mode, which mimics the model display and view manipulation “look & feel” used by ABAQUS/CAE or ANSYS/Classic
Ignore cases where a projected point cannot be found
stepi 1
stepi 1
stepi
stepi
Average the computed cycles for all crack front nodes to find one value for the cycles required to grow from crack front i to crack front i+1
Default center of rotation is the center of the model
Recenter
Version 7 New Features
• New geometric intersection engine for crack insertion (increased robustness)
10
Fatigue Crack Growth Rate Model Library
• Separate growth rate and R-ratio models (except NASGRO eqn.) • All model can be specified as temperature dependent Growth rate models: Sigmoidal Paris • Paris Bi-Linear Paris • Bi-Linear Paris • Sigmoidal • Hyperbolic Sine • Tabular • NASGRO Tabular Hyperbolic Sine R-ratio models: NASGRO • None • Walker • Closure • Tabular
温泽三坐标测量培训资料
三坐标几何元素测量通常,您可以选择使用手动、自动以及联系数学模型的方式来测量几何元素。
选择下图中所示的图标—几何元素测量在这个图标的右边显示其附属的工具栏:3D元素测量工具栏2D或理论元素测量工具栏1.手动测量几何元素手动测量几何元素时请把快捷键工具栏中的F8选项调整为没有被选中的状态。
如下图,F9被选中,F8没有被选中。
测量点数设置:选择如下图所示的图标—设置元素测量的中断条件显示下面的窗口:您可以分别为窗口中的元素设置测量点数。
●选择点数,在右边的三个文本框中分别输入数值。
快捷键工具栏中的F9、F10和F11分别相应于这三个数值。
●选择用户暂停,那么您就不需要在右边的三个文本框中分别输入数值。
当您测量一个元素的点数已经足够时,使用快捷键工具栏中的F5来结束测量。
选择测量点图标。
您可以选择显示/编辑元素代码和名称按钮来自定义这个点的代码和名称。
这个时候在测量进程栏中显示需要测量的点数和已经测量的点数。
使用摇杆在工件上测量一个点。
测量完这个点后,显示如下窗口:如果这个点所在的平面和您已经建立的坐标系的XY、YZ或ZX平面平行,那么您可以选择相应的坐标系平面,或者选择一个已测量的元素作为参照元素。
选择测量直线图标。
您可以选择显示/编辑元素代码和名称按钮来自定义这条直线的代码和名称。
这个时候在测量进程栏中显示需要测量的点数和已经测量的点数,您可以选择F9、F10或F11来切换测量点数。
使用摇杆在工件上测量所需的点,如果您还需要增加点,那么点击F6 ,您就可以继续测量了,达到了所需的点数后点击F5 。
测量完这条直线后,显示如下窗口:如果这条直线和您已经建立的坐标系的XY、YZ或ZX平面平行,那么您可以选择相应的坐标系平面,或者选择一个已测量的元素作为参照元素。
选择测量平面图标。
这个时候在测量进程栏中显示需要测量的点数和已经测量的点数,您可以选择F9、F10或F11来切换测量点数。
使用摇杆在工件上测量所需的点,如果您还需要增加点,那么点击F6 ,您就可以继续测量了,达到了所需的点数后点击F5 。
海克斯康三坐标培训讲义
A:PROBE:此按键灯亮,测量机按测头方向移动。 B:PART:此键灯亮,测量机按工件坐标系移动。 C: MACH:此键灯亮,测量机按机器坐标系移动。 X、Y、Z:X、Y、Z 轴指示灯,灯灭,轴锁定。
PRINT :编程时加 MOVE 点按键。
PROBE ENABLE(1) 当此按键灯灭时,测头保护的 功能有效,但不记录测需要正常测点时,将灯按亮点 需要正常测点时,灯亮(2)测头平衡,模拟测头
23
6、手动测量特征元素
智能判别模式 替代推测 P52 选择模式:选择测定特征
快捷键使用:
删除点: 手操盒上的DEL PNT 键(或键盘上ALT+“-“键 采集完成后:手操盒上的Done或 键盘上的End
加移动点:
手操盒上的Print或 键盘上的Ctrl+M
24
图形显示窗口的操作
Ctrl+Z :将窗口恢复到最佳视图大小 按住鼠标中键:旋转视图 鼠标滚轮:缩放 按住鼠标右键:平移
建立坐标系前的准备:
对照工件,分析图纸,明确以下要求: 、明确工件的设计基准、工艺基准、检测基准,确定建立 零件坐标系时,应测量哪些元素来建立基准,并采用何种建 立坐标系方法。 、确定需要检测的项目,应该测量哪些元素,以及测量这 些元素时,大致的先后顺序。 、根据要测量的特征元素,确定工件合理的摆放方位,采 用合适的夹具,并保证尽可能一次装夹,完成所有元素的测 量,避免二次装夹。 、根据工件的摆放方位及检测元素,选择合适的测头组件 ,并确定需要的测头角度。 工件图纸的分析过程,是工件检测的基础。分析完图纸后,应出 据一份详细的检测要求。
P84 插入-----特征-----自动--
矢量点 曲面点(样例点)
Gager3d 软件的安装步骤
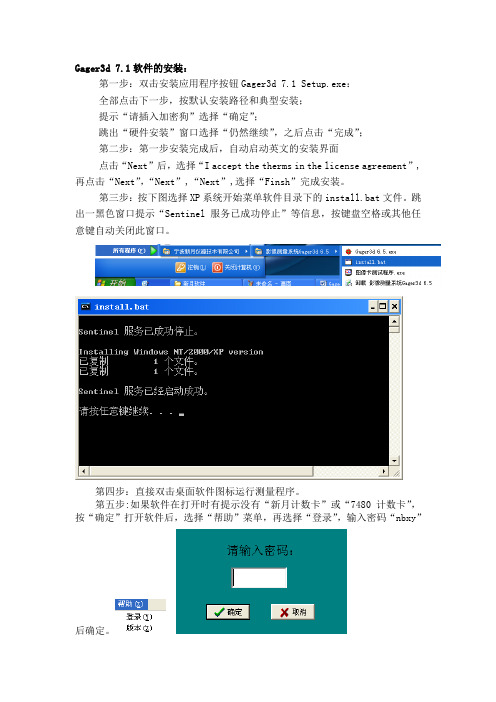
Gager3d 7.1软件的安装:
第一步:双击安装应用程序按钮Gager3d 7.1 Setup.exe:
全部点击下一步,按默认安装路径和典型安装;
提示“请插入加密狗”选择“确定”;
跳出“硬件安装”窗口选择“仍然继续”,之后点击“完成”;
第二步:第一步安装完成后,自动启动英文的安装界面
点击“Next”后,选择“I accept the therms in the license agreement”,再点击“Next”,“Next”,“Next”,选择“Finsh”完成安装。
第三步:按下图选择XP系统开始菜单软件目录下的install.bat文件。
跳出一黑色窗口提示“Sentinel服务已成功停止”等信息,按键盘空格或其他任意键自动关闭此窗口。
第四步:直接双击桌面软件图标运行测量程序。
第五步:如果软件在打开时有提示没有“新月计数卡”或“7480计数卡”,按“确定”打开软件后,选择“帮助”菜单,再选择“登录”,输入密码“nbxy”
后确定。
再选择“图像”菜单,“初始化”,再正确选择“计数卡”一项。
关闭软件后再打开看是否有错误提示。
- 1、下载文档前请自行甄别文档内容的完整性,平台不提供额外的编辑、内容补充、找答案等附加服务。
- 2、"仅部分预览"的文档,不可在线预览部分如存在完整性等问题,可反馈申请退款(可完整预览的文档不适用该条件!)。
- 3、如文档侵犯您的权益,请联系客服反馈,我们会尽快为您处理(人工客服工作时间:9:00-18:30)。
Tutorial 1:消音器建模
1.18 在套筒上添加丝绵
先选择套筒,然后在菜单选择“Builder/Add Feature/Wool”,按下图所 示添加丝绵:
执 行 后 的 视 图
Tutorial 1:消音器建模
1.19 建立伸出消音器的弯管
点击工具栏的 按钮,或选择“Builder/Add Component/Bend Pipe”, 按如下设定建立弯管:
执行后 的视图
Tutorial 1:消音器建模
选择“Connection/Flow Connection”,建立弯管与直管的连接。然后选 择“Builder/Transformations/Component Rotation”,将弯管旋转145度 :
Tutorial 1:消音器建模
1.20 建立连接上面弯管的直管
1.8 建立连接进气直管的弯管
点击工具栏的 按钮,或选择“Builder/Add Component/Bend Pipe”, 按如下设定建立弯管:
Tutorial 1:消音器建模
1.9 链接上面两个部件
选择“Connection/Flow Connection”,然后按下图所示的顺序依次点 击两个平面,则建立下面右图所示的链接(链接完成后可按“ESC”键 退出链接模式)。 注意:点击平面的顺序不可颠倒,第一个点击的面是将要移动的面, 第二个点击的面固定不动。
由于导入的几何模型是封闭的,因此需要将进出口处的端盖删除 ,这里使用“Marking”的方式来实现; 点击工具栏的 按钮,或在菜单栏选择“Slicer/Marking”; 在弹出窗口中选择“Mark face”(中间的按钮),然后按住ctrl键依 次点击五个端盖,如下所示:
标记后的显示结果
Tutorial 2:进气歧管建模
② ①
Tutorial 1:消音器建模
按下“alt”键,同时鼠标点击T型管所在的位置,出现如下左上图所示 的窗口,选择“TSplit”,点击“OK”; 选择“Builder/Transformations/Component Rotation”,然后按如下左下 图所示的参数旋转弯管。
旋转后
①
的视图
Tutorial 2:进气歧管建模
2.1 开始
此案例在于使初学者掌握如何使用已存在的STL文件来生成模型 并将几何转换成基本的流动组件。建议在操作本案例之前先熟悉 消音器模型的建立过程。 建立新模型
将建立的新模型保存为“IntMan”到以下目录: GTIHOME\v7.1.0\tutorials\Graphical_Applications\GEM3D\02IntakeManifold
Tutorial 1:消音器建模
1.5 建立进气直管
点击工具栏的 按钮,或选择“Builder/Add Component/Straight Pipe”,按如下设定建立直管:
Tutorial 1:消音器建模
左键双击
Tutorial 1:消音器建模
1.6 旋转进气直管到正确位置
鼠标选择刚建立的进气直管“inlet1”,然后在菜单选择 “Builder/Transformations/Assembly Rotation”,按如下操作旋转:
右击outlet5, 选择”Add Connection”
Tutorial 1:消音器建模
1.26 将模型离散化
以上过程建立了消音器的模型,下面要将此模型进行离散以供GT-ISE 和GT-SUITE使用。 点击工具栏的 按钮,或选择“File/Export gtm”,按如下参数设置对 话框(点击Preview可显示右下图所示的离散结果),点击Discretize可输 出*.gtm文件。详细信息请参考英文版tutorial。
按钮,或点击Slicer/Convert Mesh,做如下设置
输入如下数据
双击init-exh,设置如下参数
Tutorial 1:消音器建模
1.4 添加一个baffle
在shell几何上单击右键选择“Baffle”(或选择“Builder/Add Feature/Baffle”),按如下设定添加baffle:
执行后的视图
Tutorial 1:消音器建模
1.25 在一个腔室内添加丝绵
点击工具栏的 按钮,或选择“Selection/Chamber”,以切换到 chamber选择方式; 在相应腔室上右键单击选择“Wool”:
执行后的视图
1.26 增加外部接口
选中inlet1,右击选择”Add Connection”
连接后 的视图
Tutorial 1:消音器建模
1.15 建立锥形弯管
点击工具栏的 按钮,或选择“Builder/Add Component/Bend Pipe”, 按如下设定建立弯管:
Tutorial 1:消音器建模
选择“Connection/Flow Connection”,建立弯管与T型管的连接。然后 选择“Builder/Transformations/Component Rotation”,将弯管旋转180 度:
●
●
●
依次点 取三点
左键拖动平面 到适当位置
Tutorial 2:进气歧管建模
切割平面位置确定后,鼠标点击选择要被切割的几何,然后点击 工具栏的 按钮,或在菜单栏选择“Slicer/Clip”,或点击 “Cutting Plane Control”窗口的“Clip”按钮,执行切割操作。切 割后的视图如下右图所示:
我们需要将进气歧管的整个几何分割成可以使用管道和岔管来代替的 几部分。下面先把四个并列流道从几何中分离出来; 点击工具栏的 按钮,或在菜单栏选择“Slicer/Cutting Plane”,依次 如下左图所示点取三个点,则形成切割平面,如下中图所示; 移动切割平面到适当位置,防止平面切割到歧管,如下右图所示;
执行后 的视图
Tutorial 1:消音器建模
1.22 在消音器壳体内部建立另一个壳体
点击工具栏的 按钮,或选择“Builder/Add Component/Shell”,按如 下设定建立壳体:
Tutorial 1:消音器建模
执 行 后 的 视 图
Tutorial 1:消音器建模
选择“Builder/Transformations/Assembly Rotation”,将弯管旋转95度 :
Tutorial 2:进气歧管建模
2.2 打开相应STL文件(安装GT-SUITE时提供)
在菜单选择“File/Import 3D”,选择导入STL,点击next,选择 surface,点击next导入stl文件:
导入后的模型
Tutorial 2:进气歧管建模
2.3 使用“Marking”的方式分割几何
旋转后
①
的视图
②
Tutorial 1:消音器建模
1.11 在弯管添加穿孔
在窗口左边的模型管理树中选择“inlet2”,单击右键选择“Perforate Section”,按如下的设定建立穿孔:
执行后 的视图
Tutorial 1:消音器建模
1.12 建立连接弯管的T型分流管
点击工具栏的 按钮,或选择“Builder/Add Component/TSplit”,按如 下左图设定建立T型管; 选择“Connection/Flow Connection”,然后按下中图所示的顺序依次点 击两个平面,则建立下面右图所示的链接(链接完成后可按“ESC”键 退出链接模式)。
①
②
Tutorial 1:消音器建模
先选择直管(“outlet2”),然后在菜单选择“Builder/Add Feature/Perforate Section”,按下图所示设定添加穿孔:
执行后 的视图
Tutorial 1:消音器建模
1.17 在直管上建立套筒
先选择直管(“outlet2”),然后在菜单选择“Builder/Add Feature/Sleeve” ,按下图所示添加套筒:
点击工具栏的 按钮,或在菜单栏选择“Slicer/Clip”,则五个端 盖从当前几何中分离出来,如下左图所示; 选择这五个分离出来的端盖,按下delete键,或在菜单栏选择 “Edit/Delete”,则将它们删除,结果如下右图所示:
Tutorial 2:进气歧管建模
2.4 使用“Cutting Plane”
Tutorial 1:消音器建模
先选择锥形弯管(“outlet1”),然后在菜单选择“Builder/Add Feature/Perforate Section”,按下图所示设定添加穿孔:
执行后 的视图
Tutorial 1:消音器建模
1.16 建立包覆有套筒的直管
点击工具栏的 按钮,或选择“Builder/Add Component/Straight Pipe” ,按如下设定建立直管。并建立其与锥形弯管的连接:
②
Tutorial 1:消音器建模
1.13 在T型管添加穿孔
先选择T型管(“inlet3”),然后在菜单选择“Builder/Add Feature/Perforate All”,按下图所示设定添加穿孔:
执行后 的视图
Tutorial 1:消音器建模
1.14 建立连接T型管中垂管部分的共鸣管
点击工具栏的 按钮,或选择“Builder/Add Component/Straight Pipe” ,按如下左图设定建立共鸣管。再按以前方法建立其跟T型管的连接:
②
左键单击 选择此面
①
旋转后 的几何
Tutorial 1:消音器建模
1.7 在进气直管壁增加穿孔
在“inlet1”上单击右键选择“Perforate Section”(或选择“Builder/Add Feature/Perforate Section”),按如下设定生成穿孔:
