ASTM D4632-2015a 英文版 (1)
astm液压油标准
astm液压油标准ASTM(美国材料与试验协会)发布了一系列液压油的标准,其中一些是用于评估液压油性能和规格的标准。
以下是一些与液压油有关的ASTM标准的示例:1.ASTM D6158 - Standard Specification for Mineral HydraulicOils•标准规定了矿物基液压油的性能要求和测试方法。
2.ASTM D6159 - Standard Specification for 低温性能的非酯液压油•该标准规定了低温环境中使用的非酯基液压油的性能要求和测试方法。
3.ASTM D2882 - Standard Test Method for Indicating WearCharacteristics of Petroleum Hydraulic Fluids in a High Pressure Constant Volume Vane Pump•该标准规定了在高压恒容叶片泵中表征液压油磨损特性的测试方法。
4.ASTM D4636 - Standard Test Method for Corrosiveness andOxidation Stability of Hydraulic Oils, Aircraft Turbine Engine Lubricants, and Other Highly Refined Oils•该标准规定了液压油、航空涡轮发动机润滑油和其他高度精制油的腐蚀性和氧化稳定性测试方法。
5.ASTM D6157 - Standard Test Method for Determination ofBenzene and Toluene in Finished Motor and Aviation Gasoline by Gas Chromatography•该标准涉及使用气相色谱法测定成品汽油和航空汽油中苯和甲苯的含量。
请注意,这只是一小部分涉及液压油的ASTM标准。
包装跌落测试通用标准
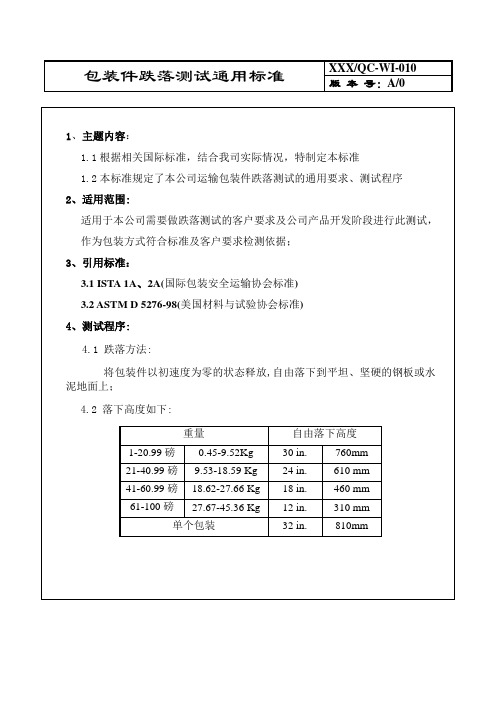
高
41LBS(18.60KGS)--60.99LBS(27.66KGS)
18Inches(45.72cm)
度
61LBS(27.67KGS)-100.0LBS(45.36KGS)
12Inches(30.48cm)
标 判 1、外箱包装材料出现破损情况为正常。(有特殊要求的除外) 准 定 2、产品各部件出现松脱、损坏、损伤等为不合格。
产品各部件无松脱、无损坏、无损伤。
7、反应计划
大箱 3 线开裂、吸塑和内衬卡位失效是导致产品部件脱出移位的预防重点;
8、附件:
《跌落测试操作指导》 、 《跌落测试报告》
编制:
审批:
包装件跌落测试通用标准
跌落测试操作指导
XXX/QC-WI-010 版 本 号:A/0
一
三条相联系梭边
点
交汇处一角
与测试角相邻的
包装件跌落测试通用标准
XXX/QC-WI-010 版 本 号:A/0
1、主题内容: 1.1 根据相关国际标准,结合我司实际情况,特制定本标准 1.2 本标准规定了本公司运输包装件跌落测试的通用要求、测试程序
2、适用范围: 适用于本公司需要做跌落测试的客户要求及公司产品开发阶段进行此测试, 作为包装方式符合标准及客户要求检测依据;
各种产品的测试项目中英文对照
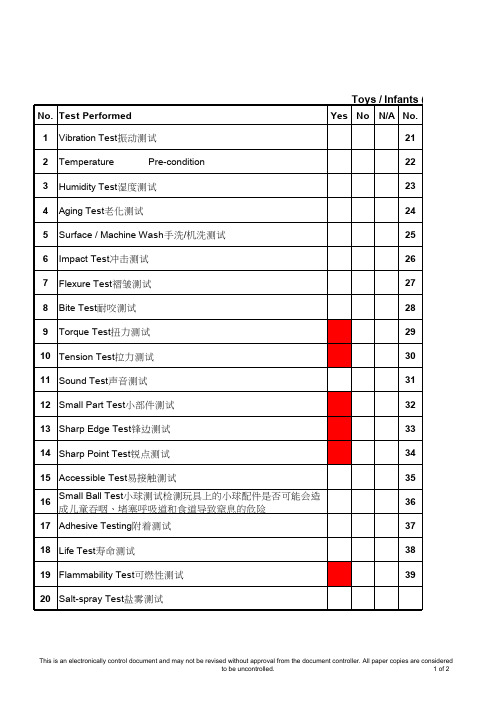
No N/A #DIV/0!/ Electric No.1234567891011121314151617181920Electronics / Electrical Ap Test PerformedPractical Use Test实际使用测试Switch Reliability Test开关可靠性测试Resistance to Environmental ExposureChild Safety儿童安全测试Input/ Output Voltage Test输入输出电压测试Leakage Current Test漏电流测试Temperature Test温度测试Dielectric Voltage - Withstand TestStrain Relief Test拉力疲劳测试Cleanability Test清洁测试Drop Test落地测试Crushing Test决定性测试Abnormal Operation Test非正常操作测试Handles and Knobs TestCorrosion Test腐蚀测试Hardness Test硬度测试Tensile Test拉伸测试Polarity Test极性测试Earth continuity test接地测试Torque test扭力测试No N/A #DIV/0!#DIV/0!Lawn and Garde(Gas Grill/ Gasoline Powered Product/ Electric Gard No.Test Performed1Pedestal Base Strength Test- Static2Dynamic Load Test (Drop test)扭力测试3Static Load Test静载测试4Stability Test稳定性测试5Strength Test (Arm, Leg, Backrest, etc.)强度测试6Flammability Test可燃性测试7Ignition Test点火测试8Electrical Voltage - Input/Output Test电压输入输出测试9Switch Operability Test开关操作测试10Leakage Current Test漏电流测试11Dielectric Withstand Test12Strain Relief Test拉伸疲劳测试13Charger Electrical Test充电测试14Durability Test耐久测试15Temperature Test温度测试16Operability Test操作测试17Rain Test淋雨测试18Corrosion Test耐腐蚀测试19Cleanability Test清洁度测试20Handle Pull Test手柄拉力测试Lawn and GardenN/A #DIV/0!Mechanical Loading Devices No.Test Performed1Practical Use Test实际使用测试2Proof Load Test载荷测试3Load Sustaining Test载荷测试4Durability Test耐久测试5Release Valve Test (if contains)缓解阀测试6Loading Limiting Device Test (if contains)7Stability Test稳定性测试8Life Test寿命测试9Product rated capacity产品额定容量测试1011121314151617181920evicesItem No.1234567891011121314151617181920General Items Test PerformedChild Safety儿童安全测试Impact Test冲击测试Static Load Test静载测试Ease of Assembly易组装测试Rain Test淋雨测试Corrosion Resistance Test防锈测试Pull Test拉力测试Practical Use Test实际使用测试Drop Test低落测试Abnormal Operation Test非正常操作测试Resistance to Environmental Exposureral Items。
完整的一套产品检测标准(英文) Word 文档
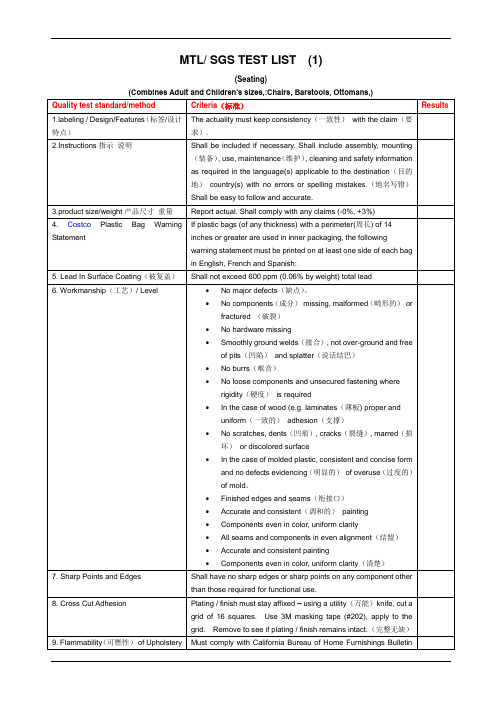
MTL/ SGS TEST LIST (1)(Seating)(Combines Adult and Children’s sizes,:Chairs, Barstools, Ottomans,)MTL/ SGS TEST LIST (2) (CD Storage/Rack/Cabinet/5.drawer chest/4.drawer chest)MTL/ SGS TEST LIST (3)thSupporting surface loading parametersable 13.2 Simulated Television Load ParametersTdegree.Includes weight of text fixture.MTL/ SGS TEST LIST (4)Bed (For Trundle and Regular Beds, Adult use)MTL/ SGS TEST LIST (5)(Bunk Bed)MTL/ SGS TEST LIST (6)(Tables (Combines Adult and Children’s sizes, Indoor/Outdoor, for the following styles: Dining, camping, occasional and coffee tables, desks, nightstands, work bench, potting bench, storageMTL/ SGS TEST LIST (7)(Seating)(Combines Adult and Children’s sizes,:Chairs, Barstools, Ottomans,)MTL/ SGS TEST LIST (8)(Seating)(Combines Adult and Children’s sizes,:Chairs, Barstools, Ottomans,)包装测试1.For all carton dimensions as usual:Dimensions refer to the exterior of a carton, measured in inches of Length x Width x Height. in inches (mm or m)1.1 Length (L) is the longer side of the opening,1.2 Width (W) is the shorter.1.3 Height (H) is the length between the openings on either end.1.。
金属电镀件检验标准(CF级英文版)
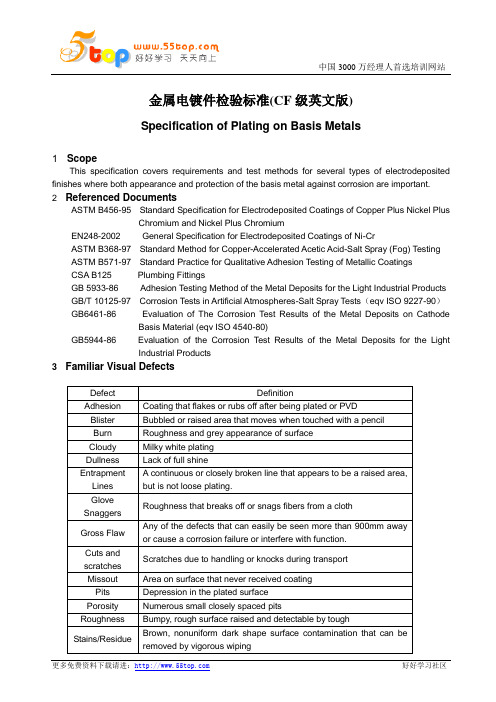
金属电镀件检验标准(CF级英文版)Specification of Plating on Basis Metals1 ScopeThis specification covers requirements and test methods for several types of electrodeposited finishes where both appearance and protection of the basis metal against corrosion are important.2 Referenced DocumentsASTM B456-95 Standard Specification for Electrodeposited Coatings of Copper Plus Nickel Plus Chromium and Nickel Plus ChromiumEN248-2002 General Specification for Electrodeposited Coatings of Ni-CrASTM B368-97 Standard Method for Copper-Accelerated Acetic Acid-Salt Spray (Fog) Testing ASTM B571-97 Standard Practice for Qualitative Adhesion Testing of Metallic CoatingsCSA B125 Plumbing FittingsGB 5933-86 Adhesion Testing Method of the Metal Deposits for the Light Industrial Products GB/T 10125-97 Corrosion Tests in Artificial Atmospheres-Salt Spray Tests(eqv ISO 9227-90)GB6461-86 Evaluation of The Corrosion Test Results of the Metal Deposits on Cathode Basis Material (eqv ISO 4540-80)GB5944-86 Evaluation of the Corrosion T est Results of the Metal Deposits for the Light Industrial Products3 Familiar Visual Defects4 Zone DefinitionA zone:This is the most critical cosmetic article of the part. The A zone is usually the most strikingfeature. It is what the customer sees first or is closest to the customer in the installed position.B zone:These features are important but further removed from the customer. B zone surface are easyto see in the installed position.C zone:These are the least important features in areas not directly seen. Often, you must move yourhead or the product a significant amount to see C zones in the installed position.D zone:These zones are not important and can not be seen at all after installation.On the D zones of the electroplated article where the follow defects are acceptable:Pit, porosity, roughness, stardusting, cuts and scratches, tool lines, gross flaws, rough plating, cloudy plating, stains, burns, missout, blisters. Adhesion failures such as cracks and peeling plate shall be avoided.6 Functional Requirement6.1 DimensionThe import dimensions and connect threads shall be comply with the drawing.6.2 Deposit Thickness Requirement6.3 Corrosion Testing Requirement7.Inspect method7.1 Appearance Inspect7.1.1 Hold the articles as installed position to inspect for aesthetic defects. Determine the article compliance with appearance criteria. The other inspects condition:a)The observer shall have 20/20 vision at a distance of 600 to 900 mm, corrected with eyeglasses if necessary.b) Using two 40W diffused daylight-type fluorescent lighting, the distance between the lightingand article shall be 1000 mm. At the surface of the article being inspected, the lighteness shall be 1500 to 1600 lm/m2.c) The article shall be evaluated at a distance of not less than 300 mm nor more than 400 mmfrom the observer.d) The observe time:A zone 6s, B zone 4s、C zone 2s。
美国ASTM标准中英文目录检索
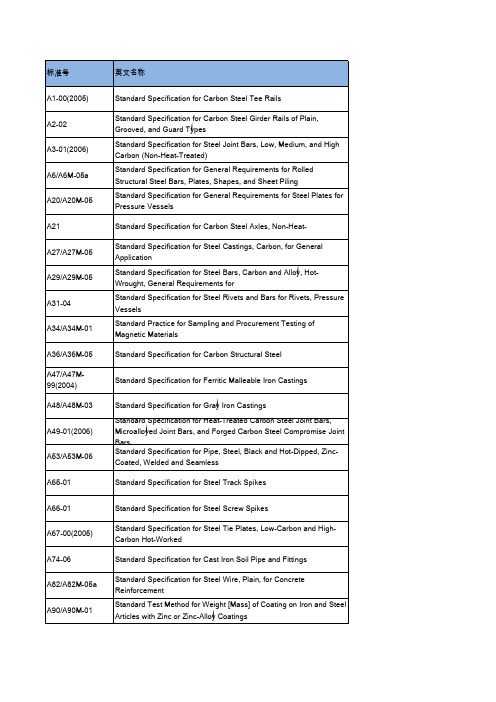
Standard Specification for Carbon Steel Tee Rails
Standard Specification for Carbon Steel Girder Rails of Plain, Grooved, and Guard Types Standard Specification for Steel Joint Bars, Low, Medium, and High Carbon (Non-Heat-Treated) Standard Specification for General Requirements for Rolled Structural Steel Bars, Plates, Shapes, and Sheet Piling Standard Specification for General Requirements for Steel Plates for Pressure Vessels
Standard Specification for Carbon Steel Axles, Non-Heat-
Standard Specification for Steel Castings, Carbon, for General Application Standard Specification for Steel Bars, Carbon and Alloy, HotWrought, General Requirements for Standard Specification for Steel Rivets and Bars for Rivets, Pressure Vessels Standard Practice for Sampling and Procurement Testing of Magnetic Materials
FDA认证483条款缺陷项中英对照
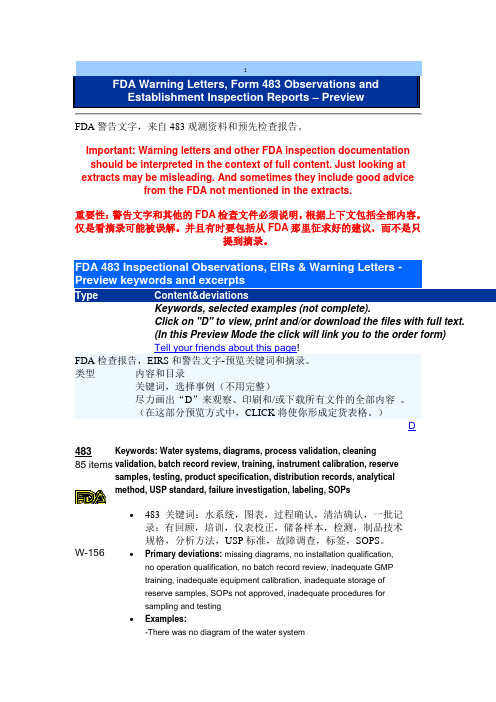
:FDA Warning Letters, Form 483 Observations andEstablishment Inspection Reports – PreviewFDA警告文字,来自483观测资料和预先检查报告。
Important: Warning letters and other FDA inspection documentationshould be interpreted in the context of full content. Just looking atextracts may be misleading. And sometimes they include good advicefrom the FDA not mentioned in the extracts.重要性:警告文字和其他的FDA检查文件必须说明,根据上下文包括全部内容。
仅是看摘录可能被误解。
并且有时要包括从FDA那里征求好的建议,而不是只提到摘录。
FDA 483 Inspectional Observations, EIRs & Warning Letters -Preview keywords and excerptsType Content&deviationsKeywords, selected examples (not complete).Click on "D" to view, print and/or download the files with full text.(In this Preview Mode the click will link you to the order form)Tell your friends about this page!FDA检查报告,EIRS和警告文字-预览关键词和摘录。
类型内容和目录关键词,选择事例(不用完整)尽力画出“D”来观察、印刷和/或下载所有文件的全部内容。
国外主要无损检测标准(含中英文名称对照)
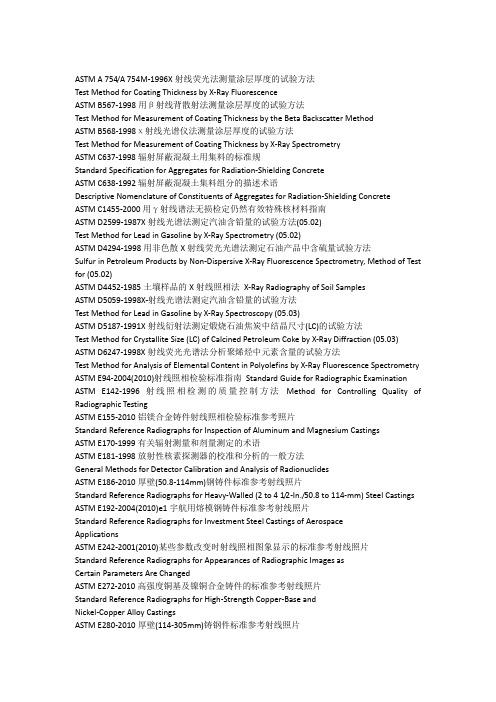
ASTM A 754/A 754M-1996X射线荧光法测量涂层厚度的试验方法Test Method for Coating Thickness by X-Ray FluorescenceASTM B567-1998用β射线背散射法测量涂层厚度的试验方法Test Method for Measurement of Coating Thickness by the Beta Backscatter MethodASTM B568-1998χ射线光谱仪法测量涂层厚度的试验方法Test Method for Measurement of Coating Thickness by X-Ray SpectrometryASTM C637-1998辐射屏蔽混凝土用集料的标准规Standard Specification for Aggregates for Radiation-Shielding ConcreteASTM C638-1992辐射屏蔽混凝土集料组分的描述术语Descriptive Nomenclature of Constituents of Aggregates for Radiation-Shielding Concrete ASTM C1455-2000用γ射线谱法无损检定仍然有效特殊核材料指南ASTM D2599-1987X射线光谱法测定汽油含铅量的试验方法(05.02)Test Method for Lead in Gasoline by X-Ray Spectrometry (05.02)ASTM D4294-1998用非色散X射线荧光光谱法测定石油产品中含硫量试验方法Sulfur in Petroleum Products by Non-Dispersive X-Ray Fluorescence Spectrometry, Method of Test for (05.02)ASTM D4452-1985土壤样品的X射线照相法X-Ray Radiography of Soil SamplesASTM D5059-1998X-射线光谱法测定汽油含铅量的试验方法Test Method for Lead in Gasoline by X-Ray Spectroscopy (05.03)ASTM D5187-1991X射线衍射法测定煅烧石油焦炭中结晶尺寸(LC)的试验方法Test Method for Crystallite Size (LC) of Calcined Petroleum Coke by X-Ray Diffraction (05.03) ASTM D6247-1998X射线荧光光谱法分析聚烯烃中元素含量的试验方法Test Method for Analysis of Elemental Content in Polyolefins by X-Ray Fluorescence Spectrometry ASTM E94-2004(2010)射线照相检验标准指南Standard Guide for Radiographic Examination ASTM E142-1996射线照相检测的质量控制方法Method for Controlling Quality of Radiographic TestingASTM E155-2010铝镁合金铸件射线照相检验标准参考照片Standard Reference Radiographs for Inspection of Aluminum and Magnesium CastingsASTM E170-1999有关辐射测量和剂量测定的术语ASTM E181-1998放射性核素探测器的校准和分析的一般方法General Methods for Detector Calibration and Analysis of RadionuclidesASTM E186-2010厚壁(50.8-114mm)钢铸件标准参考射线照片Standard Reference Radiographs for Heavy-Walled (2 to 4 1/2-In./50.8 to 114-mm) Steel Castings ASTM E192-2004(2010)e1宇航用熔模钢铸件标准参考射线照片Standard Reference Radiographs for Investment Steel Castings of AerospaceApplicationsASTM E242-2001(2010)某些参数改变时射线照相图象显示的标准参考射线照片Standard Reference Radiographs for Appearances of Radiographic Images asCertain Parameters Are ChangedASTM E272-2010高强度铜基及镍铜合金铸件的标准参考射线照片Standard Reference Radiographs for High-Strength Copper-Base andNickel-Copper Alloy CastingsASTM E280-2010厚壁(114-305mm)铸钢件标准参考射线照片Standard Reference Radiographs for Heavy-Walled (4 1/2 to 12-in. (114 to305-mm)) Steel CastingsASTM E310-2010锡青铜铸件标准参考射线照片Standard Reference Radiographs for Tin Bronze CastingsASTM E390-2011钢熔焊焊缝标准参考射线照片Standard Reference Radiographs for Steel Fusion WeldsASTM E431-96(2011)半导体和相关器件射线照片判读指南Standard Guide to Interpretation of Radiographs of Semiconductors andRelated DevicesASTM E446-2010厚度至50.8mm钢铸件的标准参考射线照片Standard Reference Radiographs for Steel Castings up to 2 in. (50.8 mm) inThicknessASTM E505-2001(2011)铝和镁压铸件检验的标准参考射线照片Standard Reference Radiographs for Inspection of Aluminum and MagnesiumDie CastingsASTM E545-2005(2010)确定直接热中子射线照相检验成象质量的标准试验方法Standard Test Method for Determining Image Quality in Direct ThermalNeutron Radiographic ExaminationASTM E586-88γ与χ射线照相检测的术语定义ASTM E592-1999(2009)e16~51mm厚钢板X射线照相检验和25~152mm厚钢板钴60照相检验获得ASTM当量穿透灵敏度的标准指南Standard Guide to Obtainable ASTM Equivalent Penetrameter Sensitivity forRadiography of Steel Plates 1/4 to 2 in. (6 to 51 mm) Thick with X Raysand 1 to 6 in. (25 to 152 mm) Thick with Cobalt-60ASTM E665-1994测量暴露在X闪光射线机的X射线照射下的材料中相对深度的吸收剂量Determining Absorbed Dose Versus Depth in Materials Exposed to the X-RayOutput of Flash X-Ray MachinesASTM E666-1997γ或X射线剂量吸收的计算Calculating Absorbed Dose from Gamma or X RadiationASTM E689-2010球墨铸铁标准参考射线照片Standard Reference Radiographs for Ductile Iron CastingsASTM E746-2007测定工业射线照相成像系统相关图象质量响应的标准方法Standard Practice for Determining Relative Image Quality Response ofIndustrial Radiographic Imaging SystemsASTM E747-2004(2010)射线照相用线型象质计(IQI)的设计、制造及材料组分类的标准方法Standard Practice for Design, Manufacture, and Material GroupingClassification of Wire Image Quality Indicators (Iqi) Used for RadiologyASTM E748-2002(2008)材料热中子射线照相标准方法Standard Practices for Thermal Neutron Radiography of MaterialsASTM E801-2006(2011)电子装置射线照相检验的质量控制标准方法Standard Practice for Controlling Quality of Radiological Examination ofElectronic DevicesASTM E802-1995(2010)厚度至114mm的灰口铸铁标准参考射线照片Standard Reference Radiographs for Gray Iron Castings up to 4 1/2 in. (114mm) in ThicknessASTM E803-1991(2008)确定中子射线透照束长径比的标准方法Standard Method for Determining the L/D Ratio of Neutron Radiography BeamsASTM E915-1996残余应力测量用X射线衍射仪校准检定的试验方法Test Method for Verifying the Alignment of X-Ray DiffractionInstrumentation for Residual Stress MeasurementASTM E999-2010工业射线照相胶片处理的质量控制标准指南Standard Guide for Controlling the Quality of Industrial Radiographic FilmProcessingASTM E1000-98(2009)射线照相检测标准指南Standard Guide for RadioscopyASTM E1025-2011射线照相检测用孔型象质计设计、制造和材料组分类的标准方法Standard Practice for Design, Manufacture, and Material GroupingClassification of Hole-Type Image Quality Indicators(IQI) Used forRadiographyASTM E1030-2005(2011)金属铸件射线照相检验的标准试验方法Standard Test Method for Radiographic Examination of Metallic CastingsASTM E1032-2012焊缝射线照相检验的标准试验方法Standard Test Method for Radiographic Examination of WeldmentsASTM E1079-2010透射密度计校准的标准方法Standard Practice for Calibration of Transmission DensitometersASTM E1114-2009e1测定铱192工业射线照相源尺寸的标准试验方法Standard Test Method for Determining the Size of Iridium -192 IndustrialRadiopraphic SourcesASTM E1161-2009半导体和电子元件射线检验的标准方法Standard Practice for Radiologic Examination of Semiconductors andElectronic ComponentsASTM E1165-2004(2010)用针孔成象法测量工业X射线管焦点的标准试验方法Standard Test Method for Measurement of Focal Spots of Industrial X-RayTubes by Pinhole ImagingASTM E1168-1995核设施工人辐射防护训练Radiological Protection Training for Nuclear Facility WorkersASTM E1254-2008射线照片及未曝光工业射线照相胶片储藏的标准指南Standard Guide for Storage of Radiographs and Unexposed IndustrialRadiographic FilmsASTM E1255-2009射线透视检验标准方法Standard Practice for RadioscopyASTM E1320-2010钛铸件标准参考射线照片Standard Reference Radiographs for Titanium CastingsASTM E1390-2012工业射线照相观片灯标准规Standard Specification for Illuminators Used for Viewing IndustrialRadiographsASTM E1400-1995高剂量辐射量测定校准实验室的特性和性能规程Characterization and Performance of a High-Dose Radiation DosimetryCalibration Laboratory, Practice for (12.02)ASTM E1411-2009射线照相系统鉴定的标准方法Standard Practice for Qualification of Radioscopic SystemsASTM E1416-2009焊缝射线检验的标准试验方法Standard Test Method for Radioscopic Examination of WeldmentsASTM E1441-2011计算机层析(CT)成像的标准指南Standard Guide for Computed Tomography (CT) ImagingASTM E1441-2000计算机层析成像(CT)指南Guide for Computed Tomography (CT) Imaging ASTM E1453-2009含模拟或数字射线照相数据的磁带媒体存储标准指南Standard Guide for Storage of Magnetic Tape Media that Contains Analog orDigital Radioscopic DataASTM E1475-2002(2008)数字射线照相检验数据计算机化传输的数据区标准指南Standard Guide for Data Fields for Computerized Transfer of DigitalRadiological Examination DataASTM E1496-2005(2010)中子射线照相尺寸测量的标准试验方法Standard Test Method for Neutron Radiographic DimensionalMeasurements(With drawn 2012)ASTM E1570-2011计算机层析(CT)检验标准方法Standard Practice for Computed Tomographic (CT) ExaminationASTM E1647-2009确定射线照相检测对比度灵敏度的标准方法Standard Practice for Determining Contrast Sensitivity in RadiologyASTM E1648-1995(2011)铝熔焊焊缝检验标准参考射线照片Standard Reference Radiographs for Examination of Aluminum Fusion WeldsASTM E1672-2006选择计算机层析(CT)系统的标准指南Standard Guide for Computed Tomography (Ct) System SelectionASTM E1695-1995(2006)e1计算机层析(CT)系统性能测量的标准试验方法Standard Test Method for Measurement of Computed Tomography (Ct) SystemPerformanceASTM E1734-2009铸件射线照相检验标准方法Standard Practice for Radioscopic Examination of CastingsASTM E1735-2007确定经4-25MV X射线曝光的工业射线胶片相关成像质量的标准试验方法Standard Test Method for Determining Relative Image Quality of IndustrialRadiographic Film Exposed to X-Radiation from 4 to 25 MVASTM E1742/E1742M-2011射线照相检验标准方法Standard Practice for Radiographic ExaminationASTM E1814-1996(2007)铸件计算机层析(CT)检验标准方法Standard Practice for Computed Tomographic (CT) Examination of CastingsASTM E1815-2008工业射线照相胶片系统分类的标准试验方法Standard Test Method for Classification of Film Systems for IndustrialRadiographyASTM E1817-2008使用典型象质计(RQIs)控制射线检验质量的标准方法Standard Practice for Controlling Quality of Radiological Examination byUsing Representative Quality Indicators(RQI-s)ASTM E1894-1997选择脉冲X射线源用的剂量测定系统的标准指南Standard Guide for Selecting Dosimetry Systems for Application in PulsedX-Ray SourcesASTM E1931-2009X射线康普顿散射层析技术标准指南Standard Guide for X-ray Compton Scatter TomographyASTM E1935-1997(2008)校准和测量计算机层析(CT) 密度的标准试验方法Standard Test Method for Calibrating and Meausring CT DensityASTM E1936-2003(2011)评估射线照相数字化系统性能的标准参考射线照片Standard Reference Radiograph for Evaluating the Performance ofRadiographic Digitization SystemsASTM E1955-2004(2009)与美国材料与试验协会ASTM E 390 参考射线照片等级比较钢中焊缝完善性的标准射线检验Standard Radiographic Examination for Soundness of Welds in Steel byComparison to Graded ASTM E390 Reference RadiographsASTM E2002-1998(2009)测定射线照相图象总不清晰度的标准方法Standard Practice for Determining Total Image Unsharpness in RadiologyASTM E2003-2010中子射线照相波束纯度指示计制作的标准方法Standard Practice for Fabrication of the Neutron Radiographic Beam PurityIndicators [Metric]ASTM E2007-2010计算机射线照相标准指南(用于CR的标准指南)(可激射线发光[PSL]法) Standard Guide for Computed Radiology (Photostimulable Luminescence (PSL)Method)ASTM E2023-2010制作中子射线照相灵敏度指示计的标准方法Standard Practice for Fabrication of Neutron Radiographic SensitivityIndicatorASTM E2033-1999(2006)计算机射线照相的标准方法(用于CR的标准实施方法)(可激射线发光[PSL]法)Standard Practice for Computed Radiology (Photostimulable LuminescenceMethod)ASTM E2104-2009优质航空与涡轮材料和构件射线照相检验的标准方法Standard Practice for Radiographic Examination of Advanced Aero andTurbine Materials and ComponentsASTM E2120-2000便携式X射线荧光光谱仪测量涂膜中铅含量的性能评估规程Practice for the Performance Evaluation of the Portable X-Ray FluorescenceSpectrometer for the Measurement of Lead in Paint FilmsASTM E2339-2004无损评价中的数字成像和通讯Digital Imaging and Communication in NDE(DICONDE)ASTM E2422-2011铝铸件标准参考数字射线图像(钛和钢铸件也适用)Standard Digital Reference Images for Al. Casting(Titanium & steel Castingalso available)ASTM E2445-2005(2010)计算机射线照相系统的长期稳定性与鉴定的标准方法(用于CR系统的质量认定和长期稳定性的标准实施方法)Standard Practice for Qualification and Long-Term Stability of ComputedRadiology SystemsASTM E2446-2005(2010)计算机射线照相系统分类的标准方法(用于CR系统分类的标准实施方法)Standard Practice for Classification of Computed Radiology SystemsASTM E2597-2007e1数字探测器阵列制造特性的标准规程Standard Practice for Manufacturing Characterization of Digital DetectorArraysASTM E2660-2011航空用优质钢铸件标准参考数字射线图像Standard Digital Reference Images for Investment Steel Castings forAerospace ApplicationsASTM E2662-2009航空用平面与夹芯复合材料射线照相检验的标准方法Standard Practice for Radiologic Examination of Flat Panel Composites andSandwich Core Materials Used in Aerospace ApplicationsASTM E2669-2011数字射线照相(DR)检测方法的数字图像与通信无损评价(DICONDE)的标准方法Standard Practice for Digital Imaging and Communication in NondestructiveEvaluation (DICONDE) for Digital Radiographic (DR) Test MethodsASTM E2698-2010使用数字探测器阵列的射线照相检验标准方法Standard Practice for Radiological Examination Using Digital DetectorArraysASTM E2736-2010数字探测器阵列射线照相检测标准指南Standard Guide for Digital Detector Array RadiologyASTM E2737-2010评价数字探测器阵列性能和长期稳定性的标准方法Standard Practice for Digital Detector Array Performance Evaluation andLong-Term StabilityASTM E2738-2011使用计算机射线照相(CR)检测方法的数字图像与通讯无损评价(DICONDE)的标准方法Standard Practice for Digital Imaging and Communication NondestructiveEvaluation (DICONDE) for Computed Radiography (CR) Test MethodsASTM E2767-2011使用X射线计算机层析(CT)检测方法的数字图像与通讯无损评价(DICONDE)的标准方法Standard Practice for Digital Imaging and Communication in NondestructiveEvaluation (DICONDE) for X-ray Computed Tomography (CT) Test MethodsASTM E2861-2011测量中子辐射束发散与校准的标准试验方法Standard Test Method for Measurement of Beam Divergence and Alignment inNeutron Radiologic BeamsASTM F629-1997铸造金属外科手术植入物射线照相检查实施方法(F-4)ASTM F727-1981透明照相干版透光度测量的试验方法Test Method for Measuring Transmittance of See-Through PhotoplateASTM F784-1982校准放射性同位素密封测试仪的试验方法Test Method for Calibrating Radioisotope Hermetic Test ApparatusASTM F864-1984硬表面玻璃照相干板的检验Inspection of Hard-Surface Glass Photoplates ASTM F947-1985测定照相胶片低能级X射线辐射灵敏度的试验方法Test Method for Determining Low-Level X-Radiation Sensitivity ofPhotographic FilmsASTM F1035-1991使用橡胶帘布圆盘验证轮胎X射线成象系统的辩别能力Use of Rubber-Cord Pie Disk to Demonstrate the Discernment Capability of aTire X-Ray Imaging SystemASTM F1039-1987X射线安全屏系统中测量低剂量X辐射的试验方法Test Method for Measurement of Low Level X-Radiation Used in X-RaySecurity Screening SystemsASTM F1467-1999微电子装置电离辐射效应中X射线测试仪(近似等于10keV辐射量子)的使用Use of an X-Ray Tester (is Approximately Equal to 10 keV Photons) inIonizing Radiation Effects Testing of Microelectronic DevicesASTM PS95-1998便携式X射线荧光(XRF)装置现场测定涂料或其它涂层含铅量的质量体系的标准临时操作规程Standard Provisional Practice for Quality Systems for Conducting In SituMeasurements of Lead Content in Paint or Other Coatings usingField-Portable X-Ray Fluorescence (XRF) DevicesASTM PS 116-1999测量涂膜含铅量用的便携式X射线荧光光谱仪性能评价的临时操作规程Provisional Practice for the Performance Evaluation of the Portable X-RayFluorescence Spectrometer for the Measurement of Lead in Paint FilmsANSI/ANS6.1.1-1991中子及r射线对剂量因素的影响Neutron and Gamma-Ray Fluence-to-DoseFactorsANSI/IEEE 309-1970盖革-弥勒计数器的试验程序Geiger-Muller Counters, Test Procedure for ANSI IT9.2-1991成象介质-已处理的照相胶片、平板和相纸-归档盒及储存箱Imaging Media - Photographic Processed Films, Plates and Papers - FilingEnclosures and Storage ContainersANSI IT9.8-1989成象介质-照相胶片耐折强度的测定Imaging Media - Photographic Film - Determination of Folding EnduranceANSI N13.2-1969辐射监测的管理规程指南Administrative Practices in Radiation Monitoring, Guide toANSI N13.5-1972直读和非直读式袖珍X和γ射线辐射剂量仪的性能Direct Reading and Indirect Reading Pocket Dosimeters for X- and GammaRadiation, PerformanceANSI N13.7-1983辐射防护照相胶片剂量仪性能标准Radiation Protection - Photographic Film Dosimeters - Criteria forPerformanceANSI N13.11-2001个人剂量测定的试验标准Personnel Dosimetry Performance, Criteria for TestingANSI N13.27-1981袖珍式报警辐射剂量仪和报警记数率计的性能要求Performance Requirements for Pocket-Sized Alarm Dosimeters and AlarmRatemetersANSI N15.36-1994核材料无损化验测量的控制和保证Nuclear materials - Nondestructive assay measurement control and assuranceANSI N15.37-1981核材料控制的自动无损化验系统指南Automation of Nondestructive Assay Systems for Nuclear Materials Control,Guide toANSI N42.16-1986用于液体闪烁计数器的密封放射检查源的规Specifications for sealed radioactive check sources used inliquid-scintillation countersANSI N42.20-1995个人辐射监视仪的性能标准Performance criteria for active personnel radiation monitorsANSI N42.26-1995辐射防护仪器监测设备X和γ辐射个人报警装置Radiation Protection Instrumentation - Monitoring Equipment - PersonalWarning Devices for X and Gamma RadiationsANSI N43.3-1993通用辐射安全非医疗应用的X射线和密封γ射线源的安装能量达10Mev General radiation safety - Installations using non-medical X-ray andsealed gamma-ray sources, energies up to 10 MeVANSI N43.6-1997密封放射性源的分类Classification of Sealed Radioactive SourcesANSI N43.9-1991γ射线照相仪器的设计和试验规Gamma Radiography - Specifications for Design and Testing of ApparatusANSI N322-1996直接和间接读取石英纤维袖珍剂量计的检验和试验规Inspection and Test Specifications for Direct and Indirect Reading QuartzFiber Pocket DosimetersASME Boiler & Pressure VesselCode(ASME锅炉压力容器规)第V卷《无损检测》2004版,第2篇“射线检测”,强制性附录-包含动态射线照相、实时射线成像检测容ASME SE-1647确定射线照相对比灵敏度的推荐实施方法ASME Code Case 2476使用荧光成像板的射线照相Radiography using phosphor imaging platesMIL-HDBK-55-66射线照相无损检测手册(已由MIL-HDBK-728/5取代)MIL-STD-139A-65射线检测铝镁合金铸件的完好性要求MIL-STD-453C-88射线照相检测MIL-STD-746A-63铸造爆破器材的射线照相检测要求MIL-STD-779-68钢焊缝参考χ射线照片(由ASTM E390取代)MIL-STD-1257A-87钴铬合金枪管射线照相及目视检验MIL-R-11470A-71对射线检验设备,操作方法和操作人员的合格审查(由MIL-STD-453取代) MIL-I-36013B-72折迭式χ射线观片灯MIL-R-45226-62石墨的射线照相检测(已停用)MIL-R-45774A(92)铝,镁导弹零件熔焊完好性要求-射线照相检测MIL-STD-1948(91)中子射线照相检验的术语和定义汇编MIL-HDBK-728/5(92)射线照相检验MIL-HDBK-733(92)复合材料无损检验方法-射线照相法MIL-STD-1166A(91)固体火箭推进剂射线照相检验要求MIL-STD-1264B(93)钢焊缝完好性射线照相检验-与ASTM E390 各级参考底片比较MIL-STD-1265A(92)钢铸件射线照相检验分类和完好性要求MIL-STD-1894A(86)不完全焊透钢焊缝的射线照相参考标准及射线照相程序MIL-STD-1895A(86)不完全焊透铝焊缝的射线照相参考标准及射线照相程序BAC 5915(美国波音公司) 射线检验DPS 4.736(美国麦道公司) 射线检验API 1104(美国石油协会) 管道及有关设备的焊接AWS B 5.15射线照相评片资格技术条件。
中英文版ISTA 1A

个别已包装产品的性能试验150磅(68千克)或小于150磅(68千克)ISTA 1系列完整性试验程序前言有三部分:概况、测试和报告z概况:提供走进试验室前所需的常识;z测试:给出在实验室做试验的特定指示;z报告:说明为了向ISTA提交试验报告而应记录的数据。
“ISTA试验程序”和“试验项目”是全世界已包装产品性能试验的主要指数。
在ISTA试验程序中给出了两个体系的度量衡。
它们是英制(英寸-磅)和国际单位制(米制/公制)。
‘英寸-磅’单位作为首选单位,而‘米制/公制’单位紧随其后的圆括号内,除了单位需分开显示的某些表中外。
z两种单位制中的任一种单位制均可作为度量单位(标准单位),但z在整个试验程序中应使用一致的标准单位;z单位被换算为两个重要的数字;z不是精确的等值;小心:在进行一项试验前,应阅读并理解整个文件。
概况“试验程序1A”是个别已包装产品的一个完整性试验。
z可用于评估一个已包装产品的性能;z可用于比较包装和产品设计的相对性能;z包装和产品被同时考虑,而不是分开考虑;z可以不包括某些运输条件,如潮湿、压力或者异常搬运。
其它的“ISTA程序”可适用于不同的条件或者满足不同的目标要求。
特别建议:z用随机振动代替固定的位移振动;采用“ISTA完整性试验程序1G”,而非“1A”。
z更详细信息,请参考“选择和使用ISTA项目与程序指南”。
ISTA 1系列试验是由完整性试验程序组成的基本试验。
z这些试验不是实际运输危险因素的模拟试验;z不必要遵守承运人的包装规定。
当被正确应用时,ISTA程序将带来实际利益:z减少损坏;z经济上平衡成本;z改进客户满意度;©2000国际安全运输协会版权所有 1A版本日期:1999年6月;修订日期:2000年7月第1/11页范围“试验程序1A”涵盖重量为150磅(68千克)或者小于150磅(68千克)的个别已包装产品的测试(当准备装运时)。
除外:在可见滑板或者货盘上的且重量超过100磅(45千克)的个别已包装产品可以根据“试验程序1E或者3E”进行测试。
ASTM标准

A S T M"American Society for Testing and Materials"系美国材料与试验协会的英文缩写。
该技术协会成立于1898年。
ASTM标准制定一直采用自愿达成一致意见的制度。
标准制度由技术委员会负责,由标准工作组起草。
经过技术分委员会和技术委员会投票表决,在采纳大多数会员共同意见后,并由大多数会员投票赞成,标准才获批准,作为正式标准出版。
在一项标准编制过程中,对该编制感兴趣的每个会员和任何热心的团体都有权充分发表意见,委员会对提出的意见都给予研究和处理,以吸收各方面的正确意见和建议。
ASTM标准现分为15类(Section),各类所包含的卷数不同,标准分卷(Volume)出版,以A S T M标准年鉴形式出版发行。
第一类钢铁产品第二类有色金属第三类金属材料试验方法及分析程序第四类建设材料第五类石油产品、润滑剂及矿物燃料第六类油漆、相关涂料和芳香族化合物第七类纺织品及材料第八类塑料第九类橡胶第十类电气绝缘体和电子产品第十一类水和环境技术第十二类核能,太阳能第十三类医疗设备和服务第十四类仪器仪表及一般试验方法第十五类通用工业产品、特殊化学制品和消耗材料A S T M活动范围很广,形式多种多样。
它除出版各种标准资料外还办有期刊。
对ASTM标准的了解是美国试验与材料学会国际组织制定的标准,成立于1898年的ASTM International是世界上最大的制定自愿性标准的组织。
作为非赢利组织,ASTM lnternational为材料、产品.系统和服务的自愿性协商一致标准的制定和发布提供论坛。
ASTM lnternational的成员来自世界100多个国家,代表制造商、用户、消费者、政府和学术机构制定技术文件,这些技术文件是生产、管理、采购、以及制定法规与条例的基础。
这些成员隶属于一个或多个委员会,每个委员会负责某个领域的项目,例如钢铁、石油、医疗器材、财产管理、消费产品以及许多其他标准。
《完整的一套产品检测标准(英文)》(doc28)-质量检验【管理资料】

MTL/ SGS TEST LIST (1)(Seating)(Combines Adult and Children’s sizes,:Chairs, Barstools, Ottomans,)MTL/ SGS TEST LIST (2) (CD Storage/Rack/Cabinet/ chest/ chest)MTL/ SGS TEST LIST (3)thSupporting surface loading parametersable Simulated Television Load ParametersTThe fixture shall be stable in the forward direction at the angle specified and become unstable (tip over) when the angle is increased b degree.Includes weight of text fixture.MTL/ SGS TEST LIST (4)Bed (For Trundle and Regular Beds, Adult use)MTL/ SGS TEST LIST (5)(Bunk Bed)MTL/ SGS TEST LIST (6)(Tables (Combines Adult and Children’s sizes, Indoor/Outdoor, for the following styles: Dining, camping, occasional and coffee tables, desks, nightstands, work bench, potting bench, storageMTL/ SGS TEST LIST (7)(Seating)(Combines Adult and Children’s sizes,:Chairs, Barstools, Ottomans,)MTL/ SGS TEST LIST (8)(Seating)(Combines Adult and Children’s sizes,:Chairs, Barstools, Ottomans,)包装测试1.For all carton dimensions as usual:Dimensions refer to the exterior of a carton, measured in inches of Length x Width x Height. in inches (mm or m)Length (L) is the longer side of the opening,Width (W) is the shorter.Height (H) is the length between the openings on either end.1.。
ASTM A系列中英文目录对照表

Standard Practice for Safeguarding Against Embrittlement of Hot-Dip Galvanized Structural Steel Products and Procedure for Detecting Embrittlement Specification for Ferrotungsten Standard Specification for Molybdenum Oxide Products Standard Specification for Steel Castings, High Strength, for Structural Purposes Standard Specification for Zinc Coating (Hot-Dip) on Iron and Steel Hardware Standard Specification for Automotive Gray Iron Castings Standard Specification for Stainless and Heat-Resisting Chromium-Nickel Steel Plate, Sheet, and Strip Standard Specification for Stainless and Heat-Resisting Chromium Steel Plate, Sheet, and Strip Standard Specification for Electric-Resistance-Welded Carbon Steel and
A143/A143M-03 A144-02 A146-04 A148/A148M-03 A153/A153M-04 A159-83(2001) A167-9 铁钨合金规范 氧化钼制品 结构用高强度钢铸件 钢铁制金属构件上镀锌层(热浸) 汽车用灰铁铸件 不锈钢和耐热铬镍钢板、薄板及带材
纺织品质量检验英语(本站推荐)
纺织品质量检验英语(本站推荐)第一篇:纺织品质量检验英语(本站推荐)质量检验英语(转贴)质量标准:quality stanard(OEKO-TEX STANDARD 100、ISO9002、SGS、ITS、AATCC、M&S)客检:customer inspection台板检验:table inspection经向检验:lamp inspection色牢度: colour fastness皂洗色牢度: washing colour fastness摩擦色牢度: rubbing/cricking colour fastness光照色牢度: lifht colour fastness汗渍色牢度: perspiration colour fastness水渍色牢度:water colour fastness氯漂白色牢度:chlorine bleach colour fastness尺寸稳定性: dimensional stability外观持久性: apprearance retention拉伸强度: tensile strength撕破强度: tear strength接缝滑裂: seam slippage抗起毛起球性:pilling resistance耐磨性: abrasion resistance拒水性: water repellency抗水性: water resistance织物密度:thread per inch/stich density纱支: yarn count克重: weightFABRIC DEFECTS 布疵COLOR YARN 色纱THICK YARN 粗纱DRAW YARN 抽纱BROKEN YARN 断纱BROKEN HOLE 破洞COLOR SHADING 色差SLUB 毛粒KNOT 结头UNCUT THREAD ENDS 线头DIRTY MARK 污渍DIRTY DOT(较小的)污点DIRTY SPOT(较大的)污点OIL STAIN 油渍CREASE MARK 摺痕POOR IRONING 烫工不良UNDERPRESS 熨烫不够OVERPRESS 熨烫过度OVERWASH 洗水过度SKIPPED STITCHES 跳线BROKEN STITCHES 断线BAD JOIN STITCHES 驳线不良POOR BACK-STITCHES 回针不佳RUN OFF STITCHES 落坑HI/LOW POCKET 高低袋HIKING AT BOTTOM OF PLACKET 前筒吊脚HIKING UP 起吊OPEN SEAM 爆口PUCKER 起皱PLEATED 打褶SLEEVE LENGTH UNEVEN 长短袖SHADING GARMENT TO GARMENT 衫与衫之间色差SHADING WITHIN 1PCS GARMENT 衣服裁片色差TWIST 扭BIG EYELID 大眼皮CENTER BACK RIDES UP 后幅起吊COLLAR POINT HI/LOW 领尖高低COLOR THREAD LEFT INSIDE 藏色线CROSSED BACK VENT 背叉搅CUFF FACING VISIBLE 介英反光EXCESS EXTENSION 突咀FLAP STRICKING UP 袋盖反翘FRONT HORIZONTAL SEAM NOT LEVEL 前幅水平缝骨不对称IMPROPER CROSS SEAM AT JOINING SIDE SEAM 袖底十字骨不对 LINING TOO FULL/TIGHT 里布太多/太紧MISMATCH CHECKS/STRIPES 格仔/条子不对称NEEDLE HOLE 针孔OFF GRAIN 布纹歪OVERLAPPED COLLAR 叠领OVERLAPPED LIPS 叠唇PULLING AT INSIDE/OUTSIDE SEAM 吊脚RAW EDGE 散口RUBBLING 起泡SCRIMP 印花裂痕SEAM OVERTURN 止口反骨SMILING POCHET 袋“笑口”STRIPES/CHECKS NOT MATCHING 不对条/格THREAD VISIBLE OUTSIDE 缝线外露TWIST LEG 扭髀UNDER THREAD VISIBLE 底线露出UNDERPLY TURN OUT 反光UNDERPLY VISIBLE OUTSIDE 反光UNEVEN COLOR 深浅色UNEVEN LIPS 大小唇UNEVEN SLEEVE LENGTH 长短袖UNEVEN STITCHING DENSITY 针步密度不均匀UNMATCHED CROTCH CROSS 下裆十字骨错位 UNMEET BACK VENT 背叉豁WAVY AT PLACKET 前筒起蛇(皱)WRONG COMBO 颜色组合错误WRONG PATTERN 图案错误WRONG SIZE INDICATED 错码第二篇:纺织品基础知识纺织品基础知识一、纺织纤维1、定义:纤维是天然或人工合成的细丝状物质,纺织纤维则是指用来纺织布的纤维。
x射线安检设备 标准外文版
x射线安检设备标准外文版下载温馨提示:该文档是我店铺精心编制而成,希望大家下载以后,能够帮助大家解决实际的问题。
文档下载后可定制随意修改,请根据实际需要进行相应的调整和使用,谢谢!并且,本店铺为大家提供各种各样类型的实用资料,如教育随笔、日记赏析、句子摘抄、古诗大全、经典美文、话题作文、工作总结、词语解析、文案摘录、其他资料等等,如想了解不同资料格式和写法,敬请关注!Download tips: This document is carefully compiled by the editor. I hope that after you download them, they can help yousolve practical problems. The document can be customized and modified after downloading, please adjust and use it according to actual needs, thank you!In addition, our shop provides you with various types of practical materials, such as educational essays, diary appreciation, sentence excerpts, ancient poems, classic articles, topic composition, work summary, word parsing, copy excerpts,other materials and so on, want to know different data formats and writing methods, please pay attention!X-ray security screening equipment is an essential tool utilized in various security applications such as airports, train stations, government buildings, and other high-security facilities. These devices are designed to provide accurate and efficient detection of prohibited items, explosives, weapons, and otherdangerous materials that may pose a threat to public safety. The following article will delve into the various components, standards, and advancements in X-ray security screening equipment to provide a comprehensive overview of its capabilities and importance in modern security systems.I. Introduction to X-ray Security Screening EquipmentX-ray security screening equipment is a type of technology that utilizes X-rays to create images of objects hidden within luggage or belongings. These devices are essential in security checkpoints to detect any potential threats or contraband items that may be concealed within bags or packages. X-ray security screening equipment helps security personnel identify prohibited items such as weapons, explosives, and illicit substances, enhancing security measures and preventing potential security threats.II. Components of X-ray Security Screening Equipment1. X-ray Generators: X-ray security screening equipment contains X-ray generators that produce a high-energy beam of X-rays to penetrate through objects and create images of the contents inside. The power and energy levels of the X-ray generators can vary depending on the specific application and security requirements.2. Detectors: Detectors are essential components of X-ray security screening equipment that capture the X-rays after they have passed through the objects being scanned. These detectors convert the X-ray energy into electronic signals, which are then processed by the system to generate images of the scanned items.3. Image Processing Software: Image processing software is utilized in X-ray security screening equipment to enhance and analyze the images produced by the detectors. This software allows security personnel to manipulate and zoom in on specific areas of interest within the scanned images to identify any potential threats or suspicious items.III. Standards for X-ray Security Screening Equipment1. European Committee for Standardization (CEN): The CEN has established standards for X-ray security screening equipment to ensure the safety and effectiveness of these devices. These standards outline the performance requirements, radiation safety guidelines, and quality assurance protocols that manufacturers must adhere to when producing X-ray security screening equipment.2. American National Standards Institute (ANSI): ANSI also sets standards for X-ray security screening equipment to ensure consistency and reliability in the performance of these devices. These standards cover aspects such as image quality, system reliability, and radiation exposure limits to protect both operators and passengers during screening procedures.IV. Advancements in X-ray Security Screening Equipment1. Dual-Energy Imaging: Dual-energy imaging technology is a recent advancement in X-ray security screening equipment that enhances the detection capabilities of these devices. This technology utilizes multiple X-ray energy levels to differentiate between organic and inorganic materials, improving the accuracy of threat detection and reducing false alarms.2. Automatic Threat Recognition: Automatic threatrecognition software is another advancement in X-ray security screening equipment that utilizes artificial intelligence algorithms to automatically detect and highlight potential threats within scanned images. This technology reduces the reliance on human operators and improves the efficiency of security screening procedures.V. Importance of X-ray Security Screening EquipmentX-ray security screening equipment plays a crucial role in maintaining public safety and security by detecting potential threats and prohibited items at security checkpoints. These devices are essential in preventing terrorist attacks, smuggling activities, and other security breaches by providing security personnel with the tools and capabilities to identify and neutralize threats effectively.In conclusion, X-ray security screening equipment is a vital component of modern security systems that helps enhance public safety and prevent security threats in various high-risk environments. By understanding the components, standards, and advancements in X-ray security screening equipment, security personnel can effectively deploy and utilize these devices to strengthen security measures and protect the public from potential threats.。
2015版危险品目录英文版
2015版危险品目录英文版说明一、危险化学品的定义和确定原则定义:具有毒害、腐蚀、爆炸、燃烧、助燃等性质,对人体、设施、环境具有危害的剧毒化学品和其他化学品。
确定原则:危险化学品的品种依据化学品分类和标签国家标准,从下列危险和危害特性类别中确定:1.物理危险爆炸物:不稳定爆炸物、1.1、1.2、1.3、1.4。
易燃气体:类别1、类别2、化学不稳定性气体类别A、化学不稳定性气体类别B。
气溶胶(又称气雾剂):类别1。
氧化性气体:类别1。
加压气体:压缩气体、液化气体、冷冻液化气体、溶解气体。
易燃液体:类别1、类别2、类别3。
易燃固体:类别1、类别2。
自反应物质和混合物:A型、B型、C型、D型、E型。
自燃液体:类别1。
自燃固体:类别1。
自热物质和混合物:类别1、类别2。
遇水放出易燃气体的物质和混合物:类别1、类别2、类别3。
氧化性液体:类别1、类别2、类别3。
氧化性固体:类别1、类别2、类别3。
有机过氧化物:A型、B型、C型、D型、E型、F型。
金属腐蚀物:类别1。
2.健康危害急性毒性:类别1、类别2、类别3。
皮肤腐蚀/刺激:类别1A、类别1B、类别1C、类别2。
严重眼损伤/眼刺激:类别1、类别2A、类别2B。
呼吸道或皮肤致敏:呼吸道致敏物1A、呼吸道致敏物1B、皮肤致敏物1A、皮肤致敏物1B。
生殖细胞致突变性:类别1A、类别1B、类别2。
致癌性:类别1A、类别1B、类别2。
生殖毒性:类别1A、类别1B、类别2、附加类别。
特异性靶器官毒性-一次接触:类别1、类别2、类别3。
特异性靶器官毒性-反复接触:类别1、类别2。
吸入危害:类别1。
3.环境危害危害水生环境-急性危害:类别1、类别2;危害水生环境-长期危害:类别1、类别2、类别3。
危害臭氧层:类别1。
二、剧毒化学品的定义和判定界限定义:具有剧烈急性毒性危害的化学品,包括人工合成的化学品及其混合物和天然毒素,还包括具有急性毒性易造成公共安全危害的化学品。
剧烈急性毒性判定界限:急性毒性类别1,即满足下列条件之一:大鼠实验,经口LD50≤5mg/kg,经皮LD50≤50mg/kg,吸入(4h)LC50≤100ml/m3(气体)或0.5mg/L(蒸气)或0.05mg/L(尘、雾)。
新的美国材料与试验协会(ASTM)标准将有助于改善路面标线
新的美国材料与试验协会(ASTM)标准将有助于改善路面
标线
张亚萍
【期刊名称】《中国标准导报》
【年(卷),期】2015(0)3
【摘要】一项新的ASTM标准将有助于改善和评估路面标线的持久性、外观以及能见度。
该标准——ASTM D 7942《非雪犁地区热塑性路面标线规范》将被用来设置热塑性路面标线,以及确保它们的性能符合所需的区域。
【总页数】1页(P14-14)
【作者】张亚萍
【作者单位】
【正文语种】中文
【相关文献】
1.ASTM美国试验与材料协会标准的分类
2.美国材料与试验协会(ASTM)的不锈钢标准 --盘条与钢丝
3.美国材料与试验协会ASTM油气管道标准研究
4.美国试验和材料协会授予国家标准化管理委员会“ASTM赞赏”奖
5.国外造纸标准 ASTM美国材料与试验协会标准(续)
因版权原因,仅展示原文概要,查看原文内容请购买。
- 1、下载文档前请自行甄别文档内容的完整性,平台不提供额外的编辑、内容补充、找答案等附加服务。
- 2、"仅部分预览"的文档,不可在线预览部分如存在完整性等问题,可反馈申请退款(可完整预览的文档不适用该条件!)。
- 3、如文档侵犯您的权益,请联系客服反馈,我们会尽快为您处理(人工客服工作时间:9:00-18:30)。
Designation:D4632/D4632M−15aStandard Test Method forGrab Breaking Load and Elongation of Geotextiles1This standard is issued under thefixed designation D4632/D4632M;the number immediately following the designation indicates the year of original adoption or,in the case of revision,the year of last revision.A number in parentheses indicates the year of last reapproval.A superscript epsilon(´)indicates an editorial change since the last revision or reapproval.This standard has been approved for use by agencies of the U.S.Department of Defense.1.Scope1.1This test method is an index test which provides a procedure for determining the breaking load(grab strength) and elongation(grab elongation)of geotextiles using the grab method.This test method is not suitable for knitted fabrics and alternate test methods should be used.While useful for quality control and acceptance testing for a specific fabric structure, the results can only be used comparatively between fabrics with very similar structures,because each different fabric structure performs in a unique and characteristic manner in this test.The grab test methods does not provide all the information needed for all design applications and other test methods should be used.1.2Procedures for measuring the breaking load and elon-gation by the grab method in both the dry and wet state are included;however,testing is normally done in the dry condi-tion unless specified otherwise in an agreement or specifica-tion.1.3The values stated in either SI units or inch-pound units are to be regarded separately as standard.The values stated in each system may not be exact equivalents;therefore,each system shall be used independently of the bining values from the two systems may result in non-conformance with the standard.1.4This standard does not purport to address all of the safety concerns,if any,associated with its use.It is the responsibility of the user of this standard to establish appro-priate safety and health practices and determine the applica-bility of regulatory limitations prior to use.2.Referenced Documents2.1ASTM Standards:2D76/D76M Specification for Tensile Testing Machines for TextilesD123Terminology Relating to TextilesD1776/D1776M Practice for Conditioning and Testing Tex-tilesD2905Practice for Statements on Number of Specimens for Textiles(Withdrawn2008)3D4354Practice for Sampling of Geosynthetics and Rolled Erosion Control Products(RECPs)for TestingD4439Terminology for GeosyntheticsE177Practice for Use of the Terms Precision and Bias in ASTM Test MethodsE691Practice for Conducting an Interlaboratory Study to Determine the Precision of a Test Method3.Terminology3.1Definitions:3.1.1atmosphere for testing geotextiles,n—air maintained at a relative humidity of6565%relative humidity and temperature of2162°C[7064°F].3.1.2breaking load,n—the maximum force applied to a specimen in a tensile test carried to rupture.3.1.3cross-machine direction,n—the direction in the plane of the fabric perpendicular to the direction of manufacture.3.1.4elongation at break,n—the elongation corresponding to the breaking load,that is,the maximum load.3.1.5geotextile,n—any permeable textile material used with foundation,soil,rock,earth,or any other geotechnical material,as an integral part of a man-made product,structure, or system.3.1.6grab test,n—in fabric testing,a tension test in which only a part of the width of the specimen is gripped in the clamps.3.1.6.1Discussion—For example,if the specimen width is 101.6mm[4in.]and the width of the jaw faces25.4 mm[1in.],the specimen is gripped centrally in the clamps.3.1.7machine direction,n—the direction in the plane of the fabric parallel to the direction of manufacture.1This test method is under the jurisdiction of ASTM Committee D35on Geosynthetics and is the direct responsibility of Subcommittee D35.01on Mechani-cal Properties.Current edition approved May15,2015.Published June2015.Originally approved st previous edition approved in2015as D4632/D4632M–15. DOI:10.1520/D4632_D4632M-15A.2For referenced ASTM standards,visit the ASTM website,,or contact ASTM Customer Service at service@.For Annual Book of ASTMStandards volume information,refer to the standard’s Document Summary page on the ASTM website.3The last approved version of this historical standard is referenced on .Copyright©ASTM International,100Barr Harbor Drive,PO Box C700,West Conshohocken,PA19428-2959.United States --`,,,`,,,`,``,,,,`,,,`,`,```,,-`-`,,`,,`,`,,`---3.1.8For definitions of other terms used in this test method, refer to Terminology D123or Terminology D4439.4.Summary of Test Method4.1A continually increasing load is applied longitudinally to the specimen and the test is carried to rupture.Values for the breaking load and elongation of the test specimen are obtained from machine scales or dials,autographic recording charts,or interfaced computers.5.Significance and Use5.1The grab method is applicable whenever it is desired to determine the“effective strength”of the fabric in use,that is, the strength of the material in a specific width,together with the additional strength contributed by adjacent material.There is no simple relationship between grab tests and strip tests since the amount of fabric assistance depends on the construction of the fabric.It is useful as a quality control or acceptance test.5.2The procedure in Test Method D4632/D4632M for the determination of grab strength of geotextiles may be used for acceptance testing of commercial shipments,but caution is advised since information about between-laboratory precision is parative tests as directed in 5.2.1are advisable.5.2.1In case of a dispute arising from differences in reported test results when using the procedures in Test Method D4632/D4632M for acceptance testing of commercial shipments,the purchaser and the manufacturer should conduct comparative tests to determine if there is a statistical bias between their petent statistical assistance is recommended for the investigation of bias.As a minimum,the two parties should take a group of test specimens that are as homogeneous as possible and which are from a lot of material of the type in question.The test specimens should then be randomly assigned in equal numbers to each laboratory for testing.The average results from the two laboratories should be compared using the appropriate Student’s t-test and an accept-able probability level chosen by the two parties before testing is begun.If a bias is found,either its cause must be found and corrected or the purchaser and the manufacturer must agree to interpret future test results in the light of the known bias. 5.3Most geotextile fabrics can be tested by this test method. Some modification of clamping techniques may be necessary for a given fabric,depending upon its structure.Special adaptation may be necessary with strong fabrics,or fabrics made from glassfibers,to prevent them from slipping in the clamps or being damaged as a result of being gripped in the clamps,such as cushioning the clamp or boarding the specimen within the clamp.5.4This test method is applicable for testing fabrics either dry or wet.It may be used with constant-rate-of-traverse(CRT) or constant-rate-of-extension(CRE)type tension machines. However,there may be no overall correlation between the results obtained with the CRT machine and the CRE machine. Consequently,these two tension testers cannot be used inter-changeably.In case of controversy,the CRE machine shall prevail.6.Apparatus6.1Tensile Testing Machine,of the constant-rate-of-extension(CRE)or constant-rate-of-traverse(CRT)type with autographic recorder conforming to the requirements of Speci-fication D76/D76M.6.2Clamps,having all gripping surfaces parallel,flat,and capable of preventing slipping of the specimen during a test. Each clamp shall have one jaw face measuring25.4by50.8 mm[1by2in.],with the longer dimension parallel to the direction of application of the load.The other jaw face of each clamp shall be at least as large as its mate.Each jaw face shall be in line,both with respect to its mate in the same clamp and to the corresponding jaw of the other clamp.7.Sampling and Selection7.1Division into Lots and Lot Samples—Divide the material into lots and take a lot sample as directed in Practice D4354. Rolls of fabric are the primary sampling unit.7.2Laboratory Sample—Take for the laboratory sample a swatch extending the width of the fabric and approximately 1m[39.37in.]along the selvage from each roll in the lot sample.The swatch may be taken from the end portion of a roll provided there is no evidence that it is distorted or different from other portions of the roll.In cases of dispute,take a swatch that will exclude fabric from the outer wrap of the roll or the inner wrap around the core.7.3Test Specimens—Cut the number of specimens from each swatch in the laboratory sample determined as directed in Section8.Take no specimens nearer the selvage of fabric edge than1⁄20of the fabric width or150mm[6in.],whichever is the smaller.Cut rectangular specimens101.6by203.2 mm[4by8in.].Cut the specimens to be used for grab tests in the machine direction with the longer dimension parallel to the machine direction and the specimens to be used for grab tests in the cross-machine direction with the longer dimension parallel to the cross-machine direction.Locate each group of specimens along a diagonal line on the swatch so that each specimen will contain different warp ends andfilling picks. Draw a line37mm[1.5in.]from the edge of the specimen running its full length.For woven and reinforced nonwoven fabrics,this line must be accurately parallel to the lengthwise yarns in the specimen.8.Number of Specimens8.1Unless otherwise agreed upon as when provided in an applicable material specification,take a number of test speci-mens per swatch in the laboratory sample such that the user may expect at the95%probability level that the test result is no more than5%above the true average for each swatch in the laboratory sample for each the machine and cross-machine direction,respectively.8.1.1Reliable Estimate of v—When there is a reliable estimate of v based upon extensive past records for similar materials tested in the user’s laboratory as directed in the method,calculate the required number of specimens using Eq 1,as follows:n5~tv/A!2(1) --`,,,`,,,`,``,,,,`,,,`,`,```,,-`-`,,`,,`,`,,`---where:n =number of test specimens (rounded upward to a wholenumber),v =reliable estimate of the coefficient of variation of indi-vidual observations on similar materials in the user’s laboratory under conditions of single-operator precision,%,t =the value of Student’s t for one-sided limits (see Table1),a 95%probability level,and the degrees of freedom associated with the estimate of v ,andA = 5.0%of the average,the value of the allowablevariation.8.1.2No Reliable Estimate of v—When there is no reliable estimate of v for the user’s laboratory,Eq 1should not be used directly.Instead,specify the fixed number of 10specimens for the machine direction tests and 10specimens for the cross-machine direction tests.The number of specimens is calculated using v =9.5%of the average for both machine direction and cross-machine direction.These values for v are somewhat larger than usually found in practice.When a reliable estimate of v for the user’s laboratory becomes available,Eq 1will usually require fewer than the fixed number of specimens.9.Conditioning9.1Bring the specimens to moisture equilibrium in the atmosphere for testing geotextiles.Equilibrium is considered to have been reached when the increase in mass of the specimen in successive weighings made at intervals of not less than 2h does not exceed 0.1%of the mass of the specimen.In general practice,the industry approaches equilibrium from the “as received”side.N OTE 1—It is recognized that in practice geotextile materials are frequently not weighed to determine when moisture equilibrium has been reached.While such a procedure cannot be accepted in cases of dispute,it may be sufficient in routine testing to expose the material to the standard atmosphere for testing for a reasonable period of time before the specimens are tested.A time of at least 24h has been found acceptable in most cases.However,certain fibers may exhibit slow moisture equaliza-tion rates from the “as received”wet side.When this is known,a preconditioning cycle,as described in Practice D1776/D1776M ,may be agreed upon between contractual parties.9.2Specimens to be tested in the wet condition shall be immersed in water maintained at a temperature of 2162°C [7064°F].The time of immersion must be sufficient to wet-out the specimens thoroughly,as indicated by no signifi-cant change in strength or elongation following a longer period of immersion,and at least 2min.To obtain thorough wetting,it may be necessary or advisable to add not more than 0.05%of a nonionic neutral wetting agent to the water.10.Procedure10.1Test the conditioned specimens in the standard atmo-sphere for testing in accordance with Section 9.10.2Set the distance between the clamps at the start of the test at 7561mm [360.05in.].Select the load range of the testing machine such that the maximum load occurs between 10and 90%of full-scale load.Set the machine to operate at a speed of 300610mm/min [1260.5in./min].10.3Secure the specimen in the clamps of the testing machine,taking care that the long dimension is as nearly as possible parallel to the direction of application of the load.Be sure that the tension in the specimen is uniform across the clamped width.Insert the specimen in the clamps so that approximately the same length of fabric extends beyond the jaw at each end.Locate the jaws centrally in the widthwise direction by having the line which was drawn 37mm [1.5in.]from the edge of the specimen run adjacent to the side of the upper and lower front jaws which are nearest this edge.This ensures that the same lengthwise yarns are gripped in both clamps.10.4If a specimen slips in the jaws,breaks at the edge of or in the jaws,or if for any reason attributed to a faulty operation the result falls markedly below the average for the set of specimens,discard the result and take another specimen.Continue this procedure until the required number of accept-able breaks have been obtained.N OTE 2—The decision to discard a break shall be based on observation of the specimen during the test and upon the inherent variability of the fabric.In the absence of other criteria for rejecting a so-called jaw break,any break occurring within 5mm [1⁄4in.]of the jaws which results in a value below 80%of the average of all the other breaks shall be discarded.No other break shall be discarded unless it is known to be faulty.N OTE 3—It is difficult to determine the precise reason for breakage of test specimens near the edge of the jaws.If breaks are caused by damage to the specimen by the jaws,then the results should be discarded.If,however,they are merely due to randomly distributed weak places in specimens,the results should be considered perfectly legitimate.In some cases,breaks may be caused by a concentration of stress in the area adjacent to the jaws.If this occurs,the specimen is prevented from contracting in width as the load is applied.In such cases,a break near the edge of the jaws is inevitable and shall be accepted as a characteristic of the geotextile when tested by this test method.10.5Start the tensile testing machine and the area measur-ing device,if used,and continue running the test to rupture.Stop the machine and reset to the initial gage position.Record and report the test results for each direction separately.10.6If fabric manifests slippage in the jaws,the jaw faces,but not the jaw dimensions,may be modified.If a modification is used,the method of modification should be stated in the report.TABLE 1Values of Student’s t for One-Sided Limitsand the 95%Probability Adf One-Sided df One-Sided df One-sided 1 6.31411 1.79622 1.7172 2.92012 1.78224 1.7113 2.35313 1.77126 1.7064 2.13214 1.76128 1.7015 2.01515 1.75330 1.6976 1.94316 1.74640 1.6847 1.89517 1.74050 1.6768 1.86018 1.73460 1.6719 1.83319 1.7291201.658101.812201.7251.645AValues in this table were calculated using Hewlett Packard HP 67/97Users’Library Programs 03848D,“One-Sided and Two-Sided Critical Values of Stu-dent’s t ”and 00350D,“Improved Normal and Inverse Distribution.”For values at other than the 95%probability level,see published tables of critical values of Student’s t in any standard statistical text.Further use of thistable is defined in Practice D2905.--`,,,`,,,`,``,,,,`,,,`,`,```,,-`-`,,`,,`,`,,`---10.7Unless otherwise specified,measure the elongation of the fabric at any stated load by means of a suitable autographic recording device,at the same time the breaking strength is determined.Measure the elongation from the point where the curve leaves the zero loading axis to a point of corresponding force in millimetres [inches].11.Calculation11.1Breaking Load—Calculate the breaking load by aver-aging the value of breaking load for all accepted specimen results.The breaking load shall be determined separately for the machine direction specimens and cross-machine direction specimens.11.2Apparent Elongation—Calculate the apparent elonga-tion at the breaking load or at other specified loads by averaging the values of apparent elongation for all accepted specimen results.The apparent elongation shall be determined separately for the machine direction specimens and cross-machine direction specimens and expressed as the percentage increase in length,based upon the initial nominal gage length of the specimen.Report this as the apparent elongation.N OTE 4—The observed elongation calculated as a percentage of the initial nominal gage length of the specimen should be referred to as “apparent elongation.”Because the actual length of fabric stretched is usually somewhat greater than this initial length due to pull-out of fabric from between the jaws,elongation calculated on initial length may be somewhat in error,depending upon the amount of this pull-out.12.Report12.1Report the following information:12.1.1State that the tests were performed as directed in Test Method D4632/D4632M.Describe the material(s)or prod-uct(s)sampled and the method of sampling used.12.1.2The average grab breaking load for specimens cut in each direction,for all specimens giving acceptable breaks.12.1.3The average grab percent apparent elongation of specimens cut in each direction,for all specimens giving acceptable breaks,if required.Identify this as “apparent breaking elongation,”or “apparent elongation at x lb load,”as required by the test specifications.12.1.4Number of specimens tested in each direction.12.1.5Condition of specimens (wet or dry).12.1.6Type of testing machine used.12.1.7Maximum load obtainable in the range used for testing.12.1.8Type of padding used in jaws,modification of specimen gripped in the jaws,or modification of jaw faces,if used.12.1.9Any modifications of sample specimens as manufactured,or test method as described.13.Precision and Bias 413.1Precision—The precision of this test method is based on an interlaboratory study of D4632/D4632M,Standard Test Method for Grab Breaking Load and Elongation of Geotextiles,conducted in 2013.Ten laboratories tested a total of four different geotextile samples for elongation and tensile strength at rupture.Every “test result”represents an individual determination.All labs were asked to report triplicate test results for each material tested.Practice E691was followed for the design and analysis of the data;the details are given in ASTM Research Report No.RR:D35-1021.13.1.1Repeatability Limit (r)—Two test results obtained within one laboratory shall be judged not equivalent if they differ by more than the “r”value for that material;“r”is the interval representing the critical difference between two test results for the same material,obtained by the same operator using the same equipment on the same day in the same laboratory.13.1.1.1Repeatability limits are listed in Tables 2and 3.13.1.2Reproducibility limit (R)—Two test results shall be judged not equivalent if they differ by more than the “R”value for that material;“R”is the interval representing the critical difference between two test results for the same material,obtained by different operators using different equipment in different laboratories.13.1.2.1Reproducibility limits are listed in Tables 2and 3.13.1.3The above terms (repeatability limit and reproduc-ibility limit)are used as specified in Practice E177.13.1.4Any judgment in accordance with statements 13.1.1and 13.1.2would have an approximate 95%probability of being correct.13.2Bias—At the time of the study,there was no accepted reference material suitable for determining the bias for this test method,therefore no statement on bias is being made.4Supporting data have been filed at ASTM International Headquarters and may be obtained by requesting Research Report RR:D35-1021.Contact ASTM Customer Service at service@.TABLE 2Maximum Elongation at Rupture (%)MaterialAverage ARepeatability Standard DeviationReproducibility Standard Deviation Repeatability LimitReproducibility Limitx ¯S rS Rr R Woven Slit TapeStabilization Geotextile25.240.85 5.37 2.3915.02Heavy Weight Nonwoven Geotextile79.20 1.7212.39 4.8134.70Light Weight Nonwoven Geotextile 79.03 2.66 6.007.4416.79Woven Mono/Slit Tape Reinforcement Geotextile22.430.844.922.3513.78AThe average of the laboratories’calculatedaverages.--`,,,`,,,`,``,,,,`,,,`,`,```,,-`-`,,`,,`,`,,`---13.3The precision statement was determined through sta-tistical examination of 240reported results,from ten laboratories,on four materials.These four materials were identified as the following:Woven Slit Tape Stabilization Geotextile Light Weight Nonwoven Geotextile Heavy Weight Nonwoven GeotextileWoven Mono/Slit Tape Reinforcement Geotextile13.4To judge the equivalency of two test results,it is recommended to choose the material closest in characteristics to the test material.ASTM International takes no position respecting the validity of any patent rights asserted in connection with any item mentioned in this ers of this standard are expressly advised that determination of the validity of any such patent rights,and the risk of infringement of such rights,are entirely their own responsibility.This standard is subject to revision at any time by the responsible technical committee and must be reviewed every five years and if not revised,either reapproved or withdrawn.Your comments are invited either for revision of this standard or for additional standards and should be addressed to ASTM International Headquarters.Your comments will receive careful consideration at a meeting of the responsible technical committee,which you may attend.If you feel that your comments have not received a fair hearing you should make your views known to the ASTM Committee on Standards,at the address shown below.This standard is copyrighted by ASTM International,100Barr Harbor Drive,PO Box C700,West Conshohocken,PA 19428-2959,United States.Individual reprints (single or multiple copies)of this standard may be obtained by contacting ASTM at the above address or at 610-832-9585(phone),610-832-9555(fax),or service@ (e-mail);or through the ASTM website ().Permission rights to photocopy the standard may also be secured from the Copyright Clearance Center,222Rosewood Drive,Danvers,MA 01923,Tel:(978)646-2600;/TABLE 3Maximum Tensile at Rupture (lbf )MaterialAverage ARepeatability Standard DeviationReproducibility Standard Deviation Repeatability LimitReproducibility Limitx ¯S rS Rr R Woven Slit TapeStabilization Geotextile168.237.4317.3520.8148.57Light Weight Nonwoven Geotextile425.2720.8126.2558.2873.49Heavy Weight Nonwoven Geotextile 131.5110.2710.2728.7528.75Woven Mono/Slit Tape Reinforcement Geotextile377.0411.1022.7931.0863.80AThe average of the laboratories’calculatedaverages.--`,,,`,,,`,``,,,,`,,,`,`,```,,-`-`,,`,,`,`,,`---。
