智能高端开关手册
智能开关说明书R-W2-X-S系列(18.10.8)
智能开关说明书R-W2-X-S系列(18.10.8)
屏1
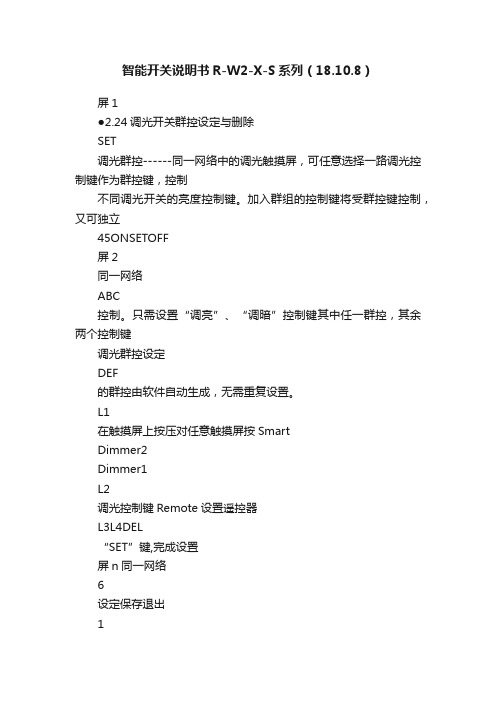
●2.24调光开关群控设定与删除
SET
调光群控------同一网络中的调光触摸屏,可任意选择一路调光控制键作为群控键,控制
不同调光开关的亮度控制键。
加入群组的控制键将受群控键控制,又可独立
45ONSETOFF
屏2
同一网络
ABC
控制。
只需设置“调亮”、“调暗”控制键其中任一群控,其余两个控制键
调光群控设定
DEF
的群控由软件自动生成,无需重复设置。
L1
在触摸屏上按压对任意触摸屏按Smart
Dimmer2
Dimmer1
L2
调光控制键Remote设置遥控器
L3L4DEL
“SET”键,完成设置
屏n同一网络
6
设定保存退出
1
23
屏1
在任意触摸屏按压图示
按键,退出设置模式
6
在同一网络中选择调在该触摸屏上按压按键在同一网络中,根据用户
屏2同一网络
删除确认退出
光开关触摸屏作为发起场景设置键需求选择触摸屏上的群
屏,按SmartRemote设控键
置遥控器SET键
45
ONSETOFF
ABC
调光群控删除
DEF
待删除的调光对任意触摸屏按SmartL1
Dimmer2
屏n同一网络Dimmer1
群控被调出Remote设置遥控器L2
“DEL”键,完成设置L3L4DEL
DEL
5152
SET。
多高智能控制开关说明书

多高智能控制开关说明书一、产品概述多高智能控制开关是一种通过智能技术实现远程控制的电器开关。
它采用先进的无线通信技术和智能控制算法,可以通过手机App或遥控器实现对开关的远程控制,方便用户在不同场景下灵活操作电器设备。
二、产品特点1.智能远程控制:用户可以通过手机App或遥控器随时随地对开关进行远程控制,无需亲自到达开关所在的位置,提高了使用的便利性。
2.定时功能:多高智能控制开关支持定时功能,用户可以预设定时开关机的时间,实现自动化控制,节省能源并提高生活质量。
3.场景模式:用户可以根据自己的需求设置不同的场景模式,如起床模式、睡眠模式、聚会模式等,开关会根据不同的场景自动切换设备状态,提供更加智能化的生活体验。
4.安全可靠:多高智能控制开关具有过载保护和短路保护功能,有效防止电器设备损坏和安全事故的发生,保障用户和家庭的安全。
5.兼容性强:多高智能控制开关与常见的电器设备兼容性强,可以广泛应用于家庭、办公室、商业场所等不同场景。
三、使用方法1.安装:将多高智能控制开关与电器设备连接,确保电源断开的情况下进行安装。
2.配网:按照说明书上的步骤进行配网操作,确保开关能够成功连接到本地无线网络。
3.下载App:在手机应用商店中搜索并下载多高智能控制开关的手机App。
4.注册登录:打开App后,根据提示进行注册和登录操作,确保能够正常使用App功能。
5.添加设备:在App中添加设备,按照提示将开关与App进行配对,确保能够实现远程控制。
6.设置定时:在App的定时功能中设置开关的定时开关机时间,根据实际需求进行设置。
7.设置场景:在App的场景模式中设置不同的场景,按照需求进行开关状态的设定,确保能够自动切换设备状态。
8.远程控制:在App中操作开关,实现远程控制功能,或使用遥控器对开关进行远程控制。
四、注意事项1.请确保开关在安装和使用过程中电源已经断开,避免触电事故的发生。
2.请按照说明书上的步骤进行操作,确保设备能够正常连接和使用。
Watt智能高频开关直流电源用户手册
20
220
10
220
5
110
10
110
20
110
40
220
10
110
20
220
2.5
1.4 接线方式及组成形式
1.4.1 接线方式
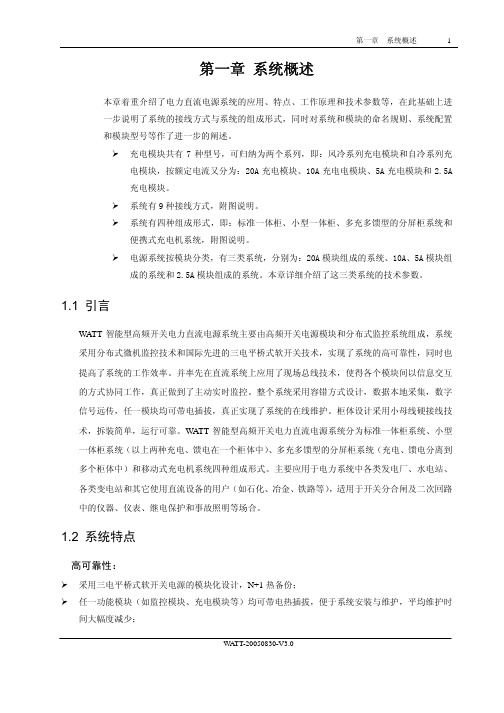
电力直流电源可以选用不同的母线接线方式来适应不同容量要求和不同等级的安全裕度。 WATT 电力直流电源有以下 9 种不同的接线方式。
WATT-20050830-V3.0
第一章 系统概述
充电模块及配置数量(只)
WEPR-220/20(F) WEPR-110/20(F) WEPR-220/20(F) WEPR-220/10(F) WEPR-220/10(F) WEPR-220/10(F) WEPR-220/5(F) WEPR-220/5(F) WEPR-220/2.5
4~6 6~8 12~15 2~3 3~4 3~4
型号
WEPR-220/20F WEPR-220/10F WEPR-220/5F WEPR-110/10F WEPR-110/20F WEPR-110/40F WEPR-220/10 WEPR-110/20 WEP-220/2.5
表 1-2 充电模块的型号列表
标称输出电压(V) 额定输出电流(A)
220
试验放电回路
1.馈线开关的型号、额定电流视工程具体情况待定 2.常规交流输入为2路自动切换 3.本接线方案适用于110kV及以下变电站
图 1-4-3 GZDW31 接线方案
WATT-20050830-V3.0
1HK1 1HKn FU1 FU2 1KK1 FDK 1KKn
+KM11 +HM11 -HM11(-KM11)
PowerMaster 智能高频开关电力操作电源 技术手册

PowerMaster智能高频开关电力操作电源技术手册资料版本V5.0归档日期2008-07-02BOM编码 31020944艾默生网络能源有限公司为客户提供全方位的技术支持,用户可与就近的艾默生网络能源有限公司办事处或客户服务中心联系,也可直接与公司总部联系。
艾默生网络能源有限公司版权所有,保留一切权利。
内容如有改动,恕不另行通知。
艾默生网络能源有限公司地址:深圳市南山区科技工业园科发路一号邮编:518057公司网址:客户服务热线:0755-********E-mail: info@目录第一章系统简介 (1)1.1 系统特点 (1)1.2 型号说明 (1)1.3 系统结构 (1)1.3.1 分屏柜系统结构 (2)1.3.2 一体柜系统结构 (3)1.4 工作原理 (4)1.4.1 系统工作原理 (4)1.4.2 交流输入配电部分工作原理 (5)1.4.3 直流输出馈电部分工作原理 (5)1.5 系统技术参数 (6)第二章充电模块 (7)2.1 型号说明 (7)2.2 工作原理 (7)2.3 主要功能 (8)2.4 HD系列模块 (8)2.4.1 HD22010-3、HD22020-3、HD11020-3、HD11040-3模块 (8)2.4.2 HD22005-3A、HD11010-3A模块 (11)2.5 ER系列模块 (14)2.5.1 型号说明 (14)2.5.2 工作原理 (14)2.5.3 主要功能 (14)2.5.4 模块外观 (15)2.5.5 性能参数 (17)第三章监控系统 (18)3.1 PSM-E20监控系统 (18)3.1.1 组成结构 (18)3.1.2 监测的信号量 (19)3.1.3 功能 (19)3.1.4 参数设置范围及默认值 (22)3.2 PSM-E11监控系统 (23)3.2.1 组成结构 (23)3.2.2 监测的信号量 (24)3.2.3 功能 (25)3.2.4 参数设置范围及默认值 (25)3.3 PSM-E01 和PSM-E02监控系统 (25)3.3.1 系统监测的信号量 (25)3.3.2 功能 (26)3.3.3 外观及结构 (26)3.3.4 监控模块器件清单 (28)3.3.5 参数设置范围及默认值 (28)第四章系统部件 (30)4.1 绝缘监测仪 (30)4.1.1 工作原理 (30)4.1.2 功能特点 (30)4.1.3 技术参数 (31)4.2 电池监测仪 (31)4.2.1 外观结构 (31)4.2.2 功能 (32)4.2.3 技术参数 (32)4.3 交流自动切换盒 (33)4.3.1 工作原理 (33)4.3.2 技术参数 (33)4.4 电压调节器 (34)4.4.1 工作原理 (34)4.4.2 外观结构 (34)4.4.3 性能指标 (35)4.4.4 功能 (35)第五章插框系统 (37)5.1 EDCF-1插框系统 (37)5.1.1 外观结构 (37)5.1.2 系统功能 (38)5.1.3 系统技术参数 (38)5.2 KZD110/220-A插框系统 (39)5.2.1 外观结构 (39)5.2.2 系统功能 (40)5.2.3 系统技术参数 (41)第六章壁挂式电源系统 (42)6.1 工作原理 (42)6.2 主要特点 (42)6.3 系统组成 (43)6.4 技术参数 (44)附录一系统接线方案 (45)第一章系统简介 1第一章系统简介本章介绍了PowerMaster智能高频开关电力操作电源系统的特点、型号说明、结构、工作原理及技术参数。
Z-Wave In-Wall 智能开关说明书

Features• QuickFit – Improved components reduced the housing depth by up to 20 percent compared to previous Z-Wave models and eliminated the need for heat tabs. QuickFit enhancements are the ideal smart solution for older-style switch boxes, multi-gang configurations or any other application with limited space.• SimpleWire – Dual ground ports, which are o set to avoid switch box mounting screws, support daisy-chaining in multi-switch setups.• Full-home coverage – Z-Wave Plus works with all previous Z-Wave generations to allow continued expansion of your home-automation network. The dimmer is capable of controlling indoor or outdoor fixtures for whole-home automation and repeats your Z-Wave signal from your hub or other devices to extend your range by up to 150ft.• Easy installation – Requires indoor in-wall installation with hardwired connections.Neutral wire required . Full-range dimmability for use with dimmable LEDs and CFLs as well as incandescent and halogen bulbs. Supported wattage – 600W incandescent; 300W LED/CFL. Supported voltage – 120VAC. Operating temperature range 32-104 degrees Fahrenheit.Wallplate sold seperatelySIMPLE WIRE ™VERSATILITYAutomating your home not only makes your life easier, but it also saves energy, cuts costs, and boosts your home’ssecurity. Control your lights, fans and appliances, schedule a timed event, or create a custom scene from anywhere atanytime of the day. Compatible with LED, CFL, incandescent and halogen bulbs, and other hardwired devices.VOICE CONTROLControl your connected device with only your voice! Works with Amazon Alexa and Google Assistant. Alexa/Echo/Google Assistant devices sold separately. Z-Wave hub must be Alexa compatible. Not directly compatible with Echo Plus . Will work through Z-Wave hub only.1QUICKFITThe revolutionary, space-saving QuickFit design features a rounded housing and 20 percent smaller depth compared to previous models. The elimination of heat tabs also o ers a more convenient installation and user-experience without reducing the electrical ratings.SIMPLEWIREWith the SimpleWire technology, the new add-on switch features dual o set ground ports, which save time, simplify installation and reduce wire congestion in multi-switch setups. Neutral wire required.46565246565QUICK FIT ™SIMPLE WIRE ™120VAC, 60Hz 908.4/916MHz600W Incandescent, 300 Dimmable CFL/LEDUp to 150 feet from controller or closest Z-Wave device32-104° F (0-40° C)2-year limited product warrantyJasco Z -Wave In-wall T oggle Smart Dimmer· QuickFit™ – Improved componentsreduce the housing depth by up to 20 percent compared to previousZ-Wave models and eliminated the need for heat tabs· SimpleWire™ – Auto line-loadsensing terminals support fastinstallation by detecting line andswitch accordingly Dual ground ports, which are offset to avoid switch box mounting screws, support daisy-chaining in multi-switch setups · Remotely monitor with any mobile device *· Works with Google and Alexa (requires compatible hub *)· May be used in single poleinstallation or with up to four Jasco model 12728 or 46561 Add-onswitches in 3, 4, 5 or 6-way wiring· Works with most dimmable LED, CFL, halogen and all incandescent bulbs· Turn ON/OFF and control the brightness level of the connected lighting manually or via Z-Wave hub or controller · New blue LED backlit toggle (with 4 adjustable settings)· UL Listed to work with dimmable LED & CFLs· Can be Included in multiple Groups and Scenes· Utilizes the Z-Wave Firmware Update Meta Data commandupdates Over the AirDim rates, Alternate exclusion andminimum and maximum dim levelsbrightness level from 0-100% in1% increments wiring connections for Line (Hot), Load, Neutral and Ground. Traveler wire required for multi pole installation · Use a standard toggle wall plate (wall plate not included)· LED status can be inverted manually changed to invert, always OFF and always ON · Inline traveler circuit protection · Improved battery life and up to 50percent greater wireless range · QR codes with unique,industry-standard secure key exchange to add a layer of 128-bit encryption· Effortless device pairing to Z-Wave · Backward compatible with all generations of Z-Wave devices · 250% faster processor · 400% more memory· Supports wireless upgrades to future-proof your home * Requires Z-Wave hub or controller, functions may vary depending on brand.New blue LED backlit toggle· Insert wire into port and tighten screw. Do not wrap wire around screw· Indoor use only· Visit /hubs for hub compatibility· Wallplates sold separately· Trilingual Instruction manual – (English, French, Spanish)3Once the hub is ready to add your smart switch, press up or down on the smart toggle switch to add it in the network.Once the controller is ready to remove your device, press up or down on the smart toggle switch to remove it from the network. The controller’s app will indicate if it has discovered the sensor. If prompted by the controller to enter the S2 security code, refer to the QR code/security number on the back of the box, or the QRcode label on the product. Enter the 5-digit code.subject to change without noticeDistributed by Jasco Products Company LLC 10 E. Memorial Rd., Oklahoma City, OK ©Jasco 2019Quickly press up on the toggle 3 times, then press the down onthe toggle 3 times.DSK : XXXXX-125651-22671 -26939-47599 -19612-25872 -477524ORIn-Wall Plug-in In-WallPurchase additional items at, or visit your local retailer.In-Wall Plug-in In-WallEnbrighten In-Wall Hinge PinDirect Porta-In-WallPlug-inD EA B CF GHOUD EA B CF GHOD EA B CF GH。
Aeotec智能开关7智能RGB led灯按钮设备说明书

Note: QR Code used forSmartStart inclusion. DSKCode can be found onpackaging. Do not removeor damage them.Important safety information.Please re ad this and the online guide(s) at/ss7 carefully. Failure to follow therecommendations set forth by Aeotec Limited may bedangerous or cause a violation of the law. Themanufacturer, importer, distributor, and / or reseller willnot be held responsible for any loss or damageresulting from not following any instructions in thisguide or in other materials.Smart Switch 7 is intended for indoor use in drylocations only. Do not use in damp, moist, and / or wetlocations.Quick start.The following will step you through installing SmartSwitch 7 and connecting it to your Z-Wave network.1. Plug Smart Switch 7 into a power outlet; its LED willflash blue slowly.2. To connect Smart Switch 7 to your automationnetwork:a. If your Z-Wave gateway supports SmartStart,scan Smart Switch 7's QR Code using yourgateway's app. Once scanned, Smart Switch 7will join your Z-Wave network automaticallywithin 10 minutes.b. Else, set your gateway into its 'add device'mode. Refer to its manual if you are unsure ofhow to perform this step.Then press Smart Switch 7's Action Button 2xtimes within 1 second; its LED will blink toindicate pair mode.c. If your gateway supports S2 security, and youwant your device to use this higher level ofsecurity, please enter the first 5 digits of theDSK into the gateway's interface whenprompted. Refer to the gateway’s manual if youare unsure how to perform this step. Do not losethe DSK or remove it from the product orpackage.3. When Smart Switch 7 successfully joins yourZ-Wave network, its LED will become a solid bluefor 2 seconds. Should its LED still flash blue, thisindicates it was unable to join your Z-Wavenetwork; repeat the above steps and pleasecontact us for further support if needed.Smart Switch 7 is now a part of your Z-Wave homecontrol system. You can configure it and itsautomations via your Z-Wave system; please refer toyour software’s user guide for precise instructions.Get help & learn more.Should you encounter any problem with Smart Switch7, visit /ss7 or contact our supportteam via /contact. You can also learn moreabout Smart Switch 7 features, configuration options,and technical specifications at the link.Gateway compatibility.To see if this device is known to be compatible withyour Z-Wave gateway, please refer to/z-wave-gateways.Manufactured for the importer by Aeotec Limited (#704, BrightWay Tower, 33 Mong Kok Rd, Mong Kok, Hong Kong)contactable via /contact. Imported into theEuropean Union by Aeotec Group GmbH (GroßeJohannisstraße 7, Hamburg 20457, Germany). The importerand / or distributor of this device can both be reachedseparately with the company from whom you have purchasedthis device from responsible for warranty, technical support,and compliance related queries.Declaration of Conformity. Aeotec Limited declares thatZWA023 is in compliance with the essential requirements andother relevant provisions of RED 2014/53/EU, RoHS2011/65/EU, IEC 62321:2008, EN 50581:2012 and ErPDirective 2009/125/EC, No 1275/2008 AMENDMENT801/2013. The full text of the declaration is available from/ss7/docSpecifications. Specifications. Z-Wave devices operatebetween 868.40 & 926.3 MHz depending on local restrictions.It uses up to -5.68dBm ERP of transmission power, enablingwireless connectivity.Full information on device specifications and certifications at/ss7/specsDisposal guidelines and WEEE. Aeotec devices maycontain batteries; remove when not in use. Do not dispose of Used in this guide.Smart Switch 7ZWA023© & ™ Aeotec Limited. Version: 501002300001 - AA In Europe contact Aeotec Group GmbH; Große Johannisstraße7, 20457 Hamburg, Germany.Conforms to UL STD. 62368-1Certified to CSA STD. C22.2No. 62368-1FCC ID: 2AOGIZWA023device as unsorted municipal waste, use separate collection facilities. Contact your local government for further information.One-Year Limited Warranty. Aeotec Limited warrants included Aeotec branded hardware device when purchased new and delivered in new condition and in its original container against defects in materials and workmanship for one year from the date of original purchase from an authorized reseller when purchased and used in the region of original export. In line with the terms of sales between Aeotec and the authorized importer / reseller of this device, any claims against the foregoing warranty are to be handled by the authorized distributor / reseller directly. The foregoing warranty is subject to the proper installation, operation, and maintenance of the device in accordance with installation instructions and the operating manual supplied to customer and further documentation made available digitally. Liquid damage, including, but not limited to, internal liquid damage caused by improper use, closure or affixing of the hardware, is not covered by this warranty. Splash, water, and dust resistance are not permanent conditions and resistance might decrease as a result of normal wear. Not warranted for damage from open flames and heat, and exposure to sun. Not warranted for battery leak damage; always remove all batteries from products that not being used. Aeotec does not warrant against normal wear and tear, nor damage caused by accident or abuse. Please be sure to read this device’s support notes, digital materials, and quick start guide fully.Subject to the full terms of obtaining service within 30 days ofthe manifestation of a problem, if you submit a valid claimunder this warranty, Aeotec shall provide further information inobtaining warranty services from the authorized importer and /or seller of this device. The full warranty, including warrantyexclusions and liabilities, are available at/warranty Aeotec’s English languagewarranty and instructional information is paramount totranslations provided in any other language and prevails overany such translations.FCC Notice. The edition of this device made and certified forthe US market and marked as such complies with part 15 ofthe FCC rules. Operation is subject to the following twoconditions: (1) this device may not cause harmful interference,and (2) this device must accept any interference received,including interference that may cause undesired operation. Themanufacturer is not responsible for any radio or TV interferencecaused by unauthorized modifications to this equipment. Suchmodifications could void the user’s authority to operate theequipment. This equipment has been tested and found tocomply with the limits for a Class B digital device, pursuant topart 15 of the FCC Rules. These limits are designed to providereasonable protection against harmful interference in aresidential installation. This equipment generates uses and canradiate radio frequency energy and, if not installed and used inaccordance with the instructions, may cause harmfulinterference to radio communications. However, there is noguarantee that interference will not occur in a particularinstallation. If this equipment does cause harmful interferenceto radio or television reception, which can be determined byturning the equipment off and on, the user is encouraged to tryto correct the interference by one or more of the followingmeasures: (1) Reorient or relocate the receiving antenna. (2)Increase the separation between the equipment and receiver.(3) Connect the equipment into an outlet on a circuit differentfrom that to which the receiver is connected. (4) Consult thedealer or an experienced radio/TV technician for help (5)Ensure this device and its antenna(s) are not be co-located oroperating in conjunction with any other antenna or transmitter.RF Exposure Statement. The device has been evaluated tomeet FCC/CE general RF exposure requirement. The devicecan be used without restriction.California Proposition 65. WARNING: This product containsa chemical known to the State of California to cause birthdefects or other reproductive harm. Use only for intendedpurposes. Do not use for other purposes including, but notlimited to, the consumption of food and drinks.While the information in this guide has been compiled withcare, it may not be deemed an assurance of devicecharacteristics. All information, including, but not limited to,information regarding the functionality, features, and / or devicespecifications are subject to change. Aeotec Limited reservesall rights to revise or update its products or documentationwithout any obligation to notify any individual or entity. AeotecLimited shall be liable only to the degree specified in the termsof sale and delivery.。
智能开关选用手册_办公篇
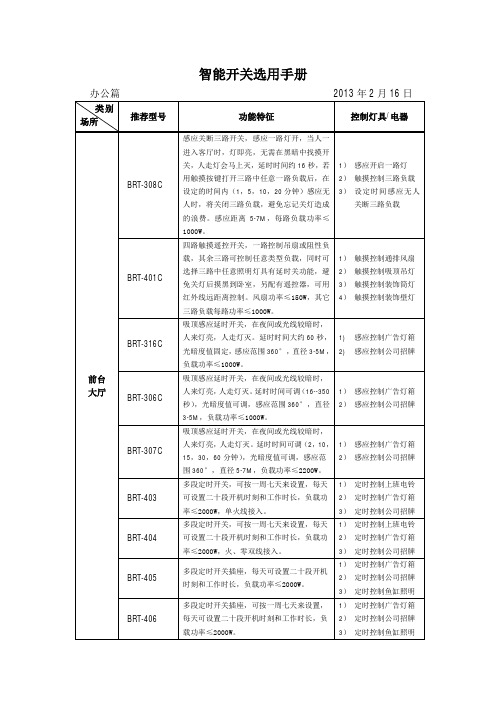
智能开关选用手册接待室BRT-308C感应关断三路开关,感应一路灯开,当人一进入客厅时,灯即亮,无需在黑暗中找摸开关,人走灯会马上灭,延时时间约16秒,若用触摸按键打开三路中任意一路负载后,设定的时间内(1,5,10,20分钟)感应无人时,将关闭三路负载,避免忘记关灯造成的浪费。
感应距离5-7M,每路负载功率≤1000W。
1)感应开一路灯或负载2)触摸控制三路灯或负载3)感应无人关断三路灯或负载BRT-309吸顶感应关断器,在设定时间内(1,5,10,20分钟)感应无人时,将关闭负载或照明灯具,避免忘记关闭负载或灯所造成的浪费,感应范围360°,直径5-7M,负载功率≤2200W。
1)感应无人关断照明灯或通排风设备BRT-310吸顶感应关断遥控器,在设定时间内(1,5,10,20分钟)感应无人时,将遥控关闭空调,电视,音响等具遥控功能的设备,避免忘记关设备所造成的浪费,感应范围360°,直径5-7M,输入电压为AC 220-240/50HZ。
1)感应无人关闭空调或具有红外遥控功能的其它设备BRT-311吸顶感应关断遥控器,在设定时间内(1,5,10,20分钟)感应无人时,将遥控关闭空调,电视,音响等具遥控功能的设备,避免忘记关设备所造成的浪费,感应范围360°,直径5-7M,输入电压为DC24V,配DC24V适配器。
1)感应无人关闭空调或具有红外遥控功能的其它设备办公大厅BRT-401A四路触摸遥控开关,一路控制吊扇或阻性负载,其余三路可控制任意类型负载,同时可选择三路中任意照明灯具有延时关功能,避免关灯后摸黑到卧室,另配有遥控器,可用红外线远距离控制。
风扇功率≤150W,其它三路负载每路功率≤1000W。
1)控制一路吊扇或阻性照明灯具2)控制其它三路任意照明灯具BRT-308C感应关断三路开关,感应一路灯开,当人一进入客厅时,灯即亮,无需在黑暗中找摸开关,人走灯会马上灭,延时时间约16秒,若用触摸按键打开三路中任意一路灯后,在设定的时间内(1,5,10,20分钟)感应无人时,将关闭三路负载,避免忘记关灯造成的浪费。
欧瑞博智能开关说明书

外观介绍装箱清单设备(x1)本用户指南中所有图片仅供参考,一切请以实物为准。
接近/光线传感器电源键麦克风*接线端子*接线端子L:火线N:零线L1~L3:负载。
每路负载范围:白炽灯≤800W(3路总负载≤2000W ),荧光灯/新风机≤400W(3路总负载≤1000W)A:RS-485信号线B:RS-485信号线背面安装设备关闭电源总闸。
安装及拆卸,请务必联系专业电工师傅安装。
安装/拆卸前请先确认电源总闸已关闭!安装时需配合标准86底盒,在墙壁86型开关、插座位置安装。
用一字螺丝刀伸入开启槽,撬开面板,分离面板和底壳组件。
将墙壁86接线盒里的火线接入底壳组件的L接口,零线接入N接口,灯控/新风控制线接入L1/L2/L3接口。
确认接线正确后,拧紧接线端子螺丝。
开启总闸的电源。
总闸电源开启后,设备自动开机。
扬声器电源键*在开机状态下操作:短按一次:息屏/进入屏保长按3秒:关机/重启长按10秒:强制重启G:地线(请勿遮挡,并保持传感器清洁以体验最佳效果)开启槽重要安全信息禁止自行改装或维修本产品;除废弃本产品时以外,禁止自行拆解。
— 否则可能导致触电、受伤或火灾。
安装涉及到强电操作,请务必联系专业电工师傅安装。
安装/拆卸前请先确认电源总闸已关闭。
禁止用湿手操作插座;禁止在浴缸附近或淋浴房内等环境处使用;禁止在室外使用。
— 否则可能发生触电或受伤。
禁止将设备安装在儿童和婴幼儿的接触范围之内。
使用设备前请先阅读用户指南。
请务必遵守以下安全注意事项。
— 因不遵守本用户指南说明而引起的任何损失,公司概不负责。
产品仅限室内使用。
用户指南(x1)螺丝配件(x1)用附带的螺丝将底壳组件固定到墙壁中的86接线盒里。
(注意 底壳组件 向上)将面板的上半部分对准并贴合到底壳组件(注意面板背面 向上),再将下半部分按进去,将面板重新卡在底壳组件上。
接火线接零线·拧螺丝请使用手动螺丝刀操作。
电动螺丝刀扭力较大可能会将螺丝或底壳组件拧变形,影响拆装。
PRS5000智能高频开关电使用手册

直流输出:负载2路100A熔断器,2路63A、16路32A、2路20A空气开关
电池接口:2路800A熔断器
出线方式:上进上出
系统最大容量:800A/24V(或48V)
宽深高:6006802238mm
重量:180kg(不包括整流模块)
PRS5000R1
组合机架电源系统
系统最大容量:600A/24V(或48V)
宽深高:6006802038mm
重量:140kg(不包括整流模块)
PRS5000K3
系统机架电源子机架
无控制模块
SMPS5000整流模块
外置交、直流配电屏
交流输入:380Vac,三相五线制,两路市电输入
接口:有机架间通信接口
用途:用于PRS5000电源系统
系统最大容量:600A/24V(或48V)
宽深高:6006802038mm
重量:140kg(不包括整流模块)
1.
PRS机架前面板上的RS232接口(见图二)可以通过通信电缆连接PC、终端机、打印机或调制解调器等设备。也可把通信电缆直接接到告警模块背后,此时可用标有“RS2 VT-100”字样的接口。图三给出了一个告警模块与PC连接的示意图。本手册的附录三为DEC VT-100终端的通讯协议。
PRS5000智能高频开关电源系统
使用手册
User's Manual
Microprocessor Controlled Power Rack System
广州珠江电信设备制造有限公司
GUANGZHOU PEARL RIVER TELECOMMUNICATION EQUIPMENT MANUFACTORING CO. LTD.
GZDW智能高频开关电力操作电源技术手册讲解
GZDW智能高频开关电力操作电源系统技术手册TH1-20020816-C-3.1主编:王建华主审:马晓峰李明谦祝佳林编辑:丛福奎任永山东泰开自动化有限公司内容介绍第一章概述电力操作电源的应用、特点、种类、命名原则和配置列表、技术参数、系统组成清单。
第二章标准一体柜系统标准一体柜的结构及配电、馈电原理。
系统的特点和性能指标。
第三章小型一体柜系统小型一体柜的结构及配电、馈电原理。
系统的特点和性能指标。
第四章分屏柜系统分屏柜系统由充电柜和馈电柜组成。
本章分别介绍充电柜I和II,以及标准馈电柜的结构、工作原理、特点和技术指标。
第五章充电模块本章介绍TH充电模块的特点、工作原理、关键技术、技术指标、外形尺寸和安装形式。
第六章监控系统电力操作电源监控系统的构成、特点,分级监控原理,智能电池管理过程。
第七章系统通用组件介绍降压硅链单元以及分级防雷措施和系统接地。
标记和符号约定产品上的标记警告高压在高压存在的地方有此标记。
保护性接地端在机柜底框架保护接地端上有此标记牌。
手册中标记注意注意字句指可能造成设备损坏的状况或做法第一章概述1.1引言GZDW系列智能高频开关电力操作电源系统是我公司集多年开发和设备网上运行经验设计的高可靠产品。
有标准一体柜系统、小型一体柜系统、分屏柜系统I和分屏柜系统II四种类型。
主要应用在发电厂、水电站以及各类变电站、开闭所和用户变中,为断路器分、合闸及二次回路中的仪器、仪表、继电保护和故障照明提供直流电源。
1.2系统特点●采用开关电源特有的模块化设计,N+1热备份。
●超宽的电压输入范围,电网适用性强,可用于环境相对恶劣的场所。
●充电模块可带电插拔,在线维护,方便快捷。
●采用我公司专利,具有国际领先水平的“谐振电压型双环控制的谐振开关电源”全程软开关技术,转换效率高,电磁干扰小。
●硬件低差自主均流技术,模块间输出电流最大不平衡度小于±3%。
●系统设计采用IEC(国际电工委员会)、UL等国际标准,可靠性与安全性有充分保障。
通用智能开关使用说明书
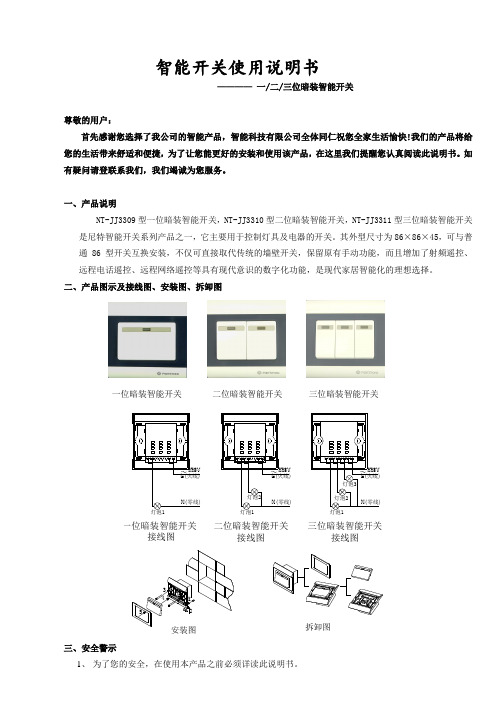
智能开关使用说明书————一/二/三位暗装智能开关尊敬的用户:首先感谢您选择了我公司的智能产品,智能科技有限公司全体同仁祝您全家生活愉快!我们的产品将给您的生活带来舒适和便捷,为了让您能更好的安装和使用该产品,在这里我们提醒您认真阅读此说明书。
如有疑问请登联系我们,我们竭诚为您服务。
一、产品说明NT-JJ3309型一位暗装智能开关,NT-JJ3310型二位暗装智能开关,NT-JJ3311型三位暗装智能开关是尼特智能开关系列产品之一,它主要用于控制灯具及电器的开关。
其外型尺寸为86×86×45,可与普通86型开关互换安装,不仅可直接取代传统的墙壁开关,保留原有手动功能,而且增加了射频遥控、远程电话遥控、远程网络遥控等具有现代意识的数字化功能,是现代家居智能化的理想选择。
二、产品图示及接线图、安装图、拆卸图一位暗装智能开关二位暗装智能开关三位暗装智能开关220VN(零线)L(火线)220V灯泡1灯泡2灯泡3N(零线)L(火线)220V一位暗装智能开关接线图灯泡2灯泡1N(零线)L(火线)三位暗装智能开关接线图二位暗装智能开关接线图灯泡1安装图345213拆卸图三、安全警示1、为了您的安全,在使用本产品之前必须详读此说明书。
2、聘请专业电工为您安装或拆卸开关,安装或拆卸开关时,必须先切断电源。
3、本开关安装在洗漱间、浴室等潮湿的地方时应装防溅盒或采取防潮措施。
4、配接负载时应严格控制在负载功率之内。
5、安装开关时严禁锤打、过力紧固以防面板变形,同时严禁金属物掉入开关外壳内。
四、概念解释:1、学习状态:此时可以把遥控器的某一指令代码,存储于开关(插座、单路控制器)的记忆芯片中,从而实现两者之间的相互确认2、对码:实现遥控器和开关(插座、单路控制器)的相互确认。
如果不进行对码,遥控器则不能控制该开关(插座、单路控制器)3、数字对码:实现遥控器数字键和开关(插座、单路控制器)的相互确认。
EATON智能家居开关指南说明书
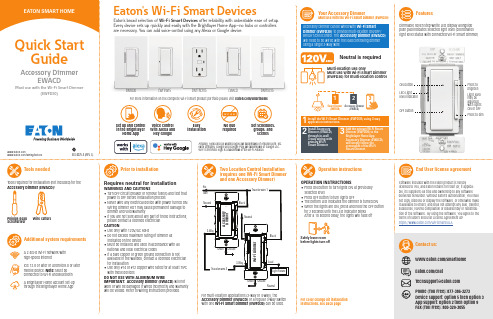
Accessory Dimmer can be wired with Wi-Fi Smart Dimmer (EWFD30) to provide multi-location ON/OFF/BRIGHT/DIM control. The Accessory Dimmer (EWACD) will need to be wired with the load controlling dimmer using a single 3-way wire.Dimmable seven step white LED display alongside push pad indicates selected light level (coordinates light level status with connected Wi-Fi Smart Dimmer)Your Accessory DimmerMust use with the Wi-Fi Smart Dimmer (EWFD30)FeaturesLight level may be adjusted with lights ON or OFF Press to brighten Press to dimTwo Location Control Installation (requires one Wi-Fi Smart Dimmer and one Accessory Dimmer)Operation instructionsMulti-location use onlyMust use with Wi-Fi Smart Dimmer (EWFD30) for multi-location controlPrior to installationOPERATION INSTRUCTIONS• Press ON button to turn lights ON at previously selected level• Press OFF button to turn lights OFF• The bottom LED indicates the dimmer is turned ON • W hen the lights are ON, press and hold the OFF button for 2 seconds until the LED indicator blinks After a 10 second delay, the lights will fade offFor color change kit installation instructions, see back pageInstall the Wi-Fi Smart Dimmer (EWFD30) using 3-way application instructions.12Install Accessory Dimmer (EWACD) through in-wall 3-way wiring with primary Wi-Fi S mart Dimmer.3Add the primary Wi-Fi Smart Dimmer (EWFD30) to the Brightlayer Home App.Accessory Dimmer (EWACD) will simply follow the commands of the Wi-Fi Smart Dimmer.3Tools neededAdditional system requirementsPhillips-head ScrewdriverWire cuttersTools required for installation (not included) for the Accessory Dimmer (EWACD):A 2.4GHz Wi-Fi network with high-speed internetIOS 12.0 or later or Android 8.0 or later mobile device. Note: Must be connected to Wi-Fi and Bluetooth A Brightlayer Home account set-up through the Brightlayer Home AppVoice controlw ith Alexa and Hey Google installation requiredSet schedules, groups, and scenesFor multi-location applications (3-way or 4-way), the Accessory Dimmer (EWACD) or a regular 3-way switch with one Wi-Fi Smart Dimmer (EWFD30) can be used.Neutral is requiredSafely leave roombefore lights turn offWi-Fi Smart Devices offer reliability with unbeatable ease o f setup. /smarthomeEWFSW15EWFTRCR15EWACDEWFFSC15Amazon, Alexa and all related logos are trademarks of , Inc. or its affiliates. Google and Google Play are trademarks of Google LLC. Wi-Fi CERTIFIED logo is a trademark of the Wi-Fi Alliance.Requires neutral for installationWARNINGS AND CAUTIONS • T urn OFF circuit breaker or remove fuse(s) and test that power is OFF before installation process • N ever wire any electrical device with power turned ON Wiring dimmer HOT may cause permanent damage to dimmer and void warranty • I f you are not sure about any part of these instructions, please contact a licensed electrician CAUTION• Use only with 120V/AC 60Hz• Do not exceed maximum rating of dimmer as indicated on the device • M ust be installed and used in accordance with all national and local electrical codes • I f a bare copper or green ground connection is not available in the wallbox, contact a licensed electrician for installation • U se only #14 or #12 copper wire rated for at least 75ºC with these devicesDO NOT USE WITH ALUMINUM WIREIMPORTANT: Accessory Dimmer (EWACD) will not work or will be damaged if wired incorrectly and warranty will be voided. Refer to wiring instructions provided.Once selected the devices would be displayed as shown below:Note: Now the user can utilize many features that are available such as creating schedules, scenes, preset light levels and minimum/maximum brightness settingsthrough the Brightlayer Home App.FCC STATEMENTThis device complies with Part 15 of the FCC Rules. Operation is subject to the following two conditions:1: This device may not cause harmful interference, and2: This device must accept any interference received, including interference that may cause undesired operation.NOTE: This equipment has been tested and found to comply with the limits for aClass B digital device, pursuant to Part 15 of the FCC Rules. These limits are designed to provide reasonable protection against harmful interference in a residentialinstallation. This equipment generates, uses and can radiate radio frequency energy and, if not installed and used in accordance with the instructions, may cause harmful interference to radio communications. However, there is no guarantee that interfer-ence will not occur in a particular installation. If this equipment does cause harmful interference to radio or television reception, which can be determined by turning the equipment off and on, the user is encouraged to try to correct the interference by one or more of the following measures:• Reorient or relocate the receiving antenna.• Increase the separation between the equipment and receiver.• Connect the equipment into an outlet on a circuit different from that to which the receiver is connected.• Consult the dealer or an experienced radio/TV technician for help.FCC CAUTION: Any changes or modifications not expressly approved by Eaton Wiring Devices could void the user’s authority to operate the equipment.This device complies with Industry Canada’s license-exempt RSSs. Operation is subject to the following two conditions:(1) This device may not cause interference; and(2) This device must accept any interference, including interference that may cause undesired operation of the device.EATON WIRING DEVICES LIMITED 2 YEAR WARRANTYEaton Wiring Devices warrants its Dimmer to be free of defects in materials and workmanship in normal use and service for a period of two years from date of original purchase. THIS TWO (2) YEAR LIMITED WARRANTY IS IN LIEU OF ALL OTHER WARRANTIES, OBLIGATIONS, OR LIABILITIES, EXPRESSED OR IMPLIED (INCLUDING ANY IMPLIED WARRANTY OF MERCHANTABILITY OR FITNESS FOR A PARTICULAR PURPOSE THAT IS IN DURATION IN EXCESS OF TWO YEARS FROM THE DATE OF ORIGINAL CONSUMER PURCHASE). NO AGENT, REPRESENTATIVE, OR EMPLOYEE OF EATON HAS AUTHORITY TO INCREASE OR ALTER THE OBLIGATIONS OF EATON UNDER THIS WARRANTY. To obtain warranty service for any properly installed Eaton Dimmer that proves defective in normal use send the defective Dimmer prepaid and insured to Quality Control Dept., Eaton Wiring Devices, 203 Cooper Circle, Peachtree City, GA 30269; in Canada: Eaton Wiring Devices, 5925 McLaughlin Road, Mississauga, Ontario L5R 1B8. Eaton will repair or replace the defective unit, at its option. Eaton will not be responsible under this warranty if examination shows that the defective condition of the unit was caused by misuse, abuse, improper installation, alteration, improper maintenance or repair of damage inTroubleshooting guideAccessory Dimmer color change kit installation instructionsSTEP 1 :Squeeze top tabs on either side of the deviceSTEP 2 :Pull faceplate offSTEP 3 :Line up all tabs and snap the faceplateWarrantyLED statusSet-up the Wi-Fi smart dimmer (EWFD30)Add the primary Wi-Fi Smart Dimmer (EWFD30) to theBrightlayer Home App, so that the Accessory Dimmer (EWACD) will simply follow the commands of the Wi-Fi Smart Dimmer.STEP 1 : Double click on the “ON” button on the Wi-Fi Smart Dimmer (EWFD30). Status LED on the Wi-Fi Smart Dimmer should be blinking cyan to indicate that the device is in set-up mode. If the status LED is not blinking, refer to the Troubleshooting guide.STEP 2 : Log in to your account on the Brightlayer Home App STEP 3 : Select “Devices” optionOnce initial device is installed, additional devices can be added using the global add (+) buttonNext click on “Add a Device” option shown in the screen belowSelect the device type to addHow to download the AppGet your Wi-Fi Smart Device running in 3 easy steps!STEP 3 (continued) :Amazon, Alexa and all related logos are trademarks of , Inc. or its affiliates. Google and Google Play are trademarks of Google LLC. Wi-Fi CERTIFIED logo is a trademark of the Wi-Fi Alliance.STEP 3 (continued) :SymptomPossible causeSolutionDevice doesn’t function. All LEDs are OFFA)B) C) Circuit breaker is OFF or trippedImproper wiring Defective dimmerA) B) C) Turn ON the circuit breakerCheck and correct wiring Replace dimmerOne of the LED indicators is blinking, but can’t control the load.Accessory dimmer (EWACD) is not connected to the Wi-Fi Smart Dimmer (EWFD30)Check wiring diagram Quick reference table for Wi-Fi Smart Dimmer (EWFD30) functionalityNOTE: Not all products include color change kits.Available in 3 different color change kitsFor more information, visit /smarthomeDownload the AppSearch and download the Brightlayer Home App via the App Store or Google Play.Select “Create an Account” to create an account by following the instructions on the screen.Fold in half vertically with page 1 on outside, then Z-fold in horizontal direction to final folded size of 3.4 in. W x 5.5 in. H with part number facing outward.。
欧璐智能开关说明书

OULU欧璐智能开关说明书安全事项为了安全、请有效的使用本开关,请您在使用前阅读本说明书。
禁止在接通电源的情况下安装本开关禁止负载超过额定功率禁止在潮湿、有可能引起爆炸的环境中使用如果开关浸水、摔坏、请停止使用并及时修理请勿使用含酒精、甲醇等化学洗涤剂清洁开关请勿使用注入式电源,如调压器非专业人员请勿拆卸本开关在安装时请保持暗埋底盒清洁,防止灰尘进入开关OL86A-KA功能:1.本开关所连的电灯(3路)可手动、红外遥控、和其它开关的异地控制。
2.实时互控,每个开关都可同步控制所有的灯(最多27路)。
3.每个开关都可同步显示27个空间的照明状态。
4.全关功能,可一键关闭所有的电灯,也可以关闭任意一个房间的电灯。
5.免打扰自锁功能,可禁止其它开关对本开关进行控制。
6.断电保护,来电时将有声音提示,并关闭所有已开启的电灯。
7.可关闭键盘指示灯状态。
8.可关闭按键声音。
9.自动夜光功能。
10.有来电提醒功能(打开/关闭)。
11.有红外接收功能(打开/关闭)。
12.内设防雷保护作用。
13.内设I2C存储器,所有设定自动记忆。
14.可快速设定开关名称(方便、快捷)。
15.操作错误有声音提醒。
16.标准86型安装尺寸。
产品外观:OL86A-KA智能开关产品外观:OL86A_YA遥控器应用简介户型图OL86A-KA智能开关应用于住房内各个房间里灯光之间的相互控制,并可显示每个房间的灯光状况,用户可以在任一开关上对住房里所有灯光进行控制,也可用遥控器进行操作。
产品接线注:所有开关线路必须全部安装完毕后才可接通电源。
产品接线产品接线一、锁定本房间的灯:锁定指示灯亮时,表示已锁定本房间的灯,此时所有开关将不能改变灯的状态,再重复以上操作,将解除锁定状态,灯会处在最后一次操作的状态。
操作步骤见例图1(作用:防止别人打扰你)二、自动夜光功能:在无任何灯光开启的情况下,键盘上指示灯自动微亮。
(此功能可打开/关闭) 操作步骤见例图2(作用:在夜晚方便快速找到开关)三、关闭指示灯状态:在不影响其他房间灯亮的情况下可关闭面板指示灯状态。
智能功率电子开关产品手册

重要说明为了保证您的人身安全、防止出现财产损失,在安装和调试智能功率电子开关之前,请您务必仔细阅读本手册,且必须遵守本手册中的有关提示。
正确的运输、存放、安装和装配,以及细心地操作和维护,对于智能功率电子开关的正常和安全运行是至关重要的。
只能由训练有素的专业人员调试和操作设备/系统。
本安全说明中所述之训练有素的人员是指有资格根据安全技术的标准,对设备、系统和电路进行操作、接地和标识的人员。
按照电子开关的要求,必须在控制设备的所有工作方式下都保持可控性。
无论紧急停车设备是如何停止运转的,都不能导致不可控的或者未曾预料的再次起动。
本设备适用于回路电压为380V的地方,具有熔断器保护,最大电流值参见相应选型数据。
易卸螺丝和快速插接器便于您拆卸设备的部件。
您可以回收这些拆卸下来的部件,并根据地方当局的要求进行处理,或把它们返还给制造商。
本手册中对某些有效的功能可能未加说明。
但是,在新的控制装置中或进行服务时,并不因为我公司提供了这些功能而要承担任何责任。
编审过程中,我们对本手册的内容与所述的硬件和软件的一致性进行了审核。
但是,仍然可能存在矛盾和谬误的地方,不可能保证它们完全一致。
我们将定期检查本手册中涵盖的内容,并在以后修订的版本中予以必要的修正。
欢迎提出改进的建议。
目录一、概述: (3二、产品特点: (3三、型号定义: (4四、使用条件 (4五、技术条件: (4六、选型说明: (5七、端子说明: (6八、调试说明: (7九、参数说明: (10十、故障代码说明: (14十一、显示面板状态说明: (15十二、注意事项: (16十三、维护事项: (16十四、附录: (17十五、附件: (17一、概述:AES70系列智能功率电子开关是本公司在原AES2X系列全数字交流电子开关基础上,软、硬件及主体结构全面升级的新型系列产品,其核心技术采用了当今最先进的马达控制专用芯片—美国德克萨斯州仪器公司生产的TMS320F240数字信号处理器,确保运算精确、响应迅速,控制特性优异、可靠性高。
智能家居系统:智能开关B5X-LS4-U说明书

1smart-houseProduct DescriptionType SelectionHousing Colour LEDs Supply by bus 55 x 55 mm White/Black* 4 white / 4 blue B5X-LS4-U *Delivered with white and black pushbutton coversEunica line, Light Switch Type B5X-LS4-UThe B5X-LS4-U is a light switch with 4 buttons and 4LED outputs. It is developed to be mounted into a 55 x 55 wall socket from Elko,Gira and Jung. The light-switch has two colours of LEDs, white and blue, indi-vidually programmable.The light switch is part of the smart-house concept for building automation applica-tions and can be used to control lights, roller blinds and all other functions sup-ported by the smart-house controller. It is fully pro-grammable via the SH tool.•Light switch for building automation application•Developed to fit into wall socket and frames from Elko,Gira and Jung•Temperature range: -20 to +50°C•4 individually programmable pushbutton inputs •Supplied by bus, no external supply required•Delivered with 2 white and 1 black pushbutton covers •White LEDs: programmable guide light function •Blue LEDs: programmable function statusLED 4 white / 4 blueOutput SpecificationsKeypad 4 pushbuttonsInput SpecificationsDupline ®SpecificationsPower supply Supplied by busSupply SpecificationsB5X-LS4-UMode of OperationThe B5X-LS4-U is fully pro-grammable via the SH tool. Each push-button can be individually associated to one or more of the functions supported by the smart-house system.B5X-LS4-U connected to the SH2WEB24Coding/AddressingIf the light switch module is connected to the SH2WEB24 controller, no addressing is needed since the module is provided with a specific identification num-ber (SIN): the user has only to insert the SIN in the SH tool when creating the sys-tem configuration.Used channels: 4 input channels, 4 output channels. LED programmingAlso the LEDs are config-urable via SH Tool:•White LEDs. The 4 whiteLEDs can be programmedindividually as guide light.If the guide light functionalityhas been activated and a sin-gle switch has been associ-ated to a function, then thewhite LED relevant to thatswitch will be ON, if the func-tion is OFF, and it will be OFF,if the function is ON.•Blue LEDs: The 4 blueLEDs can be individuallyprogrammed as functionstatus indication.If the Dupline®bus is faultyor missing, the LED will beOFF.B5X-LS4-U connected to theBH8-CTRLX-230Coding/AddressingIf the light switch moduleis connected to theBH8-CTRLX-230 controller,the user has to program theDupline®channels using theBGP-COD-BAT: this modulehas 4 input (push buttons)and 4 output (LEDs) chan-nels.I/0 1-4: push button 1-4I/0 5-8: LED 1-4LED programming•White LEDs: The 4 whiteLEDs can be all togetherprogrammed as guide light(they will be ON when thelight is OFF).Fail safe bit =0: guide lightfunction disabled.Fail safe bit=1: guide lightfunction enabled.The factory setting is failsafe bit=0.The fail safe bit has to beprogrammed by theBGP-COD-BAT.•Blue LEDs: The 4 blueLEDs can be individuallyprogrammed as functionstatus indication.If the Dupline®bus is faultyor missing, the LED will beOFF.Wall Socket and framecompatible with the EunicalineThe Eunica 55 x 55 lightswitch can fit into the frameand wall socket listed below:for any other model notincluded here below, CarloGavazzi does not grant anycompatibility.•ELKO•GIRA•JUNG.General Specifications2B5X-LS4-UDimensionsWiring DiagramsD+D-D-D+3。
Ecolink智能技术有限公司智能开关操作指南说明书
3) The LED in front of the unit will blink steadily if the network exclusion is successful.
*Please refer to the LED status section for more information on the LED behavior
© 2018 Ecolink Intelligent Technology Inc.
PN DDLS2-ZWAVE5
Notes:
Controller inclusion mode must be activated BEFORE starting sensor inclusion or exclusion mode.
The device can only be included into one controller network at a time, and must be excluded from one network before inclusion in another.
Exclusion mode on the senor iocedure as inclusion.
PN DDLS2-ZWAVE5
Network Inclusion
The Z-Wave Plus Smart Switch must be added to a Z-Wave Plus network prior to use. To include the device in a network both the device and the network controller must be in inclusion mode at the same time. Refer to the instructions provided by the manufacturer of your specific controller for details on initiating the controller’s inclusion mode. 1) Verify that the Z-Wave Plus controller you are using is compatible
智能开关dimmer_WD1_ZWA037-A详细参数说明书

(ZWA037-A)Engineering SpecificationsThis product can be operated in any Z-Wave™ network with other Z-Wave Plus™ certified devices from other manufacturers. All non-battery operated nodes within the network will act as repeaters regardless of vendor to increase reliability of the network. Each module is designed to act as a repeater, which will re-transmit a radio frequency (RF) signal by routing the signal around obstacles and radio dead spots to ensure that the signal is received at its intended destination. ZWA037-A is a security enabled Z-Wave Plus™ device. A security Enabled Z-Wave Plus™ Controller must be used in order to fully utilize the product.1 Library and Command Classes1.1 Embedded SDKv 7.13.91.2 Device TypeGeneric Type: Switch MultilevelSpecific Type: Not Used1.3 Role TypeAlways On Slave (AOS): ROLE_TYPE_SLAVE_ALWAYS_ON (0x05)1.4 Command ClassCommand Class Name Version Required Security Class Z-Wave Plus Info V2noneSecurity 2V1noneSupervision V1noneTransport Service V2noneAssociation V3highest granted Association Group Information V3highest grantedMulti-Channel Association V4highest grantedVersion V3highest grantedManufacturer Specific V2 highest grantedDevice Reset Locally V1highest grantedPower Level V1highest grantedIndicator V3highest granted Firmware Update Meta Data V5highest grantedConfiguration V4highest grantedCentral Scene V3highest grantedSwitch Multilevel V4highest grantedScene Activation V1highest granted Scene Actuator Configuration V1highest granted2 Installation wiring diagram2.1 Single pole wiring2.2 3-Way wiring2.3 4-Way wiring3 Z-Wave™ Network OperationFunctions Action Button DescriptionInclusion 1x tap Out ofnetworkSend NIF for network pairing/ inclusion (white LED quick flashes).If pairing is successful, the LED will turn to solid green for 2s, thendeactivates.In networkTrigger to send Central Scene 1x tap scene.ON/OFF control of output load.Central Scene 2x tap In network Trigger to send Central Scene 2x tap scene.Exclusion 3x tap In network Send NIF for network unpairing/ exclusion (purple LED flashes). Out ofnetworkTrigger to send Central Scene 3x tap scene.Toggle parameter 86 4x tapTopbutton Toggles parameter 86 from value 0 - 100%.Toggle parameter 84 5x tap Toggles parameter 84 from value 0 - 9. Toggle parameter 85 6x tap Toggles parameter 85 from value 0 - 9 Toggle parameter 83 7x tap Toggles Parameter 83 from values 0, 1, 2.Set the max brightness level 8x tap +hold on8th, thenrelease.Sets the default max brightness level on Parameter 132, whenreleased, saves set brightness as the max brightness level.Starts ramp up from current output level.Ramps speed at 5 seconds to 100%Toggle parameter 110 9x tap Toggle parameter 110 from value 0, 1, 2Toggle parameter 121 4x tapBottombutton Toggle parameter 121 from value 0, 1, 2, 3.Toggle parameter 122 5x tapToggle parameter 122 from value 0, 1, 2. Toggle parameter 20 6x tap Toggle parameter 20 from value 0, 1, 2Set the min brightness level 8x tap +hold on8th, thenrelease.Sets the default minimum brightness level on Parameter 131,when released, saves set brightness as the minimum brightnesslevel.Starts ramp down from current output level.Ramps speed at 5 seconds to 100%.Toggle parameter 111 9x tap Toggle parameter 111 from value 0, 1, 2 Toggle parameter 120 10x tap Toggle parameter 120 from value 0, 1, 2Central Scene Press and hold for 1 -15sTrigger to send Central Scene hold scene.Dim control output load.Central Scene Release Trigger to send Central Scene release scene. Stop dim control output load.Nothing Press and hold for 16– 19sFlash red LED rapidly.Factory reset Press and hold for 20s Manual Factory reset -> Send gateway RESET DEVICE LOCALLYNote: When the LED turns into Blue, then release the button, the LED will be solid Blue for 2 seconds, during the 2 seconds, tap the button again, it will start the factory reset process, then return to factory reset LED status.1)This device must be used in conjunction with a Security 2 Enabled Z-Wave Controller in order to fully utilize all implemented functions.3 Association GroupsThe device supports 9 association groups and every group supports max 5 associated nodes.Group 1 is lifeline group, all nodes associated in this group will receive the messages sent by device through lifeline. Group 2-9 are controlling groups.The Command Class supported by each association group is shown in the table b elow:ID Name Node Count Profile Function1 Lifeline 5 General:LifelineDevice Reset Locally Notification:Issued when Factory Reset is performed.Indicator Report:Issued when included successfully.Switch Multilevel Report:Issued when output level is changed. (Determined by Parameter 80).Basic Report:Issued when output level is changed (Determined by Parameter80).Central Scene Notification:Issued when button press or hold or release. (Determined by Parameter121).2 Top buttonset ON/OFF5Control:Key 1Basic Set or Switch Binary Set:Issued when Top button press. (The command class is determined byParameter 82)3Top buttonmultilevel set5Control:Key 1Switch Multilevel Set:Issued when Top button press or hold and release.4Bottombutton setON/OFF5Control:Key 2Basic Set or Switch Binary Set:Issued when Bottom button press. (The command class is determinedby Parameter 82)5Bottombuttonmultilevel set5Control:Key 2Switch Multilevel Set:Issued when Bottom button press or hold and release.6Externalswitch setON/OFF5Control:Key 3Basic Set or Switch Binary Set:Issued when External Switch press. (The command class is determinedby Parameter 82).7Externalswitchmultilevel set5Control:Key 3Switch Multilevel Set:Issued when External Switch press or hold and release.8Top andbottom buttonset ON/OFF5Control:Key 4Basic Set or Switch Binary Set:Issued when Top/ Bottom button press. (The command class isdetermined by Parameter 82).9Top andbottom buttonset multilevelset5Control:Key 4Switch Multilevel Set:Issued when Top/Bottom button press or hold and release.4 Basic Command Map•Basic CC is mapped to Switch Multilevel CC.•Basic Set is mapped to Switch Multilevel Set.5 Indicator Command ClassIndicator ID Property ID 0x50 (NODE IDENTIFY) 0x03(ON OFF PERIOD)0x50 (NODE IDENTIFY) 0x04(ON OFF CYCLES) 0x50 (NODE IDENTIFY)0x05(ONE TIME ON OFF PERIOD)6 Manufacturer InformationParameter Value Manufacturer ID 1 0x03 Manufacturer ID 2 0x71 Product Type ID 1 0x01 Product Type ID 2 0x03 Product ID 1 0x00 Product ID 20x257 ConfigurationUser can change the default settings by the below configuration parameters. After device reset, all these parameters will be set to their default values.Number Name Information Size MIN MAX Default Description 20Power RestoreStatus after power failure.1220 - return to OFF 1 - return to ON2 - returns to last known state when repowered 40Auto Turn Off Timer Timer that auto turn off once turned on.4 0 65535 00 - disabled1 - Auto turn off after 1s once turned on ...65535 - Auto turn off after 65535s once turned on 41Auto Turn On Timer Timer that auto turn on once turned off.4 0 65535 00 - disabled1 - Auto turn on after 1s once turned off ...65535 - Auto turn on after 65535s once turned off 80Instant Status ReportThe command for status report.1 02 20 - Nothing1 - Basic Report2 - Binary Switch Report 82Association Control SettingsSetting command for association group. 1 1 2 11 - Basic Set2- Binary Switch SET83 Led Indicator Settings Select the indicator function for output. 1 0 2 20 - disable completely 1 - Momentary blink2 - LED follows status of output 84 Led Indicator Color For OutputSelect the indicator color for output. 1 0 9 90 - Disabled 1 - Red 2 - Blue 3- Green 4- Pink 5- Cyan 6- Purple 7- Orange 8- Yellow 9- White 85Led Indicator Color For Select the indicator color for scene.1 0 9 20 - Disabled 1 - RedScene2 - Blue 3- Green 4- Pink 5- Cyan 6- Purple 7- Orange 8- Yellow 9- White86LedBrightnessSetting the brightness of indicator.1100600 - Disable 1 - 1% ...60 - 60% ...100 - 100%110Single Tap behavior Select behavior when single tap.1 0 3 00 - Last brightness level1- Custom value from Param 133 2- Max brightness from Param 132 3- Full brightness at 100%111Double Tap behavior Select behavior when double tap.1 0 3 00 - Full brightness at 99 ...1- Custom value from Param 133 2- Max brightness from Param 132 3- disabled 119External Switch Scene Enable or disable the scene function ofexternal(3-way) switch.1 0 1 10 - Disable 1 - enable120External Switch Type Select the external (3- way) switch's type.1 0 3 10 - toggle on or off only1 - toggle switch/1x to toggle /2x use Param 132 or 133 /3x toggle dimmer loop ramp -> toggle once more to stop dim2 - momentary switch / 1x to toggle / 2x user Param 132 or 133/ Press and hold to dim up and down3 - momentary switch / 1x quick toggle / 2x user Param 132 or 133 / Press and hold to dim up and down (but after a double click to full brightness, then press and hold will always go down instead of increasing) 121Output Control Enable or disable output.1 0 3 30 - disable completely 1 - enable local control 2 - enable central scene3 - enable local and central scene 122Button Function Select the paddle button functions. 1 0 2 00 - up/ON, down/OFF 1 - down/ON, up/OFF2 - toggle (up or down are the same)123 Report BehaviorSelect behavior for report and indicator when output is disable.1 0 1 00 - report on/off status and change LED indicator when parameter 121 is set to 0 or 21 - Don't report on/off status is pressed and parameter 121 is set to 0 or2 125Ramp Rate for Tap and Hub control Setting ramp rate when tap to on off or controlled by HUB. 1 0 99 20 - instant...2 - Ramp Rate 2s ...99 - Ramp Rate 99s 126 Ramp Rate for press and hold Setting ramp rate when press and hold the paddle.1 1 99 41 - Ramp Rate 1s ...4 - Ramp Rate 4s ...99 - Ramp Rate 99s 131Minimum most dim Setting the minimum value of dimmer.1 0 99 00 - Disable1 - Minimum value is 1setting ...99 - Minimum value is 99132 Maximummost dimsetting Setting the maximumvalue of dimmer.1 0 100 100 0 - Disable1 - Maximum value is 1...100 - Maximum value is 100133 Custombrightness Setting user custombrightness.1 0 99 0 0 - Disable1 - custom brightness level is 1...99 - custom brightness level is 998 Security NetworkThis device is a security enabled Z-Wave Plus product that is able to use encrypted Z-Wave Plus messages to communicate to other security enabled Z-Wave Plus products.This device supports security levels are listed in below t able:Security Levels Support (Yes/No)SECURITY_KEY_S0 NoSECURITY_KEY_S2_UNAUTHENTICATED YesSECURITY_KEY_S2_AUTHENTICATED Yes9 SmartStartSmartStart enabled products can be added into a Z-Wave network by scanning the Z-Wave QR Code present on the product with a controller providing SmartStart inclusion. No further action is required and the SmartStart product will be added automatically within 10 minutes of being switched on in the network vicinity. You can find the QR code on the bottom of the product, like this:And the DSK information will be shown like this:DSK: XXXXX-XXXXX-XXXXX-XXXXX-XXXXX-XXXXX-XXXXX-XXXXX10 SpecificationsPower Supply AC120V, 60HzMax load 150W LED/CFL, 500W incandescent.Min load 5W LEDCommunication Frequency 908.40MHz, 916.00MHz (US)Communication Range Up to 70m+ indoors (line of sight) or 150m outdoors.Communication Certification Z-Wave Plus v2 with SmartStartOperational Temperature 0 - 40℃ / 32 - 104℉Operating Humidity 8% to 80%。
- 1、下载文档前请自行甄别文档内容的完整性,平台不提供额外的编辑、内容补充、找答案等附加服务。
- 2、"仅部分预览"的文档,不可在线预览部分如存在完整性等问题,可反馈申请退款(可完整预览的文档不适用该条件!)。
- 3、如文档侵犯您的权益,请联系客服反馈,我们会尽快为您处理(人工客服工作时间:9:00-18:30)。
A RTEOR TM FLOW OF ENERGIES
FLOW OF ENERGIES 能量的流动
M e e t t h e D e s i g n e r s PIERRE-YVES PANIS AND DENYS TOULEMONDE
ARE DESIGNERS AT LEGRAND.
THEY ARE HERE TO TELL US ABOUT THE GENESIS OF THE NEW ARTEOR TM
INTERNATIONAL LINE.
奥特项目设计师的职责是什么?
不论设计师的职责范围是什么,他们必须兼顾产品功能与外观的最佳平
衡。
这就需要他们持续的革新,即使这意味着要改变对待一些事物的习
惯和假设。
就工业设计而言,关乎战略问题的核心就是:技术革新。
技
术革新把繁杂的电子零件、更加精密的功能性与用户期望的多功能、易
用性紧密地结合到了一起。
现在的产品必须做到好用、直观、美观,并
真正实现身份地位的提升。
对于消费者和设计师而言,差异化和认同的
品质已经变成他们是否做出选择的重要因素。
因此我们要做的是提前捕
捉流行趋势和预测潮流。
正因为此罗格朗的设计师始终关注建筑风格和
设计流行趋势,他们再用自己独特的风格设计出来。
设计师的工作是直
观和富于想象力的,最终产品是其创意性和合理性的结晶。
2
对话设计师
皮埃尔和丹尼斯先生是罗格朗的两位设计师。
他们现在将为我们讲述全新的奥特国际化设计的设计灵感。
3
奥特项目是怎样实现的?
How did the Arteor project take shape?
首先,奥特包含了罗格朗所有的专有技术,并包括
几个关键因素:
• 高端定位,确保奥特有价值的提升。
• 简约、清新的风格为世界上不同的市场所接受。
包涵一定的亚洲文化价值,奥特的开发立足于与本土工业设计公司紧密合作。
在创新层面上,这种合作代表了大家加强跨文化、跨地域交流的意愿,是灵感之源,是与世界交汇融合的第一步。
这种合作关系也坚定了我们集思广益和突出项目国际化空间的意愿。
这种协同效应是真正的创新方案。
“Firstly, Arteor TM had to encompass all
“首先,奥特包含了罗格朗所有的专有技术”
这种国际性的大项目所遇到的阻碍是什么?What are the constraints encountered during a project of this scale?在这个电子信息时代,相隔数万公里的工厂和亚洲工作室之间没有距离上的障碍。
地理上的距离并不意味着“创新”有距离,我们分享着相同的价值观与情感。
全球化的参与使得这种挑战正逐步突破国与国之间的限制。
这些限制可能是主观因素,如偏好、流行的影响、习惯…,也可能是一些现实因素,比如按钮的形状或者当地使用的标准等。
我们要开发一种概念,这种概念能够包含各种不同的标准并保持外观上的一致性。
“ W ith Arteor TM , wiring devices are perfectly in sync with new technologies.”4“奥特,开关插座与新科技完美的结晶”
“The round shape ensures the functions of modern wiring devices are harmoniously integrated.
”5
“圆形设计保证时尚的开关插座多种功能的和谐统一
”
TATTOO
MIRROR
6
GRAPHIC
«镜面黑»
«Mirror Black»
打造平薄镜面与注重“高科技感”的和谐统一。
触摸屏产品,
使奥特成为经典的开关插座与先进系统完美结合的典范。
图腾镜面纹理
7从最精致的到最富创意的。
有一些是独一无
二的材质处理,如金属编织材料,红色镜
面材料,还有装饰粗面皮革(鲨革或珍珠鱼
皮)材料。
为此,我们的设计团队对材料及表面处理都
具备专业的经验。
为探求新的流行趋势,我们不断对其他相关
市场进行观察,诸如:装饰、电子、汽车、
照明以及家具市场等...
我们也从出差海外、参加各种展会以及资料
库中了解不同文化并获取灵感,以更加丰富
我们产品的多样性并满足不同的生活方式的
需求。
最后,由对材料的使用与生产拥有非“Particular attention is therefore paid to the selection and quality of materials.”
BRUSHED METAL LEATHER SIGNATURE
金属拉丝
皮革金属编织你如何从原料中得到这些效果? “特别专注于材质的选择与品质保证.”
场景,根据自己喜好来设定功能:影院环境或朋友聚会、柔和的灯光、自动关窗帘以及调整温度……只要您能想得到的,我们就能帮您实现。
这个系统就是房间的大脑。
人性化的图标设计操作简单一目了然。
相比于文字,图标更容易为大多数人识别。
对应功能的实现仅需要一个简单的动作,这是科技最根本的体现。
Is Arteor TM an appropriate answer by Legrand in today’s complex design environment?
是的,我们相信设计理念能满足我们受众群体的真正需求。
由于人口流动与文化的揉杂,个人的生活方式不
再一成不变。
如今,人们通过旅行
或上网获得大量的信息,影响着他们的观念。
这种信息资源的覆盖与距离的限制,使他们更容易接受差异性并建立他们自己的价值观。
这为我们的设计带来了很大的创造自由。
设计师于是选择极简主义风格
以保证奥特系列的经典永恒,并在相当长的时间内保持生命和活力。
这符合我们对简单与真实性的设想。
这也取决于我们、设计师、制造商以及顾问用最适合的方式来满足这种需求。
“人们的生活方式不断改变”
“People’s lifestyles are constantly evolving”
奥特是如今纷杂设计环境下罗格朗给出的最佳方案吗?
T o u c
h
触摸
C u s t o m i z e
定制
V i s u a l i z
e
可视化
C o n t r o l
控
制
S u p e r v i s e
监控
S u b l i m a t e
高贵
O f f i c e s
办公室
H o t e l
s 酒店
M
a
g
n
i
f
y 突显
C
h
o
o
s
e 选
择
B
e
a
u
t
i
f
y 美学
E
n
r
i
c
h 丰
富
E
n
n
o
b
l
e 高
贵
A
c
t
i
v
a
t
e 活
力
I m a g i n e
想象
C e n t r a l i z e
集中管理
M o d e r n i z e
现代化
O f f i c e s
写字楼
H o t e l s
酒店
C o n n e c t
连接。
