AZ8928噪音计说明书
便携式噪声仪victor824a中文说明书

VICTOR 824A 说明书目录一、适用范围 (3)二、功能说明 (3)三、规格 (4)四、校正方法 (6)五、各种名称和功能 (7)六、LCD液晶显示面板说明 (9)七、操作前准备事项 (10)八、操作步骤 (11)九、注意事项 (12)数字显示程式噪音计使用说明书型号:824A 一、适用范围在您使用本产品前,请详细阅读说明书,它将教你正确的操作方法,以便能发挥本机坚固耐用之优良性能。
此声级计可用来做噪音工程,品质控制,健康防治及各种环境噪音测量。
如工厂、办公室、交通道路、家庭、音响等各种场合之噪音量测应用。
二、功能说明:此产品是高精度声级计,精度可达±1.5dB 1、本声级计符合国际委员会IEC651 TYPE2和美国国家标准ANS S1.4 TYPE2.2、测量范围:30~130分贝。
3、A和C权衡网路选择。
4、快速/慢速之反应速率选择,以及A(模拟人耳)、C(机器噪音)模式的响应特性,使得测量更准确。
5、AC和DC类比信号输出,可连接至频率分析仪或X-Y轴记录器做数据统计分析。
三、规格:a)精确度:±1.5dB(以参考音压为准,94dB@1KHz)b)频率响应:31.5Hz~8.5K Hzc)动态范围:50 dBd)测量范围:30~130 dBA,30~130 dBCe)频率加权特性:A和C特性f)数位显示:5位数,解析度0.1 dB,取样率为2次/秒g)类比刻画显示:一刻画代表 1 dB,取样率为2次/秒h)测量档位:30~80分贝,50~100分贝,60~110分贝,80~130分贝i)过载指示“OVER”、“UNDER”符号表示j)AC信号输出:0.707Vrms/每档刻满刻度,输出阻抗约600Ωk)DC信号输出:10mV/dB,输出阻抗100Ωl)动态特征:FAST(快速),SLOW(慢速)之反应速率m)麦克风:1/2英寸电容式麦克风n)最大值锁定:MAXo)电源:9V电池1个p)开机自检时间:10秒q)工作温湿度:0~+40℃,10~80%RHr)储存温湿度:0~+60℃,10~70%RHs)尺寸:220×67×32mmt)重量:约210g(含电池)四、校正方法:请使用94 dB@1KHz标准音源1、状态设定:频率加权A,时间加权:快特性(FAST),档位:60~110分贝档2、将麦克风头小心插入标准音源(94dB@1KHz)1/2英寸的孔内3、打开标准音源(94 dB@1KHz)的电源开关,使用一字批调整底盖开圆孔处的电位器使LCD显示为94.0(如图1)本仪表出厂前已调校好,建议校正周期为一年。
AWA6228+使用说明书V1_01
7.2.3.1 1/1 OCT 列表界面............................................................................................................................. 16 7.2.3.2 1/1 OCT 图形界面................................................................................................................................ 17 7.2.3.3 1/1 OCT 醒目界面 .............................
HP8920A综合测试仪使用说明

HP8920A综合测试仪使用说明HP8920A/B综合测试仪使用方法一、测试线的连接MAX PWR 60W——仪器射频信号输入输出(注意观察标注的最大功率值,可能有些仪器只能测试5W或者10W的功率)。
接被测试机器的天线头。
(此处不能接错!200mw的那个头不要输入大功率,否则,会损坏仪器!)AUDIO IN (HI)——音频信号输入(接对讲机外接耳机插孔,输入信号后仪器显示相应指标)。
AUDIO OUT——音频信号输出(接对讲机外接话咪插孔,仪器里面模拟出来的音频信号经过话咪插孔进入到对讲机里面进行调制,然后通过仪器显示相关指标)。
其它部分按钮说明:VOLUME:调节仪器蜂鸣器声音大小。
SQUELCH:旋钮上的色点一般调节在中心位置合适,不然,有噪声。
二、测试1、发射测试(检测机器时,一般先测发射,因为发射部分的一些指标不良,会影响到接收):按仪器面板上的“TX”按键,进入发射指标检测界面。
连接好对讲机各测试线并打开电源,按下对讲机的PTT按键,发射时,主要看仪器屏幕上的三个指标:Tx Frequency :频率误差(实际发射出来的频率值和该信道标称频率的差值,一般±500Hz即可。
Tx Power:功率大小FM Deviation:最大频偏(一般在4KHz左右,加亚音频之后,会高0.7KHz。
该指标影响对讲机的送话)。
在发射状态下,把仪器的滤波器调小:即把“Filter 1”选择到“<20Hz”,再把“Filter 2”选择到“300Hz”,即可以在“FM Deviation”这一栏直接查看到该信道所加的模拟亚音频数值。
2、接收测试:按仪器面板上的“RX”按键,在该界面,要设置以下参数:转动面板上的那个大的旋钮,让光标停留在“RF Gen Freq”处,直接按数字键和单位按键,即输入要测试对讲机的接收频率(如458.825MHz),然后,再把光标移到“Amplitude”这一项,分别输入1mv和0.25uv两种场强参数(看你自己的习惯,也可以用“-DBm”的单位),以检测机器的失真度和灵敏度。
AZ8921 AZ8922噪音计(带RS232 AZ8922带背光) 上海牧晨
产品代理:上海牧晨电子技术有限公司
AZ8921 AZ8922噪音计(带RS232 AZ8922带背光)
· RS-232接口
·瞬时值测量方式
·自动及手动换档
·最大/最小值锁定
·手动/自动关机
· CAL正电位器,可外接电源
·国际规范:IEC Pub 651 Type2,TYPE 2 CLASS
技术参数
量程A环境噪音:30~130dB
C机械噪音:35~130dB
分辩率0.1dB
准确度±1.5dB
响应时间选择FAST(快)/SLOW(慢)
频率范围31.5Hz-8KHz
显示42×64mm 4位液晶及条码显示
背光功能(仅AZ8922)
信号输出AC/DC信号输出 AC:0.707Vrms
DC:10mV/ dB
RS232标准信号输出,软件另配。
操作/储存温湿度0℃ to 50℃ < 90% R.H.
-10℃ to 60℃ < 70% R.H
尺寸80×256×38mm
重量190g
供电电源9V电池或外接9V电源
附件携带合,电池,使用说明书.选购
件:RS232软件及连线。
RME DMC-842数字传声器接口用户手册.pdf_1693849181.140058说明书

用户手册DMC-842数字传声器接口带有线路(Line)输出的8通道数字传声器接口8通道AES转模拟/ADAT接口AES/EBU格式和采样率转换可选的64通道MADI接口24 Bit / 192 kHz数字音频MIDI远程控制重要的安全说明 (4)概述 (5)1. 简介 (6)2. 包装清单 (6)3. 简介及主要特点 (6)4. 首次使用——快速上手 (7)4.1 控制、接口与显示 (7)4.2 快速上手 (9)5. 附件 (9)6. 产品保证 (10)7. 附录 (10)CE / FCC符合性声明 (11)使用和操作 (12)8. 前面板控制 (13)8.1 Select(选择)键和旋钮(SET) (13)8.2 Clock Section(时钟部分) (14)8.3 模拟输出 (14)8.4 Remote(遥控) (15)9. 输入通道 (15)9.1 通用 (15)9.2 Gain(增益) (15)9.3 数字幻象供电 (15)9.4 Mode 2 (16)9.5 Stereo / Inactive (16)9.6 M/S处理 (16)9.7 SRC(采样率转换器) (17)9.8 PAR (17)9.9 Sync (17)10. Setup(设置)菜单 (18)10.1 通用 (18)10.2 ID(Id,自动ID) (18)10.3 Bank(bA,库) (18)10.4 Auto ID(Au,自动ID) (19)10.5 Delay Compensation(dC,延迟补偿) (19)10.6 Follow Clock(FC,跟随时钟) (20)10.7 Word Clock Out(Co,字时钟输出) (20)10.8 Peak Hold(Ph,峰值保持) (20)10.9 Digital Output(do,数字输出) (20)10.10 Analog Output(Ao,模拟输出) (21)10.11 Gain(GA,增益) (21)10.12 Control Pulse(Cp,控制脉冲) (21)10.13 Sync Pulse(SP,同步脉冲) (21)10.14 Special(SPECIAL) (22)11. Parameter(参数)菜单 (22)11.1 通用 (22)11.2 Low Cut(Lo-Cut,低切) (23)11.3 Directivity Pattern(PAttErn,指向性图) (23)11.4 Pre-Attenuation(AttEnuAtIon,预先衰减) (23)11.5 Mute(mute,静音) (23)11.6 Peak Limiter(LImItEr,峰值限制器) (23)11.7 Command Type(ComtyPE,命令类型) (23)12. Remote Control(远程控制) (24)12.1 MIDI (24)12.2 MIDI over MADI(借助MADI的MIDI) (24)12.3 Remote Control Software(远程控制软件) (25)12.4 RS232 (26)输入和输出 (27)13. 数字输入 (28)13.1 XLR (28)13.2 D-Sub - AES/EBU Sync(同步) (28)14. 数字输出 (29)14.1 AES/EBU (29)14.2 ADAT光纤 (30)14.3 I64 MADI卡 (31)14.4不同的MADI系列可配置I64 MADI卡和ADI-642 (32)15. 模拟输出 (33)16. 字时钟 (34)16.1 字时钟输入和输出 (34)16.2 技术描述和使用 (35)16.3 布线和终止 (36)17. MIDI (36)技术参考资料 (37)18. 技术指标 (38)18.1 模拟 (38)18.2 数字输入 (38)18.3 数字输出 (40)18.4 数字 (40)18.5 MIDI (40)18.6 通用 (41)18.7 固件 (41)18.8 MADI用户比特位 (41)18.9 接口针脚 (41)19. 技术背景 (43)19.1 术语 (43)19.2 锁定(Lock)与SyncCheck(同步检查) (44)19.3 延时(Latency)与监听(Monitoring) (45)19.4 DS –双倍速 (46)19.5 QS –四倍速 (46)19.6 AES/EBU - SPDIF (47)19.7 MADI基础 (48)19.8 SteadyClock(稳定时钟) (49)20. 框图 (50)21. DMC-842的MIDI实现 (51)21.1 基本SysEx格式 (51)21.2 通知类型–命令 (51)21.3 表格 (53)重要的安全说明注意! 不要打开底盘,以防触电。
testo 816 声级计 用户手册说明书

testo 816声级计使用说明书18 概述概述在将本装置投入使用前,请认真阅读本手册,并熟悉本产品的操作。
请将本手册放在手边,以备必要时参考。
标识符号 意义备注警告忠告:Warning!如果没有采取所规定的防范措施,可能会造成严重的人身伤害。
认真阅读此警告忠告,并采取所规定的防范措施。
警告忠告:Caution!如果没有采取所规定的防范措施,可能会造成轻微的人身伤害或损坏设备。
认真阅读此警告忠告,并采取所规定的防范措施。
重要提示 请特别注意。
按键 按下这个键。
显示的内容在屏幕上显示文字或符号。
目录19目录概述20目录211. 安全建议 222. 预期用途 233. 产品说明 24显示屏和操作元件 243.1电源 243.24. 初始操作 254.1放入电池 255. 操作25开/关 255.1设定仪器 255.2测量 295.3标定 315.46. 注意事项和维护 32更换电池 326.1麦克风 326.2仪器. 326.37. 技术参数 338. 附件和备件 339. 测量的基本原理 3420 1. 安全建议1. 安全建议避免电气危险:►决不能用来测量带电零部件或在带电零部件附近测量!产品的安全/保存质保声明:►只能在技术参数表中规定的参数下操作本仪器。
不得对本仪器施加外力。
►不得与溶剂一起保存(比如丙酮)►遵守最高的保存和运输温度,以及最高的工作温度。
►确保不要让液体进入麦克风►只能在使用说明书中所描述的进行维护操作时才能打开仪器。
►仅执行本说明书中所描述的维护和维修工作。
严格遵守所规定的步骤。
为了安全,只能使用Testo的原装备件。
►如果仪器使用不当或被施加外力,质保将不再有效。
确保正确处置:►处置失效的充电电池,并将其放到规定的废电池收集点。
►在仪器寿命结束时,请直接将其发给我们。
我们将保证按照环保的方式处置它。
如同在合格证书中所声明的,本产品符合89/336/EEC的准则。
本仪器符合DIN EN 60651。
噪音计AR824使用说明

噪音计AR824使用说明噪音计AR824使用说明您所购买的这款“噪音计AR824”标志着您已步入到测量领域前沿。
该“噪音计AR824”是一款多元化、精美的产品,除去科技进步、升级,在正确操作下,该产品强度将足够您使用多年。
请仔细阅读使用说明,并将本手册放置于方便取阅处。
目录1. 属性 ----------------------------------------------------------------------------------------------------- 52. 详细说明 ----------------------------------------------------------------------------------------------- 5 3.前操作面板细节-------------------------------------------------------------------------------------- 8 4.测量步骤----------------------------------------------------------------------------------------------- 9 5.测量需要考虑的事(注意事项) -------------------------------------------------------------- 106.信号输出--------------------------------------------------------------------------------------------- 10 7.电池更换--------------------------------------------------------------------------------------------- 10 8.调节器------------------------------------------------------------------------------------------------- 11 9.A/C网络分析仪的频率测量特性 -------------------------------------------------------------- 12 10.节拍测量(块&慢)特性---------------------------------------------------------------------- 131. 属性大LCD显示器,便于阅读频率测量网络分析器满足IEC651-2款要求A&C测量网络分析器以适应标准节拍测量(块&慢)动力特性模式AC/DC输出扩展基于电子调节器电子减震系统前面板电容式麦克风,高准确度&长期稳定最大读值锁定功能以在显示屏上储存最大读值报警提示,负载超高或超低LCD显示,以减少能耗&清晰阅读—即使在周围强光环境中采用耐久材料,包括高强度轻质ABS所料外壳小巧而轻重设计,手持操作低电量报警2. 详细说明显示屏18mm(1.7寸)LCD(Liquid Crystal Display),3 1/2 digits.功能分贝(A&C频率测量),节拍测量(块,慢),最大读值锁定,AC&DC输出。
DSM8925 数字声级计使用手册说明书

DIGITAL SOUND METER WITH JUMBO DISPLAY USER’S MANUALDSM8925Please read this manual carefully and thoroughlybefore using this product.TABLE OF CONTENTS Introduction . . . . . . . . . . . . . . . . . . . . . .3 Key Features . . . . . . . . . . . . . . . . . . . . .4 What’s in the Box . . . . . . . . . . . . . . . . .5 Product Overview . . . . . . . . . . . . . .5 –7 Setup Instructions . . . . . . . . . . . . . . . . .8 Install Batteries . . . . . . . . . . . . . . . .8 Operating Instructions . . . . . . . . .8 –15 Making Basic Measurements . .8 –9 Autoranging vs.Manual Ranging . . . . . . . . . . .9 –11 Time and FrequencyWeighting Options . . . . . . . . .11 –12 Storing and RecallingMIN and MAX Readings . . . .12 –13 Operating inMAX HOLD mode . . . . . . . . . .13 –14 Disabling Auto Power Off . . . . . . .14 Calibrating the Meter . . . . . . . . . .15 Specifications . . . . . . . . . . . . . . . . . . .16 Maintenance Tips . . . . . . . . . . . . . . . .17 Warranty Information . . . . . . . . . .17 –18 Return for Repair Policy . . . . . . . . . . .182INTRODUCTIONThank you for purchasing General Tools & Instruments’ DSM8925 Digital Sound Meter with Jumbo Display. Please read this user’s manual carefully and thoroughly before using the instrument.The DSM8925 uses an integrated condenser microphone to measure the noise level of an environment or the loudness of a machine, typically in order to comply with health and/or safety rules. The meter has a range of 30 to 130 dB and an accuracy of ±2 dB. Real-time measurements are shown within a backlit liquid-crystal display window in two forms: as a three- or four-digit number, and as a line on an analog bar graph.Several features improve the meter’s versatility. Among them are two user-selectable operating modes: “A” or “C”frequency weighting, and fast or slow time response. Users also can override autoranging (the default mode) and manually select a fixed measurement range, improving the meter’s response time and measurement resolution. The meter can display the minimum and maximum sound levels measured during a recording session, as well as hold a maximum level on-screen until it is exceeded.3Physical features of the DSM8925 include an analog output jack for connecting to a data logger or chart recorder, a tripod mounting socket, and an adjustment screw for calibrating the meter to a standard 94 dB input.The DSM8925 includes a wind shield ball and is powered by four “AAA” batteries (also included).KEY FEATURES• Measures sound level of a machineor an environment• Jumbo LCD is easy to read• “A” or “C” frequency weighting• Fast or slow time weighting• Autoranging or manual ranging• Displays maximum and minimum readings • Max reading can be held until exceeded • Auto power off• Analog output for data logging• Calibrates to standard 94dB signal• Tripod mount socket on back• Includes wind shield ball• Powered by four “AAA” batteries4WHAT’S IN THE BOXThe DSM8925 comes fully assembled in a box along with a wind shield ball, four “AAA”batteries and this user’s manual.PRODUCT OVERVIEW Figure 1 shows all of the controls, indicators and connectors on the front and right side of the DSM8925. Familiarize yourself with their positions and functions before moving on to the setup procedure.1. The DSM8925’s controls, indicators and connectorsA.Wind shield ballB.MicrophoneC.Liquid-crystal displayD.Power on/off buttonE.A/C —Selects “A” or “C” frequencyweighting 5EF FRONTF.REC—Enters/exits Recording modeG.RNG—Selects autoranging or manualrangingH.F/S—Selects fast or slow time responseI.MAX HOLD buttonJ.Calibration adjustment screwK.Analog output jackFigure 2 shows all text and icons that could appear in the display window at various times.2. All possible display indications and their meaningsREC Meter is in Recording mode, trackingmaximum and minimum sound levelmeasurementsMAX Digital readout is highest levelrecorded since entering RecordingmodeMIN Digital readout is lowest levelrecorded since entering RecordingmodeMAX HOLD Meter is in Max Hold mode. Digitalreadout is highest level measuredsince entering this mode6FAST Meter is applying fast time weightingto inputsSLOW Meter is applying slow time weighting to inputsAUTO Meter is automatically choosingmeasurement range with bestresolutionMANU Meter is using user-selectedmeasurement rangeBA Reserved for future useSPL Abbreviation of sound pressure level(the parameter measured)Meter’s battery is very low on charge Array and should be replacedA Meter is applying “A” frequencyweighting to inputsC Meter is applying “C” frequencyweighting to inputsdB Sound level unit (accompaniesreading at its left)40Range Baseline (low end of currentmeasurement range, in dB). “40”indicates 40 to 70 dB range; otherpossible numbers in this displayposition are 60 (for 60 to 90 dBrange), 80 (for 80 to 110 dB range)and 100 (for 100 to 130 dB range)+0, +10,Labels of analog bar graph scale.+20, +30Indicate amplitude of input (in dB)relative to Range Baseline above leftend of graph7SETUP INSTRUCTIONS INSTALL FOUR BATTERIESThe meter’s battery compartment is accessible from the back of the unit. Use a Philips-head screwdriver to remove the one screw holding the cover in place. Then install the four included “AAA” batteries so their + and – ends match the images stenciled inside the compartment. Finally, replace the cover and secure it with the Philips-head screw. OPERATING INSTRUCTIONSMAKING BASIC MEASUREMENTSTo begin, press the button to power on the meter. The display will take a few seconds to stabilize and then begin reading out real-time sound level measurements.Note how the digital numbers and the readings from the analog bar graph track each other. At times, the two displays may seem slightly out of sync—and they are, because they refresh at different rates.Also note how the number above the left end of the bar graph—the Range Baseline—changes each time a much louder or softer sound is heard. Each change confirms that the meter is operating in Autoranging mode. To demonstrate that autoranging is on in a quiet environment, rub the windscreen with your hand (to simulate a loud noise) and watch the Range Baseline change to 100.8To measure the loudness of a sound source, point the microphone at it.The meter’s default settings are autoranging on (enabling measurements from 30 to 130 dB), fast time weighting and “A” frequency weighting. When the meter is powered on, AUTO will appear on the left side of the display, with FAST on the top line and A on the right side. Following are procedures for changing each of these settings to suit the application.AUTORANGING VS.MANUAL RANGINGThe DSM8925 has four measurement ranges: 40 to 70 dB, 60 to 90 dB, 80 to 110 dB, and 100 to 130 dB. When the meter is powered on, it automatically enters Autoranging mode. In this mode, it automatically switches to the range that displays the input with the finest resolution. For example, the meter could display a sound level of 65 dB using either the 40 to 70 dB or the 60 to 90 dB range. In autoranging mode, it would choose the lower of the two ranges (40 to 70 dB) because on this scale 65 dB has a better (finer) measurement resolution.If you already know the loudness range of the machine or environment you wish to measure, and that range is limited, consider exiting autoranging mode and operating the meter in only one of those four fixed ranges. The benefit of operating the meter in this mode—called Manual Ranging mode—is speed.9The meter can display its results more quickly because it does not have to first determine which range to use.To exit Autoranging Mode and enter Manual Ranging mode, briefly press the RNG button on the front panel. Note that when you press the button, the text MANU replaces AUTO on the left side of the display. Also note that the Range Baseline above the left end of the bar graph no longer changes in response to louder or softer sounds, as in did in Autoranging mode.When the RNG button is pressed, the meter randomly chooses one of the four ranges. Accordingly, the first Range Baseline number displayed could be 40, 60, 80 or 100. For the highest display resolution, the low end of the range you choose should be just below the quietest sound you expect to hear. For example, if your target normally produces sound levels between 85 and 105 dB, you should manually choose the 80 to 110 dB range.To manually select a specific measurement range, briefly press the RNG button as many times as necessary until its Range Baseline number appears above the left end of the analog bar graph. Each press of the RNG button advances the Range Baseline number by 20 dB; after 100, it returns to 40.Note that in Manual Ranging mode, whenever a sound level is outside the chosen range the 10digital display will show the letters LO or HI. If this happens often, consider switching back to Autoranging mode.To exit Manual Ranging mode and return to Autoranging Mode, press and hold the RNG button until the text AUTO replaces MANU on the left side of the display.TIME AND FREQUENCY WEIGHTING OPTIONSYou can choose Fast or Slow response time and “A” or “C” frequency weighting to suit different applications.By default, when the meter is powered on it begins operating with fast time weighting (a fast integration time constant) and “A”frequency weighting. Fast time weighting, with a response time of 200 milliseconds, simulates the response time of the human ear and is better for measuring the volume of singular events. Slow weighting, with a response time of 500 ms, is a better choice for measuring the average sound level that an ongoing process (such as machine vibration) produces over time.To switch the meter’s response time from fast to slow, press the F/S button. The word on the right side of top line of the display will change from FAST to SLOW. To return to fast time weighting, press the F/S button again. As mentioned earlier, when the DSM8925 is powered on it begins operating with “A”frequency weighting. The shape of the “A”11curve simulates the response of the human ear, and is therefore the better choice for measuring the sound level of an environment for the purpose of regulatory compliance, workplace design or noise-pollution control. By comparison, the “C” weighting curve is flatter, and is therefore better for measuring the sound level of a piece of machinery. In the U.S., most OSHA-mandated sound level measurements are made by instruments set for slow response and “A” frequency weighting.To switch from “A” frequency weighting to “C” weighting, press the A/C button. The letter at the right of the display will change from A to C. To switch back to “A” frequency weighting, press the A/C button again. STORING AND RECALLINGMIN AND MAX READINGSThe DSM8925 can also operate in “Recording” mode, for the purpose of tracking and displaying minimum and maximum sound level measurements.To enter Recording mode, press the REC button briefly. The text REC will appear at the upper left of the display.To display the minimum sound level measured since entering Recording mode, press the REC button briefly again. The text MIN will appear on the top line of the display and the digital display will indicate the lowest sound volume measured during this recording 12session. While the digital display is showing the minimum sound value, the meter continues to measure real-time sound level inputs and to display its results on the analog bar graph.To display the maximum sound level measured since entering Recording mode, press the REC button briefly one more time. The text MAX will replace MIN on the top line of the display and the digital display will indicate the highest sound volume measured during this recording session. While the digital display is showing the maximum sound value, the meter continues to measure real-time sound level inputs and to display its results on the analog bar graph.To repeat the process, press and hold the REC button briefly. This does not begin a new recording session. It simply extends the duration of the current session.To exit Recording mode, press and hold the REC button until the text REC disappears from the top line of the display.OPERATING IN MAX HOLD MODE You may want to use the meter’s digital display to show the loudest sound level measured up to a certain point in time. In this operating mode—called MAX HOLD mode—the digital display shows and holds the loudest sound level received since entering that mode. The analog bar graph continues to display measured input levels in real time.13However, the digital display is updated only when the meter detects a louder sound.To enter MAX HOLD mode, press the MAX HOLD button at the lower right of the front panel. To exit this mode, press the MAX HOLD button againDISABLING AUTO POWER OFFBy default, the meter powers off automatically after 20 minutes to avoid discharging the batteries. However, you can disable this feature if you would like to track sound levels over a longer period of time. For this purpose, you will also need to feed the meter’s analog output signal (available via a jack on the right side of the unit) into a chart recorder or data logger.To disable Auto Power Off, first power off the meter by pressing the button. Then power on the meter in a special way by pressing the button and pressing and holding the MAX HOLD button at the same time. This will cause the letter “n” to appear briefly on the digital display. Once “n” has appeared, you can release the MAX HOLD button.Once Auto Power Off has been disabled, the meter will no longer shut down automatically after 20 minutes. It will remain on until the button is pressed again to power off the instrument. Once the meter is powered off, Auto Power Off will automatically be re-enabled when the meter is powered on again. 14CALIBRATING THE METERThe DSM8925 must be calibrated beforeit can make accurate sound level measurements. To begin, obtain a standard acoustic calibrator with a 94 dB output, such as General Tools & Instruments’ SCAL1356. Then enter Manual Ranging mode and choose the 80 to 110 dB range using the steps outlined on p. 9. Changing the response time is unnecessary. However, make sure that “C”weighting is chosen and that that the meter is not operating in MAX HOLD mode.To calibrate the meter, insert its microphone in the hole of the acoustic calibrator. Power on the calibrator and set its output range to the range containing 94 dB. Using a small Philips-head screwdriver, turn the calibration adjustment screw on the right side of the DSM8925 until its display shows the same reading as the calibrator’s, ±0.1 dB.15SPECIFICATIONS Measurement Range40 to 130 dB overfour ranges Measurement Accuracy±2 dBDigital Display Resolution0.1 dBDigital Display Refresh160 milliseconds PeriodAnalog Bar Graph 1 dBResolutionAnalog Bar Graph 40 milliseconds Refresh PeriodFrequency Range31.5 Hz to 8 kHz Display Window Size 1.18 (W) x 1.38 (H) in.(30 x 35mm)Digit Height0.6 in. (15.2mm) Microphone 0.5 in. (12.7mm) Diameter/Type Electret condenser Battery Life60 hours (typical) Analog Output0 to 0.707Vrms Operating Temperature32° to 122°F(0° to 50°C)@<80% R.H. Storage Temperature-4° to 122°F(-20° to 50°C)@<90% R.H. Dimensions9 x 2.25 x 1.1 in.(230 x 57 x 28mm) Weight 4.6 oz. (130g) Power Source 4 “AAA” batteries16MAINTENANCE TIPSicon appears at the upper rightof the display, it’s time to replace the four AAA batteries that power the instrument (although measurements will remain valid for several hours after the icon first appears). To replace the batteries, follow the Setup Instructions on p. 8.Remove the batteries when storing the meter for an extended period of time.Do not drop or disassemble the meter or immerse it in water.WARRANTY INFORMATIONGeneral Tools & Instruments’ (General’s) DSM8925 Digital Sound Level Meter with Jumbo Display is warranted to the original purchaser to be free from defects in material and workmanship for a period of one year. Subject to certain restrictions, General will repair or replace this instrument if, after examination, the company determines it to be defective in material or workmanship. This warranty does not apply to damages that General determines to be from an attempted repair by non-authorized personnel or misuse, alterations, normal wear and tear, or accidental damage. The defective unit must be returned to General Tools & Instruments or to a General-authorized service center, freight prepaid and insured.17Acceptance of the exclusive repair and replacement remedies described herein is a condition of the contract for purchase of this product. In no event shall General be liable for any incidental, special, consequential or punitive damages, or for any cost, attorneys’fees, expenses, or losses alleged to be a consequence of damage due to failure of, or defect in any product including, but not limited to, any claims for loss of profits. RETURN FOR REPAIR POLICYEvery effort has been made to provide you with a reliable product of superior quality. However, in the event your instrument requires repair, please contact our Customer Service to obtain an RGA (Return Goods Authorization) number before forwarding the unit via prepaid freight to the attention of our Service Center at this address:General Tools & Instruments80 White StreetNew York, NY 10013212-431-6100Remember to include a copy of your proof of purchase, your return address, and your phone number and/or e-mail address.18NOTES________________________________ ________________________________ ________________________________ ________________________________ ________________________________ ________________________________ ________________________________ ________________________________ ________________________________ ________________________________ ________________________________ ________________________________ ________________________________ ________________________________ ________________________________ ________________________________ ________________________________ ________________________________ ________________________________19GENERAL TOOLS & INSTRUMENTS80 White StreetNew York, NY 10013-3567PHONE (212) 431-6100FAX (212) 431-6499TOLL FREE (800) 697-8665e-mail:**********************DSM8925 User’s Manual Specifications subject to change without notice ©2011 GENERAL TOOLS & INSTRUMENTSNOTICE - WE ARE NOT RESPONSIBLE FOR TYPOGRAPHICAL ERRORS.MAN#DSM8925 6/20/11。
噪声计使用方法说明书

噪声计使用方法说明书1. 简介噪声计是一种用于测量环境中噪声水平的仪器。
它广泛应用于工业、环境保护、健康安全等领域,帮助人们了解噪声的强度和频率分布,以便采取相应的措施进行保护。
本使用方法说明书将详细介绍噪声计的基本操作和注意事项,以帮助用户正确、有效地使用该仪器。
2. 噪声计的组成和功能噪声计由以下几个主要部件组成:- 麦克风:用于接收环境中的声波信号。
- 信号处理单元:将麦克风接收到的声音信号转换为数字信号,并进行相应的处理和分析。
- 显示屏:显示测量结果,包括噪声水平和频率分布等。
- 操作面板:提供用户与噪声计进行交互的接口,包括开关、控制按钮等。
3. 使用前准备在正式使用噪声计之前,请确保已完成以下准备工作:- 检查噪声计是否完好无损,如有损坏请及时修复或更换。
- 确保噪声计的电源充足,如需更换电池请使用规定的型号和规格。
- 针对特定的测量场景,选择合适的测量模式和参数设置。
4. 噪声计的操作步骤4.1 打开噪声计按下噪声计的电源开关,待显示屏显示出相关信息后,噪声计即可开机完成。
4.2 进行测量- 将麦克风放置在要测量的位置,确保其正对噪声源。
- 按下测量按钮开始测量,显示屏将实时显示当前的噪声水平。
- 如果需要进行频谱分析等更深入的测量,可按照设备说明书的指引进行操作。
4.3 停止测量按下停止按钮,噪声计将停止测量,并显示最终的测量结果。
5. 使用时的注意事项- 在进行测量前,应尽量消除或减少其他外界干扰噪声,以保证测量的准确性。
- 避免在强烈的电磁场或高温、潮湿等环境中使用噪声计,以免影响仪器的正常工作。
- 根据测量场景的需要,选择合适的测量模式和参数设置,以获得准确的测量结果。
- 定期校准噪声计以确保其测量精度和可靠性,校准频率可根据使用频率和要求进行确定。
6. 维护和存储- 定期对噪声计进行维护,包括清洁仪器表面、检查连接线路和插头是否松动等。
- 当不使用噪声计时,应将其存放在干燥、洁净的环境中,避免长时间暴露在高温、潮湿等条件下。
AZ8928噪音计说明书

AZ8928 噪音计使用说明书使用手册数位式噪音器【简介】你的数位式噪音计提供自动或 4 种从40 到130dB 范围的手动等级且精準度达到0.1dB。
此量计允许你切换快速或慢速回应及加上A 及C 加权,并提供最大值锁定的功能。
此量计D 提供AC 类比输出。
噪音的量测此噪音计同时以数字及bar条码示数字显示部份每160ms进行更新图表显示部份每40ms 进行更新。
按下【ON/OFF】键啟动噪音计开始时出现"18:8.8"全萤幕字样并从99.9倒数至0 这时此量计将开始量测目前的噪音量将麦克风指向所欲量测的声音来源时萤幕左边出现SPL (音压位準)右边出现dB字样。
选择回应时间你可因应各种不同的应用及标準选择快速或慢速回应时间例如: 大部份与OSHA相关的测试都是使用慢速回应时间及A加权当你啟动此量计它内定在快速回应的模式按下【FAST/SLOW】键进行快速与慢速回应的切换小字样的FAST或SLOW将出现在萤幕的右侧以指示出目前的模式.选择A/C加权当你啟动此量计它内定在A加权的模式A加权使此量计的回应与人类的耳朵的反应方式相同随著频率范围不同增加及减少其振幅加权的应用包括OSHA调整测试环境量测工作场所的设计及法律的执行.C加权适用於频率范围不同下不会增加及减少其振幅的单纯的回应量测C加权的应用包括引擎及机械的噪音分析。
按下【WEIGHTING A/C 】键去切换A加权及C加权小字样的A或C将显示在萤幕的右边用来指示目前的模式。
锁定住最大噪音量的读值1.按下【ON/OFF】键去啟动噪音计。
2.当量测噪音时按下【MAX HOLD】键去锁定住最大的读值小字样的【MAX HOLD】将会显示出此时所显示的数字将保持不变直到侦测到更高的读值但注意bar的条码仍会继续纪录随时的读值。
3.再次按下【MAX HOLD】键将离开最大值锁定的模式。
纪录所量测的最大与最小值1. 按下【ON/OFF】键去啟动噪音计。
安捷伦公司N8973噪声指数分析仪使用说明

安捷伦公司N8973噪声指数分析仪使用说明二○○三年四月目录1. 噪声系数基本概念.............................................................................................. 错误!未定义书签。
2. 主要功能:.......................................................................................................... 错误!未定义书签。
2.1噪声系数测量 .............................................................................................. 错误!未定义书签。
2.2GPIB端口可允许SCPI编程。
.................................................................. 错误!未定义书签。
2.317CM彩色LED显示。
............................................................................... 错误!未定义书签。
2.4测量结果可用图形、表格或仪表模式显示。
........................................... 错误!未定义书签。
2.5双迹显示可同时显示下列任何两个噪声参数:....................................... 错误!未定义书签。
2.6单边带和双边带测量。
.............................................................................. 错误!未定义书签。
AWA6228+使用说明书V1_01

使用说明书
AWA6228+型多功能声级计使用说明书
目
录
1.概述........................................................................................................................................................ 错误!未定义书签。 3.主要性能指标........................................................................................................................................ 错误!未定义书签。 4.结构特征.................................................................................................................................................................................. 7 5.符号、缩写定义...................................................................................................................................................................... 8 6.按键.......................................................................................................................................................................................... 9 7. 主要显示界面...................................................................................................................................................................... 10
音频分析仪说明书
一. 安全须知 (1)二. 功能特性说明 (1)三. 规格 (2)四. 控制健与功能 (2)4-1各部名称功能 (2)4-2 (3)4-3 分析荧幕之说明 (3)五.校正方法 (4)五. 使用前准备事项:...................................................................................................................................................................................................................... 4 七 日期与时间之设定 ............................................................................................................................................................................................................................... 4 八,测量 .. (5)8-1测量参数含义说明: ................................................................................................................................................................................................................... 5 8-2.设定测量参数 ............................................................................................................................................................................................................................ 5 九.记忆功能 ............................................................................................................................................................................................................................................. 6 9-2 记忆体手动储存 .......................................................................................................................................................................................................................... 6 9-2 记忆体资料读取 .......................................................................................................................................................................................................................... 6 9-3 记忆体自动存储 .......................................................................................................................................................................................................................... 7 9-4 记忆体资料清除 .......................................................................................................................................................................................................................... 7 一. 安全须知■请依噪音计各项规则使用。
噪音计AR824使用说明
噪音计AR824使用说明您所购买的这款“噪音计AR824”标志着您已步入到测量领域前沿。
该“噪音计AR824”是一款多元化、精美的产品,除去科技进步、升级,在正确操作下,该产品强度将足够您使用多年。
请仔细阅读使用说明,并将本手册放置于方便取阅处。
目录1. 属性----------------------------------------------------------------- 32. 详细说明------------------------------------------------------------- 3 3.前操作面板细节------------------------------------------------------- 6 4.测量步骤------------------------------------------------------------- 6 5.测量需要考虑的事(注意事项) ----------------------------------------- 7 6.信号输出------------------------------------------------------------- 8 7.电池更换------------------------------------------------------------- 8 8.调节器--------------------------------------------------------------- 8 9.A/C网络分析仪的频率测量特性------------------------------------------ 9 10.节拍测量(块&慢)特性 --------------------------------------------- 101. 属性大LCD显示器,便于阅读频率测量网络分析器满足IEC651-2款要求A&C测量网络分析器以适应标准节拍测量(块&慢)动力特性模式AC/DC输出扩展基于电子调节器电子减震系统前面板电容式麦克风,高准确度&长期稳定最大读值锁定功能以在显示屏上储存最大读值报警提示,负载超高或超低LCD显示,以减少能耗&清晰阅读—即使在周围强光环境中采用耐久材料,包括高强度轻质ABS所料外壳小巧而轻重设计,手持操作低电量报警2. 详细说明3.前操作面板细节3—1 电子电容式麦克风3—2 显示屏3—3电源开关&输出类型选项3—4 A/C测量&调节选项3—5 节拍测量(块/慢)/最大读值锁定选项 3—6 量程选项3—7信号输出终端3—8 电池间隔/支付(用完)3—9 量程超高/超低报警3—10 调整器电子减震系统(准确度调整减震器)4.测量步骤1)滑动“A/C测量选项”(3—4,Fig.1)到“A”或者“C”档来测量声音强度。
【精品文档】声级计说明书word版本 (8页)

本文部分内容来自网络整理,本司不为其真实性负责,如有异议或侵权请及时联系,本司将立即删除!== 本文为word格式,下载后可方便编辑和修改! ==声级计说明书篇一:AWA6228型多功能声级计使用说明书AWA6228型多功能声级计使用说明书目录1.概述 (6)2.主要特点 (6)3. 主要性能指标 (6)4.结构特征 (8)5.符号、缩写定义 (9)7.主要显示界面 (11)7.2 测量界面 (11)7.2.1 噪声测量界面 (12)7.2.1.1 单次测量界面 (12)7.2.1.2 24小时自动测量界面 (13)7.2.2 定位测量界面 (14)7.2.3 倍频程频谱分析界面 (15)7.2.3.1 OCT列表界面 (15)7.2.3.2 醒目界面 (15)7.2.3.3 图形界面 (16)7.2.3.4 室内界面 (16)7.2.4 机场噪声测量界面 (16)7.3 设置界面 (17)7.3.1 设置第1页 (17)7.3.2 设置第2页 (18)7.3.3 设置第3页 (18)7.4 调阅界面 (19)7.5 校准界面 (19)8.使用方法 (20)8.1 参数设置 (20)8.1.1 日历时钟调整 (20)8.1.2 测量时间设置 (20)8.1.3组名(测点名称)输入及选择 (20)8.1.4 组名的查看 (21)8.1.5 统计用频率计权的选择 (22)8.1.6 LCD显示对比度调节 (22)8.1.7 SMS设置 (22)8.2 噪声单次测量 (22)8.3 24小时自动监测 (23)8.4 噪声频谱分析 (23)8.5 机场噪声测量 (23)8.6 数据调阅 (23)8.6.1单次测量结果的调阅 (23)8.6.2 24小时自动监测结果的调阅 (24)8.6.3 OCT分析结果的调阅 (24)8.7 数据打印 (24)8.7.1 单次测量结果的单组打印 (25)8.7.2 单次测量结果的多组打印 (25)8.7.3 24小时测量结果打印 (25)8.7.4 统计、累积分布图打印 (27)8.8 校准 (27)8.8.1 采用AWA6221(B)进行声校准 (27)8.8.2 用活塞发声器进行校准 (27)8.8.3 直接输入灵敏度级 (27)8.9 GPS定位测量 (27)9 SD卡大容量存贮功能 (28)9.1 大容量数据存贮 (28)9.1.1 开机自检 (28)9.1.2 数据调阅及打印 (28)9.1.3 数据记录 (29)9.2 录音及回放 (29)9.2.1 录音 (29)9.2.2 回放 (29)9.3 U盘功能 (29)9.4 其它注意事项 (30)10.测量范围及本机噪声修正 (30)11. 过载指示 (31)。
环境噪声测试仪器使用方法说明书

环境噪声测试仪器使用方法说明书一、前言环境噪声测试仪器是一种用于测量环境中噪声水平的设备。
本说明书将详细介绍该仪器的使用方法,以便用户能够准确、安全地操作该设备。
二、仪器概述环境噪声测试仪器是一种手持式仪器,具有测量环境噪声水平的功能。
该仪器采用先进的声学技术,能够准确测量噪声水平,并提供实时数据显示。
三、使用准备1. 仪器检查:在使用前,请检查仪器是否完好。
确保仪器外观无损坏,并检查电池电量是否充足。
2. 噪声源选择:根据需要,选择合适的噪声源进行测试。
测试时应考虑到噪声源的种类和性质。
四、操作步骤1. 打开仪器:长按电源按钮,待仪器显示屏亮起后松开按钮,即可打开仪器。
2. 设置参数:在仪器打开后,按照提示在仪器操作界面设置相应的参数,如测试时间、测试模式等。
3. 校准仪器:根据使用指南中的指示,对仪器进行校准。
确保仪器的测量结果准确可靠。
4. 开始测试:将仪器对准待测区域,按下“开始”按钮,仪器将开始实时测量待测区域的噪声水平。
5. 结束测试:测试完成后,按下“停止”按钮,仪器将停止测量,并显示测量结果。
6. 数据保存:根据需要,将测得的数据保存到仪器内存或通过连接电脑进行保存和分析。
五、注意事项1. 在操作仪器时,请佩戴防护耳机,以免对自身产生噪声危害。
2. 使用前请仔细阅读使用说明书,并按照说明书的要求进行操作。
3. 避免将仪器放置在高温、潮湿或易受震动的环境中,以免影响仪器的正常工作。
4. 仪器使用完成后,请及时关闭电源,并将其安全存放在干燥通风的位置。
六、维护与保养1. 定期校准:为确保测量结果的准确性,定期对仪器进行校准。
校准频率根据使用频率和要求而定。
2. 清洁保养:使用软布蘸取清洁液,轻轻擦拭仪器外壳和显示屏。
严禁使用有机溶剂和腐蚀性液体清洁仪器。
3. 正确存放:在存放仪器时,应将其放置在防尘、防潮的环境中,避免阳光直射或长时间存放于高温环境中。
七、故障排除在使用环境噪声测试仪器时,如果遇到以下故障,请及时联系厂家进行维修:1. 仪器显示屏无法正常显示。
噪音计使用方法和注意事项
噪音计使用方法和注意事项(最新版)编制人:__________________审核人:__________________审批人:__________________编制单位:__________________编制时间:____年____月____日序言下载提示:该文档是本店铺精心编制而成的,希望大家下载后,能够帮助大家解决实际问题。
文档下载后可定制修改,请根据实际需要进行调整和使用,谢谢!并且,本店铺为大家提供各种类型的安全管理制度,如通用安全、交通运输、矿山安全、石油化工、建筑安全、机械安全、电力安全、其他安全等等制度,想了解不同制度格式和写法,敬请关注!Download tips: This document is carefully compiled by this editor. I hope that after you download it, it can help you solve practical problems. The document can be customized and modified after downloading, please adjust and use it according to actual needs, thank you!In addition, this shop provides you with various types of safety management systems, such as general safety, transportation, mine safety, petrochemical, construction safety, machinery safety, electrical safety, other safety, etc. systems, I want to know the format and writing of different systems ,stay tuned!噪音计使用方法和注意事项噪音计顾名思义是用来测量噪音及噪音控制的仪器设备,可以帮助改善工作环境,提高产品的成品率和人员工作效率。
数字风速计作业指导书
① 使用“+”起子打开仪表背面的电池盖,装上四颗 AA 1.5V 电池 ② 当电池电力不足时,LCD 面板会出现“ ”符号,表示此时电池电力不够用,必须更换新电池。 ③ 使用 DC 电源转换器时,请将 DC 电源转换器的输出插头(3.5ø)插入仪表侧面的 DC6V 插孔。
操作说明:
1、按下电源开关再松开。 2、按下 LEVEL▲或▼选择合适的档位测量现在的噪音,以不出现“UNDER”或”OVER”符号为主。 3、要测量以人耳为感受的噪音请选用 dBA。 4、要读取即时的噪音量请选择 FAST,如果获得当时的平均噪音量请选择 SLOW。 4、如要取得噪音量的最大值可按“MAX”功能键,即可读到噪音的最大值。
不自动关机设定
关机状态下,长按开关机键大约 3 秒,显示会出现“UOFF”,然后松开按键,即进入不自动关机测 量状态。若再按开关机键关机后,再短按开机,开机又恢复十分钟自动关机状态。除非按上述方法长按 3 秒,出现“UOFF”字样才能进入不自动关机状态。
注意事项:
1、请勿置于高温、潮湿的地方使用 2、环境噪音必须低于被测物体之噪音才可以正常测量
各种名称和功能
第1页共5页
操作指导书
WORK INSTRUCTION
AR824 数字声级计
文件编号: 版本/版次:第一次 生效日期:2016 年 11 月
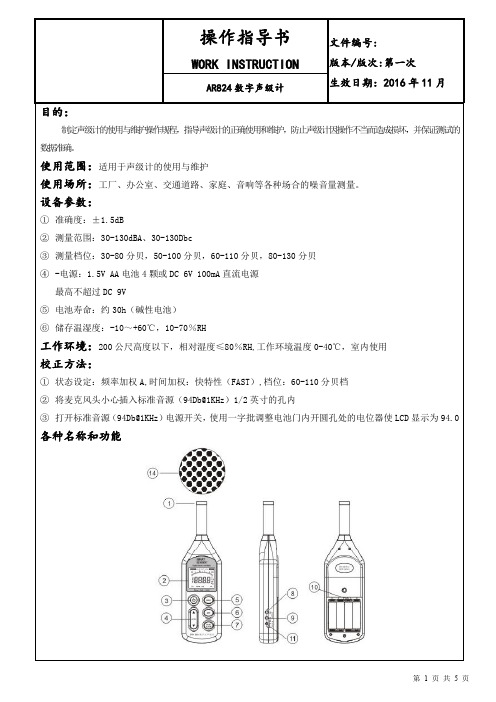
① 电容麦克风 ② 显示面板 ③ 电源开关 ④ 档位切换开关:30-80、50-100、60-110、80-130 ⑤ 最大读值锁定功能开关(MAX) ⑥ 频率加权(A/C)选择开关
第3页共5页
操作指导书
WORK INSTRUCTION
- 1、下载文档前请自行甄别文档内容的完整性,平台不提供额外的编辑、内容补充、找答案等附加服务。
- 2、"仅部分预览"的文档,不可在线预览部分如存在完整性等问题,可反馈申请退款(可完整预览的文档不适用该条件!)。
- 3、如文档侵犯您的权益,请联系客服反馈,我们会尽快为您处理(人工客服工作时间:9:00-18:30)。
AZ8928 噪音计使用说明书
使用手册
数位式噪音器
【简介】
你的数位式噪音计提供自动或 4 种从40 到130dB 范围的手动等级且精準度达到0.1dB。
此量计允许你切换快速或慢速回应及加上A 及C 加权,并提供最大值锁定的功能。
此量计D 提供AC 类比输出。
噪音的量测
此噪音计同时以数字及bar条码示数字显示部份每160ms进行更新图表显示部份每40ms 进行更新。
按下【ON/OFF】键啟动噪音计开始时出现"18:8.8"全萤幕字样并从99.9倒数至0 这时此量计将开始量测目前的噪音量将麦克风指向所欲量测的声音来源时萤幕左边出现SPL (音压位準)右边出现dB字样。
选择回应时间
你可因应各种不同的应用及标準选择快速或慢速回应时间例如: 大部份与OSHA相关的测试都是使用慢速回应时间及A加权当你啟动此量计它内定在快速回应的模式按下【FAST/SLOW】键进行快速与慢速回应的切换小字样的FAST或SLOW将出现在萤幕的右侧以指示出目前的模式.
选择A/C加权
当你啟动此量计它内定在A加权的模式A加权使此量计的回应与人类的耳朵的反应方式相同随著频率范围不同增加及减少其振幅加权的应用包括OSHA调整测试环境量测工作场所的设计及法律的执行.C加权适用於频率范围不同下不会增加及减少其振幅的单纯的回应量测C加权的应用包括引擎及机械的噪音分析。
按下【WEIGHTING A/C 】键去切换A加权及C加权小字样的A或C将显示在萤幕的右边用来指示目前的模式。
锁定住最大噪音量的读值
1.按下【ON/OFF】键去啟动噪音计。
2.当量测噪音时按下【MAX HOLD】键去锁定住最大的读值小字样的【MAX HOLD】将会显示出此时所显示的数字将保持不变直到侦测到更高的读值但注意bar的条码仍会继续纪录随时的读值。
3.再次按下【MAX HOLD】键将离开最大值锁定的模式。
纪录所量测的最大与最小值
1. 按下【ON/OFF】键去啟动噪音计。
2.按下【RECORD】键小字样的【REC-ORD REC】将显示在萤幕上方的角落此时此量计将开始追踪噪音的最大及最小值。
3.再次按下【RECORD】键小字样【MIN】将显示在萤幕上方的中央而且所测量最小的噪音读值将会显示此时本单元将不会进行纪录但bar的条码仍会继续显示随时的读值。
4.再次按下【RECORD】键小字样【MAX】将显示在萤幕上REC字样旁边而此时所量测的最大噪音量将会显示。
此时本单元将不会进行纪录但bar的条码仍会继续显示随时的读值。
5.再次按下【RECORD】键重新开始纪录及重复上述步骤。
6.持续按著【RECORD】键直至【REC-ORD】的指示消失而离开纪录的模式。
选择自动或手动的等级
此量计的特色乃是有4组以上10dB為刻度的量测范围:40─70dB , 60─90dB ,80dB─110dB , 100dB─130dB当你啟动此量度计时他将内定在自动等级的模式而且小字样【AUTO】将出现在萤幕的左边在此模式下此量计将会準确地自动调整量测的等级再【LCD bar】图表左边的两个数字将显示出目前等级的最低值。
你也可以手动地设定等级当你事先知道量测范围时这是很有帮助的此量计将能更快述的读值因為这样一来此单元就不需要在显示量测前开始建立等级手动调整等级如下:
1. 当量测噪音需要去调整量测等级时按下【RANGE】键小字样【MANu】将出现在萤幕上注意在bar 图表左边所出现的2 个数字将会改变以反映出最新选定等级的最低值。
2. 按下【RANGE】键以切换回自动等级]※若此量计在手动等级下操作当出现Lo时表示声音太低於该等级。
若出现Hi时表示声音太高於该等级。
另一种方式是你必须调整量测计的等级或是你的读值不正确.
自动关机
此量计经过20分鐘后将会自动切掉电源以节省电力。
取消此功能:
1.确认本机已关机。
2.同时按下【ON/OFF】及【MAXHOLD】键。
3.当出现全萤幕时先行鬆开【MAX HOLD】键此时"ㄇ"将出现取代全
4.鬆开【ON/OFF】键此量计将保持啟动状态直至【ON/OFF】键再次被按下。
※当下次此量计啟动时自动关机功能将会重新开始。
更换电池
当萤幕左下角出现BAT小字样时9V的电池已经到了相当低电压的情况而且应该尽速更换。
※使用螺丝起子鬆开背部的电池盖放入一个新的9V电池并锁紧背盖。
