SKLN系列逆流式颗粒冷却器说明书
yhln17x17烘干冷却器使用说明书

YHLN17×17逆流式冷却干燥机使用说明书目录1.性能和特点 (3)2.主要技术参数 (3)3.主要结构和工作过程 (4)4.设备操作使用及调整说明 (5)5.设备的维护和保养 (8)6.故障原因及排除 (9)7.附图 (10)一、性能和特点YHLN系列逆流式冷却干燥机是我公司积多年粮油饲料机械设计制造经验,结合目前国际最先进的干燥冷却技术,研究开发的新型设备,主要用于植物油厂、饲料厂、食品加工厂等各种物料膨化或制粒后高温颗粒的干燥和冷却。
该机具有独特的干燥冷却机理。
冷却风与颗粒物料逆向运动,使物料由下而上逐渐得到干燥冷却,避免了其他设备因骤冷所造成的颗粒表面开裂,芯部水分和热量在冷却时间内难以散发以及易碎等缺点。
效果优于国内现有产品,降水率不低于2%,对生产高质量的膨化颗粒物料,延长物料储存时间,改善工艺性能,提高经济效益起到了卓越的作用。
该机产量大,自动化程度高,噪音低,维修少,为国外先进国家广泛采用机型。
二、主要技术参数●型号:YHLN17×17●中间仓尺寸(长×宽×高):1.7m×1.7m×1.8m●干燥冷却后料温:介质温度+5 C●干燥能力:降水2%●配用动力:(液压系统3.0+匀料系统1.1)=4.1KW(不含风机、关风器)●吸风量:17000m3/h外形尺寸:(附外形尺寸图)三、主要结构和工作过程冷却干燥机主要结构如附图所示:1、主要结构YHLN型冷却干燥机上部应配备关风器,用于防止干燥气流的短路。
关风器出口的下方安装了布料装置,采用蜗轮箱减速机构、自动调心联轴器,运行平稳可靠,将颗粒物料可以均匀地分布在中间仓内。
在中间仓设置两个料位器,并与排料机构组成电气联锁控制。
液压翻板排料系统,均匀排料,无残留,机构安全可靠,维护检修方便。
流量调节装置处的接近开关用于调节液压翻板的开度调节,设有总排空按纽,用于停机后排净物料,以防止颗粒残留于中间仓内,产生粘结。
冷却器使用说明书

冷却器使用说明书制作单位:生产基地:公司电话:公司传真:邮编:编制日期:目录一、产品介绍 (3)二、产品使用 (3)三、设备维护 (4)四、售后服务承诺 (5)五、合格证 (6)一、产品介绍:冷却器是换热设备的一类,用以冷却流体。
通常用水或空气为冷却剂以除去热量。
有间壁式冷却器、喷淋式冷却器、夹套式冷却器和蛇管式冷却器等。
广泛用于大功率硅整流和感应炉及中频炉等大电器设备配套作为冷却保护付机的纯水、水风、油水、油风冷却装置。
二、产品使用:(1)冷却器打压试验合格后,方可投用,启用前排尽内部存水。
(2)检查各倒淋、放空阀是否灵活好用及开关位置,压力表、温度计是否全部装好。
(3)检查基础、支座是否牢固,各部螺栓是否满扣、紧固。
(4)投用时,先投冷流,后投热流。
(5)在投用冷介质或热介质时,首先要保证副线畅通,再缓慢开出口阀,检查无问题后开入口阀,一定要缓慢开,防止憋压。
投用过程要注意观察设备变化情况。
冷却器投用后,随着温度压力的变化,可能会出现泄漏现象,应及时进行检查。
三、设备维护:因冷却水大多数含有钙、镁离子和酸式碳酸盐。
当冷却水流经金属表面时,有碳酸盐的生成。
另外,溶解在冷却水中的氧还会造成金属腐蚀,形成铁锈。
由于锈垢的产生,换热效果下降。
严重时不得不在壳体外喷淋冷却水,结垢严重时会堵塞管子,使换热效果失去作用。
研究的数据显示水垢沉积物对热传输的损失影响巨大,随着沉积物的增加会造成能源费用的加大,节约能源、延长设备的使用寿命,同时节约生产时间和费用。
长期以来传统的清洗方式如机械方法(刮、刷)、高压水、化学清洗(酸洗)等在对设备清洗时出现很多问题:不能彻底清除水垢等沉积物,酸液对设备造成腐蚀形成漏洞,残留的酸对材质产生二次腐蚀或垢下腐蚀,最终导致更换设备,此外,清洗废液有毒,需要大量资金进行废水处理。
利用福世泰克清洗剂清洗凝汽器,福世泰克的高效、环保、安全、无腐蚀,不但清洗效果良好而且对设备没有腐蚀,能够保证凝汽器的长期。
丰尚SKLNA系列逆流式颗粒冷却器简明使用手册

丰尚SKLNA系列逆流式颗粒冷却器简明使用手册本册仅供操作与维护使用,不具有任何法律效力,详细内容请参见产品使用说明书目录1 安全注意事项 (1)1.1环境条件 (1)1.2 警告标识说明 (1)1.3安全标识说明 (2)1.4一般安全注意事项 (3)1.5运输、保存与安装时的安全注意事项 (4)1.6 操作、检查、保养维护时的安全注意事项 (4)1.7人身保护 (6)1.8防爆:粉尘爆炸与火灾的防范措施 (7)1.9其他注意事项(环保措施) (8)2 概述 (1)2.1 主要用途及适用范围 (1)2.2 主要特点及功能 (1)2.3 概要说明与主要结构特征 (2)2.3.1主要结构 (2)2.3.2概要说明 (2)3 冷却器规格 (1)3.1工作条件 (1)3.2型号组成及意义 (2)4 运输、安装与调整 (1)4.1运输 (1)4.2机械安装 (2)4.3电气安装 (4)5 运行 (1)5.1操作时的注意事项 (1)5.2试机前的功能检查 (1)5.3调试 (1)5.4使用、操作 (2)5.5紧急停机、恢复方法 (2)6 保养、维护与检查 (3)6.1保养、维护、检查时的注意事项 (3)6.2日常检查项目和方法 (3)6.3定期检查项目和方法 (4)6.4一般故障与排除方法 (6)6.5冷却器特殊工况及环境问题处理 (6)6.5.1冷却效率分析(水分,温度) (6)6.5.2冷却器材质配置说明 (8)6.6维护、保养用工具 (9)6.7保养备件清单 (9)6.7.1备件订货表 (10)1 安全注意事项1.1环境条件为了安全使用本设备,请按照以下使用条件来安装。
(1)请根据以下所示的条件在室内安装本设备①能正常使用的环境温度范围在(-10~+40℃)②能正常使用的相对湿度范围在30%~85%内③能正常使用的海拔高度在1000米以下④保证室内清洁与空气流通⑤保证设备远离腐蚀气体、易燃易爆气体、蒸汽(2)动力源:电压、频率请参照电机铭牌;气压≧0.4Mpa。
A7 Cooler 冷却器 使用手册说明书

1920720R 01A7 MIG WelderA7 Cooler ENO P E R A T I N G M A N U A LO P E R A T I N G M A N U A LCONTENTS1. Introduction (3)1.1 General ......................................................................................................31.2 Product introduction (3)2. Installation (4)2.1 Removal from packaging ..........................................................................42.2 Locating the machine ...............................................................................42.3 Serial number ............................................................................................42.4Installation and main parts (4)2.4.1 Assembling the equipment ......................................................................42.4.2 Main parts of cooling unit (4)2.5 Preparing for operation (5)3. Operation (8)3.1 Cooler operation .......................................................................................83.2 Overheat signal lamp ................................................................................83.3 Storage (8)4. Maintenance (9)4.1 Daily maintenance ....................................................................................94.2 Monthly maintenance ...............................................................................94.3 Every sixth months ....................................................................................94.4 Flow switch adjustment ..........................................................................104.5Trouble shooting (10)5. Disposal of the machine .................................................................116. Ordering codes ..................................................................................117. Technical data (11)O P E R A T I N G M A N U A L1.1 GeneralCongratulations on choosing the A7 Cooler cooling unit. Used correctly, Kemppi products can significantly increase the productivity of your welding, and provide years of economical service.This operating manual contains important information on the use, maintenance and safety of your K emppi product. The technical specifications of the equipment can be found at the end of the manual.Please read the manual carefully before using the equipment for the first time. For your own safety and that of your working environment, pay particular attention to the safety instructions in the manual.For more information on K emppi products, contact Kemppi Oy, consult an authorised Kemppi dealer, or visit the Kemppi web site at .The specifications presented in this manual are subject to change without prior notice.Important notesItems in the manual that require particular attention in order to minimise damage and harm are indicated with below symbols. Read these sections carefully and follow their instructions.Note: Gives the user a useful piece of information.Caution: Describes a situation that may result in damage to the equipment or system.Warning: Describes a potentially dangerous situation.If not avoided, it will result in personal damage or fatal injury.DisclaimerWhile every effort has been made to ensure that the information contained in this guide is accurate and complete, no liability can be accepted for any errors or omissions. Kemppi reserves the right to change the specification of the product described at any time without prior notice. Do not copy, record, reproduce or transmit the contents of this guide without prior permission from Kemppi.1.2 Product introductionA7 Cooler is used for liquid cooling of welding gun. It is designed for K emppi's robotic welding equipment A7 MIG Welder, but it can also be used in manual welding. It is fully compatible with FastMig X product family. The operation of A7 Cooler is controlled by a microprocessor. To ensure critical cooling of the welding gun in robotic applications, the unit has a flow switch in the return line.O P E R A T I N G M A N U A L2.1 Removal from packagingThe equipment is packed in durable packages specially designed for them. Check the equipment before taking it into use, to make sure that the equipment or a part of it have not got damaged during the transportation. Also check that the delivery corresponds your order and that you have received all the necessary instructions for installing and operating the equipment. The packaging material can be recycled.2.2 Locating the machinePlace the machine on a horizontal, stable and clean ground. Protect the machine from heavy rain and burning sunshine. Check that there is enough space for cooling air circulation in front of and behind the machine.2.3 Serial numberThe serial number of the machine is marked on the machine CEmarking. Identificating the serial number is the only proper means of maintaining and identifying parts for a specific product. It is important to make correct reference to the serial number of the product when making repairs or ordering spare parts.2.4 Installation and main parts2.4.1 Assembling the equipmentThe equipment is assembled in the following order:1. A7 Cooler60682202. Transport unit PM5006185291(If used with FastMig)Assembly the transport unit according to the instructions in the package. Fasten the cooling unit to the transport unit by using the screws and bolts delivered with the equipment.2.4.2 Main parts of cooling unitFront machine1. Housing2. Test switch3. Overheat control lamp4.Filling holeBack side5. Mains voltage connection cable6. Control cable7. Cooling water output hose 8.Cooling water input hoseO P E R A T I N G M A N U A L2.5 Preparing for operationCooling liquid is harmful! Avoid also contact with skinor eyes. In case of injury, seek for medical help.See also 2.4.2. Main parts of cooling unit.1. Fasten the filter unit's mounting plate to thecooler's front panel. Then connect the filter unit to the snap connector and fasten the unit to the mounting plate. Flow rate is factoryadjusted to1 litre per minute. 2. Connect the mains voltage and control connectorsof the cooler unit to the corresponding connectors on the base of the power supply. The connection can be established through the base of the power supply when the devices are separated or through the right side of the A7 Cooler unit by removing the right side plate.3. Attach the power supply on the cooler.4. Connect the cooling water hoses with the wirefeed unit, follow colour markings.5. Fill the reservoir with cooling liquid. It is preferredto use Kemppi brand cooling liquid. Also water can be used, if the temperature doesn't go below 0 degrees Celsius. The capacity of the reservoir is 3 litres.6. Switch on the power supply.7. Press and hold down the test switch until thetorch hoses are filled with liquid.When A7 Cooler is connected to the power sourcefor the first time, the cooler function is normally active. To deselect the cooler function, follow the instructions below depending on the power source type in use.O P E R A T I N G M A N U A LFilter unit and flow switchDepending on the FastMig model in question and the control panel type fitted, please follow the graphical instruction below in order to deselect or select watercooling function. FastMig Pulse or FastMig X operation is set to 'AUTO', FastMig KM, KMS and M equipment is set as water function ‘ON’ from the factory.If no cooler is fitted, deselect the cooler function as instructed in the following. Welding will be prevented if cooler function is enabled and no cooler is fitted.A7 MIG Welder, FastMig X and Pulsecooler ‘OFF’. This is done in the ‘System Config Menu updown arrow keys) to select ‘System Config Menu Choose ‘Water Cooling:Auto ’ and change via control knob to setting ‘then press Back/Exit . Cooler will then be set to the ‘OFF Reset power source via on/off switch and continue welding.so reducing the gun and the cooling liquid to ambient temperature.FastMig M, KMS and KMWhen leaving the factory, cooling unit status is set 'ON '. If no cooling unit is connected, set the cooling unit status to 'OFF '. Depending on your panel type follow the instructions described in the graphic below. Having selected the cooling state required, reset the power source by switching off at the main on/off switch. Restart the power source and weld.O P E R A T I N G M A N U A LKMAfter completing the preparations explained above, the device is ready for welding. Before welding, read the operating instructions.O P E R A T I N G M A N U A L3. OPERATION3.1 Cooler operationSee also 2.4.2. Main parts of cooling unitThe A7 Cooler cooler operation is controlled by the microprocessor of the power supply. The cooler pump starts to operate when the welding begins. After the welding has stopped, the pump will operate 1 to 5 minutes longer depending on the welding time. During this time the liquid will cool down to the ambient temperature and cools down the welding gun.Check the tank liquid level regularly and add liquid, if necessary.If the tanks coolant liquid level runs low, welding is stopped and an error code appears on the FastMig panel. See troubleshooting 4.5.3.2 Overheat signal lampThe overheat signal lamp is lighting when temperature control of the machine has detected cooling water overheat. The ventilator cools down the machine and when the lamp goes out welding can be started again.3.3 StorageThe machine must be stored in a clean and dry room. Protect the machine from rain and keep it away from direct sunshine in places where temperature exceeds +25° C. Check that there is free space in front of and behind the machine for air circulation.O P E R A T I N G M A N U A L4.MAINTENANCEWatch out for mains voltage when handling electriccables!In planning product maintenance machine utilization degree and circumstances should be considered. Careful use and preventive maintenance help to avoid unnecessary production disturbances and breaks.4.1 Daily maintenanceThe following maintenance opeations should be carried out daily:• Check water level and input flow, add liquid if needed.• Check cables and connections. Tighten, if necessary and replace defect parts.• Check that there are no leakages in the cooling water hoses.4.2 Monthly maintenanceCheck and clean the filter unit on the front panel once a month:1. Unscrew the cup from the filter and remove thefilter from the pivot.2. Clean the filter net using water and compressedair.3.Replace the filter net and the cup.4.3 Every sixth monthsThe following maintenance opeations should be carried out at least every sixth months:• Clean off dust and dirt. Change the coolingliquid and wash up the pipes and water reservoir with pure water.• Check seals, cables and connections. Tighten, if necessary and replace defect parts.O P E R A T I N G M A N U A L4.4 Flow switch adjustmentThe flow switch is located inside the cooler, on top of the water tank. If the cooler is already connected to the power source, you must disconnect it (see chapter 2.5). Loosen the locking screws of the black slide control and move it to show the desiredflow rate. Tighten the locking screws and reconnect the cooler to the power source.4.5 Trouble shootingSee also 3.2. Overheat signal lamp.Overheat signal lamp is lit.The unit is overheated.• Check water circulation.• Check that there is enough free space in front of and behind the machine for cooling air circulation.Error code Err5 or Err 27 on the FastMig panel• Check the liquid hoses for damages.• Remove any hose blockages.• Check water circulation, add liquid if needed.For further information and assistance, contact your nearest Kemppi service workshop.11A7 Cooler © Kemppi Oy 2021R01O P E R A T I N G M A N U A L 5.DISPOSAL OF THE MACHINE Do not dispose of electrical equipment with normal waste!In observance of European Directive 2002/96/EC on waste electrical and electronic equipment, and its implementation in accordance with national law, electrical equipment that has reached the end of its life must be collected separately and taken to an appropriate environmentallyresponsible recycling facility.The owner of the equipment is obliged to deliver a decommissioned unit to a regional collection center, as per the instructions of local authorities or a Kemppi representative. By applying this European Directive you will improve the environment and human health. 6. ORDERING CODESA7 Cooler unit 6068220Filter unit and flow switch kit SP800807Filter unit SP012057Flow switch SP012056Welding cooling liquid In 10 litre cans SP98107657.TECHNICAL DATA。
BUCHI 回流冷却器 F-100 F-105 操作手册说明书
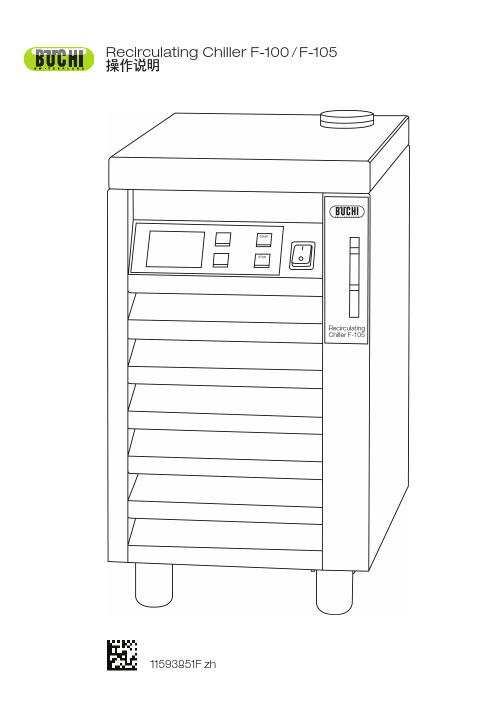
Recir culating Chiller F-100 / F-105操作说明操作手册 () Recirculating Chiller F-100 / F-10511593851F zh09.2020BÜCHI Labortechnik AGMeierseggstrasse 40PostfachCH-9230 Flawil 1电子邮件:*****************BUCHI 保留按照今后所取得的经验对本手册按需进行更改的权利。
这一点尤其适用于结构、插图和技术细节。
本操作手册受版权保护。
不允许对其中所包含的信息进行复制、销售或用于竞争目的,或向第三方提供。
同样禁止在事先未获得书面许可的情况下,利用本手册制造任何部件。
目录目录1 关于本说明书52 安全62.1 用户资质 . . . . . . . . . . . . . . . . . . . . . . . . . . . . . . . . . . . . . . . . 62.2 正确使用 . . . . . . . . . . . . . . . . . . . . . . . . . . . . . . . . . . . . . . . . 62.3 不正确使用 . . . . . . . . . . . . . . . . . . . . . . . . . . . . . . . . . . . . . . . 62.4 本说明书使用的安全警告和安全标志 . . . . . . . . . . . . . . . . . . . . . . . . . . 72.5 产品安全性 . . . . . . . . . . . . . . . . . . . . . . . . . . . . . . . . . . . . . . . 92.5.1 一般性危险 . . . . . . . . . . . . . . . . . . . . . . . . . . . . . . . . . . . . . . . 92.5.2 个人防护装备 . . . . . . . . . . . . . . . . . . . . . . . . . . . . . . . . . . . . . 102.5.3 内置安全部件和保护措施 . . . . . . . . . . . . . . . . . . . . . . . . . . . . . . . 102.6 总体安全规定 . . . . . . . . . . . . . . . . . . . . . . . . . . . . . . . . . . . . . 113 技术参数 123.1 技术参数 . . . . . . . . . . . . . . . . . . . . . . . . . . . . . . . . . . . . . . . 123.2 使用材料 . . . . . . . . . . . . . . . . . . . . . . . . . . . . . . . . . . . . . . . 134 功能说明 144.1 功能原理 . . . . . . . . . . . . . . . . . . . . . . . . . . . . . . . . . . . . . . . 145 投入使用 165.1 安装位置 . . . . . . . . . . . . . . . . . . . . . . . . . . . . . . . . . . . . . . . 165.2 冷却水路径 . . . . . . . . . . . . . . . . . . . . . . . . . . . . . . . . . . . . . . 185.3 电器连接 . . . . . . . . . . . . . . . . . . . . . . . . . . . . . . . . . . . . . . . 186 操作206.1 控制按键和外罩的操作 . . . . . . . . . . . . . . . . . . . . . . . . . . . . . . . . 206.2 准备使用 . . . . . . . . . . . . . . . . . . . . . . . . . . . . . . . . . . . . . . . 226.2.1 安装软管 . . . . . . . . . . . . . . . . . . . . . . . . . . . . . . . . . . . . . . . 236.2.2 填充冷却介质仓. . . . . . . . . . . . . . . . . . . . . . . . . . . . . . . . . . . . 236.3 开始运行 . . . . . . . . . . . . . . . . . . . . . . . . . . . . . . . . . . . . . . . 246.4 系统不得连接非BUCHI真空控制器 . . . . . . . . . . . . . . . . . . . . . . . . . . 246.5 和 BUCHI 真空控制器一起应用. . . . . . . . . . . . . . . . . . . . . . . . . . . . 257 维护和维修 267.1 客户服务 . . . . . . . . . . . . . . . . . . . . . . . . . . . . . . . . . . . . . . . 267.2 常规检查和清洁指南 . . . . . . . . . . . . . . . . . . . . . . . . . . . . . . . . . 278 故障排查 288.1 错误信息显示 . . . . . . . . . . . . . . . . . . . . . . . . . . . . . . . . . . . . . 288.2 故障及其应对方法. . . . . . . . . . . . . . . . . . . . . . . . . . . . . . . . . . 289 关闭、存放、运输和处理 309.1 存放与运输 . . . . . . . . . . . . . . . . . . . . . . . . . . . . . . . . . . . . . . 309.2 处理. . . . . . . . . . . . . . . . . . . . . . . . . . . . . . . . . . . . . . . . . . 3110 配件3310.1 交付物件 . . . . . . . . . . . . . . . . . . . . . . . . . . . . . . . . . . . . . . . 3310.2 仪器配置 . . . . . . . . . . . . . . . . . . . . . . . . . . . . . . . . . . . . . . . 3410.3 配件,选配附件. . . . . . . . . . . . . . . . . . . . . . . . . . . . . . . . . . . . 341 关于本说明书1 关于本说明书本说明书对制冷机进行说明,并包含安全操作和有序维护本设备所需的所有信息。
Parker Hyperchill 工业冷水冷却机系列说明说明书

|Parker Hyperchill water chillers celebrate a presence of over 30 years in the industrial chiller market. This experience has led to a range which not only offers all the advantages typically offered by a quality water chiller, but also adds significant benefits for the industrial user. As such Hyperchill combines advanced design solutions, such as ener-gy saving scroll compressors and a sophisticated micro-processor, with unique features to meet the specific needs of industrial users: these include Hyperchill’s extreme flexibility towards the varying working conditions typically found in industry. The standard models are augmented by a wide range of options and accessories, which together ensure Hyperchill is the perfect solution to each and every industrial application. Hyperchill maxi-mizes productivity and minimizes costs, as well as easing conformity to regulations on water quality. Hyperchill is the perfect solution to industrial chilled water needs.FOCUSED ONFLEXIBILE SOLUTIONSApplications• Food (beverage, confectionery, chocolate,processing, storage)• Plastics (injection, blow molding, extrusion,film extrusion, thermoforming)• Lasers (welding, profiling, cutting, optics, medical, marking, aesthetics)• Printing and Graphics (manufacture, printing,cardboard, labels, plastic film)• Chemical (petrochemical, paints, solvents, temperature control)• Medical (imaging and oncology)• Mechanical (welding, cutting, profiling,polishing, rolling, grinding)• Other (wood, ceramics, gold & silver, biogas,pharmaceutical, compressed air, textile)The use of cold water is very common in industry. The motives are obvious: cold water improves productivity, secures industrial processes, and reduces costs. There are several methods of creating cold water, but water chillers are increasingly becoming the preferred solution. This can be attributed to the fact that chillers always supply the exact water temperature requested, even with differing ambient conditions and differing load requests, thus ensuring optimum efficiency. Water has furthermore become a very precious, and costly, natural resource. Chillers, by operating in a closed circuit, continuously reutilize the same water, and thereby avoid unwanted water waste. In addition, a number of directives have recently emerged to safeguard the quality of the water being utilized (for health reasons) as well as to restrict the discharge of impure water (to protect the envi-ronment); closed circuit chiller operation greatly simplifies conformance to these regulations. The needs of industry are changing, and a water chiller increasingly satisfies these needs.• Increases productivity, reduces costs• Optimizes industrial applications• Adaptable to individual customer needs• Accepts wide range of water temperaturesand fluctuating water flowsEasy to UseHyperchill is an all-in-one solution, with all components packaged inside. Compact dimensions and a low weight make it simple to position; all models can be installed outdoors.Maintenance is facilitated by removable front and side panels, and a condenser section which is isolated from the rest of the chiller.Hyperchill can be used in pressurized closed circuits, facilitating Economical & Environmentally FriendlyHyperchill standardly uses environmentally friendly refrigerant R407C on all models. R407C is characterized by a very high efficiency, providing lower power consumption.Fitted scroll compressors offer energy savings of around 20%. Multiple compressors (from PCW210) ensure significant energy savings at partial loads.Fail-Safe OperationHyperchill operates continuously in all conditions and with all appli-cations. Multiple compressors and twin independent refrigeration circuits (from PCW210) with automatic rotation offer increased peace of mind, as do an extensive list of safety devices.The oversized condensers with cleanable pre-filters ensure that Hyperchill operates in extreme ambients.Features & BenefitsCleanable Condenser Pre-filterA condenser pre-filter (standard) improves chiller performance and reduces maintenance.Scroll CompressorsHyperchill features advanced scroll compressors. These offer significantly lower power consumption and a reduced refrigerant charge . The unique tech-nology offers extreme reliability and renders the compressor near indestructible . Scroll compressors are also very user friendly , as they are extremely quiet and ensure the chiller requires no pre-heating . Furthermore, scroll compressors feature 50% fewer moving parts and emit lower vibration levels, thus increasing the chiller’s longevity ./igfgIntegral PumpAs a standard feature, a pump is installed within the chiller itself. Twin pumps, or pumps with lower or higher available head pressures, are available on request. The water by-pass protects the pump in fluctuating load conditions.Options and AccessoriesCentrifugal FanDesigned for indoor installation, this version features fans which permit the condenser discharge air to be ducted.Remote Control KitsThree remote control kits are offered. The base version features remote on/off switching and gives an on/off and general alarm signal. The advanced version allows the user to perform all operations Advanced Remote ControlTechnical DataModel Chiller Unit PCW080PCW110PCW130PCW160PCW210PCW260PCW330PCW420PCW510PCW650 Cooling capacity BTU/hr79254103566122298150966206322243498311196406152491982616500 Fridge compress. absorb. power kW8.2011.0013.9017.7022.1028.2035.5044.0055.9073.70Water flow gpm162125314148628097121Parker Hannifin Corporation Industrial Gas Filtration and Generation Division 4087 Walden Avenue Lancaster, NY 14086phone 800 343 /igfg© 2018 Parker Hannifin Corporation. Product names are trademarks or registered trademarks of their respective companies BRO-PKR_PCW_022018-FOWorldwide Filtration Manufacturing LocationsNorth AmericaCompressed Air TreatmentIndustrial Gas Filtration and Generation DivisionLancaster, NY 716 686 6400/igfg Haverhill, MA 978 858 0505/igfgEngine FiltrationRacorModesto, CA 209 521 7860/racor Holly Springs, MS 662 252 2656/racorHydraulic FiltrationHydraulic & Fuel FiltrationMetamora, OH 419 644 4311/hydraulicfilter Laval, QC Canada 450 629 9594 VelconColorado Springs, CO 719 531 5855 Process Filtrationdomnick hunter Process Filtration SciLogOxnard, CA 805 604 3400/processfiltrationWater PurificationVillage Marine, Sea Recovery, Horizon Reverse OsmosisCarson, CA 310 637 3400/watermakersEuropeCompressed Air Treatmentdomnick hunter Filtration & SeparationGateshead, England +44 (0) 191 402 9000 /dhfnsParker Gas SeparationsEtten-Leur, Netherlands +31 76 508 5300/dhfnsHiross AirtekEssen, Germany +49 2054 9340/hzfd Padova, Italy+39 049 9712 111 /hzfdEngine Filtration & Water PurificationRacorDewsbury, England +44 (0) 1924 487 000 /rfdeRacor Research & DevelopmentStuttgart, Germany+49 (0)711 7071 290-10Hydraulic FiltrationHydraulic FilterArnhem, Holland +31 26 3760376 /hfde Urjala, Finland+358 20 753 2500Condition Monitoring Parker KittiwakeWest Sussex, England +44 (0) 1903 731 470 Process Filtrationdomnick hunter Process Filtration Parker Twin Filter BVBirtley, England+44 (0) 191 410 5121/processfiltrationAsia PacificAustraliaCastle Hill, Australia +61 2 9634 7777/australiaChinaShanghai, China +86 21 5031 2525 /chinaIndiaChennai, India +91 22 4391 0700 /indiaParker FowlerBangalore, India +91 80 2783 6794JapanTokyo, Japan +81 45 870 1522/japanKoreaHwaseon-City +82 31 359 0852/koreaSingaporeJurong Town, Singapore +65 6887 6300/singaporeThailandBangkok, Thailand +66 2186 7000/thailandLatin AmericaParker Comercio Ltda. Filtration DivisionSao Paulo, Brazil +55 12 4009 3500 /brPan American DivisionMiami, FL 305 470 8800/panamAfricaAeroport Kempton Park, South Africa +27 11 9610700/africaWARNING:The products described herein can expose you to chemicals known to theState of California to cause cancer or reproductive harm.For more information: 。
麦克维尔产品手册
■ 以上选型仅为示例,设计者应根据具体工程要求,与当地麦克维尔办事处联系,以便最后进行优选,确定最理想机型。
4
5
水冷冷水机组
水冷冷水机组
水冷双机头离心式冷水机组 WDC
■水冷离心双机头冷水机组拥有单压缩机离心机的所有特点。 ■采用麦克维尔双压缩机,制冷量可达 2560 冷吨,采用两套独立的机械和电气部件,低耗节能。 ■制冷量在 5%〜100% 范围内调节,80% 的制冷季节中有备用能力。 ■压缩机可以完全隔离,维修更便捷,同时两台压缩机互为备用。 ■单台压缩机可提供 60% 的冷量,部分负荷效率极为出众。 ■相比安装两台单机头压缩机节省 40% 面积,安装费用大大降低。 ■安装两个 MicroTechTMⅡ 压缩机控制器,每个控制器均可单独控制一台压缩机。 ■在 5%〜60% 设计冷量范围内年节约电费大于 25%。 ■压缩机电机故障不影响制冷剂回路。 ■机组控制器内置超前-滞后平衡功能的 LLLB 系统,控制两台压缩机逐台启动,机组启动电流更小。 ■机组工厂运行测试保证运行可靠,测试平台通过美国 ARI 认证。
46.9RT〜411.7RT
HCFC-22
74kW〜690kW
HCFC-22
137kW〜1660kW
HCFC-22
132kW〜1620kW
HFC-134a
74kW〜1620kW
HFC-134a
149kW〜460kW
HFC-134a
66.3kW〜1648kW
HCFC-22
水冷冷水机组
水冷单机头离心式冷水机组 WSC
满负荷滑块位置
低负荷滑块位置
径向排列的液态 制冷剂喷液口
导向操作膨胀阀 供液控制主阀
型 号:WSC079〜WSC126 制冷量:300RT〜1300RT 制冷剂:HFC-134a
逆流提取机组使用说明书

目录一、装置简介 (3)1、逆流提取设备主要用途 (3)2、逆流提取设备工作原理 (3)3、逆流提取设备结构和特点 (3)4、逆流提取设备工作方式 (3)二、装置技术参数 (3)三、操作规程 (4)1、上岗人员的技能培训 (4)2、开机前的准备 (4)3、操作流程 (4)4、清洗 (4)四、操作注意事项 (4)五、常见故障与解决方法 (5)六、设备的安全操作与保养 (6)一、装置简介1、逆流提取设备主要用途逆流提取机用于天然中草药的有效成分和色素等提取,在医疗、化工、保健食品各行业有极其广泛用途。
2、逆流提取设备工作原理逆流法是:药材与溶剂在浸出容器中沿相反方向运动,连续而充分地进行接触提取的一种方法。
设备为高效连续动态逆流提取机,其提取原理是:可以利用微波穿透力强的加热方式,也可以采用夹套蒸汽加热,使提取更为快捷方便。
连续逆流提取设备是动态提取、逆流提取、煎煮提取工艺的结合,在保留多种传统工艺优点的同时,创造了这些传统工艺所无法达到的诸多优点:提取速度快、有效成分提取充分、提取收得率高、溶剂耗量少、药液浓度高、减少了蒸发浓缩等后续处理艺、滚筒内药材颗粒移动速度可调节,从而可根据药材特点调节提取时间的长短、药材在温和的动态环境下进行提取,加热温度较低、有效成分破坏较少,使药液中杂质含量少,属于连续式生产,处理能力大。
3、逆流提取设备结构和特点该逆流提取:由投料斗、内带螺旋输送装置的提取筒、出渣螺旋输送器、过滤器、挤榨机等组成。
原料经粗粉碎、浸润后从投料斗投入,提取筒轴旋转,固定在轴的螺旋带将物料从机组前端向后缓慢推进,同时提取溶剂从机组末端的进液管进入过滤器,由筒后端穿过移动的物料向前端流动,固液两相物质在这种逆向运动中充分接触,从而将药材中有效成分提取出来。
药渣经出渣螺旋输送器强制推动至出挤榨机而排出,出渣螺旋同时对药渣进行挤压,将药渣申残留药液挤出药材组织,减少药渣申残留药液含量。
4、逆流提取设备工作方式正向进料、反向进水,物料与水的流动为逆向连续动态流动,使药材和溶媒能保持相对运动,使料液浓度扩散更新持续作用,进而保证了料液浸出速度快。
科普电子CPU冷却器用户手册说明书

First remove the protective foil from the underside of the cooler. Spread the thermal paste (17) on the surface of the CPU. The amount supplied is sufficient for one or two applications.Caution: The thermal paste supplied is not suitable for human consumption. If swallowed, drink lots of water and urgently seek medical attention. Keep it out of the reach of children.Avoid contact with skin and eyes.Position the cooler mounting bridge (7) centrally on the cooler. Next place the cooler unit over the CPU. Loosen both heatpipe caps that are found in the middle of the top side of the cooler.Insert the Intel/AMD mounting bridge fastening screws (12) from above into the cooler mounting bridge and then screw these alternately tight.You can use the cross-tip screwdriver (16) for this. Subsequently retighten both heatpipe caps on the top side ofthe cooler.Fasten the 120mm fan (3) using fan clips (18) onto the front side of the cooler. Slide the 135mm fan (2) between the twoheatsinks and also fasten this with fan clips (18). Connect both fans using the the Y cable (20). Connect this to theCPU fan connector on the motherboard.When dismantling the fans, push the notches of the fan clips (18) away from the fan.Position the cooler mounting bridge (7) centrally on the cooler (1). Next place the cooler unit over the CPU. Loosen both heatpipe caps that are found in the middle of the topside of the cooler (rotate as illustrated). Insert the Intel/AMD mountingbridge fastening screws (12) from above into the cooler mounting bridge (7) and then screw these alternately tight. You can use the cross-tip screwdriver (16) for this.Subsequently retighten both heatpipe caps on the top side of the cooler.Fasten the 120mm fan (3) using fan clips (18) onto the front side of the cooler. Slide the 135mm fan (2) between the two heatsinks and also fasten this with fan clips (18). Connect both fans using the the Y cable (20). Connect this to the CPU fan connector on the motherboard.When dismantling the fans, push the notches of the fan clips (18) away from the fan.Introduction: Thank you for deciding to purchase a be quiet! product. The following instructions will guide you through the installation process. If you do encounter installation problems, please don't hesitate to contact our customer services by **************************.Pleasenotethatbequiet!cannot accept liability for damage caused by compatibility problems.Warranty:• 3 years manufacturer guarantee for consumers (original purchase from authorized be quiet! dealers only)• Guarantee work can only be processed with an included copy of the purchase receipt from an authorized be quiet! dealer• Manipulation and structural changes of any kind as well as damages through external mechanical forces lead to a complete voiding of the guarantee• Our General Warranty Conditions apply, which can be viewed on Listan GmbH & Co.K G . Biedenkamp 3a . 21509 Glinde GermanyFor further information contact us via e-mail: *******************SCOPE OF DELIVERYGeneralWe recommend preparatory mounting of the cooler outside the PC case for subsequent installation.The following parts are needed for this:1x Dark Rock Pro 4 CPU cooler (1), 1x 135mm fan (2), 1x 120mm fan (3), 2x Intel mounting brackets (5), 1x cooler mounting bridge (7), 4x Intel spacer nuts (8), 4x mounting bracket fastening screws (11), Intel/AMD mounting bridge fastening screws (12), 1x cross-tip screwdriver (16), 1x thermal paste(17), 4x fan clips (18), 1x Y cable (20)Assembly of the cooler mounting frameFirst screw the Intel spacer nuts (8) onto the threads of the socket frame. Place the Intel mounting brackets (5) over the Intel spacer nuts and screw these tight with the mounting bracket fastening screws (11). You can use the cross-tip screwdriver (16) for this.First remove the protective foil from the underside of the cooler. Spread the thermal paste (17) on the surface of the CPU. Theamount supplied is sufficient for one or two applications.Caution:The thermal paste supplied is not suitable for human consumption. If swallowed, drink lots of water and urgently seek medical attention. K eep it out of the reach of children. Avoid contact with skin and eyes.1366, 2011(-3) square ILM, 20661150, 1151, 1155, 1156GeneralWe recommend preparatory mounting of the cooler outside the PC case for subsequent installation.The following parts are needed for this:1x Dark Rock Pro 4 CPU cooler (1), 1x 135mm fan (2), 1x 120mm fan (3), 1x Intel backplate (4), 2x Intel mounting brackets (5), 1x cooler mounting bridge (7), 4x Intel 115X/1366 nuts (9), 4x mounting bracket fastening screws (11), 2x Intel/AMD mounting bridge fastening screws (12), 4x Intel backplate screws (13), 4x O-rings (15), 1x cross-tip screwdriver (16), 1x thermal paste (17), 4x fan clips (18), 1x Y cable (20)Mounting the backplatePosition the Intel backplate screws (13) in the notches situated on the rear side of the Intel backplate (4). Pay attention in so doing to align with the holes specially drilled for each socket.For fixing the backplate screws onto the Intel backplate use the O-rings (15). Once assembly of the Intel backplate for therespective Intel socket is complete, position it under the motherboard. In so doing make sure that the Intel backplate screws (13) are precisely positioned inside the motherboard holes.Assembly of the cooler mounting frameScrew the Intel 115X/1366 nuts (9) onto the previously positioned Intel backplate (4). Then position the Intel mounting brackets (5) over the Intel 115X/1366 nuts and affix these with the mounting bracket fastening screws (11). You can use the cross-tip screwdriver for this (16).1366, 2011(-3) square ILM, 20661150, 1151, 1155, 1156Intel LGA 1150 / 1151 / 1155 / 1156 / 1366We recommend removal of the cooler prior to transportation.January 2018!135mm fan120mm fanIntel backplateIntel mounting brackets234567891011121314151617192013661150, 1151, 1155, 1156Position the cooler mounting bridge (7) centrally on the cooler. Next place the cooler unit onto the CPU. Loosen both heatpipe caps that are found in the middle of the topside of the cooler (rotate as illustrated).Insert the Intel/AMD mounting bridge fastening screws (12) from above into the cooler mounting bridge and then screw these alternately tight. You can use the cross-tip screwdriver (16) for this. Subsequently retighten both heatpipe caps on the topside of the cooler.Fasten the 120mm fan (3) using fan clips (18) onto the front side of the cooler. Slide the 135mm fan (2) between the two heatsinks and also fasten this with fan clips (18). Connect both fans using the Y cable (20). Connect this to the CPU fan connector on the motherboard.When dismantling the fans, push the notches of the fan clips(18) away from the fan.GeneralWe recommend preparatory mounting of the cooler outside the PC case for subsequent installation.The following parts are needed for this:1x Dark Rock Pro 4 CPU cooler (1), 1x 135mm fan (2), 1x 120mm fan (3), 2x short AMD mounting brackets (6), 1x cooler mounting bridge (7), 4x AMD spacer nuts (10), 2x Intel/AMD mounting bridge fastening screws (12), 4x AMD backplate screws (14), 1x cross-tip screwdriver (16), 1x thermal paste (17), 4x fan clips (18), 4x AM3 washers (19), Y cable (20)Assembly of the cooler mounting frameTo permit mounting of the cooler please remove both the plastic retainers of the AMD retention module. The factory-fitted backplate affixed to the rear side of the motherboard will be needed for subsequent installation of the cooler.Note: To mount the Dark Rock Pro 4 on an AM3 motherboard, please use the AM3 washers (19), placing these over the backplate bolts protruding through the front side of the motherboard.Place the 4x AMD spacer nuts (10) onto the backplate bolts protruding through the front side and affix both short AMD mounting brackets (6) with the AMD backplate screws (14).Mounting the CPU cooler:First remove the protective foil from the underside of the cooler. Spread the thermal paste (17) on the surface of the CPU. The amount supplied is sufficient for one or two applications.Caution: The thermal paste supplied is not suitable for human consumption. If swallowed, drink lots of water and urgently seek medical attention. Keep it out of the reach of children. Avoid contact with skin and eyes.AM4AM2(+) / AM3(+) / FM1 / FM2(+)NotesLimited WarrantyPer the terms and conditions of this limited warranty as given below, be quiet! warrants its new products to be free of defects resulting from faulty materials and faulty manufacturing for the length of the warranty period.I. APPLICABILITYThis non-transferable warranty is applicable to newly purchased, previously unopened be quiet! products and is enforceable by only the original consumer purchaser. Proof of purchase is required for warranty service, so should be retained. be quiet! does not provide warranty registration services.II. WARRANTY PERIODFor eligible products, parts and labor are warranted for the appli-cable warranty period from the date of purchase. The applicable warranty period varies by product model, and is identified in your user documentation, on the product package, or as listed below. Should any of these warranty periods differ, the longest specified warranty period will apply. Replaced products will be warranted for the remainder of the original warranty period or thirty days, whichever is longer.III. EXCLUSIONSThe following are not covered by the warranty:1. Normal wear and tear.2. Any product which has been modified without permission from be quiet!, or on which the serial number or warranty sticker has been defaced, modified, or removed.3. Damage, deterioration or malfunction resulting from:Accident, abuse, misuse or improper use, neglect, connection to an improper voltage source, unauthorized product modification, or failure to follow instructions included with the product.Fire, water, lightning, or other acts of nature.Repair or attempted repair by anyone not authorized by be quiet!.Shipping or transport damage (claims must be made with the carrier).Any other cause which does not relate to a defect in materials or manufacturing workmanship.4. Cartons, cases, batteries, cabinets, tapes, accessories or other consumables used with this product.5. be quiet!, Inc. does not warrant that this product will meet your requirements. It is your responsibility to determine the suitability of this product for your purpose.6. Removal or installation charges.7. Shipping charges.8. Any incidental charges.IV. EXCLUSION OF DAMAGESbe quiet!‘s sole obligation and liability under this warranty is limited to the repair or replacement of a defective product at its option. be quiet! shall not, in any event, be liable for any special, incidental, indirect, or consequential damages whatsoever, including but not limited to loss of profits, revenue, or data (whether direct or indirect), damages resulting from interruption of service and loss of business, or for liability in tort relating to this product or resulting from its use or possession, even if be quiet! has been advised previously of the possibility of such damages.V. LIMITATIONS OF IMPLIED WARRANTIESThere are no other warranties, expressed or implied, including but not limited to those of merchantability or fitness for a particular purpose. The duration of implied warranties is limited to the warranty length specified in Paragraph II.50VI. LOCAL LAW AND YOUR WARRANTYThis warranty gives you specific legal rights. You may also have other rights granted under local law. These rights may vary.VII. NO OTHER WARRANTYNo be quiet! employee, dealer, or other agent is authorized to make any modification, extension, or addition to this warranty.VIII. TO OBTAIN TECHNICAL SUPPORT OR WARRANTY SERVICE Please see your product owner’s manual or visit the Online Support section at for details and contact information. You will need to provide proof of purchase for warranty service.。
SKLN系列逆流式颗粒冷却器说明书

SKLN系列逆流式颗粒冷却器说明书⼀、型号组成含义及名称SKLN4逆流式冷却器S KL N 4表⽰冷却器容积4M2表⽰逆流式表⽰颗粒冷却表⽰饲料机械⼆、适⽤范围及性能特点1、适⽤范围SKLN系列逆流式冷却器主要⽤于⼤中型饲料⼚制粒⼯段中颗粒饲料的冷却,使从制粒机出来的温度⾼达80~90℃、⽔分含量17~18%的颗粒饲料冷却到⽐室温略⾼的温度,⽔分降⾄12~13%,从⽽便于运输,储贮和保管。
2、性能特点SKLN系列逆流式冷却器,采⽤合理冷却原理,经消化吸收国际先进技术研制⽽成,它由进料段、壳体⽀架、出料门机构部分组成。
该机机体容量⼤,只需改变料位器位置,即可适⽤于不同产量(在规定范围内)要求,出料机构采⽤⽓动或电动,⽆震动。
该机冷却室采⽤锥体⽹板,根据不同型号均布有6-8个冷却区域,可使物料分布在各个冷却区域内,因此在各冷却区域内有⼤量的冷空⽓相互串流,物料冷却速度快、效果好,从⽽保证了冷却产品的最终⾼品质。
该机型布局合理,结构简单、装拆⽅便、能耗低、⾃动化程度⾼、⽣产效率⾼,是我国⽬前理想的颗粒冷却设备。
三、主要规格和技术参数表1.各型号的技术参数四、⼯作原理1、⼯作原理从制粒机出来的湿热颗粒料,经进料机构进⼊冷却器,通过分料器向冷却器四周均布,SKLN6以上的采⽤电机⾃动布料。
当物料堆积⾼度达到料位器的位置,料位器发出信号,这时⽓缸正向充⽓或电机通电。
在推杆的作⽤下料门开启,经过冷却的物料从出料门排出,在时间继电器的定时作⽤下,料门在排料⼀定时间后关闭。
冷却空⽓通过冷却器下部各冷却区域⽹板孔进⼊,⽓流穿过物料从上出风⼝排出,当颗粒料⼜堆积到料位器⾼度时,料门⼜重复运动,从⽽达到定时定量出料的⽬的。
在控制系统中装有⼿动装置,当制粒机停⽌⼯作时,物料不能接触料位器,这时可⽤⼿动开关将物料全部排出。
2、主要结构(1)整体结构(图1)主要部件结构进料器:该装置主要供进物料之⽤,保证物料能够准确向冷却器分布,其进料器采⽤关风⼝,防⽌从顶部进风。
圆形逆流式冷却塔安装及运行与保养手册
GR-圆型系列逆流式冷却塔安装及运行与保养手册第一部分冷却塔安装说明一、检查基础1、参照冷却塔产品样本,检查基础尺寸是否正确。
2、用水平尺检查基础是否水平,要求各基础之间水平误差不大于2㎜。
3、冷却塔安装地面承载,参考冷却塔运行重量及设计的安全系数,校核安装地基的承载能力。
二、安装底盆1、按照装配示意图,将各类底盆按图示顺序摆放,并调整彼此间间隙至均匀(单台塔底盆是一整体,不必拼装)。
2、配钻底盆间的连接孔,然后用螺栓连接固定。
3、底盆封边:➢清理底盘上的所有杂物,保持底盘清洁、干燥、不能残留水滴,封底时不能在雨天进行(保证封底后一小时之内不下雨)。
➢将树脂倒进水勺,按配比加入固化剂,树脂与固化剂在25~30℃时配比为100:2,每次用多少配多少,以免浪费,同时随坏境温度高低,适当增减固化剂的配量。
➢将加入固化剂的树脂搅拌均匀,方可进行涂刷,否则会出现部分树脂过早固化,部分不能固化的现象,造成树脂及底盘漏水。
➢封底操作时应先在底盘接缝处刷上一层树脂,然后铺上一层纤维,再涂上一层树脂,并用刷子将其压平,使树脂充分浸透纤维,底盘与纤维不能有分离现象,封底纤维一般铺三层。
➢封底纤维固化后,再涂上一层树脂,保证封底纤维表面光滑。
➢树脂一般保质期为三个月,请用户在保证期内使用。
➢树脂、纤维用保存在阴凉、干燥、通风处,不宜让阳光直射及雨淋,以免树脂。
纤维变质。
三、安装主管、横水管、中心圈、管位器主管要垂直与底盘,横水管要水平,管位器安装在主管上,然后装上中心圈。
四、安装进风支柱及填料梁将填料支架与中心圈、进风支柱连接,但必须确保水平垂直。
检查各件安装到位后,可将所有螺丝紧固,然后缠绕填料。
五、安装填料将两圈填料按相反的方向放在一起,以中心管为中心进行缠绕,根据图纸的要求来确定缠绕直径的大小和高度。
缠好的填料要求:密实均匀,堆放整齐。
六、安装播水管及转头把转头装在主管顶端,再将播水管横推进转头内,直至播水管成水平位置,喷水孔要和垂直线成30°~45°向后安装(在运行时,按需求而作最后调校角度)。
- 1、下载文档前请自行甄别文档内容的完整性,平台不提供额外的编辑、内容补充、找答案等附加服务。
- 2、"仅部分预览"的文档,不可在线预览部分如存在完整性等问题,可反馈申请退款(可完整预览的文档不适用该条件!)。
- 3、如文档侵犯您的权益,请联系客服反馈,我们会尽快为您处理(人工客服工作时间:9:00-18:30)。
一、型号组成含义及名称
SKLN4逆流式冷却器
S KL N 4
表示冷却器容积4M2
表示逆流式
表示颗粒冷却
表示饲料机械
二、适用范围及性能特点
1、适用范围
SKLN系列逆流式冷却器主要用于大中型饲料厂制粒工段中颗粒饲料的冷却,使从制粒机出来的温度高达80~90℃、水分含量17~18%的颗粒饲料冷却到比室温略高的温度,水分降至12~13%,从而便于运输,储贮和保管。
2、性能特点
SKLN系列逆流式冷却器,采用合理冷却原理,经消化吸收国际先进技术研制而成,它由进料段、壳体支架、出料门机构部分组成。
该机机体容量大,只需改变料位器位置,即可适用于不同产量(在规定范围内)要求,出料机构采用气动或电动,无震动。
该机冷却室采用锥体网板,根据不同型号均布有6-8个冷却区域,可使物料分布在各个冷却区域内,因此在各冷却区域内有大量的冷空气相互串流,物料冷却速度快、效果好,从而保证了冷却产品的最终高品质。
该机型布局合理,结构简单、装拆方便、能耗低、自动化程度高、生产效率
高,是我国目前理想的颗粒冷却设备。
三、主要规格和技术参数
表1.各型号的技术参数
四、工作原理
1、工作原理
从制粒机出来的湿热颗粒料,经进料机构进入冷却器,通过分料器向冷却器四周均布,SKLN6以上的采用电机自动布料。
当物料堆积高度达到料位器的位置,料位器发出信号,这时气缸正向充气或电机通电。
在推杆的作用下料门开启,经过冷却的物料从出料门排出,在时间继电器的定时作用下,料门在排料一定时间后关闭。
冷却空气通过冷却器下部各冷却区域网板孔进入,气流穿过物料从上出风口排出,当颗粒料又堆积到料位器高度时,料门又重复运动,从而达到定时定量出料的目的。
在控制系统中装有手动装置,当制粒机停止工作时,物料不能接触料位器,这时可用手动开关将物料全部排出。
2、主要结构
(1)整体结构(图1)
主要部件结构
进料器:该装置主要供进物料之用,保证物料能够准确向冷却器分布,其进料器采用关风口,防止从顶部进风。
外筒:该段主要用于集料,聚集热空气,外筒采用长方体,在外筒上装有料位器,并设有分布不同位置的料位器孔位,便于调整不同产量,装在外筒上的温度表,可随时显示冷却器内物料的温度,并在外筒上设有观察窗和观察门,便于维修观察。
冷却网室: 该室采用网板制作,根据型号不同制造成不同的分段冷却区室,让堆积在各区冷却室内的物料有足够的冷空气穿入,能使物料在短时间很快冷却,该冷却室装在外筒机架上,采用螺栓联接,便于拆卸、更换。
出料机构:出料装置由气缸或电机驱动,开闭时间则由料位器和时间继电器控制。
冷却时间:在一定的冷却风量下,物体的冷却效果与冷却时间有关,冷却时间与颗粒大小及原料组份有关,一般用下式计算:
T=60.Vr /Q
T—物料在冷却器内的逗留时间min
V—冷却室容量(m³)
r—物体的容重(t/ m³)
Q—冷却器的产量(t/h)
冷却时间参考表
五、设备安装
本机一般应在坚固的水平基础上安装,并用地脚螺栓紧固,如车间的地坪坚实,可不另做基础,而直接用膨胀螺栓或其他方法将其固定在车间地评面上,否则应参照图3所要求制作基础。
地脚安装尺寸与进出料预留孔位置可参照图4要求。
六、操作
1.冷却器工作前,首先启动关风器,风机。
2.根据产量要求,调整料位器位置,产量要求高时,料位器应安装在上面位置,反之安癍在下面位置。
3.停班时,冷却器内的物料可通过手动开关操作将物料全部排出。
4.冷却器工作时,不得开启观察门。
七、维修、保养
1.应定期检查各联接件,是否松动脱落。
2.定期清扫冷却区板网,保证风流通畅。
3.定期对轴承及电机部分加上润滑油。
八、故障及排除方法
九、运输
该设备为全装配式,整体式机型,在运输中一定保证固定牢靠,防止碰、撞、挤压。