Websphere for Linux集群安装和配置
Linux上安装websphere及部署程序

一.安装环境 (2)二.Linux上安装 WebSphere Application Server (2)(一).WebSphere安装文档说明 (2)(二).安装步骤 (2)三.WebSphere配置数据库驱动 (11)四.配置应用程序 (13)(一).进入管理控制台 (13)(二).配置数据源 (13)(三).发布应用程序(以mbweb为例) (25)五.测试应用程序........................................ 错误!未定义书签。
(一).关于mbweb................................... 错误!未定义书签。
(二).关于MBWebService............................ 错误!未定义书签。
(三).关于qzweb................................... 错误!未定义书签。
(四).关于transfers............................... 错误!未定义书签。
一.安装环境硬件:1.硬盘空间:10G以上2.物理内存:建议2G以上(低于2G请与开发公司联系)3.Cpu速度:2G以上系统软件:1.操作系统:Red Hat Enterprise Linux Applcation Application Server 4及以上版本,支持中文2.系统环境变量LANG的值需等于zh_CN二.Linux上安装 WebSphere Application Server 要在 Linux 上安装配置 WebSphere Application Server 6.1.0,请遵循以下这些步骤。
(一).WebSphere安装文档说明WebSphere 文档位于安装软件目录的/WAS/docs目录中。
(二).安装步骤(1)解压缩安装文件1.以root用户身份登录。
2.把websphere安装程序拷贝到系统的/root/目录下3.切换到 CD 所在的驱动器的以下目录之一:# cd /root/websphere/WAS4.输入以下命令:# ./install(2)安装点击下一步选择“我接收许可证协议中的全部条款”,点击下一步点击下一步点击下一步点击下一步点击下一步安装进行,请稍等配置概要表类型,默认选项,点击下一步点击下一步点击下一步点击下一步根据所需选择端口值(默认为9080),点击下一步点击下一步配置进行中,请稍候点击完成系统自动弹出此对话框,选择安装验证系统最终提示安装验证完成、成功后结束安装。
Websphere MQ 7.0.1 For Linux版安装
Websphere MQ 7.0.1 For Linux版安装下载文件将压缩包上传至指定目录,比如:/home/hqh/MQ7下面。
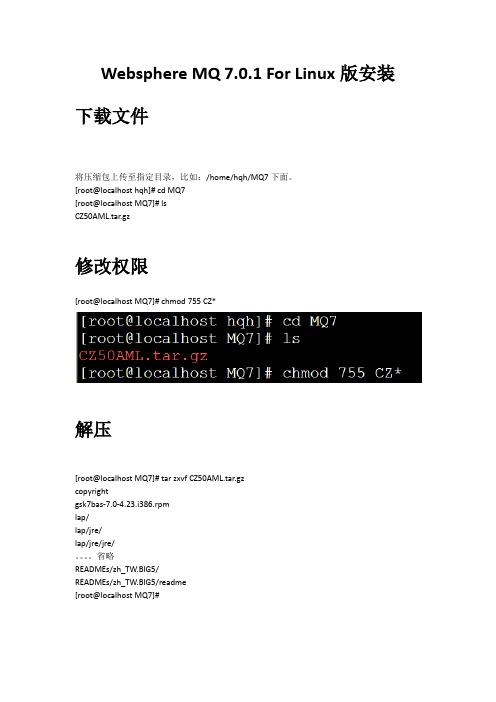
[root@localhost hqh]# cd MQ7[root@localhost MQ7]# lsCZ50AML.tar.gz修改权限[root@localhost MQ7]# chmod 755 CZ*解压[root@localhost MQ7]# tar zxvf CZ50AML.tar.gzcopyrightgsk7bas-7.0-4.23.i386.rpmlap/lap/jre/lap/jre/jre/。
省略READMEs/zh_TW.BIG5/READMEs/zh_TW.BIG5/readme[root@localhost MQ7]#同意license:[root@localhost MQ7]# ./mqlicense.sh -text_onlyLicensed Materials - Property of IBM5724-H72(C) Copyright IBM Corporation 1994, 2009 All rights reserved.US Government Users Restricted Rights - Use, duplication or disclosure restricted by GSA ADP Schedule Contract with IBM Corp.License has already been accepted: Proceed with install.License解决办法如果不是上面的提示,可用如下方法解决:在/tmp/ mq_license/ license/下面新建空文件status.datroot@localhost MQ]# cd /tmp[root@localhost tmp]# lsgconfd-root orbit-root scim-panel-socket:0-root hsperfdata_root scim-bridge-0.3.0.lockfile-0@localhost:0.0 scim-socket-frontend-root keyring-pDTCX5 scim-bridge-0.3.0.socket-0@localhost:0.0 ssh-YrKzyL3494mapping-root scim-helper-manager-socket-root virtual-root.m0Nmsa [root@localhost tmp]# mkdir mq_license[root@localhost tmp]# cd mq*[root@localhost mq_license]# mkdir license[root@localhost mq_license]# cd license[root@localhost license]# ls[root@localhost license]# vi status.dat[root@localhost license]# lsstatus.dat给所有rpm包赋予可执行权限:[root@localhost MQ7]# chmod 755 *.rpm再ls一下,变成绿色的了吧安装[root@localhost MQ7]# rpm -ivh MQSeriesRuntime-7.0.1-0.i386.rpmPreparing... ########################################### [100%] Creating group mqmCreating user mqm1:MQSeriesRuntime ########################################### [100%] [root@localhost MQ7]# rpm -ivh MQSeriesSDK-7.0.1-0.i386.rpmPreparing... ########################################### [100%] 1:MQSeriesSDK ########################################### [100%] [root@localhost MQ7]# rpm -ivh MQSeriesServer-7.0.1-0.i386.rpmPreparing... ########################################### [100%] 1:MQSeriesServer ########################################### [100%] [root@localhost MQ7]# rpm -ivh MQSeriesJava-7.0.1-0.i386.rpmPreparing... ########################################### [100%] 1:MQSeriesJava ########################################### [100%] [root@localhost MQ7]# rpm -ivh MQSeriesSamples-7.0.1-0.i386.rpmPreparing... ########################################### [100%] 1:MQSeriesSamples ########################################### [100%] [root@localhost MQ7]# rpm -ivh MQSeriesClient-7.0.1-0.i386.rpmPreparing... ########################################### [100%] 1:MQSeriesClient ########################################### [100%] [root@localhost MQ7]# rpm -ivh MQSeriesMsg_Zh_CN-7.0.1-0.i386.rpmPreparing... ########################################### [100%] 1:MQSeriesMsg_Zh_CN ########################################### [100%] [root@localhost MQ7]# rpm -ivh MQSeriesMan-7.0.1-0.i386.rpmPreparing... ########################################### [100%] 1:MQSeriesMan ########################################### [100%] [root@localhost MQ7]# rpm -ivh MQSeriesTXClient-7.0.1-0.i386.rpmPreparing... ########################################### [100%] 1:MQSeriesTXClient ########################################### [100%] [root@localhost MQ7]#检查安装完毕。
Websphere 集群安装步骤
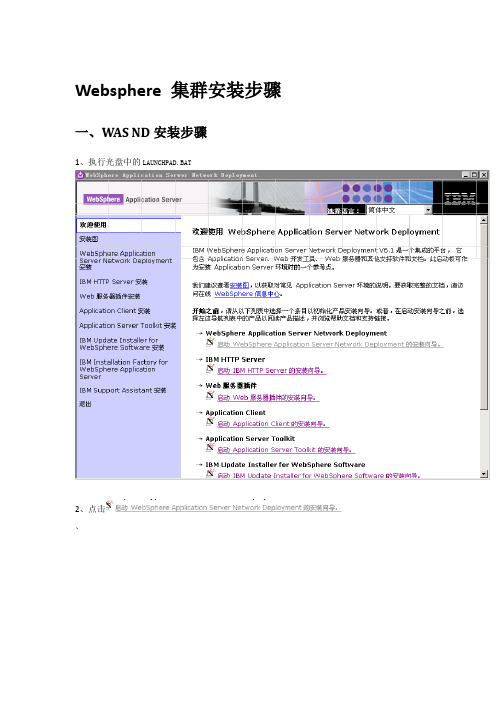
Websphere 集群安装步骤一、WAS ND安装步骤1、执行光盘中的LAUNCHPAD.BAT2、点击、3、点击下一步4、选择,然后点击5、点击6、点击7、设置安装目录后,点击8、选择列表中的(如上图)后点击9、设置管理工具的用户名和密码(在当前示例中我们设置的用户名和密码都是admin)10、点击11、点击12、点击,系统会弹出一个窗口,如下图所示:13、关闭安装验证窗口14、点击进入管理工具二、节点服务器创建步骤(创建两个以上)完成WAS ND的安装后,点击(如上图所示)1、点击2、在列表中选择“应用程序服务器”,然后点击3、选择“典型概要文件创建”,然后点击4、输入该节点的用户名和密码,然后点击5、点击6、选择,然后点击7、点击,系统会弹出一个窗口,如下图所示:8、关闭窗口,点击三、IBM Http Server安装步骤1、在安装窗口中点击2、点击3、选择,然后点击4、点击5、设置安装目录,然后点击6、设置Http Server的端口(推荐默认)然后点击7、输入操作系统密码,如下图所示:8、点击9、输入Http Server的用户名和密码,然后点击10、输入web服务器的名称和主机名或IP(推荐默认),然后点击11、点击12、点击四、Web服务器插件安装步骤1、点击安装向导窗口中的2、点击3、选择,然后点击4、点击5、选择,然后点击6、如果web服务器和WAS安装在同一台机器上,就选择本地,否则选择远程,然后点击7、选择插件安装目录(建议不要和Http Server的plugins目录相同,以避免和HttpServer冲突),然后点击8、选择WAS安装目录,然后点击9、Dmgr01是管理工具的概要,选择此概要,然后点击10、输入web服务器定义名,此名称要和HttpServer的名称一样,然后点击11、点击12、点击13、点击14、点击15、点击五、将Web Server加入配置管理服务器1. 开启IHS的admin管理: 在<IHS-install>/bin目录下运行htpasswd -cm <install_dir>\conf\admin.passwd admin(admin 是以后管理IHS的用户名). 接着输入两次密码.2. 在开始程序菜单的服务管理面板中启动IBM HTTP Server 和 IBM HTTP Administration Server.3. 将<wasplugin-install>/bin/ configure webserver1.bat文件拷贝到<was-install>/bin目录.(webserver1是安装HIS是设置的)4. 启动DM服务 < was-install >/profiles/profiles/Dmgr01/bin/ startManager.bat.5. 打开一个命令行窗口,运行<was-intall>/bin/configurewebserver1.bat.6. 到配置管理控制台确认Web Server被成功加入.六、将节点服务器加入到集中管理单元1. 通过菜单启动各节点服务器,如下图所示:2、执行< was-install >/ profiles/AppSrv01/bin/addNode.sh <DM machineName> <DM soap port>把节点1加入到集中管理单元. soap端口号为8879.3. 在另外一台节点(AppSrv02)上重复2至3步将此节点也加入到集中管理单元.4. 在配置管理控制台确认节点已加入到集中管理单元,在控制台左边菜单栏中点系统管理->选择节点,如下图:两个节点已成功加入七、创建集群1、点击开始->程序->IBM WebShpere->Application Server Network Deployment V6.1->概要文件->Dmgr01->管理控制台,如下图所示:输入用户名和密码(安装WAS ND时第8步所设置的用户名和密码),点击登录2、点击左边菜单栏中的【服务器】,选择【集群】,如下图所示:3、点击【新建】然后输入集群名称,点击下一步,如下图所示:4、将打开,并存到D盘5、点击【浏览】,从D盘中选择creatorepp.war,并在【上下文根】中输入:creatorepp,如下图所示,然后点击【下一步】6、在窗口中输入安装应用程序的目录,如:d:\webapps,然后点击【下一步】然后点击【下一步】9、点击【下一步】10、点击【完成】11、点击【保存到主配置】12、选中creatorepp应用前的复选框,然后点击【启动】,系统将启动该集群13、输入地址,查看creatorepp下的test.html是否能正常访问,如果能正常访问则表示安装成功,再用creatorepp.rar替换掉安装目录中的creatorepp.war即可,然后将web.xml复制到各节点服务器的缓存目录,如:<install_dir>\profiles\AppSrv02\config\cells\chinacre-ioylx9Cell01\applications\creatorepp.ea r\deployments\creatorepp\creatorepp.war\WEB-INF。
多图,linux下安装websphere
Websphere For LinuxES服务器安装与配置第1版2006年11月20日本文详细描述了LINUX操作系统和WebSphere Application Server V6.1系统安装。
目录目录 (2)第一章系统简介 (3)1.1文档内容及使用范围 (3)1.2系统硬件的需求 (3)1.3系统软件平台的需求 (3)第二章LINUX操作系统的安装 (4)2.1安装前的准备 (4)2.2系统安装 (4)2.2.1准备工作 (4)2.2.2操作系统的安装 (4)第三章WEBSPHERE6.1软件的安装 (7)3.1 Web服务器的安装 (7)3.1.1创建用户 (7)3.1.2以root身份安装websphere (8)3.2 Web服务器的常用操作 (15)第一章系统简介1.1文档内容及使用范围本文档适用于Red Hat Enterprise Linux ES Release 3操作系统和WebSphere Application Server V6.1环境下的系统安装。
本文档的阅读者需要具备一定linux操作系统的基础知识。
1.2系统硬件的需求系统硬件平台基本要求为:linux:服务器一台,服务器基本配置要求为:CPU:3.0GHZ内存:2GB硬盘:36GB网卡:10/100BaseTLANCD-ROM:一台1.3系统软件平台的需求系统所需第三方软件为:操作系统Red Hat Enterprise Linux ES Release 3 (Taroon Update 4)Web服务器WebSphere Application Server V6.1第二章Linux操作系统的安装2.1安装前的准备硬件连接:电源线,网络连接到位等引导设置:设置计算机启动模式为光盘启动(有可能要改变一下BIOS的启动设置参数)2.2系统安装2.2.1准备工作a)检查显示器、键盘、鼠标是否与主机正确连接b)打开主机电源c)把介质(操作系统光盘第一张)插入驱动器2.2.2操作系统的安装1.使用CD 集中的第一张CD 启动服务器。
WebSphere集群安装手册

WebSphere集群安装说明目录WebSphere集群安装说明 (1)安装前奏 (2)一、集群的安装 (2)二、Deployement Manager的安装 (3)三、Websphere update Installer的安装 (8)四、Websphere 补丁的安装 (10)五、安装HIS和Plugin (17)六、Websphere 节点的安装 (22)1.32位机器的操作 (22)2.64位机器的操作 (29)七、Websphere 集群的创建 (30)八、配置web服务器 (36)九、应用数据源的配置 (36)十、应用部署 (39)十一、命令操作 (41)十一、nfs操作 (42)十二、注意事项 (43)十三、程序更新 (43)十四、相关地址: (45)安装前奏有时linux会自带JDK的情况,可能会造成在调用was的install时出现问题,需要做以下调整:1、编辑/etc/selinux/config,找到这段# This file controls the state of SELinux on the system.# SELINUX= can take one of these three values:# enforcing - SELinux security policy is enforced.# permissive - SELinux prints warnings instead of enforcing.# disabled - SELinux is fully disabled.SELINUX=enforcing把SELINUX=enforcing 注释掉:#SELINUX=enforcing ,然后新加一行为:SELINUX=disabled保存,关闭。
/usr/soft/C88TLML/C88TFML2、chcon -t texrel_shlib_t如: chcon -t texrel_shlib_t /路径/路径/名字.so (这个文件视具体执行文件.)chcon -t texrel_shlib_t /usr/soft/C88TLML/C88TFML/JDK/jre.pak/repository/package.java.jre/java/jre/bin/libj9jit23.so chcon -t texrel_shlib_t /usr/soft/C88TLML/C88TFML/JDK/jre.pak/repository/package.java.jre/java/jre/bin/libjclscar_23.s o一、集群的安装WAS集群由一组应用服务器组成,每个服务器上部署了同样的应用程序。
Websphere的安装、部署项目和数据源的配置
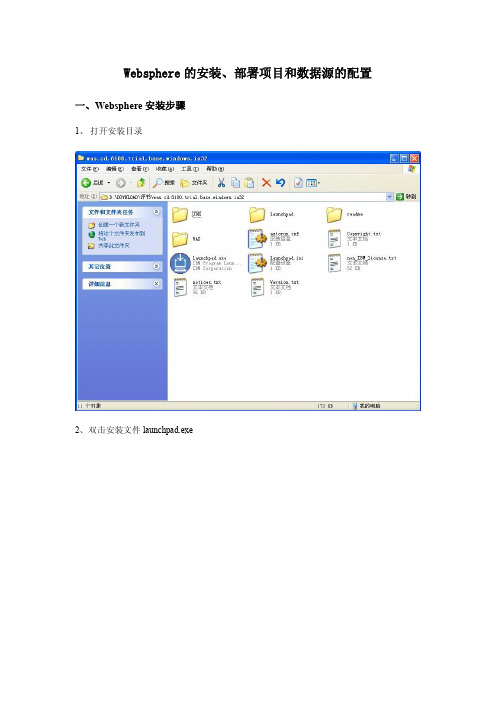
con=ds.getConnection(); } else {
System.out.println("获取 JNDI 连接失败!!"); }
String sql="select * from scott.dept";
修改${SERVER_LOG_ROOT}/SystemOut.log 和${SERVER_LOG_ROOT}/SystemErr.log 为 console
五、在 Myeclipse 下集成 Websphere 服务器
Ø 版本:Eclipse 3.3, MyEclipse 6.0.0.M1 1. 启动 MyEclipse 进入 Windows – Preferences – Java – InstallJREs 添加 ibmjre 指向 D:\javatool\IBM\WebSphere\AppServer\java
13、安装程序“正在安装组件” 14、安装程序“正在运行配置命令”。
15、安装完成,单击“完成”按钮。
二、部署项目
要部署项目需要将项目打包成.war 文件
注: 完整路径:将要安装布署的应用程序位置(E:\workspace\JndiWeb\JndiWeb.war) 上下文根:站点目录 myweb 如:http://localhost:9080/myweb/
启用类重新装入
完成并发布让其启动 6. 打开浏览器浏览网页 7. 附加说明:在配置成功之后,删除第 3 步建立的项目发布,然后选择 Explored Archive
WEBSPHERE在LINUX下的安装配置过程

WebSphere在linux下的安装配置过程一.Linux的安装没有特殊的要求,按照默认的情况安装就可以。
二.Websphere的安装1.以root用户登陆到linux服务器。
(Websphere要求以root用户权限安装)2.把websphere安装光盘,放入光驱。
3.打开一个linux终端,执行下列命令:[root@test root]#mount/dev/cdrom[root@test root]#cd/mnt/cdrom/linux/[root@test linux]#./install.sh4.进入安装程序画面:点击Next,继续安装。
5.选择标准类型的安装6.进行数据库配置数据库的名:输入创建的数据库的SID名。
DB Home:如果你的oracle的数据库安装在本机器上,这里填写oracle数据库的安装路径。
否则就先随便输入一个路径,后面将做处理。
SERVER名:输入安装数据库机器的IP地址。
端口号:默认是1521用户名:密码:上述内容输入完成后,点击Next继续安装。
7.设置安装目录默认安装在/opt下面(注意一点,就是看安装目录的空间够不够)。
典型安装也会把IBM HTTPServer一同安装上。
8.安装完成9.安装完成后,先不要启动Websphere,还需要做一些配置。
三.配置Websphere1.如果你的oracle数据库不是安装在本机器上,你需要从oracle安装机器的$ORACLE_HOME/jdbc/lib下面拷贝classes12.zip,nls_charset12.zip到linux的服务器上,比如放到/usr/local/oracle_lib下面。
2.修改配置文件。
修改/opt/WebSphere/AppServer/bin/setupCmdLine.sh文件。
找到DBDRIVER_JARS=这一行,按照刚才我们拷贝classes12.zip的目录修改好:DBDRIVER_JARS=/usr/local/oracle_lib/classes12.zip:/usr/local/oracle_lib/nls_charset12.zip修改/opt/WebSphere/AppServer/bin/admin.config文件。
最新使用Linux安装WebSphere8.5-详细安装手册
使用L i n u x安装W e b S p h e r e8.5-详细安装手册WebSphere 8.5安装手册使用RHEL5.8安装WebSphere8.51准备WebSphere Application Server 8.5的安装需要红帽5.6及后续版本。
以下操作假设64位的红帽Linux5.8已经安装好,并打开服务器上的FTP服务,允许root用户上传文件。
首先到/projects/xming/下载Windows下的X Server,运行配置并启动。
在Putty中设定远程Linux服务器连接确定X11 forwarding选中,然后保存,打开ssh连接。
将InstalMgr1.5.2_LNX_X86_WAS_8.5.zip通过Ftp传输到Linux虚拟机中。
注意,不要在Windows下解压后传送,否则会丢失Linux下文件的执行权限,导致后续安装失败。
执行was8.5安装器下的install脚本2安装管理器将WAS8.5的安装文件WAS_ND_V8.5_1_OF_3.zip、WAS_ND_V8.5_2_OF_3.zip、WAS_ND_V8.5_3_OF_3.zip通过ftp传输到Linux服务器,并解压到~/was目录安装完毕后,进入安装管理器的eclipse目录,执行./launcher安装完毕后,可看到安装好的两个Profile后续可进入WebSphere Application Server安装目录执行服务的启动、停止等操作。
重启Linux服务器后,进入WebSphere Application Server依次启动管理服务器和AppSrv01的节点代理等待服务器启动后,即可访问管理控制台。
登录管理控制台http://192.168.1.111:9060/admin,输入安装过程中设置的用户名和密码:在管理控制台启动服务器:访问默认安装的应用http://192.168.1.115:9080/snoop,检查服务器是否正确启动:3升级WAS在需要的时候可以从8.5.0.0向上升级,例如升级到8.5.5.8版本。
WebSphere集群安装与配置手册-

【文档说明】本文档在文档《ZTSJ-HQ-JSKF-SSD-应用部署-管道-Datastage安装文档》基础上做了一些修改,保留了WebSphere安装及配置部分内容。
对本文档描述的操作方法在测试环境中进行了验证。
本文档的图片部分来自于实际的测试环境,其余沿用了原始文档。
1 安装规划 1.1 目录规划1.2 安装前准备检查操作系统账户wasadm,若果没有,需要创建创建用户组和用户groupadd -g 901 glogreaduseradd -u 901 -g glogreadulogread passwdulogreadecho mybasis0|passwd wasadm --stdin 在集群各个机器上创建目录并赋权 mkdir -p /opt/IBM/WebSphere mkdir -p /opt/IBM/HTTPServer修改主机名,修改/etc/sysconfig/network 文件: vi /etc/sysconfig/network 修改/etc/hosts 文件: vi /etc/hosts系统参数修改 vim /etc/sysctl.conf 添加后执行 sysctl -p 使之生效kernel.sem = 250 128000 32 1024查看所有集群机器的时间同步配置情况,添加时间服务器 vim /etc/ntp.conf server 10.33.144.18 iburst server 10.33.144.19 iburst并检查ntpd 服务是否启动..按照如下命令启动ntpd 时间同步 chkconfigntpd onservice ntpd restart检查防火墙情况,或者直接执行以下命令,停止防火墙chkconfigiptables offservice iptables stop检查Selinux:getenforce如果不是disabled,建议修改,命令如下:vi /etc/sysconfig/selinux修改如右图红框中的内容为disabled如果无法连接图形界面,解决方式如下:vi /etc/ssh/sshd_configX11Forwarding yesUseLogin no重新启动服务器2安装WebSphere如果想看到中文界面,请输入:export LANG=zh_CN.UTF-82.1安装InstallationManager(集群两台都要装)(单机要装)解压InstalMgr1.6.2_LNX_X86_64_WAS_8.5.5.tar在DMGR机器切换到InstallationManager介质目录执行install开始安装勾选Next接受LicenseNext/opt/IBM/InstallationManager/eclipse nextnext安装进行中关闭2.2安装WebSphere(集群两台都要装)(单机要装)在DMGR机器启动installationManager路径:/opt/IBM/InstallationManager/eclipse命令:./launcher按照如图选择按照如图选择按照路径选择,具体路径见下图路径信息ok选择install勾选Next接受license Next/opt/IBM/IMSharednext/opt/IBM/WebSphere/AppServer next选择中文支持nextNextInstall安装进行中Finish2.3安装WebSphere 补丁(两台都要装)(单机要装)在DMGR机器启动installationManager按照图选择ok路径信息ok不要勾选Next此处选择Next会出现输入IBM网站的登录信息。
Linux下WebSphere安装步骤
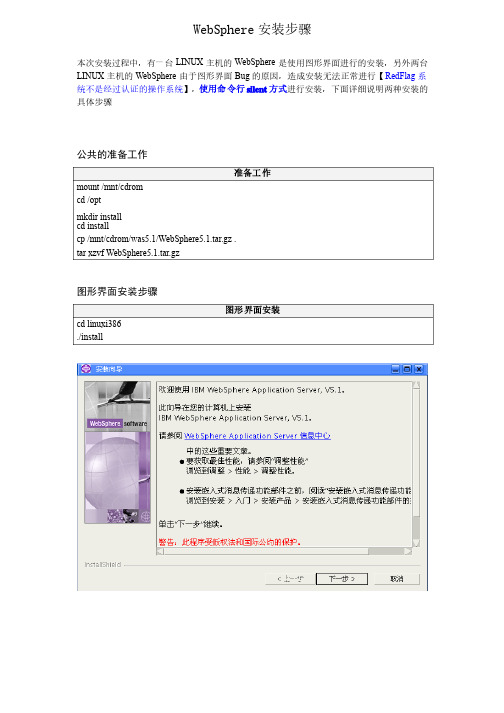
WebSphere 安装步骤安装步骤本次安装过程中,有一台LINUX 主机的WebSphere 是使用图形界面进行的安装,另外两台LINUX 主机的WebSphere 由于图形界面Bug 的原因,造成安装无法正常进行【RedFlag 系统不是经过认证的操作系统】,使用命令行silent 方式进行安装,下面详细说明两种安装的具体步骤具体步骤公共的准备工作准备工作mount /mnt/cdromcd /optmkdir install cd installcp /mnt/cdrom/was5.1/WebSphere5.1.tar.gz .tar xzvf WebSphere5.1.tar.gz图形界面安装步骤图形界面安装cd linuxi386./install命令行方式安装步骤命令行方式安装cd linuxi386./install ./install ––options options ““/opt/install/linuxi386/myresponsefile.txt /opt/install/linuxi386/myresponsefile.txt”” -silentmyresponsefile.txt# *******************************************## Response file for WebSphere Application Server 5.1 Install## Please follow the comments to use the response file and# understand the various options. You must carefully complete# or change the various values. If the values are not completed # properly, the install may be unsuccessful.## NOTE: This file is for silent install only.### IMPORTANT: ALL V ALUES MUST BE ENCLOSED IN DOUBLE QUOTES ( "" ). ## *******************************************# *******************************************# This value is required.# PLEASE DO NOT REMOVE THIS V ALUE.# *******************************************-W setupTypes.selectedSetupTypeId="custom"# *******************************************# Below is the beginning of the response file that needs to be# filled in by the user.# *******************************************# *******************************************# The below value specifies silent install. This value# indicates that the install will be silent.# *******************************************# -silent# *******************************************# WebSphere Application Server Install Location## Please specify the destination directory for the WebSphere Application# Server installation. You will need to change this for UNIX# platforms. As an example for AIX, the value may be# "/usr/WebSphere/AppServer"# *******************************************-P wasBean.installLocation="/opt/WebSphere/AppServer1"# *******************************************# IBM HTTP Server Install Location## Please specify the destination directory for the IBM HTTP Server# installation. This value will need to be completed if you# choose to install IBM HTTP Server. If you choose to not install IBM# HTTP Server, then this value is not required. You will need to change # the default value below for UNIX platforms. As an example for AIX, the # value may be "/usr/IBMHTTPServer"# *******************************************-P ihsFeatureBean.installLocation="/opt/IBMHTTPServer"# *******************************************# Below are the features that you may choose to install.# Set the following values to "true" or "false," depending upon whether # you want to install the following features or not.## NOTE: The default settings for features in this response file# detail the defaults for a typical installation.# *******************************************# *******************************************# Install Server# *******************************************-P serverBean.active="true"# *******************************************## Begin Features for Administration## *******************************************# *********# Install Administration# *********-P adminBean.active="true"# *********# The next 2 features are part of Administration. In order for any of these # features to be installed, the property to install Administration denoted # above must be set to "true."# *********# *********# Install Admin Scripting# *********-P adminScriptingFeatureBean.active="true"# *********# Install Administrative Console# *********-P adminConsoleFeatureBean.active="true"# *******************************************## End Features for Administration## *******************************************# *******************************************## Begin Features for Application Assembly and Deployment Tools## *******************************************# *********# Install Application Assembly and Deployment Tools# *********-P applicationAndAssemblyToolsBean.active="true"# *********# The next 3 features are part of Application Assembly and Deployment # Tools. In order for any of these features to be installed,# the property to install Application And Assembly Tools denoted # above must be set to "true."# *********# *********# Install Deploy Tool# *********-P deployToolBean.active="true"# *********# Install Ant Utilities# *********-P antUtilityBean.active="true"# *******************************************## End Features for Application Assembly and Deployment Tools## *******************************************# *******************************************## Begin Features for Embedded Messaging## *******************************************# *********# Install Embedded Messaging# *********-P mqSeriesBean.active="false"# *********# The next three features are for Embedded Messaging. In order to install# any of the following three subfeatures, the property to install Embedded# Messaging denoted above must be set to "true."## IMPORTANT NOTE: If you do not want to install Embedded Messaging, please # ensure all of the following options are set to "false" as well as the above# option.# *********# *********# Install Embedded Messaging Server and Client## You may only install the Embedded Messaging Server and Client or the Embedded # Messaging client below. If you set the Server and Client to "true," please# ensure that the Client only option below is set to "false." The same applies# if you set the Client only option to "true," please ensure the server and client# option is set to "false."# *********-P mqSeriesServerBean.active="false"# *********# Embedded Messaging Server and Client install location## If you choose to install Embedded Messaging Server and Client above, please# specify an install location below for Windows platforms only.# The directory may not be configured by the user for UNIX platforms # as it is predetermined.# *********-P mqSeriesServerBean.installLocation=""# *********# Install Embedded Messaging Client only# *********-P mqSeriesClientBean.active="false"# *********# Embedded Messaging Client Only install location## If you choose to install Embedded Messaging Client only above, please # specify an install location below for Windows platforms only.# The directory may not be configured by the user for UNIX platforms # as it is predetermined.# *********-P mqSeriesClientBean.installLocation=""# *********# Install Message-driven beans Samples# *********-P mqSeriesSamplesBean.active="false"# *******************************************## End Features for Embedded Messaging## *******************************************# *******************************************# Install IHS WebServer 1.3.28# *******************************************-P ihsFeatureBean.active="false"# ******************************************* ## Begin Features for Web Server Plugins## *******************************************# *********# Install Web Server Plugins# *********-P pluginBean.active="false"# *********# The next 5 features are part of Web Server Plugins. # In order for any of these features to be installed,# the property to install Web Server Plugins denoted # above must be set to "true."# *********# *********# Install IBM HTTP Server v1.3 Plugin# *********-P ihsPluginBean.active="false"# *********# Install IBM HTTP Server v2.0 Plugin# *********-P ihs20PluginBean.active="false"# *********# Install Apache Web Server v1.3 Plugin# *********-P apachePluginBean.active="false"# *********# Install Apache Web Server v2.0 Plugin# *********-P apache20PluginBean.active="false"# *********# Install Microsoft Internet Information Services (IIS) Plugin # *********-P iisPluginBean.active="false"# *********# Install iPlanet Web Server Plugin# *********-P iplanet60PluginBean.active="false"# *********# Install Domino Web Server Plugin# *********-P dominoPluginBean.active="false"# *******************************************## End Features for Web Server Plugins## *******************************************# *******************************************# Install Samples# *******************************************-P samplesBean.active="true"# *******************************************## Begin Features for Performance and Analysis Tools## *******************************************# *********# Install Performance And Analysis Tools# *********-P performanceAndAnalysisToolsBean.active="true"# *********# The next 3 features are part of Performance And Analysis# Tools. In order for any of these features to be installed,# the property to install Performance And Analysis Tools denoted # above must be set to "true."# *********# *********# Install Tivoli Performance Viewer# *********-P tivoliPerfBean.active="true"# *********# Install Dynamic Cache Monitor# *********-P DCMBean.active="true"# *********# Install Performance Servlet# *********-P performanceServletBean.active="true"# *********# Install Log Analyzer# *********-P logAnalyzerBean.active="true"# *******************************************## End Features for Performance and Analysis Tools## *******************************************# *******************************************# Install Javadocs# *******************************************-P javadocBean.active="true"# *******************************************# Please enter a node name and hostname for this installation.# The node name is used for administration, and must be unique# within its group of nodes (cell). The hostname is the DNS name# or IP address for this computer. You must replace the# "DefaultNode" with the node name that you want the default node # to be and "127.0.0.1" to a resolveable hostname or IP address# for your machine.# Warning:# 1. If you are migrating now or plan to do so after# installation, enter the same node name as the previous version.# 2. If you are performing coexistence, enter a unique node name.# *******************************************-W nodeNameBean.nodeName="localhost"-W nodeNameBean.hostName="127.0.0.1"# *******************************************# Begin Installing Services## The following are to install Services for IHS and Websphere# Application Server on Windows. Using Services, you can start and # stop services, and configure startup and recovery actions.# You can ignore these or comment them out for other Operating Systems. # *******************************************-W serviceSettingsWizardBean.active="true"# *********# The next 2 options are part of Installing Services.# In order for any of these to be set to "true,"# the property to install Services denoted above must be set# to "true."# *********# *********# Install the IHS service# *********-W serviceSettingsWizardBean.ihsChoice="true"# *********# Install the WebSphere Application Server service# *********-W serviceSettingsWizardBean.wasChoice="true"# *********# If you chose to install a service above, then you must# specify the User Name and Password which are required to# install the Services. The current user must be admin or must# have admin authority to install a Service. Also the username# which is given here must have "Log On as a Service " authority # for the service to run properly.# *********# *********# Replace YOUR_USER_NAME with your username.# *********-W erName="YOUR_USER_NAME"# *********# Replace YOUR_PASSWORD with your valid password.# *********-W serviceSettingsWizardBean.password="YOUR_PASSWORD"# *******************************************## End Installing Services## *******************************************# *******************************************# Set any or all of the following to false if the launcher# icon is not to be installed. These settings will only affect# an install in which the corresponding product component# is also selected for install.# *******************************************-P StartServerIconBean.active="true"-P StopServerIconBean.active="true"-P AdminConsolIconBean.active="true"-P SamplesGalleryIconBean.active="true"-P TivoliPerfIconBean.active="true"-P infoCenterIconBean.active="true"-P firstStepsIconBean.active="true"-P logAnalyzerIconBean.active="true"# *******************************************# Change the path to the prerequisite checker configuration# file only if a new file has been provided. This can be a# relative path or an absolute path. Make sure both the# prereqChecker.xml and prereqChecker.dtd files are present at the provided path.# *******************************************-W osLevelCheckActionBean.configFilePath="waspc/prereqChecker.xml"# *******************************************# Begin Plugin Config File Location## If you chose to install plugins above, then you will# need to specify the fully qualified path, including# the config file name, for the plugins you selected. If you want to# install the plugin, you must specify this path, otherwise the# installer will fail to install the plugins properly. Also, the# value must be included in double quotes.# *******************************************# *********# IBM HTTP Server Plugin v1.3 Config File Location# *********-W defaultIHSConfigFileLocationBean.value="/opt/IBMHTTPServer/conf/httpd.conf"# *********# IBM HTTP Server Plugin v2.0Config File Location# *********-W defaultIHS20ConfigFileLocationBean.value=# *********# Apache Web Server v1.3 Config File Location# *********-W defaultApacheConfigFileLocationBean.value=# *********# Apache Web Server v2.0 Config File Location# *********-W defaultApache20ConfigFileLocationBean.value=# *********# iPlanet Web Server Config File Location# *********-W defaultIPlanetConfigFileLocationBean.value=# *********# Begin Domino Web Server Plugin Config File Locations ## The Notes.jar and names.nsf locations are required# for the Domino Plugin. Please be sure to enter values in # double quotes for both of these files.# *********# *********# Domino Notes.jar File Location# *********-W dominoPanelBean.notesJarFile=# *********# Domino names.nsf File Location# *********-W sFile=# *********# End Domino Web Server Plugin Config File Locations # *********# *******************************************## End Plugin Config File Location## *******************************************# *******************************************# Product Registration Tool## To launch the Product Registration Tool, please# change the value to "true." This is only for# GUI install.# *******************************************-W launchPRTBean.active="false"# *******************************************# Install Default App## Please specify if you would like to install the# Default App by setting the value to "true" or "false."# *******************************************-W installSampleAppSequenceBean.active="true"# *******************************************# First Steps## If you would the First Steps to display at the end# of the installation, please change the value to "true."# *******************************************-W firstStepsSequenceBean.active="false"# *******************************************# Installation Verification Tool (IVT)## Please specify if you would like to run the Installation# Verification Tool by setting the value to "true" or "false."# *******************************************-W installIVTAppSequenceBean.active="true"# *********************************************************** # ** Support for Silent Coexistence# **# ** NOTE:# ** 1. You must uncomment and modify the properties in# ** this section for silent coexistence to work properly.# ** 2. You can not perform migration and coexistence at# ** the same time.# ***********************************************************# *********************************************************** # Tell the installer that you want to perform coexistence# ***********************************************************#-W coexistenceOptionsBean.doCoexistence="true"# *********************************************************** # Set this property if you want to modify the default IHS# and IHS Admin ports# ***********************************************************#-W eIhs="true"# *********************************************************** # The new value for the Bootstrap Port# ***********************************************************#-W coexistencePanelBean.bootstrapPort="2810"# *********************************************************** # The new values for the IHS and IHS Admin ports# NOTE: These values are only used if# eIhs is set to "true"# ***********************************************************#-W coexistencePanelBean.ihsPort="81"#-W coexistencePanelBean.ihsAdminPort="8009"# *********************************************************** # The new values for the HTTP and HTTPs transports.# ***********************************************************#-W coexistencePanelBean.httpTransportPort="9086"#-W coexistencePanelBean.httpsTransportPort="9044"# *********************************************************** # Thew new values for the admin console an secure admin# console ports.# ***********************************************************#-W coexistencePanelBean.adminConsolePort="9091"#-W coexistencePanelBean.secureAdminConsolePort="9444"# *********************************************************** # The new values for the csivServerAuthListener and# the csivMultiAuthListener ports.# NOTE: You can usually leave these set to 0# ***********************************************************#-W coexistencePanelBean.csivServerAuthListenerAddr="0"#-W coexistencePanelBean.csivMultiAuthListenerAddr="0"# *********************************************************** # The new value for the sasSSLServerAuth port.# ***********************************************************#-W coexistencePanelBean.sasSSLServerAuthAddr="0"# *********************************************************** # The new values for the JMS Server Direct Address,# JMS Server Security, and JMS Server QueuedAddress ports# ***********************************************************#-W coexistencePanelBean.jmsServerDirectAddress="5569"#-W coexistencePanelBean.jmsServerSecurityPort="5567"#-W coexistencePanelBean.jmsServerQueuedAddress="5568"# *********************************************************** # The new value for the soap connector address port# ***********************************************************#-W coexistencePanelBean.soapConnectorAddress="8881"# *********************************************************** # ** Support for Silent Migration# **# ** NOTE:# ** 1. You must uncomment and modify EVERY property# ** in this section for silent migration to work properly.# ** 2. You can not perform migration and coexistence at# ** the same time.# **# ***********************************************************# ***********************************************************# The installer must be informed that you wish to operate on# a previous version, so you must tell it that one is present# by uncommenting the next line.# ***********************************************************# -W previousVersionDetectedBean.previousVersionDetected="true"# ***********************************************************# Direct the installer to operate on a specific previous version by# uncommenting the next line and entering one of these values:## Value Edition# ***** *******# AE WAS Advanced Edition (V3.x, V4.0.x)# advanced AE# AEs WAS Advanced Single Server Edition (V4.0.x)# standard WAS Standard Edition (V3.x)## Note:# For migration from WAS V5.0.x, this field is not used. So simply# set previousVersionPanelBean.selectedVersionEdition to "<NONE>".# ************************************************************# -W previousVersionPanelBean.selectedVersionEdition="AEs"# ************************************************************# Specify the location where the previous version is installed.# ************************************************************# -W previousVersionPanelBean.selectedVersionInstallLocation="/opt/WebSphere/AppServer"# ************************************************************# Specify the path to the configuration file for the# previous version. Configuration filenames are:## Value previousVersionPanelBean.selectedVersionEdition# ***** ***********************************************# admin.config AE# admin.config advanced# server-cfg AEs# server-cfg standard## Note:# For migration from WAS V5.0.x, this field is not used. So simply# set previousVersionPanelBean.selectedVersionConfigFile to "<NONE>".# ************************************************************# -WpreviousVersionPanelBean.selectedVersionConfigFile="/opt/WebSphere/AppServer/config/server -cfg.xml"# ************************************************************# Specify the version number of the previous version: 5.0.2,5.0.1,5.0.0,4.0,4.0.1,3.5, etc...# ************************************************************# -W previousVersionPanelBean.previousVersionSelected="4.0"# ************************************************************# Uncomment the below line to indicate that you wish to# migrate the previous version.# ************************************************************# -W previousVersionPanelBean.migrationSelected="true"# ************************************************************# Specify the directory where migration will backup# information about the previous version.# ************************************************************# -W migrationInformationPanelBean.migrationBackupDir="/tmp/migrationbackup"# ************************************************************# Specify the directory where migration logs will be stored.# ************************************************************# -W migrationInformationPanelBean.migrationLogfileDir="/tmp/migrationlogs"。
linux下websphere的安装配置
Linux下安装部署websphere一、安装1、[root@www Desktop]#mkdir /usr/local/websphere 建立一个新的文件夹2、tar –zxvf was.cd.6100.trial.base.linux.ia32.tar.gz –C /usr/local/websphere/ 解压软件包到指定的位置,-C是指定位置3、[root@www Desktop]#cd /usr/local/websphere/4、[root@www websphere]#export LANG=en_US 解决乱码问题5、[root@www websphere]# ./launchpad.sh 执行脚本后出现安装的界面,参照《WebSphere安装配置文档(完整版).doc》安装。
6、linux下websphere的基础知识:启动服务:/opt/IBM/WebSphere/AppServer/bin/startServer.sh server1 停止服务:/opt/IBM/WebSphere/AppServer/bin//stopServer.sh server1 -username websphere -password websphere后台日志:(包括启动日志、停止日志、错误日志、输出日志等)/opt/IBM/WebSphere/AppServer/profiles/AppSrv01/logs/server1/应用程序二进制文件保存在:/opt/IBM/WebSphere/AppServer/profiles/AppSrv01/wstemp/-228498399 /workspace/cells/wwwNode01Cell/applications/ 中二、配置数据源安装成功后通过:http://192.168.2.229:9060/admin启动控制台(根据安装的具体情况写ip,一般默认的端口是9060,如有改动则根据具体情况)1、配置JDBC提供程序在控制台的左边“资源”->“JDBC”->“提供JDBC程序”,在控制台的右边点击“新建”如图所示:(根据实际情况填写)填写完后点击“下一步”,注意此项下的“类路径”里边的变量名称,需要按照之后的第2步配置websphere变量配置该变量。
Websphere实用手册与Linux下安装

WebSphere 安装配置及应用介绍:IBM WebSphere Application Server提供了从电子商务的构建、发布到管理的能力。
其标准版提供了开放、标准的平台。
WebSphere Application Server包括Servlet运行引擎、高性能的数据库连接程序,提供预连接、会话和状态管理的应用服务,WebSphere还支持XML文档结构。
另外,WebSphere还支持JSP 的1.0版本,Servlet的2.1版本。
有高速的数据库缓冲联结池(支持DB2 Universal Database,Oracle,Microsoft SQL Server等数据库。
)一、Windows 环境下安装WebSphere应用服务器WebSphere可以安装在2000\2003、95/98操作系统平台上,下面介绍如何在Windows 2000\2003 上安装与配置WebSphere应用服务器。
安装WebSphere必须要求有128兆内存以上,要是256兆就更好了。
操作系统要求Windows NT(Pack 3)。
安装之前,必须要有Web服务器,可以是如下之一:IBM HTTP 服务器版本 1.3.3 Windows NT 版(WebSphere应用服务器安装光盘包括IBM HTTP 服务器)Apache Server 版本 2.4.0 Windows 2000\2003 版Domino 版本 5.0 Windows 2000 版第一步:安装Web服务器:如果打算安装IBM HTTP 服务器,就必须在安装WebSphere应用服务器之前安装它。
WebSphere应用服务器安装光盘有IBM HTTP Server。
安装WebSphere 应用服务器会更改Web 服务器httpd.conf 文件。
但是,如果Web 服务器是在安装WebSphere应用服务器之后安装的,就不会进行更改,并且WebSphere应用服务器也不能够正确运行。
在LINUX中安装WEBSPHERE的正确方法
在LINUX中安装WEB SPHERE5.1的正确方法1、安装前准备1)、检查磁盘空间的分配2)、端口有没有冲突?WebSphere应用服务器缺省占用的端口包括:管理控制台端口9090,管理控制台安全端口9043,HTTP传输端口9080,HTTPS传输端口9443,SOAP通信端口8880(在网络部署版这个端口是8879)等。
如果系统中已有应用占用了这些端口,那么应用服务器启动的时候就会报告端口冲突的错误。
一般可以用netstat或nmap来查看系统端口的使用情况。
3)、服务器的主机名应该在安装Websphere之前配置主机名(hostname)。
/etc/hosts文件要有相应的条目。
4)、用户名和用户组的建立WebSphere应用服务器中内置了一个基于WebSphere MQ的JMS服务器。
在UNIX/LINUX 平台上安装的时候,如果选择了完全安装或在定制安装的时候选择了安装"嵌入式消息传递",那么就要在安装开始前先创建两个用户组mqm和mqbrkrs和一个用户mqm。
而且需要将用户mqm和root添加到mqm组,还要将root添加到mqbrkrs组。
groupadd mqmgroupadd mqbrkrsuseradd -g mqm mqmlgroupmod -M root mqmlgroupmod -M root mqbrkrs也可以使用用户管理工具rfuser完成以上工作。
注意做完以后,root用户需要重新登录,group信息才能生效。
5)、语言环境的设置安装时直接使用中文环境,而不要安装前是en_US,然后等到安装完了之后再切换成中文。
这样的切换有可能导致系统的不稳定。
2、安装的基本步骤1)、启动安装运行linuxi386/install,启动图形化安装向导。
Websphere 5.1 使用的java版本是:“J2RE 1.4.1 IBM build cxia321411-20031011”,可以正常运行。
Websphere部署与配置手册

Websphere部署与配置手册1WEBSPHERE安装1、WebSphere包括集群和单机两种方式,单机安装选择“./WAS/install.exe”;2、大部分安装过程都可按默认选择的,点“下一步”即可完成;主要需要修改的如下图,选择所需安装目录(没有特殊要求,按个人习惯选择)后,再下一步时选择“应用程序服务器”。
3、安装完成,建议进行第一次验证和启动,验证完毕建议将验证的所有配置拷贝下来;4、启动命令:D:\IBM\WebSphere\AppServer\bin>startServer.bat server1 (备注:默认为server1,根据安装具体情况修改)5、停止命令:D:\IBM\WebSphere\AppServer\bin>stopServer.bat server16、控制台:,控制台可以对WebSphere进行所有的控制和配置2WEBSPHERE配置2.1数据源配置1、配置oracle驱动程序路径●进入方式:环境——WebSphere变量,选择“ORACLE_JDBC_DRIVER_PATH”;●输入ojdbc14.jar所在的路径,如:D:\oracle\ora92\jdbc\lib;●确认后保存到主配置;●进入方式:资源——jdbc——jdbc提供程序●作用域选择为需要使用此jdbc的节点●点击“新建”按钮,步骤1按如下选择,之后下一步至完成即可;●注意:oracle9i及10g一般用的驱动是ojdbc14.jar;●确认后保存到主配置;●进入方式:资源——jdbc——数据源●作用域选择为需要使用此数据源的节点●点击“新建”按钮,步骤1按下图填写,“数据源名”按个人习惯填写,“JNDI名称”填入项目对应JNDI名;●步骤2:提供程序为先前配置的jdbc提供程序●步骤3:URL根据实际情况填写,例如:jdbc:oracle:thin:@199.3.8.252:1521:ora92;数据库的helper按默认选择即可;●确认完成后保存到主配置;4、配置JAAS-J2C认证数据●进入方式:资源——jdbc——数据源,点击上一步所配置的数据源进入配置页面●点击“JAAS - J2C 认证数据”进入●点击“新建”按钮,“别名”按个人习惯填写,“用户标识”为指定数据库的用户名,“密码”为指定用户的密码;●确认完成后保存到主配置;●重新执行本配置的第一步进入数据源配置页面,选择刚配置的认证名称,确定后保存到主配置;●在数据源列表勾选中所配置的数据源,点击“测试连接”,根据页面上方的提示结果判断连接是否正常;2.2JVM参数配置进入方式:服务器——应用服务器——server1——java管理和进程——进程定义——java虚拟机设置内容:初始堆大小:256,最大堆大小:512通用JVM参数:-Ddefault.client.encoding=GBK -D nguage=Zh -Duser.region=CN,这里主要是配置支持中文2.3安装应用程序●进入方式:应用程序——企业应用程序●默认上下文根”/”已有DefaultApplication在使用,与项目冲突,因此在安装系统程序前将系统自带的example全部卸载,勾选后点击“卸载”即可,然后保存到主配置;●点击“安装”,选择项目war包或ear包所在位置,“上下文根”根据具体项目设置填写,综合运维支撑系统为“/”;之后继续点“下一步”执行直到“步骤3: 将资源引用映射至资源”如下页面,选择“认证数据条目”,选择“JNDI”并勾选,点击“应用”,将将资源引用映射至资源;●继续执行“下一步”操作,直至“完成”,然后保存到主配置;2.4启动应用程序●进入企业应用程序,勾选指定项目,点击“启动”,看是否正常进入“已启动”状态;●进入连接:,如能正常显示系统登陆界面,说明系统已部署成功。
在Linux上安装配置ibm websphere6.1

在Linux上安装配置WAS6.11.安装前的准备工作1>确保Linux系统执行权限配置本次选用的是Red Hat Enterprise 5.1,以root用户登录,执行以下命令查看用户创建文件的默认权限:# umask确保umask的值为022,如果不符,执行以下命令设置:# umask 022umask设置了用户创建文件的默认权限,它与chmod的效果刚好相反,umask设置的是权限“补码”,而chmod设置的是文件权限码。
一般在/etc/profile、$ [HOME]/.bash_profile或$[HOME]/.profile中设置umask值。
umask 命令允许你设定文件创建时的缺省模式,对应每一类用户(文件属主、同组用户、其他用户)存在一个相应的umask值中的数字。
对于文件来说,这一数字的最大值分别是6。
系统不允许你在创建一个文本文件时就赋予它执行权限,必须在创建后用chmod命令增加这一权限。
目录则允许设置执行权限,这样针对目录来说,umask中各个数字最大可以到7。
2>确保Linux系统中已经安装好firefox确保使用的Linux系统中已经安装了Web应用程序包,其中包括firefox浏览器,以便后面安装的时候需要调用到图形界面的浏览器应用。
3>添加ulimit设置以root用户登录,在root家目录的.bashrc中添加ulimit -n 8192后保存# cd ~# vi .bashrculimit -n 8192设置ulimit主要目的是避免出现addNode和importWasprofile的错误。
4>确保Linux系统中WAS所需的程序包已经安装compat-libstdc++-33-3.2.3-61compat-db-4.2.52-5.1libXp-1.0.0-8可以在使用rpm –q 命令查看当前Linux系统中是否已经安装以上程序包,# rpm –q compat-libstdc++如果缺失,可以在Linux光盘或者ISO安装文件中找到相应的程序包通过rpm –ivh命令安装5>确认WAS6.1安装程序包下面使用的WebSphere Application Server Network Deployment V6.1 for Linux on x86, 32-bit的安装包首先就WAS6.1安装程序包上传到Linux服务,然后用tar命令提取解压:# tar zxvf C88STML.tar.gzThe command completes successfully with no errors when the Java 2 SDK is intact.提取解压后,进入以下目录确认JDK版本# cd JDK/jre.pak/repository/package.java.jre/java/jre/bin# ./java -versionjava version "1.5.0"Java(TM) 2 Runtime Environment, Standard Edition (build pxi32dev-20060511 (SR2))IBM J9 VM (build 2.3, J2RE 1.5.0 IBM J9 2.3 Linux x86-32 j9vmxi3223-20060504 (JIT enabled)J9VM - 20060501_06428_lHdSMRJIT - 20060428_1800_r8GC - 20060501_AA)JCL - 20060511a2.安装WebSphere Application Server 6.1下面将安装的主要步骤以图片及文字形式进行说明,拿到的Linux系统是RedHat Enterprise5.1中文版,避免安装WAS的时候界面乱码,设置LANG环境变量[root@was61 ~]# export LANG=en_US.UTF-8WAS安装程序包解压后,可以找到launchpa.sh文件执行,进入图形界面安装# ./launchpad.sh选择WebSphere Application Server Network Deployment点击进入进入WebSphere Application Server Network Deployment安装向导,NEXT默认选择接受,NEXT进入系统要求检查确认,如果不是官方推荐版本,可能或出现Fail,可以暂时忽略,继续安装,如果有报错信息,可以根据Log排查选则安装样例应用,NEXT保持默认安装路径,NEXTWebshpere Application Sever环境类型选择,这里选择Application Server,当然也可以选择其他类型,各种类型的区别见以下描述cell profile(单元概要文件):一个单元概要文件包含一个部署管理器概要文件和一个应用程序服务器结点概要文件。
websphere for linux(终版)

第一步:安装java,linux系统本身的java版本较低,不支持,Java文件路径 /usr/java/java同时修改系统文件/etc/profileexport JAVA_HOME=/usr/java/javaexport CLASS_PATH=.:$JAVA_HOME/lib/dt.jar:$JAVA_HOME/lib/tools.jar export PATH=$JAVA_HOME/bin:$PATH/root/.bashrcexport JAVA_HOME=/usr/java/javaexport CLASS_PATH=.:$JAVA_HOME/lib/dt.jar:$JAVA_HOME/lib/tools.jar export PATH=$JAVA_HOME/bin:$PATH第二步、安装websphere(1)获得的Websphere安装包可能为tar包或者zip包,如果是tar包,使用“tar–xvf websphere6.1.tar”将包解开;如果是zip的包,使用“unzip”解压缩。
目前为 WAS61ND_For_LinuxX86_IA32.tar.gz 李明亮版本(2)解压缩后的文件运行launchpad.sh启动安装界面。
在WAS61ND_For_LinuxX86_IA32/WAS6.1forLinux_x86_CD1下./launchpad.sh注意,在安装操作系统的时候,务必选择上“图形化互联网”的包。
启动界面,如下图所示:首先安装:安装后会启动向导,提示接受协议等,并选择安装路径。
选择默认路径后,进行安装,安装时会提示创建的类型。
注意,此处选择“无”。
稍后我们会单独创建概要文件。
依次操作,直到安装完成。
(3)安装完成后,我们开始创建概要文件。
概要文件是Websphere的重要概念,相当于一个独立的配置文件,每个应用都必须有一个单独的概要文件。
创建概要文件的方法如下。
WebSphere(was8.5)安装及部署-集群

1.业务分析及安装思路。
2.环境用户名/密码操作系统版本机器配置用途机器名/ IP地址10.50.64.211 root/root Linux 6.264位CPU 16核(Xeon 2.30GHz);运行WAS V8.5.0.0内存64G;硬盘200G运行WAS V8.5.0.0 10.50.64.212 root/root Linux 6.264位CPU 16核(Xeon 2.30GHz);内存64G;硬盘200GWAS 管理控制台用户名和密码用户名为admin,密码为:wyq19851215/InstallationManager 安装目录: /opt/IBM/InstallationManagerWAS 8.5 安装目录:/opt//IBM/WebSphere/AppServer/3.安装3.1安装包准备JDK安装包:jdk-7u80-linux-x64.tar.gz下面是Installation Manager安装包DEVELOPERSILAN.agent.installer.linux.gtk.x86_64.zip下面三个是支持所有平台的应用服务器安装介质包WAS_ND_V8.5.5_1_OF_3.zipWAS_ND_V8.5.5_2_OF_3.zipWAS_ND_V8.5.5_3_OF_3.zip下面三个是支持所有平台的Websphere应用服务器supplements安装介质包,其中包含了IBM HTTPServer,IBM Server plug-ins 和 toolboxWAS_V8.5.5_SUPPL_1_OF_3.zipWAS_V8.5.5_SUPPL_2_OF_3.zipWAS_V8.5.5_SUPPL_3_OF_3.zip下面两个是支持所有平台的Websphere应用服务器补丁包8.5.5-WS-WAS-FP0000008-part1.zip8.5.5-WS-WAS-FP0000008-part2.zip下面两个是支持所有平台的Websphere应用服务器supplements补丁包8.5.5-WS-WASSupplements-FP0000008-part1.zip8.5.5-WS-WASSupplements-FP0000008-part2zip3.2简介1. 此安装仅仅是单机环境,仅仅安装WAS 8.5 ND的 AppServer,不安装IBM HTTP Server 和Plug-Ins.2. 此安装将采用root用户安装,并且将采用root用户进行启动。
Websphere 8 for linux 集群配置
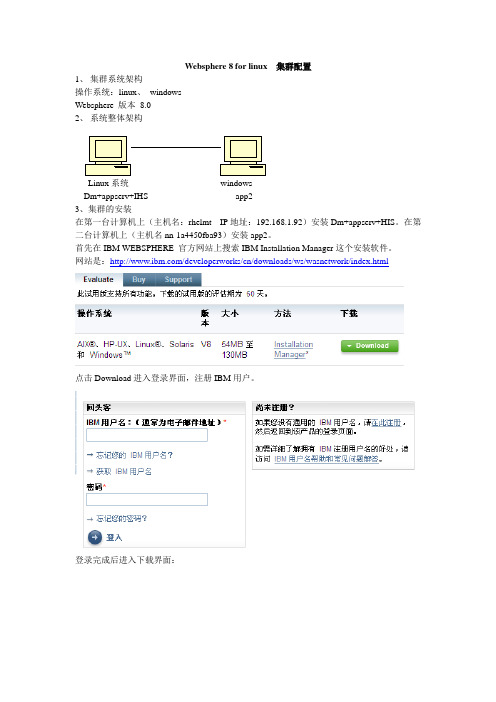
Websphere 8 for linux 集群配置1、集群系统架构操作系统:linux、windowsWebsphere 版本8.02、系统整体架构Linux系统windowsDm+appserv+IHS app23、集群的安装在第一台计算机上(主机名:rhelmt IP地址:192.168.1.92)安装Dm+appserv+HIS。
在第二台计算机上(主机名nn-1a4450fba93)安装app2。
首先在IBM WEBSPHERE 官方网站上搜索IBM Installation Manager这个安装软件。
网站是:/developerworks/cn/downloads/ws/wasnetwork/index.html点击Download进入登录界面,注册IBM用户。
登录完成后进入下载界面:选择上图所示选项,并单击“继续”按钮。
选择我同意并单击“我确认按钮”。
选择“使用HTTP下载”linux系统选择下面的选项:Windows系统选择下面的选项单击“立即下载”,下载保存在电脑磁盘上。
Linux环境:将下载下来的解压包解压如下图所示:解压方法:如果是tar包在终端中运行如下命令:tar xzvf 解压包名.tar如果是zip包直接解压安装方法:在IBMIM_linux_x86文件夹下运行终端,运行命令:./install进入安装页面。
界面:输入值钱注册的IBM用户标识和密码;登录成功后出现如下界面:点击“下一步”出现如下界面:去掉这个选项得到下图:点击“下一步”选择“我接受此协议中的条款”点击“下一步”自由选择几项答案,一直点击“下一步”出现如下界面:点击“安装”,等待安装完成,启动概要管理工具,点击“新建”在第一台计算机上(主机名:rhelmt IP地址:192.168.1.92)上新建一个Dm,选择“管理”点击“下一步”,选择“Deployment Manager”选择“应用程序服务器”,点击“下一步”选择“典型概要文件创建”,点击“下一步”程序服务器时要用到)点击“下一步”出现如下界面:记住各个端口号,后面配置要用到,点击“创建”出现如下界面:点击“完成”验证是否安装成功点击“安装验证”出现如下界面:至此安装完成。
- 1、下载文档前请自行甄别文档内容的完整性,平台不提供额外的编辑、内容补充、找答案等附加服务。
- 2、"仅部分预览"的文档,不可在线预览部分如存在完整性等问题,可反馈申请退款(可完整预览的文档不适用该条件!)。
- 3、如文档侵犯您的权益,请联系客服反馈,我们会尽快为您处理(人工客服工作时间:9:00-18:30)。
前言
目前天安保险的WAS环境中有5台服务器,每台服务器配成一个node,每个node上配置了2个application server,组成了一个ND的环境。
前台有一台F5做负载均衡,后面连接了1套oracle RAC的数据库。
但5个node之间没有做成集群。
为了保证Websphere系统高可用性,提高系统性能和负载均衡,考虑配置成集群,下面说明创建、配置集群的整个过程与注意事项。
1. 集群系统架构
操作系统:Linux version 2.6.18-8.el5
Websphere版本:WAS6.1ND
根据天安的环境,可使用如下拓扑:
其中cisapp1~cisapp5表示5台WebSphere,cisCluster表示5台做成一个cluster,dmgr一般是5台中的一台。
2. 创建集群(含session复制)
(截图为我本机测试截图,只是示意图,与天安保险的节点名和集群名不符)
在DMGR控制台中,选择集群,然后新建。
注意:先创建一个空的集群,然后我们再向该集群中添加成员即可。
这里还要注意勾选“配置HTTP会话内存到内存复制”,这样就能使session 在集群内共享,比如用户登录,加入被集群分配给node1来处理,用户的登录信息就会被保存在session中,如果此时node1宕机了,用户就会被分配到其他节点来处理而不会要求重新登录。
如果在创建集群时没有勾选此选项,也可按如下方式操作:
配置会话复制
服务器 --> 应用程序服务器 --> 选择集群成员 --> 容器设置:会话管理--> 其他属性:分布式环境设置 --> 确认分布式会话选择的是内存到内存复制,其他属性:定制调整参数 -->
调整级别:
低(故障转移优化)
写频率 servlet服务结束
写内容所有会话
调度会话清除:false
对集群每个成员重复以上操作
(建议在故障转移和系统性能之间取折中。
另:会话复制还有一种数据库方式,由于对性能影响较大,不推荐使用)
添加集群如下。
注意此处的权重:主机1权重为2,主机2权重为1则表示主机1分流三分之二的流量,而主机2分流三分之一的流量。
可以查看集群情况如下:
然后开始部署应用。
3. 应用的部署
应用的部署基本上没什么区别,唯一注意一点,就是部署的时候需要选择部署服务器的时候,要注意选择集群。
如下:
选择集群后部署没有什么区别,部署后的应用应该在两个主机的应用目录下生成文件如下:
这个时候访问客户端都可以访问到部署的应用。
4.注意事项
因为WebSphere集群是对应用服务器架构的较大调整,因此在调整前需注意以下几点:(1)备份原来的应用程序,最好是导出完整的ear包。
(2)集群创建最好不要一次性5台全部加入集群中,最好先选2台做集群,观察性能改善的效果,然后剩下的再陆续加入集群。
(3)数据源最好配置在Node上,而不要配在Cluster上,这样今后不管用不用Cluster,Node上的数据源都起作用。
(4)WebSphere的Cluster很水平和垂直两种集群,水平表示集群成员跨物理机器,垂直
表示集群成员在一台物理机器上,水平对高可用性有好处,垂直可充分利用机器资源。
建议在配置集群时两者兼用。
