用WinTarget在Windows上部署ISCSI步骤截图
在Windows Server 2008上连接iSCSI设备
在Windows Server 2008上连接iSCSI设备在Windows Server 2008上要读取iSCSI存储设备,方式有点变化,例如系统本身已内建iSCSI Initiator,不必再额外下载,操作选项的名称和位置也略有更动,我们将告诉你改变之处。
对于在Windows环境下读取iSCSI存储网络资源的用户来说,iSCSI Initiator软件的下载与设定是必备的工作。
微软为了进一步推广与方便用户使用iSCSI资源,从Vista起便内建了iSCSI Initiator,而在最新的Windows Server 2008上,微软更对内建的iSCSI Initiator作了不少调整,让设定、读取iSCSI环境更方便。
Windows内建iSCSI Initiator藉由成本相对较低、易于建置管理等特性,IP存储局域网络(SAN)逐渐成为预算有限的企业,建置存储局域网络时的首要选择。
而在多种以IP为基础的区块存储网络协议中,iSCSI又挟其发展成熟、支持厂商众多的优势,已成为当前IP存储局域网络的代名词。
为配合iSCSI的应用,许多厂商都推出了搭配不同作业平台的iSCSI Initiator软件,让用户将自身的服务器模拟为iSCSI的发起端,读取网络上的iSCSI目标设备。
在微软方面,也从2003年底开始,陆续为各种Windows版本提供了iSCSI Initiator软件,包括Windows 2000、XP与Server 2003的使用者,都可下载微软配合x86、x64或IA64等不同硬件平台的iSCSI Initiator 软件。
为因应iSCSI应用的逐渐普及,自2007年初推出的Vista起,微软更直接在操作系统内建了iSCSI Initiator,免除了另外下载安装的麻烦。
而到了2008年初的Server 2008,同样也延续了直接内建iSCSI Initiator 的做法,使用者可在Administrator Tools中找到iSCSI Initiator的控制台程序。
ISCSI使用
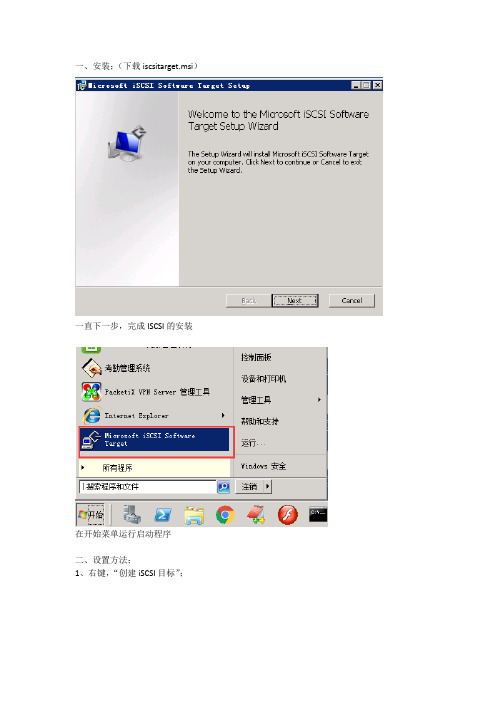
一、安装;(下载iscsitarget.msi)
一直下一步,完成ISCSI的安装
在开始菜单运行启动程序
二、设置方法;
1、右键,“创建iSCSI目标”;
2、选“下一步”,然后输入目标名称和描述;
3、选择“高级”
4、选择“添加”,类型选择“IP地址”,值输入要使用这个虚拟磁盘机器的IP地址;
5、“下一步”,完成iSCSI目标创建;
6、在“设备”右键选择“创建虚拟磁盘”;
7、选择下一步后,使用“浏览”选好虚拟磁盘要存放的位置,例如这里的路径为:“C:\rsync”文件夹,然后手动输入“\test.vhd”;(test为虚拟磁盘的名称,”.vhd”为必须输入)
8、选“下一步”后设置磁盘大小;(1024MB=1G)
9、设置好大小,为磁盘做备注;
10、添加刚刚第一步创建的iSCSI 目标;
11、完成设置;
三、在客户端添加虚拟磁盘;
1、在与第4步对应IP的客户端上添加虚拟磁盘;打开“控制面板”找到“管理工具”中的“iSCSI 发起程序”;
2、在“目标”框中输入刚刚服务器的IP地址,点击“快速链接”,可以看到发现的目标;
3、完成添加之后可以看到已经连接的服务器;
4、在我的电脑上右键,选择“管理”,打开“磁盘管理”;会弹出以下对话框;
4、点击确定完成添加,然后在新磁盘上右键“新建简单卷”;
5、根据需求完成磁盘添加;最后打开我的电脑就能看到新添加的磁盘;。
windows下配置ISCSI
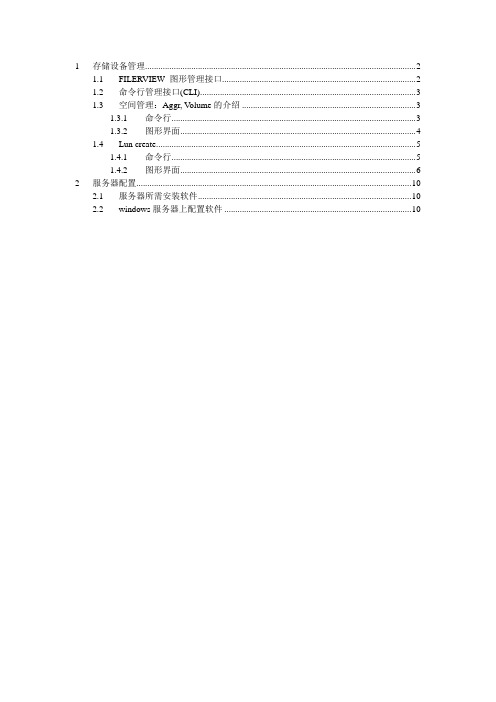
1 存储设备管理 (2)1.1 FILERVIEW 图形管理接口 (2)1.2 命令行管理接口(CLI) (3)1.3 空间管理:Aggr, V olume的介绍 (3)1.3.1 命令行 (3)1.3.2 图形界面 (4)1.4 Lun create (5)1.4.1 命令行 (5)1.4.2 图形界面 (6)2 服务器配置 (10)2.1 服务器所需安装软件 (10)2.2 windows服务器上配置软件 (10)1 存储设备管理1.1 FILERVIEW 图形管理接口Filerview是 NetApp提供的图形管理接口,可以方便地实现对 NetApp 的存储设备的管理。
启动浏览器访问 IP地址\na_admin。
你需要:✓使用 Microsoft IE或 Netscape Navigator (version 4以上) ✓URL: http://filername/na_admin如果有错,可能和DNS有关,你可以用http://IP_address_of_filer/na_admin,然后点击Filerview进入 filerview , 通过 filerview你可以完成几乎所有的管理任务。
点击 FILER VIEW图标进入 FILER VIEW管理界面,输入用户名和密码1.2 命令行管理接口(CLI)你可以用 CONSOLE口 (将 PC机的串口与 NetApp随机带的 console线连在filer的CONSOLE口, 打开 windows里的 hyperterminal或其它仿真终端,波特率设置为 default: 9600波特率, 8位,无校验,1位停止位)和 telnet 登入 filer的命令行窗口.1.3 空间管理:Aggr, Volume的介绍Aggr是由一个或多个raid group (raid group包含一个校验盘和多个数据盘)组成的虚拟存储池.卷(volume)建立在Aggr上的空间管理单位,是快照等技术实现的基本单元。
Windows 2003系统配置iSCSI存储

Windows Server 2003 模拟IP-SAN图文教程用Windows Server模拟IP-SAN测试操作系统版本:windows 2003 server sp2,软件:MS_iSCSI_Target配置步骤:1. 首先下载MS_iSCSI_Target,可从微软官方网站下载。
Windowows 2003 对应MS_iSCSI_Target 3.1版本,windows 2008 对应MS_iSCSI_Target 3.2版本;2. 将下载的MS_iSCSI_Target安装包解压,解压后打开MS-dos命令行,进入到MS_iSCSI_Target目录,运行MSiSCSITarget.bat Install;(注意Install第一个字母大写)3. 安装完成后,打开mmc控制台,添加管理单元。
选择Microsoft iSCSI Software 单元。
用Windows Server模拟IP-SAN测试操作系统版本:windows 2003 server sp2,软件:MS_iSCSI_Target配置步骤:1. 首先下载MS_iSCSI_Target,可从微软官方网站下载。
Windowows 2003 对应MS_iSCSI_Target 3.1版本,windows 2008 对应MS_iSCSI_Target 3.2版本;2. 将下载的MS_iSCSI_Target安装包解压,解压后打开MS-dos命令行,进入到MS_iSCSI_Target目录,运行MSiSCSITarget.bat Install;(注意Install第一个字母大写)3. 安装完成后,打开mmc控制台,添加管理单元。
选择Microsoft iSCSI Software 单元。
4.添加完成之后,首先创建一个iSCSI Targets刚问目标,添加方法如下:5.最后创建一个虚拟共享磁盘即可。
搭建ISCSI Target 与linux initiator和windows 2007客户端连接
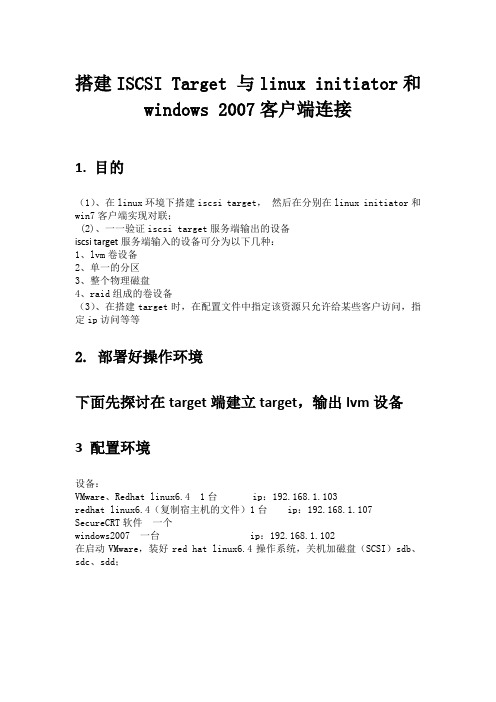
搭建ISCSI Target 与linux initiator和windows 2007客户端连接1. 目的(1)、在linux环境下搭建iscsi target,然后在分别在linux initiator和win7客户端实现对联;(2)、一一验证iscsi target服务端输出的设备iscsi target服务端输入的设备可分为以下几种:1、lvm卷设备2、单一的分区3、整个物理磁盘4、raid组成的卷设备(3)、在搭建target时,在配置文件中指定该资源只允许给某些客户访问,指定ip访问等等2. 部署好操作环境下面先探讨在target端建立target,输出lvm设备3 配置环境设备:VMware、Redhat linux6.4 1台 ip:192.168.1.103redhat linux6.4(复制宿主机的文件)1台 ip:192.168.1.107 SecureCRT软件一个windows2007 一台 ip:192.168.1.102在启动VMware,装好red hat linux6.4操作系统,关机加磁盘(SCSI)sdb、sdc、sdd;redhat 6.4iscsi server targetip:192.168.1.103redhat6.4 switch windows 2007 iscsi initiator iscsi initiator ip:192.168.1.107 ip:192.168.1.1024. 搭建iscsi target4.1 加盘添加一块硬盘sdb作为iscsi target的存储,查看新加的磁盘是否已经加入去了,命令fdisk –l可查看4.2 分配lvm创建逻辑卷lvm,分别是为linux iscsi initiator和windows 2007创建lvlinux和lvwindows,容量大小为2G(sdb 5G)5.2 创建物理卷(pv)5.2.1 查看pv命令“pvdisplay”可查看pv是否已经创建好5.3. 创建卷组(vg)创建好pv,接着在pv 的基础之上建一个卷组vg(lishengquan)5.3.1 查看vg命令“vgdisplay”可以查看5.4 创建逻辑卷(lvm)创建好卷组vg(5G),再在vg的里面划分出两个逻辑卷(各2G),分别是:lvlinux 和lvwindows创建lvlinux创建lvwindows5.4.1 查看lvm命令“lvdisplay”查看逻辑卷6 安装iscsi target创建好lvm,就接着安装iscsi target查看linux6.4是否已经安装好target,可用命令:rpm -ql rpmname安装target的时候先要看下redhat6.4是否自带了包rpm,先前安装的redhat5.4就没有target rpm,要自行下载安装,找target包比较麻烦,找到了又不不适合,上网查了说6.4的自带了,就安装6.4的用了。
iSCSI initiator

iSCSI initiator(发起程序)是客户端服务器上面的一款连接iscsi target也就是iscsi存储的客户端软件,现在已经内置于windows 2008及以上的系统中,下面我们介绍一下如何使用iscsi initiator连接iscsi target。
1. 首先,准备一台iscsi存储服务器,并建立target设备,这里我利用iStorage Server
建立了一个20G的存储设备。
2. 打开windows内置的iscsi 发起程序.
方法1:打开控制面板,找到管理工具->iSCSI发起程序。
方法2:直接点击开始,输入iscsi,系统会自动搜索到iSCSI发起程序。
3. 点击程序的发现页面,然后点击发现门户...。
在弹出的窗口中,可以输入服务器地址。
我们刚才的存储服务器地址为:192.168.0.106
4. 然后转到目标器页面,这是会自动显示服务器的所有有效target。
5. 选中我们新创建的target设备-“iStorageServer”,然后,点击连接。
注意:默认勾选“将此连接添加到收藏目标列表”,意思就是,系统启动会自动连接存储设备。
我们可以点击高级,设置连接属性,比如说连接地址,用户验证等等。
因为,windows server都支持MPIO,MC/S所以我们可以设置发起IP与目标IP,来实现通过不同的网络连接到同一target设备。
控制面板程序打开关闭windows功能Microsoft 多路径 I/O 安装
管理工具 MPIO 添加重启。
iSCSI initiator在windows和linux下的安装方法及配置指南
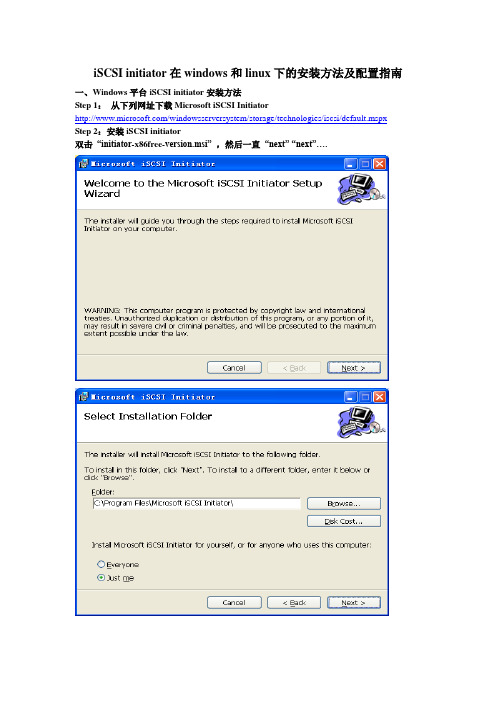
iSCSI initiator在windows和linux下的安装方法及配置指南一、Windows平台iSCSI initiator安装方法Step 1:从下列网址下载Microsoft iSCSI Initiator/windowsserversystem/storage/technologies/iscsi/default.mspx Step 2:安装iSCSI initiator双击“initiator-x86free-version.msi” ,然后一直“next” “next”….Step3:iSCSI配置文件注:开始配置之前,确保主机的IP设置,使主机能够连接上RAStor4000控制器,即在一个子网段内,互相能够ping通。
双击桌面上的“Microsoft iSCSI Initiator”图标。
出现如下界面:该界面是用来添加Target,稍后进行配置。
首先,切换到“Initiator Settings”属性页,如下图所示,记下nitiator node name,这个ID 便是将来RAStor4000中添加主机时所需要使用的WWN,也可以自己改变,但要保证是唯一的。
由于该主机为NF280,主机名为nf280,因此系统会自动给出initiator node name为“.microsoft:nf280”。
然后返回开始属性页“Target Portals”,通过单击“Add。
”,添加RAStor4000的控制器IP,如下图:其中“192.168.0.1”为RAStor4000的控制器0 IP地址,3260为默认的iscsi service端口号。
单击“Advanced…”可以设置连接方式,也可以设置为default。
source IP选择initiator主机的IP Address:192.168.0.5设置完,单击确定,再单击“Add Target Portal”对话框中的OK,进入如下界面:添加完成后,激活Target,激活会话,需要完成以下几步:单击“Log On…”选择第一个复选框,暂时不选择多路径,单击OK。
如何使用Microsoft iSCSI Initiator 连接至iSCSI装置
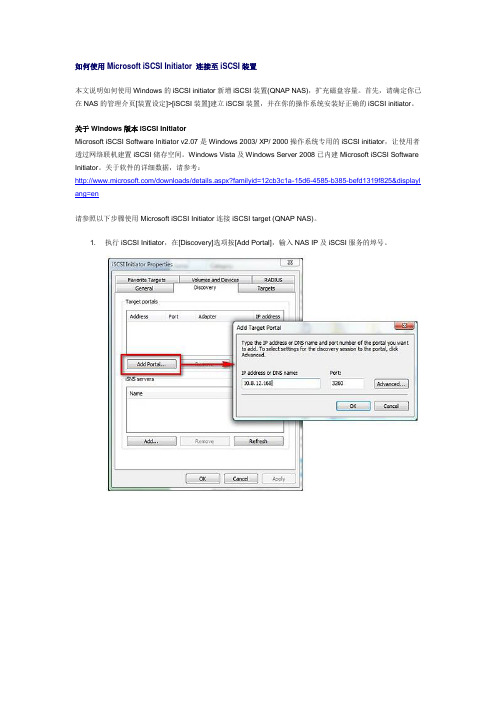
如何使用Microsoft iSCSI Initiator 连接至iSCSI装置本文说明如何使用Windows的iSCSI initiator新增iSCSI装置(QNAP NAS),扩充磁盘容量。
首先,请确定你已在NAS的管理介页[装置设定]>[iSCSI装置]建立iSCSI装置,并在你的操作系统安装好正确的iSCSI initiator。
关于Windows版本iSCSI InitiatorMicrosoft iSCSI Software Initiator v2.07是Windows 2003/ XP/ 2000操作系统专用的iSCSI initiator,让使用者透过网络联机建置iSCSI储存空间。
Windows Vista及Windows Server 2008已内建Microsoft iSCSI Software Initiator。
关于软件的详细数据,请参考:/downloads/details.aspx?familyid=12cb3c1a-15d6-4585-b385-befd1319f825&displayl ang=en请参照以下步骤使用Microsoft iSCSI Initiator连接iSCSI target (QNAP NAS)。
1. 执行iSCSI Initiator,在[Discovery]选项按[Add Portal],输入NAS IP及iSCSI服务的埠号。
2. NAS上可使用的iSCSI target及状态会显示如下,按[Log on...]。
3. 按[Advanced]输入登入数据及其它设定,如CHAP认证,然后按[OK]。
4. 成功登入后,target状态会变为[Connected]。
5. 前往Windows系统的[Disk Management](磁盘管理),系统会侦测到iSCSI target为未配置磁盘空间,请将磁盘格式化。
6. 完成后,你可以开始把iSCSI target当作新的硬盘空间使用。
配置iSCSI目标服务器Starwind

使用VMware ESXi 5.1搭建VMware虚拟化平台四、配置iSCSI目标服务器拓扑规划任务目标使用Starwind iSCSI SAN 6.0在Window上搭建iSCSI目标服务器,在Windows 7客户端上使用iSCSI发起程序连接到iSCSI存储。
项目实施1、安装Starwind iSCSI SAN 6.0(1)运行Starwind 6.0的安装程序,开始安装Starwind iSCSI SAN & NAS 6.0,如图1-120所示。
提示:如果在Windows Server 2003或Windows XP中安装Starwind,需要先安装iSCSI Initiator。
Windows Server 2008、Windows 7或更高版本默认集成了iSCSI Initiator,直接安装Starwind就可以。
(2)使用“Full Installation”,安装所有组件,如图1-121所示。
图1-120 安装Starwind 图1-121 选择所有组件(3)要使用Starwind,必须要有授权密钥。
可以在Starwind的官方网站申请一个免费的密钥,然后选择“Thank you,I do have a key already”,如图1-122所示。
(4)浏览找到授权密钥文件,如图1-123所示。
图1-122 选择已经拥有授权密钥图1-123 选择授权密钥文件(5)安装完成后会自动打开Starwind Management Console,并连接到本机的Starwind Server,如图1-124所示。
如果没有连接Starwind Server,可以选中计算机名,单击Connect。
图1-124 Starwind Management Console2、创建iSCSI Software Target(1)选择Targets Add Target,添加iSCSI目标,如图1-126所示。
微软软件iSCSI_initiator的安装和配置步骤
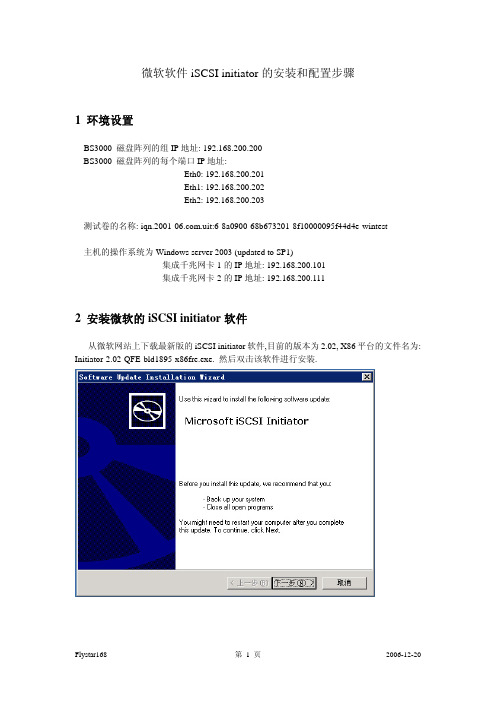
微软软件iSCSI initiator 的安装和配置步骤1 环境设置BS3000 磁盘阵列的组IP 地址: 192.168.200.200 BS3000 磁盘阵列的每个端口IP 地址:Eth0: 192.168.200.201 Eth1: 192.168.200.202 Eth2: 192.168.200.203测试卷的名称: .uit:6-8a0900-68b673201-8f10000095f44d4e-wintest主机的操作系统为Windows server 2003 (updated to SP1)集成千兆网卡1的IP 地址: 192.168.200.101 集成千兆网卡2的IP 地址: 192.168.200.1112 安装微软的iSCSI initiator 软件从微软网站上下载最新版的iSCSI initiator 软件,目前的版本为2.02, X86平台的文件名为: Initiator-2.02-QFE-bld1895-x86fre.exe. 然后双击该软件进行安装.(此环境只是举例说明,并不代表所带设备环境设置,请根据实际情况设置)中间有四个选项, 前三个选项是必选的, 第四个Microsoft MPIO Multipathing Support for iSCSI 用于多链路冗余, 如果有你的机器有两个或者多个网卡用来连接磁盘阵列, 就可以用这个选项. 这里我们选上, 以在后面做MPIO的配置.单击完成之后, 服务器重新启动, 启动之后就可以进行initiator的配置了. 至此, initiator的安装完成.3 配置iSCSI initiator3.1双击桌面上的Microsoft iSCSI initiator图标(或者从开始—程序中启动), 进入配置界面.其中 .microsoft:test001是iSCSI initiator的节点名称, 用以区分不同的软件initiator.号.一下就会出来. 选择相应的卷, 单击Log on,这里出现两个选项,其中Automatically restore this connection when the system boots用于在系统重新启动时自动进行iSCSI连接,经常要选上。
在Windows环境中部署iSCSI(附图+++详解)
WIN353 Deploying iSCSI in Windows EnvironmentsSuzanne MorganEnterprise Storage Program ManagerMicrosoft CorporationAgendaWhy SAN? iSCSI Overview Scenarios Best Practices Support Troubleshooting Futures Q&AIT Best Practice Trend: ConsolidationFile Servers Backup Serversspare spareApplication ServersspareLogsspareLogsspareSharesStoresStoresADDomainConsolidation = Improved operationsMore efficient resource utilizationDevice sharing Physical space reduction Reduction in hardware costsLess points of management Better service levelsConsolidation provides Shared SAN DevicesServer Server ServerLANCatalogBackup Server SANiSCSI Tape Library iSCSI Storage ArraysImprovement: Consolidate and share storage and backups devicesOther Capabilities in a SAN…Add storage without opening the server or disrupting applications Servers without disksBoot from SAN Easily re-deploy servers to applicationsAvailability and RedundancyRedundant Hardware Online service Multi-path I/OOther Capabilities in a SAN, continued…Snapshots/Shadow CopyInstant copies of disks without overhead Instant restore of disk images Ability to have another server access the snapshotOffload application servers as Backups are done by backup serversMore frequent backup operationsReplicationMovement of data to other locations Data movement can be done by storage devices Instant restore at remote locationiSCSI is a Familiar Network for SANsFamiliar IP Networking Expertise and Tools IP Interoperability Storage over Distance – Replication Multiple Layers of Security – Built-in to Protocol Good Performance at 1GigiSCSI Standard Brings Interoperability to SANsFamiliar technologies – Now used togetherSame SCSI commands Same Network transportServers (Initiators)EthernetiSCSI Storage (Targets)TCP/IPSCSIPacketFrameWhat is iSCSI?iSCSI Architecture DetailsApplications Management Drivers Software Initiator HardwareDevice Manager Perf. Monitor Mgmt AppsInitiator ServiceSecurityMiniport Driver Bus Driver +MiniportsiSCSI HBAMultifunction CardMicrosoft iSCSIiSNS ClientMicrosoft Windows VendorMicrosoft ConfidentialNetworkiSCSI CLI WMINICiSCSI LandscapeMicrosoft iSCSI SupportiSCSI Qualified Hardware TargetsiSCSI Qualified Hardware (HBAs)Security is ImportantExchange and SQL SupportSupport for Microsoft Cluster Server and iSCSICluster support, cont/windowsserversystem/storage/iscsi.mspxMicrosoft MPIO SupportWhen to use Microsoft MPIO vs MCS (multiple connections per sessionShared SAN DevicesLANServer Server Server CatalogBackup Server SANiSCSI Tape Library iSCSI Storage ArraysImprovement: Share Storage and backups devicesSnapshot: Point in Time Copies Improve BackupsInstant copy with no performance impact on applicationsTimeNo performance impact Space efficient Supports 1000s of snapshots Instant RestoreCommon Forms of BackupSAN NetworkBackup / Restore Performance & ManageabilityLocalBackup Approach 1: LocallyServer Server Catalog Server Server Tape Drive Tape Drive Tape DriveLANTape DriveRAIDRAIDRAIDRAIDRemote LocationBackup Approach 2: Over the NetworkLANServer Server Server Catalog Backup Server Tape LibraryRAIDRAIDRAIDImprovement: Consolidate Backup OperationsRemote LocationBackup Approach 3: Shared SAN DevicesLANServer Server Server Catalog Backup Server SANiSCSI Tape Library iSCSI Storage ArraysImprovement: Share Storage and backups devices, improve performance, offload networkRemote LocationCommon Forms of BackupHeavy server loadsAll have servers doing backup operationsLong backup operationsTape drive performance12-24 hour data lossBackups are run infrequently Typically only once a dayLong restore timesData must be converted on restoreSANBackup / Restore Performance & ManageabilityNetworkLocalDisk to Disk to Tape Provides Some Improvement in Backup and RestoreHeavy server loadsAll have servers doing backup operationsLong backup operationsTape drive performance12-24 hour data lossBackups are run infrequently Typically only once a dayLong restore timesData must be converted on restoreSANBackup / Restore Performance & ManageabilityNetworkLocalDisk to Disk to TapeBackup Approach: Disk to Disk to TapeLANServer Server Server Catalog Backup Server SANiSCSI Tape Library iSCSI Storage ArraysImprovement: Better backup performance, using disk as cacheBackup Approach: Disk to Disk to TapeLANServer Server Server Catalog Backup Server SANiSCSI Tape Library iSCSI Storage ArraysBetter backup performance using disk as cache Challenge: Much more storage needed, Moving data multiple times, long restore timesRemote LocationDisk-to-Disk to Tape BackupBenefitsReduces Backup WindowPrevent “shoe-shining” (poor performance) of the tapeUtilize inherent randomaccess capabilities of hard disks.CostsRequires additional storage for disk based backups Requires two data movement operationsOne to disk (by application servers) One to tape (by backup server)Improved support for multiple simultaneous backup streams. On second copy operation streamline disk-to-tape performance.Improved Restore from Disk (rather than tape)Recover in ½ the time with disk vs. with tape.Snapshot and SAN Offload Backups, Instant Restores, Use Less Disk SpaceNo server loadBackup server does heavy liftingSnapshot & SANFast performance 1 hour or less data lossSnapshots are run frequently, many times a dayInstant data restoreNo data conversion neededSANNetworkBackup / Restore Performance & ManageabilityLocalDisk to Disk to TapeBackup with Snapshots Off-load Backups, and Restore QuicklyCreate SnapshotAccess Snapshot for backupLANServerServerServerServerBackup ServerSANiSCSI Tape LibraryiSCSI Storage ArraysRemote LocationBackups and SnapshotsBackups solve:Providing history Transportable copies to remote locationsSnapshotsOffload Application servers Improve backup of running applications Provide instant recovery Snapshots provide history (multiple copies)But Snapshots are vulnerableSnapshots are co-located with primary storageTo snapshot data, must have access to primary dataSolution: Replicate Snapshots to Remote Location Create distance between data copies Accomplished by using network and storage technologiesPrimary Data ReplicasSupports 1-way, bi-directional, or many to one configurationsPeerStorage Auto-ReplicationDelivers ease of use and affordable disaster protectionLocation 1Location 2TimeSAN Backup and ReplicationCreate Snapshot Access Snapshot for backupLANServerServerServerServerBackup ServerReplicate SnapshotSANRemote LocationiSCSI Tape LibraryiSCSI Storage Arrays iSCSI StorageReplication and Remote SAN BackupCreate SnapshotLANServerServerServerAccess Replica for backupRemote LocationReplicate SnapshotSANiSCSI Tape LibraryiSCSI Storage ArraysiSCSI StorageBackup ServerDisk to Disk to Tape BackupLANServer Server Server CatalogBackup Server SANiSCSI Tape Library iSCSI Storage ArraysBetter backup performance using disk as cache Challenge: Much more storage needed, Moving data multiple times, long restore timesRemote LocationManufacturing: Zenon EnvironmentalDatacenterMicrosoft Exchange EnvironmentBackup Server Domain Server Exchange Mail ServersApplicationEmail and HR SystemPain PointsNeed Short-term storage for email Cost of storage upgrades Costly external professional services to maintain SANsSolutioniSCSI SAN Switched Gb-EthernetiSCSI SAN consolidation Storage capacity 5TBiSCSI Target Disk ArraysBenefitsLower cost of connectivity Predictable, linear growth plan Long term storage strategy“The more I learned about iSCSI technology, the more appropriate it seemed for the midrange environment – for organizations with users from 300-500 users.” – Shawn Eveleigh, Senior Systems AdministratorEmployee Benefits: TRI-ADDatacenterEmail, Database, and filersFile Shares SQL, Oracle Databases on Windows Exchange Mail ServersApplicationSQL, File shares, AD, Oracle and Domino Windows Server 2003Pain PointsDAS solution difficult to scale and manage Backups weren’t completing in weren’ windowSolutioniSCSI SAN Switched Gb-EthernetiSCSI SAN consolidation Storage capacity 2.5TBBenefitsiSCSI Disk ArrayDramatic service and performance improvements Snapshot backup / restore“We used to spend literally an hour or two a day just trying to manage the storage and backups. Now, we spend virtually zero time, other than just checking some reports. It has given us the opportunity to really focus on our applications and business processes and integrating some of our different service departments at a much tighter level.” – Stephen Greenlee IT Director TRI-ADContent Management: Cypress CorporationDatacenterEmail, Database, and ERPERP SQL Databases on Windows E-Mail ServersApplicationExchange SQL, ERP, Internal applications Windows Server 2003Pain PointsDAS solution difficult to scale and manage Backups weren’t completing in weren’ window Ability to support MSCST1iSCSI SAN Switched Gb-EthernetSolutioniSCSI SAN consolidation Storage capacity 5 TBBenefitsiSCSI Disk ArraySnapshot backup / restore Disaster Replication“Like us, most of our customers can’t wait 10-12 hours to load and run backup tapes, to retrieve data, but the PeerStorage arrays render backup process instantaneously. PeerStorage’s backup capabilities require less time and resources to manage than other solutions we’ve seen. So not only are they critical in case something goes wrong, but they also provide savings in terms of the time, and effort it takes to manage a daily backup process” – Paul Vagnozzi VP and CTO Cypress CorporationBackup Using VSSPublic LAN 2 NICs Microsoft iSCSI initiator VSS hardware provider VSS Exchange writer 2 NICs Microsoft iSCSI initiator VSS hardware provider VSS SQL writer Microsoft Exchange Microsoft SQL server Active Directory server server (iSCSI host) (iSCSI host)iSCSItape library backup server (iSCSI) host)Microsoft iSCSI initiator Open file agent (exposes writers)iSCSI targetiSCSI Vendors with VSS providersReleasedIn developmentBackup Vendors who support iSCSILegato CommvaultQiNetix Galaxy backup and recovery software VSS enabledComputer AssociatesBrightStor ARCserve VSS enabled-check with above vendors on which versions support iSCSI and which iSCSI targets they support Note: the above may be a partial listVirtual Server with iSCSI ScenariosSee other presentations and demos using iSCSI with Virtual Server in a cluster environmentiSCSI MSCS ScenarioiSCSI Bridge to FC SANiSCSI Boot From SANNAS Head to IPSAN。
Windows 上启动器的安装及使用iSCSI 客户端
附录Ⅰ:Windows 上启动器的安装及使用微软为了支持iSCSI 应用,提供了标准的iSCSI 客户端,也叫iSCSI 启动器,软件的最新版本可以从网址/downloads 下载;在本机的随机光盘中,包含了本软件的Initiator-2.04-build3273-x86fre 版本,可以直接安装使用。
下面以2.04 版本为例来说明。
直接点击软件的安装文件,运行后出现安装界面。
直接点击【下一步】把installation options 的复选框都选中,然后再点【下一步】,【I Agree】就开始安装了。
安装完成后点【完成】即可。
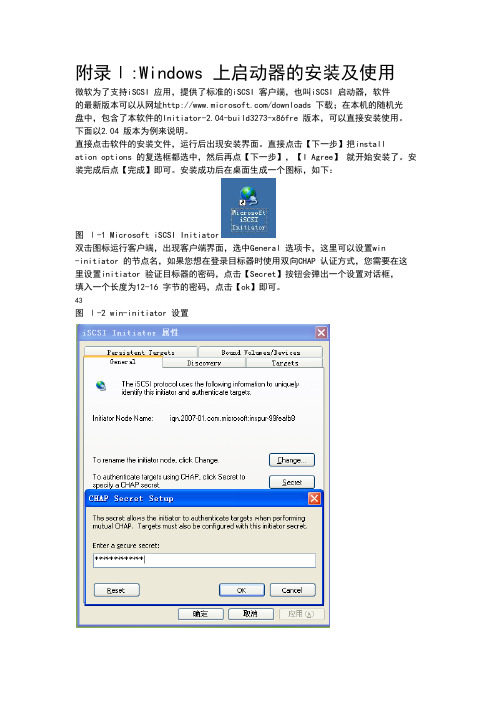
安装成功后在桌面生成一个图标,如下:图Ⅰ-1 Microsoft iSCSI Initiator双击图标运行客户端,出现客户端界面,选中General 选项卡,这里可以设置win-initiator 的节点名,如果您想在登录目标器时使用双向CHAP 认证方式,您需要在这里设置initiator 验证目标器的密码,点击【Secret】按钮会弹出一个设置对话框,填入一个长度为12-16 字节的密码,点击【ok】即可。
43图Ⅰ-2 win-initiator 设置选中Discovery 选项卡,如图Ⅰ-3 所示。
图Ⅰ-3 win-initiator 设置Target Portals 用来显示目标器信息,和target 端建立联系。
iSNS Severs 是名字服务器的相关设置。
首先点击Target Portals 中的【Add】按钮,在弹出的对话框中填入目标器IP 地址,如图Ⅰ-4,端口使用默认值3260,点击【ok】按钮即可,这时如44果弹出Connection Failed 警告信息,就说明连接不成功,请检查您的网络连接是否畅通,您的目标器端设置的限制Initiator 连接的IP 是否正确。
如果没有弹出此对话框说明操作成功,可以进入下一步登录了。
图Ⅰ-4 win-initiator 发现目标器选中Targets 复选框,就会看到如图Ⅰ-5 所示,您所连接目标端的所有可用的目标器,但状态(status)是inactive ,单击下面的【Log On】按钮。
(图解)配置iSCSI Storage
(图解)配置iSCSI Storage
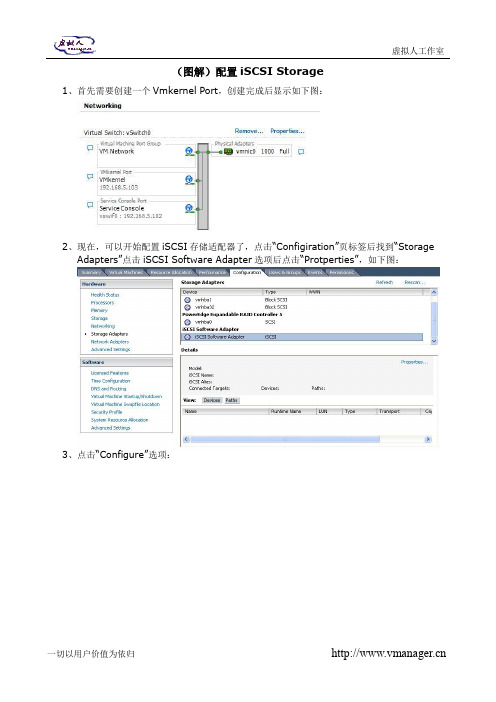
1、首先需要创建一个Vmkernel Port,创建完成后显示如下图:
2、现在,可以开始配置iSCSI存储适配器了,点击“Configiration”页标签后找到“Storage
Adapters”点击iSCSI Software Adapter选项后点击“Protperties”,如下图:
3、点击“Configure”选项:
4、勾选Status的“Enabled”选项后点击OK等待生效:
5、生效后,iSCSI Initiator名字和别名都会自动生成,同时Software iSCSI Initiator
Properties显示Enabled状态,如下图:
6、点击“CHAP…”按钮配置CHAP认证相关信息;
7、输入CHAP验证的相关信息,包括目标主机上设定的用于CHAP验证的用户名和密钥后,点
击OK生效:
8、现在可以点击“Dynamic Discovery”页标签去尝试添加iSCSI服务器的地址动态发现iSCSI
Target:
9、点击“Add”按钮输入IP或IP段之后点击OK即可生效(iSCSI缺省端口3260):
10、点击“Close”按钮关闭后,系统会要求rescan主机,点击Yes:
11、再次回到iSCSI adaptor settings那里即可看到相关的配置信息和查找到的LUN,添
加Datastore或RDM之后即可使用:。
iscsi存储配置手册_by_BCF
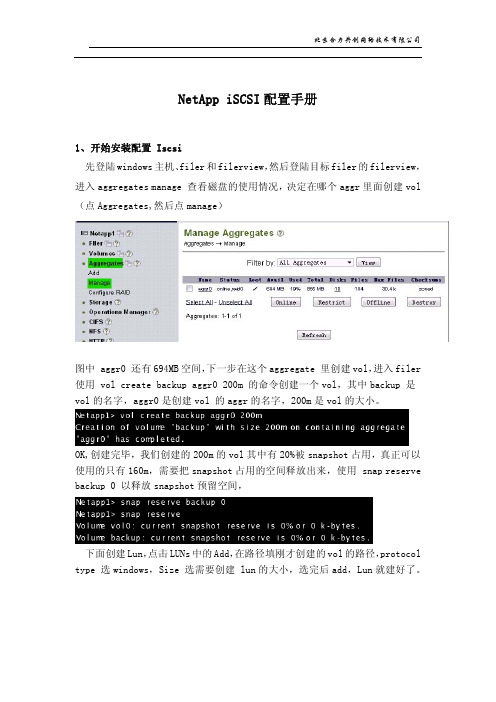
NetApp iSCSI配置手册1、开始安装配置 Iscsi先登陆windows主机、filer和filerview,然后登陆目标filer的filerview,进入aggregates manage 查看磁盘的使用情况,决定在哪个aggr里面创建vol (点Aggregates,然后点manage)图中 aggr0 还有694MB空间,下一步在这个aggregate 里创建vol,进入filer 使用 vol create backup aggr0 200m 的命令创建一个vol,其中backup 是vol的名字,aggr0是创建vol 的aggr的名字,200m是vol的大小。
OK,创建完毕,我们创建的200m的vol其中有20%被snapshot占用,真正可以使用的只有160m,需要把snapshot占用的空间释放出来,使用 snap reserve backup 0 以释放snapshot预留空间,下面创建Lun,点击LUNs中的Add,在路径填刚才创建的vol的路径,protocol type 选windows,Size 选需要创建 lun的大小,选完后add,Lun就建好了。
然后,通过NetApp FilerView 创建Intiator group,如图所示:司SCSI Initiator的Node Name,如图:把刚才创建的lun添加到这个igroup里,进入lun manage 点backup 这个lun 后面的 no maps点add groups to map然后选刚才建的那个groups,AddLun ID 选 0,Apply3、在Windows下使用Filer 共享出的LUN从桌面选择“Microsoft iSCSI initaiator”进入iSCSI配置。
检查“Node Name”。
在“Discovery”中选择“Add”。
填入NetApp存储的IP地址,端口号不改变。
ISCSI建立应用服务器到控制器的连接
建立应用服务器到控制器的连接当您在OSM3.0上为控制器的iSCSI主机端口配置iSCSI主机端口的IP地址之后,您还需要登录到应用服务器进行相应的设置,应用服务器才能通过iSCSI主机端口与存储设备建立连接,存取数据。
在设置之前至少要保证应用服务器有一个网口和控制器iSCSI主机端口网络连通。
说明该操作只适应于前端主机端口为iSCSI主机端口的情况。
下面分别介绍Windows应用服务器和Linux应用服务器连接到控制器的方法。
Windows操作系统1.以“Administrators组”用户的身份登录Windows应用服务器2.安装“Microsoft iSCSI Initiator”程序。
说明∙安装完成后,请重新启动应用服务器。
∙Microsoft iSCSI Initiator”安装程序可从微软网站上下载。
请使用2.01 及以上版本。
∙若需要安装UltraPath 软件,当安装“Microsoft iSCSI Initiator”程序时在“Installation Options”复选框中不选中“Microsoft MPIO Multipathing Support for iSCSI”。
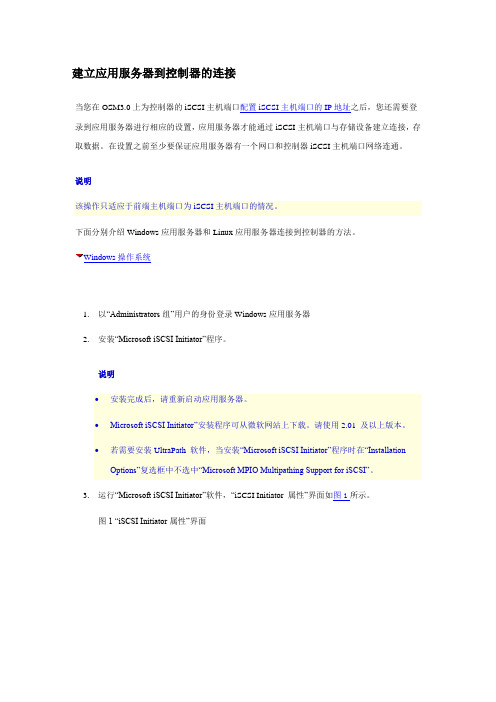
3.运行“Microsoft iSCSI Initiator”软件,“iSCSI Initiator 属性”界面如图1所示。
图1 “iSCSI Initiator属性”界面说明∙图1中:单击“Change...”,可在弹出的“Initiator Node Name Change”对话框中更改Initiator Node 的名称。
∙Initiator Node 的名称只能包含数字、英文字母、“.”、“-”和“:”。
若采用非法字符会导致应用服务器连接存储设备失败。
∙当有多个应用服务器连接控制器时,“Initiator Node Name”应各不相同。
4.选择“Discovery”页签,单击“Add”。
系统弹出“Add Target Portal”对话框,如图2所示。
用iSCSI Software Target 3 搭建IP-SAN
用iSCSI Software Target 3.3 搭建IP-SAN我们在搭建Windows群集的时候往往会使用到IP-SAN。
但是面对昂贵的硬件IP-SAN,我们在学习和实验的环境中更加多的用到的往往是软件模拟的IP-SAN。
今天就给大家介绍一个微软出品的免费iSCSI Target软件——Microsoft iSCSI Software Target 3.3。
其实这个软件很早以前就有了,只不过仅限于内部使用。
现在它终于向公众公开了。
Microsoft iSCSI Software Target 3.3下载地址:/downloads/en/details.aspx?FamilyID=45105d7f-8c6c-4666-a305-c8189062a0d0下载完成后是一个可执行文件,接下来我将简要的介绍如何使用这个软件。
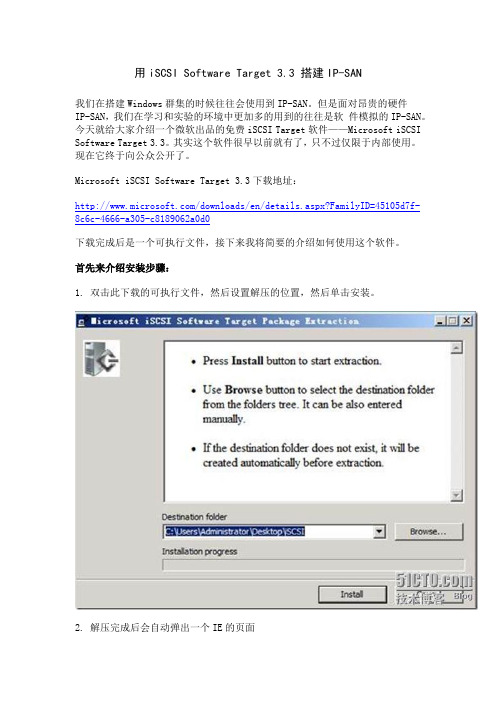
首先来介绍安装步骤:1. 双击此下载的可执行文件,然后设置解压的位置,然后单击安装。
2. 解压完成后会自动弹出一个IE的页面3. 在右下角就可以看到安装这个软件的链接,单击iSCSI Software Target (X64)4. 运行安装程序5. 打开安装向导,单击next6. 接受许可协议7. 设置安装路径8. 按照提示来,单击下一步,来安装软件的安装。
至此安装的过程已经完了,接下来配置iSCSI Target接下来介绍配置步骤:1. 单击开始菜单\管理工具中出现的Microsoft iSCSI Software Target ,打开iSCSI Target 控制台。
2. 右键单击iSCSI目标,然后单击创建iSCSI目标,这里的iSCSI目标相当于LUN3. 输入iSCSI目标名称和描述,然后单击下一步4. 设置能够访问这个iSCSI目标的IQN标示,这里可以使用DNS域名、IP地址、MAC地址和IQN标示符。
单击高级——添加。
今天演示中我们使用IP地址来实现。
5. 完成iSCSI目标的创建接下来为这个iSCSI目标添加磁盘。
LINUX-ISCSI-Target-服务器搭建与windows-客户端连接

Linux ISCSI 服务器搭建与客户机ISCSI连接ISCSI 简介:iSCSI 技术是一种由IBM公司研究开发的,是一个供硬件设备使用的可以在IP协议的上层运行的SCSI 指令集,这种指令集合可以实现在IP网络上运行SCSI 协议,使其能够在诸如高速千兆以太网上进行路由选择。
iSCSI技术是一种新储存技术,该技术是将现有SCSI 接口与以太网络(Ethernet)技术结合,使服务器可与使用IP 网络的储存装置互相交换资料。
网络拓扑:CentOS6.3ISCSI Server TargetIP:192.168.2.54CentOS6.3 ISCSI Initiator IP:192.168.2.55Windows server2012 ISCSI Initator IP:192.168.2.230实验环境:ISCSI Target:CentOS6.3 IP:192.168.2.54ISCSI Initator:CentOS6.3 IP:192.168.2.55 windows server2012IP :192.168.2.230一.ISCSI Target 的搭建:1. 在ISCSI target 服务器上添加一块新的硬盘,用于ISCSI Target 存储。
2. 创建LVM。
在此具体操作略掉。
操作结果如下图:分别为linux iscsi initator,Windows server2012创建LV.逻辑卷lvlinux和lvwindows,大小都为2GB 的容量。
3. 在CentOS 上安装iscsi target,在这里我采用YUM 的安装方式。
4. 修改ISCSI TARGET 的配置文件,配置文件为/etc/tgt/targets.conf,使用vim 工具修改配置文件:分别为linux客户端和windows server 2012 客户端建立两个target(linux-target,windows-target),将两个target关联到之前创建的LV上,并且配置用户名和密码认证(用户名和密码都为test),同时限制只有相应IP 地址的客户端才能访问iscsi target.如图:添加target:5.启动iscsi target 服务6.配置iscis target 服务器开机启动:7.查看当前iscis target 的运行状态:到此ISCSI 已配置完成,并且可以查看到当前target的状态是正常的二.ISCSI Initiator连接ISCSI target.1. windows server2012连接ISCSI TARTGET:运行管理工具中的点击 发现选项卡再点击 发现门户输入ISCSI target 服务器的IP地址和相应的端口号,ISCSI target 默认使用的是tcp 3260 端口,然后确定。