戴森PH07遥控器说明
遥控器按键功能介绍

1遥控器按键功能介绍1.1“SNOOZE”键在闹铃时按此键可暂停闹铃10分钟后重新闹。
1.2“play/pause”键,IPod播放状态下,按此键一次暂停播放,再按一次恢复播放。
1.3“SOURCE”键在开机状态下,按此键可依次选择IPOD、FM、AUX音源。
1.4音量“+”键1.4.1在播放状态下,按此键可增加音量。
1.4.2在设置闹钟时可调整闹钟的时间和闹铃的音量,可切换闹钟“O N”/“OFF”状态显示。
1.4.3在设置时间时可调整数值。
1.5音量“-”键1.5.1在播放状态下,按此键减少音量。
1.5.2在设置闹钟时可调整闹铃的时间和闹铃的音量。
1.5.3在设置时间时可调整数值1.6“ENTER”键1.6.1确认、选择各项设置。
1.7“上一曲”键1.7.1在I Pod播放状态下,按此键播放上一曲。
1.7.2在FM状态下,按此键进入手动调台并向上调整频率。
1.8“下一曲”键1.8.1在I Pod播放状态下,按此键播放下一曲。
1.8.2在FM状态下,按此键进入手动调台并向下调整频率。
1.9“SLEEP”键在开机的状态下,按一次此键启动SLEEP功能,同时连续按该键可调整SLEEP的时间,每按一下已15分钟递增,最高为60分钟;如3秒钟内不再按该键,则系统自动退出SLEEP设置,而SLEEP的时间为最后显示的时间,如最后显示的时间为“00”,则退出后SLEEP功能关闭。
1.10“POWER ON”键在关机状态下按一下此键开机,再按一下关机。
1.11“MUTE”键按此键可静音。
1.12“TIME”键按此键可进入时间设置。
1.13“MEM”键按此键可存储电台频率。
1.14“ALARM 1”1.14.1按此键可进入闹钟1设置。
1.14.2闹铃时,按此键可停止闹铃。
1.15“ALARM 2”1.15.1按此键可进入闹钟2设置。
1.15.2闹铃时,按此键可停止闹铃。
1.16“PRESET”键在FM模式下,按此键可选择收听存储的频道。
戴森吸尘器说明书
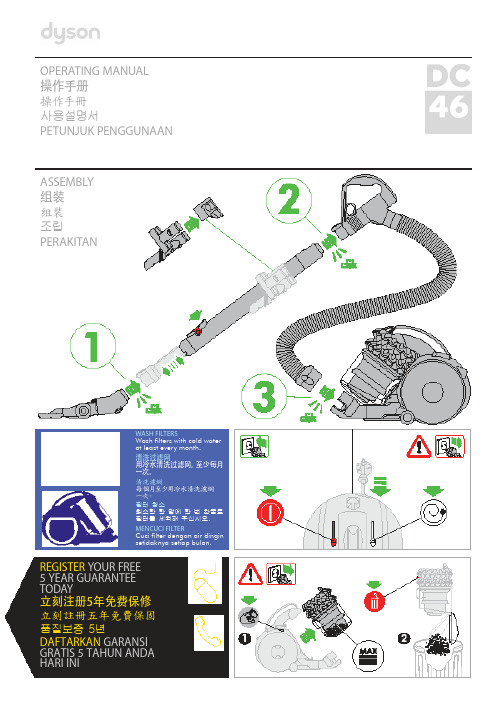
OPERATING MANUAL操作手册操作手冊사용설명서PETUNJUK PENGGUNAANASSEMBLY组装組裝조립PERAKITANWASH FILTERS清洗过滤网清洗濾網필터 청소MENCUCI FILTERREGISTER YOUR FREE5 YEAR GUARANTEE TODAY立刻注册5年免费保修立刻註冊五年免費保固품질보증 5년DAFTARKAN GARANSI GRATIS 5 TAHUN ANDA HARI INIDYSON CUSTOMER CARETHANK YOU FOR CHOOSING TO BUY A DYSON APPLIANCEAfter registering your free 5 year guarantee, your Dyson appliance will be covered for parts and labour for5 years from the date of purchase, subject to the terms of the guarantee.If you have any questions about your Dyson appliance, call the Dyson Helpline with your serial number and details of where/when you bought the appliance.Most questions can be solved over the phone by one of our trained Dyson Helpline staff.Alternatively visit for online help, general tips and useful information about Dyson.戴森客户服务感谢您选择购买戴森产品登记获取 5 年免费保修后,您的戴森产品自购买之日起,将享受 5 年的零件和人工保修服务,但须符合保修条款的规定。
戴森空气净化器说明书
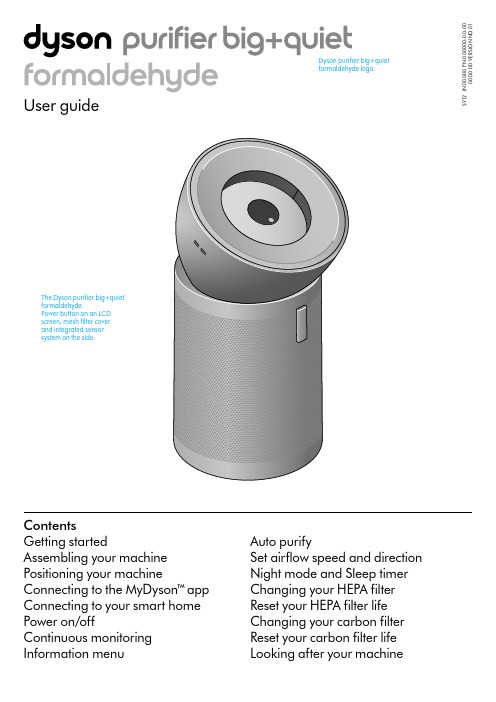
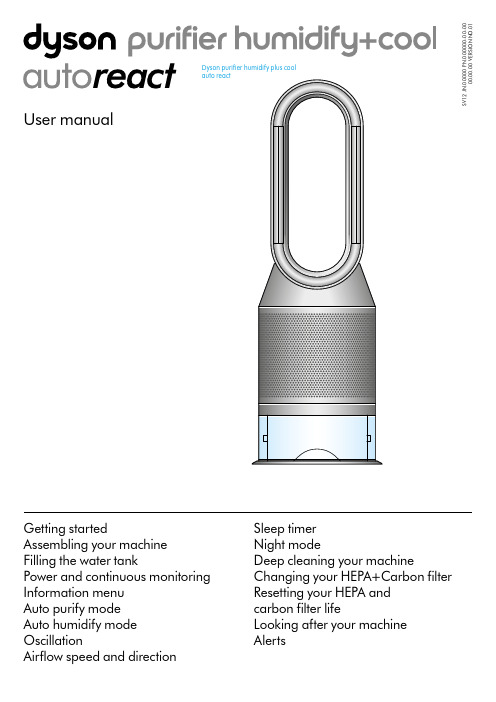
S V 12 J N .00000 P N .000000-00-00 00.00.00 V E R S I O N N O .01ContentsGetting startedAssembling your machine Positioning your machineConnecting to the MyDyson™ a pp Connecting to your smart home Power on/offContinuous monitoring Information menuAuto purifySet airflow speed and direction Night mode and Sleep timer Changing your HEPA filter Reset your HEPA filter life Changing your carbon filter Reset your carbon filter life Looking after your machineDyson purifier big+quiet formaldehyde logo.formaldehyde.real time.Hidden wheelsEasy to manoeuvre across a room – designed for hard surfaces.Carbon filterfilter is wrapped A real-time LCD display screen reports indoor air quality.on hard surfaces.Assembling your machineUse both hands to lift your machine out of the box, by its base.Your machine comes with a HEPA filter, carbon filter and permanent catalytic filter. These are already installed in your machine.Lift the conic amplifier out of the box and place it on the top of your machine.Rotate the conic amplifier until it clicks securely into place.Plug in and press the power button on the screen or remote control.Place the remote control on the front of yourmachine with the buttons facing down.The image demonstrates the location of the standby button and remote control.Image demonstrates how to assemble theDyson purifier big+quiet formaldehyde’s conic amplifier. Position and twist. A click indicates a secure lock.Positioning your machineYour machine is fitted with wheels to make it easier to move.Position your machine on a level floor.For the most effective purification, position your machine on the edge of the room at least 1 metre from the wall, with the conic amplifier pointing to the furthest point, along the wall.You can also position your machine facing diagonally acrossthe room.The purifier positioned on the edge of a room. A blue arrow shows the conic amplifier direction, pointing to furthest point, along the wall.The purifier positioned on the edge of a room. A blue arrow shows the conic amplifier direction, pointing diagonally across the room.Connecting to the MyDyson™ a ppConnecting to your smart homeTake full control with the MyDyson™ a pp and access step-by-step setup and support, control how and when your Dyson air purifier operates, monitor air quality with visual updates and automatically keep up to date with the latest software updates.Download the MyDyson™ a pp from the App Store or Google Play.Open the app and follow the on-screen instructions to create a new account.Apple and the Apple logo are trademarks of Apple Inc., registered in the U.S. and other countries. App Store is a service mark of Apple Inc., registered in the U.S. and other countries.Google Play and the Google Play logo are trademarks of Google Inc.The Android robot is reproduced or modified from work created and shared by Google and used according to terms described in the Creative Commons 3.0 Attribution License.Using Amazon AlexaAsk Alexa to enable the Dyson skill – to help control your air purifier. Set a routine that automates how your machine works with other devices in your home.Using Google AssistantControl all of your connected purifiers with Google or set a routine to automate how your machine works with other devices in your home. Just say “Hey Google” to get started.Using SiriConnect your Dyson machine to Siri Shortcuts to control it by voice onyour Apple device.Power on/offPress the Stand-by on/off button on your Dyson air purifier or remote control to start/stop your machine. It will continue to monitor the air quality.Continuous monitoring is turned off by default. You’ll need to activate it to see your historic AQ data.With continuous monitoring active, your Dyson air purifier will gather air quality and temperature information, displaying iton the LCD screen and in the MyDyson™ a pp.Continuous monitoring on/offYou’ll be prompted to activate Continuous monitoring on the MyDyson™ a pp. To turn it on or off using the remote control, press and hold the Auto mode button for five seconds. The LCD screen will indicate the Continuous monitoring status.Wi-Fi connectivityWi-Fi is turned on by default. To turn the Wi-Fi on or off, press and hold the Stand-by on/off button on your machine for five seconds.Continuous monitoring The remote control with the Stand-by button on the top left.Information menuPress this button to scroll through information monitored by your Dyson air purifier.Information about air quality, temperature, humidity and filter levels is shown on the LCD screen.When a particular type of pollutant causes air quality to decrease, a symbol for the pollutant will show on the LCD screen.Volatile organic compoundsVOCs are potentially harmful odours found in cleaning products, paints and furnishings.The current status of connection to theIndoor temperatureMonitor the ambient temperature of the room.Particulate matter (PM2.5)Microscopic particles up to 2.5 microns in size, suspended in the air we breathe. These include smoke, bacteria and allergens.Indoor humidityThe amount of water vapour in the air, shown as a percentage.Nitrogen dioxide and other oxidizing gases Potentially harmful gases released into the air by combustion from cooking and vehicle exhaust emissions.Particulate matter (PM10)Larger microscopic particles up to 10 microns in size, suspended in the air we breathe. These include dust, mould and pollen.Indoor air qualityAir quality graph shows the last12 seconds of data.Formaldehyde (HCHO)A common indoor pollutant released for many years from furnishings, floorings and glue.Carbon dioxide (CO 2)CO 2 can build up indoors without adequate ventilation, which can impact cognitive function.The remote control with the information button highlighted on the right hand side.In Night mode, your Dyson air purifier will continue to clean the air quietly, in a lower airflow speed with its LCD screen dimmed. Press the Night mode and Sleep timer button to scroll through the timer options.Night mode and Sleep timerSet your air purifier to Auto mode and the on-board sensors willintelligently adjust the settings of the machine according to the air quality.Air quality: your machine will pause when the target air quality has been reached, switching on again when the air quality levels drop.Airflow speed: the airflow speed will increase to its maximum until the target air quality has been reached.Increase or decrease the airflow speed and change air direction from 0° to 50° using the remote or MyDyson™ a pp.Select Breeze mode by repeatedly pressing down on the airflow direction button until it activates or by using the MyDyson™ a pp.Auto purifySet airflow speed and directionThe remote control with the Auto mode button highlighted on the left hand side.The remote control with the Night mode button on the bottom right and Sleep timer button on the bottom left.running low. Replacement filters are available to buy on www.dysoncanada.caRemove the conic amplifierSlide the Release button on the back of the conic amplifier to unlock. Lift the conic amplifier off your machine.Lift the outer cover off the base of your machine.Remove the filterThe HEPA filter is located in the outer cover. Press the filter release buttons located on the inner rim and lift the outer cover off the filter.Dispose of the filter.Install a new filterRemove your replacement filter from any packaging. Place the filter on the base of your machine.Place the outer cover over the filter and press down until it clicks securely into position.Place the conic amplifier on your machine and rotate until it clicks securely in position.Plug in, switch on and reset your filter life.Reset your HEPA filter lifeIt’s important to reset the filter life after replacing your filter.Press and hold the Night mode button on the remote control.The LCD screen on your machine will count down from five, until a tick appears on the screen.The filter life has been reset and your machine is ready to use.Pressing the night mode button on the bottom right of the remote control for 5 seconds.running low. Replacements are available to buy on www.dysoncanada.caRemove the conic amplifierSlide the Release button on the back of the conic amplifier to unlock. Lift the conic amplifier off your machine.Lift the outer cover off the base of your machine.Reset your carbon filter lifeIt’s important to reset your filter life after you have replaced your filter.Press and hold the down airflow direction button on the remote control. The LCD screen on your machine will count down from five, until a tick appears on the screen.The filter life has been reset and your machine is ready to use.Remove the filterThe carbon filter is wrapped around the central body of your machine. Pull each of the four clips towards you to release the filter.Dispose of the filter.Install a new filterRemove your replacement filter from any packaging.Wrap the filter around the base of your machine, fit the clips in position and push each one to secure the filter.Place the outer cover and HEPA filter back in position on the base of your machine.Place the conic amplifier on your machine and rotate until it clicks securely in position.Plug in and switch on, and reset your filter life.Holding down theairflow direction button on the right hand side of the remote control for 5 seconds.machine. A clickPlace the outer cover position on the base of your machine.Looking after your machineTo always get the best performance from your Dyson air purifier, it’s important to regularly clean it and check for blockages.Cleaning your machine If your machine is dusty, wipe with damp, lint-free cloth.Check the sensor inlets on the left hand side of the conic amplifier for dust and debris.Look for dust and debris in the outer cover and in the conic e a soft brush to remove dust and debris.Don’t use detergents or polishes to clean your machine.Eye icons identify where a user should regularly check for dust and debris, in outer cover and conic amplifier. Use a soft brush on the areas highlighted to clean the purifier.。
全功能遥控器说明书

尊敬的用户:感谢您使用XXXXXXXX 的产品,请您在使用前熟悉该说明书,掌握产品的卓越功能,使该产品发挥应有的效能。
主要用途:LED 灯饰集中编码智能遥控控制系统,是一种可广泛应用于宾馆、酒店、家庭客厅、房间、办公场地的LED 灯饰进行编码智能遥控控制的智能化控制系统,该系统可对LED 灯饰进行开关、调光、定时、装饰灯色彩的集中编码遥控控制;即分别通过对各种LED 灯饰进行编码,然后用该智能控制器对各种编码的LED 灯饰进行单独遥控控制;分组遥控控制;全部同时遥控控制。
减少线路布线和日常维护,通过增加的调光和定时功能节能降耗,通过对新增颜色调节功能的灯具的调节,增加装饰灯的观赏性,该智能控制器的使用,使一种灯饰配一只遥控器改变为一只遥控器可遥控多种灯饰或电器(1-225),给操作使用灯饰带来方便。
遥控器面板说明:1、控制器位置指示功能开关,控制位置指示功能,方便夜晚寻找控制器,按位置开关按扭可开、关该功能。
2、IP-编码操作状态,指示控制器为编码操作状态,按IP 按扭可使控制器为IP 编码状态。
3、TM-定时关灯设定状态,指示控制器为定时关灯设定状态,按TM 按扭可使控制器为定时关灯设定状态。
4、SE-模似量设置状态,在各种模似量设置时该标识会点亮。
5、电池电量显示器,显示操作时的实时电池电量,电池外框显示为电池电量一级;电池外框加框内一格为电量二级;电池外框加框内二格为电量三级;全部电池标记全显为电池满。
电池电量不够时该指示器闪烁指示电池电量不够。
6、操作显示屏,显示各种操作状态的IP 地址、亮度等级、定时时间等。
7、1-0-编码按扭,设定各种编码与模拟量的输入。
8、WP-设定编码到被控制器,当编码设定好后同时按该按扭和被编灯饰的编码按扭可将编码写入被控制电器,也叫写码按扭。
9、SV-保存按扭,将所有需要保存的操作数据保存到被控制电器中。
状态RGB 9编码前两位显示编码与定时、时间控制器位置指示功能开10、< >编码加、编码减,加减灯饰IP地址编码。
戴森 吸尘器 用户手册说明书

User manualIn the boxGetting startedCharging your machine Caring for your floors Emptying your bin Cleaning your bin Washing your filterWashing your brush barS V 12 J N .00000 P N .000000-00-00 00.00.00 V E R S I O N N O .01Cleaning your tools Clearing blockagesLooking after your machineThe Dyson cordless vacuum cleaner in an upright position with the wand and cleaner head attached.Dyson micro one point five kilogramsIn the boxWand clipClips to your vacuum's wand to hold tools.A plastic clip that attaches to the wandGetting startedCharging your machineFor the best experience, we recommend fully charging your machine, and any additional batteries, as soon as you open the box and after every clean.The LED light on the end of the handle will flash when the power is running low and you need to put your battery on to charge.Connect the charger directly to the charging point on the base of the handle of your machine. You can also connect to your dock as shown in the installation instructions supplied with your dock.The LED light on the end of the handle will pulse with a blue LED light when charging, and the light will go out when fully charged.It can take up to four hours to fully charge your battery. Your battery has been designed to be left on charge.Your machine won’t operate or charge if the ambient temperature is below 5°C (41°F). This is designed to protect both the motor and battery.You can help prolong the battery life by leaving your machine to cool downbefore recharging.Caring for your floorsCheck that the underside of the cleaner head or tool is clean and free from any objects that may cause damage.Before vacuuming your flooring, rugs, and carpets, check the manufacturer’s recommended cleaning instructions.This machine is designed for use on hard floors. The brush bar on your machine can damage certain flooring. Some rug materials may fuzz if a rotating brush bar is used when vacuuming. If this happens, we recommend vacuuming without the motorised floor tool and consulting with your flooring manufacturer.Washing your filterWash your filter at least once a month to maintain the best performance. Make sure the filter is completely dry before refitting.Twist off your filterDon’t put any part of your machine in a dishwasher or use detergents, polishes or air fresheners.Turn your filter anti-clockwise and pull it away from your machine.Before washing your filter, tap it gently over a bin to remove any loose dust and debris.Wash your filterWash the outside of the filter, rubbing with your fingers to remove the dirt. Carefully rinse the inside filter, without allowing water to fill the filter. Repeat these steps until the water runs clear.Shake and dryEmpty the filter and shake firmly to remove excess water.Keep shaking until there’s no water coming from the filter.Place your filter end up, as shown.Leave your filter to dry for at least 24 hours in a well-ventilated, warm place. Don’t dry your filter in a tumble dryer, microwave or near a naked flame. Important: your filter must be completely dry before you put it back into the machine. Your machine could be damaged if used with a damp filter.Refit your filterTo refit your filter, slide it onto the handle and turn it clockwise until it clicks into place.Your filter may need more frequent washing if you vacuum fine dust,use Max mode frequently or use with the bin full.A hand holding the filter with thenarrow end pointing downwards withdroplets of water being shaken from thefilter and again, with the end pointingdownwards shaking water out.The filter is left to drywith the pleated filterend facing upwards.Filter with hand overthe open end witharrows showing ashaking motion.Filter held in uprightposition, with the widerend in the palm of ahand. Water runningfrom a tap into thenarrower end.The filter is located at therear of your machine.Holding the filterby the hard, plasticend, tap the otherend over the bin.Washing your brush barRemove brush barDon’t put any part of your machine in a dishwasher or use detergents, polishes or air fresheners.Press the cleaner head release button to remove it from the wand.Pull the brush bar off the end cap and put the end cap to one side, don’t wash it.Wash and dry brush baror dirt. Keep washing until the water runs clear.Stand the brush bar upright and leave for at least 24 hours to dry.Replace your brush barsMake sure your brush bar is completely dry before refitting.Rotate the end cap until it clips securely back into position.The cleaner head housing is not washable and should only be wiped over with a damp lint-free cloth.Cleaning your toolspolishes or air fresheners.Light pipe crevice tool Mini motorised toolClearing blockagesIf your machine detects a blockage, the motor will pulse six times. You won’t be able to use your machine until the blockage has been cleared.If you try to use your machine when the motor is pulsing, it will automatically cut out.Leave your machine to cool down before looking for blockages and, for yoursafety, take care not to touch the power button.Disconnect your machine from the charger before looking for blockages. Be careful not to touch the trigger and be aware of sharp objects.Leave your machine to cool down before looking for blockages.Don't use your machine when looking for blockages as this could cause injury.With the wand removed from the machine, check for blockages at both ends of the wand.With the bin removed, check for blockages, paying particular attention to the air inlet, located at on the right–hand side of the machine just below the point where the bin joins the main body of the machine.Turn the cleaner head over to check for obstructions on the brush bar and air inlet.runner.Remove any obstructions from the brush bar.Looking after your machineTo always get the best performance from your machine, it’s important to clean it regularly and check for blockages.Look after your machineIf your machine is dusty, wipe with a damp lint-free cloth.Check for blockages in the cleaner head, tools and main body of your machine. Wash your filter regularly and leave to dry completely.Don’t use detergents or polishes to clean your machine.Look after your batteryTo get the best performance and life from your battery, use Eco mode.Your machine won’t operate or charge if the ambient temperature is below 5°C(41°F). This is designed to protect both the motor and battery.Your serial numbersYou can register your machine using the serial number found on the bottomof your machine.You can find your serial numbers on your machine, battery and charger.Use your serial number to register.。
遥控器操作手册

第三章 遥控器操作手册§3.2 遥控器操作§3.2.1 遥控器的外形(HDR-2型)蓝牙遥控器的外形菜单键§7.1 HD8200E操作流程1、开机:打开接收机,打开遥控器。
2、连接:遥控器与主机进行自动连接,若连接不成功,检查遥控器控制的接收机号,或自动搜索,完成后按“Shift”键重新连接。
3、设置工作方式:若工作方式不能更改,请在采集设置中结束当前文件。
4、查看卫星状态及是否进入3-D;若未进入3-D请等待收星,需要约1-2分钟,直到进入3-D状态。
5、输入文件名,时段及其它设置参数,新建或修改,成功后进行以下操作。
6、若静态,采集完成后结束文件或关机。
7、动态按“·5MNO”键进入动态设置界面,进行碎部或连续测量。
8、完成后,结束文件或直接关机。
9、若十五分钟内未能进入3-D状态,则接收机自动关机以防误开接收机,并节约电能。
10、主机上指示灯的状态代表的含义如下表。
操作遥控器前的准备:1.在背面打开电池盖,按标识正确的方向放入两节1.5V七号电池。
2.按ON/ESC键开机,显示屏会显示开机画面并进入主菜单。
3.选择相应的功能,按ENTER键进入该项设置,也可按快捷键直接进入。
4.设置完毕按ON/ESC键可返回上一级菜单,或退出该项命令的执行。
5.在需要输入字符提示下,按键默认为数字和字母键,由按键次数确定。
信号指示遥控器电量接收机电量§3.3 测量操作步骤连接成功后,遥控器将控制接收机进行全部的工作,由于接收机工作状态分为静态和后差分(动态)两种,遥控器的操作也不完全相同,以下分别进行说明。
§3.3.1 静态操作步骤”和“45o仰角线地平线卫星编号经度纬度大地高解状态精度因子§3.3.2 后差分(动态)操作步骤后差分工作方式是通过使用至少一台GPS接收机作基准站,另外使用一台或多台GPS接收机作流动站,基准站通常安置在一个已知点或一个假定点的已知点上,以静态方式进行观测。
戴森 空气净化器 用户手册说明书
AC2891, AC2888AC2886, AC2880用户手册使用产品前请仔细阅读本使用说明书保留备用目录1 重要事项 2安全22 您的空气净化器4产品概述4控件概览53 使用入门7安装滤网74 使用产品8了解空气质量指示灯8打开和关闭8更改自动模式设置9更改风速10设置定时器11使用灯光开/关功能115 清洁12清洁计划12清洗产品机身12清洁空气质量感应器12请清洁预过滤网136 更换滤网14了解健康空气智能锁14更换过滤网147 故障排除168 保修与服务18订购部件或附件189 声明18电磁场 (EMF) 18回收181简体中文1 重要事项安全使用本产品之前,请仔细阅读本用户手册,并妥善保管以备日后参考。
危险• 切勿让水或任何其它液体或易燃性清洁剂进入产品,以免发生触电和/或火灾。
• 切勿用水或任何其它液体或(易燃性)清洁剂来清洁产品,以免发生触电和/或火灾。
• 切勿在产品周围喷洒杀虫剂或香水等任何可燃材料。
警告• 在将产品连接电源之前,请先检查产品所标电压与当地的供电电压是否相符。
• 如果电源软线损坏,为避免危险,必须由制造厂或其维修部或类似的专职人员来更换。
• 如果插头、电源线或产品本身受损,请勿再使用本产品。
• 本产品适合由 8 岁或以上年龄的儿童以及肢体不健全、感觉或精神上有障碍或缺乏相关经验和知识的人士使用,但前提是有人对他们使用本产品进行监督或指导,以确保他们安全使用,并且让他们明白相关的危害。
不得让儿童玩耍本产品。
请勿让儿童在无人监督的情况下清洁和保养产品。
• 请勿堵塞进风和出风口,例如不要将物体放置在出风口上或进风口前方。
• 确保异物未通过出风口进入产品内部。
警告• 本产品不能替代正常通风、日常吸尘或者在烹饪时使用的抽油烟机。
• 如果连接产品的电源插座接触不良,则产品的插头可能会变得很热。
确保所连接的电源插座接触良好。
• 一定要在干燥、稳固、平整且水平的表面上放置和使用本产品。
rc-07遥控器说明书

rc-07遥控器说明书RC-07遥控器是一款适用于各种家电的遥控器,具有多种功能,操作简单,适用范围广泛,是现代家庭必不可少的电器之一。
下面我们具体介绍一下RC-07遥控器的使用方法和功能。
一、使用方法1.开机:按下电源键,遥控器开机,准备控制可连接的家电。
2.连接家电:选择需要控制的家电类型,按照提示进行设置,然后按下连接键,系统自动扫描家电连接,连接成功后,遥控器即可控制该家电。
3.操作家电:通过遥控器上的按键,可以将操作指令发送到被控制的家电中,实现各种功能,比如开/关电器、调节音量、切换频道等功能。
4.切换模式:遥控器上有多个控制模式,用户可以根据自己的需要进行切换,比如针对不同品牌的电视机,遥控器有相应的不同控制模式。
5.节能提示:遥控器自带节能提示功能,在用户长时间不使用的情况下,会自动进入待机模式,节省能源。
二、功能介绍1.多种控制模式:该遥控器支持多种控制模式,用户可以根据家电品牌自由进行切换。
2.人性化设计:遥控器采用人性化设计,按键排列合理,操作简单,使用方便。
3.光感技术:遥控器采用先进的光感技术,灵敏度高,反应速度快,操作稳定。
4.广泛适用:该遥控器可以控制各种品牌的电视机、DVD机、空调、电风扇等家电,适用范围广泛。
5.实用功能:遥控器具有实用的功能,比如电视机控制模式、睡眠计划定时开关、音量和频道控制,能够满足用户的各种需求。
6.系统升级:该遥控器支持自动系统升级,随着家电技术的不断发展,系统也会随之升级,更新功能更加实用。
三、使用注意事项1.遥控器需要及时更换电池,避免影响操作效果。
2.使用时请注意避免水和其他化学溶液接触。
3.请勿用力敲打遥控器,避免损坏内部电路。
4.请勿将遥控器置于高温、潮湿或震动较大的环境中,避免影响正常使用。
以上就是对RC-07遥控器的详细介绍。
总的来说,该遥控器操作简单、功能强大、使用方便,是各种家电的最佳配套设备。
我们相信,随着科技的不断发展,遥控器的应用范围和功能也会越来越广泛,让我们一起期待遥控器的更多新功能和应用场景。
Dyson Zone 空气净化耳机 用户手册说明书
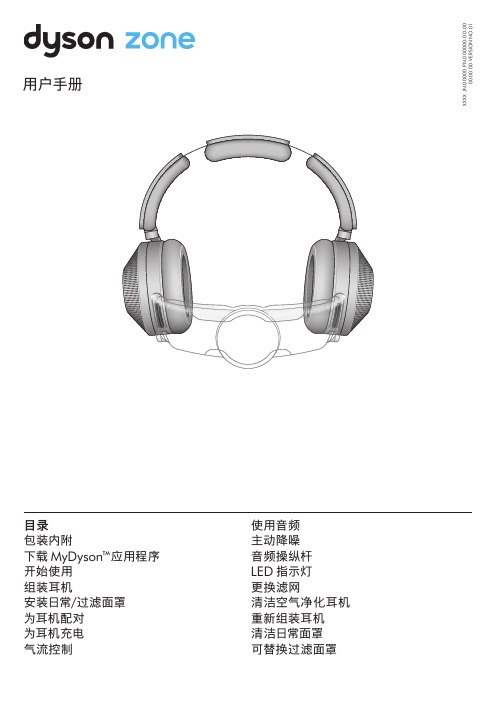
X X X X J N .00000 P N .000000-00-00 00.00.00 V E R S I O N N O .01目录包装内附下载 MyDyson™应用程序开始使用组装耳机安装日常/过滤面罩为耳机配对为耳机充电气流控制使用音频主动降噪音频操纵杆LED 指示灯更换滤网清洁空气净化耳机重新组装耳机清洁日常面罩可替换过滤面罩部分配件可能未包含在内。
您可前往戴森官方渠道购买。
USB-C 充电线飞行音频转接组件1无接触式面罩清洁刷Dyson Zone™空气净化耳机下载 MyDyson™ 应用程序作为使用体验的重要组成部分,MyDyson™应用程序让您可以随时随地控制您的 Dyson Zone™ 空气净化耳机。
现在就下载该应用程序,获取更多功能和最新信息。
从 App Store 或安卓(Andriod)应用商店下载MyDyson™应用程序。
打开应用程序,按照屏幕 上的说明创建新账号。
Apple 和 Apple 标志是 Apple Inc.在美国和其他国家的注册商标。
App Store 是 Apple Inc.在美国和其他国家的注册服务商标。
Android 和 Android 徽标是 Google Inc.的商标。
1. 鎏光金及普鲁士蓝旗舰版专属。
组装耳机插入滤网拧下两个耳罩盖。
握住滤网的边缘,将其放入耳罩中。
重新装上盖子,旋转并卡入原位。
调节耳机戴上耳机。
滑动两侧头带来调节,直至佩戴舒适。
安装无接触式面罩调节无接触式面罩调整面罩,直至佩戴舒适状态。
靠近但不接触您的面部。
气流将自动开始输送。
取下面罩外的包装,将面罩完全展开。
将面罩置于面部下方,通过磁性连接组件安装到耳罩两侧。
抬起面罩,遮盖口鼻。
x2安装日常/过滤面罩安装日常/过滤面罩将日常面罩或过滤面罩推入无接触式面罩中,确保顶部与底部安装位置均连接到位。
可重复使用的日常面罩。
可替换的过滤面罩。
这些配件可以通过戴森官方渠道再次购买。
安装无接触式面罩将无接触式面罩置于面部下方,通过磁性连接组件安装到耳罩两侧。
遥控器使用说明书
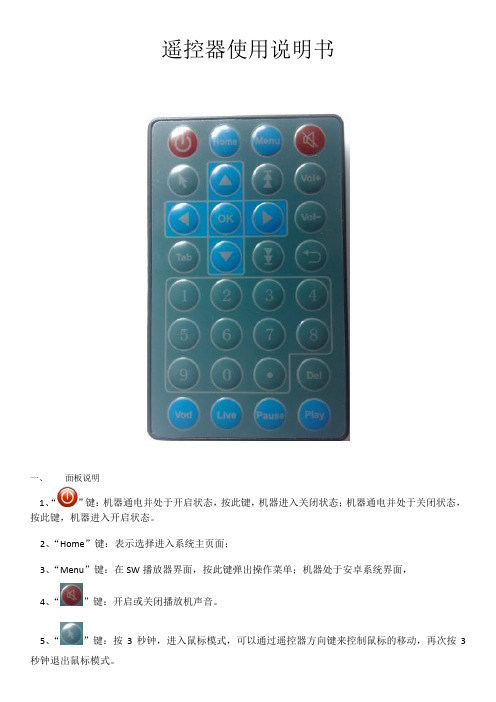
遥控器使用说明书一、面板说明1、“”键:机器通电并处于开启状态,按此键,机器进入关闭状态;机器通电并处于关闭状态,按此键,机器进入开启状态。
2、“Home”键:表示选择进入系统主页面;3、“Menu”键:在SW播放器界面,按此键弹出操作菜单;机器处于安卓系统界面,4、“”键:开启或关闭播放机声音。
5、“”键:按3秒钟,进入鼠标模式,可以通过遥控器方向键来控制鼠标的移动,再次按3秒钟退出鼠标模式。
6、“”键:方向键,可以向上移动光标;在鼠标模式可以向上移动鼠标7、“”键:方向键,可以向左移动光标;在鼠标模式可以向左移动鼠标8、“”键:方向键,可以向右移动光标;在鼠标模式可以向右移动鼠标9、“”键:方向键,可以向下移动光标;在鼠标模式可以向下移动鼠标10、“”键:此按键无功能11、“Vol+”键:调大播放机音量12、“OK”键:确定按钮13、“Vol-”键:调小音量14、“Tab”键:切换光标位置15、“”键:此按键无功能16、“”键:在SW播放器界面,按此键弹出操作菜单;安卓系统界面,返回上一级界面。
17、“1”键:输入数字1。
18、“2”键:输入数字219、“3”键:输入数字320、“4”键:输入数字421、“5”键:输入数字522、“6”键:输入数字623、“7”键:输入数字724、“8”键:输入数字825、“9”键:输入数字926、“0”键:输入数字027、“.”键:输入符号“.”28、“Del”键:删除文件或字符29、“Vod”键:此按键无功能30、“Live”键:此按键无功能31、“Pause”键:此按键无功能32、“Play”键:此按键无功能方向键包含:“”键、“”键、“”键和“”键。
数字键包含:“1”“2”“3”“4”“5”“6”“7”“8”“9”“0”“.”二、常用操作1,如何退出SW播放器按“Menu”键,弹出选择菜单,按向下方向键“”到“退出”,按“OK”键退出SW播放器。
2,如何设置网络连接2.1设置有线网络连接将RJ45网线连接播放机的有线网络插孔和网络交换机网络接口,播放机会自动识别有线网络并获取相应的IP地址。
达苑室内空气条件器可选瘦胖遥控器操作手册说明书
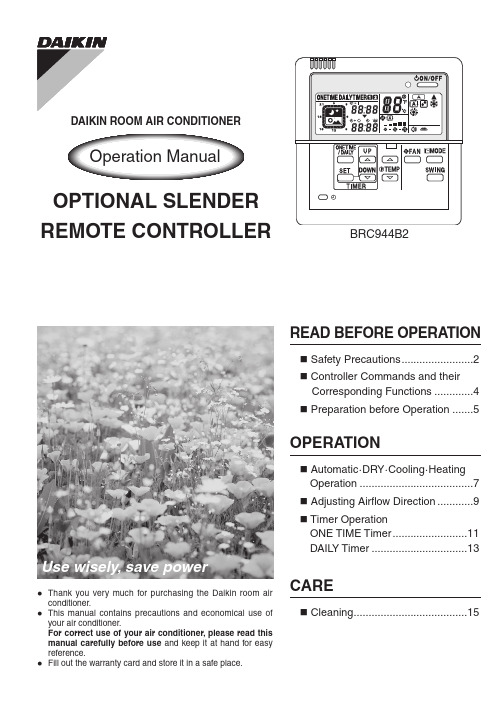
BRC944B2DAIKIN ROOM AIR CONDITIONEROperation ManualOPTIONAL SLENDER REMOTE CONTROLLERThank you very much for purchasing the Daikin room air conditioner.This manual contains precautions and economical use of your air conditioner.For correct use of your air conditioner, please read this manual carefully before use and keep it at hand for easy reference.Fill out the warranty card and store it in a safe place.Use wisely, save powerSafety Precautions ........................2 Controller Commands and their Corresponding Functions .............4 Preparation before Operation . (5)READ BEFORE OPERATIONAutomatic ·D RY ·C ooling ·H eating Operation ......................................7 Adjusting Airflow Direction ............9 Timer OperationONE TIME Timer .........................11DAIL Y Timer .. (13)OPERATIONCleaning (15)CARE2Safety Precautions•Keep this manual where the operator can easily find it.•Read this manual carefully before starting the unit.•For safety reason, the operator must read the following cautions carefully.•This manual classifies precautions into DANGER, WARNING and CAUTION. Be sure to follow all precautions below: they are all important for ensuring safety.DANGER•For refrigerant leakage, consult your dealer.Refrigerant gas is heavier than air and replaces oxygen. A massive leak could lead to oxygen depletion, especially in basements, and an asphyxiation hazard could occur leading to serious injury or death.•Refrigerant gas may produce a toxic gas if it comes in contact with fire such as from a fan heater, stove or cooking device. Exposure to this gas could cause severe injury or death.•Any abnormalities in the operation of the air conditioner such as smoke or fire could result in severe injury or death. Turn off the power and contact your dealer immediately for instructions.•Do not install the unit in an area where flammable materials are present due to risk of explosion resulting in serious injury or death.•If equipment utilizing a burner is used in the same room as the air conditioner, there is the danger of oxygen deficiency which could lead to an asphyxiation hazard resulting in serious injury or death. Be sure to ventilate the room sufficiently to avoid this hazard.•Safely dispose of the packing materials.Packing materials, such as nails and other metal or wooden parts, may cause stabs or other injuries. Tear apart and throw away plastic packaging bags so that children will not play with them. Children playingwith plastic bags face the danger of death by suffocation.WARNING•It is not good for health to expose your body to the air flow for a long time.•Do not put your finger, a rod or other objects into the air outlet or inlet. As the fan is rotating at a high speed and could, cause injury. Always keep small children away from the unit during operation.•Do not attempt to repair, relocate, modify or reinstall the air conditioner by yourself. Incorrect work or modifications could cause electric shocks, fire or other damage.For repairs and reinstallation, consult your Daikin dealer for advice and information. Never do.Be sure to follow the instructions.Be sure to ground the air conditioner.Never cause the air conditioner (including the remote controller) to get wet.Never touch the air conditioner (including the remote controller) with a wet hand.CAUTION•The air conditioner must be grounded to the earth. Improper grounding may result in electricshocks. Do not connect the earth grounding wire to a gas pipe, water pipe, lightning rod, or atelephone ground line. Follow all local and state electrical codes.authorized dealer if relocation is necessary for moving or remodeling.3Controller Commands and their Corresponding Functions45Preparation before OperationChecking the powerIf nothing appears on the remote controller's display, turn on the circuit breaker.Setting the current time1231Celsius temperature is indicated.Preparation before Operation2the Fahrenheit temperature isindicated.Setting Temperature Indication changeTemperature indication can be changed between Celsius and Fahrenheit before use.1Each time the button is pressed, the modechanges as follows.The system does not have the FAN mode.Automatic ·D RY ·C ooling ·H eating Operation2.The run indicator lamp lights up.Select your desired operation mode.Once preset, the system can get restarted in the same operation mode.Cooling onlymodelHeat pumpmodelThe run indicator lamp goes out.To adjust the temperature and airflow rate:To adjust the airflow direction:( page 9)When the unit runs in the cooling or heating mode at a low airflow rate, the cooling or heating effect may be insufficient.Adjusting Airflow Direction1 .Each time the button is pressed, the airflow direction louvers change their movement.Adjust the airflow direction for maximum comfort.W all Mounted Types (without horizontal swing function)The horizontal airflow direction louvers move up and down.The louvers stop just when the button is pressed.W all Mounted Type (with horizontal swing function)The horizontal airflow direction louversmove up and down.The horizontal airflow direction louversstop just when the button is pressed.Then the vertical ones start movingright and left.The vertical airflow direction louversstop just when the button is pressed.The vertical and horizontal louvers cannot move at the same time.D uct Connected Type (without swing function)This function cannot be used.Timer OperationTo select the ONE TIME timermode:1PEach time the button is pressed,the modes change as follows.The Timer Operation feature automatically turns off operation when you go to sleep and turns it back on when you wake up.Use the DAIL Y Timer mode on weekdays, and the ONE TIME timer mode on weekends.To cancel the timer settings:1(Timer settings displayed) The timer lamp lights up.The ONE TIME orDAIL Y TIMER disappearsfrom the display, and thetimer lamp goes out too.1P to select the ONE TIME timer.2P3PONE TIME timerOnce the timer has been activated and then deactivated, it is in the OFF mode.The ON or OFF timers can be programmed.light up.ONE TIMEEach time the button is pressed,the setting changes in a 10-minute increment or decrement.Hold the button down to advancequickly.When the ON timer is not used,save the setting as4P5P6PBoth of the ON and OFF timecannot be set assave the setting as .Timer OperationTo select the DAIL 1 P change as follows.1 The timer lamp lights up.(Timer settings displayed)1to select the DAIL Y timer.2Make the ON and OFF time settings. T ake the steps from to .Program example: 8:00 ~ 10:00, and 18:00 ~ 23:00DAIL Y timerAfter programming, the system starts and stops each day at the preset times. T wo pairs of time settings can be programmed.(Example: 8:00~10:00, and 18:00 ~ 23:00)lights up.3P Y timer is now programmed.CleaningM08B096(0807)3P202922-2B AKHTTwo-dimensional bar code is a code for manufacturing.。
戴森手持式吸尘器说明书
TO REDUCE THE RISK OF FIRE, ELECTRIC SHOCK, OR INJURY: 1. Do not charge the Dyson handheld vacuum outdoors, in a bathroom or within 10 feet of a pool. 2. Do not use outdoors or on wet surfaces. 3. Do not allow to be used as a toy. Close attention is necessary when used by or near children. 4. Use only as described in this manual. Use only Dyson recommended accessories and replacement parts. 5. Do not use with damaged cable or charger. If the Dyson handheld vacuum is not working as it should, has been
OPERATING MANUAL 사용설명서 操作手册 操作手冊
ASSEMBLY 조립 组装 組裝
clik
2
WASH FILTER Wash filter with cold water at least every month.
month
개월 个月
필터 청소 최소한 한 달에 한 번 찬물로
個月
필터를 세척해 주십시오.
SAVE THESE INSTRUCTIONS
THIS HБайду номын сангаасNDHELD VACUUM IS INTENDED FOR DOMESTIC HOUSEHOLD AND CAR USE ONLY.
戴森 DCO7 手持式吸尘器说明书
Page 2 4 6 8
10 12 14 16
Dyson Helpline contact us on 1-866-693-9766
3
Assembling your DCO7
Box contents
Wand Hose
1
2
Stair tool Brush tool
Crevice tool
Animal turbo tool Supplied with certain models only, or available as an accessory.
Using your DCO7
1
2
Transporting your Dyson
To move the machine from room to room, ensure it is upright, with the cord stored on the cord winders and the wand securely in place. Tilt back on the rear wheels and push forward.
A
B
C
D
E How to clean your tools The brush tool, stair tool and crevice tool may be washed in warm water with a detergent. Rinse and air dry thoroughly before using. You may wipe the outside of the floor tool or turbo tool with a damp cloth, but do not submerge in water. Do not attempt to clean any tools when they are attached to the machine.
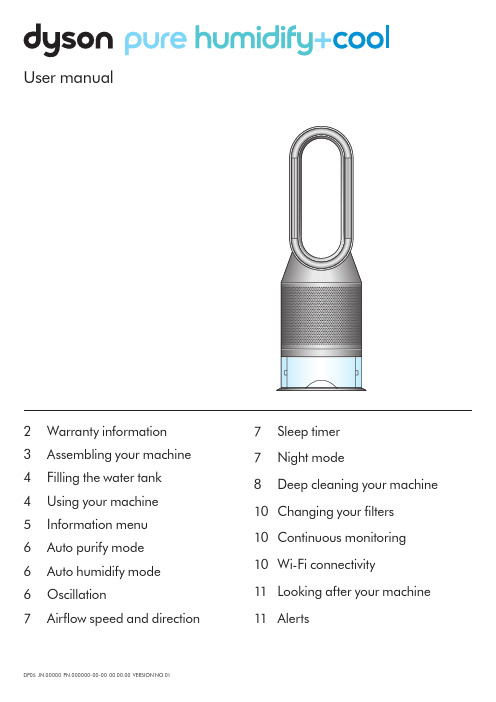
戴森 空气净化加湿器 使用说明书
Stand-by Auto purify mode
Airflow speed
Oscillation Sleep timer
Information menu Auto humidify mode
Humidity control
Airflow direction Night mode
Assembling your machine
Outer cover release buttons Two push down buttons located either side of the main body of the machine. Outer cover
The mesh cover on the bottom of the machine is in two parts, front and back.
Continuous monitoring Continuous monitoring is turned off by default. Once turned on, it will always be active until you turn it off again.
With continuous monitoring turned on, your Dyson purifier humidifier fan will gather air quality, temperature and humidity information, which is displayed on the LCD screen.
The remote control with the information button on the top right.
Indoor air quality - 12 seconds Monitor the current air quality with a graph showing the last 12 seconds of data.
戴森(Dixon)筛子入线、侧入口、侧出口和双筛子操作手册说明书
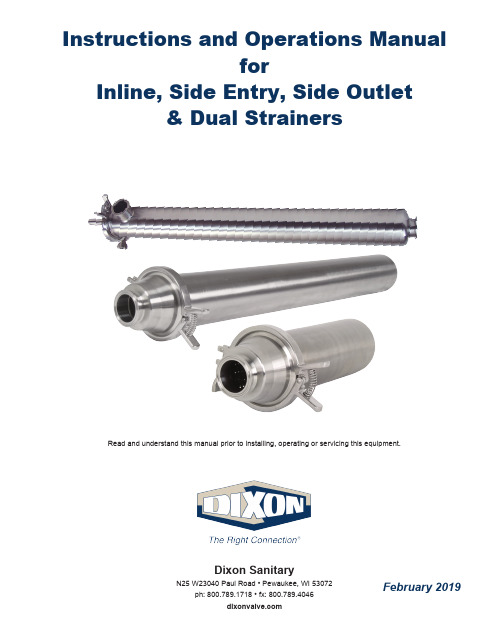
Instructions and Operations ManualforInline, Side Entry, Side Outlet& Dual StrainersDixon SanitaryN25 W23040 Paul Road • Pewaukee, WI 53072ph: 800.789.1718 • fx: 800.789.4046 Read and understand this manual prior to installing, operating or servicing this equipment.February 2019Table of ContentsSafety (3)Care of Stainless Steel (4)Technical Specifications ....................................................................................................................................................................5-6 Installation and Start-Up .. (7)General Maintenance (8)Changing Filter Media .....................................................................................................................................................................9-15 Inline ............................................................................................................................................................................................10-11 Disassembly . (10)Assembly (10)BOM (11)Side Entry ......................................................................................................................................................................................12-13 Disassembly . (12)Assembly (12)BOM (13)Side Outlet .....................................................................................................................................................................................14-15 Disassembly . (14)Assembly (14)BOM (15)Dimensions (16)Inline (16)Side Entry & Side Outlet (16)Warranty (17)800.789.17182Strainer I & O ManualSafety InformationDo’s and Don’ts•Do read and understand these instructions before installing or using the strainer.•Do use Dixon spare parts when replacing any components of the strainer.•Do Not attempt to service the strainer while under pressure.•Do Not place the strainer in an application where the service ratings are exceeded.•Do Not attempt to modify the strainer assembly as it may compromise the integrity of the assembly and will void all warranties.Safety Precautions When Installing Strainer•Do relieve product line pressure before attempting to install strainer assembly.•Do check the distance between the clamp ferrules to assure there is proper clearance for the strainer assembly.•Do Not install a damaged filter or strainer.•Do Not install strainer between damaged clamp ferrules.•Do Not install strainer between tubing that is significantly out of alignment.Safety Precautions When Strainer is in Operation•Do monitor the strainer assembly for any signs of leaks.•Do check all clamp assemblies often to ensure that they have not loosened from any excessive vibration.•Do check the pressure on either side of the strainer to monitor for any possible blockages.•Do Not attempt to loosen any clamp assemblies while the strainer is in operation.•Do Not attempt to perform any type of service or adjustment to the strainer during operation.Safety Precautions When Servicing the Strainer•Do drain piping run as much as possible.•Do vent line to relieve any pressure.•Do secure necessary lifting equipment to strainer assembly if necessary.•Do remove line clamps first before removing strainer body clamp.•D o use caution and wear protective clothing if strainer has been used in applications using acids or other chemicals that may be harmful.Strainer I & O Manual800.789.17183Care of Stainless SteelThe stainless steel components in Dixon Sanitary equipment are machined, welded and assembled by skilled craftsmen using manufacturing methods that preserve the corrosion-resistant quality of the stainless steel.Retention of corrosion-resistant qualities under processing conditions requires regular attention to the precautions listed below.1.R egularly check all electrical devices connected to the equipment for stray currents caused by improper grounding, damagedinsulation or other defects. Corrosion: Pitting often occurs when stray currents come in contact with moist stainless steel.2.N ever leave rubber mats, fittings, wrenches, etc. in contact with stainless steel. Corrosion: Pitting or galvanic action. Objectsretard complete drying, preventing air from reforming the protective oxide film. Galvanic corrosion occurs when two dissimilar metals touch when wet.3.I mmediately rinse equipment after use with warm water until the rinse water is clear. Clean the equipment (manual or CIP)as soon as possible after rinsing. Corrosion: discoloration, deposits, pitting. Product deposits often cause pitting beneath the particles.4.U se only recommended cleaning compounds. Purchase chemicals from reputable and responsible chemical manufacturersfamiliar with stainless steel processing equipment, they continuously check the effects of their products on stainless steel.5.U se cleaning chemicals exactly as specified by the manufacturer. Do not use excessive concentrations, temperatures or exposuretimes. Corrosion: Pitting, discoloration, stress cracks. Permanent damage often occurs from excessive chemical concentrations, temperatures or exposure times.6.F or manual cleaning, use only soft non-metallic brushes, sponges or pads. Brush with the grain on polished surfaces, avoidscratching the surface. Corrosion: Pitting, scratches. Metal brushes or sponges will scratch the surface and promote corrosion over a period of time. Metal particles allowed to remain on a stainless steel surface will cause pitting.7.U se chemical bactericides exactly as prescribed by the chemical manufacturer in concurrence with local health authority. Usethe lowest permissible concentration, temperature and exposure time possible. Flush immediately after bacterial treatment. In no case should the solution be in contact with stainless steel more then 20 minutes. Corrosion: Protective film destroyed. Chlorine and other halogen bactericides can destroy the protective film. A few degrees increase in temperature greatly increases chemical activity and accelerates corrosion.8.R egularly inspect the joints in pipelines. Be sure all connections are tight fitting without binding. Corrosion: Crevice corrosion.Small crevices caused by improperly seated gaskets will promote crevice corrosion. Stainless steel under stress will develop stress cracking especially in the presence of bactericides containing chlorine.9.R egularly inspect equipment for surface corrosion (i.e. pitting deposits, stress cracks, etc.). If deposit or color corrosion isdetected, remove it immediately using mild scouring powder and detergents. Rinse thoroughly and allow to air dry. Review production and cleaning procedures to determine the cause. Note: If corrosion is not removed, the protective film cannot be restored and corrosion will continue at an accelerated rate.800.789.17184Strainer I & O ManualTechnical SpecificationsSpecifications:Materials:•Product wetted steel parts: AISI 316L Stainless Steel•Product wetted elastomers: Buna (Standard)•Optional wetted elastomers: FKM•Non-Wetted components: CF8•Finish: 32 Ra on product contact surfacesStrainer Back Up Tubes:•Full flow coarse strainer tubes•1/4" perforations standard•1/8” perforations availableFilters:•Full flow filters•Micron rating from 40 to 800 (others available upon request)•Polyester, Cotton cheesecloth, and Nylon mesh filter material availableMesh Over Screens:•Full flow fine and medium over screens (not 3A compliant)•Square mesh 20 to 100Connections:•Clamp (Standard)•Bevel Seat, I-Line, and Weld ends availableSizes:•1" to 3"Types:• Inline• Short• Long•Side Entry• Long•Side Outlet• LongStrainer I & O Manual800.789.171856Strainer I & O Manual800.789.1718Technical SpecificationsPressure Drop Chart - Short StrainersPressure Drop Chart - Long Strainers7Strainer I & O Manual 800.789.1718Installation & Start UpInline, Side Entry and Side Outlet1. Be sure adequate line supports exist to prevent stress on fittings and strainer body.2. Install supports approximately every ten feet on either side of the strainer assembly.3. A ll Dixon strainer assemblies operate in any position. However, to maintain 3A certification, the unit must be installed in thevertical position.4. E nsure that the strainer assembly is in the proper orientation so that the inlet and outlet are configured according to the markingson the strainer body.5. Align the filter, strainer and gaskets such that they are centered with the clamp ferrule faces.6. C lamp ends must be parallel in all planes and on center line. CAUTION: Failure to ensure line ends are centered and parallel inall planes, could result in leaking from the valve or strainer assembly.7. Tighten all standard clamp assemblies to 25 in-lbs and high pressure bolted clamps to 20 ft-lbs.8. Once strainer assembly is installed, cycle water through the unit to ensure there are no leaks from any of the connection points.Dual Strainers1. W hen installing a dual strainer assembly with ball or butterfly valves, install supports on both sides of the valves as close to theconnections as possible.2. B efore starting product flow through the dual strainer unit, ensure that the valves are in the correct position. On manual ballvalves, check the flow path machined in the valve stem to ensure that the valves are positioned so that product is only flowing through a single strainer at any one time. For actuated valves, check the indicator beacon located on top of the actuator.3. For proper flow direction and orientation, please refer to the following diagram.4. Install supports approximately every ten feet on either side of the strainer assembly.5. A ll Dixon strainer assemblies operate in any position. However, to maintain 3A certification, the unit must be installed in thevertical position.6. E nsure that the strainer assembly is in the proper orientation so that the inlet and outlet are configured according to the markingson the strainer body.7. Align the filter, strainer and gaskets such that they are centered with the clamp ferrule faces.8. C lamp ends must be parallel in all planes and on center line. CAUTION: Failure to ensure line ends are centered and parallel inall planes, could result in leaking from the valve or strainer assembly.9. Tighten all standard clamp assemblies to 25 in-lbs and high pressure bolted clamps to 20 ft-lbs.10. Once strainer assembly is installed, cycle water through the unit to ensure there are no leaks from any of the connection points.OutletInletPos. 1Pos. 2F l o w D i r e c t i o n F l o w D i r e c t i onOutletGeneral Maintenance1. WARNING: Prior to loosening the ferrule clamps, be sure to drain piping as much as possible to prevent injury.2. Vent line to relieve any pressure that could potentially be built up in the strainer housing.3. Loosen clamps to decompress valve gasket seals.4. Secure any necessary lifting equipment required to remove the strainer from the line.5. Completely remove clamps from the strainer ends and remove the unit from between the clamp ferrules.6. Check all wetted components for any sign of damage that could have resulted from large particulate or water hammer.7. F or dual strainer units, inspect valves for any signs of damage and replace wetted components as necessary. Refer to Dixon ball and butterfly manuals for instructions.8. Remove and replace as necessary the filter bag or mesh over screen.9. T he strainer back up tube should not need to be replaced unless significant damage has occurred as a result of abnormally harsh media.800.789.17188Strainer I & O ManualChanging Filter Media1. W hen installing a filter sock or over screen, save the original packaging. This will aid in identifying your filter media type when reordering.2. Relieve all pressure inside the system and make certain the filtration system is drained of all liquid.3. R efer to the disassembly section of the manual for procedures on removing the back-up tube and filter bag or over screen assembly.4. I f you are using a filter bag (8), remove retaining rings (9) from either end of the strainer back-up tube (4). Check the retaining rings for any sign of wear or damage, and replace as necessary.5. I f you are using an over screen (7), slide the over screen off of the strainer back-up tube (4) and clean or replace as necessary.6. I nsert a new filter bag (8) or over screen (7) over the strainer back-up tube (4). If using a filter bag, insert the retainer rings (9) inside each end of the strainer back-up tube to hold the filter bag in place.7. Refer to the Assembly section of the manual for reassembly of the strainer unit.Strainer I & O Manual800.789.17189InlineDisassembly1. R emove the clamp (10) and lift off the outlet assembly (1). Note: Apply pressure to the outlet assembly when you remove the clamp, as the spring (2) will force the outlet assembly away from the body (6) when the clamp is removed.2. R emove the gasket (3) and inspect it for damage or wear.3. R emove the spring (2) and the distributor cap (5).4. R emove the back-up tube (4) and the filter bag (8) or mesh over screen (7).5. C hange the mesh over screen (7) or filter bag (8) if necessary. Refer to Changing The Filter Media section of the manual for specific instructions.Assembly1. E nsure that the filter media is in place on the strainer back-up tube (4). Refer to the Changing The Filter Media section of the manual for specific instructions.2. P lace the gasket (3) on the outlet assembly (1).3. P lace the strainer back up tube (4) in the outlet assembly (1).4. P ress the distributor cap (5) onto the strainer back-up tube (4).5. P ress the spring (2) onto the outside diameter of the distributor ca p.6. Press the strainer inlet (6) over the entire assembly and compress it to the outlet assembly (1).7. A ttach and tighten the squeeze clamp (10) to 25 in-lbs.800.789.171810Strainer I & O Manual11Strainer I & O Manual800.789.1718InlineBill of MaterialsItem #Description1" Part #1½" Part #2" Part #2½" Part #3" Part #Material Qty 1Strainer End Cap (Short)BS-01-R100BS-01-R150BS-01-R200BS-01-R250BS-01-R300316L1Strainer End Cap (Long)--BS-01-R151BS-01-R201--BS-01-R30112Strainer Spring BS-02-R100-200BS-02-R250-300BS-02-R250-30013Gasket40MP-U40040MPV-U40040MPV-U400Buna 14Back-Up Tube ⅛" Perforations (Short)BS-1418-R100200BS-1418-R250300BS-1418-R250300316L1Back-Up Tube ⅛" Perforations (Long)BS-2418-R100200BS-2418-R250300BS-2418-R2503001Back-Up Tube ¼" Perforations (Short)BS1425-R100200BS-1425-R250300BS-1425-R2503001Back-Up Tube ¼" Perforations (Long)BS-2425-R100200BS-2425-R250300BS-2425-R25030015Distributor Cap BS-05-R100-200BS-05-R250-300BS-05-R250-30016Strainer Inlet (Short)BS-16-R100BS-16-R150BS-16-R200BS-16-R250BS-16-R3001Strainer Inlet (Long)--BS-26-R150BS-26-R200--BS-26-R30017Mesh Over Screen (Short/Long)Contact Dixon Sanitary For Options --18Filter Bag (Short/Long)Contact Dixon Sanitary For Options--19Retaining Ring BS-09-U100-200BS-09-U250-300Buna 210Squeeze Clamp13MHHM-Q40013MHHMV-Q400CF81Side EntryDisassembly1. Remove the clamp (10) and lift off the end cap with handle (1).2. Remove the gasket (3) and inspect it for damage or wear.3. Remove the spring (2) and the distributor cap (5).4. Remove the back-up tube (4) the filter bag (8) or the mesh over screen (7).5. C hange the mesh over screen (7) or filter bag (8) if necessary. Refer to Changing The Filter Media section of the manual for specific instructions.Assembly1. E nsure that the filter media is in place on the strainer back-up tube (4). Refer to the Changing The Filter Media section of the manual for specific instructions.2. I nsert the strainer back-up tube (4) inside the strainer body (6) ensuring that the bottom of the back-up tube is seated firmly against the bottom of the strainer body.3. I nsert the distributor cap (5) inside the strainer body (6) ensuring that the cap is seated firmly against the top of the strainer back-up tube (4). Note: The opening on the handle of the distributor cap should be facing the opening of the inlet port so that the port is not blocked.4. I nsert the spring (2) inside the strainer body (6) ensuring that the spring is seated firmly against the ridge on the distributor cap (5).5. Place the gasket (3) on the strainer body (6).6. Compress the end cap with handle (1) onto the strainer body (6) and attach and tighten the squeeze clamp (10) to 25 in-lbs.800.789.171812Strainer I & O Manual13Strainer I & O Manual 800.789.1718Side EntryBill of MaterialsItem #Description1½" Part #2" Part #3" Part #Material Qty 1End Cap With Handle BS-31-R100-200BS-31-R250-300316L 12Strainer Spring BS-32-R100-200BS-32-R250-30013Gasket40MP-U40040MPV-U400Buna14Back-Up Tube ⅛" Perforations BS-2418-R100200BS-2418-R250300316L1Back-Up Tube ¼" Perforations BS-2425-R100200BS-2425-R25030015Distributor Cap BS-35-R100-200BS-35-R250-30016Strainer Body BS-36-R150BS-36-R200BS-36-R30017Mesh Over Screen Contact Dixon Sanitary For Options --18Filter Bag Contact Dixon Sanitary For Options --19Retaining Ring BS-09-U100-200BS-09-U250-300Buna 210Squeeze Clamp13MHHM-Q40013MHHV-Q400CF81Side OutletDisassembly1. Remove the clamp (10) and lift off the end cap with handle (1).2. Remove the gasket (3) and inspect it for damage or wear.3. Remove the stand-off tube (11) and the PTFE retainer ring (12).4. Remove the back-up tube (4) and the filter bag (8) or mesh over screen (7).5. C hange the mesh over screen (7) or filter bag (8) if necessary. Refer to Changing The Filter Media section of the manual forspecific instructions.Assembly1. E nsure that the filter media is in place on the strainer back-up tube (4). Refer to the Changing The Filter Media section of themanual for specific instructions.2. P lace the distributor cap (5) on the strainer back-up tube (4) ensuring that the cap is seated firmly against the back-up tube.3. P lace the spring (2) on the distributor cap (5) making sure that the spring is seated firmly on the ridge of the cap.4. I nsert the back-up tube (4), distributor cap (5), and spring (2) assembly into the strainer body (6).5. P ress the PTFE retainer ring (12) firmly into place on top of the back-up tube assembly.6. P lace the stand-off tube (11) inside the strainer body (6) with the three legs facing toward the retainer ring (12).7. Place the gasket (3) on the strainer body (6).8. Compress the end cap with handle (1) onto the strainer body and attach and tighten the squeeze clamp (10) to 25 in-lbs.800.789.171814Strainer I & O Manual15Strainer I & O Manual800.789.1718Side OutletBill of MaterialsItem #Description1½" Part #2" Part #3" Part #Material Qty 1End Cap With Handle BS-31-R100-200BS-31-R250-300316L 12Strainer Spring BS-02-R100-200BS-02-R250-30013Gasket40MP-U40040MPV-U400Buna14Back-Up Tube ⅛" Perforations BS-1418-R100200BS-2418-R250300316L1Back-Up Tube ¼" Perforations BS-1425-R100200BS-2425-R25030015Distributor Cap BS-05-R100-200BS-05-R250-30016Strainer Body BS-36-R150BS-36-R200BS-36-R30017Mesh Over Screen Contact Dixon Sanitary For Options --18Filter Bag Contact Dixon Sanitary For Options --19Retaining Ring BS-09-U100-200BS-09-U250-300Buna210Squeeze Clamp 13MHHM-Q40013MHHV-Q400CF8111Stand-Off Tube BS-411-R100-200BS-411-R250-300316L 112Retainer RingBS-412-R100-200BS-412-R250-300PTFE116Strainer I & O Manual800.789.1718DimensionsShort and Long InlineSide Entry and Side OutletLimited WarrantyDIXON VALVE AND COUPLING COMPANY (herein called "Dixon") warrants the products described herein, and manufactured by Dixon to be free from defects in material and workmanship for a period of one (1) year from date of shipment by Dixon under normal use and service. It's sole obligation under this warranty being limited to repairing or replacing, as hereinafter provided, at its option any product found to Dixon's satisfaction to be defective upon examination by it, provided that such product shall be returned for inspection to Dixon's factory within three (3) months after discovery of the defect. The repair or replacement of defective products will be made without charge for parts or labor. This warranty shall not apply to: (a) parts or products not manufactured by Dixon,the warranty of such items being limited to the actual warranty extended to Dixon by its supplier; (b) any product that has been subject to abuse, negligence, accident, or misapplication; (c) any product altered or repaired by others than Dixon; and (d) to normal maintenance services and the replacement of service items (such as washers, gaskets and lubricants) made in connection with such services. To the extent permitted by law, this limited warranty shall extend only to the buyer and any other person reasonably expected to use or consume the goods who is injured in person by any breach of the warranty. No action may be brought against Dixon for an alleged breach of warranty unless such action is instituted within one (1) year from the date the cause of action accrues. This limited warranty shall be construed and enforced to the fullest extent allowable by applicable law.Other than the obligation of Dixon set forth herein, Dixon disclaims all warranties, express or implied, including but not limited to any implied warranties of merchantability or fitness for a particular purpose, and any other obligation or liability. The foregoing constitutes Dixon's sole obligation with respect to damages, whether direct, incidental or consequential, resulting from the use or performance of the product.Some products and sizes may be discontinued when stock is depleted, or may require a minimum quantity for ordering.Strainer I & O Manual800.789.171817N25 W23040 Paul Road • Pewaukee, WI 53072Customer Service: 800.789.1718Fax: 800.789.4046Dixon Sanitary© 2015 DVCCStrainer I & O Manual_inhouse1015DixonCustomer ServiceDixon ™, founded in 1916, is a premier manufacturer and supplier of hose couplings, valves, dry-disconnects, swivels, and other fluid transfer and control products. The company’s global reach includes a wide range of products for numerous industries including petroleum exploration, refining,transportation, chemical processing, food & beverage, steel, fire protection, construction, mining and manufacturing. Dixon ™’s strategic objective is to create solutions that make products safer, leak-free, longer lasting, and always available.。
Keystone 05-07 PHA 窗式空调器说明书

- DO NOT share a single outlet with other electrical appliances. Improper power supply can cause fire or electrical shock.
Caution: Risk of fire/flammable materials (Required for R32/R290 units only)
- DO NOT install the unit in a location that may be exposed to combustible gas, as this could cause a fire.
- The unit has wheels to facilitate movement. Make sure not to use the wheels on thick carpet or to roll over objects, as this could cause the unit to fall.
戴森无人机说明书

戴森无人机说明书一、引言戴森无人机是一款高性能、多功能的无人机产品,具备先进的飞行控制系统、高清摄像功能以及智能避障技术,为用户提供了全新的飞行体验。
本说明书将详细介绍戴森无人机的组装、操作、安全注意事项等内容,帮助用户快速上手并安全地使用该产品。
二、组装步骤1. 将无人机主体、遥控器、电池、螺旋桨等配件准备齐全。
2. 打开无人机主体的电池仓盖,将电池插入相应插槽并确保连接牢固。
3. 安装螺旋桨:根据无人机主体上的螺旋桨安装指示,将螺旋桨正确安装在相应位置上,并确保旋转自如。
4. 将遥控器电池仓盖打开,安装电池并确保连接稳固。
5. 打开遥控器电源,待指示灯亮起后,将遥控器与无人机主体进行配对。
三、操作说明1. 开机与关机:- 开机:将无人机主体放在平稳的地面上,按下开机按钮并保持按压,等待指示灯亮起后松开按钮。
- 关机:将遥控器和无人机主体放置在平稳的地面上,按住无人机主体上方的关机按钮并保持按压,等待指示灯熄灭后松开按钮。
2. 起飞与降落:- 起飞:将遥控器左上角的油门杆向上推动,无人机会自动起飞并悬停在空中。
- 降落:将遥控器左上角的油门杆向下推动,无人机会缓慢降落到地面。
3. 前进与后退:- 前进:将遥控器右手边的摇杆向上推动,无人机会向前飞行。
- 后退:将遥控器右手边的摇杆向下推动,无人机会向后飞行。
4. 左移与右移:- 左移:将遥控器右手边的摇杆向左推动,无人机会向左移动。
- 右移:将遥控器右手边的摇杆向右推动,无人机会向右移动。
5. 悬停与急停:- 悬停:将遥控器左手边的摇杆推动到中间位置,无人机会在当前位置悬停不动。
- 急停:将遥控器左下角的急停按钮按下,无人机会立即停止飞行并自动降落。
6. 拍摄与录像:- 拍摄照片:将遥控器上的拍照按钮按下,无人机会拍摄当前画面。
- 录制视频:将遥控器上的录像按钮按下,无人机会开始录制视频,再次按下停止录制。
四、安全注意事项1. 使用前请确保阅读并理解本说明书,并按照说明正确操作。
戴森加湿空气净化器说明书
Indoor air quality – 24hrs Monitor the current air quality with a graph showing the last 24 hours of data.
Indoor humidity The amount of water vapor in the air, shown as a percentage.
Thank you for choosing to buy a Dyson purifying humidifying fan.
Set up your machine quickly, with step-by-step support
– Personalize your settings for maximum comfort.
Before you remove the water tank, make sure humidification modes are turned off.
Push down the water tank release buttons on the sides of your machine.
Clik
Use both hands to lift your Dyson purifying humidifying fan out of the box, by its base.
Don’t lift it out by the amplifier loop.
Push down the Shroud release buttons on both sides of your machine to release the shrouds.
Push down the Shroud release buttons on both sides of your machine to release the shrouds.
- 1、下载文档前请自行甄别文档内容的完整性,平台不提供额外的编辑、内容补充、找答案等附加服务。
- 2、"仅部分预览"的文档,不可在线预览部分如存在完整性等问题,可反馈申请退款(可完整预览的文档不适用该条件!)。
- 3、如文档侵犯您的权益,请联系客服反馈,我们会尽快为您处理(人工客服工作时间:9:00-18:30)。
戴森PH07遥控器说明
进入手机,找到“万能遥控器”,并点击。
在万能遥控器首页,点击左上角“+”。
进入“红外遥控器”页面后,点击“风扇”。
在“选择风扇品牌”页面,点击右侧品牌首字母“D”可以快速定位到首字母为“D”的页面(或向上滑屏来查找)。
找到“戴森”后,点击它。
在“添加风扇遥控器”页面,点击电源按钮图标,之后根据提示来操作即可轻松地添加上戴森电风遥控器,并显示在首页上。
遥控器添加好后,就像平时用遥控器一样来控制风扇了。
END注意事项手机需要有红外功能,且安装有万能遥控器。
1、使用戴森吸尘器前,应仔细看一遍说明书,然后对照说明书检查一下它的各种附件是否齐全,再按说明书上的步骤和方法将吸尘器各部分安装好。
每次连续使用时间尽量不要超过2小时,以免电机过热而烧毁。
2、启动前,先核对一下电源的电压和频率,如果戴森吸尘器带有地线,应接地。
还应检查机体上的集层过滤袋,看框格是否放平放妥,机体上应该关紧的门、搭扣或盖是否关好、盖严和搭紧,检查确认无误后才可启用。
3、使用戴森吸尘器前,应将被清扫场所中较大的脏物、纸片等除去,以免吸入管内堵塞进风口或尘道。
使用戴森吸尘器时,应注意不要吸进易燃物(如沾有汤油的尘团、火柴头、未熄灭的烟头、易燃药粉等)、潮湿泥土、污水、金属屑等等,以防损坏机器。
4、戴森吸尘器的外观清洁比较容易,一般只需要用蘸有肥皂水的软布擦拭即可,但是千万不能用有机溶剂清洗,以免其外观塑料开裂、褪色或者掉漆,当然也不可以用钢丝球等硬物清洁,以免给机体造成损害。