德国坦克声卡,dmx6fireusb,中文说明书
德国坦克 声卡,DMX 6Fire USB,中文说明书

V 1.02009.04.06使用手册DMX 6Fire USB TerraTec DMX 6Fire USB 使用手册DMX 6 Fire USB设备连接介绍2前面 (2)背面 (4)模拟输出5LINE OUT 1/2, 3/4, 5/6 (背面) (5)耳机输出(前置) (5)驱动5控制面板5混音器 (6)音量 (6)信号 (6)绕送 (7)输出和设定 (7)音量 (7)频率设定 (8)设备设定 (8)场景 (9)其它 (9)TerraTec DMX 6Fire USB 使用手册DMX 6 Fire USB设备连接介绍DMX6 Fire USB 音效界面提供你连接许多专业录音外围设备和Hi-Fi 设备。
前面1. 麦克风接口(XLR-1/4" or 6.3 mm 复合式接口)这个插座接受XLR接头和需要幻象电源(通常是电容式麦克风)的专业麦克风,和”一般” 耳机插头。
这个接口与背板上Line In 1接口是同时只能择一使用,而且假如XLR or 1/4" (6.3 mm)插头插上时,会自动重新重导信号路径(自动优先选择),此时在背板的Line In 1 和Line In 2 会自动关掉。
2. 耳机的音量控制当你将耳机插入进去,先把音量转到最左边0的位置,否则可能相当大声。
你可以在插入耳机后再转大声。
3. 耳机接口如上所述:插上耳机之前将音量控制转到最低。
这个接口仅会送出Line Out1/2的信号。
4. 麦克风控制的LED指示灯。
LED灯是提供视觉上监看麦克风的录音。
蓝灯代表”有信号” ,假如看到亮红色LED,请将Gain 1控制转小。
红色LED灯亮时代表是削峰失真,造成了录音信号失真。
5. 麦克风孔的音量控制控制前置放大的信号在麦克风输入端。
同样的,麦克风插入控制在麦克风输入端的信号前级放大。
6. 48伏幻象电源:当你连接电容式麦克风时拨到”on”。
TerraTec DMX 6Fire USB 使用手册7. -20dB切换开关假如你的麦克风的录音太大声,将PAD开关切换到”on”-信号会被降低20dB。
巧妙解决声卡音量过小
巧妙解决声卡音量过小
Blutter
【期刊名称】《电脑自做》
【年(卷),期】2003(000)001
【摘要】Terratec(德国坦克)的产品在今年上半年开始进入大陆市场。
而推出的几款产品都定位高端,此次推出的DMX Xfire1024价格仅有199元令人多少有些意外。
不过与以前评测过的几块Terratec卡相比,包装风格相似而卡的做工也同样非常不错。
DMX Xfire1024支持4声道输出,可以配合市场上的4.1音箱使用。
在接口方面作为199元的声卡,有几点比较突出。
第一,声卡主卡支持光纤输出。
【总页数】1页(P86)
【作者】Blutter
【作者单位】无
【正文语种】中文
【中图分类】TP334.7
【相关文献】
1.制作声卡的快捷音量控制按钮音量控制前面操作 [J], 颜东成
2.只宜引吭高歌,不愿窃窃私语——板载声卡音量过小的解决之道 [J], cataolqingsong5.0
3.KMPlayer从此不再音量过小 [J], 波波头
4.解决Realtek HD Audio声卡MIC音量无法调节问题 [J], Xing
5.麦克风音量过小 [J],
因版权原因,仅展示原文概要,查看原文内容请购买。
德国坦克Aureon傲龙 7.1声卡
德国坦克Aureon傲龙 7.1 USB声卡Aureon 7.1的USB是一款高性价比且功能强大的USB声卡,让您充分享受多媒体环绕声音的完美。
德国坦克Aureon 7.1 USB为我们的电脑提供最挂的音质平台,使要求成为现实。
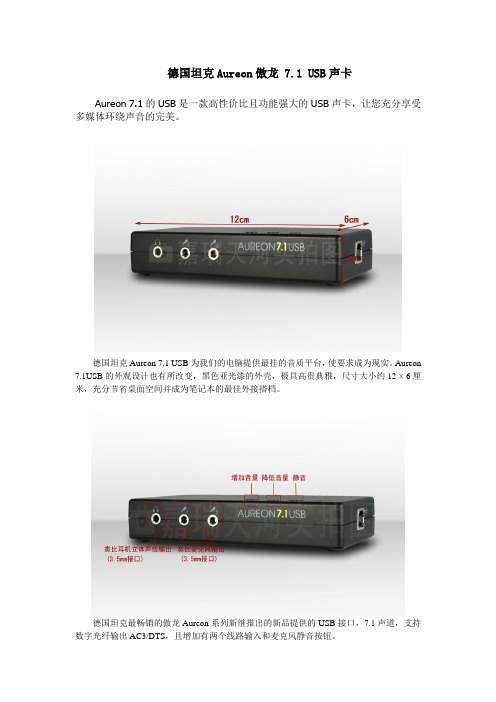
Aureon 7.1USB的外观设计也有所改变,黑色亚光漆的外壳,极具高贵典雅,尺寸大小约12 × 6厘米,充分节省桌面空间并成为笔记本的最佳外接搭档。
德国坦克最畅销的傲龙Aureon系列新继推出的新品提供的USB接口,7.1声道,支持数字光纤输出AC3/DTS,且增加有两个线路输入和麦克风静音按钮。
德国坦克做为欧洲专业的声音专家在此款Aureon 7.1 USB产品上不仅可支持到7.1声道输出,而且配备了数字光纤输入和输出(I / O),充分支持多声道的AC3和DTS格式的应用。
另外拥有两个麦克风输入和线路输入接口,更增加了音量控制和静音按钮。
USB接口方便Aureon 7.1USB声卡非常方便迅速的与计算机连接。
产品配件图产品规格:USB 1.1接口(兼容USB 2.0)USB音频类规范版本1.0通过USB总线供电4个模拟输出(3.5毫米立体声插头)2麦克风输入(3.5毫米插头)1个耳机插孔(3.5毫米立体声插头)光纤S / P - DIF数字输入(TOS的链接)光纤S / P - DIF数字输出(TOS的链接)Line-in 输入(3.5毫米立体声插头)AC3和DTS输出通过数字输出直接在设备上进行音量调节音频分辨率:16位采样率的模拟:32,44.1和48 kHz,数字:48千赫驱动支持Windows XP (SP2/3)/ Vista/ Windows7(32/64)重量:100g尺寸:约12 × 6 × 2.2厘米(长x宽x高)颜色:黑色包装盒内容:*1个Aureon 7.1 USB 声卡*1条USB线*1条光纤线*1张CD光碟*1份快速安装手册*1张客户服务卡一、安装方法:要联接Aureon 7.1 USB 到你的电脑,你需要一个USB A 接口。
德国坦克声卡001.doc
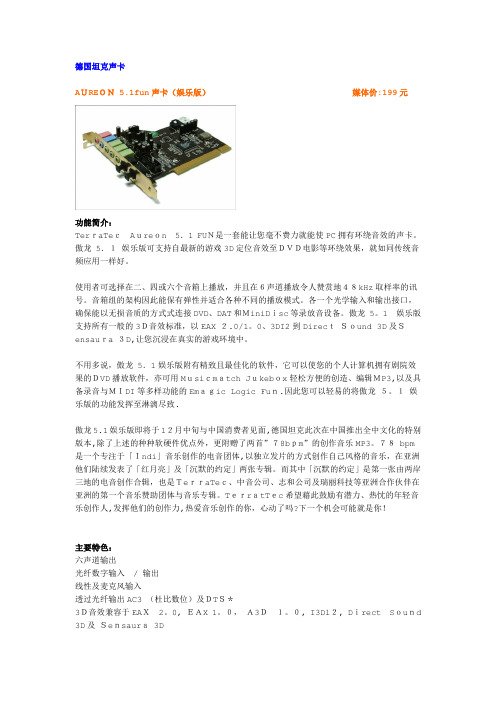
德国坦克声卡AUREON 5.1fun声卡(娱乐版)媒体价:199元功能简介:TerraTecAureon5.1 FUN是一套能让您毫不费力就能使PC拥有环绕音效的声卡。
傲龙 5.1娱乐版可支持自最新的游戏3D定位音效至DVD电影等环绕效果,就如同传统音频应用一样好。
使用者可选择在二、四或六个音箱上播放,并且在6声道播放令人赞赏地48kHz取样率的讯号。
音箱组的架构因此能保有弹性并适合各种不同的播放模式。
各一个光学输入和输出接口,确保能以无损音质的方式式连接DVD、DAT和MiniDisc等录放音设备。
傲龙 5。
1娱乐版支持所有一般的3D音效标准,以EAX 2.0/1。
0、3DI2到DirectSound 3D及Sensaura 3D,让您沉浸在真实的游戏环境中。
不用多说,傲龙 5.1娱乐版附有精致且最佳化的软件,它可以使您的个人计算机拥有剧院效果的DVD播放软件,亦可用Musicmatch Jukebox轻松方便的创造、编辑MP3,以及具备录音与MIDI等多样功能的Emagic Logic Fun.因此您可以轻易的将傲龙5。
1娱乐版的功能发挥至淋漓尽致.傲龙5.1娱乐版即将于12月中旬与中国消费者见面,德国坦克此次在中国推出全中文化的特别版本,除了上述的种种软硬件优点外,更附赠了两首”78bpm”的创作音乐MP3。
78 bpm是一个专注于「Indi」音乐创作的电音团体,以独立发片的方式创作自己风格的音乐,在亚洲他们陆续发表了「红月亮」及「沉默的约定」两张专辑。
而其中「沉默的约定」是第一张由两岸三地的电音创作合辑,也是TerraTec、中音公司、志和公司及瑞丽科技等亚洲合作伙伴在亚洲的第一个音乐赞助团体与音乐专辑。
TerratTec希望藉此鼓励有潜力、热忱的年轻音乐创作人,发挥他们的创作力,热爱音乐创作的你,心动了吗?下一个机会可能就是你!主要特色:六声道输出光纤数字输入/ 输出线性及麦克风输入透过光纤输出AC3 (杜比数位)及DTS*3D音效兼容于EAX2。
我的火线声卡说明书
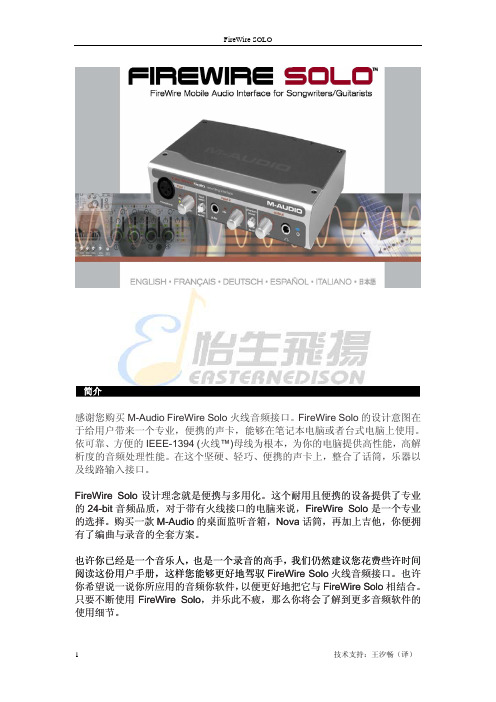
FireWire Solo 前面板上带有话筒(XLR-卡农)输入接口,乐器(1/4”TRS大三芯)输入接口;后面板上不仅带有线路输入,而且还有两个线路输出 接口。每个话筒与乐器的输入接口都带有自己的音量控制器。前面板上 带有一个前面板(话筒以及乐器)或者后面板(线路)的输入切换开关。 后面板上附带了 S/PDIF 数字输入以及输出接口,FireWire Solo 还是一 个有四路输入,四路输出的音频接口。用一根火线把它与电脑的火线接 口相连。如果你的电脑不具备火线接口的话,你需要去购买一块火线的 PCI 板卡,在各大电子市场均有销售。
个立体声输按键后立体声对将被接在一起运推拉一个会带动另外行配对的推音按键择哑音按键再次选中哑音按键可取消此时奏按键下独奏按键的时候按键变为黄色此时除此轨外的所有音轨的音频输出都会停止再按键的时候所有音轨回复输出
FireWire SOLO
简介
感谢您购买 M-Audio FireWire Solo 火线音频接口。FireWire Solo 的设计意图在 于给用户带来一个专业,便携的声卡,能够在笔记本电脑或者台式电脑上使用。 依可靠、方便的 IEEE-1394 (火线™)母线为根本,为你的电脑提供高性能,高解 析度的音频处理性能。在这个坚硬、轻巧、便携的声卡上,整合了话筒,乐器以 及线路输入接口。
3
技术支持:王汐畅(译)
前面板
FireWire SOLO
1.话筒输入:带有话筒输入平衡(卡农)接口。这个接口只在前/后面板输入切换按键(5)处于高档位的 时候才工作。这个接口对应音频软件中立体声的左声道。
2. 信号削波指示灯
3.幻想供电指示灯:当幻想供电开关(9)打开的时候,这个指示灯亮起,说明+48V 直流已经加载到话筒输 入接口上了。
DMX中文说明书
Profusion X简明操作指导The Brief Instruction of Profusion X1)正确开关机及功放的开关顺序1.1 启动系统第一步:按一下电源开关,DMX多媒体播放中心将按程序自检启动,多媒体播放中心将自动播放预先设定的音乐节目表。
第二步:依次打开各个功能区的功放1.2 关闭系统第一步:依次关闭功放第二步:按一下电源开关,DMX多媒体播放中心将进入暂停状态;再次按一下电源开关,系统将执行关闭程序NOTE: 严禁在系统尚未正常关闭的情况下切断电源。
否则可能引起Profusion X 或其他设备损坏2)音乐风格的改变在默认状态下,播放器显示屏会显示歌曲的标题,音乐家、风格、地区、定时模式和区域的日期/时间。
按“STYLE”上下键可音乐风格并且按“*”键确定新的风格。
显示屏会相应改变。
选择“Return to Schedule”可以回到默认状态。
3)各区域音量调节(通过Profusion X及通过功放调节)1 通过功放上的音量调节旋钮调节所对应区域的音量。
2 为了最大限度提高声音逼真度,DMX MUSIC建议使用功率放大器上的音量控制开关来控制回放音量。
可以通过导航菜单来分别改变各个区域的音量。
音量改变仅会在所选区域内生效。
第一步在歌曲名称和艺术家显示屏幕中按“*”进入DMM主菜单如图所示:Back>V olume ControlMessaging ControlSet Date and TimeNetwork ControlSchedule ControlDevice Information第二步按“*”进入“VOLUME CONTROL”主菜单。
第三步按NA VIGATION UP 和 DOWN键,滚动可选区域列表。
一旦选中合适区域,按“*”确定。
BACK>Zone1Zone2Zone3Zone4Mute Zone1Mute Zone2Mute Zone3Mute Zone4第四步如果选择MUTE,LCD屏幕将会显示如下:Zone1 V olumeMUTED如果选择Zone1,LCD屏幕会有如下显示:Zone1 V olume==============可以通过NA VIGATION UP或RIGHT键来提高音量或NA VIGATION DOWN或LEFT键来降低音量。
soundcheck中文指导书
Sound check中文操作说明书声仪科技Soundcheck 安装计算机配置:奔4以上CPU,1G以上内存,Windows XP Pro and Vista 32 系统。
Soundcheck 初次安装1.安装解密狗,开机提示自动进入USB解密狗的Status.dat装载文件,自动安装解密狗的驱动程序,如果更换USB端口重新安装驱动。
2.关闭计算机安装声卡,重新启动,并记录声卡的序列号。
3.安装声卡的驱动,选择声卡的类型:CardDeluxe, Digigram V2 & VX 440 and Lynx 2。
4.安装Ni-Visa的驱动,拷贝CD文件到如图所示目录下,5.建立Soundcheck的桌面快捷方式如图所示6.进入控制面板选择声卡的控制设置如图所示7.打开设备管理器,检查声卡安装是否正常如图所示8.控制面板打开电源管理器,设置如图所示Soundcheck 系统设置1.声卡的设置如图所示2.设备校准z设置激励信号如图所示z功放校准连接如图所示确保功放关闭状态,连接上图接线所示。
打开功放电源进入Soundchek系统,进入扬声器的sequences,进入校正编辑器,设置输入为Right In,输出为Left Out,调节功放增益旋钮的合适位置,按“Calibrate”测试功放的增益和频响曲线。
z屏蔽Windows系统的声音如图所示SSound check 8.0 新特性多通道的采集功能,最多可以扩展8个通道(NI PCI 4461)同时测试。
包括以下功能:z环绕立体声多通道测试。
z立体耳机测试。
z多通道的音频电子设备。
(如:调音台)Sound check 测试应用Sound check 可以支持二次开发,可在库文件修改存在的测试,每一个测试对应一个“Sequence”,一个Sequence是由一系列的Step组成,每一个STEP执行一个特定的任务,一个简单SEQUENCE结构如下:z Hardware Step(定义和配置数据采集设备)z CALBRATION STEP (定义这个硬件的灵敏度和校准曲线)z STIMULUS STEP (定义一个信号产生器的输出。
FY1 USB声卡 XMOS 用户手册_V1.0Cn
ALIENTEK
FY1 USB Audio 用户手册
FY1 高性能 USB 声卡
4. 在使用录音输出功能的时候要特别注意: 请先把麦克风和 FY1 连接好 (线录则把音源设 备和 FY1 连接好)再打开录音输出,以免出现暴音损坏耳机或设备。
4 接口
3.5mm 驻极体话筒及电容麦克风话筒接口 输入 B 型 USB 2.0 高速设备接口 外接电源输入(DC 7-9V)接口 3.5mm 耳机输出接口 输出 其他 光纤输出接口 RCA 同轴输出接口 I2S&DFU 扩展接口
2 产品包装
包装 FY1 声卡 标配 USB 数据线 光盘(DVD) 说明书(含保修卡) 数量 1台 1条 1张 1份
3 注意事项
1. 使用本产品时,为避免一些不安全的因素,应该遵循基本的安全预防措施。 2. 仔细阅读说明书并按说明书进行操作。 3. 为保证产品的性能,请使用我们提供的 USB 数据线且使用接触良好的 USB 接口,使用 过程中严禁插拔 USB 线。 User manual
User manual
ALIENTEK
FY1 USB Audio 用户手册
FY1 高性能 USB 声卡
7 使用说明Байду номын сангаас
7.1 驱动和软件安装
7.1.1 FY1 USB 声卡驱动安装
① 安装 FY1 USB 声卡驱动:这个驱动用于电脑对 FY1 声卡的支持,必须安装。“打开 光盘1, FY1 驱动1 , FY1 声卡驱动” , 然后双击运行“ FY1 USB Audio.exe” ,如图 7.1.1.1:
支持高达384khz32bit发烧级的音频文件播放支持高达192khz24bit录音室音质的录音支持高达192khz32bit的同轴光纤输出完全开放的i2s接口可外接性能更高的dac或adc配有炫酷蓝光oled显示屏具有极好的显示效果支持多种显示模式波形显示频谱显示混合显示独创硬件agc电路能有效避免显示的时候出现信号失真幅值过低的现象外接电源dc79v和usb电源2种供电方式自动切换
DMX6fireUSB-官方中文
为满足音乐玩家,DJ和游戏玩家等使用这者的专业需求:声卡专家德国坦克TERRATEC现在提供一个顶级优化的音效产品 - DMX 6 Fire USB位于 Nettetal 的声卡专业厂商德国坦克TERRATEC推出的受欢迎的 DMX 6 Fire USB。
DMX 6 Fire USB 是为音乐音响玩家,DJ,游戏玩家所质量制订的高标准完美的全方位外接音乐系统。
DMX 6Fire 24/96 提供更为强大技术与功能。
不是 PCI 接口,而是外置USB 2.0 ,不是24-bit / 96-kHz,它提供的是 24-bit / 192-kHz。
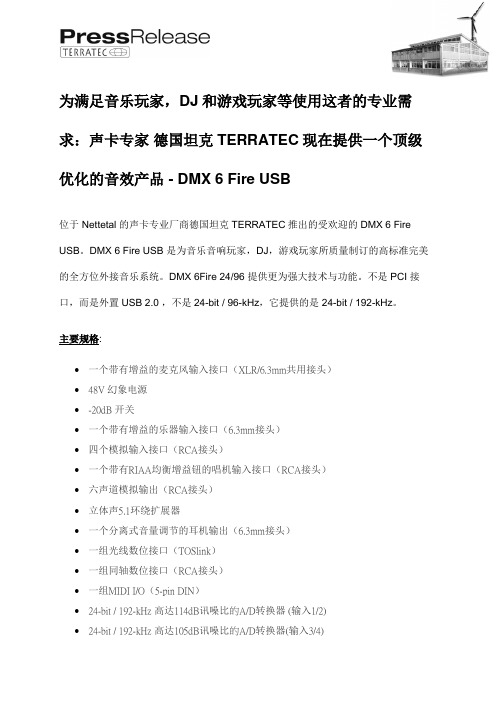
主要规格:•一个带有增益的麦克风输入接口(XLR/6.3mm共用接头)•48V 幻象电源•-20dB 开关•一个带有增益的乐器输入接口(6.3mm接头)•四个模拟输入接口(RCA接头)•一个带有RIAA均衡增益钮的唱机输入接口(RCA接头)•六声道模拟输出(RCA接头)•立体声5.1环绕扩展器•一个分离式音量调节的耳机输出(6.3mm接头)•一组光线数位接口(TOSlink)•一组同轴数位接口(RCA接头)•一组MIDI I/O(5-pin DIN)•24-bit / 192-kHz 高达114dB讯噪比的A/D转换器 (输入1/2)•24-bit / 192-kHz 高达105dB讯噪比的A/D转换器(输入3/4)•24-bit / 192-kHz 高达114dB讯噪比的D/A转换器 (输出口1-6)德国坦克TERRATEC 在莱茵河地区城镇Nettetal于 1994 年成立。
如今公司已是德国数字电视,录像和声卡重要制造商及欧洲首要的多媒体企业之一。
德国坦克致力于提供从专业的计算机音响系统到电视/视讯的解决方案和高传真消费性产品。
作为技术先驱,TERRATEC 也在无线家用的娱乐多媒体产品, 网络收音机跟数字电视产品中不断的创新。
德国坦克 Aureon 傲龙 7.1 USB 声卡使用手册说明书
Copyright@2014 唐德国际有限公司 All R ights R eserved德国坦克Aureon 傲龙7.1 USB 声卡使用手册(此说明书基于Windows7,其它版本略有不同)Copyright@2014 唐德国际有限公司 All R ights R eserved 目录安全性须知 ........................................................................................................................... 1 1. 简介 (2)1.1 包装内容 ...................................................................................................................................................................... 2 1.2系统要求 ....................................................................................................................................................................... 2 1.3 规格概要 ...................................................................................................................................................................... 2 1.4 接口 .............................................................................................................................................................................. 3 1.5输出连接 .. (4)2. 软件安装和卸载 (4)2.1 软件安装 ...................................................................................................................................................................... 4 2.2 软件卸载 . (8)3. AUREON 7.1 USB 音频中心图形化用户界面 (10)3.1 打开Aureon 7.1 USB 音频中心图形化用户界面 ................................................................................................... 10 3.2 Aureon 7.1 USB 音频中心图形化用户界面功能介绍 ............................................................................................. 11 3.2.1打开Aureon 7.1 USB ........................................................................................................................................... 11 3.2.2 主设置控制界面 ................................................................................................................................................. 12 3.2.3混音器控制界面 .................................................................................................................................................. 14 3.2.4效果控制界面 ...................................................................................................................................................... 15 3.2.5信息界面介绍 ...................................................................................................................................................... 16 3.2.6信息界面介绍 ...................................................................................................................................................... 17 3.2.7托盘图标功能介绍 . (17)Copyright@2014 唐德国际有限公司 All R ights R eserved1安全性须知* 在您安装声卡以及加入硬件设备之前,请务必详加阅读本手册所提供的相关信息。
恐怖之声·布雷姆·豪恩电钢器官手册说明书

BRENT HINDS TERROROWNER’S MANUALDESIGNED AND ENGINEERED BY ORANGE MUSIC ELECTRONIC COMPANY LTD.108 RIPON WAY, BOREHAMWOOD, WD6 2JA, UK. IMPORTANT SAFETY INSTRUCTIONSPOWERING YOUR UNIT1. Read these instructions.2. Keep these instructions.3. Heed all warnings.4. Follow all instructions.5. Do not use this apparatus near water.6. Clean only with a dry cloth.7. Do not block any ventilation openings. Install in accordance with the manufacturer’s instructions. 8. Do not install near any heat sources such as radiators, heat registers, stoves, or other apparatus (including amplifiers) that produce heat.9. Do not defeat the safety purpose of the polarised or grounding-type plug. A polarised plug has two blades with one wider than the other. A grounding type plug has two blades and a third grounding prong. The wide blade or the third prong are provided for your safety. If the provided plug does not fit into your outlet, consult an electrician for replacement of the obsolete outlet.10. Protect the power cord from being walked on or pinched particularly at plugs, convenience receptacles, and the point where they exit from the apparatus.11. Only use attachments/accessories specified by the manufacturer.12. Use only with the cart, stand, tripod, bracket, or table specified by the manufacturer, or sold with the apparatus. When a cart is used, use caution when moving the cart/apparatus combination to avoid injury from tip-over.13. Unplug this apparatus during lightning storms or when unused for long periods of time.14. Refer all servicing to qualified service personnel. Servicing is required when the apparatus has been damaged in any way, such as power-supply cord or plug is damaged, liquid has been spilled or objects have fallen into theapparatus, the apparatus has been exposed to rain or moisture, does not operate normally, or has been dropped.This symbol indicates this product is classified as Waste Electrical and Electronic Equipment (WEEE) in the European Union and should not be discarded with household waste. Contactyour local authority for more information and details of your nearest approved disposal facility.START UP PROCEDURE FOR VALVE AMPLIFIERSBefore switching the POWER switch to the ONposition, ensure the HALF/STBY/FULL switch is set to the STBY (Startup Tension Bypass) mode.Leave the amp in STBY mode for at least 2 minutes prior to performance. This will help prolong the life of the valves [tubes]. After 2 minutes, switch to play mode (FULL or HALF power). Select the STBY mode during breaks in performance.SERVICING INFORMATION FORVALVE AMPLIFIERSPeriodic valve renewal should be considered part of owning a quality valve [tube] amplifier. The rate of valve wear is dependent on many factors, but if you notice a change in the performance of your amplifier, it is likely a result of valve decline. Valves can fail at any time. Output valves (EL84, EL34, 6550 etc.) are subject to more stress than preamp valves (12AX7, 12AT7 etc.) and may require more regular replacement. Consult your service centre/dealer for more information.BASSAdjusts the lower frequency response. Increasing the bass produces deepersounds.FX LOOPUsed to place external effects between the amplifier’s preamplifier section and output section. Connect the SEND jack to the input of external effects. Connect the output of external effects to the RETURN jack.GAINControls the (preamplifier) gain level.Higher settings produce moredistortion. Note: When set to minimum,no sound will be heard.INPUT¼” instrument jack socket.VOLUMEAdjusts the volume level for either theNatural or Dirty channel.CHANNELToggles between the Natural and Dirty channel. This can be switched remotely using an optional footswitch (see rear).TREBLEAdjusts the high frequency response. Increase the treble for brighter tones or reduce for a warmer sound.MIDAdjusts the midrange response.Increasing the mids creates a fatter sound, whilst reducing‘scoops’ the tone.POWERThe lamp will illuminate to indicate thepower is switched to ON.Refer to page 4 for the HALF/STBY/FULL switch.FOOTSWITCHConnect a latching footswitch (e.g.Orange FS-1) to remotely select betweenNatural and Dirty channels.FRONT PANELORANGE ICONS REAR ICONSDIRTY CHANNEL EQThe Natural Channel gives the purest route from guitar to speaker with just a single volume control. It has no EQ controls but is voiced to complement your guitar’s natural tone. As a ‘non-master’-style channel, the output valves will begin to saturate into overdrive at highvolume settings.The Dirty Channel will be brighter at lower gain settings and fatten up at highergain settings Note: The EQ controls only affect theDirty Channel.Bias adjustment should only be performed by authorised service personnel.The fuse labelled "HT FUSE " will blow in the event of output valvefailure. The output valve(s) should be replaced, and the HT fuse replaced with the correct 250V type.The rating is indicated on the product near the HT fuse holder.Our Orange Valve Tester can be used to help match valves and check valve health.Visit for more information.Output valves should always be replaced with matched sets, though not all models require a bias adjustment. Contact your Orange dealer for more information.NATURALHALFONOFFDIRTYSTBYREAR CONNECTIONS1 x 8Ω CABINET。
гомдустру roduction EFPAU TEST NO说明书
感谢您购买 产品!请仔细阅读本手册,它将帮助你妥善设置并运行您的系统,使其发挥卓越的性能。
并保留这些说明以供日后参照。
警告:为了降低火灾与电击的风险,请不要将产品暴露在雨中或潮湿环境中。
警告:为了降低电击的风险,非专业人士请勿擅自拆卸该系统。
仅供专业人士操作。
等边三角形中的闪电标记,用以警示用户该部件为非绝缘体,系统内部存在着电压危险,电压。
可能足以引起触电。
可能足以引起触电如系统标有带惊叹号的等边三角形,则是为提示用户严格遵守本用户指南中的操作与维护规定。
注意:请勿对系统或附件作擅自的改装。
未经授权擅自改装将造成安全隐患。
警告:燃不得将明火源(如点的蜡烛)放在器材上面。
1. 请先阅读本说明。
2. 保留这些说明以供日后参照。
3. 注意所有警告信息。
4. 遵守各项操作指示。
5. 不要在雨水中或潮湿环境中使用本产品。
6. 不要将产品靠近热源安装,例如暖气管、加热器、火炉或其它能产生热量的装置(包括功放机 )。
7. 不要破坏极性或接地插头的安全性设置。
如果提供的插头不能插入插座,则应当请专业人员更换插座。
8. 保护好电源线和信号线,不要在上面踩踏或拧在一起(尤其是插头插座及穿出机体以外的部分 )。
9. 使用厂商规定及符合当地安全标准的附件。
10.雷电或长时间不使用时请断电以防止损坏产品。
12. 不要让物体或液体落入产品内——它们可能引起火灾或触电。
13. 请注意产品外罩上的相关安全标志。
. 仅与厂商指定或与电器一同售出的推车、架子、三脚架、支架或桌子一起使用。
推动小车/电器时,应谨防翻倒。
11注意事项产品的安装调试须由专业人士操作。
在使用非本厂规定的吊装件时,要保证结构的强度并符合当地的安全规范。
警告:1扬声器及扬声器系统的产品有限保修期为自正式购买日起的3年。
由于用户不合理的应用而导致音圈烧毁或纸盆损坏等故障,不包含于产品保修项目。
产品吊附件(包括音箱装配五金件和吊挂配件)的有限保修期为自正式购买日起的1年。
德国坦克声卡,DMX6FireUSB,中文使用说明
V 1.02009.04.06使用手册DMX 6Fire USB TerraTec DMX 6Fire USB 使用手册DMX 6 Fire USB设备连接介绍2前面 (2)背面 (4)模拟输出5LINE OUT 1/2, 3/4, 5/6 (背面) (5)耳机输出(前置) (5)驱动5控制面板5混音器 (6)音量 (6)信号 (6)绕送 (7)输出和设定 (7)音量 (7)频率设定 (8)设备设定 (8)场景 (9)其它 (9)TerraTec DMX 6Fire USB 使用手册DMX 6 Fire USB设备连接介绍DMX6 Fire USB 音效界面提供你连接许多专业录音外围设备和Hi-Fi设备。
前面1. 麦克风接口(XLR-1/4" or 6.3 mm 复合式接口)这个插座接受XLR接头和需要幻象电源(通常是电容式麦克风)的专业麦克风,和”一般”耳机插头。
这个接口与背板上Line In 1接口是同时只能择一使用,而且假如XLR or 1/4" (6.3 mm)插头插上时,会自动重新重导信号路径(自动优先选择),此时在背板的Line In 1 和Line In 2 会自动关掉。
2. 耳机的音量控制当你将耳机插入进去,先把音量转到最左边0的位置,否则可能相当大声。
你可以在插入耳机后再转大声。
3. 耳机接口如上所述:插上耳机之前将音量控制转到最低。
这个接口仅会送出Line Out1/2的信号。
4. 麦克风控制的LED指示灯。
LED灯是提供视觉上监看麦克风的录音。
蓝灯代表”有信号”,假如看到亮红色LED,请将Gain 1控制转小。
红色LED灯亮时代表是削峰失真,造成了录音信号失真。
5. 麦克风孔的音量控制控制前置放大的信号在麦克风输入端。
同样的,麦克风插入控制在麦克风输入端的信号前级放大。
6. 48伏幻象电源:当你连接电容式麦克风时拨到”on”。
TerraTec DMX 6Fire USB 使用手册7. -20dB切换开关假如你的麦克风的录音太大声,将PAD开关切换到”on”-信号会被降低20dB。
德国坦克声卡使用手册

德国坦克声卡使用手册(适用型号:剧场版SiXPack 5.1+)前言感谢您购买使用本公司的产品,为了让您更方便与正确的安装使用,本手册提供了开於硬件及驱动程式的安装详细解说。
请您务必依照本手册之指示完成程序。
倘若仍有其他疑问或安装使用上的困难,请来电或以电子邮件将您的问题告诉我们,我们一定全力为您服务。
谢谢您!主要功能1 采用知名crystal cs4630高效能处理晶片2 420 mips高速运算的独家(cclstn)音讯处理技术3 符合ac 97 2.1、pci 2.1规范4 完全支援windows 98se/me/2000/xp作业系统相容5 完全硬体支援微软directsound、directsound3d、directlnput、以及声波合成技术6 支援最新sensaura 3d定位音效技术,支援2/4声道7 相容及支援eax 1.0、eax 2.0、a3d 1.0、i3dl2、macrofx、multidrive zoomfx、environmentfx、(dolby surround)多声道音效技术8 支援同时64个硬体声波合成发声9 内建8mb音色取样且与mpu—401/gm/yamaha xg midi规范相容10 支援midi dls技术无限制软体音色声波合成支援11 支援硬体wavetable音源子卡12 支援对netmeeting网路语音视讯软体提供aec自动回授抑制功能13 支援16bit全双工且与soundblasterpro完全相容14 符合pci电源管理规范apm 1.2和acpi 1.0版15 符合pc 98和pc 99规范要求16 s/n讯噪比达90 db以上,音质传真自然17 具备18bita/d类比/数位转换器18 具备20bit d/a数位/类比转换器19 支援利用directshow和directsound 3d输出播放20 支援立体声,4声道和6声道喇叭模式输出21 支援标准24bit s/pdif光纤数位输入(32/44.1/48khz)和输出(48kh pcm数位讯号,如ac—35.1讯号。
whelen 警车号声器说明 说明书
Page 1©2011 Whelen Engineering Company Inc.Form No.14507 (061611)A u t o m o t i v e : S i r e n s /S w i t c h e sFor warranty information regarding this product, visit /warrantyDANGER! Sirens produce extremely loud emergency warning tones! Exposure to these tones without proper and adequate hearing protection, could cause ear damage and/or hearing loss! The Occupational Safety & Health Administration () provides information necessary to determine safe exposure times in Occupational Noise Exposure Section 1910.95. Until you have determined the safe exposure times for your specific application,operators and anyone else in the immediate vicinity should be required to wear an approved hearing protection device. Failure to follow this recommendation could cause hearing loss!•Proper installation of this product requires the installer to have a good understanding of automotive electronics, systems and procedures.•Whelen Engineering requires the use of waterproof butt splices and/or connectors if that connector could be exposed to moisture.•Any holes, either created or utilized by this product, should be made both air- and watertight using a sealant recommended by your vehicle manufacturer.•Failure to use specified installation parts and/or hardware will void the product warranty.•If mounting this product requires drilling holes, the installer MUST be sure that no vehicle components or other vital parts could be damaged by the drilling process. Check both sides of the mounting surface before drilling begins. Also de-burr the holes and remove any metal shards or remnants. Install grommets into all wire passage holes.•If this manual states that this product may be mounted with suction cups, magnets, tape or Velcro®, clean the mounting surface with a 50/50 mix of isopropyl alcohol and water and dry thoroughly.•Do not install this product or route any wires in the deployment area of your air bag. Equipment mounted or located in the air bag deployment area will damage or reduce the effectiveness of the air bag, or become a projectile that could cause serious personal injury or death. Refer to your vehicle owner’s manual for the air bag deployment area. The User/Installer assumes full responsibility to determine proper mounting location, based on providing ultimate safety to all passengers inside the vehicle.•For this product to operate at optimum efficiency, a good electrical connection to chassis ground must be made. The recommended procedure requires the product ground wire to be connected directly to the NEGATIVE (-) battery post (this does not include products that use cigar power cords).•If this product uses a remote device for activation or control, make sure that this device is located in an area that allows both the vehicle and the device to be operated safely in any driving condition.•It is recommended that these instructions be stored in a safe place and referred to when performing maintenance and/or reinstallation of this product.•FAILURE TO FOLLOW THESE SAFETY PRECAUTIONS AND INSTRUCTIONS COULD RESULT IN DAMAGE TO THE PRODUCT OR VEHICLE AND/OR SERIOUS INJURY TO YOU AND YOUR PASSENGERS!CAUTIONLoud siren noise can cause hearing damage and/or loss.Refer to OSHA Section 1910.95prior to putting ANY siren into service!Wear Protection!ACTIVATION OF THIS SIREN MAY DAMAGE UNPROTECTED EARS!Warnings to InstallersWhelen’s emergency vehicle warning devices must be properly mounted and wired in order to be effective and safe. Read and follow all of Whelen’s written instructions when installing or using this device. Emergency vehicles are often operated under high speed stressful conditions which must be accounted for when installing all emergency warning devices. Controls should be placed within convenient reach of the operator so that they can operate the system without taking their eyes off the roadway. Emergency warning devices can require high electrical voltages and/or currents. Properly protect and use caution around live electrical connections.Grounding or shorting of electrical connections can cause high current arcing, which can cause personal injury and/or vehicle damage, including fire. Many electronic devices used in emergency vehicles can create or be affected by electromagnetic interference. Therefore, after installation of any electronic device it is necessary to test all electronic equipment simultaneously to insure that they operate free of interference from other components within the vehicle. Never power emergency warning equipment from the same circuit or share the same grounding circuit with radio communication equipment. All devices should be mounted in accordance with the manufacturer’s instructions and securely fastened to vehicle elements of sufficient strength to withstand the forces applied to the device. Driver and/or passenger air bags (SRS) will affect the way equipment should be mounted. This device should be mounted by permanent installation and within the zones specified by the vehicle manufacturer, if any. Any device mounted in the deployment area of an air bag will damage or reduce the effectiveness of the air bag and may damage or dislodge the device. Installer must be sure that this device, its mounting hardware and electrical supply wiring does not interfere with the air bag or the SRS wiring or sensors. Mounting the unit inside the vehicle by a method other than permanent installation is not recommended as unit may become dislodged during swerving; sudden braking or collision. Failure to follow instructions can result in personal injury. Whelen assumes no liability for any loss resulting from the use of this warning device. PROPER INSTALLATION COMBINED WITH OPERATOR TRAINING IN THE PROPER USE OF EMERGENCY WARNING DEVICES IS ESSENTIAL TO INSURE THE SAFETY OF EMERGENCY PERSONNEL AND THE PUBLIC.Warnings to UsersWhelen’s emergency vehicle warning devices are intended to alert other operators and pedestrians to the presence and operation of emergency vehicles and personnel. However, the use of this or any other Whelen emergency warning device does not guarantee that you will have the right-of-way or that other drivers and pedestrians will properly heed an emergency warning signal. Never assume you have the right-of-way. It is your responsibility to proceed safely before entering an intersection, driving against traffic, responding at a high rate of speed, or walking on or around traffic lanes. Emergency vehicle warning devices should be tested on a daily basis to ensure that they operate properly. When in actual use, the operator must ensure that both visual and audible warnings are not blocked by vehicle components (i.e.: open trunks or compartment doors), people, vehicles, or other obstructions. It is the user’s responsibility to understand and obey all laws regarding emergency warning devices. The user should be familiar with all applicable laws and regulations prior to the use of any emergency vehicle warning device. Whelen’s audible warning devices are designed to project sound in a forward direction away from the vehicle occupants. However, because sustained periodic exposure to loud sounds can cause hearing loss, all audible warning devices should be installed and operated in accordance with the standards established by the National Fire Protection Association.Safety FirstThis document provides all the necessary information to allow your Whelen product to be properly and safely installed. Before beginning the installation and/or operation of your new product, the installation technician and operator must read this manual completely. Important information is contained herein that could prevent serious injury or damage.Installation Guide:Howler™ Siren Speaker Bracket2011 Dodge 450051 Winthrop RoadChester, Connecticut 06412-0684Phone: (860) 526-9504Internet: Sales e-mail: autosale@Customer Service e-mail: custserv@®ENGINEERING COMPANY INC.Page 25/16-18X 1-1/4BOLT(QTY 2)STRAP (QTY 2)5/16FLAT WASHER (QTY2)5/16-18ELASTIC STOP NUT (QTY 2)CLAMP MOUNTFig 1ABOTTOM OF SPEAKER5/16-18X 1-3/4BOLT (QTY 1)5/16FLAT WASHER (QTY1)SPACER (QTY 1)5/16-18ELASTIC STOP NUT (QTY 1)STRAP (QTY 2)TOP OF SPEAKERFig 1BCHANNELVENT HOLES MUST FACE BOTTOMSTRAPSlide speaker forward with strap located to rear of channel.Securing the siren speaker to the bracket:Main Bracket:Secure the clamp mount that you secured to the siren speaker in step 1, to the main bracket as shown in figure 2.Support Bracket:Extend the WHITE (positive) and BLACK (negative) speaker wires to your siren amplifier and refer to the amplifiers instructions for connections.IMPORTANT! READ THESE WARNINGS BEFORE CONTINUING!The Howler™ Supplemental Siren was designed for use in high-risk areas such as an intersection. It is not intended to be, nor should be operated as a replacement or alternative to the vehicle’s primary siren.The low-frequency tones of the Howler™ demonstrate significantly different audio characteristics as compared to those of a traditional higher-frequency siren. While the low-frequency tones are better able to penetrate other vehicles, thus alerting drivers to the presence of the responding emergency vehicle, these tones may also penetrate into the responding vehicle itself. This could potentially expose the operator to increased noise levels.To help eliminate overexposure, the Howler™ siren has been designed with a built-in timing circuit. The Occupational Safety & Health Administration (OSHA) () provides information necessary to determine safe exposure times in Noise and Hearing Conservation, Section 1910.95(Occupational Noise Exposure). Until you have determined the safe exposure times for your specific application, this siren should be configured for the minimum operating time and operators should be required to use an approved hearing protection device. FAILURE TO FOLLOW THIS RECOMMENDATION COULD CAUSE HEARING LOSS!。
德国坦克声卡,DMX6FireUSB,中文使用说明
V 1.02009.04.06使用手册DMX 6Fire USB TerraTec DMX 6Fire USB 使用手册DMX 6 Fire USB设备连接介绍2前面 (2)背面 (4)模拟输出5LINE OUT 1/2, 3/4, 5/6 (背面) (5)耳机输出(前置) (5)驱动5控制面板5混音器 (6)音量 (6)信号 (6)绕送 (7)输出和设定 (7)音量 (7)频率设定 (8)设备设定 (8)场景 (9)其它 (9)TerraTec DMX 6Fire USB 使用手册DMX 6 Fire USB设备连接介绍DMX6 Fire USB 音效界面提供你连接许多专业录音外围设备和Hi-Fi设备。
前面1. 麦克风接口(XLR-1/4" or 6.3 mm 复合式接口)这个插座接受XLR接头和需要幻象电源(通常是电容式麦克风)的专业麦克风,和”一般”耳机插头。
这个接口与背板上Line In 1接口是同时只能择一使用,而且假如XLR or 1/4" (6.3 mm)插头插上时,会自动重新重导信号路径(自动优先选择),此时在背板的Line In 1 和Line In 2 会自动关掉。
2. 耳机的音量控制当你将耳机插入进去,先把音量转到最左边0的位置,否则可能相当大声。
你可以在插入耳机后再转大声。
3. 耳机接口如上所述:插上耳机之前将音量控制转到最低。
这个接口仅会送出Line Out1/2的信号。
4. 麦克风控制的LED指示灯。
LED灯是提供视觉上监看麦克风的录音。
蓝灯代表”有信号”,假如看到亮红色LED,请将Gain 1控制转小。
红色LED灯亮时代表是削峰失真,造成了录音信号失真。
5. 麦克风孔的音量控制控制前置放大的信号在麦克风输入端。
同样的,麦克风插入控制在麦克风输入端的信号前级放大。
6. 48伏幻象电源:当你连接电容式麦克风时拨到”on”。
TerraTec DMX 6Fire USB 使用手册7. -20dB切换开关假如你的麦克风的录音太大声,将PAD开关切换到”on”-信号会被降低20dB。
星科技USB外部立体声音频适配器用户指南说明书

USB External Stereo Audio AdapterICUSBAUDIO / ICUSBAUDIOBDE: Bedienungsanleitung - FR: Guide de l’utilisateur - ES: Guía del usuario - IT: Guida per l’uso - NL: Gebruiksaanwijzing - PT: Guia do usuário - Packaging Contents• 1 x USB Audio adapter• 1 x USB extension cable• 1 x Driver CD• 1 x Instruction ManualSystem Requirements• A computer with one available USB port• Headphones/Speakers/Microphone (depending on intended usage)Installation1. Connect the USB audio adapter to an available USB port on the computer system.2. No driver installation should be required. The operating system should automatically load the drivers for the adapter.3. Once installed, the operating system should set the adapter as the default audio device. If not, change it to the default device. This should be done in the Audio properties for the operating system.4. Connect stereo speakers or headphones into the ‘headphone’ connector on the adapter. The adapter should be ready to use.connectorconnector*actual product may vary from photos Instruction Manual Manual Revision: 06/02/2022SpecificationsFCC Compliance StatementThis equipment has been tested and found to comply with the limits for a Class B digital device, pursuant to part15 of the FCC Rules. These limits are designed to provide reasonable protection against harmful interference in a residential installation. This equipment generates, uses and can radiate radio frequency energy and, if not installed and used in accordance with the instructions, may cause harmful interference to radio communications. However, there is no guarantee that interference will not occur in a particular installation. If this equipment does cause harmful interference to radio or television reception, which can be determined by turning the equipment off and on, the user is encouraged to try to correct the interference by one or more of the following measures:• Reorient or relocate the receiving antenna.• Increase the separation between the equipment and receiver.• Connect the equipment into an outlet on a circuit different from that to which the receiver is connected.Consult the dealer or an experienced radio/TV technician for help.Use of Trademarks, Registered Trademarks, and other Protected Names & SymbolsThis manual may make reference to trademarks, registered trademarks, and other protected names and/or symbols of third-party companies not related in any way to. Where they occur these references are for illustrative purposes only and do not represent an endorsement of a product or service by , or an endorsement of the product(s) to which this manual applies by the third-party company in question. Regardless of any direct acknowledgement elsewhere in the body of this document, hereby acknowledges that all trademarks, registered trademarks, service marks, and other protected names and/or symbols contained in this manual and related documents are the property of their respective holders.Technical Support’s lifetime technical support is an integral part of our commitment to provide industry-leading solutions. If you ever need help with your product, visit /support and access our comprehensive selection of online tools, documentation, and downloads.Warranty InformationThis product is backed by a two year warranty.In addition, warrants its products against defects in materials and workmanship for the periods noted, following the initial date of purchase. During this period, the products may be returned for repair, or replacement with equivalent products at our discretion. The warranty covers parts and labor costs only. does not warrant its products from defects or damages arising from misuse, abuse, alteration, or normal wear and tear.Limitation of LiabilityIn no event shall the liability of Ltd. and USA LLP (or their officers, directors, employeesor agents) for any damages (whether direct or indirect, special, punitive, incidental, consequential, or otherwise), loss of profits, loss of business, or any pecuniary loss, arising out of or related to the use of the product exceed the actual price paid for the product. Some states do not allow the exclusion or limitation of incidental or consequential damages. If such laws apply, the limitations or exclusions contained in this statement may not apply to you.。
soundcheck中文说明书

Sound check中文操作说明书声仪科技Soundcheck 安装计算机配置:奔4以上CPU,1G以上内存,Windows XP Pro and Vista 32 系统。
Soundcheck 初次安装1.安装解密狗,开机提示自动进入USB解密狗的Status.dat装载文件,自动安装解密狗的驱动程序,如果更换USB端口重新安装驱动。
2.关闭计算机安装声卡,重新启动,并记录声卡的序列号。
3.安装声卡的驱动,选择声卡的类型:CardDeluxe, Digigram V2 & VX 440 and Lynx 2。
4.安装Ni-Visa的驱动,拷贝CD文件到如图所示目录下,5.建立Soundcheck的桌面快捷方式如图所示6.进入控制面板选择声卡的控制设置如图所示7.打开设备管理器,检查声卡安装是否正常如图所示8.控制面板打开电源管理器,设置如图所示Soundcheck 系统设置1.声卡的设置如图所示2.设备校准z设置激励信号如图所示z功放校准连接如图所示确保功放关闭状态,连接上图接线所示。
打开功放电源进入Soundchek系统,进入扬声器的sequences,进入校正编辑器,设置输入为Right In,输出为Left Out,调节功放增益旋钮的合适位置,按“Calibrate”测试功放的增益和频响曲线。
z屏蔽Windows系统的声音如图所示SSound check 8.0 新特性多通道的采集功能,最多可以扩展8个通道(NI PCI 4461)同时测试。
包括以下功能:z环绕立体声多通道测试。
z立体耳机测试。
z多通道的音频电子设备。
(如:调音台)Sound check 测试应用Sound check 可以支持二次开发,可在库文件修改存在的测试,每一个测试对应一个“Sequence”,一个Sequence是由一系列的Step组成,每一个STEP执行一个特定的任务,一个简单SEQUENCE结构如下:z Hardware Step(定义和配置数据采集设备)z CALBRATION STEP (定义这个硬件的灵敏度和校准曲线)z STIMULUS STEP (定义一个信号产生器的输出。
坦克Audio HX-P930产品说明书
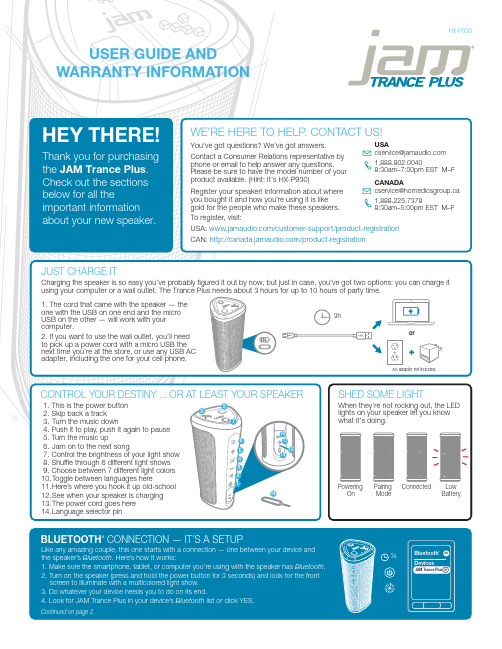
STUFF THE GOVERNMENT MAKES US SAYA MESSAGE FROM THE ENVIRONMENTFCC Compliance:Note: This device complies with part 15 of the FCC Rules. Operation is subject to the following two conditions: (1) This device may not cause harmful interference, and (2) this device must accept anyinterference received, including interference that may cause undesired operation.Note: This equipment has been tested and found to comply with the limits for a Class B digital device, pursuant to part 15 of the FCC Rules. These limits are designed to provide reasonable protection against harmful interference in a residential installation.This equipment generates, uses, and can radiate radio frequency energy and, if not installed and used in accordance with theinstructions, may cause harmful interference to radio communications. However, there is no guarantee that interference will not occur in a particular installation.If this equipment does cause harmful interference to radio or television reception, which can be determined by turning the equipment off and on, the user is encouraged to try to correct the interference by one or more of the following measures:• Reorient or relocate the receiving antenna.• Increase the separation between the equipment and receiver.• Connect the equipment into an outlet on a circuit different from that to which the receiver is connected.• Consult the dealer or an experienced radio/TV technician for help.Note: Changes or modifications not expressly approved by HMDX could void the user's authority to operate this equipment.IC Caution: RSS-GEN Issue 4 November 2014This device complies with Industry Canada’s licence-exempt RSSs.Operation is subject to the following two conditions: (1) This device may not cause interference, and (2) This device must accept any interference, including interference that may cause undesired operation of the device.WARNING:This product has an internal, non-replaceable lithium battery. Please dispose in accordance with your local, state, province, and country guidelines.This product contains small parts that may present a choking hazard for young children.CAUTION: All servicing of this product must be performed by authorized HMDX Service Personnel only.©2015 HMDX. All Rights Reserved.IB-HXP930BCCOMING CLEANA soft, dry towel is all you need to clean off your speaker. Using water, harsh cleaners, or anything else only starts messing with the mechanics inside. So, yeah, don’t do it.1 YEAR LIMITED WARRANTYFor detailed warranty instructions and information visit: USA: /customer-support/warranty-1yr CAN: /warranty-1yrTo obtain warranty service on your JAM product, contact a Consumer Relations representative by telephone or email for assistance (you can find their contact info on page 1). Please make sure to have the model number of the product available.THE VOICE FROM WITHINWhen your JAM Trance Plus isn’t rocking out, it can tell you all sorts of things it’s doing: when it’s powering on, ready to pair, paired, at maximum volume, charging, receiving a call, ending a call, rejecting a call, and powering off.Just like the global gadget it is, your speaker toggles between several languages or no language at all. Your speaker can parlay with you in English, Spanish, French, or Portuguese. Making the change between language and tone is as simple as poking a paperclip, safety pin, or the included language selector pin into the small hole on the bottom of the speaker. Click though until the speaker starts speaking your language.。
- 1、下载文档前请自行甄别文档内容的完整性,平台不提供额外的编辑、内容补充、找答案等附加服务。
- 2、"仅部分预览"的文档,不可在线预览部分如存在完整性等问题,可反馈申请退款(可完整预览的文档不适用该条件!)。
- 3、如文档侵犯您的权益,请联系客服反馈,我们会尽快为您处理(人工客服工作时间:9:00-18:30)。
V使用手册DMX 6Fire USBTerraTec DMX 6Fire USB 使用手册DMX 6 Fire USB设备连接介绍 2前面 .................................................................. .. (2)背面 .................................................................. .. (4)模拟输出 5LINE OUT 1/2, 3/4, 5/6 (背面) (5)耳机输出(前置) ................................................................. . (5)驱动 5控制面板 5混音器 .................................................................. . (6)音量 .................................................................. (6)信号 .................................................................. .. (6)绕送 .................................................................. .. (7)输出和设定 .................................................................. (7)音量 .................................................................. .. (7)频率设定 .................................................................. (8)设备设定 .................................................................. (8)场景 .................................................................. . (9)其它 .................................................................. . (9)TerraTec DMX 6Fire USB 使用手册DMX 6 Fire USB设备连接介绍DMX6 Fire USB 音效界面提供你连接许多专业录音外围设备和Hi-Fi 设备。
前面1. 麦克风接口(XLR-1/4" or mm 复合式接口)这个插座接受XLR接头和需要幻象电源(通常是电容式麦克风)的专业麦克风,和”一般” 耳机插头。
这个接口与背板上Line In 1接口是同时只能择一使用,而且假如XLR or 1/4" mm)插头插上时,会自动重新重导信号路径(自动优先选择),此时在背板的Line In 1 和 Line In 2 会自动关掉。
2. 耳机的音量控制当你将耳机插入进去,先把音量转到最左边0的位置,否则可能相当大声。
你可以在插入耳机后再转大声。
3. 耳机接口如上所述:插上耳机之前将音量控制转到最低。
这个接口仅会送出Line Out1/2的信号。
4. 麦克风控制的LED指示灯。
LED灯是提供视觉上监看麦克风的录音。
蓝灯代表”有信号” ,假如看到亮红色LED,请将Gain 1控制转小。
红色LED灯亮时代表是削峰失真,造成了录音信号失真。
5. 麦克风孔的音量控制控制前置放大的信号在麦克风输入端。
同样的,麦克风插入控制在麦克风输入端的信号前级放大。
6. 48伏幻象电源:当你连接电容式麦克风时拨到”on”。
TerraTec DMX 6Fire USB 使用手册7. -20dB切换开关假如你的麦克风的录音太大声,将PAD开关切换到”on”-信号会被降低20dB。
8. Gain 2的LED灯显示(乐器输入)在这里,相同的蓝色表示”有信号” ,红色代表”信号是削峰失真”。
9. 乐器输入的控制增益当有信号时,将控制钮转小直到红色LED不再亮起。
10.吉他或贝斯接口它可以接受所有高阻抗乐器,并进行前级放大,这个接口与背板的Line In 2同时只能择一使用,而且假如1/4" mm)插头插上时会自动重导信号路径(自动优先选择)。
此时,背板的Line In 1和 2会自动关闭。
11. Phono控制的LED指示灯这些指示从你连接到6FIRE背板PHONO IN接口的唱机送来信号。
12. PHONO IN的增益控制控制在背板PHONO IN接口输入信号的增益值。
13. 监听信号的控制DMX 6Fire USB有”真正”的硬件监听信道。
换言之,Input 1/2的输入信号(麦克风 / 乐器或Line In 1/2)在进行数字转换之前就分接信号直接送至模拟输出1/2。
在那里,监听信号可以无延迟的与这些输出信号(例如:计算机播放的声音)进行混音。
14.数字光纤输入通过光纤线连接数字来源如CD播放器、数字录音机或其它PC。
15.数字光纤输出通过光纤线选择这个输出口由你的PC传送数字数据到任何其它数字设备。
16.同轴数字输入通过RCA插头连接数字来源如CD播放器、数字录音机或其它PC。
17.同轴数字输出选择这个输出通过线材RCA插头由你的PC传送数字数据到任何其它数字设备。
TerraTec DMX 6Fire USB 使用手册背面1. 连接外部变压器。
2. USB计算机的USB 接口连接到这里。
3. MIDI 输入你可以连接诸如控制键盘或数字钢琴之类的设备到这个接口。
使用5-pin DIN线材到你键盘的MIDI OUT。
4. MIDI 输出连接到你的扩充设备;合成器或其它MIDI设备的MIDI IN。
5. 接地线连接你唱盘的接地线材避免”嗡哼声”。
6. PHON 输入直接连到唱盘上。
7. LINE IN 1/2, 3/4两对模拟RCA接口连接线级信源。
就像磁带机,调谐器或合成器。
8. LINE OUT 1/2, 3/4, 5/6三对模拟输出接口,供连接有源音箱 / 扩大器或混音器。
模拟输出符合音乐兼容的等级。
根据微软规范,每组模拟输出安排如下:• Line Out 1/2:前左/前右• Line Out 3/4:中央/重低音• Line Out 5/6:后左/后右4TerraTec DMX 6Fire USB 使用手册模拟输出LINE OUT 1/2, 3/4, 5/6 (背面)DMX 6Fire USB背面有6个高音质模拟单音输出(或3组立体),以RCA 接口形式呈现-就像是你的唱盘、TV或Hi-Fi系统。
使用6Fire的控制面板控制成对接口或个别接口;只有总音量,也就是”Main Out” ,也可以利用旧的Windows调音台控制。
你可以连接你的有源音箱,系统的音箱或混音器。
这里的满级输出为。
耳机输出(前置)6Fire 的前面配置了耳机输出(1/4" or mm 耳机接口),在其上方有一个增益控制可以供你调整音量。
这个输出信号一直都与output 1/2相同。
帮自己及你的听觉一个忙,在开启设备之前,请先检查所有增益控制钮的位置,或先把它们全部转到最小。
你的耳朵将会感激你!顺道一提。
我们之所以将耳机输出放在麦克风输入旁边并不是凑巧的,这样做可让您很方便的插上耳机。
驱动DMX 6Fire USB在系统中有两种不同的工作模式,详情请参阅”设备设定”章节。
Multi-channel: 这此模式下,所有的输出都被群组成一个多信道的设备,相对应的驱动称为"DMX 6Fire MC Out"。
使用一般的音频应用程序就可以到每一个通道。
Multi-device: 这此模式下,所有输出在系统中都被注册成为不同的设备,而这些驱动依次称为"DMX 6Fire Waveplay 1/2, DMX 6Fire Waveplay 3/4, DMX 6FireWaveplay 5/6 and DMX 6Fire Digital Play" 。
控制面板除了驱动程序以外,控制面板是包装中最重要的软件。
在这里,你可以依据不同情况的需求,对这音频接口完全操控,降低音量,将输入导向任何输出,设定MasterClock值或将模拟输入3/4在PHONO与LINE 之间切换。
这控制面板算相当直觉,而且应该不会对新手造成什么大问题。
不过,接下来的部分包含了对各别区块的一些说明。
TerraTec DMX 6Fire USB 使用手册混音器音量数字混音器工作方式就像其它混音器一般,例如:你可以对每个信号相对其它信号来调整音量。
使用鼠标”抓住”控制杆来滑动上或下。
每个单音通道都有各自控制杆,各独立通道可通过可切换的立体连动功能组合起来。
假如这已经打开,你可以使用鼠标同时两个移动控制杆。
这在录音时并不会对于信号的实际音量控制产生影响,;实际录音音量是通过GAIN控制(MIC / INST / PHONO)或是信源(LINE IN)的音量控制来完成。
每个声道都有静音按键;假如两声道已经连结,你只要按下其中一个静音按键,两声道都会被静音。
注意:假如你使用一般的音频 / MIDI音序器,你应该也要用这个软件控制音量。
好处是,所有设定通常与你的项目存在一起。
(歌曲、编曲等)信号INPUT 1/2-DMX 6Fire USB的模拟输入1/2组的控制(前面板的MIC/INST IN 或是背板的LINE IN 1/2)INPUT 3/4-DMX 6Fire USB的模拟输入3/4组的控制(LINE IN 3/4 或PHONO) 。
你可以使用这两个按键去选择想要的输入。
DIGITAL IN –DMX 6Fire USB前面板的数字输入控制。
选择你想要使用光纤或同轴输出。
TerraTec DMX 6Fire USB 使用手册WAVEPLAY 1/2, 3/4, 5/6-控制计算机通过驱动程序输出信号的音量。
DIGITAL PLAY -控制计算机经过驱动程序数字信号输出的音量。
绕送利用在LINK按钮下方的"1/2, 3/4, 5/6, D"小按钮,你可以将任何你想要模拟输入信号绕送至指定的输出通道,也可以送至数字输出信道。
你也可以设置多组的信号给一个输出或绕送一个信号到多组输出。