BRAUN博朗5系SERIES 550使用说明书-手册
博朗Series 5官方中文说明书

()614s h 19EngliBraun GmbHFrankfurter Straße 145 61476 Kronberg/Germany 96620210/X-13China/Korea/UKSer ies 5S e ri e s 511b5090cc112EnglishOur products are designed to meet the highest standards of quality, functionality and design. Thank you for your trust in Braun’s quality and we hope you enjoy your new Braun shaver.Please read the use instructions carefully and completely before using the appliance.Keep them for future reference.WarningYour appliance is provided with a special cord set, which has an integrated Safety Extra Low Voltage power supply. Do not exchange or tamper with any part of it, otherwise there is risk of an electric shock.Only use the special cord set provided with your appliance.Do not shave with a damaged foil or cord.The shaver is suitable forcleaning under running tabwater. Detach the shaver fromthe power supply before clean-ing it in water.Model 5040s w&d only:This appliance is suitable forcleaning under running waterand use in a bath or shower. Forsafety reasons it can only beoperated cordlessly.This appliance can be used by children aged from 8 years and above and per-sons with reduced physical, sensory or mental capabilities or lack of experience and knowledge if they have been given supervision or instruction concerning the safe use of the appliance and under-stand the hazards involved.Children shall not play with the appliance. Cleaning and user maintenance shall not be made by children unless they are older than 8 years and supervised.Oil bottle(models 5040s w&d/5030s/5020s) Keep out of reach of children. Do not swallow. Do not apply to eyes. Dispose of properly when empty.Clean&Charge Station(models 5090cc/5070cc/5050cc) To prevent the cleaning fluid from leaking, ensure that the Clean&Charge Station is placed on a flat surface. When a cleaning cartridge is installed, do not tip, move suddenly or transport the station in any way as cleaning fluid might spill out of the cartridge. Do not place the station inside a mirror cabinet, nor place it on a polished or lacquered surface.The cleaning cartridge contains a highly flammable liquid so keep it away from sources of ignition. Do not expose to direct sunlight and cigarette smoking nor store it over a radiator.Do not refill the cartridge and use only original Braun refill cartridges.1 Foil & Cutter cassette2 Cassette release button3 MultiHeadL ock switch4 On/off switch5 Shaver display6 Long hair trimmer7 Shaver-to-station contacts8a Release button for long hair trimmer8b Model number of shaver9 Shaver power socket10 Special cord set11a Brush11b Hard travel case*11c Protection cap**not with all modelsPrior to first use remove the protection foil if any from the shaver display and connect the shaver to an electrical outlet using the special cord set (10). Charging and basic operating information• A full charge provides up to 45 minutes of cordlessshaving time. This may vary according to your beard growth and environmental temperature.• Recommended ambient temperature for charging is 5 °C to 35 °C. The battery may not charge properly or at all under extreme low or high temperatures. Recommended ambient temperature for shaving is 15 °C to 35 °C.• Do not expose the appliance to temperatures higher than 50 °C for extended periods of time.• When the shaver will be connected to an electrical outlet, it may take some minutes until the display illuminates.Charge statusThe shaver display (5) shows the charge status of the battery.During charging: The battery symbol will blink. (5090cc: The respective battery segment will blink.) Fully charged (shaver is connected to an electrical outlet): The battery symbol will light up for a few seconds. (5090cc: All battery symbols will light up for a few seconds.)Low chargeThe low-charge light flashes red when the battery is running low. You should be able to finish your shave. With switching off the shaver a beep sound reminds of the low charge status.Cleaning status(models 5090cc/5070cc/5050cc only)Travel lockThe lock symbol lights up when the shaver has been locked to avoid unintended starting of the motor (e.g. for storing it in a suitcase).Press the on/off switch (4) to operate the shaver. Tips for a perfect dry shaveFor best results, Braun recommends you to follow 3 simple steps:1. Always shave before washing your face.2. At all times, hold the shaver at the right angle(90°) to your skin.3. Stretch your skin and shave against the directionof your beard growth.MultiHeadLock switch (head lock)To shave hard-to-reach areas (e.g. under the nose) slide the MultiHeadLock switch (3) down to lock the shaver head. The shaver head can be locked in five positions. To change position, move the shaver head with your thumb and forefinger back or forth. It will automatically click into the next position.To set it back into the pivoting position the MultiHeadLock switch needs to be slid up again. Models 5090cc/5070cc/5050cc: For automatic cleaning in the Clean&Charge Station the head lock should be released.Long hair trimmerTo trim sideburns, moustache or beard press the release button (8a) and slide the long hair trimmer (6) upwards.Shaving with the cord (models 5090cc/5070cc/ 5050cc/5030s/5020s only)If the shaver has run out of power (discharged), you may also shave with the shaver connected to an electrical outlet via the special cord set.Travel lock• A ctivation: By pressing the on/off switch (4) for3 seconds the shaver is locked. This is confirmed by a beep sound and the lock symbol in the display. Afterwards the display turns off.• D eactivation: By pressing the on/off switch for3 seconds the shaver is unlocked again.• S witch the shaver on (cordless) and rinse the shaver head under hot running water until all residues have been removed. You may use liquid soap without abrasive substances. Rinse off all foam and let the shaver run for a few more seconds.• N ext, switch off the shaver, press the release button (2) to remove the Foil & Cutter cassette (1) and let it dry.• I f you regularly clean the shaver under water, then once a week apply a drop of light machine oil on top of the Foil & Cutter cassette.Alternatively, you may clean the shaver with a brush:• S witch off the shaver. Remove the Foil & Cutter cassette (1) and tap it out on a flat surface. Using the brush, clean the inner area of the pivoting head. Do not clean the cassette with the brush as this may damage it!Model 5040s only:The shaver should be cleaned after each foam usage.The Clean&Charge Station has been developed for cleaning, charging, lubricating, disinfecting and storing your Braun shaver.12 Station power socket13 Lift button for cartridge exchange14 Station-to-shaver contacts15 Clean&Charge Station display15a Status light16 Start button17 Cleaning cartridgeInstalling the Clean&Charge Station (see fig. D)• Remove the protection foil from the Clean&Charge Station display.• Using the special cord set (10), connect the station power socket (12) to an electrical outlet. • Press the lift button (13) at the rear side of the Clean&Charge Station to lift up the housing.• Hold the cleaning cartridge (17) down on a flat, stable surface (e.g. table).• Carefully remove the lid from the cartridge.• Slide the cartridge from the rear side into the base of the station until it snaps into place.• Slowly close the housing by pushing it down until it locks.Charging the shaver in the Clean&Charge Station (see fig. D)Insert the shaver head down into the cleaning station. Important: The shaver needs to be dry and free from any foam or soap residue!The contacts (7) on the back of the shaver need to align with the contacts (14) in the station. Push the shaver in the correct position.A beep sound confirms that the shaver sits properly in the station. Charging will start automatically. Model 5090cc: The Clean&Charge Station analyzes«Cleaning programs» below.Cleaning the shaver(see fig. D)Station, upside down and with the front showing (with released head lock/contact alignment/beep sound). Cleaning programs5090cc: The hygiene status will be analyzed and oneshort economical cleaningnormal level of cleaninghigh intensive cleaning5070cc/5050cc: One standard cleaning program included.Start automatic cleaningStart the cleaning process by pressing the start button (16). If status light (15a) does not shine (Clean&Charge Station switches to stand-by after ca. 10 minutes), press start button twice. Otherwise cleaning will not start. For best shaving results, we recommend cleaning after each shave.Each cleaning program consists of several cycles, where cleaning fluid is flushed through the shaver head. Depending on your Clean&Charge Station model and/or program selected, the cleaning time takes up to 3 minutes. During this time the status light blinks. Leave the shaver in the station for drying.It takes several hours until remaining moisture evaporates depending on the climatic conditions. Afterwards the shaver is ready for use.After completing the cleaning and charging proce-dure, all indicators turn off.Removing the shaver from the Clean&Charge Station (see fig. E)Hold the Clean&Charge Station with one hand and tilt the shaver slightly to the front to release it. Cleaning Cartridge / Replacement (see fig. F) When the level indicator lights up permanently red, the remaining fluid in the cartridge is sufficient for about 3 more cycles. When the level indicator blinks red, the cartridge needs to be replaced - (about every 4 weeks when used daily.)After having pressed the lift button (13) to open the housing, wait for a few seconds before removingthe used cartridge to avoid any dripping. Before discarding the used cartridge, make sure to close the openings using the lid of the new cartridge, since the used cartridge will contain contaminated cleaning solution.The hygienic cleaning cartridge contains ethanol, which once opened will naturally evaporate slowly into the surrounding air. Each cartridge, if not used daily, should be replaced after approximately8 weeks to ensure optimal disinfection.The cleaning cartridge also contains lubricants for the shaving system, which may leave residual marks on the outer foil frame and the cleaning chamberof the Clean&Charge Station. These marks can be removed easily by wiping gently with a damp cloth. Braun recommends changing your shaver’sFoil & Cutter cassette every 18 months to maintain your shaver’s maximum performance.Available at your dealer or Braun Service Centres:• Foil & Cutter cassette: 52S/52B• Cleaning cartridge Clean&Charge Station: CCR •Braun Shaver cleaner spray21This product contains rechargeable batteries.In the interest of protecting the environment, please do not dispose of the product in the household waste at the end of its useful life. Disposal can take place at a Braun Service Centre or at appropriate collection points provided in your country.The cleaning cartridge can be disposed of with regular household waste.Subject to change without notice.For electric specifications, see printing on thespecial cord set.22。
博朗耳温计说明手册

精心整理博朗耳温计说明书1.产品包装中都有哪些东西打开包装产品共有3样东西:一个硬盒保护安放支架+送的21个耳套+耳温计一个2.产品所用电池说明刚买的产品中含有电池,但是电量不是很足,可开机,就是摄氏度状态了,看看右下角是不是变成了“℃”,这样就是摄氏度了。
6.怎么方便的使用耳温计将温度计从盒中取出,并装上一个耳套。
按照上面的描述,转换成摄氏度测量状态按I/O键启动机器,把探头轻柔缓慢地伸入耳道。
按下“Start”按钮,然后松开。
Start按钮上方的绿色Exactemp灯开始闪烁,显示正确的探头就位。
等待听见提示音以及绿色Exactemp灯信号固定不动,表示已经以正确的方式结束测量,可以拿下体温计,读数。
按住”I/O”按钮,直到显示“1MEM”,可以依次显示最近八次测量的温度。
耳温计关闭时,按住”I/O”按钮约5秒钟(会出现OFF提示)或者不进行操作机器会自动关机。
7.多少温度是正常?0-2岁36.4-38度都算正常3-10岁36.1-37.8度都算正常11-65岁35.9-37.6度都算正常65岁以上35.8-37.7都算正常8.有温差怎么办?可能您连续测了几次,前后有一点偏差,这个不需担心,4520有0.1的温差,同时要确保2次测的地方和方法都是正确的。
2次测量的时间间隔最好在1分钟以上,因为人的手是有温度的,会影响耳温计的测算温度。
9.一个耳套可以用多长时间?一个耳套可以用6-8次,不需要一次一换,太浪费;不同的人建议用不同的耳套,这样比较干净点,也比较讲究。
用酒精和棉花擦拭耳套,可以增加耳套使用次数10.为什么在耳朵测量?⑴腋下温度测量的只是表皮的温度,因此不能可靠地反映核心体温⑵口腔温度受饮水、进食和呼吸的影响⑶肛温落后于核心体温的变化,并有交叉感染的危险11.测温技巧·右耳与左耳的读数可能不同,请在同一只耳朵测温·侧卧一耳受压可能耳温偏高,睡觉后等一会儿再测温·耳内无阻塞物及过多耳垢堆积才能测得准确温度·1岁以下幼儿:将耳背垂直向后拉,使测温头清晰探测到耳鼓·1岁以上至成人:将耳背向后上方拉,使测温头清晰探测到耳鼓12.产品维修如果所在地方没有博朗耳温计的专柜,请拨打博朗官网的联系电话,他们会告诉您处理办法的,一般是寄到上海博朗维修中心。
Philips Series 5000 电动剃须刀 S5588 75 产品介绍说明书

Shaver series 5000SteelPrecision bladesPower Adapt sensor360-D Flexing headsIntegrated pop-up trimmerS5588/75Powerful shave, gentle on skinwith SkinIQ TechnologyThe Philips Series 5000 delivers a powerful shave, cutting now even more hair perstroke*. Equipped with advanced SkinIQ technology, the shaver senses andadapts to your hair density, for improved skin comfort.A powerful shavePowerful performance in every passFlexible heads follow your facial contoursEngineered for precision and cutting efficiencySkinIQ technologyAdjusts to your beard for effortless shavingFor a convenient shaveOne-touch open for easy cleaningShave wet, dry and even under the showerPrecision trimmer integrated in the handleUp to 60 minutes of cordless shaving when fully charged1-hour charging time and 5-min quick chargeLED display with icons to use the shaver intuitivelySustainabilityShaver comes with Eco passportHighlightsSteelPrecision bladesWith up to 90.000 cutting actions per minute,the SteelPrecision blades shave close, cutting more hair per stroke**. The 45 high-performance blades are self-sharpening and made in Europe.Power Adapt sensorThe intelligent facial-hair sensor reads hair density 125 times per second. The technology auto-adapts cutting power for an effortless and gentle shave.360-D Flexing headsFully flexible heads turn 360° to follow your facial contours. Experience optimal skin contact for a thorough and comfortable shave.Hair-Guide precision headsThe new shape of the shaving heads is engineered for precision. The surface is enhanced with hair guiding channels,designed to move hair into an effective cutting position.One-touch openClean your electric shaver with ease. At the touch of a button, flip open the shaver head and rinse with water.Wet & DryAdapt your shaving routine to your needs. With Wet & Dry, you can go for a comfortable dry shave or a refreshing wet shave. You can shave with gel or foam even under the shower.Pop-up trimmerComplete your look using the shaver's pop-up precision trimmer. Integrated into the shaver's body, it's the perfect way to maintain a mustache and trim sideburns.60 minutes of cordless shavingShave cordlessly for up to 60 minutes after one full battery charge.1-hour charging timeCharge your shaver fully in just 1 hour with the powerful and energy efficient lithium-ion battery. In a hurry? Plug in your shaver for 5minutes and get enough power for 1 full shave.Sustainable shaving innovationAt Philips, we drive sustainability in all aspects of product creation. Our production facility for blades uses 100% renewable electricity, and our packaging is made with recyclable materials. All shavers come with an Eco passport.SpecificationsShaving PerformanceShaving system: SteelPrecision blades Contour following: 360-D Flexing heads SkinIQ technology: Power Adapt sensor Ease of useWet & Dry: Wet and dry useDisplay: LED display, Battery level indicator, Travel lockCleaning: One-touch open, Fully washable DesignHandle: Rubber gripColor: Deep BlackShaving heads: AngularPowerRun time: 60 minutesCharging: 1 hour full charge, 5 min quickchargeAutomatic voltage: 100-240 VStand-by power: 0.04 WMax power consumption: 9 WBattery type: Li-ionService2-year warrantyReplacement head SH71: Replace every 2 yrswith SH71AccessoriesIntegrated pop-up trimmerTravel and storage: Travel case* Tested versus Philips Series 3000.© 2021 Koninklijke Philips N.V.All Rights reserved.Specifications are subject to change without notice. Trademarks are the property of Koninklijke Philips N.V. or their respective owners.Issue date 2021‑06‑23 Version: 2.0.2。
【8A版】博朗耳温计说明书

博朗耳温计说明书1.产品包装中都有哪些东西打开包装产品共有3样东西:一个硬盒保护安放支架+送的21个耳套+耳温计一个2.产品所用电池说明刚买的产品中含有电池,但是电量不是很足,可以用1-2个月,建议1-2月后换电池,电池是5号电池。
3.几个按键说明I/O:按一下开机,长按就是关start:测量前按一下,灯会闪烁,表示进入测量的状态了。
4.怎么开机关机开机:按‘I/O’键就??关机:再长按‘I/O’键就关机了(会出现OFF提示);或者不进行操作,机器会自动关机。
5.华氏度转换摄氏度的方法由于产品是美国货,美国人对温度的显示是华氏,按”I/O”开机按钮,在右下角有个”F”的标志,那就表示当下使用状态是在华氏状态。
中国人都是用摄氏度,怎么调呢?在关机的状态下,同时按住‘I/O’键和‘start’键不动,等待画面依次显示“F”“set”“℃”当显示到℃的时候同时松手就可以了。
再开机,就是摄氏度状态了,看看右下角是不是变成了“℃”,这样就是摄氏度了。
6.怎么方便的使用耳温计将温度计从盒中取出,并装上一个耳套。
按照上面的描述,转换成摄氏度测量状态按I/O键启动机器,把探头轻柔缓慢地伸入耳道。
按下“Start”按钮,然后松开。
Start按钮上方的绿色EGactemp灯开始闪烁,显示正确的探头就位。
等待听见提示音以及绿色EGactemp灯信号固定不动,表示已经以正确的方式结束测量,可以拿下体温计,读数。
按住”I/O”按钮,直到显示“1MEM”,可以依次显示最近八次测量的温度。
耳温计关闭时,按住”I/O”按钮约5秒钟(会出现OFF提示)或者不进行操作机器会自动关机。
7.多少温度是正常?0-2岁36.4-38度都算正常3-10岁36.1-37.8度都算正常11-65岁35.9-37.6度都算正常65岁以上35.8-37.7都算正常8.有温差怎么办?可能您连续测了几次,前后有一点偏差,这个不需担心,4520有0.1的温差,同时要确保2次测的地方和方法都是正确的。
博朗,说明书

篇一:博朗产品说明书全系列buran博朗系列超细干粉自动灭火装置南京燕苑博朗消防设备有限公司目录第一部分第二部分第三部分第四部分第五部分第六部分悬挂式超细干粉灭火装置1 适用范围2 技术性能3 结构和工作原理4 运输、保管注意事项5 安装注意事项6 维护注意事项7 装箱单8 售后服务悬挂式超细干粉灭火装置1 适用范围2 技术性能3 结构和工作原理4 运输、保管注意事项5 安装注意事项6 维护注意事项7 装箱单8 售后服务悬挂式超细干粉灭火装置1 适用范围2 技术性能3 结构和工作原理4 运输、保管注意事项5 安装注意事项6 维护注意事项7 装箱单8 售后服务自动温感启动器手动启动功能模块1 概述2 探测器性能特点3 主要技术指标4 安装方法5 使用方法6 维护安装注意事项备注 fzxa2.5-buran fzxa5-buran fzxa8-buran第一部分 fzxa2.5-buran悬挂式超细干粉灭火装置1 适用范围1.1 能迅速扑灭a、b、c类火灾和带电电气火灾。
如生产车间、办公室、小型仓库、商店、配电房等层高比较小的相对封闭空间及火车、船舶等交通工具消防使用。
1.2 防爆标志exibiibt32 技术性能2.1 外形尺寸(含固定架;mm)直径 ??????????????200±5高度??????????????375±52.2 灭火装置重量(kg)?????????????????????6.0±0.5 2.3 灭火超细干粉重量(kg)???????????????????2.5±0.125 2.4保护面积、体积(不密闭程度5%)2.5自动温感启动器启动温度(℃)???????????????? ≥70 2.6启动电流(a)????????????????????????≥1 2.7 检查电启动的安全电流(ma)????????????????≤150 2.8 喷射时间(秒)????????????????????????≤5 2.9 灭火时间(秒)???????????????????????≤1 2.10 使用环境温度(℃)?????????????????? -40~+50 2.11 装置启动有效期(年)?????????????????????10 2.12 可人控电启动或与火灾自动报警系统配套使用。
S500系列大屏幕温湿度计用户手册说明书

S500 系列大屏幕温湿度计用户手册S500 系列温湿度记录仪用户手册S500-EX/TH/ET/DT-USB S500-EX/TH/ET/DT-RS4854.1 注意事项----------------------------------------------------------------------------------------------------4.2 常见故障----------------------------------------------------------------------------------------------------目 录第一章 产品介绍-------------------------------------------------------------------------11.1 产品特点----------------------------------------------------------------------------------------------------1.2 使用范围----------------------------------------------------------------------------------------------------1.3 性能参数----------------------------------------------------------------------------------------------------1.4 S500-EX/TH/ET/DT-USB记录仪外型说明------------------------------------------------------------1.5 S500-EX/TH/ET/DT-RS485记录仪外型说明--------------------------------------------------------- 1.6 LCD 显示屏符号说明-------------------------------------------------------------------------------------1.7 按键功能说明----------------------------------------------------------------------------------------------第二章 S500-EX/TH/ET/DT-USB软件使用指南-------------------------------------2.1 USB 驱动安装----------------------------------------------------------------------------------------------2.2 Logpro 软件的使用---------------------------------------------------------------------------------------第三章 S500-EX/TH/ET/DT-RS485软件使用指南----------------------------------3.1 ToMonitor 实时监测软件的使用方法-----------------------------------------------------------------3.2 查看上传的数据-------------------------------------------------------------------------------------------第四章 使用注意事项-------------------------------------------------------------------------------111234557510131616516第一章 产品介绍1.1 产品特点1.2 使用范围采用进口原厂封装校准一体式温湿度传感器内置容量存储器,可存储4.3万组温湿度数据测量温湿度精准度高温湿度数据和时间同时显示,按键操作简单方便内置声光报警,超限报警功能。
2015版博朗系列产品说明书手册

ABC 超细干粉
灭火剂贮存形式
非贮压式
非贮压式
充装质量(质量偏差) 2.5Kg(0%~5%) 5Kg(0%~5%)
装置总重 全淹没空间详细尺寸 (长*宽*高)单位:米 灭火浓度(克/立方米) 保护面积 电引发器电阻(单支)
6Kg
2.51×1.93×3.53
采用 D 类特殊干粉灭火剂的博朗系列干粉灭火装置特别适用于金属火灾的扑救,如钾、钠、 镁等金属燃烧形成的火灾。譬如:烷基 D 类火灾(如三乙基铝助催化剂配加系统火灾)。 1.1.2 该系列产品可以和配套的独立于消防报警系统的博朗系列温控启动模块(70℃±5 或 85℃ ±5℃)、手启反馈模块、延时启停模块、手启延时模块的灵活组合应用形成无源单独/组网自成体 系消防灭火系统。
FZXD5-BURAN FZBA8-BURAN(C) FZBA3-BURAN
-40℃~+50℃ 直径 270 高 400
D 类普通干粉
-40℃~+50℃ 高 290 长 580
ABC 超细干粉
-50℃~+90℃ 直径 250
高 430 厚 162 ABC 超细干粉
FFZ-ACT8-BURAN
FZZA8-BURAN
-50℃~+90℃ -50℃~+90℃
外形尺寸
直径 200 高 375
直径 270 高 400
灭火剂种类
ABC 超细干粉 ABC 超细干粉
FFX-ACT8-BURAN
FZXA8-BURAN
-50℃~+90℃ 直径 270 高 480
ABC 超细干粉
FFX-DPT5-BURAN FFB-ACT8-BURAN FFB-ACT3-BURAN
BRAUN布朗说明书

Post Office Box 29, Mount Holly, N.C. 28120 USA Phone (704) 822-2993 Fax (704) 822-1292E-mail: BRAUNINST @ Post O Ph E-ffice Box 1106, D71301 Waiblingenone (+49) 07151/956230 Fax (+49) 07151/956250 mail: info @ braun-tacho.de ernet: www.braun-tacho.deIntManualE16A323 (with RS232-Interface, Board Mounting) E16E323 (with RS232-Interface, 19" Rack)E16A324 (with Profibus-Interface, Board Mounting) E16E324 (with Profibus-Interface, 19" Rack)Turbine Overspeed Protection Systemwith SIL3/IEC61508 ApprovalGenerator E1696.31 Monitor E1655.41Monitor E1655.41 Monitor E1655.41Note: Shown is model E16E323Contents page Characteristics (3)FunctionStructure (3)SystemSpeed Sensors (3)Electronics (3)SystemMonitor E1655 (4)Test Generator E1696 (4)Alarms provided by the system (4)Alarms (4)TripOverspeedWarning Alarms (4)ChannelSystem Failure Alarms (4)Modules (5)E1655Overspeed Setpoint (SP1) (5)Sensor Failure Monitor (5)Sensor Pulse Train Comparison (5)Low Speed Check (SP2) (5)External Trip Input (6)Input (6)SignalSensorSensor Signal Repeater (6)Testing (7)E1696 Generator (7)Automatic test routine (7)function (8)WatchdogFailure signals (8)Display and Keys of E1696 (9)Error-Messages of E1696 (10)Display and Keys of E1655 (11)Error-Messages of E1655 (11)Programming of the modules (12)parameters (12)toAccessListing of E1655 (13)ParameterParameters of E1655 (14)Listing of E1696 (19)ParameterParameters of E1696 (19)Function Diagram (24)Diagram (25)WiringRear View of 19"Rack (E-Version) (26)ElectricalSpecifications (27)Dimensions of E-Version (19" Rack) (28)A-Version (Board Mounting) (30)DimensionsofSummary of Versions and Spare Part Recommendation (31)Function CharacteristicsTurbine Speed Monitoring against overspeed with redundancy by 3 independent channels with trip relay outputs 1 each per channel.Function Test Facility with discrete selection by external signals, or automatic test routine with watchdog and system failure warning. 3 channel structure with independent monitoring modulesoptions for externally controlled test or automatic test routineEach channel has its own comprehensive measurement and alarm section,realized by a Monitor Module in each channel. Measurement is based on thefast responding digital pulse interval principle with automatic floating numberof periods. Inputs include sensor monitoring. Each of the three MonitorModules ends up to an alarm outputs (breaking overspeed trip circuit). Anyfailure of sensor or measuring function detected also sets the trip output of themonitor to overspeed position. Further, each channel releases its own failurewarning signal, free available to the periphery as N/O contact.The overall response to an overspeed condition is shorter than 15 millisec(plus 1 pulse interval of the input pulse train).fast response to overspeedEach module within the system has its own data port at the front, usable forthe configuration of the module, and also for data calling. Available as RS232(standard) or as PROFIBUS DP Interface.Data interface facilitySystem Structure(see also function diagram)Speed Sensors3 Hall-Effect based speed sensors series A5S... are placed at the turbine shaftfor a non-contact sensing of its rotational speed. Milled slots in the shaft, or apole wheel, form a profile to generate a pulse frequency corresponding to thespeed. The sensors have an incorporated signal amplifier providing anadequate signal level for the transmission to the E16 Electronics.Non-contact speed sensingSystem ElectronicsThe E16 Electronics includes 3 Monitor Modules E1655, one each for each channel A, B, C. Further, 1 Test Generator Module E1696.They are plugged into a card file, which is ready wired to perform the monitoring function. Terminal strips connect to the periphery. The System and its ModulesMonitor E1655This module provides:Sensor circuit monitoring and sensor signal lead monitoring, sensors pulse train comparison.Sensor signal repeating output.Digital speed measurement with display in RPM terms.Overspeed trip setpoint (SP1) 2 alarm signal outputs,also offering the facility of an external alarm control.Low end setpoint (SP2) to perform the plausibility check,with starter facility.“channel warning alarm” relay output"sensor failure alarm" relay output.All functions are digital, with 5 digits resolution and accuracy of+ 0.01% + 1 in the last digit.Parameters are programmable from the front keys (with access lock), or via data interface.Functions included into the Monitor module E1655. Detailed description on following pagesTest Generator E1696This module provides:Adjustable frequency generator to substitute the sensor signal under test condition, with display in RPM terms.Channel test selection by external control, or automatic test cycle with “System Failure” outputs. Functions included into the Test Module E1696Detailed Description on following pagesAlarms provided by the System Overspeed Trip AlarmsThe trip alarm of the monitor module E1655 within each channel will be released under one or more of these conditions:1.overspeed setpoint (SP1) exceeded,2.sensor failure detected (supply and signal lead monitor),3.sensor signal voltage failure detected (only at zero speed)4.sensor pulse train discrepancy detected,5.low end setpoint (SP2) not exceeded after starter phase,6.external alarm control actuated7.self test failure conditions for channel trip alarmChannel warning alarmThis signal contact, available from each channel to the periphery, breaks under one or more of these conditions:1.overspeed setpoint (SP1) exceeded (if programmed).2.external trip control actuated,3.low end setpoint (SP2) not exceeded after starter phase4.sensor pulse train discrepancy detected5.self test failure of a neighbor channel. conditions for channel warning alarmSensor failure alarmThis signal contact, available from each channel to the periphery, breaks under one or more of these conditions:1.sensor failure detected (supply and signal lead monitor),2.sensor signal level failure detected. conditions for sensor failure alarmSystem Failure warningsThe System Failure Alarms 1 and 2 , available as (N/O) contact will be signalized if one of the channels does not duly respond to the test procedure. see section Automatic Test Cycle for details of System failure warningsThe E1655 ModulesAlarms and Checks performedOverspeed Setpoint (SP1)The overspeed setpoint SP1 can be programmed to any speed level, in terms of RPM. Its setting can be called to display. Further programmable are the hysteresis width, and the event memory. If not memorized, the signal returns to “no excess” with the measurement decreasing below setpoint (minus hysteresis), otherwise it must be cancelled by an external acknowledge signal.details of the overspeed alarm (SP1)Sensor Failure MonitorThis function includes 2 sections, the sensor supply monitor and the sensor signal lead monitor. Both have certain preconditions, as explained below. They are met by all BRAUN sensors of series A5S... with push/pull output stage, possibly not by others. Check the sensor data sheet for validity. If not applicable, disengage the function.The supply monitor checks the current drain, and the voltage of the sensor supply lead. Thereby it detects a break as well as a short circuit in the sensor connection. Obviously, this requires a sensor with adequate power consumption (>7ma).The sensor signal lead monitor checks the level of this input to be either definitely on high or on low level, as a push/pull output is, if not broken. As primarily intended to monitor the signal lead in standstill state, the function automatically disengages when the sensor supplies a signal frequency. A failure thus detected will be memorized or not, as programmed.Sensor Failure Monitor Sensor Pulse Train ComparisonThis function checks for proper sensor signals during run of the machine. Each monitor Module E1655 compares the pulse train delivered from its own sensor to those of its both neighbor channels. If they differ, the monitor finds its own sensor to be faulty. This checks performs at any frequency, and does not depend on a speed measurement.Active sensor signal checkLow Speed Check (SP2)If the speed measurement drops below the (programmable) setpoint SP2 of the Monitor Module during operation, from whatever reason, a failure will be signalized. A very comprehensive check, including sensor and measurement function.The level SP2 will be set at the low speed end, to 30 % for instance. For start-up, it will be overrun by the starter function of the E1655 module, activated by an auxiliary contact from the machine control, and held for a programmable period of time (0...999 sec) after its end.This alarm is programmable to be memorized or not, or to be disengaged.Low speed alarm checks for full performanceDisplayThe numerical display of the E1655 module serves as a programming aid (if not programmed by the data interface), indicating the program group number, the step number, and the parameter addressed.When not in the programming phase, the display reads the actually measured speed, in terms of RPM or any other desired unit (also during the test phase). By pushbuttons, the setpoints SP1 and SP2 can be called (but not modified that way).By red and green LEDs, the module indicates its alarm conditions for SP1 and SP2.External Trip InputIn addition to the alarm and failure conditions as described before, the trip alarm may also be released by an external binary signal. This feature allows to include a condition from outside the speed monitor into the trip release, maybe a temperature signal, or a pressure contact. The high/low level for the response of this control input is adjustable. Trip release by external signalSensor Signal InputThe input accepts and feeds preferably 3-leads sensors, as BRAUN sensorseries A5S.. with p/p output. Others may give restrictions, in frequency range,transmission distance, and the safety checks that can be performed.By a control signal from the Test Generator Module, the monitor input isswitched to a second input, which receives the test frequency as emitted fromthe Test Generator.Sensor signal inputSensor Signal RepeaterThis isolated output repeats the signal as received from the sensor to the periphery. Feeds for instance a speed controller, or external display. The output is firmly tied to the sensor signal of the specific channel, not affected when the monitor is switched to the test frequency. Isolated sensor signal repetitionTesting with E1696 Test Generator Module Externally controlled test procedureThe E1696 provides a test frequency to be switched to the channels A, B, C of the system, one after the other, by means of external (DC) control signals. This frequency can be set (in terms of RPM) at the test generator, and then tuned up and down by pushbutton. The front display reads the actual frequency.3 control inputs to the system are assigned to the 3 channels A,B,C. The one input held high switches its channel to test, substituting the sensor signal by the frequency of the test generator. Note: the repeater output of the module remains with the sensor input, not affected by the test procedure. The control inputs are locked against each other, to prevent of inadvertently switching 2 or 3 channel to test at the same time (this protection can be disengaged by program).The channel under test reads the test frequency as received and measured at its numerical display (by RPM). If it exceeds its setpoint, it will signalize o-verspeed by its alarm relay and LED display.A contact set of an external voter must signalize the correct response to the test generator. externally controlled test proceduresystem reaction to externally controlled testAutomatic Test RoutineThe Test Module repeats the automatic test routine with an adjustable time interval (1 ... 9 999 min).The test routine itself is performed in three steps. With each step, the three monitors are tested subsequently.Step one:Simulated test speed 1 (n >SP1, feedback of tested channel must be trip), Step two:Simulated test speed 2 (n <SP1, feedback of tested channel must be no trip), Step three:Forced trip (n <SP1, feedback of tested channel must be trip).During step three, the monitor receives test speed 2.If measurement and alarming serve duly, the Monitor Module under test must release its trip alarm with step 1 at simulated test speed 1, but must not with step 2 at simulated test speed 2.With step 3 the forced trip input of the monitor is tested. At step 3 each monitor is switched to simulated test speed 2 (below overspeed) but the tested channel must feed back the trip signal.The Test Module checks for a corresponding response. It is returned from a contact set of an external device (magnetic valve).With an incorrect response from a channel, the routine immediately interrupts (to prevent the entire system of an unfounded overspeed trip alarm to the machine) and a system failure signal is released.The Test Module throws the faulty channel into its overspeed condition (by means of the forced trip input). Thus, the overspeed safety is maintained – the system now responds with a 1 of 2 characteristics, in other words, if just one other channel detects overspeed or an internal fault, the turbine will be shut down. regularly performed automatic test routine: checking the response of all channels to 2 test frequencies safety maintained after failure in one channelWatchdog FunctionThe watchdog section on the E1696 module performs an identical test step sequence, independent from the above but in close synchronism. If both, test routine and watchdog are not at the same step at the same moment, system failure is signalized. But more, the above mentioned measure of forcing a faulty channel to its overspeed condition also requires the said coincidence between routine cycle and watch dog. In other words, the measure is taken only if the stepping sequence up to this moment was correct. This prevents the system from an unfounded overspeed alarming, and thus further increases the reliability, and the availability of the machine.Incorrect stepping however generates a warning, by the System Failure alarm output, which should immediately be observed. watchdog checks for correct stepping sequenceand crosschecks trip signalsFailure signals to the peripheryThe Test Generator Module E1696 provides failure signals (1) and (2), as N/O relay contacts, de-energized to announce a failure, also with power supply missing.Both respond to an alarm from one or more of the channels A, B, C, and to a failure detected in the testing sequence, or to an incorrect performance of one of the Monitor Modules during test. system failure signals from test and watchdog sectionDisplay and Keys of E1696During auto test sequenceGenerator E1696LED2: flashing = channel B is testedOn = channel B signalizes tripLED3: flashing = channel C is testedchannel C signalizes tripLED4: On = Auto-Test-Mode activeOff = Manual-Test-Mode activeIn normal operation the display reads:With key the value of test speed 1,with key the value of test speed 2.With keys and depressed : the remaining time (XXXX.X minutes) until the next auto test sequence is started Start of an auto test sequenceAn auto test sequence can be manually started by depressing keys and .Reset of latched alarms with key .Display (error) messages refer to next page.Error-messages of test generator E1696During normal operation:C0-E1 : channel A signalizes trip, B and C notC0-E2 : channel B signalizes trip, A and C notC0-E3 : channel A and B signalize trip, C notC0-E4 : channel C signalizes trip, A and B notC0-E5 : channel A and C signalize trip, B notC0-E6 : channel B and C signalize trip, A notDuring an auto-test-sequence:C1-E1 : incorrect feedback of channel A at simulated test speed 1 C2-E1 : incorrect feedback of channel B at simulated test speed 1 C3-E1 : incorrect feedback of channel C at simulated test speed 1 C1-E2 : incorrect feedback of channel A at simulated test speed 2 C2-E2 : incorrect feedback of channel B at simulated test speed 2 C3-E2 : incorrect feedback of channel C at simulated test speed 2 C1-E3 : incorrect feedback of channel A at test of forced tripC2-E3 : incorrect feedback of channel B at test of forced tripC3-E3 : incorrect feedback of channel C at test of forced tripC9-E1 : channel A not ready for testC9-E2 : channel B not ready for testC9-E3 : channel A and B not ready for testC9-E4 : channel C not ready for testC9-E5 : channel A and C not ready for testC9-E6 : channel B and C not ready for testC9-E7 : channel A, B and C not ready for test Error-Messages from E1696 (C = Check, E = Error)Other display-messagesFC-1 : test of forced tripSELF : E1696 performs a self test routine (subsequent to each auto testsequence)FC = Function CheckDisplay and keys of E1655Monitor E1655In normal operation the display readsWith key the value of SP1,with key the value of SP2.Error messages(SE = Selftest-Error, CE = Check-Error)SE-01: sensor supply failure or sensor lead failure,SE-02: pulse train difference,SE-03: SE-01 and SE-02 simultaneously,SE-04: low end failure,SE-05: SE-01 and SE-04 simultaneously,SE-06: SE-02 and SE-04 simultaneously,SE-07: SE-01, SE-02 and SE-04 simultaneously.SE-10 : test speed of generator = zero (= failure of test generator)ortest time exceeds 10 minutes (= failure of test generator)orneighbourchannelsignalizes permanent self test (= failure of neighbor channel)SE-20 : neighbour channel fails to produce self test within 5 hours time of operation (= failure of neighbor channel) CE-1 : monitor switched to forced trip by E1696Reset of latched alarms with keys and .Other display-messages :(FC = Function Check)FC-1 : test of forced trip by E1696FC-2 : external trip control actuatedSELF : self test of monitor (periodically repeated after each 2 hours)Programming of the modulesAccess to parametersPrinciple: Select a Parameter by it's "Name" Pgg.ss,where gg = Parameter- Group-No. andss = Step-No. within Group,then verify the value and change it according the application Programming:To enter the programming phase, press both keys and simultaneously; insteadof normal display, P00.00 will be shown.Select group- or. step-no. with keys , .Toggle between group- and step-range with key .Show parameter's value with key .Select (move ) active digit with key .Adjust figure in active digit with keys , .Acknowledge with key , Cancel (old value still valid) with key .Return to normal operation with keyExample: change value of parameter P01.01 from 2386 to 2387 or 2385:Enter = new, changed value is validParameter listing of Monitors E1655:Summary of programming steps and their initial parameters (default values) as set on deliveryprogram- data set on delivery Step No. parameter function (initial data)P00 .00 access code request 0000 .01 new code figure 0000.02 lock status (1 = unlocked, 0 = locked) 1 = unlockedP01 .00 input: scaling decimals of input signal frequency 0 = none .01 value of nominal input frequency (Hz) 10000.02 decimals of corresponding speed 0 = none.03 corresponding speed (unit as desired) 10000.04 low end of speed range 00001P02 .00 zeroed LSDs in display 0 = none .01 display updating sequence (X.X sec) 0.3 (sec).02 time elapse of starter phase (XXX sec) 000 (sec).03 truth-level of external trip signal (0 = low, 1 = high) 1 = high.04 sensor monitoring (0=off,1=on,2=on,latched) 1 = on.05 mode of sensor monitoring (0=none,1=current,2=voltage,3=both) 1 = current.06 lowspeed monitoring (0=off,1=on,2=on,latched) 1 = on.07 sensor signal deviation monitoring (0=off,1=on) 0 = off.08 reset interval of deviation counters (1....9999 pulses) 1000.09 allowable deviation between counters (0...99 pulses) 50.10 limit of error counter (1...99 deviation detections) 5.11 warning alarm at overspeed (0=no,1=yes,2=yes and at test overspeed) 1 = yesP03 .00 setpoint (SP1) in unit as programmed for display 10000 .01 hysteresis bandwidth SP1 (XX.X % of SP1) 05.0 (%).02 alarm to be latched (0=no, 1=yes) 0 = noP04 .00 setpoint (SP2) in unit as programmed for display 00100 .01 hysteresis bandwidth SP2 (XX.X % of SP2) 05.0 (%).02 alarm to be latched (0=no, 1=yes) 0 = noP05 .00 hardware address added to device address (0=no,1=yes) 0 = no .01 device address (range 1...125) 001Parameter Group P00.xx of E1655:Data Access, PasswordKey figure to accessProgramming access to all parameters can be locked by a password number.If not properly served, the parameters may be called to display but not varied. If not properly served, the display reads -E1-,and any programming in a later program step will be rejected.Note:If the knowledge of the password number went lost it may be recalled to display by a procedure, as described in a separate sheet K0-095 (not included into these instructions). The code figure then appears by 4 digits.In a subsequent program step, a new code may be established, substituting the one previously valid.The key function may be disengaged by a next program step. With authorized access, set parameter to 1 in step No .02, to generally unlock the key. This may prove practical during the installation phase to facilitate the adjustments. Once installed, the key function should be reactivated, by programming parameter 0 in this step. Step P00.00:Code figure to access Step P00.01:new code figure Step P00.02: unlock access keyParameter Group P01.xx of E1655: Measurement Configuration, Scaling I nputScaling defines the relation between the input signal frequency (in terms of Hz), and the corresponding display (in terms of RPM). Both values are freely programmable by their decimals and numerical amount. Of course, they must refer to the same operation level. This reference point is recommended close to the high end of the intended operation range. In later operation however, it may be overrun without error.Scaling ExampleThe speed is measured by a contactless probe scanning a gear wheel on the turbine shaft with 90 teeth.Thus, a speed of 3000 rpm results in a signal frequency of 3000x90:60 (Hz) = 4500 (Hz). With this as the reference level, the following parameters are to be set:Step P01.00 parameter 0 (= no decimals)P01.01 parameter 04500P01.02 parameter 0 (= no decimals)P01.03 parameter 03000 scaling inputsignal frequency (Hz):Step P01.00 =number of decimals,Step P01.01= value. corresponding value of rpm: Step P01.02 =number of decimals,Step P01.03 = valueLow end for shut-offIf the speed falls lower than this level, the measurement will be cancelled to zero.The low end is programmed by the same terms, as defined for the speed by steps P01.02 and P01.03. Step P01.04 low end of operating rangeParameter Group P02.xx of E1655: Display, Starter time, Failure Monitoring LSDs on zeroIf the display of the speed uses 4 or more digits, for application reasons, the lesser significant digits (LSD) may appear fluctuating. To avoid irritations by not significant digits, a number of them may be permanently kept at zero. Set the parameter to the number of LSDs to be kept on zero. Step P02.00: zeroing LSDsDisplay updating sequenceIndependent from the response time used for other functions, the display may have its own up-dating sequence - again in the interest of stabilized and well legible readings. Set the parameter to the time in steps of 0.1 sec.A recommended value is 0.3 sec. Step P02.01: display updatingStarter time periodThis step sets the starter time period (elapse). Starter phase state for SP2 lasts from the beginning of the external starter signal plus the programmed time elapse following its end. Range 000...999 sec. StepP02.02:starter time elapseTruth level of External Trip SignalTo match the control source, and specific safety aspects, the parameter of this step defines either high or low signal level to make the condition true. StepP02.03:Truth level ofExternal Trip Signalparameter0 : high = control true1 : low = control trueEnable/Disable of sensor failure detectionSensors without power supply (for example inductive sensors) cannot be monitored against failure.If the sensor is monitored, it is possible to latch a failure alarm until it is reset. StepP02.04:Monitoring of sensorparameter0 : off1 : on, alarm not latched2 : on, alarm latchedMode of sensor monitoringThe sensor can be monitored versus current drain (alarm if current drops below 7 mamps or exceeds 150 mamps) and/or signal voltage level during zerospeed of the turbine.Note:Signal voltage level monitoring only possible with BRAUN sensors with incorporated push/pull output (series A5S...). StepP02.05:Mode of sensor monitoringparameter0 : no monitoring1 : current monitoring2 : voltage monitoring3 : current and voltageLowspeed monitoring (n < SP2)The lowspeed monitoring can be switched off. If the lowspeed monitoring is enabled, the speed of the turbine must exceed SP2 (after starter time has elapsed). StepP02.06:lowspeed monitoringparameter0 : off1 : on, alarm not latched2 : on, alarm latchedSensor Pulse Train ComparisonPurpose of this function:•Detection of a faulty position of the sensor (cleareance to big or wrong angular position) during starter phase of the turbine (n<SP2). •Deviation detection of the sensor signals during normal operation of the turbine (n>SP2).Function principle:The pulses of all three sensors are counted in each monitor. The main sensor of the monitor is detected as faulty if the main counter deviates from both neighbour counters. The allowable deviation between the counters is adjustable.The counters are periodically reset after an adjustable number of pulses or if a fault is detected.Subsequent counter evaluations that indicate a faulty sensor increase an error counter. This counter is reset by an evaluation that indicates a proper working sensor. If the error counter exceeds an adjustable limit, the alarm is released.Programming steps for deviation monitoring:Step P02.07 : monitoring on/offStep P02.08 : number of pulses for periodically reset of counters(range from 1 to 9999 pulses)Step P02.09 : allowable deviation between counters (range 1 to 99 pulses) Step P02.10 : limit of error counter(range from 1 to 99)Example:P02.07 set to 1 (monitoring on)P02.08 set to 1000 (counters will be reset after 1000 pulses, of any sensor)P02.09 set to 50 (allowable deviation of 50 pulses within 1000 pulses)P02.10 set to 5 (5 subsequent error detections until alarm is released)With above settings a non operational main sensor will be detected after 250 pulses of the other two sensors (5 error detections after 50 pulses). StepP02.07:sensor pulse train comparisonon/offparameter0 : off1 : onStep P02.08:number of pulses for reset ofpulse countersrange 0001 to 9999 pulsesStep P02.09:allowable deviation betweencounters until error counter isincreasedrange 01 to 99 pulsesStep P02.10:limit of error counter until alarmis releasedrange 01 to 99Warning alarm at overspeed conditionIt can be programmed whether the warning alarm will be released at a real overspeed condition or additionally at a test overspeed condition. StepP02.11:warning alarm at overspeedparameter0 : no1 : yes, only at real overspeed2 : yes, at real and test over-speed。
博朗CruZer5,face剃须刀中文版说明书

5612 English 17Braun GmbH Frankfurter Straße 145 61476 Kronberg/Germany c r u Z e r f a c eo i lOur products are designed to meet the highest standards of quality, functionality and design. We hope you entirely enjoy your new Braun shaver.WarningYour shaver is provided with a special cord set with an integrated Safety Extra Low Voltage power supply. Do not exchange or manipulate any part of it. Otherwise there is risk of electric shock.This appliance is not intended for use by children or persons with reduced physical, sensory or mental capabilities, unless they are given supervision by a person responsible for their safety. In general, we recommend that you keep the appliance out of reach of children. Children should be supervised to ensure that they do not play with the appliance.For usage in other body areas, please make sure that the skin is stretched. For hygienic reasons, do not share this appliance with other persons.Oil bottleKeep out of reach of children. Do not swallow. Dispose of properly when empty.Description1 3-day beard comb & protective cap2 Shaver foil3 Cutter block4 Twistable trimmer4a Wide trimmer (28 mm)4b Narrow trimmer (14 mm)5 Charging light6 On/off switch7 Adjustable comb8 Beard length selector9 Special cord setChargingThe best environmental temperature for charging is between 15 °C and35 °C. Do not expose the shaver to temperatures higher than 50 °C for English• When charging for the first time or when the shaver is not used for a few months, leave the shaver to charge continuously for 4 hours.• The charging light (5) shows that the appliance is being charged. When the battery is fully charged, the charging light turns off. Intermittent blinking after a while indicates that the battery maintains its full capacity. This can also happen short term when charging after the battery was completely discharged.• A full charge provides 30 minutes of cordless shaving time depending on your beard growth.• Once the shaver is completely charged, discharge the shaver through normal use. Then recharge to full capacity. Subsequent charges will take about 1 hour.• Maximum battery capacity will only be reached after several charging/ discharging cycles.• 5-minute quick charge is sufficient for a shave.ShavingFirst, remove the adjustable comb (7): Using your thumbs, press against theside clips of the adjustable comb so that they swing off in the direction of the arrows (a). Activate the on/off switch (6). The floating foil frame automatically adapts to your skin surface for a close, smooth shave.For best results:• Always shave before washing your face.• At all times, hold the shaver at right angles (90°) to the skin (b).• Stretch the skin and shave against the direction of beard growth.• For pre-shaving after a few days of not having shaved, use the wide trimmer (4a) to pre-cut long hairs. For a close, smooth shave, finish with the foil.• To maintain 100% shaving performance, replace your foil and cutter block at least every 18 months or when worn.StyleUsing the twistable trimmerThe wide trimmer (4a) evenly cuts and trims large areas (c). It is ideal for shaping sideburns, moustaches and partial short beards. The wide trimmerstretching the skin, guide the wide trimmer against the direction of hair growth.The narrow trimmer (4b) precisely defines lines and edges (d), being ideal for precise contouring.To use the narrow trimmer, push up the twistable trimmer and turn it 180°. Frequent use of the twistable trimmer will reduce the battery capacity.TrimUsing the trimming attachments (1) and (7)Place the respective trimming attachment onto the shaver foil (2) alternatively on the twistable trimmer (4) and press it against the shaver housing until it snaps into place with a click (e).3-day beard comb & protective cap (1): This attachment is perfectly suited for creating a stubble look and maintaining it.• Place the attachment onto the foil (2) and push up the twistable trimmer (4). Turn on the shaver and use the appliance as shown in the illustration (e). The attachment ensures an optimum usage angle.Adjustable comb (7): This attachment is ideal for beard trimming and keeping it at a constant length.• Place the attachment onto the shaver foil (2) and set desired beard length. Press beard length selector (8) and slide it up (f) (possible length settings from top to bottom: 1.2 mm / 2.8 mm / 4.4 mm / 6 mm). Push up the twistable trimmer (4).• Press the on/off switch and trim against hair growth by guiding the transparent comb part over the skin (f).CleaningThe shaver head is suitable for cleaning under running tap water.Warning: Detach the shaver from the power supply before cleaningthe shaver head in water.Regular cleaning ensures better shaving performance. Rinsing the shaving head after each shave under running water is an easy and fast way to keep it clean:• Next, switch off the shaver, remove the shaver foil and the cutter block. Then leave the disassembled shaving parts to dry.• If you regularly clean the shaver under water, then once a week apply a drop of light machine oil onto the trimmers (4a, 4b) and shaver foil (h). Alternatively, you may clean the shaver using the brush provided (i):• Switch off the shaver. Remove the shaver foil.• Using the brush, clean the cutter block and the inner area of the shaver head. However, do not clean the shaver foil with the brush as this may damage the foil.Keeping your shaver in top shapeReplacing the shaving partsTo maintain 100% shaving performance, replace your foil and cutter block at least every 18 months or when worn. Change both parts at the same time for a closer shave with less skin irritation. (Shaver foil and cutter block: 10B)Preserving the batteriesIn order to maintain the optimum capacity of the rechargeable batteries, the shaver has to be fully discharged (by shaving) every 6 months approximately. Then recharge the shaver to full capacity.Environmental noticeThis product contains rechargeable batteries. In the interest ofprotecting the environment, please do not dispose of the product inthe household waste at the end of its useful life. Disposal can takeplace at a Braun Service Centre or at appropriate collection points provided in your country.Subject to change without notice.For electric specifications, see printing on the special cord set.。
Braun ThermoScan 5 使用说明书

Braun博朗5系series 550使用说明书-手册

washable
1
2 3
4
Series 5
5
on • off
6
full
7
sensitive
full
7
8 9
10
560
8 9
10
550
11 12
ContourPro on • off full
sensitive
2
on • off
3
sensitive
2
sensitive on
sensitiv sen washable
Charging
The best environmental temperature for charging is between 5 °C and 35 °C. Do not expose the shaver to temperatures higher than 50 °C for extended periods of time.
• Press the foil release buttons (3) to lift the shaver foil (do not remove the foil completely). Switch on the shaver for approx. 5–10 seconds so that the shaved stubbles can fall out.
Tips for the perfect shave For best shaving results, Braun recommends you to follow 3 simple steps: 1. Always shave before washing your face. 2. At all times, hold the shaver at right
【精品】博朗榨汁机说明书
【关键字】精品博朗榨汁机说明书篇一:飞利浦榨汁机1861飞利浦榨汁机1861柑桔是凉性水果,也是世界上最重要的商品水果,是中国亚热带地区栽培面积最广的果树,也是广西最重要的果树。
它包括的种类很多,广西主要栽培的有甜橙、宽皮柑桔、柚、金桔、柠檬等,而每一种类又有许多优良品种。
中国西部有果城四川南充,主产柑桔等水果。
一般榨汁机包括:主机、刀片、滤刀网、出汁口、推果棒、果汁杯、果渣桶、顶盖。
大多可用于搅拌、切割、研磨、碎肉、碎冰、榨汁,榨出的果汁即比买来的果汁营养丰富、味道更佳。
选购方法1. 材质:首选食品级304不锈钢材质,此种材质磁铁吸不住,耐腐蚀易清洁。
塑料及可被磁铁吸住的不锈铁材质,果汁易被氧化,材料容易被果汁腐蚀、生锈和产生细菌。
2. 功率:首选大功率榨汁机,推荐800W及以上功率,功率越大,转速越快,出汁率越高,且大于26000转/分转速的榨汁机,能够破壁水果细胞膜,释放更多营养,口感也更好。
3. 刀网设计:刀网属于易磨损部件,目前家电业已经推出具有镀钛涂层的刀网,极大的提高刀网的硬度和使用寿命。
刀网的直径也是一条重要指标,直径大的刀网能够持续保持出汁率,直径小的刀网易被果汁堵塞,不能持久榨汁。
操作步骤1、将中机架竖直对准主机,放下,装配到位。
2、将榨汁网底部对准电机轮按压下,两手用力要均匀,确认压到位,旋转几下看有无刮中机架。
(提起则为拆开)3、装入顶盖,并扣上安全扣。
(扣安全扣时,请先将扣的上部扣上,再往下压,即可扣到位。
拆时刚好相反,请先将扣的底部打开,即可打开安全扣)4、试一下机,看工作是否正常,如噪音或震动偏大,可再装过,将榨汁网换个方位压入会有好的效果。
榨汁操作1、先将菜水果之类去皮去核,洗净备用,个头大于加料口的请切小。
2、将果汁杯放于出汁口,大集渣斗放于出渣口。
3、开启机器,将水果蔬菜放入榨汁机,用推料杆压下,即可榨出新鲜美味的果汁。
4、炸出汁后,有些榨汁机为了方便客户,其盛汁装置是外置的,需要把再把果汁倒进自己的杯子。
波士顿电器产品说明书.pdf_1701981029.7479885
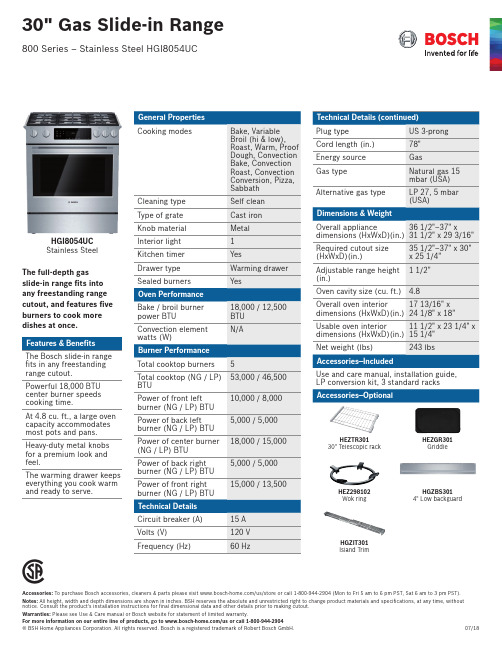
18,000 / 12,500 BTU
Convection element
N/A
watts (W)
Burner Performance
Total cooktop burners 5
Total cooktop (NG / LP) 53,000 / 46,500 BTU
Power of front left burner (NG / LP) BTU
Warranties: Please see Use & Care manual or Bosch website for statement of limited warranty.
For more information on our entire line of products, go to /us or call 1-800-944-2904
10,000 / 8,000
Power of back left burner (NG / LP) BTU
5,000 / 5,000
Power of center burner 18,000 / 15,000 (NG / LP) BTU
Power of back right burner (NG / LP) BTU
36 1/2"–37" x
dimensions (HxWxD)(in.) 31 1/2" x 29 3/16"
Required cutout size (HxWxD)(in.)
35 1/2"–37" x 30" x 25 1/4"
Adjustable range height 1 1/2" (in.)
5,000 / 5,000
博朗MR5550食物料理机说明书

c
d
e
f
g
1 2
h
2
1
i
1cm 1cm 700 g 500 g 500 g 30 g 30
500 g 500 g 500 g 500 g 400 g 200 g
15-30 30 10 20 20 15 25 30 20 45-60 60
1-4
1 - 12 1 - 12 6 - 12 6 - 12 5 - 8
Egg snow: Only whip up to 4 egg whites. Start with a medium speed setting «7» and while beating, increase the speed to setting «12».
How to operate your food preparation (FP) attachment
children or persons with reduced physical, sensory or mental capabilities, unless they are given supervision by a person responsible for their safety. In general, we recommend that you keep the appliance out of reach of children. Children should be supervised to ensure that they do not play with the appliance. • The appliance is constructed to process normal household quantities. • Always unplug the appliance when it is left unattended and before assembling, disassembling, cleaning or storing. • Before operating, check whether your voltage corresponds to the voltage printed on the bottom of the appliance. • Especially when operating the handblender attachment in hot liquids, do not immerse the blender shaft into – or remove it from the liquid while the appliance is switched on.
Braun博朗5系series 550使用说明书-手册
Press the on/off switch (6) to operate the shaver.
Comfort setting switch «sensitive» Setting the shaver head according to your comfort needs.
The «sensitive» switch (5) provides three options for comfort setting:
The red low charge segment flashes when the battery capacity has dropped below 20%, provided the shaver is switched on. The remaining capacity will then be sufficient for 2 to 3 shaves.
9
Keeping your shaver in top shape
Replacing the shaver foil and cutter block / reset To maintain 100% shaving performance, replace the shaver foil (1) and cutter block (2), when the replacement symbol (8) lights up (after about 18 months) or when worn.
1 «+»:
The shaver head is in full swing, freely follows the contours of your skin to provide more comfort.
Philips Series 5000 电动剃须刀 S5588 26 产品说明说明书

Powerful shave, gentle on skinwith SkinIQ TechnologyThe Philips Series 5000 delivers a powerful shave, cutting now even more hair per stroke*. Equipped with advanced SkinIQ technology, the shaver senses and adapts to your hair density, for improved skin comfort.A powerful shaveFollows the contours of your faceGuides hair into the optimal cutting positionMore cutting performance in every strokeSkinIQ technologyA shaver with the power to tame beardsFor a convenient shaveOne-touch open for easy cleaning60 minutes of shaving from a 1 hour chargeA more intuitive shaving experienceEven up your moustache and sideburnsChoose a convenient dry or refreshing wet shaveThe electric shaver with an Eco passportFully charged in one hourEasy, efficient trimming without nicks and cutsHighlightsSteelPrecisionbladesPowerful yet gentle , the 45 self -sharpening SteelPrecision blades on this Philips shaver complete up to 90,000 cutting actions per minute , cutting more hair per stroke ** for a clean , comfortable finish .Power A daptsensorThe electric shaver has an intelligent facial -hair sensor that reads hair density 125 times per second . The technology auto -adapts cutting power for an e ffortless and gentle shave .360 D FlexingheadsDesigned to follow the contours of your face ,this Philips electric shaver has fully flexible heads that turn 360° for a thorough and comfortable shave .Hair -Guide precisionheadsThis new -shape precision shaver is enhanced with hair -guiding channels for optimal cutting and skin comfort .One -touchopenClean your electric shaver with the touch of a button . Simply flip open the shaver head and rinse with water .Protective GuardSystemA nose , ear and eyebrow trimmer engineered for safety and comfort , the Protective Guard System covers the blades to ensure they don 't make direct skin contact . It 's also made to minimise missed hairs , pulling or tugging .Shave wet ordryA wet and dry shaver that adapts to your preference . Choose a convenient dry shave , or pair with your favourite foam or gel for a refreshing wet shave .Pop -uptrimmerRe fine and de fine your moustache and sideburns with the pop -up trimmer —and complete your look with ease .60 minutes of cordlessshavingA shaver for at home or on -the -go . Get 60 minutes of shaving time from a 1 hourcharge or plug it in for instant and continuous power .SpecificationsPowerBattery type: Li-IonRun time: 60 minutesA utomatic voltage: 100-240 V Charging: 1 hour full charge, 5-min quick chargeStand-by power: 0.04 WMax power consumption: 9 WDesignColour: Deep BlackHandle: Rubber gripShaving heads: A ngular Ease of useDisplay: LED display, Battery level indicator,Travel lockWet and Dry: Wet and dry useCleaning: One-touch open, Fully washableA ccessoriesNose trimmer includedIntegrated pop-up trimmerTravel and storage: Travel caseShaving PerformanceContour following: 360 D Flexing headsShaving system: SteelPrecision bladesSkinIQ technology: Power A dapt sensorService2 year warrantyReplacement head SH71: Replace every 2 yrswith SH71* Tested versus Philips Series 3000.© 2023 Koninklijke Philips N.V.A ll Rights reserved.Specifications are subject to change without notice. Trademarks are the property of Koninklijke Philips N.V. or their respective owners.Issue date 2023‑03‑03 Version: 4.4.1E A N: 87 10103 98502 0 。
Philips Shaver Series 5000 S5560 33 产品说明书

Shaver series 5000MultiPrecision Blade System5-direction Flex HeadsCleansing brush & beard stylerSmartClean SystemS5560/33Close, Fast Shave20% more power*The Shaver Series 5000 adds speed to your morning routine with a fast,MultiPrecision Blade System and fully washable heads.A comfortable shaveShave through dense parts of beard with 20% more powerA comfortable and close end resultBlades raise then cut long and short hairs for a fast shaveHeads flex in 5 directions for a fast close shaveGet a comfortable dry or refreshing wet shave with AquatecLifts hairs to cut comfortably closeEasy to use45 minutes of cordless shaving1-hour charging timeGet the most out of your shaverClick-on beard styler with 5 length settingsClick-on brush to cleanse more thoroughly than by handKeep your shaver like new with SmartCleanHighlightsTurbo+ modeShave even faster through dense parts of your beard with the 20% extra power boost you get by activating Turbo+ mode.MultiPrecision Blade System Get a shave that’s fast and close. OurMultiPrecision Blade System raises and cuts all hairs and remaining stubble – all in a few strokes.5-direction Flex Heads5-direction Flex Heads with 5 independent movements ensure close skin contact for a fast and close shave even on neck and jaw line.Aquatec Wet & DryChoose how you prefer to shave. With the Aquatec Wet & Dry seal, you can opt for a quick yet comfortable dry shave. Or you can shave wet – with gel or foam – even under the shower.45 minutes of cordless shavingYou'll have 45+ minutes of running time –that's about 15 shaves – on a one-hour charge.This shaver only operates in cordless mode.1-hour charging timeShave longer with every charge, thanks to our powerful energy-efficient, long-lasting lithium-ion battery. Do a quick charge for 5 minutes and you’ll have enough power for one shave.SmartClick Beard StylerChange your look with the SmartClick beard styler attachment. Choose from 5 length settings to create anything from a perfectstubble look to a short, neatly trimmed beard.Rounded tips and combs are designed to prevent skin irritation.SmartClick cleansing brushClick on our cleansing brush to clean your face more thoroughly than you can by hand. Use it with the cleanser of your choice. It removes dead skin cells and increases micro-circulation, leaving your skin feeling fresh andradiant.Philips Green LogoPhilips Green Products can reduce costs,energy consumption and CO2 emissions. How?They offer a significant environmentalimprovement in one or more of the Philips Green Focal Areas – Energy efficiency,Packaging, Hazardous substances, Weight,Recycling and disposal and Lifetime reliability.SpecificationsShaving PerformanceShaving system: MultiPrecision Blade System, Super Lift & Cut ActionContour following: 5-direction Flex Heads Turbo+ mode: Shave with 20% extra power SkinComfort: AquaTec Wet & Dry AccessoriesSmartClean: Cleans, Charges, Lubricates, Cleaning cartridge (included)SmartClick: Beard styler, Oil-control cleansing brushPouch: Travel pouch Ease of useDisplay: 3 level battery indicator, Battery lowindicator, Charging indicator, Cleaningindicator, Replace shaving heads indicator,Travel lock indicatorCleaning: Fully washableOperation: Unplug before useDesignHandle: Ergonomic grip & handlingColor: Angler Burgundy - Black MetallicChromePowerAutomatic voltage: 100-240 VBattery Type: Lithium-ionRun time: 45 min / 15 shavesCharging: 1 hour full charge, Quick charge 5min for 1 shaveMax power consumption: 9 WStand-by power: 0.1 WService2-year guaranteeReplacement head: Replace every 2 yrs withSH50Styling trimmer: Replace every 2 yrs withRQ111Cleansing brush RQ560 or RQ563: Replaceevery 3-6 months* 20% more power - compared to not using Turbo+ mode* SmartClick cleansing brush - compared to manualcleansing in same condition, according to the resultsfrom the external clinical test on 30 candidates and in 3hours after cleansing© 2019 Koninklijke Philips N.V.All Rights reserved.Specifications are subject to change without notice. Trademarks are the property of Koninklijke Philips N.V. or their respective owners.Issue date 2019‑08‑01 Version: 10.1.1。