XTToolkitPro使用初探
测试碟片和刻录机的品质

深入使用PlexTools Professional测试碟片和刻录机的品质(上)2003-9-20 19:52:27尽管PlexTools Professional已经出现很久了,但很多朋友还是对此工具的高级测试功能不得其解,特为这些朋友献上本文。
测试碟片和刻录机的品质需要用到PlexTools Professional的Q-Check高级功能,这些功能只有PX-Premium上才能实现。
执行CD Test项功能将扫描完整的碟片和检测读取错误.适用于压膜和刻录过的碟片,而不适用于空白碟片。
图片 1•Print: 打印测试结果•Save: 保存测试结果•Start: 执行碟片测试读取传输速率测试选择读取传输速率测试可以让你通过读取碟片数据来获知传输速率。
这项测试适用于于已经有内容的压膜碟片和刻录过的碟片的测试.图片 2 •Speed pulldown menu: 显示和传输速度的允许选项.•Start: 开始测试。
•View Log: 显示测试记录。
•Preferences: 显示传输速率设置窗口.•: 显示帮助信息.这里显示的图形反映了设备的读取速度.在碟片的最外圈达到最大速度。
所以报告的速度可能会与设备指定的速度不同。
例如指定40X测试但由于没有足够的数据则可能达不到40X.读取速度曲线应该尽可能平滑(或者为水平直线CLV模式下),如果显示的曲线不直(速度不确定)或者显示为或接近0X,则请使用不同的碟片。
刻录传输速率测试刻录传输度率测试选区可以让你测试数据写入碟片时候的传输速度。
这一个测试在空白的媒体上被引导,并取决于刻录机/碟片组合产生的性能表现。
图片 3这里显示的图像表示从光盘的内圈到外圈边缘的激光进展的读取速度。
该图像讲反映碟片的品质。
该品质依赖于碟片额定速率和碟片实际品质。
碟片额定为52X时,如果刻录机检测到以额定速度刻录时候的错误率变得太高,那么将被限制在40X.如果刻录速度不平整,碟片的品质可能非常差。
XTToolKitpro2使用

Xtreme ToolkitPro 初使用2011-02-24 10:30 by zhouli, 43 visits, 网摘, 收藏, 编辑编译环境:VS2005刚开始接触Xtreme ToolkitPro。
所以是些基本的界面在MFC中应用的操作。
1. 首先安装并编译Xtreme ToolkitPro,可编译成unicode debug\unicode release和非unicode debug\release2. 工程中包含附加目录,我的C/C++附加目录为:C:\Program Files\Codejock Software\MFC\Xtreme ToolkitPro v13.2.1\Source链接附加目录为:C:\Program Files\Codejock Software\MFC\Xtreme ToolkitPro v13.2.1\Lib\vc80资源附加目录为:C:\Program Files\Codejock Software\MFC\Xtreme ToolkitPro v13.2.1\Source3. 添加头文件:#include <XTToolkitPro.h> // Codejock Software Components控件的使用:4. 引用资源文件:#include "Styles\Office2007Blue\Office2007Blue.rc" (如果你想引用这个资源)5. 这样你就可以使用了,比如添加一个CXTPButton m_btnRun;m_btnRun.SetTheme(xtpButtonThemeOffice2007); //要引用资源,如第四步皮肤的使用:6.XTPSkinManager()->LoadSkin(_T("E:\\MyProject\\ToolkitTest\\debug\\Off ice2007.cjstyles"));这样就可以出来office2007的效果了。
XtremeToolkitPro使用经验总结
1前言 1.1安装和使用XtremeToolkitPro使用经验总结1 前言1.1 安装和使用1.1.1 怎样安装和编译XTP?XTP提供了安装包,安装和编译都非常方便。
主要要注意选择我们所需的编译器和编译版本。
编译器目前选择Visual C++ Version 8.0(2005),编译配置包含以下三种:As a DLLAs static library – for applications using MFC as DLLAs static library – for applications using MFC as static library其中第一个是将XTP编译成动态链接库,后面两个是将XTP编译成静态链接库,第二个MFC使用的是动态库,而第三个MFC使用的是静态库。
如果应用程序是单个发布,并且考虑到用户机器可能没有MFC动态库,这种情况下采用第三个配置比较好,如果是发布整个项目,项目中很多应用程序都使用到了MFC和Xtreme,那么采用前两个配置比较合适。
因此我们应根据实际情况在应用程序中选择使用所需的Xtreme版本。
Xtreme支持Unicode,编译之前必须选择“Unicode Support”详细内容参见其附带的《User Guide》文档。
1.1.2 静态链接在stdafx.h文件末尾加上:如果我们使用的Xtreme类在内部用到了它自定义的资源,那么还必须在res\*.rc2文件末尾加上:需注意的是,*.rc2文件必须要以空行结尾,否则资源编译器会报告一个“文件未结束”错误。
1.2窗口停靠(Docking)1前言1.1.3 使用中文版本的XTP动态链接库:打开XTP工程,找到源文件ToolkitPro.rc并选中它,选择菜单【Project→Properties】,在【Resources→General】下的【Preprocessor Definitions】中加入_XTP_RESOURCE_LANGUAGE=zh_CN,注意与已有的宏定义之间需要用分号隔开。
PROXKey Tool 用户手册说明书
PROXKey Tool User ManualTable of Contents1 Introduction (4)2 PROXKey Product (5)2.1 PROXKey Tool (5)2.2 PROXKey function modules (6)2.3 PROXKey using environment (7)3 PROXKey Tool Installation (8)3.1 PROXKey Tool Installation (8)4 PROXKey Tool (10)4.1 Launching PROXKey Tool (10)4.2 PROXKey Tool Overview (11)Change PIN (13)Change Token Name (14)Certificate (15)Device Information (16)About (21)Help (18)5 Support (22)Where we are (22)Follow us at (22)Table of FiguresFigure 1 Installation (8)Figure 2 Installation (9)Figure 3 PROXKey Token Tool Main Menu (10)Figure 4 Running Label of PROXKey Tool (11)Figure 5 Setting up User PIN (12)Figure 6 Set PIN Successful and Warning (12)Figure 7 Change PIN (13)Figure 8 Change USER PIN fail (14)Figure 9 Change Token name (14)Figure 10 Certificate (15)Figure 11 Device Information (16)Figure 12 Update (17)Figure 13 Diagnostic Tool (18)Figure 14 Help Menu (18)Figure 15 Ticket (19)Figure 16 Remote Access (19)Figure 17 System Setting (20)Figure 18 Java Configuration (20)Figure 19 About (21)1IntroductionWith the development of Internet and fast development of network technology a clear majority of people communicate with each other online,instead of traditional methods of face to face meeting. Due to this security authentication becomes vital for the network security, also the bank transactions and fund transfer becoming online it is very important to protect data.The USB tokens provide a secure way to store the Digital Signature Certificate.The PROXKey USB Token is a hardware cryptographic module with a USB form factor for two-factor authentication which has been validated against the FIPS 140-2 at security level3. The public and private user’s key is generated and is stored on the chip embedded inside the token; the key pairs are stored in EEPROM. Private Key is secured and cannot be exported.2PROXKey ProductIn internet applications, like e-business, e-government, network communication and e-transaction, it is very important to ensure the informationsecurity.PROXKey Product is developed as a solution of this security problem. It provides a convenient and reliable secure environment for customers.2.1PROXKey ToolHigh in security1.Supporting 2048 bits RSA asymmetric cryptographic algorithms and SHA2.2.Supporting password and hardware authentication.3.Hardware device provide secure memory space which can be used to store password,private key and other secret data. The secret data is not exportable;the hardware device is not replicable.4.Secure and reliable.All encryptions and decryptions are operated inside thePROXKeydevice.Uniformity specification1.Following the worldwide universal standards: PKCS#11 v2.1 specification and MicrosoftCSP 2.0 specification.pletely realized the security communication functions supported by SSL andS/MIME. The specification covers application and storage of digital certificate, digital signature and verification, encryption/decryption, etc.ing standard interface to connect with browsers, the communications is strictly abidingbrowser’s secure communication operating regulations.4.Supporting certificate’s interoperability between CSP and PKCS#11.5.Supporting certificate application and secure email exchange in the environment ofIE/Outlook, Foxmail, NetScape, Mozilla and Firefox/Thunderbird.6.Supporting X. 509 v3 certificate storage.Excellent compatibility1.No need to install special PROXKey driver, the driver integrated inside the WindowsOperating System is used there by eliminating the driver installation.2.The hardware is a kind of USB device which is following USB1.1/USB 2.0specification. Itcan be used conveniently in every USB supported facilities.4.Uniform interfaces is used for UDK devices. One suite can supports both HID and UDKdevices.5.The UI is supported in Windows/ME/2000/2003/XP/Vista/Windows7/Windows 8 andWindows 8.1/Linux Operating Systems are all supporting.Flexible designing modularized design to meet customer’s dedicated requirements.2.A convenient platform for user’s certificates management is provided.3.UI (User Interface) is designed up to customer’s requirements.4.Secondary development interface is provided.2.2PROXKey function modulesPROXKey network security suite includes the following 5 modules:CSP module:1.It is a basic interface module based on Microsoft CSP2.0 specification.2. It is configured at registry.3.It can be used in IE browser, Outlook and Foxmail for certificate application, securitywebsite visitation and security email service, etc.PKCS#11 Module:1. Supporting PKCS#11 v2.1 interface.2. It is applicable in NetScape/Mozilla browser and ThunderBird email server. Administrator’s tool:It provides functions of key initialization, certificate operation and PIN operation, etc. User’s tool:It provides not only PIN operations of verification and modification, but also certificate operations of checking and installation/uninstall.Background:At the time of PROXKey plug in and out, certificate registration/revocation will be automatically done, and application programs will automatically start and end.2.3PROXKey using environmentThe supporting operating systems are shown as below:WIN 2000/2003/2008ServerWINDOWS 7, 8, 8.1, 10Mac OS, Linux and UbuntuThe supporting software includes:IE/Mozilla/Netscape/browsers.Outlook/Foxmail/ThunderBird email clients.3PROXKey Tool InstallationThe PROXKey comes with the Autorun supported ND (No Driver) feature. User can install the PROXKey tool just by plugging the token into the USB slot, the installation and details of the PROXKey tool is explained in detail below.3.1PROXKey Tool InstallationTo begin with the installation just plug in the token into the USB slot of the Laptop or PC, the Autorun supported product will automatically install PROXKey tool on the system1.Once the token is plugged into the USB slot the Autorun features asks for the installation of thetoken management tool as shown in the Figure 1, just click the install button to proceed with the installation of the software.Figure1Installation2.The token management software installs as shown in the Figure 2,clickfinish button to complete theinstallation.Figure2Installation4PROXKey Tool4.1Launching PROXKey ToolThe PROXKey tool can be launched using the short cut icon created on the desktop during installation, or can be found by clicking Start menu on windows and then finding the WD PROXKey Tool.The User Interface of PROX Key Token tool is easy and elegant as shown in Figure 3.All the functionalities are represented by icons which are easy to access with just a click of mouse button.Figure3PROXKey Token Tool Main MenuDuring PROXKey administrator’s tool running, the label of the tool will display in the right-handbottom corner as shown in Figure 4.Figure4Running Label of PROXKey Tool4.2PROXKey Tool OverviewAfter the installation of the software and when the token is plugged in, the user will be advised to set the PIN as shown in Figure 5. The user should enter the appropriate PIN length between 6-32 characters and set the user PIN.Each new token must be set with a user defined PIN.The length of the PIN should be between 6-32 (Alpha Numeric)characters.This PIN can be reset by the user later if needed.Figure 5shows the Set User PIN prompt and Figure 6(a) shows the successful PIN set.If the PIN is entered exceed the range of 6 to 32 characters, a warning window like Figure 6(b) will pop out to tell you PIN for the token requirements.Figure5Setting up User PINOnce the proper PIN is set the dialog as shown in Figure 6 (a) is prompted and in case of invalid length of PIN setting a dialog as shown in Figure 6 (b) is prompted.(a)Figure6Set PIN Successful and Warning(b)Figure3shows the basic functionalities of the PROXKey token tool.1.Change User PIN2.Change Token Name3.Certificate4.Device Information5.Options6.Help7.AboutChange PINIf the user wants to change the PIN which was set earlier this option helps to set a new PIN.The user needs to remember his earlier set PIN which he needs to enter first and then set a new PIN as shown in Figure 7. There is an added option of even using the softkeyboard to enter the PIN.Figure7Change PINHowever,when the user tries to change the USER PIN he needs to enter the old USER PIN and confirm the old USER PIN and then enter the new USER PIN the maximum User PIN error counter is set by default to 15so the user cannot try to update the password more than15 times.As shown in Figure 8 user gets 15attempts by default in case he wants to reset the USER PIN. If the user has forgotten the USER PIN, please contact the support for help.Figure8Change USER PIN failChange Token NameChange Label provides administrators with the interface of change the label of user’s device.It is shown in Figure9Figure9Change Token nameCertificateThe PROXKey Token tool automatically registers the CA, CCA and also the user certificate which is imported in the token, the user need not worry about registering each certificate which he dwnloads.Figure10CertificateShow CertificateThis function shows the certificate details such as the issuer information, issued toinformation and validity information.Delete CertificateThis feature enables to delete the unwanted certificates, the user PIN is needed todelete the certificates which are not needed.Import CertificateImport Certificate feature enables the user to import the certificates into the token, the user PIN is needed to import the certificates in the token.Device InformationDevice inforamtion provides the token information and the system environment asshown in the figure. Such as the Winodos version, IE version,Figure11Device InformationOptionsCache User PINThis is used to cache the USER PIN of the token so that when the token is used for multiple signing the token do not prompt to enter the USER PIN again and again. This is valid until the token is plugged out from the system. Once the token is plugged this feature must be again selected to cache the password.Figure 12 shows all the submenus whenFigure12Update✓UpdateThe PROXKey tokens have automatic update feature, where in when the new software is released for the tokens it will be uploaded in the FTP.When the “Update” is clicked with the proper internet connection the token software automatically updates itself providing ease of use for the user. Figure 12 shows the update process✓Diagnostic ToolDiagnostic tool can be used to understand the user system configurations; this basically helps to understand the technical issues or compatibility issue. This tool helps the support team to get the end use system details. The diagnostic tool also creates a log file which will be helpful for thesupport team to resolve issues. Figure13shows the Diagnostic Tool workingFigure13Diagnostic ToolHelpThis will help the end user for the support related help Remote for support helps in using team viewer support and support website Figure 14 shows the help menuFigure14Help Menu✓TicketThis feature is useful for the user to report the issues to the support team, when the user is facing any issues he/she can raise the ticket. The support team will analyse the issue and close the ticket at the earliest, this is the unique feature provided in PROXKey for user convinence. Figure14 shows the ticket raising procedure whichFigure15Ticket✓Remote AccessFigure16Remote Access✓System SettingThis is used to resolve the sytem configuration related issues, if the user faces any compatablity issue the user just need to click this button and file downloads and installs which shall resolve all the system configuration related issues. Figure 16 shows the System SettingFigure17System SettingJava ConfigurationsThis button resolves the java related issues,the user just need to click this button and a file downloads and installs which will resolve all the java related issues. Figure 17 shows the java configurationFigure18Java ConfigurationAboutThis shows the version and copyright information of the company and the version name of the software the user is usingFigure19About5SupportFor any assistance and support about the PROXKey token or the PROXKey Tool please find the help icon on the left hand top corner, click the Help>About(A) icon and you can find the link for the PROXKey Tool and PROXKey token support as shown in the Figure 13and the website where the contact details can be found is as shwon in Figure 13Where we areHead OfficeCrypto Planet(A Venture of Pagaria Advisory Private Limited) F-15, 1st Floor, Haware Centurion,Plot: 88-91, Sector–19A,Nerul–East, Navi Mumbai, Maharashtra, India–400706.Follow us atContact InfoIVR:+91 86551 86552Landline:*********************** E Mail:******************************************************Web Address:www.cryptoplanet.in。
Test Track Pro配置文档

服务器端的安装::客户端、、服务器端的安装TestTrack Pro客户端步骤:1) 双击TestTrackPro的安装程序“ttprowininstall.exe”;2) 在安装页面中选择“NEXT”;选中接受协议,选择“NEXT”;3) 在选择安装类型的页面里面选择需要安装的类型。
4) 在选择类型页面里面,你可以选择单独安装客户端或者服务器端,也可以选择定制安装。
图中显示的是定制安装。
选择“NEXT”。
5) 在显示的安装设置页面里,可以选中具体需要安装的内容。
由上到下的选项依次为:客户端应用程序(一般全部勾选);服务器端应用程序(如果仅仅是客户端,此处不用选中);WEB服务需要的安装项目(本地局域网的测试环境不用选中)。
注:以上图释是在本机安装了服务器端的情况下抓取的,所以服务器部分的选项为灰色。
6) 选中具体安装项后,点击“NEXT”,进入下一步。
页面显示:选择开发环境中是否添加TestTrack的工具栏。
还会显示“Display Visual Studio .NET Add-in toolbar”的选项,选中它。
点击“NEXT”。
7) 进入TestTrack的安装路径选择页面,设置软件的安装路径,点击“NEXT”。
8) 安装完成,点击“Finish”按钮,结束安装。
如果是第一次安装,安装完成系统会提示需要重新启动计算机。
注册::TestTrack Pro注册在TestTrack Pro的安装程序目录下,一般跟有TestTrack Pro 6.1.3版的软件注册机“keygen.exe”。
直接运行即可。
如下图选择“Floating”选项。
在Registration code:中会显示出软件的注册码。
Copy下来,以被后面使用。
注:注册机和安装的软件版本对应,6.1.3版的注册码,仅可以使用在6.1.3的应用程序中。
配置::Seapine Licence Server Admin配置1) 首先确定安装了TestTrack的服务器端应用程序;2) 再确认Seapine Licence Server的服务已经启动;在窗口右下角的系统服务托盘中可以看到“Seapine Licence Server is Running”,或在本地服务中可以看到“Seapine Licence Server”已经启动。
Ati Tray Tools使用详解

Ati Tray Tools使用详解1.7.9.1573版,=======================以下为正文=======================Ati Tray Tools 简称ATT...这个软件作为ATI显卡的非官方调整工具来说相当无敌(至少我个人是这么认为)利用这个工具,大家可以调整显卡风扇转速,超频,调整显卡设置,为不同游戏设置不同配置.等等...但因为其选项相对较多,而且界面做的不是很友好,所以有不少人想用但不知如何用.说来...鄙人用此软件也有段时间了...算不上精通,但总有些心得,一直想拿出来跟大家分享,但因种种原因,一拖再拖...正好赶上春节假期,总算是有段时间能坐下来专心写东西了,所以才诞生了此文~观众: 你跟这废啥话,赶紧讲正题!!...开场白都不让我讲完么? orz,那么开始吧==================================无奈的分割线====================================首先从ATT的安装说起- -这个...点next...我就不多说了你敢不选I accept 也可以....就是装不上而已安装目标路径,反正这东西没多大...我一般就直接next了安装方式选择,包括自动启动,Smart Shader文件等等,这里推荐使用完全安装...即Full安装可选项,从上至下分别为1.禁用超频选项(如果你用的显卡不支持或者用的是集成显卡)2.隐藏Direct3D页面3.隐藏OpenGL页面4.隐藏TweakS页面(硬件)5.隐藏时序编辑器6.7 鄙人才疏学浅.没太弄明白7.X1xxx显卡兼容选项(在overdrive中禁用驱动级模式)8.HD3xxx系列显卡风扇转速补丁9.HD4xxx系列强制显示为DDR5补丁(只适用于某些非公版HD4870)这项记得选Simplified Chinese哦...否则装出来默认是英文==================================无奈的分割线==================================== OK,几秒钟就装完了,装好后会在任务栏出现如下图标右下角那个红色菱形图标就是ATT的任务栏图标了~顺便showshow主题....这主题我从xp用到win7了囧常见问题1: 我装完ATT之后语言还是英文的,怎么办?答: 在ATT图标上鼠标右击,并按下图所示选择general options之后会出现如下窗口.按照图中说明进行操作后点OK,然后退出ATT重新开下就回中文了- -未完待续...又要去干别的....2009-01-31 22:27回来了.继续==================================无奈的分割线====================================下面逐一介绍ATT各部分功能==================================无奈的分割线====================================菜单==>游戏配置点击后出现如下窗口此部分的作用主要是用作给不同游戏建立不同的配置文件,省得每次玩某个游戏时候还要调整显卡全局设置,下面以古墓8为例来做个说明 (选古墓8是因为它比较有代表性,如果开启了显卡全局的抗锯齿设置,那么进入游戏后就会看见幽灵版劳拉...即贴图错误,但如果每次玩古墓8还要现调整显卡设置就太麻烦了,这个功能在这里正好派用场)具体步骤如下这样下次在运行TRU.EXE的时候就会自动切换配置到Auto balanced,而打上游戏结束后恢复之前的设置,会在Tru.exe进程结束后切换回之前用的配置文件呼应点①今天先到这- -,继续未完待续==================================无奈的分割线====================================2009-02-01 22:52 续写第二个选项卡==>硬件,这部分主要作用是针对某游戏的超频,而其他游戏时不受影响第三个选项卡==>附加这部分没什么特别的,主要选项基本按字面意思都能理解第四选项卡==>Direct3D设置某些游戏在vista下貌似没法开启垂直同步或没法关闭垂直同步,在这里都可以解决此问题主要在一些老游戏上存在...具体现象:某游戏fps固定在60,75,85之类,而此游戏需要更高的FPS(需强制关闭垂直同步); 或某游戏FPS好几百甚至好几千...导致游戏速度异常快的(需强制开启垂直同步),基本都能用ATT这个强制同步功能来解决,而A卡自带的CCC中的垂直同步选项基本对这类游戏都不生效!==================================无奈的分割线====================================菜单==>3D这部分就是调整AA(抗锯齿)AF(各向异性过滤)以及自适应抗锯齿,采样优化等等,会一定程度上影响画质及性能,但鉴于篇幅问题,我这里不多说了,请大家在应用中自行感受. 我这只讲一下"设置"项- -不行.又12点多了.睡觉去....进入未完待续2状态2009-02-02 22:50 继续编辑第二选项卡==>附加此部分主要是调整催化剂A.I以及一些优化设置,具体请大家在使用时自行感受吧...这里就不一一赘述了菜单==>3D配置这部分主要用于快速切换3D设置,如图...我经常用的是一个起名叫4X的开启了全局4X edge-detect抗拒和16X AF的配置和 ATT自带的名叫Auto balance的所有显卡设置由应用程序控制的配置文件(这也就是我在前文菜单==>游戏配置中设置古墓8时所用的配置文件,进入古墓8时候自动切换配置文件为Auto Balanced,退出游戏后自动切换回叫4X的配置文件) 对应呼应点①==================================无奈的分割线====================================菜单==>硬件这部分的功能可以说是最实用也是应用最多的部分,最常用的超频/风扇控制/人工Power Play/监控图表都是在这个菜单内1. 超频设置==>此部分有两个选项卡,我先从简单的风扇来说吧残念= = ,今天困了,只写了这么点...只好进入未完待续第3季了...2009-02-04 继续编辑....3号偷懒一晚.....超频设置中另一选项卡==>超频(玩CS时工作在2D频率的...可以在这里手动调整核心频率,然后CS就正常了,当然你给CS单独建立一个超频配置文件也可,将此部分结合第一部分游戏配置相关的介绍即可)点击上图中显示3D渲染器之后会出现如下窗口2.自动超频这里其实可以把它理解为一个手动的Power Play (前提是要有对应的配置文件,比如我这图里用的)3.监控图表我觉得这个也是ATT一个比较实用的功能,可以监控GPU/CPU/显存的使用率/温度/占用率等等其实完全可以把它看为显卡的一张心电图,实际应用中除了作为记录工具以外,还可以借由“心电图”来发现一些问题。
ATTO CLI Tools 指令说明书

Read MeATTO CLI ToolsThe ATTO CLI Tools (Command Line Interface) are applications that allow an experienced user to perform advanced management functions with ATTO Storage Controllers, Host Adapters, RAID Controllers and Desklink Devices.The CLI is useful in environments where a GUI (Graphical User Interface) is not available, or not a preferred method, for performing configuration or diagnostic tasks. These tools can be used from a remote system, locally via a command prompt (Windows), or via a terminal application (OS X and Linux). The CLI Tools uses ASCII commands typed while in CLI mode.The CLI Tools are bundled with the driver download package and are automatically installed while you are extracting and installing the driver package. While default locations vary, they are often found in the following directories:• Windows = c:\ATTO\CLI TOOLS• Linux = /root/atto/cli tools• OS X = /Users/Cli ToolsAvailable ATTO CLI Tools include:• Fibre Channel NVRAM Tool (atfcnvr): this tool modifies NVRAM settings for ATTO CelerityFibre Channel Host Adapters and ThunderLink Fibre Channel Desklink Devices. These settings can be saved to, or restored from, a file.• SAS NVRAM Tool (atsasnvr): this tool modifies NVRAM settings for ExpressSAS adapters and ThunderLink Desklink Devices. These settings can be saved to, or restored from, a file.• Flash Update Tool (atflash): this tool updates adapter and Desklink Device flash from anATTO flash bundle.• Information Tool (atinfo): this tool displays adapter and Desklink device information.• RAID CLI Tool (atraidcli): this tool sends RAID CLI commands to ExpressSAS RAID adapters and ThunderStream SC RAID Desklink Devices.This tool is also used to send non-RAID CLIcommands to ThunderLink Desklink Devices.Note: all commands that can be sent to theadapter or Desklink Device can be found inAppendix A of the ATTO Utilities Manual (PRMA 0267- 000MD.)To run the ATTO CLI Tools, follow these samples:• Windows = atinfo.exe [parameters]• OS X = ./atinfo [parameters]• Linux 32 bit = ./atinfo [parameters]• Linux 64 bit = ./atinfo_x64 [parameters]Use to [-h] command within each tool toaccess embedded help text.Supported operating systems:• Windows 8, Windows 7, Vista, XP, Server 2012, Server 2008 and Server 2003• Linux 2.4 and 2.6 kernels, x86 and x64• Mac OS X 10.4.x, or laterSupported ATTO Products:• Celerity Fibre Channel Host Adapters - models 164E, 162E, 161E, 84EN, 82EN, 81EN, 44ES, 42ES, 42XS, 41ES, and 41XS• ExpressSAS 6Gb RAID Adapters - models R60F, R680, R608, and R644• ExpressSAS 6Gb Host Bus Adapters - models H6F0, H6F0 GT, H60F, H680, H608, and H644• FastFrame Network Interface Cards- models NS11, NS12, NS14• FastFrame Converged Network Adapters - models CS11, CS12, CS14• ThunderStream Storage Controller Desklink Devices - model SC 3808• ThunderLink Desklink Devices - models FC 1082, SH 1068, NS 1101 and NT 111ATTO Technology, Inc.155 CrossPoint ParkwayAmherst, New York 14068 USA691-1999Tel (716)691-9353Fax (716)Sales support:****************Technical support: Monday -- Friday, 8am-6pm EST*********************(716)691-1999ext.242©2012 ATTO Technology, Inc. All rights reserved. All brand or product names are trademarks of their respective holders. No part of this manual may be reproduced in any form or by any means without the express written permission of ATTO Technology, Inc.10/2012PRMA-0411-000。
Xtreme.Toolkit.Pro (vc6.0下)安装步骤

说明: XTP安装目录下的 Lib 文件夹里:
S 表示 static
D 表示 debug
U 表示 unicode
(1) As DLL // 使用MFC做为共享的DLL
(2) As Static Library,for using MFC as DLL //
(3) As Static Library,for using MFS as static library // 使用MFC做为静态链接库
1. 下载 Codejock.Xtreme.ToolKit.Pro v13.2.1 并且进行安装
2. 选择 Codejock.Xtreme.ToolKit.Pro 支持的 Visual Studio 版本
3. 安装完成后会出现一个新的配置窗口
// Microsoft 基础类
安装时我选择的是第3个.
4. 选择完成后会弹出一个CMD窗口开始自为程序添加 头文件 和 DLL链接库
例 :
Xtreme Toolkit Pro 安装完成后放在D盘XTP目录里
以vc 6.0为例:
点击"工具"->"选项"->"目录"
7. 在工程的 stdafx.h 末尾加入 #include "XTToolkitPro.h"
8. 在 mainfrm.h 中修改工程继承关系:
class CMainFrame : public CXTPMDIFrameWnd
9. 开始组建工程,编译成功后就能使用XTP控件来美化工程啦.
在"目录下拉列表"选择 includes 然后在下方加入要包含的文件 D:\XTP\SOURCE
ProToolKit用户手册序言

序本部分包含了用户指南和术语约定的信息。
目的 (2)阅者须知 (2)内容 (2)在线文档 (2)术语约定 (2)本手册描述了PTC公司为Pro/Engineering软件提供的C语言开发工具包Pro/ToolKit的使用方法。
它赋予PTC客户或者第三方开发人员通过C语言编写外部应用程序来扩展Pro/Engineering 功能的能力,同时可以把程序无缝整合进Pro/Engineering软件包中。
本手册介绍了Pro/ToolKit工具包的特性以及用户需要掌握的技术和背景知识。
在我们正式进入Pro/ToolKit的世界之前,我们还需要再确认以下两点:首先我们要具备熟练的C语言编程能力;其次,丰富的Pro/Engineering的实际操作经验是必不可少的,尤其是我们准备拓展的模块。
Pro/ToolKit提供了功能丰富的C语言函数库,使得客户或者第三方开发的外部应用程序通过它们可以安全受控地访问Pro/Engineering内部数据库和UI图形界面接口。
本手册各章节概要如下:第一章:Pro/ToolKit的基础必备知识及特性;第二章:Pro/Develop开发用户须知;第三章~第五章:涵盖了Pro/ToolKit开发的基本知识框架;其它章节:可以根据开发需要用户有针对性的选读。
PTC公司建议本手册的阅读者为有经验的C语言软件开发工程师,但是最好同时受过必要的Pro/Engineering基本知识培训训练。
注:后者的要求能保证在开发过程中对API函数以及将要实现的过程有更好的帮助和理解。
本手册包含了所有Pro/ToolKit提供的函数功能包说明,以帮助读者更好地开发外部应用程序。
在线查询文档集成在Pro/ToolKit安装程序中,其中包含详细的函数语法和例程。
注:在线查询文档必须需要java@runtime运行环境支持,同时需要在Pro/Engineering内嵌浏览器中才能浏览。
以下术语约定适用于本手册全文注:此处关于约定的中文翻译排版等整个翻译完成后看排版格式重新编排,而不再按照原文对照直译。
【转载】XtremeToolkitPro使用经验总结
CXTPDockingPaneManager 有一个公共成员变量 m_ptMinClientSize 用于限制视图区的大小,
示例代码如下:
m_paneManager.m_ptMinClientSize = CPoint(400, 200);
1.3 工具栏(Toolbar)
SetIncludeExtensions 无法控制文件夹的显示,要想不显示文件夹,必须从
4 XtremeToolkitPro 使用经验总结
1 前言
1.7 窗口大小与位置(Resize)
CXTShellListCtrl 派生出一个类,并重写 CXTShellListBase 中的虚函数 IsItemFiltered,该函 数用于决定当前目录中的某个项目 (包括文件或文件夹) 是否需要被排除, 其默认实现如下, 只需修该其前两条语句就行:
1.3.2 怎样隐藏菜单栏?
菜单栏等工具栏是放置于 CXTPDockBar 上的,当我们隐藏菜单栏后,CXTPDockBar 并不会隐藏, 因此会在界面上留下一条矩形区域, 由于 CXTPDockBar 也是从 CWnd 派生的, 因此只需将 CXTPDockBar 隐藏即可。 具体方法为:
slowboot工具使用操作说明

slowboot工具使用操作说明
fastboot调试:
找到在windows下的sdk配置包,打开windows下的cmd命令终端,进入sdk配置包所在分区,我的sdk是放在D盘,执行命令:d:可以进入d盘,通过dir可以查看所有的文档,通过cd命令:cd sdk/platform-tools/
在这个路径下执行命令: fastboot.exe devices 便可以进入fastboot调试;顺便也记录一下adb调试的配置,adb调试需要在windows下配置相关的环境变量:打开系统设置->选择高级->环境变量创建环境变量,环境变量为sdk所在的路径,在系统变量path的前面添加
sdk/platfrom-tools/的路径进入cmd,在命令行下输入adb devices看是否链接成功,然后执行adb shell 进入adb 调试fastboot相关命令:
在串口终端执行reboot bootloader模式
写入命令:fastboot flash <emmc_partition> <emmc_parititon image frombuild> fastboot flash<分区> <分区的对应镜像> 。
擦除命令为image提供空间:fastboot erase 分区名。
PROTOOL组态手册

1 常规注意事项.......................................................................................... 2
1.1
图形和 OLE 对象 ........................................................................................ 3
•
在线帮助的打印
i
•
•
目录
01.02
1 常规注意事项
逐渐增加组态文件的大小
多次的修改和保存将增加组态文件的大小(*.pdb) 这是 Windows 操作系统的一个特 性 纠正方法 可不定期地调用菜单命令 另存为 以减少项目文件的大小 这样会重新组织文件 结构
编译基于图形/基于文本的单元中的项目
在对 ProTool V6.0 下所创建的基于图形/基于文本的单元进行编译时 路径名长度 不能超过 128 个字符 路径名由相应文件名及其路径的所有目录名组成
下面描述如何在组态中改变 OLE 对象的大小 y 单击该对象 拖动某一个尺寸控制点 改变该对象的尺寸 根据方向 压缩 或扩展对象 y 单击该对象 在按住 ALT 键的同时 拖动某一个尺寸控制点 这只改变显示 对象区域的大小 该对象本身的大小保持不变 例如 MS Office 97 Excel 和 Word 均支持该操作 在 Excel 中 这将改变可见的列和行的数目 而 Word 则完成一次自动换行
•
在线帮助的打印
5
•
•
基于文本的面板
01.02
分布式系统中的 CPU 通讯
在下列分布式系统的 CPU 中 • IM151 (ET200 S CPU) • BM147 (ET200 X CPU)
Xtool X-Series Service Tool 用户手册说明书
X-Series Service Tool User ManualTrademark:is the registered trademark of Shenzhen Xtooltech Co., Ltd. In countries that the trademarks, service marks, domain names, logos and the name of the company are not registered, Xtool claims that it still reserves the ownership of the unregistered trademarks, service marks, domain names, logos and the company name. All other marks for the other products and the company’s name mentioned in the manual still belong to the original registered company.Copyright:You may not use the trademarks, service marks, domain names, logos and company name of Xtool or other companies mentioned without written permission from the trademark holder.Responsibility:Xtool shall not be liable for any incidental or consequential damages or for any economic consequential damages arising from the accidents of individual users and the third parties, misuse or abuse of the device, unauthorized change or repair of the device, or the failure made by the user not to use the product according to the manual.After sale:After-Sale Service Hotline(0086-755-21670995/86267858)Email:*********************************Official website:Safety:●This product is intended for automotive technicians only.●When the engine is running, please keep the maintenance area well ventilated, properly connect the engine and the building's exhaust system. The carbon monoxide generated by the engine will cause the body to be unresponsive and even cause serious personal injury or death.●Wear ANSI-compliant goggles and keep clothing, hair, hands, tools, diagnostics, etc. away from running or hot engine parts.ContentsCHAPTER I ABOUT MAINFRAME (4)1.1P RODUCT OVERVIEW (4)1.2A PPEARANCE (5)1.3T ECHNICAL PARAMETERS OF EQUIPMENT (6)CHAPTER II HOW TO USE (7)2.1F UNCTIONAL S ELECTION OF H OME P AGE (7)2.2S PECIAL FUNCTIONS (9)2.3S YSTEM S ETTINGS (10)CHAPTER III SOFTWARE UPGRADING (16)3.1WIFI O NE-CLICK U PGRADE (16)3.2USB DA TA WIRE UPGRADE (18)Chapter I About Mainframe1.1 Product overviewX300P and X100Pro2 are service tools for special functions of automobiles produced by Shenzhen Xtooltech CO., LTD .X300P includes maintenance reset, EPB replacement, OBD II, tooth learning, BMS battery replacement, TPS throttle relearn, tire pressure reset, electronic steering matching, ABS bleeding function and so on.X100Pro2 includes key programming and dashboard recovery.These two equipments is anti-seismic and durable which can meet the actual needs of different users such as automobile repair plants and fast repair shops.1.2 Appearance1.3 Technical parameters of equipmentChapter II How to Use2.1 Functional Selection of Home PageUse the up/down key and left/right key to switch, select the corresponding function and click OK to enter.(X300P)(X100Pro2)2.2 ServicesSelect services, you can select special functions by pressing up/down key, press OK key to enter.(X300P)For X100Pro2, you can directly enter Immobiliser, dashboard, eeprom or OBDII menu directly from the home page.2.3 System SettingsSelect options to enter, you can choose WIFI settings, language settings, unit settings, software upgrades by up/down keys.2.3.1 WIFI settingsEnter the WIFI settings, click OK to open the WIFI switch, connect the WIFI, click OK to enter the password, and then press the trigger button to connect, as shown below.2.3.2 Language settingsThe operating system of this device supports multi-language switching: English, Spanish, French, Portuguese, German, Russian, Polish and Italian. Select the language you need by pressing the up/down button and switch by pressing the OK key, as shown below.2.3.3 Unit settingsAccording to the demand, select Metric or British system by up/down key and switch by OK key, as shown below.2.3.4 Tip sound settingsAccording to the requirement, select whether to open the button prompt tone by up/down key, and switch by OK key, as shown below.2.3.5 AboutOn the page, you can view the current software version and hardware version number.Chapter III Software Upgrading3.1 WIFI One-click UpgradeThe product supports one-click upgrade through WIFI upgrade. The upgrade module can be selected by up/down keys or all modules can be upgraded by one-click, and can be returned by pressing the return key.3.2 USB data wire upgradeThe product supports the upgrading of computers through USB connection, and downloads the upgrade program to upgrade the equipment according to the prompt information.The upgrade method is as follows.1. Log on the Xtool official website: , Select ’Download Upgrade Tool’ on the page of ‘Service&Support’ , and install the upgrade tool.2. Open the upgrade software, enter the product serial number and activation code to log in the software.3. Connect the X300P/X100Pro2 handheld device to the computer through the USB cable.4. When the X300P/X100Pro2 handheld device is turned on, the computer software will automatically connect the device and log in.5. Select installation items for computer software to upgrade procedures.6. Disconnect the USB cable and restart the X300P/X100Pro2 handheld device to start using the upgrade software.Shenzhen Xtooltech Co., LtdCompany address: 2nd Floor, Building No.2, Block 1, Excellence City, No.128, Zhongkang Road, Shangmeilin, Futian District, Shenzhen, ChinaFactory address: 2/F, Building 12, Tangtou Third Industrial Zone, Shiyan Street, Baoan District, Shenzhen, ChinaService Hotline: 0086-755-21670995/86267858Email:*********************************Fax: 0086-755-83461644Website: 。
ProTool组态软件的介绍与使用

ProTool 组态软件的介绍与使用ProTool 组态软件的使用对象:通过使用ProTool组态软件,可在组态计算机(PC或PU)的Windows操作系统中为以下操作单元创建过程可视化项目:1.文本显示(如TD 17)2.带基于文本显示的操作面板(如0P 3、OP 7、OP 17)3.带图形显示的操作面板(如0P 27、0P 37)4.触摸面板(如TP 27、TP 37)5.基于Windows的系统Panel (TP 170A 、TP 170B、0P 170B、TP 270、0P 270)Mobile Panel (Mobile Panel 170)Multi Panel (MP 270 、MP 270B、MP 370)0P 37/ProPanel PC (Panel PC 670 、Panel PC 870 、Panel PC IL 、FI 25 、FI 45)PC6.C7 单元(如C7-621/623/633/634/635OP/635TP)ProTool 组态软件的版本级别:ProTool/Pro 用于组态整个单元系列。
ProTool用于组态文本显示、文本和图形操作面板以及基于Win dows的单元。
ProTool/Lite 用于组态文本显示、基于文本的操作面板和基于Windows的单元TP170A、TP170B^ OP170BProTool 组态软件的安装1. 将安装光盘插入光盘驱动器。
数秒之后安装程序自动启动;2.单击“安装”;3.单击“ ProTool ”、“ ProTool/Lite ”或“ ProTool/Pro ”;4.按屏幕指示进行;5.按要求安装许可证。
在Windows? NT Windows? 2000和Windows? XP下进行安装要求有管理员权限。
安装后,组态软件必须由具有本地管理权限的用户启动一次,以使ProTool系统文件成功注册。
ProTool组态软件的使用步骤1.启动ProTool组态软件双击桌面上的ProTool组态软件图标一。
Xtreme Toolkit Pro 安装编译详解

动态编译注意事项
其实,和静态编译很像。静态编译可以参考我之前的“xtreme toolkit静态编译注意事项 ”只不过需要xtreme toolkit的.dll拷贝到system32下。或者放在exe的输出目录下。
这个库在VC下是非常好用的,在好朋友的帮助下快速安装成功,这里做一下详细的步骤:
1.先下载Codejock.Xtreme.Toolkit.Pro.v13.2.1
2.安装的时候一路下一步
3.安装完以后会出一个新的配置窗口,这里你可以跟据需要是否选择UNICODE的版本
或者DLL 还是静态的LIB方式这里推荐LIB用LIB发布时不用带DLL了。
由于toolkit安装时,编译生成相应的lib非常慢,我当时只生成了静态的库。分别是:
ToolkitPro1321vc80S.lib
ToolkitPro1321vc80SD.lib
ToolkitPro1321vc80SU.lib
ToolkitPro1321vc80SUD.lib
其中,S表示static, 后面的D表示debug, U表示unicode,
//编译的时候,是有3个选项的
a) As DLL
b) As Static Library, for using MFC as DLL
c) As Static Library, for using MFS as static library.
//我选择了b,所以,生成以上libs:S.lib, SD.lib, SU.lib, SUD.lib.
//如果选择了c),则会生成DS.lib, DSD.lib, DSU.lib, DSUD.lib//前面的D表示using mfc as dll
XTToolkitPro使用初探
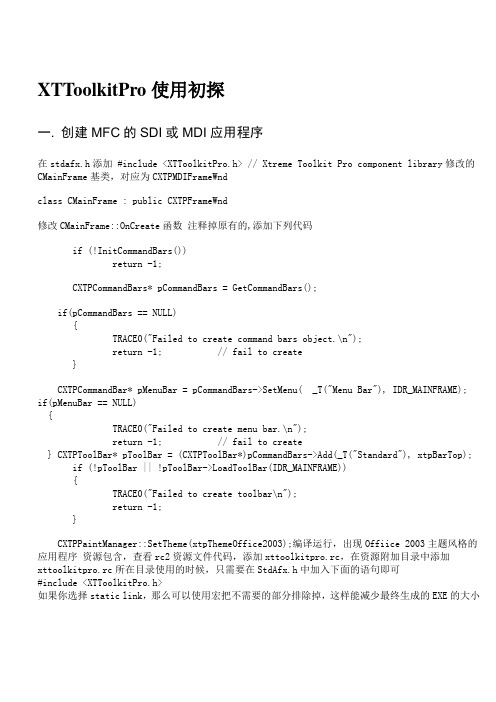
XTToolkitPro使用初探一. 创建MFC的SDI或MDI应用程序在stdafx.h添加 #include <XTToolkitPro.h> // Xtreme Toolkit Pro component library修改的CMainFrame基类,对应为CXTPMDIFrameWndclass CMainFrame : public CXTPFrameWnd修改CMainFrame::OnCreate函数注释掉原有的,添加下列代码if (!InitCommandBars())return -1;CXTPCommandBars* pCommandBars = GetCommandBars();if(pCommandBars == NULL){TRACE0("Failed to create command bars object.\n");return -1; // fail to create}CXTPCommandBar* pMenuBar = pCommandBars->SetMenu( _T("Menu Bar"), IDR_MAINFRAME);if(pMenuBar == NULL){TRACE0("Failed to create menu bar.\n");return -1; // fail to create} CXTPToolBar* pToolBar = (CXTPToolBar*)pCommandBars->Add(_T("Standard"), xtpBarTop); if (!pToolBar || !pToolBar->LoadToolBar(IDR_MAINFRAME)){TRACE0("Failed to create toolbar\n");return -1;}CXTPPaintManager::SetTheme(xtpThemeOffice2003);编译运行,出现Offiice 2003主题风格的应用程序资源包含,查看rc2资源文件代码,添加xttoolkitpro.rc,在资源附加目录中添加xttoolkitpro.rc所在目录使用的时候,只需要在StdAfx.h中加入下面的语句即可#include <XTToolkitPro.h>如果你选择static link,那么可以使用宏把不需要的部分排除掉,这样能减少最终生成的EXE的大小//#define _XTP_EXCLUDE_COMMON#define _XTP_EXCLUDE_TABMANAGER#define _XTP_EXCLUDE_GRAPHICLIBRARY//#define _XTP_EXCLUDE_CONTROLS//#define _XTP_EXCLUDE_COMMANDBARS//#define _XTP_EXCLUDE_DOCKINGPANE//#define _XTP_EXCLUDE_PROPERTYGRID#define _XTP_EXCLUDE_REPORTCONTROL#define _XTP_EXCLUDE_CALENDAR#define _XTP_EXCLUDE_TASKPANEL#define _XTP_EXCLUDE_SHORTCUTBAR#define _XTP_EXCLUDE_SKINFRAMEWORK#define _XTP_EXCLUDE_RIBBON#define _XTP_EXCLUDE_SYNTAXEDIT另外值得注意的一点是,如果你选择static link,那么需要将XTP的资源导入你的工程之中。
- 1、下载文档前请自行甄别文档内容的完整性,平台不提供额外的编辑、内容补充、找答案等附加服务。
- 2、"仅部分预览"的文档,不可在线预览部分如存在完整性等问题,可反馈申请退款(可完整预览的文档不适用该条件!)。
- 3、如文档侵犯您的权益,请联系客服反馈,我们会尽快为您处理(人工客服工作时间:9:00-18:30)。
XTToolkitPro使用初探一. 创建MFC的SDI或MDI应用程序在stdafx.h添加 #include <XTToolkitPro.h> // Xtreme Toolkit Pro component library修改的CMainFrame基类,对应为CXTPMDIFrameWndclass CMainFrame : public CXTPFrameWnd修改CMainFrame::OnCreate函数注释掉原有的,添加下列代码if (!InitCommandBars())return -1;CXTPCommandBars* pCommandBars = GetCommandBars();if(pCommandBars == NULL){TRACE0("Failed to create command bars object.\n");return -1; // fail to create}CXTPCommandBar* pMenuBar = pCommandBars->SetMenu( _T("Menu Bar"), IDR_MAINFRAME);if(pMenuBar == NULL){TRACE0("Failed to create menu bar.\n");return -1; // fail to create} CXTPToolBar* pToolBar = (CXTPToolBar*)pCommandBars->Add(_T("Standard"), xtpBarTop); if (!pToolBar || !pToolBar->LoadToolBar(IDR_MAINFRAME)){TRACE0("Failed to create toolbar\n");return -1;}CXTPPaintManager::SetTheme(xtpThemeOffice2003);编译运行,出现Offiice 2003主题风格的应用程序资源包含,查看rc2资源文件代码,添加xttoolkitpro.rc,在资源附加目录中添加xttoolkitpro.rc所在目录使用的时候,只需要在StdAfx.h中加入下面的语句即可#include <XTToolkitPro.h>如果你选择static link,那么可以使用宏把不需要的部分排除掉,这样能减少最终生成的EXE的大小//#define _XTP_EXCLUDE_COMMON#define _XTP_EXCLUDE_TABMANAGER#define _XTP_EXCLUDE_GRAPHICLIBRARY//#define _XTP_EXCLUDE_CONTROLS//#define _XTP_EXCLUDE_COMMANDBARS//#define _XTP_EXCLUDE_DOCKINGPANE//#define _XTP_EXCLUDE_PROPERTYGRID#define _XTP_EXCLUDE_REPORTCONTROL#define _XTP_EXCLUDE_CALENDAR#define _XTP_EXCLUDE_TASKPANEL#define _XTP_EXCLUDE_SHORTCUTBAR#define _XTP_EXCLUDE_SKINFRAMEWORK#define _XTP_EXCLUDE_RIBBON#define _XTP_EXCLUDE_SYNTAXEDIT另外值得注意的一点是,如果你选择static link,那么需要将XTP的资源导入你的工程之中。
比如要使用中文资源,那么把下面的代码加入工程的rc2文件的最后#define _XTP_RESOURCE_LANGUAGE zh_CN#include <XTToolkitPro.rc>同时,你还需要修改一下XTP附带的XTToolkitPro.rc中的内容将最后的LANGUAGE_DEFAULT(TaskPanel)改成LANGUAGE_LOCALIZED(TaskPanel)然后在TaskPanel\res目录下将Resource.rc复制成Resource_zh_CN.rc,并将其中的编码改成中文#if !defined(AFX_RESOURCE_DLL) || defined(AFX_TARG_CHS)#ifdef _WIN32LANGUAGE LANG_CHINESE, SUBLANG_CHINESE_SIMPLIFIED#pragma code_page(936)#endif //_WIN32#endif否则你之后include的资源会变成默认的英文二.认识XtremeToolkitPro的文件夹结构及文件用途XtremeToolkitPro安装后,其文件夹结构如下图所示:前面的几个文件夹就不用我说了,重点说说Utils里面的文件夹。
AppWizard:很显然是XtremeToolkitPro应用程序工程生成向导的文件夹,这一点后面再作详解。
Package:此文件夹里有一个动态库文件CodejockPackage.dll和一个1033的文件夹,文件夹1033及其下的CodejockPackageUI.dll应该是与UI有关的E文资源包。
而DLL文件是被注册在注册表中VisualStudio\8.0\Packages项下的,应该是用作本地化的,具体用途是为Visual Studio提供本地化资源,还是作别的什么用途就不是很清楚了,因为笔者对本地化不是很了解,望有这方面经验的达人指点指点,呵呵。
Translations:文件夹是为ToolkitPro提供的多语言资源库。
方便大家开发多语言版本的软件项目。
另外Utils文件夹下还有两个.exe文件,CommandBarsDesigner.exe和ResourceEditor.exe,前者就不用我说了,是开发界面风格的工具,help中有它的使用说明手册。
后者呢,是开发多语言版的资源编辑工具,不但可以用来编辑修改Translations文件夹下的资源动态库文件(.DLL),生成新的语种资源动态库,还可以提取.exe中的资源(String Table、Menu和Dialogs中的字符串)生成.xml 文件,然后Export to DLL,生成新的资源动态库。
然后是Workspace文件夹,在此之下的Resource文件夹是XtremeToolkitPro 支持的各国语言资源文件夹,其下又包括多个以ResourceXXX命名的文件夹,且每个文件夹下均包括Resource.rc、ResourceXXX_vc80.sln和ResourceXXX_vc80.vcproj三个文件(XXX代表语言名称)。
打开.sln文件,整个解决方案里就只包括Resource.rc,由此可看出该工程仅仅是用来编译资源文件的。
而Resource文件夹下有.mak文件(Resource.mak)、项目文件(Resource_vc80.sln)、资源包的定义文件ResourcePackage.h、ResourcePackage.rc。
由此可看出是为批量编译资源文件用的。
Samples文件夹下全是各个Sample的.sln文件。
ToolkitPro文件夹下面是编译XtremeToolkitPro各种版本动态库用的项目文件。
如果你修改了ToolkitPro的原文件(如果你是这种牛人:->),你可以打开ToolkitPro_vc80.sln再次编译ToolkitPro界面库便可生成Unicode版本的动态库,或非Unicode动态库。
总结,由上述可以看到,XtremeToolkitPro不但为开发者提供了漂亮的界面库,而且为开发者开发多国语言的程序提供现成的界面相关语言资源库。
顺便告诉大家,ToolkitPro还提供了类CXTPResourceManager,处理资源问题应该很方便哦,呵呵。
使用方法在help里能找到。
笔者之前通过ToolkitPro向导生成项目,结果界面部分却总是E文的,所以总感觉很不爽。
至此,想要ToolkitPro显示中文,不再是难事了。
哈哈!!三. 让你的应用程序界面--ToolkitPro显示中文打开ToolkitPro_vc80.sln项目,然后查看ToolkitPro.rc源代码,拉到文件最后,会发现如下的定义:1#if !defined(AFX_RESOURCE_DLL) || defined(AFX_TARG_ENU)3#ifdef _WIN325LANGUAGE 9, 167#pragma code_page(1252)9#endif//_WIN321011#include "XTToolkitPro.rc"// non-Microsoft Visual C++ edited resources1213#include "afxres.rc"// Standard components1415#endif16代码中定义包含的文件"XTToolkitPro.rc"是在ToolkitPro的Source文件夹下的,"XTToolkitPro.rc"文件集中定义的是界面库中各种控件的资源文件,咱们再打开"XTToolkitPro.rc"文件,我们发现文件开头几行定义说明了一切问题。
12#define LANGUAGE_DEFAULT(ProdName) <##ProdName##\res\Resource.rc>34#ifdef _XTP_RESOURCE_LANGUAGE56#define LANGUAGE_LOCALIZED__(ProdName, LangName) <##ProdName##\res\Resource_##LangName##.rc>8#define LANGUAGE_LOCALIZED_(ProdName, LangName) LANGUAGE_LOCALIZED__(ProdName, LangName)10#define LANGUAGE_LOCALIZED(ProdName) LANGUAGE_LOCALIZED_(ProdName, _XTP_RESOURCE_LANGUAGE) 12#else14#define LANGUAGE_LOCALIZED(ProdName) LANGUAGE_DEFAULT(ProdName)16#endif19#if !defined(_XTP_EXCLUDE_CALENDAR)21#include LANGUAGE_LOCALIZED(Calendar) // _XTP_INCLUDE_CALENDAR23#endif2426#if !defined(_XTP_EXCLUDE_COMMANDBARS)28#include LANGUAGE_LOCALIZED(CommandBars) // _XTP_INCLUDE_COMMANDBARS30#endif第一行定义了缺省的语言,第二行的标识_XTP_RESOURCE_LANGUAGE可以看出该标识是为使用不同的语言资料文件而定义标识的。
